


Dell™ PowerVault™
NX3000 Systems
Getting Started
With Your System
系统使用入门
Memulai Pengaktifan Sistem Anda
はじめに
시스템 시작 안내서


Dell™ PowerVault™
NX3000 Systems
Getting Started
With Your System
www.dell.com | support.dell.com

Notes, Cautions, and Warnings
NOTE: A NOTE indicates important information that helps you make better use
of your computer.
CAUTION: A CAUTION indicates potential damage to hardware or loss of data if
instructions are not followed.
WARNING: A WARNING indicates a potential for property damage,
personal injury, or death.
____________________
Information in this document is subject to change without notice.
© 2009 Dell Inc. All rights reserved.
Reproduction of these materials in any manner whatsoever without the written permission of Dell Inc.
is strictly forbidden.
Dell, the DELL logo, and PowerVault are trademarks of Dell Inc.; Intel and Xeon are registered
trademarks of Intel Corporation in the U.S. and other countries; Microsoft and Windows are either
trademarks or registered trademarks of Microsoft Corporation in the United States and/or other
countries.
Other trademarks and trade names may be used in this document to refer to either the entities claiming
the marks and names or their products. Dell Inc. disclaims any proprietary interest in trademarks and
trade names other than its own.
Model E02S
Regulatory Type E02S001
April 2009 P/N K187N Rev. A00
Installation and Configuration
WARNING: Before performing the following procedure, review the safety
instructions that came with the system.
Unpacking the System
Unpack your system and identify each item.
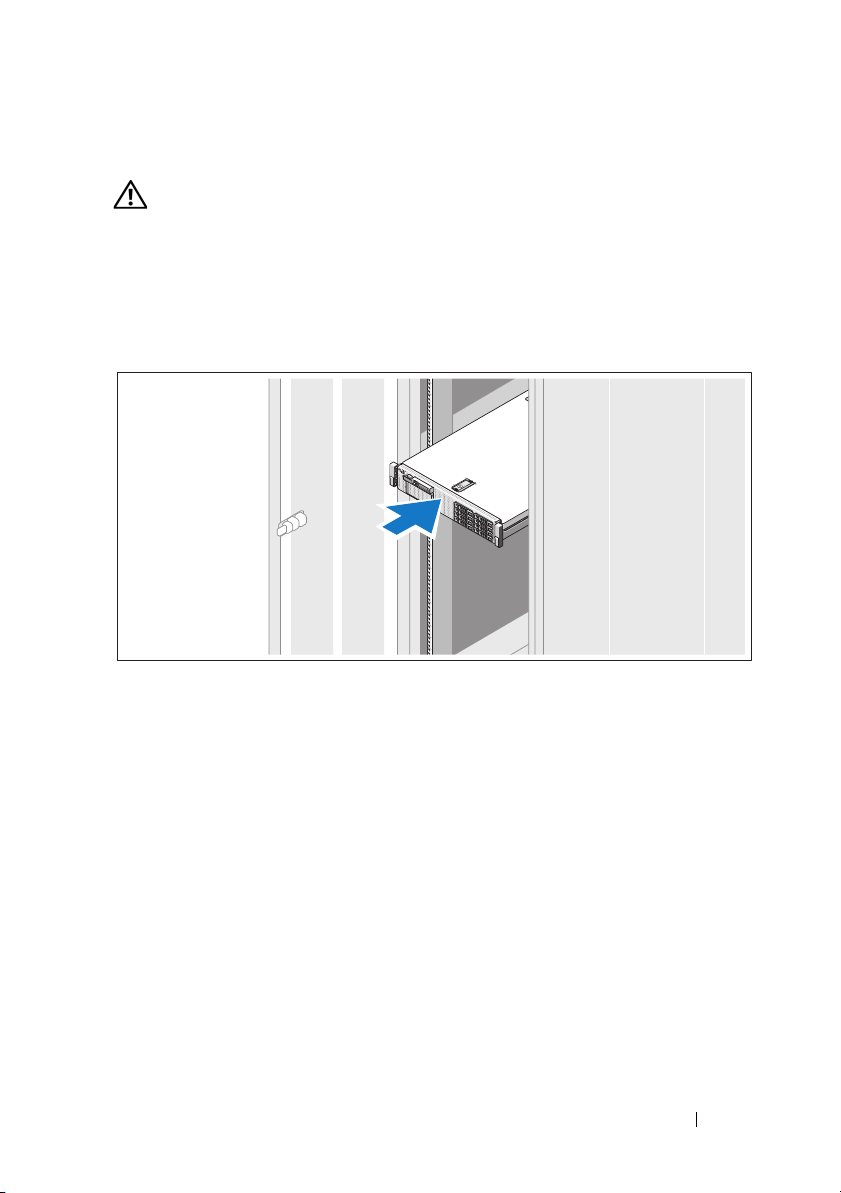
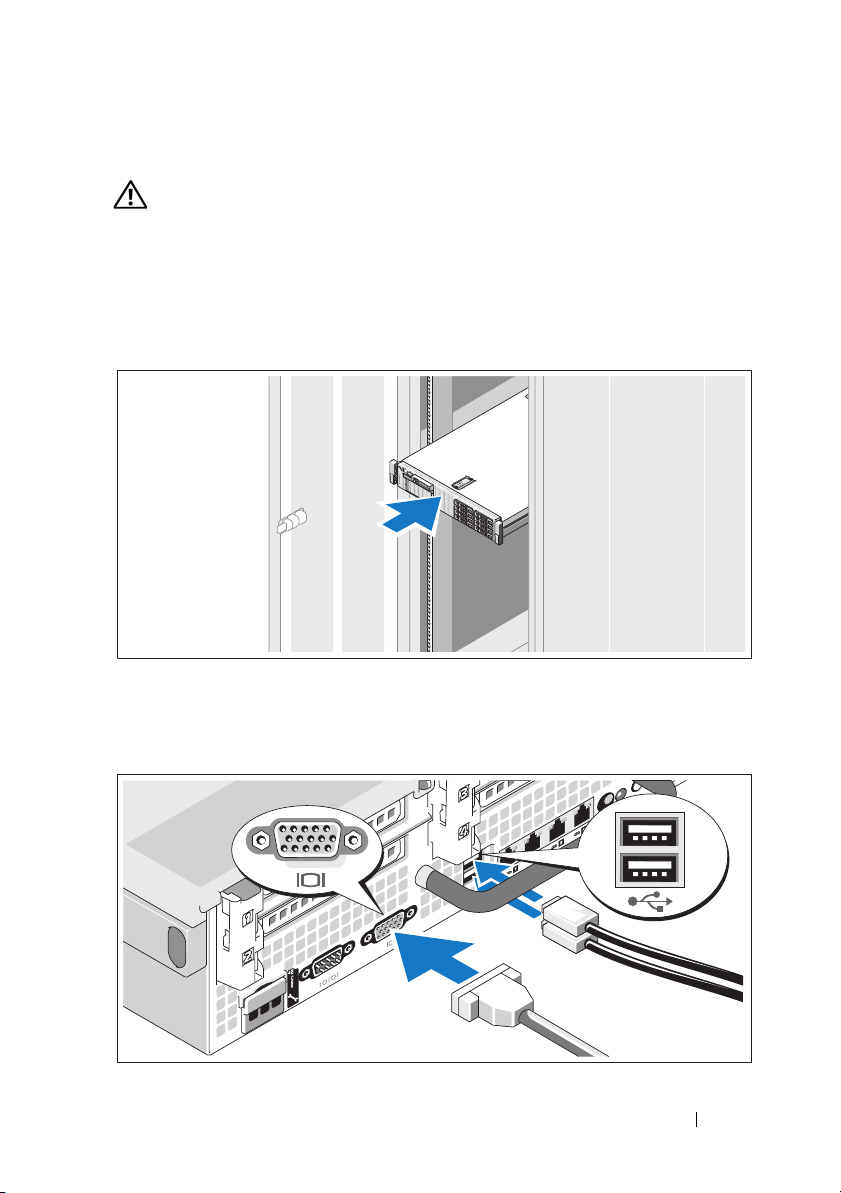
Installing the Rails and System in a Rack
Assemble the rails and install the system in the rack following the safety
instructions and the rack installation instructions provided with your system.
Getting Started With Your System 3
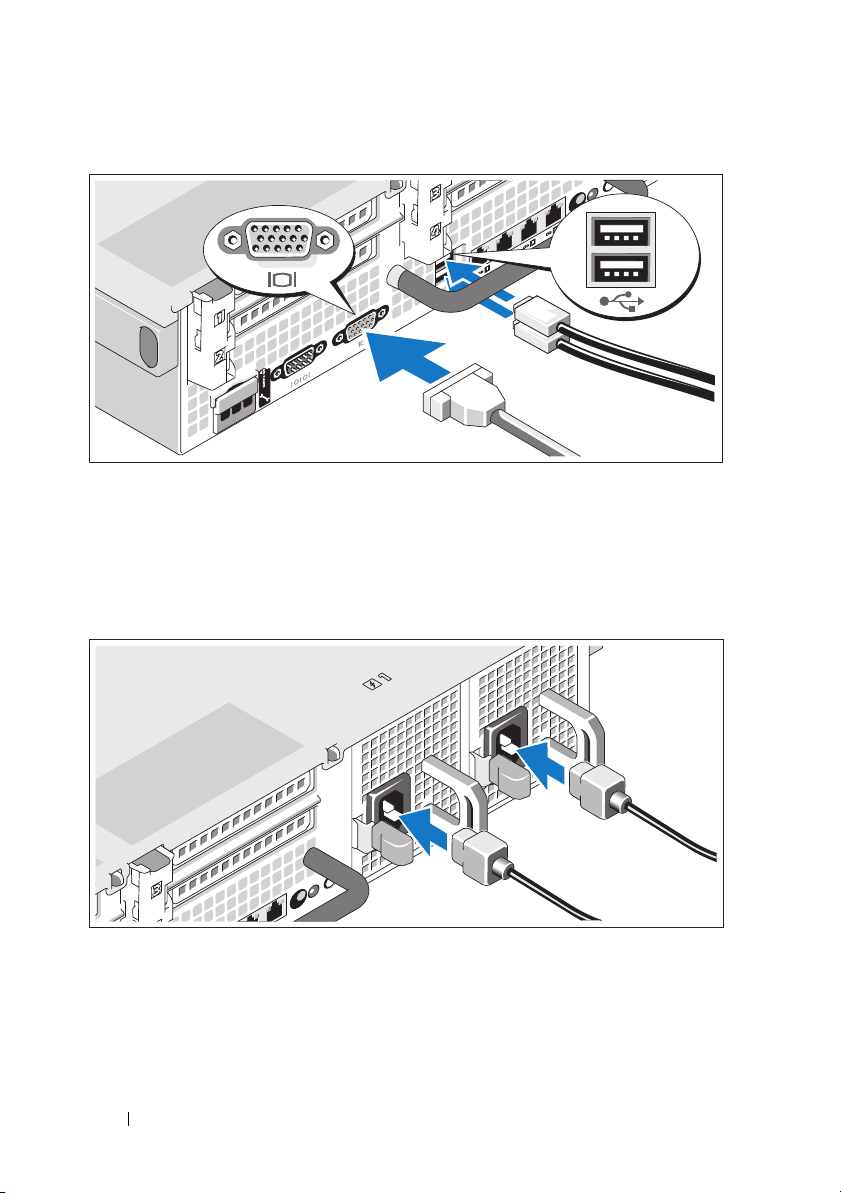
Optional – Connecting the Keyboard, Mouse, and Monitor
Connect the keyboard, mouse, and monitor (optional).
The connectors on the back of your system have icons indicating which cable
to plug into each connector. Be sure to tighten the screws (if any) on the
monitor's cable connector.
Connecting the Power Cable(s)
Connect the system’s power cable(s) to the system and, if a monitor is used,
connect the monitor’s power cable to the monitor.
4 Getting Started With Your System
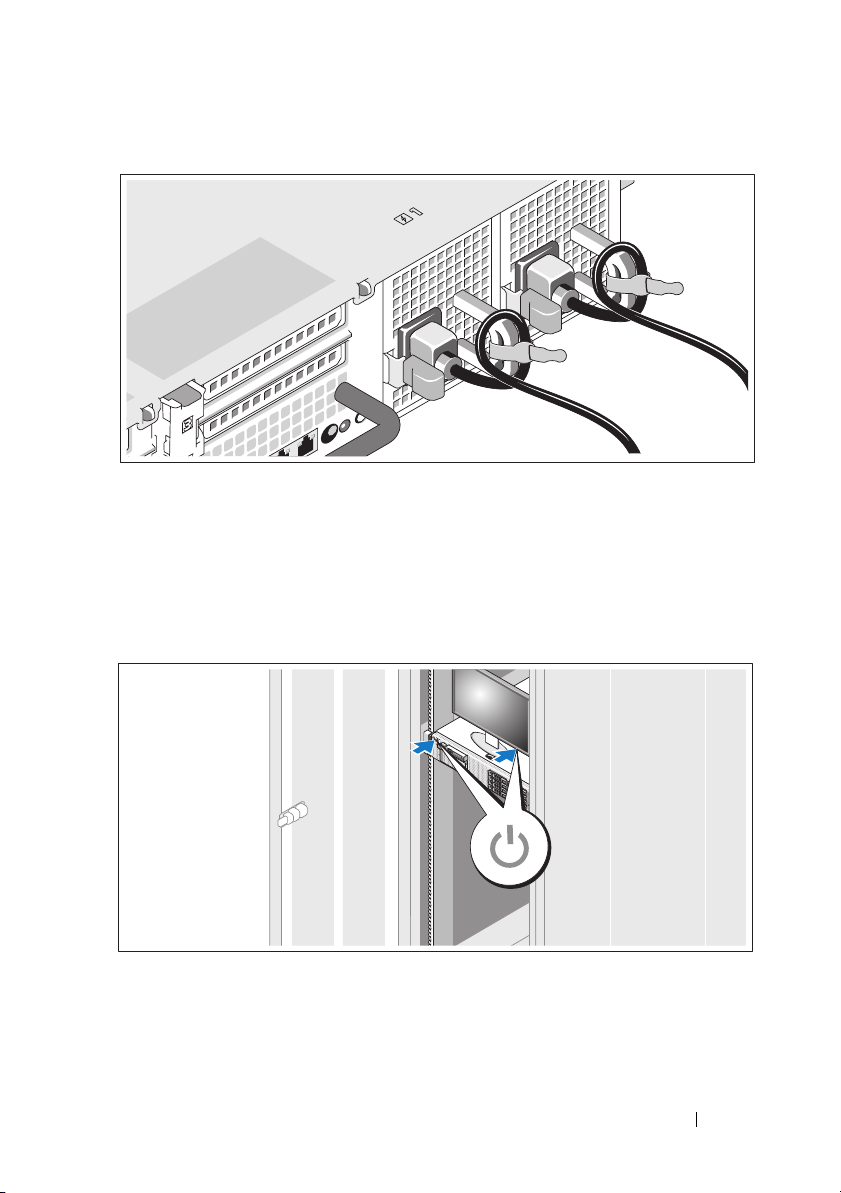
Securing the Power Cable(s)
Bend the system power cable(s) into a loop as shown in the illustration and
secure the cable(s) to the bracket using the provided strap.
Plug the other end of the power cable(s) into a grounded electrical outlet or
a separate power source such as an uninterruptible power supply (UPS) or
a power distribution unit (PDU).
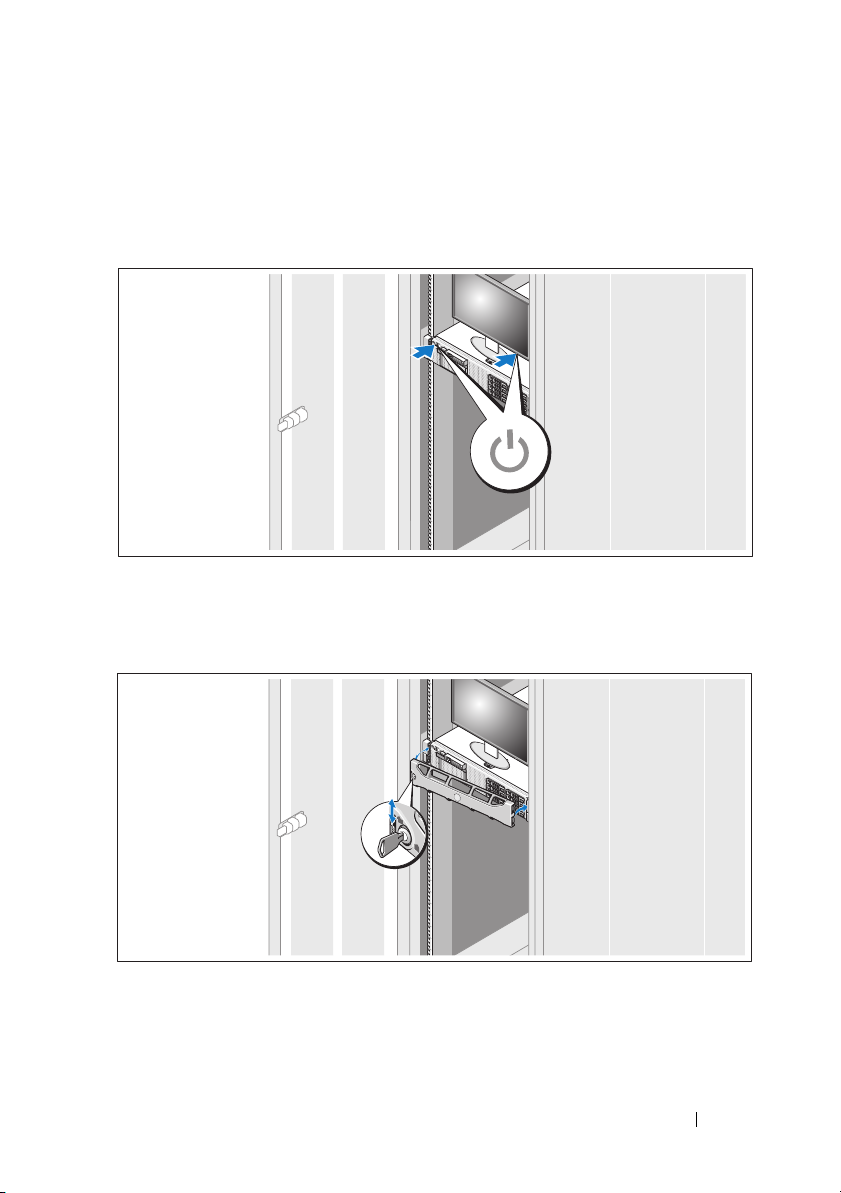
Turning On the System
Press the power button on the system and on the optional monitor, if used.
The power indicators should light.
Getting Started With Your System 5
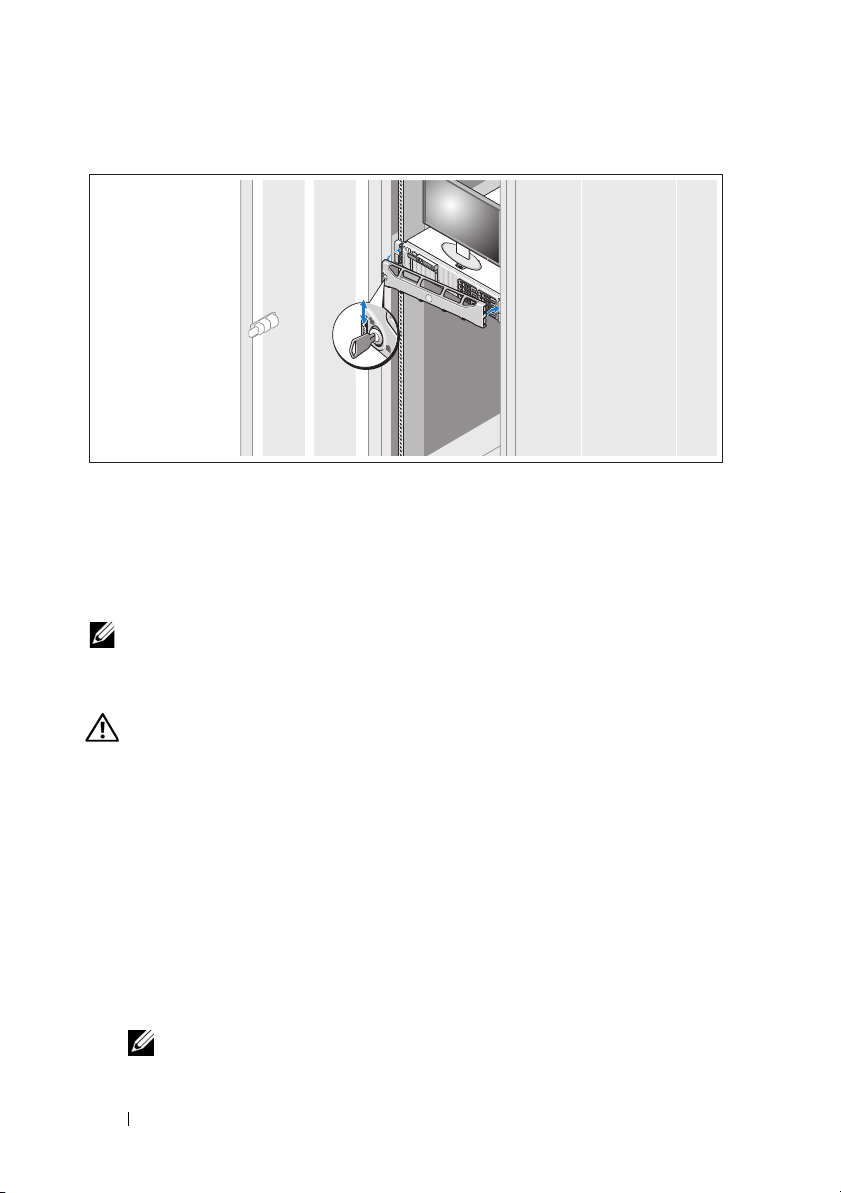
Installing the Optional Bezel
Install the bezel (optional).
Supported Operating System
Your system is preinstalled with Microsoft® Windows® Storage Server 2008
Standard x64 Edition.
NOTE: For the latest information on supported operating systems, see www.dell.com
Other Information You May Need
WARNING: See the safety and regulatory information that shipped with
your system. Warranty information may be included within this document or
as a separate document.
• The rack documentation included with your rack solution describes how to
install your system into a rack.
•The
• Any media that ships with your system that provides documentation and
Hardware Owner’s Manual
and describes how to troubleshoot the system and install or replace system
components. This document is available online at
tools for configuring and managing your system, including those pertaining
to the operating system, system management software, system updates, and
system components that you purchased with your system.
provides information about system features
support.dell.com.
NOTE: Always check for updates on support.dell.com and read the updates
first because they often supersede information in other documents.
6 Getting Started With Your System
Obtaining Technical Assistance
If you do not understand a procedure in this guide or if the system does not
perform as expected, see your Hardware Owner’s Manual. Dell
comprehensive hardware training and certification. See www.dell.com/training
for more information. This service may not be offered in all locations.
™
offers
NOM Information (Mexico Only)
The following information is provided on the device described in this
document in compliance with the requirements of the official Mexican
standards (NOM):
Importer:
Model number: E02S
Supply voltage: 100–240 VAC
Frequency: 50/60 Hz
Current consumption: 7.0–3.5A
Getting Started With Your System 7

Technical Specifications
Processor
®
Processor type One or two quad-core Intel
series
Expansion Bus
Bus type PCI Express Generation 2
Expansion slots via riser card:
Riser 1 (Center Riser)
One full-height, 9.5-inch length, x4 link (slot 1)
NOTE: This slot can be upgraded to 12.2 inches.
One low-profile, 9.5-inch length, x4 link (slot 2)
Riser 2 (Left Riser)
Two full-height, 9.5-inch length, x8 link (slot 3 and 4)
or
One full-height, 9.5-inch length, x16 link (slot 3)
NOTE: Support for up to 25W is available only on the first
two cards installed in the system; any additional cards
installed in the system must be 15W or under.
Memory
Architecture 800, 1066, or 1333 MHz DDR3 registered or unbuffered
Error Correcting Code (ECC) DIMMs. Support for
Advanced ECC or Memory Optimized operation.
Memory module
sockets
Memory module
capacities
Minimum RAM 1 GB with a single processor (1 DIMM per processor)
Maximum RAM 96 GB (with quad-rank 8 GB RDIMM), 144 GB
Eighteen 240-pin
1 GB or 2 GB UDIMMs and 2 GB, 4 GB,
or 8 GB RDIMMs
(single, dual, or quad-rank dependent on capacity)
(with dual-rank 8 GB RDIMM), or 24 GB (with 2 GB
UDIMMs)
Xeon® Processor 5500
8 Getting Started With Your System
Drives
Hard drives Up to six 3.5-inch, internal, hot-swappable SAS or
SATA hard drives without optional internal tape
drive support
Diskette Drive Optional external USB 1.44-MB drive
Optical drive One optional internal slimline SATA DVD-ROM or
DVD+RW drive
Optional external USB DVD
NOTE: DVD devices are data only
Flash Drive Optional internal Secure Digital (SD) memory card
Optional external SD memory card
Connectors
Back
NIC
Serial
USB
Video
Optional external
VFlash card
Front
Video
USB
Internal
USB
Optional internal
SD module
Four RJ-45 10/100/1000 Mbps Ethernet
9-pin, DTE, 16550-compatible
Two 4-pin, USB 2.0-compliant
15-pin VGA
One flash memory card slot on the back panel
15-pin VGA
Two 4-pin, USB 2.0-compliant
One 4-pin, USB 2.0-compliant
One internal flash memory card slot
Video
Video type Integrated Matrox G200
Video memory 8 MB shared
Getting Started With Your System 9
Power
AC Power Supply (per power supply)
Wa t ta g e
Vo lt ag e
Heat dissipation
Maximum inrush
current
Batteries
System battery
RAID battery
(optional)
Physical
Height 8.64 cm (3.4 in)
Width 48.24 cm (18.99 in) with rack latches
Depth 72.06 cm(28.4 in) with power supplies and bezel
Weight (maximum
configuration)
Weight (empty) 17.7 kg (39 lb)
870 W (High Output)
570 W /200840 KB (Energy Smart)
90–264 VAC, autoranging, 47-63 Hz
2968.6 BTU/hr maximum (High Output)
1944.9 BTU/hr maximum (Energy Smart)
Under typical line conditions and over the entire system
ambient operating range, the inrush current may
reach 55 A per power supply for 10 ms or less.
CR 2032 3.0-V lithium coin cell
3.7-V lithium ion battery pack
44.31 cm (17.4 in) without rack latches
68.07 cm(26.8) without power supplies and bezel
26.1 kg (57.54 lb)
10 Getting Started With Your System

Environmental
NOTE: For additional information about environmental measurements for specific
system configurations, see www.dell.com/environmental_datasheets
Temperature
Operating
10° to 35°C (50° to 95°F) with a maximum temperature
gradation of 10°C per hour
NOTE: For altitudes above 2950 feet, the maximum operating
temperature is derated 1°F/550 ft.
Storage
Relative humidity
Operating
Storage
Maximum vibration
Operating
Storage
Maximum shock
Operating
Storage
Altitude
Operating
–40° to 65°C (–40° to 149°F) with a maximum temperature
gradation of 20°C per hour
20% to 80% (non-condensing) with a maximum humidity
gradation of 10% per hour
5% to 95% (non-condensing) with a maximum humidity
gradation of 10% per hour
0.26 Gms from 5–350 Hz for 5 minutes in operational
orientations
1.54 Gms from 10–250 Hz for 10 minutes in all orientations
Half sine shock in all operational orientations of 31 G plus
or minus 5% with a pulse duration of 2.6 ms plus or minus
10%
Half sine shock on all six sides of 71 G plus or minus 5%
with a pulse duration of 2 ms plus or minus 10%
Square wave shock on all six sides of 27 G with a velocity
change at 235 in/sec or greater
–16 to 3048 m (–50 to 10,000 ft)
NOTE: For altitudes above 2950 feet, the maximum operating
temperature is derated 1°F/550 ft.
Storage
–16 to 10,600 m (–50 to 35,000 ft)
Getting Started With Your System 11

12 Getting Started With Your System

Dell™ PowerVault™
NX3000 系统
系统使用入门
www.dell.com | support.dell.com
注、小心和警告
注: “注”表示可以帮助您更好地使用计算机的重要信息。
小心:
警告: “警告”表示可能会导致财产损失、人身伤害甚至死亡。
“小心”表示如果不遵循说明,就有可能损坏硬件或导致数据丢失。
____________________
本说明文件中的信息如有更改,恕不另行通知。
© 2009 Dell Inc. 版权所有,翻印必究。
未经 Dell Inc. 书面许可,严禁以任何形式复制这些材料。
Dell,、DELL 徽标、和 PowerVault 是 Dell Inc. 的商标; Intel 和 Xeon 是 Intel Corporation 在美
国 和其它国家和地区的注册商标; Microsoft 和 Windows 是 Microsoft Corporation 在美国和 /
或其它国家和地区的商标或注册商标。
本说明文件中述及的其它商标和产品名称是指拥有相应商标和产品名称的公司或其制造的产
品。 Dell Inc. 对本公司的商标和产品名称之外的其它商标和产品名称不拥有任何专有权。
型号 E02S
管制类型 E02S001
2009 年 4 月 P/N K187N 修订版。 A00
安装和配置
警告: 执行下列步骤之前,请阅读系统随附的安全说明。
打开系统包装
打开系统包装并识别每件物品。
在机架中安装滑轨和系统
遵循系统随附的安全说明和机架安装说明组装滑轨并在机架中安装系统。
可选连接键盘、鼠标和显示器
系统使用入门 15

连接键盘、鼠标和显示器 (可选)。
系统背面的连接器附有图标,这些图标指示了要插入每个连接器的电缆。
确保拧紧显示器的电缆连接器上的螺钉 (如果有)。
连接电源电缆
将系统电源电缆连接至系统,如果使用显示器,将显示器电源电缆连接至
显示器。
固定电源电缆
如图所示,将系统电源电缆弯曲成一个环路,并使用所提供的带子将其固
定到支架。
16 系统使用入门
将电源电缆的另一端插入接地的电源插座或单独的电源,如不间断电源设
备 (UPS) 或配电装置 (PDU)。
开启系统
按下系统和显示器 (如有使用)上的电源按钮。电源指示灯将会亮起。
安装可选挡板
安装挡板 (可选)。
系统使用入门 17

支持的操作系统
系统预安装了 Microsoft® Windows® 2008 标准 x64 版存储服务器。
注: 有关支持的操作系统的最新信息,请参阅 www.dell.com
可能需要的其它信息
警告: 请参阅系统附带的安全与管制信息。保修信息可能包括在该说明文
件中,也可能作为单独的说明文件提供。
•
机架解决方案附带机架说明文件,介绍了如何将系统安装到机架中。
•
《硬件用户手册》提供了有关系统功能的信息,并说明了如何排除系统
故障以及安装或更换系统组件。可在
文件。
•
系统随附的任何介质提供了用于配置和管理系统的说明文件和工具,
包括与随系统购买的操作系统、系统管理软件、系统更新软件以及系
统组件相关的说明文件和工具。
注: 请经常访问 support.dell.com 查看是否有更新,并先阅读更新信
息,因为这些更新通常会取代其它说明文件中的信息。
support.dell.com
在线获取该说明
获得技术帮助
如果您对本指南中的步骤有疑问,或系统运行无法达到预期效果,请参阅
《硬件用户手册》。Dell
www.dell.com/training。此服务可能并非在所有地区都提供。
18 系统使用入门
®
提供全面的硬件培训和认证。有关详情,请参阅

NOM 信息 (仅限于墨西哥)
本说明文件中述及的符合墨西哥官方标准 (NOM) 要求的设备上均具有以
下信息:
进口商:
型号:
电源电压: 100 – 240 VAC
频率:
电流消耗: 7.0 – 3.5 A
E02S
50/60 Hz
技术规格
处理器
处理器类型 一个或两个四核 Intel
扩充总线
总线类型 PCI Express 第 2 代
通过提升卡的扩充槽:
提升卡 1(中央提升卡)一个全高、 9.5 英寸长 x4 链路 (插槽 1)
注: 此插槽可升级为 12.2 英寸。
一个小型、 9.5 英寸长 x4 链路 (插槽 2)
提升卡 2(左提升卡)
两个全高、 9.5 英寸长 x8 链路 (插槽 3 和 4)
或
一个全高、 9.5 英寸长 x16 链路 (插槽 3)
注: 仅前两个安装到系统的插卡最大可支持 25W,安
装到系统的任何其它插卡必须为 15W 或以下。
®
Xeon®处理器 5500 系列
系统使用入门 19

内存
体系结构 800、 1066 或 1333 MHz DDR3 已注册或非缓冲错误
纠正代码 (ECC) DIMM。支持高级 ECC 或内存优化
操作。
内存模块
插槽
内存模块
容量
最小 RAM 1 GB,含单一处理器 (每个处理器 1 DIMM)
最大 RAM 96 GB (含四列 8 GB RDIMM)、 144 GB (含双列
驱动器
硬盘驱动器 支持多达六个 3.5 英寸、内部,热交换 SAS 或 SATA
软盘驱动器 可选的外部 USB 1.44-MB 驱动器
光盘驱动器 一个可选的内部细长型 SATA DVD-ROM 或
18 个 240 针
1 GB 和 2 GB UDIMM,和 2 GB、 4 GB
或 8 GB RDIMM
(根据容量,为单列、双列或四列)
8 GB RDIMM)或 24 GB (含 2 GB UDIMM)
硬盘驱动器 (无可选内部磁带驱动器支持)
DVD+RW 驱动器
可选的外部 USB DVD
注: DVD 设备仅用于数据
闪存驱动器 可选的内部安全数字 (SD) 内存卡
可选的外部 SD 内存卡
连接器
背面
NIC
串行
USB
视频
可选的外部
VFlash
内存卡背面板上有一个闪存卡插槽
20 系统使用入门
四个 RJ-45 10/100/1000 Mbps 以太网
9 针、 DTE、 16550 兼容连接器
两个 4 针、 USB 2.0 兼容连接器
15 针 VGA 连接器

连接器 (续)
正面
视频
USB
内部
USB
可选的内部
视频
视频类型 集成 Matrox G200
视频内存 8 MB 共享
Power (电源)
交流电源设备 (每个电源设备)
功率
电压
散热
最大涌入
电流
电池
系统电池
RAID 电池
(可选)
SD
模块
15 针 VGA 连接器
两个 4 针、 USB 2.0 兼容连接器
一个 4 针、 USB 2.0 兼容连接器
一个内部闪存卡插槽
870 W (高输出)
570 W /200840 KB ( 节能 )
90 – 264 VAC、自动调节、 47-63 Hz
最大 2968.6 BTU/ 小时 (高输出)
最大 1944.9 BTU/ 小时 (Energy Smart)
在典型的线路条件下和整个系统环境操作范围内,每
个电源设备在 10 毫秒或更短时间内的涌入电流可能
达到 55 A
CR 2032 3.0V 锂离子电池
3.7V 锂离子电池组
系统使用入门 21

内存
高度 8.64 厘米 (3.4 英寸)
宽度 48.24 厘米 (18.99 英寸),带机架闩锁
44.31 厘米 (17.4 英寸),不带机架闩锁
厚度 72.06 厘米 (28.4 英寸),带电源设备和挡板
68.07 厘米 (26.8 英寸),不带电源设备和挡板
重量 (最大配置) 26.1 千克 (57.54 磅)
重量 (空置) 17.7 千克 (39 磅)
环境参数
注: 有关特定系统配置的环境测量值的其它信息,请参阅
www.dell.com/environmental_datasheets
温度
运行时
10° 到 35 °C (50° 到 95 °F),最大温度变化梯度为
每小时 10°C
注: 海拔高度在 2950 英尺以上时,每升高 550 英尺,最
高操作温度降低 1 华氏度。
存储时
相对湿度
运行时
存储时
最大振动
运行时
存储时
最大撞击
运行时
存储时
零下 40 到 零上 65 摄氏度 (零下 40 到零上 149 华氏
度),每小时最大温差不超过 20 摄氏度
20% 至 80% (非冷凝),每小时最大湿度变化为 10%
5% 至 95% (非冷凝),每小时最大湿度变化不超过 10%
在操作方向, 0.26 Gms, 5 – 350 Hz,历时 5 分钟
在所有方向, 1.54 Gms, 10 – 250 Hz,历时 10 分钟
在所有操作方向上可以承受 31 G (+/-5%) 的半正弦波撞
击,脉冲持续时间为 2.6 毫秒 (+/-10%)
在所有操作方向上可以承受 71 G (+/-5%) 的半正弦波撞
击,脉冲持续时间为 2 毫秒 (+/-10%)
所有六面可以承受 27 G 的方波撞击,速度变化为 235 英
寸 / 秒 (或更大)
22 系统使用入门

环境参数 (续)
海拔高度
运行时
存储时
-16 至 3048 米(-50 至 10,000 英尺)
注: 海拔高度在 2950 英尺以上时,每升高 550 英尺,最高操作
温度降低 1 华氏度。
-16 至 10,600 米(-50 至 35,000 英尺)
系统使用入门 23

24 系统使用入门

Sistem Dell™
PowerVault™ NX3000
Memulai Pengaktifan
Sistem Anda
www.dell.com | support.dell.com

Catatan, Perhatian, dan Peringatan
CATATA N: CATATAN menunjukkan informasi penting yang membantu Anda
mengoptimalkan penggunaan komputer Anda.
PERHATIAN: PERHATIAN menunjukkan kerusakan potensial pada perangkat
keras atau kehilangan data jika Anda tidak mengikuti instruksi yang diberikan.
PERINGATAN: PERINGATAN menunjukkan potensi terjadinya kerusakan
properti, cedera pada seseorang, atau kematian.
____________________
Informasi di dalam dokumen ini dapat diubah tanpa pemberitahuan sebelumnya.
© 2009 Dell Inc. Hak cipta dilindungi undang-undang.
Dilarang keras memperbanyak material ini dalam cara apa pun tanpa izin tertulis Dell Inc.
Dell, logo DELL, dan PowerVault merupakan merek dagang Dell Inc.; Intel dan Xeon merupakan
merek dagang terdaftar Intel Corporation di AS. dan negara lain; Microsoft dan Windows merupakan
merek dagang atau merek dagang terdaftar dari Microsoft Corporation di Amerika Serikat dan/atau
negara lain.
Merek dagang lain dan nama dagang yang mungkin digunakan dalam dokumen ini mengacu ke entitas
yang mengaku memiliki merek dan nama produk mereka. Dell Inc. tidak mengklaim kepemilikan dari
merek dagang dan nama dagang selain miliknya sendiri.
Model E02S
Tipe Peraturan E02S001
April 2009 No. Komp. K187N Rev. A00

Pemasangan dan Konfigurasi
PERINGATAN: Sebelum menjalankan prosedur berikut, bacalah instruksi
keselamatan yang dikirimkan bersama sistem.
Mengeluarkan Sistem
Keluarkan sistem Anda dan identifikasi setiap komponen.
Memasang Rel dan Sistem di Rak
Susun rel dan pasang sistem di rak sesuai instruksi keselamatan dan instruksi
pemasangan rak yang disediakan dengan sistem Anda.
Memulai Pengaktifan Sistem Anda 27

Opsional – Menyambungkan Keyboard, Mouse, dan Monitor
Sambungkan keyboard, mouse, dan monitor (opsional).
Konektor pada bagian belakang sistem memiliki ikon yang
mengindikasikan kabel mana yang harus dipasang ke setiap konektor. Pastikan
untuk mengencangkan baut (jika ada) pada konektor kabel monitor.
Menyambungkan Kabel Daya
Sambungkan kabel daya sistem ke sistem dan jika monitor digunakan,
sambungkan kabel daya monitor ke monitor.
28 Memulai Pengaktifan Sistem Anda

Menyambungkan Kabel Daya
Tekuk kabel daya sistem dan masukkan ke dalam loop seperti yang
ditunjukkan pada gambar dan kencangkan kabel ke braket menggunakan
ikatan yang telah disediakan.
Masukkan ujung lainnya dari kabel daya ke outlet listrik yang memiliki
koneksi ground atau sumber daya yang terpisah seperti Uninterruptible Power
Supply (UPS) atau Power Distribution Unit (PDU).
Menyalakan Sistem
Tekan tombol daya pada sistem dan pada monitor opsional, jika digunakan.
Indikator daya harus menyala.
Memulai Pengaktifan Sistem Anda 29

Memasang Bezel Opsional
Pasang bezel (opsional).
Sistem Pengoperasian yang Didukung
Sistem Anda telah dilengkapi dengan Microsoft® Windows® Storage
Server 2008 Standard x64 Edition.
CATATA N: Untuk informasi terkini tentang sistem pengoperasian yang didukung,
lihat www.dell.com
Informasi Lain yang Mungkin Anda Butuhkan
PERINGATAN: Lihat informasi keselamatan dan peraturan yang dikirimkan
bersama dengan sistem Anda. Informasi garansi mungkin disertakan dalam
dokumen ini atau sebagai dokumen yang terpisah.
• Dokumentasi mengenai rak yang disertakan dengan solusi pemasangan rak
menjelaskan bagaimana memasang sistem Anda ke dalam rak.
•
Manual Perangkat Keras untuk Pemilik
sistem dan menjelaskan bagaimana cara melakukan penelusuran kesalahan
sistem dan memasang atau mengganti komponen sistem. Dokumen ini
tersedia online di
30 Memulai Pengaktifan Sistem Anda
support.dell.com.
menyediakan informasi tentang fitur

• Media apa pun yang dikirimkan bersama dengan sistem Anda yang disertai
dengan dokumentasi dan peralatan untuk mengonfigurasi dan mengatur
sistem Anda, termasuk dokumentasi dan peralatan yang terkait dengan
sistem pengoperasian, perangkat lunak manajemen sistem, update sistem,
dan komponen sistem yang Anda beli bersama dengan sistem Anda.
CATATA N: Periksa selalu update pada support.dell.com dan baca dahulu
versi update karena versi update sering kali menggantikan informasi di dalam
dokumen.
Memperoleh Bantuan Teknis
Jika Anda tidak memahami salah satu prosedur di dalam panduan ini atau jika
sistem tidak beroperasi sebagaimana mestinya, lihat Manual Perangkat Keras
untuk Pemilik. Dell
keras dan sertifikasi. Lihat www.dell.com/training untuk informasi tambahan.
Servis ini mungkin tidak ditawarkan di semua lokasi.
™
memberikan pelatihan lengkap mengenai perangkat
Informasi NOM (Hanya untuk Meksiko)
Informasi berikut disediakan untuk perangkat yang dijelaskan dalam
dokumen ini sesuai dengan persyaratan dari standar resmi Meksiko (NOM):
Importir:
Nomor model: E02S
Tegangan suplai: 100–240 VAC
Frekuensi: 50/60 Hz
Konsumsi arus: 7,0–3,5A
Memulai Pengaktifan Sistem Anda 31

Spesifikasi Teknis
Prosesor
Tipe Prosesor Satu atau dua quad-core Intel
series
Bus Ekspansi
Tipe bus PCI Express Generasi 2
Slot ekspansi via kartu riser:
Riser 1 (Riser Sentral)
Riser 2 (Riser Kiri)
Satu dengan ketinggian penuh, panjang 9,5-inci, x4 link
(slot 1)
CATATA N: Slot ini dapat diupgrade hingga 12,2 inci.
Satu versi low-profile, panjang 9,5-inci, x4 link (slot 2)
Dua versi panjang penuh, panjang 9,5-inci, x8 link
(slot 3 dan 4)
atau
Satu dengan ketinggian penuh, panjang 9,5-inci, x4 link
(slot 1)
CATATA N: Dukungan hingga 25W hanya tersedia pada
dua kartu pertama yang dipasang di sistem; kartu
tambahan lainnya yang dipasang pada sistem harus
berada pada 15W atau di bawahnya.
®
Xeon® Processor 5500
Memori
Arsitektur DDR3 terdaftar atau tanpa buffer Error Correcting
Code (ECC) DIMM 800, 1066, atau 1333 MHz.
Mendukung pengoperasian ECC Lanjutan atau
Pengoptimalan Memori.
Soket modul memori Delapan belas 240-pin
Kapasitas modul memori 1 GB atau 2 GB UDIMM dan 2 GB, 4 GB,
atau 8 GB RDIMM
(tunggal, ganda, atau quad-rank tergantung kapasitas)
RAM Minimal 1 GB dengan prosesor tunggal (1 DIMM per prosesor)
RAM Maksimal 96 GB (dengan quad-rank 8 GB RDIMM), 144 GB
(dengan dual-rank 8 GB RDIMM), atau 24 GB (dengan
2 GB UDIMM)
32 Memulai Pengaktifan Sistem Anda

Drive
Hard drive Hingga enam hard drive SAS atau SATA yang dapat
saling dipertukarkan, bersifat internal dengan ukuran
3,5 inci, tanpa dukungan untuk tape drive internal
opsional
Diskette Drive Drive USB 1,44-MB eksternal opsional
Drive optis Satu drive SATA DVD-ROM atau DVD+RW slimline
internal, opsional
DVD USB eksternal opsional
CATATAN: Perangkat DVD hanya merupakan data
Flash Drive Kartu memori Secure Digital (SD) internal opsional
Kartu memori SD eksternal opsional
Konektor
Belakang
NIC
Serial
USB
Video
Kartu memori VFlash
eksternal opsional
Depan
Video
USB
Internal
USB
Modul SD internal
opsional
Empat Ethernet RJ-45 10/100/1.000 Mbps
9-pin, DTE, kompatibel untuk 16550
Dua 4-pin, untuk USB 2.0
15-pin VGA
Satu slot kartu flash di panel belakang
15-pin VGA
Dua 4-pin, untuk USB 2.0
Satu 4-pin, kompatibel dengan USB 2.0
Satu slot kartu memori flash internal
Video
Tipe video Matrox G200 Terintegrasi
Memori video 8 MB bersama
Memulai Pengaktifan Sistem Anda 33

Daya
Catu Daya AC (per catu daya)
Wa t t
Vo lt
Penghilangan panas
Arus inrush
maksimum
Baterai
Baterai sistem
Baterai RAID
(opsional)
Fisik
Tinggi 8,64 cm (3,4 in)
Lebar 48,24 cm (18,99 in) dengan kait rak
Panjang 72,06 cm(28,4 in) dengan catu daya dan bezel
Berat (konfigurasi
maksimal)
Berat (kosong) 17,7 kg (39 lb)
870 W (Output Tinggi)
570 W /200840 KB (Energy Smart)
90–264 VAC, penyetelan kisaran otomatis, 47-63 Hz
2968,6 BTU/jam maksimum (Output Tinggi)
1944,9 BTU/jam maksimum (Energy Smart)
Saat berada dalam kondisi jalur yang normal dan pada
semua kisaran pengoperasian sekitar sistem, arus inrush
dapat mencapai 55 A per catu daya selama 10 ms atau
kurang.
Sel lithium CR 2032 3.0-V berbentuk koin
Unit baterai ion lithium 3,7-V
44,31 cm (17,4 in) tanpa kait rak
68,07 cm(26,8) tanpa catu daya dan bezel
26,1 kg (57,54 lb)
34 Memulai Pengaktifan Sistem Anda

Lingkungan
CATATA N: Untuk informasi tambahan mengenai pengukuran sekitar untuk konfigurasi
sistem yang spesifik, lihat www.dell.com/environmental_datasheets
Suhu
Pengoperasian
10° hingga 35°C (50° hingga 95°F) dengan peningkatan
suhu maksimal 10°C per jam
CATATAN: Untuk ketinggian di atas 2.950 kaki, suhu
pengoperasian maksimum diturunkan menjadi 1°F/550 kaki.
Penyimpanan
Kelembapan relatif
Pengoperasian
Penyimpanan
Getaran maksimal
Pengoperasian
Penyimpanan
Getaran maksimal
Pengoperasian
Penyimpanan
Ketinggian
Pengoperasian
–40° hingga 65°C (–40° to 149°F)dengan peningkatan
temperatur maksimum adalah 20°C per jam
20% hingga 80% (tanpa kondensasi) dengan peningkatan
kelembapan maksimum sebesar 10% per jam
5% hingga 95% (tanpa kondensasi) dengan peningkatan
kelembapan maksimum sebesar 10% per jam
0,26 Gms dari 5–350 Hz selama 5 menit pada status
pengoperasian
1,54 Gms dari 10–250 Hz selama 10 menit pada semua
status pengoperasian
Setengah kejutan sinus di semua status pengoperasian 31 G
plus atau minus 5% dengan durasi pulsa sebesar 2,6 ms plus
atau minus 10%
Setengah kejutan sinus di semua status pengoperasian 31 G
plus atau minus 5% dengan durasi pulsa sebesar 2,6 ms plus
atau minus 10%
Kejutan gelombang persegi di keenam sisi 27 G dengan
perubahan velositas pada nilai 235 in/dtk atau lebih besar
–16 hingga 3.048 m (–50 hingga 10.000 kaki)
CATATAN: Untuk ketinggian di atas 2.950 kaki, suhu pengoperasian
maksimum diturunkan menjadi 1°F/550 kaki.
Penyimpanan
–16 hingga 10.600 m (–50 hingga 35.000 kaki)
Memulai Pengaktifan Sistem Anda 35

36 Memulai Pengaktifan Sistem Anda

Dell™ PowerVault™
NX3000
はじめに
システム
www.dell.com | support.dell.com

メモ、注意、警告
メモ : コンピュータを使いやすくするための重要な情報を説明しています。
注意 : 手順に従わないと、ハードウェアの損傷やデータの損失につながる可能性が
あることを示しています。
警告: 物的損害、けがまたは死亡の原因となる可能性があることを示して
います。
____________________
本書の内容は予告なく変更されることがあります。
© 2009 すべての著作権は Dell Inc. にあります。
Dell Inc. の書面による許可のない 複製は、いかなる形態においても厳重に禁じられています。
本書に使用されている商標:
よび
Xeon は米国およびその他の国における Intel Corporation の登録商標です。Microsoft および
Windows
商標または製品の権利を主張する事業体を表すために、その他の商標および社名が使用されているこ
とがあります。
モデル E02S
規制タイプ E02S001
2009 年 4 月 P/N K187N Rev. A00
は米国およびその他の国における Microsoft Corporation の商標または登録商標です。
Dell Inc. はデル以外の商標や社名に対する所有権を一切否認します。
Dell、DELL ロゴ、および PowerVault は Dell Inc. の商標です。Intel お

取り付けと設定
警告:次の手順を実行する前に、システムに付属しているマニュアルの、
安全にお使いいただくための注意事項をお読みください。
システムの開梱
システムを箱から取り出し、同梱品がすべて揃っていることを確認します。
ラックへのレールとシステムの取り付け
レールの組み立てとラックへのシステムの取り付けの際は、システムに付属して
いるマニュアルの、安全にお使いいただくための注意事項およびラックへの取り
付け手順に従ってください。
はじめに 39

オプション – キーボード、マウス、モニタの接続
キーボード、マウス、モニタ(オプション)を接続します。
システム背面のコネクタには、どのケーブルをどのコネクタに接続するかを示す
アイコンがあります。モニタのケーブルコネクタにネジがある場合は、必ず締め
てください。
電源ケーブルの接続
システムの電源ケーブルをシステムに接続し、モニタを使用する場合は、モニタ
の電源ケーブルをモニタに接続します。
40 はじめに

電源ケーブルの固定
システムの電源ケーブルをループ状に曲げ(図を参照)、付属のストラップでブラ
ケットに固定します。
電源ケーブルのもう一方の端を、アースされた電源コンセントまたは、
(無停電電源装置)や配電装置(
PDU
)などの別の電源に接続します。
UPS
システムの電源投入
システムと、オプションのモニタ(使用している場合)の電源ボタンを押します。
電源インジケータが点灯します。
はじめに 41

ベゼル(オプション)の取り付け
ベゼル(オプション)を取り付けます。
対応オペレーティングシステム
お使いのシステムには
Standard x64 Edition
メモ : サポートされているオペレーティングシステムの最新情報については、
www.dell.com/jp を参照してください。
Microsoft® Windows® Storage Server 2008
が事前にインストールされています。
その他の情報
警告:システムに付属のマニュアルで、安全および認可機関に関する情報を参照
してください。保証情報は、このマニュアルに含まれている場合と、別の文書とし
て付属する場合があります。
•
ラックソリューションに付属のマニュアルでは、システムをラックに取り付
ける方法について説明しています。
•
『ハードウェアオーナーズマニュアル』では、システムの機能、トラブル
シューティングの方法、およびコンポーネントの取り付け方や、交換方法に
ついて説明しています。このマニュアルは
ラインで入手できます。
•
システムに付属のメディアには、オペレーティングシステム、システム管理
ソフトウェア、システムアップデート、およびシステムと同時に購入したシ
ステムコンポーネントに関するものを含め、システムの設定と管理用のマ
ニュアルとツールが収録されています。
メモ : アップデートには、他の文書の内容を差し替える情報が含まれている
場合がよくありますので、
常に確認し、初めにお読みください。
support.jp.dell.com でアップデートがないかを
42 はじめに
support.jp.dell.com
からオン

テクニカルサポートの利用法
本書の手順が理解できない場合や、システムが思ったとおりに動作しない場合は、
『ハードウェアオーナーズマニュアル』を参照してください。デルでは広範囲にわ
たるハードウェアのトレーニングと資格認証を実施しています。詳細については、
www.dell.com/training
ない地域もあります。
を参照してください。このサービスが提供されてい
NOM 情報(メキシコのみ)
以下は、メキシコの公式規格(
装置に関する情報です。
輸入者 :
モデル番号:
供給電圧 : 100 ~ 240 VAC
周波数 :
消費電流 :7.0 ~ 3.5 A
NOM
E02S
50/60 Hz
)の仕様に準拠する、本書で取り上げている
はじめに 43

技術仕様
プロセッサ
プロセッサの種類
拡張バス
バスの種類
ライザーカードを介する拡張スロット
ライザー
(センターライザー)
ライザー 2(左ライザー)
メモリ
アーキテクチャ
メモリモジュール
ソケット
メモリモジュール
容量
最小
最大
1
RAM シングルプロセッサに 1 GB
RAM 96 GB(クアッドランクの 8 GB RDIMM を使用)、
Quad-Core Intel® Xeon® プロセッサ 5500 シリーズ
1 つまたは 2 つ
PCI Express Gen 2
フルハイト、9.5 インチ長、x4 リンク 1 つ(スロット 1)
メモ : このスロットは 12.2 インチにアップグレードでき
ます。
ロープロファイル、
(スロット
フルハイト、9.5 インチ長、x8 リンク 2 つ
(スロット
または
フルハイト、
(スロット
2)
3 および 4)
3)
9.5 インチ長、x4 リンク 1 つ
9.5 インチ長、x16 リンク 1 つ
メモ : 25W までのサポートは、システムにインストール
された、最初の
カードはすべて
2 枚のカードに限られます。それ以上の
15W 以下にする必要があります。
800、1066、または 1333 MHz DDR3 レジスタまたは
バッファなし
モリ最適化操作のサポート。
ECC DIMM。アドバンスド ECC またはメ
240 ピンソケット 18 個
1 GB または 2 GB の UDIMM、および 2 GB、4 GB、
または 8 GB の RDIMM
(容量に応じて、シングル、デュアル、またはクアッド
ランク)
(各プロセッサに DIMM 1 つ)
144 GB(デュアルランクの 8 GB RDIMM を使用)、ま
24 GB(2 GB の UDIMM を使用)
たは
44 はじめに

ドライブ
ハードディスクドライブ 最高
ディスケットドライブ オプションの外付け
光学ドライブ オプションの内蔵スリムライン
6 つの 3.5 インチ、内蔵ホットスワップ対応 SAS ま
SATA ハードディスクドライブ(内蔵テープドライ
たは
ブサポートオプションなし)
USB 1.44 MB ドライブ
DVD+RW
オプションの外付け
ドライブ 1 つ
USB DVD
メモ : DVD デバイスはデータ専用
フラッシュドライブ オプションの内蔵
オプションの外付け
コネクタ
背面
NIC
シリアル
USB
ビデオ
オプションの外付け
カード
VFlash
前面
ビデオ
USB
内蔵
USB
オプションの内蔵
モジュール
SD
RJ-45 10/100/1000 Mbps イーサネット 4 つ
16550 互換 9 ピン DTE
4 ピン USB 2.0 対応 2 つ
15 ピン VGA
背面パネルにフラッシュメモリカードスロット 1 つ
15 ピン VGA
4 ピン USB 2.0 対応 2 つ
4 ピン USB 2.0 対応 1 つ
内蔵フラッシュメモリカードスロット 1 つ
SD メモリカード
SD メモリカード
SATA DVD-ROM または
ビデオ
ビデオの種類 内蔵
ビデオメモリ 8 MB 共有
Matrox G200
はじめに 45

電源
AC 電源装置(各電源装置につき)
ワット数
870 W(高出力)
570 W /200840 KB (Energy Smart(省電力構成) )
電圧
熱消費
最大流入
電流
バッテリ
システムバッテリ
RAID
(オプション)
サイズと重量
縦幅
横幅 48.24 cm(ラックのラッチを含む)
バッテリ
90 ~ 264 VAC、自動選択、47 ~ 63 Hz
最大 2968.6 BTU/ 時(高出力)
1944.9 BTU/ 時(Energy Smart(省電力構成))
最大
通常のラインコンディションのもと、システムの動作環境
全範囲で、
突入電量を許容できます。
10 ミリ秒以下で電源装置 1 台に付き 55 A の
3.0 V コイン型リチウムバッテリ CR 2032
3.7 V リチウムイオンバッテリパック
8.64 cm
44.31 cm(ラックのラッチを含まない)
奥行き
72.06 cm(電源ユニットおよびベゼルを含む)
68.07 cm(電源ユニットおよびベゼルを含ない)
重量(最大構成)
重量(空の状態)
26.1 kg
17.7 kg
46 はじめに

環境
メモ : 特定のシステム構成でのその他の環境条件の詳細については、
www.dell.com/environmental_datasheets を参照してください。
温度
動作時
1 時間当たり最大 10° C の温度変化で 10 ~ 35° C
メモ : 高度が 2950 フィートを超えると、動作時の許容最大
550 フィートごとに 1° F ずつ低下します。
31 G +/– 5 パーセントのハーフサイン衝撃
71 G +/– 5 パーセントのハーフサイン衝撃
保管時
相対湿度
動作時
保管時
最大耐久震度
動作時
保管時
最大耐久衝撃
動作時
保管時
温度は、
1 時間当たり最大 20 ℃ の温度変化で -40 ~ 65° C
1 時間当たり最大 10 パーセントの湿度変化で 20 ~ 80 パー
セント(結露しないこと)
1 時間当たり最大 10 パーセントの湿度変化で 5 ~ 95 パー
セント(結露しないこと)
動作方向に 5 分間 5 ~ 350 Hz で 0.26 Gms
すべての方向に 10 分間 10 ~ 250 Hz で 1.54 Gms
パルス持続時間 2.6 ミリ秒 +/– 10 パーセントで、すべての動
作方向に
パルス持続時間 2 ミリ秒 +/– 10 パーセントで、6 つのすべて
の面において
597 cm/ 秒以上の速度変化で、6 つのすべての面において
のスクエアウェーブ衝撃
27 G
高度
動作時
–16 ~ 3,048 m
メモ: 高度が 2950 フィートを超えると、動作時の許容最大
550 フィーとごとに 1 ° F ずつ低下します。
保管時
温度は、
–16 ~ 10,600 m
はじめに 47

48 はじめに

Dell™ PowerVault™
NX3000 시스템
시스템 시작 안내서
www.dell.com | support.dell.com

주 , 주의 및 경고
주 : " 주 " 는 컴퓨터를 보다 효율적으로 사용하는 데 도움을 주는 중요 정보를
나타냅니다 .
주의 : " 주의 " 는 지침을 준수하지 않을 경우의 하드웨어 손상이나 데이터 손
실 위험을 설명합니다 .
경고 : " 경고 " 는 재산상의 피해나 심각한 부상 또는 사망을 유발할 수 있는
위험이 있음을 알려 줍니다 .
____________________
이 문서의 정보는 사전 통보 없이 변경될 수 있습니다 .
© 2009 Dell Inc. 저작권 본사 소유 .
Dell Inc. 의 서면 승인 없이 어떠한 경우에도 무단 복제하는 것을 엄격히 금합니다 .
본 설명서에 사용된 상표인 Dell, DELL 로고 및 PowerVault 는 Dell Inc. 의 상표이며 ,
Intel 및 Xeon 은 미국 및 기타 국가에서 Intel Corporation 의 등록 상표입니다 . Microsoft 및
Windows 는 미국 및 / 또는 기타
본 문서에서 특정 회사의 표시나 제품 이름을 지칭하기 위해 기타 상표나 상호를 사용할 수도
있습니다 . Dell Inc. 는 자사가 소유하고 있는 것 이외에 기타 모든 상표 및 상호에 대한 어떠한
소유권도 없습니다 .
모델 E02S
규정 유형 E02S001
2009 년 4 월 P/N K187N Rev. A00
국가에서 Microsoft Corporation 의 상표 또는 등록 상표입니다 .

설치 및 구성
경고 : 다음 절차를 수행하기 전에 시스템과 함께 제공되는 안전 지침을 검토
하십시오 .
시스템 포장 풀기
시스템 포장을 풀고 각 항목을 확인합니다 .
레일 및 시스템을 랙에 설치
안전 지침 및 시스템과 함께 제공되는 랙 설치 지침에 따라 레일을 조립하
고 시스템을 랙에 설치합니다 .
시스템 시작 안내서 51

선택 사양 – 키보드 , 마우스 및 모니터 연결
키보드 , 마우스 및 모니터 ( 선택 사양 ) 를 연결합니다 .
시스템 후면에 있는 커넥터에는 각 커넥터에 연결된 케이블이 표시된 아이
콘이 있습니다 . 모니터의 케이블 커넥터에 있는 나사 ( 해당하는 경우 ) 를
단단히 고정하십시오 .
전원 케이블 연결
시스템의 전원 케이블을 시스템에 연결하고 , 모니터를 사용하는 경우 모
니터의 전원 케이블을 모니터에 연결합니다 .
52 시스템 시작 안내서

전원 케이블 고정
시스템 전원 케이블을 그림에 표시된 대로 루프 모양으로 구부리고 제공된
스트랩을 사용하여 브래킷에 케이블을 고정시킵니다 .
전원 케이블의 반대쪽 끝을 접지된 전원이나 UPS(Uninterruptible Power
Supply) 또는 PDU(Power Distribution Unit) 와 같은 별도의 전원에 연결합
니다 .
시스템 켜기
시스템과 선택 사양인 모니터 ( 사용되는 경우 ) 의 전원 단추를 누릅니다 .
그러면 전원 표시등이 켜집니다 .
시스템 시작 안내서 53

베젤 ( 선택 사양 ) 설치
베젤 ( 선택 사양 ) 을 설치합니다 .
지원되는 운영 체제
시스템에는 Microsoft® Windows® Storage Server 2008 Standard x64
Edition 이 이미 설치되어 있습니다 .
주 : 지원되는 운영 체제에 대한 최신 정보는 www .dell.com 을 참조하십시오 .
기타 필요한 정보
경고 : 시스템과 함께 제공되는 안전 및 규제 정보를 참조하십시오 . 보증 정
보는 본 설명서에 포함되어 있거나 별도의 문서로 제공됩니다 .
•
랙 솔루션과 함께 제공되는 랙 설명서에는 시스템을 랙에 설치하는 방
기술되어 있습니다
법이
하드웨어 소유자 설명서에서는 시스템 기능에 대한 정보를 제공하고 시
•
문제 해결 방법 및
스템
니다
. 이
문서는 support.dell.com
운영 체제, 시스템 관리 소프트웨어, 시스템 업데이트 및 시스템과 함께
•
구입한 시스템 구성요소와 관련된 설명서 및 도구를 비롯하여 시스템을
구성 및 관리하는 데 필요한 설명서 및 도구를 제공하는 모든 매체가 시
스템과
함께
제공됩니다
주 : support.dell.com 에서 업데이트를 항상 확인하십시오 . 업데이트에
는 최신 정보가 수록되어 있으므로 다른 문서를 읽기 전에 반드시 먼저
읽어보시기 바랍니다 .
.
시스템 구성요소 설치 또는 교체 방법을 설명합
에서 온라인으로 볼 수 있습니다
.
.
54 시스템 시작 안내서

기술 지원 얻기
본 안내서의 절차가 이해되지 않거나 시스템이 제대로 작동하지 않을 경우
에는 하드웨어 소유자 설명서를 참조하십시오 . Dell™ 은 포괄적인 하드웨
어 교육 및 인증 과정을 제공합니다 . 자세한 내용은 www.dell.com/training
을 참조하십시오 . 지역에 따라 이 서비스가 제공되지 않을 수도 있습니다 .
NOM 정보 ( 멕시코에만 해당 )
다음 정보는 공식 멕시코 표준 (NOM: Official Mexican Standards) 의 요구
사항을 준수하는 본 문서에 기술된 장치에 대한 내용입니다 .
수입업체 :
모델 번호 :
공급 전압 :
주파수 :
전류 소비량 :
E02S
100~240VAC
50/60Hz
7.0–3.5A
시스템 시작 안내서 55

기술 사양
프로세서
프로세서 유형 한 개 또는 두개의 4 중 코어 Intel
5500 시리즈
확장 버스
버스 유형
라이저 카드를 통해 연결된 확장 슬롯 :
라이저
라이저
1(중앙
2(왼쪽
라이저)전체 높이 , 9.5 인치 길이 , x4 링크 1 개 ( 슬롯 1)
라이저)전체 높이 , 9.5 인치 길이 , x8 링크 2 개 ( 슬롯 3, 4)
PCI Express Generation 2
주 :
이 슬롯은
로우 프로파일 , 9.5 인치 길이 , x4 링크 1 개 ( 슬롯 2)
또는
전체 높이 , 9.5 인치 길이 , x16 링크 1 개 ( 슬롯 3)
12.2
인치로 업그레이드할 수 있습니다
주 : 시스템에 설치된 두 개의 카드 중 첫 번째로 설치
된 카드에만 최대 25W 가 지원되며 이후 시스템에 추
가로 설치되는 카드는 15W 이하여야 합니다 .
메모리
아키텍처 800, 1066 또는 1333MHz DDR3 등록된 또는 버퍼되
지 않는 ECC(Error Correcting Code) DIMM. 고급
ECC 또는 메모리 최적화 작업을 지원합니다 .
메모리 모듈
소켓
메모리 모듈
용량
최소 RAM 단일 프로세서가 제공되는 1GB( 프로세서 당
240 핀 18 개
1GB 또는 2GB UDIMM 및 2GB, 4GB,
또는 8GB RDIMM
( 용량에 따라 단일 , 2 중 , 4 중
1DIMM)
®
Xeon® 프로세서
등급 결정 )
.
최대 RAM 96GB(4 중 등급의 8GB RDIMM), 144GB(2 중 등급의
8GB RDIMM) 또는 24GB(2GB 의 UDIMM)
56 시스템 시작 안내서

드라이브
하드 드라이브 최대 6 개의 3.5 인치 내장 핫 스왑 가능한 SAS 또는
SATA 하드 드라이브 ( 선택 사양인 내장형 테이프 드
라이브가 지원되지 않음 )
디스켓 드라이브 외장형 USB 1.44MB 드라이브 ( 선택 사양 )
광학 드라이브 내장형 슬림라인 SATA DVD-ROM 또는 DVD+RW
드라이브 1 개 ( 선택 사양 )
외장형 USB DVD( 선택 사양 )
주 : DVD 장치는 데이터 전용입니다 .
플래시 드라이브 내장 SD(Secure Digital) 메모리 카드 ( 선택 사양 )
외장형 SD 메모리 카드 ( 선택 사양 )
커넥터
후면
NIC
직렬
USB
비디오
외장형
(선택 사양)
전면
비디오
USB
내부
USB
내장형
(선택 사양)
VFlash
SD
모듈
카드
RJ-45 10/100/1000Mbps 이더넷 4 개
9 핀 , DTE, 16550 호환
4 핀 2 개 , USB 2.0 호환
15 핀 VGA
후면 패널에 플래시 메모리 카드 슬롯 1 개
15 핀 VGA
4 핀 2 개 , USB 2.0 호환
4 핀 1 개 , USB 2.0 호환
내장형 플래시 메모리 카드 슬롯 1 개
비디오
비디오 유형 통합 Matrox G200
비디오 메모리 8MB 공유
시스템 시작 안내서 57

전원
AC 전원 공급 장치 ( 전원 공급 장치당 )
와트
전압
열 손실
최대 유입
전류
전지
시스템 전지
RAID 전지
선택 사양
(
규격
높이 8.64cm(3.4 인치 )
너비 랙 래치가 있는 경우 48.24cm(18.99 인치 )
깊이 전원 공급 장치 및 베젤이 있는 경우 72.06cm
무게 ( 최대 구성 시 )
무게 ( 비어 있을 경우 )
)
870W( 고용량 )
570W/200840KB( 저용량 )
90–264VAC, 자동 범위 조정 , 47-63Hz
2968.6BTU/hr 최대 ( 고용량 )
1944.9BTU/hr 최대 ( 저용량 )
일반적인 라인 상태 및 전체 시스템의 주변 작동 범위
에서는 유입 전류가 10ms 이하인 동안 전원 공급 장치
마다 55A 에 달할 수 있습니다 .
CR 2032 3.0-V 리튬 코인 셀
3.7-V 리튬 이온 전지 팩
랙 래치가 없는 경우 44.31cm(17.4 인치 )
(28.4 인치 )
전원 공급 장치 및 베젤이 없는 경우 68.07cm
(26.8 인치 )
26.1kg(57.54lb)
17.7kg(39lb)
58 시스템 시작 안내서

환경
주 : 특정 시스템 구성을 위한 환경 측정에 대한 자세한 내용은
www.dell.com/environmental_datasheets 를 참조하십시오 .
온도
작동
10°~35°C(50°~95°F), 시간당 최고 10°C 의 온도 변화 기
준
주 : 2,950 피트 이상의 고도에서는 최대 작동 온도가
550 피트당 1°F 씩 감쇄됩니다 .
보관
상대 습도
작동
보관
최대 진동
작동
보관
최대 충격
작동
보관
고도
작동
–40°~65°C(–40°~149°F), 시간당 최고 20°C 의 온도 변화
기준
20%~80%( 비응축 ), 시간당 최고 10% 의 습도 변화 기준
5%~95%( 비응축 ), 시간당 최고 10% 의 습도 변화 기준
작동 방향에서 5 분 동안 5–350Hz 에서 0.26Gms
모든 방향에서 10 분 동안 10–250Hz 에서 1.54Gms
2.6ms +/- 10% 펄스 기간에 모든 작동 방향에서
31G +/- 5% 의 반사인 충격
2ms +/- 10% 펄스 기간에 6 면 모두에서 71G +/- 5% 의 반
사인 충격
6 개의 모든 면에서 235in/sec 이상의 속도 변화를 가진
27G 사각파 충격
–16~3,048m(–50~10,000ft)
주 : 2,950 피트 이상의 고도에서는 최대 작동 온도가 550
피트당 1°F 씩 감쇄됩니다 .
보관
–16~10,600m(–50~35,000ft)
시스템 시작 안내서 59

60 시스템 시작 안내서


Printed in China
Dicetak di China
Printed on Recycled Paper
www.dell.com | support.dell.com
 Loading...