

Page 1

Dell™ PowerVault™
NX1950 Systems
Getting Started With
Your System
Začínáme se systémem
Guide de mise en route
Erste Schritte mit dem System
Τα πρώτα βήµατα Με το σύστηµά σας
Rozpoczęcie pracy z systemem
Начало работы с системой
Model EMU01
Procedimientos iniciales con el sistema
www.dell.com | support.dell.com
Page 2

Page 3

Dell™ PowerVault™
NX1950 Systems
Getting Started With
Your System
www.dell.com | support.dell.com
Page 4

Notes, Notices, and Cautions
NOTE: A NOTE indicates important information that helps you make better use of your computer.
NOTICE: A NOTICE indicates either potential damage to hardware or loss of data and tells you how to avoid the problem.
CAUTION: A CAUTION indicates a potential for property damage, personal injury, or death.
_________________
Information in this document is subject to change without notice.
© 2006 Dell Inc. All rights reserved.
Reproduction in any manner whatsoever without the written permission of Dell Inc. is strictly forbidden.
Trademarks used in this text: Dell, the DELL logo, and PowerVault are trademarks of Dell Inc.; Intel and Xeon are registered trademarks
of Intel Corporation; Microsoft and Windows are registered trademarks of Microsoft Corporation.
Other trademarks and trade names may be used in this document to refer to either the entities claiming the marks and names or their products.
Dell Inc. disclaims any proprietary interest in trademarks and trade names other than its own.
Model EMU01
September 2006 P/N KN401 Rev. A00
Page 5

System Features
The major hardware and software features of your system include:
• Two Dual Core Intel® Xeon® processor 5000 Sequence.
• 4 GB of 667 MHz, Fully Buffered DIMMs (FBD), upgradable to a maximum of 8 GB.
The system also features redundant memory, which provides memory sparing or memory mirroring.
Either feature is available if eight identical memory modules are installed.
• 15000 rpm hard drives configured into a RAID1 array for fault tolerant operating system operations.
• A slimline DVD-ROM, or DVD-ROM/ CD-RW drive.
• Two hot-pluggable, 670-W power supplies in a 1 + 1 redundant configuration.
• Four fan modules, each comprised of two dual-rotor fans, for a total of eight cooling fans.
The system board includes the following features:
• Two riser cards (left and center risers), each providing a x8 lane width PCI-Express expansion slot.
• Dedicated PCI slot for an integrated RAID controller card with 256 MB of
a RAID battery.
• Four integrated Gigabit Ethernet NICs capable of supporting 10-Mbps, 100-Mbps, 1000-Mbps,
and 2-Gbps data rates.
• Two x4 SAS ports for connectivity to storage subsystem or two 4-Gbps Fibre Channel ports
for connectivity to a storage area network (SAN).
• Four USB 2.0-compliant connectors (two on the front and two on the back)
support for
• Remote access controller (RAC) for remote systems management.
•
An integrated VGA-compatible video subsystem with an ATI ES1000, 33-MHz PCI video
controller. This video subsystem contains a minimum of 16MB of graphics memory with support
for 2D graphics. Maximum resolution is 1600x1200 with 65,536 colors; true-color graphics are
supported in the following resolutions: 640 x 480, 800 x 600, 1024 x 768, 1280 x 1024. When the
optional remote access card is installed, the maximum video resolution is 1280x1024
• Systems management circuitry that monitors operation of the system fans as well as critical system
voltages and temperatures. The systems management circuitry works in conjunction with the systems
management software.
• Back-panel connectors include serial, video, two USB connectors, four NIC connectors, two SAS
(or Fibre Channel in gateway mode connectors), and one NIC connector for RAC access.
• Front-panel connectors include a video and two USB connectors.
• Front-panel 1x5 LCD for system ID and error messaging.
For more information about specific features, see Technical Specifications.
a diskette drive, a CD-ROM drive, a keyboard, a mouse, or a USB flash drive.
cache memory and
capable of external
.
Getting Started With Your System 3
Page 6
Supported Operating System
Your system supports Microsoft® Windows® Unified Data Storage Server 2003 Standard and Enterprise
x64 Editions operating system.
Other Information You May Need
CAUTION: The Product Information Guide provides important safety and regulatory information.
Warranty information may be included within this document or as a separate document.
• The
• The
• CDs included with your system provide documentation and tools for configuring and managing
• Updates are sometimes included with the system to describe changes to the system, software,
• Release notes or readme files may be included to provide last-minute updates to the system or
Rack Installation Guide
describes how to install your system into a rack.
Hardware Owner’s Manual
to troubleshoot the system and install or replace system components. This document may be found
on the CDs that came with your system or at
your system.
and/or documentation.
NOTE: Always check for updates on support.dell.com and read the updates first because they often
supersede information in other documents.
documentation or advanced technical reference material intended for experienced users or technicians.
or
Rack Installation Instructions
provides information about system features and describes how
support.dell.com
included with your rack solution
.
Obtaining Technical Assistance
If you do not understand a procedure in this guide or if the system does not perform as expected,
see your Hardware Owner’s Manual.
Dell Enterprise Training and Certification is available; see www.dell.com/training for more information.
This service may not be offered in all locations.
Installation and Configuration
CAUTION: Before performing the following procedure, read and follow the safety instructions and important
regulatory information in your Product Information Guide.
This section describes the steps to set up your system for the first time.
4 Getting Started With Your System
Page 7

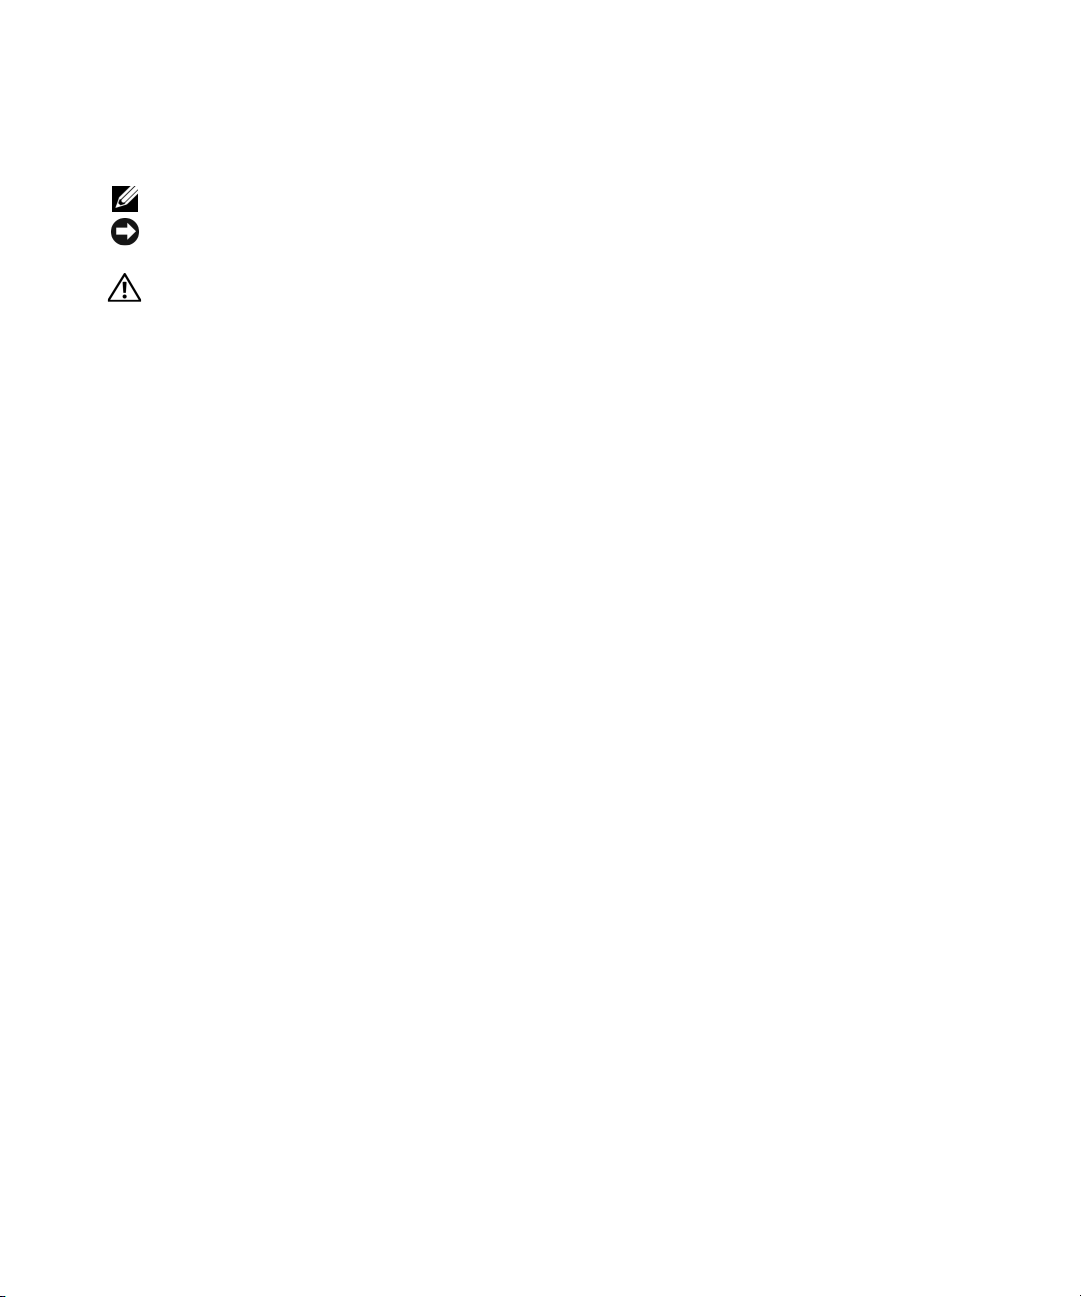
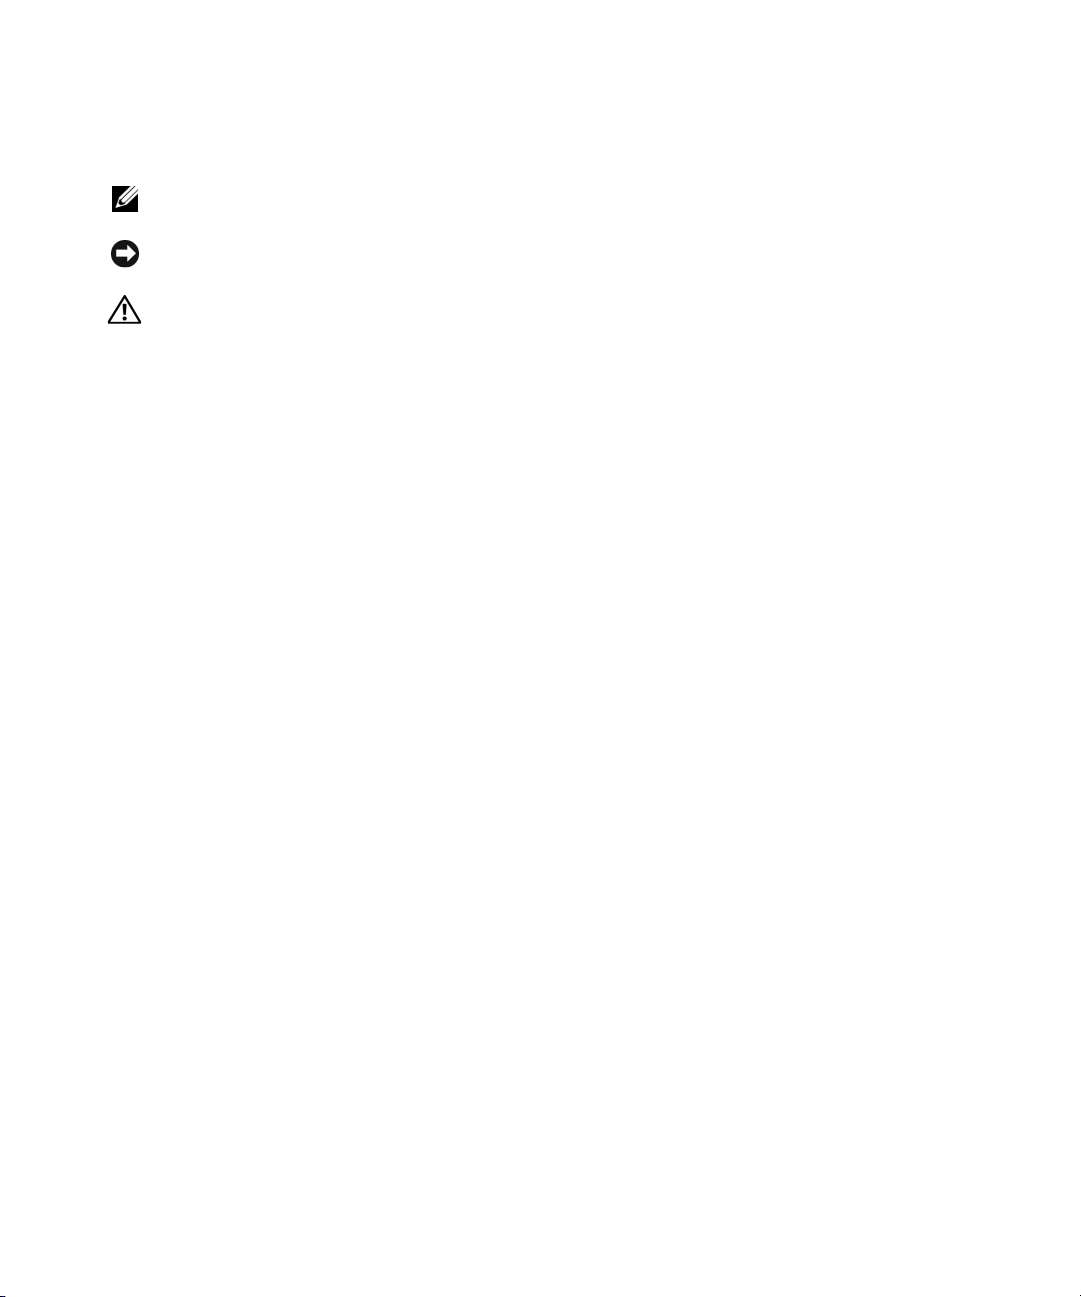
Unpacking the System
Unpack your system and identify each item.
Keep all shipping materials in case you need them later.
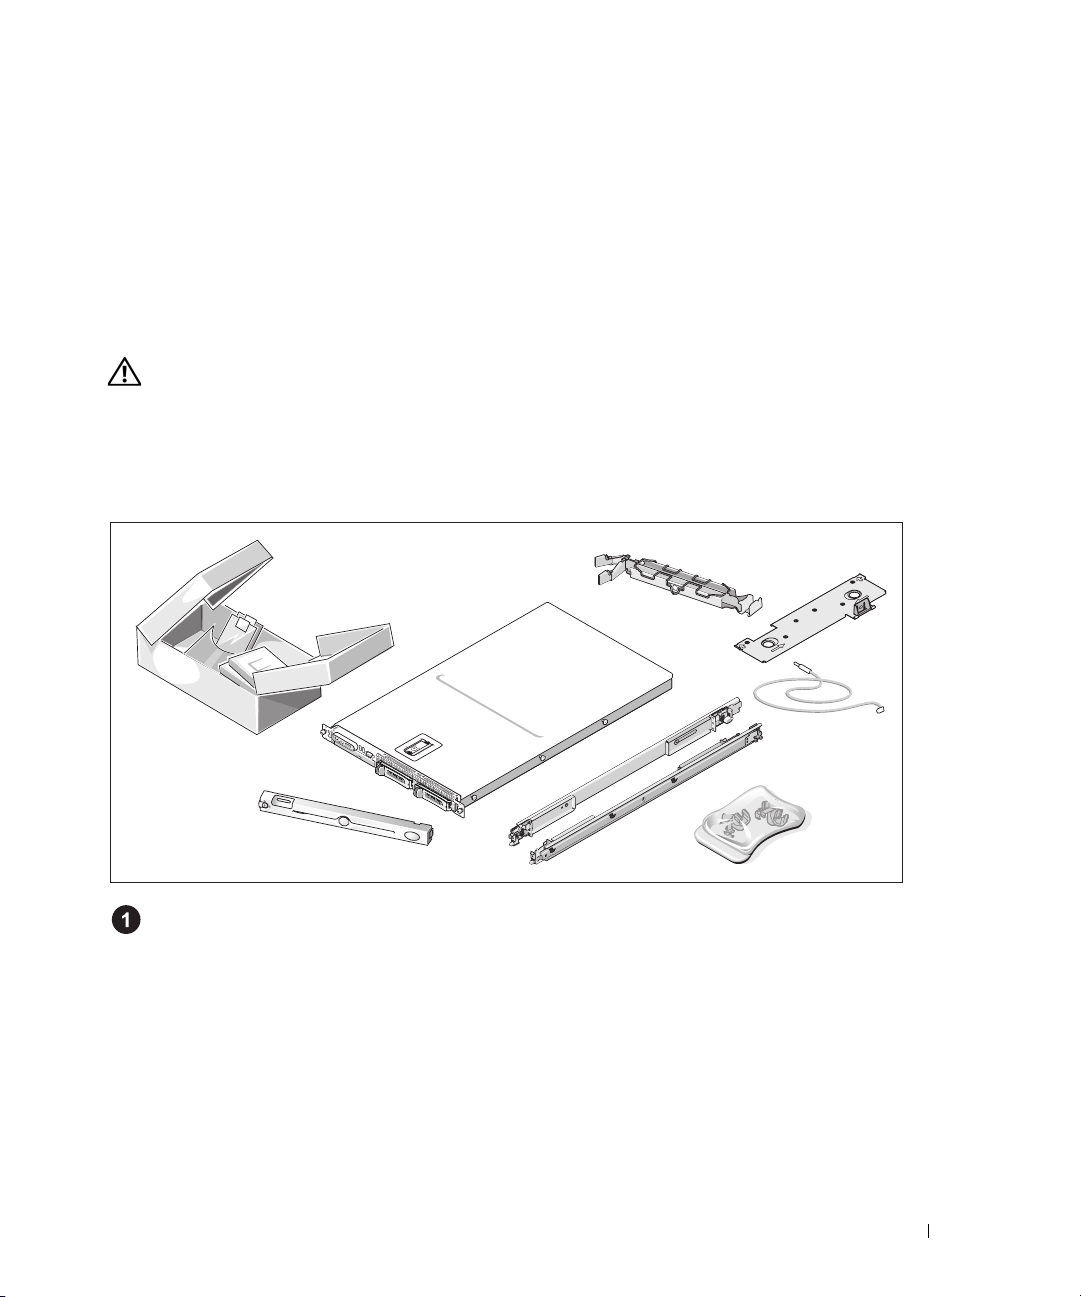
Installing the Rail and System in a Rack
Install the system in the rack once you have read the "Safety Instructions" located in the rack
installation documentation for your system.
See your rack installation documentation for instructions on installing your system in a rack.
Getting Started With Your System 5
Page 8
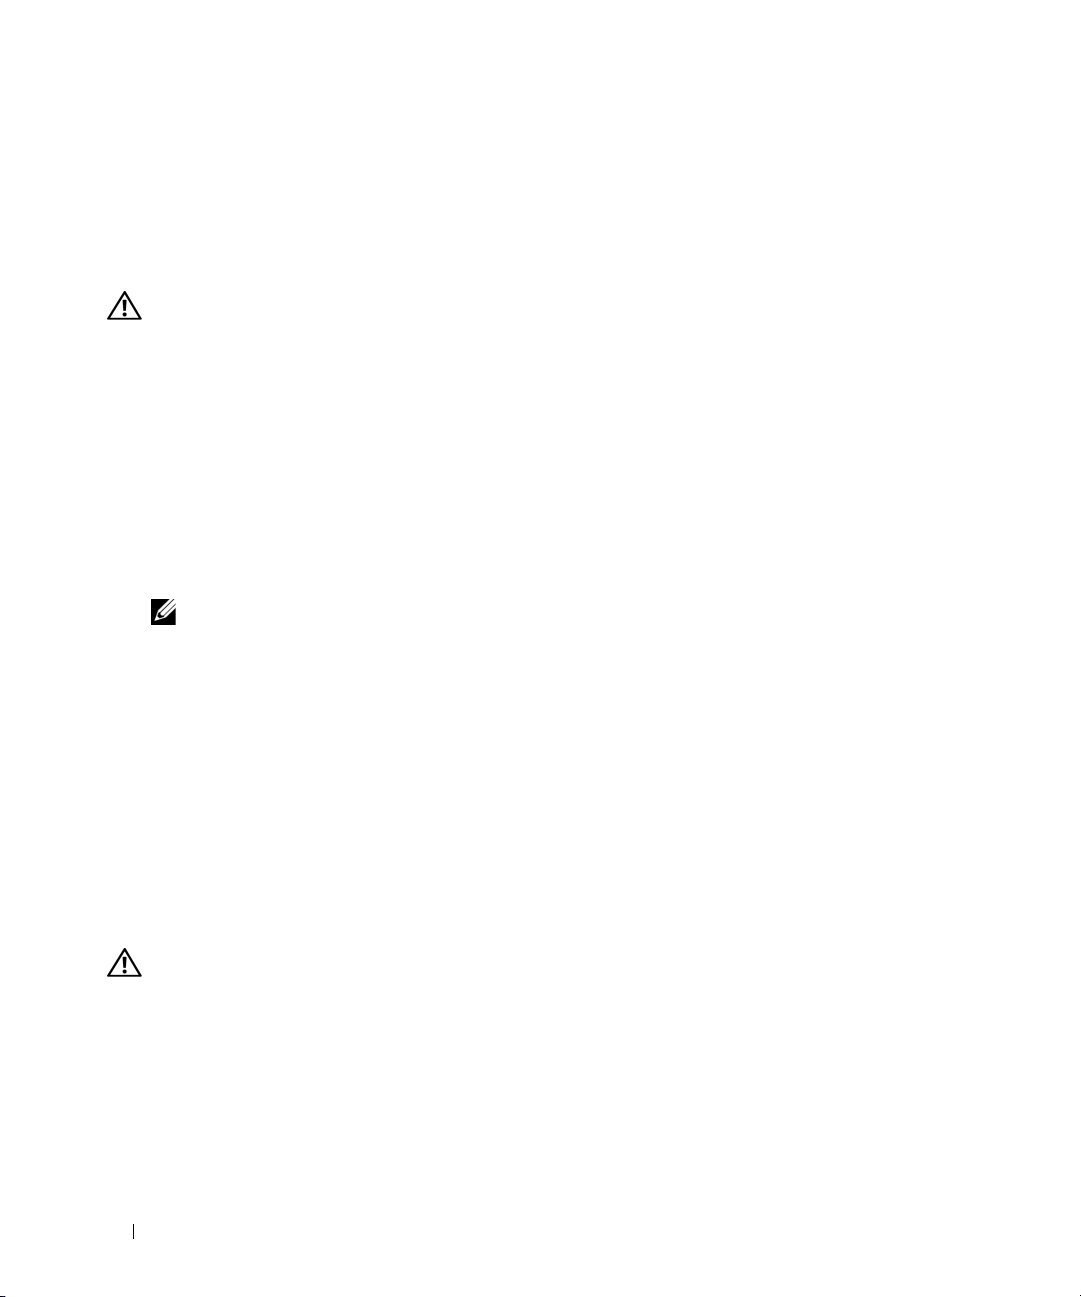
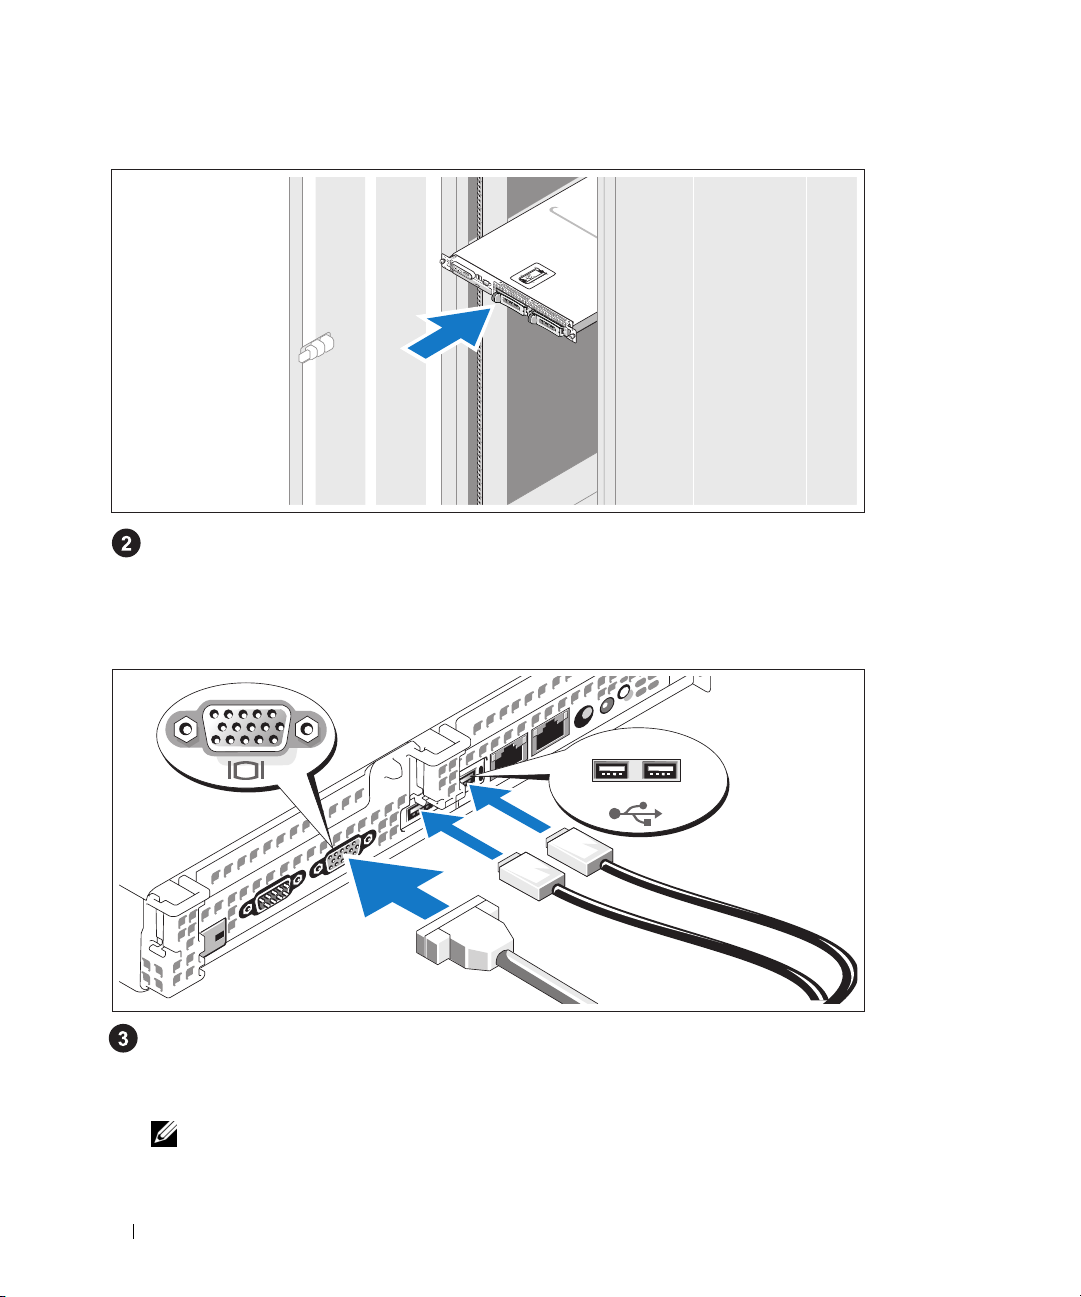
Connecting the Keyboard, Mouse, and Monitor
Connect the keyboard, mouse, and monitor (optional).
The connectors on the back of your system have icons indicating which cable to plug into each
connector. Be sure to tighten the screws (if any) on the monitor's cable connector.
NOTE: If you simultaneously connect two monitors to the system, using the front and rear video
connections, the video will default to the front since only one display can operate at a time.
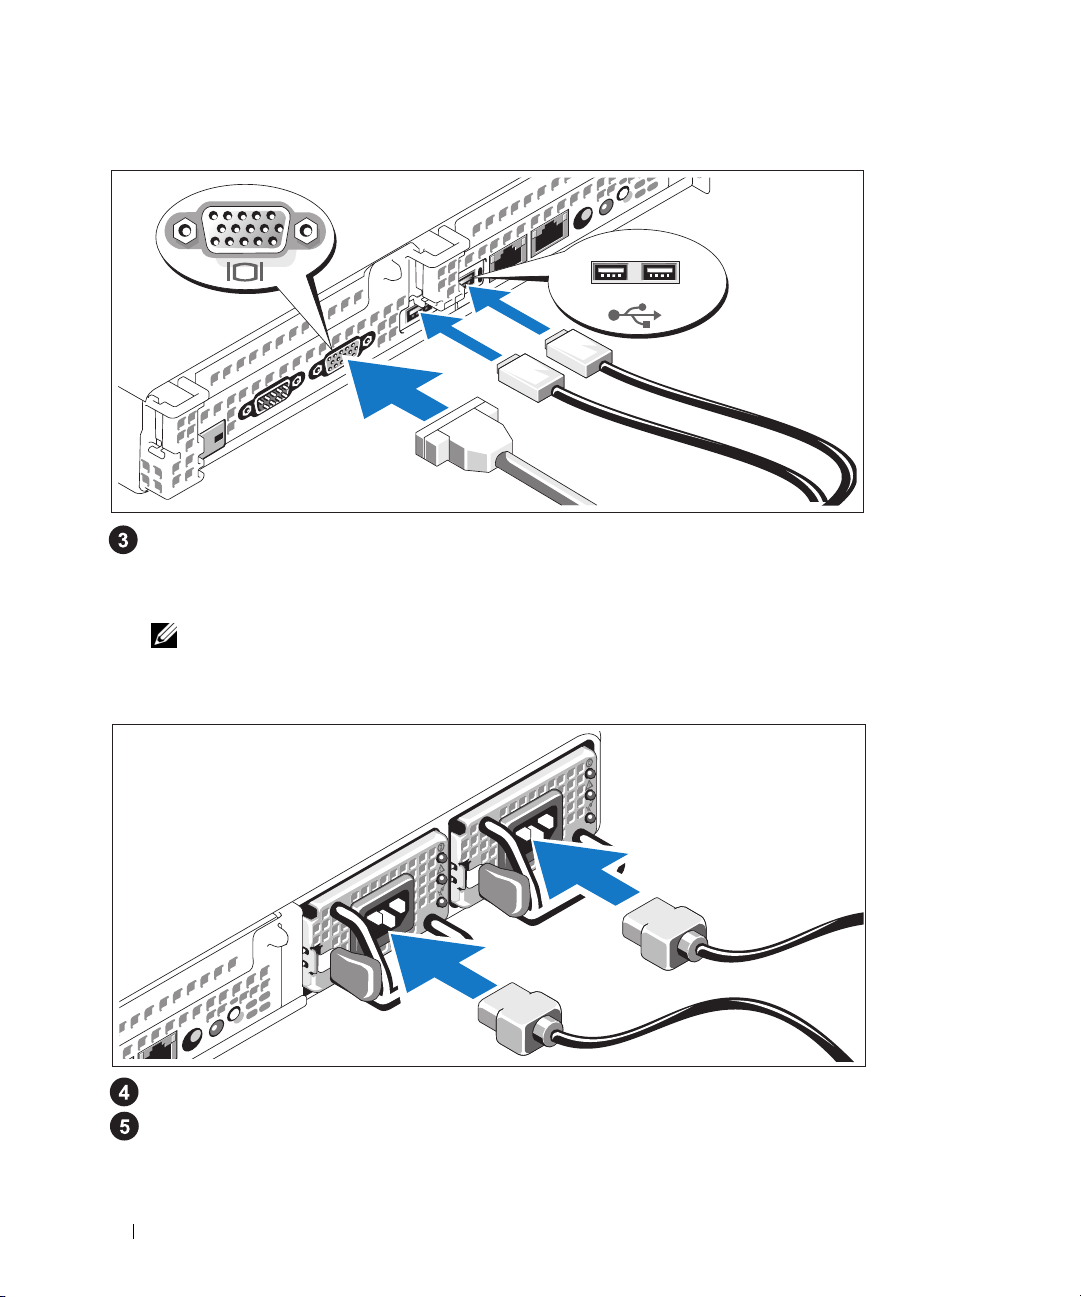
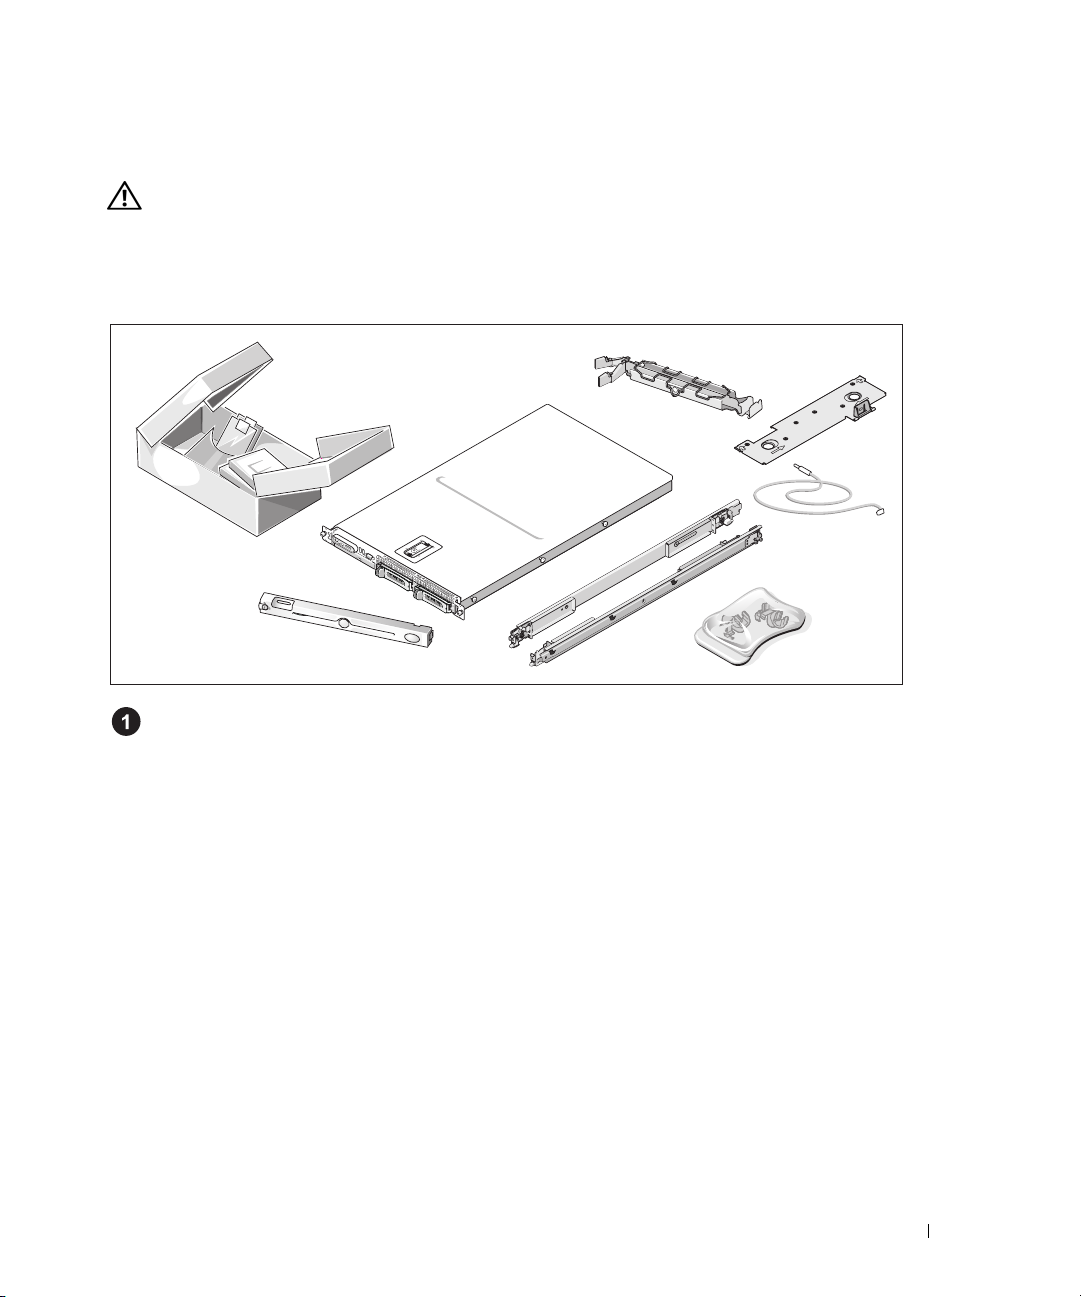
Connecting the Power
Connect the system’s power cable(s) to the system.
Plug the other end of the cable into a grounded electrical outlet or a separate power source
such as an uninterrupted power supply (UPS) or a power distribution unit (PDU).
6 Getting Started With Your System
Page 9
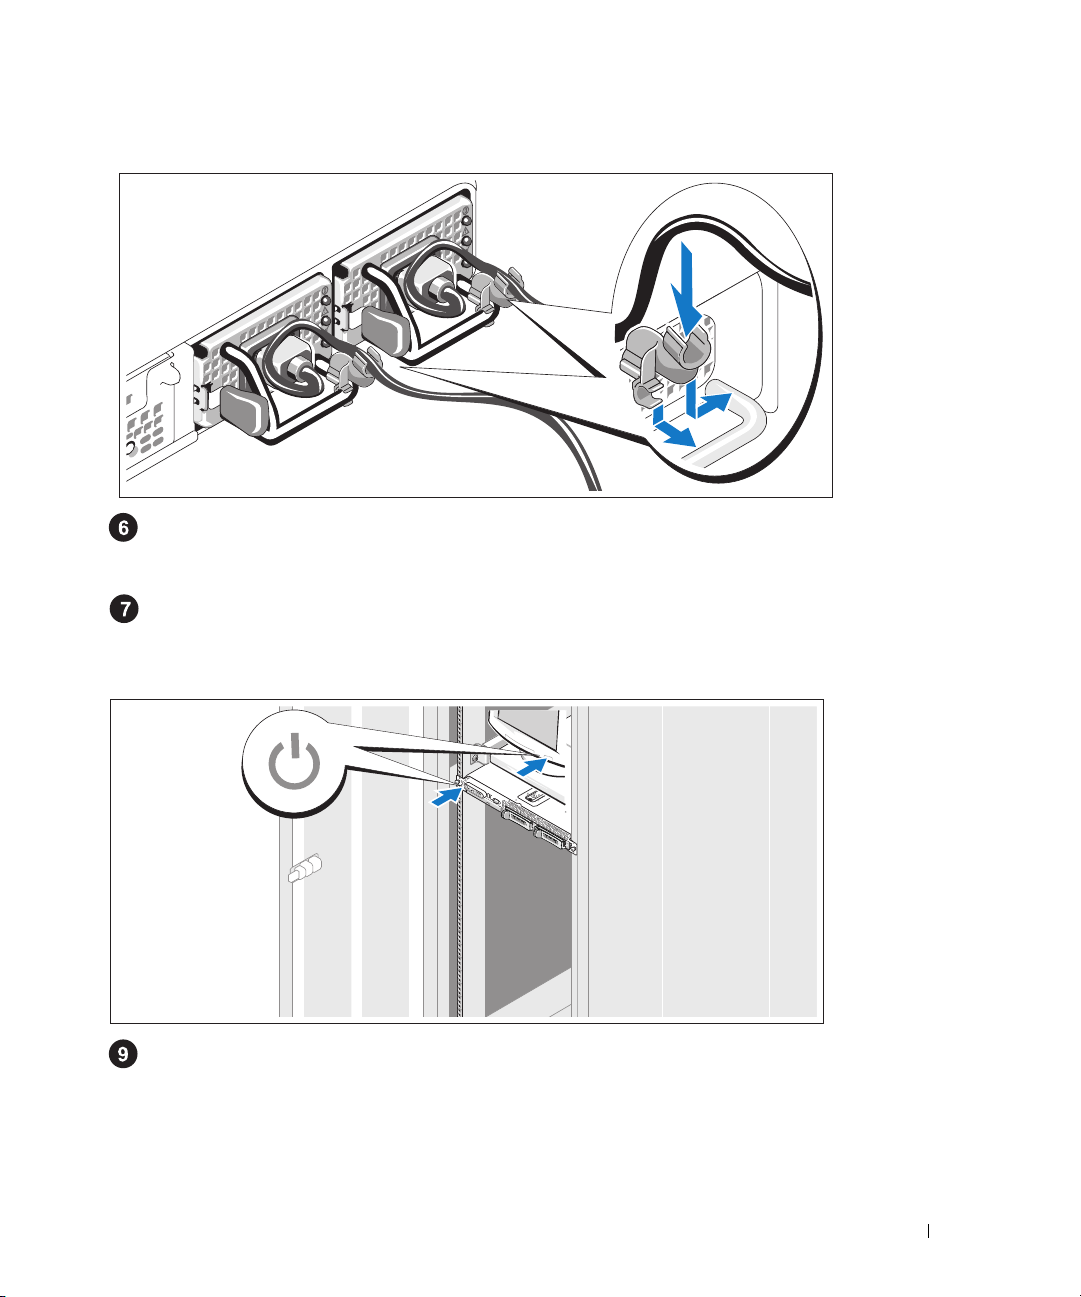
Installing the Power Cord Retention Bracket (Optional)
Attach the power cord retention bracket on the right bend of the power supply handle. Bend the
system power cable into a loop as shown in the illustration and attach to the bracket’s cable clasp.
Repeat the procedure for the second power supply.
Plug the other end of the power cables into a grounded electrical outlet or a separate power source
such as an UPS or a PDU.
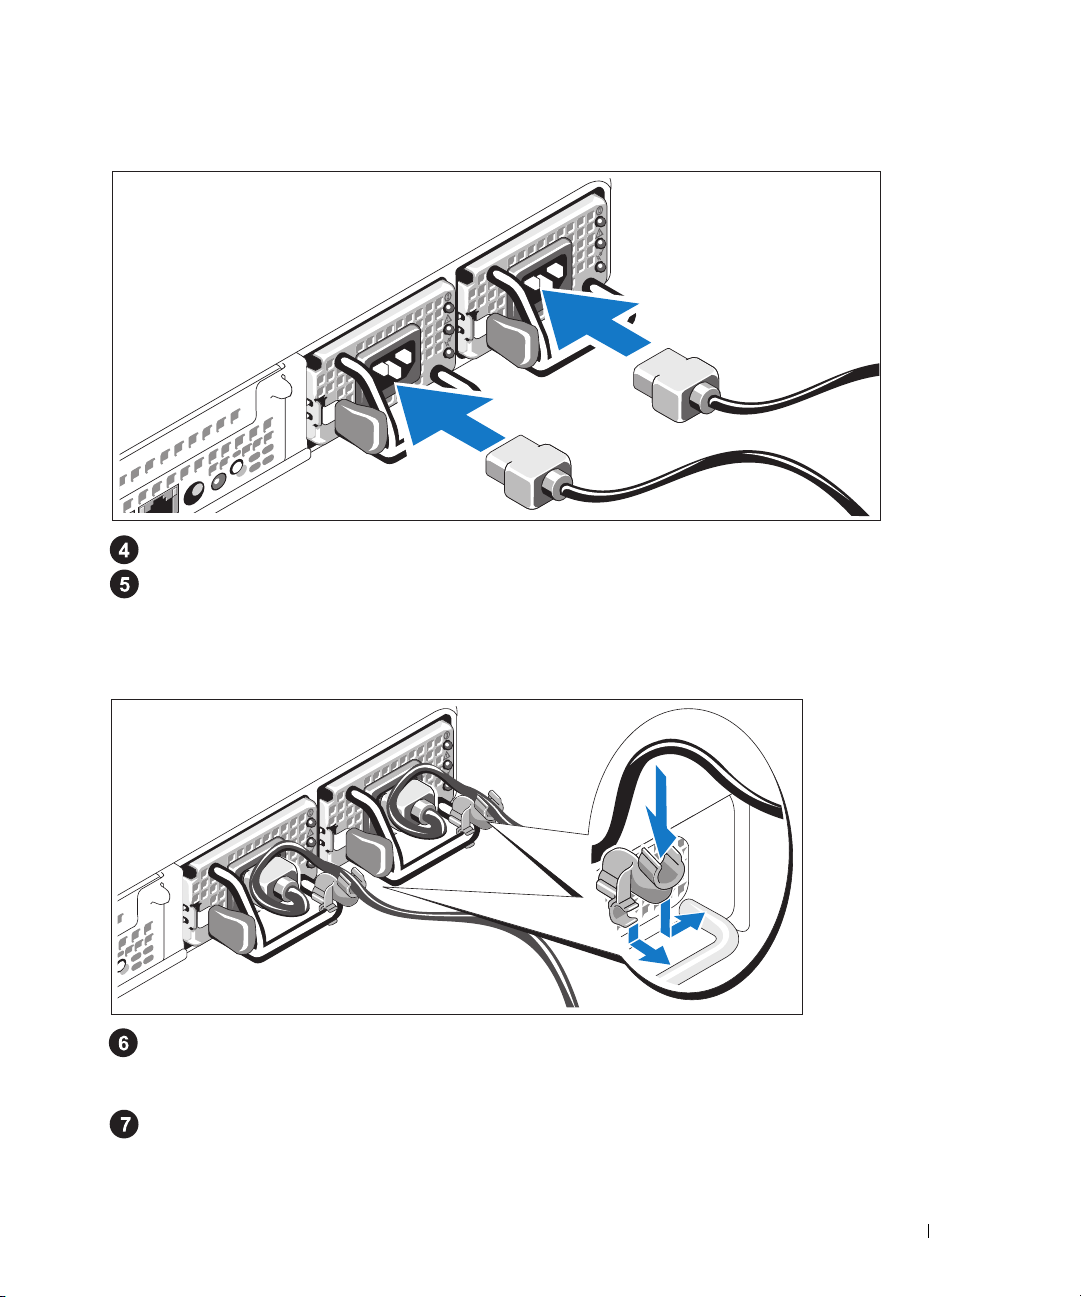
Turning on the System
Turn on the system and monitor (optional).
Press the power button on the system and the monitor. The power indicators should light.
Adjust the monitor's controls until the displayed image is satisfactory.
Getting Started With Your System 7
Page 10
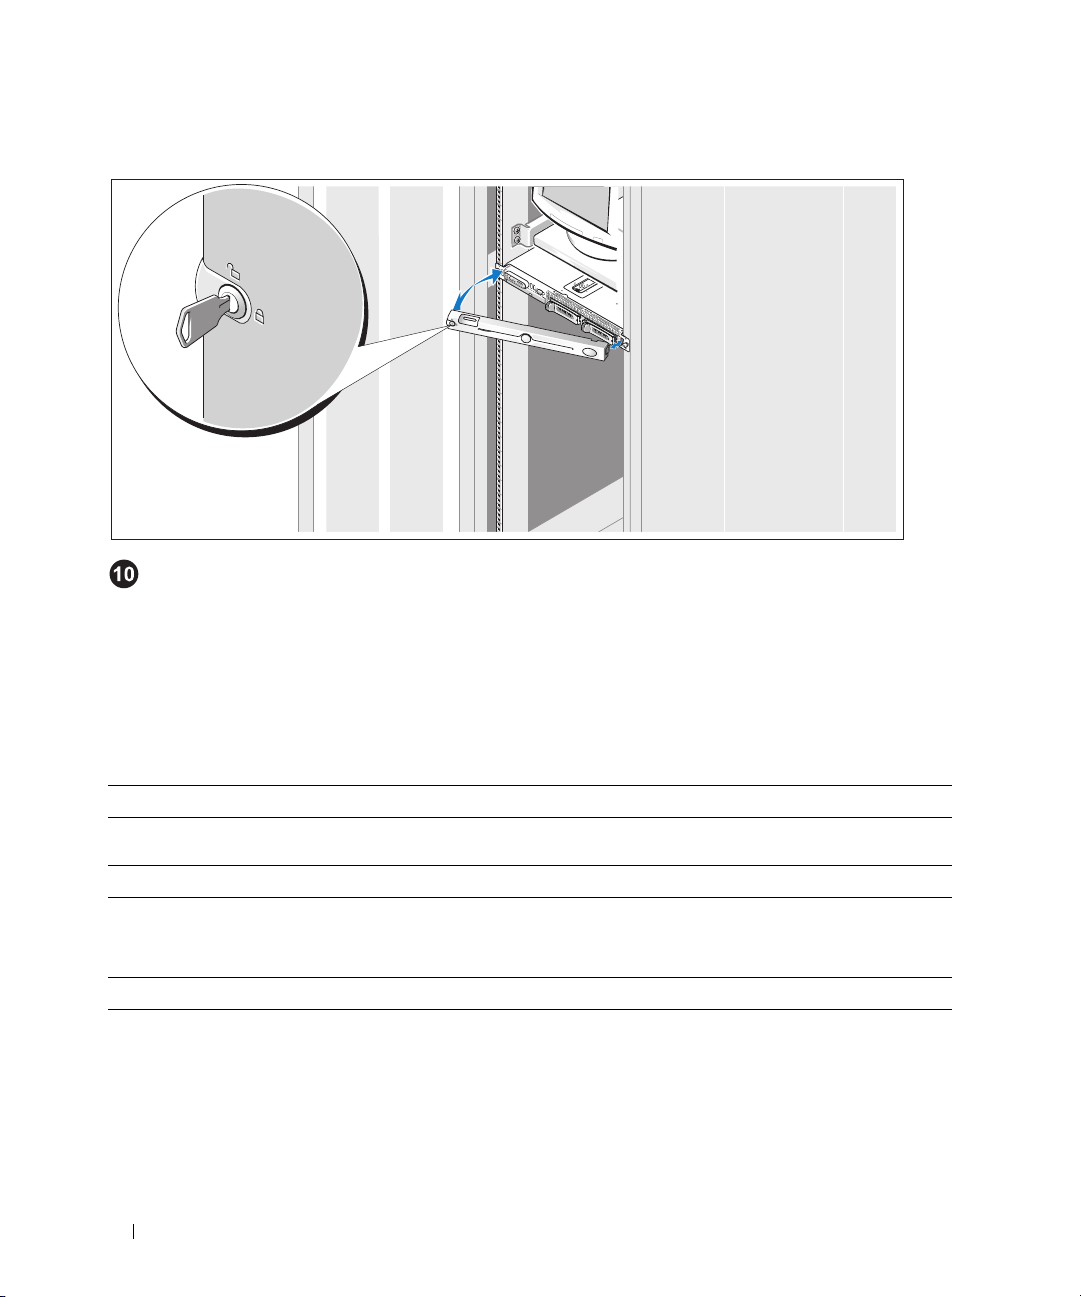
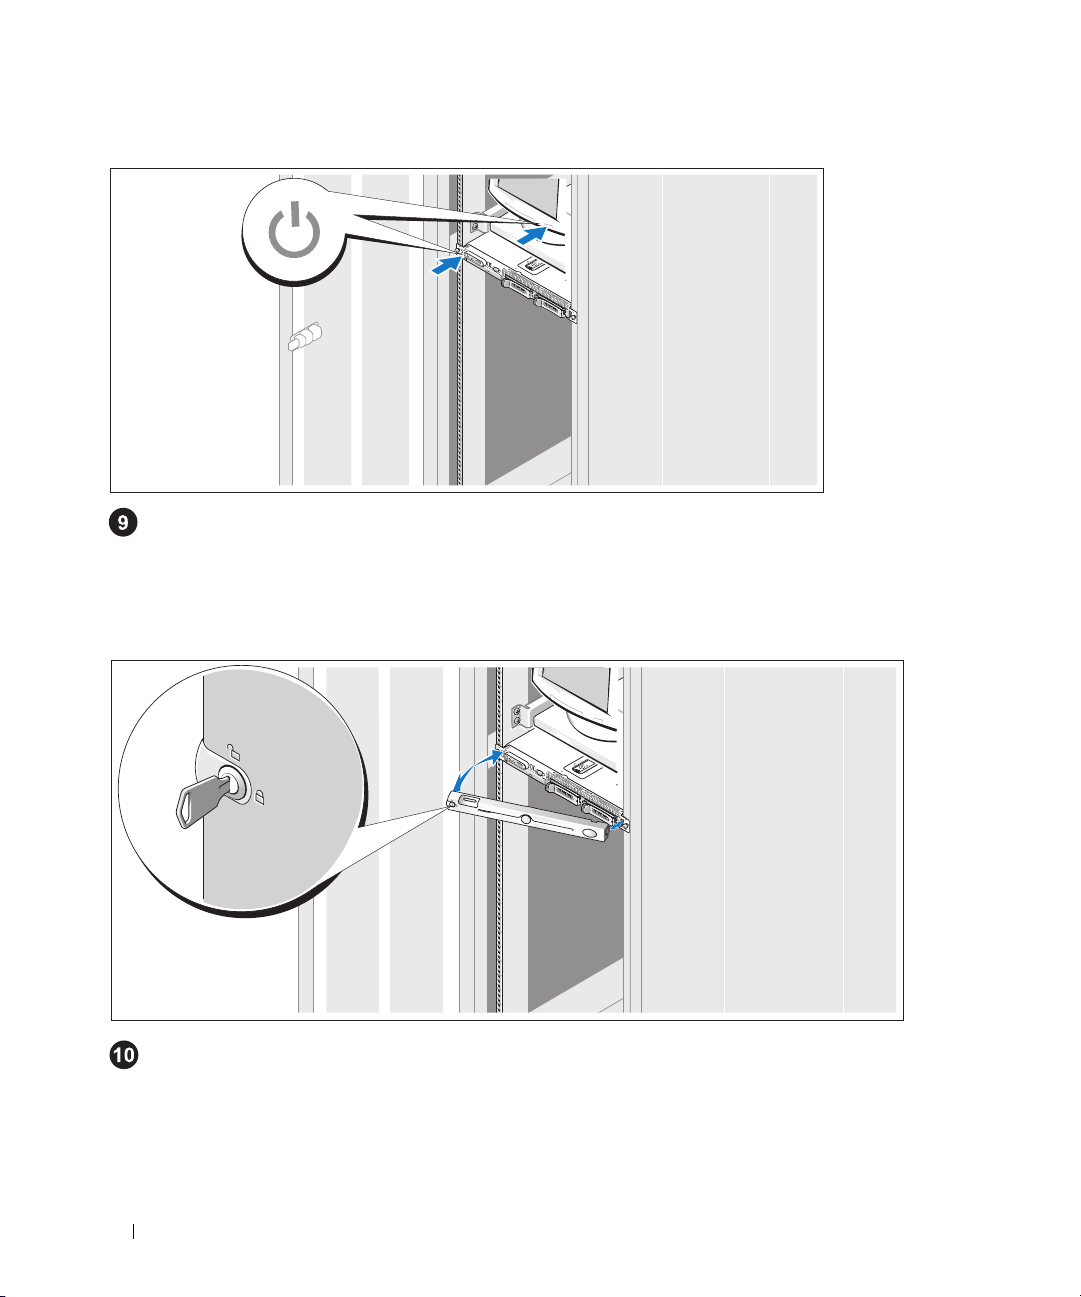
Installing the Bezel
Install the bezel (optional).
Complete the 0perating System Setup
The operating system is preinstalled on your system. To reinstall the operating system,
see the documentation that is shipped along with your system.
Technical Specifications
Processor
Processor type Two dual-core Intel Xeon
Expansion Bus
Bus type PCIe
PCIe Risers Two x8 lane width
Memory
Architecture PC2-5300 667 MHz fully-buffered DIMMs with ECC protection,
with two-way lockstep operation
Memory module sockets Eight 240-pin
Minimum RAM 4 GB (four 1 GB modules)
Maximum RAM 8 GB
8 Getting Started With Your System
processors 5100 Sequence
Page 11

Drives
SAS hard drives Two 3.5-inch, internal, hot-plug, (optional) with backplane support
Optical drive One slimline DVD-ROM/CD-RW combination, or DVD-ROM
NOTE: DVD devices are data only.
Connectors
Back
NIC
Storage Two x4 SAS or two LC Fibre Channel ports
RAC
Serial
USB
Video
Front
Video
USB
Video
Video type ATI ES1000 video controller; VGA connector
Video memory 16 MB of DDR SDRAM
Four RJ-45 (for integrated 1-GB NICs)
One RJ-45
9-pin, DTE, 16550-compatible
Two 4 pin, USB 2.0 compliant
15-pin VGA
15 pin-VGA
Two 4 pin, USB 2.0 compliant
Power
AC power supply (per power supply)
Wattage
Vo lt ag e
Heat dissipation
Maximum inrush current
Batteries
System battery
RAID battery (optional)
670 W
90–264 VAC, autoranging, 47-63 Hz, 10.0 A (at 90 VAC)
2697 BTU/hr (maximum)
Under typical line conditions and over the entire system ambient
operating range, the inrush current may reach 55 A per power supply
for 10 ms or less.
CR 2032 3.0-V lithium ion coin cell
4.1-V lithium ion battery pack
Getting Started With Your System 9
Page 12

Physical
Height 4.29 cm (1.69 in)
Width 48.26 cm (19 in)
Depth 76.2 cm (30 in)
Weight (maximum configuration) 17.69 kg (39 lb)
Environmental
NOTE: For additional information about environmental measurements for specific system configurations,
see www.dell.com/environmental_datasheets.
Te mp e ra t ur e
Operating
Storage
Relative humidity
Operating
Storage
Maximum vibration
Operating
Storage
Maximum shock
Operating
Storage
Altitude
Operating
Storage
10° to 35°C (50° to 95°F)
–40° to 65°C (–40° to 149°F)
8% to 85% (noncondensing) with a maximum humidity gradation
of 10% per hour
5% to 95% (noncondensing)
0.25 G at 3–200 Hz for 15 min
0.5 G at 3–200 Hz for 15 min
One shock pulse in the positive z axis (one pulse on each side
of the system) of 41 G for up to 2 ms
Six consecutively executed shock pulses in the positive and negative
x, y, and z axes (one pulse on each side of the system) of 71 G
for up to 2 ms
–16 to 3048 m (–50 to 10,000 ft)
–16 to 10,600 m (–50 to 35,000 ft)
10 Getting Started With Your System
Page 13

Dell™ PowerVault™
NX1950 Systems
Začínáme se systémem
www.dell.com | support.dell.com
Page 14
Poznámky, upozornění a výstrahí
POZNÁMKA: POZNÁMKA označuje důležitou informaci, s jejíž pomocí lépe využijete svůj počítač.
UPOZORNĚNÍ: UPOZORNĚNÍ poukazuje na možnost poškození hardwaru nebo ztráty dat a poskytuje
návod, jak se danému problému vyhnout.
POZOR: Výstraha („POZOR“) poukazuje na riziko poškození majetku, poranění nebo smrtelného
úrazu.
_________________
Informace obsažené v tomto dokumentu podléhají změnám bez předchozího upozornění.
© 2006 Dell Inc. Všechna práva vyhrazena.
Jakákoli reprodukce tohoto dokumentu je bez písemného souhlasu společnosti Dell Inc. přísně zakázána.
Ochranné známky použité v tomto textu: Dell, DELL logo, a PowerVault jsou obchodní značky Dell Inc.; Intel a Xeon jsou registrované
obchodní značky Intel Corporation; Microsoft a Windows jsou registrované obchodní značky Microsoft Corporation.
V tomto dokumentu mohou být použity další ochranné známky a obchodní názvy odkazující na subjekty, kterým tyto známky či názvy patří,
nebo na jejich výrobky. Společnost Dell Inc. se zříká jakýchkoli vlastnických zájmů o jiné než vlastní ochranné známky a obchodní názvy.
Model EMU01
Září 2006 P/N KN401 Rev. A00
Page 15

Systémové funkce
Hlavní hardwarové a softwarové funkce systému jsou:
•
Jeden nebo dva dvoujádrové procesory řady Intel® Xeon® 5000.
•
4 GB 667 MHz, Fully Buffered DIMMs (FBD), rozšiřitelné na maximálně 8 GB.
Systém pracuje i s redundantní pamětí, která umožňuje sparing a zrcadlení paměti. Každá z těchto funkcí
je k dispozici v případě, že je nainstalováno osm identických pamět’ových modulů.
•
Pevné disky s 15000 ot/min konfigurované do svazku RAID1 pro operace tolerující chyby operačního
systému.
•
Mechanika slimline DVD-ROM, nebo DVD-ROM/ CD-RW.
•
Dva hot-plug napájecí zdroje 670 W v konfiguraci 1 + 1 záložní.
•
Čtyři ventilátorové moduly, každý modul sestává ze dvou ventilátorů s duálním rotorem, celkem tedy osm
chladicích ventilátorů.
Systémová deska má následující funkce:
•
Dvě riser karty (levá a střední), každá poskytující rozšiřující slot PCI Express x8 lane.
•
Vyhrazený slot PCI pro integrovanou kartu RAID řadiče s 256 MB
•
Čtyři integrované sít’ové karty Gigabit Ethernet podporující datový přenos rychlostí 10 Mbps, 100 Mbps
a 1000 Mbps a 2-Gbps.
•
Dva porty x4 SAS pro spojení s úložným podsystémem nebo dva porty 4-Gbps Fibre Channel pro spojení
se sítí úložné oblasti (SAN).
•
Čtyři konektory USB 2.0 (dva na přední a dva na zadní straně)
CD-ROM mechaniku, klávesnici, myš nebo USB flash disk.
•
Ovladač pro vzdálený přístup umožňující vzdálenou správu systému.
•
Integrovaný VGA kompatibilní grafický subsystém s ATI ES1000, 33 MHz PCI grafickou kartou.
Tento grafický subsystém disponuje min. 16 MB grafické paměti s podporou 2D grafiky. Maximální
rozlišení je 1600 x 1200 bodů při 65536 barvách; grafiky true color jsou podporovány v následujících
rozlišeních: 640 x 480, 800 x 600, 1024 x 768, 1280 x 1024. Je-li nainstalována volitelná karta
ovladače pro vzdálený přístup, je max. grafické rozlišení 1280 x 1024
•
Okruhy systémové správy monitorující funkci systémových ventilátorů a kritická napětí a teploty
v systému. Okruhy systémové správy spolupracují se softwarem systémové správy.
•
Ke konektorům na zadním panelu patří sériový, video, dva USB konektory, čtyři NIC konektory,
dva SAS (nebo Fibre Channel v režimu brány) a jeden konektor NIC pro přístup RAC.
•
Konektory na předním panelu - video a dva USB konektory.
•
1x5 LCD na předním panelu pro zobrazení ID systému a chybových hlášení.
Pro více informací o specifických funkcích viz Technická specifikace.
cache paměti a RAID baterií.
podporující externí
.
disketovou mechaniku,
Začínáme se systémem 13
Page 16

Podporovaný operační systém
Váš systém podporuje operační systém Microsoft® Windows® Unified Data Storage Server 2003 Standard
a Enterprise x64 edice.
Další užitečné informace
POZOR: Informační příručka produktu obsahuje důležité bezpečnostní a právní informace.
Informace o záruce je součástí tohoto dokumentu nebo je přiložena samostatně.
•
Příručka pro instalaci do stojanu
systémem popisují instalaci vašeho systému do stojanu.
•
Uživatelská příručka k hardwaru
systémem a instalaci nebo výměnu systémových komponent. Tento dokument můžete nalézt na CD,
která byla dodána s vaším systémem, nebo na adrese
•
CD dodaná se systémem obsahují dokumentaci a nástroje pro konfiguraci a správu vašeho systému.
•
S počítačem jsou případně dodány také aktualizace, které popisují změny v počítači, softwaru a/nebo
v dokumentaci.
POZNÁMKA: Vždy nejprve zkontrolujte a pročtěte aktualizace uvedené na adrese
support.dell.com, protože tyto aktualizace často nahrazují informace v ostatních dokumentech.
•
Poznámky a soubory „readme“ mohou být také součástí dodávky a obsahují poslední aktualizace k
systému nebo dokumentaci, příp. rozšířené technické materiály určené zkušeným uživatelům a technikům.
nebo
Pokyny pro instalaci do stojanu
obsahuje informaci o funkcích systému a popisuje řešení problémů se
support.dell.com
dodané s vaším stojanovým
.
Odborná pomoc
Nerozumíte-li některému z postupů popsaných v této příručce nebo nepracuje-li systém podle očekávání,
nahlédněte do Uživatelské příručky k hardwaru.
Společnosti Dell rovněž nabízí trénink a certifikaci (Dell Enterprise Training and Certification); pro více
informací navštivte www.dell.com/training. Tato služba nemusí být nabízena ve všech regionech.
14 Začínáme se systémem
Page 17
Instalace a konfigurace
POZOR: Před provedením následujícího postupu si pročtěte a postupujte podle následujících
bezpečnostních pokynů a důležitých předpisů uvedených v Informační příručce produktu.
V této části jsou popsány kroky, které je nutné provést při první instalaci vašeho systému.
Rozbalení systému
Rozbalte systém a identifikujte jeho jednotlivé součásti.
Veškerý obalový materiál uschovejte pro případ pozdější potřeby.
Začínáme se systémem 15
Page 18

Instalace kolejniček a systému do stojanu
Nejprve si přečtěte „Bezpečnostní pokyny“ uvedené v instalační dokumentaci k systému,
potom proveďte instalaci systému do stojanu.
Pokyny pro instalaci systému do stojanu naleznete v dokumentaci pro instalování stojanu.
Připojení klávesnice, myši a monitoru
Připojte klávesnici, myš a monitor (volitelné).
Konektory na zadní straně systému mají ikony znázorňující, který kabel připojit ke kterému konektoru.
Zajistěte, aby šrouby na konektoru kabelu monitoru byly dobře dotaženy (je-li jimi konektor vybaven).
POZNÁMKA: Jestliže k systému připojíte současně dva monitory, s použitím předního i zadního
videokonektoru, pak je výchozím monitor připojený vpředu, protože v jednom okamžiku může být
aktivní pouze jeden monitor.
16 Začínáme se systémem
Page 19
Připojení ke zdroji napětí
Zapojte napájecí kabel systému do systému.
Poté zasuňte druhý konec kabelu do uzemněné elektrické zásuvky nebo ho připojte k samostatnému
zdroji napájení, například k UPS (Uninterruptible Power Supply - zdroj nepřerušitelného napájení)
nebo jednotce rozvaděče (PDU).
Instalace napájecích kabelů do retenčních svorek (volitelně)
Připevněte retenční svorku napájecího kabelu do pravého ohybu rukojeti napájecího zdroje.
Napájecí kabel ohněte do tvaru oka, jak je znázorněno na obrázku, a připevněte ho do příslušného
úchytu. Celý postup zopakujte u druhého napájecího kabelu.
Poté zasuňte druhý konec napájecích kabelů do uzemněné elektrické zásuvky nebo je připojte
k samostatnému zdroji napájení, například k UPS nebo PDU.
Začínáme se systémem 17
Page 20
Zapnutí systému
Zapněte systém a monitor (volitelný).
Stiskněte vypínač na systému a na monitoru. Kontrolky napájení by se měly rozsvítit.
Nastavte ovladače monitoru tak, aby byl výsledný obraz uspokojivý.
Instalace čelního krytu
Nainstalujte čelní kryt (volitelný).
Dokončení nastavení operačního systému
Operační systém je na vašem zařízení předinstalován. Pro přeinstalování operačního systému
si prostudujte dokumentaci dodávanou s vaším systémem.
18 Začínáme se systémem
Page 21

Technická specifikace
Procesor
Typ procesoru Dva dvoujádrové procesory řady Intel Xeon
Rozšiřovací sběrnice
Typ sběrnice PCIe
PCIe Risers Dva x8 lane
Pamět’
Architektura PC2-5300 667 MHz fully-buffered DIMMs s ochranou ECC,
s dvousměrnou replikací
Sloty pro pamět’ové moduly osm 240-pin
Min. RAM 4 GB (čtyři 1 GB moduly)
Max. RAM 8 GB
Disky
SAS pevné disky Dva 3,5 palcové, interní, hot-plug, (volitelně) s backplane podporou
Optické mechaniky Jedna kombinace slimline DVD-ROM/CD-RW nebo DVD-ROM
POZNÁMKA: DVD zařízení jsou určena pouze pro data.
5100.
Konektory
Vzadu
Sít’ové
skladovací Dva x4 SAS nebo dva LC Fibre Channel porty
RAC
Sériové
USB
Grafika
Vpředu
Grafika
USB
Čtyři RJ-45 (pro integrovanou sít’ovou kartu 1 GB)
Jeden RJ-45
9-pin, DTE, 16550 kompatibilní
Dva 4-pin, USB 2.0 kompatibilní
15-pin VGA
15-pin VGA
Dva 4-pin, USB 2.0 kompatibilní
Začínáme se systémem 19
Page 22

Grafika
Typ grafiky grafický adaptér ATI ES1000; VGA konektor
Grafická pamět’ 16 MB DDR SDRAM
Napájení
Střídavý proud (na jeden napájecí zdroj)
Výkon
Napětí
Odvod tepla
Max. zapínací proud
Baterie
Systémová baterie
RAID baterie (volitelná)
Rozměry
Výška 4,29 cm (1,69 palců)
Šířka 48,26 cm (19 palců)
Hloubka 76,2 cm (30 palců)
Hmotnost (max. konfigurace) 17,69 kg (39 liber)
670 W
90 - 264 VAC, automatické přepínání rozsahu, 47 - 63 Hz, 10,0 A
(při 90 VAC)
2697 BTU/hod. (max.)
Za typických podmínek připojení a při provozním rozpětí okolí celého
systému může nárazový proud dosáhnout 55 A na každý zdroj napájení
po dobu 10 ms nebo méně.
CR 2032 3,0 V lithium-iontová knoflíková baterie
4,1 V lithium-iontová baterie
20 Začínáme se systémem
Page 23

Prostředí
POZNÁMKA: Další informace o měřených údajích prostředí naleznete pro jednotlivé systémové
konfigurace na adrese www.dell.com/environmental_datasheets.
Te pl ot a
provozní
skladovací
Relativní vlhkost
provozní
skladovací
Max. vibrace
provozní
skladovací
Max. ráz
provozní
skladovací
Nadmořská výška
provozní
skladovací
10 až 35 °C (50 až 95 °F)
–40 až 65 °C (–40 až 149 °F)
8% až 85% (bez kondenzace) s max. vlhkostním gradientem 10%
za hodinu
5% až 95% (bez kondenzace)
0,25 G při 3 - 200 Hz po dobu 15 minut
0,5 G při 3 - 200 Hz po dobu 15 minut
jeden rázový impuls v kladné ose z (jeden impuls na každé straně
systému) o síle 41 G v délce do 2 ms
šest po sobě jdoucích rázových impulsů v kladné i záporné ose x, y,
a z (jeden impuls na každé straně systému) o síle 71 G v délce do 2 ms
-16 až 3048 m (-50 až 10000 stop)
-16 až 10 600 m (-50 až 35 000 stop)
Začínáme se systémem 21
Page 24

22 Začínáme se systémem
Page 25

Systèmes Dell™
PowerVault™ NX1950
Guide de mise en route
www.dell.com | support.dell.com
Page 26
Remarques, avis et précautions
REMARQUE : une REMARQUE indique des informations importantes qui peuvent vous aider à mieux utiliser
votre ordinateur.
AVIS : un AVIS vous avertit d'un risque de dommage matériel ou de perte de données et vous indique comment éviter
le problème.
PRÉCAUTION : une PRÉCAUTION indique un risque potentiel d'endommagement du matériel, de blessure corporelle
de mot.
_________________
Les informations contenues dans ce document peuvent être modifiées sans préavis.
© 2006 Dell Inc. Tous droits réservés.
La reproduction de ce document de quelque manière que ce soit sans l'autorisation écrite de Dell Inc. est strictement interdite.
Marques utilisées dans ce document : Dell, le logo DELL et PowerVault sont des marques de Dell Inc. ; Intel et Xeon sont des marques déposées
de Intel Corporation ; Microsoft et Windows sont des marques déposées de Microsoft Corporation.
Tous les autres noms de marques et marques commerciales utilisés dans ce document se rapportent aux sociétés propriétaires des marques et
des noms de ces produits. Dell Inc. décline tout intérêt dans l'utilisation des marques déposées et des noms de marques ne lui appartenant pas.
Modèle EMU01
Septembre 2006 P/N KN401 Rev. A00
Page 27

Caractéristiques du système
Les principales caractéristiques du système sur le plan matériel et logiciel sont les suivantes :
• Deux processeurs Intel
• Barrettes FB-DIMM de 4 Go cadencées à 667 MHz. Extension possible jusqu'à un maximum de 8 Go.
Le système est également équipé d'une mémoire redondante, ce qui permet de bénéficier d'une réserve
utilisée en cas de défaillance, ou d'une fonction de mise en miroir de la mémoire. Ces fonctions sont
disponibles si les huit barrettes de mémoire installées sont identiques.
• Disques durs à 15 000 tours par minute installés dans une baie en RAID 1 pour un fonctionnement
du système d'exploitation avec tolérance de pannes.
• Un lecteur slim de DVD-ROM ou DVD-ROM/CD-RW.
• Deux blocs d'alimentation de 670 W enfichables à chaud dans une configuration redondante 1 + 1.
• Quatre modules de ventilation, chacun comprenant deux ventilateurs à double rotor, soit un total
de huit ventilateurs.
La carte système offre les caractéristiques suivantes :
• Deux cartes de montage (gauche et centrale), chacune contenant un logement d'extension PCIExpress x8.
• Logement PCI réservé pour une carte contrôleur RAID intégrée avec
et pile RAID.
• Quatre NIC Ethernet Gigabit intégrés pouvant prendre en charge des débits de données de
10, 100, 1 000 Mbps et 2 Gbps.
• Deux ports SAS x4 pour la connexion au sous-système de stockage ou deux ports Fibre Channel
à 4 Gbps pour la connexion à un réseau SAN.
• Quatre connecteurs USB 2.0 (deux à l'avant et deux à l'arrière)
externe
• Contrôleur d'accès à distance (RAC) permettant la gestion de systèmes à distance.
•
Un sous-système vidéo compatible VGA intégré avec un contrôleur vidéo PCI ATI ES1000 à
33 MHz. Ce sous-système dispose d'un minimum de 16 Mo de mémoire graphique avec prise
en charge des graphiques en 2D. La définition maximale prise en charge est de 1600 x 1200
avec 65 536 couleurs. Les graphiques True-color sont pris en charge dans les définitions suivantes :
640 x 480, 800 x 600, 1024 x 768 et 1280 x 1024. Lorsque la carte d'accès à distance en option
est installée, la définition vidéo est de 1280 x 1024
• Des circuits intégrés de gestion de systèmes surveillant le fonctionnement des ventilateurs, ainsi que
les tensions et les températures critiques. Ces circuits de surveillance fonctionnent de pair avec les
logiciels de gestion de systèmes.
(lecteur de disquette ou de CD-ROM, clavier, souris ou lecteur flash USB).
®
Xeon® double cœur, séquence 5000.
.
mémoire cache de 256 Mo
pour la connexion d'un périphérique
Guide de mise en route 25
Page 28

• Connecteurs du panneau arrière : un connecteur série, un connecteur vidéo, deux connecteurs USB,
quatre connecteurs de NIC, deux connecteurs SAS (ou Fibre Channel en mode passerelle) et un
connecteur de NIC pour l'accès du contrôleur RAC.
• Le panneau avant comprend un connecteur vidéo et deux connecteurs USB.
• Un écran LCD 1x5 sur le panneau avant, affichant l'ID du système et les messages d'erreur.
Pour plus d'informations sur des caractéristiques spécifiques, voir “Spécifications techniques”.
Système d'exploitation pris en charge
Microsoft® Windows® Unified Data Storage Server 2003 - Standard Edition et Enterprise Edition 64 bits.
Autres informations utiles
PRÉCAUTION : le document Product Information Guide (Guide d'informations sur le produit) contient
d'importantes informations se rapportant à la sécurité et aux réglementations. Les informations sur la garantie
se trouvent soit dans ce document, soit à part.
• Les documents
(Instructions d'installation du rack) fournis avec la solution rack décrivent l'installation du système.
• Le document
les caractéristiques du système, ainsi que des instructions relatives au dépannage et à l'installation
ou au remplacement de composants. Il se trouve sur les CD fournis avec le système et sur le site
support.dell.com
• Les CD fournis avec le système contiennent des documents et des outils relatifs à la configuration
et à la gestion du système.
• Des mises à jour sont parfois fournies avec le système. Elles décrivent les modifications apportées
au système, aux logiciels ou à la documentation.
Rack Installation Guide
Hardware Owner's Manual
.
(Guide d'installation du rack) et
(Manuel du propriétaire) contient des informations sur
Rack Installation Instructions
REMARQUE : vérifiez toujours si des mises à jour sont disponibles sur le site support.dell.com et lisez-les
en premier, car elles remplacent souvent les informations contenues dans les autres documents.
• Des notes de version ou des fichiers lisez-moi (readme) sont parfois fournis ; ils contiennent des mises
à jour de dernière minute apportées au système ou à la documentation, ou des documents de référence
technique avancés destinés aux utilisateurs expérimentés ou aux techniciens.
26 Guide de mise en route
Page 29
Obtention d'une assistance technique
Si vous ne comprenez pas une procédure décrite dans ce guide ou si le système ne réagit pas comme prévu,
consultez le document
Des formations et certifications Dell Enterprise sont disponibles. Pour plus d'informations, consultez le site
www.dell.com/training
Hardware Owner's Manual
. Ce service n'est disponible que dans certains pays.
(Manuel du propriétaire).
Installation et configuration
PRÉCAUTION : avant de commencer la procédure suivante, lisez et appliquez les consignes concernant
la sécurité et les réglementations, que vous trouverez dans le document Product Information Guide
(Guide d'informations sur le produit).
Cette section décrit les étapes à exécuter lors de la configuration initiale du système.
Déballage du système
Sortez le système de son emballage et identifiez chaque élément.
Conservez les matériaux d'emballage au cas où vous en auriez besoin ultérieurement.
Guide de mise en route 27
Page 30
Installation des rails et du système dans un rack
Commencez par lire les consignes de sécurité qui se trouvent dans la documentation
d'installation du rack, puis installez le système dans le rack.
Consultez la documentation d'installation du rack pour obtenir les instructions appropriées.
Connexion du clavier, de la souris et du moniteur
Connectez le clavier, la souris et le moniteur (facultatif).
Utilisez les icônes des connecteurs situés à l'arrière du système pour savoir où insérer chaque câble.
N'oubliez pas de serrer les vis situées sur le connecteur du câble du moniteur, s'il en est équipé.
REMARQUE : vous ne pouvez utiliser qu'un seul écran à la fois. Si vous connectez deux moniteurs au
système à l'aide des connecteurs vidéo avant et arrière, le système utilise par défaut le connecteur avant.
28 Guide de mise en route
Page 31

Connexion du câble d'alimentation
Branchez le(s) câble(s) d'alimentation sur le système.
Branchez ensuite l'autre extrémité du câble sur une prise de courant mise à la terre
ou sur une source d'alimentation autonome (onduleur ou unité de distribution de l'alimentation).
Fixation du support du câble d'alimentation (facultatif)
Fixez le support du câble sur la partie droite de la poignée du bloc d'alimentation.
Faites une boucle comme indiqué dans l'illustration et insérez le câble d'alimentation
dans le clip du support. Recommencez cette procédure pour le second bloc d'alimentation.
Branchez ensuite l'autre extrémité des câbles sur une prise de courant mise à la terre
ou sur une source d'alimentation autonome (onduleur ou unité de distribution de l'alimentation).
Guide de mise en route 29
Page 32

Mise sous tension du système
Mettez le système sous tension, ainsi que le moniteur, si nécessaire.
Appuyez sur le bouton d'alimentation du système et sur celui du moniteur.
Les voyants d'alimentation doivent s'allumer. Réglez le moniteur jusqu'à ce que l'image
soit correctement affichée.
Installation du cadre
Installez le cadre (facultatif).
Finalisation de l'installation du système d'exploitation
Le système est doté d'un système d'exploitation préinstallé. Pour réinstaller ce dernier,
consultez la documentation fournie avec le produit.
30 Guide de mise en route
Page 33

Spécifications techniques
Processeur
Type de processeur Deux processeurs Intel Xeon double cœur, séquence 5100
Bus d'extension
Type de bus PCIe
Cartes de montage PCIe Deux logements x8
Mémoire
Architecture Barrettes FB-DIMM PC2-5300 à 667 MHz, avec protection ECC
et fonctionnement lockstep à deux voies
Supports de barrette de mémoire Huit à 240 broches
RAM minimale 4 Go (quatre barrettes de 1 Go)
RAM maximale 8 Go
Lecteurs
Disques durs SAS Deux disques internes de 3,5 pouces, enfichables à chaud,
pouvant être supportés par le fond de panier (facultatif)
Lecteur optique Un lecteur slim de DVD-ROM ou DVD-ROM/CD-RW.
REMARQUE : les périphériques DVD sont uniquement
des périphériques de données.
Connecteurs
À l'arrière
NIC
Stockage Deux ports SAS x4 ou deux ports Fibre Channel LC
Contrôleur RAC
Série
USB
Vidéo
À l'avant
Vidéo
USB
Quatre connecteurs RJ-45 (pour NIC 1 Gb intégrés)
Un connecteur RJ-45
Connecteur DTE à 9 broches, compatible 16550
Deux connecteurs à 4 broches, compatibles USB 2.0
VGA, 15 broches
VGA, 15 broches
Deux connecteurs à 4 broches, compatibles USB 2.0
Guide de mise en route 31
Page 34

Vidéo
Type de vidéo Contrôleur vidéo ATI ES1000, connecteur VGA
Mémoire vidéo 16 Mo, SDRAM DDR
Alimentation
Bloc d'alimentation en CA (selon la tension en vigueur)
Puissance
Te ns i on
Dissipation thermique
Appel de courant maximal
Piles
Pile du système
Pile RAID (en option)
Caractéristiques physiques
Hauteur 4,29 cm (1,69 pouce)
Largeur 48,26 cm (19 pouces)
Profondeur 76,2 cm (30 pouces)
Poids (configuration maximale) 17,69 kg (39 livres)
670 W
90-264 VCA avec sélection automatique de la tension ;
47-63 Hz ; 10,0 A (à 90 VCA)
2697 BTU/h (679 kcal/h) maximum
Dans des conditions de lignes typiques et dans toute la gamme
ambiante de fonctionnement du système, l'appel de courant peut
atteindre 55 A par bloc d'alimentation pendant un maximum de
10 ms.
Pile bouton au lithium-ion CR 2032 (3 V)
Pack 4,1 V au lithium-ion
32 Guide de mise en route
Page 35

Environnement
REMARQUE : pour plus d'informations concernant les mesures d'exploitation liées à différentes configurations
spécifiques, rendez-vous sur le site www.dell.com/environmental_datasheets.
Te mp é ra t ur e
En fonctionnement
Stockage
Humidité relative
En fonctionnement
Stockage
Tolérance maximale aux vibrations
Fonctionnement
Stockage
Tolérance maximale aux chocs
Fonctionnement
Stockage
Altitude
Fonctionnement
Stockage
De 10° à 35° C (50° à 95° F)
De -40° à 65° C (-40° à 149° F)
De 8 % à 85 % (sans condensation) avec un gradient d'humidité
maximal de 10 % par heure
5 % à 95 % (sans condensation)
0,25 G de 3 à 200 Hz pendant 15 mn
0,5G de 3à 200Hz pendant 15mn
Une impulsion de choc de 41 G pendant un maximum de 2 ms
sur l'axe z positif (une impulsion de chaque côté du système)
Six chocs consécutifs de 71 G pendant un maximum de 2 ms en
positif et négatif sur les axes x, y et z (une impulsion de chaque côté
du système)
De -16 à 3 048 m (-50 à 10 000 pieds)
De -16 à 10 600 m (-50 à 35 000 pieds)
Guide de mise en route 33
Page 36

34 Guide de mise en route
Page 37

Dell™ PowerVault™
NX1950 Systeme
Erste Schritte mit dem System
www.dell.com | support.dell.com
Page 38

Anmerkungen, Hinweise und Warnungen
ANMERKUNG: Eine ANMERKUNG macht auf wichtige Informationen aufmerksam, die die Arbeit mit dem Computer
erleichtern.
HINWEIS: Ein HINWEIS warnt vor möglichen Beschädigungen der Hardware oder vor Datenverlust und zeigt auf,
wie derartige Probleme vermieden werden können.
VORSICHT: Hiermit werden Sie auf eine potentiell gefährliche Situation hingewiesen, die zu Sachschäden,
Verletzungen oder zum Tod führen könnte.
_________________
Irrtümer und technische Änderungen vorbehalten.
© 2006 Dell Inc. Alle Rechte vorbehalten.
Die Reproduktion dieses Dokuments in jeglicher Form ohne schriftliche Genehmigung von Dell Inc. ist streng untersagt.
Marken in diesem Text: Dell, das DELL Logo und PowerVault sind Marken von Dell Inc.; Intel und Xeon sind eingetragene Marken
von Intel Corporation; Microsoft und Windows sind eingetragene Marken von Microsoft Corporation.
Alle anderen in dieser Dokumentation genannten Marken und Handelsnamen sind Eigentum der jeweiligen Hersteller und Firmen.
Dell Inc. erhebt keinen Anspruch auf Marken und Handelsnamen mit Ausnahme der eigenen.
Modell EMU01
September 2006 P/N KN401 Rev. A00
Page 39

Systemmerkmale
Dies sind die wesentlichen Hardware- und Softwaremerkmale des Systems:
• Zwei Dual-Core Intel
• 4 GB RAM auf FBD-Speichermodulen (FBD = Fully Buffered DIMMs) mit 667 MHz, erweiterbar
auf maximal 8 GB.
Das System ermöglicht auch die Verwendung von redundantem Speicher, und zwar als Memory-Sparing
(Redundanz) oder Memory-Mirroring (Spiegelung). Beide Funktionen stehen zur Verfügung, wenn acht
identische Speichermodule installiert sind.
• Festplatten mit 15.000 U/min in einer RAID1-Konfiguration für fehlertolerante Betriebssystemoperationen.
• Ein Slimline-DVD-ROM oder DVD-ROM/CD-RW-Laufwerk.
• Zwei hot-plug-fähige 670-W-Netzteile in einer redundanten 1 + 1-Konfiguration.
• Vier Lüftermodule, jeweils bestehend aus zwei Doppelrotor-Lüftern, damit insgesamt acht Lüfter.
Die Systemplatine ist mit folgenden Komponenten ausgestattet:
• Zwei Riserkarten (links und mittig), jeweils mit einem PCI-Express-Erweiterungssteckplatz
(x8-Bandbreite).
• Ein dedizierter PCI-Steckplatz für eine integrierte RAID-Controllerkarte mit 256 MB
und einer RAID-Batterie.
• Vier integrierte Gigabit-Ethernet-NICs für Datenübertragungsraten von 10 Mbit/s, 100 Mbit/s,
1000 Mbit/s und 2 Gbps.
• Zwei x4-SAS-Anschlüsse zur Verbindung mit einem Speichersubsystem oder zwei 4-Gbps-FibreChannel-Ansschlüsse zur Verbindung mit einem Speichernetzwerk (SAN).
• Vier USB 2.0-konforme Anschlüsse (zwei auf der Vorderseite und zwei auf der Rückseite) zum
Anschließen von externen Geräten wie Diskettenlaufwerk, CD-ROM-Laufwerk, Tastatur, Maus
oder USB-Flash-Laufwerk.
• Remote-Zugriff-Controller (RAC) zur Remote-Verwaltung des Systems.
•
Integriertes VGA-kompatibles Grafiksubsystem mit ATI ES1000 PCI-Grafikcontroller mit 33 MHz.
Dieses Grafiksubsystem enthält mindestens 16 MB Grafikspeicher mit Unterstützung für 2DGrafik. Die maximale Auflösung beträgt 1600 × 1200 bei 65 536 Farben. True-Color-Darstellung
wird für folgende Auflösungen unterstützt: 640 × 480, 800 × 600, 1024 × 768, 1280 × 1024. Bei
installierter optionaler Remote-Access-Karte ist die maximale Bildschirmauflösung 1280 × 1024
• Systemverwaltungselektronik zur Überwachung der Systemlüfter und der kritischen Systemspannungen und -temperaturen. Die Systemverwaltungselektronik funktioniert im Verbund
mit der Systemverwaltungssoftware.
®
Xeon®-Prozessoren 5000 Sequence.
Cachespeicher
.
Erste Schritte mit dem System 37
Page 40

• Auf der Rückseite befinden sich ein serieller Anschluss, ein Monitoranschluss, zwei USB-Anschlüsse,
zwei SAS-Anschlüsse (bzw. Fibre-Channel-Anschlüsse im Gateway-Modus) und ein NIC-Anschluss
für den Remote-Zugriffscontroller.
• Auf der Vorderseite sind ein Bildschirm- und zwei USB-Anschlüsse vorhanden.
• LCD-Display (1 × 5) auf der Vorderseite zur Anzeige von System-ID und Fehlermeldungen.
Weitere Informationen zu spezifischen Systemmerkmalen finden Sie im Abschnitt Technische Daten.
Unterstütztes Betriebssystem
Ihr System unterstützt das Betriebssystem Microsoft® Windows® Unified Data Storage Server 2003
in den Editionen Standard und Enterprise x64.
Weitere nützliche Informationen
VORSICHT: Das Dokument Product Information Guide (Produktinformationshandbuch) enthält wichtige
Informationen zu Sicherheits- und Betriebsbestimmungen. Garantiebestimmungen können als separates
Dokument beigelegt sein.
• Im zusammen mit der Rack-Lösung gelieferten
oder in der Dokumentation
beschrieben, wie das System in einem Rack installiert wird.
•Im
• Mitgelieferte CDs enthalten Dokumentation und Dienstprogramme zur Konfiguration
• Möglicherweise sind auch aktualisierte Dokumente beigelegt, in denen Änderungen am System,
Hardware Owner’s Manual
Systemfunktionen, zur Fehlerbehebung am System und zum Installieren oder Austauschen von
Systemkomponenten. Dieses Dokument befindet sich auf den zusammen mit dem System gelieferten
CDs und kann unter
und Verwaltung des Systems.
an der Software oder an der Dokumentation beschrieben sind.
Rack Installation Instructions
(Hardware-Benutzerhandbuch) erhalten Sie Informationen über
support.dell.com
heruntergeladen werden.
Rack Installation Guide
(Rack-Installationsanleitung) ist
(Rack-Installationshandbuch)
ANMERKUNG: Wenn auf der Website support.dell.com aktualisierte Dokumente vorliegen, lesen Sie
diese immer zuerst, denn frühere Informationen werden dadurch gegebenenfalls ungültig.
• Möglicherweise sind Versionshinweise oder Infodateien vorhanden. Diese enthalten Aktualisierungen
zum System oder zur Dokumentation bzw. detailliertes technisches Referenzmaterial für erfahrene
Benutzer oder Techniker.
So erhalten Sie technische Unterstützung
Falls Sie einen Vorgang in diesem Handbuch nicht nachvollziehen können oder das System sich nicht
wie erwartet verhält, ziehen Sie das
Dell bietet Schulungen und Zertifizierungen für Unternehmen an. Weitere Informationen finden Sie
unter
www.dell.com/training
38 Erste Schritte mit dem System
Hardware Owner’s Manual
. Diese Dienstleistungen stehen unter Umständen nicht überall zur Verfügung.
(Hardware-Benutzerhandbuch) zu Rate.
Page 41

Installation und Konfiguration
VORSICHT: Bevor Sie mit dem folgenden Vorgang beginnen, lesen und befolgen Sie die Sicherheitshinweise
und die Betriebsbestimmungen im Product Information Guide (Produktinformationshandbuch).
In diesem Abschnitt ist die erstmalige Einrichtung des Systems beschrieben.
Auspacken des Systems
Entnehmen Sie das System der Verpackung und identifizieren Sie die einzelnen Komponenten.
Bewahren Sie das Verpackungsmaterial für möglichen späteren Gebrauch auf.
Erste Schritte mit dem System 39
Page 42

Installation der Schienen und des Systems in einem Rack
Lesen Sie die Sicherheitshinweise in der Dokumentation zur Rack-Installation für das System,
und installieren Sie dann das System im Rack.
Wie Sie das System in einem Rack installieren, erfahren Sie in der Dokumentation zur Rack-
Installation.
Anschließen von Tastatur, Maus und Bildschirm
Schließen Sie die Tastatur, die Maus und den Bildschirm (optional) an.
Die Anschlüsse auf der Rückseite des Systems sind mit Symbolen gekennzeichnet, mit denen sich die
entsprechenden Kabel zuordnen lassen. Denken Sie daran, gegebenenfalls die Schrauben am Stecker
des Bildschirmkabels festzuziehen.
ANMERKUNG: Wenn Sie zwei Bildschirme am System anschließen, und zwar am vorderen und am hinteren
Anschluss, erfolgt die Ausgabe standardmäßig über den vorderen Anschluss; es kann nur ein Bildschirm
auf einmal angesteuert werden.
40 Erste Schritte mit dem System
Page 43

Anschließen der Stromversorgung
Verbinden Sie das bzw. die Netzstromkabel mit dem System.
Verbinden Sie das andere Ende des Kabels mit einer geerdeten Steckdose oder mit einer
separaten Spannungsquelle, etwa einer unterbrechungsfreien Stromversorgung (USV)
oder einem Stromverteiler.
Befestigen der Rückhalteklemme für das Netzstromkabel (optional)
Bringen Sie die Rückhalteklemme für das Netzstromkabel am rechten Bogen des Netzteilgriffs an.
Biegen Sie das Netzstromkabel wie abgebildet zu einer Schlaufe und befestigen Sie es an der
Kabelklemme. Wiederholen Sie den Vorgang für das zweite Netzteil.
Verbinden Sie das andere Ende des Kabels jeweils mit einer geerdeten Steckdose oder mit
einer separaten Spannungsquelle, etwa einer unterbrechungsfreien Stromversorgung (USV)
oder einem Stromverteiler (PDU).
Erste Schritte mit dem System 41
Page 44

Einschalten des Systems
Schalten Sie das System und den Bildschirm (optional) ein.
Drücken Sie den Netzschalter am System und am Bildschirm. Daraufhin sollten die Betriebsanzeigen
aufleuchten. Stellen Sie den Bildschirm ein, bis die Anzeige zufrieden stellend ist.
Anbringen der Blende
Installieren Sie die Frontverkleidung (optional).
Einrichten des Betriebssystems
Das Betriebssystem ist jetzt auf dem System installiert. Um das Betriebssystem erneut zu installieren,
beachten Sie die Anleitung in der mit Ihrem System ausgelieferten Dokumentation.
42 Erste Schritte mit dem System
Page 45

Technische Daten
Prozessor
Prozessortyp Zwei Dual-Core Intel Xeon-Prozessoren 5100 Sequence
Erweiterungsbus
Bustyp PCIe
PCIe-Riserkarten Zwei Steckplätze mit x8-Bandbreite
Speicher
Architektur Fully-Buffered-DIMMs (PC2-5300, 667 MHz) mit ECC-Schutz
und beidseitigem Lockstep-Betrieb
Speichermodulsockel Achtmal 240-polig
RAM (Minimum) 4 GB (vier 1-GB-Module)
RAM (Maximum) 8 GB
Laufwerke
SAS-Festplatten Zwei interne, hot-plug-fähige 3,5-Zoll-Laufwerke (optional)
mit Unterstützung für Rückwandplatine
Optisches Laufwerk Ein Slimline-DVD-ROM/CD-RW- oder DVD-ROM-Laufwerk.
ANMERKUNG: DVD-Geräte sind reine Datenlaufwerke.
Anschlüsse
Rückseite
NIC
Speicher Zwei x4-SAS- oder zwei LC-Fibre-Channel-Anschlüsse
RAC
Seriell
USB
Grafik
Vo rd er se it e
Grafik
USB
Vier RJ-45-Anschlüsse (für integrierte 1-GB-NICs)
Ein RJ-45-Anschluss
9-polig, DTE, 16550-kompatibel
Zwei 4-polige Anschlüsse, USB 2.0
VGA, 15-polig
VGA, 15-polig
Zwei 4-polige Anschlüsse, USB 2.0
Erste Schritte mit dem System 43
Page 46

Grafik
Grafiktyp Grafikcontroller ATI ES1000; VGA-Anschluss
Grafikspeicher 16 MB DDR-SDRAM
Stromversorgung
Wechselstromnetzteil (je Netzteil)
Leistung
Spannung
Wärmeabgabe
Maximaler Einschaltstrom
Batterien
Systembatterie
RAID-Akku (optional)
Abmessungen und Gewicht
Höhe 4,29 cm
Breite 48,26 cm
Tiefe 76,2 cm
Gewicht (maximale Konfiguration) 17,69 kg
670 W
90-264 VAC, autom. Bereichseinstellung, 47-63 Hz, 10,0 A
(bei 90 VAC)
2697 BTU/h (maximal)
Unter typischen Leitungsbedingungen und über den gesamten
Umgebungsbetriebsbereich des Systems kann der Einschaltstrom
pro Netzteil (über einen Zeitraum von 10 ms oder weniger)
55 A erreichen.
CR 2032, 3,0-V-Lithium-Ionen-Knopfzelle
4,1 V Lithium-Ionen-Batterie
44 Erste Schritte mit dem System
Page 47

Umgebungsbedingungen
ANMERKUNG: Weitere Informationen zu Umgebungsbedingungen für verschiedene Systemkonfigurationen
finden Sie unter www.dell.com/environmental_datasheets.
Te mp e ra t ur
Betrieb
Lagerung
Relative Luftfeuchtigkeit
Betrieb
Lagerung
Maximale Erschütterung
Betrieb
Speicher
Maximale Stoßeinwirkung
Betrieb
Speicher
Höhe über NN
Betrieb
Speicher
10° bis 35°C
-40° bis 65°C
8% bis 85% (nicht-kondensierend) mit einem Anstieg der Luftfeuchtigkeit von 10 % pro Stunde
5 bis 95 % (nicht kondensierend)
0,25 G bei 3-200 Hz, 15 min lang
0,5 G bei 3-200 Hz, 15 min lang
Ein Stoß von 41 G in der positiven z-Achse (ein Stoß auf jeder Seite
des Systems) über einen Zeitraum von bis zu 2 ms.
Sechs nacheinander ausgeführte Stöße mit 71 G von bis zu 2 ms
Dauer in positiver und negativer X-, Y- und Z-Richtung
(ein Stoß auf jeder Seite des Systems).
–16 bis 3.048 m
–16 bis 10.600 m
Erste Schritte mit dem System 45
Page 48

46 Erste Schritte mit dem System
Page 49

Συστήµατα Dell™
PowerVault™ NX1950
Τα πρώτα βήµατα µε
το σύστηµά σας
www.dell.com | support.dell.com
Page 50

Σηµείωση, Ειδοποίηση και Προσοχή
ΣΗΜΕΙΩΣΗ: Η ένδειξη ΣΗΜΕΙΩΣΗ υποδεικνύει σηµαντικές πληροφορίες που σας βοηθούν
να χρησιµοποιήσετε πιο σωστά τον υπολογιστή σας.
ΕΙ∆ΟΠΟΙΗΣΗ: Η ένδειξη ΕΙ∆ΟΠΟΙΗΣΗ υποδεικνύει είτε πιθανή βλάβη του υλικού είτε απώλεια δεδοµένων
και σας πληροφορεί πώς να αποφύγετε το πρόβληµα.
ΠΡΟΣΟΧΗ: Η ένδειξη ΠΡΟΣΟΧΗ υποδεικνύει την πιθανότητα υλικής ζηµιάς, προσωπικού
τραυµατισµού ή θανάτου.
_________________
Οι πληροφορίες που περιέχονται στο παρόν έγγραφο ενδέχεται να αλλάξουν χωρίς προηγούµενη ειδοποίηση.
© 2006 Dell Inc. Με επιφύλαξη κάθε νόµιµου δικαιώµατος.
Απαγορεύεται αυστηρώς η αναπαραγωγή µε οποιονδήποτε τρόπο χωρίς την έγγραφη άδεια της Dell Inc.
Εµπορικά σήµατα που χρησιµοποιούνται σε αυτό το κείµενο: Η επωνυµία Dell, το λογότυπο DELL και το όνοµα PowerVault είναι εµπορικά
σήµατα της Dell Inc. Οι επωνυµίες Intel και Xeon είναι σήµατα κατατεθέντα της Intel Corporation. Οι επωνυµίες Microsoft και Windows είναι
σήµατα κατατεθέντα της Microsoft Corporation.
Στο παρόν έγγραφο ενδέχεται να χρησιµοποιούνται άλλα εµπορικά σήµατα και εµπορικές ονοµασίες για αναφορά στις οντότητες που
διεκδικούν τα σήµατα και τις ονοµασίες ή για αναφορά στα προϊόντα τους. Η Dell Inc. αποποιείται οποιοδήποτε πιθανό συµφέρον ιδιοκτησίας
από εµπορικά σήµατα και εµπορικές ονοµασίες εκτός από αυτά που έχει στην κατοχή της.
Μοντέλο EMU01
Σεπτέµβριος 2006 P/N KN401 Rev. A00
Page 51

Χαρακτηριστικά συστήµατος
Τα κύρια χαρακτηριστικά λογισµικού και υλικού του συστήµατός σας περιλαµβάνουν:
•
∆ύο επεξεργαστές διπλού πυρήνα Intel® Xeon® της σειράς 5000.
•
4 GB µνήµης DIMM µε περιοχή προσωρινής αποθήκευσης (FBD) στα 667 MHz, µε δυνατότητα αναβάθµισης
σε 8 GB το µέγιστο.
Το σύστηµα χαρακτηρίζεται επίσης από εφεδρική µνήµη, η οποία παρέχει πλεόνασµα ή κατοπτρικό είδωλο µνήµης.
Και τα δύο χαρακτηριστικά είναι διαθέσιµα αν είναι εγκατεστηµένες οκτώ ίδιες µονάδες µνήµης.
•
Σκληροί δίσκοι µε 15000 rpm, διαµορφωµένοι σε διάταξη RAID1 για διεργασίες λειτουργικού συστήµατος
µε ανοχή στα σφάλµατα.
•
Μια λεπτή µονάδα DVD-ROM ή DVD-ROM/ CD-RW.
•
∆ύο παροχές τροφοδοσίας 670 W, θερµής σύνδεσης σε εφεδρική διαµόρφωση 1 + 1.
•
Τέσσερις µονάδες ανεµιστήρα, καθεµία από τις οποίες αποτελείται από δύο ανεµιστήρες µε διπλό ρότορα,
µε σύνολο οκτώ ανεµιστήρες ψύξης.
Η πλακέτα του συστήµατος περιλαµβάνει τα παρακάτω χαρακτηριστικά:
•
∆ύο κάρτες ανύψωσης (κάρτες ανύψωσης στα αριστερά και στο κέντρο), καθεµία από τις οποίες παρέχει
µια µακρόστενη υποδοχή επέκτασης PCI-Express µήκους x8.
•
Ειδική υποδοχή PCI για ενσωµατωµένη κάρτα ελεγκτή RAID µε 256 MB
µπαταρία.
•
Τέσσερις ενσωµατωµένες κάρτες NIC Gigabit Ethernet, µε δυνατότητα υποστήριξης ταχυτήτων δεδοµένων
της τάξης των 10 Mbps, 100 Mbps, 1000 Mbps και 2-Gbps.
•
∆ύο θύρες x4 SAS για δυνατότητα σύνδεσης στο υποσύστηµα αποθήκευσης ή δύο θύρες Καναλιού ινών
4 Gbps για δυνατότητα σύνδεσης σε δίκτυο περιοχής αποθήκευσης (SAN).
•
Τέσσερις συζευκτήρες συµβατούς µε USB 2.0 (δύο στο εµπρός και δύο στο πίσω µέρος) µε
εξωτερικής υποστήριξης για µία
ποντίκι ή µία µονάδα µνήµης flash USB.
•
Ελεγκτής αποµακρυσµένης πρόσβασης (RAC) για αποµακρυσµένη διαχείριση συστηµάτων.
•
Ένα ενσωµατωµένο υποσύστηµα οθόνης συµβατό µε VGA µε ελεγκτή οθόνης ATI ES1000, 33-MHz PCI.
Αυτό το υποσύστηµα οθόνης περιέχει κατ’ ελάχιστον 16 MB µνήµης οθόνης µε υποστήριξη για
δισδιάστατα γραφικά. Η µέγιστη ανάλυση είναι 1600 x 1200 µε 65.536 χρώµατα. Τα γραφικά µε
πραγµατικά χρώµατα υποστηρίζονται για τις ακόλουθες αναλύσεις: 640 x 480, 800 x 600, 1024 x 768,
1280 x 1024. Όταν εγκατασταθεί η προαιρετική κάρτα ελεγκτή αποµακρυσµένης πρόσβασης, η µέγιστη
ανάλυση της οθόνης γίνεται 1280x1024
•
∆ιάταξη κυκλωµάτων για τη διαχείριση συστηµάτων, η οποία παρακολουθεί τη λειτουργία των ανεµιστήρων
του συστήµατος, καθώς και τις κρίσιµες θερµοκρασίες και τάσεις του συστήµατος. Η διάταξη κυκλωµάτων για
τη διαχείριση συστηµάτων λειτουργεί σε συνδυασµό µε το λογισµικό διαχείρισης συστηµάτων.
RAID.
µονάδα δισκέτας, µία µονάδα δίσκου CD-ROM, ένα πληκτρολόγιο, ένα
.
κρυφής µνήµης (cache) και
δυνατότητα
Τα πρώτα βήµατα µε το σύστηµά σας 49
Page 52

•
Οι συζευκτήρες στο πίσω πλαίσιο περιλαµβάνουν σειριακό συζευκτήρα, συζευκτήρα οθόνης, δύο συζευκτήρες
USB, τέσσεις συζευκτήρες κάρτας NIC, δύο συζευκτήρες SAS (ή Καναλιού ινών σε συζευκτήρες λειτουργίας
ως πύλη δικτύου) και ένα συζευκτήρα NIC για πρόσβαση RAC.
•
Οι συζευκτήρες του εµπρός µέρους περιλαµβάνουν ένα συζευκτήρα οθόνης και δύο συζευκτήρες USB.
•
Μπροστινό πλαίσιο 1x5 LCD για τον κωδικό αναγνώρισης του συστήµατος και µηνύµατα σφαλµάτων.
Για περισσότερες πληροφορίες σχετικά µε συγκεκριµένα χαρακτηριστικά, ανατρέξτε στην ενότητα Τεχνικές
προδιαγραφές.
Λειτουργικό σύστηµα που υποστηρίζεται
Το σύστηµά σας υποστηρίζει το λειτουργικό σύστηµα Microsoft® Windows® Unified Data Storage Server 2003,
εκδόσεις Standard και Enterprise x64.
Άλλες πληροφορίες που ενδέχεται να χρειαστείτε
ΠΡΟΣΟΧΗ: Ο Οδηγός πληροφοριών προϊόντος παρέχει σηµαντικές πληροφορίες για την
ασφάλεια και τους ρυθµιστικούς κανόνες. Οι πληροφορίες για την εγγύηση ενδέχεται να
συµπεριλαµβάνονται µέσα σε αυτό το έγγραφο ή ως ξεχωριστό έγγραφο.
•
Ο
Οδηγός εγκατάστασης σε ράφι
περιγράφουν τον τρόπο εγκατάστασης τους συστήµατός σας σε ράφι.
•
Το
Εγχειρίδιο κατόχου υλικού
περιγράφει την αντιµετώπιση προβληµάτων του συστήµατός σας και την εγκατάσταση ή την αντικατάσταση
συστατικών στοιχείων του συστήµατος. Το έγγραφο αυτό µπορεί να εντοπιστεί στα CD που συνοδεύουν
το σύστηµά σας ή στη διεύθυνση
•
Τα CD που συνοδεύουν το σύστηµά σας παρέχουν τεκµηρίωση και εργαλεία για τη διαµόρφωση και τη
διαχείριση του συστήµατός σας.
•
Μερικές φορές παρέχονται ενηµερωµένες εκδόσεις µαζί µε το σύστηµα, για να περιγράψουν αλλαγές
στο σύστηµα, το λογισµικό ή/και την τεκµηρίωση.
ή οι
Οδηγίες εγκατάστασης σε ράφι
παρέχει πληροφορίες σχετικά µε τα χαρακτηριστικά του συστήµατος και
support.dell.com
.
που συνοδεύουν τη δική σας λύση σε ράφι
ΣΗΜΕΙΩΣΗ: Να ελέγχετε πάντοτε για ενηµερωµένες εκδόσεις στην τοποθεσία support.dell.com
και να διαβάζετε πρώτα τις ενηµερωµένες εκδόσεις επειδή πολύ συχνά καθιστούν ξεπερασµένες
τις πληροφορίες άλλων εγγράφων.
•
Σηµειώσεις έκδοσης ή αρχεία Readme (πληροφοριών) ενδέχεται να περιλαµβάνονται για να παρέχουν τις
τελευταίες ενηµερώσεις για το σύστηµα, όπως επίσης τεκµηρίωση ή προχωρηµένο υλικό αναφοράς για τεχνικά
θέµατα που προορίζονται για έµπειρους χρήστες ή τεχνικούς.
50 Τα πρώτα βήµατα µε το σύστηµά σας
Page 53

Λήψη τεχνικής βοήθειας
Εάν δεν κατανοείτε µια διαδικασία του οδηγού αυτού ή αν το σύστηµα δεν λειτουργεί µε τον αναµενόµενο τρόπο,
ανατρέξτε στο δικό σας
Είναι διαθέσιµη η Επιχειρηµατική εκπαίδευση και πιστοποίηση της Dell. Για περισσότερες πληροφορίες, ανατρέξτε
στη διεύθυνση
www.dell.com/training
Εγχειρίδιο κατόχου υλικού
. Η υπηρεσία αυτή ενδέχεται να µην προσφέρεται σε όλες τις τοποθεσίες.
.
Εγκατάσταση και διαµόρφωση
ΠΡΟΣΟΧΗ: Προτού πραγµατοποιήσετε την παρακάτω διαδικασία, διαβάστε και ακολουθήστε
τις οδηγίες ασφαλείας και τους σηµαντικούς ρυθµιστικούς κανόνες στον Οδηγό πληροφοριών
προϊόντος.
Η ενότητα αυτή περιγράφει τα βήµατα για την αρχική ρύθµιση των παραµέτρων του συστήµατός σας.
Άνοιγµα της συσκευασίας του συστήµατος
Ανοίξτε τη συσκευασία του συστήµατός σας και αναγνωρίστε κάθε αντικείµενο.
Φυλάξτε όλα τα υλικά που σας αποστάλθηκαν για την περίπτωση που θα τα χρειαστείτε αργότερα.
Τα πρώτα βήµατα µε το σύστηµά σας 51
Page 54

Τοποθέτηση των ραγών και του συστήµατος σε ράφι
Τοποθετήστε το σύστηµα σε ράφι αφού ολοκληρώσετε την ανάγνωση των “Οδηγιών ασφαλείας”
που βρίσκονται στην τεκµηρίωση εγκατάστασης σε ράφι για το σύστηµά σας.
Για οδηγίες σχετικά µε την εγκατάσταση του συστήµατός σας σε ράφι, ανατρέξτε στην τεκµηρίωση
εγκατάστασης σε ράφι.
Σύνδεση πληκτρολογίου, ποντικιού και οθόνης
Συνδέστε το πληκτρολόγιο, το ποντίκι και την οθόνη (προαιρετικά).
Οι συζευκτήρες στο πίσω µέρος του συστήµατος έχουν εικονίδια τα οποία υποδεικνύουν το καλώδιο που συνδέεται
σε κάθε συζευκτήρα. Πρέπει να σφίξετε τις βίδες (εάν υπάρχουν) στο συζευκτήρα καλωδίου της οθόνης.
ΣΗΜΕΙΩΣΗ: Αν συνδέσετε ταυτόχρονα δύο οθόνες στο σύστηµα, χρησιµοποιώντας τις συνδέσεις
στο εµπρός και το πίσω µέρος, η εικόνα από προεπιλογή θα εµφανιστεί στην οθόνη στο εµπρός
µέρος, επειδή µπορεί να λειτουργεί µόνο µία οθόνη κάθε φορά.
52 Τα πρώτα βήµατα µε το σύστηµά σας
Page 55

Σύνδεση της τροφοδοσίας
Συνδέστε το καλώδιο(α) τροφοδοσίας στο σύστηµα.
Συνδέστε το άλλο άκρο του καλωδίου σε γειωµένη πρίζα ρεύµατος ή σε ξεχωριστή πηγή τροφοδοσίας,
όπως είναι ένα σύστηµα αδιάλειπτης τροφοδοσίας (UPS) ή µια µονάδα διανοµής ρεύµατος (PDU).
Τοποθέτηση του στηρίγµατος συγκράτησης του καλωδίου τροφοδοσίας (Προαιρετικά)
Συνδέστε το στήριγµα συγκράτησης του καλωδίου τροφοδοσίας στο δεξί σύνδεσµο της λαβής της παροχής
τροφοδοσίας. Κάµψτε το καλώδιο τροφοδοσίας του συστήµατος σε µορφή βρόχου όπως φαίνεται στο
σχήµα και συνδέστε το στην αγκράφα του καλωδίου του στηρίγµατος. Επαναλάβετε τη διαδικασία για τη
δεύτερη παροχή τροφοδοσίας.
Τοποθετήστε την άλλη άκρη των καλωδίων τροφοδοσίας σε γειωµένη πρίζα ή σε ξεχωριστή πηγή ηλεκτρικού
ρεύµατος, όπως είναι ένα σύστηµα UPS ή µια µονάδα PDU.
Τα πρώτα βήµατα µε το σύστηµά σας 53
Page 56

Θέση του συστήµατος σε λειτουργία
Θέστε σε λειτουργία το σύστηµα και την οθόνη (προαιρετικά).
Πιέστε το κουµπί λειτουργίας στο σύστηµα και την οθόνη. Πρέπει να ανάψουν οι ενδείξεις λειτουργίας.
Ρυθµίστε τα κουµπιά ελέγχου της οθόνης ώσπου η εικόνα που εµφανίζεται να σας ικανοποιεί.
Τοποθέτηση της πρόσοψης µονάδας
Τοποθετήστε την πρόσοψη µονάδας (προαιρετικά).
Ολοκλήρωση της εγκατάστασης του λειτουργικού συστήµατος
Το λειτουργικό σύστηµα είναι προεγκατεστηµένο στο σύστηµά σας. Για να κάνετε εκ νέου εγκατάσταση του
λειτουργικού συστήµατος, ανατρέξτε στην τεκµηρίωση που συνοδεύει το σύστηµά σας.
54 Τα πρώτα βήµατα µε το σύστηµά σας
Page 57

Τεχνικές προδιαγραφές
Επεξεργαστής
Τύπος επεξεργαστή ∆ύο επεξεργαστές διπλού πυρήνα Intel Xeon
∆ίαυλος επέκτασης
Τύπος διαύλου PCIe
Κάρτες ανόδου δικτύου PCIe ∆ύο x8 µακρόστενου σχήµατος
Μνήµη
Αρχιτεκτονική Μονάδες µνήµης PC2-5300 µε περιοχή προσωρινής αποθήκευσης
(FBD) στα 667 MHz µε προστασία ECC, µε αµφίδροµη λειτουργία
κλειδώµατος βήµατος
Υποδοχές µονάδων µνήµης Οκτώ µε 240 ακίδες
Ελάχιστη µνήµη RAM 4 GB (τέσσερις µονάδες του 1 GB)
Μέγιστη µνήµη RAM 8 GB
Μονάδες
Σκληροί δίσκοι SAS ∆ύο εσωτερικές µονάδες σκληρού δίσκου 3,5 ιντσών, θερµής
σύνδεσης, (προαιρετικά) µε στήριγµα της πλακέτας βάσης
Μονάδα οπτικού δίσκου Μία λεπτή µονάδα συνδυασµού DVD-ROM/CD-RW ή DVD-ROM
ΣΗΜΕΙΩΣΗ: Οι µονάδες DVD είναι µόνο για δεδοµένα.
της σειράς 5100
Συζευκτήρες
Πίσω µέρος
Κάρτα NIC
Αποθήκευσης ∆ύο x4 SAS ή δύο θύρες Καναλιού ινών LC
RAC
Σειριακή
USB
Οθόνη
Εµπρός µέρος
Οθόνη
USB
Τέσσερις RJ-45 (για ενσωµατωµένες κάρτες NIC 1 GB)
Ένα RJ-45
9 ακίδων, DTE, συµβατή µε 16550
∆ύο 4 ακίδων, συµβατοί µε USB 2,0
VGA 15 ακίδων
VGA 15 ακίδων
∆ύο 4 ακίδων, συµβατοί µε USB 2,0
Τα πρώτα βήµατα µε το σύστηµά σας 55
Page 58

Οθόνη
Τύπος οθόνης Ελεγκτής οθόνης ATI ES1000, συζευκτήρας VGA
Μνήµη οθόνης 16 MB µνήµης DDR SDRAM
Τροφοδοσία
Τροφοδοσία AC (ανά τροφοδοσία)
Ηλεκτρική ισχύς σε Watt
Τάση
Έκλυση θερµότητας
Μέγιστο ρεύµα εισροής
Μπαταρίες
Μπαταρία συστήµατος
Μπαταρία RAID (προαιρετικά)
Φυσικά χαρακτηριστικά
Ύψος 4,29 εκ. (1,69 ίντσες)
Μήκος 48,26 εκ. (19 ίντσες)
Πλάτος 76,2 εκ. (30 ίντσες)
Βάρος (µέγιστη διαµόρφωση) 17,69 κιλά (39 λίβρες)
670 W
90–264 VAC, µε αυτόµατη επιλογή περιοχής, 47-63 Hz, 10,0 A
(στα 90 VAC)
2697 BTU/ώρα (µέγιστο)
Κάτω από τυπικές συνθήκες γραµµής και πάνω από την περιοχή
λειτουργίας περιβάλλοντος ολόκληρου του συστήµατος, το ρεύµα
εισροής µπορεί να αγγίξει τα 55 A ανά παροχή τροφοδοσίας για 10 ms
ή λιγότερο.
CR 2032 3,0 V ιόντος λιθίου σε σχήµα νοµίσµατος
4,1 V συσκευασία µπαταρίας ιόντος λιθίου
56 Τα πρώτα βήµατα µε το σύστηµά σας
Page 59

Χαρακτηριστικά περιβάλλοντος
ΣΗΜΕΙΩΣΗ: Για επιπλέον πληροφορίες σχετικά µε τις περιβαλλοντικές µετρήσεις για συγκεκριµένες
διαµορφώσεις συστήµατος, επισκεφτείτε τη διεύθυνση www.dell.com/environmental_datasheets.
Θερµοκρασία
Λειτουργίας
Αποθήκευσης
Σχετική υγρασία
Λειτουργίας
Αποθήκευσης
Μέγιστη ταλάντευση
Λειτουργίας
Αποθήκευσης
Μέγιστη δόνηση
Λειτουργίας
Αποθήκευσης
Υψόµετρο
Λειτουργίας
Αποθήκευσης
10° έως 35°C (50° έως 95°F)
–40° έως 65°C (–40° έως 149°F)
8% έως 85% (χωρίς συµπύκνωση) µε µέγιστη βαθµίδα υγρασίας 10%
ανά ώρα
5% έως 95% (χωρίς συµπύκνωση)
0,25 G σε 3–200 Hz για 15 λεπτά
0,5 G σε 3–200 Hz για 15 λεπτά
Ένας παλµός δόνησης στο θετικό τµήµα του άξονα z (ένας παλµός
στην κάθε πλευρά του συστήµατος) των 41 G για έως και 2 ms
Έξι διαδοχικά εκτελεσµένοι παλµοί δόνησης στο θετικό και αρνητικό
τµήµα των αξόνων x, y και z (ένας παλµός στην κάθε πλευρά του
συστήµατος) των 71 G για έως και 2 ms
–16 έως 3.048 µέτρα (–50 έως 10.000 πόδια)
–16 έως 10.600 µέτρα (–50 έως 35.000 πόδια)
Τα πρώτα βήµατα µε το σύστηµά σας 57
Page 60

58 Τα πρώτα βήµατα µε το σύστηµά σας
Page 61

Komputery Dell™
PowerVault™ NX1950
Rozpoczęcie pracy
z systemem
www.dell.com | support.dell.com
Page 62

Uwagi, pouczenia i ostrzeżenia
UWAGA: UWAGA oznacza ważną informację pozwalającą na lepsze wykorzystanie możliwości komputera.
POUCZENIE: POUCZENIE wskazuje na możliwość uszkodzenia sprzętu lub utraty danych i informuje
o sposobie uniknięcia problemu.
OSTRZEŻENIE: OSTRZEŻENIE wskazuje na możliwość wystąpienia szkody materialnej oraz
potencjalne niebezpieczeństwo obrażeń ciała lub śmierci.
_________________
Informacje zawarte w tym dokumencie mogą ulec zmianie bez uprzedzenia.
© 2006 Dell Inc. Wszelkie prawa zastrzeżone.
Powielanie w jakikolwiek sposób bez pisemnego zezwolenia firmy Dell Inc. jest zabronione.
Znaki towarowe użyte w tym tekście: Dell, logo DELL oraz PowerVault są znakami towarowymi firmy Dell Inc.; Intel i Xeon są zastrzeżonymi
znakami towarowymi firmy Intel Corporation; Microsoft oraz Windows są zastrzeżonymi znakami towarowymi firmy Microsoft Corporation.
W tym dokumencie mogą być także użyte inne znaki towarowe i nazwy handlowe w odniesieniu do podmiotów posiadających prawa do
znaków i nazw lub ich produktów. Firma Dell Inc. nie rości sobie praw własności do jakichkolwiek znaków towarowych i nazw handlowych,
których nie jest właścicielem.
Model EMU01
Wrzesień 2006 P/N KN401 Rev. A00
Page 63

Funkcje systemu
Sprzęt i funkcje oprogramowania zainstalowane w zestawie komputerowym:
•
Dwa procesory dwurdzeniowe Intel® Xeon® 5000 Sequence.
•
Całkowicie buforowane pamięci DIMM (FBD) o pojemności 4 GB i częstotliwości 667 MHz
z możliwością rozszerzenia do maksymalnie 8 GB.
System posiada również funkcję pamięci nadmiarowej, która zapewnia oszczędność pamięci lub odbicie
lustrzane pamięci. Każda z tych funkcji jest dostępna, jeżeli zainstalowanych jest osiem identycznych
modułów pamięci.
•
Dyski twarde o prędkości 15000 obrotów na minutę skonfigurowane do macierzy RAID1 dla operacji
wykonywanych przez system operacyjny odporny na błędy.
•
Wąski napęd DVD-ROM lub DVD-ROM/CD-RW.
•
Dwa zasilacze o mocy 670 W podłączane podczas pracy urządzenia w konfiguracji nadmiarowej 1+ 1.
•
Cztery moduły wentylatorów, każdy składający się z dwóch wentylatorów dwuwirnikowych, co daje
razem osiem wentylatorów chłodzących.
Płyta systemowa obejmuje następujące urządzenia:
•
Dwie karty nośne (lewa i środkowa), każda z gniazdem rozszerzenia PCI Express na kartę x8.
•
Gniazdo PCI przeznaczone dla zintegrowanej karty kontrolera RAID z pamięcią podręczną o pojemności
256 MB
•
Cztery zintegrowane karty sieciowe Gigabit Ethernet o prędkości transmisji danych 10 Mb/s, 100 Mb/s
i 1000 -Mb/s.
•
Dwa porty SAS o prędkości x4 do nawiązywania połączenia z podsystemem przechowywania danych lub
dwa porty Fibre Channel o prędkości 4 Gb/s do nawiązywania połączenia z siecią pamięci masowej
(SAN).
•
Cztery złącza kompatybilne z USB 2.0 (dwa z przodu i dwa z tyłu)
napęd CD-ROM, klawiaturę, mysz lub napęd USB typu flash.
•
Kontroler zdalnego dostępu (RAC) do zdalnego zarządzania systemem.
•
Zintegrowany podsystem kompatybilny z grafiką VGA, z kontrolerem grafiki ATI ES1000 PCI o
częstotliwości 33-MHz. Podsystem grafiki ma min. 16 MB na operacje graficzne z obsługą grafiki
dwuwymiarowej (2D). Maksymalna rozdzielczość wynosi 1600x1200 z 65 536 kolorów, grafika w
kolorach rzeczywistych jest obsługiwana przy następujących rozdzielczościach: 640 x 480, 800 x 600,
1024 x 768, 1280 x 1024. Gdy zainstalowana jest dodatkowa karta zdalnego dostępu maksymalna
rozdzielczość grafiki wynosi 1280x1024
•
Obwody zarządzania systemami, które monitorują działanie wentylatorów systemowych, jak również
napięcie krytyczne i temperaturę krytyczną systemu. Obwody zarządzania systemami działają w
połączeniu z oprogramowaniem do zarządzania systemami.
i baterią RAID.
, obsługujące
.
napęd dyskietek,
Rozpoczęcie pracy z systemem 61
Page 64

•
Złącza na paanelu tylnym obejmują złącza szeregowe, grafiki, USB, cztery złącza kontrolera NIC, dwa
SAS (lub Fibre Channel w złączach trybu bramki) oraz jedno złącze kontrolera NIC do zdalnego dostępu
(RAC).
•
Złącza na panelu przednim obejmują jedno złącze grafiki i dwa złącza USB.
•
1x5 diod LCD na panelu przednim dla identyfikatora (ID) systemu i komunikatów o błędach.
Więcej informacji o poszczególnych funkcjach można znaleźć w sekcji Specyfikacja techniczna.
Obsługiwany system operacyjny
Ten komputer obsługuje system operacyjny Microsoft® Windows® Unified Data Storage Server 2003
Standard/Enterprise x64 Editions (wersja standardowa i dla firm zoptymalizowana pod kątem zarządzania
dużą ilością danych na dyskach).
Inne przydatne informacje
OSTRZEŻENIE: Przewodnik z informacjami o produkcie zawiera ważne wskazówki dotyczące
bezpieczeństwa oraz przepisy prawne. Informacje dotyczące gwarancji mogą być zamieszczone
w tym dokumencie lub dostarczone jako oddzielny dokument.
•
Podręcznik montowania stelażu
opisują sposób montowania komputera na stelażu.
•
Podręcznik użytkownika sprzętu
problemów zaistniałych podczas użytkowania systemu, a także instrukcje dotyczące instalacji lub
wymiany elementów systemu. Ten dokument można znaleźć na płycie CD dostarczonej wraz z systemem
lub na stronie internetowej
•
Płyta CD dołączona do systemu zawiera dokumentację i narzędzia do konfiguracji systemu oraz
zarządzania nim.
•
Czasem wraz z systemem dostarczane są aktualizacje, opisujące zmiany w oprogramowaniu systemowym
i/lub dokumentacji.
lub
Instrukcje dotyczące montowania stelażu
zawiera informacje o funkcjach systemu i opis sposobów rozwiązywania
support.dell.com
.
dołączone do stelażu
UWAGA: Należy zawsze sprawdzać, czy pojawiły się nowe aktualizacje na stronie
support.dell.com i czytać informacje o aktualizacjach, ponieważ często pojawiają się one tam
wcześniej niż w innych dokumentach.
•
Dane o wersji lub pliki readme mogą być dołączone do systemu w celu dostarczenia informacji o
uaktualnieniach wprowadzonych w ostatniej chwili do systemu, dokumentacji lub zaawansowanych
technicznie materiałów referencyjnych, przeznaczonych dla doświadczonych użytkowników lub personelu
technicznego.
62 Rozpoczęcie pracy z systemem
Page 65

Uzyskiwanie pomocy technicznej
Jeżeli nie rozumiesz procedur opisanych w tym podręczniku lub jeśli system nie działa zgodnie z
oczekiwaniami, zapoznaj się z Podręcznikiem użytkownika sprzętu.
Dostępne są również szkolenia i certyfikaty firmy Dell; odwiedź stronę internetową www.dell.com/training
w celu uzyskania dalszych informacji. Ta usługa może nie być dostępna we wszystkich lokalizacjach.
Instalacja i konfiguracja
OSTRZEŻENIE: Przed wykonaniem poniższej procedury należy przeczytać instrukcje
dotyczące bezpieczeństwa oraz ważne informacje prawne zamieszczone w Przewodniku z
informacjami o produkcie i zastosować się do nich.
Ta sekcja opisuje czynności, które należy wykonać podczas konfigurowania systemu po raz pierwszy.
Rozpakowanie zestawu komputerowego
Rozpakuj komputer i zidentyfikuj jego poszczególne elementy.
Zachowaj wszystkie opakowania na wypadek, gdyby były później potrzebne.
Rozpoczęcie pracy z systemem 63
Page 66

Montowanie prowadnic i zestawu komputerowego na stelażu
Po zapoznaniu się z „Instrukcjami dotyczącymi bezpieczeństwa” przedstawionymi w dokumentacji
montowania stelażu przeznaczonego dla tego zestawu komputerowego należy zamontować komputer
na stelażu.
W celu uzyskania instrukcji dotyczących montowania zestawu komputerowego na stelażu,
należy przejrzeć dokumentację montowania stelażu.
Podłączanie klawiatury, myszy i monitora
Podłącz klawiaturę, mysz i monitor (opcjonalnie).
Złącza w tylnej części komputera oznaczone są symbolami wskazującymi , który kabel należy podłączyć
do danego złącza. Należy upewnić się, że dokręcone są śruby na złączu kabla monitora (o ile występują).
UWAGA:
podłączane są do komputera dwa monitory, obraz będzie domyślnie transmitowany do monitora
podłączonego do złącza na panelu przednim, ponieważ jednocześnie może być używany tylko jeden
wyświetlacz.
Jeżeli za pomocą złącz grafiki umieszczonych na panelu przednim i tylnym równocześnie
64 Rozpoczęcie pracy z systemem
Page 67

Podłączanie do zasilania
Podłącz kable zasilania do komputera.
Teraz podłącz drugą końcówkę kabla do uziemionego gniazdka elektrycznego lub innego źródła zasilania,
np. do zasilacza bezprzerwowego (UPS) lub jednostki rozdziału zasilania (PDU).
Mocowanie wspornika podtrzymującego kabel zasilania (opcjonalne)
Podłącz wspornik podtrzymujący kabel zasilania do prawego węzła na uchwycie zasilacza. Zegnij
kabel zasilacza, tworząc pętlę, w sposób przedstawiony na rysunku i przymocuj do zacisku kabla
na wsporniku. Powtórz te czynności dla drugiego zasilacza.
Teraz podłącz drugą końcówkę tych kabli do uziemionego gniazdka elektrycznego lub oddzielnego
źródła zasilania, np. do zasilania bezprzerwowego (UPS) lub do jednostki rozdziału zasilania (PDU).
Rozpoczęcie pracy z systemem 65
Page 68

Włączanie komputera
Włącz komputer i monitor (opcjonalnie).
Naciśnij przyciski zasilania komputera i monitora. Powinny zaświecić się wskaźniki zasilania.
Wyreguluj ustawienia monitora aż do uzyskania odpowiedniego obrazu.
Montaż osłony
Zamontuj osłonę (dodatkową).
Skonfiguruj system operacyjny
System operacyjny jest fabrycznie zainstalowany w komputerze. Aby przeinstalować system operacyjny,
zapoznaj się z dokumentacją dostarczoną wraz z komputerem.
66 Rozpoczęcie pracy z systemem
Page 69

Specyfikacja techniczna
Procesor
Typ procesora Dwa procesory dwurdzeniowe Intel Xeon 5100 Sequence
Szyna rozszerzeń
Typ szyny PCIe
Karty nośne PCIe Dwie karty o szerokości pasma x 8
Pamięć
Architektura Całkowicie buforowane moduły pamięci DIMM PC2-5300 o
częstotliwości 667 MHz z zabezpieczeniem ECC oraz dwoma
niezależnymi trybami „lockstep”, które umożliwiają tworzenie
dwukanałowych odbić lustrzanych.
Gniazda modułów pamięci Osiem gniazd 240-stykowych
Minimalna pojemność pamięci RAM 4 GB (cztery moduły po 1 GB)
Maksymalna pojemność pamięci RAM 8 GB
Napędy
Dyski twarde SAS Dwa 3,5 calowe dyski wewnętrzne podłączane podczas pracy
urządzenia, (dodatkowo) z obsługą płyty montażowej.
Napęd optyczny Jeden wąski napęd typu combo DVD-ROM/CD-RW lub napęd
DVD-ROM
UWAGA: Urządzenia DVD są przeznaczone wyłącznie
dla danych.
Złącza
Tylne
Kontroler NIC Cztery złącza RJ-45 (dla zintegrowanej 1-GB karty NIC)
Przechowywanie
RAC Jeden RJ-45
Szeregowe 9-stykowe złącze DTE, kompatybilne z 16550
USB Dwa 4-stykowe, kompatybilne z USB 2.0
Grafika 15-stykowa karta VGA
Dwa napędy SAS x4 lub dwa porty LC Fibre Channel
Rozpoczęcie pracy z systemem 67
Page 70

Złącza (ciąg dalszy)
Przednia
Grafika 15-stykowa karta VGA
USB Dwa 4-stykowe, kompatybilne z USB 2.0
Grafika
Typ grafiki Kontroler grafiki ATI ES1000; złącze VGA
Pamięć grafiki Pamięć DDR SDRAM o pojemności 16 MB
Zasilanie
Zasilacz prądu zmiennego
Moc 670 W
Napięcie 90–264 VAC, automatyczna regulacja zakresu, 47-63 Hz, 10.0 A
(przy 90 VAC)
Emisja ciepła 2697 BTU/godz. (max.)
Maksymalne natężenie prądu przy
włączeniu
Przy typowym zasilaniu i w całym dozwolonym zakresie warunków
pracy systemu natężenie prądu przy włączeniu może osiągnąć 55 A
na zasilacz przez 10 ms lub lub krócej.
Baterie
Bateria systemowa Litowo-jonowa bateria pastylkowa CR 2032 o napięciu 3,0 V
Bateria RAID (opcjonalna) Zestaw baterii litowo-jonowych o napięciu 4,1 V
Cechy fizyczne
Wysokość 4,29 cm (1,69 cala)
Szerokość 48,26 cm (19 cali)
Głębokość 76,2 cm (30 cali)
Ciężar (konfiguracja maksymalna) 17,69 kg (39 funtów)
68 Rozpoczęcie pracy z systemem
Page 71

Warunki otoczenia
UWAGA: W celu uzyskania dodatkowych informacji o warunkach otoczenia przewidzianych dla
poszczególnych konfiguracji systemu, proszę odwiedzić stronę internetową
www.dell.com/environmental_datasheets
Temperatura
W trakcie pracy Od 10° do 35°C (od 50° do 35,00°C)
Przechowywanie Od -40° do 65°C (od -40° do 149°F)
Wilgotność względna
W trakcie pracy Od 8% do 85% (bez kondensacji) przy maksymalnym gradiencie
wilgotności wynoszącym 10% na godzinę
Przechowywanie Od 5% do 95% (przy braku kondensacji)
Maksymalne natężenie wibracji
W trakcie pracy 0.25 G przy częstotliwości 3 – 200 Hz przez 15 min
Przechowywanie 0,5 G przy częstotliwości 3 – 200 Hz przez 15 min
Maksymalny wstrząs
W trakcie pracy Jeden wstrząs na dodatniej osi Z (jeden wstrząs po każdej stronie
systemu) o sile 41 G przez maksymalnie 2 ms
Przechowywanie Sześć kolejnych wstrząsów na dodatniej i ujemnej stronie osi X, Y, Z
(jeden wstrząs po każdej stronie systemu) o sile 71 G przez
maksymalnie 2 ms
Wysokość n.p.m.
W trakcie pracy od -16 do 3048 m (od –50 do 10 000 stóp)
Przechowywanie Od -16 do 10 600 m (od –50 do 35 000 stóp)
Rozpoczęcie pracy z systemem 69
Page 72

70 Rozpoczęcie pracy z systemem
Page 73

Системы Dell™
PowerVault™ NX1950
Начало работы
ссистемой
www.dell.com | support.dell.com
Page 74

Примечания, символы внимания и предупреждения
ПРИМЕЧАНИЕ: Подзаголовок ПРИМЕЧАНИЕ указывает на важную информацию, которая поможет
использовать компьютер более эффективно.
ВНИМАНИЕ: “ВНИМАНИЕ” указывает на возможность повреждения оборудования или потери
данных и объясняет, как этого избежать.
ПРЕДУПРЕЖДЕНИЕ: “ПРЕДУПРЕЖДЕНИЕ” указывает на потенциальную опасность
повреждения, получения легких травм или угрозу для жизни.
_________________
Информация, содержащаяся в данном документе, может быть изменена без предварительного уведомления.
© 2006 Dell Inc. Все права защищены.
Воспроизведение любой части данного документа любым способом без письменного разрешения корпорации Dell Inc. строго
воспрещается.
Торговые марки, упомянутые в данном документе: Dell, логотип DELL и PowerVault являются товарными знаками Dell Inc.;
Intel и Xeon являются зарегистрированными товарными знаками корпорации Intel; Microsoft и Windows являются
зарегистрированными товарными знаками корпорации Microsoft.
Остальные товарные знаки и торговые наименования могут использоваться в этом руководстве для обозначения компаний,
заявляющих права на товарные знаки и наименования, или продуктов этих компаний. Корпорация Dell Inc. не заявляет прав
ни на какие товарные знаки и наименования, кроме собственных.
Модель EMU01
Сентябрь 2006 г. P/N KN401 Rev. A00
Page 75

Характеристики системы
Ниже перечислены основные характеристики аппаратного и программного обеспечения системы.
•
Два двухядерных процессора Intel® Xeon® серии 5000.
•
Модули памяти Fully Buffered DIMM (FBD) с тактовой частотой 667 МГц объемом 4 Гб с возможностью
расширения до 8 Гб.
Кроме того, система характеризуется наличием избыточной памяти, что обеспечивает резервирование или
зеркальное отображение памяти. Каждая из этих возможностей доступна только в случае установки восьми
одинаковых модулей памяти.
•
Жесткие диски со скоростью 15000 об/мин, объединенные в массив RAID1 для обеспечения отказоустойчивой
работы операционной системы.
•
Один тонкий дисковод DVD-ROM или комбинированное устройство DVD-ROM/CD-RW.
•
Два блока питания мощностью 670 Вт с возможностью замены в “горячем” режиме в избыточной
конфигурации 1 + 1.
•
Четыре вентиляторных модуля, каждый из которых состоит из двух двухмоторных вентилятора – всего восемь
охлаждающих вентилятора.
Ниже указаны компоненты, имеющиеся на системной плате.
•
Две надстроечные платы (левая и центральная), каждая из которых предоставляет 8-канальный разъем
расширения PCI-Express.
•
Выделенный разъем PCI для встроенного контроллера RAID с
аккумулятором RAID.
•
Четыре встроенные сетевые интерфейсные платы Gigabit Ethernet, поддерживающие передачу данных
со скоростью 10 Мбит/с, 100 Мбит/с и 1000 Мбит/с и 2 Гбит/с.
•
Два 4-канальных порта SAS для связи с подсистемой хранения или два порта Fibre Channel со скоростью
передачи данных 4 Гбит/с для связи с сетями Storage Area Nnetwork (SAN).
•
Четыре разъема, совместимых со стандартом USB 2.0 (два на передней и два на задней панели),
обеспечивающие внешнюю поддержку
мыши или флэш-памяти USB.
•
Контроллер удаленного доступа RAC для удаленного управления системой.
•
Встроенная VGA-совместимая видеоподсистема с видеоконтроллером ATI ES1000 на шине PCI с частотой
33 МГц. В данной видеоподсистеме имеется не менее 16 Мб видеопамяти с поддержкой двумерной
графики. Максимальное разрешение 1600x1200 с поддержкой 65 536 цветов; режим true-color
поддерживается при разрешениях 640 x 480, 800 x 600, 1024 x 768, 1280 x 1024. При установке
дополнительной платы удаленного доступа максимальное разрешение видеоизображения – 1280x1024
•
Схема управления системой, следящая за работой вентиляторов, а также за напряжением питания и рабочей
температурой системы. Схема управления системой работает совместно с программным обеспечением
управления системой.
дисковода гибких дисков, дисковода компакт-дисков, клавиатуры,
кэш-памятью объемом 256 Мб и
.
Начало работы с системой 73
Page 76

•
Разъемы на задней панели, в том числе разъем последовательного порта, видеоадаптера, два разъема USB,
четыре разъема сетевой интерфейсной платы, два разъема SAS (или Fibre Channel для работы в режиме
шлюза) и один разъем сетевой интерфейсной платы для доступа к контроллеру RAC.
•
На передней панели расположен видеоразъем и два разъема USB.
•
ЖК-дисплей размером 1x5 дюймов на передней панели для отображения системного идентификатора
и сообщений об ошибках.
Более подробную информацию об отдельных компонентах см. в разделе Технические характеристики.
Поддержка операционных систем
Данная система поддерживает операционные системы Microsoft® Windows® Unified Data Storage Server 2003
Standard Edition и Enterprise x64 Edition.
Дополнительная полезная информация
ПРЕДУПРЕЖДЕНИЕ: В документе Информационное руководство по продуктам приведены
важные сведения по технике безопасности, а также нормативная информация. Гарантийная
информация может включаться в состав данного документа или в отдельный документ.
•
В документах
со стойкой, описывается процедура монтажа системы в стойку.
•
В документе
системы и описан порядок поиска и устранения неисправностей системы и установки или замены ее
компонентов. Этот документ можно найти на компакт-дисках, поставляемых вместе с системой или
на веб-сайте
•
Компакт-диски, поставляемые вместе с системой, предоставляют документацию, а также средства настройки
системы и управления ею.
•
К системе иногда прилагаются обновления, в которых описываются изменения, внесенные в систему,
программное обеспечение и/или документацию.
Руководство по установке в стойку
Руководство по эксплуатации оборудования
support.dell.com
.
или
Инструкции по установке в стойку
представлена информация о характеристиках
, поставляемых
ПРИМЕЧАНИЕ: Рекомендуется регулярно проверять наличие обновлений на веб-сайте
support.dell.com и в первую очередь изучать содержащуюся в них информацию, поскольку
зачастую она обладает более высоким приоритетом по отношению к информации в других
документах.
•
В комплект поставки могут включаться заметки о выпуске или файлы Readme, содержащие описание
последних обновлений и изменений системы или документации, а также дополнительную справочную
техническую информацию, предназначенной для опытных пользователей и технических специалистов.
Получение технической поддержки
В случае непонимания приведенной в настоящем руководстве процедуры или неправильной работы системы
см. документ Руководство пользователя оборудования.
С программой обучения и сертификации Enterprise Training & Certification корпорации Dell можно ознакомиться
на веб-сайте www.dell.com/training. Услуги обучения и сертификации доступны не во всех регионах.
74 Начало работы с системой
Page 77

Установка и настройка
ПРЕДУПРЕЖДЕНИЕ: Перед выполнением описанных ниже процедур ознакомьтесь с
инструкциями по технике безопасности и важной нормативной информацией, содержащейся
в документе Информационное руководство по продуктам.
В данном разделе описываются действия по первоначальной установке системы.
Распаковка системы
Распакуйте систему и идентифицируйте каждый компонент.
Сохраните все упаковочные материалы, так как они могут понадобиться в дальнейшем.
Начало работы с системой 75
Page 78

Установка направляющего кронштейна и системы в стойку
Установите систему в стойку после ознакомления с “Инструкциями по технике безопасности”,
представленными в документации по монтажу системы в стойку.
Инструкции по установке системы в стойку можно найти в документации по установке в стойку.
Подключение клавиатуры, мыши и монитора
Подключите клавиатуру, мышь и монитор (дополнительный).
Разъемы на задней панели системы снабжены значками, позволяющими определить правильное подключение
кабелей. На кабельном соединителе монитора необходимо затянуть винты (если они имеются).
ПРИМЕЧАНИЕ:
на передней и задней панелях) по умолчанию видеосигнал подается на разъем на передней панели,
так как в каждый момент времени может функционировать только один монитор.
При одновременном подключении к системе двух мониторов (в видеоразъемам
76 Начало работы с системой
Page 79

Подключение питания
Подсоедините кабели питания к системе.
Подключите другой конец кабеля к заземленной электрической розетке или отдельному источнику питания,
например к источнику бесперебойного питания или блоку распределения питания.
Установка кронштейна фиксация шнура питания (дополнительно)
Прикрепите кронштейн фиксации на правом изгибе рукоятки разъема шнура питания. Согните системный
шнур питания в петлю (см. рисунок) и прикрепите его к кабельному зажиму кронштейна. Повторите
данную процедуру со вторым источником питания.
Подключите другие концы кабелей питания к заземленной розетке или отдельному источнику питания,
например источнику бесперебойного питания или блоку распределения питания.
Начало работы с системой 77
Page 80

Включение системы
Включите систему и монитор (дополнительный).
Нажмите кнопку питания системы и монитора. Должны включиться индикаторы питания. С помощью
элементов управления монитора отрегулируйте качество изображения.
Установка лицевой панели
Установите лицевую панель (дополнительную).
Завершение установки операционной системы
На компьютере уже установлена операционная система. Инструкции по переустановке операционной системы
см. в документации, поставляемой вместе с системой.
78 Начало работы с системой
Page 81

Технические характеристики
Процессор
Тип процессора Два двуядерных процессора Intel Xeon серии 5100.
Шина расширения
Тип шины PCIe
Надстроечные платы PCIe Два 8-канальных гнезда
Память
Архитектура Модули DIMM PC2-5300 с тактовой частотой 667 МГц, полной
буферизацией, защитой ECC и с двухсторонним жестким режимом работы
Разъемы для модулей памяти Восемь 240-контактных
Минимальный объем оперативной памяти 4 Гб (четыре модуля 1 Гб)
Максимальный объем оперативной памяти 8 Гб
Накопители
Жесткие диски SAS Два 3,5-дюймовых внутренних диска с возможностью подключения в
“горячем” режиме и (дополнительной) поддержкой объединительной
платы
Дисковод оптических дисков Один тонкий дисковод DVD-ROM или комбинированное устройство
DVD-ROM/CD-RW
ПРИМЕЧАНИЕ: Устройства DVD предназначены только
для данных.
Разъемы
Задняя панель
Сетевая интерфейсная плата
Хранение Два 4-канальных порта SAS или два порта LC Fibre Channel
RAC
Последовательный порт
USB
Видео
Передняя панель
Видео
USB
Четыре разъема RJ-45 (для встроенных сетевых интерфейсных плат
1 гигабит)
Один разъем RJ-45
9-контактный DTE-разъем, совместимый с 16550
Два 4-контактных разъема, совместимых с USB 2.0
15-контактный VGA
15-контактный разъем VGA
Два 4-контактных разъема, совместимых с USB 2.0
Начало работы с системой 79
Page 82

Видео
Тип видео Видеоконтроллер ATI ES1000; VGA-разъем
Видеопамять DDR SDRAM на 16 Мб
Электропитание
Источник питания переменного тока (для каждого блока питания)
Мощно сть
Напряжение
Тепл оотдач а
Максимальный бросок тока
Аккумуляторы
Системный аккумулятор
Аккумулятор RAID (дополнительно)
670 Вт
90-264 В переменного тока, функция автоматического переключения
диапазонов измерений, 47-63 Гц, 10,0 A (при напряжении 90 В
переменного тока)
2697 BTU/час (максимум)
В условиях стандартного электропитания и нормальных условий
окружающей среды системы бросок тока может достигать не более 55 А
на блок питания в течение не более 10 мс.
Круглый ионно-литиевый CR 2032, 3,0 В
Блок ионно-литиевых батарей на 4,1 В
Габаритные размеры
Высота 4,29 см
Ширина 48,26 см
Глубина 76,2 см
Вес (макс. конфигурация) 17,69 kg
80 Начало работы с системой
Page 83

Требования к окружающей среде
ПРИМЕЧАНИЕ: Дополнительную информацию об измерении параметров окружающей среды
для установки определенной конфигурации системы см. по адресу:
www.dell.com/environmental_datasheets.
Температура
Эксплуатация
Хранение
Относительная влажность
Эксплуатация
Хранение
Максимальная вибрация
Эксплуатация
Хранение
Максимальная ударная нагрузка
Эксплуатация
Хранение
Высота над уровнем моря
Эксплуатация
Хранение
от 10° до 35°C
от -40 до 65° C
От 8% до 85% (без конденсации) с максимальным изменением влажности
10% в час.
5 - 95 % (без конденсации)
0,25 G при частоте от 3 до 200 Гц в течение 15 минут
0,5 G при частоте от 3 до 200 Гц в течение 15 минут
Один ударный импульс 41 g длительностью не более 2 мс в положительном
направлении по оси z (по одному импульсу с каждой стороны системы)
Шесть последовательных ударных импульсов 71 g длительностью не более
2 мс в положительном и отрицательном направлениях по осям x, y и z
(по одному импульсу с каждой стороны системы).
от -16 до 3048 м
от -16 до 10600 м
Начало работы с системой 81
Page 84

82 Начало работы с системой
Page 85

Sistemas Dell™
PowerVault™ NX1950
Procedimientos iniciales
con el sistema
www.dell.com | support.dell.com
Page 86

Notas, avisos y precauciones
NOTA: una NOTA proporciona información importante que le ayudará a utilizar mejor el ordenador.
AVISO: un AVISO indica la posibilidad de daños en el hardware o la pérdida de datos, e informa de cómo evitar
el problema.
PRECAUCIÓN: un mensaje de PRECAUCIÓN indica el riesgo de daños materiales, lesiones o incluso la muerte.
_________________
La información contenida en este documento puede modificarse sin previo aviso.
© 2006 Dell Inc. Reservados todos los derechos.
Queda estrictamente prohibida la reproducción de este documento en cualquier forma sin la autorización por escrito de Dell Inc.
Marcas comerciales utilizadas en este texto: Dell, el logotipo de DELL y PowerVault son marcas comerciales de Dell Inc.; Intel y Xeon son
marcas comerciales registradas de Intel Corporation; Microsoft y Windows son marcas comerciales registradas de Microsoft Corporation.
Otras marcas y otros nombres comerciales pueden utilizarse en este documento para hacer referencia a las entidades que los poseen
o a sus productos. Dell Inc. renuncia a cualquier interés sobre la propiedad de marcas y nombres comerciales que no sean los suyos.
Modelo EMU01
Septiembre de 2006 P/N KN401 Rev. A00
Page 87

Componentes del sistema
Los principales componentes de hardware y software del sistema son:
• Dos procesadores Intel
• Módulos DIMM con búfer completo (FB-DIMM) de 4 GB a 667 MHz ampliables a un máximo
de 8 GB.
El sistema también dispone de memoria redundante, que puede utilizarse como sustitución de memoria o
duplicación de memoria. Ambas características están disponibles si se instalan ocho módulos de memoria
idénticos.
• Unidades de disco duro a 15 000 rpm configuradas en una matriz RAID 1 para operaciones de sistema
operativo con tolerancia a errores.
• Unidad de DVD-ROM o DVD-ROM/CD-RW reducida.
• Dos fuentes de alimentación de 670 W de acoplamiento activo en una configuración redundante
1 + 1.
• Cuatro módulos de ventilador, formados por dos ventiladores de dos rotores cada uno, para un total
de ocho ventiladores de refrigeración.
La placa base incluye los componentes siguientes:
• Dos tarjetas verticales (izquierda y central), cada una de ellas con una ranura de expansión
PCI-Express x8.
• Una ranura PCI dedicada para una tarjeta controladora RAID integrada con 256 MB de
caché y una batería RAID.
• Cuatro NIC Ethernet Gigabit integradas que admiten velocidades de datos de 10 Mbps, 100 Mbps
y 1 000 Mbps.
• Dos puertos SAS x4 para conectividad con el subsistema de almacenamiento o dos puertos
Fibre Channel de 4 Gbps para conectividad con una red de área de almacenamiento (SAN).
• Cuatro conectores compatibles con USB 2.0 (dos en la parte frontal y dos en la parte posterior)
que admiten soporte externo de
un ratón o una unidad flash USB.
• Controladora de acceso remoto (RAC) para la administración remota de sistemas.
•
Un subsistema de vídeo integrado compatible con VGA con una controladora de vídeo PCI ATI
ES1000 a 33 MHz. Este subsistema de vídeo contiene un mínimo de 16 MB de memoria gráfica que
admite gráficos en 2D. La resolución máxima es de 1 600 x 1 200 con 65 536 colores; se admiten
gráficos de color verdadero en las resoluciones siguientes: 640 x 480, 800 x 600, 1 024 x 768,
1 280 x 1 024. Cuando la tarjeta de acceso remoto opcional está instalada, la resolución máxima
de vídeo es de 1 280 x 1 024
• Circuitos de administración de sistemas que supervisan el funcionamiento de los ventiladores
del sistema, así como los voltajes y temperaturas críticos del sistema. Los circuitos de administración
de sistemas funcionan conjuntamente con el software de administración de sistemas.
®
Xeon® de doble núcleo secuencia 5000.
una unidad de disquete, una unidad de CD-ROM, un teclado,
.
memoria
Procedimientos iniciales con el sistema 85
Page 88

• En el panel posterior se incluyen los conectores serie, de vídeo, dos conectores USB, cuatro conectores
de NIC, dos conectores SAS (o Fibre Channel, en modo de puerta de enlace) y un conector de NIC
para acceso a la RAC.
• En el panel frontal se incluyen un conector de vídeo y dos conectores USB.
• LCD de panel frontal 1x5 para la ID y los mensajes de error del sistema.
Para obtener más información sobre componentes específicos, consulte Especificaciones técnicas.
Sistema operativo admitido
El sistema admite el sistema operativo Microsoft® Windows® Unified Data Storage Server 2003
Standard Edition y Enterprise x64 Edition.
Otra información útil
PRECAUCIÓN: la Guía de información del producto contiene información importante sobre seguridad y
normativas. La información de la garantía puede estar incluida en este documento o constar en un documento
aparte.
• En los documentos
con el rack, se describe cómo instalar el sistema en un rack.
• En el
• Los CD que se facilitan con el sistema proporcionan documentación y herramientas para configurar
• Algunas veces, con el sistema se incluyen actualizaciones que describen los cambios realizados
Manual del propietario del hardware
del sistema y se describe cómo solucionar problemas del sistema e instalar o sustituir componentes.
Este documento puede encontrarse en los CD incluidos con el sistema o en
y administrar el sistema.
en el sistema, en el software o en la documentación.
Guía de instalación del rack
se proporciona información sobre los componentes
o
Instrucciones de instalación del rack
support.dell.com
, incluidos
.
NOTA: compruebe si hay actualizaciones en support.dell.com y, si las hay, léalas antes de proceder
a la instalación, puesto que a menudo sustituyen la información contenida en otros documentos.
• Es posible que se incluyan notas de la versión o archivos Léame para proporcionar actualizaciones de
última hora relativas al sistema o a la documentación, o material de consulta técnica avanzada destinado
a técnicos o usuarios experimentados.
86 Procedimientos iniciales con el sistema
Page 89

Obtención de asistencia técnica
Si no comprende algún procedimiento descrito en esta guía o si el sistema no funciona del modo esperado,
consulte el
Tiene a su disposición el servicio de formación y certificación Dell para empresas. Para obtener más
información, visite
Manual del propietario del hardware
www.dell.com/training
. Es posible que este servicio no se ofrezca en todas las regiones.
.
Instalación y configuración
PRECAUCIÓN: antes de realizar el procedimiento siguiente, lea y siga las instrucciones de seguridad
y la información importante sobre normativas incluidas en la Guía de información del producto.
En esta sección se describen los pasos para configurar el sistema por primera vez.
Desembalaje del sistema
Desembale el sistema e identifique cada elemento.
Guarde el material de embalaje por si lo necesita más adelante.
Procedimientos iniciales con el sistema 87
Page 90

Instalación del riel y del sistema en un rack
Después de leer las instrucciones de seguridad incluidas en la documentación del sistema
relativa a la instalación del rack, instale el sistema en el rack.
Consulte la documentación de instalación del rack para obtener instrucciones
sobre la instalación del sistema en un rack.
Conexión del teclado, el ratón y el monitor
Conecte el teclado, el ratón y el monitor (opcional).
Los conectores de la parte posterior del sistema incluyen iconos que indican qué cable debe enchufarse
en cada conector. Asegúrese de apretar los tornillos (si los hay) del conector del cable del monitor.
NOTA: si conecta simultáneamente dos monitores al sistema, mediante la conexión frontal y la posterior,
el vídeo utilizará de manera predeterminada la conexión frontal, debido a que sólo puede funcionar una
pantalla a la vez.
88 Procedimientos iniciales con el sistema
Page 91

Conexión de la alimentación
Conecte los cables de alimentación al sistema.
Conecte el extremo opuesto del cable a una toma eléctrica con conexión a tierra o a otra fuente
de alimentación, como un sistema de alimentación ininterrumpida (SAI) o una unidad
de distribución de alimentación (PDU).
Instalación del soporte de retención del cable de alimentación (opcional)
Fije el soporte de retención del cable de alimentación en el codo derecho del asa de la fuente
de alimentación. Doble el cable de alimentación del sistema en forma de bucle, tal como se muestra
en la ilustración, y fíjelo a la abrazadera correspondiente del soporte. Repita el procedimiento
para la segunda fuente de alimentación.
Conecte el extremo opuesto de los cables de alimentación a una toma eléctrica con conexión
a tierra o a una fuente de energía independiente, como un SAI o una PDU.
Procedimientos iniciales con el sistema 89
Page 92

Encendido del sistema
Encienda el sistema y el monitor (opcional).
Presione el botón de encendido del sistema y del monitor. Deberán encenderse los indicadores
de alimentación. Ajuste los controles del monitor hasta que la imagen mostrada sea satisfactoria.
Instalación del embellecedor
Instale el embellecedor (opcional).
Finalización de la configuración del sistema operativo
El sistema operativo está preinstalado en el sistema. Para volver a instalar el sistema operativo,
consulte la documentación que se entrega junto con el sistema.
90 Procedimientos iniciales con el sistema
Page 93

Especificaciones técnicas
Procesador
Tipo de procesador Dos procesadores Intel Xeon
Bus de expansión
Tipo de bus PCIe
Tarjetas verticales PCIe Dos x8
Memoria
Arquitectura Módulos DIMM PC2-5300 con búfer completo a 667 MHz
con protección ECC y funcionamiento lockstep dual
Zócalos de módulo de memoria Ocho de 240 patas
RAM mínima 4 GB (cuatro módulos de 1 GB)
RAM máxima 8 GB
Unidades
Unidades de disco duro SAS Dos unidades internas de 3,5 pulgadas y acoplamiento activo
(opcionales) con soporte de plano posterior
Unidad óptica Una combinación DVD-ROM/CD-RW reducida o DVD-ROM
NOTA: los dispositivos de DVD son sólo de datos.
de doble núcleo secuencia 5100
Conectores
Parte posterior
NIC
En almacenamiento Dos unidades SAS x4 o dos puertos LC Fibre Channel
RAC
Serie
USB
Vídeo
Parte frontal
Vídeo
USB
Cuatro RJ-45 (para NIC de 1 GB integradas)
Un RJ-45
Nueve patas, DTE, compatible con el estándar 16550
Dos de 4 patas compatibles con USB 2.0
VGA de 15 patas
VGA de 15 patas
Dos de 4 patas compatibles con USB 2.0
Procedimientos iniciales con el sistema 91
Page 94

Vídeo
Tipo de vídeo Controladora de vídeo ATI ES1000; conector VGA
Memoria de vídeo 16 MB de SDRAM DDR
Alimentación
Fuente de alimentación de CA (por fuente de alimentación)
Potencia
Vo lt aj e
Disipación de calor
Corriente de conexión máxima
Baterías
Batería del sistema
Batería RAID (opcional)
Características físicas
Altura 4,29 cm
Anchura 48,26 cm
Profundidad 76,2 cm
Peso (configuración máxima) 17,69 kg
670 W
De 90 a 264 V CA, autoajustable, de 47 a 63 Hz, 10,0 A (a 90 V CA)
2 697 BTU/h (789,8 W) como máximo
En condiciones normales de línea y en todo el ambiente del rango
operativo del sistema, la corriente de la conexión puede alcanzar
los 55 A por cada fuente de alimentación durante 10 ms o menos.
Batería de tipo botón de ion-litio de 3,0 V CR2032
Batería de ion-litio de 4,1 V
92 Procedimientos iniciales con el sistema
Page 95

Especificaciones ambientales
NOTA: para obtener información adicional sobre medidas ambientales relativas a configuraciones de sistema
específicas, visite la página web www.dell.com/environmental_datasheets.
Te mp e ra t ur a
En funcionamiento
En almacenamiento
Humedad relativa
En funcionamiento
En almacenamiento
Vibración máxima
En funcionamiento
En almacenamiento
Impacto máximo
En funcionamiento
En almacenamiento
Altitud
En funcionamiento
En almacenamiento
De 10 a 35 °C
De –40 a 65 °C
Del 8 al 85% (sin condensación) con una gradación de humedad
máxima del 10% por hora
Del 5 al 95% (sin condensación)
0,25 G a 3-200 Hz durante 15 minutos
0,5 G a 3-200 Hz durante 15 minutos
Un choque en el sentido positivo del eje z (un choque en cada lado
del sistema) de 41 G durante un máximo de 2 ms
Seis choques ejecutados consecutivamente en el sentido positivo y
negativo de los ejes x, y y z (un choque en cada lado del sistema)
de 71 G durante un máximo de 2 ms
De –16 a 3 048 m
De –16 a 10 600 m
Procedimientos iniciales con el sistema 93
Page 96

94 Procedimientos iniciales con el sistema
Page 97

ריצב דחא להZ יבויח )תכרעמה לש דצ לכב דחא לה ( המצעב
יריצב יפוצר לה ילג השיש X ,Y ,Z יילילשו ייבויח) לה
תכרעמה לש דצ לכב דחא
( לש המצעב71 G שמל 2ילימ תוינש
רתויה לכל
םייזיפ םידממ
4.29 ס"מ הבוג
48.26 ס"מ בחור
76.2ס "מ קמוע
17.69ק "ג לקשמ)תיברמ הרוצתב(
www.dell.com/environmental_datasheets.
הרוטרפמט
10°C דע 35°C הלועפ
-40°C דע 65°C וסחא
תיסחי תוחל
8% דע85% )יוביע אלל ( לש יברמ תוחל יוניש בצק ע10%העשל הלועפ
5% דע 95% )יוביע אלל ( וסחא
תיברמ הדיער
.25 Gב 3–200 Hz שמב 15קד '
.5 Gב 3–200 Hz שמב 15קד '
יברמ לה
הלועפ
לש41 G שמל 2ילימ רתויה לכל תוינש
וסחא
יה ינפ לעמ הבוג
16 דע 3048רטמ הלועפ
16 דע 10,600 רטמ וסחא
הביבס
הרעה: ףסונ עדימללע תכרעמ תורוצת רובע תויתביבס תודימ תויפיצפס ,תבותכב רקב
הלועפ
וסחא
104| תכרעמה םע הדובעה תליחת
Page 98

םיקסיד
r
לדוגב יימינפ יקסיד ינש3.5ניא ,' ח רוביחב יכמותה
)ילנויצפוא( ,א חול תכימת ע
בלושמ קד נוכDVD-ROM/CD-RW נוכ וא DVD-ROM
הרעה:
DVD םיללוכדבלב םינותנ.
גוסמ העבראRJ-45) יבלושמ תשר קשממ יסיטרכ רובע1-GB( תשר קשממ סיטרכ)NIC(
תואיצי יתשSAS x4 יביס ורע תואיצי יתש וא LC
גוסמ דחאRJ-45
9יניפ ,DTE , אות16550
לש יינש4יניפ , ימאות USB 2.0
) ומיסקמ( וח תטילפ
הלוכ תכרעמה לש הביבס יאנתב הלעפה חווטבו יליגר וק יאנתב ,
ל עיגי סנכנה רזהש כתיי55 A שמל חוכ קפס לכל 10מ " וא ש
VGA
15יניפ
תיזח
VGA 15 יניפ
לש יינש4יניפ , ימאותUSB 2.0
ואדיו רקבATI ES1000 ; רבחמVGA
16 MB לש DDR SDRAM
670 W קפסה
90–264 VAC ,וטוא חווטיטמ ,47-63 Hz ,10.0 A) ב90 VAC(
2697 BTU/h
תוחפ.
ותיל עבטמ תללוסCR 2032 3.0-V
וי ויתיל תללוס זראמ4.1-V
גוסמ יחישק יקסידSAS
יטפוא נוכ
םירבחמ
ירוחא חול
בג
וסחא
RAC
ירוט
USB
ואדיו
ואידיו
USB
ואדיו
ואדיו גוס
ואדיו ורכיז
חתמ
חוכ קפסAC) חוכ קפס לכ רובע(
חתמ
יברמ יעגר רז
תוללוס
רעמ תללוסתכ
תללוסRAID) ילנויצפוא(
תכרעמה םע הדובעה תליחת | 103
Page 99

נקתהיוסיכה חול ת
יוסיכה חול תא קתה)ילנויצפוא.(
-
הלעפהה תכרעמ תנקתה תא םלשה
הלעפהה תכרעמ תא שדחמ יקתהל ידכ ,תכרעמל רוצמה דועיתב ייע .
תכרעמב שארמ תנקתומ הלעפהה תכרעמ.
םיינכט םיטרפמ
דבעמ
הלופכ הביל ע ידבעמ ינשIntel Xeon processor 5100
Sequence
PCIe קיפא גוס
בחורב יצירח ינש8ילולסמ יביכרPCIe Riser
דבעמ גוס
הבחרה קיפא
יביכרPC2-5300 Fully Buffered DIMM (FBD)לש 667 MHz
תנגה עECC תלועפ עו Lockstepוד תינוויכ
לש יעקש הנומש240יניפ ר יצירחורכיז יביכ
4 GB) לש ילודומ העברא1 GB( ורכיזRAMילאמינימ
8 GB ורכיזRAMילאמיסקמ
ןורכיז
הרוטקטיכרא
102| תכרעמה םע הדובעה תליחת
Page 100

רובע הז ילה לע רוזח
למשחה לבכ לע הנגהל ןתיווזה תנקתה)ילנויצפוא(
חוכה קפס תידי לש ינמיה ופיכב למשחה לבכ לע הרימשל תיווזה תא רבח. לש למשחה לבכ תא פוכ
ונממ רוצו תכרעמה רויאב גצומכ האלול .תיווזב לבכה ספתל ותוא רבח כמ רחאל.
ינשה חוכה קפס.
PDU
תכרעמ
.
6
תכרעמ וגכ דרפנ חתמ רוקמל וא קראומ ילמשח עקשל למשחה ילבכ לש רחאה הצקה תא סנכהUPS וא
7
תכרעמה תקלדה
גצבו תכרעמב הלעפהה גתמ לע חל. וקלדיי למשחה ינווחמ. תעיבשמ הנומת תגצהל דע גצה ידקפ תא נווכ
תכרעמה םע הדובעה תליחת | 101
גצה תאו תכרעמה תא קלדה)ילנויצפוא.(
8
וצר.
 Loading...