

Page 1

Dell™ PowerVault™
NX1950 Systems
Deployment Guide
Page 2

Notes and Notices
NOTE: A NOTE indicates important information that helps you make better use of
your computer.
NOTICE: A NOTICE indicates either potential damage to hardware or loss of data
and tells you how to avoid the problem.
____________________
Information in this document is subject to change without notice.
© 2006–2008 Dell Inc. All rights reserved.
Reproduction in any manner whatsoever without the written permission of Dell Inc. is strictly forbidden.
Trademarks used in this text: Dell, the DELL logo, Pow er Edg e, Po we r Vau lt , and OpenManage are
trademarks of Dell Inc.; Microsoft, SharePoint, Windows Server, and Windows are either trademarks or
registered trademarks of Microsoft Corporation in the United States and/or other countries; UNIX is
a registered trademark of The Open Group in the United States and other countries.
Other trademarks and trade names may be used in this document to refer to either the entities claiming
the marks and names or their products. Dell Inc. disclaims any proprietary interest in trademarks and
trade names other than its own.
March 2008 Rev. A05
Page 3

Contents
Microsoft Windows Unified Data Storage Server 2003
Operating System Features
Solution Overview . . . . . . . . . . . . . . . . . . 5
. . . . . . . . . . . . . . . . 7
PowerVault NX1950 Management Console
. . . . . 9
Microsoft iSCSI Software Target. . . . . . . . . . 14
Indexing
Single Instance Storage
. . . . . . . . . . . . . . . . . . . . . . . 15
. . . . . . . . . . . . . . 16
Windows SharePoint Services . . . . . . . . . . . 17
Clustering
. . . . . . . . . . . . . . . . . . . . . . 19
Dell Storage Management Tools
Dell OpenManage Server Administrator
. . . . . . . . . . . . 19
. . . . . . 19
Modular Disk Storage Manager
(Integrated Solution)
. . . . . . . . . . . . . . . . 20
EMC Navisphere Manager
(Gateway Solution) . . . . . . . . . . . . . . . . . 20
Group Manager (Gateway Solution)
. . . . . . . . 20
Restoring Your Operating System and the
Dell Components
. . . . . . . . . . . . . . . . . . . . . 21
Installing Your Operating System Using the
Dell Systems Build and Update Utility
. . . . . . . 22
Restoring the Dell Storage
Array Components
Dell OpenManage Server Administrator
Installing the MUI
Applying the MUI Language
. . . . . . . . . . . . . . . . . 26
. . . . . . 31
. . . . . . . . . . . . . . . . . . 33
. . . . . . . . . . . . 34
Index . . . . . . . . . . . . . . . . . . . . . . . . . . . . . . . 37
Contents 3
Page 4

4 Contents
Page 5

This document provides information about the deployment tools on your
system and a general overview of the Microsoft
®
Windows® Unified Data
Storage Server 2003 x64 operating system. For information about cabling,
configuring, and localizing your Dell™ PowerVault™ NX1950 storage
solution, see the Dell PowerVault NX1950 Systems Installation Guide.
For more information, see the operating system documentation located on the
Dell documentation website at www.dell.com/ostechsheets.
The following topics are discussed in this document:
• "Solution Overview" on page 5
• "Microsoft Windows Unified Data Storage Server 2003 Operating System
Features" on page 7
• "PowerVault NX1950 Management Console" on page 9
• "Dell Storage Management Tools" on page 19
• "Restoring Your Operating System and the Dell Components" on page 21
NOTE: Throughout this document, PowerVault NX1950 storage system refers to the
individual storage unit and PowerVault NX1950 storage solution refers to the
configuration of the storage unit along with the storage arrays.
Solution Overview
The PowerVault NX1950 storage solution consists of either a single-node or a
multiple-node cluster configuration running the Windows Unified Data
Storage Server 2003 operating system. The solution is configured from Dell
for either a PowerVault MD3000 storage array (integrated solution), a
Dell|EMC storage array (Dell|EMC Storage Area Network [SAN] gateway
solution) or a Dell EqualLogic storage array (Dell EqualLogic iSCSI Storage
Area Network [SAN] gateway solution). The solution is pre-configured with
the operating system and the required software. Minimal configuration steps
are required to complete the setup of the solution.
NOTE: The default Administrator password for your system is storageserver.
Figure 1-1 illustrates the components of the integrated solution and the SAN
gateway solutions. Table 1-1 lists the supported software components for
Windows Unified Data Storage Server 2003.
Deployment Guide 5
Page 6
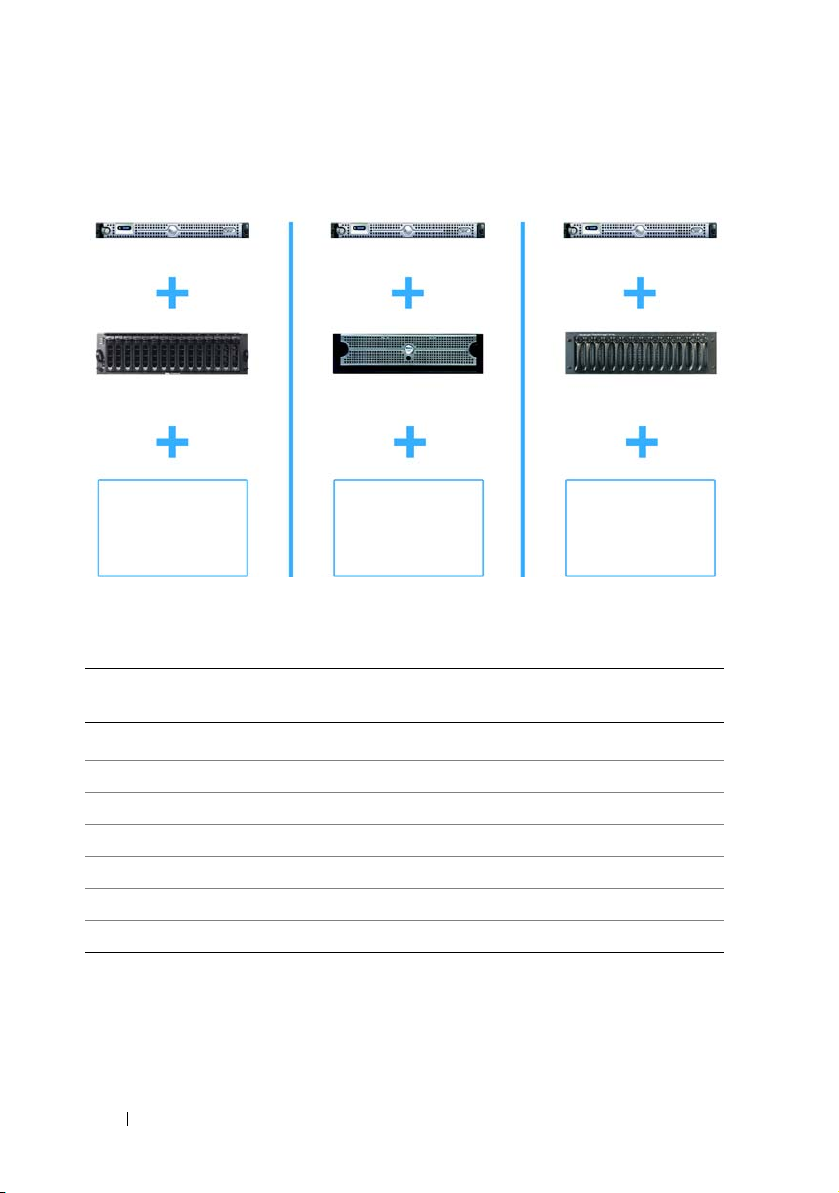
Figure 1-1. PowerVault NX1950 Storage Solutions
PowerVault NX1950 System
PowerVault NX1950 System
PowerVault NX1950 System
PowerVault MD3000
Storage Array
Dell|EMC Storage Array Dell EqualLogic
Storage Array
Windows Unified
DataStorage Server
2003 (Standard or
Enterprise)
Windows Unified
Data Storage Server
2003 (Standard or
Enterprise)
Windows Unified
Data Storage Server
2003 (Enterprise)
Table 1-1. Supported Software Components for
Windows Unified Data Storage Server 2003
DSIW
Share Manager X X
EqualLogic Auto Snapshot Manager X X 9
Share & Storage Provision 99 X
Storage Manager for SANs 99 9
Microsoft Initiator X X 9
Initial Configuration Tasks Wizard 99 X
Integrated EMC Gateway EqualLogic
99 X
Gateway
9
6 Deployment Guide
Page 7

Microsoft Windows Unified Data Storage Server 2003 Operating System Features
This section provides comprehensive information on the features that are
available to you as part of the storage solution.
The Windows Unified Data Storage Server 2003 operating system is
configured to provide the following functionality:
• Optimal performance for Network File System (NFS) and Common
Internet File System (CIFS)
• Support for Microsoft Internet SCSI (iSCSI) Software Target
block storage services in addition to file-level services
• Significant enhancements in share and storage management scenarios as
well as integration of storage server management components and
functionality
NOTE: For compatibility information of network and storage components in the
PowerVault NX1950 storage solution, see the Dell PowerVault NX1950 Systems
Support Matrix located on the Dell Support website at support.dell.com.
Supported Editions
Dell supports the following editions of the Windows Unified Data Storage
Server 2003 operating system:
• Windows Unified Data Storage Server 2003, Standard x64 Edition
• Windows Unified Data Storage Server 2003, Enterprise x64 Edition
to provide
NOTE: The Windows Unified Data Storage Server 2003, Enterprise x64 Edition
operating system supports a multiple-node cluster environment.
NOTE: The Windows Unified Data Storage Server 2003, x64 Standard and
Enterprise Editions support the x64-based versions of PowerVault NX1950
Management console snap-ins only and not the 32-bit versions.
Deployment Guide 7
Page 8

Additional Features in Windows Unified Data Storage Server 2003
Windows Unified Data Storage Server 2003 provides the following features
and functionality. For supported software components, see Table 1-1.
• Efficient and unified file management by extending and consolidating the
management interface.
• Initial Configuration Tasks user interface and Command Line
Interface (CLI) support through the Special Administration Console (SAC)
simplify setting up the storage server.
• Windows Unified Data Storage Server 2003 console integrates multiple
snap-ins for file server management.
• File Server Management provides support for performing additional
administration tasks.
• Share and Storage Management is a new snap-in that includes two new
wizards for provisioning shares and storage.
• Microsoft iSCSI Software Target including the new iSCSI Software Target
snap-in and wizards for creating and managing iSCSI targets, virtual disks,
and snapshots.
• NFS provides an identity mapping interface and wizard.
• Remote Desktop for Administration provides a new Microsoft Remote
Administration applet that enables browser-based remote access to the
management console from client systems running Linux or Microsoft operating
systems.
These features and functionalities provide significant improvements over
previous operating systems from Microsoft.
8 Deployment Guide
Page 9

The Windows Unified Data Storage Server 2003 console opens in the
PowerVault NX1950 Management Console and allows administrators to
perform a majority of storage management tasks such as provisioning and
administering volumes, sharing folders, and managing iSCSI Software Targets.
Windows Unified Data Storage Server 2003 integrates the following snap-ins:
• PowerVault NX1950 Management console
• Microsoft iSCSI Software Target
NOTE: The Microsoft iSCSI Software Target is not applicable to the
Dell EqualLogic gateway solution.
• Indexing service
• Local users and groups
•Event viewer
• Performance logs and alerts
NOTE: Windows Unified Data Storage Server 2003 console is also referred to as
the PowerVault NX1950 storage system console.
The Windows Unified Data Storage Server 2003 console opens automatically
when you close the Initial Configuration Tasks window. If you have chosen the
option not to display the Initial Configurations Tasks window, the Windows
Unified Data Storage Server 2003 console opens automatically after the Dell
Storage Initialization wizard runs when you log in to the operating system as
an administrator. If the console does not open automatically or you have
closed it, you can open it manually using administrator privileges.
To open the Windows Unified Data Storage Server 2003 console, click
Start→ All Programs→ Administrative Tools→ Windows Unified Data
Storage Server 2003.
PowerVault NX1950 Management Console
The PowerVault NX1950 Management console can be used to perform the
various tasks listed in Table 1-2 using the adjacent snap-ins.
Deployment Guide 9
Page 10

Table 1-2. Tasks and Tools/Snap-Ins to be used
Tasks Tool/Snap-In used
Provisioning and managing volumes
Share and Storage Management
Creating and managing SMB/CIFS
shared folders and NFS exports
Creating and managing iSCSI targets Microsoft iSCSI Software Target
NOTE: This option is not available with
Dell EqualLogic gateway solution.
Defragmenting volumes
Setting quota limits
Disk Management/Disk Defragmenting
File Server Resource Manager
Creating storage utilization reports
Replicating data to and from the
DFS Management
file server
Managing SANs
Storage manager for SANs
The PowerVault NX1950 Management console provides a single console for
file sharing management and disk management.
The PowerVault NX1950 Management console in Windows Unified Data
Storage Server 2003 provides access to the following additional administrative
features:
• Editing the server configuration using the PowerVault NX1950
Initial Configuration Ta s ks
user interface
• Editing the cluster configuration using the cluster administrator tools
• Editing the network file system (NFS) configuration using the
Services for NFS Configuration Guide
These tools can also be accessed from the
and
Identity Mapping Setup
Initial Configuration Tasks
Microsoft
wizard.
user
interface.
10 Deployment Guide
Page 11

Share and Storage Management
The Share and Storage Management snap-in allows you to easily set up and
manage shared folders and storage. Share and Storage Management provides
the following features:
• PowerVault NX1950 Management Console-based management of shared
folders and storage.
•
Provision Storage
wizard for creating and configuring storage, creating a
logical unit number (LUN), and formatting a volume.
•
Provision a Shared Folder
wizard or
Shared Folders
wizard for creating
and configuring shared folders that can be accessed either using the Server
Message Block (SMB) or NFS protocol.
These features enable you to complete most of the administrative tasks required
to create and manage shared folders and volumes without using the shared
folder management, storage manager for SANs, or disk management snap-ins.
This also includes configuring quotas to restrict the quantity of data,
configuring file screening to prevent certain file types or only allowing certain
file types defined by the administrator, and enabling indexing.
Share and storage management includes the following tabs for managing
shared folders and volumes:
• Volumes — This tab displays all volumes available to the server and
information about each volume.
• Shares — This tab displays all shared folders created using share and
storage management, and information about each shared folder.
Share and storage management includes support for configuring single
instance storage (SIS). SIS recovers disk space by reducing the amount of
redundant data stored on a volume. This is accomplished by identifying
identical files and storing only a single copy of the file in the SIS common
store. SIS replaces the files with pointers to the file in the SIS common store.
Share and storage management also incorporates other snap-ins that can be
used to manage specific functionality and provide advanced management
capabilities. These snap-ins include:
• Share Manager
• File Server Resource Manager which includes quota management, file
screening management, and storage reports management
• Storage manager for SANs
Deployment Guide 11
Page 12

• EqualLogic Auto Snapshot Manager
•Disk Defragmenter
• Disk management
The following paragraphs describe the snap-ins.
Share Manager
Share Manager is used for creating and configuring shared folders that can be
accessed using the server message block (SMB) protocol
File Server Resource Manager
File server resource manager provides a suite of tools for administrators to
understand, control, and manage the quantity and type of data stored on
their servers. The administrator can also perform advanced tasks such as
generating comprehensive reports on storage usage.
Storage Manager for SANs
Storage manager for SANs helps you perform the following tasks:
• Creating and managing LUNs on disk-drive subsystems accessible by
your system.
• Managing connections between LUNs and the servers in your
storage network.
EqualLogic Auto Snapshot Manager
EqualLogic Auto Snapshot Manager helps you manage snapshot activities on
your solution.
Disk Defragmenter
In addition to analyzing local volumes, disk defragmenter is used to locate
and consolidate fragmented files and folders.
Disk Management
Disk management is used to manage disks and the volumes or partitions that
they contain. Using disk management it is possible to initialize disks, create
volumes, and format volumes.
12 Deployment Guide
Page 13

DFS Management
The Distributed File System (DFS) solution in Windows Unified Data
Storage Server 2003 provides simplified, fault-tolerant access to files and wide
area network (WAN) friendly replication. DFS consists of two technologies:
• DFS Namespaces — DFS namespaces allows administrators to group shared
folders located on different servers and present them to users as a virtual
tree of folders known as a namespace. A namespace provides benefits such
as increased availability of data, load sharing, and simplified data migration.
• DFS Replication — The successor to file replication service (FRS), DFS
replication is a state-based, multimaster replication engine that supports
scheduling and bandwidth throttling. DFS replication uses a compression
algorithm known as Remote Differential Compression (RDC). RDC is a
protocol that updates files over a limited-bandwidth network. RDC
detects insertions, removals, and rearrangement of data in files enabling
DFS replication to replicate only the changes when the files are updated.
Microsoft Services for NFS
Microsoft Services for NFS is a component of Windows Unified Data Storage
Server 2003 that provides a file sharing solution for enterprise systems
running both Windows and UNIX
®
operating systems. Using Microsoft
Services for NFS, you can configure storage services that enable users to store
and access files on the Windows Unified Data Storage Server 2003 based
storage server. You can also transfer files between the storage server and
systems running the UNIX operating system using the NFS protocol.
In Windows Unified Data Storage Server 2003, the initial configuration of
Microsoft Services for NFS can be completed using the Microsoft Services for
NFS Configuration Guide. This document includes instructions on how to
use the Identity Mapping Setup wizard. After completing the initial
configuration of Microsoft Services for NFS, you can use the Microsoft
Services for NFS console for maintenance and administration.
For more information about Microsoft Services for NFS, see the Microsoft
website.
Deployment Guide 13
Page 14

Microsoft iSCSI Software Target
Microsoft iSCSI Software Target is used for creating and managing iSCSI
targets. It can also be used for creating virtual disks for storage and
implementing backup and recovery support using snapshots. For iSCSI
configuration, see the End-to-End Deployment Guide for iSCSI on the Dell
Support website at support.dell.com.
Virtual Disk Storage
The disks that are created using iSCSI software target are virtual disks, which
are files in the Virtual Hard Disk (VHD) format. Virtual disks provide the
following features:
• Flexible and effective storage
• Dynamically extendable to provide extra capacity on demand
• Efficient storage utilization
• Minimizes the time required to create new disks
• Reduces the down time typically required to install new disks
Snapshots
A snapshot is a point-in-time, read-only copy of an iSCSI virtual disk. Creating
snapshots of iSCSI virtual disks facilitates backup and recovery operations.
Snapshots are used as interim copies of data that have been modified since
the most recent backup. Snapshots offer the following advantages:
• Snapshots can be scheduled to be created automatically.
• Snapshots are space-efficient because they are differential copies.
• It is not necessary to close files or stop programs when creating snapshots, so
application servers can continue servicing clients without disruption.
• Each snapshot is typically created in less than one minute regardless of the
amount of data.
• Snapshots are useful for fast system recovery of files and volumes, in case
of accidental data deletion by a user, overwritten data, or data corruption
resulting from a malicious program.
• Snapshots can be mounted locally or exported to facilitate backup and
recovery operations.
14 Deployment Guide
Page 15

Wizards
To support creation and management of iSCSI targets, virtual disks, and
snapshots, the iSCSI Software Target snap-in provides the following wizards:
• Create iSCSI Target wizard
• Create Virtual Disk wizard
• Import Virtual Disk wizard
•Extend Virtual Disk wizard
• Schedule Snapshot wizard
• Export Snapshot wizard
NOTE: Wizards are not applicable to the Dell EqualLogic gateway solution.
Volume Shadow Copy Service Provider
You can install the volume shadow copy service (VSS) provider to support
advanced management of iSCSI virtual disks and snapshots.
Microsoft iSCSI Software Target VSS Provider — iSCSI snapshots are
created using the VSS and a storage array with a provider that is designed for
use with VSS. A Microsoft iSCSI Software Target VSS provider is required to
create application-transportable snapshots of iSCSI virtual disks and create
application-consistent snapshots from iSCSI initiators.
This provider can be installed on the iSCSI initiator server and on the server
that is used to perform backups. The backup software should support
transportable snapshots.
The iSCSI software target VSS provider installation package is located on the
Microsoft Windows Unified Data Storage Server 2003 Reinstallation DVD at
the following location:
CMPNENTS\FEATURE_PACKS\iSCSITargetVSS.exe.
Indexing
The Indexing service extracts information from a set of documents and
organizes the information for quick and easy access by the search function on
systems running Windows 2000 or Windows XP. This information can include
the contents and characteristics of the document such as the author's name.
When the index is created, you can query the index for documents that contain
keywords, phrases, or properties.
Deployment Guide 15
Page 16

For example, you can query all documents containing the word product or you
can query for all Microsoft Office documents written by a specific author. The
Indexing service returns a list of all documents that meet your search criteria.
NOTE: Indexing is not supported in clustered environments.
Single Instance Storage
SIS recovers disk space by reducing the amount of redundant data stored in a
volume. To recover the disk space, SIS performs the following procedures:
• Identifies identical files
• Stores one copy of the file in the SIS common store
• Replaces the files with pointers to the file in the SIS common store
For example, User A and User B receive the same e-mail with an attachment.
Both users save the attachment to their home folder. SIS detects the two
identical files on the volume, moves one of the copies into the SIS common
store, and then replaces both files with a pointer to the file in the SIS
common store.
Subsequently, User A makes a change to the file. SIS immediately detects that
an update is pending for the file, removes the pointer in the user’s home folder,
and replaces the pointer with a copy of the file in the SIS common store.
The updates are then applied to a fresh copy of the original file. This process
is completely transparent to the application.
The User B file remains in the SIS common store with a pointer in the User B's
home folder, even if there is only one pointer to the file. When User B updates
the file (assuming there are no other pointers), the pointer is deleted and
replaced with a copy of the original file. The file in the SIS common store is
then deleted.
SIS works in the background and does not require user intervention.
The administrator can enable SIS on a per-volume basis. For best results, the
administrator should use a backup application that supports SIS.
16 Deployment Guide
Page 17

Single Instance Storage Administration
You can activate SIS using the command line tool sisadmin.exe or by using
the volume properties. To activate SIS using the volume properties, follow
these steps:
1
In the
2
Select the
3
Click the
4
Click
Disk Management
Advanced
Enable SIS on this volume
Apply
.
view, right-click
tab.
Vo lu me
check box.
, and select
Properties
The command line options to manage SIS using sisadmin.exe are listed in
Ta b l e 1 - 3 .
Table 1-3. sisadmin.exe Command Line Parameters
Command Description
/i [vol] Installs SIS on the indicated volume(s), creates common store, and
activates filter and groveler
/f [vol] Places the groveler into foreground mode
/b [vol] Places the groveler into background mode
/e Enables the groveler on all volumes
/d Disables the groveler on all volumes
/v [vol] Displays statistics about SIS usage on volumes (including disk
space saved)
/l [vol] Lists SIS-controlled volumes
/s [file] Displays information about the SIS files
/h or /? Displays the Help text
.
Windows SharePoint Services
Windows SharePoint® Services is an integrated portfolio of collaboration and
communication services designed to connect people, information, processes,
and systems both within and beyond the organizational firewall. Windows
SharePoint Services 2.0 Service Pack 2 is included in the Windows Unified
Data Storage Server 2003 Standard and Enterprise x64 Editions.
Deployment Guide 17
Page 18

Windows SharePoint Services 2.0 includes the following features:
• SharePoint sites for file storage and collaboration
• SharePoint central administration
• Application for Windows SharePoint Services
SharePoint Sites for File Storage and Collaboration
Websites based on Windows SharePoint Services 2.0 provide a location where
teams can communicate, share documents, and collaborate on a project.
SharePoint sites include:
• Team collaboration features — Includes event calendars, contacts,
web links, discussions, issues lists, and announcements.
• Document libraries — Locations where users can store and retrieve
documents and use additional features, such as check-in and check-out,
version history, custom metadata, and flexible and customizable views.
• Web Parts — Provide data access, web services, and many other
applications and content to SharePoint sites.
Site users can contribute by using a web browser. However, if users have
Windows SharePoint services-compatible client programs such as Microsoft
Office 2003 installed on their systems, they can work seamlessly with the site,
saving files to libraries, editing documents in the client program, and moving
or linking that information to the site.
SharePoint Central Administration
You can manage a single server or an entire server farm running Windows
SharePoint Services from SharePoint Central Administration—a web browser
interface. You can use SharePoint Central Administration to perform the
following tasks:
• Extend a virtual server
• Create sites or turn on
Self-Service Site Creation
so that users can create
their own sites
• Manage security settings
• Manage the list of servers in your server farm
You can also use the stsadm.exe command-line utility to manage your servers
running SharePoint Services.
18 Deployment Guide
Page 19

Application for Windows SharePoint Services
Windows SharePoint Services includes a number of built-in applications.
You can boost worker productivity by downloading and installing an application
for Windows SharePoint Services. These applications are tailored to address
specific processes or tasks and include recruiting, project management, help
desk issue tracking, timesheet and scheduling, and event planning. Use the
applications as soon as you install them or customize them further to meet
your organization's specific requirements.
Clustering
If you are configuring your system to be a part of a cluster, the
Cluster Configuration Wizard takes you through the required configuration
procedures. For more information on clustering, including supported cluster
configurations, see the following documents located on the Dell Support site
at support.dell.com:
•
Dell PowerVault NX1950 Cluster Systems Installation and Troubleshooting
Guide
for the Integrated and Dell|EMC Gateway Solutions
•
Dell PowerVault NX1950 Cluster Systems Dell EqualLogic PS Series
Installation and Troubleshooting Guide
Dell Storage Management Tools
The PowerVault NX1950 Management Console provides snap-ins for
Dell management tools. Snap-ins are provided for the following applications:
• Dell OpenManage™ Server Administrator
• Modular Disk Storage Manager for Integrated Solution
• EMC Navisphere Agent for Gateway Solution
• Group Manager for Gateway Solution
Dell OpenManage Server Administrator
The Dell OpenManage Server Administrator snap-in appears only if you have
installed it. To install the Dell OpenManage Server Administrator snap-in,
see "Installing OpenManage Server Administrator" on page 31. Dell
OpenManage opens in a window that allows easy navigation, configuration,
and management of your PowerVault NX1950 hardware subsystems along
with other systems in your datacenter.
Deployment Guide 19
Page 20

Modular Disk Storage Manager (Integrated Solution)
The Dell PowerVault Modular Disk Storage Manager is pre-installed on your
PowerVault NX1950 solution. The Modular Disk Storage Manager allows
users to easily navigate the configuration options available for the PowerVault
MD3000 storage system. Most of the provisioning and configuration tasks can
be performed within the PowerVault NX1950 Management console in the
Share and Storage Management snap-in. The Modular Disk Storage Manager
is used only under fault conditions or to perform advanced provisioning
and configuration tasks. For information about advanced features available on
the Modular Disk Storage Manager application, see the documentation that
was shipped with your PowerVault MD3000 storage array.
EMC Navisphere Manager (Gateway Solution)
The EMC Navisphere Manager is pre-installed on your PowerVault NX1950
solution. The Navisphere Manager allows users to easily navigate the configuration
options available for the Dell|EMC storage array. Most of the provisioning
and configuration tasks can be performed within the PowerVault NX1950
Management console in the Share and Storage Management snap-in.
The Navisphere Manager is used only under fault conditions or to perform
advanced provisioning and configuration tasks. For information about
advanced features available on the Navisphere Manager application, see
the documentation that was shipped with your Dell|EMC storage array.
Group Manager (Gateway Solution)
The Group Manager is pre-installed on your PowerVault NX1950 solution.
The Group Manager allows users to easily navigate the configuration options
available for the PS series storage array. Most of the provisioning and
configuration tasks can be performed within the PowerVault NX1950
Management console in the storage manager for SANs snap-in. For more
information on the Group Manager, see the documentation that was shipped
with your PS Series storage array. To launch Group Manager, open a web
browser and enter the group IP address.
20 Deployment Guide
Page 21

Restoring Your Operating System and the Dell Components
The operating system is pre-installed on the solution. This section covers the
procedures that you need to follow to reinstall the operating system and the
Dell components:
• Installing your operating system using the
Utility
• Restoring the
• Restoring the Dell storage array components
• Installing and configuring the multilanguage user interface (MUI)
• Applying the MUI language
Figure 1-2 illustrates sequence of the procedures to be followed to restore
your operating system and the Dell components.
Figure 1-2. Restoring Your Operating System and the Dell Components
Dell Systems Build and Update Utility
Dell Systems Build and Update
Deployment Guide 21
Page 22

Installing Your Operating System Using the Dell Systems Build and Update Utility
The following section explains how to reinstall your Microsoft Windows
Unified Data Storage Server 2003 x64 operating system using the
Dell Systems Build and Update Utility available on the Dell Systems
Management Tools and Documentation media.
The Dell Systems Build and Update Utility installs the operating system
software, the Dell-specific device drivers, and additional components that are
not on the operating system media.
NOTICE: When you install Windows Unified Data Storage Server 2003 x64 with the
Dell Systems Build and Update Utility, all data is erased from your internal hard
drives. Dell recommends that you back up your data before you perform this
procedure.
NOTE: The Windows Storage Server wallpaper will be seen while the operating
system is being restored.
NOTE: For the latest BIOS, firmware, and driver updates, see the Dell Support
website at support.dell.com.
To perform a clean installation of the operating system, perform the
following steps:
NOTE: To restore your operating system, you can either locally boot from the
Dell Systems Build and Update Utility on your PowerVault NX1950 storage system
or you can configure the Dell remote access controller (DRAC) 5 and perform a
remote installation. For remote installation, configure the DRAC 5 and refer to the
DRAC 5 instructions for booting through virtual media.
1
If restoring locally, connect a keyboard, mouse, and monitor to your system.
2
Turn on your system.
3
Insert the
into the system.
4
If you are not using the
first time, the
window appears. Go to step 5.
Dell Systems Management Tools and Documentation media
Dell Systems Build and Update Utility
Welcome to Dell Systems Build and Update Utility
for the
22 Deployment Guide
Page 23

If you are using the
Dell Systems Build and Update Utility
for the first time, perform the following steps:
a
When prompted, click the appropriate language for your system.
The
Dell Software License Agreement
window appears. Read the
information carefully.
b
If you agree with all of the information, click
If you
do not
agree with all the information, click
Accept
restarts, and you will not able to complete the operating system
installation.
5
Click
Server Setup
The
Set the Date and Time
6
Select the appropriate date, time, and time zone, and click
7
Select
Microsoft Windows Server 2003 x64 Edition
NOTE: Select Microsoft Windows Server® 2003 x64 Edition.
NOTE: Since the product identification (PID) is included on the operating
system media, providing your PID is not required. You are only prompted to
enter a PID during the Server Administrator installation if you use
Dell OpenManage 5.0 or earlier.
8
Click
Continue
The
Configure the Hard Drive for Microsoft
to install the operating system.
window appears.
.
window appears.
to continue.
Decline
.
on your system
. Your system
Continue
.
9
The
Configure or Skip RAID
window appears. Perform the following
steps:
a
Select one of the following options, and then click
Continue
•Configure RAID
• Skip RAID configuration
NOTE: Your system was pre-configured with hardware RAID1 using both the
internal hard disk drives, and this is the only supported hardware
configuration for your system.
If you selected
b
Skip RAID
configuration, go to step 10.
Deployment Guide 23
:
Page 24

c
If you selected
Configure RAID
, configure the RAID with one of the
following options:
•Click
Go to Advanced Wizard
at the top left of the page and
follow the prompts.
• Select a RAID level and click
NOTE: Select RAID1 to ensure adequate redundancy for the boot disk.
Continue
.
The RAID configuration summary appears.
d
Click
Continue
.
The following message appears:
All existing virtual disk(s) on this controller
will be deleted and all data will be lost
e
Click
OK
to continue.
The
Select an Operating System to Install
10
To set up a new boot partition, select the appropriate file system and size
for your partition and click
NOTICE: If the hard drive has a partition, the Confirm to delete partition window
appears. Click Continue. Dell Systems Build and Update Utility deletes all existing
partitions on the hard drive.
NOTE: For maximum system security, Dell recommends selecting NTFS-NT
file system.
The
Network Adapter(s) configuration
Continue
window appears.
.
window appears.
.
11
Select one of the following options and click
Continue
• Obtain IP address from the DHCP server.
• Specify an IP address.
The
Enter Configuration Information: Microsoft Windows Server 2003
x64 Edition
12
Enter your system information in the appropriate fields, and click
NOTE: If you leave any field blank, Windows Setup prompts you later for this
window appears.
information.
NOTE: To provide more configuration information, click the Advanced tab in
the top-right corner.
24 Deployment Guide
:
Continue
.
Page 25

NOTE: Internet Information Services (IIS) is a required component for
Windows Unified Data Storage Server 2003. Although this is not selected in
the Advanced tab, this component is installed as part of the operating system
installation. No additional user interaction is required.
The
Operating System Installation Summary
13
If the configuration settings are correct, click
The
Microsoft Windows Installation Wizard
window appears.
Continue
.
window appears and the file
copy process starts.
If the configuration settings are not correct, perform the following steps:
a
Click
Back
until the appropriate screen appears.
b
Enter the correct information.
c
Click
Continue
until the
Microsoft Windows Installation Wizard
window appears.
14
When prompted, insert the
media into the DVD drive. The
Windows Unified Data Storage Server 2003 x64
Dell Systems Build and Update Utility
automatically detects the media and begins copying the operating system files.
NOTE: The procedure may take several minutes to complete.
15
When prompted, remove the
media from the DVD drive, and click
Windows Unified Data Storage Server 2003 x64
Finish
.
Your system automatically restarts, Windows Setup appears in text mode,
and the installation continues.
NOTE: If console redirection is enabled in the System Setup program, you are
prompted for an administrator password in the text mode of Windows Setup.
Enter an administrator password and press <Enter> to continue. The EMS
window appears. Click OK to continue.
Windows Setup automatically restarts your system, and the Windows
Setup window appears.
Windows Setup completes the installation and restarts your system.
NOTE: The system reboots several times during the installation. The entire
installation may take 45 minutes or more.
Deployment Guide 25
Page 26

16
In the
Log On
window, type your administrator password, and click OK.
The operating system installation continues.
NOTE: The installation procedure may take several minutes to complete.
17
When the installation is completed, the system automatically reboots.
18
When prompted, log on as
Administrator
.
The Windows Storage Server script starts, and requires no user intervention.
19
After the script executes the system is locked. Unlock the system, log off
and then log on as administrator.
NOTE: After you unlock the system or you log off and log on, the Windows
Storage Server 2003 splash screen is displayed.
20
The Windows Unified Data Storage Server 2003 x64 components are
installed and configured, and the installation procedure is complete.
NOTE: It is recommended that you download and install any patches, hotfixes, and
Service Pack 2 (SP2) from the Microsoft Support website at support.microsoft.com.
Install hotfixes after you install SP2.
NOTE: If the iSCSI 3.1 Active/Active Target is not on the operating system media, go
to the Dell Support website at support.dell.com to download and install it.
Restoring the Dell Storage Array Components
This section provides information about reinstalling the Dell storage array
components. Table 1-4 provides the Dell recommended order for installing
the Dell storage array components for the integrated solution.
Table 1-4. PowerVault NX1950 Storage Solution With PowerVault MD3000 Storage
Arrays (Integrated Solution )
Component Minimum Version
Information
1 SAS 5/E adapter driver v.1.24.04.00 support.dell.com
2 StorPort hotfix KB940467 support.microsoft.com
3 Kernel fix for PowerNow KB924441 support.microsoft.com
4 2 TB GPT hotfix KB919117 support.microsoft.com
5 SIS hotfix KB932198 support.microsoft.com
Location
26 Deployment Guide
Page 27

Table 1-4. PowerVault NX1950 Storage Solution With PowerVault MD3000 Storage
Arrays (Integrated Solution
(continued)
)
Component Minimum Version
Location
Information
6 Daylight savings hotfix KB928388 support.microsoft.com
7 Modular Disk Storage Manager
02.17.G6.26 support.dell.com
(Resource media)
8 VDS/VSS provider for
SMProvider-WSx64-
09.19.G6.00 Resource media, in the
VDS/VSS folder
09.19.G6.00.exe
9 Dell PowerVault NX1950 firewall
1.1.0 support.dell.com
script batch file for Windows
Unified Data Storage Server 2003,
Enterprise Edition
10 Firewall exceptions script for
Windows Unified Data Storage
Server 2003, Standard Edition
11 Dell Storage Initialization
Wizard for
Windows Unified
1.0.0 Operating System media
(scripts\ fw_md3k_
open.bat)
1.1.0 support.dell.com
Data Storage Server 2003,
Enterprise Edition
12 Microsoft iSCSI Target Secure
A01 support.dell.com
Installer
Table 1-5 provides the recommended order for installing the Dell storage
array components for the gateway solution.
Table 1-5. PowerVault NX1950 Storage Solution With Dell|EMC Storage Arrays
(Gateway Solution)
Component Minimum
Location
Version
Information
1 QLogic FC HBA drivers 9.1.4.15 support.qlogic.com
2 StorPort hotfixes KB943545 support.microsoft.com
3 Kernel fix for PowerNow KB924441 support.microsoft.com
Deployment Guide 27
Page 28

Table 1-5. PowerVault NX1950 Storage Solution With Dell|EMC Storage Arrays
(Gateway Solution)
(continued)
Component Minimum
Location
Version
Information
4 2 TB GPT hotfix KB919117 support.microsoft.com
5 SIS hotfix KB932198 support.microsoft.com
6 Daylight savings hotfix KB928388 support.microsoft.com
7 Po werPath 5.1. 1 powerlink.emc.com
8 Navisphere Agent 6.26.0.2.20 powerlink.emc.com
9 Navisphere CLI 6.26.0.2.24 powerlink.emc.com
NOTE: While running
NaviCLI installation wizard,
remember the following:
• Do not select the
classic CLI check box.
• Do not set the user and
password for the
security file. Select
none.
10 Navisphere Storage System
Initialization Wizard
11 EMC Solutions Enabler 6.4.852 powerlink.emc.com
12 Sun JRE 1.5 Update 7 www.sun.com
13 Dell PowerVault NX1950
firewall script batch file Gateway Standard for Windows
Unified Data Storage Server
2003, Standard Edition
14 Dell PowerVault NX1950
firewall script batch file Gateway Enterprise for
Windows Unified Data Storage
Server 2003, Enterprise Edition
6.26.0.2.22 powerlink.emc.com
1.2.0.0 support.dell.com
1.2.0.0 support.dell.com
28 Deployment Guide
Page 29

Table 1-5. PowerVault NX1950 Storage Solution With Dell|EMC Storage Arrays
(Gateway Solution)
(continued)
Component Minimum
Location
Version
Information
15 Dell Storage Initialization
1.4.0 support.dell.com
Wizard
16 Microsoft iSCSI Target Secure
1.0 support.dell.com
Installer
17 Microsoft WUDS Update
1.0 support.dell.com
Secure Installer
Table 1-6 provides the Dell-recommended order for installing the Dell storage
array components for the EqualLogic gateway solution.
Table 1-6. PowerVault NX1950 Storage Solution With Dell Equallogic Storage Arrays
(Gateway Solution)
Component Minimum
Version
Information
1 Storport hotfix KB940467 support.microsoft.com
2 Kernel fix for PowerNow KB924441 support.microsoft.com
3 2 TB GPT hotfix KB919117
4 SIS hotfix
5 Daylight savings hotfix KB928388
6 Microsoft Initiator
7 Host Integration Tool v10.01.238
8 Dell consolidated MMC
9 Dell PowerVault NX1950 firewall
KB932198
v2.06 or later
v1.0
1.2.0.0 support.dell.com
script batch file - Gateway
Enterprise for Windows Unified
Data Storage Server 2003, Standard
Edition
Location
support.microsoft.com
support.microsoft.com
support.microsoft.com
support.microsoft.com
EqualLogic.com
support.dell.com
Deployment Guide 29
Page 30

After you have installed all the software components, reboot the system.
The Dell Storage Initialization Wizard launches automatically and walks you
through the device detection process. After the detection is complete and you
have exited the wizard, the PowerVault NX1950 Initial Configuration Tasks wizard
appears and prompts you to complete the setup of the PowerVault NX1950
storage systems.
Windows Unified Data Storage Server 2003 x64, Standard Edition—
The Dell Storage Initialization wizard and firewall exceptions script is
installed along with the operating system. After installing the operating
system, the Dell Storage Initialization wizard is installed on your system and
runs automatically on every system reboot. Until the software required to
support the storage array is installed on your system and the PowerVault MD3000
solution is correctly cabled, an error message appears at powerup.
NOTE: The Dell Storage Initialization wizard is not applicable for
Dell EqualLogic solution.
To restore the software required to support the storage arrays connected to
the PowerVault NX1950 systems, see Table 1-4.
Windows Unified Data Storage Server 2003 x64, Enterprise Edition—The
Dell Storage Initialization wizard and firewall exceptions batch script are not
installed after you reinstall the operating system. To download and execute
the latest firewall port exceptions batch script:
1
Go to the Dell Support website at
2
Click
Drivers and Downloads
3
In the
Select a Product
Model
as NX1950, and then click Go.
4
Locate and download the firewall port exceptions batch file.
5
Execute the batch script to restore the Firewall exceptions required for the
menu; select
support.dell.com
.
Product Type
.
as PowerVault,
Product
PowerVault NX1950 cluster solutions.
To download the latest Dell Storage Initialization wizard see the Dell
Support website at support.dell.com.
To restore the software required to support the storage arrays connected to
the PowerVault NX1950 systems, see Table 1-3. You must download the
software and install them on the system.
30 Deployment Guide
Page 31

Dell OpenManage Server Administrator
Dell OpenManage Server Administrator provides a comprehensive, one-to-one
system management solution using an integrated, Web browser-based interface
(the Server Administrator home page) or a CLI through the operating system.
OpenManage Server Administrator allows you to monitor and manage your
PowerVault NX1950 storage systems on a network locally and remotely and
focus on managing the entire network with comprehensive, one-to-one
system management.
For more information, see the OpenManage Server Administrator
documentation located on the Dell Support website at support.dell.com
Installing OpenManage Server Administrator
The Dell Systems Build and Update Utility provides a setup program to
install, upgrade, and uninstall OpenManage Server Administrator and other
managed system software components on your system. Additionally, you can
install Server Administrator on multiple systems through an unattended
installation across a network.
Using the setup program on the Dell Systems Build and Update Utility, you
can install and upgrade Server Administrator on systems running all
supported Windows Unified Data Storage Server 2003 x64 Edition operating
systems.
To restore OpenManage Server Administrator, perform the following steps:
1
Insert the
into the PowerVault NX1950 CD drive.
The media loads and the
Dell Systems Management Tools and Documentation
Server Administrator Installer
window appears.
media
2
Click
Install, Modify, Repair or Remove Server Administrator
3
In the
License Agreement
and click
4
In the
Next
.
Setup Type
configuration and click
5
In the
Ready to Install
6
In the
Install Wizard Completed
.
window, read and understand the agreement
window, select the appropriate setup type for your
Next
.
window, click
Install
.
window, click
Finish
.
Deployment Guide 31
Page 32

Accessing OpenManage Server Administrator
You can access Server Administrator locally through the host by double-clicking the
Server Administrator icon on the desktop. The PowerVault NX1950
Management Console also has a link to Dell OpenManage Systems Management
Software in the "Dell Storage Management Tools" on page 19.
To access Server Administrator directly from a client system on the same network,
open Internet Explorer 6.0 or later and connect to the secure port, 1311, of
your PowerVault NX1950 storage system.
For example, type:
https://DELL1234567:1311
where DELL1234567 is the name of your PowerVault NX1950 storage system.
If port 1311 is disabled by the firewall, use the following procedure to set an
exception to enable port 1311 for the use of Dell OpenManage Server
Administrator.
1 Click Start and select Settings→ Control Panel→ Windows Firewall
2
Click the
3
Click
4
Ty p e
Exceptions
Add port
tab.
.
Dell OpenManage Server Administrator
in the
.
Name
field.
5
Ty p e
1311
in the
Port number
6
Click OK.
7
If prompted, restart the firewall service.
field.
Adding Trusted Sites to Your Browser
Due to enhanced Microsoft security standards, you may be prompted to add an
internet or intranet site to the trusted sites zone when you initially access the site.
To add trusted sites to Internet Explorer, perform the following steps:
1
In the
Tools
The
2
Click the
The
menu, click
Internet Options
Security Tab
Security
tab menu appears.
Internet Options
window appears.
.
.
32 Deployment Guide
Page 33

3
Click
Trusted Sites
The
Trusted sites
4
Click
Sites
.
The
Trusted sites
5
In the
Add this Web site to the zone:
using the
https
The site appears in the
6
Repeat step 5 to add any additional sites and click OK.
The
Internet Options
7
Click OK.
.
option appears.
window appears.
field, type the address of the site,
: secure protocol, and click
Web sites:
box.
window appears.
Add
.
Installing the MUI
NOTE: If you are using Dell Systems Build and Update Utility version 5.3 or later,
the MUI is automatically installed.
If you reinstall the operating system using Dell Systems Build and Update
Utility, the MUI components for the Windows Unified Data Storage Server
2003 are installed automatically. To install the additional MUI components
required for the PowerVault NX1950 storage solution, follow the procedure
below:
1
Insert the
the DVD drive of the PowerVault NX1950 storage system and navigate to
\cmpnents\mui\muisetup.exe
Windows Unified Data Storage Server 2003 R2 x64
.
media into
NOTE: You must install separate R2 MUI packs for each language. To ensure
that all the MUI components have been installed, see the readme file
associated with the MUI pack.
2
In the
Installer
window, select the languages to be installed, and select the
default MUI language from the menu.
3
Click OK to perform the installation.
4
After the installation is complete, reboot the system.
Deployment Guide 33
Page 34

5
Navigate to the location \
cmpnents\mui
\ and run the R2 installer(s) for the
required language(s).
NOTE: The readme file located in this directory contains details about the
language file names and associations.
6
Navigate to the location
iscsi_target_sb.exe
7
Navigate to the location
\cmpnents\mui\
and
iscsi_target_db.exe
\cmpnents\mui\
and install both the
files.
and install the following files:
• WindowsServer2003-KB920697-x64-ENU.exe
• WindowsServer2003-KB922298-x64-ENU.exe
Applying the MUI Language
You can perform the following steps to apply the MUI to a user:
NOTE: You can use the PowerVault NX1950 Initial Configuration Tasks wizard to
install the additional MUI components.
1
Click
Start→ Control Panel→ Regional and Language Options
2
On the
Standards and Formats
3
Update your Web browser default language and character encoding.
If you are using Internet Explorer, perform the following steps:
a
b
c
d
e
f
g
h
Regional Options
tab, select the appropriate region under
and click
OK
.
Open a browser window.
Select
Tools→ Internet Options
In the
Internet Option
In the
Language Preferenc
In the
Add Languag
In the
Language
box, verify that the correct language appears.
s window, click
e window, select a language and click OK.
.
Languages
e window under the
.
General
tab, click
To remove a language, select the language and then click
Click
OK
.
Close the
Internet Option
s window.
Remove
.
Add
.
.
34 Deployment Guide
Page 35

If you are using Firefox, perform the following steps:
a
Open a browser window.
b
Select
Tools→ Options
c
In the
d
Options
In the
Languages and Character Encoding
window under
appropriate selections and then click
e
Close the
Options
.
window.
General
tab, click
window, make the
OK
.
Languages
.
Log off and log on to the system again to enable the new MUI language.
To update your Windows Unified Data Storage Server 2003 Edition operating
system, see the Microsoft Support website at support.microsoft.com. All
updates to Windows Server 2003 R2 x64 Editions apply to Windows Unified
Data Storage Server 2003.
After you have completed the tasks in the PowerVault NX1950 Initial
Configuration Tasks Wizard, the system configuration is completed. The
PowerVault NX1950 Management Console opens by default and can be used
for disk and share provisioning, accessing Dell Management Tools such as
Dell OpenManage Server Administrator or Modular Disk Storage Manager,
and other general administrative tasks.
Deployment Guide 35
Page 36

36 Deployment Guide
Page 37

Index
D
Dell OpenManage Server
Administrator
accessing server administrator, 32
installing server administrator, 19
E
EMC, 15
M
Microsoft, 32
multilanguage user interface, 21
applying MUI language, 34
installing and configuring, 33
O
Operating System Features, 15
indexing, 15
single instance storage, 16
single instance storage
administration, 17
R
Restoring Your Operating
System
installing additional
components, 22
installing using the server
management CD, 22
restoring the storage array
software, 33
S
SharePoint Services, 17
central administration, 18
file storage and collaboration, 18
Storage Management Tools, 19
Modular Disk Storage
Manager, 20
Server Administrator, 19
T
trusted sites
adding to browser, 32
Index 37
Page 38

38 Index
 Loading...