

Page 1

Microsoft® Windows
®
Storage Server 2003
R2 x64 Edition With SP2
for Dell™ PowerVault™
Storage Solutions
Getting Started Guide
使用入门指南
入門指南
Guide de mise en route
Handbuch Zum Einstieg
はじめに
시작 안내서
Guía de introducción
Page 2

Page 3

Microsoft® Windows
®
Storage Server 2003 R2
x64 Edition With SP2 for Dell™
PowerVault™ Storage
Solutions
Getting Started Guide
Page 4

Notes and Notices
NOTE: A NOTE indicates important information that helps you make better use
of your computer.
NOTICE: A NOTICE indicates either potential damage to hardware or loss of data
and tells you how to avoid the problem.
___________________
Information in this document is subject to change without notice.
© 2007 Dell Inc. All rights reserved.
Reproduction in any manner whatsoever without the written permission of Dell Inc. is strictly forbidden.
Trademarks used in this text: Dell, the DELL logo, PowerEdge, PowerVault, and OpenManage are
trademarks of Dell Inc.; Microsoft, Internet Explorer, Windows, and Windows Server are either
trademarks or registered trademarks of Microsoft Corporation in the United States and/or other countries.
Other trademarks and trade names may be used in this document to refer to either the entities claiming
the marks and names or their products. Dell Inc. disclaims any proprietary interest in trademarks and
trade names other than its own.
September 2007 P/N CM391 Rev. A00
Page 5

Contents
Overview . . . . . . . . . . . . . . . . . . . . . . . . . . 5
Naming Convention
Configuring Your NAS System
. . . . . . . . . . . . . . . . . . . . 6
. . . . . . . . . . . . . . . 7
Configuring Your System Using a Keyboard,
Monitor, and Mouse
. . . . . . . . . . . . . . . . . 7
Configuring Your System For Network Access
Configuring the Network IP Address
for the NAS System
. . . . . . . . . . . . . . . . . . 8
Entering the Default Administrator
User Name and Password
. . . . . . . . . . . . . . 9
Localizing Your System Using the Multilanguage
User Interface
. . . . . . . . . . . . . . . . . . . . . . . 9
Starting the Windows Storage Server
Management Console
. . . . . . . . . . . . . . . . . . 10
Accessing the Microsoft Management Console
Accessing the MMC Locally on the Host
. . . . . . 10
Accessing the MMC Using Remote Desktop
Connection
. . . . . . . . . . . . . . . . . . . . . 11
. . . . 7
. . . . 10
Contents 3
Page 6

Dell OpenManage Server Administrator . . . . . . . . 12
Installing OpenManage Server Administrator
Accessing OpenManage Server Administrator
Adding Trusted Sites to Your Browser
Updating Your System
. . . . . . . . . . . . . . . . 14
Updating Your Microsoft Windows Software
. . . 12
. . 13
. . . . . . . 13
. . . 14
Other Documents You May Need
. . . . . . . . . . . . 15
4 Contents
Page 7

This document provides an overview of the Microsoft® Windows®
Storage Server 2003 R2 x64 Edition with SP2 operating system and information
about configuring, localizing, and installing your Dell™ Network Attached
Storage (NAS) system on a corporate network.
The following topics are covered in this document:
• Overview
• Naming Convention
• Configuring your NAS system
• Localizing your system using the Multilanguage User Interface (MUI)
• Starting the Windows Storage Server Management Console
• Accessing the Microsoft Management Console (MMC)
• Dell OpenManage
™
Server Administrator
• Other documents you may need
Overview
The Windows Storage Server 2003 R2 x64 Edition with SP2 operating system
adds new search capabilities, simplified setup and storage management,
extensibility, and is specially tuned to provide optimal NAS performance.
Windows Storage Server 2003 R2 x64 Edition with SP2 provides significant
enhancements in storage management scenarios, and ease of installation.
Your NAS system is preconfigured with the Windows
x64 Edition with SP2 operating system. Most of the setup procedures are
completed for you and do not require user intervention.
When your system boots for the first time, the
begins. When completed, your system automatically reboots and you can access
the server either locally or remotely.
Storage Server 2003 R2
Microsoft Mini Setup
process
NOTE: If your system is pre-configured with software redundant array of
independent disks (RAID) 5, the system performs a RAID synchronization to optimize
the array. The process runs in the background and may affect your overall system
performance until it completes. If the system is powered off before the process
completes, RAID synchronization will begin again when the system is powered up
and continue until it completes.
Getting Started Guide 5
Page 8
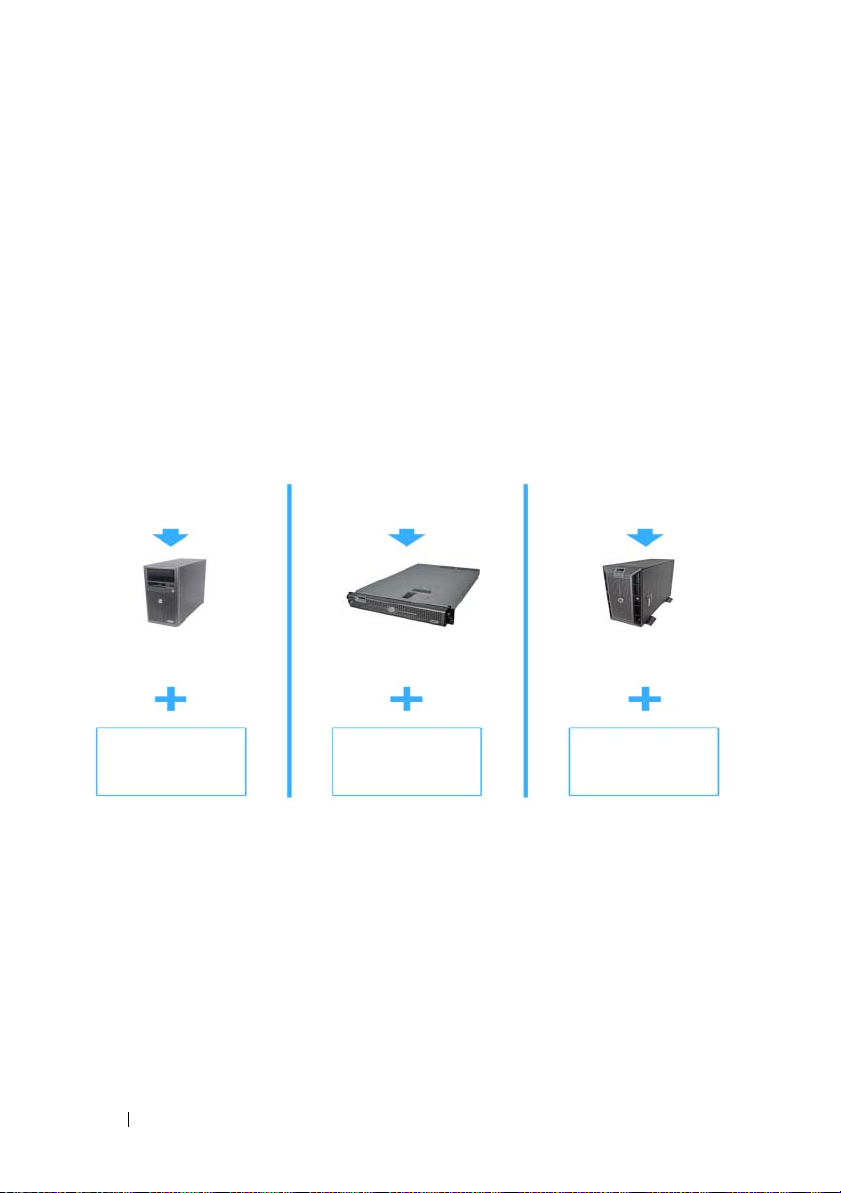
Naming Convention
The term
PowerVault NF100
Dell PowerVault™ 100
refers to the configuration of PowerVault 100 storage system
refers to the hardware platform.
and Microsoft Windows Storage Server 2003 R2 with SP2 operating system.
The term
PowerVault NF500
Dell PowerVault 500
refers to the configuration of PowerVault 500 storage system
refers to the hardware platform.
and Microsoft Windows Storage Server 2003 R2 with SP2 operating system.
The term
PowerVault NF600
Dell PowerVault 600
refers to the configuration of PowerVault 600 storage system
refers to the hardware platform.
and Microsoft Windows Storage Server 2003 R2 with SP2 operating system.
Figure 1-1. Naming Convention
PowerVault NF100
PowerVault 100
storage system
Microsoft Windows
Storage Server 2003
R2 with SP2
PowerVault NF500
PowerVault 500
storage system
Microsoft Windows
Storage Server 2003
R2 with SP2
PowerVault NF600
PowerVault 600
storage system
Microsoft Windows
Storage Server 2003
R2 with SP2
6 Getting Started Guide
Page 9

Configuring Your NAS System
Configuring Your System Using a Keyboard, Monitor, and Mouse
NOTE: Depending on your method of configuration, local keyboard, video, and
mouse (KVM) connections may be required to complete the installation and
configuration procedures. If your remote system can complete the configuration
procedures, local KVM connections are not required for operation.
1
Connect a keyboard, monitor, and mouse to the NAS system.
For information about system connectors, see your system’s
2
Turn on the NAS system.
3
Log in to the NAS system.
NOTE: The default administrator user name is administrator
.
and the default password is storageserver
Configuring Your System For Network Access
1
If your NAS system is powered on, turn it off.
2
Connect one end of an Ethernet cable into one of the 10/100/1000 RJ-45
NIC connectors (see Figure 1-2) on the back of your NAS system.
For more information about the location of system connectors, see your
NAS system’s
3
Connect the other end of the Ethernet cable to a functioning Ethernet jack.
4
Turn on the NAS system.
5
Verify that the server is connected to the Ethernet by ensuring that the
LED associated with the network interface controller (NIC) connector
is on. See Figure 1-2. If the NIC connector’s LED is a steady green color,
then the connection is good. If the NIC connector’s LED is a flashing
amber color, then data is successfully being transferred.
If the LED is not on, ensure that each end of the Ethernet cable is seated
properly in the NIC connector and the Ethernet jack.
The NAS system retrieves the required information to set up network
parameters (the IP address, gateway subnet mask, and DNS server address)
from a
Dynamic Host Configuration Protocol (
User’s Guide
.
DHCP) server on the network.
User’s Guide
.
NOTE: Depending on your configuration and the amount of storage attached
to the NAS system, it may take several minutes for the NAS system to boot.
Getting Started Guide 7
Page 10
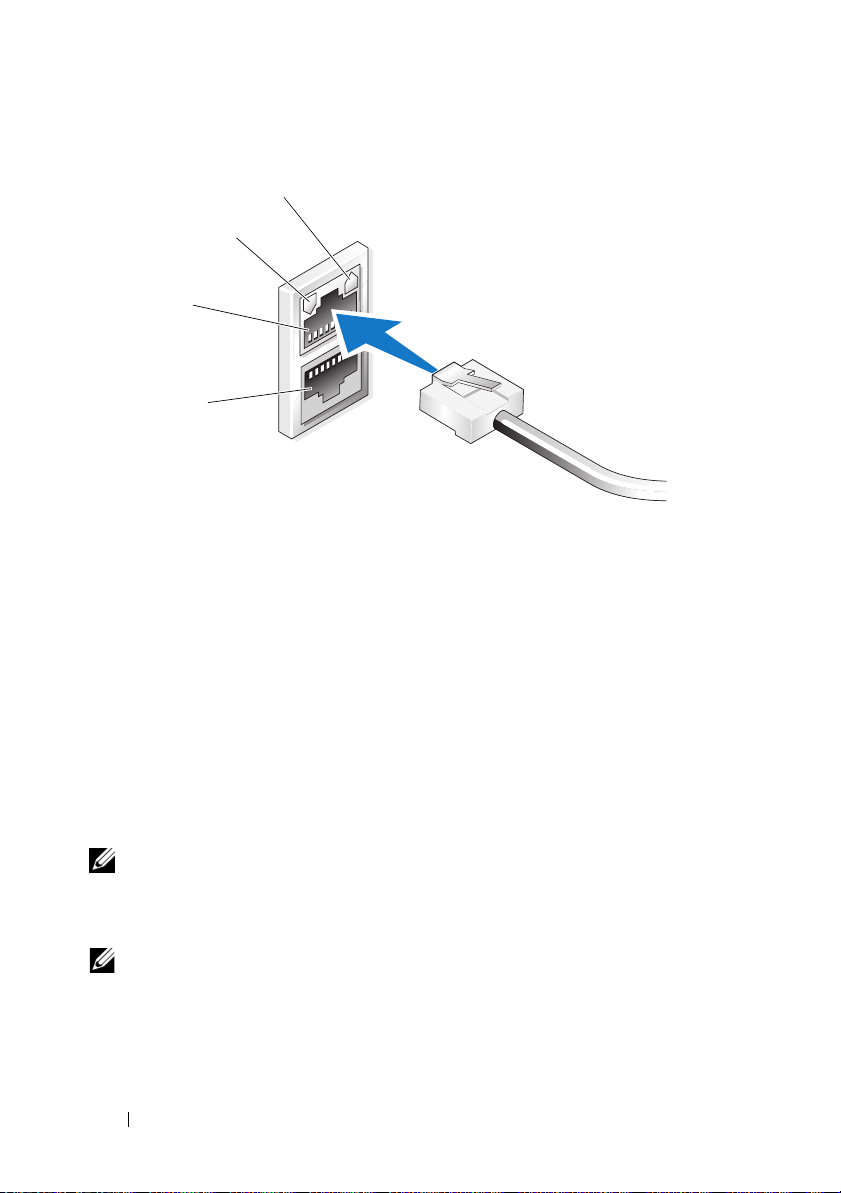
Figure 1-2. NIC Connector
1
2
3
4
1 NIC 1 LED 3 NIC 1
2 NIC 2 LED 4 NIC 2
Configuring the Network IP Address for the NAS System
If you have a DHCP server on your network, you are not required to configure
your NAS system’s IP address because DHCP automatically assigns an address
to the NAS system. If your network is not configured with a DHCP server,
configure the NAS system’s IP address through the
window.
To access the
Panel
→ Network Configuration
Network Configuration
.
window, click
Network Configuration
Start→
Settings→
Control
NOTE: If you do not have a DHCP server on your network, a local keyboard,
monitor, and a mouse is required to complete your NAS configuration. For more
information, see "Configuring Your System Using a Keyboard, Monitor, and Mouse"
on page 7.
NOTE: The Windows Firewall is enabled by default. When you access the remote
system, you may experience issues with connectivity.
8 Getting Started Guide
Page 11

Entering the Default Administrator User Name and Password
When logging into the NAS system for the first time, you must enter an
administrator user name and password. The default administrator user name
for your NAS system is
storageserver.
Changing the Administrator Password
1
Click
Start→
2
In the
Computer Management
and select
3
In the right window pane, right-click
Set Password
4
In the
Set Password for Administrator
5
Enter and confirm your password in the appropriate fields and clickOK.
6
Close the
Computer Management
administrator
Administrative Tools→
Users
.
.
and the default password is
Computer Management
window, expand
Administrator
window, click
window.
Local Users and Groups
and select
Proceed
.
.
Localizing Your System Using the Multilanguage User Interface
The NAS system allows you to change the native language for the operating
system's user interface. Many languages are installed on your system by default.
The Multilanguage User Interface (MUI) allows the NAS system to display
operating systems menus, dialogs, and help files in multiple languages.
If your system was pre-configured with the Windows Storage Server 2003 R2
x64 Edition with SP2 operating system, the MUI is pre-configured with your
localized language in both the regional settings and in the browser settings.
No user intervention is required.
To change the default browser language:
1
Open an Internet Explorer® browser.
2
In the
To ol s
3
In the
4
In the
5
In the
6
Click OK.
menu, select
General
Language Preference
Language
tab, click
box, select a language.
Internet Options
Languages
window, click
.
.
Add
.
Getting Started Guide 9
Page 12

Starting the Windows Storage Server Management Console
The
Windows Storage Server Management Console
providing an easy and convenient method for system administration. The MMC
opens automatically when you are logged into the Windows Storage Server 2003
R2 x64 Edition with SP2 operating system.
To open the
All Programs→
In the
the
File Server Management (Local)
window pane provides selectable scenarios that assist you with operating system
administration.
Windows Storage Server Management Console
Windows Storage Server Management
Microsoft Management Console
window, the left window pane shows
node as the default node. The center
appears in the MMC,
, click
Start→
.
Accessing the Microsoft Management Console
The MMC is configured by default as part of the Microsoft
MMC can be used for disk management, NFS configuration, and as a general
NAS management station. For more information, see the Microsoft MMC
document included with your system.
Using MMC, you can configure your storage by either accessing MMC locally
on the host or by accessing MMC using a Remote Desktop Connection.
Start
menu. The
Accessing the MMC Locally on the Host
The MMC appears on the host in the
in the
Start
menu, perform the following steps:
1
Click
Start→
2
Ty p e
nas.msc
NOTE: The nas.msc file is located at c:\windows\system32.
10 Getting Started Guide
Run
.
and click OK.
Start
menu. If the MMC does not appear
Page 13

Accessing the MMC Using Remote Desktop Connection
Use Remote Desktop Connection for remote server administration to reduce
the overhead associated with remote administration. Enabled by Terminal
Services technology, Remote Desktop for Administration is specifically designed
for server management.
Remote Desktop for Administration does not require a special license for client
systems that access the server. Additionally, you are not required to install
Terminal Server Licensing when using Remote Desktop for Administration.
Administrators can also fully administer computers running Windows Storage
Server 2003 R2 x64 Edition with SP2 from systems running earlier versions of
Windows by installing Remote Desktop Connection.
NOTE: To connect to Remote Desktop for Administration from a remote system,
use Remote Desktop Connection.
Creating a Remote Desktop Connection to Your Desktop
To create and save a Remote Desktop Connection to Windows Storage
Server 2003 R2 x64 Edition with SP2, perform the following steps:
1
Click
Start→ Run
2
Ty p e
mstsc
The
Remote Desktop Connection
3
In the
Remote Desktop Connection
or IP address of the storage server and then click
4
Under
Connection Settings
5
In the
Save As
the default
6
In the
Save in
Your connection is saved to your desktop.
.
and then click OK.
window appears.
screen, type the computer name
, click
Save As
Options
.
.
screen, type a name for the connection and include
.rdp
extension.
drop-down menu, select
Desktop
and then click
Save
.
For more information about configuring your Remote Desktop Connection,
Help
in the
click
Remote Desktop Connection
window.
Getting Started Guide 11
Page 14

Dell OpenManage Server Administrator
Dell OpenManage Server Administrator provides a comprehensive, one-to-one
system management solution using an integrated, Web browser-based interface
(the OpenManage Server Administrator home page) or a command line
interface (CLI) through the operating system.
OpenManage Server Administrator allows you to manage NAS systems on a
network locally and remotely and to focus on managing the entire network
with comprehensive, one-to-one system management.
NOTE: If you are using OpenManage Server Administrator, a system can be a
stand-alone system, a server with Network Attached Storage units in separate
chassis, or a modular system consisting of one or more server modules in a chassis.
For more information, see your OpenManage Server Administrator
documentation.
Installing OpenManage Server Administrator
The
Dell Systems Build and Update Utility
to install, upgrade, and uninstall OpenManage Server Administrator and other
system software components on your NAS system. You can also install
OpenManage Server Administrator on multiple systems through an unattended
installation across a network.
Using the setup program on the
you can install and upgrade OpenManage Server Administrator on systems
running all supported Windows Storage Server 2003 R2 x64 Edition with SP2
operating systems.
To install OpenManage Server Administrator, perform the following steps:
1
Insert the
CD/DVD drive.
The media autoloads and the
appears.
Dell
Systems Build and Update Utility media into your system’s
Dell Systems Build and Update Utility
Server Administrator Installer
media provides a setup program
media,
window
2
Click
Install, Modify, Repair or Remove Server Administrator
3
In the
License Agreement
and click
12 Getting Started Guide
Next
.
.
window, read and accept the agreement
Page 15

4
In the
Setup Type
for your configuration and click
5
In the
Ready to Install
6
In the
Install Wizard Completed
window, select the appropriate setup type
Next
.
window, click
Install
.
window, click
Finish
.
Accessing OpenManage Server Administrator
You can access OpenManage Server Administrator locally through the host
by double-clicking the
To access OpenManage Server Administrator directly from a client system on
the same network, open an Internet Explorer 6.0 or later browser and connect
to the secure port, 1311, of your NAS system.
For example, type:
https://DELL1234567:1311
where
DELL1234567
If port 1311 is disabled by the firewall, use the following procedure to set
an exception to enable port 1311 for OpenManage use.
1 Click Start→ Settings→ Control Panel→ Windows Firewall
2
Click the
3
Click on
4
Ty p e
field.
5
Ty p e
6
Click OK.
7
If prompted, restart the firewall service.
Exceptions
Add port
Dell OpenManage Server Administrator
1311
Server Administrator
is the name of your NAS system.
tab.
.
in the
Port number
field.
icon on the desktop.
.
in the
Name
Adding Trusted Sites to Your Browser
Due to enhanced Microsoft security standards, you may be prompted to add
an Internet or intranet site to the trusted sites zone when you initially access
the site.
Getting Started Guide 13
Page 16

To add trusted sites to Internet Explorer, perform the following steps:
1
In the
To ol s
menu, click
The
Internet Options
2
Click the
The
3
Click
4
Click
The
5
In the
using the https: secure protocol, and click
The site appears in the
6
Repeat step 5 to add any additional sites and click OK.
The
7
Click OK.
Security Tab
Security
Trusted sites
Internet Options
tab menu appears.
Trusted Sites
Sites
.
Add this Web site to the zone:
Internet Options
screen appears.
.
.
screen appears.
Web sites:
screen appears.
.
field, type the address of the site,
Add
.
box.
Updating Your System
The
Server Update Utility
applying updates to your server. The Server Update Utility (SUU) can also be
downloaded from the Dell Support website at
information, see the
To update individual OpenManage Server Administrator components, use
component-specific Dell Update Packages (DUP), which may be found on the
Dell Updates media. The SUU compares the versions of components currently
installed on your Dell NAS system with update components that are packaged
on the Dell Updates media. Use the SUU to view a comparison report of the
versions and to update an entire system.
media contains an application for identifying and
support.dell.com
Server Update Utility User’s Guide
.
. For more
Updating Your Microsoft Windows Software
To update your Windows Storage Server 2003 R2 x64 Edition operating system,
see the Microsoft Support website at
Microsoft Windows Server
Server 2003 R2 x64 Edition.
14 Getting Started Guide
®
2003 R2 x64 Edition apply to Windows Storage
support.microsoft.com
. All updates to
Page 17

Other Documents You May Need
NOTE: The Product Information Guide provides important safety and regulatory
information. Warranty information may be included within this document or as
a separate document.
• The
• The
• The
• The system’s
• Systems management software documentation describes the features,
• Operating system documentation describes how to install (if necessary),
• Documentation for any components you purchased separately provides
• Updates are sometimes included with the system to describe changes
Rack Installation Guide
with your rack solution describes how to install your system into a rack.
Administrator’s Guide
configuration procedures on your system and a general overview of
Windows Storage Server 2003 R2 x64 Edition with SP2 features.
Important Information
and software requirements and all known issues.
User's Guide
and technical specifications.
requirements, installation, and basic operation of the software.
configure, and use the operating system software.
information to configure and install these options.
to the system, software, and/or documentation.
or
Rack Installation Instructions
provides information about completing the
document provides the minimum hardware
provides information about system features
included
NOTE: Always read the updates first because they often supersede information
in other documents.
• Release notes or readme files may be included to provide last-minute
updates to the system, documentation, or advanced technical reference
material intended for experienced users or technicians.
• The
Server Update Utility User's Guide
the Server Update Utility to view the software versions on your system
and update your system’s software. It can be downloaded from the
Dell Support website at
support.dell.com
describes how you can use
.
Getting Started Guide 15
Page 18

16 Getting Started Guide
Page 19

用于
Dell™ PowerVault™
存储解决方案的
Microsoft
®
Windows® Storage Server 2003
R2 x64 Edition
(含
SP2
)
使用入门指南
Page 20

注和注意
注:“注”表示可以帮助您更好地使用计算机的重要信息。
注意:“注意”表示可能会损坏硬件或导致数据丢失,并告诉您如何
避免此类问题。
___________________
本说明文件中的信息如有更改,恕不另行通知。
© 2007 Dell Inc.
未经
Dell Inc.
本文中使用的商标:
的商标;
在美国和/或其它国家/地区的商标或注册商标。
本文件中述及的其它商标和产品名称是指拥有相应商标和名称的公司或其制造的产品。
Dell Inc.
2007 年 9
版权所有,翻印必究。
书面许可,严禁以任何形式进行复制。
Microsoft、Internet Explorer、Windows 和 Windows Server 是 Microsoft Corporation
对本公司的商标和产品名称之外的其它商标和产品名称不拥有任何专有权。
月
Dell、DELL
P/N CM391 Rev. A00
徽标、
PowerEdge、PowerVault 和 OpenManage 是 Dell Inc.
Page 21

目录
概览 . . . . . . . . . . . . . . . . . . . . . . . . . . .
命名惯例
配置
使用多语种用户界面本地化系统
启动
访问
Dell OpenManage Server Administrator
. . . . . . . . . . . . . . . . . . . . . . . . .
系统
NAS
使用键盘、显示器和鼠标配置系统
配置系统进行网络访问
为
NAS
输入默认管理员用户名和密码
Windows Storage Server
Microsoft
在主机上本地访问
使用远程桌面连接访问
安装
访问
将受信任的站点添加到您的浏览器
更新系统
更新
. . . . . . . . . . . . . . . . . . . . .
. . . . . . .
. . . . . . . . . . . . . .
系统配置网络
管理控制台
MMC
IP
. . . . . . . . . .
地址
. . . . . . . . . .
. . . . . . . . . . .
管理控制台
. . . . . . . . . . . . . .
. . . . . . . . . . . . .
MMC
. . . . . .
. . . . . . . . . .
. . . . . . . .
OpenManage Server Administrator
OpenManage Server Administrator
. . . . . . .
. . . . . . . . . . . . . . . . . . . . . .
. . . . . . . . . .
Microsoft Windows
软件
. . . . .
. . . . .
21
22
23
23
23
24
25
25
26
26
26
27
28
28
29
30
30
30
您可能需要的其它说明文件
. . . . . . . . . . . . . .
目录 19
31
Page 22

20 目录
Page 23

本说明文件概要介绍
(含
网络连接存储器
)操作系统,并提供有关在公司网络上配置、本地化和安装
SP2
(NAS)
Microsoft
®
Windows® Storage Server 2003 R2 x64 Edition
系统的信息。
本说明文件讨论以下主题:
• 概览
• 命名惯例
• 配置
• 使用多语种用户界面
• 启动
• 访问
•
Dell OpenManage™ Server Administrator
系统
NAS
(MUI)
Windows Storage Server
Microsoft
管理控制台
(MMC)
• 您可能需要的其它说明文件
概览
Dell™
本地化系统
管理控制台
Windows Storage Server 2003 R2 x64 Edition
(含
)操作系统增加了新
SP2
的搜索功能,简化了设置和存储管理过程,提高了可扩展性,并经过专门
优化以提供最佳的
(含
NAS
)在存储管理方面提供了重要的增强功能,并且易于安装。
SP2
系统已预配置了
NAS
Windows
性能。
Windows Storage Server 2003 R2 x64 Edition
Storage Server 2003 R2 x64 Edition
(含
SP2
)
操作系统。大多数设置过程已经完成,无需用户干预。
第一次引导系统时,将开始
Microsoft Mini Setup(Microsoft
袖珍安装)
过程。安装完成后,系统会自动重新引导,然后您便可通过本地或远程访
问服务器。
注:如果系统已预先配置了软件独立磁盘冗余阵列
同步以优化阵列。此过程在后台运行,在完成之前可能会影响系统的
RAID
整体性能。如果在此过程完成之前关闭系统电源,则在系统通电时将再次开
始
同步,直至此过程完成。
RAID
(RAID) 5
使用入门指南 21
,系统将执行
Page 24

命名惯例
术语
Dell PowerVault™ 100
PowerVault 100
(含
SP2
术语
Dell PowerVault 500
存储系统和
存储系统和
)操作系统的配置。
Microsoft Windows Storage Server 2003 R2
的配置。
术语
Dell PowerVault 600
存储系统和
Microsoft Windows Storage Server 2003 R2
的配置。
图
命名惯例
1-1.
PowerVault NF100
PowerVault 100
存储系统
Microsoft Windows
Storage Server 2003
R2(含 SP2
)
是指硬件平台。
PowerVault NF100
Microsoft Windows Storage Server 2003 R2
是指硬件平台。
是指硬件平台。
PowerVault NF500
PowerVault 500
Microsoft Windows
Storage Server 2003
R2(含 SP2
PowerVault NF500 是指 PowerVault 500
(含
SP2
PowerVault NF600 是指 PowerVault 600
(含
SP2
PowerVault NF600
PowerVault 600
存储系统
Microsoft Windows
Storage Server 2003
)
R2(含 SP2
是指
)操作系统
)操作系统
存储系统
)
22 使用入门指南
Page 25

配置
NAS
系统
使用键盘、显示器和鼠标配置系统
注:根据您的配置方法,您可能需要进行本地键盘、视频和鼠标
才能完成安装和配置过程。如果远程系统可以完成配置过程,则无需进行本
地
1 将键盘、显示器和鼠标连接至
有关系统连接器的信息,请参阅《用户指南》。
2 打开
3 登录到
连接,系统即可正常运行。
KVM
系统。
NAS
系统。
NAS
系统。
NAS
注: 默认的管理员用户名为 administrator,默认密码为
storageserver
。
配置系统进行网络访问
1 如果已打开
2 将以太网电缆的一端连接至
RJ-45 NIC
有关系统连接器位置的详情,请参阅
3 将以太网电缆的另一端连接至有效的以太网插孔。
4 打开
5 确保与网络接口控制器
NAS
服务器已连接至以太网。请参阅图
呈绿色持续亮起,则表明连接是正常的。如果
琥珀色闪烁,则表明正在成功地传输数据。
如果
LED
地插入
NIC
系统将从网络中的动态主机配置协议
NAS
网络参数所需的信息(
注: 引导
系统的存储设备数量而定。
系统的电源,请关闭电源。
NAS
系统背面上的一个
NAS
连接器(请参阅图
系统。
(NIC)
未亮起,请进行检查,以确保以太网电缆的两端分别正确
连接器和以太网插孔中。
地址、网关子网掩码和
IP
系统可能需要几分钟,具体视您的配置以及连接至
NAS
)。
1-2
NAS
连接器关联的
。如果
1-2
系统的《用户指南》。
LED
(DHCP)
10/100/1000
亮起,这表示验证
连接器的
NIC
连接器的
NIC
服务器上检索设置
服务器地址)。
DNS
(KVM)
LED
LED
连接,
呈
NAS
使用入门指南 23
Page 26
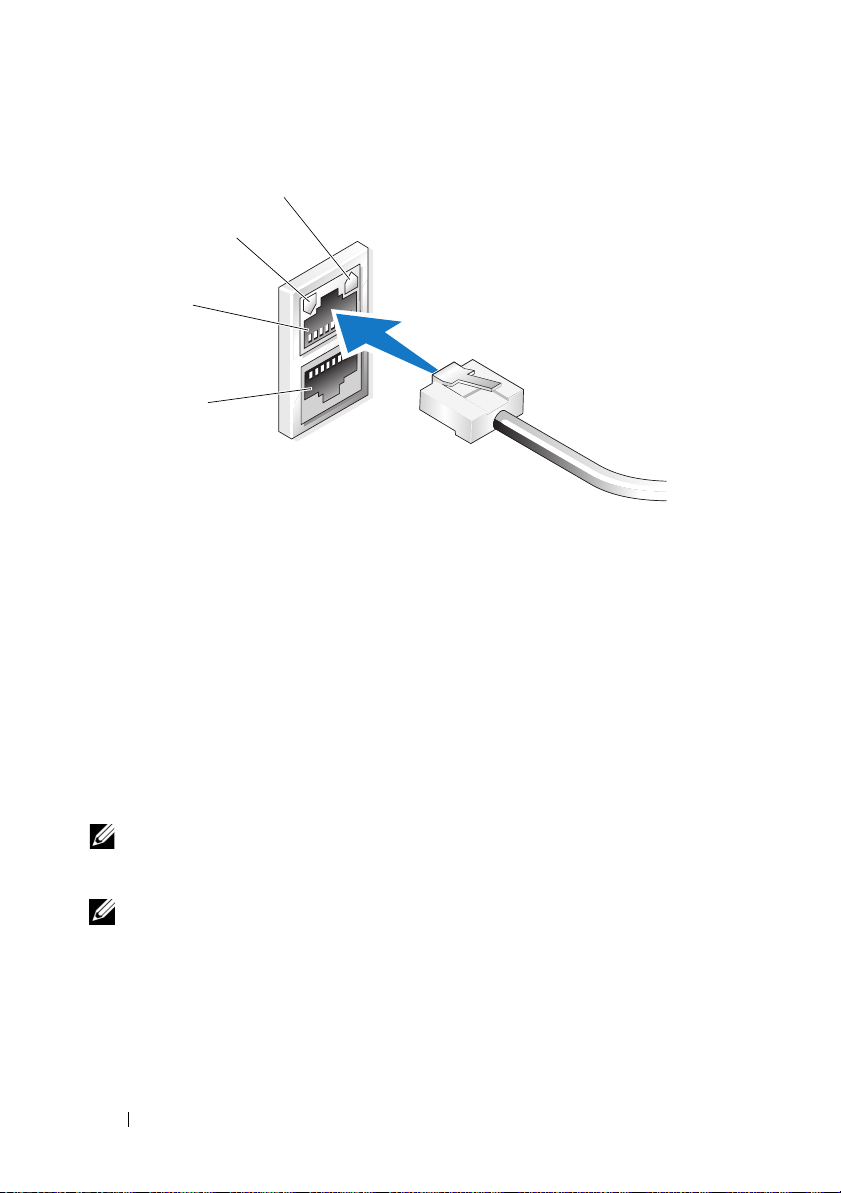
图
1-2. NIC
连接器
3
4
1
2
NIC 1 LED 3 NIC 1
1
NIC 2 LED 4 NIC 2
2
为
系统配置网络
NAS
如果网络上已配备
DHCP
则通过
要访问
Settings
会自动为
NAS
Network Configuration
Network Configuration
(设置)→
(网络配置)。
注:如果网络上未配备
来完成
配置系统”。
注:默认情况下,已启用
到与连接有关的问题。
配置。有关详情,请参阅第
NAS
24 使用入门指南
地址
IP
DHCP
服务器,则无需配置
NAS
系统分配地址。如果网络中未配置
(网络配置)窗口配置
(网络配置)窗口,请单击
Control Panel
DHCP
(控制面板)→
服务器,则需要使用本地键盘、显示器和鼠标
页的“使用键盘、显示器和鼠标
23
Windows
防火墙。在访问远程系统时,可能会遇
系统的
NAS
地址,因为
IP
DHCP
系统的
(开始)→
Start
服务器,
地址。
IP
Network Configuration
Page 27

输入默认管理员用户名和密码
首次登录
管理员用户名为 administrator,默认密码为 storageserver。
更改管理员密码
1 单击
Computer Management
2 在
Computer Management
and Groups
3 在右侧窗格中,右键单击
Set Password
4 在
Set Password for Administrator
单击
5 在相应字段中输入并确认密码,然后单击
6 关闭
系统时,必须输入管理员用户名和密码。
NAS
(开始)→
Start
(本地用户和组),然后选择
(设置密码)。
Proceed
Computer Management
(继续)。
Administrative Tools
(计算机管理)。
(计算机管理)窗口中,展开
Administrator
(为管理员设置密码)窗口中,
(计算机管理)窗口。
系统的默认
NAS
(管理工具)→
(用户)。
Users
(管理员),然后选择
(确定)。
OK
Local Users
使用多语种用户界面本地化系统
系统允许您更改操作系统用户界面的母语。默认情况下,系统中安装
NAS
了多种语言。多语种用户界面
系统菜单、对话框和帮助文件。
如果系统预配置了
操作系统,则
无需用户干预。
要更改默认的浏览器语言:
1 打开
2 在
3 在
4 在
5 在
6 单击
Internet Explorer
To ol s
General
Language Preference
Language
OK
Windows Storage Server 2003 R2 x64 Edition
在区域设置和浏览器设置中都已预配置了本地化语言。
MUI
(工具)菜单中,选择
(常规)选项卡中,单击
(语言)框中,选择语言。
(确定)。
(MUI)
®
浏览器。
(语言首选项)窗口中,单击
允许
Internet Options(Internet
系统用多种语言显示操作
NAS
Languages
(语言)。
Add
(含
(添加)。
SP2
选项)。
)
使用入门指南 25
Page 28

启动
Windows Storage Server Management Console(Windows Storage Server
管理控制台)显示在
当您登录到
操作系统时,系统将自动打开
要打开
Server
Windows Storage Server Management(Windows Storage Server
在
格中将显示
节点作为默认节点。中间窗格提供多种可供选择的方案,帮助您进行操作
系统管理。
Windows Storage Server
MMC
Windows Storage Server 2003 R2 x64 Edition
Windows Storage Server Management Console(Windows Storage
管理控制台),单击
Microsoft Management Console(Microsoft
File Server Management (Local)
中,可供用户进行简单便捷的系统管理。
。
MMC
(开始)→
Start
管理控制台
(含
All Programs
管理控制台)窗口中,左窗
(文件服务器管理 [本地])
(所有程序)→
)
SP2
管理)。
访问
默认情况下,
MMC
有关详情,请参阅随系统附带的
您可以在主机上本地访问
从而利用
Microsoft
MMC
可用于进行磁盘管理和
来配置存储设备。
MMC
在主机上本地访问
显示为主机上
MMC
菜单中未显示
1 单击
2 键入 nas.msc,然后单击
注:
MMC
(开始)→
Start
nas.msc
管理控制台
被配置为
MMC
Start
,则执行以下步骤:
文件位于
Microsoft Start
NFS
MMC
(开始)菜单中的菜单项。如果
Run
c:\windows\system32
(开始)菜单的一部分。
配置,还可用作常规的
Microsoft MMC
或用远程桌面连接来访问
(运行)。
(确定)。
OK
说明文件。
下。
NAS
MMC
Start
管理站。
,
(开始)
26 使用入门指南
Page 29

使用远程桌面连接访问
MMC
使用远程桌面连接来进行远程服务器管理,可以减少与远程管理相关的额
外开销。用于管理的远程桌面通过终端服务技术实现,它是专门为管理服
务器而设计的。
对于访问服务器的客户机系统,用于管理的远程桌面不需要特殊许可。
此外,在使用用于管理的远程桌面时,无需安装终端服务器许可。
通过安装远程桌面连接,管理员也可以从运行
上全面管理运行
Windows Storage Server 2003 R2 x64 Edition
Windows
较早版本的系统
(含
SP2
)
的计算机。
注:要从远程系统连接至用于管理的远程桌面,请使用远程桌面连接。
创建指向您的桌面的远程桌面连接
要创建和保存指向
Windows Storage Server 2003 R2 x64 Edition
(含
SP2
)
的远程桌面连接,请执行以下步骤:
1 单击
2 键入 mstsc,然后单击
屏幕将显示
Start
(开始)→
(运行)。
Run
OK
(确定)。
Remote Desktop Connection
(远程桌面连接)窗口。
3 在
Remote Desktop Connection
机名称或存储服务器的
4 在
Connection Settings
5 在
名
6 在
然后单击
Save As
.rdp
Save in
(另存为)屏幕中,键入连接的名称,并包含默认的扩展
。
(保存到)下拉式菜单中,选择
(保存)。
Save
此连接已保存到您的桌
IP
(连接设置)下,单击
面上。
(远程桌面连接)屏幕中,键入计算
地址,然后单击
有关配置远程桌面连接的详情,请单击
(远程桌面连接)窗口中的
Help
(帮助)。
Options
Desktop
(选项)。
Save As
(桌面),
(另存为)。
Remote Desktop Connection
使用入门指南 27
Page 30

Dell OpenManage Server Administrator
Dell OpenManage Server Administrator
管理解决方案,即通过操作系统使用一个集成的、基于
面(
OpenManage Server Administrator
借助于
OpenManage Server Administrator
网络上的
可以将精力集中在整个网络的管理上。
注:如果您使用的是
以是独立式系统,也可以是在单独的机箱中装有多个网络连接存储器装置的
服务器,还可以是在机箱中安装了一个或多个服务器模块的模块化系统。
有关详情,请参阅
安装
OpenManage Server Administrator
Dell Systems Build and Update Utility
系统上安装、升级和卸载
NAS
系统软件组件。也可采用无人参与安装方式,通过网络在多个系统上安装
OpenManage Server Administrator
使用
Dell Systems Build and Update Utility
所有支持的
统的系统上安装和升级
要安装
OpenManage Server Administrator
1 将
Dell Systems Build and Update Utility
驱动器。
介质自动载入程序,并显示
(
Server Administrator
系统;同时,通过全面的、一对一的系统管理功能,
NAS
OpenManage Server Administrator
OpenManage Server Administrator
OpenManage Server Administrator
Windows Storage Server 2003 R2 x64 Edition
OpenManage Server Administrator
安装程序)窗口。
提供了一个全面的、一对一的系统
浏览器的界
Web
主页)或使用命令行界面
,用户能以本地和远程方式管理
,则所谓的系统既可
说明文件。
介质提供了一个安装程序,用于在
。
介质上的安装程序,可以在运行
(含
SP2
。
,请执行以下步骤:
介质插入系统的
Server Administrator Installer
CD/DVD
。
(CLI)
和其它
)操作系
2 单击
3 在
28 使用入门指南
Install, Modify, Repair or Remove Server Administrator
(安装、修改、修复或删除
License Agreement
然后单击
(下一步)。
Next
Server Administrator
(许可协议)窗口中,阅读并接
)。
受此协议,
Page 31

4 在
Setup Type
然后单击
5 在
Ready to Install
6 在
Install Wizard Completed
单击
Finish
访问
OpenManage Server Administrator
在主机上,双击桌面上的
OpenManage Server Administrator
要从位于同一网络中的客户机系统直接访问
Administrator
并连接至
例如,键入:
https://DELL1234567:1311
NAS
(安装类型)窗口中,选择适合配置的安装类型,
(下一步)。
Next
(准备安装)窗口中,单击
(安装向导完成)窗口中,
(完成)。
Server Administrator
。
,请打开
系统的安全端口
Internet Explorer 6.0
。
1311
(安装)。
Install
图标可以本地访问
OpenManage Server
或更新版本的浏览器,
其中,DELL1234567 是
如果防火墙禁用了端口
以使端口
1 单击
(控制面板)→
2 单击
3 单击
4 在
Name
Administrator。
5 在
Port number
6 单击
7 如果出现提示,请重新启动防火墙服务。
可用于
1311
(开始)→
Start
Exceptions
Add port
(名称
(确定)。
OK
1311
OpenManage
Windows Firewall(Windows
(例外)选项卡。
(添加端口)。
)字段中,键入 Dell OpenManage Server
(端口号)字段中,键入 1311。
系统的名称。
NAS
,请使用以下过程设置例外,
。
Settings
(设置)→
Control Panel
防火墙)。
使用入门指南 29
Page 32

将受信任的站点添加到您的浏览器
由于提高了
系统可能会提示您将这些站点添加到受信任的站点区域。
要将受信任的站点添加到
1 在
Microsoft
(工具)菜单中,单击
To ol s
屏幕将显示
安全标准,因此当您初次访问互联网或内部网时,
Internet Explorer
Internet Options(Internet
,请执行以下步骤:
Internet Options(Internet
选项)窗口。
选项)。
2 单击
3 单击
4 单击
5 在
6 重复步骤
7 单击
Security
屏幕将显示
Trusted Sites
Sites
屏幕将显示
Add this Web site to the zone:
键入网站的地址(使用
该站点将出现在
屏幕将显示
OK
(安全)选项卡。
Security
(站点)。
Trusted sites
添加任何其它的站点,然后单击
5
Internet Options(Internet
(确定)。
(安全)选项卡菜单。
(受信任的站点)。
受信任的站点)屏幕。
(
安全协议),然后单击
https:
Web sit es :
(网站:) 框中。
更新系统
Server Update Utility
的应用程序。也可以从
公用程序
(服务器更新公用程序用户指南)。
要更新
Dell
SUU
的更新组件进行比较。使用
(SUU)
OpenManage Server Administrator
更新软件包
会将当前安装在
介质包含一个用于识别服务器和对服务器应用更新
支持网站
Dell
。有关详情,请参阅
(DUP)
,您可以在
Dell NAS
SUU
Dell Updates
系统上的组件版本与
查看版本比较报告,然后更新整个系统。
(将该网站添加到区域中:) 字段中,
(添加)。
Add
(确定)。
OK
选项)窗口。
support.dell.com
Server Update Utility User's Guide
的单独组件,请使用组件特定的
下载服务器更新
介质上找到该软件包。
Dell Updates
介质上
更新
Microsoft Windows
要更新
Windows Storage Server 2003 R2 x64 Edition
支持网站
Edition
30 使用入门指南
support.microsoft.com。Microsoft Windows Server
的所有更新均适用于
软件
操作系统,请参阅
Windows Storage Server 2003 R2 x64 Edition
Microsoft
®
2003 R2 x64
。
Page 33

您可能需要的其它说明文件
注:《产品信息指南》提供了重要的安全与管制信息。保修信息可能附带
在该说明文件中,也可能作为单独的说明文件提供。
• 随机架解决方案附带的《机架安装指南》或《机架安装说明》,
介绍了如何在机架中安装系统。
• 《管理员指南》提供了有关完成系统配置过程的信息,并简要概述
了
Windows Storage Server 2003 R2 x64 Edition
• 重要信息说明文件,提供了最低硬件和软件要求及所有的已知问题。
• 系统的《用户指南》,提供了有关系统功能和技术规格的信息。
• 系统管理软件说明文件,介绍了软件的功能、要求、安装和基本操作。
• 操作系统说明文件,介绍了如何安装(如果需要)、配置和使用操作
系统软件。
• 单独购买的任何组件所附带的说明文件,提供了有关配置和安装这
些选件的信息。
• 系统有时附带更新,用于说明对系统、软件和/或说明文件所做的
更改。
注:请始终先阅读这些更新,因为更新通常用于替代其它说明文件中的信息。
• 系统可能附带版本注释或自述文件,以提供系统、说明文件的最新
更新,或者为有经验的用户或技术人员提供高级技术参考资料。
•
Server Update Utility User's Guide
说明了如何使用服务器更新公用程序来查看系统上的软件版本和更
新系统的软件。可以从
Dell
(服务器更新公用程序用户指南),
支持网站
support.dell.com
(含
)的功能。
SP2
下载该指南。
使用入门指南 31
Page 34

32 使用入门指南
Page 35

Dell™ PowerVault™ 儲存解決
方案的 Microsoft
®
Windows® Storage Server
2003 R2 x64
Edition With SP2
入門指南
Page 36

註和注意
註:「註」會提供您更有效使用電腦的重要資訊。
注意:「注意」表示可能會損壞硬體或導致資料遺失,並告訴您如何避免
此類問題的發生。
___________________
對本文件中所含資訊之修正恕不另行通知。
© 2007 Dell Inc. 版權所有,翻印必究。
未經 Dell Inc. 的書面許可,不准以任何形式進行複製。
本文所用商標:Dell、DELL 標誌、Powe rE dge 、PowerVault 和 OpenManage 是 Dell Inc. 的商標;
Microsoft、Internet Explorer、Windows 和 Windows Server 是 Microsoft Corporation 在美國和 /
或其他國家 / 地區的商標或註冊商標。
本文件所述及之其他商標或品牌名稱,均各自分屬其商標或產品名稱之申請者或擁有者所
擁有。Dell Inc. 對本公司之外的商標和產品名稱不擁有任何專有權。
2007 年 9 月 P/N CM391 Rev. A00
Page 37

目錄
概觀 . . . . . . . . . . . . . . . . . . . . . . . . . . . 37
命名慣例
組態 NAS 系統
. . . . . . . . . . . . . . . . . . . . . . . . . 38
. . . . . . . . . . . . . . . . . . . . . 39
使用鍵盤、顯示器和滑鼠組態系統
組態系統進行網路存取
組態 NAS 系統的網路 IP 位址
. . . . . . . . . . . . . . 39
. . . . . . . . . . 40
輸入預設管理員使用者名稱和密碼
使用多語言使用者介面本土化系統
. . . . . . . . . . 41
啟動 Windows Storage Server 管理控制台
存取 Microsoft 管理控制台
在主機上從本機存取 MMC
. . . . . . . . . . . . . . 42
. . . . . . . . . . . . 42
使用 Remote Desktop Connection 存取 MMC
Dell OpenManage Server Administrator
. . . . . . . . 44
安裝 OpenManage Server Administrator
存取 OpenManage Server Administrator
新增信任的網站至瀏覽器
更新系統
. . . . . . . . . . . . . . . . . . . . . . 46
更新 Microsoft Windows 軟體
其他您可能需要的文件
. . . . . . . . . . . . 45
. . . . . . . . . . 46
. . . . . . . . . . . . . . . . 47
. . . . . . . 39
. . . . . . . 41
. . . . . . 42
. . . 43
. . . . . 44
. . . . . 45
目錄 35
Page 38

36 目錄
Page 39

本文件概述 Microsoft® Windows® Storage Server 2003 R2 x64 Edition with
SP2 作業系統以及關於在公司網路中組態、本土化和安裝 Dell™ Network
Attached Storage (NAS) 系統的資訊。
本文件將討論以下主題:
• 概觀
• 命名慣例
• 組態 NAS 系統
• 使用多語言使用者介面 (MUI) 本土化系統
• 啟動 Windows Storage Server 管理控制台
• 存取 Microsoft 管理控制台 (MMC)
• Dell OpenManage™ Server Administrator
• 其他您可能需要的文件
概觀
Windows Storage Server 2003 R2 x64 Edition with SP2 作業系統新增了搜尋
功能、簡化的設定和儲存管理、擴充性,並已專門調整為提供最佳的 NAS
效能。Windows Storage Server 2003 R2 x64 Edition with SP2 大大增強了儲
存管理功能,並且簡化了安裝。
您的 NAS 系統已使用 Windows
作業系統預先組態。大多數設定程序均已完成,無需使用者介入。
在系統第一次啟動時,Microsoft Mini Setup (Microsoft 迷你安裝程式 )
即會開始安裝。安裝完成之後,您的系統會自動啟動,您可以在本機或遠
端存取伺服器。
註:如果您的系統已使用軟體容錯式獨立磁碟陣列 (RAID) 5 預先組態,系統
將執行 RAID 同步以最佳化陣列。同步程序在背景中執行,執行期間可能會
影響您的整體系統效能。如果在該程序完成之前關閉了系統電源,則在系統
加電時,RAID 同步將重新開始,直到完成為止。
Storage Server 2003 R2 x64 Edition with SP2
入門指南 37
Page 40

命名慣例
術語 Dell PowerVault™ 100 是指硬體平台。PowerVault NF100 是指
PowerVault 100 儲存系統與 Microsoft Windows Storage Server 2003 R2
with SP2 作業系統的組態。
術語 Dell PowerVault 500 是指硬體平台。PowerVault NF500 是指 PowerVault
500 儲存系統與 Microsoft Windows Storage Server 2003 R2 with SP2 作業系
統的組態。
術語 Dell PowerVault 600 是指硬體平台。PowerVault NF600 是指 PowerVault 600
儲存系統與 Microsoft Windows Storage Server 2003 R2 with SP2 作業系統
的組態。
圖 1-1. 命名慣例
PowerVault NF100
PowerVault 100
儲存系統
Microsoft Windows
Storage Server 2003
R2 with SP2
PowerVault NF500
PowerVault 500
儲存系統
Microsoft Windows
Storage Server 2003
R2 with SP2
PowerVault NF600
PowerVault 600
儲存系統
Microsoft Windows
Storage Server 2003
R2 with SP2
38 入門指南
Page 41

組態 NAS 系統
使用鍵盤、顯示器和滑鼠組態系統
註:視您的組態方法而定,可能需要進行本機鍵盤、影像及滑鼠 (KVM) 連
接才能完成安裝和組態程序。如果遠端系統可以完成組態程序,則無需本機
KVM 連接即可進行操作。
1 將鍵盤、顯示器和滑鼠連接至 NAS 系統。
如需系統連接器的資訊,請參閱系統的《使用者指南》。
2 開啟 NAS 系統。
3 登入 NAS 系統。
註:預設管理員使用名稱為 administrator,預設密碼為
storageserver
組態系統進行網路存取
1 如果 NAS 系統電源已開啟,請關閉。
2 將乙太網路電纜的一端連接至 NAS 系統背面的一個 10/100/1000
RJ-45 NIC 連接器 ( 請參見圖 1-2)。
如需系統連接器位置的詳細資訊,請參閱 NAS 系統的使用者指南。
3 將乙太網路纜線的另一端連接至運作中的乙太網路插孔。
4 開啟 NAS 系統。
5 可透過觀察與網路介面控制器 (NIC) 關聯的 LED 是否亮起來驗證伺
服器是否連接至乙太網路。請參閱圖 1-2。如果 NIC 連接器的 LED
呈綠色持續亮起,則表明連接狀況良好。如果 NIC 連接器的 LED
呈琥珀色閃爍,則表明資料正在順利傳送。
如果 LED 未亮起,請確定乙太網路電纜的各端是否正確穩定地連接
至 NIC 連接器和乙太網路插座。
NAS 系統將從網路上的動態主機組態協定 (DHCP) 伺服器擷取所需的
資訊來設定網路參數 (IP 位址、閘道子網路遮罩和 DNS 伺服器位址 )。
註:視您的組態和系統安裝的儲存容量而定,NAS 系統啟動可能需要
幾分鐘。
。
入門指南 39
Page 42

圖 1-2. NIC 連接器
1
2
3
4
1 NIC 1 LED 3 NIC 1
2 NIC 2 LED 4 NIC 2
組態 NAS 系統的網路 IP 位址
如果您的網路上有 DHCP 伺服器,則無需組態 NAS 系統的 IP 位址,因為
DHCP 會自動指定位址給 NAS 系統。如果您的網路未使用 DHCP 伺服器
組態,請透過 Network Configuration ( 網路組態 ) 視窗組態 NAS 系統的
IP 位址。
若要存取 Network Configuration ( 網路組態 ) 視窗,請按一下
Start ( 開始 ) → Settings ( 設定 ) → Control Panel ( 控制台 ) →
Network Configuration ( 網路設定 )。
註:如果您的網路上沒有 DHCP 伺服器,則需要本機鍵盤、顯示器和滑鼠來
完成 NAS 組態。如需更多資訊,請參閱第 39 頁的「使用鍵盤、顯示器和滑
鼠組態系統」。
註:Windows 防火牆預設為啟用。在存取遠端系統時,您可能會遇到連接
性問題。
40 入門指南
Page 43

輸入預設管理員使用者名稱和密碼
在第一次登入 NAS 系統時,必須輸入管理員使用者名稱和密碼。NAS 系統的
預設管理員使用者名稱為 administrator,預設密碼為 storageserver。
變更管理員密碼
1 按一下 Start ( 開始 ) → Administrative Tools ( 管理工具 ) →
Computer Management ( 電腦管理 )。
2 在 Computer Management (電腦管理) 視窗中,展開 Local Users and
Groups ( 本機使用者和群組 ),然後選擇 Users ( 使用者 )。
3 在右窗格中,用滑鼠右鍵按一下 Administrator ( 管理員 ) 並選擇
Set Password ( 設定密碼 )。
4 在 Set Password for Administrator ( 設定管理員密碼) 視窗中,按一下
Proceed ( 繼續 )。
5 在對應的欄位中輸入並確認您的密碼,然後按一下 OK ( 確定 )。
6 關閉 Computer Management ( 電腦管理 ) 視窗。
使用多語言使用者介面本土化系統
NAS 系統允許您變更作業系統使用者介面的原始語言。系統預設安裝有許
多語言。多語言使用者介面 (MUI) 允許 NAS 系統以多種語言顯示作業系
統功能表、對話方塊和說明檔案。
如果您的系統已經使用 Windows Storage Server 2003 R2 x64 Edition with
SP2 作業系統預先組態,則 MUI 的區域設定和瀏覽器設定將會用本土化
的語言預先組態。而無需使用者介入。
若要變更預設的瀏覽器語言,請:
®
1 開啟 Internet Explorer
2 在 Tool s ( 工具 ) 功能表中,選擇 Internet Options (網際網路選項 )。
3 在 General ( 一般 ) 標籤中,按一下 Languages ( 語言 )。
4 在 Language Preference ( 語言喜好設定 ) 視窗中,按一下 Add ( 新增 )。
5 在 Language ( 語言 ) 方塊中,選擇一種語言。
6 按一下 OK ( 確定 )。
瀏覽器。
入門指南 41
Page 44

啟動 Windows Storage Server 管理控制台
Windows Storage Server 管理控制台將出現在 MMC 中,提供簡便的系統
管理方法。該 MMC 在您登入 Windows Storage Server 2003 R2 x64
Edition with SP2 作業系統時自動開啟。
若要開啟 Windows Storage Server Management Console (Windows 儲存伺
服器管理控制台 ),請按一下 Start ( 開始 ) → All Programs ( 所有程式 ) →
Windows Storage Server Management (Windows 儲存伺服器管理 )。
在 Microsoft Management Console (Microsoft 管理控制台 ) 視窗中,左窗
格顯示 File Server Management (Local) ( 檔案伺服器管理 ( 本機 )) 節點作
為預設節點。中央窗格提供協助您管理作業系統的可選情景。
存取 Microsoft 管理控制台
MMC 預設組態為 Microsoft Start ( 開始 ) 功能表的一部份。MMC 可用於
磁碟管理、NFS 組態以及用作一般的 NAS 管理站。 如需更多資訊,
請參閱系統隨附的 Microsoft MMC 文件。
利用 MMC,可以透過在主機上從本機存取 MMC 或使用 Remote Desktop
Connection ( 遠端桌面連線 ) 存取 MMC 來組態儲存系統。
在主機上從本機存取 MMC
MMC 將出現在主機的 Start ( 開始 ) 功能表中。如果 MMC 沒有出現在
Start ( 開始 ) 功能表中,請執行下列步驟:
1 按一下 Start ( 開始 ) → Run ( 執行 )。
2 鍵入 nas.msc 並按一下 OK ( 確定 )。
註:nas.msc 檔案位於 c:\windows\system32 下。
42 入門指南
Page 45

使用 Remote Desktop Connection 存取 MMC
使用 Remote Desktop Connection ( 遠端桌面連線 ) 進行遠端伺服器管理
可以降低與遠端管理相關的費用。Remote Desktop for Administration
( 系統遠端管理桌面 ) 由終端機服務技術支援,專門設計用於伺服器管理。
Remote Desktop for Administration ( 系統遠端管理桌面 ) 不需要特殊的用
戶端系統授權即可存取伺服器。此外,在使用 Remote Desktop for
Administration ( 系統管理遠端桌面 ) 時,也無需安裝終端機伺服器授權。
安裝 Remote Desktop Connection ( 遠端桌面連線 ) 之後,管理員亦可從
早期版本的 Windows 系統完全管理執行 Windows Storage Server 2003
R2 x64 Edition with SP2 的電腦。
註:若要從遠端系統連接至 Remote Desktop for Administration ( 系統管理遠端
桌面 ),請使用 Remote Desktop Connection ( 遠端桌面連接 )。
建立 Remote Desktop Connection 至桌面
若要建立並儲存 Remote Desktop Connection ( 遠端桌面連線 ) 至 Windows
Storage Server 2003 R2 x64 Edition with SP2,請執行下列步驟:
1 按一下 Start ( 開始 ) → Run ( 執行 )。
2 鍵入 mstsc,然後按一下 OK ( 確定 )。
螢幕上將會出現 Remote Desktop Connection ( 遠端桌面連接 ) 視窗。
3 在 Remote Desktop Connection (遠端桌面連線) 畫面中,鍵入儲存伺
服器的電腦名稱或 IP 位址,然後按一下 Options ( 選項 )。
4 在 Connection Settings (連線設定) 下,按一下 Save As (另存新檔 )。
5 在 Save As ( 另存新檔 ) 畫面中,鍵入連線的名稱,包含預設的 .rdp
副檔名。
Save in ( 儲存位置 ) 下拉功能表中,選擇 Desktop ( 桌面 ),
6 在
然後按一下 Save ( 儲存檔案 )。
您的連接即會儲存至桌面。
如需有關設定 Remote Desktop Connection ( 遠端桌面連線 ) 的詳細資
訊,請在 Remote Desktop Connection ( 遠端桌面連線 ) 視窗中按一下
Help ( 說明 )。
入門指南 43
Page 46

Dell OpenManage Server Administrator
Dell OpenManage Server Administrator 透過作業系統使用整合式、基於 Web
瀏覽器的介面 (OpenManage Server Administrator 首頁 ) 或指令行介面 (CLI)
提供全面的一對一系統管理解決方案。
OpenManage Server Administrator 可讓您從本機和遠端管理網路上的 NAS
系統,以及透過全面的一對一管理來集中管理整個網路。
註:如果使用的是 OpenManage Server Administrator,系統可以是獨立的系
統、將 Network Attached Storage 單元安裝於獨立機殼的伺服器、或在機殼中
包括一或多個伺服器模組的模組化系統。
如需更多資訊,請參閱您的 OpenManage Server Administrator 文件。
安裝 OpenManage Server Administrator
Dell Systems Build and Update Utility 媒體提供安裝程式,用以在 NAS 系
統上安裝、升級和解除安裝 OpenManage Server Administrator 及其他系統
軟體元件。您也可以透過自動網路安裝在多個系統上安裝 OpenManage
Server Administrator。
使用 Dell Systems Build and Update Utility 媒體上的安裝程式,您可以在所
有支援的 Windows Storage Server 2003 R2 x64 Edition with SP2 作業系統
上安裝和升級 OpenManage Server Administrator。
若要安裝 OpenManage Server Administrator,請執行下列步驟:
1 將 Dell Systems Build and Update Utility 媒體插入系統的 CD/DVD
光碟機。
該媒體將自動載入,並且螢幕上出現 Server Administrator Installer
( 伺服器管理員安裝程式 ) 視窗。
2 按一下 Install, Modify, Repair or Remove Server Administrator
( 安裝、修改、修復或移除伺服器管理員 )。
3 在 License Agreement ( 授權合約 ) 視窗中,閱讀並接受合約,
然後按一下 Next ( 下一步 )。
44 入門指南
Page 47

4 在 Setup Type ( 安裝類型 ) 視窗中,選擇適合您的組態的安裝類型,
然後按一下 Next ( 下一步 )。
5 在 Ready to Install ( 準備安裝 ) 視窗中,按一下 Install ( 安裝 )。
6 在 Install Wizard Completed ( 安裝精靈完成 ) 視窗中,按一下
Finish ( 完成 )。
存取 OpenManage Server Administrator
您可以連按兩下桌面的 Server Administrator ( 伺服器管理員 ) 圖示,
透過主機從本機存取 OpenManage Server Administrator。
若要直接從同一網路的用戶端系統存取 OpenManage Server Administrator,
請開啟 Internet Explorer 6.0 或更新版本的瀏覽器,然後連接至 NAS 系統
的安全連接埠 1311。
例如,鍵入:
https://DELL1234567:1311
其中 DELL1234567 為 NAS 系統的名稱。
如果連接埠 1311 已被防火牆停用,請使用下列程序設定例外以啟用連接
埠 1311 供 OpenManage 使用。
1 按一下 Start (開始 ) → Settings ( 設定 ) → Control Panel ( 控制台 ) →
Windows Firewall (Windows 防火牆 )。
2 按一下 Exceptions ( 例外 ) 標籤。
3 按一下 Add port ( 新增連接埠 )
4 在 Name ( 名稱 ) 欄位中鍵入 Dell OpenManage Server
Administrator。
5 在 Port number ( 連接埠號碼 ) 欄位中鍵入 1311。
6 按一下 OK ( 確定 )。
7 如果出現提示,請重新啟動防火牆服務。
。
新增信任的網站至瀏覽器
由於 Microsoft 安全保護標準的提高,在您開始存取網站時,系統可能會
提示您將網際網路或公司內部網站新增至信任的網站區域。
入門指南 45
Page 48

若要將信任的網站新增至 Internet Explorer,請執行下列步驟:
1 在 Tools ( 工具) 功能表中,按一下 Internet Options ( 網際網路選項 )。
將會出現 Internet Options ( 網際網路選項 ) 畫面。
2 按一下 Security ( 安全性 ) 標籤。
螢幕上將會出現 Security ( 安全性 ) 標籤功能表。
3 按一下 Trusted Sites ( 信任的網站 )。
4 按一下 Sites ( 網站 )。
將會出現 Trusted sites ( 信任的網站 ) 畫面。
5 在 Add this Web site to the zone: ( 將此網站加到該區域:) 欄位中,
鍵入網址,使用 https: 安全通訊協定,然後按一下新增。
該網站將出現在 Web sites: ( 網站:) 方塊中。
6 重複步驟 5 以新增任何其他網站,然後按一下 OK ( 確定 )。
將會出現 Internet Options ( 網際網路選項 ) 畫面。
7 按一下 OK ( 確定 )。
更新系統
Server Update Utility 媒體包含用於辨識伺服器和套用更新至伺服器的應用
程式。Server Update Utility (SUU) 亦可從 Dell 支援網站 support.dell.com
下載。如需更多資訊,請參閱 Server Update Utility User
更新公用程式使用者指南 )。
若要更新個別 OpenManage Server Administrator 元件,請使用元件特定的
Dell 更新套件 (DUP),這些套件可在 Dell Updates 媒體中找到。SUU 會
將您 Dell NAS 系統上目前安裝的元件版本與 Dell Updates 媒體上封裝的
更新元件進行比較。請使用 SUU 檢視比較報告和更新整個系統。
’s
Guide ( 伺服器
更新 Microsoft Windows 軟體
若要更新 Windows Storage Server 2003 R2 x64 Edition 作業系統,請參閱
Microsoft 支援網站 support.microsoft.com。所有 Microsoft Windows
®
Server
R2 x64 Edition。
46 入門指南
2003 R2 x64 Edition 更新均適用於 Windows Storage Server 2003
Page 49

其他您可能需要的文件
註:《產品資訊指南》提供重要的安全說明與管制資訊。保固資訊包含於
此文件或以單獨文件附加。
• 《機架安裝指南》或《機架安裝說明》隨附於機架解決方案,
說明如何將系統安裝於機架中。
• 管理員指南提供在系統上完成組態程序的資訊,並概述 Windows
Storage Server 2003 R2 x64 Edition with SP2 的功能。
• 《重要資訊》文件提供最低的硬體及軟體要求,並列出所有已知的
問題。
• 系統的《使用者指南》提供有關系統功能和技術規格的資訊。
• 系統管理軟體說明文件說明軟體的功能、要求、安裝和基本操作。
• 作業系統說明文件說明如何安裝 ( 如有必要 )、組態和使用作業系統
軟體。
• 您單獨採購的任何元件之說明文件提供這些選件的組態和安裝資訊。
• 有時候更新會包含在系統中以描述系統、軟體和/或說明文件的變更。
註:請務必先閱讀更新內容,因為它們經常在其他文件中更新資訊。
• 可能會隨附附註說明或讀我檔案以提供最新的系統更新、說明文件
或進階的技術參考資料以供有經驗的使用者或技術人員使用。
• 《伺服器更新公用程式使用者指南》說明如何使用伺服器更新公用
程式檢視系統上的軟體版本和更新系統軟體。該公用程式可從 Dell
支援網站 support.dell.com 下載。
入門指南 47
Page 50

48 入門指南
Page 51

Microsoft® Windows
®
Storage Server 2003 R2 Édition
64 bits avec SP2 pour
les solutions de stockage
Dell™ PowerVault™
Guide de mise en route
Page 52

Remarques et avis
REMARQUE : une REMARQUE indique des informations importantes qui vous
aident à mieux utiliser votre ordinateur.
AVIS : un AVIS vous avertit d'un risque de dommage matériel ou de perte
de données et vous indique comment éviter le problème.
___________________
Les informations contenues dans ce document peuvent être modifiées sans préavis.
© 2007 Dell Inc. Tous droits réservés.
La reproduction de ce document de quelque manière que ce soit sans l'autorisation écrite de Dell Inc.
est strictement interdite.
Marques utilisées dans ce document : Dell, le logo DELL, PowerEdge, PowerVault et OpenManage so nt
des marques de Dell Inc. ; Microsoft, Internet Explorer, Windows et Windows Server sont des marques
ou des marques déposées de Microsoft Corporation aux États-Unis et/ou dans d'autres pays.
Tous les autres noms de marques et marques commerciales utilisés dans ce document se rapportent
aux sociétés propriétaires des marques et des noms de ces produits. Dell Inc. décline tout intérêt dans
l'utilisation des marques déposées et des noms de marques ne lui appartenant pas.
Septembre 2007 N/P CM391 Rév. A00
Page 53

Sommaire
Présentation générale . . . . . . . . . . . . . . . . . . 53
Conventions de dénomination
Configuration du système NAS
. . . . . . . . . . . . . . 54
. . . . . . . . . . . . . 55
Configuration du système à l'aide d'un clavier,
d'un moniteur et d'une souris
. . . . . . . . . . . 55
Configuration du système pour l'accès
au réseau
. . . . . . . . . . . . . . . . . . . . . . 55
Configuration de l'adresse IP réseau
pour le système NAS
. . . . . . . . . . . . . . . . 56
Saisie du nom d'utilisateur et du mot
de passe par défaut de l'administrateur
Changement de langue à l'aide de l'interface
multilingue (MUI)
. . . . . . . . . . . . . . . . . . . . 58
Démarrage de la console de gestion
de Windows Storage Server
Accès à la console MMC
. . . . . . . . . . . . . . . 58
. . . . . . . . . . . . . . . . 59
Accès à la console MMC en local
sur le système hôte
. . . . . . . . . . . . . . . . . 59
Accès à la console MMC via une connexion
Bureau à distance
. . . . . . . . . . . . . . . . . 59
. . . . . . 57
Sommaire 51
Page 54

Dell OpenManage Server Administrator . . . . . . . . 60
Installation d'OpenManage Server Administrator
Accès à OpenManage Server Administrator
Ajout de sites de confiance au navigateur
Mise à jour du système
Mise à jour de Microsoft Windows
. . . . . . . . . . . . . . . 63
. . . . . . . . . 63
. 61
. . . . 61
. . . . . 62
Autres documents utiles
. . . . . . . . . . . . . . . . . 64
52 Sommaire
Page 55

Ce document présente le système d'exploitation Microsoft® Windows® Storage
Server 2003 R2 Édition 64 bits avec SP2. Il indique comment configurer et
installer un système Dell™ Network Attached Storage (NAS) sur un réseau
d'entreprise et contient les instructions requises pour changer la langue de
l'interface utilisateur.
Les thèmes abordés dans ce document sont les suivants :
• Présentation générale
• Conventions de dénomination
• Configuration du système NAS
• Changement de langue à l'aide de l'interface multilingue (MUI)
• Démarrage de la console de gestion de Windows Storage Server
• Accès à la console MMC
• Dell OpenManage
™
Server Administrator
• Autres documents utiles
Présentation générale
L'édition 64 bits de Windows Storage Server 2003 R2 avec SP2 inclut de
nouvelles fonctions de recherche et simplifie la gestion du stockage et de la
configuration. Ce système d'exploitation évolutif a été conçu spécialement pour
optimiser les performances des systèmes de stockage réseau (NAS). Il apporte
des améliorations notables en termes de gestion du stockage et de facilité
d'installation.
L'édition 64 bits de Windows
sur votre système NAS. La plupart des procédures de configuration ont déjà été
effectuées et ne requièrent aucune intervention de l'utilisateur.
Le processus de
mini-installation Microsoft
du système. Une fois son exécution terminée, vous pouvez accéder au serveur
en local ou à distance.
Storage Server 2003 R2 avec SP2 a été préinstallée
est lancé au premier démarrage
REMARQUE : Si le système a été préconfiguré en RAID logiciel de niveau 5,
il lance une synchronisation RAID pour optimiser la matrice de disques. Ce
processus s'exécute en arrière-plan et peut affecter les performances générales
du système tant qu'il n'est pas terminé. Si le système est mis hors tension
prématurément, la synchronisation RAID recommence à la mise sous tension
suivante, jusqu'à ce qu'elle puisse se terminer.
Guide de mise en route 53
Page 56

Conventions de dénomination
Le terme
PowerVault NF100
Dell PowerVault™ 100
fait référence à la configuration du système de stockage
fait référence à la plate-forme matérielle.
PowerVault 100 et au système d’exploitation Microsoft Windows Storage
Server 2003 R2 avec SP2.
Le terme
PowerVault NF500
Dell PowerVault 500
fait référence à la configuration du système de stockage
fait référence à la plate-forme matérielle.
PowerVault 500 et au système d’exploitation Microsoft Windows Storage
Server 2003 R2 avec SP2.
Le terme
PowerVault NF600
Dell PowerVault 600
fait référence à la configuration du système de stockage
fait référence à la plate-forme matérielle.
PowerVault 600 et au système d’exploitation Microsoft Windows Storage
Server 2003 R2 avec SP2.
Figure 1-1. Conventions de dénomination
PowerVault NF100
Système de stockage
PowerVault 100
PowerVault NF500
Système de stockage
PowerVault 500
PowerVault NF600
Système de stockage
PowerVault 600
Microsoft Windows
Storage Server 2003
R2 avec SP2
54 Guide de mise en route
Microsoft Windows
Storage Server 2003
R2 avec SP2
Microsoft Windows
Storage Server 2003
R2 avec SP2
Page 57

Configuration du système NAS
Configuration du système à l'aide d'un clavier, d'un moniteur et d'une souris
REMARQUE : Selon la méthode de configuration utilisée, vous devrez peut-être
utiliser des connexions KVM (clavier/vidéo/souris) locales pour effectuer les
procédures d'installation et de configuration. Ces connexions ne sont pas
nécessaires si la configuration peut être effectuée à partir du système distant.
1
Connectez un clavier, un moniteur et une souris au système NAS.
Pour plus d'informations sur les connecteurs du système, reportez-vous
au document
2
Allumez le système NAS.
3
Connectez-vous au système NAS.
REMARQUE : Le nom d'utilisateur par défaut de l'administrateur est
administrator et le mot de passe associé storageserver
Configuration du système pour l'accès au réseau
1
Si le système NAS est sous tension, éteignez-le.
2
Connectez l'extrémité d'un câble Ethernet à l'un des connecteurs de
contrôleur d'interface réseau (NIC) 10/100/1000 RJ-45 (voir la figure 1-2)
situés à l'arrière du système NAS.
Pour plus d'informations sur l'emplacement des connecteurs, consultez
le document
User's Guide
User's Guide
(Guide d'utilisation).
(Guide d'utilisation) du système NAS.
.
3
Connectez l'autre extrémité du câble Ethernet à une prise Ethernet fiable.
4
Allumez le système NAS.
5
Vérifiez que le serveur est connecté à Ethernet. Pour ce faire, vérifiez que
le voyant du connecteur de NIC est allumé. Voir figure 1-2. Si ce voyant
est vert fixe, la connexion est de bonne qualité. S'il clignote en orange,
des données sont en cours de transfert.
Si le voyant est éteint, vérifiez que chaque extrémité du câble Ethernet est
correctement insérée dans le connecteur de NIC et dans la prise Ethernet.
Guide de mise en route 55
Page 58

Le système NAS obtient d'un serveur DHCP
Protocol
) les informations permettant de définir les paramètres réseau
(Dynamic Host Configuration
(adresse IP, masque de sous-réseau correspondant à la passerelle et adresse
du serveur DNS).
REMARQUE : Le démarrage du système NAS peut prendre quelques
minutes. Ce délai varie selon la configuration utilisée et le nombre de
ressources de stockage connectées.
Figure 1-2. Connecteur de NIC
1
2
3
4
1 Voyant du NIC 1 3 NIC 1
2 Voyant du NIC 2 4 NIC 2
Configuration de l'adresse IP réseau pour le système NAS
Si votre réseau contient un serveur DHCP, il est inutile de configurer l'adresse IP
du système NAS (le protocole DHCP attribue cette adresse automatiquement).
Dans le cas contraire, configurez l'adresse IP du système NAS via la fenêtre
Configuration du réseau
56 Guide de mise en route
.
Page 59

Pour accéder à cette dernière, cliquez sur
de configuration
REMARQUE : Si le réseau ne comprend aucun serveur DHCP, vous devez
connecter un clavier, un moniteur et une souris au système local pour procéder
à la configuration du système NAS. Pour plus d'informations, voir “Configuration
du système à l'aide d'un clavier, d'un moniteur et d'une souris”, à la page 55.
REMARQUE : Le pare-feu Windows est activé par défaut. Il est donc possible que
vous soyez confronté à des problèmes de connectivité lors de l'accès au système
distant.
→ Configuration du réseau
Démarrer →
.
Paramètres →
Panneau
Saisie du nom d'utilisateur et du mot de passe par défaut de l'administrateur
Lorsque vous vous connectez au système NAS pour la première fois, vous devez
entrer un nom d'utilisateur pour l'administrateur, ainsi qu'un mot de passe.
Par défaut, le nom d'administrateur est
storageserver
Modification du mot de passe administrateur
1
Cliquez sur
l'ordinateur
2
Dans la fenêtre
et groupes locaux
3
Dans le volet de droite, cliquez avec le bouton droit sur
et sélectionnez
4
Dans la fenêtre
cliquez sur
5
Saisissez puis confirmez le mot de passe dans les champs appropriés,
puis cliquez sur
6
Fermez la fenêtre
.
Démarrer →
Outils d'administration →
.
Gestion de l'ordinateur
puis cliquez sur
Définir le mot de passe
Définir le mot de passe Administrateur
Continuer
OK
.
.
Gestion de l'ordinateur
administrator
, développez l'élément
Utilisateurs
.
.
.
et le mot de passe
Gestion de
Utilisateurs
Administrateur
,
Guide de mise en route 57
Page 60

Changement de langue à l'aide de l'interface multilingue (MUI)
Le système NAS permet de changer la langue de l'interface utilisateur du
système d'exploitation. Par défaut, plusieurs langues sont installées. L'interface
MUI permet d'afficher les menus, boîtes de dialogue et fichiers d'aide du
système d'exploitation dans plusieurs langues.
Si le système a été préconfiguré avec l'édition 64 bits de Windows Storage
Server 2003 R2 avec SP2, l'interface MUI est configurée pour prendre en compte
votre langue dans les paramètres régionaux et dans le navigateur. Aucune
intervention de l'utilisateur n'est requise.
Pour changer la langue par défaut du navigateur, procédez comme suit :
1
Ouvrez une fenêtre Internet Explorer®.
2
Dans le menu
3
Dans l'onglet
4
Dans la fenêtre
5
Dans la zone
6
Cliquez sur OK.
Outils
Général
Langues
Langue
, sélectionnez
, cliquez sur
, cliquez sur
, sélectionnez une langue.
Options Internet
Langues
Ajouter
.
.
.
Démarrage de la console de gestion de Windows Storage Server
La console de gestion de Windows Storage Server s'affiche dans la console
MMC (Microsoft Management Console) et simplifie l'administration du
système. La console MMC s'ouvre automatiquement lorsque vous vous
connectez à Windows Storage Server 2003 R2 Édition 64 bits avec SP2.
Pour ouvrir la console de gestion de Windows Storage Server, cliquez sur
Démarrer→
Le nœud par défaut affiché dans le volet gauche de la fenêtre
Management Console
central affiche plusieurs scénarios que vous pouvez sélectionner pour bénéficier
d'une assistance lors des opérations liées à l'administration du système
d'exploitation.
58 Guide de mise en route
Tous les programmes→ , puis sélectionnez l'option appropriée.
est
Gestion de serveur de fichiers (Local)
Microsoft
. Le volet
Page 61

Accès à la console MMC
Par défaut, la console MMC figure parmi les options du menu
peut être utilisée pour configurer le système de fichiers réseau (NFS) et gérer
les disques ou le système NAS. Pour plus d'informations, consultez la
documentation concernant la console MMC fournie avec le système.
Avec la console MMC, vous pouvez gérer le stockage localement
(à partir du système hôte) ou au moyen d'une connexion Bureau à distance.
Démarrer
. Elle
Accès à la console MMC en local sur le système hôte
La console MMC doit normalement figurer parmi les options du menu
Démarrer
1
2
. Si tel n'est pas le cas, procédez comme suit :
Cliquez sur
Ta p e z
REMARQUE : Le fichier nas.msc se trouve dans le répertoire
c:\windows\system32.
Démarrer →
nas.msc
Exécuter
et cliquez sur OK.
.
Accès à la console MMC via une connexion Bureau à distance
La gestion du serveur via la fonction Bureau à distance permet d'alléger la
charge liée à l'administration à distance. Elle est spécialement conçue pour
la gestion des serveurs et fait appel à la technologie Terminal Services.
Aucune licence spéciale n'est requise pour les clients qui accèdent au serveur,
et il n'est pas nécessaire d'installer la gestion de licences Terminal Server.
La connexion Bureau à distance permet également aux administrateurs de gérer
intégralement les systèmes équipés de l'édition 64 bits de Windows Storage
Server 2003 R2 avec SP2 à partir d'ordinateurs équipés de versions antérieures
de Windows.
REMARQUE : Pour vous connecter à la fonction Bureau à distance pour
l’administration à partir d'un système distant, utilisez la connexion au bureau
à distance.
Guide de mise en route 59
Page 62

Création d'une connexion Bureau à distance et ajout d'une icône sur le bureau
Pour créer et enregistrer une connexion Bureau à distance vers un système
Windows Storage Server 2003 R2 édition 64 bits avec SP2, procédez comme suit :
1
Cliquez sur
2
Ta p e z
La fenêtre
3
Dans le champ
l'ordinateur ou l'adresse IP du serveur de stockage, puis cliquez sur
Options
4
Sous
5
Dans l'écran
en conservant l'extension par défaut
6
Dans le menu déroulant
puis cliquez sur
La connexion est enregistrée sur le bureau.
Pour plus d'informations sur la configuration de la connexion au bureau à
distance, cliquez sur
Démarrer → Exécuter
mstsc
et cliquez sur OK.
Connexion Bureau à distance
Connexion au bureau à distance
.
Paramètres de connexion
Enregistrer sous
OK
.
Aide
dans la fenêtre
, saisissez un nom pour la connexion
Enregistrer dans
.
s'affiche.
, entrez le nom de
, cliquez sur
Enregistrer sous
.rdp
.
, sélectionnez
Connexion Bureau à distance
.
Bureau
.
Dell OpenManage Server Administrator
Dell OpenManage Server Administrator fournit une solution de gestion de
systèmes individuels complète, qui peut être utilisée via une interface intégrée
de type navigateur Web (page d'accueil d’OpenManage Server Administrator)
ou au moyen de l'interface CLI du système d'exploitation.
Ses fonctions d'administration permettent de gérer des systèmes NAS
individuellement sur un réseau, en local ou à distance, et de se concentrer
sur la gestion du réseau dans son ensemble.
REMARQUE : Dans le cadre de l'utilisation d’OpenManage Server Administrator,
le terme système peut désigner un système autonome, un serveur connecté à des
unités NAS dans un châssis distinct, ou bien un système modulaire constitué d'un
châssis contenant un ou plusieurs modules serveurs.
Pour plus de détails, reportez-vous à la documentation d’OpenManage Server
Administrator.
60 Guide de mise en route
Page 63

Installation d'OpenManage Server Administrator
Le support
configuration qui permet d'installer, de mettre à niveau et de désinstaller Server
Administrator, ainsi que d'autres composants logiciels du système NAS.
Vous pouvez également installer OpenManage Server Administrator
automatiquement sur plusieurs systèmes du réseau.
Le programme de configuration fourni sur le support
Update Utility
le mettre à niveau sur tout système équipé d'une version prise en charge
de Windows Storage Server 2003 R2 Édition 64 bits avec SP2.
Pour installer OpenManage Server Administrator, procédez comme suit :
1
2
3
4
5
6
Dell Systems Build and Update Utility
permet d'installer OpenManage Server Administrator et de
Insérez le CD
de CD/DVD.
Le support démarre automatiquement et la fenêtre
Installer
Cliquez sur
(Installer, modifier, réparer ou supprimer Server Administrator).
Dans la fenêtre
le contrat, puis cliquez sur
Dans la fenêtre
d'installation souhaité et cliquez sur
Dans la fenêtre
sur
Install
Dans la fenêtre
terminé), cliquez sur
Dell
Systems Build and Update Utility dans le lecteur
(Programme d'installation de Server Administrator) s'affiche.
Install, Modify, Repair or Remove Server Administrator
License Agreement
Next
Setup Type
Ready to Install
(Installer).
Install Wizard Completed
(Type d'installation), sélectionnez le type
Finish
(Contrat de licence), lisez et acceptez
(Suivant).
(Prêt pour l'installation), cliquez
(Terminer).
contient un programme de
Dell Systems Build and
Server Administrator
Next
.
(Assistant d'installation
Accès à OpenManage Server Administrator
Vous pouvez accéder à OpenManage Server Administrator en local sur le
système hôte. Pour ce faire, cliquez deux fois sur l'icône
du bureau.
Pour accéder directement à OpenManage Server Administrator à partir
d'un système client connecté au même réseau, ouvrez Internet Explorer 6.0
(ou version suivante) puis connectez-vous au port sécurisé (1311)
du système NAS.
Guide de mise en route 61
Server Administrator
Page 64

Par exemple, tapez :
https://DELL1234567:1311
où
DELL1234567
Si le port 1311 est désactivé par le pare-feu, utilisez la procédure suivante
pour définir une exception afin d'autoriser OpenManage à utiliser ce port.
1 Cliquez sur
Pare-feu Windows
2
Cliquez sur l'onglet
3
Cliquez sur
4
Ta p e z
Dell OpenManage Server Administrator
dans le champ
5
Ta p e z
1311
6
Cliquez sur OK.
7
Si un message vous y invite, redémarrez le service de pare-feu.
est le nom du système NAS.
Démarrer →
.
Ajouter un port
Nom
dans le champ
Paramètres →
Exceptions
.
.
Numéro du port
.
Panneau de configuration →
.
Ajout de sites de confiance au navigateur
Microsoft ayant renforcé ses normes de sécurité, vous serez probablement invité
à ajouter un site Internet ou intranet auquel vous accédez pour la première fois
à la zone des sites de confiance.
Pour ajouter des sites de confiance à Internet Explorer, procédez comme suit :
1
Dans le menu
L'écran
Outils
, cliquez sur
Options Internet
s'affiche.
Options Internet
.
2
Cliquez sur l'onglet
Le menu correspondant s'affiche.
3
Cliquez sur
4
Cliquez sur
La fenêtre
5
Dans le champ
en utilisant le protocole de sécurité https:, puis cliquez sur
Le site s'affiche dans la zone
62 Guide de mise en route
Sites de confiance
Sites
Sites de confiance
Sécurité
.
Ajouter ce site Web à cette zone
.
.
s'affiche.
Sites Web
.
, tapez l'adresse du site
Ajouter
.
Page 65

6
Recommencez l'étape 5 pour ajouter des sites supplémentaires,
puis cliquez sur
L'écran
7
Cliquez sur OK.
Options Internet
OK
.
s'affiche.
Mise à jour du système
Le support
d'identifier les mises à jour et de les appliquer au serveur. Server Update Utility
(“SUU”) peut également être téléchargé à partir du site
plus de détails, reportez-vous au document
(Server Update Utility - Guide d'utilisation).
Pour mettre à jour uniquement certains composants d’OpenManage Server
Administrator, utilisez les progiciels de mise à jour Dell appropriés disponibles
sur le support Dell Updates. SUU compare les versions des composants installés
sur le système Dell NAS avec celles du support Dell Updates. Il permet
d'afficher un rapport comparatif de ces versions et de mettre à jour la totalité
du système.
Server Update Utility
contient une application permettant
support.dell.com
Server Update Utility User's Guide
. Pour
Mise à jour de Microsoft Windows
Pour mettre à jour le système d'exploitation Windows Storage Server 2003 R2
Édition 64 bits avec SP2, rendez-vous sur le site Web de support technique de
Microsoft,
2003 R2 Édition 64 bits s'appliquent à Windows Storage Server 2003 R2
Édition 64 bits.
support.microsoft.com
. Toutes les mises à jour de Windows Server®
Guide de mise en route 63
Page 66

Autres documents utiles
REMARQUE : Le document Product Information Guide (Guide d'informations
sur le produit) contient d'importantes informations se rapportant à la sécurité
et aux réglementations. Les informations sur la garantie se trouvent soit dans
ce document, soit à part.
•Le
Guide d'installation du rack
fournis avec la solution rack décrivent l'installation du système dans le rack.
• Le document
des informations relatives aux procédures de configuration du système,
ainsi qu'une présentation générale des fonctions de Windows Storage
Server 2003 R2 Édition 64 bits avec SP2.
• Le document
la configuration minimale requise sur le plan matériel et logiciel, et
répertorie tous les incidents recensés.
• Le document
sur les fonctions et spécifications techniques du système.
• La documentation du logiciel de gestion de systèmes comprend des
renseignements sur les fonctionnalités, les spécifications, l'installation et
le fonctionnement de base du logiciel.
• La documentation du système d'exploitation indique comment installer
(au besoin), configurer et utiliser le système d'exploitation.
• La documentation fournie avec les composants que vous avez achetés
séparément contient des informations pour configurer et installer ces
options.
• Des mises à jour sont parfois fournies avec le système pour décrire les
modifications apportées au système, aux logiciels ou à la documentation.
Administrator's Guide
Important Information
User's Guide
ou les
Instructions d'installation du rack
(Guide de l'administrateur) contient
(Informations importantes) présente
(Guide d'utilisation) fournit des informations
REMARQUE : Lisez toujours les mises à jour en premier car elles remplacent
souvent les informations contenues dans les autres documents.
• Si des notes d'édition ou des fichiers lisez-moi (readme) sont fournis, ils
contiennent des mises à jour de dernière minute apportées au système ou à
la documentation, ou bien des informations techniques avancées destinées
aux utilisateurs expérimentés ou aux techniciens.
• Le document
Guide d'utilisation) indique comment utiliser SUU pour afficher les
versions de logiciels installées sur le système et les mettre à jour. Il peut
être téléchargé à partir du site
64 Guide de mise en route
Server Update Utility User's Guide
support.dell.com
(Server Update Utility -
.
Page 67

Microsoft® Windows
®
Storage Server 2003 R2
x64 Edition mit SP2
für Dell™ PowerVault™
Speicherlösungen
Handbuch zum Einstieg
Page 68

Anmerkungen und Hinweise
ANMERKUNG: Eine ANMERKUNG macht auf wichtige Informationen
aufmerksam, die die Arbeit mit dem Computer erleichtern.
HINWEIS: Ein HINWEIS warnt vor möglichen Beschädigungen der Hardware oder
vor Datenverlust und zeigt auf, wie derartige Probleme vermieden werden können.
___________________
Irrtümer und technische Änderungen vorbehalten.
© 2007 Dell Inc. Alle Rechte vorbehalten.
Jegliche Reproduktion dieses Dokuments ohne vorherige schriftliche Genehmigung von Dell Inc.
ist streng untersagt.
In diesem Text verwendete Marken: Dell, das DELL Logo, PowerEdge, PowerVault, und OpenManage
sind Marken von Dell Inc.; Microsoft, Internet Explorer, Windows und Windows Server sind Marken
oder eingetragene Marken von Microsoft Corporation in den USA und/oder anderen Ländern.
Alle anderen in dieser Dokumentation genannten Marken und Handelsbezeichnungen sind Eigentum
der jeweiligen Hersteller und Firmen. Dell Inc. erhebt keinen Anspruch auf Besitzrechte an Marken
und Handelsbezeichnungen mit Ausnahme der eigenen.
September 2007 Teilener. CM391 Rev. A00
Page 69

Inhalt
Übersicht. . . . . . . . . . . . . . . . . . . . . . . . . 69
Bezeichnungskonvention
Konfigurieren des NAS-Systems
. . . . . . . . . . . . . . . . 70
. . . . . . . . . . . . 71
Konfiguration des Systems mit Tastatur,
Bildschirm und Maus
. . . . . . . . . . . . . . . . 71
Konfiguration des Systems
für den Netzwerkzugriff
. . . . . . . . . . . . . . . 71
Konfiguration der Netzwerk-IP-Adresse
für das NAS-System
. . . . . . . . . . . . . . . . 73
Eingabe des vorgegebenen Administratorbenutzernamens und -kennworts
. . . . . . . . . 73
Lokale Anpassung des Systems mithilfe
der Mehrsprachen-Benutzerschnittstelle
. . . . . . . . 74
Aufrufen der Windows Storage
Server Management Console
. . . . . . . . . . . . . . 74
Aufrufen der Microsoft Management Console
Lokaler MMC-Aufruf auf dem Host
. . . . . . . . . 75
Zugriff auf die MMC über eine Remotedesktopverbindung
. . . . . . . . . . . . . . . . . 75
. . . . . 75
Inhalt 67
Page 70

Dell OpenManage Server Administrator . . . . . . . . 76
Installation von OpenManage
Server Administrator
. . . . . . . . . . . . . . . . 77
Aufrufen von OpenManage
Server Administrator
. . . . . . . . . . . . . . . . 78
Hinzufügen von vertrauenswürdigen
Sites im Browser
Aktualisieren des Systems
. . . . . . . . . . . . . . . . . . 79
. . . . . . . . . . . . . 79
Aktualisieren der Microsoft
Windows-Software
. . . . . . . . . . . . . . . . . 80
Weitere nützliche Dokumente
. . . . . . . . . . . . . . 80
68 Inhalt
Page 71

Dieses Dokument enthält einen Überblick über das Betriebssystem Microsoft®
Windows
®
Storage Server 2003 R2 x64 Edition mit SP2 und Informationen
über die Konfiguration, Lokalisierung und Installation des Dell™ NAS-Systems
(Network Attached Storage) in einem Unternehmensnetzwerk.
Die folgenden Themen werden in diesem Dokument behandelt:
• Übersicht
• Bezeichnungskonvention
• Konfigurieren des NAS-Systems
• Lokalisieren des Systems mit der Mehrsprachen-Benutzerschnittstelle
(MUI)
• Aufrufen der Windows Storage Server Management Console
• Aufrufen der Microsoft Management Console (MMC)
™
• Dell OpenManage
Server Administrator
• Weitere nützliche Dokumente
Übersicht
Das Betriebssystem Windows Storage Server 2003 R2 x64 Edition mit SP2 bietet
neue Suchfunktionen, vereinfachte Einrichtung und Speicherverwaltung sowie
Erweiterbarkeit; insbesondere wird eine optimale NAS-Leistung erreicht.
Windows Storage Server 2003 R2 x64 Edition mit SP2 bietet erhebliche Verbesserungen bei Speichermanagement-Szenarien und ist einfach zu installieren.
Ihr NAS-System ist vorkonfiguriert mit dem Betriebssystem Windows Storage
Server 2003 R2 x64 Edition mit SP2. Die meisten Einrichtungsvorgänge wurden
bereits durchgeführt und erfordern keinen Benutzereingriff.
Wenn Sie das System zum ersten Mal starten, beginnt das
Setup
. Nachdem es abgeschlossen ist, startet Ihr System automatisch neu.
Anschließend können Sie lokal oder über Netzwerk auf den Server zugreifen.
Microsoft Mini-
ANMERKUNG: Wenn das System mit softwareseitigem RAID 5 (RAID = Redundant
Array of Independent Disks) vorkonfiguriert ist, wird eine RAID-Synchronisation
zum Optimieren des Arrays durchgeführt. Der Vorgang findet im Hintergrund statt
und kann bis zu seinem Abschluss die allgemeine Systemleistung beeinträchtigen.
Wenn das System vor Abschluss des Vorgangs ausgeschaltet wird, beginnt die
RAID-Synchronisation beim nächsten Einschalten erneut, bis der Vorgang
abgeschlossen ist.
Handbuch zum Einstieg 69
Page 72

Bezeichnungskonvention
Der Begriff
PowerVault NF100
Dell PowerVault™ 100
bezieht sich auf die Hardwareplattform.
bezieht sich auf die Konfiguration aus dem Speichersystem
PowerVault 100 und dem Betriebssystem Microsoft Windows Storage
Server 2003 R2 mit SP2.
Der Begriff
PowerVault NF500
Dell PowerVault™ 500
bezieht sich auf die Hardwareplattform.
bezieht sich auf die Konfiguration aus dem Speichersystem
PowerVault 500 und dem Betriebssystem Microsoft Windows Storage
Server 2003 R2 mit SP2.
Der Begriff
PowerVault NF600
Dell PowerVault™ 600
bezieht sich auf die Hardwareplattform.
bezieht sich auf die Konfiguration aus dem Speichersystem
PowerVault 600 und dem Betriebssystem Microsoft Windows Storage
Server 2003 R2 mit SP2.
Abbildung 1-1. Bezeichnungskonvention
PowerVault NF100
Speichersystem
PowerVault 100
PowerVault NF500
Speichersystem
PowerVault 500
PowerVault NF600
Speichersystem
PowerVault 600
Microsoft Windows
Storage Server 2003
R2 mit SP2
70 Handbuch zum Einstieg
Microsoft Windows
Storage Server 2003
R2 mit SP2
Microsoft Windows
Storage Server 2003
R2 mit SP2
Page 73

Konfigurieren des NAS-Systems
Konfiguration des Systems mit Tastatur, Bildschirm und Maus
ANMERKUNG: Je nach Konfigurationsverfahren ist es eventuell erforderlich,
dass Tastatur, Bildschirm und Maus lokal angeschlossen sind, um die Installation
und Konfiguration durchzuführen. Wenn Sie die Konfiguration über das Netzwerk
vornehmen können, brauchen Tastatur, Bildschirm und Maus nicht lokal
angeschlossenen zu sein.
1
Verbinden Sie eine Tastatur, einen Bildschirm und eine Maus
mit dem NAS-System.
Nähere Informationen zu den Systemanschlüssen finden Sie
im
Benutzerhandbuch
2
Schalten Sie das NAS-System ein.
3
Melden Sie sich beim NAS-System an.
ANMERKUNG: Der vorgegebene Administratorbenutzername lautet
administrator, und das zugehörige Kennwort ist storageserver.
Konfiguration des Systems für den Netzwerkzugriff
1
Falls das NAS-System eingeschaltet ist, schalten Sie es aus.
2
Verbinden Sie ein Ende eines Ethernet-Kabels mit einem der 10/100/1000
RJ-45 NIC-Anschlüsse (siehe Abbildung 1-2) auf der Rückseite des NASSystems.
Nähere Informationen über die Position der Systemanschlüsse erhalten
Sie im
Benutzerhandbuch
.
zum NAS-System.
3
Verbinden Sie das andere Ende des Ethernet-Kabels mit einer funktionierenden
Ethernet-Anschlussbuchse.
4
Schalten Sie das NAS-System ein.
5
Überprüfen Sie die Ethernet-Verbindung des Servers, indem Sie
kontrollieren, ob die LED für den Netzwerkadapter (NIC) leuchtet.
Siehe Abbildung 1-2. Wenn die LED des NIC-Anschlusses stetig grün
leuchtet, ist die Verbindung ordnungsgemäß hergestellt. Wenn die LED
des NIC-Anschlusses gelb blinkt, zeigt dies die Übertragung von Daten an.
Handbuch zum Einstieg 71
Page 74

Wenn die LED nicht leuchtet, überprüfen Sie den korrekten Sitz
des Ethernet-Kabels am NIC-Anschluss und an der EthernetAnschlussbuchse.
Das NAS-System bezieht die für das Einrichten der Netzwerkparameter
(IP-Adresse, Gateway-Subnetzmaske und DNS-Serveradresse) erforderlichen
Informationen von einem DHCP-Server (DHCP = Dynamic Host
Configuration Protocol) im Netzwerk.
ANMERKUNG: Je nach Konfiguration und der am System angeschlossenen
Speicherkapazität kann der Startvorgang des NAS-Systems mehrere Minuten
dauern.
Abbildung 1-2. NIC-Anschluss
1
2
3
4
1 LED für NIC 1 3 NIC 1
2 LED für NIC 2 4 NIC 2
72 Handbuch zum Einstieg
Page 75

Konfiguration der Netzwerk-IP-Adresse für das NAS-System
Wenn das Netzwerk über einen DHCP-Server verfügt, brauchen Sie die IPAdresse des NAS-Systems nicht zu konfigurieren, da DHCP dem NAS-System
automatisch eine Adresse zuweist. Wenn das Netzwerk nicht mit einem DHCPServer ausgestattet ist, konfigurieren Sie die IP-Adresse des NAS-Systems im
Fenster
Um das Fenster
Einstellungen→
Netzwerkkonfiguration
Netzwerkkonfiguration
Systemsteuerung→
ANMERKUNG: Wenn im Netzwerk kein DHCP-Server vorhanden ist, benötigen
Sie zum Durchführen der NAS-Konfiguration eine lokalen Gerätesatz aus Tastatur,
Bildschirm und Maus. Weitere Informationen erhalten Sie unter „Konfiguration des
Systems mit Tastatur, Bildschirm und Maus“ auf Seite 71.
ANMERKUNG: Die Windows-Firewall ist standardmäßig aktiviert. Wenn Sie
über das Netzwerk auf das System zugreifen, kann es zu Verbindungsproblemen
kommen.
.
zu öffnen, klicken Sie auf
Netzwerkkonfiguration
Start→
.
Eingabe des vorgegebenen Administratorbenutzernamens und -kennworts
Wenn Sie sich am NAS-System zum ersten Mal anmelden, müssen Sie einen
Administratorbenutzernamen mit dem dazugehörigen Kennwort eingeben.
Der vorgegebene Administratorbenutzername für das NAS-System lautet
administrator
, und das entsprechende Kennwort ist
storageserver
.
Ändern des Administratorkennworts
1
Klicken Sie auf
2
Erweitern Sie im Fenster
Benutzer und Gruppen
3
Klicken Sie im rechten Bereich auf
Kennwort festlegen
4
Klicken Sie im Fenster
(Kennwort für Administrator festlegen) auf
5
Geben Sie das Kennwort in den entsprechenden Feldern ein,
und klicken Sie auf
6
Schließen Sie das Fenster
Start→
Ver wa lt un g→
Computerverwaltung
Computerverwaltung
,und wählen Sie
Administrator
.
Set Password for Administrator
OK
.
Computerverwaltung
den Eintrag
Benutzer
Fortsetzen
.
Handbuch zum Einstieg 73
.
Lokale
.
, und wählen Sie
.
Page 76

Lokale Anpassung des Systems mithilfe der Mehrsprachen-Benutzerschnittstelle
Sie können für das NAS-System die Sprache der Betriebssystem-Benutzerschnittstelle ändern. Viele Sprachen sind standardmäßig auf dem System
installiert. Die Mehrsprachen-Benutzerschnittstelle (MUI) ermöglicht für
das NAS-System die Anzeige von Menüs, Dialogfenstern und Hilfedateien
in verschiedenen Sprachen.
Wenn das System mit dem Betriebssystem Windows Storage Server 2003
R2 x64 Edition mit SP2 vorkonfiguriert war, ist die Mehrsprachen-Schnittstelle
bereits für Ihre Sprache eingestellt, und zwar sowohl bei den Länder- als auch
den Browsereinstellungen. Es ist kein Eingriff vom Benutzer erforderlich.
So ändern Sie die Standardsprache des Browsers:
1
Öffnen Sie ein Fenster des Browsers Internet Explorer®.
2
Wählen Sie im Menü
3
Klicken Sie auf der Registerkarte
4
Klicken Sie im Fenster
5
Wählen Sie eine Sprache im Feld
6
Klicken Sie auf OK.
Extras
den Eintrag
Allgemein
Spracheinstellung
Sprache
Internetoptionen
auf
Sprachen
auf
Hinzufügen
.
.
.
.
Aufrufen der Windows Storage Server Management Console
Die
Windows Storage Server Management Console
(Microsoft Management Console) angezeigt und ermöglicht eine einfache
und komfortable Verwaltung des Systems. Die MMC wird automatisch
geöffnet, wenn Sie sich bei Windows Storage Server 2003 R2 x64 Edition
mit SP2 anmelden.
Um die
Sie auf
(Windows Storage Server Verwaltung).
Im linken Bereich des Fensters
Knoten
als Standardknoten angezeigt. Der mittlere Fensterbereich enthält Szenarien,
die Sie zur vereinfachten Betriebssystemverwaltung auswählen können.
74 Handbuch zum Einstieg
Windows Storage Server Management Console
Start→
Alle Programme→
File Server Management (Local)
Windows Storage Server Management
Microsoft Management Console
(Dateiserververwaltung [lokal])
wird in der MMC
zu öffnen, klicken
wird der
Page 77

Aufrufen der Microsoft Management Console
Die MMC ist standardmäßig im Microsoft Startmenü konfiguriert. Die MMC
lässt sich zur Datenträgerverwaltung und NFS-Konfiguration sowie als
allgemeine NAS-Verwaltungsstation nutzen. Weitere Informationen erhalten
Sie im mitgelieferten Dokument über Microsoft MMC.
Um Ihr Speichersystem über MMC zu konfigurieren, können Sie entweder
lokal oder über eine Remotedesktopverbindung auf die MMC zugreifen.
Lokaler MMC-Aufruf auf dem Host
Die MMC wird im
nicht im Menü
1
Wählen Sie
2
Geben Sie
ANMERKUNG: Die Datei nas.msc befindet sich im Verzeichnis
c:\windows\system32.
Zugriff auf die MMC über eine Remotedesktopverbindung
Verwenden Sie die Remotedesktopverbindung zur Serververwaltung über
das Netzwerk und reduzieren Sie so den Aufwand für die Fernverwaltung.
Remotedesktop für Verwaltung ist mit Terminal-Services-Technologie
ausgestattet und speziell auf die Anforderungen der Serververwaltung
zugeschnitten.
Remotedesktop für Verwaltung benötigt keine spezielle Lizenz für ClientSysteme, die auf den Server zugreifen. Außerdem ist es nicht erforderlich,
bei der Benutzung von Remotedesktop für Verwaltung die Terminal-ServerLizenzierung zu installieren.
Computer mit Windows Storage Server 2003 R2 x64 Edition mit SP2 lassen
sich auch von einem System mit einer Vorgängerversion von Windows
vollständig verwalten, wenn die Remotedesktopverbindung auf jenem System
installiert wird.
Start
-Menü des Hosts angezeigt. Wenn die MMC
Start
angezeigt wird, gehen Sie wie folgt vor:
Start→ Ausführen
nas.msc
ein, und klicken Sie auf OK.
.
ANMERKUNG: Um von einer Netzwerkstation auf Remotedesktop für Verwaltung
zuzugreifen, verwenden Sie die Remotedesktopverbindung.
Handbuch zum Einstieg 75
Page 78

Erstellen einer Remotedesktopverbindung auf dem Desktop
Um eine Remotedesktopverbindung zu Windows Storage Server 2003 R2 x64
Edition mit SP2 zu erstellen und zu speichern, gehen Sie wie folgt vor:
1
Wählen Sie
2
Geben Sie
Das Fenster
3
Geben Sie im Fenster
oder die IP-Adresse des Speicherservers ein, und klicken Sie dann auf
Optionen
4
Klicken Sie unter
5
Geben Sie im Fenster
ein, und hängen Sie die Standard-Dateinamenerweiterung
6
Wählen Sie im Dropdownmenü
und klicken Sie dann auf
Die Verbindung wird auf dem Desktop gespeichert.
Weitere Informationen über das Konfigurieren der Remotedesktopverbindung
erhalten Sie, wenn Sie im Fenster
Start→ Ausführen
mstsc
ein, und klicken Sie auf OK.
Remotedesktopverbindung
Remotedesktopverbindung
.
Verbindungseinstellungen
Speichern unter
.
Speichern in
Speichern
Remotedesktopverbindung
wird angezeigt.
den Computernamen
auf
Speichern unter
einen Namen für die Verbindung
den Eintrag
.
auf
.
.rdp
an.
Desktop
Hilfe
,
klicken.
Dell OpenManage Server Administrator
Dell OpenManage Server Administrator ist eine umfassende, Eine-zu-EinsSystemverwaltungslösung, die sich mit einer integrierten browser-basierten
Schnittstelle (der Server-Administrator-Homepage) oder einer Befehlszeilenschnittstelle (CLI) über das Betriebssystem bedienen lässt.
Mit OpenManage Server Administrator können Sie NAS-Systeme im Netzwerk
lokal und aus der Ferne verwalten. Die Verwaltung des gesamten Netzwerks
erfolgt über eine umfassende Eins-zu-Eins-Systemverwaltung.
ANMERKUNG: Ein System im Sinne von OpenManage Server Administrator
kann ein eigenständiges System sein, ein Server mit NAS-Einheiten in separaten
Gehäusen oder ein modulares System mit einem oder mehreren Servermodulen
in einem Gehäuse.
Weitere Informationen finden Sie in der Dokumentation zu OpenManage
Server Administrator.
76 Handbuch zum Einstieg
Page 79

Installation von OpenManage Server Administrator
Auf dem
Setup-Programm, mit dem sich OpenManage Server Administrator und andere
System-Softwarekomponenten auf dem NAS-System installieren, upgraden und
deinstallieren lassen. Außerdem können Sie OpenManage Server Administrator
auf mehreren Systemen mit einer unbeaufsichtigten Installation über das
Netzwerk installieren.
Mit dem Setup-Programm auf dem
Medium können Sie OpenManage Server Administrator auf Systemen mit
Windows Storage Server 2003 R2 x64 Edition mit SP2 installieren oder
upgraden.
Um OpenManage Server Administrator zu installieren, gehen Sie wie folgt vor:
Dell Systems Build and Update Utility
Dell Systems Build and Update Utility
1
Legen Sie das
das CD/DVD-Laufwerk des Systems ein.
Das Medium wird automatisch gestartet, und das Fenster
Administrator Installer
2
Klicken Sie auf
(Server Administrator installieren, ändern, reparieren oder entfernen).
3
Lesen und akzeptieren Sie die Bedingungen im Fenster
Agreement
4
Wählen Sie im Fenster
für die Installation aus, und klicken Sie auf
5
Klicken Sie im Fenster
auf
Install
6
Klicken Sie im Fenster
des Assistenten) auf
Dell Systems Build and Update Utility
wird angezeigt.
Install, Modify, Repair or Remove Server Administrator
(Lizenzvertrag), und klicken Sie auf
Setup Type
Ready to Install
(Installieren).
Install Wizard Completed
Finish
(Fertig stellen).
-Medium befindet sich ein
-Medium in
Server
License
Next
(Weiter).
(Setup-Typ) den betreffenden Typ
Next
(Weiter).
(Bereit zur Installation)
(Fertigstellen
-
Handbuch zum Einstieg 77
Page 80

Aufrufen von OpenManage Server Administrator
Sie können OpenManage Server Administrator lokal über den Host aufrufen,
indem Sie auf dem Desktop auf das Symbol
doppelklicken.
Um OpenManage Server Administrator direkt von einem Client-System auf
dem gleichen Netzwerk aufzurufen, öffnen Sie Internet Explorer 6.0 oder eine
neuere Browserversion, und stellen Sie eine Verbindung mit dem sicheren Port
1311 des NAS-Systems her.
Geben Sie beispielsweise ein:
https://DELL1234567:1311
wobei
DELL1234567
Wenn Port 1311 von der Firewall deaktiviert wurde, legen Sie mit den folgenden
Schritten eine Ausnahme fest, um Port 1311 zur Verwendung durch
OpenManage freizugeben.
1 Klicken Sie auf
Firewall
2
Klicken Sie auf die Registerkarte
3
Klicken Sie auf
4
Geben Sie
Fel d
5
Geben Sie
6
Klicken Sie auf OK.
7
Wenn Sie dazu aufgefordert werden, starten Sie den Firewall-Dienst neu.
.
Name
der Name des NAS-Systems ist.
Start→
Port
Dell OpenManage Server Administrator
ein.
1311
Einstellungen →
.
im Feld
Portnummer
Server Administrator
Systemsteuerung→
Ausnahmen
.
ein.
Windows-
im
78 Handbuch zum Einstieg
Page 81

Hinzufügen von vertrauenswürdigen Sites im Browser
Aufgrund von verbesserten Microsoft-Sicherheitsstandards werden Sie beim
ersten Zugriff auf eine Internet- oder Intranet-Site möglicherweise dazu
aufgefordert, diese Site der Zone mit den vertrauenswürdigen Sites
hinzuzufügen.
So fügen Sie im Internet Explorer vertrauenswürdige Sites hinzu:
1
Klicken Sie im Menü
Das Fenster
2
Klicken Sie auf die Registerkarte
Die Registerkarte
3
Klicken Sie auf
4
Klicken Sie auf
Das Fenster
5
Geben Sie im Feld
Website ein, unter Verwendung des sicheren https-Protokolls, und klicken
Sie auf
Die Website wird im Feld
6
Wiederholen Sie Schritt 5 gegebenenfalls für weitere Websites,
und klicken Sie dann auf
Das Fenster
7
Klicken Sie auf OK.
Internetoptionen
Vertrauenswürdige Sites
Hinzufügen
Internetoptionen
Extras
auf den Eintrag
wird eingeblendet.
Sicherheit
Sicherheit
Vertrauenswürdige Sites
Sites
.
Diese Website zur Zone hinzufügen:
.
wird angezeigt.
wird angezeigt.
Websites:
OK
angezeigt.
.
wird eingeblendet.
Internetoptionen
.
.
.
die Adresse der
Aktualisieren des Systems
Das
Server Update Utility
und Anwenden von Updates für den Server. Das SUU-Dienstprogramm zum
Server-Update kann auch von der Dell Support-Website
heruntergeladen werden. Weitere Informationen hierzu finden Sie im
Benutzerhandbuch zum Server-Update-Dienstprogramm
Um einzelne Komponenten von OpenManage Server Administrator zu
aktualisieren, verwenden Sie komponentenspezifische Dell Update-Pakete
(DUP), die sich auf dem Dell Updates-Medium befinden. Das SUUDienstprogramm vergleicht die derzeit auf dem Dell PowerEdge NAS-System
installierten Komponentenversionen mit den Update-Komponenten auf dem
Dell Updates-Medium. Verwenden Sie das Server-Update-Dienstprogramm,
um die Versionsvergleiche anzuzeigen und das gesamte System zu aktualisieren.
-Medium enthält eine Anwendung zum Identifzieren
support.dell.com
.
Handbuch zum Einstieg 79
Page 82

Aktualisieren der Microsoft Windows-Software
Um das Betriebssystem Windows Storage Server 2003 R2 x64 Edition zu
aktualisieren, rufen Sie die Microsoft Support-Website
auf. Alle Updates für Microsoft Windows Server
für Windows Storage Server 2003 R2 x64 Edition.
support.microsoft.com
®
2003 R2 x64 Edition gelten
Weitere nützliche Dokumente
ANMERKUNG: Das Produktinformationshandbuch enthält wichtige Informationen
zu Sicherheits- und Betriebsbestimmungen. Garantiebestimmungen können als
separates Dokument beigelegt sein.
• Im zusammen mit der Rack-Lösung gelieferten
handbuch
wie das System in einem Rack installiert wird.
•Das
maßnahmen für das System und einen allgemeinen Überblick über die
Funktionen von Windows Storage Server 2003 R2 x64 Edition mit SP2.
• Das Dokument
für Hardware und Software und informiert über bekannte Probleme.
•Das
technische Daten.
• In der Dokumentation zur Systemverwaltungssoftware sind die Merkmale,
die Anforderungen, die Installation und der grundlegende Einsatz der
Software beschrieben.
oder in der
Administratorhandbuch
Benutzerhandbuch
Rack-Installationsanleitung
enthält Informationen über die Konfigurations-
Wichtige Informationen
enthält Informationen über Systemfunktionen und
enthält die Mindestanforderungen
Rack-Installations-
ist beschrieben,
80 Handbuch zum Einstieg
Page 83

• In der Dokumentation zum Betriebssystem ist beschrieben, wie das
Betriebssystem installiert (sofern erforderlich), konfiguriert und verwendet
wird.
• Dokumentationen für alle separat erworbenen Komponenten enthalten
Informationen zur Konfiguration und zur Installation dieser Zusatzgeräte.
• Möglicherweise sind auch aktualisierte Dokumente beigelegt, in denen
Änderungen am System, an der Software oder an der Dokumentation
beschrieben sind.
ANMERKUNG: Lesen Sie diese aktualisierten Dokumente immer zuerst,
da sie frühere Informationen gegebenenfalls außer Kraft setzen.
• Möglicherweise sind Versionshinweise oder Readme-Dateien vorhanden –
diese enthalten letzte Aktualisierungen der Systemdokumentation oder
fortgeschrittenes technisches Referenzmaterial für erfahrene Benutzer
oder Techniker.
• Im Dokument
Server-Update-Dienstprogramm Benutzerhandbuch
ist
beschrieben, wie Sie mit dem Server-Update-Dienstprogramm die
Softwareversionen auf dem System anzeigen und die Systemsoftware
aktualisieren. Das Dienstprogramm kann von der Dell Support-Website
support.dell.com
heruntergeladen werden.
Handbuch zum Einstieg 81
Page 84

82 Handbuch zum Einstieg
Page 85

Dell™ PowerVault™ ストレー
ジソリューション用
Microsoft
®
Windows
®
Storage Server 2003 R2
x64 Edition With SP2
はじめに
Page 86

メモおよび注意
メモ: コンピュータを使いやすくするための重要な情報を説
明しています。
注意: ハードウェアの損傷やデータの損失の可能性を示し、
その危険を回避するための方法を説明しています。
___________________
本書の内容は予告なく変更されることがあります。
© 2007 すべての著作権は Dell Inc. にあります。
Dell Inc. の書面による許可のない複製は、いかなる形態においても厳重に禁じられて
います。
本書に使用されている商標:Dell、DELL ロゴ、PowerEdge、PowerVault、および
OpenManage は Dell Inc. の商標です。Microsoft、Internet Explorer、Windows、および
Windows Server は 米国その他の国における Microsoft Corporation の商標または登録商標
です。
本書では、必要に応じて上記以外の商標や会社名が使用されている場合がありますが、
それらの商標や会社名は、一切 Dell Inc. に帰属するものではありません。
2007 年 9 月 P/N CM391 Rev. A00
Page 87

目次
概要 . . . . . . . . . . . . . . . . . . . . . . . . . . . 87
命名規則
NAS システムの設定
. . . . . . . . . . . . . . . . . . . . . . . . 88
. . . . . . . . . . . . . . . . . 89
キーボード、モニター、およびマウスを
使用したシステムの設定
. . . . . . . . . . . . 89
ネットワークにアクセスするためのシ
ステム設定
. . . . . . . . . . . . . . . . . . . . 89
NAS システムのネットワーク IP アドレ
スの設定
. . . . . . . . . . . . . . . . . . . . . . 90
デフォルトの管理者ユーザー名とパス
ワードの入力
. . . . . . . . . . . . . . . . . . . 91
多言語ユーザーインタフェースを使用し
てシステムをローカライズする方法
. . . . . . . . 92
Windows Storage Server 管理コンソール
. . . . . . . . . . . . . . . . . . . . . . . . . . 92
の起動
Microsoft 管理コンソールへのアクセス
ホストでローカルから MMC にア
クセス
. . . . . . . . . . . . . . . . . . . . . . . 93
リモートデスクトップ接続を使用して
MMC にアクセス
. . . . . . . . . . . . . . . . . 93
. . . . . . 93
目次 85
Page 88

Dell OpenManage Server Administrator . . . . . . . . 94
OpenManage Server Administrator
のインストール
. . . . . . . . . . . . . . . . . . 95
OpenManage Server Administrator
へのアクセス
信頼済みサイトのブラウザへの追加
システムのアップデート
. . . . . . . . . . . . . . . . . . . 96
. . . . . 97
. . . . . . . . . . . . 98
Microsoft Windows ソフトウェアの
アップデート
. . . . . . . . . . . . . . . . . . . 98
その他のマニュアル
. . . . . . . . . . . . . . . . . . 98
86 目次
Page 89

本書では、
With SP2
Microsoft® Windows® Storage Server 2003 R2 x64 Edition
の概要、および
Dell™ Network Attached Storage(NAS
)
システムを企業ネットワークに設置し、設定、ローカライズする手順につ
いて説明します。
取り上げるトピックは以下のとおりです。
•
概要
•
命名規則
•
NAS
システムの設定
•
多言語ユーザーインタフェース(
MUI
)を使用してシステムをロー
カライズする方法
•
Windows Storage Server
•
Microsoft
•
Dell OpenManage™ Server Administrator
•
その他のマニュアル
管理コンソール(
管理コンソールの起動
MMC
)へのアクセス
概要
Windows Storage Server 2003 R2 x64 Edition With SP2
は、新しい検索
機能、ストレージ管理、拡張性が加わり、セットアップが簡易化されてい
るほか、
ています。
NAS
の最適なパフォーマンスが得られるように特別に調整され
Windows Storage Server 2003 R2 x64 Edition With SP2
では、
ストレージ管理のさまざまな面が大幅に改善されているほか、インストー
ルが容易に行えます。
NAS
お使いの
2003 R2 x64 Edition With SP2
システムには、工場出荷時に
がインストールされ、設定済みです。セッ
トアップ手順のほとんどが完了しており、ユーザーの操作は不要です。
システムを初めて起動したときに、
Microsoft Mini Setup の処理が開
Windows Storage Server
始します。処理が完了すると、ローカルでもリモートからでもサーバーに
アクセスできます。
メモ: お使いのシステムがソフトウェア RAID 5 で設定済みの場合、シス
テムは RAID の同期化を実行してアレイを最適化します。この処理はバッ
クグラウンドで実行され、完了するまでシステム全体のパフォーマンスが
影響を受けることがあります。処理が完了する前にシステムの電源が切ら
れた場合は、システムに再度電源を入れた時点で RAID の同期化が再開し、
完了するまで続行されます。
はじめに 87
Page 90

命名規則
Dell PowerVault™ 100
指します。
ジシステムと
PowerVault NF100
Microsoft Windows Storage Server 2003 R2 With SP2
成を指します。
Dell PowerVault 500
します。
ステムと
PowerVault NF500
Microsoft Windows Storage Server 2003 R2 With SP2
という用語は、ハードウェアプラットフォームを指
指します。
Dell PowerVault 600
します。
ステムと
PowerVault NF600
Microsoft Windows Storage Server 2003 R2 With SP2
という用語は、ハードウェアプラットフォームを指
指します。
図 1-1 命名規則
PowerVault NF100
PowerVault 100
ストレージシステム
という用語は、ハードウェアプラットフォームを
という用語は、
PowerVault 100
ストレー
の構
という用語は、
PowerVault 500
ストレージシ
の構成を
という用語は、
PowerVault 600
ストレージシ
の構成を
PowerVault NF500
PowerVault 500
ストレージシステム
PowerVault NF600
PowerVault 600
ストレージシステム
Microsoft Windows
Storage Server 2003
R2 With SP2
88 はじめに
Microsoft Windows
Storage Server
2003 R2 With SP2
Microsoft Windows
Storage Server 2003
R2 With SP2
Page 91

NAS システムの設定
キーボード、モニター、およびマウスを使用したシステムの設定
メモ: 設定方法によっては、インストールと設定の手順を完了するため
にローカルのキーボード、ビデオ、およびマウス(KVM)の接続が必要な
場合があります。リモートシステムで設定手順を完了できる場合は、操作
のためにローカル KVM 接続は必要ありません。
1
キーボード、モニター、およびマウスを
ます。
システムコネクタの詳細については、お使いのシステムの
『ユーザーズガイド』を参照してください。
2
NAS
システムの電源を入れます。
3
NAS
システムにログインします。
メモ: デフォルトの管理者ユーザー名は administrator で、
デフォルトのパスワードは storageserver
ネットワークにアクセスするためのシステム設定
1
NAS
システムに電源が入っている場合は、オフにします。
2
イーサネットケーブルの一方の端を
10/100/1000 RJ-45 NIC
ます。
システムコネクタの位置の詳細については、
『ユーザーズガイド』を参照してください。
コネクタ(図
NAS
NAS
システム背面の
1-2
を参照)の
システムに接続し
です。
1
つに接続し
NAS
システムの
3
イーサネットケーブルのもう一方の端を機能しているイーサネット
ジャックに接続します。
4
NAS
システムの電源を入れます。
5
NIC
コネクタと関連する
で、サーバーがイーサネットに接続されていることを確認します。
1-2
を参照してください。
図
いれば、接続は正常です。
る場合は、データの転送が正常に行われています。
LED
がオンになっていない場合は、イーサネットケーブルの両端が
コネクタとイーサネットジャックに正しく接続されていること
NIC
を確認します。
LED
の点灯(オンの状態)を確かめること
NIC
NIC
コネクタの
コネクタの
LED
が緑色に点灯して
LED
が黄色に点滅してい
はじめに 89
Page 92

NAS
システムは、ネットワーク上の DHCP サーバーからネットワーク
パラメータのセットアップに必要な情報(
サブネットマスク、および
メモ: 設定や NAS システムに接続されているストレージの容量に
よっては、NAS システムが起動するのに数分かかることがあります。
図 1-2 NIC コネクタ
1
2
3
4
1 NIC 1 LED 3 NIC 1
2 NIC 2 LED 4 NIC 2
DNS
IP
アドレス、ゲートウェイ
サーバーアドレス)を取得します。
NAS システムのネットワーク IP アドレスの設定
ネットワーク上に
動的に
NAS
定する必要はありません。お使いのネットワークが
定されていない場合は、
の
IP
アドレスを設定します。
90 はじめに
DHCP
サーバーがある場合、
システムに割り当てるので、
ネットワークの設定 ウィンドウで
NAS
DHCP が IP
システムの
DHCP
アドレスを自
IP
アドレスを設
サーバーで設
NAS
システム
Page 93

ネットワークの設定 ウィンドウにアクセスするには、
コントロールパネル→
メモ: ネットワーク上に DHCP サーバーがない場合は、NAS の設定を完了
するためにローカルのキーボード、モニター、およびマウスが必要です。
詳細については、89 ページの「キーボード、モニター、およびマウスを使
用したシステムの設定」を参照してください。
メモ:
テムにアクセスする際に、接続に関する問題が発生する場合があります。
Windows
ネットワークの設定 の順にクリックします。
ファイアウォールはデフォルトで有効です。リモートシス
スタート→
デフォルトの管理者ユーザー名とパスワードの入力
はじめて
ワードを入力する必要があります。お使いの
の管理者ユーザー名は
storageserver です。
管理者パスワードの変更
1
2
3
4
5
6
NAS
システムにログインする際には、管理者ユーザー名とパス
NAS
システムのデフォルト
administrator で、デフォルトのパスワードは
スタート→
コンピュータの管理 ウィンドウで、
展開し、
管理ツール→
コンピュータの管理 をクリックします。
ユーザー を選択します。
ローカルユーザーとグループ を
右ウィンドウペインで Administrator を右クリックし、
ドの設定
Administrator
を選択します。
のパスワードの設定 ウィンドウで、続行
クします。
パスワードの入力と確認入力を各フィールドで行い、OK
します。
コンピュータの管理 ウィンドウを閉じます。
パスワー
をクリッ
をクリック
設定→
はじめに 91
Page 94

多言語ユーザーインタフェースを使用してシ ステムをローカライズする方法
NAS
システムでは、
更できます。システムには、デフォルトで多数の言語がインストールされ
ています。多言語ユーザーインタフェース(
ムは
OS
メニュー、ダイアログ、およびヘルプファイルを複数の言語で表
示することができます。
お使いのシステムが
SP2
で設定済みの場合、
おいても、お使いの言語にあらかじめ設定されています。ユーザーは何も
行う必要がありません。
デフォルトのブラウザ言語を変更するには、次の手順を実行します。
1
Internet Explorer®
2
ツール メニューで インターネットオプション を選択します。
3
全般 タブで、言語
4
言語の優先順位 ウィンドウで 追加 をクリックします。
5
言語 ボックスで言語を選択します。
6
OK をクリックします。
OS
のユーザーインタフェースに使用される言語を変
MUI
)により、
Windows Storage Server 2003 R2 x64 Edition With
MUI
は地域の設定とブラウザの設定のどちらに
ブラウザを開きます。
をクリックします。
NAS
システ
Windows Storage Server 管理コンソールの起動
Windows Storage Server
(
MMC
)内に表示され、これを使用すれば、システムの管理が容易になり
ます。
Windows Storage Server 2003 R2 x64 Edition With SP2
ンすると、
Windows Storage Server
すべてのプログラム→
クします。
Microsoft 管理コンソール ウィンドウには、左ウィンドウペインに ファ
イルサーバーの管理(ローカル)
れます。中央ウィンドウペインには、
用意されています。
MMC
は自動的に開きます。
管理コンソールは Microsoft
管理コンソール を開くには、
Windows Storage Server
ノードがデフォルトノードとして表示さ
OS
の管理に役立つ選択可能な例が
管理コンソール
にログイ
スタート→
の管理 の順にクリッ
92 はじめに
Page 95

Microsoft 管理コンソールへのアクセス
MMC
はデフォルトで
れています。
NAS Management Station
システムに同梱の
MMC
を使用することで、ホストでローカルから
か、リモートデスクトップ接続を使用して
ストレージを設定できます。
MMC
ホストでローカルから MMC にアクセス
MMC
はホストで スタート メニュー内に表示されます。
スタート メニューに表示されない場合は、次の手順を実行します。
1
スタート→
2 nas.msc と入力し、OK
メモ: nas.msc ファイルは c:\windows\system32 にあります。
リモートデスクトップ接続を使用して MMC にアクセス
リモートサーバーの管理にリモートデスクトップ接続を使用して、リモー
ト管理によるオーバーヘッドを低減します。ターミナルサービステクノロ
ジによって有効にされる管理用リモートデスクトップは、サーバー管理専
用に設計されています。
管理用リモートデスクトップは、サーバーにアクセスするクライアントシ
ステム用に特別なライセンスを必要としません。また、管理用リモートデ
スクトップ使用時には、ターミナルサーバーライセンスのインストールは
不要です。
管理者はまた、リモートデスクトップ接続をインストールすることで、
Windows Storage Server 2003 R2 x64 Edition With SP2
コンピュータを
分に管理することができます。
メモ: リモートシステムから管理用リモートデスクトップに接続す
るには、リモートデスクトップ接続を使用します。
Microsoft のスタート メニューの一部として設定さ
は、ディスク管理と
として使用できます。詳細については、
Microsoft MMC
ファイル名を指定して実行 の順にクリックします。
をクリックします。
Windows
の旧バージョンを実行しているシステムから十
NFS
の設定に、また、一般的な
のマニュアルを参照してください。
MMC
にアクセスする
MMC
にアクセスすることで、
MMC が
を実行している
はじめに 93
Page 96

リモートデスクトップ接続をデスクトップに作成する方法
リモートデスクトップ接続を作成し、
R2 x64 Edition With SP2
1
スタート→ ファイル名を指定して実行 の順にクリックします。
2 mstsc と入力し、OK
リモートデスクトップ接続 ウィンドウが表示されます。
3
リモートデスクトップ接続 画面で、ストレージサーバーのコン
ピュータ名または
ます。
4
接続の設定 の下で、
5
名前を付けて保存 画面で、デフォルトの .rdp 拡張子を含めて接続
用の名前を入力します。
6
保存先 ドロップダウンメニューで デスクトップ を選択し、
保存 をクリックします。
接続がデスクトップに保存されます。
に保存するには、次の手順を実行します。
をクリックします。
IP
アドレスを入力し、
名前を付けて保存 をクリックします。
Windows Storage Server 2003
オプション をクリックし
リモートデスクトップ接続の設定の詳細については、
プ接続
ウィンドウの ヘルプ をクリックしてください。
リモートデスクトッ
Dell OpenManage Server Administrator
Dell OpenManage Server Administrator
ザベースのインタフェース(
は
OS
を通じてコマンドラインインタフェース(
な
1 対 1
OpenManage Server Administrator
のシステム管理により、ネットワーク上の
リモートで管理し、ネットワーク全体の管理に集中することができます。
詳細については、
照してください。
94 はじめに
のシステム管理ソリューションが備わっています。
メモ: OpenManage Server Administrator を使用する場合、「システム」はス
タンドアロン、別のシャーシ内に NAS ユニットを備えたサーバー、1 つの
シャーシ内に 1 つまたは複数のサーバーモジュールを組み込んだモジュ
ラーシステムのいずれでもかまいません。
OpenManage Server Administrator
Server Administrator
には、統合されたウェブブラウ
のホームページ)また
CLI
)を使用する総合的
を使用することで、総合的な
NAS
システムをローカルまたは
のマニュアルを参
1 対 1
Page 97

OpenManage Server Administrator のインストール
Dell Systems Build and Update Utility
Server Administrator
ントをお使いの
インストールするためのセットアッププログラムが用意されています。
また、
OpenManage Server Administrator
システムに無人インストールすることも可能です。
Dell Systems Build and Update Utility
ムを使用して、サポートされているすべての
2003 R2 x64 Edition With SP2
Server Administrator
ます。
OpenManage Server Administrator
を実行します。
1
システムの
Utility
メディアをセットします。
メディアがオートロードし、
ウィンドウが表示されます。
2
Server Administrator の
かをクリックします。
3
使用許諾契約書 ウィンドウの内容を読んで同意したら、次へ
リックします。
4
セットアップの種類 ウィンドウで、使用する構成にふさわしいセッ
トアップの種類を選択し、
5
インストールの準備完了 ウィンドウで、
ます。
6
インストールウィザードの完了 ウィンドウで、完了
ます。
およびその他のシステムソフトウェアのコンポーネ
NAS
システムにインストールし、アップグレードし、アン
を実行しているシステムに
をインストールし、アップグレードすることができ
CD/DVD
ドライブに
インストール、変更、修復、削除 のいずれ
次へ をクリックします。
メディアには、
をネットワークを介して複数の
メディアのセットアッププログラ
Windows Storage Server
をインストールするには、次の手順
Dell Systems Build and Update
Server Administrator
インストール をクリックし
OpenManage
OpenManage
インストーラ
をクリックし
をク
はじめに 95
Page 98

OpenManage Server Administrator へのアクセス
デスクトップの Server Administrator アイコンをダブルクリックする
ことで、ホストを通じてローカルで
にアクセスできます。
同じネットワーク上にあるクライアントシステムから
Server Administrator
れ以降の
ポート(
たとえば、次のように入力します。
https://DELL1234567:1311
Internet Explorer
1311
)に接続します。
に直接アクセスするには、バージョン
を開き、お使いの
OpenManage Server Administrator
OpenManage
6.0
NAS
システムのセキュア
またはそ
DELL1234567
ポート
1311
手順で例外を設定し、ポート
有効にします。
1
スタート→
の順にクリックします。
ル
2
例外 タブをクリックします。
3
ポートの追加 をクリックします。
4
名前 フィールドに Dell OpenManage Server Administrator
と入力します。
5
ポート番号 フィールドに 1311 と入力します。
6
OK をクリックします。
7
ファイアウォールサービスの再起動を指示するメッセージが表示さ
れたら、ファイアウォールサービスを再起動します。
は NAS
がファイアウォールによって無効にされている場合は、次の
設定→
システムの名前です。
1311 を OpenManage
コントロールパネル→
で使用できるように
Windows
ファイアウォー
96 はじめに
Page 99

信頼済みサイトのブラウザへの追加
Microsoft
トラネットのサイトにはじめてアクセスする場合、サイトを信頼済みサイ
トゾーンに追加するように求めるメッセージが表示される場合があり
ます。
信頼済みサイトを
ます。
1
2
3
4
5
6
の高度なセキュリティ基準により、インターネットまたはイン
Internet Explorer
ツール メニューで インターネットオプション をクリックします。
インターネットオプション 画面が表示されます。
セキュリティ タブをクリックします。
セキュリティ タブのメニューが表示されます。
信頼済みサイト をクリックします。
サイト をクリックします。
信頼済みサイト 画面が表示されます。
次の
Web
サイトをゾーンに追加する フィールドに
protocol
ます。
Web
手順5 を繰り返して他のサイトを追加し、OK
インターネットオプション 画面が表示されます。
を使用してサイトのアドレスを入力し、追加
サイト ボックスにサイトが表示されます。
に追加するには、次の手順を実行し
https: secure
をクリックし
をクリックします。
7
OK をクリックします。
はじめに 97
Page 100

システムのアップデート
Server Update Utility
サーバーに適用するためのアプリケーションが入っています。
Update Utility
からダウンロードすることも可能です。詳細については、
Utility
OpenManage Server Administrator
デートするには、コンポーネントに固有の
(
ます。
るコンポーネントのバージョンを
アップデートコンポーネントと比較します。
の比較レポートを参照し、システム全体をアップデートしてください。
の『ユーザーズガイド』を参照してください。
DUP
)を使用してください。
SUU
(
は、お使いの
メディアには、アップデートを識別してお使いの
SUU
)は、デルサポートサイト support.dell.com
Server Update
の個々のコンポーネントをアップ
Dell
アップデートパッケージ
DUP は Dell Updates
Dell NAS
システムに現在インストールされてい
Dell Updates
SUU
メディアに入ってい
メディアに入っている
を使用してバージョン
Server
Microsoft Windows ソフトウェアのアップデート
Windows Storage Server 2003 R2 x64 Edition
は、
Microsoft
ださい。
プデートはすべて
されます。
のサポートサイト support.microsoft.com を参照してく
Microsoft Windows Server® 2003 R2 x64 Edition
Windows Storage Server 2003 R2 x64 Edition
をアップデートする場合
に対するアッ
に適用
その他のマニュアル
メモ: 『製品情報ガイド』には、安全および認可機関に関する情報が記
載されています。保証情報に関しては、『サービス & サポートのご案内』
を参照してください。
•
システムをラックに取り付ける方法については、ラックに付属の
『ラック取り付けガイド』に説明があります。
•
『管理者ガイド』には、お使いのシステムの設定手順を完了するため
の情報、および
SP2
の機能に関する概要が記載されています。
•
『重要情報』には、ハードウェアとソフトウェアの最小要件とすべて
の既知の問題が記載されています。
•
システムの『ユーザーズガイド』では、システム機能および仕様に
ついて説明しています。
Windows Storage Server 2003 R2 x64 Edition With
98 はじめに
 Loading...