

Page 1

Dell™ PowerVault™ ML6000
Getting Started Guide (English)
Příručka – začínáme (Czech)
Guide de démarrage rapide (French)
Erste Schritte (German)
Οδηγός «Πρώτα Βήματα» (Greek)
Podstawowe informacje (Polish)
Руководство по началу работы (Russian)
Guía de inicio (Spanish)
*JK926 A03*
JK926 A03
www.dell.com | support.dell.com
Page 2
Notes, Cautions, and Warnings
NOTE: A NOTE indicates important information that helps you make better use of
your computer.
CAUTION: A CAUTION indicates potential damage to hardware or loss of data if
instructions are not followed.
WARNING: A WARNING indicates a potential for property damage, personal
injury, or death.
Poznámky, upozornění a varování
POZNÁMKA: POZNÁMKA označuje důležitou informaci, která vám
pomůže lépe využít váš počítač.
UPOZORNĚNÍ: UPOZORNĚNÍ označuje možné nebezpečí pro
hardware nebo ztrátu dat v případě, že nebudete postupovat podle
pokynů.
VAROVÁNÍ: VAROVÁNÍ označuje možné riziko poškození majetku,
zranění osob nebo smrti.
Remarques, mises en garde et avertissements
REMARQUE : UNE REMARQUE désigne des informations importantes destinées à
vous aider à optimiser l'utilisation de votre ordinateur.
MISE EN GARDE : UNE MISE EN GARDE désigne un risque potentiel de dommage
matériel ou de perte de données en cas de non-respect des instructions.
AVERTISSEMENT: UN AVERTISSEMENT désigne un risque potentiel de dommage
de propriété, de blessures, voire de mort.
Page 3
Anmerkungen, Vorsichts- und Warnhinweise
ANMERKUNG: Eine ANMERKUNG gibt Ihnen wichtige Informationen, die Ihnen
helfen, Ihren Computer besser nutzen zu können.
VORSICHTSHINWEIS: Ein VORSICHTSHINWEIS weist auf mögliche
Hardwareschäden oder Datenverluste hin, die eintreten können, wenn
Anweisungen nicht befolgt werden.
WARNHINWEIS: Ein WARNHINWEIS weist auf mögliche Gefahren von
Vermögensschäden, Verletzungsgefahren oder Lebensgefahr hin.
Σημειώσεις, Επισημάνσεις και
Προειδοποιήσεις
ΣΗΜΕΙΩΣΗ: Η ένδειξη ΣΗΜΕΙΩΣΗ υποδεικνύει σημαντικές πληροφορίες
που σας βοηθούν να κάνετε καλύτερη χρήση του υπολογιστή σας.
ΠΡΟΣΟΧΗ: Η ένδειξη ΠΡΟΣΟΧΗ υποδεικνύει πιθανή πρόκληση
ζημιάς στο υλικό ή απώλεια δεδομένων σε περίπτωση μη τήρησης
των οδηγιών.
ΠΡΟΕΙΔΟΠΟΙΗΣΗ: Η ένδειξη ΠΡΟΕΙΔΟΠΟΙΗΣΗ υποδεικνύει την
πιθανότητα πρόκλησης ζημιάς στην περιουσία, τραυματισμού ή
θανάτου.
UWAGI, OSTRZEŻENIA i PRZESTROGA
UWAGA: UWAGA wskazuje istotną informację, pomagającą korzystać ze
swojego komputera z większą wydajnością.
OSTRZEŻENIE: OSTRZEŻENIE wskazuje na mozlwiość uszkodzenia
sprzętu komputerowego lub utratę danych w przypadku nie
przestrzegania wskazówek zawartych w instrukcji obsługi.
OSTRZEŻENIE: OSTRZEŻENIE wskazuje na możliwość uszkodzenia
własności, uszczerbek na zdrowiu lub utratę życia.
Page 4
Примечания, предостережения и
предупреждения
ПРИМЕЧАНИЕ. Пометка ПРИМЕЧАНИЕ рядом с разделом указывает
на информацию, которая поможет вам более правильно пользоваться
своим компьютером.
ВНИМАНИЕ! Пометка ВНИМАНИЕ! указывает на потенциальную
угрозу повреждения оборудования или утраты данных в случае,
если не будут соблюдаться инструкции.
ПРЕДУПРЕЖДЕНИЕ! Пометка ПРЕДУПРЕЖДЕНИЕ! указывает на
потенциальную угрозу нанесения ущерба собственности,
получения травмы или смертельного исхода.
Notas, precauciones y advertencias
NOTA: Las NOTAS indican información importante que ayuda a utilizar mejor el
equipo.
PRECAUCIONES: Las PRECAUCIONES indican daños potenciales al hardware o la
pérdida de datos si no se observan las instrucciones.
ADVERTENCIA: Las ADVERTENCIAS indican un peligro potencial de datos a la
propiedad, lesiones personales o la muerte.
____________________
Information in this document is subject to change without notice.
© 2010 Dell Inc. All rights reserved.
Reproduction of these materials in any manner whatsoever without the written permission of Dell Inc.
is strictly forbidden.
Trademarks used in this text: Dell, the DELL logo, and PowerVault are trademarks of Dell Inc. L TO
is a trademark of IBM in the United States and other countries
Other trademarks and trade names may be used in this document to refer to either the entities claiming
the marks and names or their products. Dell Inc. disclaims any proprietary interest in trademarks and
trade names other than its own.
Page 5

Informace obsažené v tomto dokumentu podléhají změnám bez upozornění.
© 2010 Dell Inc. Všechna práva vyhrazena.
Kopírování těchto materiálů jakýmkoliv způsobem bez písemného povolení společnosti Dell Inc. je
přísně zakázáno.
Ochranné známky používané v textu: Dell, logo DELL, a PowerVault jsou ochranné známky
společnosti Dell Inc. LTO je ochranná známka společnosti IBM ve Spojených státech a ostatních
zemích.
Ostatní ochranné známky a obchodní názvy mohou být použity v tomto dokumentu při odkazování
na společnosti nárokující si tyto známky a názvy nebo jejich výrobky. Společnost Dell Inc. nemá
vlastnické zájmy vůči ochranným známkám a obchodním názvům jiným než vlastním.
Les informations contenues dans ce document sont sujettes à modification sans préavis.
© 2010 Dell Inc. Tous droits réservés.
Toute reproduction, de quelque manière que ce soit, de ces supports sans l'autorisation écrite de Dell
Inc. est strictement interdite.
Les marques utilisées dans le présent document, et notamment Dell, le logo de DELL et PowerVault
sont des marques de Dell Inc. L TO est une marque d'IBM déposée aux États-Unis et dans d'autres pays.
D'autres marques et appellations commerciales peuvent être utilisées dans le présent document pour
désigner les entités détentrices de marques, noms ou de leurs produits. Dell Inc. dénie tout intérêt
propriétaire vis-à-vis des marques et noms de marque autres que les siens.
Irrtümer und technische Änderungen vorbehalten.
© 2010 Dell Inc. Alle Rechte vorbehalten.
Die Reproduktion dieser Unterlagen in jeglicher Weise ist ohne die schriftliche Genehmigung von
Dell Inc. streng verboten.
Die in diesem Text verwendeten Warenzeichen: Dell, das DELL Logo und PowerVault sind
Warenzeichen der Dell Inc. LTO ist ein Warenzeichen der IBM in den USA und anderen Ländern.
Andere Warenzeichen und Handelsnamen können in diesem Dokument verwendet werden; sie
beziehen sich entweder auf die juristischen Personen, die diese Marken und Namen beanspruchen,
oder auf deren Produkte. Dell Inc. verzichtet auf alle Besitzrechte an Marken und
Handelsbezeichnungen, die nicht sein Eigentum sind.
Οι πληροφορίες του παρόντος εγγράφου υπόκεινται σε αλλαγή χωρίς ειδοποίηση.
© 2010 Dell Inc. Με επιφύλαξη παντός δικαιώματος.
Απαγορεύεται αυστηρά η αναπαραγωγή αυτού του υλικού με οποιονδήποτε τρόπο χωρίς την έγγραφη
άδεια της Dell Inc.
Εμπορικά σήματα που χρησιμοποιούνται στο παρόν κείμενο: Η ονομασία Dell, το λογότυπο DELL,
και η ονομασία PowerVault είναι εμπορικά σήματα της εταιρείας Dell Inc. Η ονομασία LTO είναι
εμπορικό σήμα της IBM στις Ηνωμένες Πολιτείες και σε άλλες χώρες
Στο παρόν έγγραφο μπορεί να χρημιμοποιούνται άλλα εμπορικά σήματα και εμπορικές ονομασίες για
την αναφορά σε οντότητες που διεκδικούν τα σήματα και τα ονόματα ή στα προϊόντα τους. Η εταιρεία
Dell Inc. αποποιείται οποιουδήποτε ιδιοκτησιακού συμφέροντος όσον αφορά τα εμπορικά σήματα
και τις εμπορικές ονομασίες πέραν των όσων της ανήκουν.
Page 6

Informacje zawarte w niniejszym dokumencie mogą zostać zmienione bez uprzedzenia.
© 2010 Dell Inc. Wszelkie prawa zastrzeżone.
Powielanie tych materiałów dowolną metodą bez pisemnej zgody Dell Inc. jest surowo zabronione.
Znaki firmowe użyte w tej instrukcji: Dell, logo DELL, i PowerVault, są znakami firmowymi,
należącymi do Dell Inc. LTO, który jest znakiem firmowym, należącym do IBM w Stanach
Zjednoczonych i innych krajach.
Inne znaki firmowe i nazwy firmowe, mogą być użyte w tym dokumencie w odniesieniu do albo
przypisanych znaków i nazw lub ich produktów. Firma Dell Inc. nie rości sobie żadnych praw
własności do nienależących do niej znaków towarowych lub nazw handlowych.
Информация в данном документе может быть изменена без предварительного
уведомления.
© Dell Inc, 2010 Все права защищены.
Воспроизведение данных материалов в любом виде без письменного разрешения компании
Dell Inc. строго запрещено.
Товарные знаки, используемые в данном тексте: Dell, логотип DELL и PowerVault являются
товарными знаками компании Dell Inc. LTO является товарным знаком компании IBM в
Соединенных Штатах и в других странах
Другие товарные знаки и торговые марки могут использоваться в данном документе для
указания либо предприятий, заявивших товарный знак или торговую марку, либо их продукции.
Dell Inc. отказывается от права собственности на любые торговые марки и товарные знаки,
кроме своих собственных.
La información en este documento está sujeta a cambios sin previo aviso.
© 2010 Dell Inc. Todos los derechos reservados.
Queda estrictamente prohibida la reproducción de este material en cualquier forma sin el permiso
escrito de Dell Inc.
Las marcas comerciales que se utilizan en este texto: Dell, el logotipo de DELL y PowerVault son
marcas comerciales de Dell, Inc. L T O es una marca comercial de I BM en E stados Unido s y en otr os
países.
Es posible que se utilicen otras marcas y nombres comerciales en este documento para referirse a las
entidades titulares de las marcas y nombres o a sus productos. Dell Inc. renuncia a cualquier interés
en la propiedad de las marcas y nombres comerciales que no sean los suyos propios.
May 2010 P/N JK926 Rev. A03
Page 7

Contents
1 Dell PowerVault ML6000 Getting Started Guide
(English) . . . . . . . . . . . . . . . . . . . . . . . . . 13
Installing Your Library in a Rack . . . . . . . . . . . . 14
Special Instructions for LTO-5 Tape Drives
Connecting Parallel SCSI Cables
Connecting Fibre Channel Cables to a Host or Switch
Connecting Fibre Channel Cables Through a
Fibre Channel I/O Blade
Connecting Serial Attached SCSI (SAS) Cables
Finishing Cabling the Library
Powering On the Library
Getting Started. . . . . . . . . . . . . . . . . . . . . . 24
. . . . . . . . . . . . 16
. . . . . . . . . . . . . . . . . 19
. . . . . . . . . . . . . . 22
. . . . . . . . . . . . . . . . . 23
. . . . . . . 14
. . . . 20
2 Příručka Dell PowerVault ML6000 –
začínáme (Czech)
Instalace knihovny do stojanu
Zvláštní pokyny pro páskové jednotky LTO-5
Připojování paralelními kabely SCSI
. . . . . . . . . . . . . . . .
. . . . . . . . . . .
. . . . . . .
. . 18
25
. .
26
26
28
Připojování sběrnice optickým kabelem k hostiteli
nebo přepínači
. . . . . . . . . . . . . . . . . . .
30
Page 8

Připojování sběrnice s optickými kabely přes
optickou sběrnici I/O Blade
. . . . . . . . . . . .
Sériové připojování dodávanými kabely
SCSI (SAS)
. . . . . . . . . . . . . . . . . . . . .
31
33
Dokončení kabeláže knihovny
Elektrické napájení knihovny
Začínáme
. . . . . . . . . . . . . . . . . . . . . .
. . . . . . . . . . .
. . . . . . . . . . .
34
35
36
3 Guide de démarrage rapide de Dell PowerVault
ML6000 (French) . . . . . . . . . . . . . . . . . . . 37
Installation de votre bibliothèque dans un rack . . . . 38
Instructions spéciales pour les lecteurs de bande LTO-5
Connexion des câbles SCSI parallèles
. . . . . . . . . 40
Connexion des câbles Fibre Channel à un hôte ou à
un commutateur
. . . . . . . . . . . . . . . . . . . . . 42
Connexion des câbles Fibre Channel au moyen d'une
lame d'E/S Fibre Channel
Connexion des câbles SCSI (SAS)
Terminer le câblage de la bibliothèque
. . . . . . . . . . . . . . . . 43
. . . . . . . . . . . . 44
. . . . . . . . . 46
. 38
8 Contents
Mise sous tension de la bibliothèque . . . . . . . . . . 47
Guide de démarrage rapide
. . . . . . . . . . . . . . . 48
Page 9

4 Dell PowerVault ML6000 Erste Schritte
(German) . . . . . . . . . . . . . . . . . . . . . . . . . 49
Einbau Ihrer Bibliothek in ein Rack . . . . . . . . . . . 50
Sonderanweisungen für LTO-5-Bandlaufwerke
Anschließen von parallelen SCSI-Kabeln
. . . . . . . 52
Anschluss von Fibre Channel-Kabeln an einen
Host oder Switch
. . . . . . . . . . . . . . . . . . . . 54
Anschluss von Fibre Channel-Kabeln über ein
Fibre Channel E/A-Blade
. . . . . . . . . . . . . . . . 55
Anschluss von SAS-Kabeln . . . . . . . . . . . . . . . 57
Fertigstellen der Verkabelung der Bibliothek
Einschalten der Bibliothek
. . . . . . . . . . . . . . . 59
Erste Schritte. . . . . . . . . . . . . . . . . . . . . . . 60
5 Dell PowerVault ML6000 Οδηγός
«Πρώτα Βήματα» (Greek)
Εγκατάσταση της βιβλιοθήκης σε
μεταλλικό φατνίο
Ειδικές οδηγίες για τις μονάδες ταινίας LTO-5
. . . . . . . . . . . . . . . . . . .
. . . . . . . . . . .
. . . . 50
. . . . . 58
61
62
. . .
63
Σύνδεση καλωδίων παράλληλου SCSI
. . . . . . .
Σύνδεση καλωδίων οπτικών ινών σε κεντρικό
υπολογιστή ή μεταγωγέα
. . . . . . . . . . . . . .
Σύνδεση καλωδίων καναλιού οπτικών ινών μέσω
I/O blade καναλιού οπτικών ινών
. . . . . . . . . .
64
66
67
Page 10

Σύνδεση σειριακά συνδεδεμένων καλωδίων
SCSI (SAS)
. . . . . . . . . . . . . . . . . . . . . .
Ολοκλήρωση της σύνδεσης καλωδίων της
βιβλιοθήκης
. . . . . . . . . . . . . . . . . . . . .
69
70
Ενεργοποίηση της βιβλιοθήκης
Τα πρώτα βήματα
. . . . . . . . . . . . . . . . . .
. . . . . . . . . . .
6 Dell PowerVault ML6000 Pierwsze
kroki- instrukcja obsługi (Polish)
Instalacja biblioteki w obudowie
Instrukcje specjalne dla napędu
taśmowego LTO-5
. . . . . . . . . . . . . . . . .
Łączenie paralelne kabli SCSI
Podłączanie kabli magistrali szeregowej do
komputera głównego lub przełącznika
Połącz kable magistrali szeregowej poprzez
kasetę I/O magistrali szeregowej
Łączenie kabli seryjnie przyłączonych
SCSI (SAS)
. . . . . . . . . . . . . . . . . . . . .
Zakończenie podłączenia kabli biblioteki
. . . . . . . . . .
. . . . . . . . . . .
. . . . . . . . .
. . . . .
. . . . . .
. . . . .
71
72
73
74
75
76
78
79
81
82
10 Contents
Zasilanie biblioteki
Rozpoczynając
. . . . . . . . . . . . . . . . . . .
. . . . . . . . . . . . . . . . .
83
84
Page 11

7 Dell PowerVault ML6000 Руководство по
началу работы (Russian)
. . . . . . . . . . .
85
Установка библиотеки в стойку
Специальные инструкции для стримеров LTO-5
. . . . . . . . . .
.
Подключение кабелей с параллельным
интерфейсом SCSI
. . . . . . . . . . . . . . . . .
Подключение кабелей Fibre Channel к основной
системе или к коммутатору
. . . . . . . . . . . .
Подключение кабелей Fibre Channel через блок
разъемов ввода/вывода Fibre Channel
. . . . . .
Подключение кабелей с последовательным
интерфейсом SCSI (SAS)
Завершение подключения кабелей к библиотеке
Подача электропитания на библиотеку
Начало работы
. . . . . . . . . . . . . . . . . . .
. . . . . . . . . . . . . .
.
. . . . . .
8 Guía de inicio de Dell PowerVault ML6000
(Spanish) . . . . . . . . . . . . . . . . . . . . . . . . . 97
86
87
88
90
91
93
94
95
96
Instalación de la biblioteca en un bastidor. . . . . . . 98
Instrucciones especiales para las unidades de
cinta LTO-5
Conexión de cables SCSI paralelos
. . . . . . . . . . . . . . . . . . . . . . . . 98
. . . . . . . . . . . 100
Conexión de cables Fibre Channel al host o
al conmutador
. . . . . . . . . . . . . . . . . . . . . . 102
Conexión de cables Fibre Channel por medio de
una tarjeta de E/S Fibre Channel
. . . . . . . . . . . . 103
Page 12

Conexión de cables SCSI de conexión en serie (SAS
) . . 104
Finalización del cableado de la biblioteca
Encendido de la biblioteca
. . . . . . . . . . . . . . . 107
. . . . . . . 106
Inicio . . . . . . . . . . . . . . . . . . . . . . . . . . . 108
Page 13
Dell PowerVault ML6000 Getting Started Guide (English)
WARNING: Before cabling your library, read the Dell™ PowerVault™ Systems
Product Information Guide.
WARNING: All libraries must be installed in a rack having a main protective
earthing (grounding) terminal. For detailed installation information, see the Dell™
PowerVault™ ML6000 Tape Library User’s Guide.
WARNING: The socket outlet shall be installed near the equipment and shall be
easily accessible.
WARNING: The front panel power switch is not the main disconnection device.
Please pull all main plugs out of the appliance inlets in order to switch off the
appliance completely.
WARNING: Before cabling your library, remove all interior packaging. Be sure to
remove the orange robot restraint assembly that secures the robot to the floor of
the library. In addition, remove the yellow strip in the I/E station. Save all
packaging materials and the orange robot restraint assembly in case you need to
move or ship the library in the future. For details, see the unpacking instructions
that came with your library and the Dell™ PowerVault™ ML6000 Tape Library
User’s Guide.
Dell PowerVault ML6000 Getting Started Guide 13
Page 14
Installing Your Library in a Rack
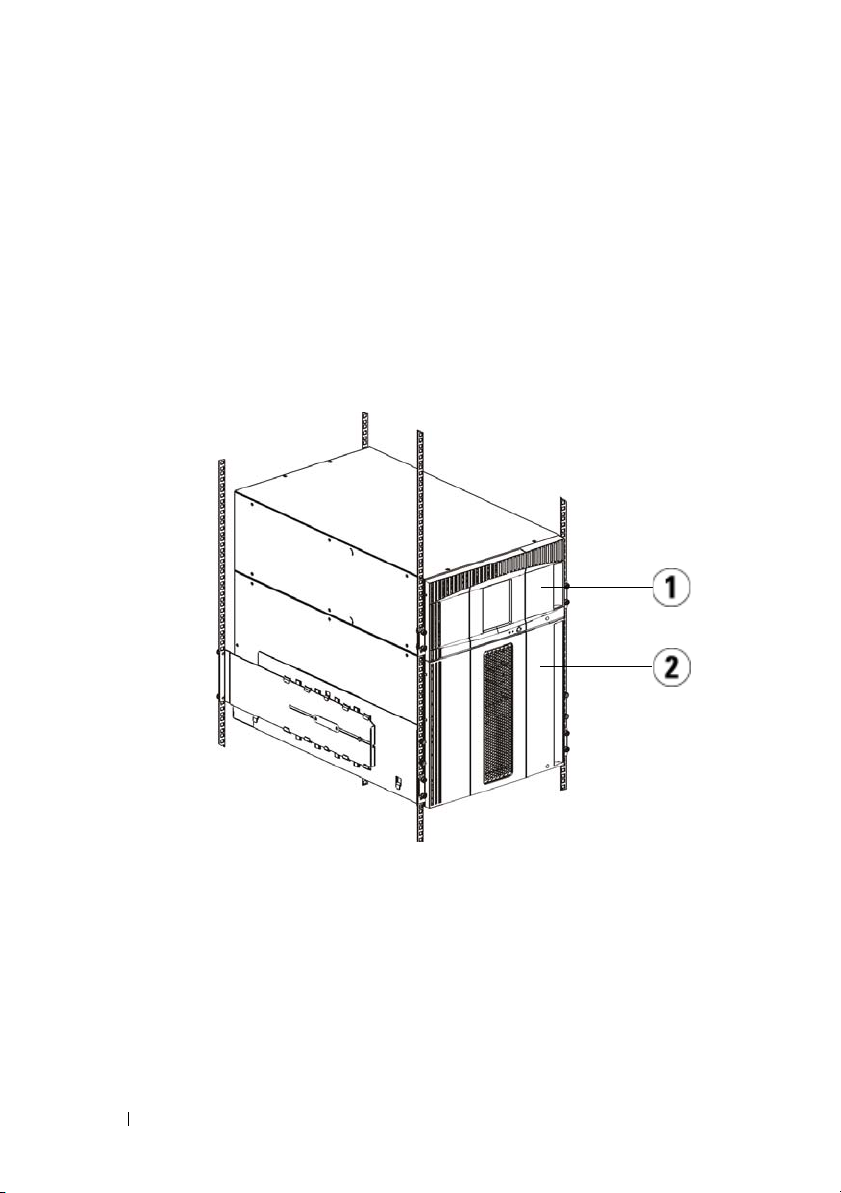
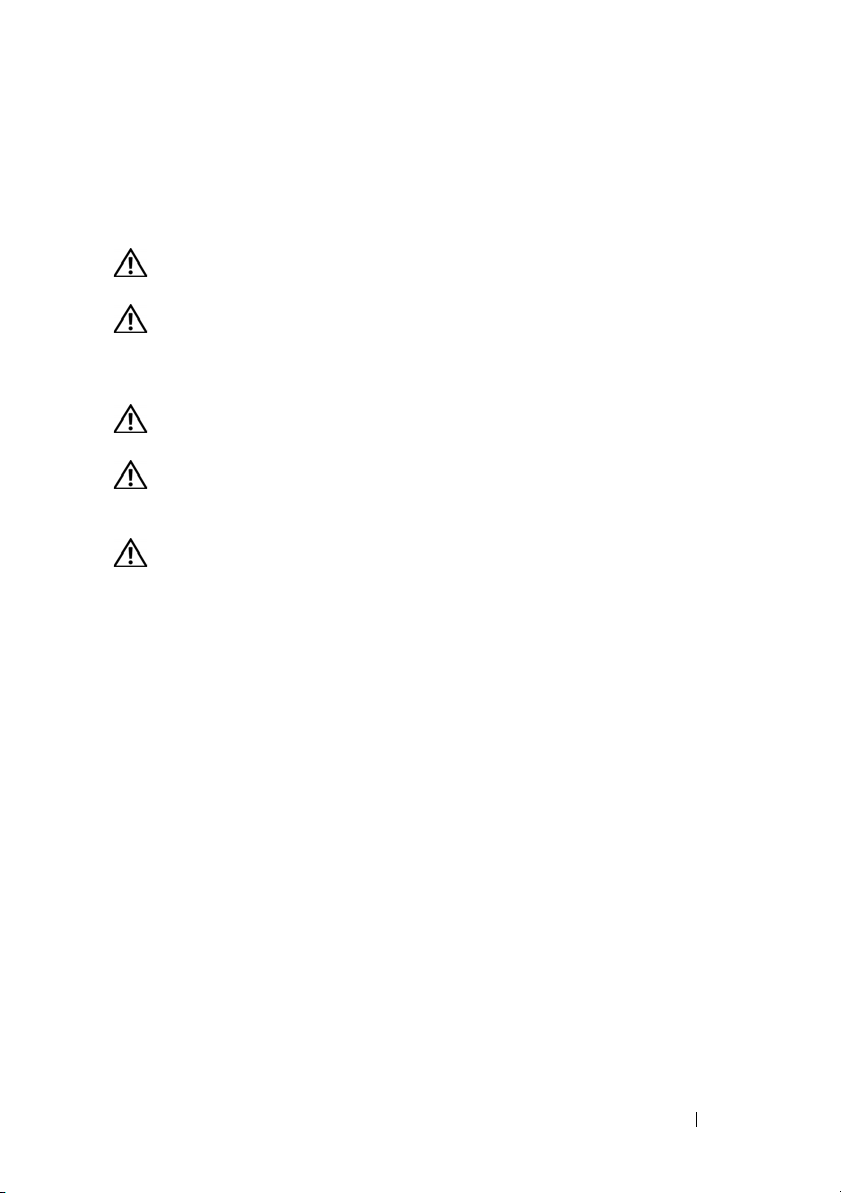
All Dell™ PowerVault™ ML6000 libraries must be installed in a rack. For
instructions, see the
• ML6010 CM is a single 5U Library Control Module.
• ML6020 CM consists of one (1) ML6010 CM 5U Library Control Module
and one (1) ML6000 EM 9U Library Expansion Module (14U total).
• ML6030 CM consists of one (1) ML6010 CM 5U Library Control Module
and two (2) ML6000 EM 9U Library Expansion Modules (23U total).
Dell™ PowerVault™ ML6000 Tape Library User’s Guide
.
1 5U Library Control Module 2 9U Library Expansion Module
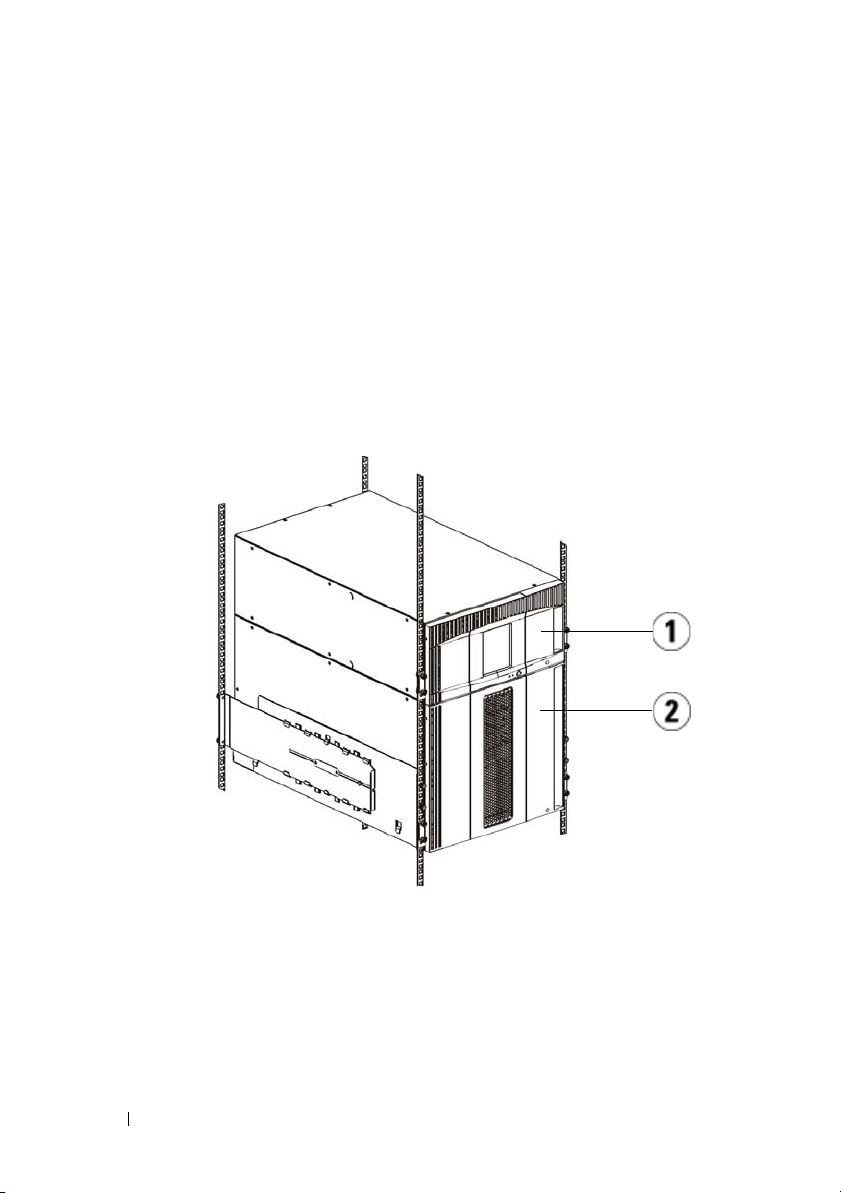
Special Instructions for LTO-5 Tape Drives
Currently, the library does not support using the following features on LTO-5
tape drives:
• Ethernet port
14 Dell PowerVault ML6000 Getting Started Guide
Page 15
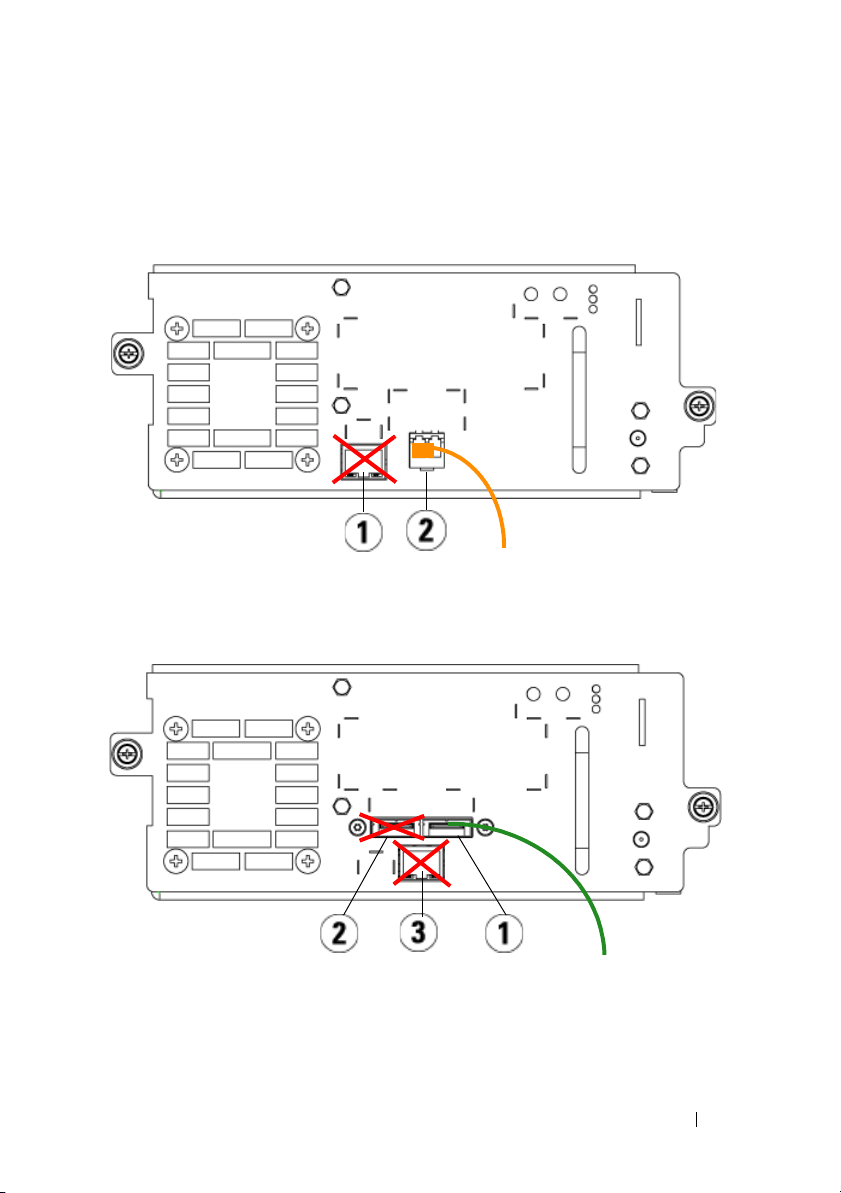
• Port 2 on dual-port tape drives
See the following two figures for details.
LTO-5 Fibre Channel Tape Drive
1 Ethernet port - do not use 2 Fibre Channel port - use this port
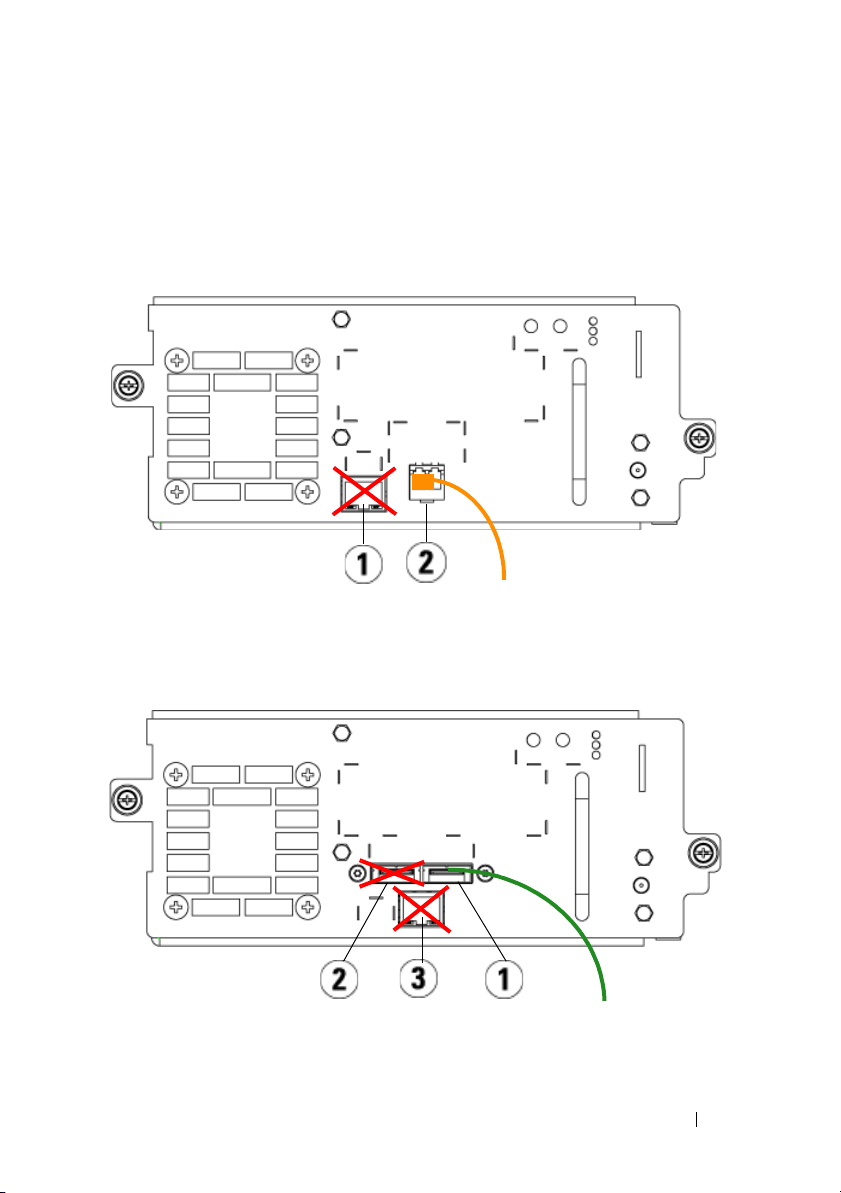
LTO-5 SAS Tape Drive
1 SAS port 1 - use this port 2 SAS port 2 - do not use
3 Ethernet port - do not use
Dell PowerVault ML6000 Getting Started Guide 15
Page 16

Connecting Parallel SCSI Cables
Perform this step if your library contains parallel SCSI tape drives.
There are two recommended ways to cable SCSI tape drives: one tape drive per
SCSI bus or two tape drives per SCSI bus.
NOTE: To avoid possible performance issues, do not connect more than two tape
drives per SCSI bus.
To connect one tape drive per SCSI bus:
1
Use a SCSI cable to connect the bottom port of the tape drive to your host
system.
2
Attach a SCSI terminator to terminate the top port of the tape drive.
To connect two tape drives per SCSI bus:
1
Connect one end of a SCSI cable to the top SCSI port of the bottom tape
drive.
2
Connect the other end of the cable to the bottom SCSI port of the tape
drive above.
3
Use another SCSI cable to connect the bottom tape drive of the SCSI bus
to your host system.
4
Use a SCSI terminator to terminate the top tape drive of the SCSI bus.
16 Dell PowerVault ML6000 Getting Started Guide
Page 17
1 Connecting one tape drive per SCSI
bus
3 SCSI cable to host 4 SCSI terminator
Dell PowerVault ML6000 Getting Started Guide 17
2 Connecting two tape drives per SCSI
bus
Page 18
Connecting Fibre Channel Cables to a Host or Switch
Perform this step if your library contains Fibre Channel tape drives that you will
be connecting directly to a host or switch.
Use Fibre Channel cables to connect your host (or switch) to the library. For
each tape drive:
1
Connect one end of the Fibre Channel cable to the Fibre Channel port on
the tape drive.
2
Connect the other end of the Fibre Channel cable to your host or switch.
1 Fibre Channel port 2 Fibre Channel cable
18 Dell PowerVault ML6000 Getting Started Guide
Page 19

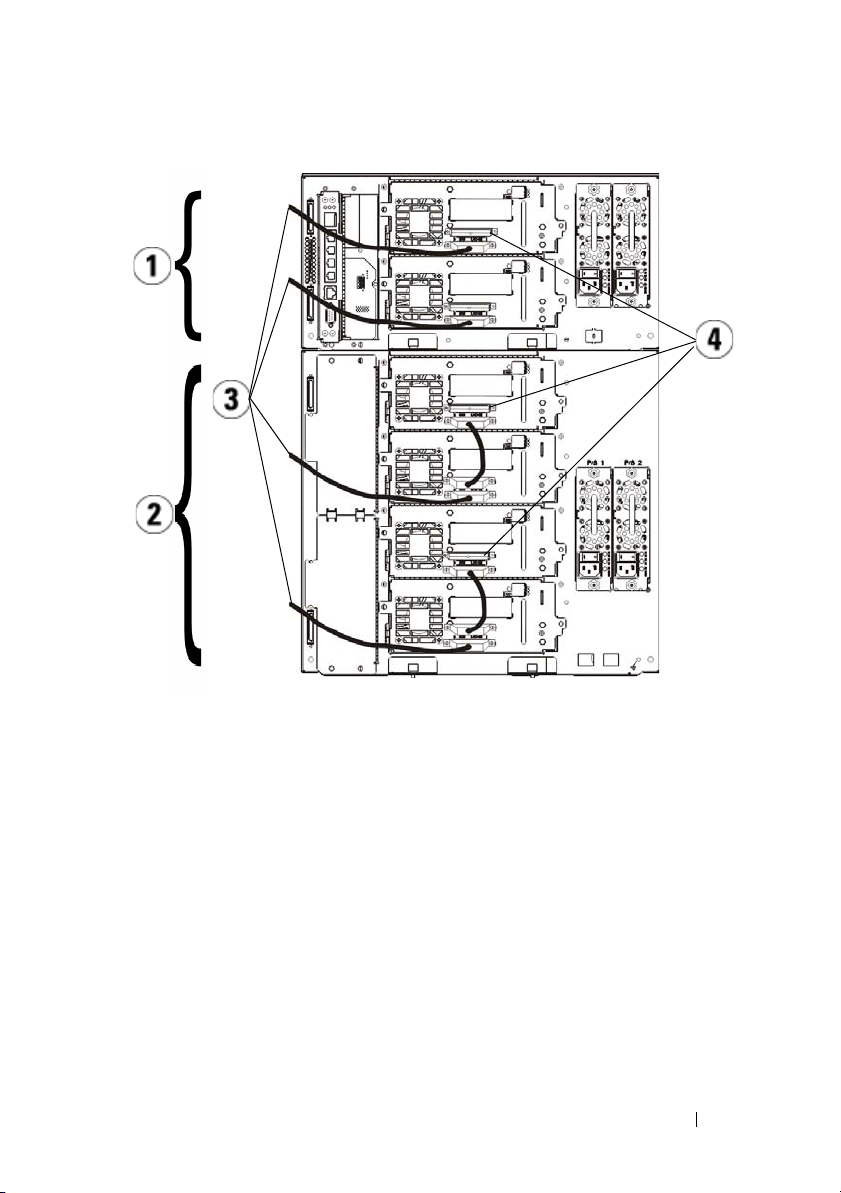
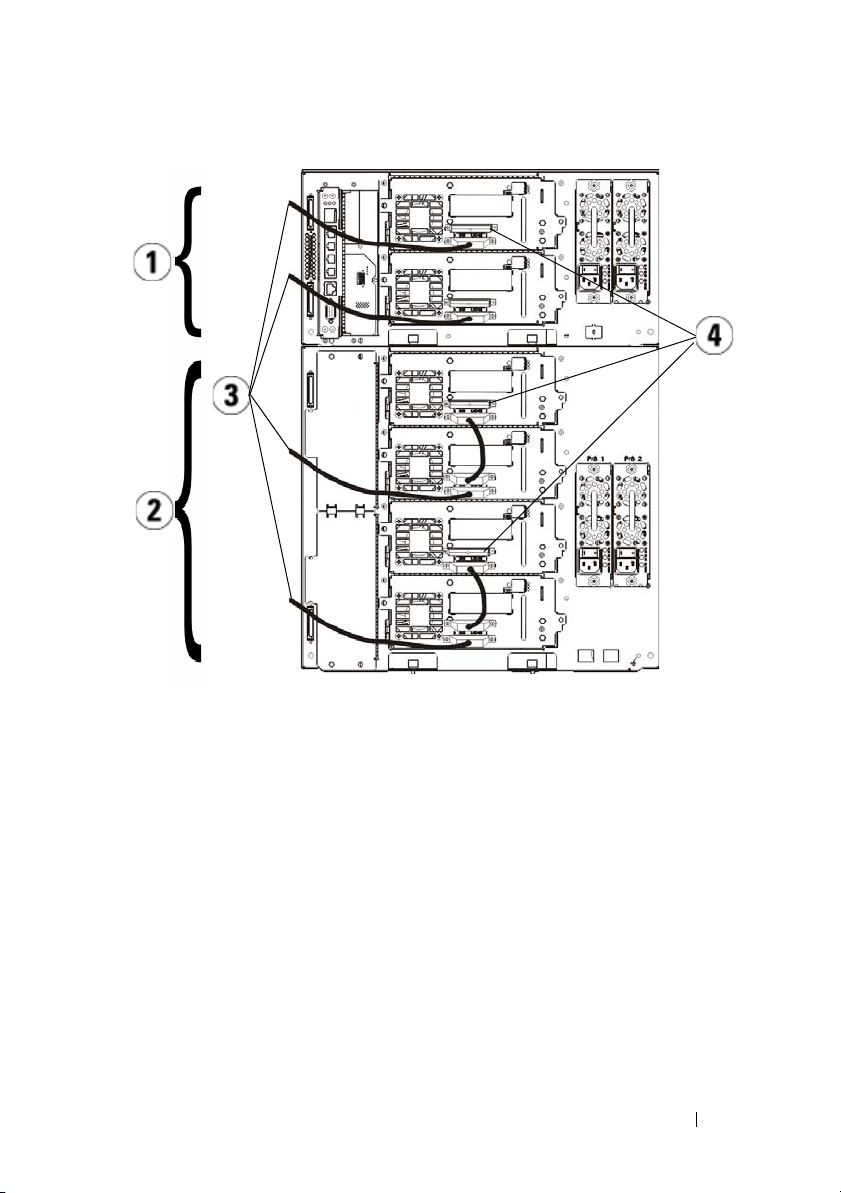
Connecting Fibre Channel Cables Through a Fibre Channel I/O Blade
Perform this step if your library contains Fibre Channel tape drives that you will
be connecting to your host or switch through a Fibre Channel I/O blade.
1
For each tape drive: Connect one end of a Fibre Channel cable to the Fibre
Channel port on the tape drive. Connect the other end of the Fibre
Channel cable to an initiator port (lower ports 3 – 6) on the nearest Fibre
Channel I/O blade.
2
For each Fibre Channel I/O blade: Connect one end of a Fibre Channel
cable to one of the target ports (upper ports 1 and 2) on the Fibre Channel
I/O blade. Connect the other end of the Fibre Channel cable to your host
or switch.
Use Ethernet cables to connect the LCB in the 5U Library Control Module to
each 9U Library Expansion Module that contains a Fibre Channel I/O blade.
For each Fibre Channel I/O blade installed in a 9U Library Expansion Module:
3
Connect one end of the Ethernet cable to any of the four middle Ethernet
ports on the LCB Ethernet hub.
4
Connect the other end of the cable to the appropriate port on the 9U
Library Expansion Module. If the Fibre Channel I/O blade is installed in
the upper bay, use the port labelled "UPPER." If the Fibre Channel I/O
blade is installed in the lower bay, use the port labelled "LOWER."
Dell PowerVault ML6000 Getting Started Guide 19
Page 20
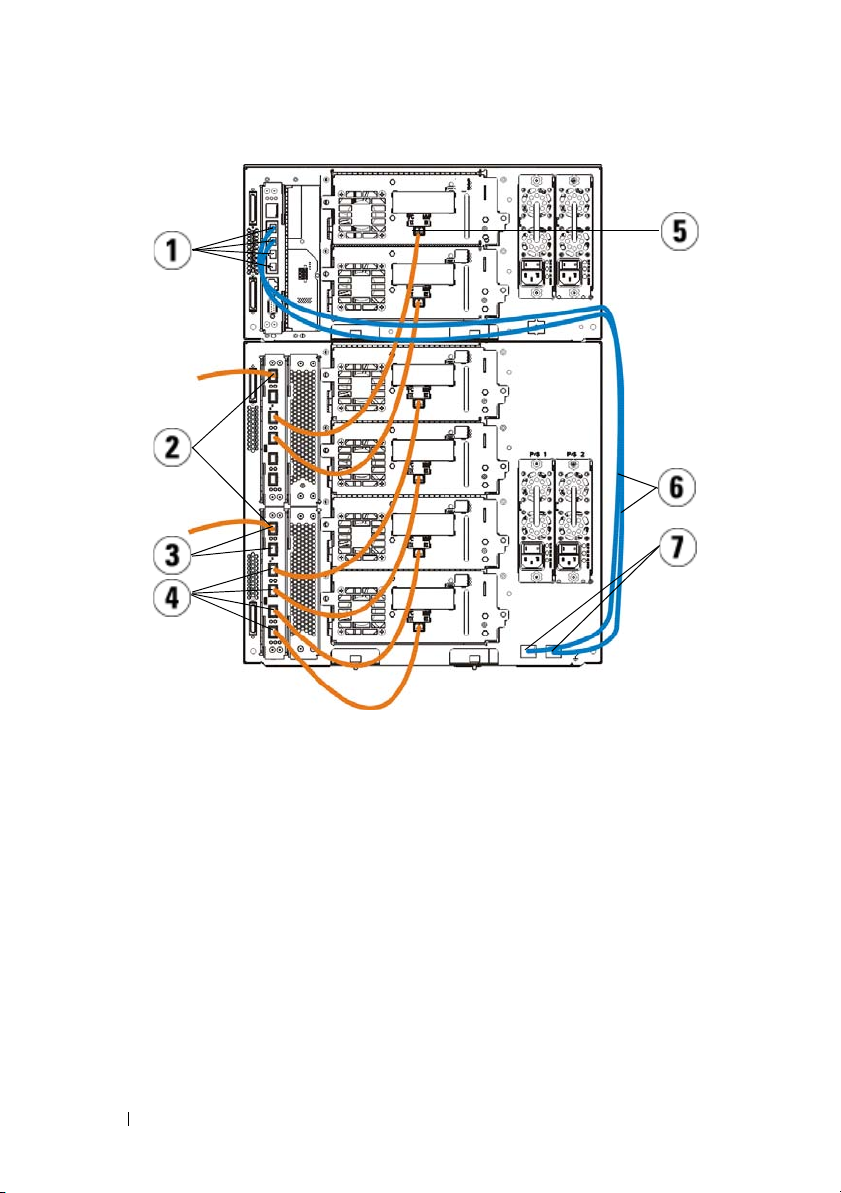
1 LCB middle Ethernet ports 2 Fibre Channel I/O blade
3 Target ports 4 Initiator ports
5 Fibre Channel port 6 Ethernet cables
7 "UPPER" and "LOWER" ports
Connecting Serial Attached SCSI (SAS) Cables
Perform this step if your library contains serial attached SCSI (SAS) tape drives.
Use SAS cables to connect the SAS tape drives directly to the host. For each
tape drive:
1
Connect one end of the SAS cable to the SAS port on the tape drive.
2
Connect the other end of the SAS cable directly to the host.
20 Dell PowerVault ML6000 Getting Started Guide
Page 21
1 SAS port 2 SAS cable
Dell PowerVault ML6000 Getting Started Guide 21
Page 22

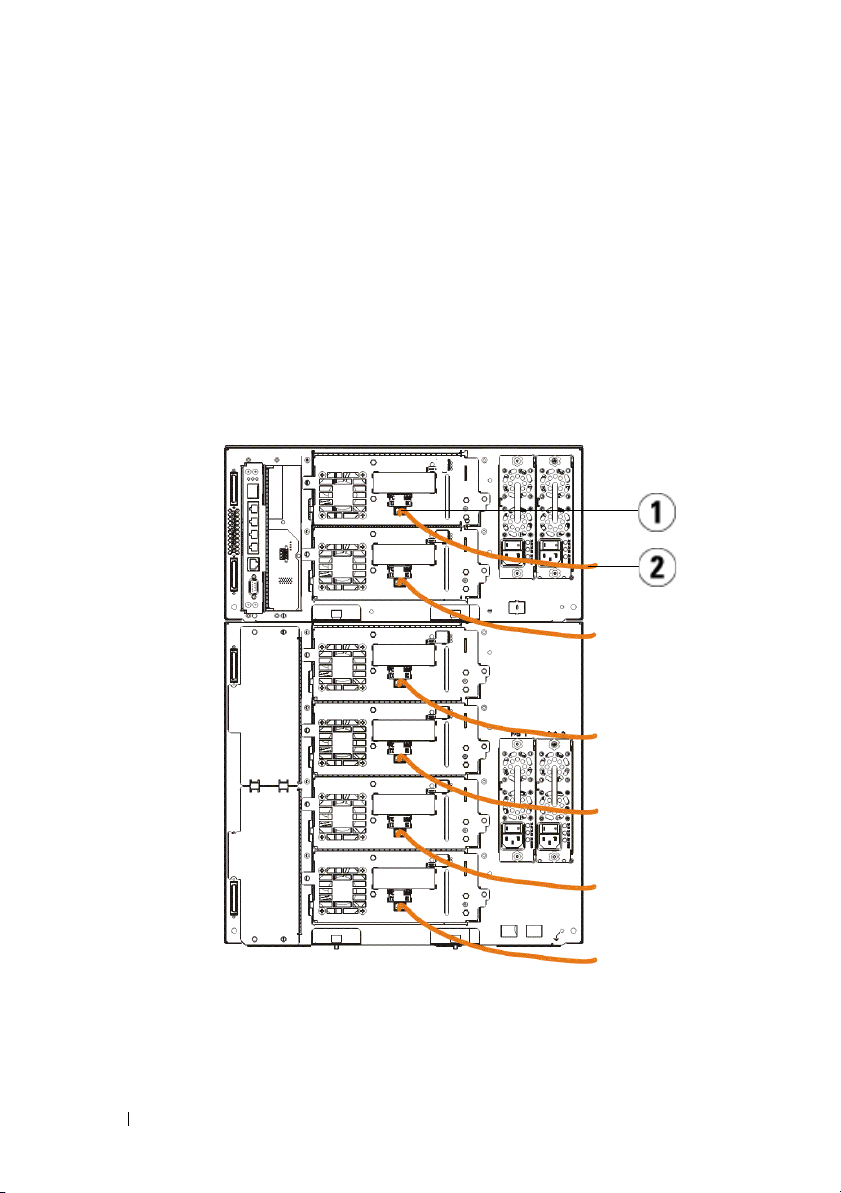
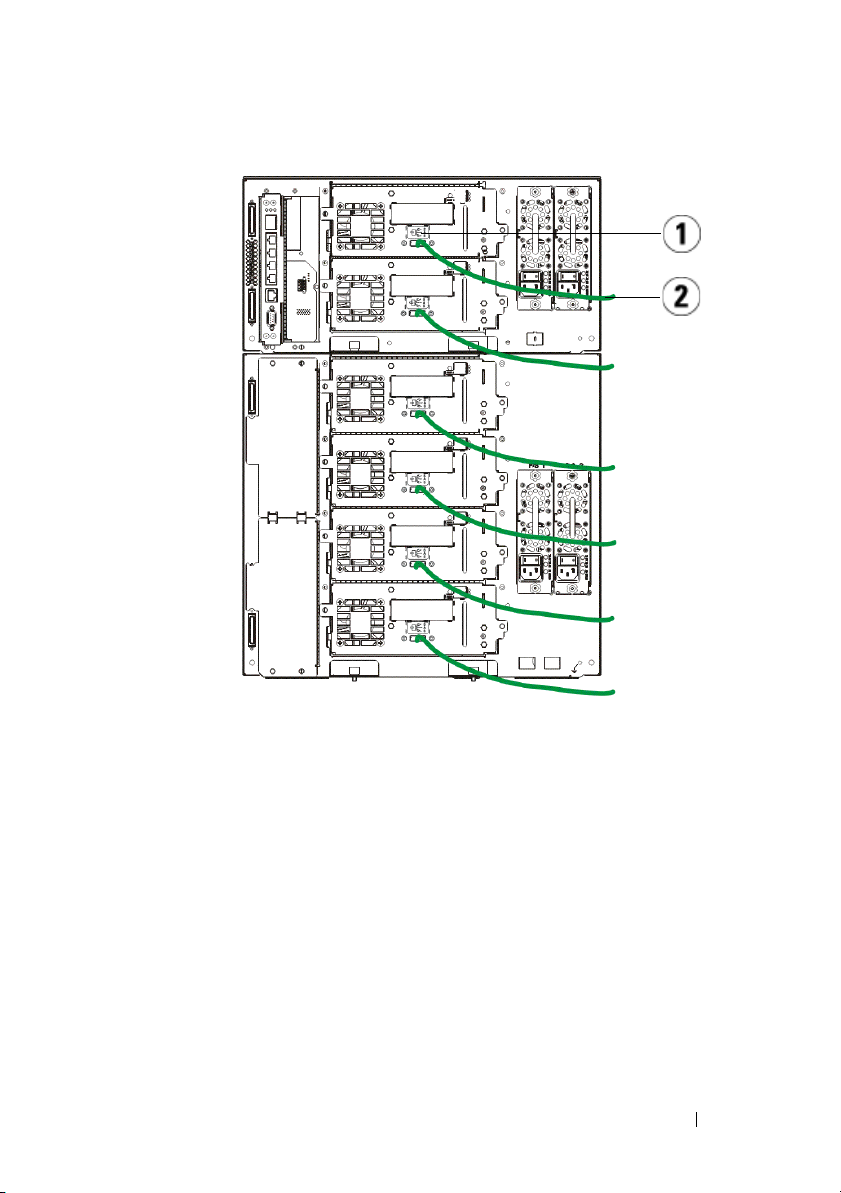
Finishing Cabling the Library
All libraries must use module terminators. Libraries that consist of multiple
modules must use module-to-module cables.
CAUTION: The module terminator is not the same as a SCSI terminator. Using a
SCSI terminator instead of a module terminator can damage the library. The
module terminators are located in a plastic package tied to the back of the
5U Library Control Module.
1
Remove the protective plastic caps covering the module connectors on the
5U Library Control Module and 9U Library Expansion Module(s).
2
Using the module-to-module cables from the accessory kit, connect each
module to the one above it. Connect one end of the cable to the bottom
module. Then connect the other end of the cable to the module above it.
3
Using the module terminators from the plastic package tied to the back of
the 5U Liberary Control Module, terminate the topmost and botommost
modules.
4
Connect an Ethernet cable to the top Gigabit Ethernet port on the library
control blade (LCB) for remote access to the library via the Web client.
(Ethernet cable not supplied.)
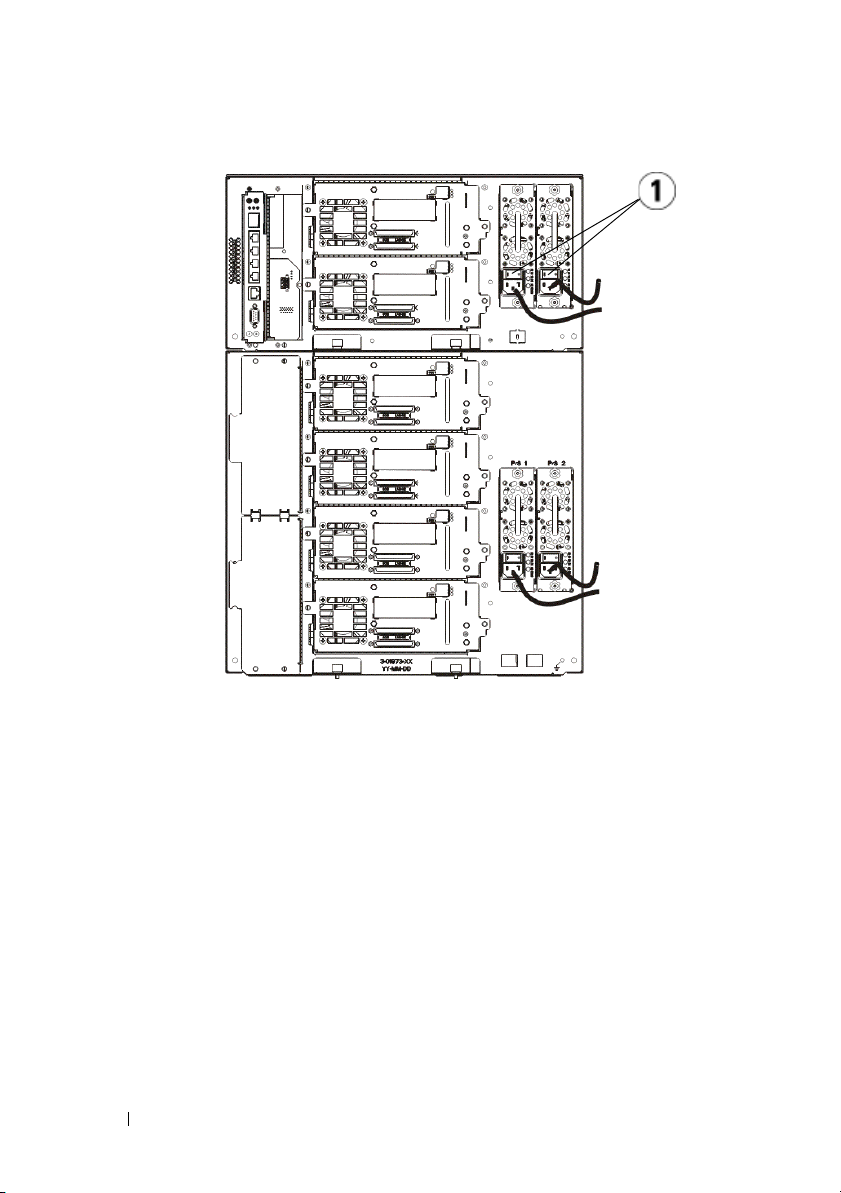
5
At least one power supply is required for each module that contains tape
drives. For each power supply, connect one end of the power cord to the
power supply. Connect the other end to a nearby grounded AC power
source (of the type marked on the product label).
22 Dell PowerVault ML6000 Getting Started Guide
Page 23
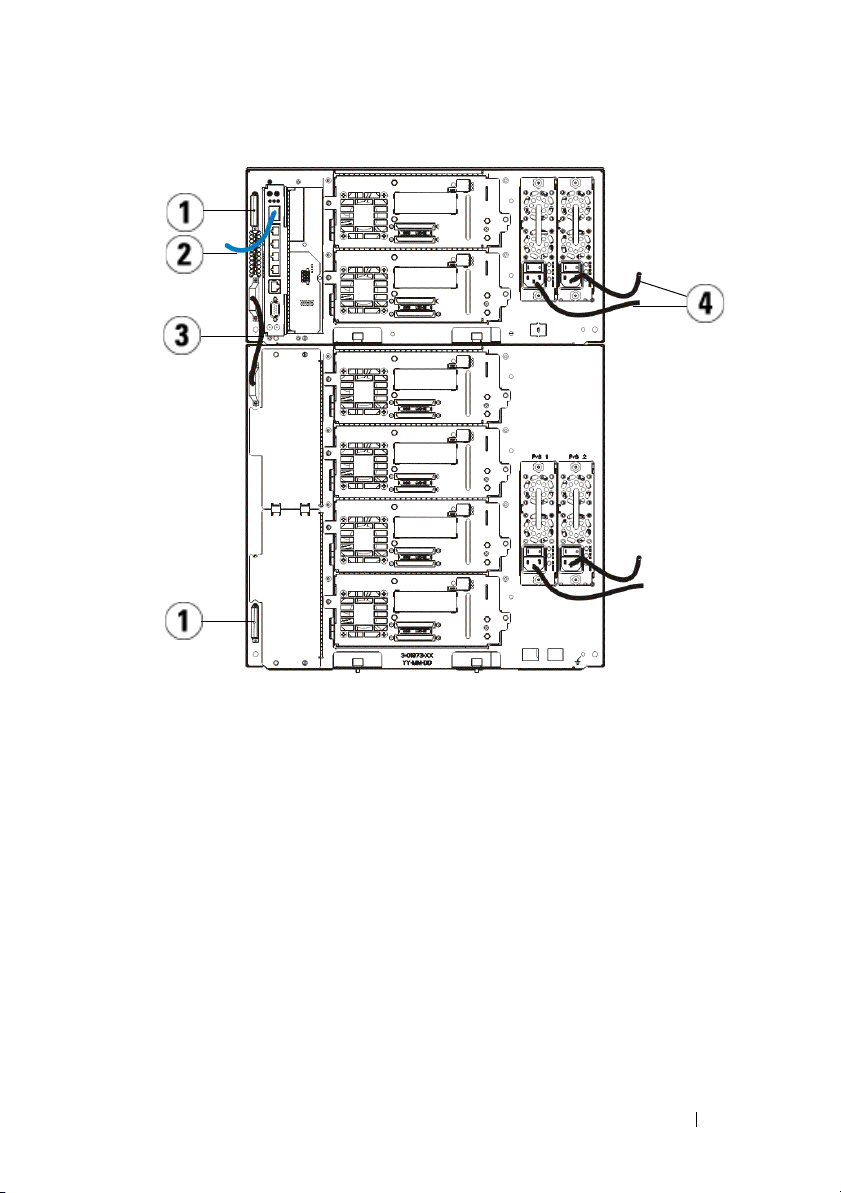
1 Module terminator 2 Ethernet cable connected to Gigabit
Ethernet port
3 Module-to-module cable 4 Power cords
Powering On the Library
1
Turn on each power supply’s power switch.
2
Turn on the library’s main power using the power button located on the
front of the 5U Library Control Module.
The Setup Wizard screen appears on the operator panel when the library
has completed its power-on self-test (POST) and initialization. This
process takes approximately 30 minutes. Do not power off the library
during this process.
Dell PowerVault ML6000 Getting Started Guide 23
Page 24
1 Power supply power switch
Getting Started
1
Configure your library using the Setup Wizard. For details, see the
PowerVault™ ML6000 Tape Library User’s Guide
2
Verify that each host can communicate with the library’s tape drives. For
details, see your host application documentation.
24 Dell PowerVault ML6000 Getting Started Guide
.
Dell™
Page 25
Příručka Dell PowerVault ML6000 – začínáme (Czech)
VAROVÁNÍ: Před připojením páskové knihovny kabelem si přečtěte
Informační příručku k systémům Dell™ PowerVault™.
VAROVÁNÍ: Všechny knihovny musí být nainstalovány ve stojanu
vybaveném hlavním ochranným uzemňovacím výstupem. Podrobné
instalační pokyny viz Uživatelská příručka k páskové knihovně Dell™
PowerVault™ ML6000.
VAROVÁNÍ: Používaná zásuvka by měla být instalována v blízkosti
zařízení a být snadno přístupná.
VAROVÁNÍ: Vypínač na předním panelu není hlavní odpojovač.
Chcete-li zařízení zcela vypnout, odpojte od něho všechny napájecí
kabely.
VAROVÁNÍ: Před připojením knihovny kabelem odstraňte veškeré
vnitřní obaly. Nezapomeňte odstranit oranžový zámek robota, který
zajišťuje robota k podlaze knihovny. Kromě toho odstraňte žlutou
pásku ve stanici I/E. Uschovejte veškeré obalové materiály a oranžový
zámek robota pro případné budoucí přemísťování nebo převážení
knihovny. Podrobné informace naleznete v pokynech pro vybalení,
dodaných s knihovnou, a v Uživatelské příručce k páskové knihovně
Dell™ PowerVault™ ML6000.
Příručka Dell PowerVault ML6000 – začínáme 25
Page 26
Instalace knihovny do stojanu
Všechny knihovny Dell™ PowerVault™ ML6000 musí být nainstalovány ve
stojanu. Pokyny viz
PowerVault
•
•
•
™
ML6010 CM je samostatný řídící modul knihovny 5U.
ML6020 CM se skládá z jednoho (1) řídícího modulu knihovny 5U ML6010
CM a jednoho (1) rozšiřujícího modulu knihovny 9U ML6000 EM
(celkem 14U).
ML6030 CM se skládá z jednoho (1) řídícího modulu knihovny 5U ML6010
CM a dvou (2) rozšiřujících modulů knihovny 9U ML6000 EM (celkem 23U).
Uživatelská příručka k páskové knihovně Dell™
ML6000
.
1 Řídící modul knihovny 5U 2 Rozšiřující modul knihovny 9U
Zvláštní pokyny pro páskové jednotky LTO-5
V současné době knihovna nepodporuje využívání následujících funkcí páskových
jednotek LTO-5:
26 Příručka Dell PowerVault ML6000 – začínáme
Page 27
•
Síťový port (ethernet)
•
Port 2 na páskových jednotkách se dvěma porty
Více podrobností viz následující dva obrázky.
Optická sběrnice páskové jednotky LTO-5
1 Ethernetový port – nepoužívejte 2 Optický port sběrnice – použijte
tento port
Pásková jednotka LTO-5 SAS
1 Port 1 SAS – použijte tento port 2 Port 2 SAS – nepoužívejte
3 Ethernetový port – nepoužívejte
Příručka Dell PowerVault ML6000 – začínáme 27
Page 28

Připojování paralelními kabely SCSI
Tento krok proveďte, pokud Vaše knihovna obsahuje paralelní páskové jednotky
SCSI.
Existují dva doporučené způsoby připojení páskových jednotek SCSI kabelem:
jedna pásková jednotka na sběrnici SCSI nebo dvě páskové knihovny na sběrnici
SCSI.
POZNÁMKA: Aby se zabránilo možným problémům s výkonem,
nepřipojujte na sběrnici SCSI více než dvě páskové jednotky.
Připojení jedné páskové jednotky na sběrnici SCSI:
1
Pomocí kabelu SCSI připojte dolní port páskové jednotky k hostitelskému
počítači.
2
Pomocí terminátoru SCSI zakončete horní port páskové jednotky.
Připojení dvou páskových jednotek na sběrnici SCSI:
1
Připojte jeden konec kabelu SCSI k hornímu portu SCSI dolní páskové
jednotky.
2
Připojte druhý konec kabelu k dolnímu portu SCSI horní páskové jednotky.
3
Pomocí dalšího kabelu SCSI připojte dolní páskovou jednotku sběrnice SCSI
k hostitelskému počítači.
4
Pomocí terminátoru SCSI zakončete horní páskovou jednotku sběrnice SCSI.
28 Příručka Dell PowerVault ML6000 – začínáme
Page 29
1 Připojení jedné páskové jednotky
na sběrnici SCSI
3 Kabel SCSI k hostiteli 4 Terminátor SCSI
Příručka Dell PowerVault ML6000 – začínáme 29
2 Připojení dvou páskových
jednotek na sběrnici SCSI
Page 30

Připojování sběrnice optickým kabelem k hostiteli nebo přepínači
Tento krok proveďte, pokud Vaše knihovna obsahuje páskové jednotky Fibre
Channel, které budete připojovat přímo k hostiteli nebo přepínači.
Připojte hostitele (nebo přepínač) ke knihovně pomocí kabelů Fibre Channel. Pro
každou páskovou jednotku:
1
Připojte jeden konec kabelu Fibre Channel k portu Fibre Channel na páskové
jednotce.
2
Připojte druhý konec kabelu Fibre Channel k hostiteli nebo přepínači.
1 Port Fibre Channel 2 Kabel Fibre Channel
30 Příručka Dell PowerVault ML6000 – začínáme
Page 31

Připojování sběrnice s optickými kabely přes optickou sběrnici I/O Blade
Tento krok proveďte, pokud Vaše knihovna obsahuje páskové jednotky Fibre
Channel, které budete připojovat k hostiteli nebo přepínači prostřednictvím
modulu Fibre Channel I/O blade.
1
Pro každou páskovou jednotku: Připojte jeden konec kabelu Fibre Channel k
portu Fibre Channel na páskové jednotce. Připojte druhý konec kabelu Fibre
Channel k portu iniciátora (dolní porty 3—6) na nejbližším modulu Fibre
Channel I/O blade.
2
Každý modul Fibre Channel I/O blade: Připojte jeden konec kabelu Fibre
Channel k jednomu z cílových portů (horní porty 1 a 2) na modulu Fibre
Channel I/O blade. Připojte druhý konec kabelu Fibre Channel k hostiteli
nebo přepínači.
Pomocí kabelů Ethernet připojte LCB v řídícím modulu knihovny 5U ke každému
rozšiřujícímu modulu knihovny 9U, který obsahuje modul Fibre Channel I/O
blade. Pro každý modul Fibre Channel I/O blade nainstalovaný v rozšiřujícím
modulu knihovny 9U:
3
Připojte jeden konec kabelu Ethernet k některému ze čtyř prostředních portů
Ethernet na rozbočovači LCB Ethernet.
4
Připojte druhý konec kabelu k příslušnému portu na rozšiřujícím modulu
knihovny 9U. Pokud je modul Fibre Channel I/O blade nainstalován v horní
pozici, použijte port označený „UPPER“ (HORNÍ). Pokud je modul Fibre
Channel I/O blade nainstalován v dolní pozici, použijte port označený
„LOWER“ (DOLNÍ).
Příručka Dell PowerVault ML6000 – začínáme 31
Page 32

1 Prostřední porty Ethernet na
rozbočovači LCB
3 Cílové porty 4 Porty iniciátora
5 Port Fibre Channel 6 Kabely Ethernet
7 Porty „UPPER“ a „LOWER“
(DOLNÍ)
2 Modul Fibre Channel I/O blade
32 Příručka Dell PowerVault ML6000 – začínáme
Page 33

Sériové připojování dodávanými kabely SCSI (SAS)
Tento krok proveďte, pokud Vaše knihovna obsahuje páskové jednotky s
rozhraním SAS (Serial Attached SCSI).
Použijte kabely SAS pro připojení páskových jednotek SAS přímo k hostiteli. Pro
každou páskovou jednotku:
1
Připojte jeden konec kabelu SAS k portu SAS na páskové jednotce.
2
Druhý konec kabelu SAS připojte přímo k hostiteli.
1 Port SAS 2 Kabel SAS
Příručka Dell PowerVault ML6000 – začínáme 33
Page 34

Dokončení kabeláže knihovny
Všechny knihovny musí používat modulární terminátory. Knihovny, které se
skládají z více modulů, musí používat kabely modul-modul.
POZOR! Modulární terminátor není totožný s terminátorem SCSI. Při
použití terminátoru SCSI místo modulárního terminátoru může dojít k
poškození knihovny. Modulární terminátory se nacházejí v plastovém
obalu, připevněném k zadní části řídícího modulu knihovny 5U.
Odstraňte ochranná plastová víčka zakrývající konektory modulu na řídícím
1
modulu knihovny 5U a rozšiřujícím modulu (modulech) knihovny 9U.
2
Pomocí kabelů modul-modul ze sady příslušenství připojte každý modul k
modulu nad ním. Připojte jeden konec kabelu k dolnímu modulu. Poté
připojte druhý konec kabelu k modulu nad ním.
3
Pomocí modulárních terminátorů z plastového obalu, připevněného k zadní
části řídícího modulu knihovny 5U, zakončete nejvyšší a nejnižší moduly.
4
Chcete-li získat vzdálený přístup ke knihovně prostřednictvím webového
klienta, připojte kabel Ethernet k hornímu portu Gigabit Ethernet na řídícím
modulu blade knihovny (LCB). (Kabel Ethernet není dodáván.)
5
Každý modul, který obsahuje páskové jednotky, vyžaduje alespoň jeden
zdroj napájení. Pro každý zdroj napájení připojte jeden konec napájecí šňůry
ke zdroji napájení. Připojte druhý konec k nejbližšímu uzemněnému zdroji
střídavého proudu (jehož typ odpovídá označení na štítku výrobku).
34 Příručka Dell PowerVault ML6000 – začínáme
Page 35

1 Modulární terminátor 2 Kabel Ethernet připojený k portu
Gigabit Ethernet
3 Kabel modul-modul 4 Napájecí šňůry
Elektrické napájení knihovny
1
Zapněte vypínač napájení každého zdroje.
2
Zapněte hlavní napájení knihovny pomocí vypínače na přední straně řídícího
modulu knihovny 5U.
Po dokončení automatického testu při spuštění (POST) a inicializaci
knihovny se na panelu obsluhy zobrazí Setup Wizard (Průvodce nastavením).
Tento proces trvá přibližně 30 minut. Během tohoto procesu nevypínejte
napájení knihovny.
Příručka Dell PowerVault ML6000 – začínáme 35
Page 36

1 Vypínač zdroje napájení
Začínáme
1
Nakonfigurujte knihovnu pomocí Průvodce nastavením. Podrobnosti viz
Uživatelská příručka k páskové knihovně Dell™ PowerVault™ ML6000
2
Ověřte, zda může každý hostitel komunikovat s páskovými jednotkami
knihovny. Podrobnosti viz dokumentace k hostitelské aplikaci.
36 Příručka Dell PowerVault ML6000 – začínáme
.
Page 37

Guide de démarrage rapide de Dell PowerVault ML6000 (French)
AVERTISSEMENT : Avant d'effectuer le câblage de votre bibliothèque, consultez
le Manuel d'informations sur les produits système Dell™ PowerVault™.
AVERTISSEMENT : Toutes les bibliothèques doivent être installées dans un rack
disposant d'une borne de mise à la terre (masse) principale. Pour obtenir des
informations détaillées sur l'installation, consultez le Guide d'utilisation de la
bandothèque Dell™ PowerVault™ ML6000.
AVERTISSEMENT : La prise de courant doit être installée près de l'équipement
et être facilement accessible.
AVERTISSEMENT : L'interrupteur d'alimentation du panneau avant ne constitue
pas le principal dispositif de déconnexion. Veuillez retirer toutes les prises
principales des entrées de l'appareil avant d'éteindre complètement l'appareil.
AVERTISSEMENT : Avant d'effectuer le câblage de votre bibliothèque, retirez
tout l'emballage intérieur. Assurez-vous de retirer l'attache orange du robot qui
fixe le robot à la base de la bibliothèque. Retirez également la bande jaune du
poste I/E. Conservez tout le matériel d'emballage et l'attache orange du robot au
cas où vous auriez besoin de déplacer ou d'expédier la librairie par la suite. Pour
obtenir des détails, consultez les instructions de déballage contenues dans la
librairie et le Guide d'utilisation de la bandothèque Dell™ PowerVault™ ML6000.
Guide de démarrage rapide Dell PowerVault ML6000 37
Page 38

Installation de votre bibliothèque dans un rack
Toutes les bibliothèques Dell™ PowerVault™ ML6000 doivent être installées
dans un rack. Pour obtenir des instructions, consultez le
™
bandothèque Dell
• ML6010 CM est un module de contrôle de bibliothèque 5U unique.
• ML6020 CM est composé d'un (1) module de contrôle de bibliothèque
ML6010 CM 5U et d'un (1) module d'extension de bibliothèque ML6000
EM 9U (14U au total).
• ML6030 CM est composé d'un (1) module de contrôle de bibliothèque
ML6010 CM 5U et de deux (2) modules d'extension de bibliothèque
ML6000 EM 9U (23U au total).
PowerVault™ ML6000
.
Guide d'utilisation de la
1
Module de contrôle de bibliothèque 5U
2
Module de contrôle de bibliothèque 9U
Instructions spéciales pour les lecteurs de bande LTO-5
La bibliothèque ne prend actuellement pas en charge les fonctionnalités
suivantes des lecteurs de bande LTO-5 :
38 Guide de démarrage rapide Dell PowerVault ML6000
Page 39

• Port Ethernet
• Port numéro 2 des lecteurs de bande à double port
Voir les deux figures suivantes pour plus de détails.
Lecteur de bande Fibre Channel LTO-5
1 Port Ethernet : ne pas utiliser 2 Port Fibre Channel : port à utiliser
Lecteur de bande LTO-5 SAS
1 Port SAS 1 : port à utiliser 2 Port SAS 2 : ne pas utiliser
3 Port Ethernet : ne pas utiliser
Guide de démarrage rapide Dell PowerVault ML6000 39
Page 40

Connexion des câbles SCSI parallèles
Effectuez cette étape si votre bibliothèque contient des lecteurs de bande SCSI
parallèles.
Il existe deux manières recommandées d'effectuer le câblage des lecteurs de
bande SCSI : un lecteur de bande par bus SCSI ou deux lecteurs de bande par
bus SCSI.
REMARQUE : Pour éviter d'éventuels problèmes de performance, ne connectez
pas plus de deux lecteurs de bande par bus SCSI.
Pour connecter un lecteur de bande par bus SCSI :
1
Utilisez un câble SCSI pour connecter le port inférieur du lecteur de
bande à votre système hôte.
2
Raccordez un terminateur SCSI pour terminer le port supérieur du lecteur
de bande.
Pour connecter deux lecteurs de bande par bus SCSI :
1
Connectez une extrémité du câble SCSI au port SCSI supérieur du lecteur
de bande inférieur.
2
Connectez l'autre extrémité du câble au port SCSI inférieur du lecteur de
bande supérieur.
3
Utilisez un autre câble SCSI pour connecter le lecteur de bande inférieur
du bus SCSI à votre système hôte.
4
Utilisez un terminateur SCSI pour terminer le lecteur de bande supérieur
du bus SCSI.
40 Guide de démarrage rapide Dell PowerVault ML6000
Page 41

1 Connexion d'un lecteur de bande par
bus SCSI
3 Câble SCSI à l'hôte 4 Terminateur SCSI
Guide de démarrage rapide Dell PowerVault ML6000 41
2 Connexion de deux lecteurs de
bande par bus SCSI
Page 42

Connexion des câbles Fibre Channel à un hôte ou à un commutateur
Effectuez cette étape si votre bibliothèque contient des lecteurs de bande Fibre
Channel que vous connecterez directement à un hôte ou un commutateur.
Utilisez des câbles Fibre Channel pour connecter votre hôte (ou commutateur)
à la bibliothèque. Pour chaque lecteur de bande :
1
Connectez une extrémité du câble Fibre Channel au port Fibre Channel
du lecteur de bande.
2
Connectez l'autre extrémité du câble Fibre Channel à votre hôte ou
commutateur.
1 Port Fibre Channel 2 Câble Fibre Channel
42 Guide de démarrage rapide Dell PowerVault ML6000
Page 43

Connexion des câbles Fibre Channel au moyen d'une lame d'E/S Fibre Channel
Effectuez cette étape si votre bibliothèque contient des lecteurs de bande Fibre
Channel que vous connecterez directement à votre hôte ou commutateur au
moyen d'une lame d'E/S Fibre Channel.
1
Pour chaque lecteur de bande : connectez une extrémité du câble Fibre
Channel au port Fibre Channel du lecteur de bande. Connectez l'autre
extrémité du câble Fibre Channel à un port déclencheur (ports inférieurs 3
à 6) sur la lame d'E/S Fibre Channel la plus proche.
2
Pour chaque lame d'E/S Fibre Channel : connectez une extrémité du câble
Fibre Channel à un des ports cibles (ports supérieurs 1 et 2) de la lame
d'E/S Fibre Channel. Connectez l'autre extrémité du câble Fibre Channel
à votre hôte ou commutateur.
Utilisez des câbles Ethernet pour connecter la lame de contrôle de la
bibliothèque du module de contrôle de bibliothèque 5U à chaque module
d'extension de bibliothèque 9U qui contient une lame d'E/S Fibre Channel.
Pour chaque lame d'E/S Fibre Channel installée dans un module d'extension de
bibliothèque 9U :
3
Connectez une extrémité du câble Ethernet à un des quatre ports
Ethernet centraux du concentrateur Ethernet de la lame de contrôle de la
bibliothèque.
4
Connectez l'autre extrémité du câble au port du module d'extension de
bibliothèque 9U approprié. Si la lame d'E/S Fibre Channel est installée
dans la baie supérieure, utilisez le port intitulé « UPPER (supérieur) ». Si la
lame d'E/S Fibre Channel est installée dans la baie inférieure, utilisez le
port intitulé « LOWER (inférieur) ».
Guide de démarrage rapide Dell PowerVault ML6000 43
Page 44

1 Ports Ethernet centraux de la lame
de contrôle de la bibliothèque
3 Ports cibles 4 Ports déclencheurs
5 Port Fibre Channel 6 Câbles Ethernet
7 Ports « UPPER (supérieur) » et
« LOWER (inférieur) »
2 Lame d'E/S Fibre Channel
Connexion des câbles SCSI (SAS)
Effectuez cette étape si votre bibliothèque contient des lecteurs de bande SAS
(serial attached SCSI).
Utilisez des câbles SAS pour connecter les lecteurs de bande SAS directement à
l'hôte. Pour chaque lecteur de bande :
44 Guide de démarrage rapide Dell PowerVault ML6000
Page 45

1
Connectez une extrémité du câble SAS au port SAS du lecteur de bande.
2
Connectez l'autre extrémité du câble SAS directement à l'hôte.
1 Port SAS 2 Câble SAS
Guide de démarrage rapide Dell PowerVault ML6000 45
Page 46

Terminer le câblage de la bibliothèque
Toutes les bibliothèques doivent utiliser des terminateurs de module. Les
bibliothèques composées de plusieurs modules doivent utiliser des câbles
module-à-module.
ATTENTION ! Un terminateur de module n'est pas la même chose qu'un
terminateur SCSI. L'utilisation d'un terminateur SCSI au lieu d'un terminateur de
module peut endommager la bibliothèque. Les terminateurs de module sont situés
dans un emballage en plastique attaché à l'arrière du module de contrôle de
bibliothèque 5U.
1
Retirez les bouchons en plastique protecteurs qui recouvrent les
connecteurs de module du module de contrôle de bibliothèque 5U et des
modules d'extension de bibliothèque 9U.
2
À l'aide des câbles module-à-module du kit d'accessoires, connectez
chaque module à celui du dessus. Connectez une extrémité du câble au
module inférieur. Puis connectez l'autre extrémité du câble au module
situé au dessus.
3
À l'aide des terminateurs de module de l'emballage en plastique attaché à
l'arrière du module de contrôle de bibliothèque 5U, terminez les modules
situés tout en haut et tout en bas.
4
Connectez un câble Ethernet au port Gigabit Ethernet supérieur de la
lame de contrôle de la bibliothèque pour permettre l'accès à distance à la
bibliothèque via le client Web (câble Ethernet non fourni).
5
Au moins un bloc d'alimentation est requis pour chaque module
contenant des lecteurs de bande. Pour chaque bloc d'alimentation,
connectez une extrémité du cordon d'alimentation au bloc d'alimentation.
Connectez l'autre extrémité à une source de courant alternatif mise à la
terre (du type indiqué sur l'étiquette du produit).
46 Guide de démarrage rapide Dell PowerVault ML6000
Page 47

1 Terminateur de module 2 Câble Ethernet connecté au port
Ethernet Gigabit
3 Câble module-à-module 4 Cordons d'alimentation
Mise sous tension de la bibliothèque
1
Appuyez sur l'interrupteur d'alimentation de chaque bloc d'alimentation.
2
Allumez l'alimentation principale de la bibliothèque au moyen du bouton
d'alimentation situé à l'avant du module de contrôle de bibliothèque 5U.
L'écran Setup Wizard (Assistant d'installation) apparaît sur le panneau de
commande lorsque la bibliothèque a terminé son test d'autodiagnostic et
l'initialisation. Ce processus prend environ 30 minutes. N'éteignez pas la
bibliothèque pendant ce processus.
Guide de démarrage rapide Dell PowerVault ML6000 47
Page 48

1 Interrupteur d'alimentation du bloc
d'alimentation
Guide de démarrage rapide
1
Configurez votre bibliothèque à l'aide de l'assistant d'installation. Pour
obtenir des détails, consultez le
Dell™ PowerVault™ ML6000
2
Vérifiez que chaque hôte peut communiquer avec les lecteurs de bande de
la bibliothèque. Pour obtenir des détails, consultez la documentation de
votre application hôte.
48 Guide de démarrage rapide Dell PowerVault ML6000
Guide d'utilisation de la bandothèque
.
Page 49

Dell PowerVault ML6000 Erste Schritte (German)
WARNUNG: Lesen Sie den Dell™ PowerVault™ Systems
Produktinformationsleitfaden, bevor Sie Ihre Bibliothek verkabeln.
WARNUNG: Alle Bibliotheken müssen in ein Rack montiert werden, das eine
Haupt-Schutzerdungsklemme hat. Detaillierte Informationen hierzu finden Sie im
Dell™ PowerVault™ ML6000 Tape Library-Benutzerhandbuch.
WARNUNG: Die Anschlusssteckdose muss sich in der Nähe des Gerätes
befinden und gut zugänglich sein.
WARNUNG: Der Schalter auf dem Bedienfeld ist nicht der Hauptschalter des
Gerätes. Ziehen Sie alle Stecker aus den Eingängen des Gerätes, um dieses
vollständig auszuschalten.
WARNUNG: Entfernen Sie das vollständige innere Verpackungsmaterial, bevor
Sie Ihre Bibliothek verkabeln. Die orangefarbene Transportsicherung des
Roboters, mit der dieser am Boden der Bibliothek befestigt ist, muss entfernt
werden. Entfernen Sie außerdem den gelben Streifen in der I/E-Station. Bewahren
Sie alle Verpackungsmaterialien und die orangefarbene RoboterTransportsicherung auf, falls Sie die Bibliothek in Zukunft bewegen oder
transportieren wollen. Einzelheiten hierzu finden Sie in der Auspackanleitung, die
Sie zusammen mit der Bibliothek und dem Dell™ PowerVault™ ML6000 Tape
Library-Benutzerhandbuch erhalten haben.
Dell PowerVault ML6000 Erste Schritte 49
Page 50

Einbau Ihrer Bibliothek in ein Rack
Alle Dell™ PowerVault™ ML6000-Bibliotheken müssen in ein Rack eingebaut
werden. Anweisungen hierzu finden Sie im
Library-Benutzerhandbuch
• Das ML6010 CM ist ein einzelnes 5U Bibliothek-Steuermodul.
• Das ML6020 CM besteht aus einem (1) ML6010 CM 5U BibliothekSteuermodul und einem (1) ML6000 EM 9U BibliothekErweiterungsmodul (insgesamt 14U).
• Das ML6030 CM besteht aus einem (1) ML6010 CM 5U BibliothekSteuermodul und zwei (2) ML6000 EM 9U BibliothekErweiterungsmodulen (insgesamt 23U).
.
Dell™ PowerVault™ ML6000 Tape
1 5U Bibliothek-Steuermodul 2 9U Bibliothek-Erweiterungsmodul
Sonderanweisungen für LTO-5-Bandlaufwerke
Zurzeit unterstützt die Bibliothek die Verwendung der folgenden Funktionen
von LTO-5-Bandlaufwerken nicht:
• Ethernetanschluss
50 Dell PowerVault ML6000 Erste Schritte
Page 51

• Anschluss 2 auf Bandlaufwerken mit Dualanschluss
Einzelheiten hierzu finden Sie in folgenden zwei Abbildungen.
LTO-5 Fibre Channel-Bandlaufwerk
1 Ethernetanschluss - nicht verwenden 2 Fibre Channel-Anschluss - diesen
Anschluss verwenden
LTO-5 SAS-Bandlaufwerk
1 SAS Anschluss 1 - diesen Anschluss
verwenden
3 Ethernetanschluss - nicht verwenden
Dell PowerVault ML6000 Erste Schritte 51
2 SAS Anschluss 2 - nicht verwenden
Page 52

Anschließen von parallelen SCSI-Kabeln
Führen Sie diesen Schritt durch, wenn Ihre Bibliothek mit parallelen SCSIBandlaufwerken ausgerüstet ist.
Es gibt zwei empfohlene Verkabelungsverfahren für SCSI-Bandlaufwerke: ein
Bandlaufwerk pro SCSI-Bus oder zwei Bandlaufwerke pro SCSI-Bus.
ANMERKUNG: Schließen Sie nicht mehr als zwei Bandlaufwerke pro SCSI-Bus
an, um mögliche Leistungsprobleme auszuschließen.
Anschluss eines Bandlaufwerks pro SCSI-Bus:
1
Verwenden Sie ein SCSI-Kabel, um den unteren Anschluss des
Bandlaufwerks mit dem Host-System zu verbinden.
2
Verwenden Sie einen SCSI-Terminator, um den oberen Anschluss des
Bandlaufwerks abzuschließen.
Anschluss von zwei Bandlaufwerken pro SCSI-Bus:
1
Schließen Sie ein Ende eines SCSI-Kabels an den oberen SCSI-Anschluss
des unteren Bandlaufwerks an.
2
Schließen Sie das andere Ende des Kabels an den unteren SCSI-Anschluss
des oberen Bandlaufwerks an.
3
Verwenden Sie ein weiteres SCSI-Kabel, um das Bandlaufwerk des SCSIBus an Ihr Host-System anzuschließen.
4
Verwenden Sie einen SCSI-Terminator, um das obere Bandlaufwerk des
SCSI-Bus abzuschließen.
52 Dell PowerVault ML6000 Erste Schritte
Page 53

1 Anschluss eines Bandlaufwerks pro
SCSI-Bus
3 SCSI-Kabel an Host 4 SCSI-Terminator
2 Anschluss zweier Bandlaufwerke pro
SCSI-Bus
Dell PowerVault ML6000 Erste Schritte 53
Page 54

Anschluss von Fibre Channel-Kabeln an einen Host oder Switch
Führen Sie diesen Schritt aus, wenn Ihre Bibliothek mit Fibre ChannelBandlaufwerken ausgerüstet ist, die Sie direkt an einen Host oder an einen
Switch anschließen.
Verwenden Sie Fibre Channel-Kabel, um Ihren Host (oder Switch) an die
Bibliothek anzuschließen. Führen Sie folgende Schritte für jedes Bandlaufwerk
durch:
1
Schließen Sie ein Ende des Fibre Channel-Kabels an den Fibre ChannelAnschluss des Bandlaufwerks an.
2
Schließen Sie das andere Ende des Fibre Channel-Kabels an Ihren Host
oder Switch an.
1 Fibre Channel-Anschluss 2 Fibre Channel-Kabel
54 Dell PowerVault ML6000 Erste Schritte
Page 55

Anschluss von Fibre Channel-Kabeln über ein Fibre Channel E/A-Blade
Führen Sie diesen Schritt durch, wenn Ihre Bibliothek mit Fibre ChannelBandlaufwerken ausgestattet ist, die Sie über ein Fibre Channel E/A-Blade an
Ihren Host oder Switch anschließen wollen.
1
Führen Sie folgende Schritte für jedes Bandlaufwerk durch: Schließen Sie
ein Ende eines Fibre Channel-Kabels an den Fibre Channel-Anschluss des
Bandlaufwerks an. Schließen Sie das andere Ende des Fibre ChannelKabels an einen Initiatoranschluss (untere Anschlüsse 3 - 6) am nächsten
Fibre Channel E/A-Blade an.
2
Führen Sie folgende Schritte für jedes Fibre Channel E/A-Blade durch:
Schließen Sie ein Ende des Fibre Channel-Kabels an einen der
Zielanschlüsse (obere Anschlüsse 1 und 2) des Fibre Channel E/A-Blade
an. Schließen Sie das andere Ende des Fibre Channel-Kabels an Ihren Host
oder Switch an.
Verwenden Sie Ethernetkabel, um das LCB im 5U Bibliothek-Steuermodul an
jedes 9U Bibliothek-Erweiterungsmodul, das mit einem Fibre Channel E/ABlade ausgestattet ist, anzuschließen. Führen Sie für jedes im 9U BibliothekErweiterungsmodul installierte Fibre Channel E/A-Blade folgende Schritte
durch:
3
Schließen Sie ein Ende des Ethernetkabels an einen beliebigen der vier
mittleren Ethernetanschlüsse des LCB Ethernet-Hubs an.
4
Schließen Sie das andere Ende des Kabels an den entsprechenden
Anschluss im 9U Bibliothek-Erweiterungsmodul an. Wenn das Fibre
Channel E/A-Blade im oberen Schacht installiert ist, verwenden Sie den
Anschluss mit der Bezeichnung "UPPER" (OBERE). Wenn das Fibre
Channel E/A-Blade im unteren Schacht installiert ist, verwenden Sie den
Anschluss mit der Bezeichnung "LOWER" (UNTERE).
Dell PowerVault ML6000 Erste Schritte 55
Page 56

1 Mittlere LCB Ethernetanschlüsse 2 Fibre Channel E/A-Blade
3 Zielanschlüsse 4 Initiatoranschlüsse
5 Fibre Channel-Anschluss 6 Ethernetkabel
7 Anschlüsse "UPPER" (OBERE) und
"LOWER" (UNTERE)
56 Dell PowerVault ML6000 Erste Schritte
Page 57

Anschluss von SAS-Kabeln
Führen Sie diesen Schritt durch, wenn Ihre Bibliothek mit SAS-Bandlaufwerken
ausgerüstet ist.
Verwenden Sie SAS-Kabel, um die SAS-Bandlaufwerke direkt an den Host
anzuschließen. Führen Sie folgende Schritte für jedes Bandlaufwerk durch:
1
Schließen Sie ein Ende des SAS-Kabels an den SAS-Anschluss des
Bandlaufwerks an.
2
Schließen Sie das andere Ende des SAS-Kabels direkt an den Host an.
1 SAS-Anschluss 2 SAS-Kabel
Dell PowerVault ML6000 Erste Schritte 57
Page 58

Fertigstellen der Verkabelung der Bibliothek
Alle Bibliotheken müssen mit Modulterminatoren ausgerüstet sein. Bei aus
mehreren Modulen bestehenden Bibliotheken müssen Modul-zu-Modul-Kabel
verwendet werden.
VORSICHT: Der Modulterminator ist nicht identisch mit dem SCSI-Terminator.
Wenn anstelle eines Modulterminators ein SCSI-Terminator verwendet wird, kann
die Bibliothek beschädigt werden. Die Modulterminatoren befinden sich in einem
an der Rückseite des 5U Bibliothek-Steuermoduls befestigten Kunststoffbeutel.
1
Entfernen Sie die Kunststoff-Schutzkappen auf den Modulsteckern des 5U
Bibliothek-Steuermoduls und des/der 9U BibliothekErweiterungsmoduls/-module.
2
Verbinden Sie mit den Modul-zu-Modul-Kabeln aus dem Zubehörsatz
jedes Modul mit dem jeweils darüberliegenden Modul. Schließen Sie ein
Ende des Kabels an das untere Modul an. Schließen Sie dann das andere
Ende des Kabels an das jeweils darüberliegende Modul an.
3
Terminieren Sie das obere und das untere Modul mit den
Modulterminatoren, die sich in dem an der Rückseite des 5U BibliothekSteuermoduls befestigten Kunststoffbeutel befinden.
4
Schließen Sie ein Ethernetkabel an den oberen Gigabit-Ethernetanschluss
des Bibliothek-Steuerblades (LCB) an, um den Remote-Zugriff auf die
Bibliothek über den Webclient herzustellen. (Das Ethernetkabel ist nicht
im Lieferumfang enthalten.)
5
Für jedes Modul, das Bandlaufwerke enthält, ist mindestens ein Netzteil
erforderlich. Schließen Sie für jedes Netzteil ein Ende des Netzkabels an
das Netzteil an. Schließen Sie das andere Ende an eine nahegelegene und
geerdete Wechselstromsteckdose an (siehe Markierung auf dem
Produktetikett).
58 Dell PowerVault ML6000 Erste Schritte
Page 59

1 Modulterminator 2 An Gigabit-Ethernetanschluss
angeschlossenes Ethernetkabel
3 Modul-zu-Modul-Kabel 4 Netzkabel
Einschalten der Bibliothek
1
Schalten Sie den Netzschalter jedes Netzteils ein.
2
Schalten Sie die Hauptstromversorgung der Bibliothek mit dem Schalter
an der Vorderseite des 5U Bibliothek-Steuermoduls ein.
Nach Ende des POST-Tests und der Initialisierung wird auf dem
Bedienfeld der Einrichtungsassistent angezeigt. Dieser Prozess dauert etwa
30 Minuten. Schalten Sie die Bibliothek während dieses Prozesses nicht
aus.
Dell PowerVault ML6000 Erste Schritte 59
Page 60

1 Netzschalter Stromversorgung
Erste Schritte
1
Konfigurieren Sie Ihre Bibliothek mit dem Einrichtungsassistenten.
Einzelheiten hierzu finden Sie im
Library-Benutzerhandbuch
2
Überprüfen Sie, ob jeder Host mit den Bandlaufwerken der Bibliothek
kommunizieren kann. Einzelheiten hierzu finden Sie in der
Dokumentation der Host-Anwendung.
60 Dell PowerVault ML6000 Erste Schritte
.
Dell™ PowerVault™ ML6000 Tape
Page 61

Dell PowerVault ML6000 Οδηγός «Πρώτα Βήματα» (Greek)
ΠΡΟΕΙΔΟΠΟΙΗΣΗ: Πριν από τη σύνδεση των καλωδίων της
βιβλιοθήκης, διαβάστε τον oδηγό πληροφοριών των συστημάτων
Dell™ PowerVault™.
ΠΡΟΕΙΔΟΠΟΙΗΣΗ: Η εγκατάσταση όλων των βιβλιοθηκών πρέπει να
γίνεται σε μεταλλικό φατνίο που διαθέτει ακροδέκτη κύριας
προστατευτικής γείωσης. Για αναλυτικές πληροφορίες σχετικά με την
εγκατάσταση, ανατρέξτε στον Οδηγό χρήσης της βιβλιοθήκης ταινιών
Dell™ PowerVault™ ML6000.
ΠΡΟΕΙΔΟΠΟΙΗΣΗ: Η πρίζα πρέπει να είναι εγκατεστημένη κοντά στον
εξοπλισμό και εύκολα προσπελάσιμη.
ΠΡΟΕΙΔΟΠΟΙΗΣΗ: Ο διακόπτης λειτουργίας στην μπροστινή πλευρά
δεν είναι η κύρια διάταξη αποσύνδεσης. Για να απενεργοποιήσετε
εντελώς τη συσκευή θα πρέπει να αποσυνδέσετε όλα τα κύρια
βύσματα από τις εισόδους.
ΠΡΟΕΙΔΟΠΟΙΗΣΗ: Πριν από τη σύνδεση των καλωδίων της
βιβλιοθήκης, αφαιρέστε όλα τα υλικά της εσωτερικής συσκευασίας.
Πρέπει να αφαιρέσετε την πορτοκαλί διάταξη συγκράτησης του
αυτόματου μηχανισμού που τον στερεώνει στο κάτω μέρος της
βιβλιοθήκης. Επίσης, αφαιρέστε την κίτρινη ταινία του Σταθμού
Εισαγωγής/Εξαγωγής. Φυλάξτε όλα τα υλικά συσκευασίας και την
πορτοκαλί διάταξη συγκράτησης του αυτόματου μηχανισμού για την
περίπτωση που θελήσετε μελλοντικά να μετακινήσετε ή να
μεταφέρετε τη βιβλιοθήκη. Για λεπτομέρειες, ανατρέξτε στις οδηγίες
αποσυσκευασίας που συνοδεύουν τη βιβλιοθήκη, καθώς και στον
Οδηγό χρήσης της βιβλιοθήκης ταινιών Dell™ PowerVault™ ML6000.
Dell PowerVault ML6000 Οδηγός «Πρώτα Βήματα» 61
Page 62

Εγκατάσταση της βιβλιοθήκης σε μεταλλικό φατνίο
Όλες οι βιβλιοθήκες Dell™ PowerVault™ ML6000 πρέπει να εγκαθίστανται σε
μεταλλικό φατνίο. Για οδηγίες, ανατρέξτε στον
ταινιών Dell™ PowerVault™ ML6000
•
Το ML6010 CM είναι μία μονάδα ελέγχου βιβλιοθήκης 5U.
•
Το ML6020 CM αποτελείται από μία (1) μονάδα ελέγχου βιβλιοθήκης 5U
ML6010 CM και μία (1) μονάδα επέκτασης βιβλιοθήκης 9U ML6000 EM
(συνολικά 14U).
•
Το ML6030 CM αποτελείται από μία (1) μονάδα ελέγχου βιβλιοθήκης 5U
ML6010 CM και δύο (2) μονάδες επέκτασης βιβλιοθήκης 9U ML6000 EM
(συνολικά 23U).
.
Οδηγό χρήσης της βιβλιοθήκης
1 Μονάδα ελέγχου βιβλιοθήκης 5U 2 Μονάδα επέκτασης βιβλιοθήκης 9U
62 Dell PowerVault ML6000 Οδηγός «Πρώτα Βήματα»
Page 63

Ειδικές οδηγίες για τις μονάδες ταινίας LTO-5
Προς το παρόν, η βιβλιοθήκη δεν υποστηρίζει τη χρήση των παρακάτω
χαρακτηριστικών σε μονάδες ταινίας LTO-5:
•
Θύρα Ethernet
•
Θύρα 2 σε μονάδες ταινίας διπλής θύρας
Για λεπτομέρειες, ανατρέξτε στις παρακάτω δύο εικόνες.
Μονάδα ταινίας καναλιού οπτικών ινών LTO-5
1 Θύρα Ethernet - μην χρησιμοποιείτε 2 Θύρα καναλιού οπτικών ινών -
χρησιμοποιήστε
Dell PowerVault ML6000 Οδηγός «Πρώτα Βήματα» 63
Page 64

Μονάδα ταινίας SAS LTO-5
1 Θύρα SAS 1 - χρησιμοποιήστε 2 Θύρα SAS 2 - μην χρησιμοποιείτε
3 Θύρα Ethernet - μην χρησιμοποιείτε
Σύνδεση καλωδίων παράλληλου SCSI
Εκτελέστε αυτό το βήμα αν η βιβλιοθήκη περιέχει μονάδες ταινίας παράλληλου
SCSI.
Η σύνδεση των καλωδίων των μονάδων ταινίας SCSI συνιστάται να γίνεται με δύο
τρόπους: μία μονάδα ταινίας ανά δίαυλο SCSI ή δύο μονάδες ταινίας ανά δίαυλο
SCSI.
ΣΗΜΕΙΩΣΗ: Για να αποφύγετε πιθανά προβλήματα απόδοσης, μη
συνδέετε περισσότερες από δύο μονάδες ταινίας ανά δίαυλο SCSI.
Για να συνδέσετε μία μονάδα ταινίας ανά δίαυλο SCSI:
1
Χρησιμοποιήστε ένα SCSI καλώδιο για να συνδέσετε την κάτω θύρα της
μονάδας ταινίας με το κεντρικό σύστημα.
2
Για να τερματίσετε την επάνω θύρα της μονάδας ταινίας τοποθετήστε μια
τερματική διάταξη SCSI.
Για να συνδέσετε δύο μονάδες ταινίας ανά δίαυλο SCSI:
1
Συνδέστε το ένα άκρο του καλωδίου SCSI στην επάνω θύρα SCSI της κάτω
μονάδας ταινίας.
2
Συνδέστε το άλλο άκρο του καλωδίου στην κάτω θύρα SCSI της παραπάνω
μονάδας ταινίας.
64 Dell PowerVault ML6000 Οδηγός «Πρώτα Βήματα»
Page 65

3
Χρησιμοποιήστε ένα άλλο SCSI καλώδιο για να συνδέσετε την κάτω μονάδα
ταινίας του διαύλου SCSI με το κεντρικό σύστημα.
4
Χρησιμοποιήστε μια τερματική διάταξη SCSI για να τερματίσετε την επάνω
μονάδα ταινίας του διαύλου SCSI.
1 Σύνδεση μίας μονάδας ταινίας ανά
δίαυλο SCSI
3 Καλώδιο SCSI προς κεντρικό
υπολογιστή
Dell PowerVault ML6000 Οδηγός «Πρώτα Βήματα» 65
2 Σύνδεση δύο μονάδων ταινίας ανά
δίαυλο SCSI
4 Τερματική διάταξη SCSI
Page 66

Σύνδεση καλωδίων οπτικών ινών σε κεντρικό υπολογιστή ή μεταγωγέα
Εκτελέστε το βήμα αυτό αν η βιβλιοθήκη περιέχει μονάδες ταινίας καναλιού
οπτικών ινών που θα συνδέσετε απευθείας σε έναν κεντρικό υπολογιστή ή ένα
μεταγωγέα.
Χρησιμοποιήστε καλώδια καναλιού οπτικών ινών για να συνδέσετε τον κεντρικό
υπολογιστή (ή το μεταγωγέα) με τη βιβλιοθήκη. Για κάθε μονάδα ταινίας:
1
Συνδέστε το ένα άκρο του καλωδίου καναλιού οπτικών ινών στη θύρα
καναλιού οπτικών ινών της μονάδας ταινίας.
2
Συνδέστε το άλλο άκρο του καλωδίου καναλιού οπτικών ινών στον κεντρικό
υπολογιστή ή το μεταγωγέα.
1 Θύρα καναλιού οπτικών ινών 2 Καλώδιο καναλιού οπτικών ινών
66 Dell PowerVault ML6000 Οδηγός «Πρώτα Βήματα»
Page 67

Σύνδεση καλωδίων καναλιού οπτικών ινών μέσω I/O blade καναλιού οπτικών ινών
Εκτελέστε το βήμα αυτό αν η βιβλιοθήκη περιέχει μονάδες ταινίας καναλιού
οπτικών ινών που θα συνδέετε στον κεντρικό υπολογιστή ή το μεταγωγέα μέσω
I/O blade καναλιού οπτικών ινών.
1
Για κάθε μονάδα ταινίας: Συνδέστε το ένα άκρο του καλωδίου καναλιού
οπτικών ινών στη θύρα καναλιού οπτικών ινών της μονάδας ταινίας.
Συνδέστε το άλλο άκρο του καλωδίου καναλιού οπτικών ινών σε μια θύρα
εκκινητή (κάτω θύρες 3 – 6) στο πλησιέστερο I/O blade καναλιού οπτικών
ινών.
2
Για κάθε I/O blade καναλιού οπτικών ινών: Συνδέστε το ένα άκρο ενός
καλωδίου καναλιού οπτικών ινών σε μία από τις θύρες προορισμού (επάνω
θύρες 1 και 2) του I/O blade καναλιού οπτικών ινών. Συνδέστε το άλλο άκρο
του καλωδίου καναλιού οπτικών ινών στον κεντρικό υπολογιστή ή το
μεταγωγέα.
Χρησιμοποιήστε καλώδια Ethernet για να συνδέσετε το LCB στη μονάδα ελέγχου
βιβλιοθήκης 5U με κάθε μονάδα επέκτασης βιβλιοθήκης 9U που περιέχει ένα I/O
blade καναλιού οπτικών ινών. Για κάθε I/O blade καναλιού οπτικών ινών που είναι
τοποθετημένο σε μια μονάδα επέκτασης βιβλιοθήκης 9U:
3
Συνδέστε το ένα άκρο του καλωδίου Ethernet σε οποιεσδήποτε από τις
τέσσερις μεσαίες θύρες Ethernet του Ethernet διανομέα LCB.
4
Συνδέστε το άλλο άκρο του καλωδίου στην κατάλληλη θύρα της μονάδας
επέκτασης βιβλιοθήκης 9U. Αν το I/O blade καναλιού οπτικών ινών είναι
εγκατεστημένο στην επάνω θέση, χρησιμοποιήστε τη θύρα με τη σήμανση
"UPPER" (Επάνω). Αν το I/O blade καναλιού οπτικών ινών είναι
εγκατεστημένο στην κάτω θέση, χρησιμοποιήστε τη θύρα με τη σήμανση
"LOWER" (Κάτω).
Dell PowerVault ML6000 Οδηγός «Πρώτα Βήματα» 67
Page 68

1 Μεσαίες θύρες Ethernet του LCB 2 I/O blade καναλιού οπτικών ινών
3 Θύρες προορισμού 4 Θύρες εκκινητή
5 Θύρα καναλιού οπτικών ινών 6 Καλώδια Ethernet
7 "UPPER" (Επάνω) και "LOWER"
(Κάτω) θύρες
68 Dell PowerVault ML6000 Οδηγός «Πρώτα Βήματα»
Page 69

Σύνδεση σειριακά συνδεδεμένων καλωδίων SCSI (SAS)
Εκτελέστε το βήμα αυτό αν η βιβλιοθήκη περιέχει SCSI μονάδες ταινίας σειριακά
συνδεδεμένες (SAS).
Χρησιμοποιήστε καλώδια SAS για να συνδέσετε τις μονάδες ταινίας SAS
απευθείας στον κεντρικό υπολογιστή. Για κάθε μονάδα ταινίας:
1
Συνδέστε το ένα άκρο του καλωδίου SAS στη θύρα SAS της μονάδας
ταινίας.
2
Συνδέστε το άλλο άκρο του καλωδίου SAS απευθείας στον κεντρικό
υπολογιστή.
1 Θύρα SAS 2 Καλώδιο SAS
Dell PowerVault ML6000 Οδηγός «Πρώτα Βήματα» 69
Page 70

Ολοκλήρωση της σύνδεσης καλωδίων της βιβλιοθήκης
Όλες οι βιβλιοθήκες πρέπει να χρησιμοποιούν τερματικές διατάξεις μονάδας. Οι
βιβλιοθήκες που αποτελούνται από πολλαπλές μονάδες πρέπει να χρησιμοποιούν
καλώδια για σύνδεση μονάδας με μονάδα.
ΠΡΟΣΟΧΗ: Η τερματική διάταξη μονάδας δεν είναι ίδια με την τερματική
διάταξη SCSI. Η χρήση μιας τερματικής διάταξης SCSI αντί της τερματικής
διάταξης μονάδας μπορεί να προκαλέσει ζημιά στη βιβλιοθήκη. Οι τερματικές
διατάξεις μονάδας βρίσκονται σε μια πλαστική συσκευασία που είναι δεμένη
στο πίσω μέρος της μονάδας ελέγχου βιβλιοθήκης 5U.
1
Αφαιρέστε τα πλαστικά προστατευτικά καλύμματα που καλύπτουν τις
υποδοχές σύνδεσης της μονάδας ελέγχου βιβλιοθήκης 5U και της(ων)
μονάδας(ων) επέκτασης βιβλιοθήκης 9U.
2
Αν χρησιμοποιήσετε τα καλώδια σύνδεσης μονάδας σε μονάδα από το κιτ
εξαρτημάτων, συνδέστε κάθε μονάδα με αυτή που βρίσκεται από πάνω της.
Συνδέστε το ένα άκρο του καλωδίου στην κάτω μονάδα. Κατόπιν, συνδέστε
το άλλο άκρο του καλωδίου στη μονάδα που βρίσκεται από πάνω της.
3
Αν χρησιμοποιήσετε τις τερματικές διατάξεις μονάδας από την πλαστική
συσκευασία που είναι δεμένη στο πίσω μέρος της μονάδας ελέγχου
βιβλιοθήκης 5U, τερματίστε την πρώτη επάνω και την τελευταία κάτω
μονάδα.
4
Συνδέστε ένα καλώδιο Ethernet στην επάνω Ethernet Gigabit θύρα στο blade
ελέγχου βιβλιοθήκης (LCB) για απομακρυσμένη πρόσβαση στη βιβλιοθήκη
μέσω του προγράμματος-πελάτη Web. (Δεν παρέχεται καλώδιο Ethernet.)
5
Για κάθε μονάδα που περιέχει μονάδες ταινίας απαιτείται μία τουλάχιστον
ηλεκτρική παροχή. Για κάθε ηλεκτρική παροχή, συνδέστε το ένα άκρο του
καλωδίου ρεύματος στην ηλεκτρική παροχή. Συνδέστε το άλλο άκρο σε μια
κοντινή γειωμένη πηγή εναλλασσόμενου ρεύματος (του τύπου που
επισημαίνεται στην ετικέτα του προϊόντος).
70 Dell PowerVault ML6000 Οδηγός «Πρώτα Βήματα»
Page 71

1 Τερματική διάταξη μονάδας 2 Καλώδιο Ethernet συνδεδεμένο στην
Ethernet Gigabit θύρα
3 Καλώδιο σύνδεσης μονάδας σε
μονάδα
4 Καλώδια τροφοδοσίας
Ενεργοποίηση της βιβλιοθήκης
1
Ανοίξτε τον διακόπτη λειτουργίας κάθε ηλεκτρικής παροχής.
2
Ανοίξτε την κύρια παροχή τροφοδοσίας της βιβλιοθήκης με το κουμπί
λειτουργίας που βρίσκεται στην μπροστινή πλευρά της μονάδας ελέγχου
βιβλιοθήκης 5U.
Όταν η βιβλιοθήκη ολοκληρώσει τον έλεγχο στην εκκίνηση (POST) και την
προετοιμασία, εμφανίζεται στον πίνακα του χειριστή η οθόνη του Οδηγού
εγκατάστασης. Αυτή η διαδικασία διαρκεί περίπου 30 λεπτά. Μην
απενεργοποιήσετε τη βιβλιοθήκη κατά τη διάρκεια αυτής της διαδικασίας.
Dell PowerVault ML6000 Οδηγός «Πρώτα Βήματα» 71
Page 72

1 Διακόπτης λειτουργίας τροφοδοσίας
Τα πρώτα βήματα
1
Ρυθμίστε τις παραμέτρους της βιβλιοθήκης με τον Οδηγό εγκατάστασης. Για
λεπτομέρειες, ανατρέξτε στον
PowerVault™ ML6000
2
Βεβαιωθείτε ότι κάθε κεντρικός υπολογιστής μπορεί να επικοινωνεί με τις
μονάδες ταινίας της βιβλιοθήκης. Για λεπτομέρειες, ανατρέξτε στην
τεκμηρίωση της εφαρμογής του κεντρικού υπολογιστή.
72 Dell PowerVault ML6000 Οδηγός «Πρώτα Βήματα»
Οδηγό χρήσης της βιβλιοθήκης ταινιών Dell™
.
Page 73

Dell PowerVault ML6000 Pierwsze kroki- instrukcja obsługi (Polish)
OSTRZEŻENIE: Przed podłączeniem biblioteki przeczytaj instrukcję
obsługi produktów systemowych Dell™ PowerVault™.
OSTRZEŻENIE: Wszystkie biblioteki muszą być zainstalowane w
obudowie posiadającej główne zabezpieczenie w postaci uziemienia
terminalu. Szczegóły instalacji znajdują się w Dell™ PowerVault™
ML6000 instrukcja obsługi bibliteki taśmowej.
OSTRZEŻENIE: Gniazdo napięcia zostanie zainstalowane w pobliżu
sprzętu i będzie łatwo dostępne.
OSTRZEŻENIE: Wyłącznik główny znajdujący się na panelu przednim,
nie jest głównym wyłącznikiem urządzenia. Aby wyłączyć urządzenie
całkowicie, należy odłączyć główne wtyczki urządzenia.
OSTRZEŻENIE: Przed podłączeniem biblioteki usuń wszelkie
wewnętrzne elementy pakowania. Upewnij się, że komplet trzymający
pomarańczowego robota, przytwierdza go do spodu biblioteki.
Dodatkowo, usuń żółty pasek stacji I/E. Zachowaj wszelkie elementy
pakowania i komplet trzymający pomarańczowego robota, na
wypadek konieczności transportu lub przemieszczenia biblioteki w
przyszłości. Szczegóły instrukcji rozpakowania znajdują się w
instrukcji obsługi biblioteki taśmowej Dell™ PowerVault™ ML6000.
Dell PowerVault ML6000 Pierwsze kroki- instrukcja obsługi 73
Page 74

Instalacja biblioteki w obudowie
Wszystkie biblioteki Dell™ PowerVault™ ML6000 muszą być zainstalowane w
obudowie. Szczegóły instalacji znajdują się w
instrukcja obsługi bibliteki taśmowej.
• ML6010 CM jest modułem kontroli biblioteki 5U.
• ML6020 CM zawiera jeden (1) ML6010 CM 5U moduł kontroli biblioteki
i jeden (1) ML6000 EM 9U moduł rozszerzenia biblioteki (14U całkowity).
• ML6030 CM zawiera (1) ML6010 CM 5U moduł kontroli biblioteki i
dwa(2) ML6000 EM 9U moduły rozszerzenia biblioteki (23U całkowity).
Dell™ PowerVault™ ML6000
1 5U moduł kontroli biblioteki 2 9U moduł rozszerzenia biblioteki
74 Dell PowerVault ML6000 Pierwsze kroki- instrukcja obsługi
Page 75

Instrukcje specjalne dla napędu taśmowego LTO-5
Aktualnie biblioteka nie wspomaga użytkowania następujących elementów
napędów taśmowych LTO-5:
• Port sieci lokalnej
• Port 2 dla podwójnych napedów ta?mowych
Zwróć uwagę na następujące dwie pozycję aby uzyskać szczegóły.
Napęd taśmowy magistrali szeregowej LTO-5
1 Port sieci lokalnej - nie używać 2 Port magistrali szeregowej - użyć
ten port
Dell PowerVault ML6000 Pierwsze kroki- instrukcja obsługi 75
Page 76

Napęd taśmowy LTO-5 SAS
1 SAS port 1 - użyć ten port 2 SAS port 2 - nie używać
3 Port sieci lokalnej - nie używać
Łączenie paralelne kabli SCSI
Wykonaj ten krok jesli twoja biblioteka zawiera łączenie paralelne napędów
taśmowych SCSI.
Są dwa rekomendowane sposoby podłączenia kabli napędów taśmowych: jeden
napęd taśmowy na SCSI bus lub dwa napędy taśmowe na magistrali SCSI.
UWAGA: Aby uniknąć możliwości problematycznego działania, nie
podłączaj więcej niż dwa napędy taśmowe na SCSI bus.
Aby połączyć jeden napęd na magistrali SCSI:
1
Użyj kabla SCSI do podłączenia portu na spodzie napędu taśmowego do
systemu komputera głównego.
2
Przyłącz terminator SCSI by wyeliminować górny port napędu taśmowego.
Aby połączyć dwa napędy na magistrali SCSI:
1
Podłącz jeden koniec kabla SCSI do górnego portu napędu taśmowego SCSI.
2
Powyżej podłącz drugi koniec kabla do portu na spodzie napędu taśmowego
powyżej SCSI.
76 Dell PowerVault ML6000 Pierwsze kroki- instrukcja obsługi
Page 77

3
Użyj innego kabla SCSI w celu podłączenia spodniego napędu taśmowego
magistrali SCSI do swojego systemu komputera głównego.
4
Użyj terminatora SCSI by wyeliminować górny port napędu taśmowego
magistrali SCSI.
1 Podłączenie jednego napęd
taśmowego na magistrali SCSI
3 Podłączenie kabla SCSI do
komputera głównego
Dell PowerVault ML6000 Pierwsze kroki- instrukcja obsługi 77
2 Łączenie dwóch napędów
taśmowych na magistrali SCSI
4 Terminator SCSI
Page 78

Podłączanie kabli magistrali szeregowej do komputera głównego lub przełącznika
Wykonaj ten krok jesli twoja biblioteka zawiera napędy taśmowe magistrali
szeregowej, które będziesz podłączał bezpośrednio do komputera głównego lub
przełącznika.
Użyj kabli magistrali szeregowej do podłączenia twojego komputera głównego
(lub przełącznika) do biblioteki. Dla każdego napędu taśmowego:
1
Podłącz jeden koniec kabla magistrali szeregowej do portu magistrali
szeregowej napędu taśmowego .
2
Podłącz drugi koniec kabla magistrali szeregowej do swojego komputera
głównego lub przełącznika
1 Port magistrali szeregowej 2 Kabel magistrali szeregowej
78 Dell PowerVault ML6000 Pierwsze kroki- instrukcja obsługi
Page 79

Połącz kable magistrali szeregowej poprzez kasetę I/O magistrali szeregowej
Wykonaj ten krok jeśli twoja biblioteka zawiera napędy taśmowe magistrali
szeregowej, które będziesz łączył ze swoim komputerem głównym lub
przełącznikiem poprzez kasetę I/O magistrali szeregowej.
1
Dla każdego napędu taśmowego: podłącz jeden koniec kabla magistrali
szeregowej z portem magistrali szeregowej napędu taśmowego. Podłącz
drugi koniec kabla magistrali szeregowej do portu inicjacyjnego (niższe
porty 3 – 6) na najbliższej kasecie I/O magistrali szeregowej.
2
Dla każdej kasety I/O magistrali szeregowej: podłącz jeden koniec kabla
magistrali szeregowej z jednym z portów docelowych (wyższe porty 1 i 2) na
kasecie I/O magistrali szeregowej. Połącz drugi koniec kabla magistrali
szeregowej do swojego komputera głównego lub przełącznika
Użyj kabli sieci lokalnej do podłączenia LCB w module kontroli biblioteki 5U, do
każdego modułu rozszerzenia biblioteki 9U, zawierającej kasetę I/O magistrali
szeregowej. Dla każdej zainstalowanej kasety I/O magistrali szeregowej w module
rozszerzenia biblioteki 9U:
3
Połącz jeden koniec kabla sieci lokalnej do którego kolwiek ze środkowych
portów we wnęce sieci lokalnej LCB.
4
Połącz drugi koniec kabla z właściwym portem na module rozszerzenia
biblioteki 9U. Jeśli kaseta l/O magistrali szeregowej jest zainstalowana w
wyższej wnęce, użyj portu oznaczonego jako UPPER (GÓRNY). Jeśli kaseta
l/O Magistrali Szeregowej jest zainstalowana w niższej wnęce, użyj portu z
oznaczeniem LOWER (DOLNY).
Dell PowerVault ML6000 Pierwsze kroki- instrukcja obsługi 79
Page 80

1
Środkowe porty sieci lokalnej LCB
3 Porty docelowe 4 Porty inicjujące
5 Port magistrali szeregowej 6 Kable sieci lokalnej
7 Porty „UPPER” (GÓRNY)
„LOWER” (DOLNY)
2 Kaseta I/O magistrali szeregowej
80 Dell PowerVault ML6000 Pierwsze kroki- instrukcja obsługi
Page 81

Łączenie kabli seryjnie przyłączonych SCSI (SAS)
Wykonaj ten krok, jeśli twoja biblioteka zawiera seryjnie przyłączone napędy
taśmowe SCSI (SAS).
Użyj kabli SAS do połączenia napędów taśmowych SAS bezpośrednio do
komputera głównego.Dla każdego napędu taśmowego:
1
Podłącz jeden koniec kabla SAS do portu SAS napędu taśmowego .
2
Podłącz ten drugi koniec kabla SAS bezpośrednio do komputera głównego.
1 Port SAS 2 Kabel SAS
Dell PowerVault ML6000 Pierwsze kroki- instrukcja obsługi 81
Page 82

Zakończenie podłączenia kabli biblioteki
Wszystkie biblioteki muszą użyć modułu terminatora. Biblioteki zawierające wiele
modułów, muszą użyć kabli łączących moduł z modułem.
OSTRZEŻENIE: Moduł terminatora nie jest tym samym co terminator
SCSI.Używanie terminatora SCSI zamiast modułu terminatora może
spowodować uszkodzenie biblioteki. Moduły terminatorów, są
umieszczone w plastikowym opakowaniu, przymocowanym z tyłu
modułu kontroli biblioteki 5U.
1
Usuń plastikowe ochronne pokrywki, zakrywające łączniki modułów, moduł
kontroli biblioteki 5U i moduł rozszerzenia biblioteki 9U (s).
2
Używanie kabli łączących moduł z modułem z zestawu pomocniczego,
połacz każdy moduł z tym, który jest umieszcczony nad nim. Podłącz jeden
koniec kabla do spodniego modułu. Następnie podłącz ten drugi koniec kabla
z modułem ponad nim.
3
Używanie modułu terminatora z plastikowego opakowania
przytwierdzonego z tyłu modułu kontroli biblioteki, usuwa najwyższy i
najniższy moduł.
4
W celu uzyskania zdalnego dostepu do biblioteki poprzez sieć klienta,
podłącz kabel sieci lokalnej z górnym portem sieci lokalnej Gigabit na
kasecie- (LCB) kontroli biblioteki.(Kable sieci lokalnej nie są dołączone.)
5
Dla każdego modułu zawierającego napędy taśmowe wymagany jest co
najmniej jeden kabel zasilający.Podłącz jeden koniec kabla zasilania do
źródła zasilania dla każdego źródła zasilania prądem. Podłącz ten drugi
koniec kabla do uziemionego źródła zasilania prądem AC (rodzaj prądu
opisany na etykiecie produktu).
82 Dell PowerVault ML6000 Pierwsze kroki- instrukcja obsługi
Page 83

1 Moduł terminatora 2 Podłączony kabel sieci lokalnej
do portu sieci lokalnej Gigabit
3 Kabel łączący moduł z modułem 4 Przewody zasilania
Zasilanie biblioteki
1
Włącz zasilanie poprzez włąccznik zasilania.
2
Włącz główne zasilanie biblioteki, używając włącznika zasilania
umieszczonego z przodu modułu kontroli biblioteki 5U.
Na panelu sterowania, pojawia się ekran kreatora konfiguracji, kiedy
biblioteka zakończyła test POST ("test POST, Wewnętrzny test POST po
włączeniu") i inicjacji. Ten proces może trwać około 30 minut.Nie odłączaj
zasilania biblioteki podczas trwania tego procesu.
Dell PowerVault ML6000 Pierwsze kroki- instrukcja obsługi 83
Page 84

1 Podłącz zasilanie przez
przełącznik zasilania
Rozpoczynając
1
Używając kreatora konfiguracji, skonfiguruj swoją bibliotekę.Szczegóły
instalacji znajdują się w
bibliteki taśmowej.
2
Zweryfikuj czy kązdy host może łączyć się z napędami taśmowymi
biblioteki. Szczegóły znajdują się w twojej dokumentacji aplikacji hosta.
84 Dell PowerVault ML6000 Pierwsze kroki- instrukcja obsługi
Dell™ PowerVault™ ML6000 instrukcja obsługi
Page 85

Dell PowerVault ML6000 Руководство по началу работы (Russian)
ПРЕДУПРЕЖДЕНИЕ! Перед подключением кабелей к библиотеке,
прочитайте справочное руководство по системам Dell™
PowerVault.
ПРЕДУПРЕЖДЕНИЕ! Все библиотеки должны быть установлены в
стойку, имеющую контакт защитного заземления электрической
сети. Подробная информация по установке приведена в
«Руководстве пользователя ленточной библиотеки Dell™
PowerVault™ ML6000».
ПРЕДУПРЕЖДЕНИЕ! Сетевая розетка должна быть установлена в
непосредственной близости к оборудованию, и доступ к ней не
должен вызывать затруднений.
ПРЕДУПРЕЖДЕНИЕ! Выключатель питания на передней панели
не является устройством, обеспечивающим полное отключение
от сети электропитания. Для полного отключения установки
отсоедините все подключенные к ней разъемы сети
электропитания.
ПРЕДУПРЕЖДЕНИЕ! Перед подключением кабелей к библиотеке,
удалите все внутренние элементы упаковки. Убедитесь в том, что
приспособление оранжевого цвета, закрепляющее
автоматический манипулятор к днищу корпуса библиотеки, было
удалено. Кроме того, удалите желтую ленту с установки для
импорта/экспорта. Сохраните все упаковочные материалы,
включая оранжевое приспособление для закрепления
автоматического манипулятора на тот случай, если они
понадобятся в будущем для переноса библиотеки на другое
место или ее транспортировки. Детальная информация изложена
в инструкциях по распаковке, которая поставляется в комплекте с
библиотекой, а также в «Руководстве пользователя ленточной
библиотеки Dell™ PowerVault™ ML6000».
Dell PowerVault ML6000 Руководство по началу работы 85
Page 86

Установка библиотеки в стойку
Все библиотеки Dell™ PowerVault™ ML6000 должны устанавливаться в
стойку. Инструкции по установке приведены в
™
ленточной библиотеки Dell
•
ML6010 CM представляет собой одинарный управляющий модуль
библиотеки, рассчитанный на 5 устройств.
•
ML6020 CM состоит из одного (1) управляющего модуля библиотеки
ML6010 CM, рассчитанного на 5 устройств, и одного (1) модуля
расширения библиотеки ML6000 EM на 9 устройств (итого 14
устройств).
•
ML6030 CM состоит из одного (1) управляющего модуля библиотеки
ML6010 CM, рассчитанного на 5 устройств, и двух (2) модулей
расширения библиотеки ML6000 EM на 9 устройств (итого 23
устройства).
PowerVault™ ML6000
Руководстве пользователя
.
1 Управляющий модуль
библиотеки на 5 устройств
86 Dell PowerVault ML6000 Руководство по началу работы
2 Модуль расширения
библиотеки на 9 устройств
Page 87

Специальные инструкции для стримеров LTO-5
На данный момент библиотека не поддерживает использование следующих
функций на стримерах LTO-5:
•
Порт для подключения к Ethernet
•
Порт 2 на двухпортовых стримерах
Более подробная информация приведена на двух рисунках, размещенных ниже.
Стример LTO-5 с интерфейсом Fibre Channel
1 Порт Ethernet - не использовать 2 Порт Fibre Channel -
использовать данный порт
Dell PowerVault ML6000 Руководство по началу работы 87
Page 88

Стример LTO-5 с интерфейсом SAS
1 SAS-порт 1 - использовать
данный порт
3 Порт Ethernet - не использовать
2 SAS-порт 2 - не использовать
Подключение кабелей с параллельным интерфейсом SCSI
Это действие следует выполнить, если библиотека содержит стримеры с
параллельным интерфейсом SCSI.
Для подключения кабелей к стримерам с интерфейсом SCSI рекомендуется
два способа: по одному стримеру на шину SCSI или по два стримера на шину
SCSI.
ПРИМЕЧАНИЕ. Во избежание возникновения проблем в процессе
эксплуатации не подключайте более двух стримеров к одной шине
SCSI.
При подключении одного стримера к шине SCSI следует:
1
Использовать кабель SCSI для соединения нижнего порта стримера с
основной системой.
2
Установить терминатор SCSI с тем, чтобы заглушить верхний порт
стримера.
88 Dell PowerVault ML6000 Руководство по началу работы
Page 89

При подключении двух стримеров к шине SCSI следует:
1
Подключить один конец кабеля SCSI к верхнему порту SCSI нижнего
стримера.
2
Подключить другой конец кабеля к верхнему порту SCSI верхнего
стримера.
3
Воспользоваться другим кабелем SCSI для соединения нижнего
стримера шины SCSI с основной системой.
4
Воспользоваться терминатором SCSI для того, чтобы заглушить
верхний стример шины SCSI.
1 Подключение одного стримера
к шине SCSI
3 Кабель SCSI к основной
системе
Dell PowerVault ML6000 Руководство по началу работы 89
2 Подключение двух стримеров к
шине SCSI
4 Терминатор SCSI
Page 90

Подключение кабелей Fibre Channel к основной системе или к коммутатору
Это действие следует выполнить, если ваша библиотека имеет стримеры с
интерфейсом Fibre Channel, которые вы намерены непосредственно
подключить к основной системе или к коммутатору.
Воспользуйтесь кабелями Fibre Channel для подключения основной системы
(или коммутатора) к библиотеке. С каждым стримером необходимо
выполнить следующее:
1
Подключить один конец кабеля Fibre Channel к порту Fibre Channel на
стримере.
2
Подключить другой конец кабеля Fibre Channel к основной системе или
к коммутатору.
1 Порт Fibre Channel 2 Кабель Fibre Channel
90 Dell PowerVault ML6000 Руководство по началу работы
Page 91

Подключение кабелей Fibre Channel через блок разъемов ввода/вывода Fibre Channel
Это действие следует выполнить, если ваша библиотека имеет стримеры с
интерфейсом Fibre Channel, которые вы намерены непосредственно
подключить к основной системе или к коммутатору через блок разъемов
ввода/вывода Fibre Channel.
1
Для каждого стримера: подключить один конец кабеля Fibre Channel к
порту Fibre Channel на стримере. Подключить другой конец кабеля Fibre
Channel к клиентскому порту (нижние порты 3 – 6) на ближайшем блоке
разъемов ввода/вывода Fibre Channel.
2
Для каждого блока разъемов ввода/вывода Fibre Channel: подключить
один конец кабеля Fibre Channel к одному из серверных портов (верхние
порты 1 и 2) на блоке разъемов ввода/вывода Fibre Channel. Подключить
другой конец кабеля Fibre Channel к основной системе или к
коммутатору.
Воспользуйтесь кабелем подключения к Ethernet для соединения между
блоком управляющих разъемов на управляющем модуле библиотеки для 5
устройств и каждым из модулей расширения библиотеки на 9 устройств,
имеющим блок разъемов ввода/вывода Fibre Channel. Для каждого блока
разъемов ввода/вывода Fibre Channel, установленного на модуле расширения
библиотеки на 9 устройств:
3
Подключить один конец кабеля Ethernet к любому из четырех средних
портов Ethernet на блоке разъемов Ethernet, имеющихся в составе блока
управляющих разъемов библиотеки.
4
Подключить другой конец кабеля к нужному порту на модуле
расширения библиотеки на 9 устройств. Если блок разъемов
ввода/вывода Fibre Channel установлен в верхнем отсеке, используйте
порт, помеченный как UPPER (ВЕРХНИЙ). Если блок разъемов
ввода/вывода Fibre Channel установлен в нижнем отсеке, используйте
порт, помеченный как LOWER (НИЖНИЙ).
Dell PowerVault ML6000 Руководство по началу работы 91
Page 92

1 Средние порты Ethernet на
блоке управляющих разъемов
библиотеки
3 Серверные порты 4 Клиентские порты
5 Порт Fibre Channel 6 Кабели Ethernet
7 Порты, отмеченные как UPPER
(ВЕРХНИЙ) и LOWER
(НИЖНИЙ)
2 Блок разъемов ввода-вывода
Fibre Channel
92 Dell PowerVault ML6000 Руководство по началу работы
Page 93

Подключение кабелей с последовательным интерфейсом SCSI (SAS)
Это действие следует выполнить, если ваша библиотека имеет стримеры с
последовательным интерфейсом SCSI (SAS).
Воспользуйтесь кабелями SAS для подключения стримеров, имеющих
интерфейс SAS, непосредственно к основной системе. С каждым стримером
необходимо выполнить следующее:
1
Подключить один конец кабеля с интерфейсом SAS к порту SAS на
стримере.
2
Подключить другой конец кабеля с интерфейсом SAS непосредственно
к основной системе.
1 Порт SAS 2 Кабель SAS
Dell PowerVault ML6000 Руководство по началу работы 93
Page 94

Завершение подключения кабелей к библиотеке
Все библиотеки должны иметь терминаторы модулей. Библиотеки,
состоящие из нескольких модулей, должны использовать кабели
межмодульного соединения.
ВНИМАНИЕ! Терминатор модуля отличается от терминатора SCSI.
Применяя терминатор SCSI вместо терминатора модуля, вы
можете вывести библиотеку из строя. Терминаторы модулей
помещаются в пластиковый пакет, который прикрепляется к
тыльной стороне управляющего модуля библиотеки на 5
устройств.
1
Снимите защитные пластиковые колпачки, закрывающие разъемы
управляющего модуля библиотеки на 5 устройств и модуля (модулей)
расширения библиотеки на 9 устройств.
2
Используя кабели межмодульного соединения из комплекта
принадлежностей, подключите каждый модуль к соответствующему
модулю, расположенному над ним. Подключите один конец кабеля к
нижнему модулю. После этого подключите другой конец кабеля к
модулю, расположенному над ним.
3
Используя терминаторы модулей из пластикового пакета,
прикрепленного к тыльной стороне управляющего модуля библиотеки
на 5 устройств, заглушите самый верхний и самый нижний модули.
4
Подключить кабель Ethernet к верхнему порту Gigabit Ethernet на блоке
управляющих разъемов библиотеки (LCB) для удаленного доступа к
библиотеке через веб-клиент. (Кабель Ethernet не входит в комплект
поставки.)
5
Для каждого модуля, имеющего в своем составе стримеры, требуется,
по меньшей мере, один источник питания. На каждом источнике
питания следует подключить один конец шнура питания к этому
источнику. Другой конец следует подключить к ближайшему источнику
переменного тока, имеющему заземление (маркировка типа приведена
на паспортной табличке изделия).
94 Dell PowerVault ML6000 Руководство по началу работы
Page 95

1 Терминатор модуля 2 Кабель Ethernet, подключенный
к порту Gigabit Ethernet
3 Кабель межмодульного
соединения
4 Шнуры питания
Подача электропитания на библиотеку
1
Включить выключатель на каждом блоке питания.
2
Включить питание библиотеки от сети с помощью кнопки питания,
расположенной на передней панели управляющего модуля библиотеки
на 5 устройств.
По завершении самотестирования при включении питания (POST) и
инициализации на панели оператора появится экран мастера установки.
Этот процесс занимает около 30 минут. В ходе его выполнения
запрещается отключать подачу напряжения питания на библиотеку.
Dell PowerVault ML6000 Руководство по началу работы 95
Page 96

1 Выключатель блока питания
Начало работы
1
Используйте мастер установки для настройки конфигурации
библиотеки. Подробная информация приведена в
пользователя ленточной библиотеки
2
Убедитесь в том, что каждая из основных систем может обмениваться
информацией со стримерами библиотеки. Более подробная информация
приведена в документации по применению основных систем.
96 Dell PowerVault ML6000 Руководство по началу работы
Dell™ PowerVault™ ML6000
руководстве
.
Page 97

Guía de inicio de Dell PowerVault ML6000 (Spanish)
ADVERTENCIA: Antes de conectar los cables de la biblioteca, lea la Guía de
información del producto de los sistemas Dell™ PowerVault™.
ADVERTENCIA: Todas las bibliotecas deben estar instaladas en un bastidor con
un terminal principal de protección de conexión a tierra. Para ver información
detallada sobre la instalación, consulte la Guía del usuario de la biblioteca de
cinta Dell™ PowerVault™ ML6000.
ADVERTENCIA: El tomacorriente debe estar cerca de la biblioteca y debe ser
accesible fácilmente.
ADVERTENCIA: El interruptor de encendido del panel frontal no es el dispositivo
principal de desconexión. Retire todas las clavijas principales de las entradas del
aparato para apagarlo completamente.
ADVERTENCIA: Antes de conectar los cables de la biblioteca, retire todo el
embalaje interior. Asegúrese de quitar el conjunto de retención del robot
anaranjado que asegura el robot al piso de la biblioteca. Además, quite la banda
amarilla en la estación de I/E. Guarde todo el material de embalaje y el conjunto
de retención del robot anaranjado en caso de que necesite mover o transportar la
biblioteca en el futuro. Para obtener detalles, consulte las instrucciones de
desembalaje incluidas con la biblioteca y la Guía del usuario de la biblioteca de
cinta Dell™ PowerVault™ ML6000.
Guía de inicio de Dell PowerVault ML6000 97
Page 98

Instalación de la biblioteca en un bastidor
Todas las bibliotecas Dell™ PowerVault™ ML6000 deben instalarse en un
bastidor. Para ver instrucciones, consulte la
cinta Dell™ PowerVault™ ML6000
• El ML6010 CM es un módulo de control de biblioteca único de 5U.
• El ML6020 CM consiste en un (1) módulo de control de biblioteca
ML6010 CM de 5U y un (1) módulo de expansión de biblioteca ML6000
EM de 9U (un total de 14U).
• El ML6030 CM consiste en un (1) módulo de control de biblioteca
ML6010 CM de 5U y dos (2) módulos de expansión de biblioteca ML6000
EM de 9U (un total de 23U).
.
Guía del usuario de la biblioteca de
1
Módulo de control de biblioteca de 5U
2
Módulo de expansión de biblioteca de 9U
Instrucciones especiales para las unidades de cinta LTO-5
Actualmente, la biblioteca de cinta no admite el uso de las siguientes
características en las unidades de cinta LTO-5:
98 Guía de inicio de Dell PowerVault ML6000
Page 99

• Puerto Ethernet
• Puerto 2 en las unidades de cinta de doble puerto
Consulte las dos figuras a continuación para obtener detalles.
Unidad de cinta LTO-5 Fibre Channel
1 Puerto Ethernet, no lo utilice 2 Puerto Fibre Channel, utilice este
puerto
Unidad de cinta LTO-5 SAS
1 Puerto SAS 1, utilice este puerto 2 Puerto SAS 2, no lo utilice
3 Puerto Ethernet, no lo utilice
Guía de inicio de Dell PowerVault ML6000 99
Page 100

Conexión de cables SCSI paralelos
Ejecute este paso si la biblioteca tiene unidades de cinta SCSI paralelas.
Hay dos maneras recomendables para conectar unidades de cinta SCSI: una
unidad de cinta por bus SCSI o dos unidades de cinta por bus SCSI.
NOTA: Para evitar posibles problemas de rendimiento, no conecte más de dos
unidades de cinta por cada bus SCSI.
Para conectar una unidad de cinta por bus SCSI:
1
Utilice un cable SCSI para conectar el puerto inferior de la unidad de cinta
al sistema host.
2
Conecte un terminador SCSI para dar terminación al puerto superior de la
unidad de cinta.
Para conectar dos unidades de cinta por cada bus SCSI:
1
Conecte un extremo del cable SCSI al puerto SCSI superior de la unidad
de cinta inferior.
2
Conecte el otro extremo del cable SCSI al puerto SCSI inferior de la
unidad de cinta superior.
3
Utilice un segundo cable SCSI para conectar la unidad de cinta inferior del
bus SCSI al sistema host.
4
Utilice un terminador SCSI para dar terminación a la unidad de cinta
superior del bus SCSI.
100 Guía de inicio de Dell PowerVault ML6000
 Loading...