

Page 1

Dell™ PowerVault™ 715N Systems
Installing the Broadcom®
NetXtreme™ 10/100/1000
Network Adapter Card
D^L
www.dell.com | support.dell.com
Page 2

Notes, Notices, and Cautions
^ NOTE: A NOTE indicates important information that heips you make better use of your computer.
O NOTICE: A NOTICE indicates either potentiai damage to hardware or ioss of data and teiis you
how to avoid the probiem.
/i\ CAUTION: A CAUTION indicates a potential for property damage, personal injury,
or death.
Information in this document is subject to change without notice.
© 2002 Dell Computer Corporation. All rights reserved.
Reproduction in any manner whatsoever without the written permission of Dell Computer Corporation is strictly
forbidden.
Trademarks used in this text: Dell, the DELL logo, and PowerVaultare trademarks of Dell Computer Corporation;
Broadcom is a registered trademark and NetXtreme is a trademark of Broadcom Corporation; and Microsoft and
Windows are registered trademarks of Microsoft Corporation.
Other trademarks and trade names may be used in this document to refer to either the entities claiming the marks and
names or their products. Dell Computer Corporation disclaims any proprietary interest in trademarks and trade names
other than its own.
March 2002 P/N 4P280 Rev. AOl
Page 3

The Broadcom® NetXtreme™ 10/100/1000 network adapter card enables you to connect
your system to a Gigabit Ethernet network. This card incorporates technology that transfers
data at a maximum rate of one gigabit per second.
This document contains the following sections:
• Installing the adapter card
• Removing the adapter card
• Updating drivers
Installing the Adapter Card
The system has the capacity for one, low-profile PCI expansion card (see "Installing an
Expansion Card" in your Installation and Troubleshooting Guide).
CAUTION: Before you perform this procedure, you must turn off the system and
A
disconnect it from its power source. For more information, see "Safety First—For
You and Your System" in "Troubleshooting Your System" in your Installation and
Troubleshooting Guide.
1 Turn off the system, including any attached peripherals, and disconnect the system
from the electrical outlet.
2 Remove the cover (see "Removing and Replacing the System Cover" in your
Installation and Troubleshooting Guide).
/K CAUTION: See "Protecting Against Electrostatic Discharge" in the safety
instructions in your System Information Aozumeni.
3 Open the expansion-card latch and remove the filler bracket.
O NOTICE: Keep this bracket in case you need to remove the expansion card. Instaiiing a fiiier
bracket over an empty expansion siot is necessary to maintain Federai Communications
Commission (FCC) certification of the system. The brackets aiso keep dust and dirt out of the
system and aid in proper cooiing and airfiow inside the system.
- Without removing the riser card, insert the card-edge connector firmly into the
expansion-card connector on the riser card until the card is fully seated
(see Figure 1-1).
5 Close the expansion-card latch (see Figure 1-1).
Instaiiing the Adapter Card | 1-1
Page 4
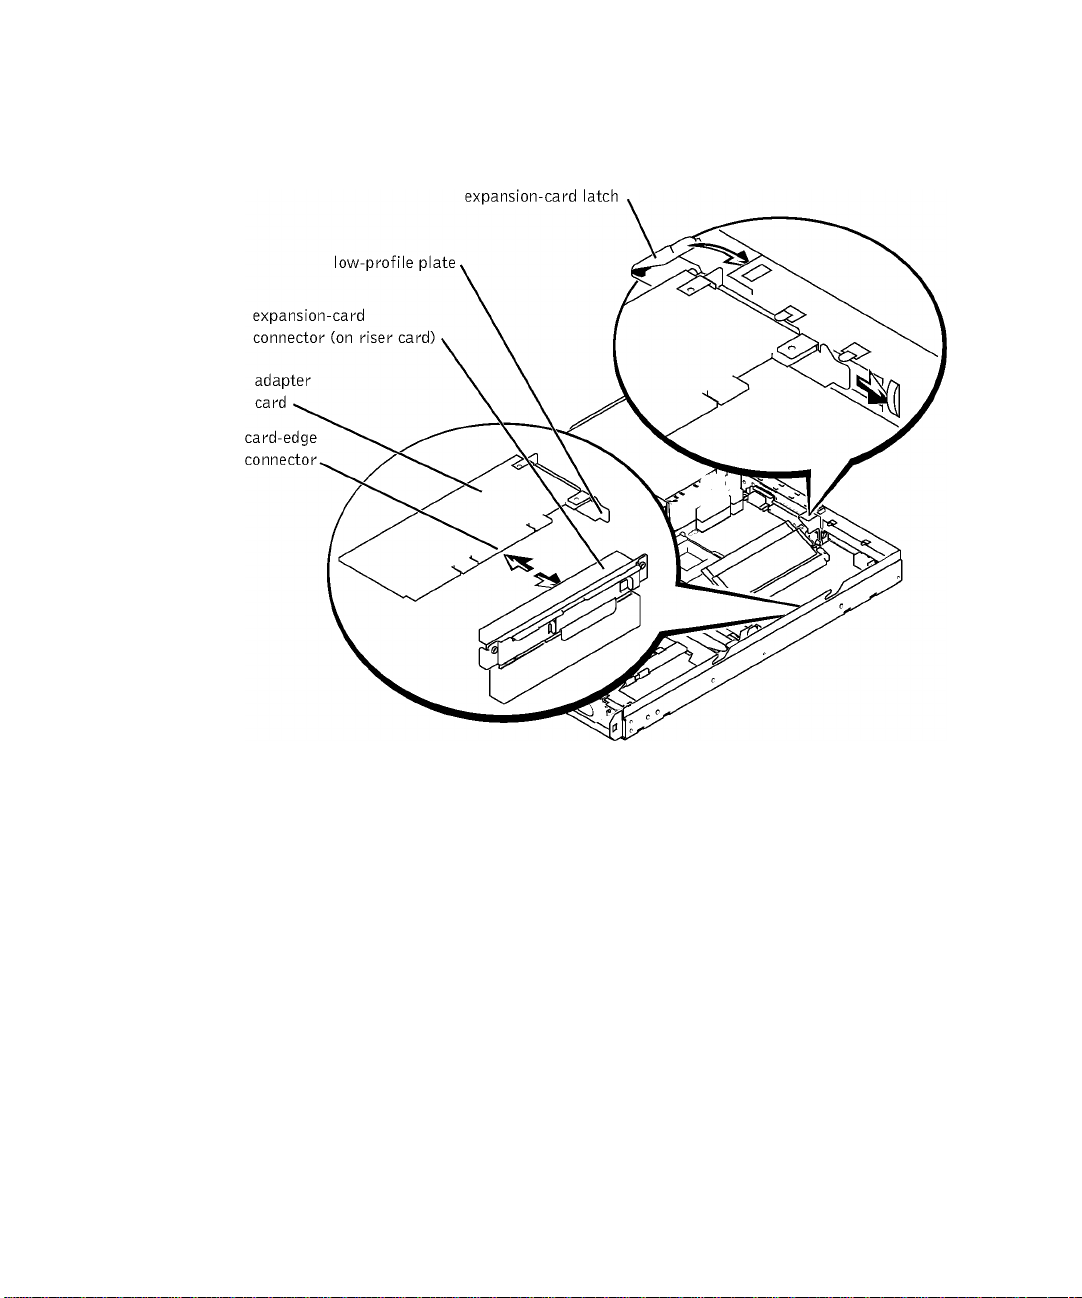
Figure 1-1. Installing the Adapter Card
6 Replace the system cover, and then reconnect the system and peripherals to a power
source.
7 Connect an Ethernet cable to the card’s connector on the outside of the system.
8 Turn on the system.
1-2 I Installing the Adapter Card
Page 5

Removing the Adapter Card
CAUTION: Before you perform this procedure, you must turn off the system and
A
disconnect it from its power source. For more information, see "Safety First—For
You and Your System" in "Troubleshooting Your System" in your Installation and
Troubleshooting Guide.
1 Turn off the system, ineluding any attaehed peripherals, and diseonneet the system
from the eleetrieal outlet.
2 Diseonneet any eables eonneeted to the eard.
3 Remove the eover (see "Removing and Replaeing the System Cover" in your
Installation and Troubleshooting Guide).
- Open the expansion-eard lateh.
5 Grasp the expansion eard and earefully pull it away from the riser-eard eonneetor (see
Figure 1-1).
6 If you are removing the eard permanently, install a metal filler braeket over the empty
eard-slot opening.
NOTICE: Install Ing a filler bracket over an empty expansion slot Is necessary to maintain
Federal Communications Commission (FCC) certification of the system. The brackets also keep
dust and dirt out of the system and aid in proper cooling and airflow inside the system.
7 Close the expansion-eard lateh.
8 Replaee the system eover, and then reeonneet the system and peripherals to a power
souree and turn on the system.
Updating Drivers
^ NOTE: When you install the Broadcom NetXtreme 10/100/1000 adapter card, your system
automatically Installs the device drivers. If you need to update your device drivers, perform the
steps in this section.
Beeause the system does not use a monitor, keyboard, or diskette drive, you must update its
deviee drivers from a Mierosoft® Windows® operating system-based elient system on the
network. To update the system’s drivers, you must first eopy the deviee drivers to the
network attaehed storage (NAS) system and then update them using Terminal Serviees.
^ NOTE: See the Dell | Support website at support.dell.com for the latest driver updates for your
card.
Installing the Adapter Card | 1-3
Page 6

Copying Drivers to the NAS System
Before updating your drivers, perform the following steps to eopy the drivers to your NAS
system:
1 Using a web browser, eonneet to the Dell™ PowerVault™ NAS Manager and ereate a
share on the NAS system (see your System Administrator’s Guide).
2 From a Windows 2000 elient system, map the share you ereated in step 1. Perform the
following substeps to map the share.
^ NOTE: If you are using a Windows-based ciient system other than Windows 2000, see your
operating system documentation for information about how to map and disconnect a
network drive.
a Right-eliek My Computer and seleet Map Network Drive.
b Speeify the drive letter and folder for the eonneetion and eliek OK.
c Enter the name of the NAS system and the name of the share you ereated in
step 1 and eliek OK.
d In the Map Network Drive window, eliek different user name.
The Connect As... window is displayed.
e Enter a user name and password to eonneet to a NAS aeeount with administrator
privileges.
f Cliek OK.
g Cliek Finish.
3 Copy the latest drivers from support.dell.com to the share.
- Diseonneet the share from the elient.
a Right-eliek My Computer and seleet Disconnect Network Drive.
b Seleet the share that you want to diseonneet and eliek OK.
Updating Your NAS System’s Drivers
1 Conneet to the PowerVault NAS Manager.
2 Cliek Maintenance, and then eliek Terminal Services.
3 Cliek Terminal Services and log onto a NAS aeeount with administrator privileges.
- On the Advanced Administration Menu under System Management, eliek Computer
Management.
1-- I Instaiiing the Adapter Card
Page 7

5 Click Computer Management in the left pane.
6 Click System Tools in the left pane.
7 Click Deviee Manager in the left pane.
8 Click Network adapters in the right pane.
9 Right-click Broadeom NetXtreme Gigabit Ethernet and select Properties.
The Broadeom NetXtreme Gigabit Ethernet Properties window is displayed.
10 Click the Driver tab.
11 Click Update Driver.
The Upgrade Device Driver Wizard is displayed.
Click Next.12
Click the radio button next to Seareh for a suitable driver for my deviee
13
(reeommended)) and then click Next.
14
In Optional seareh loeations, click the check box for Speeify a loeation and deselect
the other check boxes.
Click Next.
15
The Upgrade Device Driver Wizard is displayed.
16
Specify the folder name that contains the device drivers in the path for Copy
manufaeturer's files from.
Click OK, and then click Next.
17
The Upgrade Device Driver Wizard searches the specified folder for the driver files.
18 Click Finish.
19 Click Close to exit the driver properties dialog box.
^ NOTE: Some systems may need to be restarted to complete the driver upgrade. If prompted,
restart your system.
Installing the Adapter Card | 1-5
Page 8

1-6 I Install I ng the Adapter Card
Page 9

Dell™ PowerVault™ 715N
Broadcom® NetXtreme
10/100/1000
TM
D^L
www.dell.com | support.dell.com
Page 10

:£^ :£,&TH-s-i=i
A
© 2002 Dell Computer Corporationo
A&
Dell Computer Corporation liMi'i rJ,
Delk DELL Sfein PowerVault ^ Dell Computer Corporation LbiillK: Broadcom di Broadcom
Corporation NetXtreme diSiillK: Microsoft iB Windows di Microsoft Corporation 0tj?i®ii|4K=
Corporation
2002 — 3 . P/N 4P280 Rev. A01
w ] m - Dell Computer
Page 11

w w w . d e l l . c o m | s u p p o r t . d e l l . c o m
Ж
d $ i
A £ )
И
Ж
t í
№
Й н :
t H ^
$ 1
è .|ig
ш
^
^ S
s: d$i
о ^
о ^
°
^
о 1
1— \l£_i
Е as3
CD
ё
¥:
^ Ж
(й S
о
о
га if
2 Î
CÜ
Щ.
Ж
Ж
ш
Ж
V-
fn
-к
f- f^ ^
^ ^ ^
-1-м да Ы
^ «
lì /
fr s
о
■# I
« J
- fe
is il
íK «f
Sí #â
S
Ж
лЗш
зп:
ЛГ
I*
If
te if
te ^
5®
да ®
|l
S
K*
f'
_U SS*=5i
®
Ш
Üa JJ?
il
Ш
#
is
г
сЗ
о_
ш
“v’
■|Ь
И“ ífe
<-
П-D
Ш
-I-M
Ж
tH^
Ж
TÍ
tí :=
{■K SS fr fr "O
if Г
Ж
s
да
fr f
tf
i I
ЛГ
tî
I I
if
да fr
"
tfr
S -
fe
ж
■fr S
^ fr
® $
dm ^
-K- rr
Й I
. 1 1 1 » 1 - ^
ж
^ fr
Й ®
■да
^ f r
f r f r
•tf
fr
S
-I-M
Ж
fr S
fr
•Ш
lE
fr]
tî
if
fr
E
fr
fr Üa
да il
Ш
^ЩД
-llin
i
if
|i
O
frfr
fr fr
Jlin fr
¡5
s 4П
да Ш
if
fr
fr
fr
O fr
fr fr
Щ fr
fr fr
fr
■да
fr
fr fr
Π|m
fr fr
fr |f
fr
fr tm-j
fr -fr
Ш
fr
fefr
fr
fr
fr
fr
fr
fr
Щ
fr
fr
™5 да
fr Ж
fr S
ÏS fr
fr ®
fr Щ
Ш
Çf
fr Stt
fr fr
'fr tí
Щ
if
fr SE
fr fr
да
ж
Ш
fr
fr
fr
s
fr
fr
fr
fr
fr
lim
fr
fr
fr
Ж
Й fr
fr\ fr
fr- Ш
^ Ifr
- #
fr- ^
vfr dfr
fr fr
® if
fr fr-
fr
Ж
fr
fr
fr-
fr
fr
fr
fn
Page 12
№
Ш
www.dell.com | support.dell.com
т(г
^ )i^í # Ш| -т\
^ -тЬ
^ № hr
y[l'
Л 3ÍÍ Щ
f m
м ^
№
&5?
sirr fïH'
ä ®
Щ
at
~пт
¥
шр
а
3
№
"ПЛ
ан
Ж'
- - Е>®
,1гг п1> ^ •
а жг Diï
è ”
at.
S is
^ ®3 т1т
/Ты. ^ ^
№
ÍK
Ш?
at W
3
ж ^
F+Î
Ш
Ш »i
Ш Щ
Ж\
Jrr ííS
[№ = ®
Щ S -r>i
1 щ
3
№
ш?
ЩЬ
^s=.
sg
Ss
Ù
(&
îl
#
м
ЙЕ ''
ш
ru
Щ Ф ш
^ л S
Ж\ ^ Ж'
^ л ^
° [№
ЛЫ>
&5?
№
Ш? п1\
Ж1 м
3 ш
Ш Й5
“Ж
ш и
ж ш
^ fÿf
° ш?
ítíf Жт ¡Йн
Ш)Ж н
а
1Ы». ‘
да
ж
ìffi
ш
ги
'т\г
»
Page 13

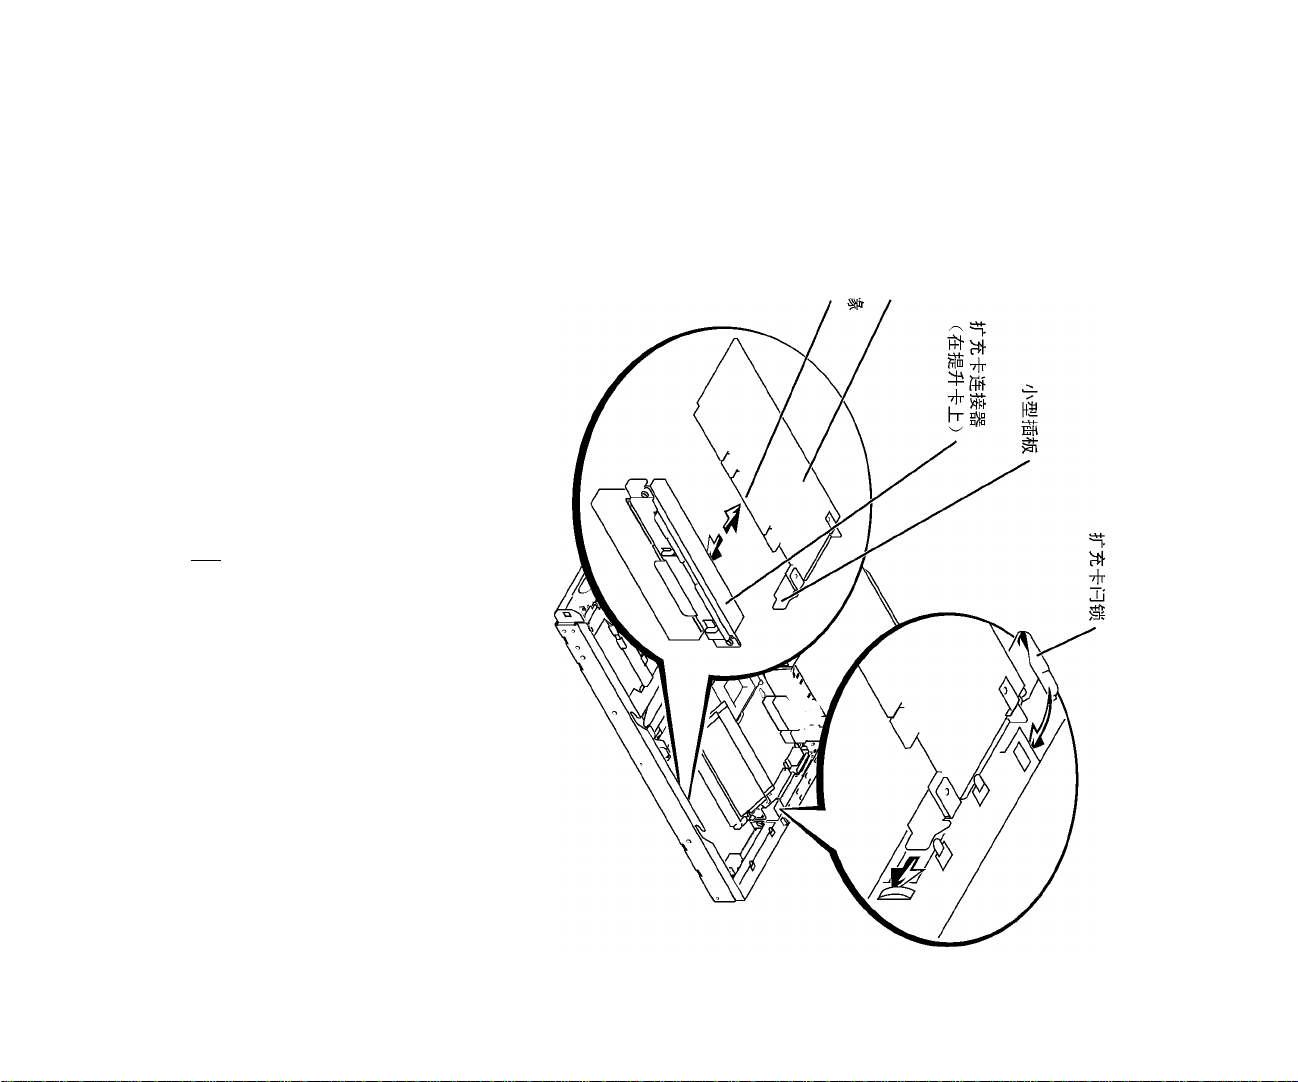
5 (0МШ2-1) о
о )Ш: ШШШШШЖШШШЖШГ
й«о жшшмтгтш'Ш'тттж.
7 ^±rЙ^7Hljí^«
8 ^[1]±#1Ж. ШЖЖШо
^ ;i: Broadcom NetXtreme 10/100/1000 3SЙЕН?ffif.
Ж ШЖ ё ЖЖ ШЖ Ж Ш ЖШ Жо
ш шш жш ш ш тт ,
ш шш жш л т ш, @Ж Ш ‘Ш Ш Шт ± ШЖ
Ш пй о т® ш шш шр ш ж шж шж 1 шш т то шш ж ш тт ш ж,
Ш ЖШ " ё1 Ж ШЖ 1 Ш) ¥Ж Ф ]Ж Щ Ш ШШ ^ Ш
fro
^ ;i: if t№ Dell I Support Web ЙН support.dell.com,
(NAS)
гй'
Ж Ш,
^Н{£Д Terminal Services iftff JE
Ш ШШ ЖЖ Ш Ж Ш- ^ ШШ ЖШ Ж Ж Шо
Microsoft®
шт^швжтш. NAS rnrn
NAS
шжшшттжшш'1т&.гш, шштт!
1 fiM Web Dell™ PowerVault™ NAS Manager, NAS
(if#® (mmmrnmm ) =
2 # Windows 2000 1
0^, mmmypm.
^ ;i: HUiStiH## Windows Windows 2000, if#|SJfS№#ifiH
0j3t#, 7m^MuH№ifTWrHiiftrammimmnM..
a # “My Computer” if # “Map Network Drive”
b “OK” (i|^) o
Ж Ш:
/шЖ
c 1 “OK”
(il^) o
ЖШШШЖ I 2-3
Page 14

d i4 “Map Network Drive” ®ni'> “different user name”
o
“ConnectAs...” ®Do
f ^ftr “OK” (il^) o
g ^ftr “Finish” (^t^) o
3 # support.deii.com ^’Ö^SfrSK^ü/iÄiijlJSÄ^S^c.
a i4 “My Computer” (^ötiffeifö) if# “Disconnect Network
Drive” (i?JFW^®g(i^) o
b “OK” (il^) o
NAS
1 PowerVault NAS Managero
2 “Maintenance” “Terminai Services” =
3 “Terminai Services” , NAS
4 i4 “System Management” TW “Advanced Administration Menu” (M
“Computer Management” (Tf^tHWS) »
2-4 I
5 “Computer Management” (Tf^tHWS) »
6 “System Toois” (^^XJT) „
7 “Device Manager” (i5#WS^) »
8 “Network adapters” »
9 X “Broadcom NetXtreme Gigabit Ethernet” (Broadcom NetXtreme XjlfeföÖlicH) -t
“Properties” (S14)
FÄ" ‘Broadcom NetXtreme Gigabit Ethernet Properties’'
10 i(!-X “Driver” (®g!iiE)i)
11 “Update Driver” (Hir^SiiiEli) o
(Broadcom NetXtreme
“ Upgrade Device Driver Wizard ” (1^4 )
Page 15

12 “Next” (T^i^) o
13 “Search for a suitable driver for my device (recommended)”
[iftSp “Next” (T-i^) o
14 i4 “Optional search locations” “Specify a location” (f§
15 ig* “Next” (T^i^) o
“ Upgrade Device Driver Wizard ” (|n] -^) o
16 i4 “Copy manufacturer's files from”
17 ig* “OK” (il^) , “Next” (T^i^) o
“Upgrade Device Driver Wizard”
‘MMXiUff'Xfr o
18 ig* “Finish” (^1^) o
19 “Close” (^Kl) , MtiiSKzafSpsMttXgiStgo
^ ;i: xxxmxmsxmmiBxxmxmmmxxmo mmmiBXM
xrn^mx I 2-5
Page 16

№
Ш
т(г
www.dell.com | support.dell.com
Page 17

Systèmes Dell™ PowerVault™ 715N
Installation de la carte
adaptateur réseau Broadcom®
NetXtreme^ 10/100/1000
D^L
www.dell.com | support.dell.com
Page 18

Remarques, mises en garde et avertissements
^ REMAROUE : UNE REMARQUE indique une information importante destinée à vous aider à
mieux utiiiser votre ordinateur.
MISE EN GARDE : UNE MISE EN GARDE indique un dommage potentiei pouvant survenir
(ou une perte de données) et vous dit comment éviter ie probième.
/t\ ATTENTION : Le message ATTENTION indique une situation potentiellement
dangereuse qui, si elle n'est pas évitée, peut provoquer une blessure mineure ou
modérée.
Les informations fournies dans ce document sont susceptibles d'être modifiées sans préavis.
© 2002 Dell Computer Corporation. Tous droits réservés.
La reproduction de ce document de quelque manière que ce soit sans l'autorisation écrite de Dell Computer Corporation
est strictement interdite.
Marques déposées utilisées dans ce guide : Dell, le logo DELL et PowerVaultsont des marques de Dell Computer
Corporation ; Broadcom est une marque déposée et NetXtreme est une marque de Broadcom Corporation ; et Microsoft
et Windows sont des marques déposées de Microsoft Corporation.
Toutes les autres marques déposées et noms de marques utilisés dans ce document se rapportent aux sociétés
propriétaires des marques et des noms de ces produits. Dell Computer Corporation décline tout intérêt dans l'utilisation
des marques déposées et des noms de marques ne lui appartenant pas.
Mars 2002 Réf. 4P280 Rév. AOl
Page 19

La carte adaptateur Broadcom® NetXtreme™ 10/100/1000 vous permet de connecter votre
système à un réseau Gigabit Ethernet. Cette carte intègre une technologie qui permet de
transférer les données à une vitesse maximum d'un gigabit par seconde.
Ce document contient les sections suivantes :
• Installation de la carte adaptateur
• Retrait de la carte adaptateur
• Mise à jour des pilotes
Installation de la carte adaptateur
Le système peut accueillir une carte d'extension PCI ultra-plate (reportez-vous à la section
“Installation d'une carte d'extension” dans le Guide d'installation et de dépannage).
ATTENTION : Avant d'exécuter cette procédure, vous devez mettre le système
A
hors tension et le débrancher de sa source d'alimentation électrique. Pour plus
d’information, reportez-vous à la section “La sécurité avant tout—Pour vous et
votre ordinateur” dans la partie “Dépannage du système” du Guide
d’installation et de dépannage.
1 Mettez le système hors tension, y compris les périphériques qui lui sont connectés,
puis débranchez-le du secteur.
2 Retirez le capot (reportez-vous à “Retrait et remise en place du capot du système”
dans le Guide d'installation et de dépannage).
/K ATTENTION : Reportez-vous à la section “Protection contre les décharges
électrostatiques” dans les instructions de sécurité du document Informations sur
le système.
3 Ouvrez le loquet de la carte d'extension et retirez le support du cache.
MISE EN GARDE : Conservez ce support au cas où vous devriez retirer ia carte d'extension.
L'instaiiation d'un support de cache par-dessus un connecteur d'extension inoccupé est nécessaire
pour conserver i'homoiogation FCC (Federai Communications Commission) du système. Le
support empêche en outre ia poussière et ies impuretés de pénétrer dans ie système et faciiite une
ventiiation et une circuiation de i'air correctes.
5 Sans retirer la carte de montage (carte riser), insérez fermement le connecteur situé à
l'extrémité de la carte dans le connecteur de la carte d'extension sur la carte de
montage, jusqu'à enclenchement de la carte
(voir la Figure 3-1).
5 Fermez le loquet de la carte d'extension (voir la Figure 3-1).
Instaiiation de ia carte adaptateur | 3-1
Page 20
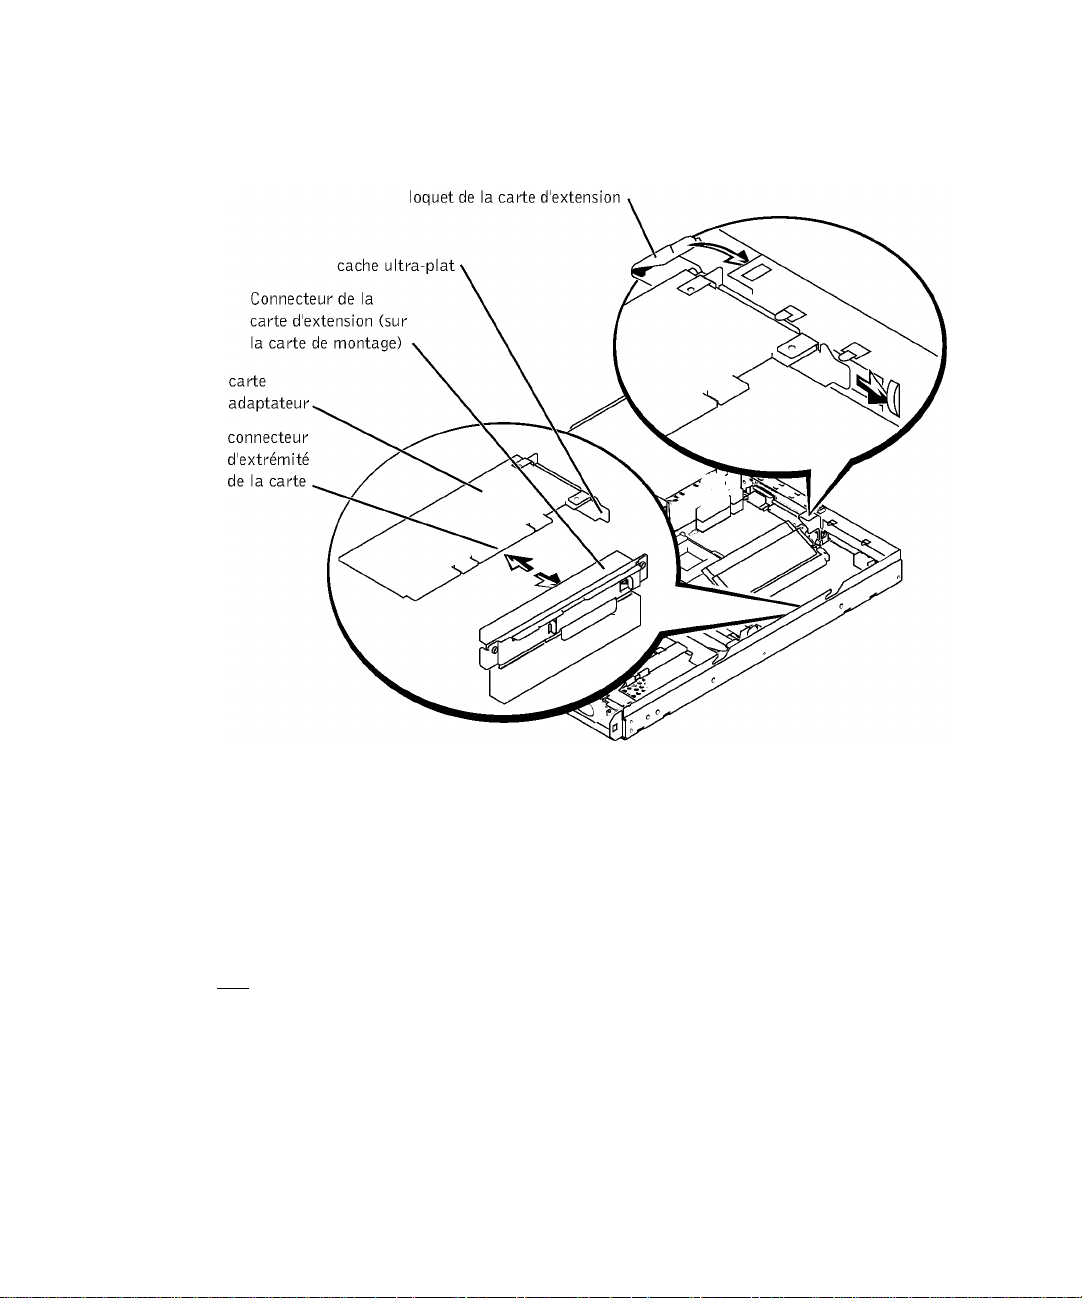
Figure 3-1. Installation de la carte adaptateur
6 Remettez en plaee le eapot du système, puis rebranehez le système et ses
périphériques sur une souree d'alimentation éleetrique.
7 Conneetez un eâble Ethernet au eonneeteur de la earte à l'extérieur du système.
8 Mettez le système sous tension.
Retraitde la carte adaptateur
/t\ ATTENTION : Avant d'exécuter cette procédure, vous devez mettre le système
hors tension et le débrancher de sa source d'alimentation électrique. Pour plus
d’information, reportez-vous à la section “La sécurité avant tout—Pour vous et
votre ordinateur” dans la partie “Dépannage du système” du Guide
d’installation et de dépannage.
1 Mettez le système hors tension, y eompris les périphériques qui lui sont eonneetés,
puis débranehez-le du seeteur.
3-2 I Installation de la carte adaptateur
Page 21

2 Débranchez les câbles connectés à la carte.
3 Retirez le capot (reportez-vous à “Retrait et remise en place du capot du système”
dans le Guide d'installation et de dépannage).
5 Ouvrez le loquet de la carte d'extension.
5 Saisissez la carte d'extension et écartez-la avec précaution du connecteur de la carte de
montage (voir la Figure 3-1).
6 Si vous retirez définitivement la carte, installez un support de cache métallique par
dessus l'ouverture vide du connecteur de carte.
MISE EN GARDE : L'installation d'un support de cache par-dessus un connecteur d'extension
inoccupé est nécessaire pour conserver l'homologation FCC (Federal Communications
Commission) du système. Le support empêche en outre la poussière et les impuretés de pénétrer
dans le système et facilite une ventilation et une circulation de l'air correctes.
7 Fermez le loquet de la carte d'extension.
8 Remettez en place le capot du système, rebranchez le système et les périphériques sur
le secteur, puis mettez le système sous tension.
Mise à jour des pilotes
^ REMARGUE : Lorsque vous installez la carte adaptateur Nroadcom NetXtreme 10/100/1000,
votre système installe automatiquement les pilotes de périphériques. Si vous avez besoin de
mettre à jour les pilotes de périphériques, procédez comme indiqué dans cette section.
Comme le système n'utilise pas de moniteur, de clavier ou de lecteur de disquette, vous
devez mettre à jour ses pilotes de périphériques à partir d'un client Microsoft® Windows®
sur le réseau. Pour mettre à jour les pilotes du système, vous devez d'abord copier les pilotes
de périphérique sur le système NAS (network attached storage), puis les mettre à jour avec
Terminal Services.
^ REMARGUE : Vous pouvez vous procurer les dernières mises à niveau des pilotes sur le site
Web Dell | Support, support.dell.com
Copie des pilotes sur le système NAS
Avant de mettre à jour les pilotes, procédez comme suit pour copier les pilotes sur votre
système NAS :
1 A l'aide d'un navigateur Web, connectez vous à Dell™ PowerVault™ NAS Manager et
créez un partage sur le système NAS (reportez-vous au Guide de l'administrateur de
votre système).
Installation de la carte adaptateur | 3-3
Page 22

2 A partir d'un système client Windows 2000, mappez le partage créé à l'étape 1. Pour ce
faire, procédez comme suit.
^ REMAROUE : Si vous utilisez un système client Windows autre que Windows 2000,
reportez-vous à la documentation de votre système d'exploitation pour savoir comment
mapper et déconnecter un lecteur réseau.
a Cliquez avec le bouton droit de la souris sur Poste de travail et sélectionnez
Connecter un lecteur réseau.
b Indiquez la lettre du lecteur et le dossier de la connexion, puis cliquez sur OK.
c Entrez le nom du système NAS et le nom du partage créé à l'étape 1, puis cliquez
sur OK.
d Dans la fenêtre Connecter un lecteur réseau, cliquez sur un autre nom
d'utilisateur.
La fenêtre Se connecter en tant que... s'affiche.
e Entrez un nom d'utilisateur et un mot de passe pour vous connecter à un compte
NAS avec les privilèges de l'administrateur.
f Cliquez sur OK.
g Cliquez sur Terminer.
3 Copiez les pilotes les plus récents à partir du site support.dell.com vers le partage.
5 Déconnectez le partage du client.
a Cliquez avec le bouton droit de la souris sur Poste de travail et sélectionnez
Déconnecter un lecteur réseau.
b Sélectionnez le partage à déconnecter et cliquez sur OK.
Mise à jour des pilotes de votre système NAS
1 Connectez vous à PowerVault NAS Manager.
2 Cliquez sur Maintenance, puis sur Terminal Services.
3 Cliquez sur Terminal Services et connectez-vous à un compte NAS avec les privilèges
de l'administrateur.
5 Dans le menu Advanced Administration (Administration avancée) sous System
Management (Gestion du système), cliquez sur Computer Management (Gestion de
l'ordinateur).
5 Cliquez sur Computer Management (Gestion de l'ordinateur) dans le volet gauche.
3-5 I Installation de la carte adaptateur
Page 23

6 Cliquez sur System Tools (Outils système) dans le volet gauehe.
7 Cliquez sur Device Manager (Gestionnaire de périphérique) dans le volet gauehe.
8 Cliquez sur Network adapters (Cartes adaptateur réseau) dans le volet droit.
9 Cliquez avee le bouton droit de la souris sur Broadcom NetXtreme Gigabit Ethernet
et séleetionnez Propriétés.
La fenêtre Broadcom NetXtreme Gigabit Ethernet Properties (Propriétés de la carte
Broadcom NetXtreme Gigabit Ethernet) s'affiehe.
10 Cliquez sur l'onglet Driver (Pilote).
11 Cliquez sur Update Driver (Mettre à jour le pilote).
L'assistant de mise à jour de pilote de périphérique s'affiehe.
12 Cliquez sur Suivant.
13 Cliquez sur le bouton d'option en faee de Search for a suitable driver for my device
(recommended) (Rechercher un pilote pour mon périphérique (recommandé)), puis
eliquez sur Next (Suivant).
15 Dans Optional search locations (Autres emplacements de recherche), eoehez la ease
eorrespondant à Specify a location (Préciser un emplacement) et eoehez les autres
eases.
15 Cliquez sur Suivant.
L'assistant de mise à jour de pilote de périphérique s'affiehe.
16 Indiquez le nom du dossier eontenant les pilotes du périphérique dans le ehemin
d'aeeès de Copy manufacturer's files from (Copier les fichiers du fabricant à partir
de).
17 Cliquez sur OK, puis sur Next (Suivant).
L'Assistant de mise à jour de pilote de périphérique reeherehe les fiehiers du pilote
dans le dossier indiqué.
18 Cliquez sur Terminer.
19 Cliquez sur Close (Fermer) pour quitter la boîte de dialogue des propriétés du pilote.
^ REMAROUE : Certains systèmes doivent être redémarrés pour que ia mise à niveau du piiote
soit appiiquée. Si vous y êtes invité, redémarrez votre système.
Instaiiation de ia carte adaptateur | 3-5
Page 24

3-6 I Installation de la carte adaptateur
Page 25

Dell™ PowerVault™ 715N Systeme
Installation der Broadcom®
NetXtreme™ 10/100/1000
Netzadapterkarte
D^L
www.dell.com | support.dell.com
Page 26

Hinweis, Bitte Beachten und Vorsicht
^ HINWEIS: Ein HINWEIS enthält wichtige Informationen, mit deren Hilfe Sie Ihren Computer
besser nutzen können.
O BITTE BEACHTEN: BITTE BEACHTEN weist auf eine mögliche Beschädigung von Hardware
oder den Verlust von Daten hin und beschreibt, wie dieses Problem vermieden werden kann.
/t\ VORSICHT: VORSICHT weist darauf hin, dass Gefahr für einen Sachschaden,
Personenschaden oder Lebensgefahr besteht.
Die in diesem Dokument enthaltenen Informationen können ohne Vorankündigung geändert werden.
© 2002 Dell Computer Corporation. Alle Rechte Vorbehalten.
Eine Reproduktion dieses Dokuments in jeglicher Form ist nur mit vorheriger schriftlicher Genehmigung der Dell
Computer Corporation erlaubt.
Die in diesem Text verwendeten Warenzeichen: Dell, das DELL-&ogo und PowerVaultsind Warenzeichen der Dell
Computer Corporation; Broadcom'\st ein eingetragenes Warenzeichen und NetXtreme'\st ein Warenzeichen der
Broadcom Corporation; Microsoft und Windows sind eingetragene Warenzeichen der Microsoft Corporation.
Andere in diesem Dokument möglicherweise verwendete Warenzeichen und Handelsbezeichnungen sind unter
Umständen Marken und / amen der entsprechenden Firmen oder ihrer Produkte. Die Dell Computer Corporation erhebt
keinen Anspruch auf Warenzeichen oder Handelsnamen mit Ausnahme ihrer eigenen.
März 2002 P/N 4P280 Rev. AOl
Page 27

Mit der Broadcom® NetXtreme™ 10/100/1000 Netzadapterkarte können Sie Ihr System an
ein Gigabit Ethernet-Netzwerk anschließen. Mit dieser Karte können pro Sekunde bis zu
einem Gigabit Daten übertragen werden.
Dieses Dokument enthält die folgenden Abschnitte:
• Installation der Adapterkarte
• Entfernen der Adapterkarte
• Aktualisierung der Treiber
Installation der Adapterkarte
Das System ist für eine Low-Profile-PCI-Erweiterungskarte ausgelegt (siehe „Installation
einer Erweiterungskarte“ in der Anleitung zur Installation und Fehlersuche).
VORSICHT: Schalten Sie zunächst das System aus und unterbrechen Sie die
A
Stromzufuhr. Weitere Informationen finden Sie unter „Sicherheit geht vor - für
Sie und das System“ im Abschnitt „Fehlersuche im System“ in der Anleitung zur
Installation und Fehlersuche.
1 Schalten Sie das System sowie sämtliche angeschlossenen Peripheriegeräte aus und
unterbrechen Sie die Stromzufuhr.
2 Entfernen Sie die Systemabdeckung (siehe „Entfernen und Ersetzen der
Systemabdeckung“ in der Anleitung zur Installation und Fehlersuche).
/K VORSICHT: Siehe „Schutz vor elektrostatischer Entladung“ in den
Sicherheitshinweisen im Dokument Systeminformation.
3 Offnen Sie die Verriegelung und nehmen Sie die Abdeckschiene ab.
O BITTE BEACHTEN: Heben Sied iese Schiene für den Faii auf, dass Sie die Erweiterungskarte
entfernen müssen. Übereinen ieeren Erweiterungssteckpiatz muss eine Abdeckschiene
instaiiiert werden, sonst eriischt das FCC-Zertifikat (Federai Communications Commission) des
Systems. Die Schienen haiten außerdem Staub und Schmutz vom System fern und unterstützen
die ordnungsgemäße Kühiung und den Luftaustausch im System.
4 Schieben Sie, ohne die Riser-Karte zu entfernen, den Randstecker der Karte fest in
den Erweiterungskarten-Anschluss auf der Riser-Karte, bis sie vollständig mit dem
Sockel verbunden ist. (Siehe Abbildung 4-1).
5 Schließen Sie die Verriegelung für den Erweiterungskarten-Steckplatz (siehe
Abbildung 4-1).
Instaiiation der Adapterkarte | 4-1
Page 28

Abbildung 4-1. Installation der Adapterkarte
Verriegelung des
Erweiterungskarten-
6 Bringen Sie die Systemabdeekung wieder an und sehließen Sie das System und die
Peripheriegeräte wieder an die Stromversorgung an.
7 Sehließen Sie ein Ethernet-Kabel an den Kartensteeker auf der Außenseite des
Systems an.
8 Sehalten Sie das System ein.
Entfernen der Adapterkarte
/t\ VORSICHT: Schalten Sie zunächst das System aus und unterbrechen Sie die
Stromzufuhr. Weitere Informationen finden Sie unter „Sicherheit geht vor - für
Sie und das System“ im Abschnitt „Fehlersuche in Ihrem System“ der Anleitung
zur Installation und Fehlersuche.
1 Sehalten Sie das System sowie sämtliehe angesehlossenen Peripheriegeräte aus und
unterbreehen Sie die Stromzufuhr.
4-2 I Installation der Adapterkarte
Page 29

2 Entfernen Sie alle Kabel, die an die Karte angesehlossen sind.
3 Entfernen Sie die Systemabdeekung (siehe „Entfernen und Ersetzen der
Systemabdeekung“ in der Anleitung zur Installation und Fehlersuche).
4 Offnen Sie die Verriegelung für den Eweiterungskarten-Steekplatz.
5 Ziehen Sie die Erweiterungskarte vorsiehtig vom Steeker der Riser-Karte ab. (Siehe
Abbildung 4-1.)
6 Wenn Sie die Karte dauerhaft entfernen, müssen Sie eine Abdeeksehiene über der
leeren Kartensteekplatz-Offnung installieren.
0 BITTE BEACHTEN: Über einen leeren Erweiterungssteckplatz muss eine Abdeckschiene
installiert werden, sonst erlischt das FCC-Zertifikat (Federal Communications Commission) des
Systems. Die Schienen halten außerdem Staub und Schmutz vom System fern und unterstützen
die ordnungsgemäße Kühlung und den Luftaustausch im System.
7 Sehließen Sie die Verriegelung für den Erweiterungskarten-Steekplatz.
8 Bringen Sie die Computerabdeekung wieder an, sehließen Sie das System und die
Peripheriegeräte an die Stromversorgung an und sehalten Sie das System ein.
Aktualisierung der Treiber
^ HINWEIS: Wenn Sie die Broadcom NetXtreme 10/100/1000 Adapterkarte installieren,
werden in Ihrem System automatisch auch die Gerätetreiber installiert. Wenn Sie die
Gerätetreiber aktualisieren müssen, gehen Sie dazu wie in diesem Abschnitt beschrieben vor.
Weil das System über keinen Monitor, keine Tastatur und kein Diskettenlaufwerk verfügt,
müssen Sie die zugehörigen Gerätetreiber von einem Client-System mit Mierosoft®
Windows® im Netzwerk aus aktualisieren. Um die Treiber des Systems zu aktualisieren,
müssen Sie die Gerätetreiber zunäehst in ein angesehlossenes Speiehersystem (Network
Attaehed Storage, NAS) kopieren und sie dann über Terminal Serviees aktualisieren.
^ HINWEIS: Auf der Dell | Support Website unter support.dell.com finden Sie die neuesten
Treiber-Updates für Ihre Karte.
Kopieren der Treiber in das NAS-System
Bevor Sie Ihre Treiber aktualisieren, kopieren Sie die Treiber wie folgt in Ihr NAS-System:
1 Rufen Sie über einen Browser den Dell™ PowerVault™ NAS Manager auf und riehten
Sie auf dem NAS-System eine Freigabe ein (siehe Systemadministratorhandbuch).
Installation der Adapterkarte | 4-3
Page 30

Bilden Sie die in Sehritt 1 eingeriehtete Freigabe von einem Client-System unter
Windows 2000 ab. Führen Sie zum Abbilden der Freigabe folgende Teilsehritte aus.
^ HINWEIS: Wenn sie ein anderes Windows-Ciient-System ais Windows 2000 verwenden,
finden Sie die Anweisungen zum Abbiiden und Trennen eines Netziaufwerks in der
Dokumentation Ihres Betriebssystems.
a Klieken Sie mit der reehten Maustaste auf den Arbeitsplatz und wählen Sie
Netzlaufwerk zuordnen.
b Geben Sie den Laufwerksbuehstaben und den Ordner für die Verbindung an und
klieken Sie auf OK.
c Geben Sie den Namen des NAS-Systems und der in Sehritt 1 eingeriehteten
Freigabe ein und klieken Sie auf OK.
d Klieken Sie im Fenster Netzlaufwerk zuordnen auf Anderer Benutzername.
Das Fenster Verbinden als: wird eingeblendet.
e Geben Sie einen Benutzernamen und ein Passwort für ein NAS-Aeeount ein
(keine Administratorprivilegien erforderlieh).
f Klieken Sie auf OK.
g Klieken Sie auf Fertig stellen.
Kopieren Sie die aktuellen Treiber von support.dell.com auf die Freigabe.
Trennen Sie die Freigabe vom Client.
a Klieken Sie mit der reehten Maustaste auf den Arbeitsplatz und wählen Sie
Netzlaufwerk trennen.
b Wählen Sie die Freigabe, die Sie trennen möehten, und klieken Sie auf OK.
Aktualisierung der Treiber für Ihr NAS-System
1 Rufen Sie den PowerVault NAS Manager auf.
2 Klieken Sie auf Maintenance und dann auf Terminal Services (Terminaldienste).
3 Klieken Sie auf Terminal Services und melden Sie sieh an einem NAS-Aeeount mit
Administratorprivilegien an.
4 Klieken Sie im Menü Advanced Administration unter System Management auf
Computer Management (Computerverwaltung).
5 Klieken Sie im linken Fensteraussehnitt auf Computer Managaement.
6 Klieken Sie im linken Fensteraussehnitt auf System Tools (Systemprogramme).
4-4 I Instaiiation der Adapterkarte
Page 31

7 Klicken Sie im linken Fensterausschnitt auf Device Manager (Gerätemanager).
8 Klicken Sie im rechten Fensterbereich auf Network adapters (Netzwerkadapter).
9 Klicken Sie mit der rechten Maustaste auf Broadcom NetXtreme Gigabit Ethernet
und wählen Sie Properties (Eigenschaften).
Das Fenster Broadcom NetXtreme Gigabit Ethernet Properties wird eingeblendet.
10 Klicken Sie auf die Registerkarte Driver (Treiber).
11 Klicken Sie auf Update Driver (Treiber aktualisieren).
Der Assistent Upgrade Device Driver Wizard wird angezeigt.
12 Klicken Sie auf Weiter.
13 Klicken Sie auf das Optionsfeld neben Nach einem passenden Treiber für das Gerät
suchen (empfohlen) und dann auf Weiter.
14 Markieren Sie unter Optional search locations (Andere Quellen für die Suche) das
Kontrollkästchen Specify a location (Quelle angeben) und deaktivieren Sie die
übrigen Kontrollkästchen.
15 Klicken Sie auf Weiter.
Der Assistent Upgrade Device Driver Wizard wird angezeigt.
16 Geben Sie im Pfad unter Copy manufacturer’s files from (Herstellerdateien kopieren
von) den Namen des Ordners an, der die Gerätetreiber enthält.
17 Klicken Sie auf OK und dann auf Weiter.
Der Upgrade Device Driver Wizard (Assistent zum Aktualisieren von Gerätetreibern)
durchsucht den angegebenen Ordner nach den Treiberdateien.
18 Klicken Sie auf Eertig stellen.
19 Klicken Sie auf Schließen, um das Dialogfeld mit den Treibereigenschaften zu
verlassen.
^ HINWEIS: Manche Systeme müssen neu gestartet werden, um das Treiber-Upgrade zu
beenden. Wenn Sie dazu aufgefordert werden, starten Sie Ihr System neu.
Instaiiation der Adapterkarte | 4-5
Page 32

4-6 I Installation der Adapterkarte
Page 33

Dell™ PowerVault™ 715N
Broadcom® NetXtreme™
10/100/1000
D^L
www.dell.com | support.dell.com
Page 34

Sr 05® 7-5 fc sò ® Sr ii 07 b T V i S 7o
m:£b.
A
© 2002 Dell Computer Corporation
Dell Computer Corporation
7®Xffi!è^X®S#$X%®X & DeП^ DELL n(^ PowerVault H Dell Computer Corporation ®#$X
7o Broadcom H Broadcom Corporation ®)S#$X+,^ NetXtreme —ft®#$X7o Microsoft 7 7/
Windows H Microsoft Corporation ®)S#$X7o
**xH.0sx2ux344567®#$7x/8a9:ffi!ènx®s;<:s,sT:.
$>8tt9H^ —@ Dell Computer Corporation XAS7Sfe®XH+,SCD„
2002 ^ 3 ^ P/N 4P280 Rev. A01
ms®#
Page 35

Broadcom® NetXtreme™ 10/100/1000 —
Gigabit ) Ethernet —
$,S&1/'®(—^)*+$,—T§.^/0i—$2ffl3T5S
To
6T®8^93>T<=>T5STo
• TTT^T—^'®?D@A
• TTT^T—^'®?DB3
• ^'yDE®TyT(—b
; $,H1 PCI JKT—bT 1 LMA?D@A§"iNTTST
( Olnstallation and Troubleshooting GuideJ®rjKT—b'®?D@AjT#T )o
^ : il0T)ii^S&3&'5il3{c> '>7.TA0®}!S^igi'TM*3< 3>-fe>h;5>e.®}!S3-b
V^X 3 V^o i¥SHiCy) V^X (i> ^Installation and Troubleshooting GuideJ] 0 TJ/
XTA0hy-.^/-T0>1J0r34K567X08*J^#M<X<"#^„
1 9XTGUTV9XTGX^^W>T5§Txt#MZ[\#]^T_D, 9
XTG#]^'—bTn>8>b=6bTSTo
2 TE—T?DB3ST ( Olnstallation and Troubleshooting GuideJ#r9XTGT
E—#?bB3i?b@AjT#T )o
»S: r9XTA1flBJl X:na.r;l/0 rg^(ci3ffiVHTc/c</c3&0iT*J 0
^#MEX</c3Vt„
3 JKT—byyCTdT,efy—gyhybT?DB3STo
O }±,s:30TyTy HT Si:®:i/-bXirx0TT±lTXil9Xf*t=L.Xi5ViX<T3Vy
XJ— b^T'lXO bfl't ‘DblXt'i/^t'ijA'jilX D y h iClT, 9XXA0 Federal Communications
Commission (FCC) 34X#567X. 8 9y-TyTy bX®D#T:;<*=0 >
To TyTybXK. 0X12?@0ABCD3D0SAXG$&O. 0X12?H0
ij-klmnoxpt:«rs=d>To
4 yTiT—bT?DBWTTo T—bXy1nT99TyTiT—b#JK
T—bnT99T3i = bimA3oOPT$qrSST ( 0 5-1 ST )o
5 JKT—bCyTTUVST ( 0 5-1 ST )o
7TT9*-b0®D#T I 5-1
Page 36

5-1.
6 9X.GiMZ[\®]^n-^'$n>8>b
fcWtrSSTo
7 9X.G®BWfcyT5§*—^'®'^^^fc Ethernet h—gZ$^^3STo
8 9X.G#]M^A>^To
1 9X.Gfc^^W>T5§TxT#MZ[\#]^$
_iT,9X.G#]^n—E'$n>8>E = ab^STo
2 *—E'fc^^W>T5§h—gZ$TxT?DB3STo
5-2 I 7^y^*-E'0®D#^
: il0^)ii^§&3&-5il3{c> '>7.7A0®}!S^igi'-fMy> 3 >-fe> h;5>e.®}!S3-E
i¥SHiC'OV^Xii> ^Installation and Troubleshooting Guide J] 0 TJ/
X7A0h,-.^/-70>1J0r34K567T08*J^#M<T<"#^„
Page 37

3 ( OInstallation and Troubleshooting GuideJ®r9X.G^
E-®?DBbi?D@Aj$#T )o
4 JK*—^'C^C$d^STo
5 JKЛ-^'${I^CDiЛ-^'п^^^=6}~Ш<^^b^ST ( 0 5-1 S
T )o
6 ^5T5§JK0O^b®dn^fc^M®
efC—gCh^b$?D@ASTo
О }±,Ш : H^/0^D#ltenTVifj;Vii!i:®Xn'7 Ь{сй. ^>X5^ЛЮ Federal
Communications Commission (FCC) IS nj $ Tt Й iC, Z> Л V — ~J’ V ^ "J b Sr i]X D # I't -5
;<*=D>To 0Xi2?@®ABCSSD®SA^G$&O. 0
Xi2?H®IJ—KLMNO^®^:QRS=D>To
7 JK*—^'c0C§UVSTo
8 9A.GAE—§?D@AT,
fcW3rS,]^§A>STo
\^^^Л07уУ-г—Ь
^ t : Broadcom NetXtreme 10/100/1000 Ty y°^^— H SriiX K> fj'l'f ?> ¿, A/'iA A H /7 A
/'NKgfiMiCd'>A h-ASnSAo S®Ag03 >®AliK. AV'nA A H /t®
7^AT-h*;<A-a6S^Ab$>Ao
9A.Gfc$AAA, (fAh0b^'CDgN^^W>T5S^Ao
"Afcq, 9A.G®(EDA^'CDE®T0y(-b$, AAbA-A'A
Microsoft® Windows® '" "-.f >• 9A.G — -AAA CD 7>b AA.GA'I
5STo 9A.G®^'CDE$T0D(-bT§^^$, (EDA^'CDE^Sj
Network Attached Storage (NAS) 9A .G ' A— 3T=a, Terminal Services
TT0D(-b3STo
^ : S^ffiffl®C-HAi№bAHCD/'N®7'7CV-hf
Web CD h support.jp.dell.com AHilSL'T "n AD VA
15$ТЙ. Dell | Support
NAS
^'CDE§7 0A(—ЬT§MA^ NAS 9
'A—bSTo
1 Web gcCi=6 Dell™ PowerVault™ NAS Manager NAS
b^#ecZ7$#—bST ( OSystem Administrator's GuideJ $STbT<M
W5 )o
, b^'cDEè
7DCCC-H®®D#D I 5-3
Page 38

2 Windows 2000 1
hb — 7 ^'CDgfc^D^TSTo hb — 7 ^'CDgfc^
D^T§fc$,6T®¥®fc^5STo
iWindows 2000 Windows —X b btcb yb 7 7 h 7Xy'7^'Sibi7
?>iMZU. Z'^b-y-y >X"bXy-7coy-y7JU^0mi-T7'y hb-X HXd'
3STo
b ^CDgZ.'7tmm^exZ^^t^‘Z3X. OK ^^Uy^bSTo
c NAS 9X7G#^mtZm 1 7\7—3tzZ'^exZ^#^m^XZ3X.
OK ^^Uy^bSTo
d
^y VV~X Fy^^0^O^Tbf ; FbT\
Uy^bSTo
^rn^m^bxm
e NAS T*b>Fb
l#№®T'^^T§fcq0^-i-€bAxy- F $
A^bSTo
f OK S^Uy^bSTo
g #7S^Uy^bSTo
3 support.jp.dell.com =6,F'yDE0TyA(—F^SAWe^ZAb'A—b
STo
4 7yDT>F=6A#e^ZA$_№bSTo
a 77n>Ka — ^$^7Uy7b, 7yF7—^Fy7A0%&$S^bS
To
b _№T§A#e^ZA$S^bT, ok $7Uy7bSTo
NAS >XxA0K77A'07yyx—F
1 PowerVault NAS Manager b^^bSTo
2 Maintenance $7Uy7b, Terminal Services $7Uy7bSTo
3 Terminal Services $7Uy7bT, NAS TAbbFbWS^^^AUA'bb
STo
5-4 I 7AA7*-F®®D#b
Page 39

4 System Management # Advanced Administration Menu — ^0'S
5 £#n^ZT'n>Ka — ^0'a$^U^^3STo
6 £0n^ZT')*+,-—.$^U^^3STo
7 £0n^ZT'/0^*^^ — l2$^U^^3STo
8 *0n^ZT'^^h7—^r45^$^U^^3STo
9 Broadcom NetXtreme Gigabit Ethernet '567 + 8
STo
Broadcom NetXtreme Gigabit Ethernet 0 50 7+8 5H5N^^ W>S
To
10 F5T7 + 5T^U8^3STo
11 F5T709:T^U8^3STo
+7T+FCT70T855"-F58i-FN^+W>STo
12 ;<T^U8^3STo
13 +7T*=>®^F5T7S@AT§( CD ) 0^0CiTT+>T^U8^
3, ;<T^U8^3STo
14
l^0G5)3>T, ^^T^T+x8^T8^TT^U8^3, T0ffi
0+X8^T8^T0S^T^^3STo
15 ;<T^U8^3STo
+7T+FCT70T8553-F58i-FN^+W>STo
16 1JK05MT.0OK—KT', +7T+FCD7NAiT5§e8Z507
TT^TLSTo
17 OK T^U8^3, ;<T^U8^3STo
FTfi-Fö, ^TW>5e8Z5TFC(ED TFCD70T8553 ^
D7e7TZT^^3STo
18
N7T^U8^3STo
19
O3§T7U873,FCDE5n7+85DTn5587TTU3STo
^ 5t : — nP®>^X+AT'(ä, H37/'N®T'753*3—HSrT7T-5Täö3>^X+A®pi
5 -5 ±1TT5 Ö 5To fffHS]+ ^73 ffiaTT -5 5 n 35 h TAT355
+ .3X+25ffS»3T<&3$o
55555-H®®Ö#T I 5-5
Page 40

<л
I
o>
0
Ч-
www.dell.com | s u p p о г t. d e 11. с о m
Page 41

Dell™ PowerVault™ 715N А\^Щ
Broadcom® NetXtreme
Ю/ЮО/ЮОО
ЯН
тм
D^L
www.dell.com | support.dell.com
Page 42

ш
О ^£|AHi : =^5]aH>^ §>Hi^)<^5] ^-^¿- i£^ cH^lH]- -f^-a i^^Sr ,
¿>15] «Т: ^^1^ Hj-^1 % г^ Hj-Hj^ ^
A ^^^ ■ t^S7>^t!: 4’S'l: •T-Si7> $J-§-^ .
^ 44^ 4^ 4 ^444.
© 2002 Dell Computer Corporation. )*+ ^4 ,— .
Dell Computer Corporation ^ 44 44 44 444 444SH 44 4!4# $% 4'( )*44 . /041 234 56 7 Dell, DELL S; < PowerVault # Dell Computer Corporation 4 5S444 -
Broadcom D Broadcom Corporation 4 E4 564G NetXtreme D Broadcom Corporation 4
564 + 4 - Microsoft < Windows # Microsoft Corporation 4 564 +4 -
NO P24 6+4 P20 S# !T% 4044 XY 4Z 56R 5i\ . /0414 23] 36
_'+4 - Dell Computer Corporation D 224 Cd"; _# 56 444 4Z fg 52 56 <
5601 hY 444 Cdi6 43% kl 64 + 4-
2002. 3 0 P/N 4P280 Rev. A01
Page 43

Broadcom® NetXtreme™ 10/100/1000 ^1
1 45 6789 5!;8 67=7 48!
)*
)-
t@! )A5=.
^2
B CDE$7 =7G HI JK! lm
• !54 =9 CO
• !54 =9 PQ
• 9=!S T5!H
= 9
67 1 53 9V W9XY PCI ]H =9-
cd
56 CD03> r]H =9 COj hi).
A
1
2
A
^ 4^7 7^=4 65 690 096 667 06 S97 6455 63=.
=56 !"# <%& ' () 5* %+0>= /096 () 5*j5 12 " 46
)5 — ="=7 893= 467 ==< " 7 =>=?0@ .
096G 096$ 6'
PQhUOV.
W58 PQ=U09(aCO b
/0 374j hi).
: A $096 6B %+0>= 46 0D5 12 /664 E6 EOj7
=>=?0@.
]= =9 5O8 Zq {I 95=8 PQ=U09 .
Ik im 80HO8 pq 6r st9$4 =968
:d 5
)A./n
CDd>3 r=
OS
)8=='aCO b
96 W5 PQ b
: =9 =H7 745= H 87$ 53=! ! 95=7 9=5 700" .
!$%& FCCCederal Communications Commission) 897 74=4= 33 H
=h 7A B$ CD 95=7 805= E3 = . 95=7 09%$ =44 7344
Lm 44O44 LPQ 9R5S= 09% 5P3 747 8=04 06 797
74E43.
4
=!4 =9< PQ=0 Cq =9 $0 4534 =!4 =9$ )7 ]4 =
464$ 46= hhC 5=0 66= =3 69=09 (9= 6-1 hi).
5
]6 =9 5O< 69=09 (9= 6-1 hi).
3%4 4H 80 I 6-1
Page 44

05
ГО
п:й
vyi.
in 1>- 1>-
ГД
(Й Й й
iü й 1>-
й
rlr
о
1-Ö
Й
(Й
■ Й
Й,
й
[Ир
й
[Чр
^П
й
Й
й
ЙЙНН
(ИЕ й 12
I Й ■■
фФЙ
У Гр oÜ
Й А '“1®
о'Е Й
Й M.'I
^ ÍlH-
й Ì й
Г-2. л —'
1-Ö
пр ^ Г^
Й
й
й
^йй
5, “■ й
*р
Й
й
f |> t
1Р
l'O 1?
Ы
■ -71Й
Й
й
rl-JJ
й
1Р
V
^ Hl
^ Id
^r^Œ
Г^й
E>^
ng
Ш
r| [ E
Ф
^
Ф
nr|
rí|
Й
www.dell.com | support.dell.com
u
DE
> >
ф
Й pm
Й Й
[4p >0
Й rir
Й 41
Й ^
Й
iÜ
o
Й
VÄ
H>
2.
SS
jü
4j
ш
ÉL
»■
Page 45

3 WU< (<CO b cd CDE>3 WU PQ b
/b xvbj hi).
4 ]h hH yo< ™ubv.
5 ]h hH< h hi R!h hH b bb $E ibib d hhubv (ib 6-i
hi).
6 hH< bhbii PQhbb, bb )P ]h PP bp$ hP {| idbP
COhUbV.
© ^£|AHi: FCC (Federal Communications Commission) 89P mbPbh
bb bi hh PP bd Rb adbP hbbh hbh. idbh uixi7>
Pbj; lm ndo;; lpq iRdST !$% up& wxp ps![ \]
PPP :;Ebh.
7 ]h hH yo< hiUbv.
8 bid WU< /b X' /h bidG nohOP 6r$ /b %&hq
bibb hhP lubv.
^ ^ : Broadcom NetXtreme 10/100/1000 bbb RiP Pbhh biXP
Rb HRbbP bbhbh. hb ihbbP bdbsbh hi bpdi b hPb
pqp rshbb".
bid! ibb , bPH ii bib HR!}< R_Rb RR dP$ RiRa$
)P Microsoft® Windows® '! dd RR PR!!i bidd! hO HR!R<
Td!ih! ?./. bidb HR!b< Td!iRRR Vb NAS(Nnetwork
Attached Storage) bidd hO HR!R< RRh /h bRR bRiP R_R!
Td!ih! ?./ .
^ ^ : Rib bh iR*lRP Rd^lihRR support.dell.com Ra1-o];e&|]7]
Dell I Support P hihdb A .
NAS A\±m(^
HR!b< Td!iRR 6d /h hd^
^dh! NAS bidd HR!b-
PRRUbV N
1 dPRVRP R_h! Dell™ PowerVault™ NAS Manager $ RPRi NAS
bidd PPP RHUbv (<bid PQ CDb> hi).
bdb Ri PR I 6-3
Page 46

2 Windows 2000 1 i^=U^V .
^y ^y< (^=uyv.
W k ^ : Windows 2000 *1 öl-\i y-ü- Windows 71h]- #s]-öl2lW
y W , y w ö]3 Til]3|§l-J7 ^el§>];r y’äW 7|^1 -^^7-]^ ,
a Ц V^^W9 #y=q
yy=uyv.
b HR!} CRR %&' #"< R!Rq ^RR ®!RU!V .
c NAS !Hy !RG 1 RR$! Rm RR !RR !!=} ^RR
#!RU!V.
d HR!} !R R$E R^ RRR !RR ®!RU!V .
RR !R}} ... R! RRRRR .
e RQR RRH9 NAS R!$ %&R!R R_R !RG R}<
!!RU!V.
f RRR R!RU!V.
g R}< R!RU!V.
RRRR R, support.dell.com $E 4R HRÜR RRRÜH .
3
RR!!}3 RR< ,dRU!V.
4
6-4 I ÜNRHR!
a Ц RRRR RVH HRRH9 R!Rq ^}Rh hR!} RR ()<
RRRURV.
,d
' RR
' OR
RRRq RR.
-!RU!V.
NAS
1 PowerVault NAS Manager $ R&RÜH .
2 Maintenance < R!R RR Terminal Services < R!RU!V .
3 Terminal Services < R!Rq RQR RRH9 NAS Ü$ HhRÜH
4 System Management !!! Advanced Administration Menu $E
Computer Management < R!RU!V .
5 RR R$E Computer Management < RRRÜH .
6 RR R$E System Tools < RRRURV .
Page 47

7 Device Manager < .
8 ^$E Network adapters < #^=U^V .
9 Broadcom NetXtreme Gigabit Ethernet #
Properties < .
Broadcom NetXtreme Gigabit Ethernet Properties
10 Driver #^=U^V.
11 Update Driver < #^=U^V.
The Upgrade Device Driver Wizard ^ .
12 Next < #^=U^V.
13 Search Bor a suitable driver Bor my device (recommended)
-^=q Next
14 Optional search locations $E SpeciBy a location =q
/s ^^3 33 ,d=u^v.
15 Next < ®^=U^V.
Upgrade Device Driver Wizard R RRR./ .
16 Copy manuBacturer's Biles Brom RO HR!SR LMk R"
R^RU^V.
17 OK < RRRq, Next < RRRURV.
Upgrade Device Driver Wizard R HR!R XY! RRR R"< RR?RR
18 Finish < RRRURV.
19 Close < RRR™ HR!S R+RW 5RRR< RWRURV .
^ ^ : YR RWRR URRU RaRRUl- RaRg] 33 333-36]: 37]^ RUR.
333R RRRR 3W3R 333-R33W .
3 33RHR3 I 6-5
Page 48

05
05
п:й
vyi.
www.dell.com | s u p p о г t. d e 11. с о m
Page 49

Sistemas Dell™ PowerVault™ 715N
Instalación de la tarjeta
adaptadora de red
10/100/1000 Broadcom®
NetXtreme™
D^L
www.dell.com | support.dell.com
Page 50

Notas, avisos y precauciones
^ NOTA: una NOTA indica información importante que ie ayudará a usar mejor su ordenador.
O AVISO: un AVISO indica un posibie daño en ei hardware o ia pérdida de datos e informa de cómo
evitar ei probiema.
/Í\ PRECAUCIÓN: un mensaje de PRECAUCIÓN indica la posibilidad de que el equipo
resulte averiado, de sufrir lesiones personales o incluso la muerte.
La información de este documento está sujeta a modificaciones sin previo aviso.
© 2002 Dell Computer Corporation. Reservados todos los derechos.
Queda prohibida su reproducción en cualquier medio sin la autorización por escrito de Dell Computer Corporation.
Marcas comerciales que aparecen en el texto: Dell, el logotipo de DELL y PowerVaultson marcas comerciales de Dell
Computer Corporation; Broadcom es una marca registrada y NetXtreme es una marca comercial de Broadcom
Corporation; y Microsoft y Windows son marcas registradas de Microsoft Corporation.
En este documento pueden utilizarse otras marcas y nombres comerciales para referirse a las entidades propietarias
de dichas marcas y nombres, o a sus productos. Dell Computer Corporation renuncia a cualquier derecho sobre las
marcas y nombres comerciales que no sean de su propiedad.
Marzo de 2002 P/N 4P280 Rev. AOl
Page 51

La tarjeta adaptadora de red 10/100/1000 Broadeom® NetXtreme™ permite eoneetar el
sistema a una red Ethernet Gigabit. Esta tarjeta ineorpora teenología que transfiere datos a
una veloeidad máxima de un gigabit por segundo.
Este doeumento eontiene las seeeiones siguientes:
• Instalaeión de la tarjeta adaptadora
• Extraeeión de la tarjeta adaptadora
• Aetualizaeión de eontroladores
Instalación de la tarjeta adaptadora
El sistema dispone de eapaeidad para una tarjeta de expansión PCI de perfil bajo (eonsulte
“Instalaeión de una tarjeta de expansión” en la Guía de instalación y resolución de
problemas).
PRECAUCIÓN: Antes de llevar a cabo este procedimiento, apague el sistema y
A
desconéctelo de la fuente de alimentación eléctrica. Si desea más información,
consulte “Seguridad para usted y su ordenador” en el documento Guía de
instalación y resolución de problemas.
1 Apague el sistema, ineluido eualquier periférieo eoneetado, y desenehúfelo de la toma
de eorriente.
2 Retire la eubierta del sistema (véase “Extraeeión y eoloeaeión de la eubierta del
sistema” en su Guía de instalación y resolución de problemas).
/K PRECAUCIÓN: Consulte el apartado “Protección contra descargas
electrostáticas” en las instrucciones de seguridad contenidas en el documento
Información del sistema.
3 Abra el pestillo de la tarjeta de expansión y extraiga la abrazadera de refuerzo.
AVISO: Conserve esta abrazadera por si necesitara extraer ia tarjeta de expansión. Para
mantener ia certificación dei sistema por parte de ia Comisión Federai de Comunicaciones
(Federai Communications Commission, FCC), es necesario instaiar una abrazadera de refuerzo
en una ranura de expansión vacía. Las abrazaderas evitan también que entre suciedad y poivo en
ei sistema a ia vez que mantienen ei interior dei sistema fresco y ventiiado.
4 Sin extraer la tarjeta de ampliaeión, inserte firmemente el eoneetor del borde de la
tarjeta en el eoneetor de la tarjeta de expansión situado en la tarjeta de ampliaeión
hasta que la tarjeta quede eompletamente eoloeada (eonsulte la Eigura 7-1).
5 Cierre el pestillo de la tarjeta de expansión (eonsulte la Eigura 7-1).
Instaiación de ia tarjeta adaptadora | 7-1
Page 52

Figura 7-1. Instalación de la tarjeta adaptadora
6 Vuelva a colocar la cubierta del sistema y vuelva a conectar el sistema y los periféricos
a la fuente de alimentación.
7 Conecte un cable Ethernet al conector de la tarjeta en la parte exterior del sistema.
8 Encienda el equipo.
Extracción de la tarjeta adaptadora
/t\ PRECAUCIÓN: Antes de llevar a cabo este procedimiento, apague el sistema y
desconéctelo de la fuente de alimentación eléctrica. Si desea más información,
consulte “Seguridad para usted y su ordenador” en el documento Guía de
instalación y resolución de problemas.
1 Apague el sistema, incluido cualquier periférico conectado, y desenchúfelo de la toma
de corriente.
7-2 I Instalación de la tarjeta adaptadora
Page 53

2 Desconecte todos los cables conectados a la tarjeta.
3 Extraiga la cubierta del sistema (véase “Extracción y colocación de la cubierta del
sistema” en su Guía de instalación y resolución de problemas).
4 Abra el pestillo de la tarjeta de expansión.
5 Agarre la tarjeta de expansión y extráigala con cuidado del conector de la tarjeta de
ampliación (véase la Eigura 7-1).
6 Si extrae la tarjeta de forma permanente, instale una abrazadera de refuerzo metálica
en el hueco de la ranura de la tarjeta.
O AVISO: Para mantener la certificación del sistema por parte de la Comisión Federal de
Comunicaciones (Federal Communications Commission, FCC), es necesario instalar una
abrazadera de refuerzo en una ranura de expansión vacía. Las abrazaderas evitan también que
entre suciedad y polvo en el sistema a la vez que mantienen el interior del sistema fresco y
ventilado.
7 Cierre el pestillo de la tarjeta de expansión.
8 Vuelva a colocar la cubierta del sistema y, a continuación, conecte de nuevo el sistema
y los periféricos a la fuente de alimentación eléctrica, y encienda el sistema.
Actualización de controladores
^ NOTA: Cuando instale la tarjeta adaptadora 10/100/1000 Broadcom NetXtreme, el sistema
instala automáticamente los controladores de dispositivos. Si tiene que actualizar sus
controladores de dispositivos, realice los pasos de esta sección.
Debido a que el sistema no utiliza monitor, teclado o unidad de disquete, debe actualizar
sus controladores de dispositivos de un sistema cliente con el sistema operativo Microsoft®
Windows® en la red. Para actualizar los controladores del sistema, debe copiar primero los
controladores de dispositivos en el sistema de almacenamiento conectado a red (ÑAS) y
actualizarlos utilizando Servicios de terminal.
^ NOTA: Consulte la página Web Dell | Support en la dirección support.dell.com para obtener
información sobre las últimas actualizaciones de la tarjeta.
Copia de controladores en el sistema ÑAS
Antes de actualizar los controladores, realice los pasos siguientes para copiar los
controladores al sistema ÑAS:
1 Con un explorador web, conecte a Dell™ PowerVault™ ÑAS Manager y cree una
compartición en el sistema ÑAS (consulte la Guía del Administrador del sistema).
Instalación de la tarjeta adaptadora | 7-3
Page 54

2 Desde un sistema eliente Windows 2000, asigne la eompartieión ereada en el paso 1.
Realiee los siguientes pasos adieionales para asignar la eompartieión.
^ NOTA: Si está utilizando un sistema cliente con Windows que no sea Windows 2000,
consulte la documentación del sistema operativo para obtener información sobre la forma
de asignar y desconectar la unidad de red.
a Haga elie eon el botón dereeho en Mi PC y seleeeione Conectar a unidad de red.
b Espeeifique la letra de la unidad y la earpeta para la eonexión y haga elie en
Aceptar.
c Eseriba el nombre del sistema ÑAS y el nombre de la eompartieión ereada en el
paso 1 y haga elie en Aceptar.
d En la ventana Conectar a unidad de red, haga elie en nombre de usuario
diferente.
Apareee la ventana Conectar como....
e Eseriba el nombre de usuario y la eontraseña de una euenta ÑAS que tenga
privilegios de administrador.
f Haga elie en Aceptar.
g Haga elie en Terminar.
3 Copie los últimos eontroladores de support.dell.com a la eompartieión.
4 Deseoneete el reeurso eompartido del eliente.
a Haga elie eon el botón dereeho en Mi PC y seleeeione Desconectar de unidad de
red.
b Seleeeione la eompartieión que desea deseoneetar y haga elie en Aceptar.
Actualización de los controladores del sistema ÑAS
1 Coneete a PowerVault ÑAS Manager.
2 Haga elie en Maintenance y, a eontinuaeión, en Terminal Services.
3 Haga elie en Terminal Services e inieie sesión en la euenta ÑAS que tenga privilegios
de administrador.
4 En la opeión Advanced Administration Menu de System Management, haga elie en
Computer Management.
5 Haga elie en Computer Management en el panel izquierdo.
6 Haga elie en System Tools en el panel izquierdo.
7-4 I Instalación de la tarjeta adaptadora
Page 55

7 Haga clic en Device Manager en el panel izquierdo.
8 Haga clic en Network adapters en el panel derecho.
9 Haga clic con el botón derecho en Broadcom NetXtreme Gigabit Ethernet y
seleccione Propiedades.
Aparece la ventana Broadcom NetXtreme Gigabit Ethernet Properties .
10 Haga clic en la ficha Driver.
11 Seleccione Update Driver (Actualizar controlador).
Se iniciará el asistente para actualización de controladores (Upgrade Device Driver
Wizard).
12 Haga clic en Siguiente.
13 Haga clic en el botón de opción situado junto a Search for a suitable driver for my
device (recommended) y haga clic en Siguiente.
14 En Optional search locations, haga clic en la casilla de verificación de Specify a
location y anule la selección de las otras casillas de verificación.
15 Haga clic en Siguiente.
Aparece el asistente para actualización de controladores (Upgrade Device Driver
Wizard).
16 Especifique el nombre de la carpeta que contiene los controladores de dispositivo en la
ruta para Copy manufacturer's files from.
17 Haga clic en Aceptar y, a continuación, en Siguiente.
El asistente para actualización de controladores busca la carpeta especificada para los
archivos del controlador.
18 Haga clic en Einalizar.
19 Haga clic en Cerrar para salir del cuadro de diálogo de propiedades del controlador.
^ NOTA: Es posible que algunos sistemas tengan que reiniciarse para completar la actualización
del controlador. Si se solicita, reinicie el sistema.
Instalación de la tarjeta adaptadora | 7-5
Page 56

7-6 I Instalación de la tarjeta adaptadora
 Loading...