


Dell™ PowerVault™ 132T LTO Tape Library
Upgrading to LTO-2 Tape Drive Modules
www.dell.com | support.dell.com

Notes, Notices, and Cautions
NOTE: A NOTE indicates important information that helps you make better use of your computer.
NOTICE: A NOTICE indicates either potential damage to hardware or loss of data and tells you
how to avoid the problem.
CAUTION: A CAUTION indicates a potential for property damage, personal
injury,or death.
___________________
Information in this document is subject to change without notice.
–2006 Dell Inc. All rights reserved.
© 2003
Reproduction in any manner whatsoever without the written permission of Dell Inc. is strictly forbidden.
Trademarks used in this text: Dell, the DELL logo, and PowerVault are trademarks of Dell Inc.; Microsoft and Windows
are registered trademarks of Microsoft Corporation.
Other trademarks and trade names may be used in this document to refer to either the entities claiming the marks and
names or their products. Dell Inc. disclaims any proprietary interest in trademarks and trade names other than its own.
January 2006 P/N H1038 Rev. A04

This document provides information about upgrading Dell™ PowerVault™ 132T LTO tape
drive modules to LTO-2. You must perform the following procedures:
• Installing drives
• Updating tape library firmware
Installing Drives
If you have only one drive module installed in the library, that module must be in the
centermost drive bay.
CAUTION: Before performing this procedure, read and follow the safety
instructions in your System Information Guide.
To install drive modules, perform the following steps:
1 Turn off the host system and attached peripherals, including the tape library, and
disconnect the system from its electrical outlet.
2 Disconnect the SCSI cable that connects the tape library to the host system.
3 On the back of the library, loosen the thumbscrews and remove the cover plate (see
Figure 2-1) or the drive module that you want to replace.
NOTE: If you remove the cover plate, store it in a convenient place. The cover plate is
required for proper operation and cooling of the library if the optional drive is removed.
Slide the drive module into position. See Figure 2-2.
4
The metal edge on the drive module should be inserted into the plastic guide on the
left side of the drive bay.
5 Tighten the four thumbscrews on the drive module until it is flush with the chassis.
6 Connect the SCSI cable to either SCSI connector on the drive module.
7 Connect the other end of the SCSI cable to the host system.
8 Connect a terminator to the last device in the SCSI chain.
Upgrading Tape Drive Modules 3
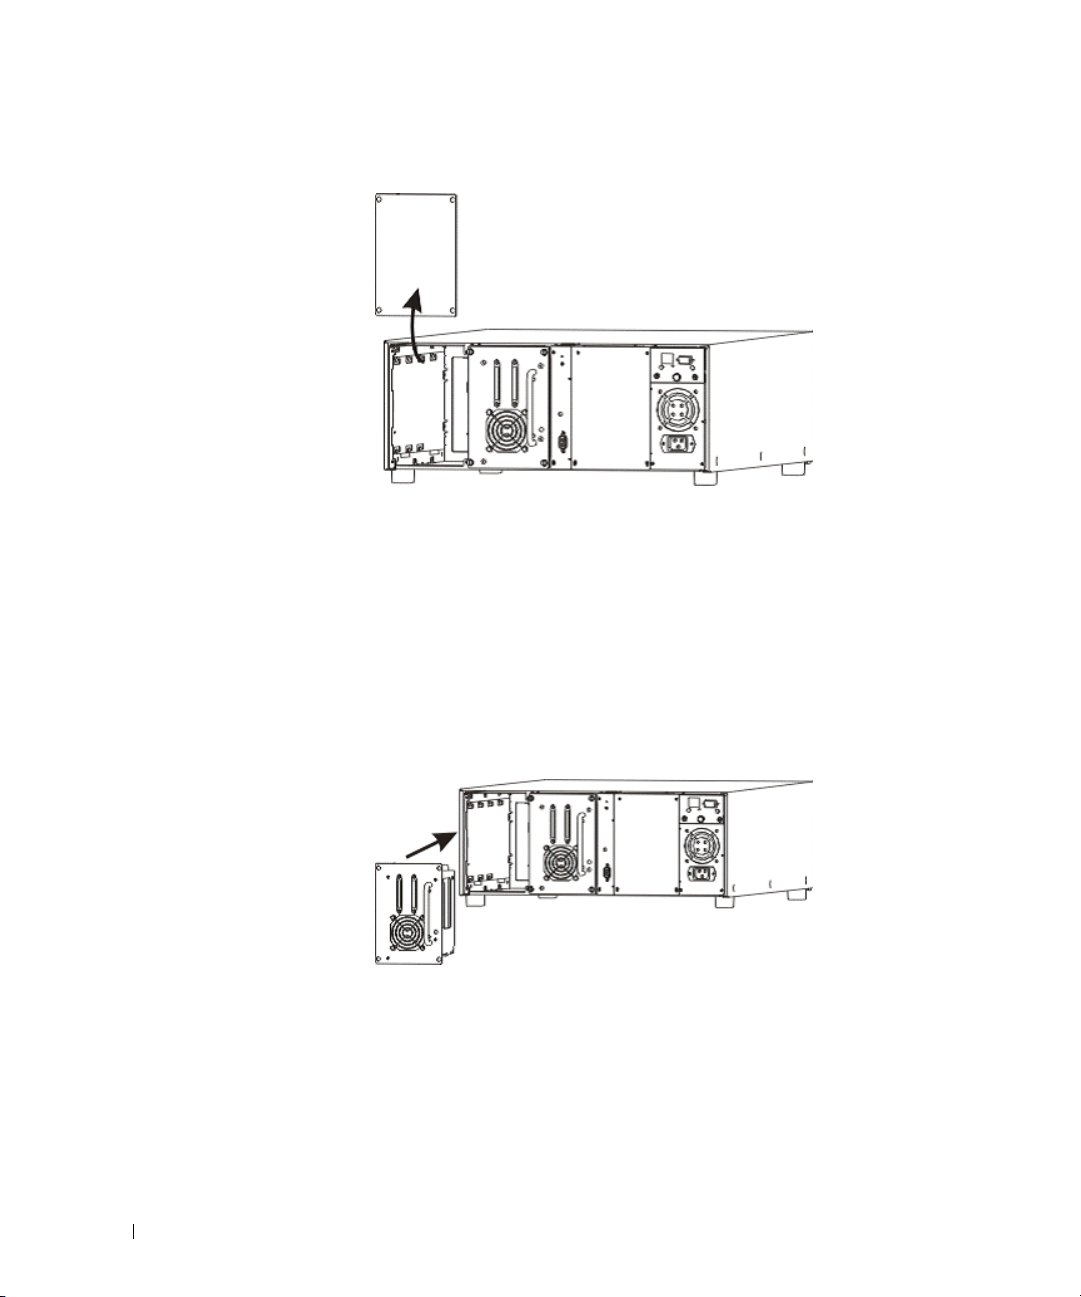
Figure 2-1. Removing the Drive Module Cover Plate
www.dell.com | support.dell.com
9
Reconnect the tape library and the host system to an electrical outlet.
10 Turn on the tape library.
An error message may appear on the LCD that reads Drive Error or Drive
Offline. This behavior is normal until the tape library firmware has been updated.
11 When the tape library is turned on and online, turn on the host system.
12 Update the firmware. See "Updating the Tape Library Firmware."
Figure 2-2. Inserting the Drive Module
4 Upgrading Tape Drive Modules

Updating the Tape Library Firmware
You can update the firmware using one of the following methods:
• Using a Web browser
• Using a serial connection
You must download the latest firmware package from the Dell Support website at
support.dell.com. After you download the package, the firmware file will be located at
c:\dell\drivers\rxxxxx\LTO-2 Library, where rxxxxx is the release number of the
downloaded firmware package.
Updating Firmware Using a Web Browser
1 Open a Web browser on the system that contains the downloaded firmware file and go
to the IP address of the remote management unit that is installed in the library for
which you want to update the firmware.
2 On the main page, click Firmware.
3 Enter the administrator user name and password for the library.
The default user name is admin and the default password is password.
4 Click Update Library Firmware in the Select target for update box that appears.
5 Click Browse and locate the firmware file that you downloaded.
NOTE: The downloaded firmware file is located at c:\dell\drivers\rxxxxx\LTO-2 Library,
where rxxxxx is the release number of the downloaded firmware package.
Click Update Firmware to start the update.
6
7 Reboot the library after the update completes.
8 Verify that the library is online.
The LCD Main menu displays Dell 132T when the library is online.
9 Verify the firmware level on the main Web page of the remote management unit. The
firmware version is displayed in the Library Firmware field.
Upgrading Tape Drive Modules 5

Updating Firmware Using a Serial Connection
1 Turn on the tape library.
2 Connect one end of a straight-through serial cable to the serial port of the tape library
(not the serial port for the remote management unit).
3 Connect the other end of the serial cable to a COM port on the system that has the
updated firmware that you downloaded.
4 Open a command prompt in the Microsoft
to the directory that contains the downloaded firmware file.
NOTE: The downloaded firmware file is located at c:\dell\drivers\rxxxxx\LTO-2 Library,
www.dell.com | support.dell.com
5
where rxxxxx is the release number of the downloaded firmware package.
Type the following information at the command prompt:
®
Windows® operating system and change
PV132T_LTO2_Update
x
where x represents the COM port number on the system where the serial cable was
connected.
6 Press <Enter>.
The firmware update takes approximately 8
–10 minutes.
A summary of the firmware update displays at the command prompt when the
firmware update has completed.
7 Reboot the library after the firmware update completes.
8 Verify that the library is online.
The LCD Main menu displays Dell 132T when the library is online.
6 Upgrading Tape Drive Modules

Dell™ PowerVault™ 132T LTO 磁带库
升级至 LTO-2 磁带驱动器模块
www.dell.com | support.dell.com

注、注意和警告
注 : 注表示可以帮助您更好地使用计算机的重要信息。
注意 : 注意表示硬件的潜在损坏或数据丢失,并且告诉您如何避免此类问题。
警告 : 警告表示可能导致财产损失、人身伤害或死亡的潜在危险。
___________________
本说明文件中的信息如有更改,恕不另行通知。
© 2003
–2006 Dell Inc. 版权所有,翻印必究。
未经 Dell Inc. 书面许可,严禁以任何方式进行复制。
本文件中使用的商标 : Dell、 DELL 徽标和 PowerVault 是 Dell Inc. 的商标 ; Microsoft 和 Windows 是 Microsoft
Corporation 的注册商标。
本说明文件中述及的其它商标和商品名称是指拥有相应标记和名称的公司或其制造的产品。 Dell Inc. 对不属于
自己的商标和商品名称不拥有任何所有权。
2006 年 1 月 P/ N H1038 修订版 A04

本说明文件提供将 Dell™ PowerVault™ 132T LTO 磁带驱动器模块升级为 LT O - 2 的有关
信息。必须执行以下步骤:
•
安装驱动器
•
更新磁带库固件
安装驱动器
如果您在库中仅安装了一个驱动器模块,该模块必须位于最中间的驱动器托架中。
警告 : 在执行此步骤之前,请阅读并遵循 《系统信息指南》中的安全说明。
要安装驱动器模块,请执行以下步骤:
1
关闭主机系统和连接的外围设备 (包括磁带库),然后断开系统与电源插座的连
接。
2
断开将磁带库连接至主机系统的
3
在库背面拧松指旋螺钉,卸下盖板 (参见图
注 : 如果卸下盖板,请将其放置在一个方便拿取的地方。如果卸下可选驱动器,则必
须使用盖板来确保库的正常操作和良好冷却。
将驱动器模块滑入到位。参见图
4
驱动器模块的金属边缘应插入驱动器托架左侧的塑料导轨中。
5
拧紧驱动器模块上的四颗指旋螺钉,直至与机箱保持齐平。
6
将
SCSI
电缆连接至驱动器模块上的任意一个
7
将
SCSI
电缆的另一端连接至主机系统。
8
将终结处理器连接至
SCSI
SCSI
电缆的连接。
4-1
)或要更换的驱动器模块。
4-2
。
SCSI
链上的最后一个设备上。
连接器上。
升级磁带驱动器模块 9
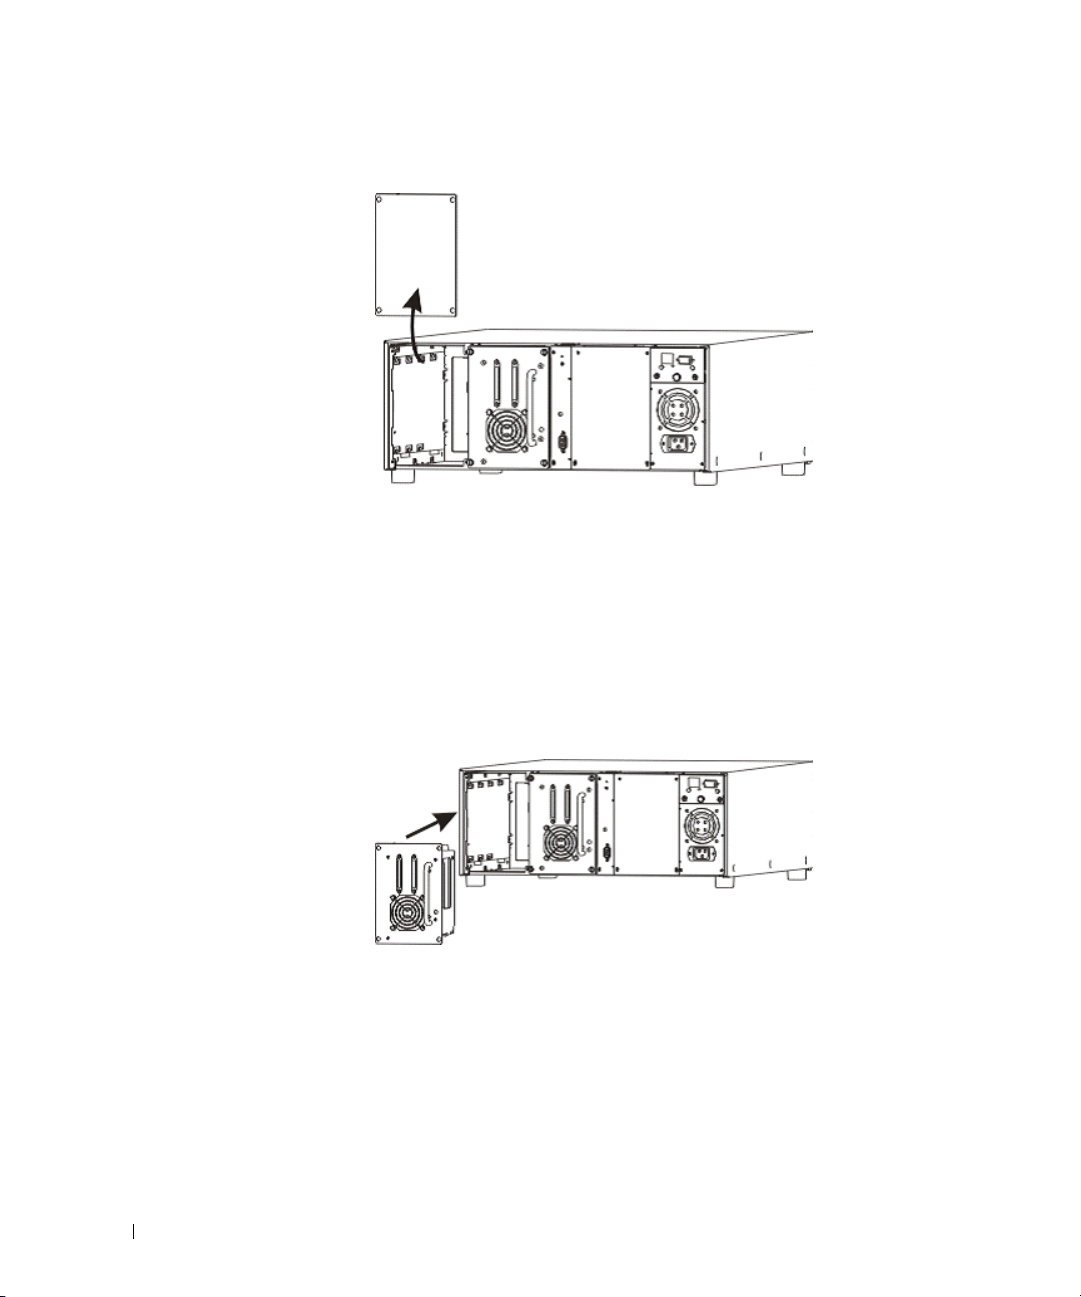
图 4-1. 卸下驱动器模块盖板
www.dell.com | support.dell.com
9
将磁带库和主机系统重新连接至电源插座。
10
打开磁带库。
LCD
Offline
11
磁带库打开并且联机后,请打开主机系统。
12
更新固件。请参阅 “更新磁带库固件”。
图 4-2. 插入驱动器模块
上可能会显示一个错误信息,即
Drive Error
(驱动器错误)或
(驱动器脱机)。这属于正常,更新磁带库固件后即可消除。
Drive
10 升级磁带驱动器模块

更新磁带库固件
可选用下列任一种方法来更新固件。
•
使用网络浏览器
•
使用串行连接
必须从 Dell 支持网站 support.dell.com 下载最新的固件包。固件包下载后,该固件文
件将位于 c:\dell\drivers\rxxxxx\LTO-2 Library, 其中 rxxxxx 为所下载的固件包的发布
号。
使用网络浏览器更新固件
1
打开包含下载的固件文件的系统的网络浏览器,然后转到安装在要更新固件的库中
IP
的远程管理单元的
2
在主页上单击
3
输入库的管理员用户名和密码。
默认用户名为
4
在显示的
Firmware
admin
Select target for update
(更新库固件)。
5
单击
Browse
注 : 下载的固件文件位于 c:\dell\drivers\rxxxxx\LTO-2 Library, 其中 rxxxxx 为下载的固件
包的发布号。
单击
6
7
8
Update Firmware
更新完成后,请重新引导库。
验证库是否已联机。
(浏览)并找到已下载的固件文件。
当库处于联机状态时,
地址上。
(固件)。
,默认密码为
password
(选择更新目标)框中单击
(更新固件)开始更新。
LCD Main
(主菜单)将显示 Dell 132T
。
Update Library Firmware
。
9
在远程管理单元的主网页上验证固件级别。固件版本显示在
件)字段中。
Library Firmware
升级磁带驱动器模块 11
(库固

使用串行连接更新固件
1
打开磁带库。
2
将直通式串行电缆的一端连接至磁带库的串行端口 (而不是远程管理单元的串行端
口)。
3
将串行电缆的另一端连接至具有下载的已更新固件的系统的
4
在
Microsoft® Windows®
文件的目录。
在命令提示符下键入如下信息:
www.dell.com | support.dell.com
5
PV132T_LTO2_Update
COM
端口。
操作系统中打开命令提示符,并且更改至包含下载的固件
注 : 下载的固件文件位于 c:\dell\drivers\rxxxxx\LTO-2 Library, 其中 rxxxxx 为下载的固件
包的发布号。
x
其中x代表串行电缆所连接的系统上的
6
按
<Enter>
固件更新需要大约
键。
8–10
分钟。
COM
端口编号。
当固件更新完成后,在命令提示符下将显示固件更新的摘要信息。
7
在固件更新完成后,重新引导库。
8
验证库是否已联机。
当库处于联机状态时,
LCD Main
(主菜单)将显示 Dell 132T
。
12 升级磁带驱动器模块

Bibliothèque de bandes Dell™ PowerVault™ 132T LTO
Mise à niveau vers les modules de lecteur de bande LTO-2
www.dell.com | support.dell.com
 Loading...