

Dell PowerVault 120T DDS4, PowerVault 120T User Manual

Dell™ PowerVault™
120T DDS4 Autoloader
USER’S GUIDEUSER’S GUIDE
www.dell.com
™

Dell™ PowerVault™ 120T DDS4 Autoloader User’s Guide
www.dell.com

Notes, Notices, Cautions, and Warnings
Through out this document, blocks of text may be accompanied by a icon and printed in bold type
or in italic type. These blocks are notes, notices, cau tions, and warnings and they are used as
follows:
NOTE:
A NOTE indicates important information that helps you make better use of your storage
system.
NOTICE: A NOTICE indicates either potential damage to hardware or loss of data and tells
you how t o avoid the problem.
CAUTION: A CAUTION indicates a potentially hazardous situ ation which, if not avoided,
may result in minor or moderate injury.
WARNING: A WARNING indicates the potent ial for bodily harm and tells you how to avoid
the problem.
____________________
Information in this document is subject to change wi thout notice.
© 1999 Dell Computer Corporation. All rights reserved.
Trademarks used in this text: Dell, PowerVault and the DELL logo are trademarks of Dell
Computer Corporation; Windows NT is a trademark of Microsoft Corporation; Novell and Netware
are trademarks of Novell, Inc.; Seagate and Seagate Backup Exec are trademarks o f Seagate
Technology Inc.; Veritas and Veritas Backup Exec are trademarks of Veritas Software
Corporation; Computer Associates and ArcServe are trademarks of Computer Associates
International, Inc..
Other trademarks and trade names may be used in this document t o refer to either the entities
claiming the marks and names or their products. Dell Computer Corporation disclaims any
proprietary interest in tr ademarks and trade names other than its own.
November 1999 P/N 79EJG

iv
Contents
Chapter 1
Introduction .......................................................................................1-1
Overview...................................................................................1-1
Features ..................................................................................1-1
Tape Backup Software ............................................................1-2
Tape Backup Applications .......................................................1-2
Chapter 2
Getting Started .................................................................................. 2-1
Front Panel .............................................................................2-1
Power, SCSI Connection, Setting SCSI ID (External) ...........2-2
Power, SCSI Connection, Setting SCSI ID (Internal) ...........2-4
Option Switches (Internal, External ) ................................... 2-5
Mounting Holes for 5.25" (Internal) ......................................2-6
Orientation ..............................................................................2-7
Loading Device Drivers ...........................................................2-7
Native Operating System Backup Utilities ............................. 2-7
Tape Backup Applications .......................................................2-7
Chapter 3
Using the Autoloader ........................................................................3-1
Autoloader Modes of Operation ............................................3-1
Front Panel .............................................................................3-2
Front Panel LCD ..................................................................... 3-3
Front Panel LEDs....................................................................3-3
Operator Action ...................................................................... 3-4
Loading and Unloading Definition .......................................... 3-4
Magazine ...................................................................................3-4
Eight Cartridge Setting .......................................................... 3-4

v
One Cartridge Setting ............................................................3-4
Seven Cartridge Setting ......................................................... 3-5
How to Insert Cartridges.......................................................3-5
How to Remove Cartridges .....................................................3-6
Slide Stopper...........................................................................3-9
Write Protect .......................................................................... 3-9
Magazine Index Label...............................................................3-9
Loading the Magazine .............................................................. 3-9
Exchanging the Cartridge .................................................... 3-10
Ejecting Magazine ..................................................................3-11
Chapter 4
Troubleshooting ................................................................................4-1
Reinstalling the Tape Backup Software ...............................4-1
Reinstalling Drivers for Windows NT ...................................4-1
Autoloader Makes Noises During System Startup ...............4-1
Drive Failures During Backup or Restore Operations ........4-1
LCD Indication for Autoloader Status .................................4-2
Tape Backup Software Errors ...............................................4-3
Running Dell Diagnostics.......................................................4-3
Cleaning the Autoloader .......................................................4-3
Emergency Cassette Removal Procedure .............................4-4
Emergency Ejecting a Magazine ..............................................4-4
Ejecting Magazine by Manual Operation ................................4-4
Ejecting Tape Cartridge from Drive by Manual Operation .. 4-6
Appendix A
LCD Panel............................................................................................A-1
Appendix B
Specifications .....................................................................................B-1
Appendix C
Regulatory..........................................................................................C-1

Dell PowerVault 120T DDS4 Autoloader User's Guide 1-1
Chapter 1
Introduction
Overview
The Dell™ PowerVault™ 120T DDS4 Autoloader is a high-capacity data storage
cartridge changer using 4mm DAT (Digital Audio Tape) technology. The tape autoloader
achieves high data reliability through read-after-write and an additional level of error
correction code (ECC).
The tape autoloader stores data on tape using a standard format called DDS (Digital
Data Storage), DDSDC, DDS2, DDS3 and DDS4. This format is used by numerous
other DDS tape drive manufacturers, providing a broad range of compatible tape drives.
The tape autoloader is fully READ and WRITE compatible with the DDS4, DDS3, DDS2,
DDS and DDSDC format tapes.
Features
The tape autoloader has the following features:
• Data capacity 160 (native) to 320 GB (typical)*
• Transfer rate (sustained) ~ 2.4 (native) to 4.7 MB/sec (typical)*
• 8 cartridge tape magazine
• Compatibility with SCSI-2 medium changer command set
• 80 seconds maximum to swap a tape cartridge
• High reliability, with a mean failure rate of less than 1 failure in 100,000
cartridge swaps
• Supported formats: DDS4, DDS3, DDS2, DDS, DDSDC
• High burst transfer rate -14 MB/sec asynchronous / 40 MB/sec synchronous
• Large 10 MB buffer
• 5.25-inch half height
• Embedded wide ultra SE/LVD SCSI interface
• Supports variable or fixed record length

1-2 Dell PowerVault 120T DDS4 Autoloader User's Guide
• Supports SCSI-2 sequential-access devices command set
• Read after write (RAW)
• Frame rewrite function
• Three levels of ECC
• Quick search (Forward: 115 times / reverse: 155 times normal DDS4 read /
write speed)
*2:1 compression. Actual capacity and transfer rate may vary since compression is
depending upon data type.
Tape Backup Software
Drivers:
Please see instructions supplied with the tape backup application software.
Native Operating System Backup Utilities:
Tape autoloaders are not supported by Microsoft® Windows NT® 4.0 and Novell®
NetWare® native backup utilities.
Tape Backup Applications:
Microsoft Windows NT 4.0: Computer Associates ARCServeIT 6.6, Seagate Backup
Exec 7.2, Veritas Backup Exec 7.3
Novell NetWare: Computer Associates ARCServe 6.1, Seagate Backup Exec 8.0
Dell PowerVault 120T DDS4 Autoloader User's Guide 2-1
Chapter 2
Getting Started
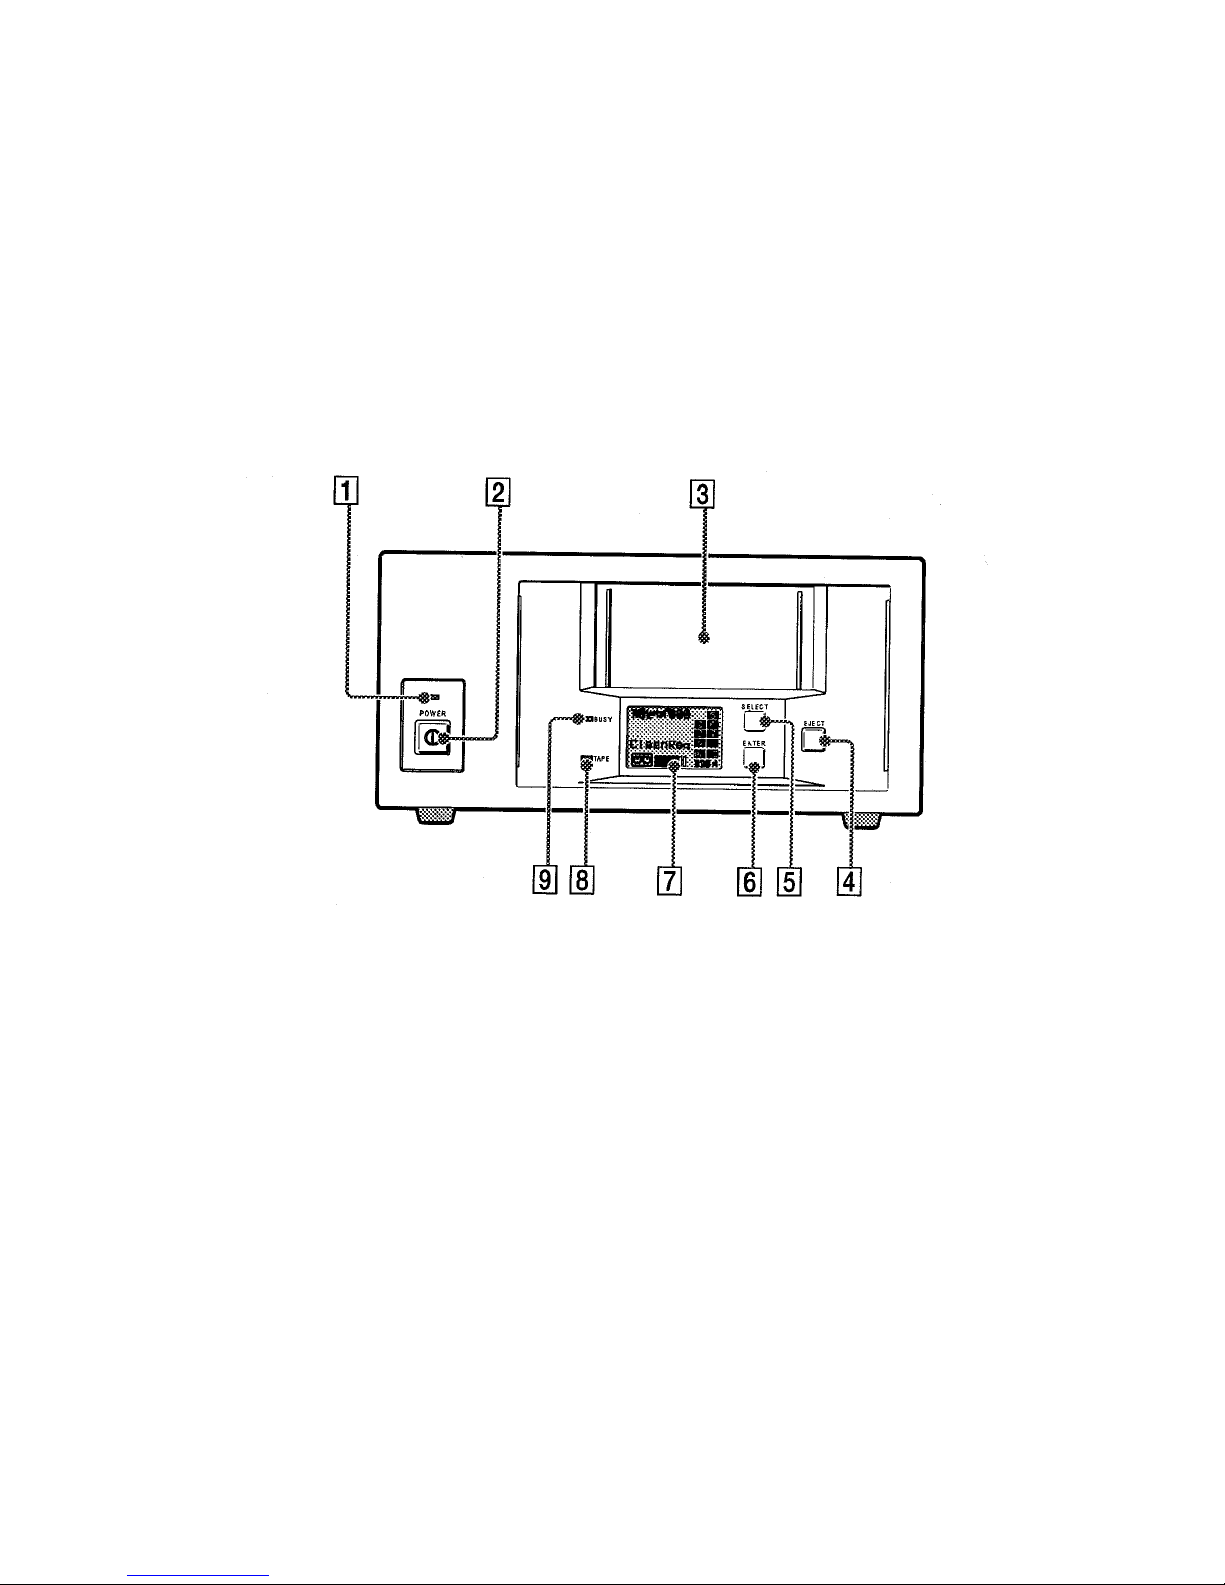
Figure 2-1. Front Panel (External)
The Autoloader front panel consists of the following:
• (1) A Power indicator
• (2) A Power button
• (3) A Magazine receptacle
• (4) An Eject button
• (5) Select button (6) Enter button
• (7) Liquid Crystal Display (LCD)
• (8) Tape Present (9) Busy Status
The Select button allows you to select any of the cartridges present in the magazine,
once the magazine has been inserted into the loader. The number selected is displayed
on the LCD. If you press the Select button repeatedly, the display cycles through the
cartridges available in the magazine, see Figure 2-1.
Once a cartridge has been selected, the Enter button should be pressed for
confirmation, and the autoloader will load the selected cartridge into the drive, see
Figure 2-1.
2-2 Dell PowerVault 120T DDS4 Autoloader User's Guide
The Eject Button
The Eject button starts the unload process. The drive unloads any currently loaded
cartridge, and the loader mechanism returns it to the magazine. The magazine is then
ejected, see Figure 2-1.
NOTE: The host can disable the Eject button by sending a SCSI PREVENT MEDIA
REMOVAL command.
The Front Panel Liquid Crystal Display
Displays autoloader function and status, Figure 2-1.
Power Button (External Only)
Press to turn autoloader on or off.
External Power/SCSI Connection/Setting SCSI ID
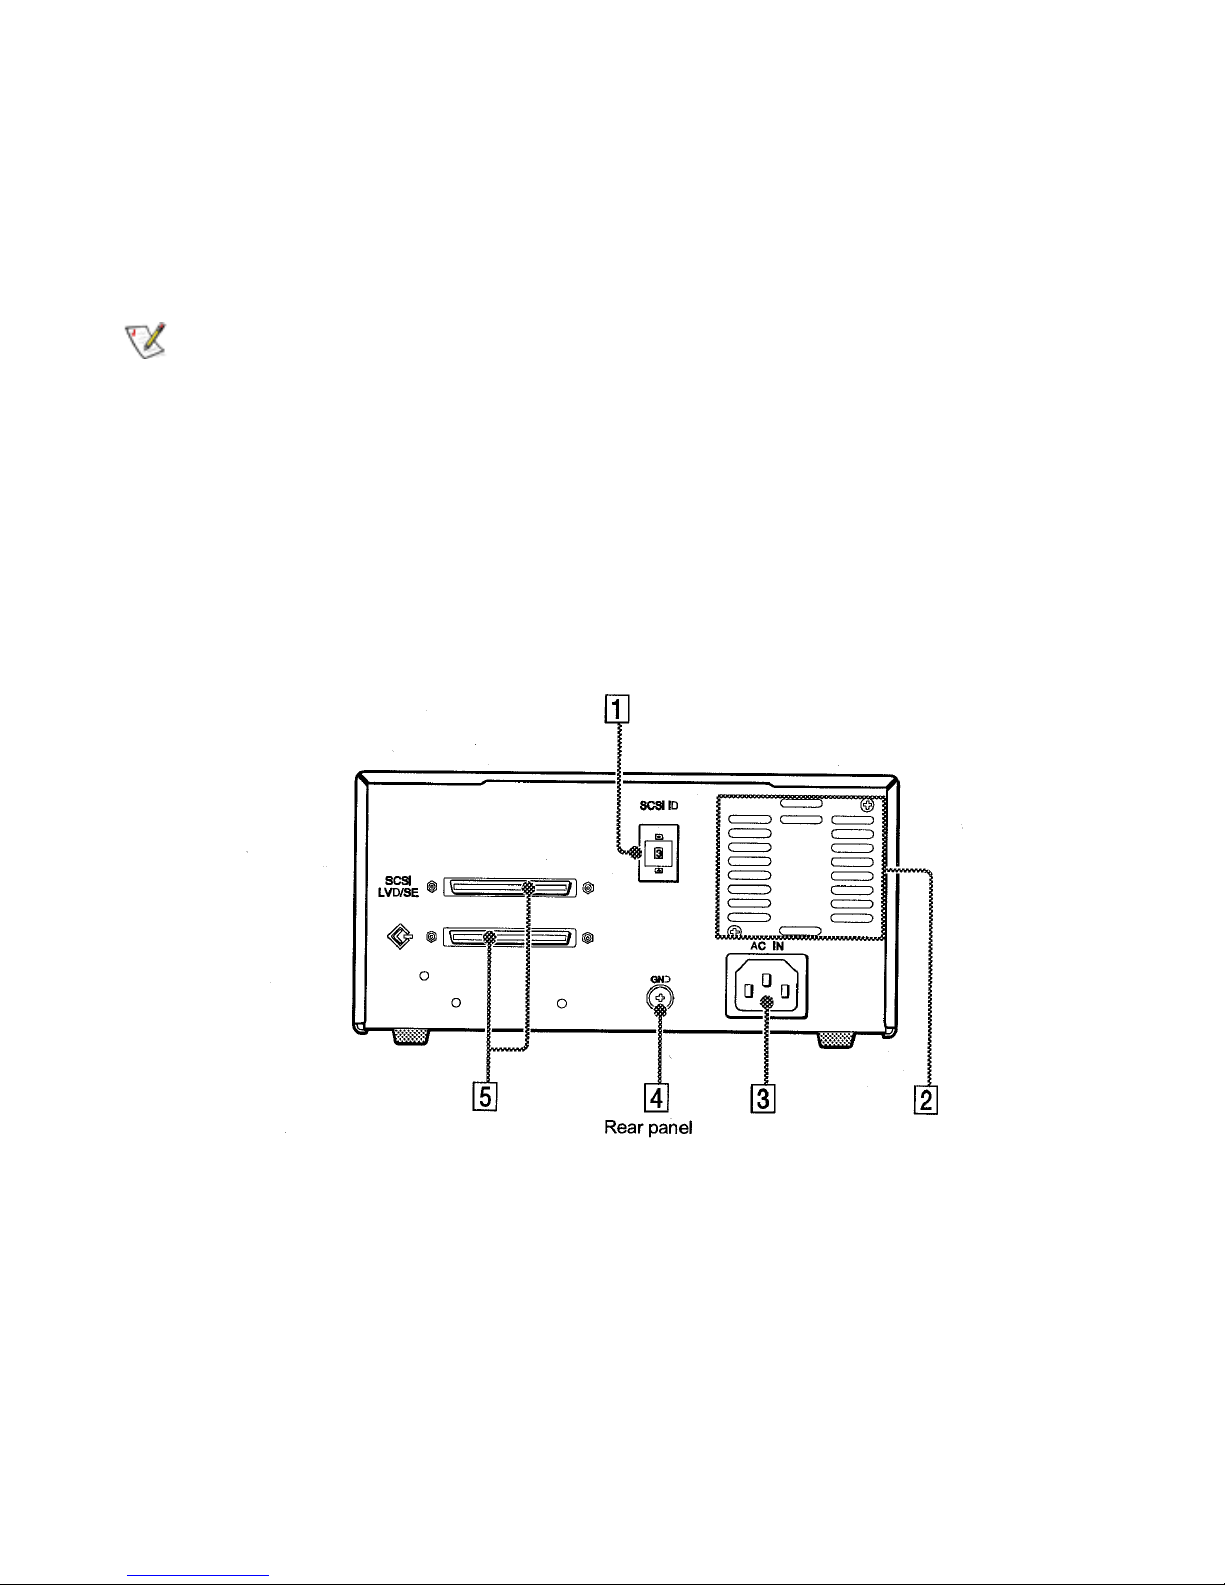
Figure 2-2. Rear Panel (External)
• (1) Rotary Selector Switch for setting SCSI ID
• (2) Cooling Fan
• (3) AC In Connector
• (4) Ground (GND) Terminal
• (5) SCSI Connector

Dell PowerVault 120T DDS4 Autoloader User's Guide 2-3
SCSI Connector
Connects to the SCSI bus connector of the host computer or another SCSI peripheral.
The autoloader has a Ultra Wide Single Ended (SE) / Low Voltage Differential (LVD)
SCSI bus. The autoloader will automatically detect the type (SE or LVD) of SCSI host
adapter attached. In Ultra Wide SCSI, up to 15 peripherals can be attached to the SCSI
bus, see Figure-2-2.
NOTE: Turn off the host computer and autoloader power before connecting the supplied
SCSI cable. Make sure the SCSI connectors are pressed tightly together and the screw
tabs are secure.
Termination
Please make sure to apply supplied External SE / LVD Terminator to the last device on
the SCSI bus.
SCSI ID
The SCSI ID is set by the push button switches on the rear panel. Press the + or buttons to move the number up or down, respectively. The default SCSI ID is set to 0,
see Figure 2-2.
NOTE: The SCSI ID must be different from the IDs of the other peripherals on the SCSI
bus. Before changing the SCSI ID setting, be sure to turn off the power with the power
switch on the front panel.
Power
Connect the supplied AC power cable. Turn on the autoloader using the front panel
power button, see Figure 2-2.
2-4 Dell PowerVault 120T DDS4 Autoloader User's Guide
Internal SCSI Connection/Setting the SCSI ID/Power
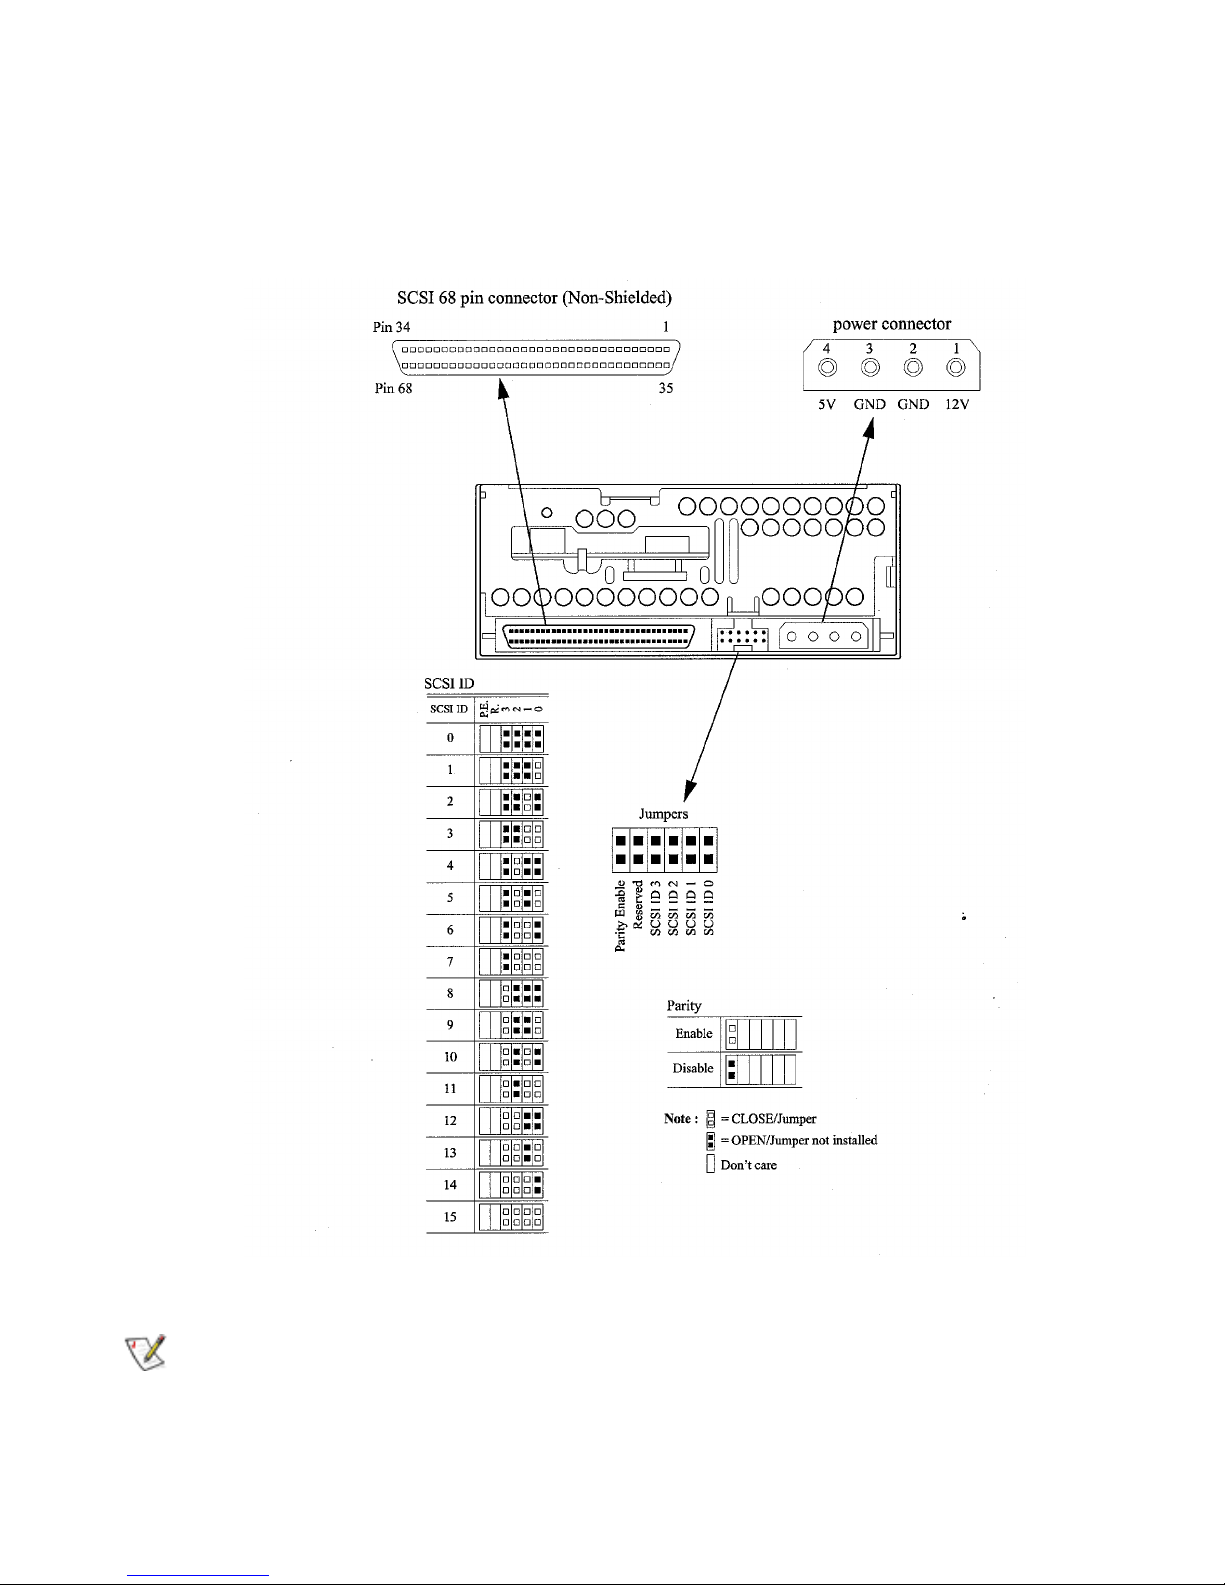
Figure 2-3. Rear Connectors and Jumpers (Internal)
NOTE: Dell performs the installation and setup of tape autoloaders that are shipped as
part of a system. If the software has been recently upgraded, however, you may need to
install the software. In this case, installation instructions are provided with the software.

Dell PowerVault 120T DDS4 Autoloader User's Guide 2-5
Internal/External Option Switches (DIP Switch)
Figure 2-4. Dip Switch Settings
Terminator Power Definition
OFF No provided
ON Provided
DC Control-1 DC Control-2 Definition
OFF OFF
Compression disabled at power-on. The host is allowed to
control compression.
OFF ON
Compression disabled at power-on. The host is not allowed
to control compression.
ON OFF
Compression enabled at power-on. The host is allowed to
control compression.
ON ON
Compression enabled at power-on. The host is not allowed
to control compression.
2-6 Dell PowerVault 120T DDS4 Autoloader User's Guide
Internal Mounting Holes for 5.25-inch
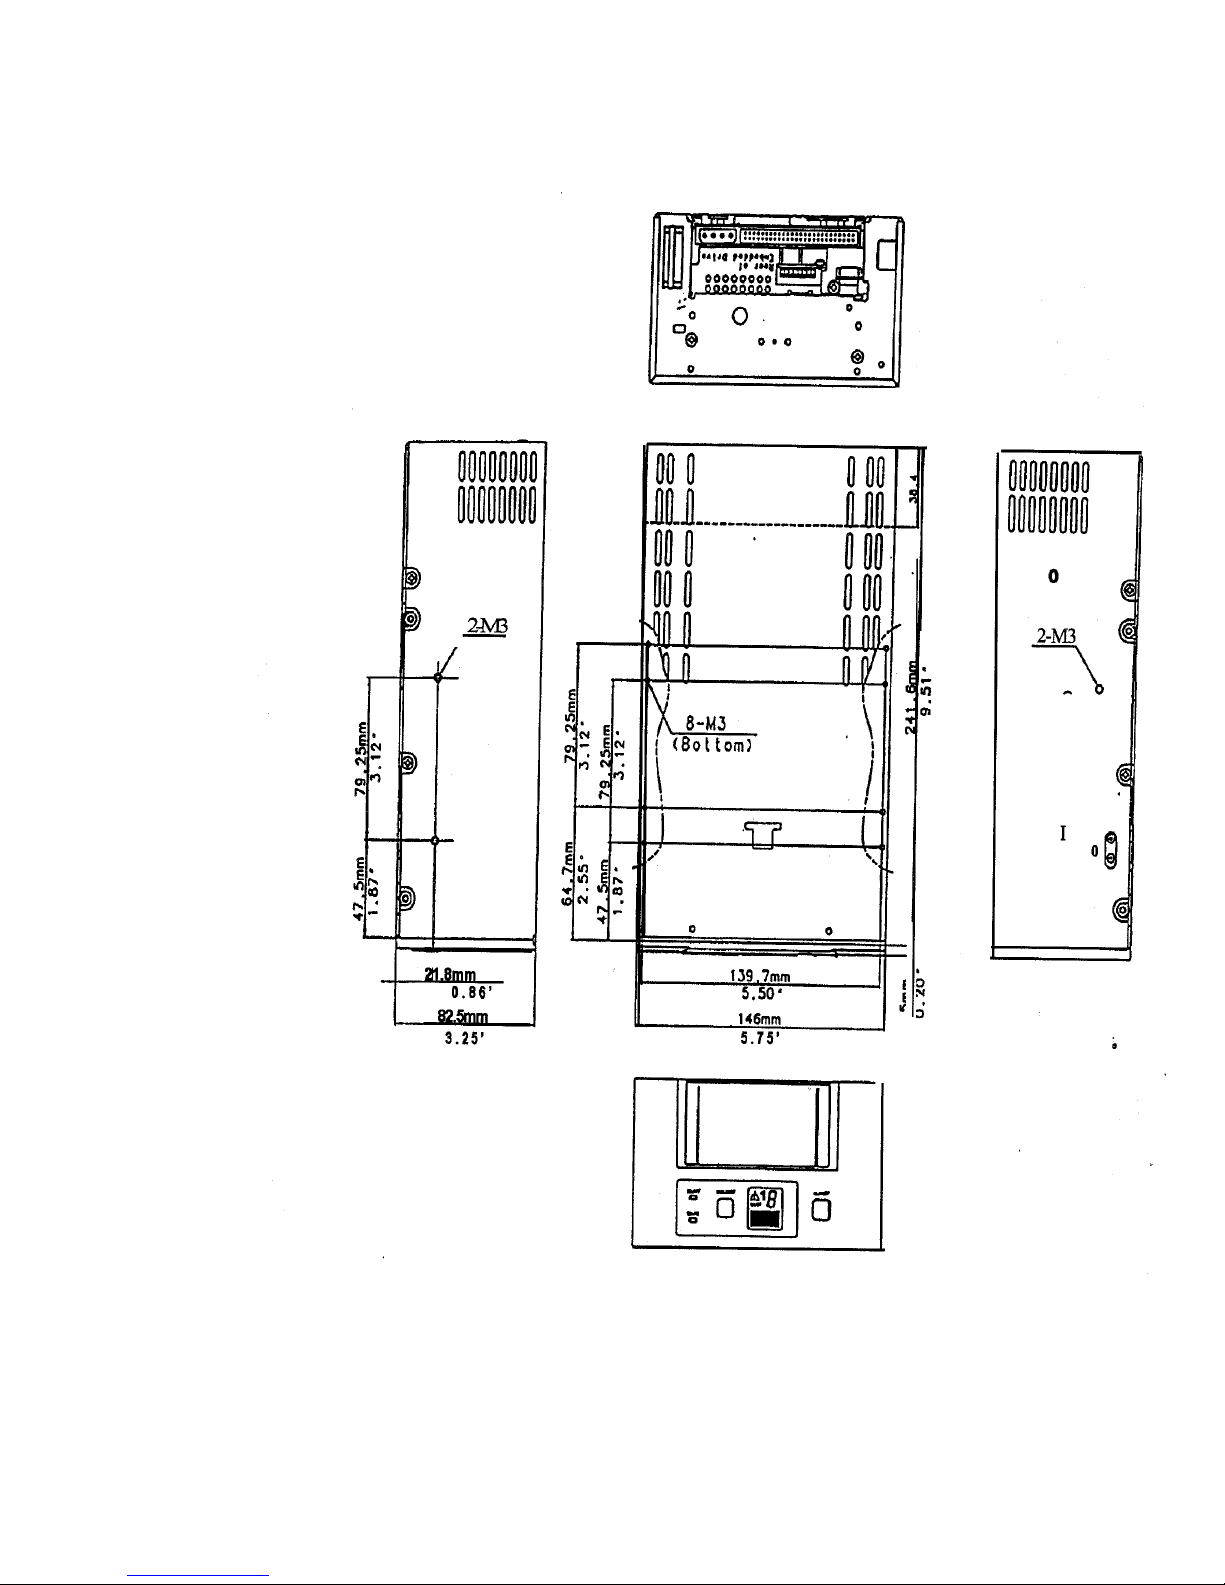
Figure 2-5. Mounting Holes 5.25-inch autoloader (Internal)
Dell PowerVault 120T DDS4 Autoloader User's Guide 2-7
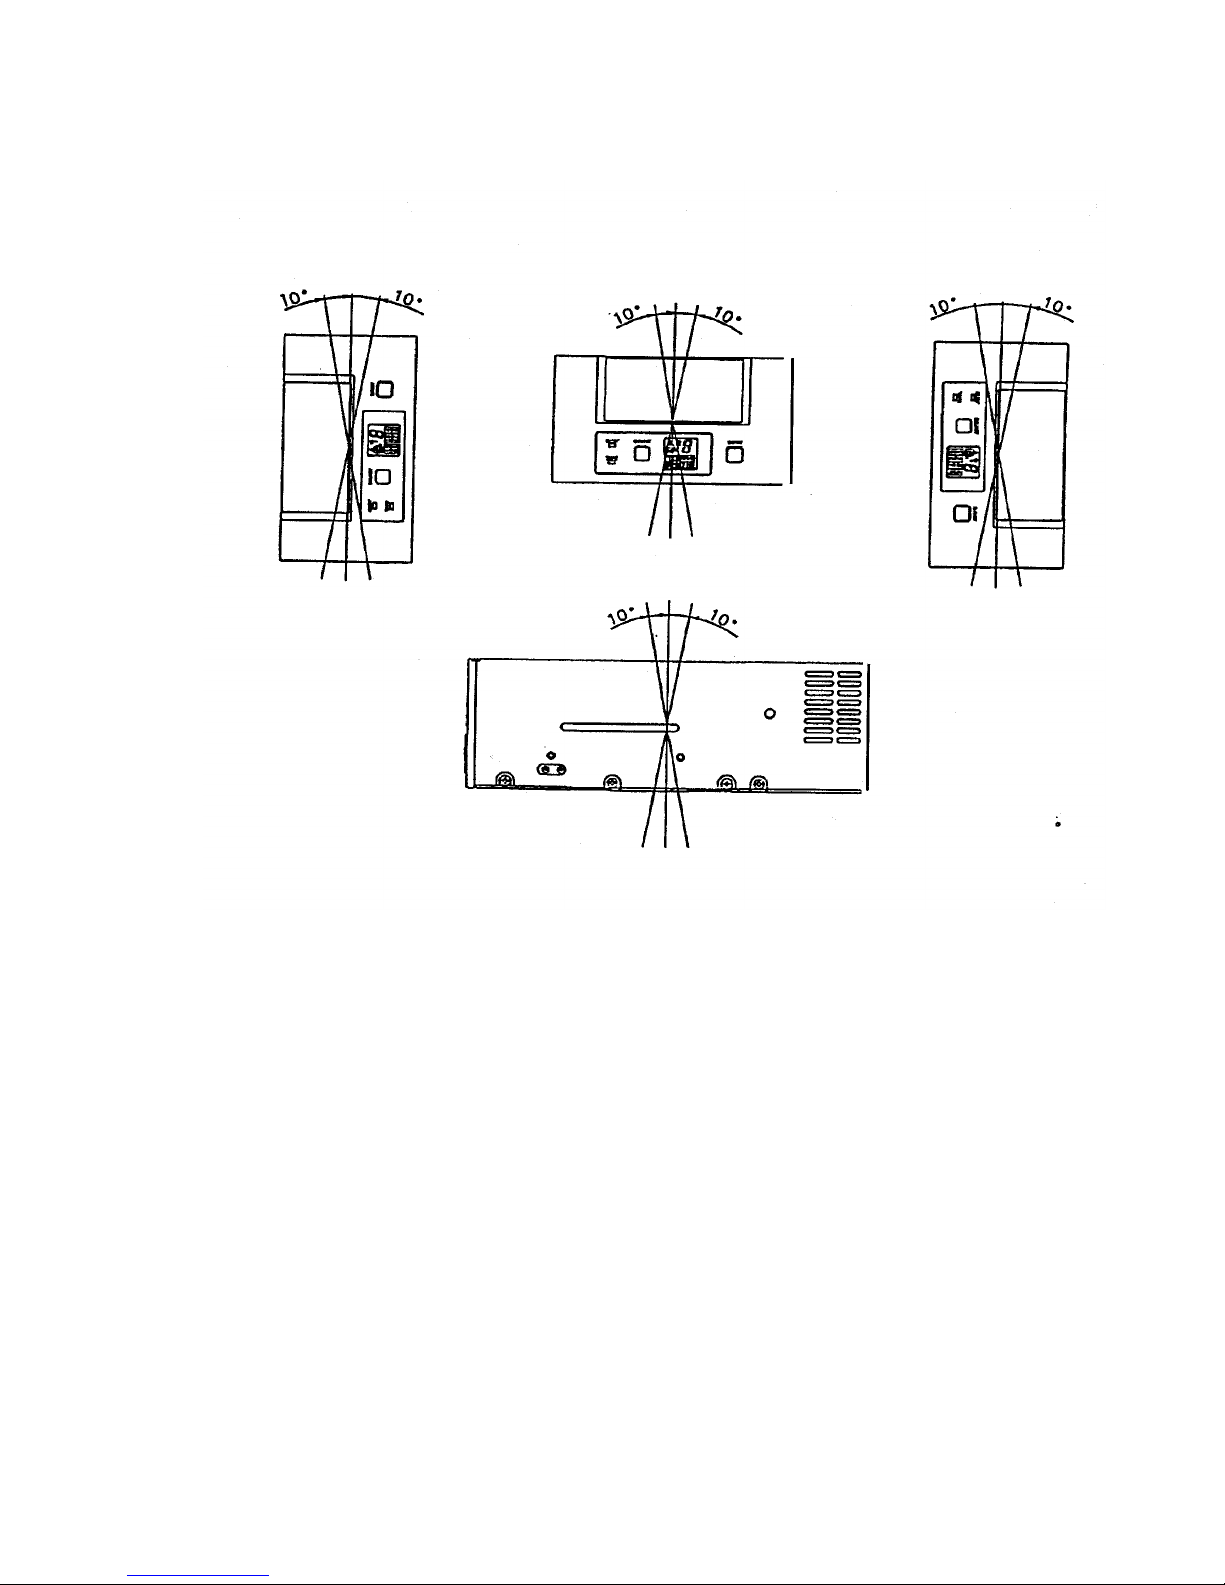
Orientation
Figure 2-6. Orientation (Internal)
Loading Device Drivers
Drivers
See instructions supplied with the tape backup software.
Native Operating System Backup Utilities
Tape autoloaders are not supported by Microsoft® Windows NT® 4.0 or Novell®
NetWare® native backup utilities.
Tape Backup Applications
Microsoft Windows NT 4.0: Computer Associates ARCServeIT 6.6, Seagate Backup
Exec 7.2, Veritas Backup Exec 7.3
Novell NetWare: Computer Associates ARCServe 6.1, Seagate Backup Exec 8.0
Installing the Tape Backup Software
See instructions supplied with the tape backup software.

Dell PowerVault 120T DDS4 Autoloader User's Guide 3-1
Chapter 3
Using the Autoloader
Autoloader Modes of Operation
There are basically four modes of operations.
At any one time, the autoloader can be considered to be in one of these modes.
EMPTY MODE
The autoloader is considered to be in this mode when there is no magazine
loaded in the autoloader. A magazine must be inserted manually.
STANDBY MODE
The autoloader enters this mode immediately following a magazine insertion
and successful magazine rotation-check sequence.
No buttons have been pressed and no SCSI commands have been received.
SEQUENTIAL MODE
The autoloader enters this mode when the Select button/the Enter button has
been pressed and the selected tape is loaded successfully. In this mode, the
autoloader will load the cartridges sequentially. Upon receiving an UNLOAD
command (LUN 0) the cartridge will be automatically replaced in its slot in the
magazine and the next highest cartridge is loaded.
This continues until there are no more cartridges. If the unload command is
received for the last cartridge (for example, cartridge 8), the autoloader will
simply place it in its slot and no further action is taken. A cartridge can be
loaded in any order by using the Select button/the Enter button.
This mode can only be entered from STANDBY MODE.
RANDOM MODE
The autoloader enters this mode when it receives a SCSI MOVE MEDIUM
command. The Select button will be disabled while the autoloader is in this
mode. The Eject button or SCSI UNLOAD (LUN 1) command can be used to
exit the random mode.
3-2 Dell PowerVaullt 120T DDS4 Autoloader User's Guide
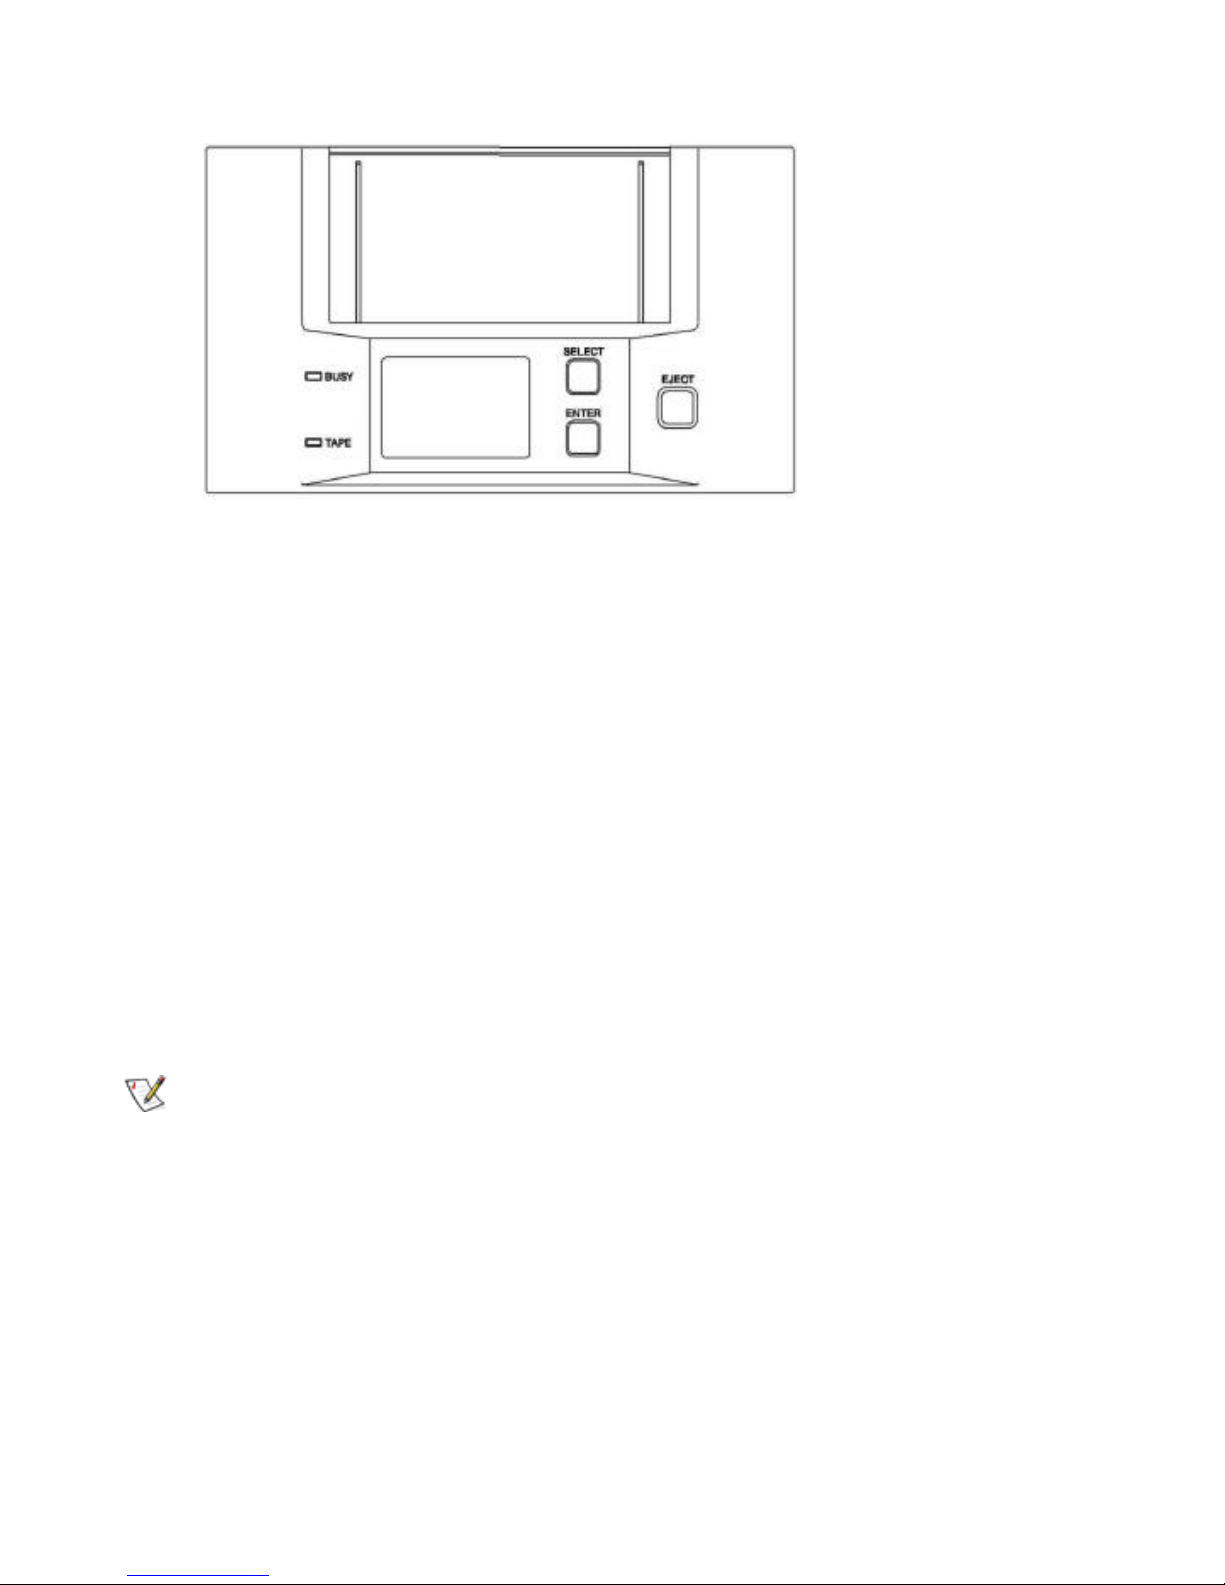
Figure 3-1. Front Panel
The Autoloader front panel consists of the following:
• A select button / An enter button
• A Liquid Crystal Display (LCD)
• An eject button
• Two lights (LED's): tape present, and busy status
The Select Button / The Enter Button
The Select button allows you to select any of the cartridges present in the magazine,
once the magazine has been inserted into the loader. The number selected is displayed
on the LCD. If you press the Select button repeatedly, the display cycles through the
cartridges available in the magazine, see Figure 3-1.
Once a cartridge has been selected, the Enter button should be pressed for
confirmation, and the autoloader will load the selected cartridge into the drive.
The Eject Button
The Eject button starts the unload process. The drive unloads any currently loaded
cartridge , and the loader mechanism returns it to the magazine. The magazine is then
ejected, see Figure 3-1.
NOTE: The host can disable the Eject button by sending a SCSI PREVENT MEDIA
removal command.
 Loading...