

Dell PowerVault 110T DLT VS80, 110T VS80 Quick Start Manual

Dell™ PowerVault™ Data Protection
Solution Quick Start Guide
www.dell.com | support.dell.com

Notes, Notices, and Cautions
NOTE: A NOTE indicates important information that helps you make better use of
your computer.
NOTICE: A NOTICE indicates either potential damage to hardware or loss of data
and tells you how to avoid the problem.
CAUTION: A CAUTION indicates a potential for property damage, personal injury,
or death.
____________________
Information in this document is subject to change without notice.
© 2007 Dell Inc. All rights reserved.
Reproduction in any manner whatsoever without the written permission of Dell Inc. is strictly
forbidden.
Trademarks used in this text: Dell, the DELL logo, PowerEdge, PowerVault, and Dell OpenManage
are trademarks of Dell Inc.; Intel is a registered trademarks of Intel Corporation; Microsoft, Windows,
SQL Server, and Windows Server are either trademarks or registered trademarks of Microsoft
Corporation in the United States and/or other countries.
Other trademarks and trade names may be used in this document to refer to either the entities claiming
the marks and names or their products. Dell Inc. disclaims any proprietary interest in trademarks and
trade names other than its own.
November 2007 Rev. A00

Contents
1 Getting Started . . . . . . . . . . . . . . . . . . . . . 7
Introduction . . . . . . . . . . . . . . . . . . . . . . . . 7
Supported Systems Information
. . . . . . . . . . . . . . 7
Locating the PowerVault System Model
Obtaining Support Documents
and Software Updates
DPM Prerequisites
Rack Installation
. . . . . . . . . . . . . . . . . . . . . 11
Connecting and Powering on the System
. . . . . . . . . . . . . . . . 9
. . . . . . . . . . . . . . . . . . . . 11
. . . . . . . . 12
Configuring Your System Using a Keyboard,
Video Monitor and Mouse
. . . . . . . . . . . . . . . . 12
Entering the Default Administrator Username
and Password
Changing the Administrator Password
Network Configuration
. . . . . . . . . . . . . . . . . . . . . . 13
. . . . . . . . . 13
. . . . . . . . . . . . . . . . . 14
Cabling and Configuring Your Network Connection
Configuring TCP/IP Using DHCP (Default Setting)
Configuring TCP/IP Using a Static IP Address
Changing the Computer Name
. . . . . . . . . . . . . . 16
. . . . . . . 8
14
. 14
. . . 15
Domain Membership
. . . . . . . . . . . . . . . . . . . 17
Localizing Your System Using MUI
. . . . . . . . . . . 19
Contents 3

2 Configuring Your System Remotely . . . . 21
Special Administration Console (SAC) . . . . . . . . . 21
Accessing the SAC Command Prompt
Remote Desktop Connection
Remote Web Administration
. . . . . . . . . . . . 23
. . . . . . . . . . . . 24
. . . . . . . 22
Dell Remote Access Controller (DRAC)
Baseboard Management Controller (BMC)
. . . . . . . . . 24
. . . . . . . 25
3 Configuring DPM . . . . . . . . . . . . . . . . . . 27
Running the Configuration Wizard. . . . . . . . . . . . 27
Microsoft Data Protection Manager Mini-Setup
DPM Storage Pool Configuration
Verification
. . . . . . . . . . . . . . . . . . . . . . . . 35
. . . . . . . . . . . . 33
. . . . 32
4 Licensing . . . . . . . . . . . . . . . . . . . . . . . . 37
DPM Licenses . . . . . . . . . . . . . . . . . . . . . . 37
Windows Storage Server 2003 R2 x64 License
. . . . . 38
5 DPM Deployment . . . . . . . . . . . . . . . . . . 39
4 Contents
Installing Protected System Prerequisite Software. . . 39
Deploying Agents
Protecting Servers
Advanced Configuration
. . . . . . . . . . . . . . . . . . . . 39
. . . . . . . . . . . . . . . . . . . . 40
. . . . . . . . . . . . . . . . . 40

6 DPM and Tape Devices . . . . . . . . . . . . . . 41
Installing Tape Drives and Tape Libraries. . . . . . . . 41
Using DPM with Tape Drives and Tape Libraries
. . . . 41
7 Installing Dell OpenManage™ Server
Administrator
Overview . . . . . . . . . . . . . . . . . . . . . . . . . 43
Installing Server Administrator
. . . . . . . . . . . . . . . . . . . . . 43
. . . . . . . . . . . . . 43
8 Updating Software . . . . . . . . . . . . . . . . . 45
Updating Your PowerVault System . . . . . . . . . . . 45
Using the Server Update Utility . . . . . . . . . . . . . . . . . .
Using Dell Update Packages
Updating Your Operating System
Updating DPM
. . . . . . . . . . . . . . . . . . . . . . 45
. . . . . . . . . . . . 45
. . . . . . . . . . . . 45
45
9 Getting Help . . . . . . . . . . . . . . . . . . . . . . 47
Dell Support . . . . . . . . . . . . . . . . . . . . . . . 47
Hardware Issues
Software/DPM Issues
. . . . . . . . . . . . . . . . . . . . . 47
. . . . . . . . . . . . . . . . . . 47
Troubleshooting the
PowerVault Data Protection Solution Wizard
Other Documents and Resources You May Need
Microsoft Information
. . . . . . . . . . . . . . . 48
. . . . . 47
. . . . 48
Contents 5

Dell Hardware. . . . . . . . . . . . . . . . . . . . 48
Dell Software
. . . . . . . . . . . . . . . . . . . . 49
Index . . . . . . . . . . . . . . . . . . . . . . . . . . . . . . . 51
6 Contents

Getting Started
Introduction
Your Dell™ PowerVault™ Data Protection Solution is preconfigured for quick
and simple deployment. Some configuration settings are unique to your IT
environment and must be entered upon initial use. This document provides
the information needed to configure the system for your specific IT
environment.
NOTE: Prior to deploying your system, review the Dell PowerVault Data Protection
Solution Information Update for the latest information.
NOTE: For documents referenced in this guide, see the Dell PowerVault Data
Protection Solution Quick Reference Guide at support.dell.com.
Supported Systems Information
The PowerVault Data Protection Solution is based on Microsoft® System
Center Data Protection Manager (DPM) 2007, which is preconfigured to run
on a Dell PowerVault system. It is important to know your PowerVault system
model when you require support from Dell, install additional hardware, or
reinstall the PowerVault Data Protection Solution software. Dell
OpenManage™ system management applications recognize and report your
system model information.
Table 1-1. PowerVault Data Protection Solutions and System Models
Data Protection Solution System Model
PowerVault DP100 PowerVault 100
PowerVault DP500 PowerVault 500
PowerVault DP600 PowerVault 600
Getting Started 7

The PowerVault Data Protection Solution name is located on the front of
your system.
Figure 1-1. PowerVault Data Protection Solution Tower System
Figure 1-2. PowerVault Data Protection Solution Rack System
Locating the PowerVault System Model
The PowerVault system model is available from the following locations:
• BIOS boot and configurations screens
• OpenManage
• OpenManage
• operating system
8 Getting Started
™
Server Administrator
™
IT Assistant
System Properties
window (see Figure 1-3)
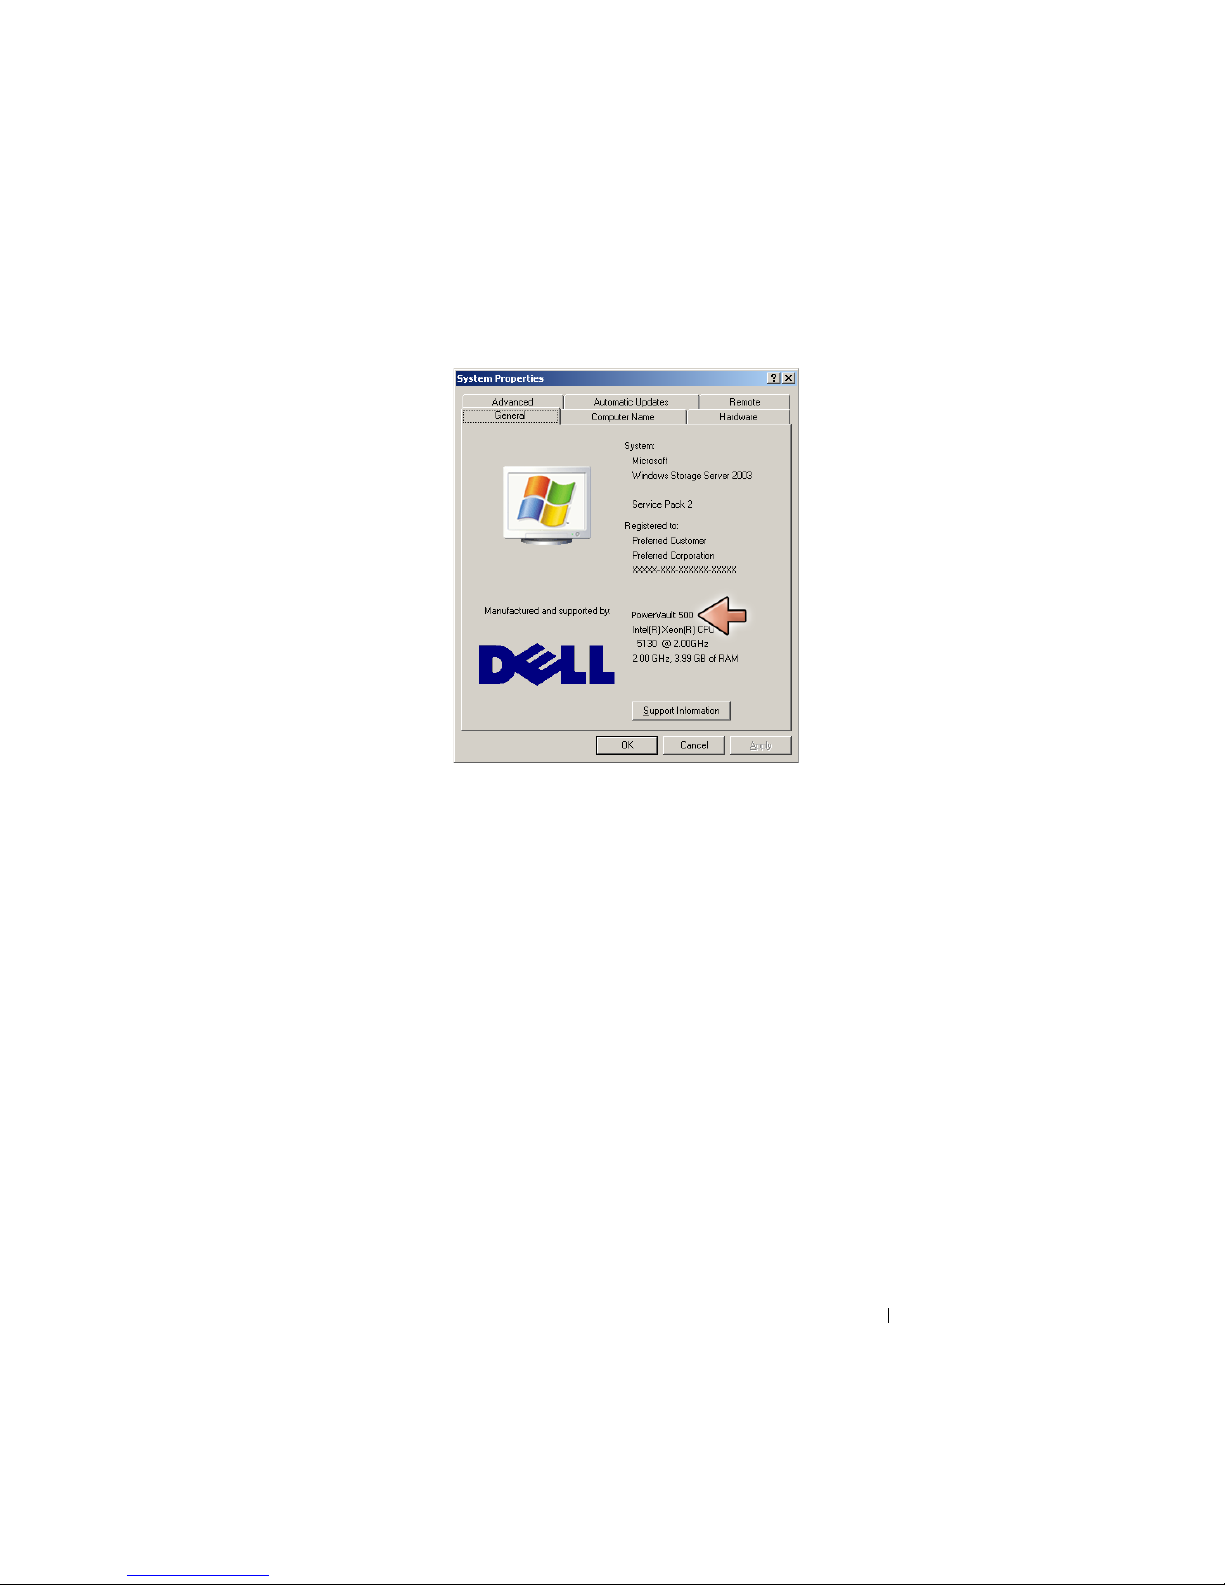
Figure 1-3. PowerVault System Model Identification on the System Properties Window
Obtaining Support Documents and Software Updates
Visit support.dell.com to obtain additional documentation or software
updates for your PowerVault system, including:
• BIOS updates
• firmware updates to the PowerVault system and internal peripherals
• device drivers
Locate the documents and software updates that apply to your system by
selecting your PowerVault system model (for example, PowerVault 500).
Then, choose your system model by either model, service tag, or from your
customized system list.
Getting Started 9
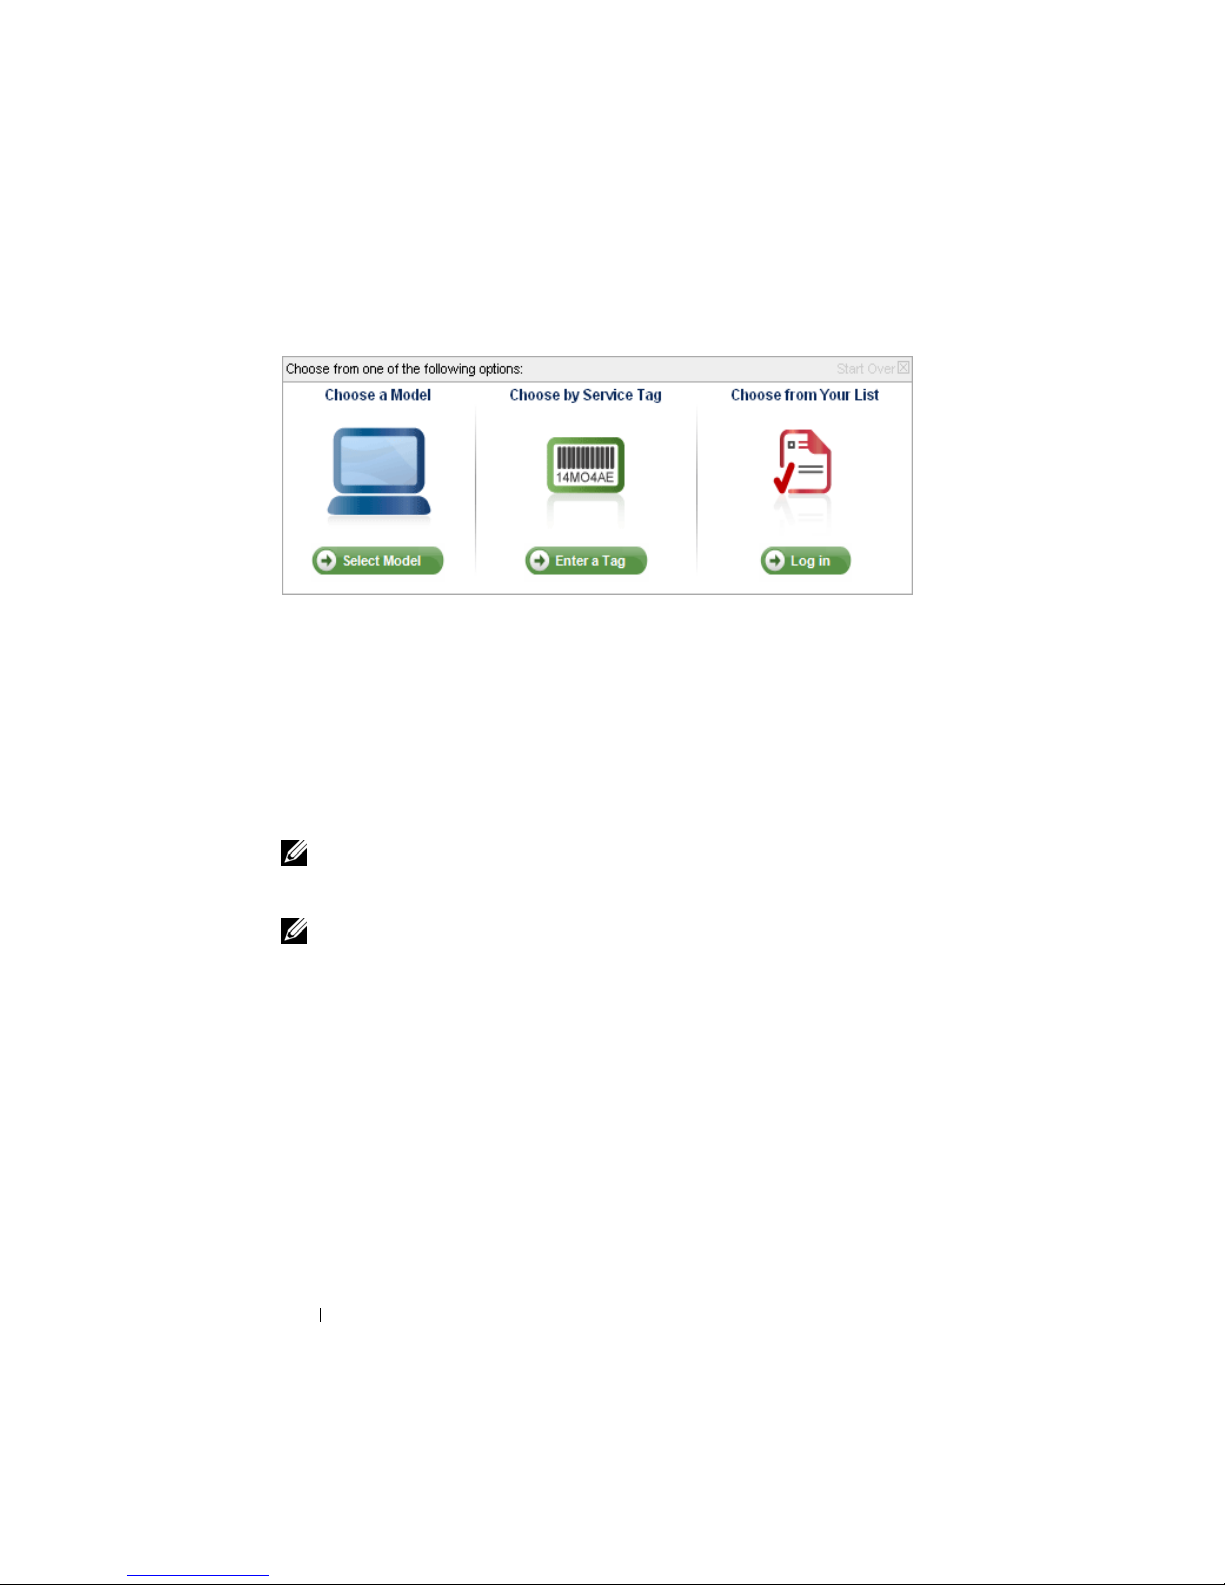
Figure 1-4. Model Selection via support.dell.com
Choose by Model
1
Click on
2
Under
3
Under
4
Choose your system model.
Choose by Service Tag
NOTE: The service tag is a label attached to the side or back of your system that
includes a bar code and alpha numerics. When you enter your system’s service tag,
the system model is determined automatically.
Select Model
Product Family
Product Line
, click on
.
, click
Select Servers, Storage and Networking
PowerVault Storage
.
.
NOTE: Dell recommends using this method when using support.dell.com.
1
Click on
2
Enter your service tag, then click Go.
Choose from Your List
Enter a Tag
.
You can maintain a list of systems you have purchased from Dell using the
Yo u r L i st feature on support.dell.com. Once you have created an account and
entered the service tags for the systems that you own, you can choose your
model from that list.
10 Getting Started
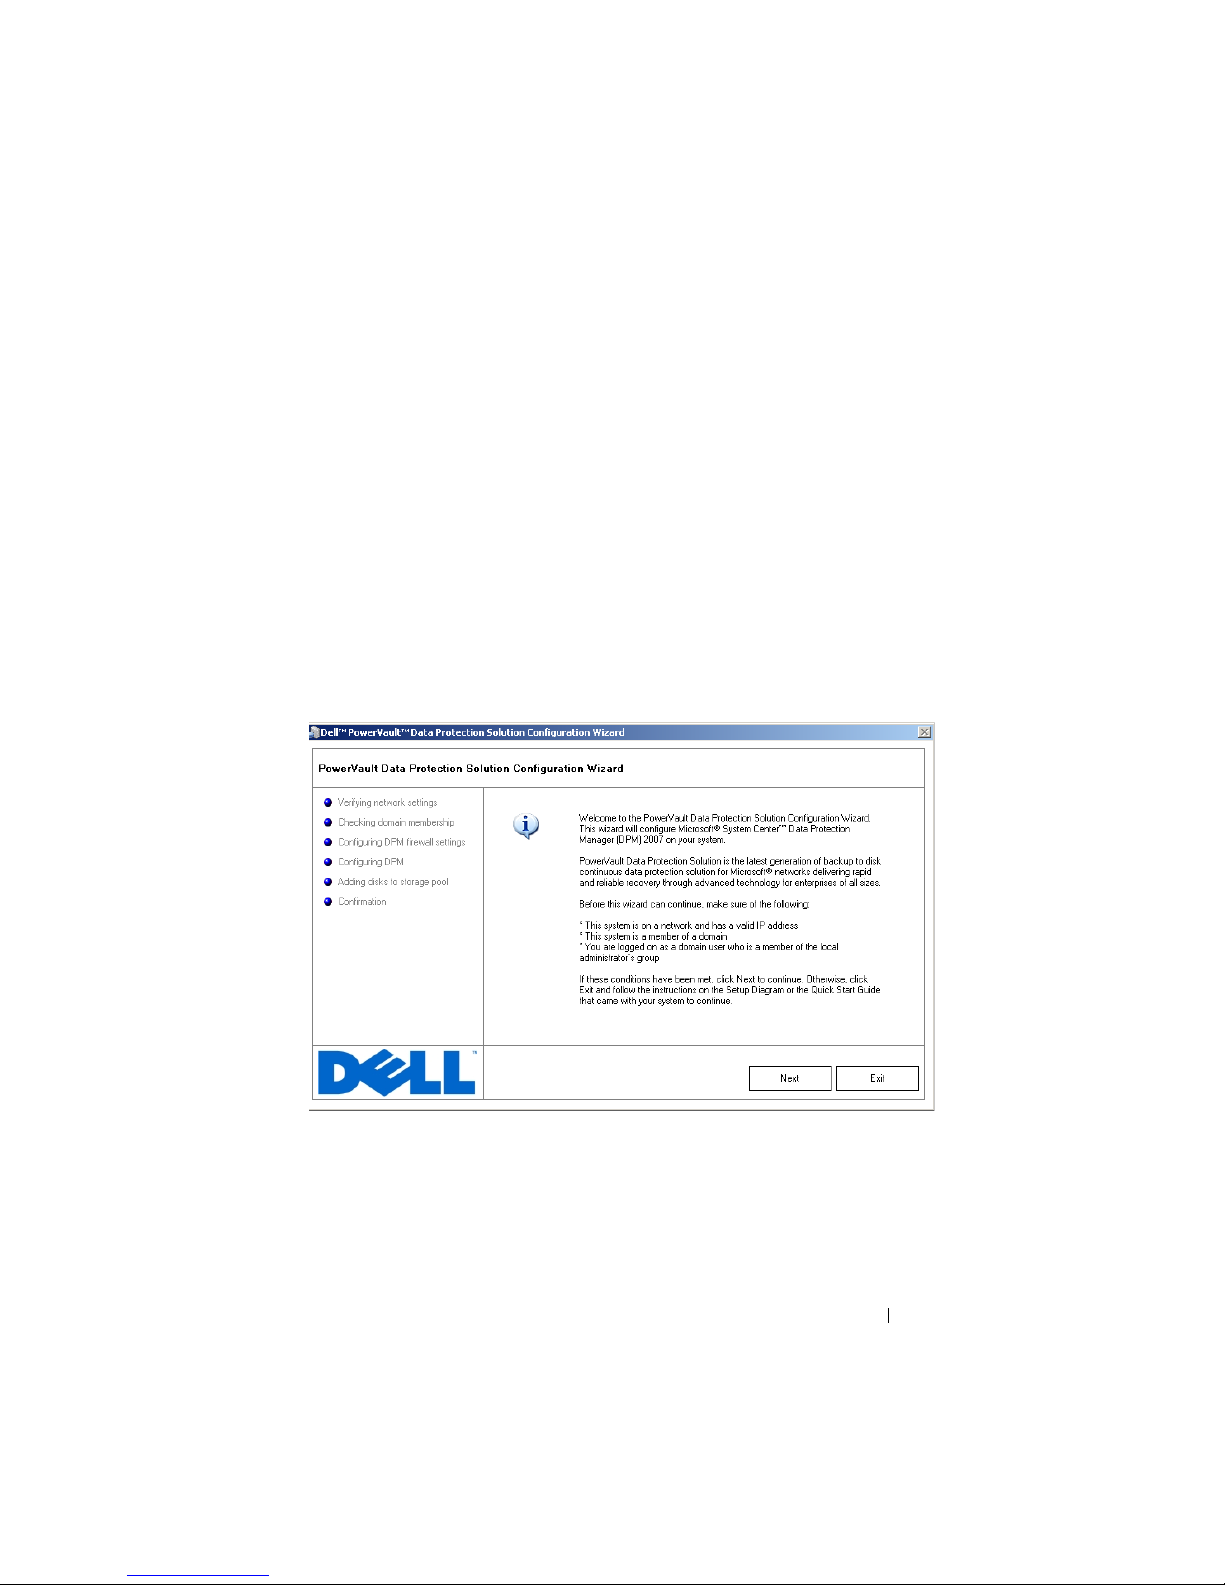
DPM Prerequisites
Before you run Microsoft® System Center Data Protection Manager (DPM)
2007 for the first time, these prerequisites apply:
• The system must be on a network and have a valid IP address.
• The system must be a member of a domain.
• The user must be logged on as a domain user, and that domain user must
be a member of the local administrator group.
At initial login, the PowerVault Data Protection Solution Configuration
Wizard starts up automatically. Exit the wizard to configure your system to
meet the prerequisites above. The following sections in this document guide
help you complete these tasks.
Figure 1-5. PowerVault Data Protection Solution Configuration Wizard Welcome
Screen
Rack Installation
For rack mountable systems, see the Rack Installation Instructions or Rack
Installation Guide included with your rack solution for information on how to
install your system into a rack.
Getting Started 11
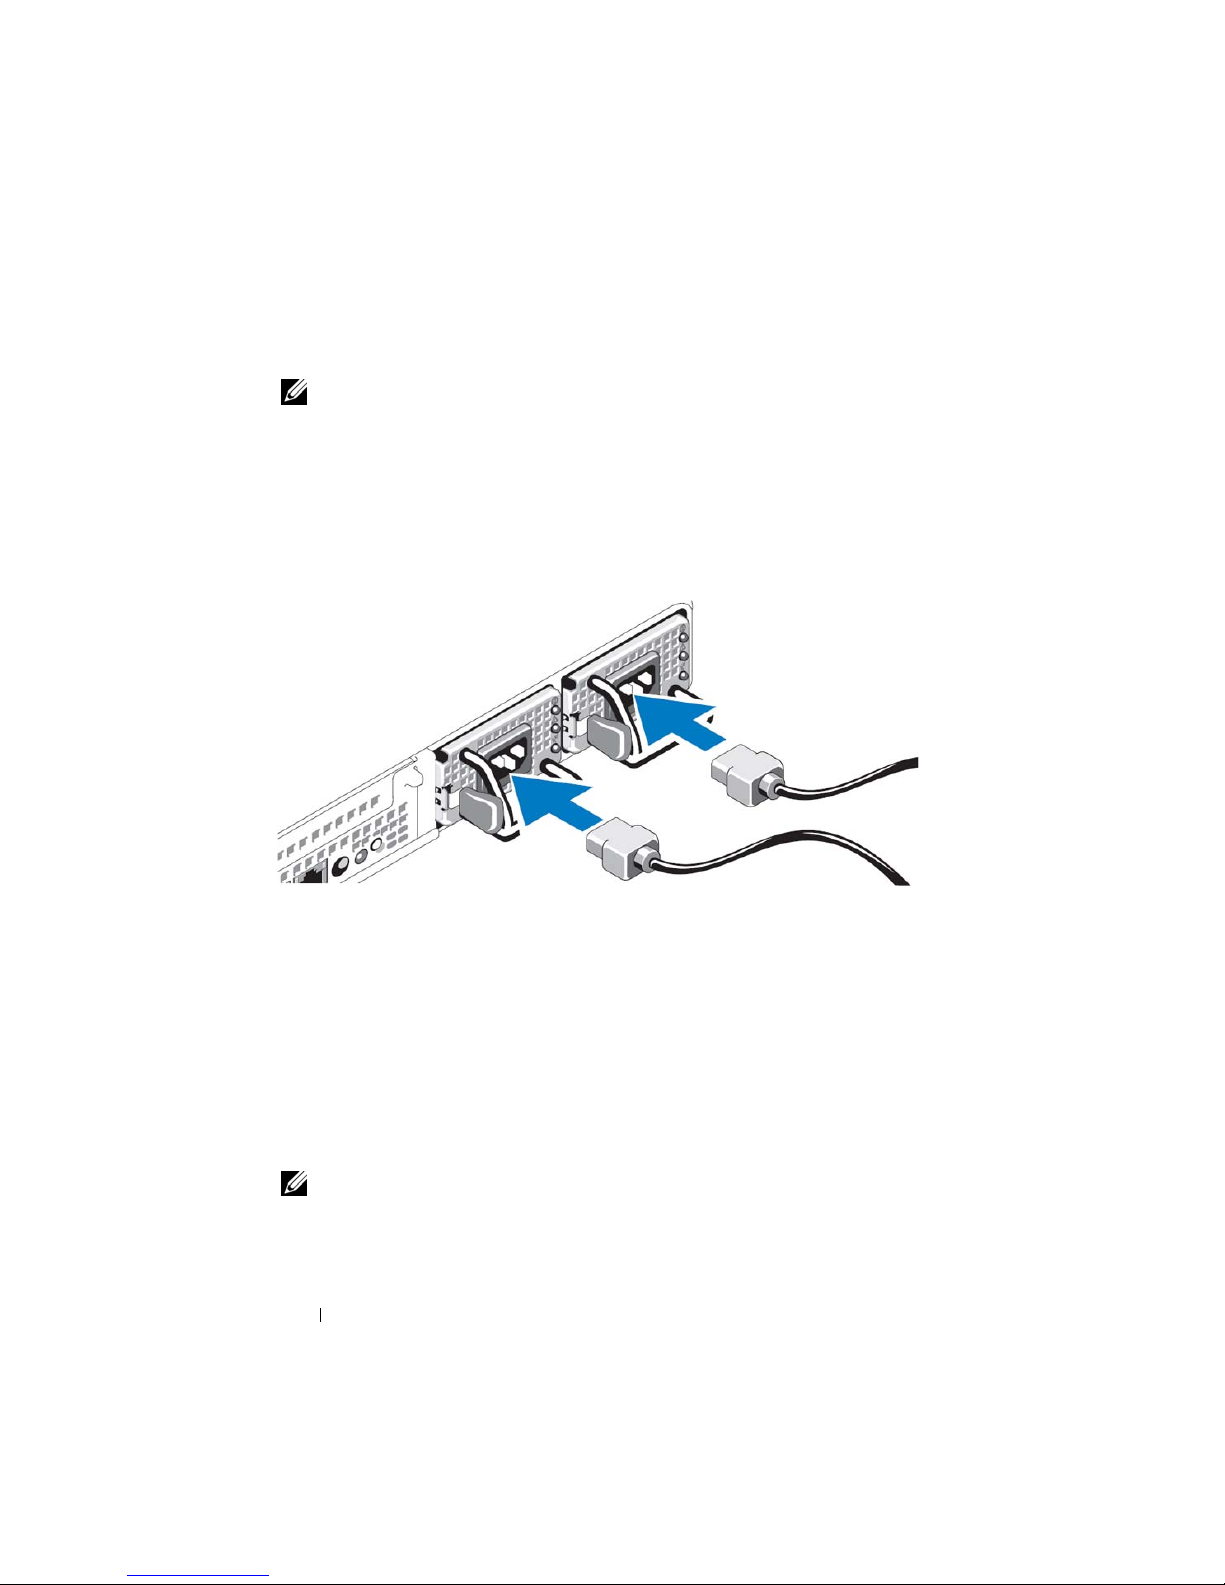
Connecting and Powering on the System
NOTE: For maximum reliability and availability of your PowerVault Data Protection
Solution, connect your system to an Uninterrupted Power Supply (UPS).
Connect the system’s power cable(s) to the system. Plug the other end of the
cable into a grounded electrical outlet or a separate power source, such as an
uninterrupted power supply (UPS) or a power distribution unit (PDU). For
information about system connectors, see your system’s Hardware Owner’s
Manual.
Figure 1-6. Power Connectors
Configuring Your System Using a Keyboard, Video
Monitor and Mouse
1
Connect your keyboard, video monitor, and mouse to the system.
For information about system connectors, see your system’s
Owner’s Manual.
2
Push the power button to turn on the system.
3
Log on to the system.
NOTE: If you plan to complete the system setup remotely, refer to "Configuring Your
System Remotely" on page 21. Then, return to this section and complete the
following steps.
12 Getting Started
Hardware
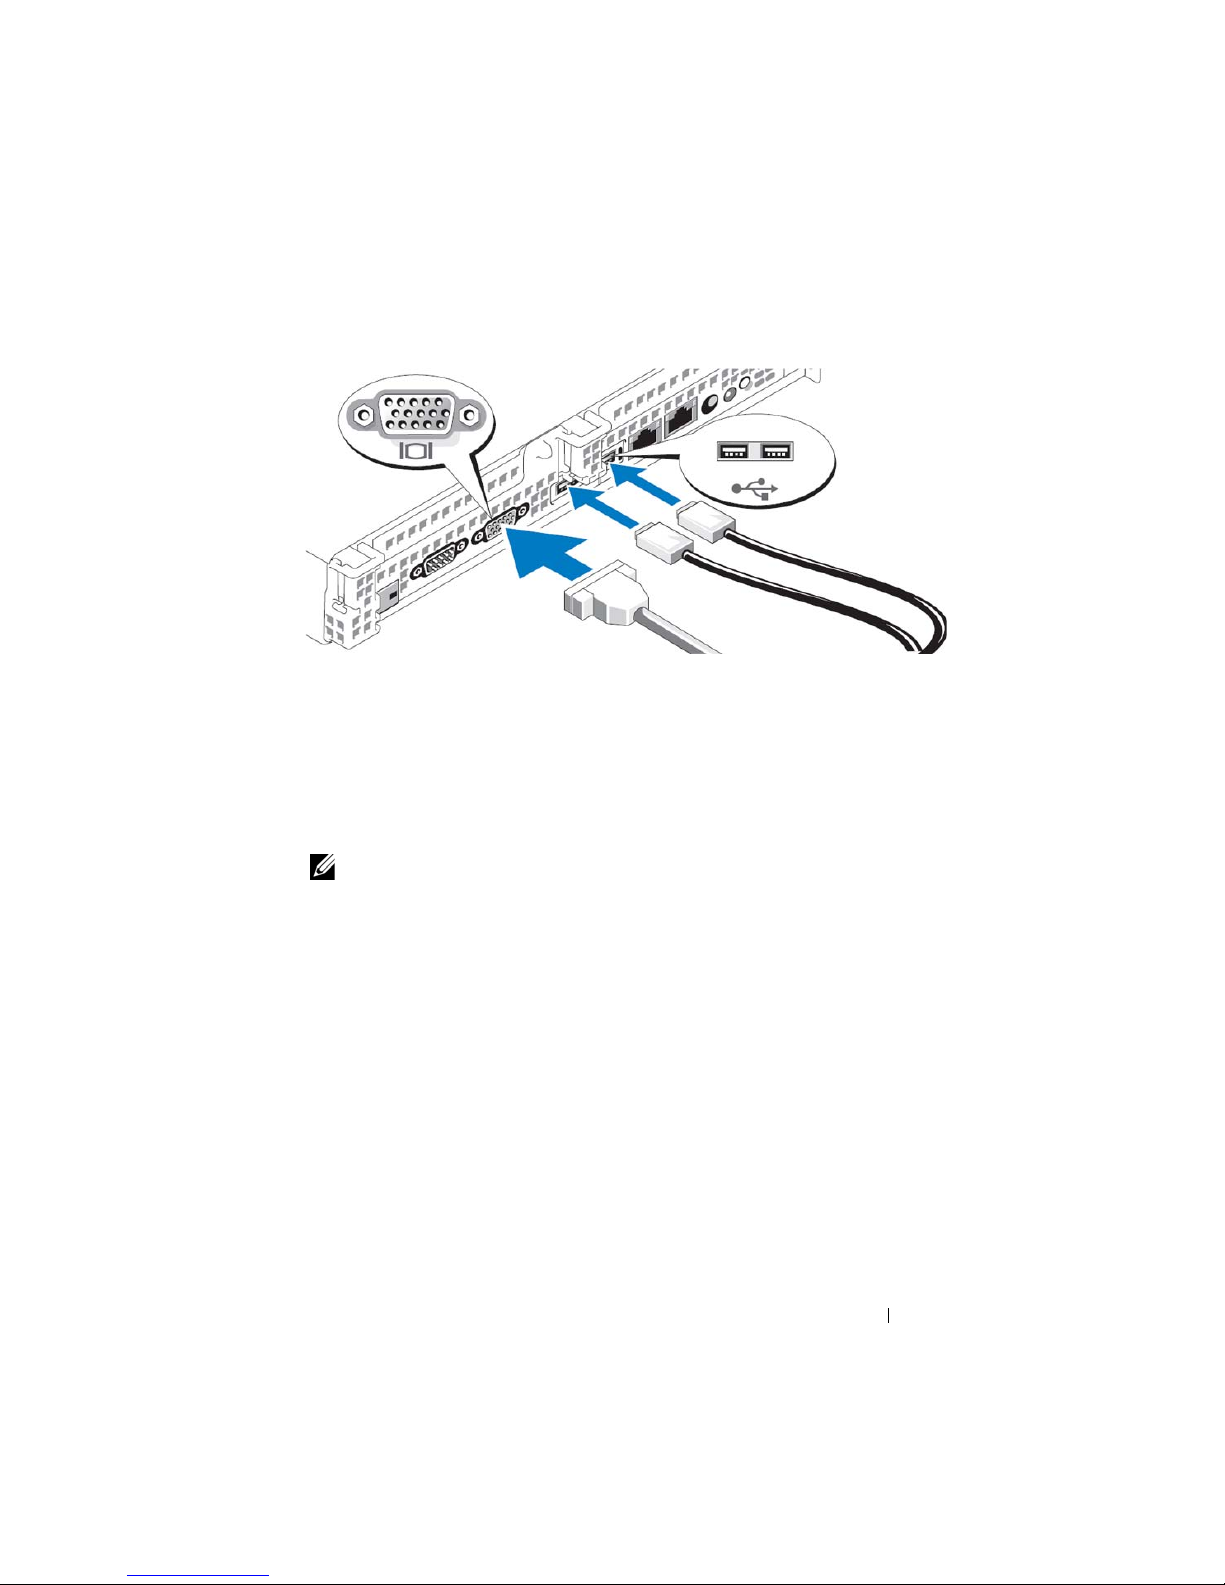
Figure 1-7. Connecting a Keyboard, Video Monitor and Mouse to the System
Entering the Default Administrator Username and
Password
When logging into the system for the first time, you must enter an
administrator user name and password. The default administrator user name
for your system is administrator; the default password is storageserver.
NOTE: Change the default password immediately to keep your system secure.
Changing the Administrator Password
1
Click
Start
and select
2
In the
Computer Management
(Local)
3
In the right window, right-click
4
In the
5
Enter and confirm your password in the appropriate fields, then click OK.
6
Close the
tree, expand
Set Password for Administrator
Computer Management
Administrative Tools → Computer Management
window in the
Local Users and Groups
Administrator
window, click
window.
Computer Management
, then select
and select
Getting Started 13
Users
Set Password
Proceed
.
.
.
.
Network Configuration
Cabling and Configuring Your Network Connection
1
Connect one end of an Ethernet cable into one of the RJ-45 network
interface connectors (NIC) (see Figure 1-8) on the back of your system.
See the
2
Connect the other end of the Ethernet cable to a functioning Ethernet
jack.
3
Verify that the NIC connector LED is lit (see Figure 1-8). If the LED is
steady green, the connection is good. If the LED is flashing amber, data is
successfully being transferred.
4
If the LED is not lit, make sure that each end of the Ethernet cable is
seated properly in the NIC connector and Ethernet jack.
Figure 1-8. NIC Connector
Hardware Owner’s Manual
for the NIC locations.
NOTE: The NIC connector’s physical orientation may vary depending on your
system. See your system’s Hardware Owner’s Manual for more information.
Configuring TCP/IP Using DHCP (Default Setting)
Dynamic Host Configuration Protocol (DHCP) is enabled by default on your
system. If your network is not configured with a DHCP server, proceed to
"Configuring TCP/IP Using a Static IP Address" on page 15 to configure a
static IP address on your system. Use the following procedure to verify your
system’s DHCP configuration.
14 Getting Started

NOTE: To perform this procedure, you must be a member of the Administrator
group or the Network Configuration Operator group on the local computer.
1
Click
Start
and select
2
Right-click the network connection you want to configure, then click
Properties
3
On the
.
General
(for all other connections), click
Properties
4
Verify that
.
Obtain an IP address automatically
Settings→ Control Panel→ Network Connections
tab (for a local area connection) or the
Networking
Internet Protocol (TCP/IP)
is selected, then click OK.
. Then, click
Proceed to "Changing the Computer Name" on page 16.
Configuring TCP/IP Using a Static IP Address
The following procedure is required if DHCP is not configured on the
network, or if a static IP address is desired.
NOTE: To perform this procedure, you must be a member of the Administrator
group or the Network Configuration Operator group on the local computer.
1
Click
Start
and select
2
Right-click the network connection that you want to configure, then click
Properties
3
On the
.
General
(for all other connections), click
Properties
4
Click
5
If you are configuring a local area connection, enter the appropriate
.
Use the following IP address
information in the
you are configuring an ad hoc connection, enter the IP address in the
address
field.
6
Click
Use the following DNS server addresses
7
In the
Preferred DNS server
primary and secondary DNS server addresses.
Settings→ Control Panel→ Network Connections
tab (for a local area connection) or the
Networking
Internet Protocol (TCP/IP)
.
IP address, Subnet mask
, and
Default gateway
.
and
Alternate DNS server
fields, type the
. Then, click
.
tab
.
tab
fields. If
IP
Getting Started 15

8
Configure additional IP addresses, if required. Otherwise, go to the next
step.
a
Click
Advanced
b
c
On the
Under
IP Settings
TCP/IP Address
appropriate fields, then click
d
Repeat step b and step c for each additional IP address.
9
Configure additional default gateways, if required. Otherwise, go to the
.
tab under
IP addresses
, click
Add
.
, enter an IP address and subnet mask in the
Add
.
next step.
a
b
On the
Under
IP Settings
tab under
Default gateways
TCP/IP Gateway Address
in the
Gateway
, click
Add
.
field, enter the IP
address of the default gateway.
c
To manually configure a default route metric, clear the
metric
check box and enter a metric in the
d
Click
Add
.
e
Repeat step b through step d for each default gateway (if required).
10
Configure a custom metric for this connection, if required. Otherwise, go
Metric
Automatic
field.
to step 11.
11
12
13
Clear the
In the
Click OK.
Automatic metric
Interface metric
check box.
field, type the appropriate metric.
Changing the Computer Name
1
Right-click
dialog box is displayed.
2
On the
Changes
want to assign to your system. Then, click
3
Click OK to close the
4
When prompted, restart your system.
16 Getting Started
Computer Name
dialog box, in the
My Computer
System Properties
, then click
tab, click
Properties
Change
Computer name
. The
System Properties
. On the
Computer Name
field, enter the name you
OK
.
window.
 Loading...