

Page 1

Dell PowerVault Tape Systems
LTO Media Handbook
Page 2

Notes, Cautions, and Warnings
NOTE: A NOTE indicates important information that helps you make better use of
your computer.
CAUTION: A CAUTION indicates potential damage to hardware or loss of data if
instructions are not followed.
WARNING: A WARNING indicates a potential for property damage, personal
injury, or death.
_____________________
Information in this publication is subject to change without notice.
© 2005–2013 Dell Inc. All rights reserved.
Reproduction of these materials in any manner whatsoever without the written permission of Dell Inc.
is strictly forbidden.
Trademarks used in this text: Dell™, the DELL logo, PowerEdge™, and PowerV ault™ are trademarks
of Dell Inc.
Other trademarks and trade names may be used in this publication to refer to either the entities claiming
the marks and names or their products. Dell Inc. disclaims any proprietary interest in trademarks and
trade names other than its own.
December 2013 Rev. A04
Page 3

Contents
Drives and Media . . . . . . . . . . . . . . . . . . . . . 5
Media Color Schemes . . . . . . . . . . . . . . . . . . 13
Invalid Media Symptoms . . . . . . . . . . . . . . . . 14
PowerVault LTO-1 Tape Drives . . . . . . . . . . . . 5
PowerVault LTO-2 Tape Drives . . . . . . . . . . . . 7
PowerVault LTO-3 Tape Drives . . . . . . . . . . . . 8
PowerVault LTO-4 Tape Drives . . . . . . . . . . . . 9
PowerVault LTO-5 and LTO-6 Tape Drives . . . . . 10
Media Types for PowerVault LTO Tape Drives . . . 11
Cartridge Memory
Migrating LTO Media
WORM Media
Cleaning Media . . . . . . . . . . . . . . . . . . . . . 15
Label Designations on LTO Cleaning Media . . . . 15
Cleaning Media Usage and Drive Cleaning Lights . 16
Characteristics of Expired LTO Cleaning Tape . . . 18
Stuck Tapes . . . . . . . . . . . . . . . . . . . . . . . 21
Erasing a Pre-Written LTO Tape . . . . . . . . . . . . . 23
Media Handling
Media Description . . . . . . . . . . . . . . . . . 24
Perform a Thorough Inspection . . . . . . . . . . 25
Handle the Cartridge Carefully . . . . . . . . . . . 25
. . . . . . . . . . . . . . . . . . . . 14
. . . . . . . . . . . . . . . . . . 15
. . . . . . . . . . . . . . . . . . . . . . 15
. . . . . . . . . . . . . . . . . . . . . 24
Contents 3
Page 4

Ensure Proper Packaging While Shipping Tapes. . 27
Cartridge Storage Conditions . . . . . . . . . . . . 28
Cartridge Life . . . . . . . . . . . . . . . . . . . . 28
Media Do’s and Don’ts . . . . . . . . . . . . . . . 29
4 Contents
Page 5
This document describes media compatibility, handling, and usage for all Dell
PowerVault Linear Tape Open (LTO) drives.
Drives and Media
Table 1 through Table 5 list the basic characteristics of Dell PowerVault LTO
tape drives.
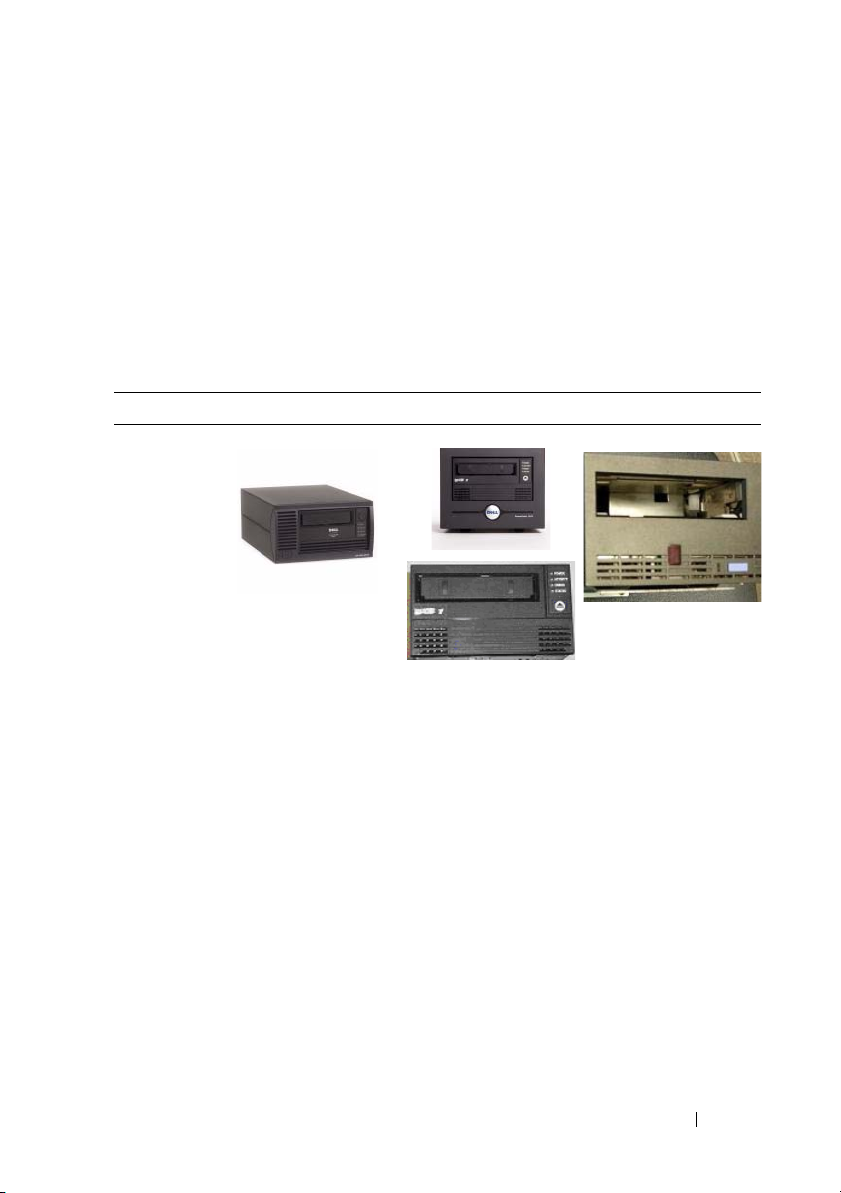
PowerVault LTO-1 Tape Drives
Table 1. LTO-1 Drive Types and Basic Characteristics
PowerVault 110T LTO PowerVault 110T LTO-1 PowerVault 110T LTO-1
Capacity Native
/Compressed
Native Speed 15 MB/s 15 MB/s 15 MB/s
Primary Media Ultrium-1 Ultrium-1 Ultrium-1
100 GB/200 GB 100 GB/200 GB 100 GB/200 GB
LTO Media Handbook 5
Page 6

Table 1. LTO-1 Drive Types and Basic Characteristics
PowerVault 110T LTO PowerVault 110T LTO-1 PowerVault 110T LTO-1
Physical
Device
Description
Supported
Systems
• Single air intake
at the bottom of
the drive
• Eject button at
top right corner
• Status lights
(vertical)
–Power
– Activity
– Error
–Status
• PowerVault110T
LTO ( ta bl e t o p
and internal
standalone)
• PowerVault 122T
• PowerVault 136T
• PowerVault 114T
• Ultrium-1 label on
drive bezel
•Split air intakes on
both the bottom
corners
• Flush mount eject
button
• Status lights
(vertical)
–Ready
– Drive error
– Tape error
–Use cleaning
cartridge
PowerVault 110T LTO1
(table top and internal
standalone)
Seven segment display
NOTE: PowerVault
110T LTO-1 is only sold
on 132T drive sled.
PowerVault 132T
6 LTO Media Handbook
Page 7
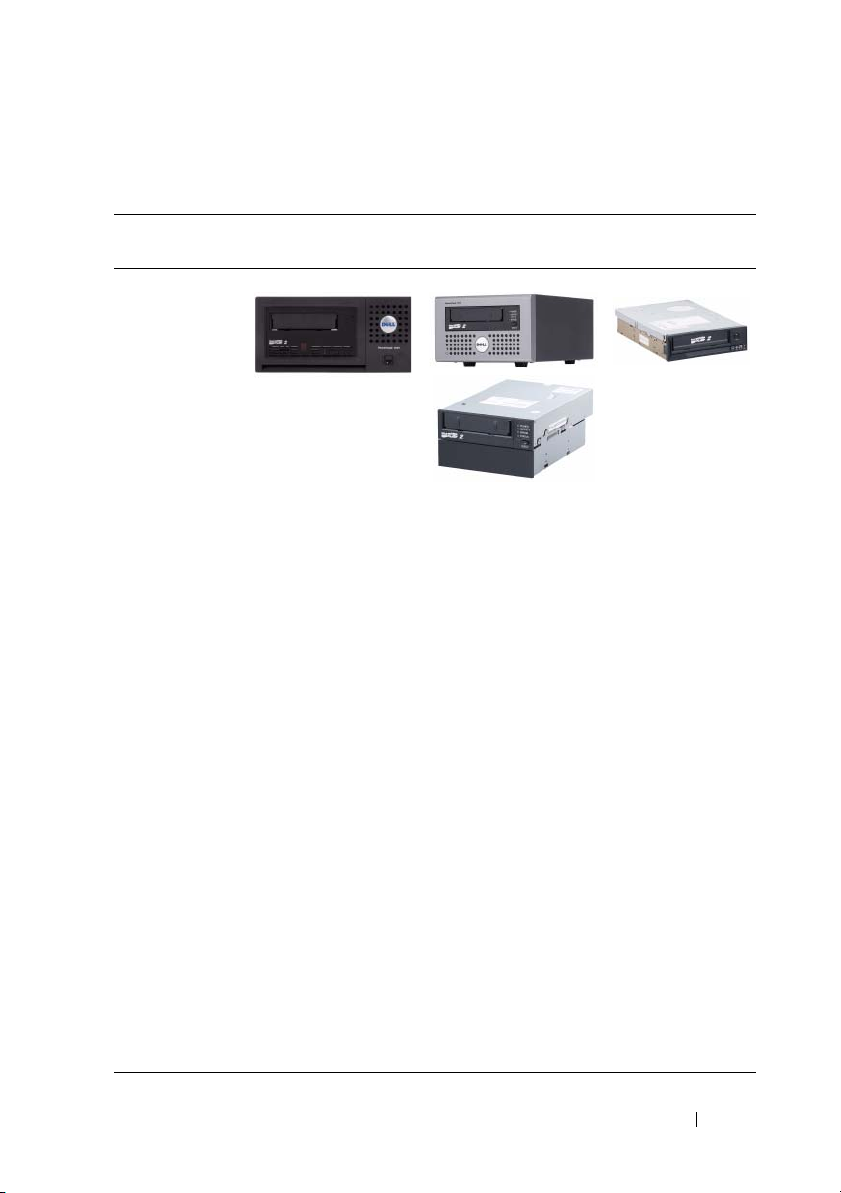
PowerVault LTO-2 Tape Drives
Table 2. LTO-2 Drive Types and Basic Characteristics
PowerVault 110T LTO2 PowerVault 110T LTO-2-L
(Certance)
Capacity (Native/
Compressed)
Native Speed 35 MB/s 24 MB/s 24 MB/s
Primary Media Ultrium-2 Ultrium-2 Ultrium-2
Physical Device
Description
Supported
Systems
200 GB/400 GB 200 GB/400 GB 200 GB/400 GB
• Seven segment
display
• Full height
• Ultrium-2 label
• PowerVault 132T
• PowerVault 136T
• PowerVault 122T
• PowerVault 110T
LTO-2 table top
and internal
standalone
• PowerVault 114T
• Ultrium-2 label
• Int drive has full
height expander
•LEDs (Vertical)
–Power
–Activity
–Error
– Status
• PowerVault 110T
LTO - 2- L (t abl e t o p
and internal
standalone)
• PowerVault 114T
• PowerVault 124T
• Supported internally
on select systems
PowerVault 110T
LTO-2-L (Tandberg)
• Ultrium-2 label
• Half height
•LEDs arranged
horizontally
with symbols
•PowerVault
110T LTO-2-L
internal
standalone
•Supported
internally on
select systems
•Supported
externally on
select systems
LTO Media Handbook 7
Page 8
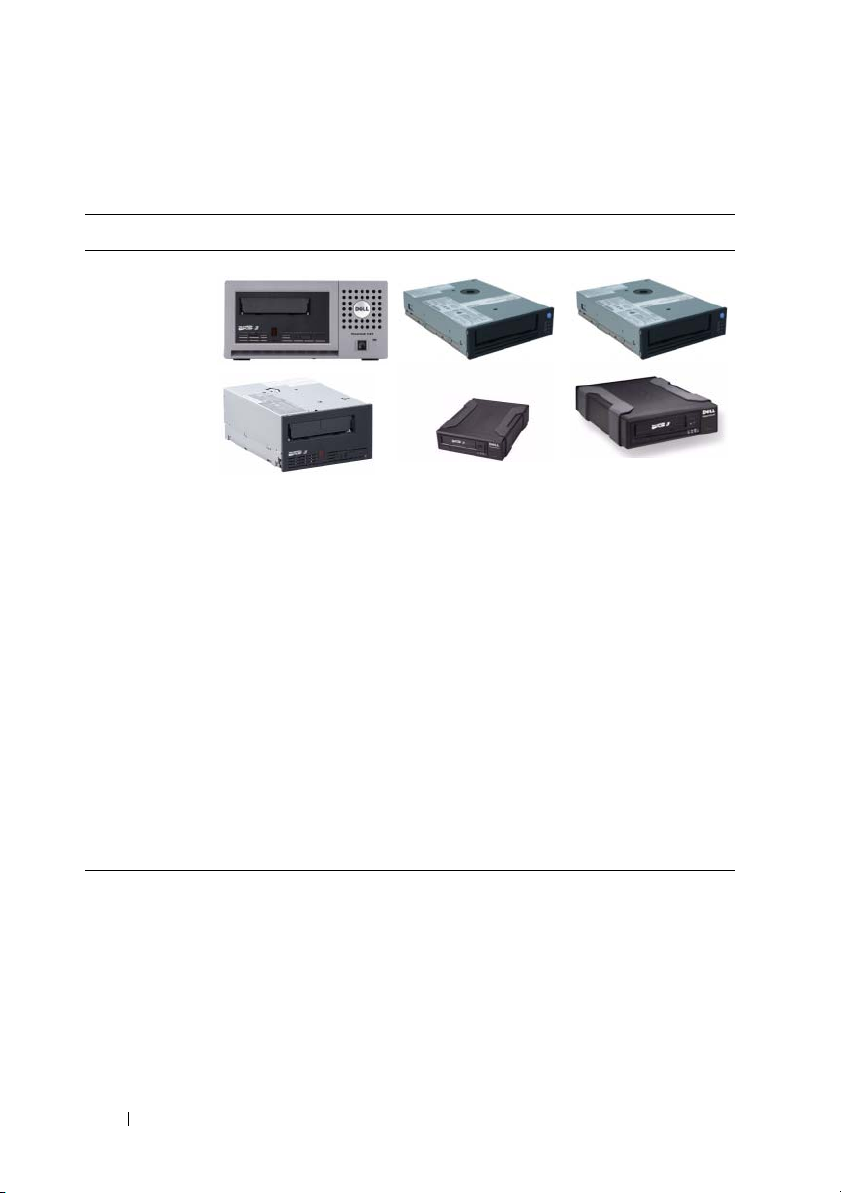
PowerVault LTO-3 Tape Drives
Table 3. LTO-3 Drive Types and Basic Characteristics
PowerVault 110T LTO 3 PowerVault LTO-3-060 PowerVault LTO-3-080
Capacity (Native
/Compressed)
Native Speed 80 MB/s 60 MB/s 80 MB/s
Primary Media Ultrium-3 Ultrium-3 Ultrium-3
Physical Device
Description
Supported
Systems
400 GB/800 GB 400 GB/800 GB 400 GB/800 GB
• Seven segment
display
• Ultrium-3 label
• Full height
For a list of supported tape devices, firmware, and driver versions, see
the Dell PowerVault Compatibility Matrix at dell.com/pvmatrix.
•Internal/External
drive
• Half height
•LEDs (Vertical)
–Power
– Activity
–Clean
– Error
•Seven segment
display
• Internal/External
drive
• Half height
8 LTO Media Handbook
Page 9
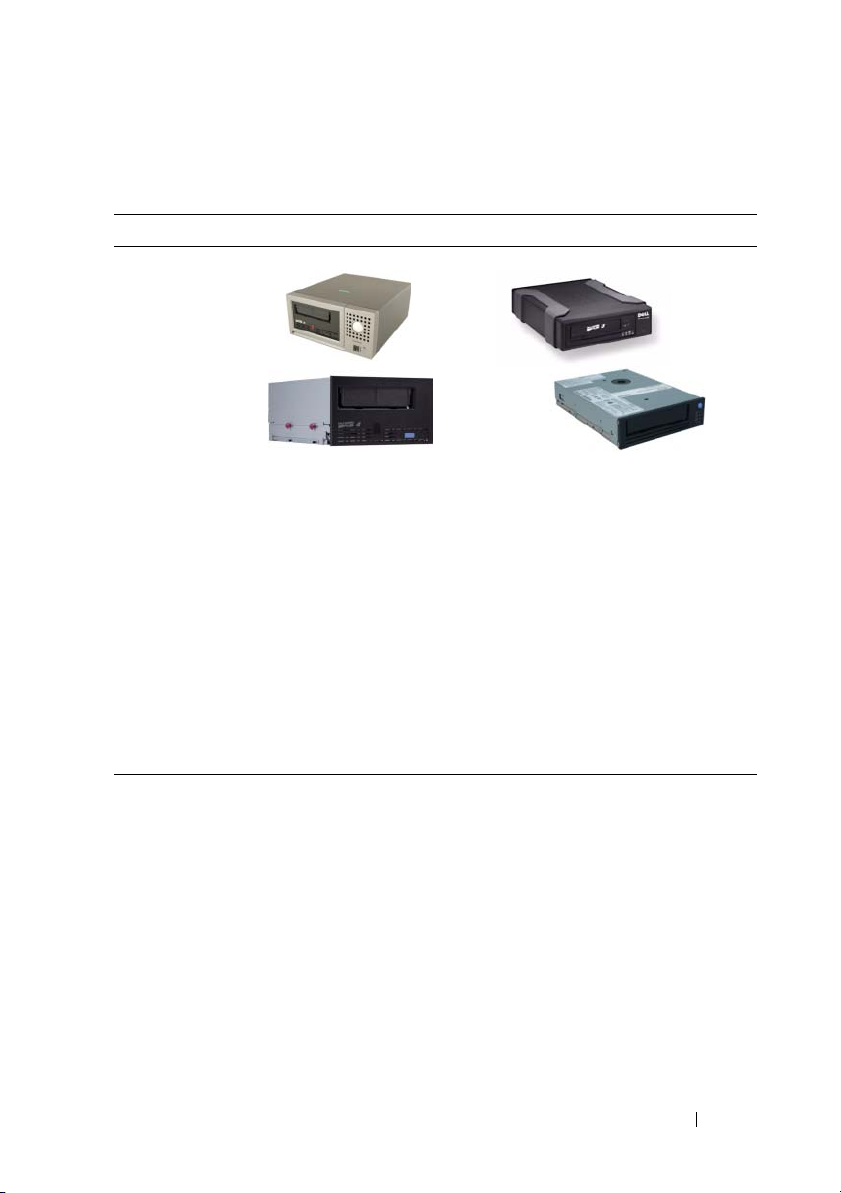
PowerVault LTO-4 Tape Drives
Table 4. PowerVault LTO-4 Drive Types and Basic Characteristics
PowerVault LTO-4-120 (IBM) PowerVault LTO-4-120 HH (IBM)
Capacity (Native/
Compressed)
Native Speed 120 MB/s 120 MB/s
Primary Media Ultrium-4 Ultrium-4
Physical Device
Description
Supported Systems For a list of supported tape devices, firmware, and driver versions,
800 GB/1600 GB 800 GB/1600 GB
• Seven segment display
• Ultrium-4 label
• Full height
• Internal/External drive
see the Dell PowerVault Compatibility Matrix at
dell.com/pvmatrix.
• Seven segment display
• Ultrium-4 label
• Half height
• Internal/External drive
LTO Media Handbook 9
Page 10
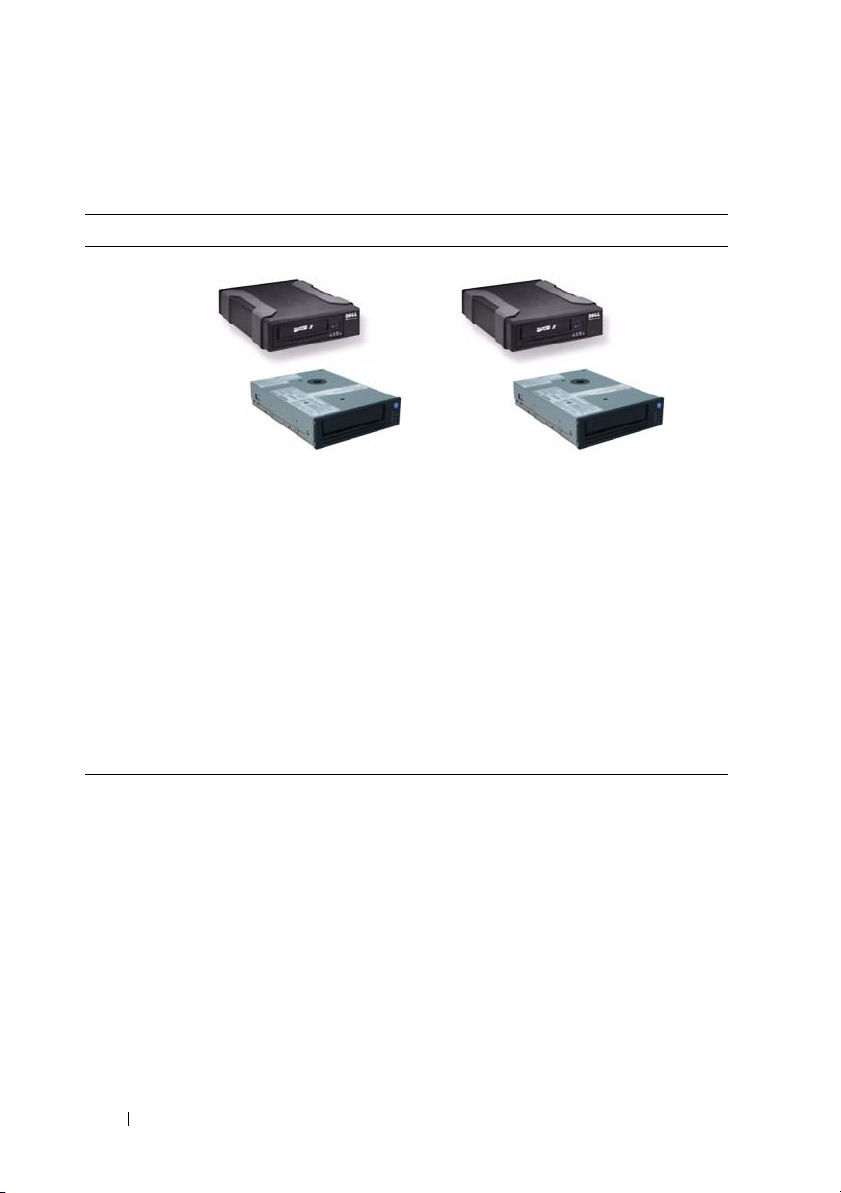
PowerVault LTO-5 and LTO-6 Tape Drives
Table 5. PowerVault LTO-5 and LTO-6 Drive Types and Basic Characteristics
PowerVault LTO-5-140 (IBM) PowerVault LTO-6
Capacity
(Native/
Compressed)
Native Speed 140 MB/s 160 MB/s
Primary Media Ultrium-5 Ultrium-6
Physical
Device
Description
Supported
Systems
1500 GB/3000 GB 2500GB/6250 GB
• Seven segment display
• Ultrium-5 label
• Half height
•Internal/External drive
For a list of supported tape devices, firmware, and driver versions, see
the Dell PowerVault Compatibility Matrix at dell.com/pvmatrix.
• Seven segment display
• Ultrium-6 label
• Half height
• Internal/External drive
10 LTO Media Handbook
Page 11

Media Types for PowerVault LTO Tape Drives
Table 6. Supported Ultrium Media Types Per PowerVault 110 LTO Tape Drive
Part No.
PowerVault
110T LTO
PowerVault
110T LTO-1
PowerVault
110T LTO-2
PowerVault
110T LTO-2- L
(Certance)
PowerVault
110T LTO-2- L
(Tandberg)
PowerVault
110T LTO 3 (IBM)
PowerVault
LTO3-060 (IBM)
PowerVault
LTO3-080 (IBM)
PowerVault
LTO 4-1 20
PowerVault
LTO 5-1 40
PowerVault
LTO 6
Ultrium-1
Media
340-7240 340-8701 341-2645 341-4640 342-1103 342-5450
BC-RW P ✕✕✕✕
BC-RW P ✕✕✕✕
BC-RW P ✕✕✕✕
BC-R BC-RW P ✕✕✕
BC-R BC-RW P ✕✕✕
BC-R BC-RW P ✕✕✕
Ultrium-2
Media
P ✕✕✕✕✕
P ✕✕✕✕✕
✕ BC-R BC-RW P ✕✕
✕✕BC-R BC-RW P ✕
✕✕✕BC-R BC-RW P
✕- Not Supported
BC-R - Backward Compatible - Read Only
BC-RW - Backward Compatible - Read/Write
P - Primary
Ultrium-3
Media
Ultrium-4
Media
Ultrium-5
Media
Ultrium-6
Media
LTO Media Handbook 11
Page 12

Table 7. Supported LTO Media Types Per PowerVault 110 LTO Tape Drive
LTO-3 WOR M
Media
Part No.
PowerVault 110T LTO
PowerVault 110T LTO-1
PowerVault 110T LTO-2
PowerVault 110T
LTO-2- L (Certance)
PowerVault 110T
LTO-2- L (Tandberg)
PowerVault 110T LTO 3 (IBM)
PowerVault LTO3-060 (IBM)
PowerVault LTO3-080 (IBM)
PowerVault LTO4-120
PowerVault LTO5-140
PowerVault LTO6
341-2655 341-4647 342-1105 342-5452
✕✕✕✕
✕✕✕✕
✕✕✕✕
✕✕✕✕
✕✕✕✕
P ✕✕✕
P ✕✕✕
P ✕✕✕
BC-RW P ✕✕
BC-R BC-RW P ✕
✕ BC-R BC-RW P
✕- Not Supported
BC-R - Backward Compatible - Read Only
BC-RW - Backward Compatible - Read/Write
P - Primary
LTO-4 WORM
Media
LTO-5 WORM
Media
LTO-6 WOR M
Media
12 LTO Media Handbook
Page 13
Media Color Schemes
Table 8 describes the media color schemes and labels for PowerVault LTO
tapes.
Table 8. Ultrium Media Color Schemes for PowerVault LTO Tapes
Media Type Ultrium-1
Color Scheme
Label
Media
Black Purple Blue-Gray Green Red Black
Ultrium-1 Ultrium-2 Ultrium-3 Ultrium-4 Ultrium-5 Ultrium-6
Ultrium-2
Media
Ultrium-3
Media
Ultrium-4
Media
Ultrium-5
Media
Ultrium-6
Media
Table 9. LTO WORM Media Color Schemes for PowerVault LTO Tapes
Media Type LTO-3 WORM Media LTO-4 WORM Media LTO-5 WORM Media LTO-6 WORM Media
Color Scheme
Blue-Gray on top
and gray below
Green on top and
gray below
Red on top and
gray below
Black on top and
gray below
NOTE: All Dell LTO cleaning media are black in color. Depending on the vintage of
the cartridge, it may be marked Ultrium 1, 2, 3, or a combination of 1, 2, and 3 and so
on. For more details on cleaning media, see
"Cleaning Media" on page 15.
NOTE: PowerVault LTO tape drives are compatible with LTO Ultrium logo compliant
media. However, Dell LTO Ultrium media is recommended since it has been
extensively tested with PowerVault LTO tape products.
NOTE: WORM media that is not labeled "Dell" is always two toned with gray on the
bottom and uses the respective color chosen by the tape vendor on the top.
NOTE: The WORM label is present on the media regardless of media vendor.
LTO Media Handbook 13
Page 14

Invalid Media Symptoms
PowerVault LTO tape drive with invalid media displays the following
symptoms:
• Cleaning light turns on.
• Media light flashes or stays on.
• Tape ejects.
• Backup software reports invalid media.
• Error code
7
is displayed on drives with a seven segment display.
Cartridge Memory
Tape drives require information about the tape cartridge being used. For LTO
tape cartridges, this information is stored in a small chip within the tape and
is referred to as the Cartridge Memory (CM). CM is a nonvolatile memory
that responds through a passive radio frequency interface.
The CM holds the following information:
• The type of cartridge
• Important information that the drive uses to setup and calibrate
• The tape directory to enable a quick search for data sets
You experience difficulties with the cartridge if the CM is damaged or
corrupted. However, the user data can still be recovered. To recover the data,
set the write protect tab on the cartridge and the load the cartridge into an
Ultrium drive.
The drive stores enough information on tape to be able to recognize the tape.
However, the data directory is lost. Hence, the drive can only search from the
beginning of tape (BOT) to end of tape (EOT) across all wraps to find the
data. A Fast Search to the correct location is not possible.
NOTE: Recovery of data from a full tape could take up to 3 hours.
14 LTO Media Handbook
Page 15

Migrating LTO Media
Known issues for media migration from one manufacturer to another are
fixed through the drive firmware. Use the latest available firmware for the
drive, regardless of which vendor/OEM product is being used to create media.
This ensures optimal performance for migrating tape between different drive
vendors.
NOTE: LTO technology is built on an open standard. Migrating media from one
drive manufacturer to another is fully supported.
NOTE: For information on backward read/write compatibility of the systems, see
Table 6.
WORM Media
WORM media stands for Write Once, Read Many. This means once data is
written to a piece of WORM media, the data on the tape cannot be changed
or overwritten. WORM media can be appended to if data is already present
on the tape. The media also stores unique identifiers which allow the drive to
determine whether or not the media has been tampered with.
WORM media offers a method of data retention for compliance laws such as
the Sarbanes-Oxley Act of 2002. Specific WORM media barcode labels end
in LT.
Cleaning Media
NOTE: LTO drives in general do not require frequent cleaning.
Label Designations on LTO Cleaning Media
For the last several years, LTO drives have been using UCC (universal
cleaning cartridges) as cleaning tapes. Prior to the universal or for use with all
designation of cleaning media, vendor specific cleaning media was used. This
document provides information on only universal or for use with all cleaning
media. If a tape is not labeled universal or for use with all, then it is
recommended that you purchase a tape with that designation.
NOTE: LTO-1, 2, 3, 4, 5, and 6 all use the same cleaning media although it may not
be labeled as such depending on the vintage of the tape.
LTO Media Handbook 15
Page 16

Cleaning Media Usage and Drive Cleaning Lights
NOTE: New Dell UCC tapes are labeled—For Use With All Ultrium 1, 2, 3, 4, 5, and 6
Drives.
Table 10. Characteristics For Cleaning Drives
Physical
Description
Part Number 310-5084
Drive Type No. of tape Media Motion
Dell PowerVault
110T LTO
Dell PowerVault
110T LTO-1
Dell PowerVault
110T LTO-2-L
(Certance)
Dell PowerVault
110T LTO-2-L
(Tandberg)
Dell PowerVault
110T LTO-2 (IBM)
Dell PowerVault
110T LTO-3 (IBM)
Dell PowerVault
110T LTO-3-060
(IBM)
Dell PowerVault
110T LTO-3-080
(IBM)
Dell PowerVault
110T LTO-4 (IBM)
Black tape labeled For Use With All Ultrium X drives, Ultrium 2,
3, 4, 5, and 6 may or may not be written on the tape.
hours before cleaning
light illuminates
Not Supported 15 Cleaning cartridge
500 50 Status light
500 50 Power light on
100 50 Cleaning LED
Not Supported 50 C on seven segment
See Table 11 50 C on seven segment
See Table 11 50 Cleaning LED
See Table 11 50 C on seven segment
See Table 11 50 C on seven segment
No. of uses
before cleaning
tape expires
How the cleaning
requirement is
displayed
light
solid green,
Status light on
solid amber
(amber) ON
display
display
(amber) ON
display
display
16 LTO Media Handbook
Page 17

Drive Type No. of tape Media Motion
hours before cleaning
light illuminates
Dell PowerVault
110T LTO-4-120HH
(IBM)
Dell PowerVault
110T LTO-5-140
(IBM)
Dell PowerVault
110T LTO-6
Table 11. Cleaning Interval Characteristics
LTO 2 0.7 19 4 31 63
LTO 3 1.1 38 16 57 153
LTO 4 1 22 19 45 173
LTO5 HH 0.5 8 12 24 82
LTO 6 3.7 15 15 66 612
See Table 11 50 C on seven segment
See Table 11 50 C on seven segment
See Table 11 50 C on seven segment
MM (xE6) FFP equiv. TB equiv. MMH Short MMH Long
No. of uses
before cleaning
tape expires
How the cleaning
requirement is
displayed
display
display
display
Legend
MM (xe6) Motion Meters
FFP equiv. The approximate amount of full file passes worth of data that is
processed when you stream data with low space, locate commands, and
standard number of rewinds.
TB equiv. The approximate data processed (in TB) if streaming data with low space
and locate commands and standard number of rewinds. It refers to the
capacity to clean.
MMH Short Media Motion Hours if the drive operates at the fastest speed with
equivalent generation media for the entire operational period.
MMH Long Media Motion Hours if the drive operates at the slowest speed with
equivalent generation media for the entire operational period.
LTO Media Handbook 17
Page 18

The cleaning light on an LTO drive turns on for the following reasons:
• A periodic maintenance threshold has exceeded.
– If the tape drive has processed the number of equivalent FFP,
including read and writes for the generation of the drive (this can be
converted to TB) before reaching the maximum MM.
– The drive has processed the maximum MM for the generation of the
drive indicated (MMxE6) before reaching the maximum amount of
data that can be processed.
• A high error rate has occurred. This can happen due to the following:
– A head clog
– A hardware failure on the drive
– Bad or marginal media
NOTE: If you perform a backup with verification, you see a cleaning request twice
as frequently as you do when you perform a backup without verification.
Verification doubles the number of passes the tape makes over the head.
NOTE: Most backup applications support Tape Alerts. If the tape drive requests
cleaning, the backup software notifies you of the need to clean.
Characteristics of Expired LTO Cleaning Tape
Table 12. Characteristics of Expired LTO Cleaning Tape in Various Drives
Drive Type Cleaning with a Good Tape Cleaning with an Expired Tape
Dell PowerVault
110T LTO
Dell PowerVault
110T LTO-1
18 LTO Media Handbook
• Ready light blinks green.
• Use cleaning cartridge
light turns on.
•Ejects tape when done.
• Power light on solid green.
• Activity light on solid
green.
• Status light on solid amber.
•Ejects tape when
complete.
•Ready light blinks green.
• Ejects tape out shortly after
inserting.
• Power light on solid green.
• Activity light on solid green.
• Status light blinks amber.
• Ejects tape shortly after inserting.
Page 19

Table 12. Characteristics of Expired LTO Cleaning Tape in Various Drives
Drive Type Cleaning with a Good Tape Cleaning with an Expired Tape
Dell PowerVault
110T LTO-2
Dell PowerVault
110T LTO-2-L
(Certance)
Dell PowerVault
110T LTO-2-L
(Tandberg)
Dell PowerVault
110T LTO-3
No seven segment display
indicator.
• Activity light blinks green.
• Ejects tape shorty after.
• Power light on solid green.
• Activity light on solid
green.
• Status light on solid amber.
•Ejects tape when
complete.
• Press and hold the Eject
button for 6 seconds. The
drive enters the service
mode indicated by all
LEDs flashing slowly.
• Press Eject twice. The
Activity LED flashes fast.
• Ejects tape shorty after.
No seven segment display
indicator.
• Activity light blinks green
• Ejects tape shorty after.
Pre firmware 53Y3:
•
segment display indicator. Activity
light blinks green but ejects tape
shortly after inserting.
Firmware 53Y3 and newer:
•
– Seven segment display shows
– Activity light blinks amber
– Ejects tape shortly after
inserting. When tape is
completely removed, all light
indicators turn off.
• Power light on solid green.
• Activity light on solid green.
• Status light blinks amber.
• Ejects tape shortly after inserting.
• Cleaning light turns on.
• Activity light flashes.
• Fault light flashes.
• Cartridge hold in the drive
When pressing Eject button, the
cartridge is ejected and the Cleaning
light stays on.
• Seven segment display shows
• Activity light blinks amber.
• Ejects tape shortly after inserting.
When tape is completely removed,
all light indicators turn off.
(continued)
No seven
7
7
.
LTO Media Handbook 19
Page 20

Table 12. Characteristics of Expired LTO Cleaning Tape in Various Drives
Drive Type Cleaning with a Good Tape Cleaning with an Expired Tape
Dell PowerVault
LTO 3-0 60
Dell PowerVault
LTO 3-0 80
Dell PowerVault
LTO 4-1 20
Dell PowerVault
LTO 4-1 20H H
Dell PowerVault
LTO 5-1 40
Dell PowerVault
LTO 6
No seven segment display
indicator.
• Activity light blinks green.
• Ejects tape shorty after.
No seven segment display
indicator.
• Activity light blinks green.
• Ejects tape shorty after.
No seven segment display
indicator.
• Activity light blinks green.
• Ejects tape shorty after.
No seven segment display
indicator.
• Activity light blinks green.
• Ejects tape shorty after.
No seven segment display
indicator.
• Activity light blinks green.
• Ejects tape shorty after.
No seven segment display
indicator.
• Activity light blinks green.
• Ejects tape shorty after.
• Cleaning light blinks amber.
• Ejects tape shortly after inserting.
When tape is completely removed,
all light indicators turn off.
• Seven segment display shows
•Activity
• Ejects tape shortly after inserting.
When tape is completely removed,
all light indicators turn off.
• Seven segment display shows
•Activity
• Ejects tape shortly after inserting.
When tape is completely removed,
all light indicators turn off.
• Seven segment display shows
•Activity
• Ejects tape shortly after inserting.
When tape is completely removed,
all light indicators turn off.
• Seven segment display shows
•Activity
• Ejects tape shortly after inserting.
When tape is completely removed,
all light indicators turn off.
• Seven segment display shows
•Activity
• Ejects tape shortly after inserting.
When tape is completely removed,
all light indicators turn off.
light blinks amber.
light blinks amber.
light blinks amber.
light blinks amber.
light blinks amber.
(continued)
7
.
7
.
7
.
7
.
7
.
NOTE: Run Dell Online PowerEdge Diagnostics to determine media or hardware
related failures.
20 LTO Media Handbook
Page 21

NOTE: Dell Online PowerEdge Diagnostics does not support PowerVault 110T LTO
tape drives. For more information, see
Ta bl e 1.
Stuck Tapes
A stuck tape can result from a dropped or damaged media. Different drives
react differently when damaged media is inserted. Some may eject the tape,
while others may be stuck permanently with the drive and require the drive to
be returned. Most LTO drives have the capability to reset the drive in the
event of a stuck tape or other non-responsive drive issues. Table 13 describes
how to reset your PowerVault LTO tape drive.
NOTE: A drive reset may or may not help remove a stuck tape.
NOTE: Dell PowerEdge Diagnostics includes a Media Eject test that can be run to
force eject a tape.
Table 13. Resetting Your PowerVault 110T LTO Tape Drive
Drive Type Device Reset Procedure
Dell PowerVault
110T LTO
Dell PowerVault
110T LTO-1
Dell PowerVault
110T LTO-2-L
(Certance)
Dell PowerVault
110T LTO-2-L
(Tandberg)
Dell PowerVault
110T LTO-2
Dell PowerVault
110T LTO-3
Insert a paper clip to press the Reset button on the front panel of
the drive.
1
Press and hold the
2
Release the
3
Press
Eject
Press and hold the Eject button for more than 5 seconds. The tape
should eject within 40 seconds.
1
Press and hold the
Service mode and all the LEDs flash slowly.
2
Press
Eject
the
Eject
button.
1
Press and hold the
2
Release the
3
Press
Eject
1
Press and hold the
2
Release the
3
Press
Eject
Eject
button for more than 5 seconds.
Eject
button.
again to eject tape.
Eject
button for 6 seconds. The drive enters
twice, the Activity LED flashes fast, then double-click
Eject
button for more than 10 seconds.
Eject
button.
again to eject tape.
Eject
button for more than 10 seconds.
Eject
button.
again to eject tape.
LTO Media Handbook 21
Page 22

Table 13. Resetting Your PowerVault 110T LTO Tape Drive
Drive Type Device Reset Procedure
Dell PowerVault
110T LTO3-060
(IBM)
Dell PowerVault
110T LTO3-060
(Tandberg)
Dell PowerVault
110T LTO3-080
(IBM)
Dell PowerVault
110T LTO4-120
Dell PowerVault
110T LTO4120HH
Dell PowerVault
110T LTO5-140
Dell PowerVault
110T LTO6
1
Press and hold the
2
Release the
3
Press
Eject
1
Press and hold the
Eject
button for more than 10 seconds.
Eject
button.
again to eject tape.
Eject
button for six seconds. The drive enters
service mode and all the LEDs flash slowly.
2
Press Eject twice. The Activity LED flashes fast.
3
Double-click the
1
Press and hold the
2
Release the
3
Press
Eject
1
Press and hold the
2
Release the
3
Press
Eject
1
Press and hold the
2
Release the
3
Press
Eject
1
Press and hold the
2
Release the
3
Press
Eject
1
Press and hold the
2
Release the
3
Press
Eject
Eject
button.
Eject
button for more than 10 seconds.
Eject
button.
again to eject tape.
Eject
button for more than 10 seconds.
Eject
button.
again to eject tape.
Eject
button for more than 10 seconds.
Eject
button.
again to eject tape.
Eject
button for more than 10 seconds.
Eject
button.
again to eject tape.
Eject
button for more than 10 seconds.
Eject
button.
again to eject tape.
(continued)
NOTE: It may take up to 20 minutes for a tape cartridge to fully rewind and eject.
22 LTO Media Handbook
Page 23
Erasing a Pre-Written LTO Tape
CAUTION: Do not bulk erase Ultrium format cartridges. This destroys
pre-recorded servo information and renders the cartridge unusable.
The erase feature in the backup software is the preferred method for erasing
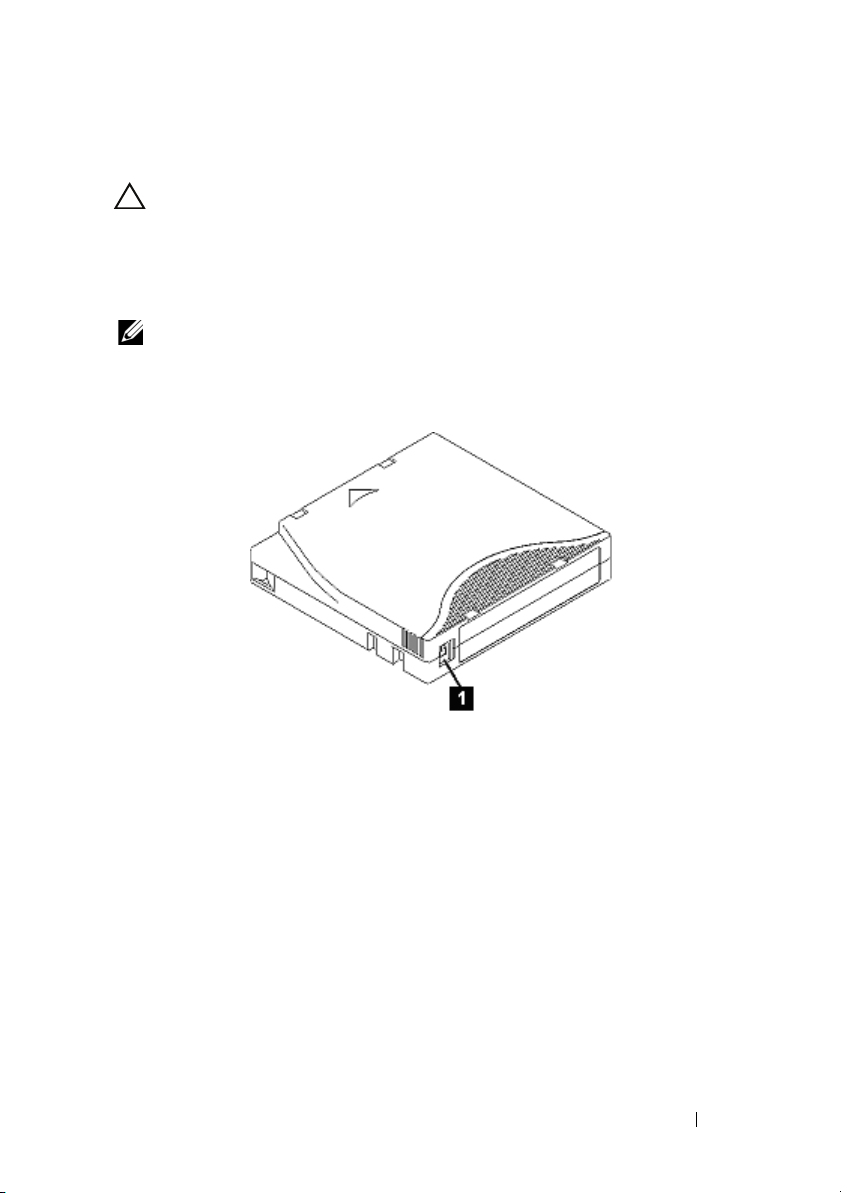
an LTO tape. To prevent erasing a tape, slide the write-protect switch to the
right.
NOTE: Write-protection does not prevent a cartridge from being erased by
bulk-erasure or degaussing.
Figure 1-1. Setting the Write-Protect Switch
1 write-protect switch
LTO Media Handbook 23
Page 24
Media Handling
Media Description
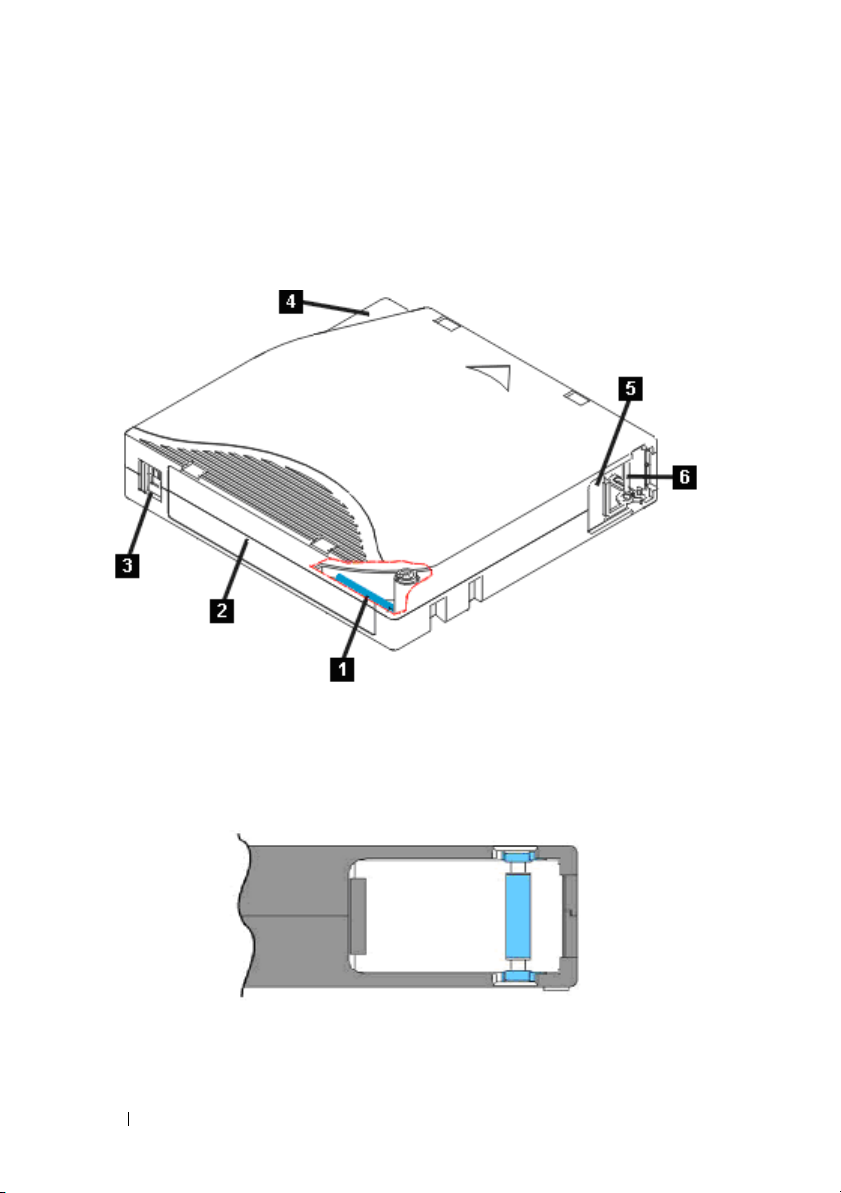
Figure 1-2. LTO Ultrium Data Cartridge
1 LTO CM 3 write-protect switch 5 cartridge door
2 label area 4 insertion guide 6 leader pin
Figure 1-3. Correct Leader Pin Location
24 LTO Media Handbook
Page 25

Perform a Thorough Inspection
• Inspect the cartridge packaging to check for any rough handling.
• When inspecting a cartridge, open only the cartridge door. Do not open
any other part of the cartridge case. The upper and lower parts of the case
are held together with screws; separating them destroys the usefulness of
the cartridge. While the door is open, check that the leader pin is properly
seated. If the cartridge has been dropped, it is likely that the pin is
dislodged inside the cartridge. It is recommended that you open the door
and check if the pin is properly seated before each use. See Figure 1-4.
• Inspect the cartridge for damage before using or storing it.
• Inspect the back of the cartridge (the part that you load first into the tape
load compartment) and ensure that there are no gaps in the seam of the
cartridge case. If there are gaps in the seam, the leader pin may be
dislodged. See Figure 1-5.
• If you suspect that the cartridge has been mishandled but it appears
usable, copy any data onto a good cartridge immediately for possible data
recovery. Discard the mishandled cartridge.
Handle the Cartridge Carefully
• Do not drop the cartridge. If the cartridge drops, slide the cartridge door
back and ensure that the leader pin is properly seated in the pin-retaining
spring clips.
• Do not handle tape that is outside the cartridge. Handling the tape can
damage the tape surface or edges, which may interfere with the read or
write reliability. Pulling on tape that is outside the cartridge can damage
the tape and the brake mechanism in the cartridge.
• Do not stack more than six cartridges.
• Do not degauss a cartridge that you intend to reuse. Degaussing renders
the tape unusable.
Figure 1-4 displays a dropped tape which resulted in a dislodged leader pin.
This cartridge if inserted into a drive could result in a stuck tape. Other
damage could result in the leader pin falling out of the cartridge or getting
dropped inside the tape housing.
LTO Media Handbook 25
Page 26
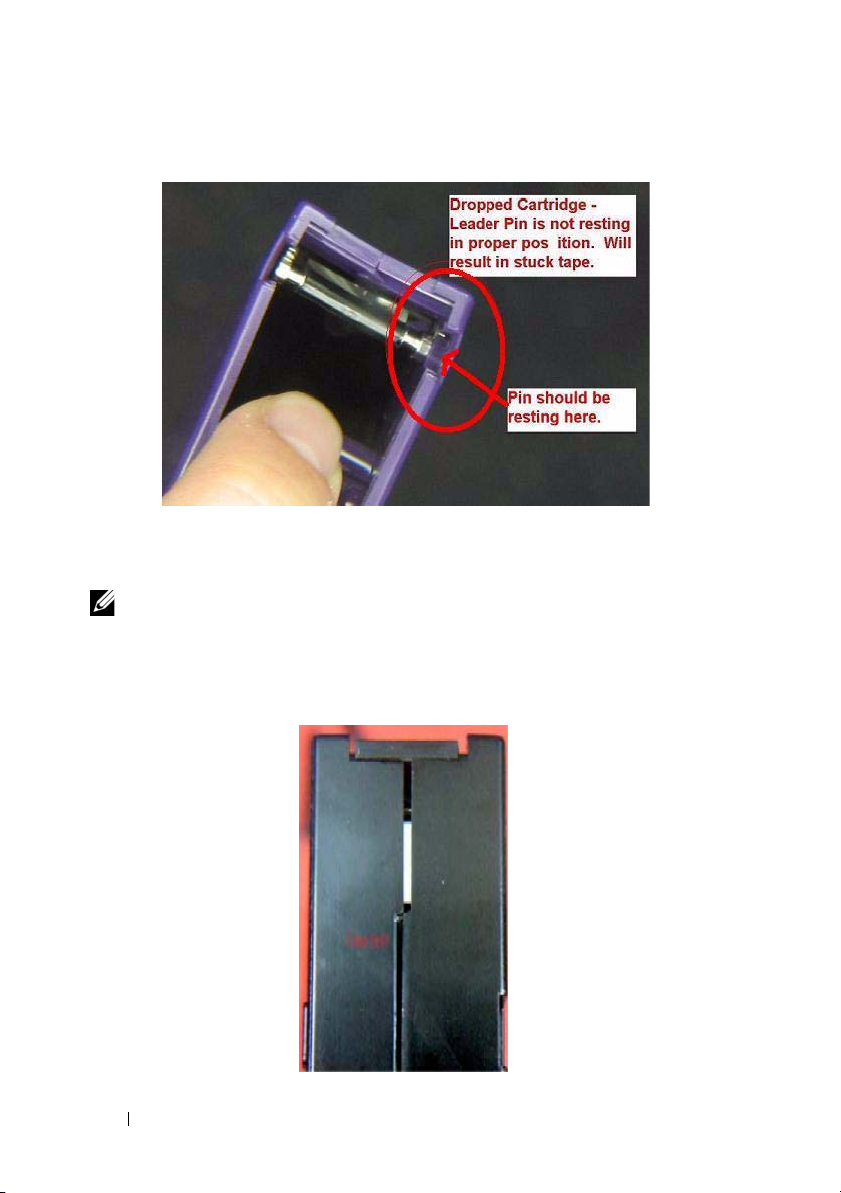
Figure 1-4. Media Inspection - Bad Tape
Figure 1-5 displays a tape that has been dropped and the cartridge seam has
split.
NOTE: Newer versions of LTO tapes have plastic-welded seams to prevent
splitting; however, the tapes must be checked for leader pins that may have
dropped inside the cassette housing.
Figure 1-5. Split Seam on LTO Tape
26 LTO Media Handbook
Page 27
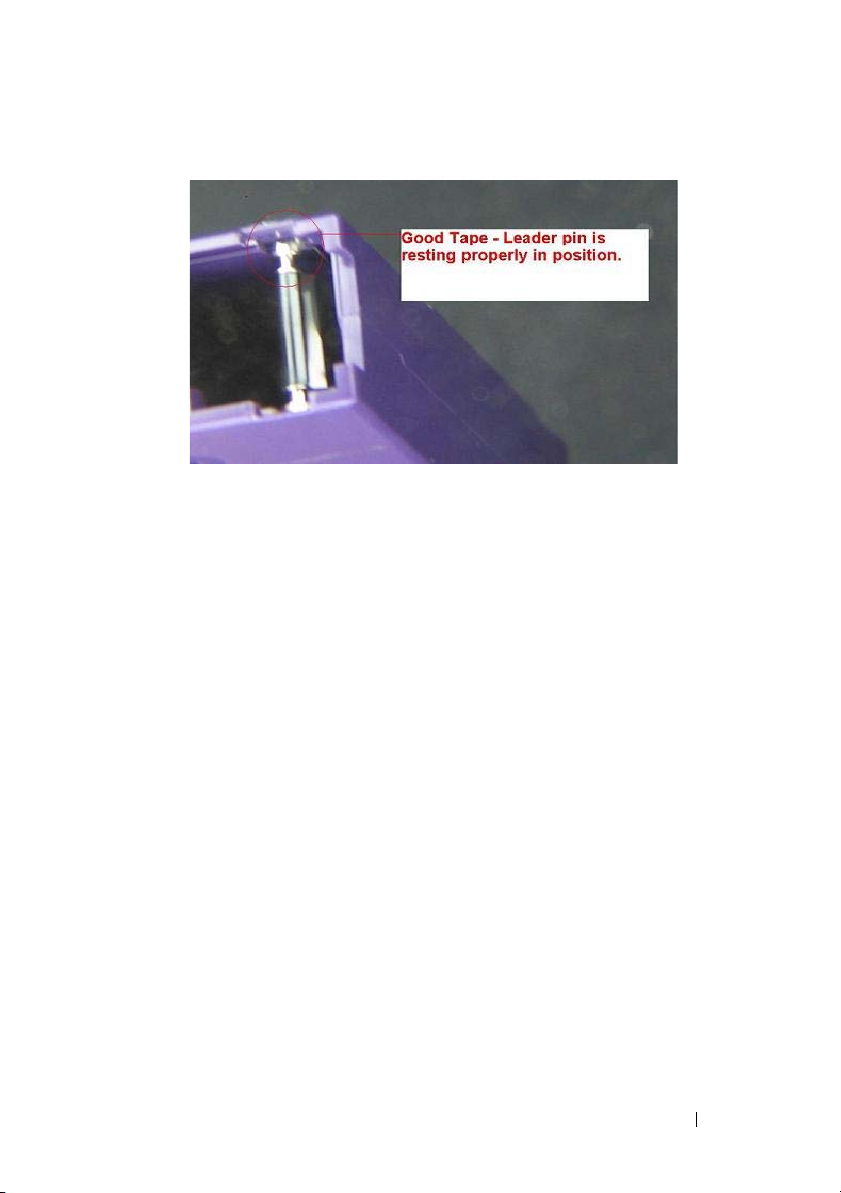
Figure 1-6. Media Inspection - Good Tape
Ensure Proper Packaging While Shipping Tapes
• When you ship a cartridge, ship it in its original or better packaging.
• Always ship or store a cartridge in the vertical orientation and inside the
jewel case to prevent damage to the tape edge.
• Use only a recommended shipping container that securely holds the
cartridge in its jewel case during transportation.
• Never ship a cartridge in a commercial shipping envelope. Always place it
in a box or package.
• If you ship the cartridge in a cardboard box or a box of a sturdy material,
ensure the following:
– Place the cartridge in polyethylene plastic wrap or bags to protect it
from dust, moisture, and other contaminants.
– Pack the cartridge snugly. Do not allow it to move around.
– Double-box the cartridge (place it inside a box, then place that box
inside the shipping box) and add padding between the two boxes.
LTO Media Handbook 27
Page 28

Cartridge Storage Conditions
• Before you use a cartridge, let it acclimate to the normal operating
environment for 24 hours.
• Ensure that all surfaces of the cartridge are dry before use.
• Do not expose the cartridge to moisture or direct sunlight.
• Always ship or store a cartridge in the vertical orientation and inside a
jewel case to prevent damage to the tape edge.
• Do not expose recorded or blank cartridges to stray magnetic fields (for
example, terminals, motors, video equipment, X-ray equipment, or fields
that exist near high-current cables or power supplies). Such exposure can
lead to loss of data or render the blank cartridge unusable.
• Maintain the environmental conditions outlined in the Table 14.
Table 14. Environmental Specifications for Tapes
Environmental
Factor
Temperature 10 °C to 45 °C
Relative humidity
(non-condensing)
Wet bu l b
temperature
Operating Operational
Storage
16 °C to 32 °C
(50 °F to 113 °F)
10 % to 80 % 20 % to 80 % 20 % to 50 % 5 % to 80 %
26 °C
(79 °F)
(61 °F to 90 °F)
26 °C
(79 °F)
Archival
Storage
16 °C to 25 °C
(61 °F to 77 °F)
26 °C
(79 °F)
Shipping
-23 °C to 49 °C
(-9 °F to 120 °F)
26 °C
(79 °F)
Cartridge Life
• Durability – 1,000,000 passes on any area of tape, equates to over 20,000
end-to-end passes/260 full tape backups.
• Archival life – 30 years.
28 LTO Media Handbook
Page 29

Media Do’s and Don’ts
Do’s:
• Store cartridges in their protective cases.
• Handle cartridges with great care.
• Store the cartridge vertically.
• Align cartridges so the grooves interlock.
• Inspect cartridges prior to each use.
• Unload cartridges prior to turning off the drive.
• Allow a 24-hour conditioning period to the operating temperature and
humidity before using new or stored cartridges.
• Eject media before turning off the drive.
Don’ts:
• Touch the media or leader with bare fingers.
• Use pens or pencils during cartridge inspection.
• Drop cartridge.
• Store the cartridge horizontally.
• Disassemble cartridges.
• Ship cartridges in drive.
• Store near magnetic fields (e.g. speakers, monitors, electric motors, power
supplies, etc.).
• Use a cartridge that fell from 3 ft or higher.
• Degauss LTO tapes.
• Ship the LTO drive with media loaded.
LTO Media Handbook 29
Page 30

30 LTO Media Handbook
 Loading...