

Dell PowerEdge R710 User Manual [tr]

Dell™ PowerEdge™
R710 Systems
Getting Started
With Your System
Začínáme se systémem
Guide de mise en route
Erste Schritte mit dem System
Τα πρώτα βήµατα µε το σύστηµά σας
Rozpoczęcie pracy z systemem
Начало работы с системой
Procedimientos iniciales con el sistema
Sisteminizi Kullanmaya Başlarken
תכרעמה םע הדובעה תליחת


Dell™ PowerEdge™
R710 Systems
Getting Started
With Your System

Notes, Cautions, and Warnings
NOTE: A NOTE indicates important information that helps you make better use
of your computer.
WARNING: A WARNING indicates a potential for property damage,
personal injury, or death.
____________________
Information in this document is subject to change without notice.
© 2008 Dell Inc. All rights reserved.
Reproduction of these materials in any manner whatsoever without the written permission of Dell Inc.
is strictly forbidden.
Dell, the DELL logo, and PowerEdge are trademarks of Dell Inc.; Citrix and XenServer are trademarks
of Citrix Systems, Inc. and/or more of its subsidiaries, and may be registered in the United States
Patent and Trademark Office and in other countries. Intel and Xeon are registered trademarks of Intel
Corporation in the U.S. and other countries; Microsoft, Hyper-V, Windows, and Windows Server are
either trademarks or registered trademarks of Microsoft Corporation in the United States and/or other
countries. Red Hat and Enterprise Linux are registered trademarks of Red Hat, Inc. in the United States
and other countries; SUSE is a registered trademark of Novell, Inc., in the United States and other
countries. VMware is a registered trademark of VMware, Inc. in the United States and/or other
jurisdictions.
Other trademarks and trade names may be used in this document to refer to either the entities claiming
the marks and names or their products. Dell Inc. disclaims any proprietary interest in trademarks and
trade names other than its own.
Model E02S
December 2008 P/N CX802 Rev. A02

Installation and Configuration
WARNING: Before performing the following procedure, review the safety
instructions that came with the system.
Unpacking the System
Unpack your system and identify each item.
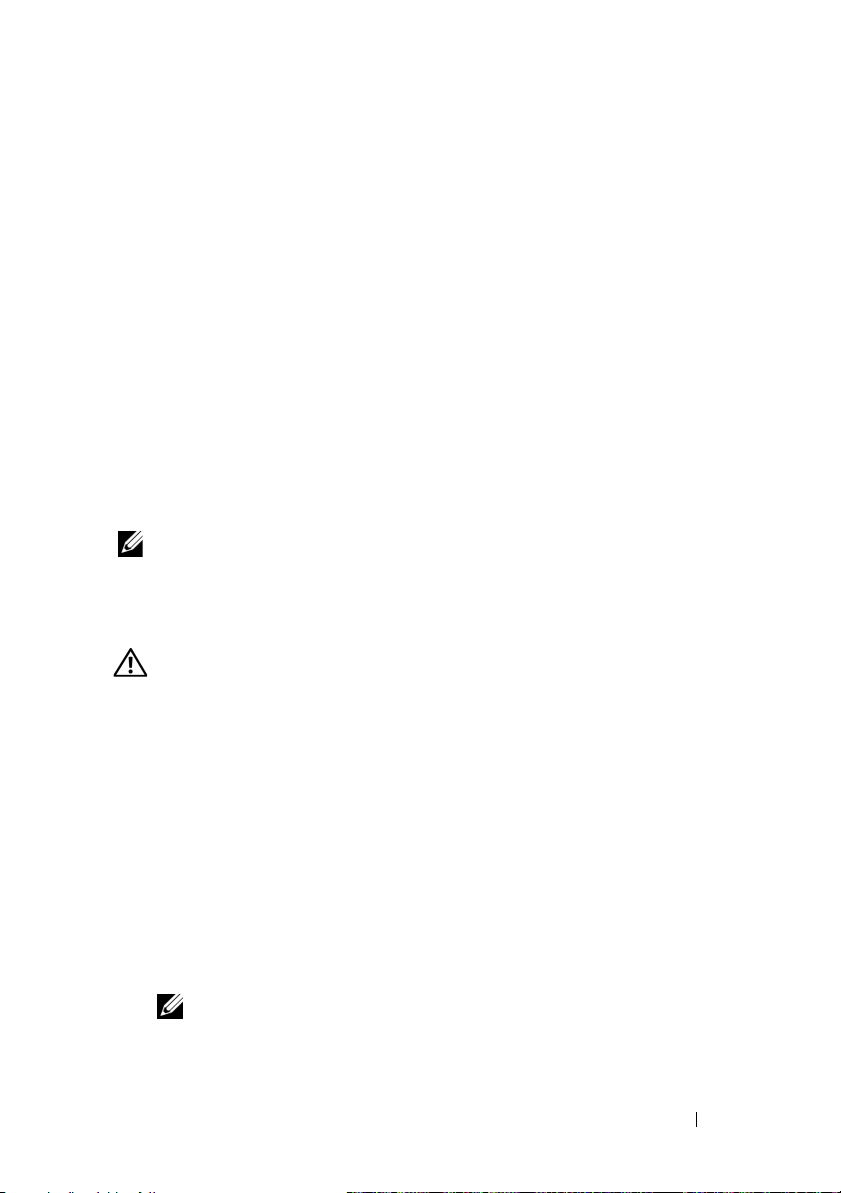
Installing the Rails and System in a Rack
Assemble the rails and install the system in the rack following the safety
instructions and the rack installation instructions provided with your system.
Getting Started With Your System 3

Optional – Connecting the Keyboard, Mouse, and Monitor
Connect the keyboard, mouse, and monitor (optional).
The connectors on the back of your system have icons indicating which cable
to plug into each connector. Be sure to tighten the screws (if any) on the
monitor's cable connector.
Connecting the Power Cables
Connect the system’s power cable(s) to the system and, if a monitor is used,
connect the monitor’s power cable to the monitor.
4 Getting Started With Your System

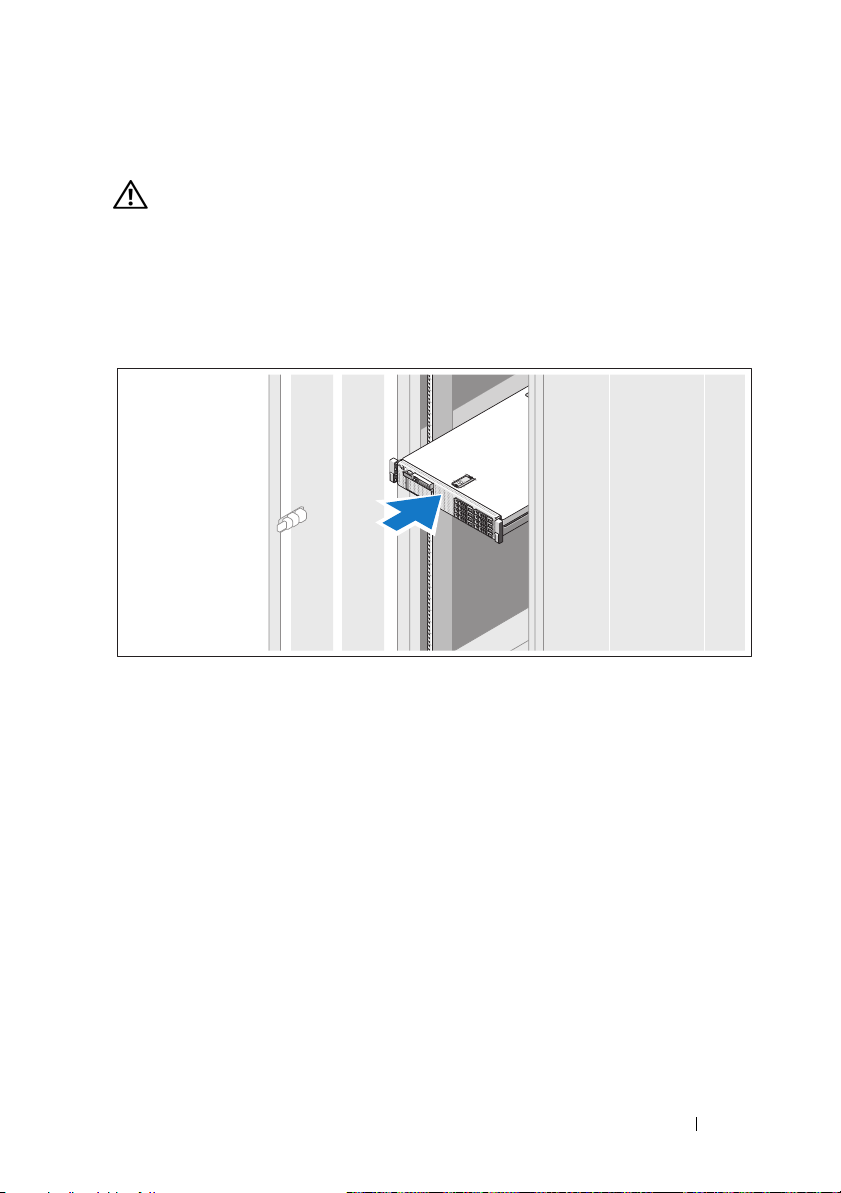
Securing the Power Cord
Bend the system power cable into a loop as shown in the illustration and
secure the cable to the bracket using the provided strap.
Plug the other end of the power cables into a grounded electrical outlet or
a separate power source such as an uninterruptible power supply (UPS) or
a power distribution unit (PDU).
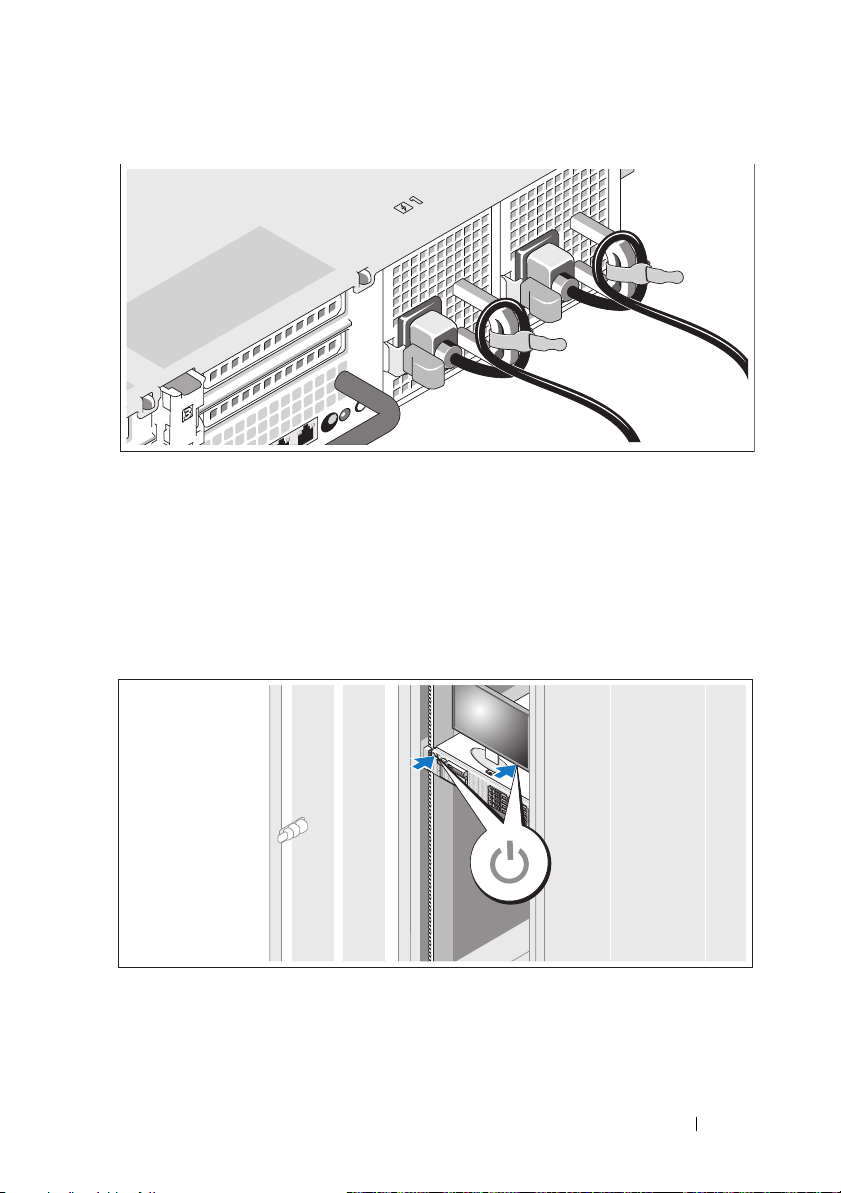
Turning on the System
Press the power button on the system and the monitor. The power indicators
should light.
Getting Started With Your System 5

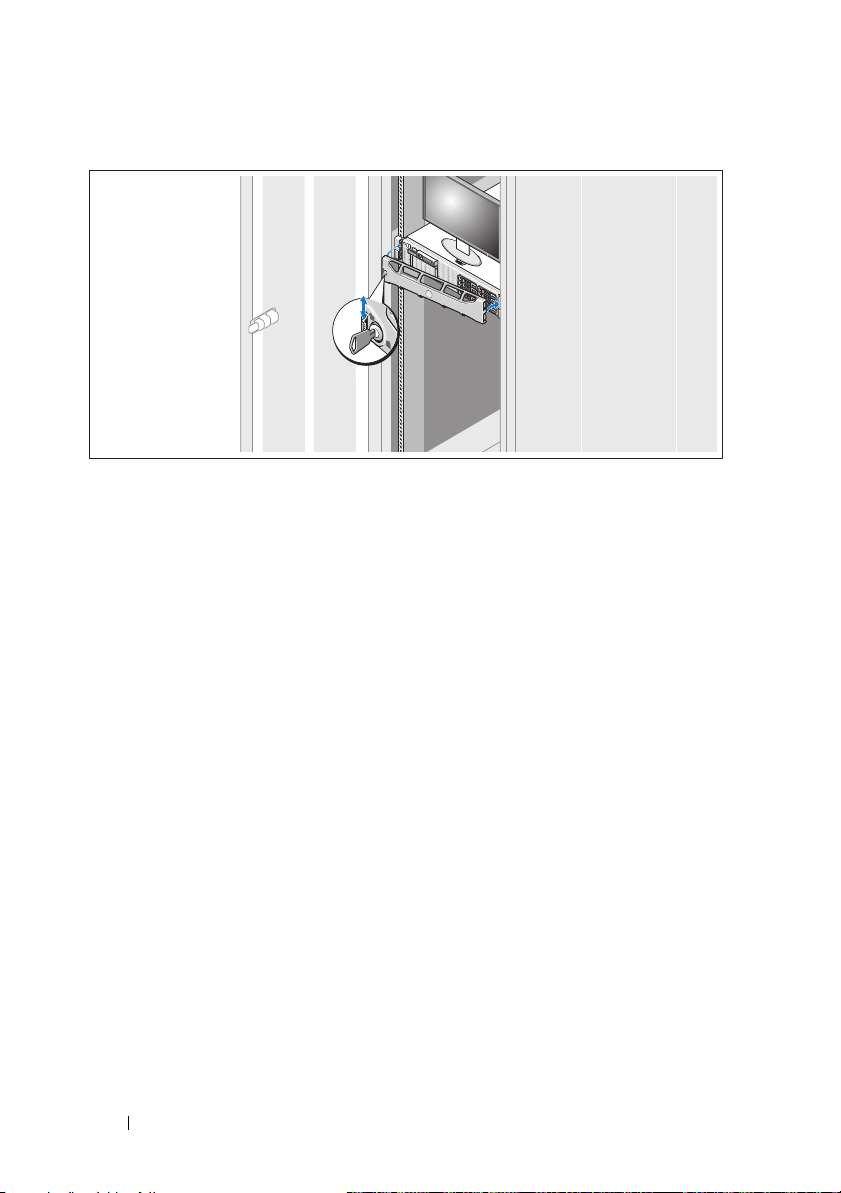
Installing the Optional Bezel
Install the bezel (optional).
Complete the 0perating System Setup
If you purchased a preinstalled operating system, see the operating system
documentation that ships with your system. To install an operating system for
the first time, see the installation and configuration documentation for your
operating system. Be sure the operating system is installed before installing
hardware or software not purchased with the system.
• Citrix® XenServer™ 5.0 with hotfix 1 or later
• Microsoft
• Microsoft Windows Server 2008 Web, Standard, and Enterprise
(32-bit x86) Gold editions
• Microsoft Windows Server 2008 Web, Standard, Enterprise, and
Datacenter (x64) Gold editions
• Microsoft Window Small Business Server 2008, Standard and Premium
(x64) editions
• Microsoft Windows Server 2003 Web, Standard, and Enterprise
(32-bit x86) editions with SP2
• Microsoft Windows Server 2003 Standard and Enterprise (x64) editions
with SP2
®
Windows Server® 2008 Hyper-V
™
6 Getting Started With Your System
• Microsoft Windows Server 2003 R2 Standard and Enterprise (32-bit x86)
editions with SP2
• Microsoft Windows Server 2003 R2 Standard, Enterprise,
and Datacenter (x64) editions with SP2
• Microsoft Windows Small Business Server 2003 R2 Standard
and Premium editions with SP2
•Red Hat
®
Enterprise Linux® ES and AS 4.7 (x86)
• Red Hat Enterprise Linux ES and AS 4.7 (x86_64)
• Red Hat Enterprise Linux 5.2 Server (x86_32)
• Red Hat Enterprise Linux 5.2 Server (x86_64)
• SUSE Linux Enterprise Server 10 SP2 (x86_64)
®
•VMware
ESX Version 4.0 and 3.5, Update 4 (when available)
• VMware ESXi Version 4.0 and 3.5, Update 4 (when available)
NOTE: For the latest information on supported operating systems,
see www.dell.com.
Other Information You May Need
WARNING: See the safety and regulatory information that shipped with your
system. Warranty information may be included within this document or as
a separate document.
• The rack documentation included with your rack solution describes how to
install your system into a rack.
• The
• Any media that ships with your system that provides documentation and
Hardware Owner’s Manual
provides information about system
features and describes how to troubleshoot the system and install or
replace system components. This document is available online at
support.dell.com.
tools for configuring and managing your system, including those
pertaining to the operating system, system management software, system
updates, and system components that you purchased with your system.
NOTE: Always check for updates on support.dell.com and read the updates
first because they often supersede information in other documents.
Getting Started With Your System 7

Obtaining Technical Assistance
If you do not understand a procedure in this guide or if the system does not
perform as expected, see your Hardware Owner’s Manual. Dell
™
offers
comprehensive hardware training and certification. See www.dell.com/training
for more information. This service may not be offered in all locations.
Technical Specifications
Processor
®
®
Processor type One or two quad- or dual-core Intel
Expansion Bus
Bus type PCI Express Generation 2
Expansion slots via
riser card:
Riser 1 (Center Riser)
Riser 2 (Left Riser)
One full-height, 9.5-inch length, x4 link (slot 1)
NOTE: This slot can be upgraded to 12.2 inches.
One low-profile, 9.5-inch length, x4 link (slot 2)
Two full-height, 9.5-inch length, x8 link (slot 3 and 4)
or
One full-height, 9.5-inch length, x16 link (slot 3)
NOTE: Support for up to 25W is available only on the first
two cards installed in the system; any additional cards
installed in the system must be 15W or under.
Memory
Architecture 800, 1066, or 1333 MHz DDR3 registered or unbuffered
Error Correcting Code (ECC) DIMMs. Support for
Advanced ECC or Memory Optimized operation.
Memory module
sockets
Memory module
capacities
Minimum RAM 1 GB with a single processor (1 DIMM per processor)
Maximum RAM 96 GB (with quad-rank 8 GB RDIMM), 144 GB
Eighteen 240-pin
1 GB and 2 GB UDIMMs, and 2 GB, 4 GB,
or 8 GB RDIMMs
(single, dual, or quad-rank dependent on capacity)
(with dual-rank 8 GB RDIMM), or 24 GB (with 2 GB
UDIMMs)
Xeon
processors
8 Getting Started With Your System

Drives
Hard drives Up to six 3.5-inch, internal, hot-swappable SAS or SATA
hard drives without optional internal tape drive support
or
Up to four 3.5-inch, internal, hot-swappable SAS or
SATA hard drives with optional internal tape drive support
or
Up to eight 2.5-inch, internal, hot-swappable SAS or
SATA hard drives with optional internal tape drive
support
Diskette Drive Optional external USB 1.44-MB drive
Optical drive One optional internal slimline SATA DVD-ROM or
DVD+RW drive
Optional external USB DVD
NOTE: DVD devices are data only
Internal Tape Drive One optional half-height tape back-up device
Flash Drive Optional internal USB
Optional internal Secure Digital (SD) memory card
Optional external SD memory card
Connectors
Back
NIC
Serial
USB
Video
Optional external
VFlash card
Front
Video
USB
Internal
USB
Optional internal
SD module
Four RJ-45 10/100/1000 Mbps Ethernet
9-pin, DTE, 16550-compatible
Two 4-pin, USB 2.0-compliant
15-pin VGA
One flash memory card slot on the back panel
15-pin VGA
Two 4-pin, USB 2.0-compliant
One 4-pin, USB 2.0-compliant
One internal flash memory card slot
Getting Started With Your System 9

Video
Video type Integrated Matrox G200
Video memory 8 MB shared
Power
AC Power Supply (per power supply)
Wa t ta g e
Vo lt ag e
Heat dissipation
Maximum inrush
current
Batteries
System battery
RAID battery
(optional)
Physical
Height 8.64 cm (3.4 in)
Width 48.24 cm (18.99 in) with rack latches
Depth 72.06 cm(28.4 in) with power supplies and bezel
Weight (maximum
configuration)
Weight (empty) 17.7 kg (39 lb)
870 W (High Output)
570 W /200840 KB (Energy Smart)
90–264 VAC, autoranging, 47-63 Hz
2968.6 BTU/hr maximum (High Output)
1944.9 BTU/hr maximum (Energy Smart)
Under typical line conditions and over the entire system
ambient operating range, the inrush current may reach
55 A per power supply for 10 ms or less.
CR 2032 3.0-V lithium coin cell
3.7-V lithium ion battery pack
44.31 cm (17.4 in) without rack latches
68.07 cm(26.8) without power supplies and bezel
26.1 kg (57.54 lb)
10 Getting Started With Your System

Environmental
NOTE: For additional information about environmental measurements for specific
system configurations, see www.dell.com/environmental_datasheets
Temperature
Operating
10° to 35°C (50° to 95°F) with a maximum temperature
gradation of 10°C per hour
NOTE: For altitudes above 2950 feet, the maximum operating
temperature is derated 1°F/550 ft.
Storage
Relative humidity
Operating
Storage
Maximum vibration
Operating
Storage
Maximum shock
Operating
Storage
Altitude
Operating
–40° to 65°C (–40° to 149°F) with a maximum temperature
gradation of 20°C per hour
20% to 80% (non-condensing) with a maximum humidity
gradation of 10% per hour
5% to 95% (non-condensing) with a maximum humidity
gradation of 10% per hour
0.26 Gms from 5–350 Hz for 5 minutes in operational
orientations
1.54 Gms from 10–250 Hz for 10 minutes in all orientations
Half sine shock in all operational orientations of 31 G plus
or minus 5% with a pulse duration of 2.6 ms plus or minus
10%
Half sine shock on all six sides of 71 G plus or minus 5%
with a pulse duration of 2 ms plus or minus 10%
Square wave shock on all six sides of 27 G with a velocity
change at 235 in/sec or greater
–16 to 3,048 m (–50 to 10,000 ft)
NOTE: For altitudes above 2950 feet, the maximum operating
temperature is derated 1°F/550 ft.
Storage
–16 to 10,600 m (–50 to 35,000 ft)
Getting Started With Your System 11

12 Getting Started With Your System

Systémy Dell™
PowerEdge™ R710
Začínáme se
systémem

Poznámky, upozornění a varování
POZNÁMKA: POZNÁMKA označuje důležité informace, které pomáhají
lepšímu využití počítače.
VAROVÁNÍ: VAROVÁNÍ upozorňuje na potenciální nebezpečí
poškození majetku, úrazu nebo smrti.
____________________
Informace obsažené v tomto dokumentu podléhají změnám bez předchozího upozornění.
© 2008 Dell Inc. Všechna práva vyhrazena.
Jakákoli reprodukce těchto materiálů bez písemného povolení společnosti Dell Inc. je přísně zakázána.
Dell, logo DELL, a PowerEdge jsou ochranné známky společnosti Dell Inc.; Citrix a XenServer jsou
ochranné známky společnosti Citrix Systems, Inc. a/nebo dalších jejich dceřiných společností a lze je
registrovat u Amerického úřadu pro patenty a ochranné známky (United States Patent and Trademark
Office, USPTO) a v dalších zemích. Intel a Xeon jsou registrované ochranné známky společnosti Intel
Corporation v USA a dalších zemích. Microsoft, Hyper-V, Windows a Windows Server jsou ochranné
známky nebo registrované ochranné známky společnosti Microsoft Corporation v USA a/nebo dalších
zemích. Red Hat a Enterprise Linux jsou registrované ochranné známky společnosti Red Hat, Inc. v
USA a dalších zemích. SUSE je registrovaná ochranná známka společnosti Novell, Inc. v USA a
dalších zemích. VMware je registrovaná ochranná známka společnosti VMware, Inc. v USA a dalších
zemích.
V tomto dokumentu mohou být použity další ochranné známky a obchodní názvy s odkazem na
společnosti vlastnící tyto známky a názvy nebo na jejich produkty. Společnost Dell Inc. nemá
vlastnické zájmy vůči ochranným známkám a obchodním názvům jiným než svým vlastním.
Model E02S
Prosinec 2008 Č. dílu CX802 Rev. A02
Instalace a konfigurace
VAROVÁNÍ: Před provedením následujícího postupu si prostudujte
bezpečnostní pokyny dodané se systémem.
Rozbalení systému
Rozbalte systém a identifikujte jeho jednotlivé součásti.
Instalace kolejniček a systému do stojanu
Sestavte kolejničky a nainstalujte systém do stojanu podle bezpečnostních pokynů
a pokynů k instalaci do stojanu dodaných se systémem.
Začínáme se systémem 15

Volitelné – Připojení klávesnice, myši a monitoru
Připojte klávesnici, myš a monitor (volitelné).
Konektory na zadní straně systému mají ikony znázorňující, který kabel se má
připojit ke kterému konektoru. Zajistěte, aby šrouby na konektoru kabelu monitoru
byly dobře dotaženy (je-li jimi konektor vybaven).
Připojení napájecích kabelů
Připojte napájecí kabely k systému, a pokud používáte monitor, připojte napájecí
kabel také k monitoru.
16 Začínáme se systémem
Zajištění napájecího kabelu
Ohněte napájecí kabel do smyčky, jak je znázorněno na obrázku, a připevněte jej
dodanou páskou k držáku.
Poté zasuňte druhý konec napájecích kabelů do uzemněné elektrické zásuvky nebo
je připojte k samostatnému zdroji napájení, například ke zdroji nepřerušitelného
napájení (UPS) nebo jednotce rozvaděče (PDU).
Zapnutí systému
Stiskněte vypínač na systému a na monitoru. Indikátory napájení by se měly
rozsvítit.
Začínáme se systémem 17
Instalace volitelného čelního krytu
Nainstalujte čelní kryt (volitelný).
Dokončení nastavení operačního systému
Pokud jste zakoupili předinstalovaný operační systém, prostudujte dokumentaci k
operačnímu systému dodanou se systémem. Chcete-li provést první instalaci
operačního systému, postupujte podle dokumentace k instalaci a konfiguraci
operačního systému. Než začnete s instalací hardwaru či softwaru, který nebyl
zakoupen společně se systémem, ujistěte se, že je nainstalován operační systém.
•
Citrix® XenServer™ 5.0 s hotfix 1 nebo pozdější verzí
•
Microsoft® Windows Server® 2008 Hyper-V
•
Microsoft Windows Server 2008 Web, Standard, a Enterprise (32-bitové x86)
verze Gold
•
Microsoft Windows Server 2008 Web, Standard, Enterprise a Datacenter
(x64), verze Gold
•
Microsoft Windows Small Business Server 2008, verze Standard a Premium
(x64)
•
Microsoft Windows Server 2003, verze Web, Standard a Enterprise
(32 bitové x86) s aktualizací SP2
•
Microsoft Windows Server 2003, verze Standard a Enterprise (x64)
s aktualizací SP2
•
Microsoft Windows Server 2003 R2, verze Standard a Enterprise
(32 bitové x86) s aktualizací SP2
™
18 Začínáme se systémem
•
Microsoft Windows Server 2003 R2, verze Standard, Enterprise a Datacenter
(x64) s aktualizací SP2
•
Microsoft Windows Small Business Server 2003 R2, verze Standard
a Premium s aktualizací SP2
•
Red Hat® Enterprise Linux® ES a AS 4.7 (x86)
•
Red Hat Enterprise Linux ES a AS 4.7 (x86_64)
•
Red Hat Enterprise Linux 5.2 Server (x86_32)
•
Red Hat Enterprise Linux 5.2 Server (x86_64)
•
SUSE Linux Enterprise Server 10 SP2 (x86_64)
•
VMware® ESX verze 4.0 a 3.5, aktualizace 4 (pokud je k dispozici)
•
VMware ESXi verze 4.0 a 3.5, aktualizace 4 (pokud je k dispozici)
POZNÁMKA: Nejnovější informace o podporovaných operačních
systémech naleznete na webu www.dell.com.
Další užitečné informace
VAROVÁNÍ: Prostudujte si informace o bezpečnosti a předpisech,
které byly dodány se systémem. Informace o záruce je součástí
tohoto dokumentu nebo je přiložena samostatně.
•
Pokyny k instalaci do stojanu dodané se stojanovým řešením popisují
instalaci systému do stojanu.
•
Příručka majitele hardwaru
popisuje řešení problémů se systémem a instalaci nebo výměnu komponent.
Tento dokument je k dispozici online na webu
•
Média dodaná se systémem obsahují dokumentaci a nástroje pro konfiguraci
a správu systému. Mohou být dodána například média týkající se operačního
systému, softwaru pro správu systému, aktualizací systému a komponent
zakoupených se systémem.
obsahuje informace o funkcích systému a
support.dell.com.
POZNÁMKA: Vždy nejprve zkontrolujte a pročtěte aktualizace
uvedené na adrese support.dell.com, protože tyto aktualizace často
nahrazují informace v ostatních dokumentech.
Začínáme se systémem 19

Odborná pomoc
Nerozumíte-li některému z postupů popsaných v této příručce nebo nepracuje-li
systém podle očekávání, nahlédněte do
™
Dell
nabízí v souvislosti s hardwarem kompletní školení a certifikaci. Další
informace naleznete na webových stránkách
Příručky majitele hardwaru
www.dell.com/training
. Společnost
. Tato služba
nemusí být nabízena ve všech regionech.
Technické specifikace
Procesor
Typ procesoru Jeden nebo dva čtyřjádrové nebo dvoujádrové procesory
Rozšiřovací sběrnice
Typ sběrnice PCI Express 2. generace
Rozšiřující sloty
prostřednictvím zvedací
karty:
Zvedací karta 1 (střední)
Zvedací karta 2 (levá) Dva sloty x8 s plnou výškou a délkou 9,5 palce (sloty 3 a 4)
®
®
Xeon
Intel
Jeden slot x4 s plnou výškou a délkou 9,5 palce (slot 1)
POZNÁMKA: Tento slot lze upgradovat na délku
12,2 palce.
Jeden nízkoprofilový slot x4 s délkou 9,5 palce (slot 2)
nebo
Jeden slot x16 s plnou výškou a délkou 9,5 palce (slot 3)
POZNÁMKA: Podpora pro výkon až 25 W je k
dispozici pouze pro první dvě karty nainstalované
do systému. Další instalované karty musí mít výkon
15 W nebo nižší.
Pamět’
Architektura Pamět’ové moduly DIMM s taktovací frekvencí 800,
1066 nebo 1333 MHz, typ DDR3, registrované nebo bez
vyrovnávací paměti, s ochranou ECC; podpora technologie
Advanced ECC a optimalizace využití paměti
Kapacity
pamět’ové moduly
Osmnáct 240 kolíkových
20 Začínáme se systémem

Pamět’ (pokračování)
Kapacity
pamět’ových modulů
Minimum paměti RAM 1 GB s jedním procesorem (1 modul DIMM pro jeden
Maximum paměti RAM 96 GB (s kvadrálními moduly RDIMM 8 GB), 144 GB
Jednotky
Pevné disky Až šest 3,5 palcových pevných disků SAS nebo SATA
Disketová jednotka Volitelná externí jednotka USB 1,44 MB
Optická jednotka Jedna volitelná interní jednotka DVD-ROM nebo
Moduly UDIMM 1 GB a 2 GB , moduly RDIMM 2 GB,
4 GB nebo 8 GB
(jednoduché, duální nebo kvadrální – v závislosti na
kapacitě)
procesor)
(s duálními moduly RDIMM 8 GB) nebo 24 GB (s moduly
UDIMM 2 GB)
připojitelných za provozu bez podpory volitelné interní
páskové jednotky
nebo
Až čtyři 3,5 palcové pevné disky SAS nebo SATA
připojitelné za provozu s podporou volitelné interní páskové
jednotky
nebo
Až osm 2,5 palcových pevných disků SAS nebo SATA
připojitelných za provozu s podporou volitelné interní
páskové jednotky
DVD+RW (slim-line SATA)
Volitelná externí jednotka USB DVD
POZNÁMKA: Zařízení DVD jsou určena pouze pro
data.
Interní pásková jednotka Jedno volitelné páskové zálohovací zařízení s poloviční
výškou
Disk flash Volitelný interní USB
Volitelná interní pamět’ová karta SD (Secure Digital)
Volitelná externí pamět’ová karta SD
Začínáme se systémem 21

Konektory
Vzadu
Sít’ové Čtyři konektory sítě Ethernet typu RJ-45 podporující
rychlosti 10/100/1000 Mb/s
Sériový 9 kolíkový, DTE, kompatibilní s normou 16550
USB Dva 4kolíkové, USB 2.0
Video 15 kolíkový VGA
Volitelná externí karta
VFlash
Vpředu
Video 15 kolíkový VGA
USB Dva 4 kolíkové, USB 2.0
Interní
USB Jeden 4 kolíkový, USB 2.0
Volitelný interní modul SDJeden interní slot pro pamět’ovou kartu flash
Video
Typ grafiky Integrovaná Matrox G200
Grafická pamět’ 8 MB (sdílená)
Jeden slot pro pamět’ovou kartu flash na zadním panelu
Napájení
Střídavý proud (na jeden napájecí zdroj)
Výkon 870 W (vysokokapacitní zdroj)
570 W /200840 KB (Energy Smart)
Napětí 90–264 V stř., automatické přepínání rozsahu, 47–63 Hz
Odvod tepla Maximálně 2968,6 BTU/hod. (vysokokapacitní zdroj)
1944.9 BTU/hod. maximum (Energy Smart)
Maximální nárazový
proud
V typických podmínkách napájení a v celém provozním
rozsahu systému může nárazový proud dosáhnout 55 A na
jeden napájecí zdroj po dobu 10 ms nebo méně.
22 Začínáme se systémem

Napájení (pokračování)
Baterie
Systémová baterie Lithium-iontová knoflíková baterie CR 2032 3,0 V
Baterie RAID
(volitelná)
Rozměry
Výška 8,64 cm
Šířka 48,24 cm se západkami kolejniček
Hloubka 72,06 cm s napájecími zdroji
Hmotnost (maximální
konfigurace)
Hmotnost (prázdné) 17,7 kg
Prostředí
Lithium-iontová baterie 3,7 V
44,31 cm bez západek kolejniček
68,07 cm bez napájecích zdrojů
26,1 kg
POZNÁMKA: Další informace o měřených údajích prostředí najdete pro
jednotlivé systémové konfigurace na adrese
www.dell.com/environmental_datasheets.
Te pl ot a
Provozní 10 až 35 °C s maximálním nárůstem teploty o 10 °C za hodinu
POZNÁMKA: V nadmořských výškách nad 900 metrů
je maximální provozní teplota snížena o 0,55 °C na
každých 168 metrů.
Skladovací -40 až 65 °C s maximálním nárůstem teploty o 20 °C za hodinu
Relativní vlhkost
Provozní 20 až 80 % (bez kondenzace) s maximálním nárůstem vlhkosti o
10 % za hodinu
Skladovací 5 až 95 % (bez kondenzace) s maximálním nárůstem vlhkosti o
10 % za hodinu
Začínáme se systémem 23

Prostředí (pokračování)
Maximální vibrace
Provozní 0,26 g při 5–350 Hz po dobu 5 minut v provozních orientacích
Skladovací 1,54 g při 10–250 Hz po dobu 10 minut ve všech orientacích
Maximální ráz
Provozní Půlsinusový ráz ve všech provozních orientacích o síle 31 G
+/- 5 % s délkou impulsu 2,6 ms +/- 10 %
Skladovací Půlsinusový ráz na všech šesti stranách o síle 71 G +/- 5 %
s délkou impulsu 2 ms +/- 10 %
Ráz s obdélníkovým průběhem vlny na všech šesti stranách
o síle 27 G se změnou rychlosti 5,969 m/s nebo vyšší
Nadmořská výška
Provozní -16 až 3 048 m
POZNÁMKA: V nadmořských výškách nad 900 metrů
je maximální provozní teplota snížena o 0,55 °C na
každých 168 metrů.
Skladovací -16 až 10 600 m
24 Začínáme se systémem

Systèmes Dell™
PowerEdge™ R710
Guide de mise en route

Remarques, précautions et avertissements
REMARQUE : Une REMARQUE indique des informations importantes qui peuvent
vous aider à mieux utiliser votre ordinateur.
AVERTISSEMENT : Un AVERTISSEMENT vous avertit d’un risque
d'endommagement du matériel, de blessure corporelle ou de mort.
____________________
Les informations contenues dans ce document sont sujettes à modification sans préavis.
© 2008 Dell Inc. Tous droits réservés.
La reproduction de ces documents de quelque manière que ce soit sans l'autorisation écrite de Dell Inc.
est strictement interdite.
Dell, le logo DELL et PowerEdge sont des marques de Dell Inc. ; Citrix et XenServer sont des marques
de Citrix Systems, Inc. et/ou de ses filiales, et peuvent être déposées auprès du Patent and Trademark
Office aux États-Unis et d'organismes similaires dans d'autres pays. Intel et Xeon sont des marques
déposées d'Intel Corporation aux États-Unis et dans d'autres pays ; Microsoft, Hyper-V, Windows et
Windows Server sont des marques ou des marques déposées de Microsoft Corporation aux États-Unis
et/ou dans d'autres pays. Red Hat et Enterprise Linux sont des marques déposées de Red Hat, Inc. aux
États-Unis et dans d'autres pays ; SUSE est une marque déposée de Novell, Inc. aux États-Unis et dans
d'autres pays. VMware est une marque déposée de VMware, Inc. aux États-Unis et dans d'autres
juridictions.
D'autres marques commerciales et noms de marque peuvent être utilisés dans ce document pour faire
référence aux entités se réclamant de ces marques et de ces noms ou de leurs produits. Dell Inc. dénie
tout intérêt propriétaire vis-à-vis des marques commerciales et des noms de marque autres que les siens.
Modèle E02S
Décembre 2008 N/P CX802 Rév. A02

Installation et configuration
AVERTISSEMENT : Avant de commencer, consultez les consignes de sécurité
fournies avec le système.
Déballage du système
Sortez le système de son emballage et identifiez chaque élément.
Installation des rails et du système dans un rack
Assemblez les rails et installez le système dans le rack en suivant les consignes
de sécurité et les instructions d'installation du rack fournies avec votre
système.
Guide de mise en route 27

Facultatif – Connexion du clavier, de la souris et du moniteur
Connectez le clavier, la souris et le moniteur (si nécessaire).
Les icônes des connecteurs situés à l'arrière du système indiquent où insérer
chaque câble. N'oubliez pas de serrer les vis situées sur le connecteur du câble
du moniteur, s'il en est équipé.
Connexion des câbles d'alimentation
Connectez le ou les câbles d'alimentation au système et, si vous utilisez un
moniteur, connectez son câble d'alimentation.
28 Guide de mise en route
 Loading...