

Page 1

Dell Networking
W-ClearPass
Policy Manager
Getting Started Guide
Page 2

Copyright Information
© 2014 Aruba Networks, Inc. Aruba Networks trademarks include the Aruba Networks logo, Aruba Networks®, Aruba
Wireless Networks®, the registered Aruba the Mobile Edge Company logo, and Aruba Mobility Management System®.
Dell™, the DELL™ logo, and PowerConnect™ are trademarks of Dell Inc.
All rights reserved. Specifications in this manual are subject to change without notice.
Originated in the USA. All other trademarks are the property of their respective owners.
Open Source Code
Certain Aruba products include Open Source software code developed by third parties, including software code subject
to the GNU General Public License (GPL), GNU Lesser General Public License (LGPL), or other Open Source
Licenses. Includes software from Litech Systems Design. The IF-MAP client library copyright 2011
Infoblox, Inc. All rights reserved. This product includes software developed by Lars Fenneberg, et al. The Open Source
code used can be found at this site:
http://www.arubanetworks.com/open_source
Legal Notice
The use of Aruba Networks, Inc. switching platforms and software, by all individuals or corporations, to terminate
other vendors’ VPN client devices constitutes complete acceptance of liability by that individual or corporation for
this action and indemnifies, in full, Aruba Networks, Inc. from any and all legal actions that might be taken against it
with respect to infringement of copyright on behalf of those vendors.
March 2014 | 0511213-03 Dell Networking W-W-ClearPass Polic y Manager | Getting Started Guide
Page 3

Contents
Powering Up and Configuring Policy Manager Hardware 5
Overview 5
Server Port Overview 5
Server Port Configuration 5
Powering Off the System 7
Resetting the Passwords to Factory Default 8
Generating a Support Key for Technical Support 8
A Subset of Useful CLI Commands 9
Accessing Policy Manager 11
Accessing Help 12
Checking Basic Services 13
Use Cases 15
802.1X Wireless Use Case 15
Configuring the Service 15
Web Based Authentication Use Case 21
Configuring the Service 22
MAC Authentication Use Case 28
Configuring the Service 29
TACACS+ Use Case 31
Configuring the Service 32
Single Port Use Case 33
Dell Networking W-ClearPass Policy Manager | Getting Started Guide Contents | 3
Page 4

4 | Contents
Dell Networking W-ClearPass Policy Manager | Getting Started
Guide
Page 5
Chapter 1
Powering Up and Configuring Policy
Manager Hardware
Overview
This Getting Started Guide for the Dell Networking W-W-ClearPass Policy Manager System (Policy Manager)
describes the steps for installing the appliance using the Command Line Interface (CLI) and using the User Interface
(UI) to ensure that the required services are running.
Server Port Overview
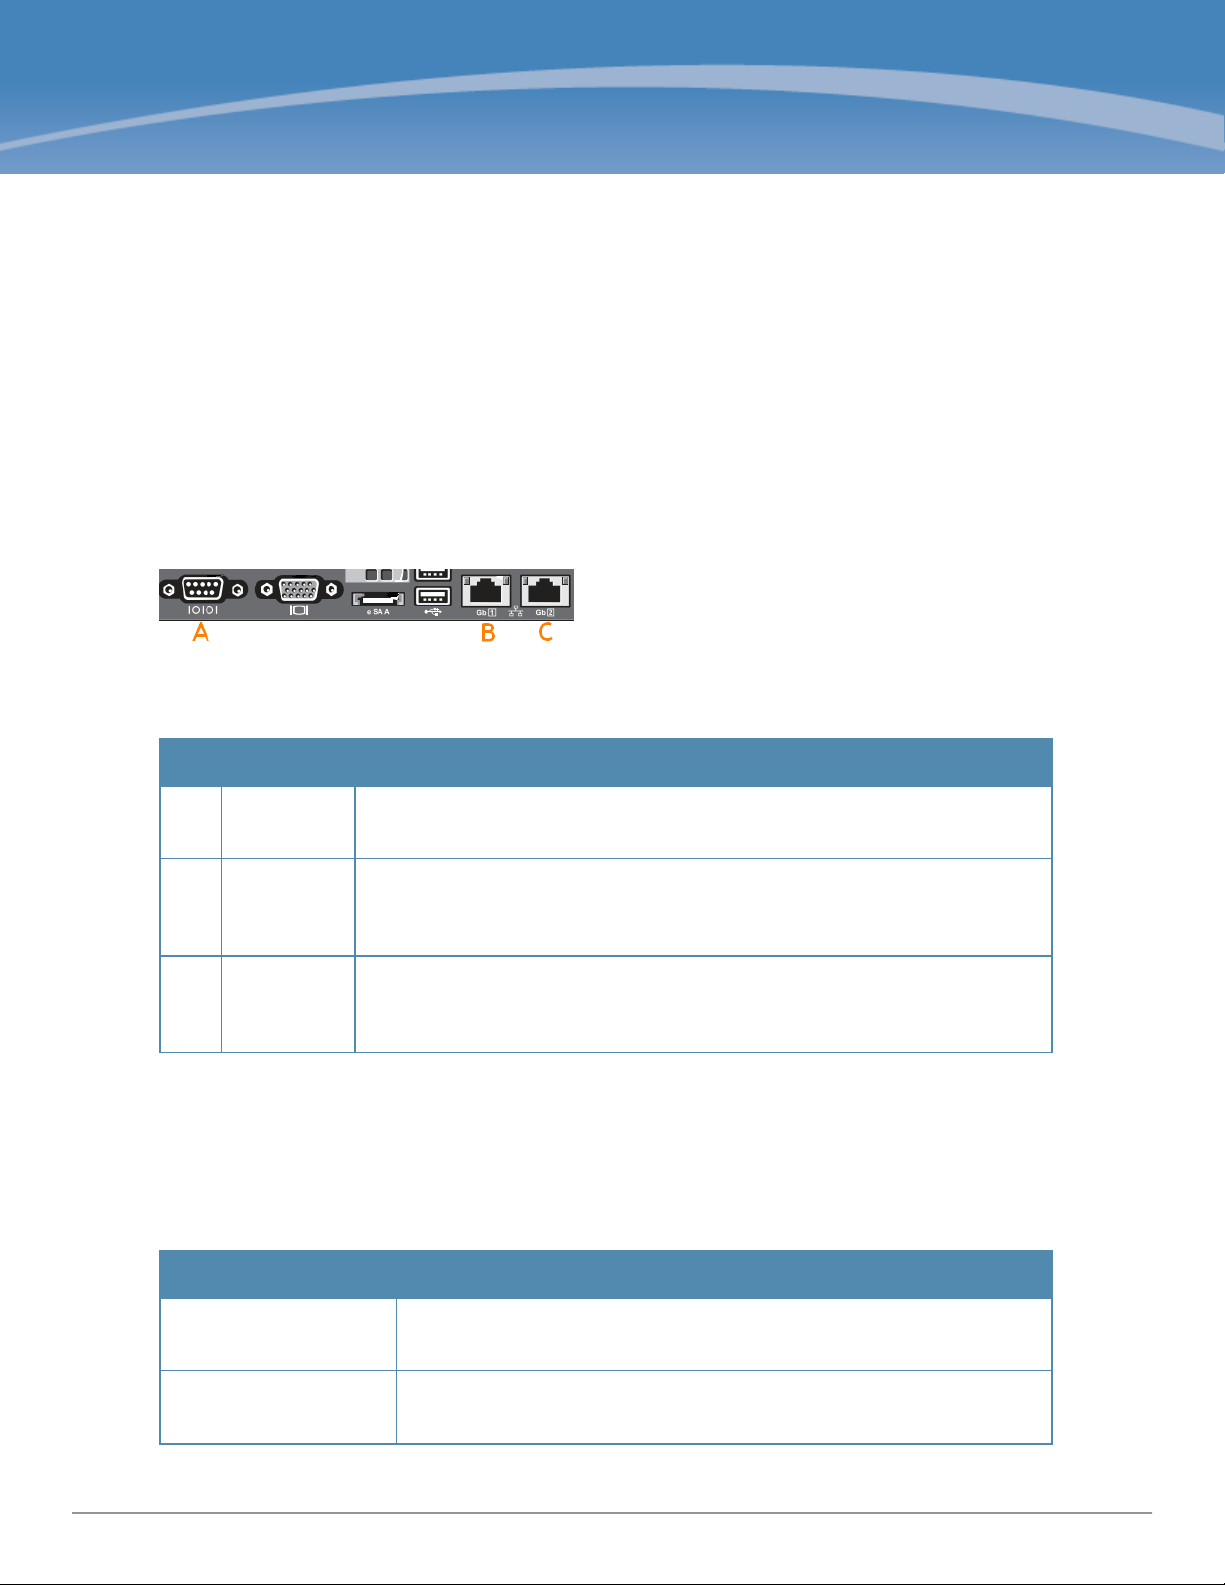
The W-ClearPass Policy Manager server requires initial port configuration. The backplane of the Policy Manager
contains three ports.
Figure 1: Policy Manager Backplane
The ports in the figure above are described in the following table:
Table 1:
Key Port Description
A Serial
B eth0
C eth1
Device Ports
Management
(gigabit
Ethernet)
Data (gigabit
Ethernet)
Configures the W-ClearPass Policy Manager appliance initially using hardwired
terminal.
Provides access for cluster administration and appliance maintenance using Web
access, CLI, or internal cluster communications.
Configuration is mandatory.
Provides point of contact for RADIUS, TACACS+, Web Authentication, and other
data-plane requests. Configuration is optional. If this port is not configured,
requests are redirected to the management port.
Server Port Configuration
Before starting the installation, collect the following information that you need, write it in the table below, and keep it
for your records:
Table 2:
Required Information
Requirement Value for Your Installation
Hostname (Policy
Manager server)
Management Port IP
Address
Dell Networking W-ClearPass Policy Manager | Getting Started Guide Powering Up and Configuring Policy Manager Hardware | 5
Page 6

Table 2:
Required Information (Continued)
Requirement Value for Your Installation
Management Port Subnet
Mask
Management Port
Gateway
Data Port IP Address
(optional)
Data Port Gateway
(optional)
Data Port Subnet Mask
(optional)
Primary DNS
Secondary DNS
NTP Server (optional)
NOTE: The Data Port IP Address must not be in the same subnet as the
Management Port IP Address.
Perform the following steps to set up the Policy Manager appliance:
1. Connect and power on
Connect a serial port on the appliance to a terminal using the null modem cable provided and power on. The
appliance is available for configuration.
Use the following parameters for the serial port connection:
l Bit Rate: 9600
l Data Bits: 8
l Parity: None
l Stop Bits: 1
l Flow Control: None
2. Login
You can create a unique appliance/cluster administration password later. For now, use the following preconfigured
credentials:
login: appadmin
password: eTIPS123
This initiates the Policy Manager Configuration Wizard.
3. Configure the Appliance
Replace the bolded placeholder entries in the following illustration with your local information:
Enter hostname: verne.xyzcompany.com
Enter Management Port IP Address: 192.168.5.10
Enter Management Port Subnet Mask: 255.255.255.0
Enter Management Port Gateway: 192.168.5.1
Enter Data Port IP Address: 192.168.7.55
Enter Data Port Subnet Mask: 255.255.255.0
6 | Powering Up and Configuring PolicyManager Hardwar e DellNetworking W-ClearPass Policy Manager | Getting Started Guide
Page 7

Enter Data Port Gateway: 192.168.7.1
Enter Primary DNS: 198.168.5.3
Enter Secondary DNS: 192.168.5.1
4. Change your password
Use any string with a minimum of six characters:
New Password:************
Confirm Password: ************
From now, you must use this password for cluster administration and management of the appliance.
5. Change the system date/time
Do you want to configure system date time information [y|n]: y
Please select the date time configuration options.
1) Set date time manually
2) Set date time by configuring NTP servers
Enter the option or press any key to quit: 2
Enter Primary NTP Server: pool.ntp.org
Enter Secondary NTP Server: time.nist.gov
Do you want to configure the timezone? [y|n]: y
After the timezone information is entered, you are prompted to confirm the selection.
6. Commit or restart the configuration
Follow the prompts:
Proceed with the configuration [y[Y]/n[N]/q[Q]
y[Y] to continue
n[N] to start over again
q[Q] to quit
Enter the choice:Y
Successfully configured Policy Manager appliance
*************************************************************
* Initial configuration is complete.
* Use the new login password to login to the CLI.
* Exiting the CLI session in 2 minutes. Press any key to exit now.
When the Policy Manager system is up and running, navigate to the Administration > Agents and Software Updates
> Software Updates page to view and download any available software updates. Refer to in the UserGuide for more
information.
Powering Off the System
Perform the following steps to power off the system gracefully without logging in:
Connect to the CLI from the serial console using the front serial port and enter the following:
login: poweroff
password: poweroff
This procedure gracefully shuts down the appliance.
Dell Networking W-ClearPass Policy Manager | Getting Started Guide Powering Up and Configuring Policy Manager Hardware | 7
Page 8

Resetting the Passwords to Factory Default
To reset Administrator passwords in Policy Manager to factory defaults, you can login to the CLI as the apprecovery
user. The password to log in as the apprecovery user is dynamically generated.
Perform the following steps to generate the recovery password:
1. Connect to the Policy Manager appliance using the front serial port (using any terminal program). See "Resetting
the Passwords to Factory Default" on page 8 for details.
2. Reboot the system and execute the restart command.
3. After the system restarts, the following prompt is displayed for ten seconds:
Generate support keys? [y/n]:
Enter y at the prompt. The system prompts you with the following choices:
Please select a support key generation option.
1) Generate password recovery key
2) Generate a support key
3) Generate password recovery and support keys
Enter the option or press any key to quit.
4. To generate the recovery key, select option 1.
5. To generate a support key and a recovery key and support, select option 3.
6. After the password recovery key is generated, email the key to Dell technical support. A unique password will be
generated from the recovery key and emailed back to you.
7. Enter the following command at the command prompt:
[apprecovery] app reset-passwd
*******************************************************
* WARNING: This command will reset the system account *
* passwords to factory default values *
*******************************************************
Are you sure you want to continue? [y/n]: y
INFO - Password changed on local node
INFO - System account passwords have been reset to factory default values
Generating a Support Key for Technical Support
To troubleshoot certain critical system level errors, Dell technical support might need to log into a support shell.
Perform the following steps to generate a dynamic support password:
1. Log into the Command Line Interface (CLI) and enter the following command:
system gen-support-key
2. Connect to the Policy Manager appliance using the front serial port (using any terminal program). See "Server Port
Configuration" on page 5 for details.
3. Reboot the system using the restart command.
4. When the system restarts, the following prompt appears for 10 seconds:
Generate support keys? [y/n]:
Enter y at the prompt. The system prompts with the following choices:
Please select a support key generation option.
8 | Powering Up and Configuring PolicyManager Hardwar e DellNetworking W-ClearPass Policy Manager | Getting Started Guide
Page 9

1) Generate password recovery key
2) Generate a support key
3) Generate password recovery and support keys
Enter the option or press any key to quit.
5. To generate the support key, select option 2. Select 3, if you want to generate a password recovery key as well.
6. After the password recovery key is generated, email the key to Dell technical support. A unique password can now
be generated by Dell technical support to log into the support shell.
A Subset of Useful CLI Commands
The CLI provides a way to manage and configure Policy Manager information. Refer to Appendix A: Command Line
Interface in the User Guide for more detailed information on the CLI.
The CLI can be accessed from the console using a serial port interface or remotely using SSH:
*****************************************************************************************
* Dell W-ClearPass Policy Manager *
* Software Version : 6.3.0.62080 *
*****************************************************************************************
Logged in as group Local Administrator
[appadmin@company.com]#
The following subset of CLI commands may be useful at this point:
l To view the Policy Manager data and management port IP address, and DNS configuration:
[appadmin]# show ip
l To reconfigure DNS or add a new DNS:
[appadmin]# configure dns <primary> [secondary] [tertiary]
l To reconfigure or add management and data ports:
[appadmin]# configure ip <mgmt | data > <ipadd> netmask <netmask address> gateway <gateway address>
where:
Flag/Parameter Description
ip <mgmt|data> <ip
address>
netmask <netmask
address>
gateway <gateway
address>
l To configure the date (time and time zone optional):
[appadmin]# configure date –d <date> [-t <time>] [-z <timezone>]
l To configure the hostname to the node:
configure hostname <hostname>
l If you are using Active Directory to authenticate users, be sure to join the Policy Manager appliance to that domain
l Network interface type:
l Server ip address.
Netmask address.
Gateway address.
mgmtordata
as well.
ad netjoin <domain-controller.domain-name> [domain NETBIOS name]
where:
Dell Networking W-ClearPass Policy Manager | Getting Started Guide Powering Up and Configuring Policy Manager Hardware | 9
Page 10

Flag/Parameter Description
<domain-controller.
domain-name>
[domain NETBIOS name]
Required.
Host to be joined to the domain.
Optional.
10 | Powering Up and Configuring PolicyManager Hardware Dell Networking W-ClearPass Policy Manager |Getting Started Guide
Page 11
Accessing Policy Manager
Use Firefox 3.0 (or higher) or Internet Explorer 7.0.5 (or higher) to perform the following steps:
1. Open the administrative interface.
Navigate to https://<hostname>/tips, where <hostname> is the hostname you configured during the initial
configuration.
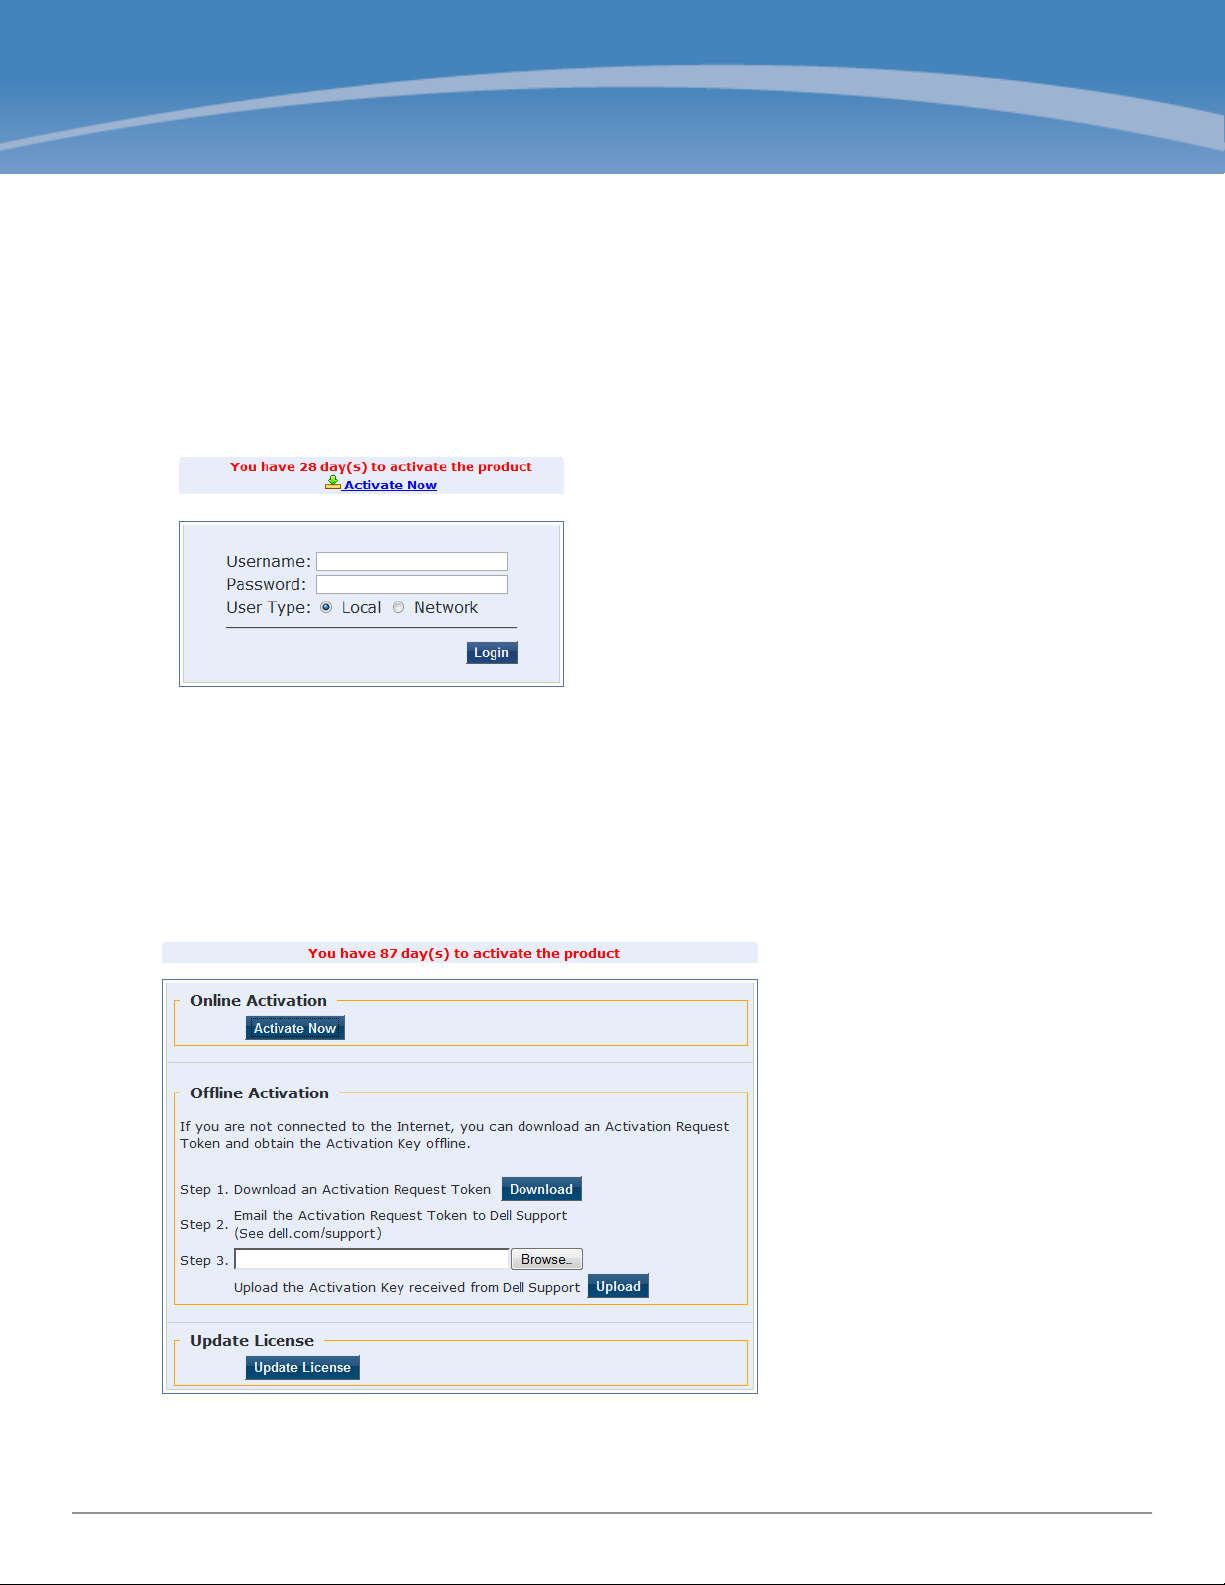
2. Enter License Key.
3. Click the Activate Now link.
Chapter 2
4. Activate the product.
If the appliance is connected to the Internet, click on the Activate Now button. If not, click on the Download
button to download the Activation Request Token. Contact Dell Support and provide your technician with the
downloaded token in an email attachment. Once you receive the Activation Key from Dell Support, save it to a
known location on your computer. Come back to this screen and click on the Browse button to select the
Activation Key. Upload the key by clicking on the Upload button.
The product is now activated.
5. Login. Username: admin, Password: eTIPS123
Dell Networking W-ClearPass Policy Manager | Getting Started Guide Accessing Policy Manager | 11
Page 12

6. Change the password.
Navigate to Administration > Admin Users, then use the Edit Admin User popup to change the administration
password.
Accessing Help
The Policy Manager User Guide (in PDF format) is built within the help system here:
https://<hostname>/tipshelp/html/en/
(where <hostname> is the hostname you configured during the initial configuration.)
All Policy Manager user interface screens have context-sensitive help. To access context-sensitive help, click on the
Help link at the top right hand corner of any screen.
12 | Accessing PolicyManager Dell Networking W-ClearPass Policy Manager |Getting Started Guide
Page 13

Chapter 3
Checking Basic Services
To check the status of service, navigate to Administration > Server Manager >Server Configuration, then click on
a row to select a server:
l The System tab displays server identity and connection parameters.
l The Service Control tab displays all services and their current status. If a service is stopped, you can use its
Start/Stop button (toggle) to restart it.
You can also start an individual service from the command line,
service start <service-name>
or all services from the command line,
service start all
l The Service Parameters tab allows you to change system parameters for all services.
l The System Monitoring tab allows you to configure SNMP parameters, ensuring that external MIBbrowsers can
browse the system-level MIB objects exposed by the Policy Manager appliance.
l The Network tab allows you to view and create GRE tunnels and VLANs.
l The FIPS tab is used to enable W-ClearPass in Federal Information Processing Standard mode. For most users, this
tab should be ignored. Changing the mode to FIPS mode causes the database to be reset.
Dell Networking W-ClearPass Policy Manager | Getting Started Guide Checking BasicServices | 13
Page 14

14 | Checking Basic Services Dell Networking W-ClearPass PolicyManager |Getting Started Guide
Page 15

Appendix A
Use Cases
This appendix contains several specific W-ClearPass Policy Manager use cases. Each one explains what it is typically
used for, and then describes how to configure Policy Manager for that use case.
l "802.1X Wireless Use Case" on page 15
l "Web Based Authentication Use Case" on page 21
l "MAC Authentication Use Case" on page 28
l "TACACS+ Use Case" on page 31
l "Single Port Use Case" on page 33
802.1X Wireless Use Case
The basic Policy Manager Use Case configures a Policy Manager Service to identify and evaluate an 802.1X request
from a user logging into a Wireless Access Device. The following image illustrates the flow of control for this Service.
Figure 2: Flow of Control, Basic 802.1X Configuration Use Case
Configuring the Service
Follow the steps below to configure this basic 802.1X service:
1. Create the Service.
The following table provides the model for information presented in Use Cases, which assume the reader’s ability
to extrapolate from a sequence of navigational instructions (left column) and settings (in summary form in the right
Dell Networking W-ClearPass Policy Manager | Getting Started Guide Use Cases | 15
Page 16

column) at each step. Below the table, we call attention to any fields or functions that may not have an
immediately obvious meaning.
Policy Manager ships with fourteen preconfigured Services. In this Use Case, you select a Service that supports
802.1X wireless requests.
Table 3:
802.1X - Create Service Navigation and Settings
Navigation Settings
Create a new Service:
l Services >
l Add Service (link) >
Name the Service and select a preconfigured Service Type:
l Service (tab) >
l Type (selector): 802.1X Wireless >
l Name/Descript ion (freeform) >
l Upon completion, click Next (to
Authentication)
The following fields deserve special mention:
n Monitor Mode: Optionally, check here to allow handshakes to occur (for monitoring purposes), but without
enforcement.
n Service Categorization Rule: For purposes of this Use Case, accept the preconfigured Service Categorization
Rules for this Type.
2. Configure Authentication.
Follow the instructions to select [EAP FAST], one of the pre-configured Policy Manager Authentication Methods,
and Active Directory Authentication Source (AD), an external Authentication Source within your existing
enterprise.
Policy Manager fetches attributes used for role mapping from the Authorization Sources (that are associated with the
authentication source). In this example, the authentication and authorization source are one and the same.
16 | Use Cases DellNetworking W-ClearPass PolicyManager | Getting Started Guide
Page 17

Table 4:
Configure Authentication Navigation and Settings
Navigation Settings
Select an Authentication Method
and an Active Directory server
(that you have already configured
in Policy Manager):
l Authentication (tab) >
l Methods (Select a method
from the drop-down list)
l Add >
l Sources (Select drop-down
list):
[Local User Repository] [Local
SQL DB]
[Guest User Repository]
[Local SQL DB]
[Guest Device Repository]
[Local SQL DB]
[Endpoints Repository] [Local
SQL DB]
[Onboard Devices Repository]
[Local SQL DB] >
[Admin User Repository]
[Local SQL DB] >
AmigoPod AD [Active
Directory>
l Add >
l Upon completion, Next (to
configure Authorization)
The following field deserves special mention:
n Strip Username Rules: Optionally, check here to pre-process the user name (to remove prefixes and suffixes)
before sending it to the authentication source.
To view detailed setting information for any preconfigured policy component, select the item and click View Details.
3. Configure Authorization.
Policy Manager fetches attributes for role mapping policy evaluation from the Authorization Sources. In this use
case, the Authentication Source and Authorization Source are one and the same.
Dell Networking W-ClearPass Policy Manager | Getting Started Guide Use Cases | 17
Page 18

Table 5:
02.1X - Configure Authorization Navigation and Settings
Navigation Settings
l Configure Service level authorization
source. In this use case there is nothing
to configure. Click the Next button.
l Upon completion, click Next (to Role
Mapping).
4. Apply a Role Mapping Policy.
Policy Manager tests client identity against role-mapping rules, appending any match (multiple roles acceptable) to
the request for use by the Enforcement Policy. In the event of role-mapping failure, Policy Manager assigns a
default role.
In this Use Case, create the role mapping policy RMP_DEPARTMENT that distinguishes clients by department and
the corresponding roles ROLE_ENGINEERING and ROLE_FINANCE, to which it maps:
Table 6:
Role Mapping Navigation and Settings
Navigation Settings
Create the new Role Mapping Policy:
l Roles (tab) >
l Add New Role Mapping Policy (link) >
Add new Roles (names only):
l Policy (tab) >
l Policy Name (freeform): ROLE_
ENGINEER >
l Save (button) >
l Repeat for ROLE_FINANCE >
l When you are finished working in the
Policy tab, click the Next button (in the
Rules Editor)
18 | Use Cases DellNetworking W-ClearPass PolicyManager | Getting Started Guide
Page 19

Table 6:
Role Mapping Navigation and Settings (Continued)
Navigation Settings
Create rules to map client identity to a
Role:
l Mapping Rules (tab) >
l Rules Evaluation Algorithm (radio
button): Select all matches >
l Add Rule (button opens popup) >
l Add Rule (button) >
l Rules Editor (popup) >
l Conditions/ Actions: match
Conditions to Actions (drop-down list)
>
l Upon completion of each rule, click
the Save button (in the Rules Editor) >
l When you are finished working in the
Mapping Rules tab, click the Save
button (in the Mapping Rules tab)
Add the new Role Mapping Policy to the
Service:
l Back in Roles (tab) >
l Role Mapping Policy (selector):
DEPARTMENT
l Upon completion, click Next (to
>
RMP_
Posture)
5. Configure a Posture Server.
For purposes of posture evaluation, you can configure a Posture Policy (internal to Policy Manager), a Posture Server
(external), or an Audit Server (internal or external). Each of the first three use cases demonstrates one of these options;
here, the Posture Server.
Policy Manager can be configured for a third-party posture server, to evaluate client health based on vendor-specific
credentials, typically credentials that cannot be evaluated internally by Policy Manager (that is, not in the form of
internal posture policies). Currently, Policy Manager supports the following posture server interface: Microsoft NPS
(RADIUS).
Refer to the following table to add the external posture server of type Micrsoft NPS to the 802.1X service:
Dell Networking W-ClearPass Policy Manager | Getting Started Guide Use Cases | 19
Page 20

Table 7:
Posture Navigation and Settings
Navigation Setting
Add a new Posture Server:
l Posture (tab) >
l Add new Posture Server (button)
>
Configure Posture settings:
l Posture Server (tab) >
l Name (freeform): PS_NPS
l Server Type (radio button):
Microsoft NPS
l Default Post ure Token (selector):
UNKOWN
l Next (to Primary Server)
Configure connection settings:
l Primary/ Backup Server (tabs):
Enter connection information for
the RADIUS posture server.
l Next (button): from Primary Server
to Backup Server.
l To complete your work in these
tabs, click the Save button.
Add the new Posture Server to the
Service:
l Back in the Posture (tab) >
l Posture Servers (selector): PS_
NPS, then click the Add button.
l Click the Next button.
6. Assign an Enforcement Policy.
Enforcement Policies contain dictionary-based rules for evaluation of Role, Posture Tokens, and System Time to
Evaluation Profiles. Policy Manager applies all matching Enforcement Profiles to the Request. In the case of no
match, Policy Manager assigns a default Enforcement Profile.
20 | Use Cases DellNetworking W-ClearPass PolicyManager | Getting Started Guide
Page 21

Table 8:
Enforcement Policy Navigation and Settings
Navigation Setting
Configure the Enforcement
Policy:
l Enforcement (tab) >
l Enforcement Policy
(selector): Role_Based_
Allow_Access_ Policy
For instructions about how to build such an Enforcement Policy, refer to "Configuring Enforcement Policies" in the
W-ClearPass Policy Manager User Guide.
7. Save the Service.
Click Save. The Service now appears at the bottom of the Services list.
Web Based Authentication Use Case
This Service supports known Guests with inadequate 802.1X supplicants or posture agents. The following figure
illustrates the overall flow of control for this Policy Manager Service.
Dell Networking W-ClearPass Policy Manager | Getting Started Guide Use Cases | 21
Page 22

Figure 3: Flow-of-Control of Web-Based Authentication for Guests
Configuring the Service
Perform the following steps to configure Policy Manager for WebAuth-based Guest access.
1. Prepare the switch to pre-process WebAuth requests for the Policy Manager Dell WebAuth service.
Refer to your Network Access Device documentation to configure the switch such that it redirects HTTP requests
to the Dell Guest Portal, which captures username and password and optionally launches an agent that returns
posture data.
2. Create a WebAuth-based Service.
Table 9:
Navigation Settings
22 | Use Cases DellNetworking W-ClearPass PolicyManager | Getting Started Guide
Service Navigation and Settings
Create a new Service:
l Services >
l Add Service >
Page 23

Table 9:
Service Navigation and Settings (Continued)
Navigation Settings
Name the Service and
select a pre-configured
Service Type:
l Service (tab) >
l Type (selector): Dell
Web-Based
Authentication >
l Name/Descript ion
(freeform) >
l Upon completion,
click Next .
3. Set up the Authentication.
a. Method: The Policy Manager WebAuth service authenticates WebAuth clients internally.
b. Source: Administrators typically configure Guest Users in the local Policy Manager database.
4. Configure a Posture Policy.
For purposes of posture evaluation, you can configure a Posture Policy (internal to Policy Manager), a Posture Server
(external), or an Audit Server (internal or external). Each of the first three use cases demonstrates one of these options.
This use case demonstrates the Posture Policy.
As of the current version, Policy Manager ships with five pre-configured posture plugins that evaluate the health of
the client and return a corresponding posture token.
To add the internal posture policy IPP_UNIVERSAL_XP, which (as you will configure it in this Use Case, checks
any Windows®XP clients to verify the most current Service Pack).
Dell Networking W-ClearPass Policy Manager | Getting Started Guide Use Cases | 23
Page 24

Table 10:
Local Policy Manager Database Navigation and Settings
Navigation Settings
Select the local Policy Manager
database:
l Authentication (tab) >
l Sources (Select drop-down list):
[Local User Repository] >
l Add >
l Strip Username Rules (check box) >
l Enter an example of preceding or
following separators (if any), with the
phrase “user” representing the
username to be returned. For
authentication, Policy Manager strips
the specified separators and any
paths or domains beyond them.
l Upon completion, click Next (until you
reach Enforcement Policy).
Table 11:
Posture Policy Navigation and Settings
Navigation Setting
Create a Posture
Policy:
l Posture (tab) >
l Enable Validation
Check (check
box) >
l Add new I nt ernal
Policy (link) >
24 | Use Cases DellNetworking W-ClearPass PolicyManager | Getting Started Guide
Page 25

Table 11:
Posture Policy Navigation and Settings (Continued)
Navigation Setting
Name the Posture
Policy and specify a
general class of
operating system:
l Policy (tab) >
l Policy Name
(freeform):
UNIVERSAL
l Host Operating
System (radio
buttons):
Windows >
l When finished
working in the
Policy tab, click
Next to open the
Posture Plugins
tab
Select a Validator:
l Posture Plugins
(tab) >
l Enable Windows
Health Syst em
Validator >
l Configure
(button) >
IPP_
>
Dell Networking W-ClearPass Policy Manager | Getting Started Guide Use Cases | 25
Page 26

Table 11:
Posture Policy Navigation and Settings (Continued)
Navigation Setting
Configure the
Validator:
l Windows Syst em
Health Validator
(popup) >
l Enable all
Windows
operating
systems (check
box) >
l Enable Service
Pack levels for
Windows 7,
Windows Vista®,
Windows XP
Windows Server
2008, Windows
Server 2008 R2,
and Windows
Server 2003
(check boxes) >
l Save (button) >
l When finished
working in the
Posture Plugin
tab click Next to
move to the Rules
tab)
®
26 | Use Cases DellNetworking W-ClearPass PolicyManager | Getting Started Guide
Page 27

Table 11:
Posture Policy Navigation and Settings (Continued)
Navigation Setting
Set rules to correlate
validation results with
posture tokens:
l Rules (tab) >
l Add Rule (button
opens popup) >
l Rules Editor
(popup) >
l Conditions/
Actions: match
Conditions
(Select Plugin/
Select Plugin
checks) to Actions
(Posture Token)>
l In the Rules
Editor, upon
completion of
each rule, click
the Save button >
l When finished
working in the
Rules tab, click
the Next button.
Add the new Posture
Policy to the Service:
Back in Posture (tab)
>
Internal Policies
(selector): IPP_
UNIVERSAL_XP,
then click the Add
button
The following fields deserve special mention:
n Default Posture Token. Value of the posture token to use if health status is not available.
n Remediate End-Hosts. When a client does not pass posture evaluation, redirect to the indicated server for
remediation.
n Remediation URL. URL of remediation server.
5. Create an Enforcement Policy.
Because this Use Case assumes the Guest role, and the Dell Web Portal agent has returned a posture token, it does
not require configuration of Role Mapping or Posture Evaluation.
Dell Networking W-ClearPass Policy Manager | Getting Started Guide Use Cases | 27
Page 28

The SNMP_POLICY selected in this step provides full guest access to a Role of [Guest] with a Posture of Healthy, and
limited guest access.
Table 12:
Enforcement Policy Navigation and Settings
Navigation Setting
Add a new Enforcement
Policy:
l Enforcement (tab) >
l Enforcement Policy
(selector): SNMP_
POLICY
l Upon completion, click
Save.
6. Save the Service.
Click Save. The Service now appears at the bottom of the Services list.
MAC Authentication Use Case
This Service supports Network Devices, such as printers or handhelds. The following image illustrates the overall flow
of control for this Policy Manager Service. In this service, an audit is initiated on receiving the first MAC
Authentication request. A subsequent MAC Authentication request (forcefully triggered after the audit, or triggered
after a short session timeout) uses the cached results from the audit to determine posture and role(s) for the device.
28 | Use Cases DellNetworking W-ClearPass PolicyManager | Getting Started Guide
Page 29

Figure 4: Flow-of-Control of MAC Authentication for Network Devices
Configuring the Service
Follow these steps to configure Policy Manager for MAC-based Network Device access.
1. Create a MAC Authentication Service.
Table 13:
Navigation Settings
Create a new Service:
l Services >
l Add Service (link) >
MAC Authentication Service Navigation and Settings
Dell Networking W-ClearPass Policy Manager | Getting Started Guide Use Cases | 29
Page 30

Table 13:
MAC Authentication Service Navigation and Settings (Continued)
Navigation Settings
Name the Service and select a
pre-configured Service Type:
l Service (tab) >
l Type (selector): MAC
Authentication >
l Name/Descript ion
(freeform) >
l Upon completion, click
Next to configure
Authentication
2. Set up Authentication.
You can select any type of authentication/authorization source for a MAC Authentication service. Only a Static
Host list of type MAC Address List or MAC Address Regular Expression shows up in the list of authentication
sources (of type Static Host List). Refer to "Adding and Modifying Static Host Lists" in the ClearPass Policy
Manager User Guide for more information. You can also select any other supported type of authentication source.
Table 14:
Authentication Method Navigation and Settings
Navigation Settings
Select an Authentication Method and
two authentication sources - one of
type Static Host List and the other of
type Generic LDAP server (that you
have already configured in Policy
Manager):
l Authentication (tab) >
l Methods (This method is
automatically selected for this type
of service): [ MAC AUT H] >
l Add >
l Sources (Select drop-down list):
Handhelds [St atic Host List ] and
Policy Manager Clients White List
[Generic LDAP] >
l Add >
l Upon completion, Next (to Audit)
3. Configure an Audit Server.
This step is optional if no Role Mapping Policy is provided, or if you want to establish health or roles using an
audit. An audit server determines health by performing a detailed system and health vulnerability analysis
(NESSUS). You can also configure the audit server (NMAP or NESSUS) with post-audit rules that enable Policy
Manager to determine client identity.
30 | Use Cases DellNetworking W-ClearPass PolicyManager | Getting Started Guide
Page 31

Table 15:
Audit Server Navigation and Settings
Navigation Settings
Configure the Audit Server:
l Audit (tab) >
l Audit End Hosts (enable) >
l Audit Server (selector): NMAP
l Trigger Conditions (radio
button): For MAC
authentication request s
l Reauthent icate client (check
box): Enable
Upon completion of the audit, Policy Manager caches Role (NMAP and NESSUS) and Posture (NESSUS), then
resets the connection (or the switch reauthenticates after a short session timeout), triggering a new request, which
follows the same path until it reaches Role Mapping/Posture/Audit; this appends cached information for this client
to the request for passing to Enforcement. Select an Enforcement Policy.
4. Select the Enforcement Policy Sample_Allow_Access_Policy:
Table 16:
Enforcement Policy Navigation and Settings
Navigation Setting
Select the Enforcement Policy:
l Enforcement (tab) >
l Use Cached Results (check
box): Select Use cached Roles
and Posture attributes f rom
previous sessions >
l Enforcement Policy (selector):
UnmanagedClientPolicy
l When you are finished with your
work in this tab, click Save.
Unlike the 802.1X Service, which uses the same Enforcement Policy (but uses an explicit Role Mapping Policy to
assess Role), in this use case Policy Manager applies post-audit rules against attributes captured by the Audit Server
to infer Role(s).
5. Save the Service.
Click Save. The Service now appears at the bottom of the Services list.
TACACS+ Use Case
This Service supports Administrator connections to Network Access Devices via TACACS+. The following image
illustrates the overall flow of control for this Policy Manager Service.
Dell Networking W-ClearPass Policy Manager | Getting Started Guide Use Cases | 31
Page 32

Figure 5: Administrator connections to Network Access Devices via TACACS+
Configuring the Service
Perform the following steps to configure Policy Manager for TACACS+-based access:
1. Create a TACACS+ Service.
Table 17:
Navigation Settings
Create a new Service:
l Services >
l Add Service (link) >
Name the Service and select a preconfigured Service Type:
l Service (tab) >
l Type (selector): [Policy Manager Admin
l Name/Descript ion (freeform) >
l Upon completion, click Next (to
TACACS+ Navigation and Settings
Network Login Service] >
Authentication)
2. Set up the Authentication.
a. Method: The Policy Manager TACACS+ service authenticates TACACS+ requests internally.
32 | Use Cases DellNetworking W-ClearPass PolicyManager | Getting Started Guide
Page 33

b. Source: For purposes of this use case, Network Access Devices authentication data will be stored in the Active
Directory.
Table 18:
Active Directory Navigation and Settings
Navigation Settings
Select an Active Directory server
(that you have already configured
in Policy Manager):
l Authentication (tab) >
l Add >
l Sources (Select drop-down list):
AD (Active Directory) >
l Add >
l Upon completion, click Next
(to Enforcement Policy)
3. Select an Enforcement Policy.
Select the Enforcement Policy [Admin Network Login Policy] that distinguishes the two allowed roles (Net
Admin Limited and Device SuperAdmin.
Table 19:
Enforcement Policy Navigation and Settings
Navigation Setting
Select the Enforcement Policy:
l Enforcement (tab) >
l Enforcement Policy (selector):
Device Command
Authorization Policy
l When you are finished with
your work in this tab, click Save.
4. Save the Service.
Click Save. The Service now appears at the bottom of the Services list.
Single Port Use Case
This Service supports all three types of connections on a single port.
The following figure illustrates both the overall flow of control for this hybrid service, in which complementary switch
and Policy Manager configurations allow all three types of connections on a single port:
Dell Networking W-ClearPass Policy Manager | Getting Started Guide Use Cases | 33
Page 34

Figure 6: Flow of the Multiple Protocol Per Port Case
34 | Use Cases DellNetworking W-ClearPass PolicyManager | Getting Started Guide
 Loading...