

Dell PowerConnect W-651 Quick Start Manual

Dell PowerConnect W-Series
ArubaOS 6.1 Quick Start Guide
This document describes the initial setup of a Dell user-centric network that consists of a Dell controller and Dell
Access Points (APs). The installation consists of the following steps:
1. Launch the WebUI or Console Setup Wizard to configure the controller.
2. Connect the controller to the wired network.
3. Configure the controller to allow APs, when installed and powered on, to able to locate and connect to the
controller. If you are configuring mesh, define the mesh cluster profile, mesh radio profile, before installing
APs in a mesh networking environment.
4. Install and connect your APs to the network.
Before you begin, read the ArubaOS End User License Agreement and review the contents of your controller
shipment to ensure that you have received the following:
Dell controller with appropriate power cord and accessories
The Dell PowerConnect W-Series Quick Start Guide included with your controller.
The ArubaOS End User License Agreement
Install the Controller
The WebUI Startup Wizard allows you to configure access to the controller, install software licenses, and
configure wireless local area networks (WLANs) for internal or guest users. The Startup Wizard is available the
first time you connect to and log into the controller or whenever the controller is reset to its factory default
configuration. The serial console setup dialog allows you to configure basic controller settings through a serial
port connection to the controller. After you complete the Startup Wizard or serial console setup procedure, the
controller reboots using the new configuration information you entered.
Do not connect the controller to your network when running the Setup Wizard or serial console setup dialog. The
factory-default controller boots up with a default IP address and both DHCP server and spanning tree functions
enabled. Once you have completed setup and rebooted the controller, you can use the controller CLI or WebUI
to complete its configuration before connecting the controller to your network.
Initial Setup Using the WebUI Setup Wizard
The following browsers are officially supported for use with the Dell PowerConnect W-Series Setup wizard and
WebUI:
Microsoft Internet Explorer
Mozilla Firefox on Windows XP, Windows Vista, Windows 7, and MacOS
Apple Safari on MacOS
You can launch the setup wizard using any PC or workstation that can run a supported Web browser. The PC or
workstation must either be configured to obtain its IP address using DHCP, or configured to have a static IP
address on the 172.16.0.0/24 subnetwork. The default IP address of the controller is 172.16.0.254. Connect a PC
or workstation to a line port on the controller, then enter this IP address into a supported Web browser to launch
the Setup Wizard.
To run the Setup Wizard:
1. Make sure that the controller is not connected to any device on your network.
0510847-01 | June 2011 1
2. Boot up the controller.
3. Connect your PC or workstation to a line port on the controller.
4. On your PC or workstation, open a Web browser and connect to https://172.16.0.254.
5. The controller contains a default server certificate to validate the device on the network. At the Security Alert,
click Yes to proceed with the Setup Wizard.
NOTE: The default certificate installed in the controller does not guarantee security in production networks. Dell strongly
recommends that you replace the default certificate with a custom certificate issued for your site or domain by a trusted
Certificate Authority. See the Dell PowerConnect W-Series ArubaOS User Guide for more information about certificates.
6. Enter the required information described in the table below, and, if desired, the optional configuration
information described in “Optional Information” on page2.
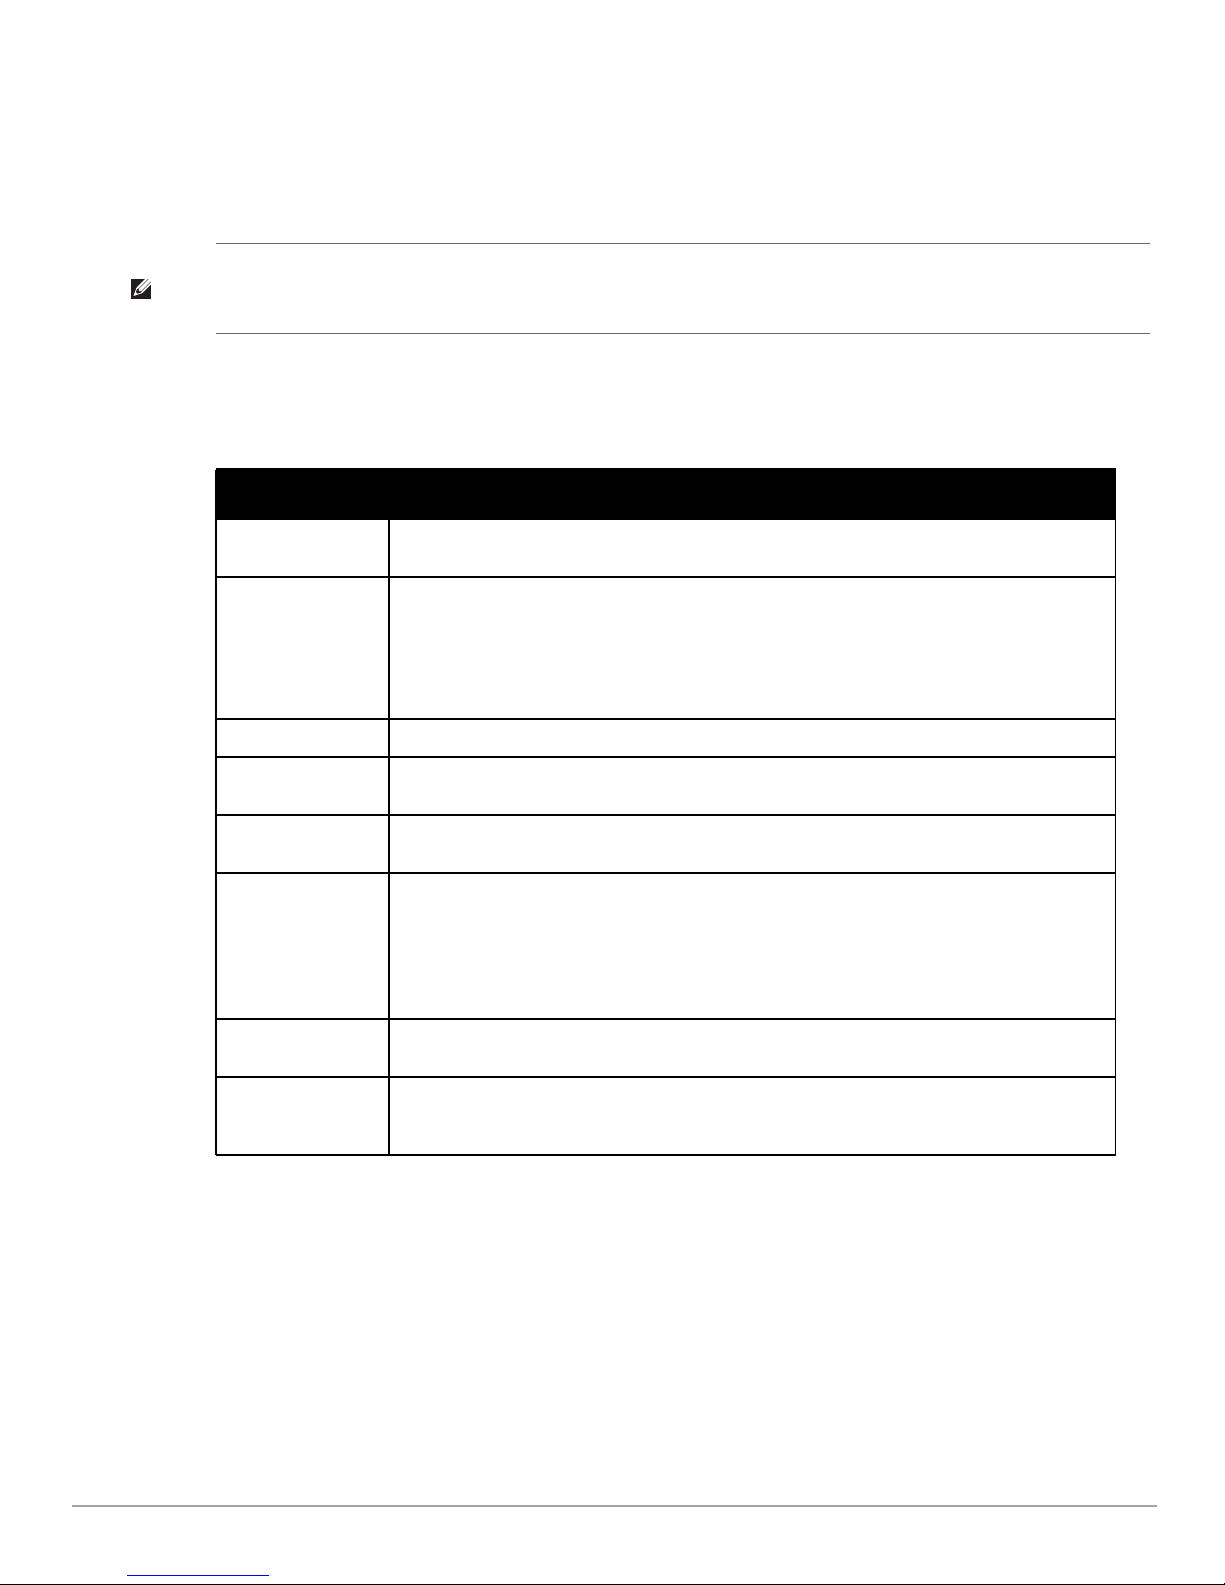
Table 1 Controller Setup Information
Requirement Description
System Name A user-defined name by which the controller will be referenced. You can specify a name of up to 63
characters.
Country Code The country in which the controller will operate. The country code determines the 802.11 wireless
transmission spectrum.
NOTE: You cannot change the country code for controllers designated for certain countries, such
as the U.S. or Israel. Improper country code assignment can disrupt wireless transmissions. Most
countries impose penalties and sanctions for operators of wireless networks with devices set to
improper country codes.
Admin Password Password of up to 32 characters for the admin user to log in to the controller.
Enable Mode
Password of up to 15 characters for the admin user to access the Enable mode in the CLI.
Password
Date and Time You can either manually set the date, time, and GMT time zone or specify the IP address of an NTP
server from which the controller will obtain its date and time settings.
Controller Mode
Standalone: If this is the only controller on the network.
Master: If this controller will manage other controllers on the network. You are prompted for a
key that will be used by all controllers on the network.
Local: If this controller will be managed by a master controller. You are prompted for a key that
will be used by all controllers on the network. (You need to provide the IP address of the master
controller.)
VLAN 1 The controller takes its IP address from VLAN 1. The controller uses the configured IP address to
communicate with other controllers and with APs.
Default Gateway This is usually the IP address of the interface on the upstream switch or router to which you will
connect the controller. The default gateway and the VLAN 1 IP address need to be in the same
network.
Optional Information
The Setup Wizard also allows you to:
Create virtual local area networks (VLANs) into which wireless users are placed after authentication
Modify default port settings
Install licenses for ArubaOS software modules
Configure internal and guest WLANs
2 Dell PowerConnect W-Series | ArubaOS 6.1 Quick Start Guide

If you plan on adding controller licenses or configuring additional VLANs, WLANs, or port settings on our
controller, make a note of the desired licenses or settings before you launch the Setup wizard.
NOTE: These optional configuration settings cannot be configured when running initial setup on a serial port connection.
Initial Setup on a Serial Port Connection
The serial port is located on the front panel of the controller. You can start the Initial Setup dialog when you
connect a terminal, PC or workstation running a terminal emulation program to the serial port on the controller.
The serial port connection only allows you to configure the basic configuration required to connect the controller
to the network. The recommended browser-based Setup Wizard allows you to also install software licenses and
configure internal and guest WLANs (see “Initial Setup Using the WebUI Setup Wizard” on page1). If you use
the Initial Setup dialog to configure the controller, the browser-based Setup Wizard will not be available unless
you reset the controller to its factory default configuration.
To run the Initial Setup dialog from a serial connection:
1. Configure your terminal or terminal emulation program to use the following communication settings:
Table 2 Terminal Connection Settings
Baud Rate Data Bits Parity Stop Bits Flow Control
9600 8 None 1 None
2. Connect your terminal or PC/workstation to the serial port on the controller using an RS-232 serial cable. All
accessory kits shipped with Dell controllers contain an RJ-45 cable and DB-9 to RJ-45 adapter. You may need
to provide a USB adapter to connect the serial cable to your PC.
3. Boot up the Dell controller. After the controller has booted up, you should see a screen similar to the
following:
Figure 1 Initial Setup for Serial Port Connection
***************** Welcome to the Dell W-651 setup dialog *****************
This dialog will help you to set the basic configuration for the switch.
These settings, except for the Country Code, can later be changed from the
Command Line Interface or Graphical User Interface.
Commands: <Enter> Submit input or use [default value], <ctrl-I> Help
<ctrl-B> Back, <ctrl-F> Forward, <ctrl-A> Line begin, <ctrl-E> Line end
<ctrl-D> Delete, <BackSpace> Delete back, <ctrl-K> Delete to end of line
<ctrl-P> Previous question <ctrl-X> Restart beginning
4. The Serial Port Configuration Dialog displays the configuration prompts described in Table 3. Enter the
required information at each prompt, then press Enter to continue to the next question.
Table 3 Console Configuration Setup Information
Console Prompt Description
Enter System Name Enter a name for the controller, or press Enter to use the default system name. You
Enter VLAN 1 interface IP address The controller takes its IP address from VLAN 1 and uses this IP address to
Dell PowerConnect W-Series | ArubaOS 6.1 Quick Start Guide 3
can specify a name of up to 63 characters.
communicate with other controllers and with APs. Enter the VLAN 1 interface IP
address, or press Enter without specifying an IP address to use the default address
172.16.0.254.
 Loading...