

Page 1

Dell™ Latitude™ C/Dock II Expansion Station
System Information Guide
Guide d'information sur le système
Guia de Informações do Sistema
Guía de información del sistema
Model PDX
www.dell.com | support.dell.com
Page 2

Page 3

Dell™ Latitude™ C/Dock II Expansion Station
System Information Guide
www.dell.com | support.dell.com
Page 4

Notes, Notices, and Cautions
NOTE: A NOTE indicates important information that helps you make better use of your computer.
NOTICE: A NOTICE indicates either potential damage to hardware or loss of data and tells you
how to avoid the problem.
CAUTION: A CAUTION indicates a potential for property damage, personal injury,
or death.
____________________
Information in this document is subject to change without notice.
© 2001–2002 Dell Computer Corporation. All rights reserved.
Reproduction in any manner whatsoever without the written permission of Dell Computer Corporation is strictly
forbidden.
Trademarks used in this text: Dell, the DELL logo, and Latitude are trademarks of Dell Computer Corporation; 3Com
is a trademark of 3Com Corporation; Microsoft, Windows, and Windows NT are registered trademarks of Microsoft
Corporation.
Other trademarks and trade names may be used in this document to refer to either the entities claiming the marks and
names or their products. Dell Computer Corporation disclaims any proprietary interest in trademarks and trade names
other than its own.
This product incorporates copyright protection technology that is protected by method claims of certain U.S. patents
and other intellectual property rights owned by Macrovision Corporation and other rights owners. Use of this copyright
protection technology must be authorized by Macrovision Corporation, and is intended for home and other limited
viewing uses only unless otherwise authorized by Macrovision Corporation. Reverse engineering or disassembly is
prohibited.
January 2002 P/N 5G287 Rev. A03
Page 5

Dell™ Latitude™ C/Dock II Expansion Station
System Information Guide
This document contains getting started, safety, regulatory, and warranty
information about your Dell Latitude C/Dock II Expansion Station as well
as information about other Dell documents that are available and how to
obtain them.
Safety Instructions
The following information defines the meaning of additional symbols used
only in the Safety Instructions section.
Risk of explosion Aircraft
Risk of fire Use of this feature may be prohibited
on aircraft
Risk of electric shock
Caution: General (Safety Instructions, continued)
• When setting up the docking station for work, place it
on a level surface.
• Do not attempt to service the docking station yourself
unless you are an authorized service technician. Always
follow installation instructions closely.
System Information Guide 3
Page 6

www.dell.com | support.dell.com
• If you use an extension power cable with your AC
adapter, ensure that the total ampere rating of the
products plugged in to the extension power cable does
not exceed the ampere rating of the extension cable.
• Do not push objects into air vents or openings of your
computer. Doing so can cause fire or electric shock by
shorting out interior components.
• Place the AC adapter in a ventilated area, such as a desk
top or on the floor, when you use it to run the computer
or to charge the battery. Do not cover the AC adapter
with papers or other items that will reduce cooling; also,
do not use the AC adapter inside a carrying case.
• Do not use your computer in a wet environment, for
example, near a bath tub, sink, or swimming pool or in a
wet basement.
• To help avoid the potential hazard of electric shock, do
not connect or disconnect any cables or perform
maintenance or reconfiguration of this product during
an electrical storm. Do not use your computer during
an electrical storm unless all cables have been
disconnected and the computer is operating on battery
power.
4 System Information Guide
• Before you clean your docking station, remove power.
Clean your computer with a soft cloth dampened with
water. Do not use liquid or aerosol cleaners, which may
contain flammable substances.
Caution: Power (Safety Instructions, continued)
• Use only the Dell-provided AC adapter approved for
use with this docking station. Use of another AC
adapter may cause a fire or explosion.
Page 7

• Before you connect the docking station to an electrical
outlet, check the AC adapter voltage rating to ensure
that the required voltage and frequency match the
available power source.
• To remove power from the computer, turn it off,
remove the battery pack, and disconnect the AC
adapter from the electrical outlet.
• To help prevent electric shock, plug the AC adapter and
peripheral power cables into properly grounded power
sources. These power cables may be equipped with
three-prong plugs to provide an earth grounding
connection. Do not use adapter plugs or remove the
grounding prong from the power cable plug. If you use a
power extension cable, use the appropriate type, twoprong or three-prong, to mate with the AC adapter
power cable.
• Be sure that nothing rests on your AC adapter’s power
cable and that the cable is not located where it can be
tripped over or stepped on.
• If you are using a multiple-outlet power strip, use
caution when plugging the AC adapter’s power cable
into the power strip. Some power strips may allow you
to insert the plug incorrectly. Incorrect insertion of the
power plug could result in permanent damage to your
computer, as well as risk of electric shock and/or fire.
Ensure that the ground prong of the power plug is
inserted into the mating ground contact of the power
strip.
Other Documents Available
• Documentation updates, which are sometimes included with your
docking device to describe changes to your docking device or software.
Always read these updates before consulting any other documentation
because the updates often contain the latest information.
System Information Guide 5
Page 8

• Documentation included with any options you purchase separately
from your docking device. This documentation includes information
that you need to configure and install these options in your docking
device.
Getting Help
Dell provides a number of tools to help you if your docking device does not
perform as expected. For information on these help tools, see the “Getting
Help” section in the computer’s User’s Guide.
www.dell.com | support.dell.com
Docking Device Overview
NOTE: Alert your network administrator before you connect the docking
device to a network.
You must attach an AC adapter to the docking device before you dock the
computer to the docking device and turn on the computer. The AC adapter
powers the docking device and the computer at the same time. Any battery
installed in the computer charges while you use the docking device.
NOTICE: Always use the Dell PA-6 AC adapter that came with the docking
device. If you use any other commercially available AC adapter—or the AC
adapter from older models of Dell computers—you may damage the docking
device or the computer.
6 System Information Guide
Page 9

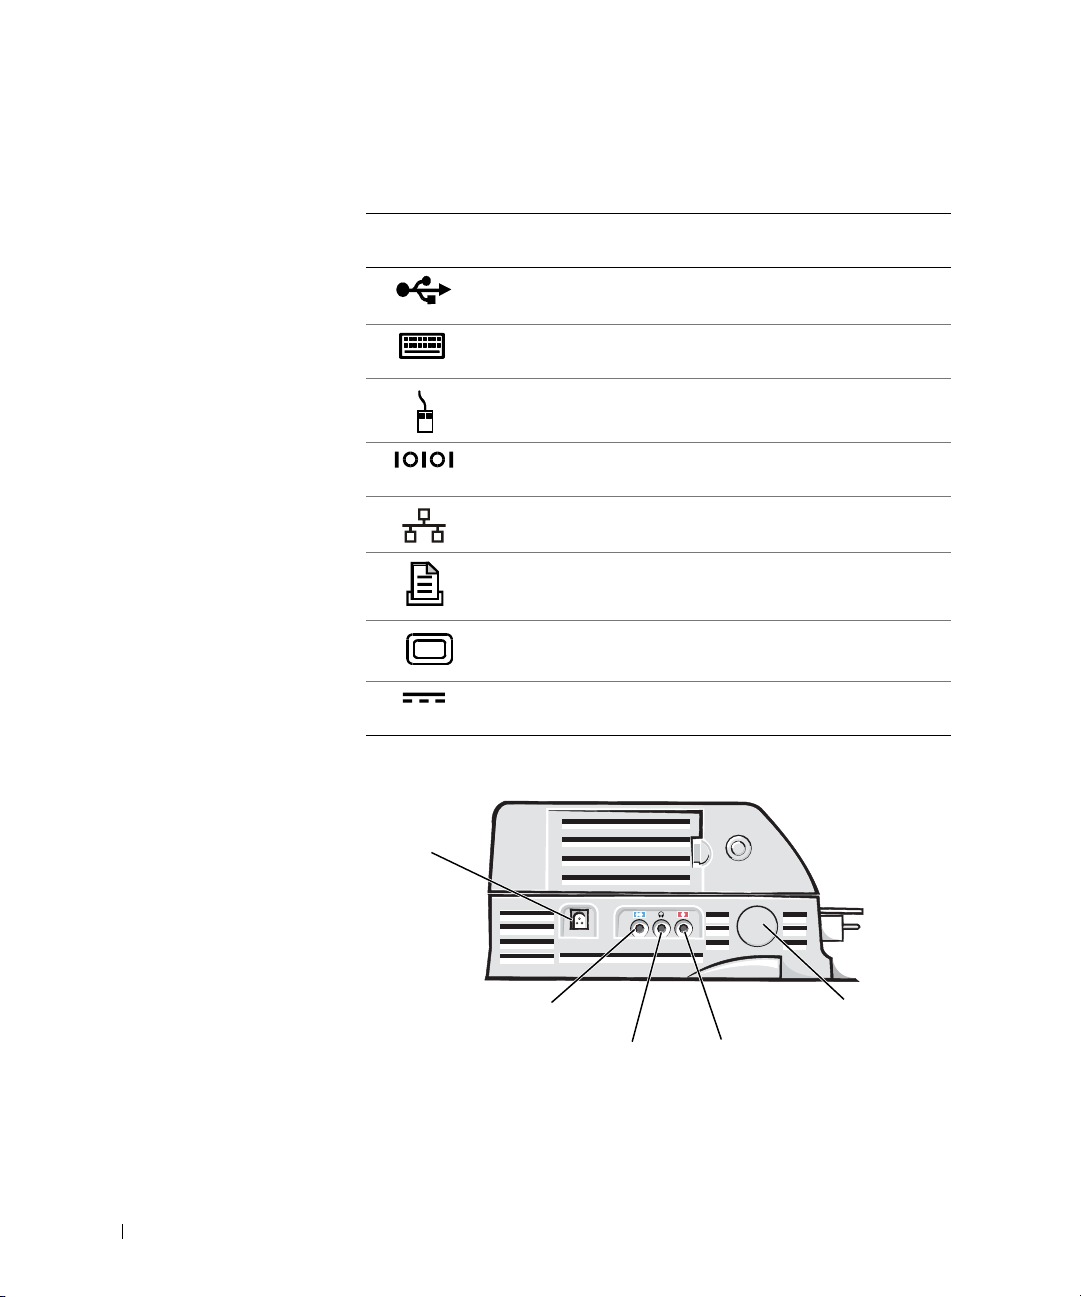
I/O Panel of the Docking Device
serial connector USB connectors (2)
PS/2-keyboard
connector
PS/2-mouse
connector
video connector network connector
parallel connector
SCSI
connector
The “External I/O Connectors” table shows the icons for each of the
connectors on the back of the docking device and indicates the type of
external device(s) that you can attach to each connector.
System Information Guide 7
Page 10
www.dell.com | support.dell.com
External I/O Connectors
Connector
Icon Connector Description
One or two USB devices, such as a USB mouse, connect to
the dual USB connector.
An e xtern al PS /2-s ty le ke yb oard or ex te rn al nu me ric ke ypad
connects to the PS/2 keyboard connector.
An external PS/2-compatible mouse connects to the PS/2
mouse connector.
A serial device, such as a serial mouse or external modem,
connects to the serial port connector.
A network interface cable connects to the NIC connector.
A parallel device, such as a printer, connects to the parallel
port connector.
An external monitor connects to the video connector.
The AC adapter that came with the docking device connects
to the AC adapter connector.
Audio Connectors and Infrared Sensor
AC adapter
connector
line-in/audio-in connector
8 System Information Guide
infrared sensor
headphones/speaker connector microphone connector
Page 11
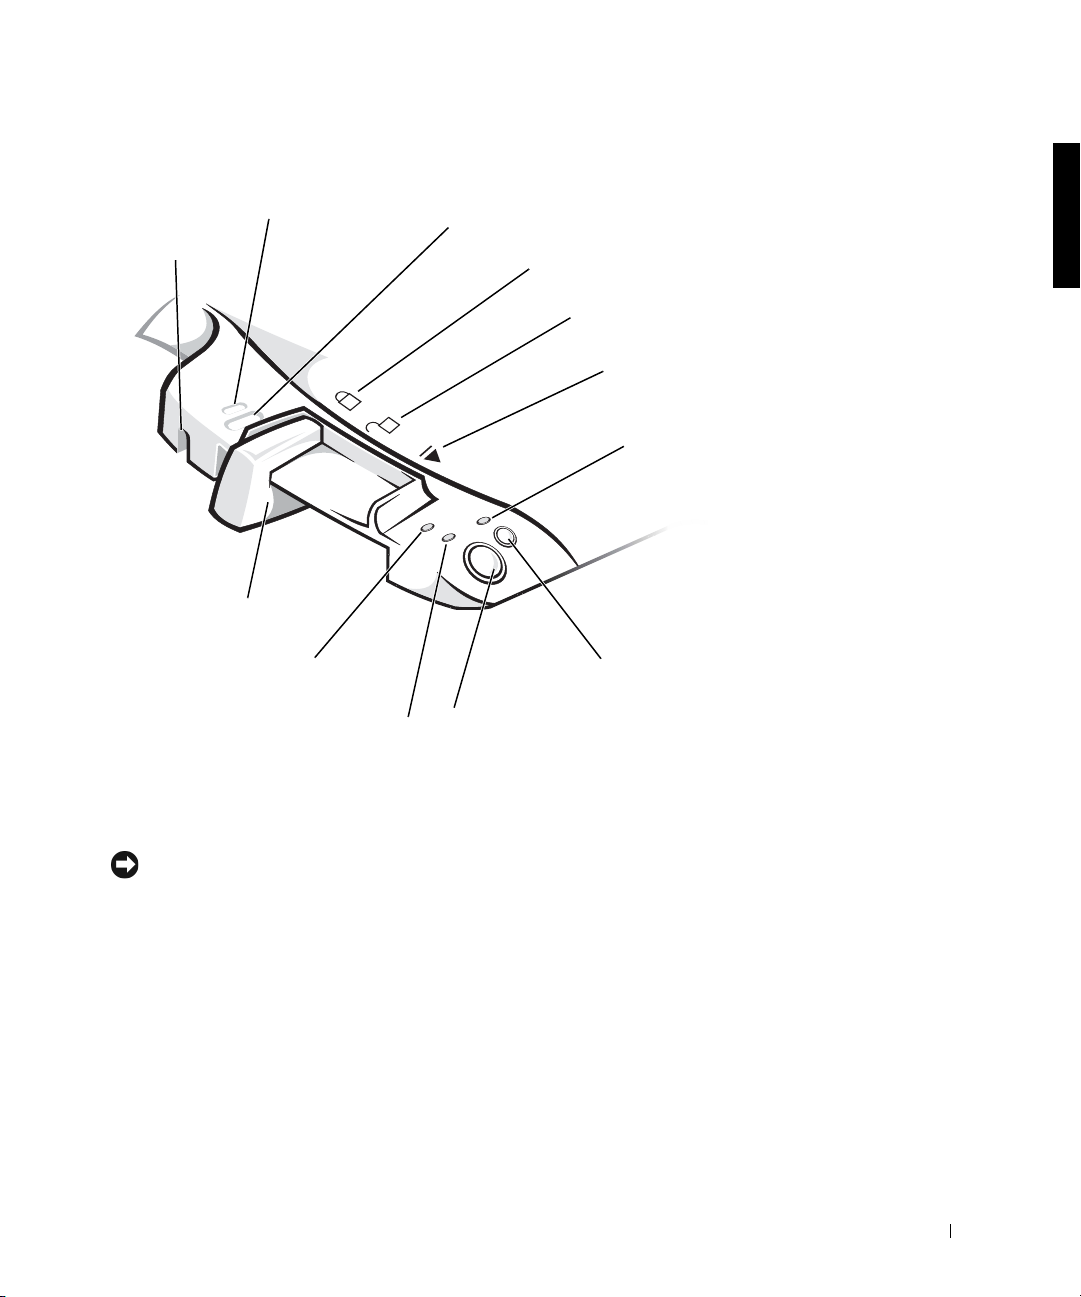
Docking Control Base Controls and Indicators
slot (not on all
devices)
eject/locking lever
drive access indicator
security lock slotsecurity lock
power indicator
padlock slot
locked position
unlocked position
eject position
docking
indicator
undock request
button
power button
Monitor Stand
NOTICE: The stand supports monitors that weigh up to 45.3 kilograms (kg)
(100 pounds [lb]). Heavier monitors may damage the stand
docking device.
, computer, and
System Information Guide 9
Page 12

Docking Device With the Monitor Stand
www.dell.com | support.dell.com
monitor stand
computer docking control
NOTE: Be sure that the back legs on the monitor stand engage the slots on
either side of the docking control base.
docking device
base
Before Docking the Computer
If your computer is running the Microsoft® Windows® 9x, Windows NT®,
or Windows Millennium Edition (Me) operating system, you must first
check your computer for existing docking drivers. If your computer does not
have the docking drivers, install them before you dock the computer for the
first time. To install the docking drivers, perform the steps in “Installing the
Docking Drivers.”
10 System Information Guide
Page 13

NOTE: If your computer is running the Windows XP or Windows 2000
operating system
to perform the steps in
Computer.
, the drivers are installed automatically and you do not need
“Installing the Docking Drivers.” Go to “Docking Your
”
Check Your Computer for Existing Docking Drivers
1 Double-click My Computer.
2 Double-click Control Panel.
3 Double-click Add/Remove Programs.
4 Locate the correct docking drivers from the list of programs.
For Windows 9x and Windows Me, check for the driver with Quick
Install in the name. For example: Dell Dock Quick Install for
Windows.
For Windows NT, check for NT Softex Docking Services.
If your computer does not have the docking drivers, go to the next section,
“Installing the Docking Drivers.” If your computer has the docking drivers,
go to “Docking Your Computer.”
Installing the Docking Drivers
You can install your docking drivers in one of the following ways:
• Install the drivers from the ResourceCD or Drivers and Utilities CD
that came with your computer or docking device.
• Download the drivers from the Dell | Support website.
Installing the Docking Drivers From the ResourceCD or Drivers and
Utilities CD
1 Insert the ResourceCD or Drivers and Utilities CD into the CD drive.
In most cases, the CD should start running automatically. If it does
not, start Windows
Explorer, click your CD drive directory to display
the CD contents, and then double-click the autorcd application file. If
a welcome screen appears, click Next. The first time that you run the
CD, it might prompt you to install some setup files. Click OK and
follow the instructions on the screen to continue.
System Information Guide 11
Page 14

2 From the Language pull-down menu on the toolbar, select your
preferred language for the driver (if available).
A welcome screen appears.
3 Click Next.
4 Under Search Criteria, select the appropriate categories from the
System Model and Operating System pull-down menus.
If your system is running Windows 9x or Windows Me, select System
Utilities from the Device Type pull-down menu, and then select
Drivers from the Topic pull-down menu.
www.dell.com | support.dell.com
If your system is running Windows NT, select System Utilities from the
Device Type pull-down menu, and then select Utilities from the Topic
pull-down menu.
A link or links appear(s) for the specific drivers or utilities used by your
computer.
5 If your system is running Windows 9x or Windows Me, click the link for
the Dell Dock QuickInstall utility.
The Dell Dock QuickInstall file is a utility that installs the required
docking drivers on your computer.
If your computer is running Windows NT, click the link for Softex
Docking Services.
6 Click the Install button to start the automatic installation. At the
welcome screen, follow the screen prompts to complete the
installation.
NOTE: Some ResourceCDs may require users to navigate through folders to
obtain the correct driver. For complete instructions on reinstalling drivers, see
your User’s Guide.
Installing the Docking Drivers From the Dell | Support Website
1 Go to the Dell | Support website at support.dell.com. If you are
visiting the website for the first time, click your region under Choose a
region and click Go.
2 Follow the instructions on the screen.
12 System Information Guide
Page 15

3 Enter your docking device information, and then click Go!.
4 Click Downloads.
The Downloads For Your Dell window appears, including a short form
for you to fill out.
5 Select your operating system and operating system language.
6 Select System and Configuration Utilities as your download category.
7 Click Go!.
8 If your computer is running Windows 9x or Windows Me, locate and
click the link for the Dell Dock QuickInstall utility.
If your computer is running Windows NT, locate and click the link for
Softex Docking Services.
9 Follow the instructions on the screen to download and install the
required drivers.
After you download the files and before you install the drivers, make
sure to view the readme.txt file that is included in the downloaded files
for important information about the installation.
Docking Your Computer
If you attach a monitor to the docking device and turn the monitor on, the
screen image appears on the monitor. To switch the image to the computer
display, or to both the monitor and the computer display, press
<Fn><F8>.
When you dock the computer to the docking device and turn the computer
on, the green power light on the docking control base lights up (see
“Docking Control Base Controls and Indicators”).
NOTICE: To avoid losing data, save any open files before you dock the
computer.
NOTICE: If a Peripheral Component Interconnect (PCI) video card is
installed in the docking device
undocking to avoid losing data.
Save all files, close and exit all application programs, exit the operating
1
, shut down the computer before docking or
system, and turn off the computer.
System Information Guide 13
Page 16
www.dell.com | support.dell.com
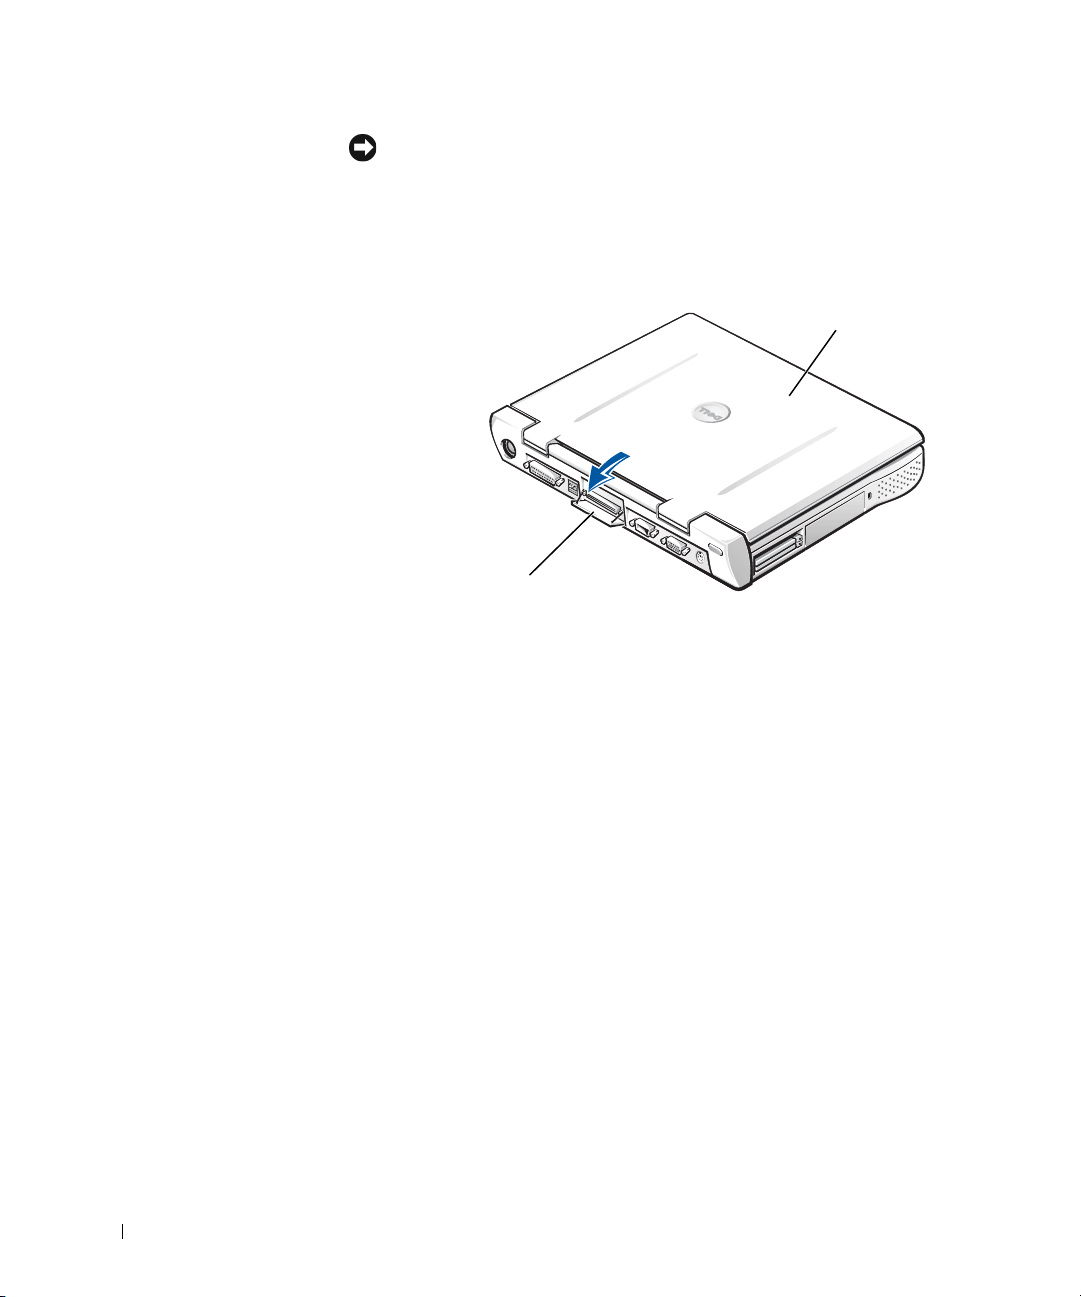
NOTICE: To avoid damaging the docking connector, open the docking panel
door before you attempt to dock the computer to the docking device.
2
If the computer has a docking panel door, open the docking panel door
on the back of the computer.
Docking Panel Door on the Computer
computer
docking panel door
(not on all computers)
3
If you are using the docking device with a monitor stand, close the
computer display.
4 Ensure that the eject/locking lever is in the unlocked position.
14 System Information Guide
Page 17
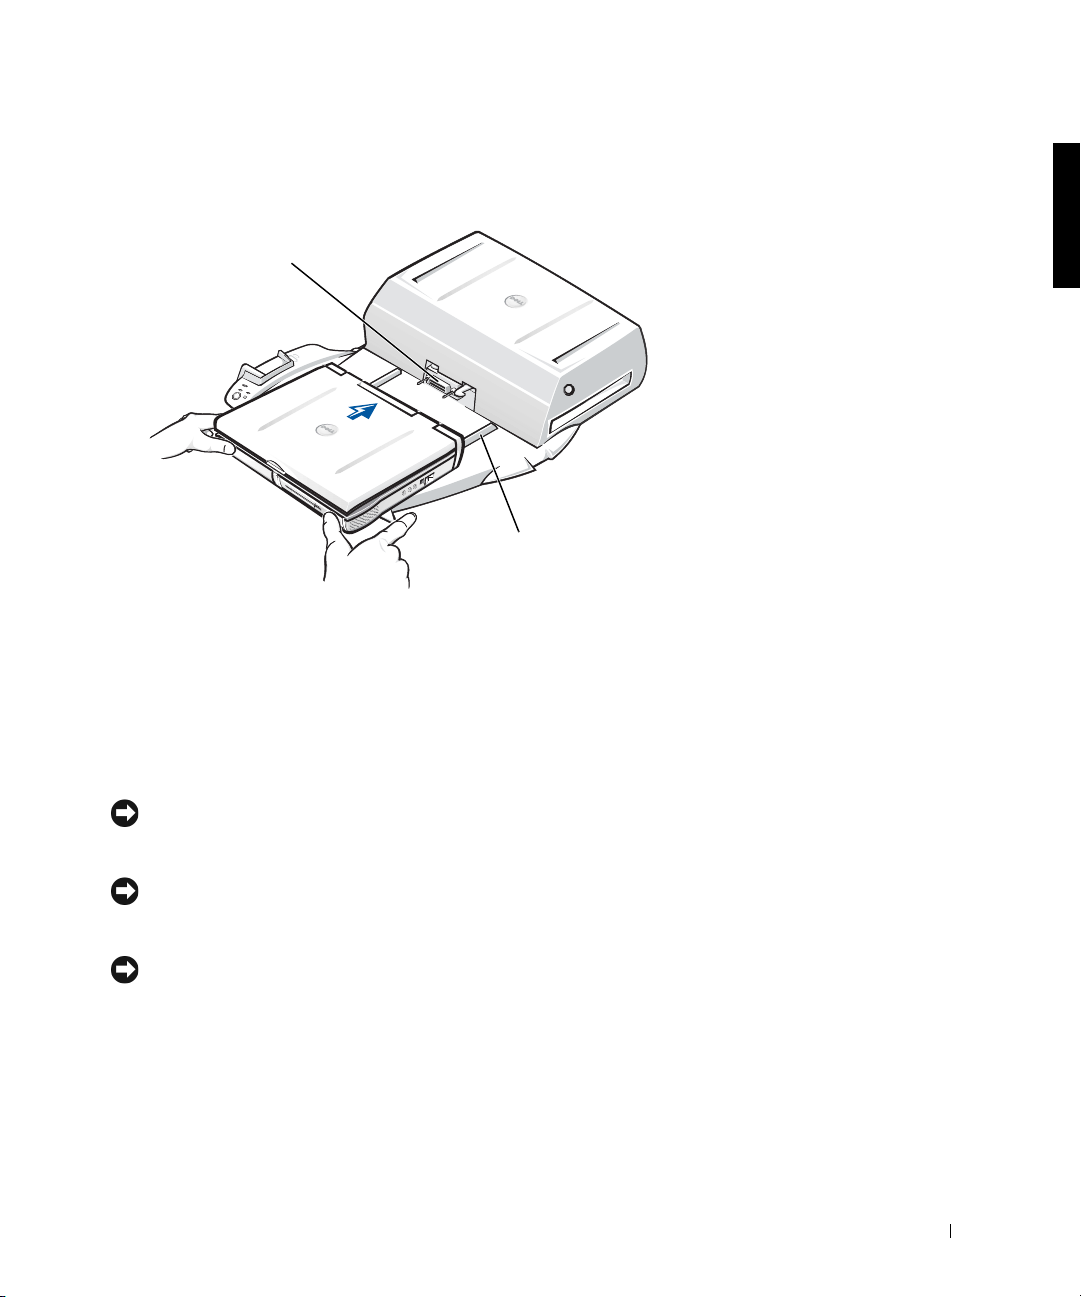
5 Dock the computer to the docking device as follows:
Docking the Computer
docking connector
alignment rails (2)
a Horizontally center the computer on the docking device platform,
with the back of the computer facing the docking device docking
connector, as shown in “Docking the Computer.”
b Slide the computer toward the connector until you feel the
grooves on the bottom of the computer engage with the alignment
rails.
NOTICE: If you attempt to push the computer all the way into the docking
device without engaging the alignment rails, you may irreparably damage the
docking connector on the computer.
NOTICE: Do not pick up the computer or the docking device separately when
they are connected because you may damage the connectors on the computer
and the docking device.
NOTICE: If you are using a monitor with the monitor stand
monitor from the stand before moving the docking control base into place.
c Gently push the computer forward until the docking connector is
, remove the
fully engaged.
System Information Guide 15
Page 18

Docking for the First Time With Windows XP and Windows 2000
1 Dock and turn on your computer.
2 Press <F2> during the system boot routine to view the system setup
program.
3 Set Docking IRQ to Optimized.
4 Set Universal Connect to Enabled.
5 Exit the system setup program.
Your system will continue the boot process.
www.dell.com | support.dell.com
In Windows 2000, the Add New Hardware Wizard appears.
NOTE: In Windows XP, the operating system automatically installs the drivers
in the background. In Windows 2000, the Add New Hardware Wizard
automatically installs your drivers.
NOTE: In Windows XP and Windows 2000, to reinstall drivers or ensure the
best drivers are installed, see “Updating Drivers in Windows XP, Windows
2000, or Windows Me” later in this document.
Docking for the First Time With Windows Me
1 Dock and turn on your computer.
2 Press <F2> during the system boot routine to view the system setup
program.
3 Set Docking IRQ to Optimized.
4 Set Universal Connect to Enabled.
5 Exit the system setup program.
Your system will continue the boot process.
The Add New Hardware Wizard appears.
6 Select Search for the Best Driver for Your Device (Recommended)
and click Next.
7 Click Next.
8 Follow the prompts on the Add New Hardware Wizard.
9 Whenever prompted, select Search for the Best Driver for Your
16 System Information Guide
Device (Recommended) and click Next.
Page 19

10 Continue to follow the prompts to complete the installation.
The Windows desktop appears and the installation is complete.
Docking for the First Time With Windows NT 4.0
1 Dock and turn on your computer.
2 Either press <F2> during the system boot routine, or press
<Fn><F1> after your computer boots to view the system setup
program.
3 Set Docking IRQ to Optimized.
4 Set Universal Connect to Enabled.
5 Exit the system setup program.
6 Press <Ctrl><Alt><Del> to log on.
Docking Station Setup window appears and indicates that the
computer must be undocked to continue.
7 Click OK and wait for the computer to turn off.
8 Undock the computer (see “Undocking the Computer”).
The computer restarts automatically. If it does not, turn on the
computer.
9 Select OK at the Device Removal window.
10 Click Start and select Shut Down.
11 Wait for the computer to turn off completely and redock the computer
to the docking device.
The computer restarts automatically. If it does not, turn on the
computer.
12 Press <Ctrl><Alt><Del> to log on.
The computer automatically detects new devices.
13 When prompted, select Install System Provided Driver for the
Selected Device (Recommended) and click OK.
14 Click Continue at the Windows NT Setup window.
15 Select Install System Provided Driver for the Selected Device
(Recommended) and click OK.
System Information Guide 17
Page 20

16 Select the name of your network interface controller (NIC) from the
drop-down menu.
17 Select whether the network adapter should obtain an IP address from a
server, or whether an IP address is specified.
If you do not know what to select, see your system administrator.
18 Follow the prompts to complete the installation.
The Windows desktop appears and the installation is complete.
The computer cannot enter suspend-to-disk mode while docked.
www.dell.com | support.dell.com
Docking for the First Time With Windows 98
1 Dock and turn on your computer.
2 Either press <F2> during the system boot routine, or press
<Fn><F1> after your computer boots to view the system setup
program.
3 Set Docking IRQ to Optimized.
4 Set Universal Connect to Enabled.
5 Exit the system setup program.
6 If the Configuration Setup window appears, click OK.
The Add New Hardware Wizard appears.
7 Click Next.
8 Select Search for the Best Driver for Your Device (Recommended)
and click Next.
9 Remove the check-mark next to each option and click Next.
A window appears, indicating that Windows is ready to detect the best
driver for your device.
10 Follow the prompts on the Add New Hardware Wizard.
11 Whenever prompted, select Search for the Best Driver for Your
Device (Recommended) and click Next.
12 Continue to follow the prompts to complete the installation.
The Windows desktop appears and the installation is complete.
18 System Information Guide
Page 21

Docking for the First Time With Windows 95
1 Dock and turn on your computer.
2 Either press <F2> during the system boot routine, or press
<Fn><F1> after your computer boots to view the system setup
program.
3 Set Docking IRQ to Optimized.
4 Set Universal Connect to Enabled.
5 Exit the system setup program.
The computer automatically detects new hardware.
6 Click Yes at the System Settings Change window.
The computer restarts and automatically detects new hardware.
7 If the Configuration Setup window appears, click OK.
8 Click OK at the Network window.
9 Select the Identification tab at the next Network window.
10 Enter a Computer Name and Workgroup that will identify your
computer on the network, and click Close.
If you are unsure what Computer Name and Wor kg ro up to enter,
check with your system administrator.
NOTE: You must enter a Computer Name and Workgroup to proceed with the
driver installation.
The computer automatically copies files and builds a driver
information database.
11 Click Ye s at the System Settings Change window.
The computer restarts.
An Enter Network Password window appears. If you do not wish to set
a username and password at this point, or if you have not yet been
provided one for use by your system administrator, click Cancel.
The computer automatically detects new hardware.
12 Click OK at the Configuration Setup window.
The Windows desktop appears and the installation is complete.
System Information Guide 19
Page 22

NOTE: To use the USB connectors, you must install the USB supplement from
your ResourceCD in the Win95\OSUpdate directory. If you install the USB
supplement
you do not install the USB supplement unless you intend to use USB devices.
, your computer cannot enter suspend mode. Dell recommends that
Updating Drivers in Windows XP and Windows 2000
To update drivers in Windows XP and Windows 2000:
1 Right-click My Computer and click Manage. (In Windows XP, click
the Start button to access My Computer. In Windows 2000, My
Computer is located on the Windows desktop.)
www.dell.com | support.dell.com
2 In the Computer Management window, click Device Manager, and
double-click Network adapters.
3 Double-click 3Com 3C920 Integrated Fast Ethernet Controller.
4 Click the Driver tab.
5 Click Update Driver... and follow the prompts.
Updating Drivers in Windows Me
To update drivers in Windows Me:
1 Right-click My Computer on the desktop and click Properties.
2 In the System Properties window, click the Device Manager tab, and
double-click Network adapters.
3 Double-click 3Com 3C920 Integrated Fast Ethernet Controller.
4 Click the Driver tab.
5 Click Update Driver... and follow the prompts.
20 System Information Guide
Page 23

Undocking the Computer
eject/locking
lever
NOTICE: If the computer does not have power from a battery, the computer
turns off when you undock it
NOTICE: Never undock the computer without first preparing the computer. If
you undock before preparing the computer
may not recover normal operation for several minutes
, and you will lose all unsaved data.
, you will lose data and the computer
, if at all.
To prepare the computer for undocking, perform one of the following:
• Press <Fn><Esc> on the computer's keyboard
(or <Scroll Lock><Esc> on an external keyboard).
Wait a few seconds for the power light on the computer to turn off.
• In Windows XP, click the Start button, and then click Undock
Computer.
In Windows 95, Windows 98, Windows Me, or Windows 2000, click the
Start button, and then click Eject PC.
In Windows NT, click the docking icon on the taskbar, and then click
Undock to place the computer in suspend mode.
Wait a few seconds for the power light on the computer to turn off.
System Information Guide 21
Page 24

www.dell.com | support.dell.com
• Press the undock request button on the docking control base (see the
figure “Docking Control Base Controls and Indicators”). Wait for the
green docking light to turn off.
Replacing the Battery
Your docking device uses a lithium ion battery. The lithium ion cell battery
is a long-life battery, and it is very possible that you will never need to
replace it. However, should you need to replace it, perform the following
steps.
CAUTION: There is a danger of a new battery exploding if it is
incorrectly installed. Replace the battery only with the same or
equivalent type recommended by the manufacturer. Discard used
batteries according to the manufacturer’s instructions.
1 Undock the computer as described in “Undocking the Computer.”
2 Turn off the power switch on the docking device and disconnect the
AC adapter.
3 Remove the top cover by pressing the two side buttons and rotating
the cover toward the back of the expansion station (see “Removing the
Top Cover”). Once the cover is vertical, disengage the hinge tabs, and
fully remove the cover.
22 System Information Guide
Page 25
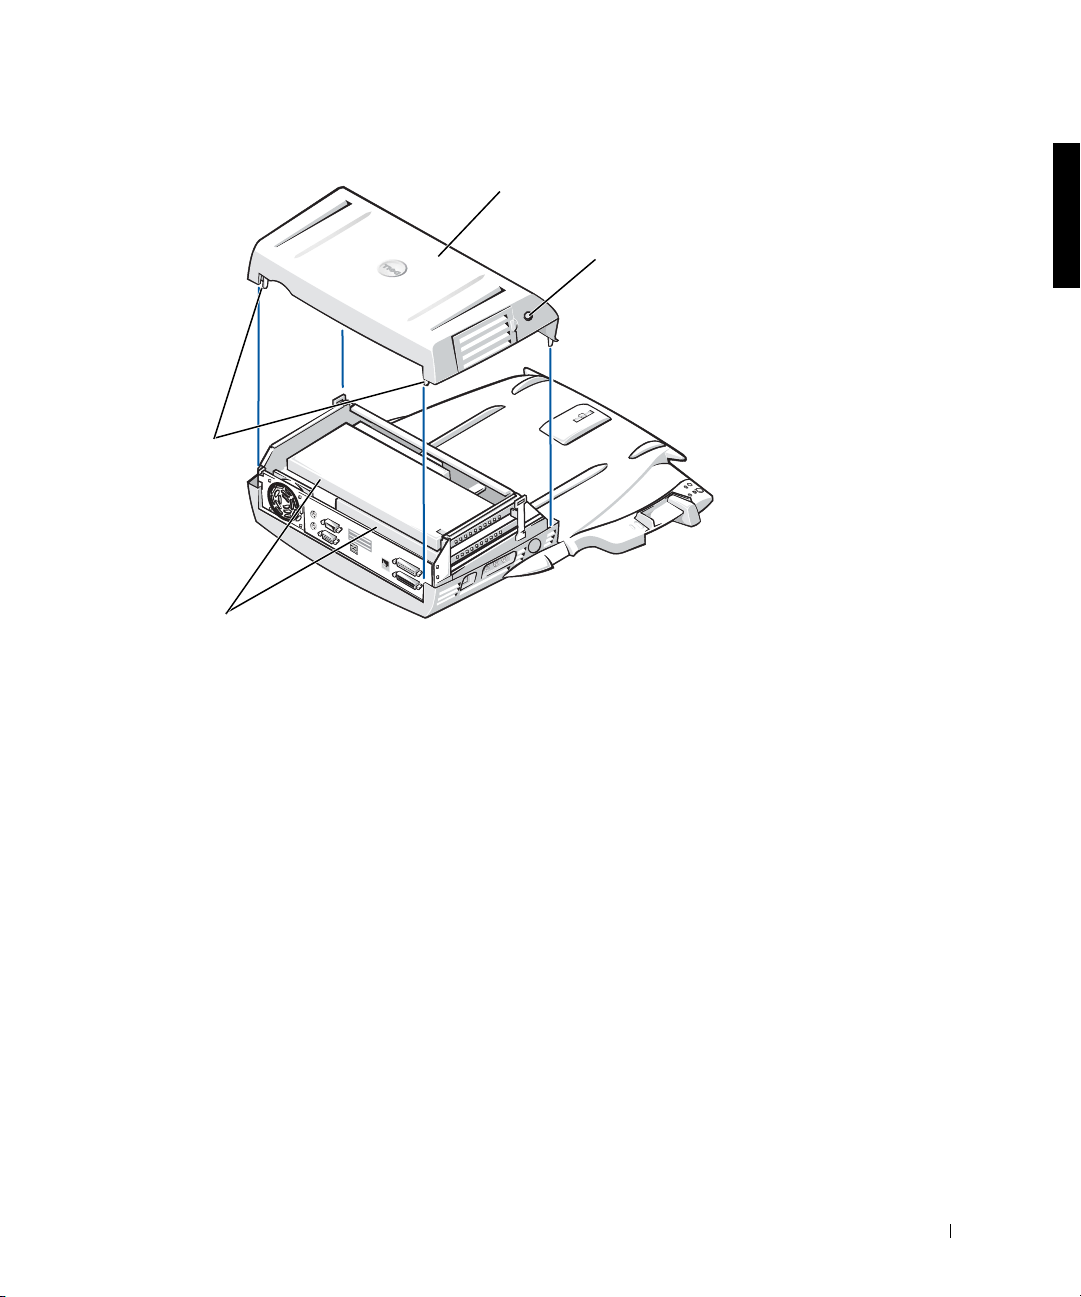
Removing the Top Cover
top cover
hinge tabs (2)
PCI cards (2)
4
Remove any installed cards from the expansion-card slots.
side buttons (2)
System Information Guide 23
Page 26

www.dell.com | support.dell.com
b
Replacing the Battery
battery
expansion-card
slots (2)
5
Slightly lift up the battery securing tab and remove the battery from
the battery socket.
6 Orient the new battery with the side labeled “+” facing up. Then
insert the battery into the socket and release the securing tab.
attery
socket
battery
securing
tab
Do not dispose of this battery along with household waste. Contact your
local waste disposal agency for the address of the nearest battery deposit
site.
Removing and Installing a PCI
Expansion Card
To install a Peripheral Component Interconnect (PCI) expansion card in
the docking device, perform the following steps.
24 System Information Guide
NOTE: Install 3.3-volt (V) or 5-V PCI expansion cards no longer than 10
inches (25.4 centimeters [cm]) in the top slot and install 3.3-V or 5-V PCI
expansion cards no longer than 6.9 inches (15.5 cm) in the bottom slot.
NOTICE: Do not touch or handle anything inside the docking device except
those objects mentioned in the following procedure. If you touch other objects,
you may damage the docking device, and may void your warranty.
Page 27
1 Save all files, close and exit all application programs, and exit the
operating system.
2 Turn off the computer.
3 Remove the monitor from the monitor stand. Remove the monitor
stand from the docking device.
4 Undock your computer and leave the eject/locking lever in the
unlocked position.
5 Detach all cables—including the AC adapter cable—from the docking
device. Make sure the eject/locking lever is not in the back/locking
position.
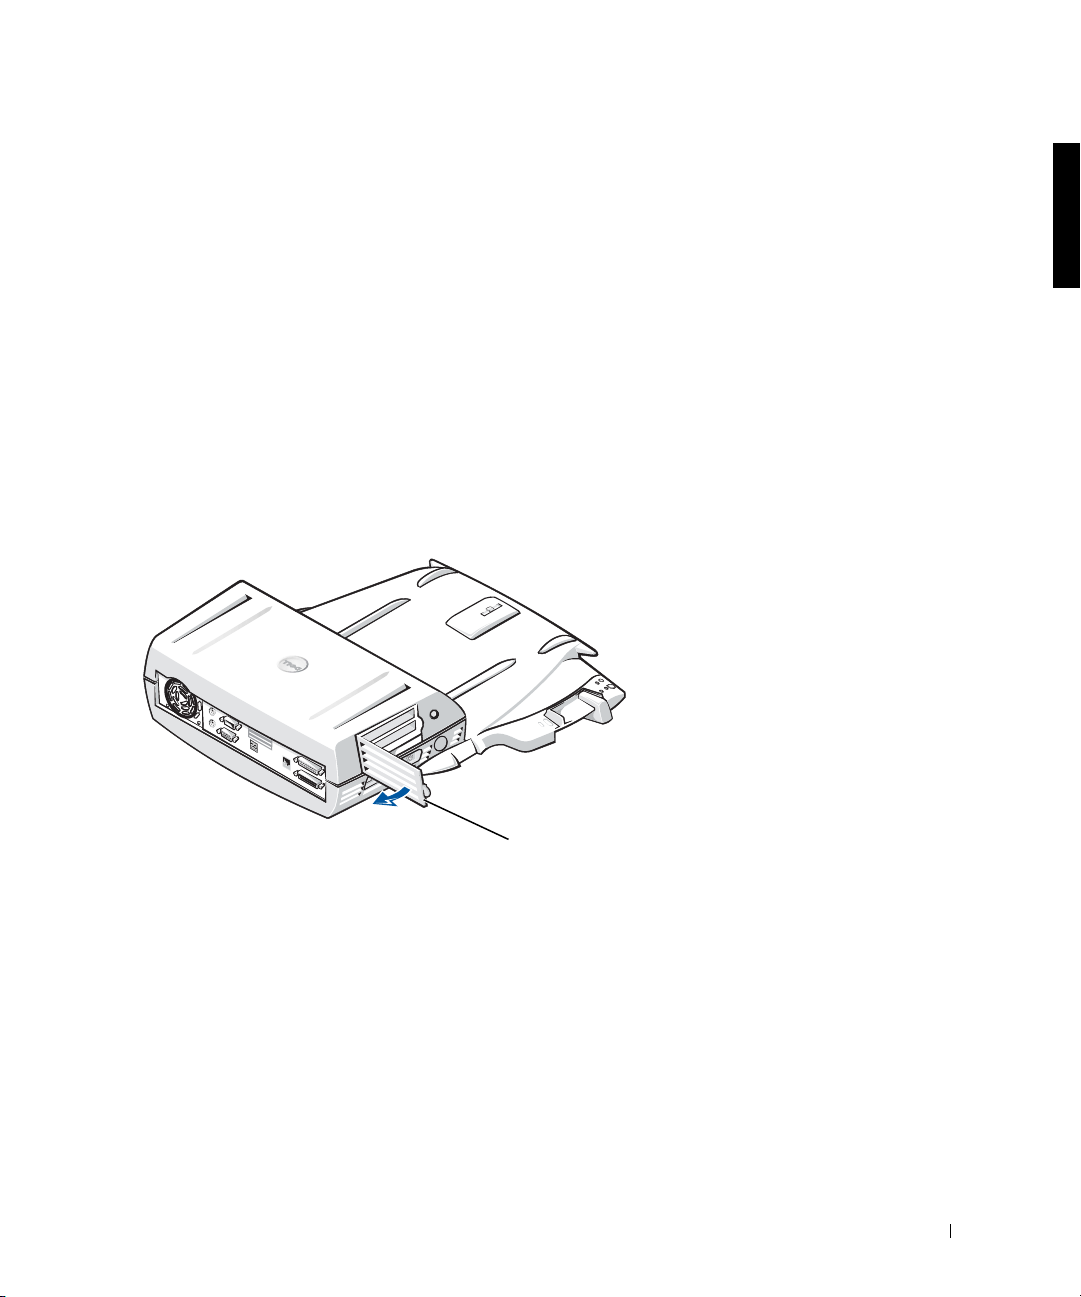
6 Press the latch on the PCI expansion-slot door and remove it. See the
following figure.
PCI Expansion-Slot Door and Expansion-Card Connector
PCI expansion-slot door
7
Remove the top cover by pressing the two side buttons and rotating
the cover toward the back of the docking device. Once the cover is
rotated back, disengage the hinge tabs from the back of the docking
device, and fully remove the top cover.
See the figure “Removing the Top Cover.”
System Information Guide 25
Page 28

www.dell.com | support.dell.com
8 Remove the screw holding the empty mounting bracket and set aside
for future use.
Remove the empty mounting bracket. If a PCI card is installed,
remove it by grasping the card by its outside corners, and easing it out
of its connector.
9 Install a PCI expansion card.
a Insert the card-edge connector of the card firmly into the
expansion-card connector.
b Gently rock the card side to side into the connector until it is fully
seated.
10 Reseat the screw in the PCI card bracket to secure the PCI card.
11 Replace the top cover by first engaging the hinge tabs and gently
lowering the front of the top cover into place. The top cover will be
properly aligned when you hear the side buttons click into place.
12 Reconnect the cables—including the AC adapter cable—you
disconnected in step 5.
13 Dock your computer.
14 Replace the monitor stand on the docking device and the monitor on
the monitor stand.
15 Turn on the computer.
16 Install the drivers for the PCI card.
26 System Information Guide
If a 16/4 Token-Ring PCI Adapter network card came with the docking
device, Dell included a CD containing drivers and installation
instructions.
NOTE: If you are installing network drivers for a 16/4 Token-Ring PCI
Adapter network card, connect the computer to the network before you install
the drivers. Alert your network administrator before you connect the docking
device to a network.
If you are using a PCI card that was not purchased from Dell, use the
drivers and instructions provided by the manufacturer of the card.
NOTE: The 16/4 Token-Ring PCI Adapter network card that Dell installed has
been tested for use with the C/Dock II Expansion Station. Although you can
install other PCI expansion cards, Dell does not guarantee their functionality.
Page 29

Using the C/Dock II Media Bay
You may use any media device from your computer, such as a floppy drive or
CD drive, in the C/Dock II Expansion Station media bay.
NOTICE: To avoid damaging the docking device or the media device, do not
install any device in the docking device media bay that you do not normally use
in your computer.
NOTICE: To avoid damaging the docking device, do not install the travel
module or battery from the Dell Latitude computer in the docking device media
bay.
To install the computer's media device in the docking device media bay,
perform the following steps.
NOTE: The eject/locking lever must be in the unlocked position before you
install a media bay device.
Save all files, close and exit all application programs, and exit the
1
operating system.
2 Turn off the computer.
3 Remove any media device in the docking device media bay.
Press the media-bay eject button (see “Installing a Media Device in
the Media Bay”). After the device slides partially out of the media bay,
gently remove it the rest of the way.
Installing a Media Device in the Media Bay
media device
media-bay eject button
4
Insert the desired media device into the docking device media bay (see
the figure “Installing a Media Device in the Media Bay”).
System Information Guide 27
Page 30

www.dell.com | support.dell.com
5 Press the device in firmly.
If you properly seat the device, you should hear a click.
If you do not properly seat the device, it will be loose within the media
bay. Reseat the device.
6 Turn on the computer.
Installing a Media Device for Windows NT 4.0 With Softex
Docking Services
Windows NT with Softex Docking services allows hot-swapping of devices
from the media bay. For more information, see "Docking With Windows
NT and Softex Docking Services" and the Softex Docking Services User's
Guide at http://support.dell.com.
Securing the C/Dock II Expansion
Station
Security Features
The docking device has the following security features:
• An eject/locking lever that allows you to secure and eject your
computer. The back position secures the computer to the C/Dock II
Expansion Station. The middle position allows you to use the docking
device without securing it. The front position ejects the computer
from the docking device. Push the eject/locking lever to the back
position to use the padlock security lock and the security lock slot.
• A spring-loaded latch on the front of the base that fits into a security
• A secured top cover that blocks access to Peripheral Card Interconnect
• A secured media-bay eject button that blocks removal of media bay
• An immobilized catch latch to deter unauthorized computer removal.
28 System Information Guide
slot on the bottom of the computer secures the computer to the
docking control base. Not all Dell portable computers have the
security slot.
(PCI) Card removal.
devices.
Page 31

Securing the C/Dock II Expansion Station
Use one of the following methods to secure the docking device:
• Use a padlock alone or a padlock and looped security cable with the
padlock slot (see the figure “Docking Control Base Controls and
Indicators”) on the docking device.
A padlock alone blocks the eject lever and makes it difficult to detach
the computer from the docking device.
A security cable looped around a stationary object and used in
conjunction with the padlock can help prevent the unauthorized
movement of the computer and the C/Dock II Expansion Station.
• Attach a commercially available antitheft device to the security lock
slot (see the figure “Docking Control Base Controls and Indicators”)
on the docking device.
Antitheft devices usually include a segment of metal-stranded cable
with an attached locking device and associated key. Dell recommends
that you use a Kensington lock. For instructions on installing this kind
of antitheft device, see the documentation that accompanied the
device.
Dell Diagnostics
The Dell Diagnostics that came with your Dell Latitude computer includes
tests that help you troubleshoot the controllers in your docking device.
The subtests in the Network Interface test group of the Dell Diagnostics
verify the basic operation of the network controller in the docking device.
They test the controller's internal functions, including read and write access
to its registers and internal transmit and receive (loopback) capability.
The subtests in the Serial/Infrared Ports test group check the docking
device's interface with external devices (such as a serial mouse or a printer).
The subtests in this test group are not intended as a diagnostic test for the
external device itself.
The subtests in the USB test group check the docking device's interface
with external devices (such as a mouse). The subtests in this test group are
not intended as a diagnostic test for the external device itself.
System Information Guide 29
Page 32

www.dell.com | support.dell.com
For complete instructions on using the Dell Diagnostics, see your
computer's User's Guide.
Technical Specifications
Technical Specifications
Physical
Height:
With monitor stand 10.9 cm (4.3 inches)
Standalone 10.9 cm (4.3 inches)
Depth:
With monitor stand 50.0 cm (19.7 inches)
Standalone 47.0 cm(18.5 inches)
Width:
With monitor stand 43.5 cm (17.1 inches)
Standalone 42.0 cm (16.5 inches)
Weight:
With monitor stand 5.5 kg (12.0 lb)
Standalone 4.1 kg (9.0 lb)
Power
AC Adapter Input:
Voltage 100–240 VAC, 50–60 Hz
Amperage 3.5–4.5 A
C/Dock II Expansion Station
Input:
Voltage requires 20 VDC from AC Adapter
Amperage 3.5 A
I/O
Serial (DTE) 16550-compatible, 16-byte buffer connector
Parallel unidirectional, bidirectional, or ECP connector
PS/2 two mini-DIN connectors
30 System Information Guide
Page 33

Technical Specifications
USB two USB-compliant connectors
Infrared infrared port compatible with IrDA Standards
1.1 (Fast IR) and 1.0
Audio line out microphone-in jack; line-in/audio-in jack (for
record/playback devices); audio line-out jack
(for headphones)
SCSI Ultra SCSI, 50-pin, subminiature D connector
Video one connector
Network one RJ45 connector
Docking (to connect to
computer)
Ethernet Network Controller
Chip set 3Com
Data bus width 32-bit PCI host bus interface
IRQ IRQ10
SCSI Controller
Chip set Adaptec AIDC 7880C
Data bus width 8-bit SCSI bus; 32-bit PCI host bus interface
Data transfer rate 20 MB/sec
IRQ IRQ10
one connector
®
3C920; 10/100 BASE-TX (PC99-
compliant)
Regulatory Notices
Electromagnetic Interference (EMI) is any signal or emission, radiated in
free space or conducted along power or signal leads, that endangers the
functioning of a radio navigation or other safety service or seriously
degrades, obstructs, or repeatedly interrupts a licensed radio
communications service. Radio communications services include but are
not limited to AM/FM commercial broadcast, television, cellular services,
radar, air-traffic control, pager, and Personal Communication Services
(PCS). These licensed services, along with unintentional radiators such as
digital devices, including computers, contribute to the electromagnetic
environment.
System Information Guide 31
Page 34

Electromagnetic Compatibility (EMC) is the ability of items of electronic
equipment to function properly together in the electronic environment.
While this computer has been designed and determined to be compliant
with regulatory agency limits for EMI, there is no guarantee that
interference will not occur in a particular installation. If this equipment
does cause interference with radio communications services, which can be
determined by turning the equipment off and on, you are encouraged to try
to correct the interference by one or more of the following measures:
• Reorient the receiving antenna.
• Relocate the computer with respect to the receiver.
www.dell.com | support.dell.com
• Move the computer away from the receiver.
• Plug the computer into a different outlet so that the computer and the
receiver are on different branch circuits.
If necessary, consult a Dell Technical Support representative or an
experienced radio/television technician for additional suggestions.
Dell computers are designed, tested, and classified for their intended
electromagnetic environment. These electromagnetic environment
classifications generally refer to the following harmonized definitions:
• Class A is typically for business or industrial environments.
• Class B is typically for residential environments.
Information Technology Equipment (ITE), including devices, expansion
cards, printers, input/output (I/O) devices, monitors, and so on, that are
integrated into or connected to the computer should match the
electromagnetic environment classification of the computer.
A Notice About Shielded Signal Cables: Use only shielded cables for
connecting devices to any Dell device to reduce the possibility of
interference with radio communications services. Using shielded cables
ensures that you maintain the appropriate EMC classification for the
intended environment. For parallel printers, a cable is available from Dell.
If you prefer, you can order a cable from Dell on the World Wide Web at
accessories.us.dell.com/sna/segmenter/asp.
32 System Information Guide
Page 35

Most Dell computers are classified for Class B environments. However, the
inclusion of certain options can change the rating of some configurations to
Class A. To determine the electromagnetic classification for your computer
or device, refer to the following sections specific for each regulatory agency.
Each section provides country-specific EMC/EMI or product safety
information.
FCC Notices (U.S. Only)
Most Dell computers are classified by the Federal Communications
Commission (FCC) as Class B digital devices. To determine which
classification applies to your computer, examine all FCC registration labels
located on the bottom or back panel of your computer, on card-mounting
brackets, and on the cards themselves. If any one of the labels carries a Class
A rating, your entire computer is considered to be a Class A digital device. If
all labels carry an FCC Class B rating as distinguished by either an FCC ID
number or the FCC logo, ( ), your computer is considered to be a Class B
digital device.
Once you have determined your computer’s FCC classification, read the
appropriate FCC notice. Note that FCC regulations provide that changes
or modifications not expressly approved by Dell could void your authority to
operate this equipment.
This device complies with Part 15 of the FCC Rules. Operation is subject to
the following two conditions:
• This device may not cause harmful interference.
• This device must accept any interference received, including
interference that may cause undesired operation.
Class A
This equipment has been tested and found to comply with the limits for a
Class A digital device pursuant to Part 15 of the FCC Rules. These limits
are designed to provide reasonable protection against harmful interference
when the equipment is operated in a commercial environment. This
equipment generates, uses, and can radiate radio frequency energy and, if
not installed and used in accordance with the manufacturer’s instruction
manual, may cause harmful interference with radio communications.
Operation of this equipment in a residential area is likely to cause harmful
interference, in which case you will be required to correct the interference at
your own expense.
System Information Guide 33
Page 36

www.dell.com | support.dell.com
Class B
This equipment has been tested and found to comply with the limits for a
Class B digital device pursuant to Part 15 of the FCC Rules. These limits are
designed to provide reasonable protection against harmful interference in a
residential installation. This equipment generates, uses, and can radiate
radio frequency energy and, if not installed and used in accordance with the
manufacturer’s instruction manual, may cause interference with radio
communications. However, there is no guarantee that interference will not
occur in a particular installation. If this equipment does cause harmful
interference to radio or television reception, which can be determined by
turning the equipment off and on, you are encouraged to try to correct the
interference by one or more of the following measures:
• Reorient or relocate the receiving antenna.
• Increase the separation between the equipment and the receiver.
• Connect the equipment into an outlet on a circuit different from that
to which the receiver is connected.
• Consult the dealer or an experienced radio/television technician for
help.
The following information is provided on the device or devices covered in
this document in compliance with FCC regulations:
• Model number: PDX
• Company name:
34 System Information Guide
Dell Computer Corporation
One Dell Way
Round Rock, Texas 78682 USA
Page 37

IC Notice (Canada Only)
Most Dell computers (and other Dell digital apparatus) are classified by the
Industry Canada (IC) Interference-Causing Equipment Standard #3
(ICES-003) as Class B digital devices. To determine which classification
(Class A or B) applies to your computer (or other Dell digital apparatus),
examine all registration labels located on the bottom or the back panel of
your computer (or other digital apparatus). A statement in the form of "IC
Class A ICES-003" or "IC Class B ICES-003" will be located on one of these
labels. Note that Industry Canada regulations provide that changes or
modifications not expressly approved by Dell could void your authority to
operate this equipment.
This Class B (or Class A, if so indicated on the registration label) digital
apparatus meets the requirements of the Canadian InterferenceCausing Equipment Regulations.
Cet appareil numérique de la Classe B (ou Classe A, si ainsi indiqué sur
l’étiquette d’enregistration) respecte toutes les exigences du Reglement
sur le Materiel Brouilleur du Canada.
CE Notice (European Union)
Marking by the symbol indicates compliance of this Dell computer to
the EMC Directive and the Low Voltage Directive of the European Union.
Such marking is indicative that this Dell system meets the following
technical standards:
• EN 55022 — “Information Technology Equipment — Radio
Disturbance Characteristics — Limits and Methods of Measurement.”
• EN 55024 — “Information technology equipment - Immunity
characteristics - Limits and methods of measurement.”
• EN 61000-3-2 — “Electromagnetic compatibility (EMC) - Part 3:
Limits - Section 2: Limits for harmonic current emissions (Equipment
input current up to and including 16 A per phase).”
• EN 61000-3-3 — “Electromagnetic compatibility (EMC) - Part 3:
Limits - Section 3: Limitation of voltage fluctuations and flicker in
low-voltage supply systems for equipment with rated current up to and
including 16 A.”
System Information Guide 35
Page 38

www.dell.com | support.dell.com
• EN 60950 — “Safety of Information Technology Equipment.”
NOTE: EN 55022 emissions requirements provide for two classifications:
• Class A is for typical commercial areas.
• Class B is for typical domestic areas.
This Dell device is classified for use in a typical Class B domestic
environment.
A "Declaration of Conformity" in accordance with the preceding directives
and standards has been made and is on file at Dell Computer Corporation
Products Europe BV, Limerick, Ireland.
Battery Disposal
Your computer uses a lithium ion battery. The lithium ion battery
is a long-life battery, and it is very possible that you will never need
to replace it. However, should you need to replace it, see
“Replacing the Battery” found earlier in this section.
Do not dispose of the battery along with household waste. Contact your
local waste disposal agency for the address of the nearest battery deposit
site.
EN 55022 Compliance (Czech Republic Only)
This device belongs to Class B devices as described in EN 55022, unless
it is specifically stated that it is a Class A device on the specification
label. The following applies to devices in Class A of EN 55022 (radius of
protection up to 30 meters). The user of the device is obliged to take all
steps necessary to remove sources of interference to telecommunication
or other devices.
Pokud není na typovém štitku počítače uvedeno, že spadá do třídy
A podle EN 55022, spadá automaticky do třídy B podle EN 55022.
Pro zařízení zařazená do třídy A (ochranné pásmo 30m) podle EN
55022 platí následující. Dojde−li k rušení telekomunikačních nebo
jinych zařízení, je uživatel povinen provést taková opatření, aby
rušení odstranil.
36 System Information Guide
Page 39

VCCI Notice (Japan Only)
Most Dellcomputers are classified by the Voluntary Control Council for
Interference (VCCI) as Class B information technology equipment (ITE).
However, the inclusion of certain options can change the rating of some
configurations to Class A. ITE, including devices, expansion cards, printers,
input/output (I/O) devices, monitors, and so on, integrated into or
connected to the computer should match the electromagnetic environment
classification (Class A or B) of the computer.
To determine which classification applies to your computer, examine the
regulatory labels/markings (see "VCCI Class A ITE Regulatory Mark" and
"VCCI Class B ITE Regulatory Mark") located on the bottom or back panel
of your computer. Once you have determined your computer’s VCCI
classification, read the appropriate VCCI notice.
Class A ITE
This is a Class A product based on the standard of the Voluntary Control
Council for Interference (VCCI) for information technology equipment. If
this equipment is used in a domestic environment, radio disturbance may
arise. When such trouble occurs, the user may be required to take corrective
actions.
VCCI Class A ITE Regulatory Mark
VCCI-A
System Information Guide 37
Page 40

www.dell.com | support.dell.com
Class B ITE
This is a Class B product based on the standard of the Voluntary Control
Council for Interference (VCCI) for information technology equipment. If
this equipment is used near a radio or television receiver in a domestic
environment, it may cause radio interference. Install and use the equipment
according to the instruction manual.
VCCI Class B ITE Regulatory Mark
MIC Notice (Republic of Korea Only)
To determine which classification (Class A or B) applies to your computer
(or other Dell digital device), examine the Republic of Korean Ministry of
Information and Communications (MIC) registration labels located on
your computer (or other Dell digital device). The MIC label may be located
separately from the other regulatory marking applied to your product. Line
three of the label identifies the emissions class for the product—"(A)" for
Class A products or "(B)" for Class B products.
• Class A devices are for business purposes.
• Class B devices are for nonbusiness purposes.
38 System Information Guide
NOTE: MIC emissions requirements provide for two classifications:
Page 41

Class A Device
Please note that this device has been approved for business purposes with
regard to electromagnetic interference. If you find that this device is not
suitable for your use, you may exchange it for a nonbusiness-purpose device.
MIC Class A Regulatory Label
Class B Device
Please note that this device has been approved for nonbusiness purposes
and may be used in any environment, including residential areas.
System Information Guide 39
Page 42

www.dell.com | support.dell.com
MIC Class B Regulatory Label
Polish Center for Testing and Certification Notice
The equipment should draw power from a socket with an attached
protection circuit (a three-prong socket). All equipment that works together
(computer, monitor, printer, and so on) should have the same power supply
source.
The phasing conductor of the room’s electrical installation should have a
reserve short-circuit protection device in the form of a fuse with a nominal
value no larger than 16 amperes (A).
To completely switch off the equipment, the power supply cable must be
removed from the power supply socket, which should be located near the
equipment and easily accessible.
A protection mark "B" confirms that the equipment is in compliance with
the protection usage requirements of standards PN-93/T-42107 and PN-EN
55022.
40 System Information Guide
Page 43

Wymagania Polskiego Centrum Badań i Certyfikacji
Urządzenie powinno być zasilane z gniazda z przyłączonym obwodem
ochronnym (gniazdo z kołkiem). Współpracujące ze sobą urządzenia
(komputer, monitor, drukarka) powinny być zasilane z tego samego
źródła.
Instalacja elektryczna pomieszczenia powinna zawierać w przewodzie
fazowym rezerwową ochronę przed zwarciami, w postaci bezpiecznika
o wartości znamionowej nie większej ni 16A (amperów).
W celu całkowitego wyłączenia urządzenia z sieci zasilania, naley
wyjąć wtyczkę kabla zasilającego z gniazdka, które powinno
znajdować się w pobliu urządzenia i być łatwo dostępne.
Znak bezpieczeństwa "B" potwierdza zgodność urządzenia z
wymaganiami bezpieczeństwa uytkowania zawartymi w
PN−93/T−42107 i PN−EN 55022:1996.
Jeźeli na tabliczce znamionowej umieszczono informację, źe
urządzenie jest klasy A, to oznacza to, źe urządzenie w środowisku
mieszkalnym moźe powodować zaklócenia radioelektryczne. W takich
przypadkach moźna źądać od jego uźytkownika zastosowania
odpowiednich środków zaradczych.
System Information Guide 41
Page 44

www.dell.com | support.dell.com
Ni
Pozostałe instrukcje bezpieczeństwa
•
e naley uywać wtyczek adapterowych lub usuwać kołka
obwodu ochronnego z wtyczki. Jeeli konieczne jest uycie
przedłuacza to naley uyć przedłuacza 3−yłowego z
prawidłowo połączonym przewodem ochronnym.
• System komputerowy naley zabezpieczyć przed nagłymi,
chwilowymi wzrostami lub spadkami napięcia, uywając
eliminatora przepięć, urządzenia dopasowującego lub
bezzakłóceniowego źródła zasilania.
• Naley upewnić się, aby nic nie leało na kablach systemu
komputerowego, oraz aby kable nie były umieszczone w miejscu,
gdzie mona byłoby na nie nadeptywać lub potykać się o nie.
• Nie naley rozlewać napojów ani innych płynów na system
komputerowy.
• Nie naley wpychać adnych przedmiotów do otworów systemu
komputerowego, gdy moe to spowodować poar lub poraenie
prądem, poprzez zwarcie elementów wewnętrznych.
• System komputerowy powinien znajdować się z dala od
grzejników i źródeł ciepła. Ponadto, nie naley blokować otworów
wentylacyjnych. Naley unikać kładzenia luźnych papierów pod
komputer oraz umieszczania komputera w ciasnym miejscu bez
moliwości cyrkulacji powietrza wokół niego.
42 System Information Guide
Page 45

NOM Information (Mexico Only)
The following information is provided on the device(s) described in this
document in compliance with the requirements of the official Mexican
standards (NOM):
Exporter: Dell Computer Corporation
One Dell Way
Round Rock, TX 78682
Importer: Dell Computer de México,
S.A. de C.V.
Paseo de la Reforma 2620 - 11° Piso
Col. Lomas Altas
11950 México, D.F.
Ship to: Dell Computer de México,
S.A. de C.V. al Cuidado de Kuehne &
Nagel de México S. de R.I.
Avenida Soles No. 55
Col. Peñon de los Baños
15520 México, D.F.
Supply voltage: 100–240 VAC
Frequency: 50–60 Hz
Current Consumption: 1.5 A
Output voltage: 20 VDC
Output current: 3.5–4.5 A
System Information Guide 43
Page 46

www.dell.com | support.dell.com
Información para NOM (únicamente para México)
La información siguiente se proporciona en el dispositivo o en los
dispositivos descritos en este documento, en cumplimiento con los
requisitos de la Norma Oficial Mexicana (NOM):
Exportador: Dell Computer Corporation
One Dell Way
Round Rock, TX 78682
Importador: Dell Computer de México,
S.A. de C.V.
Paseo de la Reforma 2620 - 11° Piso
Col. Lomas Altas
11950 México, D.F.
Embarcar a: Dell Computer de México,
S.A. de C.V. al Cuidado de Kuehne &
Nagel de México S. de R.I.
Avenida Soles No. 55
Col. Peñon de los Baños
15520 México, D.F.
Voltaje de entrada de
alimentación:
Frecuencia: 50–60 Hz
Consumo eléctrico: 1.5 A
Voltaje de salida: 20 VDC
Corriente de salida: 3.5–4.5 A
44 System Information Guide
100–240 VAC
Page 47

BSMI Notice (Taiwan Only)
System Information Guide 45
Page 48

www.dell.com | support.dell.com
46 System Information Guide
Page 49

CE Mark Notice
This equipment complies with the essential requirements of the European
Union Directive 1999/5/EC.
System Information Guide 47
Page 50

www.dell.com | support.dell.com
Limited Warranties and Return Policy
To determine which warranty you purchased, see the Dell invoice that
accompanied your docking device. The following sections describe these
limited warranties, the manufacturer guarantee for Latin America and the
Caribbean, and the return policy for the U.S.
One-Year Limited Warranty (U.S. Only)
Dell Computer Corporation (“Dell”) manufactures its hardware products
from parts and components that are new or equivalent to new in accordance
with industry-standard practices. Dell warrants that the hardware
products it manufactures will be free from defects in materials and
workmanship. The limited warranty term is one year beginning on the date
of invoice, as further described in the following text.
Damage due to shipping the products to you is covered under this limited
warranty. Otherwise, this limited warranty does not cover damage due to
external causes, including accident, abuse, misuse, problems with electrical
power, servicing not authorized by Dell, usage not in accordance with
product instructions, failure to perform required preventive maintenance,
and problems caused by use of parts and components not supplied by Dell.
This limited warranty does not cover any items that are in one or more of
the following categories: software; external devices (except as specifically
noted); accessories or parts added to a Dell system after the system is
shipped from Dell; accessories or parts added to a Dell system through
Dell’s system integration department; accessories or parts that are not
installed in the Dell factory; or Dell Software and Peripherals products.
Monitors, keyboards, and mice that are Dell-branded or that are included
on Dell’s standard price list are covered under this limited warranty; all
other monitors, keyboards, and mice (including those sold through the Dell
Software and Peripherals program) are not covered.
48 System Information Guide
Page 51

Dell will repair or replace products covered under this limited warranty that
are returned to Dell’s facility. To request warranty service, you must contact
Dell’s Customer Technical Support within the limited warranty period. See
“Getting Help” in your computer’s online User’s Guide to find the
appropriate contact information for obtaining customer assistance. If
warranty service is required, Dell will issue a Return Material Authorization
Number. You must ship the products back to Dell in their original or
equivalent packaging, prepay shipping charges, and insure the shipment or
accept the risk of loss or damage during shipment. Dell will ship the
repaired or replacement products to you (freight prepaid) if you use an
address in the continental U.S., where applicable. Shipments to other
locations will be made freight collect.
NOTE: Before you ship the product(s) to Dell, back up the data on the hard drive(s)
and any other storage device(s) in the product(s). Remove any removable media, such
as floppy disks, CDs, or PC Cards. Dell does not accept liability for lost data or
software.
Dell owns all parts removed from repaired products. Dell uses new and
reconditioned parts made by various manufacturers in performing warranty
repairs and building replacement products. If Dell repairs or replaces a
product, its warranty term is not extended.
THIS LIMITED WARRANTY GIVES YOU SPECIFIC LEGAL RIGHTS,
AND YOU MAY ALSO HAVE OTHER RIGHTS, WHICH VARY FROM
STATE TO STATE (OR JURISDICTION TO JURISDICTION). DELL'S
RESPONSIBILITY FOR MALFUNCTIONS AND DEFECTS IN
HARDWARE IS LIMITED TO REPAIR AND REPLACEMENT AS SET
FORTH IN THIS LIMITED WARRANTY STATEMENT. ALL EXPRESS
AND IMPLIED WARRANTIES FOR THE PRODUCT, INCLUDING
BUT NOT LIMITED TO ANY IMPLIED WARRANTIES OF AND
CONDITIONS OF MERCHANTABILITY AND FITNESS FOR A
PARTICULAR PURPOSE, ARE LIMITED IN DURATION TO THE
WARRANTY PERIOD SET FORTH ABOVE AND NO WARRANTIES,
WHETHER EXPRESS OR IMPLIED, WILL APPLY AFTER SUCH
PERIOD.
SOME STATES (OR JURISDICTIONS) DO NOT ALLOW
LIMITATIONS ON HOW LONG AN IMPLIED WARRANTY LASTS, SO
THE PRECEDING LIMITATION MAY NOT APPLY TO YOU.
System Information Guide 49
Page 52

DELL DOES NOT ACCEPT LIABILITY BEYOND THE REMEDIES
SET FORTH IN THIS LIMITED WARRANTY STATEMENT OR
LIABILITY FOR INCIDENTAL OR CONSEQUENTIAL DAMAGES,
INCLUDING WITHOUT LIMITATION ANY LIABILITY FOR
PRODUCTS NOT BEING AVAILABLE FOR USE OR FOR LOST DATA
OR SOFTWARE.
SOME STATES (OR JURISDICTIONS) DO NOT ALLOW THE
EXCLUSION OR LIMITATION OF INCIDENTAL OR
CONSEQUENTIAL DAMAGES, SO THE PRECEDING EXCLUSION
OR LIMITATION MAY NOT APPLY TO YOU.
www.dell.com | support.dell.com
These provisions apply to Dell’s one-year limited warranty only. For
provisions of any service contract covering your system, refer to your invoice
or the separate service contract that you will receive.
If Dell elects to exchange a product or portion of a product, the exchange
will be made in accordance with Dell’s Exchange Policy in effect on the date
of the exchange. In any instance in which Dell issues a Return Material
Authorization Number, Dell must receive the product(s) for repair prior to
the expiration of the warranty period in order for the repair(s) to be covered
by the limited warranty.
Three-Year Limited Warranty (U.S. Only)
Dell Computer Corporation (“Dell”) manufactures its hardware products
from parts and components that are new or equivalent to new in accordance
with industry-standard practices. Dell warrants that the hardware products
it manufactures will be free from defects in materials and workmanship.
The limited warranty term is three years beginning on the date of invoice, as
described in the following text.
Damage due to shipping the products to you is covered under this limited
warranty. Otherwise, this limited warranty does not cover damage due to
external causes, including accident, abuse, misuse, problems with electrical
power, servicing not authorized by Dell, usage not in accordance with
product instructions, failure to perform required preventive maintenance,
and problems caused by use of parts and components not supplied by Dell.
50 System Information Guide
Page 53

This limited warranty does not cover any items that are in one or more of
the following categories: software; external devices (except as specifically
noted); accessories or parts added to a Dell system after the system is
shipped from Dell; accessories or parts added to a Dell system through
Dell’s system integration department; accessories or parts that are not
installed in the Dell factory; or Dell Software and Peripherals products.
Monitors, keyboards, and mice that are Dell-branded or that are included
on Dell’s standard price list are covered under this limited warranty; all
other monitors, keyboards, and mice (including those sold through the Dell
Software and Peripherals program) are not covered. Batteries for portable
computers are covered only during the initial one-year period of this limited
warranty.
Limited Warranty Coverage During Year One
During the one-year period beginning on the invoice date, Dell will repair or
replace products covered under this limited warranty that are returned to
Dell’s facility. To request warranty service, you must contact Dell’s
Customer Technical Support within the warranty period. See “Getting
Help” in your online User’s Guide to find the appropriate contact
information for obtaining customer assistance. If warranty service is
required, Dell will issue a Return Material Authorization Number. You must
ship the products back to Dell in their original or equivalent packaging,
prepay shipping charges, and insure the shipment or accept the risk of loss
or damage during shipment. Dell will ship the repaired or replacement
products to you freight prepaid if you use an address in the continental U.S.,
where applicable. Shipments to other locations will be made freight collect.
NOTE: Before you ship the product(s) to Dell, back up the data on the hard drive(s)
and any other storage device(s) in the product(s). Remove any removable media, such
as floppy disks, CDs, or PC Cards. Dell does not accept liability for lost data or
software.
Dell owns all parts removed from repaired products. Dell uses new and
reconditioned parts made by various manufacturers in performing warranty
repairs and building replacement products. If Dell repairs or replaces a
product, its warranty term is not extended.
System Information Guide 51
Page 54

www.dell.com | support.dell.com
Limited Warranty Coverage During Years Two and Three
During the second and third years of this limited warranty, Dell will provide,
on an exchange basis and subject to Dell’s Exchange Policy in effect on the
date of the exchange, replacement parts for the Dell hardware product(s)
covered under this limited warranty when a part requires replacement. You
must report each instance of hardware failure to Dell’s Customer Technical
Support in advance to obtain Dell’s concurrence that a part should be
replaced and to have Dell ship the replacement part. Dell will ship parts
(freight prepaid) if you use an address in the continental U.S., where
applicable. Shipments to other locations will be made freight collect. Dell
will include a prepaid shipping container with each replacement part for
your use in returning the replaced part to Dell. Replacement parts are new
or reconditioned. Dell may provide replacement parts made by various
manufacturers when supplying parts to you. The warranty term for a
replacement part is the remainder of the limited warranty term.
You will pay Dell for replacement parts if the replaced part is not returned to
Dell. The process for returning replaced parts, and your obligation to pay for
replacement parts if you do not return the replaced parts to Dell, will be in
accordance with Dell’s Exchange Policy in effect on the date of the
exchange.
You accept full responsibility for your software and data. Dell is not required
to advise or remind you of appropriate backup and other procedures.
General Provisions
THIS LIMITED WARRANTY GIVES YOU SPECIFIC LEGAL RIGHTS,
AND YOU MAY ALSO HAVE OTHER RIGHTS, WHICH VARY FROM
STATE TO STATE (OR JURISDICTION TO JURISDICTION). DELL'S
RESPONSIBILITY FOR MALFUNCTIONS AND DEFECTS IN
HARDWARE IS LIMITED TO REPAIR AND REPLACEMENT AS SET
FORTH IN THIS LIMITED WARRANTY STATEMENT. ALL EXPRESS
AND IMPLIED WARRANTIES FOR THE PRODUCT, INCLUDING
BUT NOT LIMITED TO ANY IMPLIED WARRANTIES OF AND
CONDITIONS OF MERCHANTABILITY AND FITNESS FOR A
PARTICULAR PURPOSE, ARE LIMITED IN DURATION TO THE
WARRANTY PERIOD SET FORTH ABOVE AND NO WARRANTIES,
WHETHER EXPRESS OR IMPLIED, WILL APPLY AFTER SUCH
PERIOD.
52 System Information Guide
Page 55

SOME STATES (OR JURISDICTIONS) DO NOT ALLOW
LIMITATIONS ON HOW LONG AN IMPLIED WARRANTY LASTS, SO
THE PRECEDING LIMITATION MAY NOT APPLY TO YOU.
DELL DOES NOT ACCEPT LIABILITY BEYOND THE REMEDIES
SET FORTH IN THIS LIMITED WARRANTY STATEMENT OR
LIABILITY FOR INCIDENTAL OR CONSEQUENTIAL DAMAGES,
INCLUDING WITHOUT LIMITATION ANY LIABILITY FOR
PRODUCTS NOT BEING AVAILABLE FOR USE OR FOR LOST DATA
OR SOFTWARE.
SOME STATES (OR JURISDICTIONS) DO NOT ALLOW THE
EXCLUSION OR LIMITATION OF INCIDENTAL OR
CONSEQUENTIAL DAMAGES, SO THE PRECEDING EXCLUSION
OR LIMITATION MAY NOT APPLY TO YOU.
These provisions apply to Dell’s three-year limited warranty only. For
provisions of any service contract covering your system, refer to your invoice
or the separate service contract that you will receive.
If Dell elects to exchange a system or component, the exchange will be
made in accordance with Dell’s Exchange Policy in effect on the date of the
exchange. In any instance in which Dell issues a Return Material
Authorization Number, Dell must receive the product(s) for repair prior to
the expiration of the warranty period in order for the repair(s) to be covered
by the limited warranty.
One-Year Limited Warranty (Canada Only)
Dell Computer Corporation (“Dell”) manufactures its hardware products
from parts and components that are new or equivalent to new in accordance
with industry-standard practices. Dell warrants that the hardware
products it manufactures will be free from defects in materials and
workmanship. The limited warranty term is one year beginning on the date
of invoice, as further described in the following text.
Damage due to shipping the products to you is covered under this limited
warranty. Otherwise, this limited warranty does not cover damage due to
external causes, including accident, abuse, misuse, problems with electrical
power, servicing not authorized by Dell, usage not in accordance with
product instructions, failure to perform required preventive maintenance,
and problems caused by use of parts and components not supplied by Dell.
System Information Guide 53
Page 56

www.dell.com | support.dell.com
This limited warranty does not cover any items that are in one or more of
the following categories: software; external devices (except as specifically
noted); accessories or parts added to a Dell system after the system is
shipped from Dell; accessories or parts added to a Dell system through
Dell’s system integration department; accessories or parts that are not
installed in the Dell factory; or Dell Software and Peripherals products.
Monitors, keyboards, and mice that are Dell-branded or that are included
on Dell’s standard price list are covered under this limited warranty; all
other monitors, keyboards, and mice (including those sold through the Dell
Software and Peripherals program) are not covered.
Dell will repair or replace products covered under this limited warranty that
are returned to Dell’s facility. To request warranty service, you must contact
Dell’s Customer Technical Support within the warranty period. See
“Getting Help” in your online User’s Guide to find the appropriate contact
information for obtaining customer assistance. If warranty service is
required, Dell will issue a Return Material Authorization Number. You must
ship the products back to Dell in their original or equivalent packaging,
prepay shipping charges, and insure the shipment or accept the risk of loss
or damage during shipment. Dell will ship the repaired or replacement
products to you (freight prepaid) if you use an address in Canada, where
applicable. Shipments to other locations will be made freight collect.
NOTE: Before you ship the product(s) to Dell, back up the data on the hard drive(s)
and any other storage device(s) in the product(s). Remove any removable media, such
as floppy disks, CDs, or PC Cards. Dell does not accept liability for lost data or
software.
Dell owns all parts removed from repaired products. Dell uses new and
reconditioned parts made by various manufacturers in performing warranty
repairs and building replacement products. If Dell repairs or replaces a
product, its warranty term is not extended.
54 System Information Guide
Page 57

DELL MAKES NO EXPRESS WARRANTIES OR CONDITIONS
BEYOND THOSE STATED IN THIS LIMITED WARRANTY
STATEMENT. DELL DISCLAIMS ALL OTHER WARRANTIES AND
CONDITIONS, EXPRESS OR IMPLIED, INCLUDING WITHOUT
LIMITATION IMPLIED WARRANTIES AND CONDITIONS OF
MERCHANTABILITY AND FITNESS FOR A PARTICULAR PURPOSE.
SOME STATES (OR JURISDICTIONS) DO NOT ALLOW
LIMITATIONS ON IMPLIED WARRANTIES OR CONDITIONS, SO
THIS LIMITATION MAY NOT APPLY TO YOU.
DELL’S RESPONSIBILITY FOR MALFUNCTIONS AND DEFECTS IN
HARDWARE IS LIMITED TO REPAIR AND REPLACEMENT AS SET
FORTH IN THIS LIMITED WARRANTY STATEMENT. THESE
WARRANTIES GIVE YOU SPECIFIC LEGAL RIGHTS, AND YOU MAY
ALSO HAVE OTHER RIGHTS, WHICH VARY FROM STATE TO
STATE (OR JURISDICTION TO JURISDICTION).
DELL DOES NOT ACCEPT LIABILITY BEYOND THE REMEDIES
SET FORTH IN THIS LIMITED WARRANTY STATEMENT OR
LIABILITY FOR INCIDENTAL OR CONSEQUENTIAL DAMAGES,
INCLUDING WITHOUT LIMITATION ANY LIABILITY FOR
PRODUCTS NOT BEING AVAILABLE FOR USE OR FOR LOST DATA
OR SOFTWARE.
SOME STATES (OR JURISDICTIONS) DO NOT ALLOW THE
EXCLUSION OR LIMITATION OF INCIDENTAL OR
CONSEQUENTIAL DAMAGES, SO THE PRECEDING EXCLUSION
OR LIMITATION MAY NOT APPLY TO YOU.
These provisions apply to Dell’s one-year limited warranty only. For
provisions of any service contract covering your system, refer to your invoice
or the separate service contract that you will receive.
If Dell elects to exchange a product or portion of a product, the exchange
will be made in accordance with Dell’s Exchange Policy in effect on the date
of the exchange. In any instance in which Dell issues a Return Material
Authorization Number, Dell must receive the product(s) for repair prior to
the expiration of the warranty period in order for the repair(s) to be covered
by the limited warranty.
System Information Guide 55
Page 58

www.dell.com | support.dell.com
Three-Year Limited Warranty (Canada Only)
Dell Computer Corporation (“Dell”) manufactures its hardware products
from parts and components that are new or equivalent to new in accordance
with industry-standard practices. Dell warrants that the hardware products
it manufactures will be free from defects in materials and workmanship.
The warranty term is three years beginning on the date of invoice, as
described in the following text.
Damage due to shipping the products to you is covered under this limited
warranty. Otherwise, this limited warranty does not cover damage due to
external causes, including accident, abuse, misuse, problems with electrical
power, servicing not authorized by Dell, usage not in accordance with
product instructions, failure to perform required preventive maintenance,
and problems caused by use of parts and components not supplied by Dell.
This limited warranty does not cover any items that are in one or more of
the following categories: software; external devices (except as specifically
noted); accessories or parts added to a Dell system after the system is
shipped from Dell; accessories or parts added to a Dell system through
Dell’s system integration department; accessories or parts that are not
installed in the Dell factory; or Dell Software and Peripherals products.
Monitors, keyboards, and mice that are Dell-branded or that are included
on Dell’s standard price list are covered under this limited warranty; all
other monitors, keyboards, and mice (including those sold through the Dell
Software and Peripherals program) are not covered. Batteries for portable
computers are covered only during the initial one-year period of this limited
warranty.
56 System Information Guide
Page 59

Limited Warranty Coverage During Year One
During the one-year period beginning on the invoice date, Dell will repair or
replace products covered under this limited warranty that are returned to
Dell’s facility. To request warranty service, you must contact Dell’s
Customer Technical Support within the warranty period. To request
warranty service, you must contact Dell’s Customer Technical Support
within the warranty period. See “Getting Help” in your online User’s Guide
to find the appropriate contact information for obtaining customer
assistance. If warranty service is required, Dell will issue a Return Material
Authorization Number. You must ship the products back to Dell in their
original or equivalent packaging, prepay shipping charges, and insure the
shipment or accept the risk of loss or damage during shipment. Dell will
ship the repaired or replacement products to you freight prepaid if you use
an address in Canada, where applicable. Shipments to other locations will
be made freight collect.
NOTE: Before you ship the product(s) to Dell, back up the data on the hard drive(s)
and any other storage device(s) in the product(s). Remove any removable media, such
as floppy disks, CDs, or PC Cards. Dell does not accept liability for lost data or
software.
Dell owns all parts removed from repaired products. Dell uses new and
reconditioned parts made by various manufacturers in performing warranty
repairs and building replacement products. If Dell repairs or replaces a
product, its warranty term is not extended.
System Information Guide 57
Page 60

www.dell.com | support.dell.com
Limited Warranty Coverage During Years Two and Three
During the second and third years of this limited warranty, Dell will provide,
on an exchange basis and subject to Dell’s Exchange Policy in effect on the
date of the exchange, replacement parts for the Dell hardware product(s)
covered under this limited warranty when a part requires replacement. You
must report each instance of hardware failure to Dell’s Customer Technical
Support in advance to obtain Dell’s concurrence that a part should be
replaced and to have Dell ship the replacement part. Dell will ship parts
(freight prepaid) if you use an address in Canada, where applicable.
Shipments to other locations will be made freight collect. Dell will include a
prepaid shipping container with each replacement part for your use in
returning the replaced part to Dell. Replacement parts are new or
reconditioned. Dell may provide replacement parts made by various
manufacturers when supplying parts to you. The warranty term for a
replacement part is the remainder of the limited warranty term.
You will pay Dell for replacement parts if the replaced part is not returned to
Dell. The process for returning replaced parts, and your obligation to pay for
replacement parts if you do not return the replaced parts to Dell, will be in
accordance with Dell’s Exchange Policy in effect on the date of the
exchange.
You accept full responsibility for your software and data. Dell is not required
to advise or remind you of appropriate backup and other procedures.
General Provisions
DELL MAKES NO EXPRESS WARRANTIES OR CONDITIONS
BEYOND THOSE STATED IN THIS LIMITED WARRANTY
STATEMENT. DELL DISCLAIMS ALL OTHER WARRANTIES AND
CONDITIONS, EXPRESS OR IMPLIED, INCLUDING WITHOUT
LIMITATION IMPLIED WARRANTIES AND CONDITIONS OF
MERCHANTABILITY AND FITNESS FOR A PARTICULAR PURPOSE.
SOME STATES (OR JURISDICTIONS) DO NOT ALLOW
LIMITATIONS ON IMPLIED WARRANTIES OR CONDITIONS, SO
THIS LIMITATION MAY NOT APPLY TO YOU.
58 System Information Guide
Page 61

DELL’S RESPONSIBILITY FOR MALFUNCTIONS AND DEFECTS IN
HARDWARE IS LIMITED TO REPAIR AND REPLACEMENT AS SET
FORTH IN THIS LIMITED WARRANTY STATEMENT. THESE
WARRANTIES GIVE YOU SPECIFIC LEGAL RIGHTS, AND YOU MAY
ALSO HAVE OTHER RIGHTS, WHICH VARY FROM STATE TO
STATE (OR JURISDICTION TO JURISDICTION).
DELL DOES NOT ACCEPT LIABILITY BEYOND THE REMEDIES
SET FORTH IN THIS LIMITED WARRANTY STATEMENT OR
LIABILITY FOR INCIDENTAL OR CONSEQUENTIAL DAMAGES,
INCLUDING WITHOUT LIMITATION ANY LIABILITY FOR
PRODUCTS NOT BEING AVAILABLE FOR USE OR FOR LOST DATA
OR SOFTWARE.
SOME STATES (OR JURISDICTIONS) DO NOT ALLOW THE
EXCLUSION OR LIMITATION OF INCIDENTAL OR
CONSEQUENTIAL DAMAGES, SO THE PRECEDING EXCLUSION
OR LIMITATION MAY NOT APPLY TO YOU.
These provisions apply to Dell’s three-year limited warranty only. For
provisions of any service contract covering your system, refer to your invoice
or the separate service contract that you will receive.
If Dell elects to exchange a system or component, the exchange will be
made in accordance with Dell’s Exchange Policy in effect on the date of the
exchange. In any instance in which Dell issues a Return Material
Authorization Number, Dell must receive the product(s) for repair prior to
the expiration of the warranty period in order for the repair(s) to be covered
by the limited warranty.
System Information Guide 59
Page 62

www.dell.com | support.dell.com
“Total Satisfaction” Return Policy (U.S. Only)
If you are an end-user customer who bought new products directly from a
Dell company, you may return them to Dell within 30 days of the date of
invoice for a refund or credit of the product purchase price. If you are an
end-user customer who bought reconditioned or refurbished products from
a Dell company, you may return them to Dell within 14 days of the date of
invoice for a refund or credit of the product purchase price. In either case,
the refund or credit will not include any shipping and handling charges
shown on your invoice. If you are an organization that bought the products
under a written agreement with Dell, the agreement may contain different
terms for the return of products than specified by this policy.
To return products, you must contact Dell Customer Service to receive a
Credit Return Authorization Number. See “Getting Help” in your online
User’s Guide to find the appropriate contact information for obtaining
customer assistance. To expedite the processing of your refund or credit,
Dell expects you to return the products to Dell in their original packaging
within five days of the date that Dell issues the Credit Return Authorization
Number. You must also prepay shipping charges and insure the shipment or
accept the risk of loss or damage during shipment. You may return software
for refund or credit only if the sealed package containing the floppy disk(s)
or CD(s) is unopened. Returned products must be in as-new condition, and
all of the manuals, floppy disk(s), CD(s), power cables, and other items
included with a product must be returned with it. For customers who want
to return, for refund or credit only, either applications software or an
operating system that has been installed by Dell, the whole system must be
returned, along with any media and documentation that may have been
included in the original shipment.
This “Total Satisfaction” Return Policy does not apply to Dell Software and
Peripherals products, which may be returned under Dell Software and
Peripherals's then-current return policy.
60 System Information Guide
Page 63

One-Year End-User Manufacturer Guarantee (Latin America and
the Caribbean Only)
Guarantee
Dell Computer Corporation (“Dell”) warrants to the end user in accordance
with the following provisions that its branded hardware products, purchased
by the end user from a Dell company or an authorized Dell distributor in
Latin America or the Caribbean, will be free from defects in materials,
workmanship, and design affecting normal use, for a period of one year from
the original purchase date. Products for which proper claims are made will,
at Dell’s option, be repaired or replaced at Dell’s expense. Dell owns all
parts removed from repaired products. Dell uses new and reconditioned
parts made by various manufacturers in performing repairs and building
replacement products.
Exclusions
This Guarantee does not apply to defects resulting from: improper or
inadequate installation, use, or maintenance; actions or modifications by
unauthorized third parties or the end user; accidental or willful damage; or
normal wear and tear.
Making a Claim
Claims must be made in Latin America or the Caribbean by contacting the
Dell point of sale within the guarantee period. The end user must always
supply proof of purchase, indicating name and address of the seller, date of
purchase, model and serial number, name and address of the customer, and
details of symptoms and configuration at the time of malfunction,
including peripherals and software used. Otherwise, Dell may refuse the
guarantee claim. Upon diagnosis of a warranted defect, Dell will make
arrangements and pay for ground freight and insurance to and from Dell’s
repair/replacement center. The end user must ensure that the defective
product is available for collection properly packed in original or equally
protective packaging together with the details listed above and the return
number provided to the end user by Dell.
System Information Guide 61
Page 64

www.dell.com | support.dell.com
Limitation and Statutory Rights
Dell makes no other warranty, guarantee or like statement other than as
explicitly stated above, and this Guarantee is given in place of all other
guarantees whatsoever, to the fullest extent permitted by law. In the absence
of applicable legislation, this Guarantee will be the end user’s sole and
exclusive remedy against Dell or any of its affiliates, and neither Dell nor
any of its affiliates shall be liable for loss of profit or contracts, or any other
indirect or consequential loss arising from negligence, breach of contract, or
howsoever.
This Guarantee does not impair or affect mandatory statutory rights of the
end user against and/or any rights resulting from other contracts
concluded by the end user with Dell and/or any other seller.
Dell World Trade LP
One Dell Way, Round Rock, TX 78682, USA
Dell Computadores do Brasil Ltda (CNPJ No. 72.381.189/0001-10)/
Dell Commercial do Brasil Ltda (CNPJ No. 03 405 822/0001-40)
Avenida Industrial Belgraf, 400
92990-000 - Eldorado do Sul – RS - Brasil
Dell Computer de Chile Ltda
Coyancura 2283, Piso 3- Of.302,
Providencia, Santiago - Chile
Dell Computer de Colombia Corporation
Carrera 7 #115-33 Oficina 603
Bogota, Colombia
Dell Computer de Mexico SA de CV
Paseo de la Reforma 2620 - 11° Piso
Col. Lomas Altas
11950 México, D.F.
62 System Information Guide
Page 65

Station d'accueil C/Dock II Dell™ Latitude™
Guide d'information sur le système
www.dell.com | support.dell.com
Page 66

Remarques, avis et précautions
REMARQUE : Une REMARQUE fournit des informations importantes qui vous aident à mieux
utiliser votre ordinateur.
AVIS : Un AVIS vous avertit d'un risque de dommage matériel ou de perte de données et vous
indique comment éviter le problème.
PRÉCAUTION : Une PRÉCAUTION indique un risque potentiel d'endommagement
du matériel, de blessure corporelle ou de mort.
____________________
Les informations contenues dans ce document sont sujettes à modification sans préavis.
© 2001–2002 Dell Computer Corporation. Tous droits réservés.
Toute reproduction sans l'autorisation écrite de Dell Computer Corporation est strictement interdite.
Marques utilisées dans ce document : Dell, le logo DELL et Latitude sont des marques de Dell Computer Corporation ;
3Com est une marque de 3Com Corporation ; Microsoft, Windows et Windows NT sont des marques déposées de
Microsoft Corporation.
D'autres marques et noms commerciaux peuvent être utilisés dans ce document pour faire référence aux entités se
réclamant de ces marques et de ces noms ou à leurs produits. Dell Computer Corporation dénie tout intérêt propriétaire
aux marques et aux noms commerciaux autres que les siens.
Ce produit intègre une technologie de protection des droits d'auteur qui est protégée par des documents de méthode de
certains brevets américains et autres droits de propriété intellectuelle détenus par Macrovision Corporation ainsi par
que d'autres détenteurs de droits. L'utilisation de cette technologie de protection des droits d'auteur doit être autorisée
par Macrovision Corporation et, sauf autorisation contraire de Macrovision Corporation, est limitée à un usage par
les particuliers et à d'autres utilisations pour un public restreint. L'ingénierie inverse et le désassemblage sont interdits.
Janvier 2002 P/N 5G287 Rév. A03
Page 67

Station d'accueil C/Dock II Dell™ Latitude™
Guide d'information sur
le système
Cette documentation comprend des informations sur la mise en route, la
sécurité, la réglementation et la garantie relatives à votre station d'accueil
C/Dock II Dell Latitude, ainsi que des informations concernant les autres
documents Dell disponibles et la façon de vous les procurer.
Instructions de sécurité
Les informations suivantes indiquent la signification des symboles
supplémentaires utilisés uniquement dans les instructions de Sécurité.
Risque d'explosion Symbole de référence avion
Risque d'incendie L'utilisation de cette fonction
peut être interdite en avion
Risque de choc
électrique
Précaution : Généralités (Instructions de sécurité, suite)
• Lorsque vous installez la station d'amarrage pour
travailler, placez-la sur une surface plane.
• N'essayez pas de réparer la station d'amarrage
vous-même à moins que vous ne soyez un technicien
qualifié. Suivez toujours scrupuleusement les
instructions d'installation.
Guide d'information sur le système 65
Page 68

www.dell.com | support.dell.com
• Si vous raccordez une rallonge à votre adaptateur
CA/CC, assurez-vous que l'intensité totale du courant
drainé par tous les appareils raccordés à cette rallonge
ne dépasse pas la limite de cette dernière.
• N'insérez pas d'objets dans les orifices d'aération ou
dans les ouvertures de votre ordinateur. Cela risquerait
de provoquer un incendie ou un choc électrique dû à
un court-circuit des composants internes.
• L'adaptateur CA/CC doit se trouver dans une zone
aérée, par exemple sur un bureau ou sur le sol, lorsqu'il
est utilisé pour alimenter l'ordinateur ou pour charger la
batterie. Ne recouvrez pas l'adaptateur CA/CC de
papiers ou autres objets susceptibles d'entraver le
refroidissement. De même, n'utilisez pas l'adaptateur
CA/CC dans une mallette de transport.
• N'utilisez pas votre ordinateur dans un environnement
humide, par exemple près d'une baignoire, d'un évier,
d'une piscine ou dans un sous-sol humide.
• Pour éviter tout risque de décharge électrique,
n'effectuez aucun branchement ou débranchement,
ni aucune opération de maintenance ou de
reconfiguration de ce produit pendant un orage.
N'utilisez pas votre ordinateur pendant un orage, à
moins qu'il n'ait été déconnecté de tous ses câbles et
qu'il fonctionne sur batterie.
66 Guide d'information sur le système
• Avant de nettoyer votre station d’accueil, mettez-la
hors tension. Nettoyez votre ordinateur avec un tissu
doux et humidifié avec de l'eau. N'utilisez pas de
liquide ni d'aérosol nettoyants, ceux-ci peuvent
contenir des substances inflammables.
Page 69

Précaution : Alimentation (Instructions de sécurité,
suite)
• Utilisez uniquement l'adaptateur CA/CC fourni par
Dell et homologué pour cette station d'amarrage.
L'utilisation d'un autre adaptateur CA/CC peut
provoquer un incendie ou une explosion.
• Avant de raccorder la station d'amarrage à une prise
électrique, assurez-vous que la tension et la fréquence
du secteur sont compatibles avec la tension d'entrée de
l 'adaptateur CA/CC.
• Pour mettre l'ordinateur totalement hors tension,
éteignez-le, retirez sa batterie et débranchez
l'adaptateur CA/CC de la prise de courant.
• Pour éviter tout risque de décharge électrique, branchez
l'adaptateur CA/CC et les cordons d'alimentation de
l'ordinateur et de ses périphériques sur des prises
possédant un circuit de mise à la terre adéquat. Il se
peut que ces câbles d'alimentation soient équipés de
prises à trois broches afin de fournir une mise à la terre.
N'utilisez pas les fiches intermédiaires ou ne retirez pas
la broche de masse d'un câble. Si vous utilisez une
rallonge électrique, veillez à ce qu'elle comporte des
prises à deux ou trois broches, afin de pouvoir la
raccorder au câble d'alimentation de l'adaptateur
CA/CC.
• Assurez-vous que rien ne repose sur le cordon
d'alimentation de l'adaptateur CA/CC et que ce cordon
n'est pas placé dans un endroit où l'on pourrait marcher
ou trébucher dessus.
Guide d'information sur le système 67
Page 70

www.dell.com | support.dell.com
• Si vous utilisez une barrette d'alimentation multiprise,
soyez prudent lorsque vous y raccordez le cordon de
l'adaptateur CA/CC. Certaines rampes d'alimentation
peuvent ne pas empêcher l'insertion d'une prise de
façon incorrecte. L'insertion incorrecte de la prise de
courant peut provoquer un dommage irréparable sur
votre ordinateur, ainsi qu'un risque de choc électrique
et/ou d'incendie. Assurez-vous que le contact de mise à
la terre de la prise de courant est inséré dans le contact
de mise à la terre correspondant de la rampe
d'alimentation.
Autres documents disponibles
• Les mises à jour de documentation, qui sont parfois fournies avec le
périphérique d'amarrage et qui décrivent les modifications apportées
au périphérique d'amarrage ou au logiciel. Prenez le temps de lire
systématiquement ces mises à jour avant de consulter d'autres
documentations, car elles contiennent souvent les informations
les plus récentes.
• La documentation relative aux options que vous avez acquises
séparément. Cette documentation contient des informations
nécessaires à la configuration et à l'installation de ces options
sur votre périphérique d'amarrage.
Obtenir de l'aide
Dell fournit un certain nombre d'outils qui vous aideront si votre
périphérique d'amarrage ne fonctionne pas de la manière escomptée.
Pour obtenir des informations relatives à ces outils d'aide, reportez-vous
à la section intitulée « Obtention de l'aide » dans votre Guide d'utilisation
en ligne.
68 Guide d'information sur le système
Page 71

Présentation du périphérique
d'amarrage
REMARQUE : Prenez contact avec votre administrateur réseau avant de
connecter le périphérique d'amarrage à un réseau.
Vous devez brancher un adaptateur CA/CC sur le périphérique d'amarrage
avant d'amarrer l'ordinateur au périphérique d'amarrage et d'allumer
l'ordinateur. L'adaptateur CA/CC alimente simultanément le périphérique
d'amarrage et l'ordinateur. Toute batterie installée sur l'ordinateur se
recharge pendant que vous utilisez le périphérique d'amarrage.
AVIS : Utilisez exclusivement l'adaptateur CA/CC Dell PA-6 livré avec ce
périphérique d'amarrage. En cas d'utilisation de tout autre adaptateur CA/CC
disponible dans le commerce ou de l'adaptateur CA/CC d'un ancien modèle
d'ordinateur Dell, vous pouvez endommager le périphérique d'amarrage ou
l'ordinateur.
Panneau d'E/S du périphérique d'amarrage
Connecteur série Connecteurs USB (2)
Connecteur de
clavier PS/2
Connecteur
de souris PS/2
Connecteur vidéo
Connecteur réseau
Connecteur
parallèle
Connecteur
SCSI
Le tableau « Connecteurs d'E/S externes » présente les icônes de chaque
connecteur à l'arrière du périphérique d'amarrage et indique le type de
périphérique externe pouvant être branché à chaque connecteur.
Guide d'information sur le système 69
Page 72

www.dell.com | support.dell.com
Connecteurs d'E/S externes
Icône du
connecteur Description du connecteur
Un ou deux périphériques USB, une souris USB par exemple,
peuvent être connectés au double connecteur USB.
Un clavier externe de style PS/2 ou un pavé numérique
externe se connecte au connecteur de clavier PS/2.
Une souris externe de style PS/2 se connecte au connecteur
de souris PS/2.
Un périphérique série, tel qu'une souris série ou un modem
externe, se connecte au connecteur du port série.
Un câble d'interface réseau se connecte au connecteur NIC
(Network Interface Controller [contrôleur d'interface
réseau]).
Un périphérique parallèle, tel qu'une imprimante, se
connecte au connecteur du port parallèle.
Un moniteur externe se connecte au connecteur vidéo.
L'adaptateur CA/CC fourni avec le périphérique d'amarrage
se connecte au connecteur de l'adaptateur CA/CC.
Connecteurs audio et capteur infrarouge
Connecteur de
l'adaptateur
CA/CC
Connecteur de ligne
d'entrée/d'entrée audio
Connecteur
d'écouteurs/de haut-parleurs
70 Guide d'information sur le système
Capteur
infrarouge
Connecteur de microphone
Page 73

Commandes et voyants du panneau de contrôle de
l'amarrage
Emplacement pour
anneau de sécurité (pas
disponible sur tous les
périphériques)
Levier
d'éjection/verrouillage
Voyant d'accès à l'unité
Voyant d'alimentation
Emplacement pour
anneau de sécurité
Bouton
d'alimentation
Emplacement pour
cadenas
Position verrouillée
Position non
verrouillée
Position
d'éjection
Voyant
d'amarrage
Bouton de
demande de
déconnexion
Support de moniteur
AVIS : Le support accepte des moniteurs pouvant peser jusqu'à
45,3 kilogrammes. Des moniteurs plus lourds peuvent endommager
le support
, l'ordinateur et le périphérique d'amarrage.
Guide d'information sur le système 71
Page 74

Périphérique d'amarrage avec le support de moniteur
www.dell.com | support.dell.com
Support de
moniteur
Ordinateur Panneau de
REMARQUE : Assurez-vous que les pieds arrière du support du moniteur
s'enclenchent dans les emplacements prévus à cet effet de chaque côté du
panneau de contrôle de l'amarrage.
Périphérique
d'amarrage
contrôle de
l'amarrage
Avant d'amarrer l'ordinateur
Si votre ordinateur fonctionne sous Microsoft® Windows®9x,
Windows NT
commencer par rechercher les pilotes d'amarrage existants sur votre
ordinateur. Si votre ordinateur ne possède pas de pilotes d'amarrage,
procédez à leur installation préalablement au tout premier amarrage de
l'ordinateur. Pour installer les pilotes d'amarrage, suivez la procédure
indiquée dans la section « Installation des pilotes d'amarrage ».
72 Guide d'information sur le système
®
ou Windows Millennium Edition (Me), vous devez
Page 75

REMARQUE : Si votre ordinateur fonctionne sous Windows XP ou
Windows 2000
par conséquent pas besoin de suivre la procédure indiquée dans la section
, les pilotes s'installent automatiquement et vous n'avez
« Installation des pilotes d'amarrage ». Passez directement à la section
« Amarrage de l'ordinateur ».
Recherche de pilotes d'amarrage existants sur l'ordinateur
1 Double-cliquez sur My Computer (Poste de travail).
2 Double-cliquez sur Control Panel (Panneau de configuration).
3 Double-cliquez sur Add/Remove Programs (Ajout/Suppression de
programmes).
4 Recherchez les pilotes d'amarrage appropriés dans la liste des
programmes.
Si votre ordinateur fonctionne sous Windows 9x ou sous Windows Me,
recherchez le pilote portant la mention Quick Install dans son nom.
Par exemple : Dell Dock Quick Install pour Windows.
Si votre ordinateur fonctionne sous Windows NT, recherchez la mention
NT Softex Docking Services.
Si votre ordinateur ne possède pas de pilotes d'amarrage, passez à la section
suivante « Installation des pilotes d'amarrage ». Si votre ordinateur possède
des pilotes d'amarrage, passez à la section intitulée « Amarrage de
l'ordinateur ».
Installation des pilotes d'amarrage
Vous pouvez procéder à l'installation des pilotes d'amarrage de l'une des
façons suivantes :
• Installez les pilotes à partir du CD ResourceCD ou Pilotes et utilitaires
livré avec l'ordinateur ou le périphérique d'amarrage.
• Téléchargez les pilotes à partir du site Web d'assistance de Dell.
Guide d'information sur le système 73
Page 76

www.dell.com | support.dell.com
Installation des pilotes d'amarrage à partir du CD ResourceCD ou Pilotes et
utilitaires.
1 Insérez le CD ResourceCD ou Pilotes et utilitaires dans le lecteur
de CD.
La plupart du temps, le CD s'exécute automatiquement. Si ce n'est
pas le cas, démarrez l'Explorateur Windows, cliquez sur le répertoire
du lecteur de CD pour afficher le contenu du CD, puis double-cliquez
sur le fichier d'application autorcd. Si l'écran d'accueil apparaît,
cliquez sur Next (Suivant). La première fois que vous exécutez le CD,
il peut vous inviter à installer certains fichiers de configuration.
Cliquez sur OK et suivez les invites à l'écran pour continuer.
2 Dans le menu déroulant Language (Langue) de la barre d'outils,
sélectionnez une langue pour le pilote (si disponible).
Un écran d'accueil apparaît.
3 Cliquez sur Suivant.
4 Sous Search Criteria (critères de recherche), sélectionnez les
catégories appropriées dans les menus déroulants System
Model (modèle de système) et Operating System (Système
d'exploitation).
Si votre ordinateur fonctionne sous Windows 9x ou Windows Me,
sélectionnez System Utilities (Utilitaires système) dans le menu
déroulant Device Type (Type de périphérique), puis sélectionnez
Drivers (Pilotes) dans le menu déroulant Topic (Sujet).
Si votre ordinateur fonctionne sous Windows NT, sélectionnez
Utilitaires système dans le menu déroulant Type de périphérique, puis
sélectionnez Utilities (Utilitaires) dans le menu déroulant Sujet.
Un ou plusieurs liens apparaissent pour les pilotes ou les utilitaires
spécifiques utilisés par votre ordinateur.
5 Si votre ordinateur fonctionne sous Windows 9x ou Windows Me,
cliquez le lien pour l'utilitaire Dell Dock Quick Install.
Le fichier Dell Dock Quick Install désigne un utilitaire qui installe les
pilotes d'amarrage correspondants sur votre ordinateur.
Si votre ordinateur fonctionne sous Windows NT, cliquez sur le lien pour
l'utilitaire Softex Docking Services.
74 Guide d'information sur le système
Page 77

6 Cliquez sur le bouton Install (Installer) pour lancer l'installation
automatique. Lorsque l'écran d'accueil apparaît, suivez les invites pour
exécuter l'installation.
REMARQUE : Sur certains CD ResourceCD, vous devez parcourir les
dossiers afin de trouver le pilote approprié. Pour obtenir des instructions
complètes sur la réinstallation de pilotes, reportez-vous au Guide d'utilisation.
Installation des pilotes d'amarrage à partir du site Web d'assistance de Dell
1 Ouvrez la page de support du site Web de Dell à l'adresse
support.dell.com. Si c'est la première fois que vous visitez ce site Web,
cliquez sur votre région sous Choose a region (sélectionnez une
région) et cliquez sur Go (Lancer la recherche).
2 Suivez les instructions qui s'affichent à l'écran.
3 Entrez les informations propres à votre périphérique d'amarrage, puis
cliquez sur Go! (Aller !).
4 Cliquez sur Downloads (téléchargments).
La fenêtre Downloads For Your Dell (téléchargements pour votre
ordinateur Dell) apparaît. Elle comporte un petit formulaire que vous
devez remplir.
5 Sélectionnez votre système d'exploitation et sa version linguistique.
6 Sélectionnez System and Configuration Utilities (utilitaires système
et utilitaires de configuration) comme catégorie de téléchargement.
7 Cliquez sur Aller !.
8 Si votre ordinateur fonctionne sous Windows 9x ou Windows Me,
recherchez le lien pour l'utilitaire Dell Dock QuickInstall et cliquez
dessus.
Si votre ordinateur fonctionne sous Windows NT, recherchez le lien pour
l'utilitaire Softex Docking Services et cliquez dessus.
9 Suivez les instructions affichées à l'écran pour télécharger et installer
les pilotes correspondants.
Après avoir téléchargé les fichiers et avant d'installer les pilotes,
consultez le fichier readme.txt téléchargé afin de disposer
d'informations essentielles sur l'installation.
Guide d'information sur le système 75
Page 78

Amarrage de l'ordinateur
Si vous connectez un moniteur au périphérique d'amarrage et que vous
allumez le moniteur, une image s'affiche sur l'écran de ce moniteur. Pour
passer de cette image à l'affichage de l'ordinateur ou à l'affichage à la fois
du moniteur et de l'ordinateur, appuyez sur les touches <Fn<F8>.
Lorsque vous amarrez l'ordinateur au périphérique d'amarrage et que vous
allumez l'ordinateur, le voyant d'alimentation vert du panneau de contrôle
de l'amarrage s'allume (reportez-vous à la section intitulée « Commandes et
voyants du panneau de contrôle de l'amarrage »).
www.dell.com | support.dell.com
AVIS : Pour éviter toute perte de données, enregistrez tout fichier ouvert
avant de procéder à l'amarrage de l'ordinateur.
AVIS : Si la carte vidéo PCI est installée dans le périphérique d'amarrage
éteignez l'ordinateur avant de procéder à tout amarrage ou déconnexion afin
d'éviter toute perte de données.
1
Enregistrez et fermez tous les fichiers, quittez toutes les applications,
quittez le système d'exploitation et éteignez l'ordinateur.
AVIS : Pour éviter d'endommager le connecteur d'amarrage, ouvrez la trappe
du panneau d'amarrage préalablement à toute tentative d'amarrage de
l'ordinateur au périphérique d'amarrage.
2
Ouvrez la trappe du panneau d'amarrage située à l'arrière de
l'ordinateur, le cas échéant.
,
76 Guide d'information sur le système
Page 79

Trappe du panneau d'amarrage de l'ordinateur
Ordinateur
Trappe du panneau
d'amarrage (n'existe pas
sur tous les ordinateurs)
3
Si vous utilisez le périphérique d'amarrage avec un support de
moniteur, fermez l'écran de l'ordinateur.
4 Assurez-vous que le levier d'éjection/verrouillage est en position de
déverrouillage.
Guide d'information sur le système 77
Page 80

www.dell.com | support.dell.com
5 Amarrez l'ordinateur au périphérique d'amarrage en procédant comme
indiqué ci-dessous.
Amarrage de l'ordinateur
Connecteur
d'amarrage
Rails d’alignement (2)
a Centrez l'ordinateur horizontalement sur le socle du périphérique
d'amarrage, l'arrière de l'ordinateur vers le connecteur d'amarrage
du périphérique, comme indiqué dans la section « Amarrage de
l'ordinateur ».
b Faites glisser l’ordinateur vers le connecteur jusqu’à ce que vous
sentiez les rainures situées sous l’ordinateur s’enclencher dans les
rails d’alignement.
AVIS : Si vous tentez de pousser l'ordinateur complètement dans le
périphérique d'amarrage sans l'enclencher dans les rails d'alignement, vous
risquez d'endommager de façon irréparable le connecteur d'amarrage de
l'ordinateur.
AVIS : Ne soulevez pas l'ordinateur ni le périphérique d'amarrage séparément
lorsqu'ils sont amarrés, car vous risquez d'endommager les connecteurs de
l'ordinateur et du périphérique d'amarrage.
AVIS : En cas d'utilisation d'un moniteur avec un support
du support avant de mettre en place le panneau de contrôle de l'amarrage.
c Poussez doucement l’ordinateur vers l’avant jusqu’à ce que le
connecteur d’amarrage soit totalement enclenché.
78 Guide d'information sur le système
, retirez le moniteur
Page 81

Tout premier amarrage sous Windows XP et Windows 2000
1 Amarrez l'ordinateur et mettez-le sous tension.
2 Appuyez sur la touche <F2> au cours de la procédure d'amorçage du
système pour afficher le programme de configuration du système.
3 Définissez Docking IRQ (IRQ d'amarrage) sur Optimisé.
4 Définissez Connexion universelle sur Activée.
5 Quittez le programme de configuration du système.
Votre système poursuivra la procédure d'amorçage.
Sous Windows 2000, l'Assistant Ajout de nouveau matériel s'affiche.
REMARQUE : Sous Windows XP, le système d'exploitation installe
automatiquement les pilotes en arrière-plan. Sous Windows 2000, l'Assistant
Ajout de nouveau matériel installe automatiquement les pilotes.
REMARQUE : Sous Windows XP et Windows 2000, pour réinstaller des
pilotes ou assurer l'installation des meilleurs pilotes, consultez la section
« Mise à jour des pilotes sous Windows XP, Windows 2000 ou Windows Me »
plus loin dans ce document.
Tout premier amarrage sous Windows Me
1 Amarrez l'ordinateur et mettez-le sous tension.
2 Appuyez sur la touche <F2> au cours de la procédure d'amorçage du
système pour afficher le programme de configuration du système.
3 Définissez Docking IRQ (IRQ d'amarrage) sur Optimized
(Optimisé).
4 Définissez Universal Connect (Connexion universelle) sur Enabled
(Activée).
5 Quittez le programme de configuration du système.
Votre système poursuivra la procédure d'amorçage.
L’ Add New Hardware Wizard (Assistant Ajout de nouveau matériel)
s'affiche.
6 Sélectionnez Search for the Best Driver for Your Device
(Recommended) [Rechercher le meilleur pilote pour votre
périphérique (Recommandé)] et cliquez sur Suivant.
Guide d'information sur le système 79
Page 82

7 Cliquez sur Suivant.
8 Suivez les indications figurant dans la fenêtre Assistant Ajout de
nouveau matériel.
9 À chaque invite, sélectionnez Rechercher le meilleur pilote pour votre
périphérique (Recommandé) et cliquez sur Suivant.
10 Continuez à suivre les indications pour terminer l'installation.
Le bureau Windows s'affiche et l'installation est terminée.
Tout premier amarrage sous Windows NT 4.0
www.dell.com | support.dell.com
1 Amarrez l'ordinateur et mettez-le sous tension.
2 Appuyez sur la touche <F2> au cours de la procédure d'amorçage du
système ou appuyez sur <Fn><F1> une fois l'ordinateur démarré
pour accéder au programme de configuration du système.
3 Définissez IRQ d'amarrage sur Optimisé.
4 Définissez Connexion universelle sur Activée.
5 Quittez le programme de configuration du système.
6 Appuyez sur les touches <Ctrl><Alt><Suppr> pour ouvrir une
session.
La fenêtre Docking Station Setup (configuration de la station
d'accueil) s'affiche et indique que l'ordinateur doit être déconnecté
pour pouvoir continuer.
7 Cliquez sur OK et patientez pendant que l'ordinateur s'éteint.
8 Déconnectez l'ordinateur (reportez-vous à la section « Déconnexion de
l'ordinateur »).
L'ordinateur redémarre automatiquement. Dans le cas contraire,
rallumez-le manuellement.
9 Sélectionnez OK lorsque la fenêtre Device Removal (retrait du
périphérique) s'affiche.
10 Cliquez sur le bouton Start (Démarrer), puis sur Shut Down
(Arrêter).
80 Guide d'information sur le système
Page 83

11 Patientez 0pendant que l'ordinateur s'éteint complètement et
réamarrez l'ordinateur au périphérique d'amarrage.
L'ordinateur redémarre automatiquement. Dans le cas contraire,
rallumez-le manuellement.
12 Appuyez sur les touches <Ctrl><Alt><Suppr> pour ouvrir une
session.
L'ordinateur détecte automatiquement le nouveau périphérique.
13 À chaque invite, sélectionnez Install System Provided Driver for the
Selected Device (Recommended) [Installer le pilote fourni pour le
système destiné au périphérique sélectionné (recommandé)] et
cliquez sur OK.
14 Cliquez sur Continue (continuer) lorsque la fenêtre Windows NT
Setup (Installation de Windows NT) s'affiche.
15 Sélectionnez Installer le pilote fourni pour le système destiné au
périphérique sélectionné (recommandé) et cliquez sur OK.
16 Sélectionnez le nom de votre NIC (Network Interface Controller
[Contrôleur d'interface réseau]) dans le menu déroulant.
17 Indiquez si la carte réseau doit obtenir une adresse IP auprès d'un
serveur ou si une adresse IP doit être spécifiée.
En cas d'hésitation, consultez votre administrateur système.
18 Suivez les indications pour terminer l'installation.
Le bureau Windows s'affiche et l'installation est terminée.
L'ordinateur ne peut pas entrer en mode suspension sur disque pendant
qu'il est amarré.
Tout premier amarrage sous Windows 98
1 Amarrez l'ordinateur et mettez-le sous tension.
2 Appuyez sur la touche <F2> au cours de la procédure d'amorçage du
système ou appuyez sur <Fn><F1> une fois l'ordinateur démarré
pour accéder au programme de configuration du système.
3 Définissez IRQ d'amarrage sur Optimisé.
4 Définissez Connexion universelle sur Activée.
Guide d'information sur le système 81
Page 84

www.dell.com | support.dell.com
5 Quittez le programme de configuration du système.
6 Si la fenêtre Configuration Setup (Définir la configuration) s'affiche,
cliquez sur OK.
L'Assistant Ajout de nouveau matériel s'affiche.
7 Cliquez sur Suivant.
8 Sélectionnez Rechercher le meilleur pilote pour votre périphérique
(Recommandé] et cliquez sur Suivant.
9 Désélectionnez toutes les options et cliquez sur Suivant.
Une fenêtre, indiquant que Windows est prêt à rechercher le meilleur
pilote pour votre périphérique, s'affiche.
10 Suivez les indications figurant dans la fenêtre Assistant Ajout de
nouveau matériel.
11 À chaque invite, sélectionnez Rechercher le meilleur pilote pour votre
périphérique (Recommandé) et cliquez sur Suivant.
12 Continuez à suivre les indications pour terminer l'installation.
Le bureau Windows s'affiche et l'installation est terminée.
Tout premier amarrage sous Windows 95
1 Amarrez l'ordinateur et mettez-le sous tension.
2 Appuyez sur la touche <F2> au cours de la procédure d'amorçage du
système ou appuyez sur <Fn><F1> une fois l'ordinateur démarré
pour accéder au programme de configuration du système.
3 Définissez IRQ d'amarrage sur Optimisé.
4 Définissez Connexion universelle sur Activée.
5 Quittez le programme de configuration du système.
L'ordinateur détecte automatiquement le nouveau périphérique.
6 Cliquez sur Yes (Oui) lorsque la fenêtre System Settings Change
(Modification des paramètres système) s'affiche.
L'ordinateur redémarre et détecte automatiquement le nouveau
périphérique.
82 Guide d'information sur le système
Page 85

7 Si la fenêtre Définir la configuration s'affiche, cliquez sur OK.
8 Cliquez sur OK lorsque la fenêtre Network (Réseau) s'affiche.
9 Sélectionnez l'onglet Identification dans la fenêtre Réseau suivante.
10 Saisissez un Computer Name (Nom d'ordinateur) et un Workgroup
(Groupe de travail) identifiant l'ordinateur sur le réseau, puis cliquez
sur Close (Fermer).
Si vous n'êtes pas sûr du Nom d'ordinateur et du Groupe de travail à
saisir, contactez votre administrateur système.
REMARQUE : Vous devez saisir un Nom d'ordinateur et un Groupe de travail
pour procéder à l'installation des pilotes.
L'ordinateur copie automatiquement les fichiers et crée une base de
données sur les pilotes.
11 Cliquez sur Oui lorsque la fenêtre Modification des paramètres
système s'affiche.
L'ordinateur redémarre.
La fenêtre Enter Network Password (Saisir un mot de passe réseau)
s'affiche. Si vous ne souhaitez pas définir un nom d'utilisateur et un
mot de passe à ce stade ou si votre administrateur système ne vous les
a pas encore fournis, cliquez sur Cancel (Annuler).
L'ordinateur détecte automatiquement le nouveau périphérique.
12 Cliquez sur OK lorsque la fenêtre Définir la configuration s'affiche.
Le bureau Windows s'affiche et l'installation est terminée.
REMARQUE : Pour pouvoir utiliser les connecteurs USB, vous devez
installer un supplément USB figurant sur le CD ResourceCD, dans le répertoire
Win95\OSUpdate. Si vous installez ce supplément USB
plus entrer en mode suspension. Dell vous recommande de ne pas installer de
supplément USB sauf si vous envisagez d'utiliser des périphériques USB.
, l'ordinateur ne peut
Guide d'information sur le système 83
Page 86

www.dell.com | support.dell.com
Mise à jour des pilotes sous Windows XP et Windows 2000
Pour mettre à jour les pilotes sous Windows XP et Windows 2000 :
1 Cliquez avec le bouton droit sur Poste de travail et cliquez sur
Manage (Gérer). (Sous Windows XP, cliquez sur le bouton Démarrer
pour accéder au Poste de travail. Sous Windows 2000, le Poste de
travail se trouve sur le bureau Windows.)
2 Dans la fenêtre Computer Management (Gestion de l'ordinateur),
cliquez sur Device Manager (Gestionnaire de périphériques), puis
double-cliquez sur Network adapters (Cartes réseau).
3 Double-cliquez sur 3Com 3C920 Integrated Fast Ethernet Controller
(contrôleur Fast Ethernet intégré 3Com 3C920).
4 Cliquez sur l'onglet Driver (Pilote).
5 Cliquez sur Update Driver... (Mettre à jour le pilote…). et suivez les
invites à l'écran.
Mise à jour des pilotes sous Windows Me
Pour mettre à jour les pilotes sous Windows Me :
1 Cliquez avec le bouton droit sur Poste de travail, sur le bureau, puis
cliquez sur Propriétés.
2 Dans la fenêtre System Properties (Propriétés système), cliquez sur
l'onglet Gestionnaire de périphériques, puis double-cliquez sur Cartes
réseau.
3 Double-cliquez sur 3Com 3C920 Integrated Fast Ethernet Controller
(Contrôleur Fast Ethernet intégré 3Com 3C920).
4 Cliquez sur l'onglet Pilote.
5 Cliquez sur Mettre à jour le pilote... et suivez les invites à l'écran.
84 Guide d'information sur le système
Page 87

Déconnexion de l'ordinateur
Levier d'éjection/
verrouillage
AVIS : Si l'ordinateur n'est pas alimenté par une batterie, l'ordinateur
s'éteindra lorsque vous le déconnecterez
seront perdues.
AVIS : Ne déconnectez jamais un ordinateur sans avoir préalablement
préparé l'ordinateur en conséquence. Si vous déconnectez l'ordinateur sans
l'y avoir préalablement préparé
l'ordinateur risque de ne pas reprendre un fonctionnement normal pendant
plusieurs minutes
, voire plus du tout.
, vous allez perdre toutes vos données et
et toutes les données non enregistrées
Pour préparer l'ordinateur pour la déconnexion, suivez l'une des procédures
ci-dessous.
• Appuyez sur <Fn><Echap> sur le clavier de l'ordinateur (ou sur
<Arrêt Défil.><Echap> sur un clavier externe).
Patientez pendant quelques secondes, jusqu'à ce que le voyant
d'alimentation de l'ordinateur s'éteigne.
Guide d'information sur le système 85
Page 88

• Sous Windows XP, cliquez sur le bouton Démarrer, puis sur Undock
Computer (Déconnecter l'ordinateur).
Sous Windows 95, Windows 98, Windows Me ou Windows 2000, cliquez
sur le bouton Démarrer, puis sur Eject PC (Éjecter le PC).
Sous Windows NT, cliquez sur l'icône d'amarrage de la barre des tâches,
puis cliquez sur Undock (déconnecter) pour placer l'ordinateur en
mode suspension.
Patientez pendant quelques secondes, jusqu'à ce que le voyant
d'alimentation de l'ordinateur s'éteigne.
www.dell.com | support.dell.com
• Appuyez sur le bouton de demande de déconnexion sur le panneau
de contrôle de l'amarrage (reportez-vous à la figure « Commandes et
voyants du panneau de contrôle de l'amarrage »). Patientez pendant
que le voyant d'amarrage vert s'éteint.
Remplacement de la batterie
Votre périphérique d'amarrage utilise une batterie au lithium-ion. La durée
de vie de cette batterie au lithium-ion est telle qu'il est fort probable que
vous n'ayez jamais besoin de la remplacer. Si vous êtes toutefois amené à la
remplacer, procédez comme indiqué ci-dessous.
PRÉCAUTION : Une nouvelle batterie mal installée risque
d'exploser. Remplacez la batterie uniquement par une batterie de
type identique ou équivalent à celui recommandé par le fabricant.
Jetez les batteries usagées selon les instructions données par le
fabricant.
Déconnectez l'ordinateur du périphérique d'amarrage, comme décrit
1
dans la section « Déconnexion de l'ordinateur ».
2 Éteignez le bouton d'alimentation du périphérique d'amarrage et
débranchez l'adaptateur CA/CC.
3 Retirez le capot supérieur en appuyant sur les deux boutons latéraux et
en faisant pivoter le capot vers l'arrière de la station d'accueil (reportezvous à la section « Retrait du capot supérieur »). Lorsque le capot est à
la verticale, débloquez les ergots à charnière et retirez complètement le
capot.
86 Guide d'information sur le système
Page 89

Retrait du capot supérieur
C
apot supérieur
Boutons
latéraux (2)
Ergots à
charnière (2)
Cartes PCI (2)
4
Retirez toutes les cartes présentes dans les emplacements d'extension.
Guide d'information sur le système 87
Page 90

www.dell.com | support.dell.com
Remplacement de la batterie
Batterie
Emplacements
d'extension (2)
5
Soulevez légèrement l'ergot de fixation de la batterie et retirez la
batterie de son support.
6 Tenez la nouvelle batterie avec la face portant la mention « + »
orientée vers le haut. Insérez ensuite la batterie dans le support
et relâchez l'ergot de fixation.
Support de
batterie
Ergot de
fixation de
la batterie
Ne jetez pas la batterie usagée avec les ordures ménagères. Contactez
service municipal de traitement des déchets pour connaître l'adresse du
site de dépôt de batteries le plus proche de votre domicile.
Retrait et installation d'une carte
d'extension PCI
Pour installer une carte d'extension PCI (Peripheral Component
Interconnect) dans le périphérique d'amarrage, procédez comme suit.
REMARQUE : N'insérez pas de cartes d'extension PCI de 3,3 ou 5 volts d'une
taille supérieure à 25,4 centimètres (cm) dans l'emplacement supérieur et
d'une taille supérieure à 15,5 cm dans l'emplacement inférieur.
88 Guide d'information sur le système
Page 91

AVIS : Ne touchez ni ne manipulez aucun élément à l'intérieur du
périphérique d'amarrage mis à part les objets mentionnés dans la procédure
ci-après. Si vous touchez d'autres objets, vous risquez d'endommager le
périphérique d'amarrage et d'annuler la garantie.
Enregistrez et fermez tous les fichiers, quittez toutes les applications
1
et quittez le système d'exploitation.
2 Éteignez l'ordinateur.
3 Retirez le moniteur de son support. Retirez le support du moniteur
du périphérique d'amarrage.
4 Déconnectez votre ordinateur et assurez-vous que le levier
d'éjection/verrouillage est en position de déverrouillage.
5 Déconnectez tous les câbles, y compris le câble de l'adaptateur
CA/CC, du périphérique d'amarrage. Assurez-vous que le levier
d'éjection/verrouillage n'est pas en position arrière/verrouillage.
6 Appuyez sur le loquet du couvercle de l'emplacement d'extension PCI
et retirez-le. Reportez-vous à la figure suivante.
Couvercle de l'emplacement d'extension PCI et connecteur
de carte d'extension
Couvercle de
l'emplacement
d'extension PCI
Guide d'information sur le système 89
Page 92

www.dell.com | support.dell.com
7 Retirer le capot supérieur en appuyant sur les deux boutons latéraux
et en faisant pivoter le capot vers la partie arrière du périphérique
d'amarrage. Lorsque vous avez fait pivoter le capot vers l'arrière,
débloquez les ergots à charnière de l'arrière du périphérique d'amarrage
et retirez complètement le capot.
Reportez-vous à la figure « Retrait du capot supérieur ».
8 Retirez la vis retenant le support de montage vide et mettez-la de côté
pour l'utiliser plus tard.
Retirez le support de montage vide. Si une carte PCI est installée,
retirez-la en la saisissant par les angles extérieurs et en la faisant glisser
délicatement hors du connecteur.
9 Installez une carte d'extension PCI.
a Insérez fermement le connecteur de bord de carte dans le
connecteur de carte d'extension.
b Poussez doucement la carte dans le connecteur jusqu'à ce qu'elle
soit bien en place.
10 Revissez la vis dans le support de carte PCI pour fixer la carte PCI.
11 Remettez le capot supérieur en place en enclenchant tout d'abord les
languettes de charnière et en abaissant délicatement le capot supérieur
pour le mettre en place. Le capot supérieur est correctement aligné
lorsque vous entendez un clic vous avertissant que les boutons latéraux
sont en place.
12 Reconnectez les câbles, y compris le câble de l'adaptateur CA/CC,
déconnectés lors de l'étape 5.
13 Connectez l'ordinateur.
14 Remettez le support de moniteur sur le périphérique d'amarrage et le
moniteur sur le support.
15 Allumez l'ordinateur.
16 Installez les pilotes pour la carte PCI.
Si vous avez reçu une carte réseau pour adaptateur PCI 16/4 TokenRing avec le périphérique d'amarrage, Dell a inclus un CD-ROM
contenant les pilotes et des instructions d'installation.
90 Guide d'information sur le système
Page 93

REMARQUE : Si vous installez des pilotes de réseau pour une carte réseau
pour adaptateur PCI 16/4 Token-Ring, connectez l'ordinateur au réseau avant
d'installer les pilotes. Prenez contact avec votre administrateur réseau avant de
connecter le périphérique d'amarrage à un réseau.
Si vous utilisez une carte PCI qui n'a pas été achetée chez Dell, utilisez
les pilotes et les instructions fournis avec cette carte.
REMARQUE : La carte réseau pour adaptateur PCI 16/4 Token-Ring
installée par Dell a été testée afin de pouvoir être utilisée avec la station
d'accueil C/Dock II. Bien qu'il vous soit possible d'installer d'autres cartes
d'extension PCI, Dell ne saurait garantir leur fonctionnement.
Utilisation de la baie de périphériques
C/Dock II
Vous pouvez utiliser un périphérique multimédia quelconque provenant
de votre ordinateur (un lecteur de disquettes ou de CD) dans la baie des
périphériques de la station d'accueil C/Dock II.
AVIS : Pour éviter d'endommager le périphérique d'amarrage ou le
périphérique multimédia, n'installez aucun périphérique que vous n'utilisez
pas habituellement dans votre ordinateur dans la baie des périphériques.
AVIS : Pour éviter d'endommager le périphérique d'amarrage, n'installez
pas le module de voyage ni la batterie provenant de l'ordinateur portable
Dell Latitude dans la baie des périphériques.
Pour installer un périphérique multimédia de l'ordinateur dans la baie des
périphériques du périphérique d'amarrage, suivez la procédure ci-après.
REMARQUE : Le levier d'éjection/verrouillage doit être dans la position de
déverrouillage avant que vous puissiez installer un périphérique multimédia.
Enregistrez et fermez tous les fichiers, quittez toutes les applications
1
et quittez le système d'exploitation.
2 Éteignez l'ordinateur.
3 Retirez tous les périphériques multimédias de la baie des
périphériques du périphérique d'amarrage.
Appuyez sur le bouton d'éjection de la baie des périphériques
(reportez-vous à la section « Installation d'un périphérique multimédia
dans la baie de périphériques »). Une fois le périphérique
partiellement sorti de la baie des périphériques, retirez- le
délicatement.
Guide d'information sur le système 91
Page 94

www.dell.com | support.dell.com
Installation d'un périphérique multimédia dans la baie des
périphériques
Périphérique
multimédia
Bouton d'éjection de la
baie des périphériques
4
Insérez le périphérique multimédia désiré dans la baie des
périphériques du périphérique d'amarrage (reportez-vous à la figure
« Installation d'un périphérique multimédia dans la baie des
périphériques »).
5 Insérez fermement le périphérique.
Si vous installez le périphérique correctement, vous devez entendre
un clic.
Si vous n'installez pas le périphérique correctement, il sera branlant à
l'intérieur de la baie des périphériques. Réinstallez le périphérique.
6 Allumez l'ordinateur.
Installation d'un périphérique multimédia sous Microsoft
Windows NT 4.0 avec l'utilitaire Softex Docking Services
Avec l'utilitaire Softex Docking Services, Windows NT permet de changer
à chaud les périphériques dans la baie des périphériques. Pour plus
d'informations reportez-vous à la section «Windows NT: Amarrage avec
Softex Docking Services » et au Guide d'utilisation de Softex Docking
Services à l'adresse http://support.dell.com.
92 Guide d'information sur le système
Page 95

Fixation de la station d'accueil C/Dock
Caractéristiques de sécurité
Le périphérique d'amarrage possède les caractéristiques de sécurité
suivantes :
• Un levier d'éjection/verrouillage qui vous permet de fixer et d'éjecter
votre ordinateur. La position arrière fixe l'ordinateur à la station
d'accueil C/Dock II. La position du milieu vous permet d'utiliser
le périphérique d'amarrage sans le fixer. La position avant permet
d'éjecter l'ordinateur du périphérique d'amarrage. Mettez le levier
d'éjection/verrouillage en position arrière pour utiliser le cadenas et
l'emplacement de l'anneau de sécurité.
• Un loquet à ressort situé à l'avant du panneau qui s'ajuste dans un
emplacement de sécurité sous l'ordinateur fixe l'ordinateur au panneau
de contrôle de l'amarrage. Tous les ordinateurs portables Dell ne
comportent pas d'emplacement de sécurité.
• Un capot supérieur sécurisé qui empêche le retrait de la carte PCI
(Peripheral Card Interconnect).
• Un bouton d'éjection de la baie des périphériques sécurisé qui
empêche le retrait des périphériques de la baie des périphériques.
• Un loquet d'accrochage immobilisé pour décourager le retrait de
l'ordinateur sans autorisation.
Fixation de la station d'accueil C/Dock II
Pour fixer le périphérique d'amarrage, utilisez l'une des méthodes ci-après :
• Utilisez un cadenas seul ou un cadenas relié à un câble de sécurité
à boucle dans l'emplacement de cadenas (voir la figure 1 dans
« Commandes et voyants du panneau de contrôle l'amarrage »)
sur le périphérique d'amarrage.
Un cadenas seul bloque le levier d'éjection et complique le retrait de
l'ordinateur du périphérique d'amarrage.
Un câble de sécurité à boucle enroulé autour d'un objet stationnaire et
utilisé conjointement avec le cadenas peut empêcher le déplacement
de l'ordinateur et de la station d'accueil C/Dock II sans autorisation.
Guide d'information sur le système 93
Page 96

• Installez un dispositif antivol vendu dans le commerce dans
l'emplacement du verrou de sécurité (voir la figure 1 dans
« Commandes et voyants du panneau de contrôle l'amarrage »)
sur le périphérique d'amarrage.
Des dispositifs antivol pour ordinateurs portables sont généralement
composés d'un câble galvanisé avec un dispositif de fermeture et une
clé associée. Dell vous recommande d'utiliser un verrou Kensington.
Des instructions détaillées sur l'installation de ce type de dispositif
antivol sont généralement fournies avec le dispositif.
www.dell.com | support.dell.com
Diagnostics Dell
Les Diagnostics Dell qui ont été livrés avec votre ordinateur Dell Latitude
comprennent les tests qui vous aident à dépanner les contrôleurs de votre
périphérique d'amarrage.
Les sous-tests du groupe de tests Network Interface (Interface de réseau)
des diagnostics Dell vérifient le fonctionnement de base du contrôleur de
réseau dans le périphérique d’amarrage. Ils testent les fonctions internes
du contrôleur, y compris l'accès en écriture et en lecture à ses registres et
la capacité interne de transmission et de réception (rebouclage).
Les sous-tests du groupe de tests Serial/Infrared Ports (Ports
série/infrarouge) vérifient l'interface entre du périphérique d’amarrage et
les périphériques externes (une souris ou imprimante série par exemple).
Les sous-tests de ce groupe de tests ne sont pas destinés à être utilisés
comme tests de diagnostic pour le périphérique externe lui-même.
Les sous-tests du groupe de tests USB (Universal Serial Bus ([Bus série
universel]) vérifient l'interface entre du périphérique d’amarrage et les
périphériques externes (une souris par exemple). Les sous-tests de ce
groupe de tests ne sont pas destinés à être utilisés comme tests de
diagnostic pour le périphérique externe lui-même.
Pour des instructions complémentaires sur l'utilisation des diagnostics Dell,
reportez-vous au Guide d’utilisation de votre ordinateur.
94 Guide d'information sur le système
Page 97

Caractéristiques techniques
Caractéristiques techniques
Caractéristiques physiques
Hauteur :
Avec support de moniteur 10,9 cm (4,3 pouces)
Autonome 10,9 cm (4,3 pouces)
Profondeur :
Avec support de moniteur 50 cm (19,7 pouces)
Autonome 47 cm (18,5 pouces)
Largeur :
Avec support de moniteur 43,5 cm (17,1 pouces)
Autonome 42 cm (16,5 pouces)
Poids :
Avec support de moniteur 5,5 kg (12 livres)
Autonome 4,1 kg (9 livres)
Alimentation
Tension d'entrée de l'adaptateur
CA/CC :
Tension 100–240 VAC, 50–60 Hz
Intensité de courant 3,5–4,5 A
Tension d'entrée de la station
d'accueil C/Dock II :
Tension requiert 20 VDC de l'adaptateur CA/CC
Intensité de courant 3,5 A
E/S
Série (DTE) connecteur tampon 16 octets,
compatible 16550
Parallèle connecteur unidirectionnel, bidirectionnel
ou ECP
PS/2 deux connecteurs mini-DIN
USB deux connecteurs compatibles USB
Guide d'information sur le système 95
Page 98

www.dell.com | support.dell.com
Caractéristiques techniques
Infrarouge port infrarouge compatible aux normes
IrDA 1.1 (IR Rapide) et 1.0
Ligne de sortie audio jack d'entrée de microphone ; prise jack
d'entrée ligne/entrée audio pour les
périphériques d'enregistrement/lecture) ; prise
jack de sortie ligne audio (pour le casque)
SCSI connecteur D miniature à 50 broches Ultra
SCSI
Vidéo un connecteur
Réseau un connecteur RJ45
Amarrage (pour la connexion à
un connecteur
l'ordinateur)
Contrôleur de réseau
Ethernet
Jeu de puces 3Com
®
3C920 ; 10/100 BASE-TX
(conforme PC99)
Largeur du bus de données interface de bus de l'hôte PCI de 32 bits
IRQ IRQ10
Contrôleur SCSI
Jeu de puces Adaptec AIDC 7880C
Largeur du bus de données Bus SCSI de 8 bits ; interface de bus de l'hôte
PCI de 32 bits
Débit de données 20 Mo/s
IRQ IRQ10
96 Guide d'information sur le système
Page 99

Réglementations
Une interférence électromagnétique (EMI, Electromagnetic Interference)
est un signal ou une émission, véhiculé(e) dans l'espace libre ou par des
conducteurs électriques ou de signaux, qui peut mettre en danger le
fonctionnement d'une radionavigation ou autre service de sécurité ou
sérieusement dégrader, obstruer ou interrompre à maintes reprises un
service de communications radio autorisé. Les services de communications
radio incluent, de manière non limitative, les services de radiodiffusion
commerciale AM/FM, la télévision, les services de téléphonie cellulaire,
la radiodétection, le contrôle de la circulation aérienne, les récepteurs de
radiomessagerie et les systèmes GSM. Ces services autorisés, ainsi que les
éléments rayonnants parasites involontaires tels que les dispositifs
numériques, y compris les ordinateurs, contribuent à l'environnement
électromagnétique.
La compatibilité électromagnétique (CEM) est la capacité des
éléments d'un équipement électronique à interagir correctement dans
l'environnement électronique. Bien que cet ordinateur ait été conçu dans le
respect de cette compatibilité et soit conforme aux seuils fixés en matière
d'interférences électromagnétiques par l'organisme de réglementation, il n'y
a aucune garantie concernant les interférences susceptibles de se produire
sur une installation particulière. Si l'équipement crée effectivement des
interférences avec des services de communications radio (ce qui peut être
déterminé en l'éteignant et en l'allumant), l'utilisateur est encouragé à
essayer de corriger ce phénomène en prenant l'une ou l'ensemble des
mesures suivantes :
• Changer l'orientation de l'antenne de réception.
• Repositionner l'ordinateur en fonction du récepteur.
• Éloigner l'ordinateur du récepteur.
• Brancher l'ordinateur sur une autre prise, pour faire en sorte que
l'ordinateur et le récepteur se trouvent sur différents circuits de
dérivation.
Guide d'information sur le système 97
Page 100

www.dell.com | support.dell.com
Si nécessaire, consulter un membre de l'équipe du support technique de
Dell ou un technicien radio/télévision expérimenté pour des suggestions
supplémentaires.
Les ordinateurs Dell sont conçus, testés et classés pour l'environnement
électromagnétique dans lequel il est prévu de les utiliser. Ces classifications
font généralement référence aux définitions harmonisées suivantes :
• Classe A : environnements professionnels ou industriels.
• Classe B : environnements résidentiels.
Les équipements informatiques, y compris les périphériques, cartes
d'extension, imprimantes, périphériques d'entrée/sortie (E/S), moniteurs,
etc., qui sont intégrés ou connectés à l'ordinateur doivent appartenir à la
même classification CEM que l'ordinateur.
Remarque sur les câbles de signal blindés : N'utilisez que des câbles
blindés pour connecter les périphériques aux dispositifs Dell, afin de
réduire la possibilité d'interférence avec les services de communications
radio. L'utilisation de câbles blindés permet de rester dans la classification
CEM pour l'environnement prévu. Dell propose un câble pour les
imprimantes utilisant le port parallèle. Si vous le souhaitez, vous pouvez
commander un câble sur le World Wide Web, à l'adresse suivante :
accessories.us.dell.com/sna/segmenter/asp.
La plupart des ordinateurs Dell sont répertoriés pour les environnements
de classe B. Cependant, l'inclusion de certaines options peut provoquer le
passage de certaines configurations en classe A. Pour déterminer la classe
s'appliquant à votre ordinateur ou périphérique, consultez les sections
suivantes, propres à chaque organisme de réglementation. Chaque section
propose, de façon spécifique pour tel(le) pays ou zone géographique, des
informations CEM/EMI ou relatives à la sécurité des produits.
98 Guide d'information sur le système
 Loading...