

Page 1

Dell™ P793 Color Monitor
Quick Setup Guide
Safety Instructions
Observe the following safety guidelines when connecting and using your monitor:
•
Be sure that your monitor is electrically rated to operate with the AC power available in your location.
•
Locate your monitor near an easily accessible electrical outlet.
•
Place the monitor on a solid surface and treat it c arefully. The screen can be damaged if dropped, sha rply hit, or
touched with a sharp or abrasive implement.
• Put your monitor in a location with low humidity and a minimum of dust.
•
Never use your monitor if the power cable has been damaged. Do not allow anything to rest on the power ca ble,
and keep the cable away from where people could trip over it.
•
Never insert anything metallic into the monitor openings. Doing so may create the danger of electric shock.
•
T o avoid electric shock, never touch the inside of the monitor . Only a qualified technician should open the monitor's
case.
•
Be sure to hold the plug, not the cable, when disconnecting the monitor from an electrical outlet.
•
Openings in the monitor cabinet are provided for ventilation. To prevent overheating, these openings should not be
blocked or covered. Also, avoid using the monitor on a bed, sofa, rug, or other soft surface. Doing so may block the
ventilation openings in the bottom of the cabinet. If you put the monitor in a bookcase or some other enclosed space,
be sure to provide adequate ventilation.
•
Do not expose the monitor to rain or use it near water. If the monitor accidentally gets wet, unplug it and contact an
authorized dealer immediately . You can clean the exterior of the monitor with a damp clot h when necessary, but be
sure to unplug the monitor first.
•
If your monitor does not operate normally-in particular, if there are any unusual sounds or smells coming from it
unplug the monitor immediately and contact an authorized dealer or service center.
Connecting Your Monitor to a Computer
1. Turn off your computer and unplug your computer's power cable.
2. Connect the blue connector of the monitor's signal cable to the blue video connector on the back of your computer.
Tighten the connector screws finger-tight. Do not overtighten.
3. Fully insert the monitor power cable into the power port on the back of the monitor.
4. Plug the power cables of your computer and your monitor into a nearby electrical outlet.
5. Turn on your computer and monitor. If the monitor does not display an image, refer to the troubleshooting section of
this guide.
Dell™ P793 Color Monitor Quick Setup Guide 1
Page 2
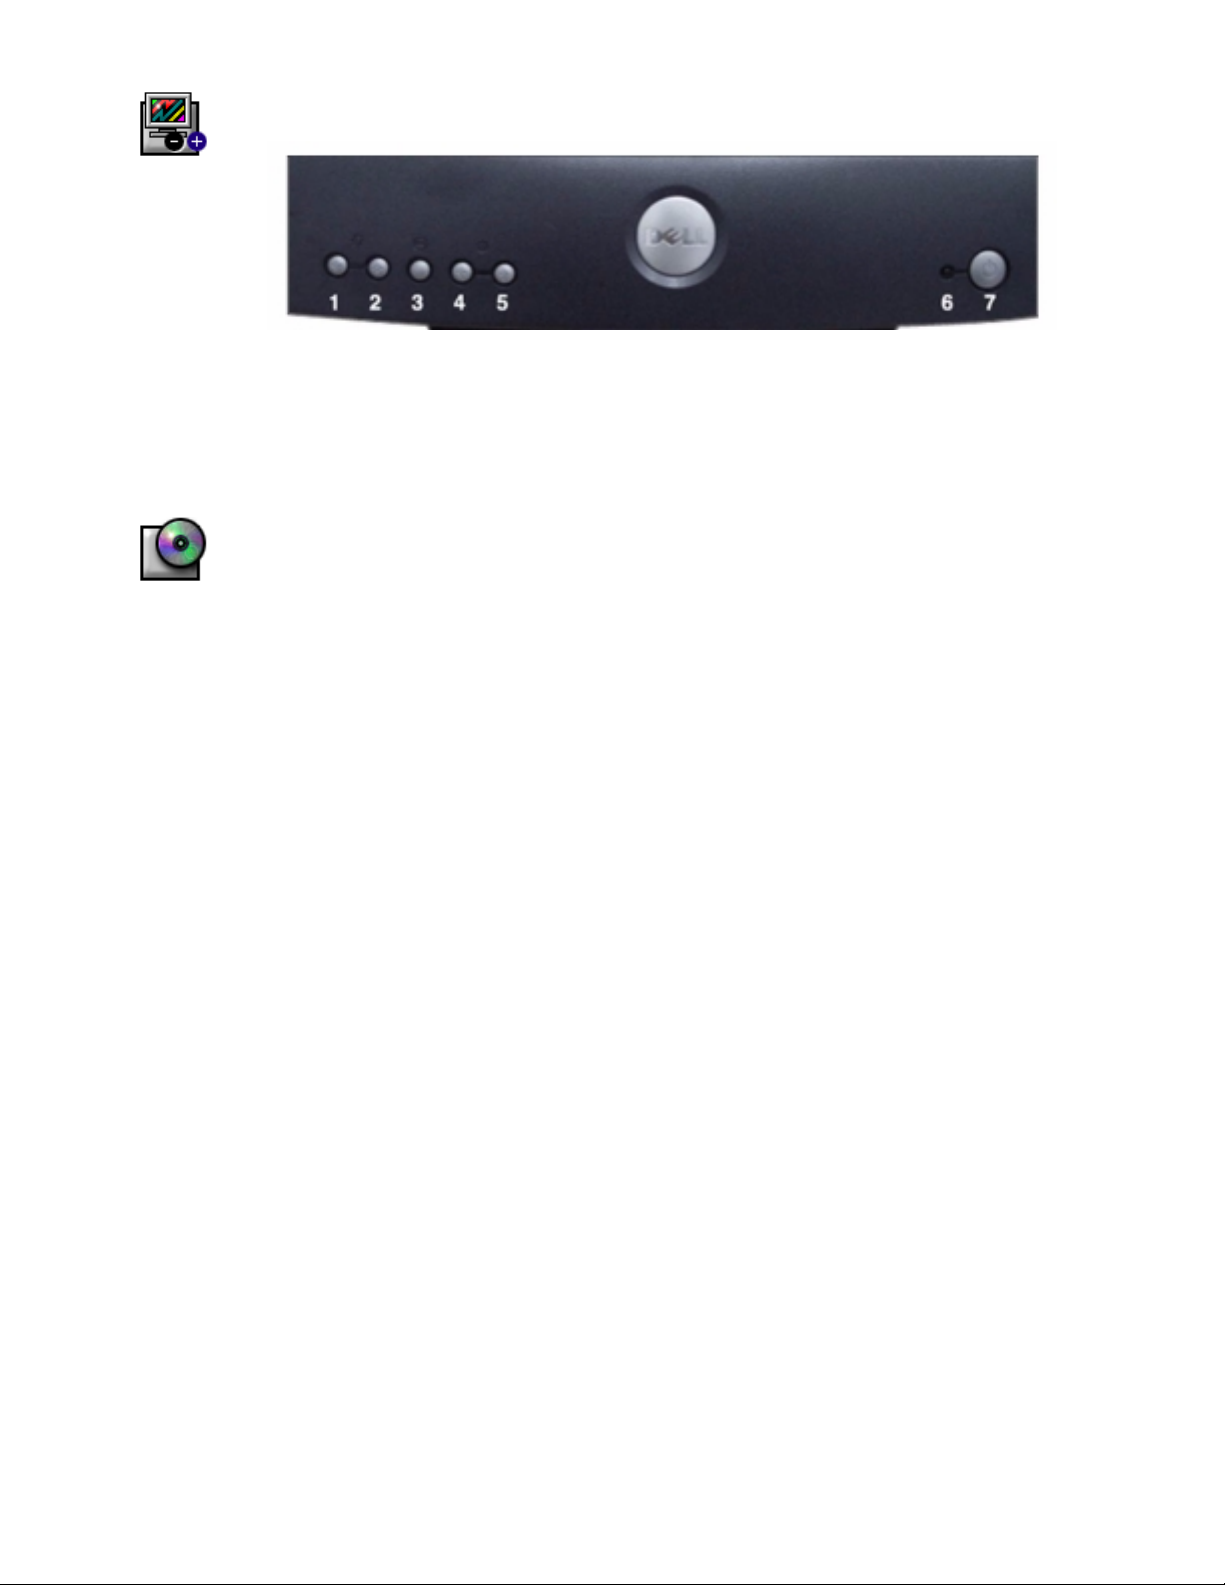
Monitor Controls and Indicators
1,2 Select(Up & Down) button These buttons allow you to highlight items using the on-screen display.
3 MENU button
4,5 Adjust(Left & Right) button These buttons allow you to adjust items using the on-screen display.
6 Power indicator This light glows green during normal operation.
7 Power butt o n Use this button to turn the monitor on and off.
This button is used with the OSD system to activate a highl ighted function for
adjustment.
Driver Installation
Use the monitor CD to install the appropriate monitor driver for your operating system.
Microsoft® Windows® XP Operating System
To manually install or update the driver, perform the following steps:
1. Insert the monitor CD into the CD-ROM drive.
2. Click StartÆÆÆÆControl PanelÆÆÆÆ Appearance & Themes and then click the Display icon.
3. In the Display Properties window, click the Settings tab, and then click Advanced.
4. Click the Monitor tab, and then click PropertiesÆÆÆÆ Driver tabÆÆÆÆ Update Driver.
5. When the Hardware Update Wizard dialog box appears, choose “Install the software automatically,” and click
Next> and then Finish to complete the installation.
6. Close the Display Properties window.
Microsoft® Windows® Millennium Operating System
To manually install or update the driver, perform the following steps:
1. Click StartÆÆÆÆSettingsÆÆÆÆControl Panel and then double-click Display.
2. In the Display Properties window, click the Settings tab, and then click Advanced.
3. Click the Monitor tab, and then click ChangeÆÆÆÆSpecify the location of the driverÆÆÆÆNext.
4. When the Update Device Driver Wizard dialog box appears, select "Display a list of all the drivers in a specific
location, so you can select the driver you want," and click Next>.
5. Insert the monitor CD into the CD-ROM drive, then click Have Disk.
6. Type d:\ (change the drive letter to match your CD-ROM drive if it is not drive D) in the Copy manufacturer's files
from: box, then click OK.
7. Click Next>, Next>, and then Finish to compl e te th e installat i on.
8. Close the Display Properties window.
Microsoft® Windows® 2000 Operating System
To manually install or update the driver, perform the following steps:
1. Click StartÆÆÆÆSettingsÆÆÆÆControl Panel and then double-click Display.
2. In the Display Properties window, click the Settings tab, and then click Advanced.
3. Click the Monitor tab, and then click PropertiesÆÆÆÆ DriverÆÆÆÆ Update Driver.
4. When the Update Device Driver Wizard dialog box appears, choose "Search for a suitable driver for my device,"
and click Next>.
5. Insert the monitor CD into the CD-ROM drive, type d:\ (change the drive letter to match your CD-ROM drive if it is
not drive D) in the Copy manufacturer's files from: box, and click Next> and then Finish to complete the
installation.
6. Close the Display Properties window.
Microsoft® Windows® 98 Operating System
Windows 98 automatically detects the new monitor and displays the
is not already installed.
1. Insert the monitor CD into the CD-ROM drive, and click Next> twice when the Add New Hardware Wizard dialog
box appears.
2. Click the CD-ROM drive box to install the drivers from the CD and then click Next>.
3. Confirm that the driver was found on the CD, and click Next> twice to install the driver.
4. Click Finish to exit the Add New Hardware Wizard dialog box.
Add New Hardware Wizard
dialog box if the monitor driver
2 Dell™ P793 Color Monitor Quick Setup Guide
Page 3

To manually install or update the driver, perform the following steps:
1. Click StartÆÆÆÆSettingsÆÆÆÆControl Panel and then double-click Display.
2. In the Display Properties window, click the Settings tab, and then click Advanced.
3. Click the Monitor tab, and then click Change.
4. When the Update Device Driver Wizard dialog box appears, follow the steps in the previous paragraph.
Microsoft® Windows® 95 Operating System
First determine the Windows 95 version installed on your computer by right-clicking the
selecting
Properties
. The version number is listed under
System
. Perform the steps for the appropriate version.
My Computer
icon on the desktop and
Version 4.00.950A
1. Click StartÆÆÆÆSettingsÆÆÆÆControl Panel and then double-click Display.
2. In the Display Properties window, click the Settings tab and then click Change Display Type.
3. In the Change Display Type window, click Change and then click Have Disk.
4. Insert the monitor CD into the CD-ROM drive, type d:\ (change the drive letter to match your CD-ROM drive if it is
not drive D) in the Copy manufacturer's files from: box, and click OK.
5. In the Select Device window, click the appropriate monitor model and then click OK.
6. In the Change Display Type window, click Close.
7. In the Display Properties window, click OK.
Version 4.00.950B
1. Click StartÆÆÆÆSettingsÆÆÆÆControl Panel and then double-click Display.
2. In the Display Properties window, click the Settings tab and then click Advanced Properties.
3. In the Advanced Display Properties window, click the Monitor tab and then click Change.
4. In the Select Device window, click Have Disk.
5. Insert the monitor CD into the CD-ROM drive, type d:\ (change the drive letter to match your CD-ROM drive if it is
not drive D) in the Copy manufacturer's files from: box, and click OK.
6. In the Select Device window, click the appropriate monitor model and then click OK.
7. In the Advanced Display Properties window, click Close.
8. In the Display Properties window, click OK.
Setting Display Resolution
For optimal monitor performance while using Microsoft® Windows® 2000, Windows 98, Windows 95 or Windows NT,
set the display resolution to 1024 x 768 as follows:
1. Click StartÆÆÆÆSettingsÆÆÆÆControl Panel.
2. Double-click the Display icon in the Control Panel window, and the click the Settings tab.
3. In the Desktop area, move the slidebar to 1024 by 768 pixels. Then click OK.
Accessing the User's Guide Online or via CD
To view the latest monitor User's Guide, access the SUPPORT section of the Dell Web site (http://support.dell.com).
If you do not have Internet access, you can access the guide on the monitor CD:
1. Insert the monitor CD into your CD-ROM drive.
A start-up document should launch automatically; however, if the start-up document does not launch automatically,
click
drive.)
2. Click the appropriate icon to open the User's Guide in the desired language.
NOTE: All applicable warranty and regulatory information regarding your monitor is contained in the User's Guide on
your CD.
Start
ÆÆÆÆ
Run
, type D:\monitor.htm, and click OK. (Substitute the c orrect CD-ROM driv e letter if it is not the D
Troubleshooting Tips
Monitor Has No Power
If the monitor's power indicator is off and no image appears on the display, perform the following checks:
•
Ensure that the power cable is fully inserted in the monitor's power port and the electrical outlet.
•
Test the electrical outlet by plugging in a working electrical device such as a lamp.
•
Ensure that the power button has been depressed, and wait for the power indicator to light.
•
Try another power cable on the monitor. Use the computer's power cable and turn on the monitor with the signal
cable disconnected. If the monitor is working correctly, a self-test pattern appears.
Dell™ P793 Color Monitor Quick Setup Guide 3
Page 4

No Image Is Displayed on the Monitor
If the monitor power indicator is on but no image appears on the display, perform the following checks:
• Ensure that the video connector is seated properly. Tighten the connector screws securely with your fingers.
•
Ensure that the computer is on.
• Increase brightness and contrast controls.
•
Turn off the monitor and unplug the signal cable. Check the cable connector for bent or broken pins.
• With the signal cable still disconnected, turn on the monitor. If the monitor is working correctly, a self-test pattern
appears.
• Perform a monitor reset or recall.
Two Fine Horizontal Lines are Visible on the Screen
The 2 very faint thin lines across the screen are normal. They are caused by the apertur e grille stabilization filaments
which are required for all aperture grille CRTs.
IMPORTANT!
Before contacting Dell for technical assistance, refer to the Troubleshooting section in the User's Guide on
your monitor CD. This section contains detailed information for resolving most monitor problems.
__________________________________
Information in this document is subject to change without notice.
© 2001 Dell Computer Corporation. All rights reserved.
Reproduction in any manner whatsoever without the written permission of Dell Computer Corporation is strictly forbidden.
Trademarks used in this text: Dell and the DELL logo are trademarks of Dell Computer Corporation; Microsoft and Windows are registered
trademarks of Micro soft Corporation.
Other trademarks and trade names may be used in this document to refer to either the entities claiming the marks and names or their products.
Dell Computer Corporation disclaims any proprietary interest in trademarks and trade names other than its own.
May 2001
4 Dell™ P793 Color Monitor Quick Setup Guide
 Loading...