

Dell Inspiron 3558 User Manual [pt]

Inspiron 15
3000 Series
Service Manual
Regulatory Model: P47F
Regulatory Type: P47F002

Notas, avisos e advertências
NOTA: Uma NOTA indica informações importantes para melhor utilizar o computador.
AVISO: Um AVISO indica potenciais danos do hardware ou a perda de dados e explica como evitar o problema.
ADVERTÊNCIA: Uma ADVERTÊNCIA indica potenciais danos no equipamento, lesões pessoais ou mesmo morte.
Copyright © 2015 Dell Inc. Todos os direitos reservados. Este produto está protegido por leis de copyright e de propriedade
intelectual dos EUA e internacionais. Dell™ e o logótipo da Dell são marcas comerciais da Dell Inc. nos Estados Unidos e/ou noutras
jurisdições. Todas as outras marcas e nomes aqui mencionados podem ser marcas comerciais das respetivas empresas.
2015–01
Rev. A00

Contents
1 Antes de trabalhar no interior do computador..................................................................................7
Antes de começar .................................................................................................................................................................7
Instruções de segurança....................................................................................................................................................... 7
Ferramentas recomendadas.................................................................................................................................................8
2 After working inside your tablet.................................................................................................... 9
3 Retirar a bateria..........................................................................................................................10
Procedure..............................................................................................................................................................................10
4 Voltar a colocar a bateria..............................................................................................................11
Procedimento........................................................................................................................................................................ 11
5 Retirar o painel de base............................................................................................................... 12
Pré-requisitos........................................................................................................................................................................12
Procedimento....................................................................................................................................................................... 12
6 Volte a colocar o painel de base.................................................................................................... 13
Procedimento....................................................................................................................................................................... 13
Pós-requisitos....................................................................................................................................................................... 13
7 Como retirar a unidade de disco rígido.......................................................................................... 14
Pré-requisitos........................................................................................................................................................................14
Procedure..............................................................................................................................................................................14
8 Voltar a colocar a unidade de disco rígido...................................................................................... 16
Procedimento....................................................................................................................................................................... 16
Pós-requisitos....................................................................................................................................................................... 16
9 Como remover os módulos de memória......................................................................................... 17
Pré-requisitos........................................................................................................................................................................17
Procedure..............................................................................................................................................................................17
10 Como substituir os módulos de memória......................................................................................18
Procedure..............................................................................................................................................................................18
Pós-requisitos....................................................................................................................................................................... 18
11 Retirar a placa sem fios.............................................................................................................. 19
Pré-requisitos........................................................................................................................................................................19
Procedure..............................................................................................................................................................................19
12 Volte a colocar a placa sem fios.................................................................................................. 20
Procedimento.......................................................................................................................................................................20
Contents 3

Pós-requisitos...................................................................................................................................................................... 20
13 Retirar o teclado........................................................................................................................21
Pré-requisitos........................................................................................................................................................................21
Procedimento....................................................................................................................................................................... 21
14 Voltar a colocar o teclado...........................................................................................................23
Procedimento.......................................................................................................................................................................23
Pós-requisitos...................................................................................................................................................................... 23
15 Retirar o apoio para as mãos...................................................................................................... 24
Prerequisites.........................................................................................................................................................................24
Procedure............................................................................................................................................................................. 24
16 Voltar a colocar o apoio para as mãos.......................................................................................... 27
Procedimento.......................................................................................................................................................................27
Pós-requisitos.......................................................................................................................................................................27
17 Retirar o painel táctil................................................................................................................. 28
Prerequisites.........................................................................................................................................................................28
Procedure............................................................................................................................................................................. 28
18 Voltar a colocar o painel táctil.................................................................................................... 30
Procedimento.......................................................................................................................................................................30
Pós-requisitos...................................................................................................................................................................... 30
19 Retirar a placa do botão de alimentação.......................................................................................31
Prerequisites......................................................................................................................................................................... 31
Procedure..............................................................................................................................................................................31
20 Voltar a colocar a placa do botão de alimentação......................................................................... 33
Procedimento.......................................................................................................................................................................33
Pós-requisitos...................................................................................................................................................................... 33
21 Retirar os altifalantes................................................................................................................ 34
Prerequisites.........................................................................................................................................................................34
Procedure............................................................................................................................................................................. 34
22 Voltar a colocar os altifalantes................................................................................................... 36
Procedimento.......................................................................................................................................................................36
Pós-requisitos...................................................................................................................................................................... 36
23 Retirar a placa de E/S............................................................................................................... 37
Prerequisites.........................................................................................................................................................................37
Procedure............................................................................................................................................................................. 37
24 Voltar a colocar a placa de E/S...................................................................................................38
Procedimento.......................................................................................................................................................................38
4
Contents

Pós-requisitos...................................................................................................................................................................... 38
25 Remover a placa de sistema.......................................................................................................39
Prerequisites........................................................................................................................................................................ 39
Procedure.............................................................................................................................................................................39
26 Voltar a colocar a placa de sistema............................................................................................. 42
Procedimento.......................................................................................................................................................................42
Pós-requisitos...................................................................................................................................................................... 42
27 Retirar a bateria de célula tipo moeda......................................................................................... 43
Prerequisites.........................................................................................................................................................................43
Procedure............................................................................................................................................................................. 43
28 Voltar a colocar a bateria de célula tipo moeda............................................................................ 44
Procedimento.......................................................................................................................................................................44
Post-requisites.....................................................................................................................................................................44
29 Retirar o dissipador de calor...................................................................................................... 45
Prerequisites........................................................................................................................................................................ 45
Procedure.............................................................................................................................................................................45
30 Voltar a colocar o dissipador de calor..........................................................................................47
Procedimento.......................................................................................................................................................................47
Pós-requisitos.......................................................................................................................................................................47
31 Retirar o ventilador................................................................................................................... 48
Prerequisites.........................................................................................................................................................................48
Procedure............................................................................................................................................................................. 48
32 Voltar a colocar o ventilador...................................................................................................... 50
Procedimento...................................................................................................................................................................... 50
Post-requisites.....................................................................................................................................................................50
33 Retirar o conjunto do ecrã..........................................................................................................51
Prerequisites......................................................................................................................................................................... 51
Procedimento....................................................................................................................................................................... 51
34 Voltar a colocar o conjunto do ecrã.............................................................................................53
Procedimento.......................................................................................................................................................................53
Pós-requisitos...................................................................................................................................................................... 53
35 Retirar a porta do adaptador de alimentação............................................................................... 54
Prerequisites........................................................................................................................................................................ 54
Procedimento.......................................................................................................................................................................54
36 Voltar a colocar a porta do adaptador de alimentação.................................................................. 55
Procedimento...................................................................................................................................................................... 55
Contents
5

Pós-requisitos...................................................................................................................................................................... 55
37 Retirar a moldura do ecrã.......................................................................................................... 56
Prerequisites........................................................................................................................................................................ 56
Procedimento.......................................................................................................................................................................56
38 Voltar a colocar a moldura do ecrã..............................................................................................57
Procedimento.......................................................................................................................................................................57
Pós-requisitos...................................................................................................................................................................... 57
39 Retirar o painel do ecrã............................................................................................................. 58
Prerequisites........................................................................................................................................................................ 58
Procedimento.......................................................................................................................................................................58
40 Voltar a colocar o painel do ecrã.................................................................................................60
Procedimento.......................................................................................................................................................................60
Pós-requisitos...................................................................................................................................................................... 60
41 Retirar a câmara........................................................................................................................ 61
Prerequisites......................................................................................................................................................................... 61
Procedimento....................................................................................................................................................................... 61
42 Voltar a colocar a câmara...........................................................................................................63
Pós-requisitos...................................................................................................................................................................... 63
Procedimento.......................................................................................................................................................................63
43 Retirar as dobradiças do ecrã.....................................................................................................64
Prerequisites........................................................................................................................................................................ 64
Procedimento.......................................................................................................................................................................64
44 Voltar a colocar as dobradiças do ecrã........................................................................................ 66
Procedimento.......................................................................................................................................................................66
Pós-requisitos...................................................................................................................................................................... 66
45 Actualizar o BIOS......................................................................................................................67
46 Obter ajuda e contactar a Dell....................................................................................................68
6
Contents
Antes de trabalhar no interior do computador
NOTA: The images in this document may differ from your computer depending on the configuration you ordered.
Tópicos
• Antes de começar
• Instruções de segurança
• Ferramentas recomendadas
Antes de começar
1. Guarde e feche todos os ficheiros abertos e saia de todas as aplicações abertas.
2. Encerre o computador.
• Windows 10: Clique ou toque em Iniciar > Ligar > Desligar.
• Windows 8.1: No ecrã Iniciar, clique ou toque no ícone de alimentação > Desligar.
• Windows 7: Clique ou toque em Iniciar > Encerrar.
1
NOTA:
de encerramento.
3. Desligue o computador e todos os dispositivos a ele ligados das respectivas tomadas eléctricas.
4. Desligue todos os cabos, como cabos de telefone, de rede, etc., do computador.
5. Desligue todos os dispositivos e periféricos ligados, como teclado, rato, monitor, etc., do computador.
6. Retire todos os cartões multimédia e discos ópticos do computador, se aplicável.
Caso esteja a utilizar outro sistema operativo, consulte a respectiva documentação para obter as instruções
Instruções de segurança
Utilize as directrizes de segurança seguintes para ajudar a proteger o computador de potenciais danos e para ajudar a assegurar a sua
segurança pessoal.
NOTA:
safety best practices, see the Regulatory Compliance home page at www.dell.com/regulatory_compliance.
NOTA: Disconnect all power sources before opening the computer cover or panels. After you finish working inside the
computer, replace all covers, panels, and screws before connecting to the power source.
AVISO: To avoid damaging the computer, ensure that the work surface is flat and clean.
AVISO: To avoid damaging the components and cards, handle them by their edges and avoid touching pins and contacts.
AVISO: You should only perform troubleshooting and repairs as authorized or directed by the Dell technical assistance
team. Damage due to servicing that is not authorized by Dell is not covered by your warranty. See the safety
instructions that shipped with the product or at www.dell.com/regulatory_compliance.
Before working inside your computer, read the safety information that shipped with your computer. For more
AVISO: Before touching anything inside your computer, ground yourself by touching an unpainted metal surface, such
as the metal at the back of the computer. While you work, periodically touch an unpainted metal surface to dissipate
static electricity, which could harm internal components.
AVISO: When you disconnect a cable, pull on its connector or on its pull tab, not on the cable itself. Some cables have
connectors with locking tabs or thumb-screws that you must disengage before disconnecting the cable. When
disconnecting cables, keep them evenly aligned to avoid bending any connector pins. When connecting cables, ensure
that the ports and connectors are correctly oriented and aligned.
Antes de trabalhar no interior do computador 7

AVISO: Press and eject any installed card from the media-card reader.
Ferramentas recomendadas
Os procedimentos descritos neste documento podem requerer as seguintes ferramentas:
• Chave de parafusos Phillips
• Instrumento de plástico pontiagudo
8 Antes de trabalhar no interior do computador

After working inside your tablet
CAUTION: Leaving stray or loose screws inside your computer may severely damage your computer.
1. Replace all screws and ensure that no stray screws remain inside your tablet.
2. Connect any external devices, peripherals, and cables you removed before working on your tablet.
3. Replace any media cards, discs, and any other parts that you removed before working on your tablet.
4. Connect your tablet and all attached devices to their electrical outlets.
5. Turn on your tablet.
2
After working inside your tablet 9
Retirar a bateria
NOTA: Before working inside your computer, read the safety information that shipped with your computer and follow
the steps in Before working inside your computer. After working inside your computer, follow the instructions in After
working inside your computer. For more safety best practices, see the Regulatory Compliance home page at
www.dell.com/regulatory_compliance.
Tópicos
• Procedure
Procedure
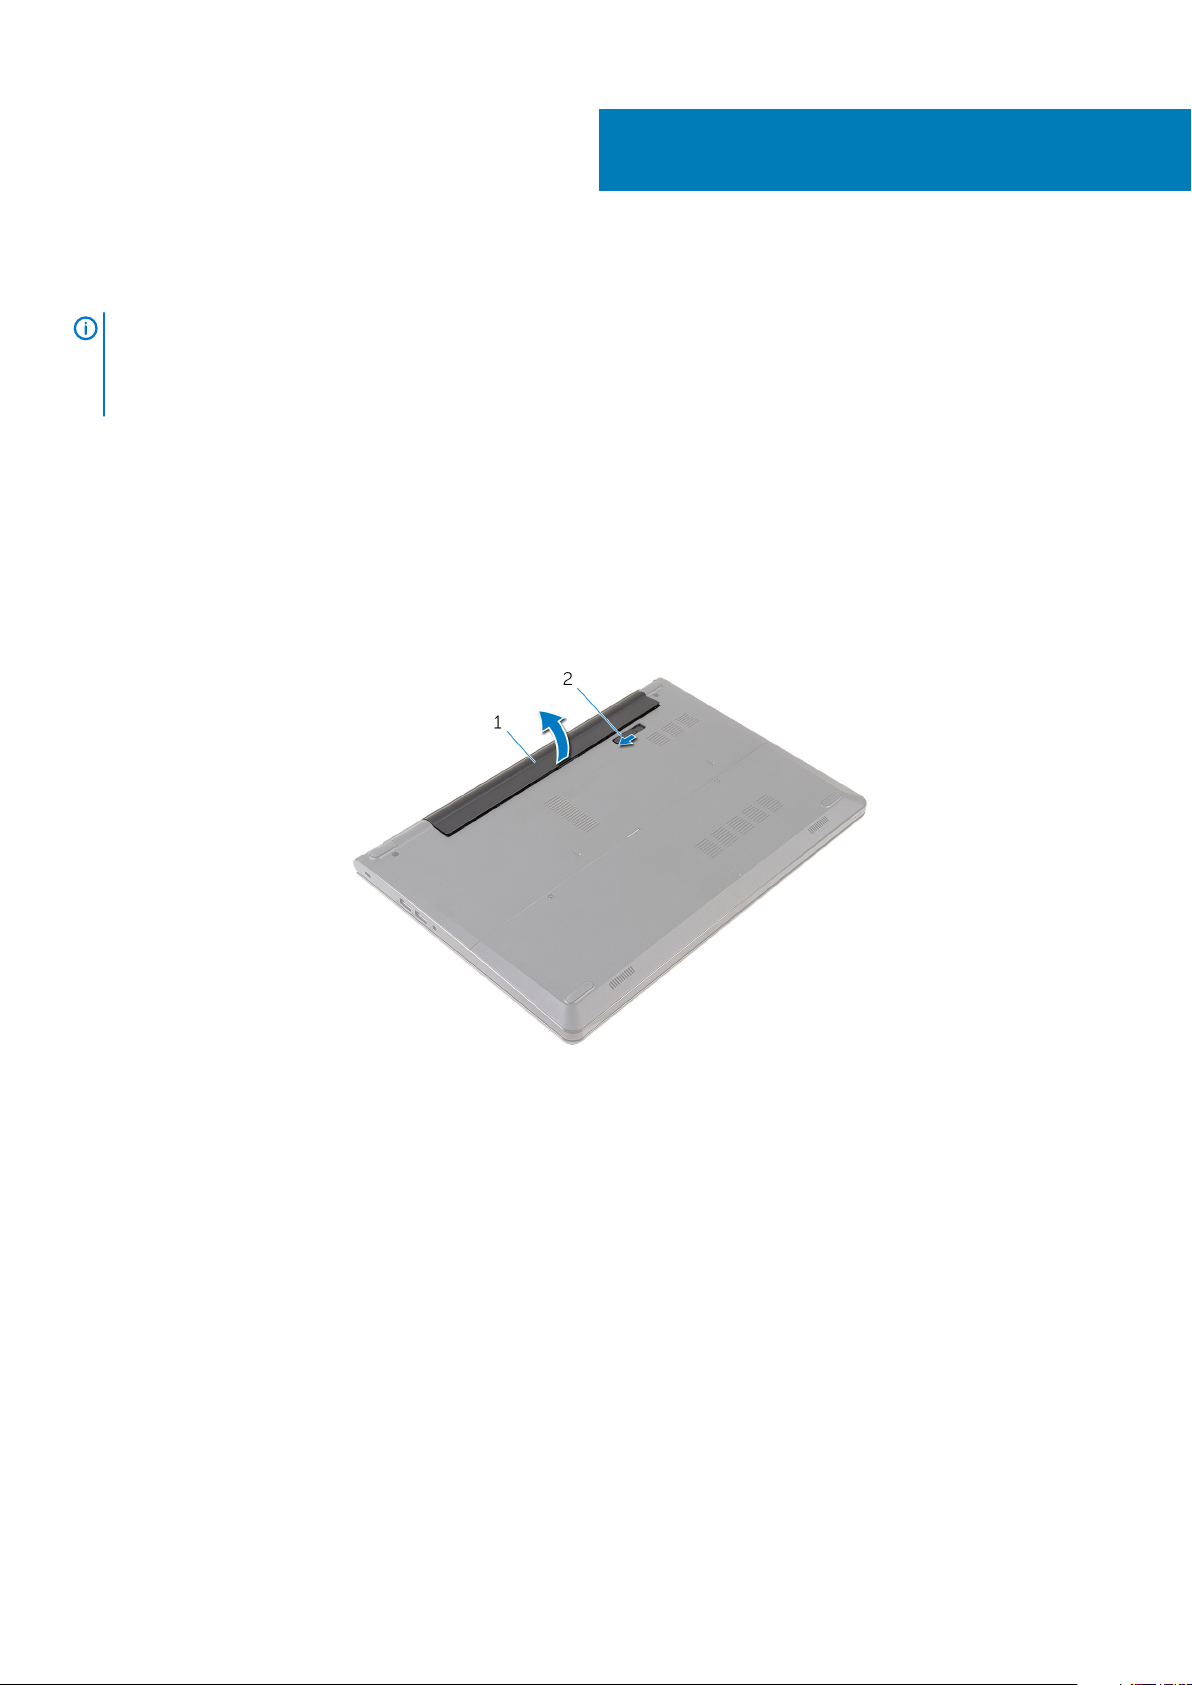
1. Close the display and turn the computer over.
2. Slide the battery-release latch to the unlock position.
3. Lift the battery at an angle and remove the battery from the battery bay.
3
1. battery 2. battery-release latch
4. Turn the computer over, open the display, and press the power button for five seconds to ground the system board.
10 Retirar a bateria

Voltar a colocar a bateria
NOTA: Before working inside your computer, read the safety information that shipped with your computer and follow
the steps in Before working inside your computer. After working inside your computer, follow the instructions in After
working inside your computer. For more safety best practices, see the Regulatory Compliance home page at
www.dell.com/regulatory_compliance.
Tópicos
• Procedimento
Procedimento
Deslize as patilhas na bateria para as ranhuras do compartimento da bateria e encaixe-a bateria no devido lugar.
NOTA:
O trinco de libertação da bateria volta à posição de bloqueio se a bateria for instalada correctamente.
4
Voltar a colocar a bateria 11
Retirar o painel de base
NOTA: Before working inside your computer, read the safety information that shipped with your computer and follow
the steps in Before working inside your computer. After working inside your computer, follow the instructions in After
working inside your computer. For more safety best practices, see the Regulatory Compliance home page at
www.dell.com/regulatory_compliance.
Tópicos
• Pré-requisitos
• Procedimento
Pré-requisitos
Retire a bateria.
Procedimento
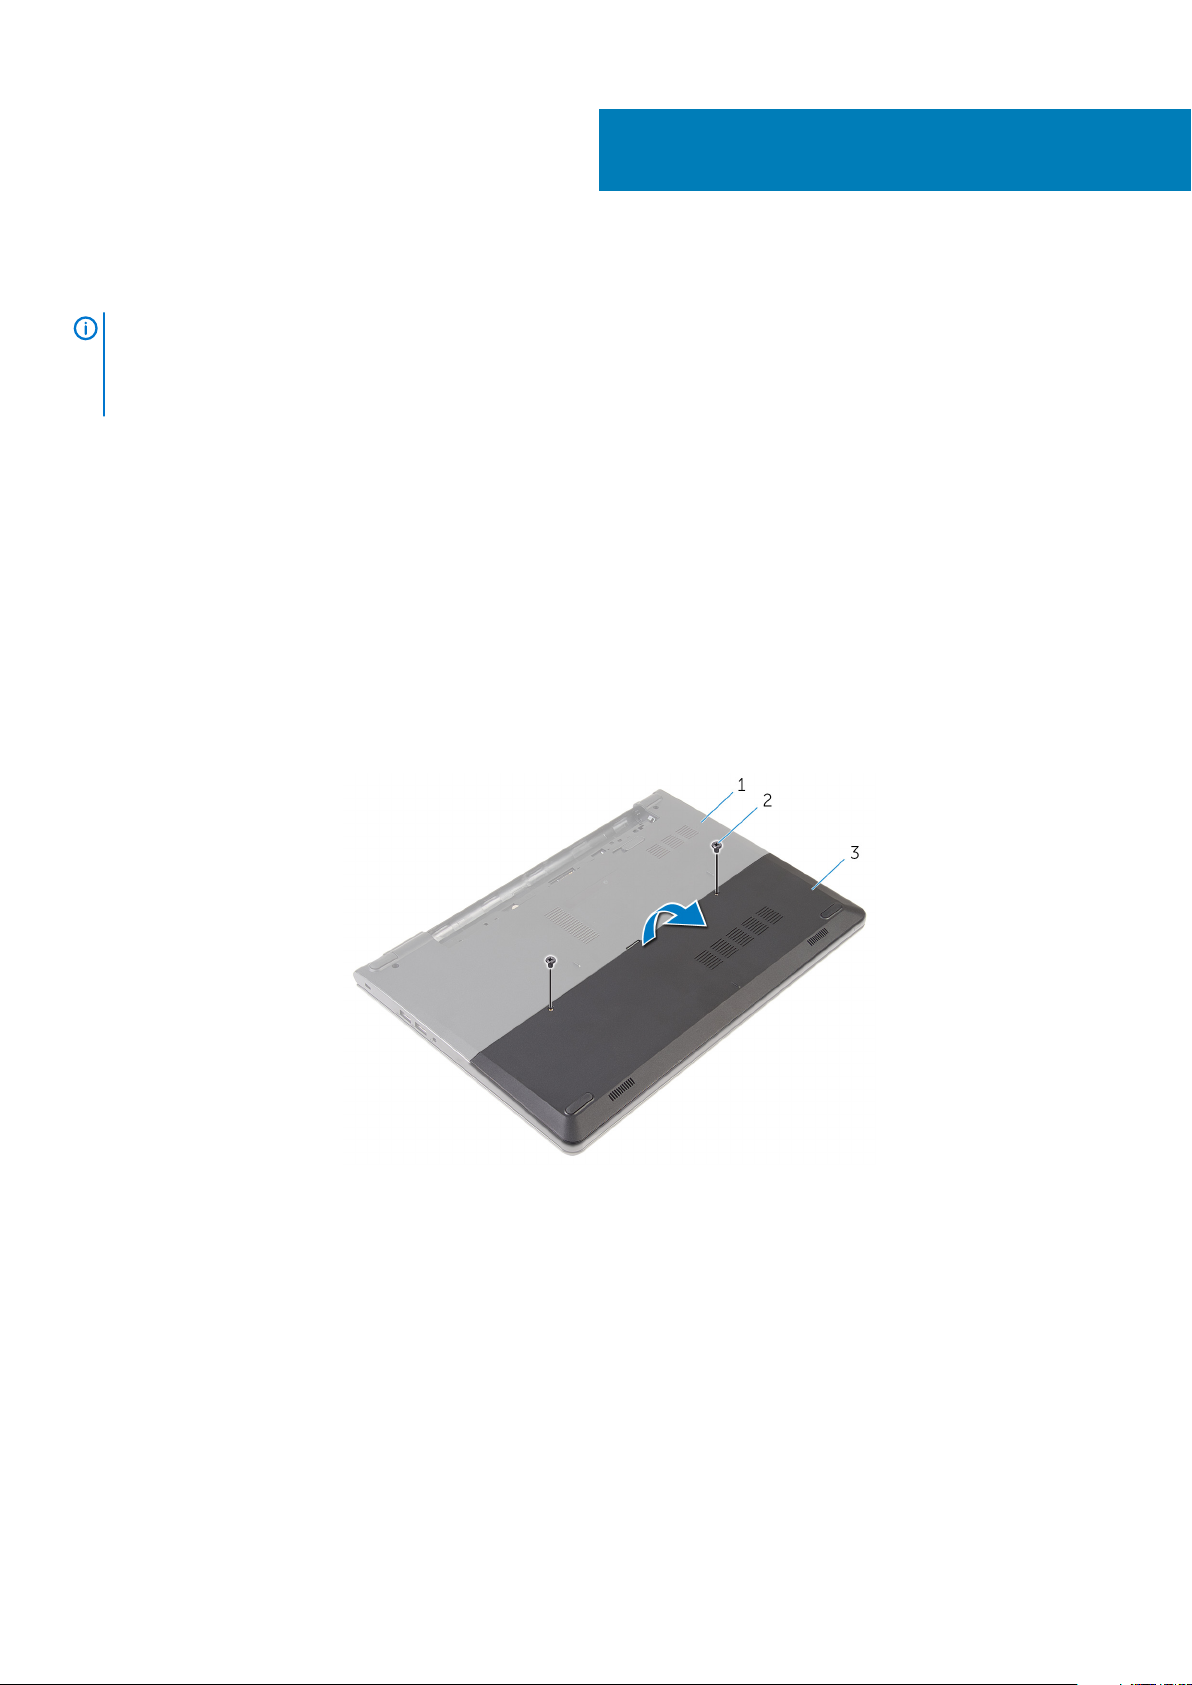
1. Retire os parafusos que fixam o painel de base à base do computador.
2. Utilizando as pontas dos dedos, levante o painel de base da base do computador.
5
base do computador 2. parafusos (2)
1.
3. painel de base
12 Retirar o painel de base

6
Volte a colocar o painel de base
NOTA: Before working inside your computer, read the safety information that shipped with your computer and follow
the steps in Before working inside your computer. After working inside your computer, follow the instructions in After
working inside your computer. For more safety best practices, see the Regulatory Compliance home page at
www.dell.com/regulatory_compliance.
Tópicos
• Procedimento
• Pós-requisitos
Procedimento
1. Faça deslizar as patilhas no painel de base para as ranhuras na base do computador e encaixe-o cuidadosamente no respectivo lugar.
2. Volte a colocar os parafusos que fixam o painel de base à base do computador.
Pós-requisitos
Volte a colocar a bateria.
Volte a colocar o painel de base 13
Como retirar a unidade de disco rígido
NOTA: Before working inside your computer, read the safety information that shipped with your computer and follow
the steps in Before working inside your computer. After working inside your computer, follow the instructions in After
working inside your computer. For more safety best practices, see the Regulatory Compliance home page at
www.dell.com/regulatory_compliance.
AVISO: Hard drives are fragile. Exercise care when handling the hard drive.
AVISO: To avoid data loss, do not remove the hard drive while the computer is in sleep or on state.
Tópicos
• Pré-requisitos
• Procedure
Pré-requisitos
1. Retire a bateria.
2. Retire o painel de base.
7
Procedure
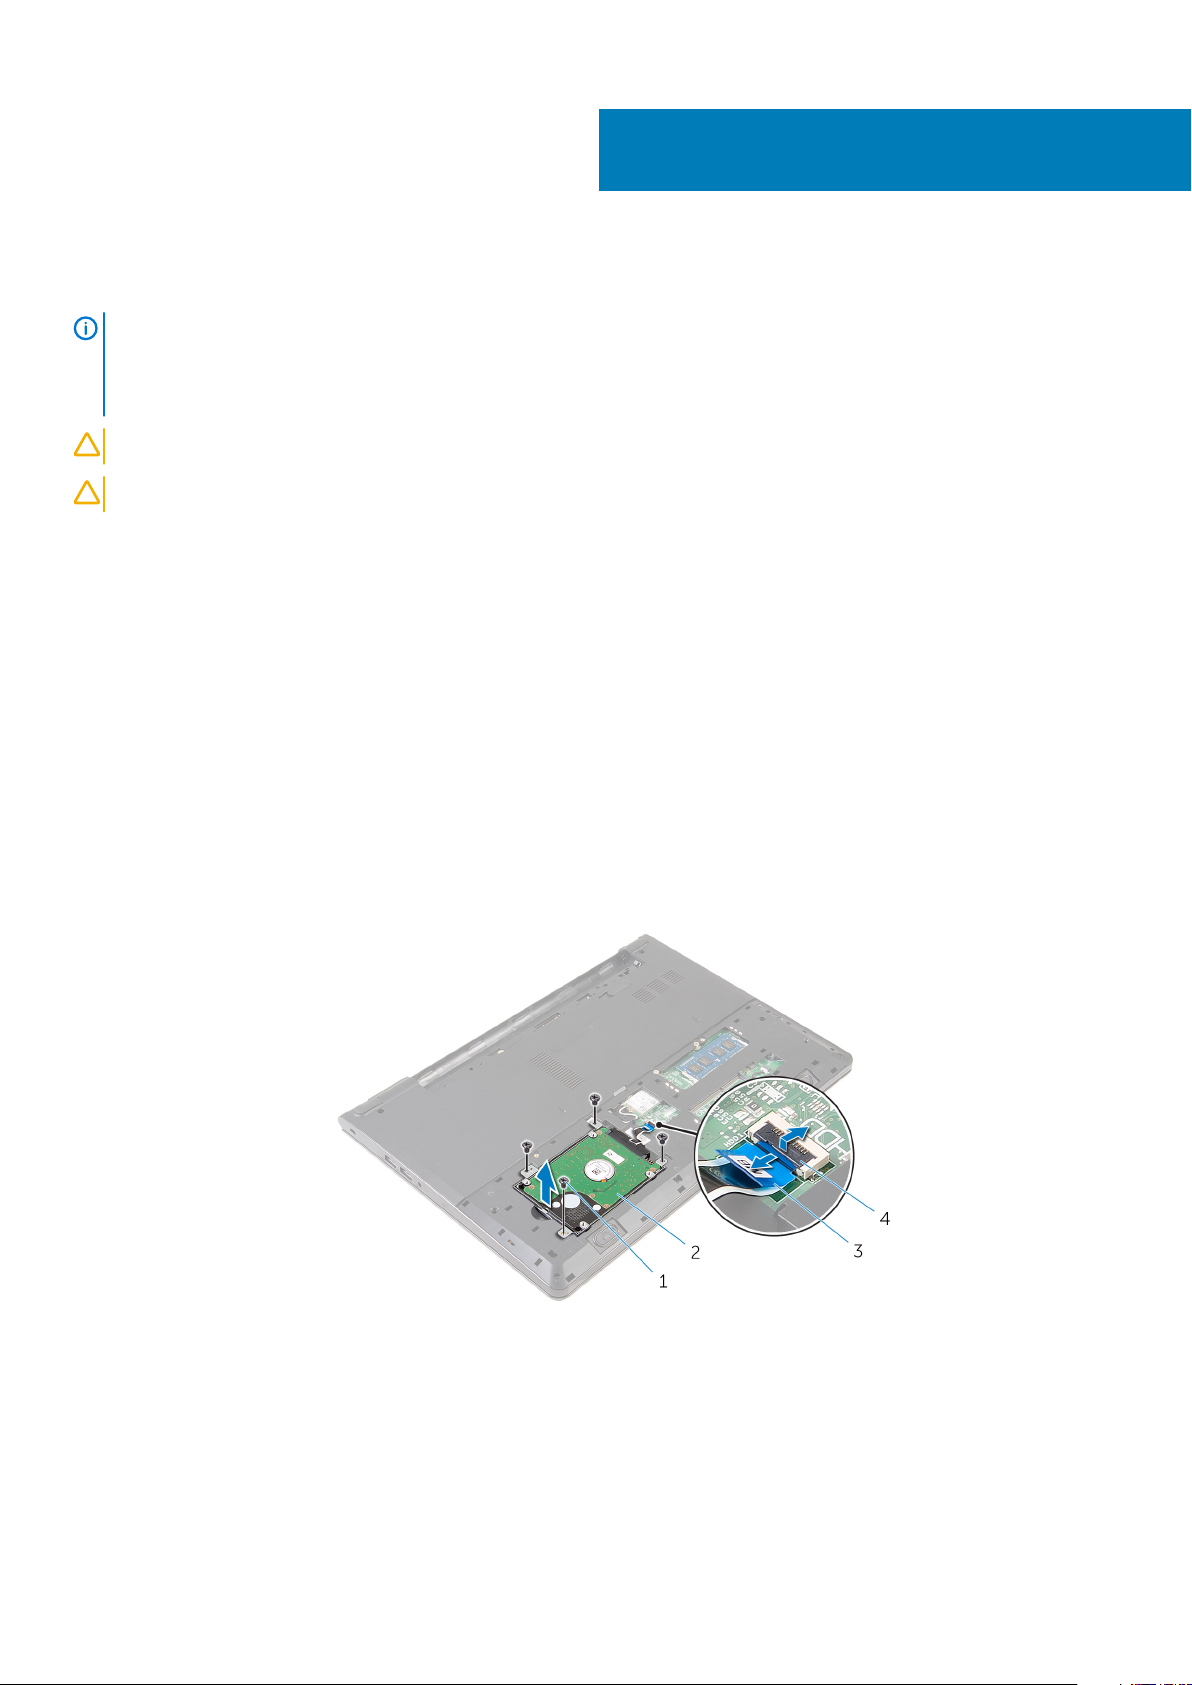
1. Remove the screws that secure the hard-drive assembly to the computer base.
2. Lift the latch and disconnect the hard-drive cable from the system board.
3. Lift the hard-drive assembly off the computer base.
screws (4) 2. hard-drive assembly
1.
3. hard-drive cable 4. latch
4. Disconnect the interposer from the hard drive.
14 Como retirar a unidade de disco rígido
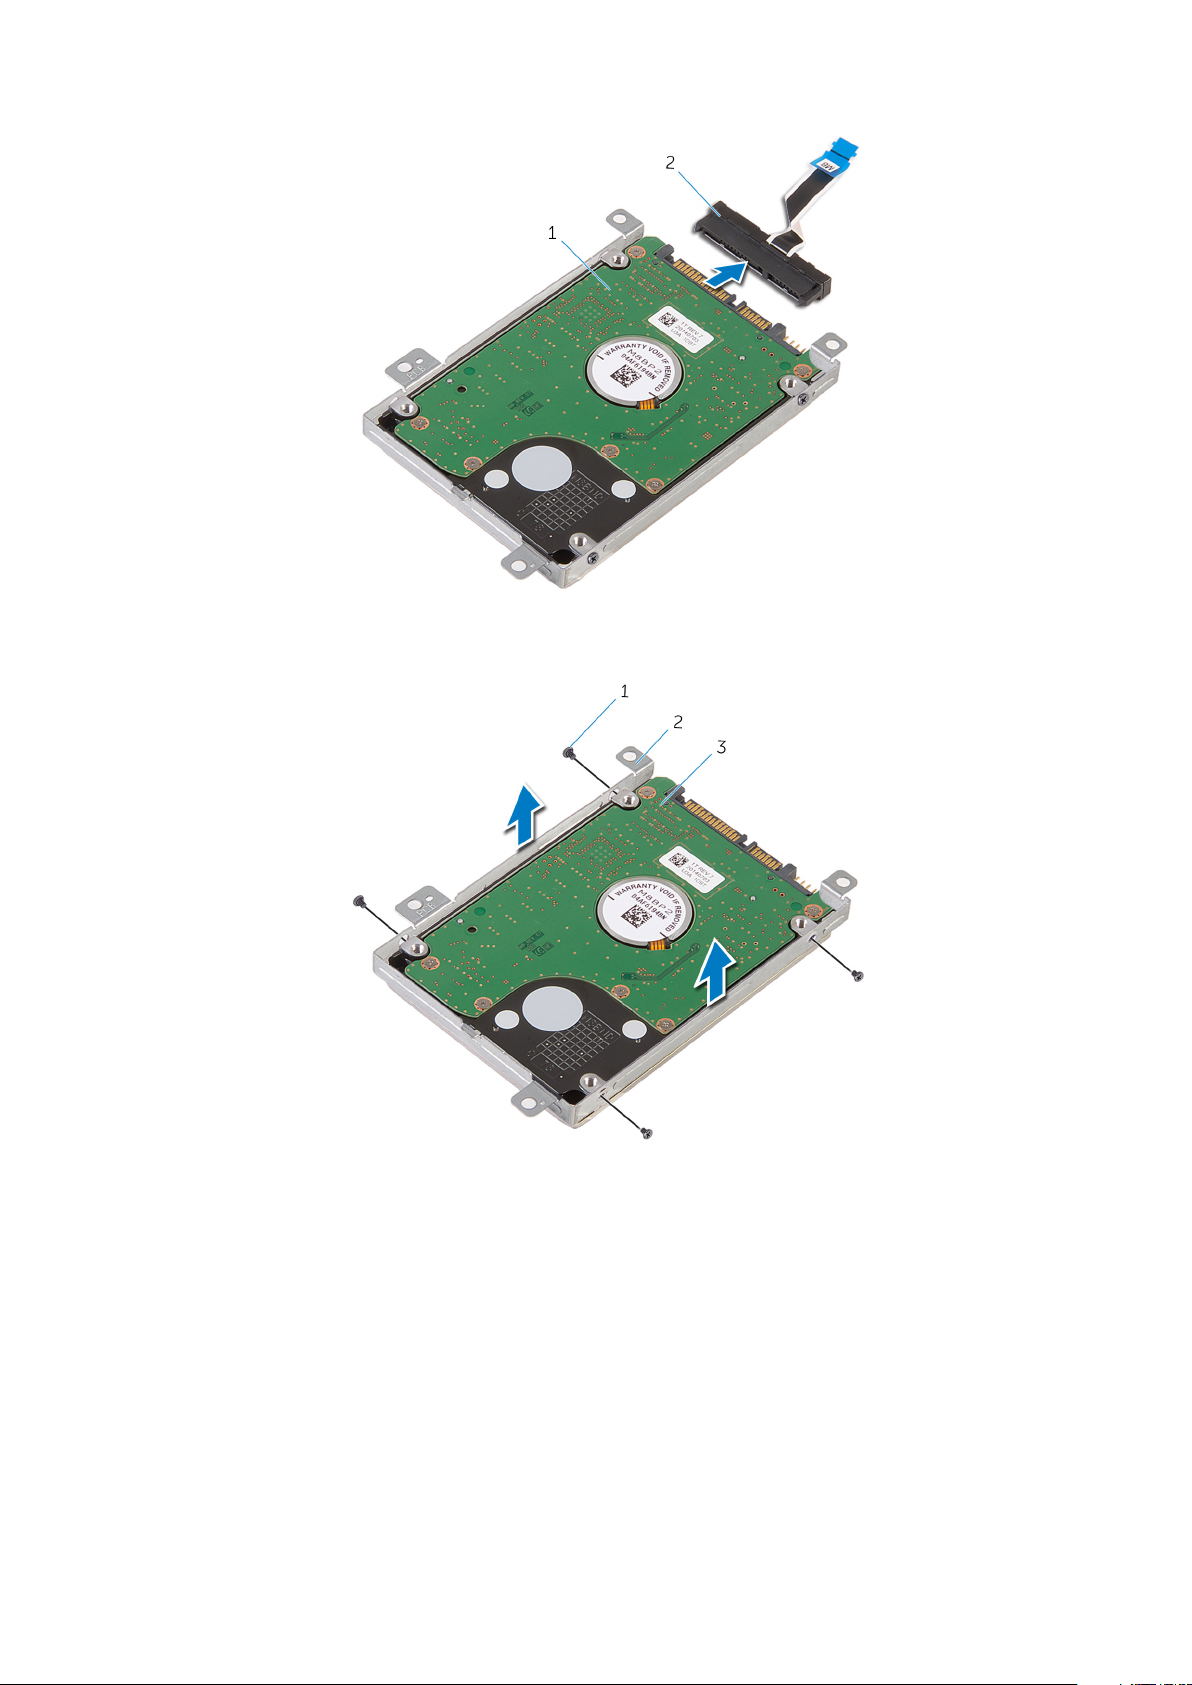
1. hard-drive assembly 2. interposer
5. Remove the screws that secure the hard-drive bracket to the hard drive and lift the hard-drive bracket off the hard drive.
screws (4) 2. hard-drive bracket
1.
3. hard drive
Como retirar a unidade de disco rígido 15

8
Voltar a colocar a unidade de disco rígido
NOTA: Before working inside your computer, read the safety information that shipped with your computer and follow
the steps in Before working inside your computer. After working inside your computer, follow the instructions in After
working inside your computer. For more safety best practices, see the Regulatory Compliance home page at
www.dell.com/regulatory_compliance.
AVISO: Hard drives are fragile. Exercise care when handling the hard drive.
Tópicos
• Procedimento
• Pós-requisitos
Procedimento
1. Coloque o suporte da unidade de disco rígido na respectiva unidade e alinhe os orifícios dos parafusos no suporte da unidade com os
respectivos orifícios.
2. Volte a colocar os parafusos que fixam o suporte da unidade de disco rígido à respectiva unidade.
3. Faça deslizar o conjunto da unidade de disco rígido na base do computador e alinhe os orifícios dos parafusos no conjunto da unidade
de disco rígido com os orifícios na base do computador.
4. Ligue o cabo da unidade de disco rígido à unidade.
5. Volte a colocar os parafusos que fixam o conjunto da unidade de disco rígido à base do computador.
Pós-requisitos
1. Volte a colocar o painel de base.
2. Volte a colocar a bateria.
16 Voltar a colocar a unidade de disco rígido
Como remover os módulos de memória
NOTA: Before working inside your computer, read the safety information that shipped with your computer and follow
the steps in Before working inside your computer. After working inside your computer, follow the instructions in After
working inside your computer. For more safety best practices, see the Regulatory Compliance home page at
www.dell.com/regulatory_compliance.
Tópicos
• Pré-requisitos
• Procedure
Pré-requisitos
1. Retire a bateria.
2. Retire o painel de base.
Procedure
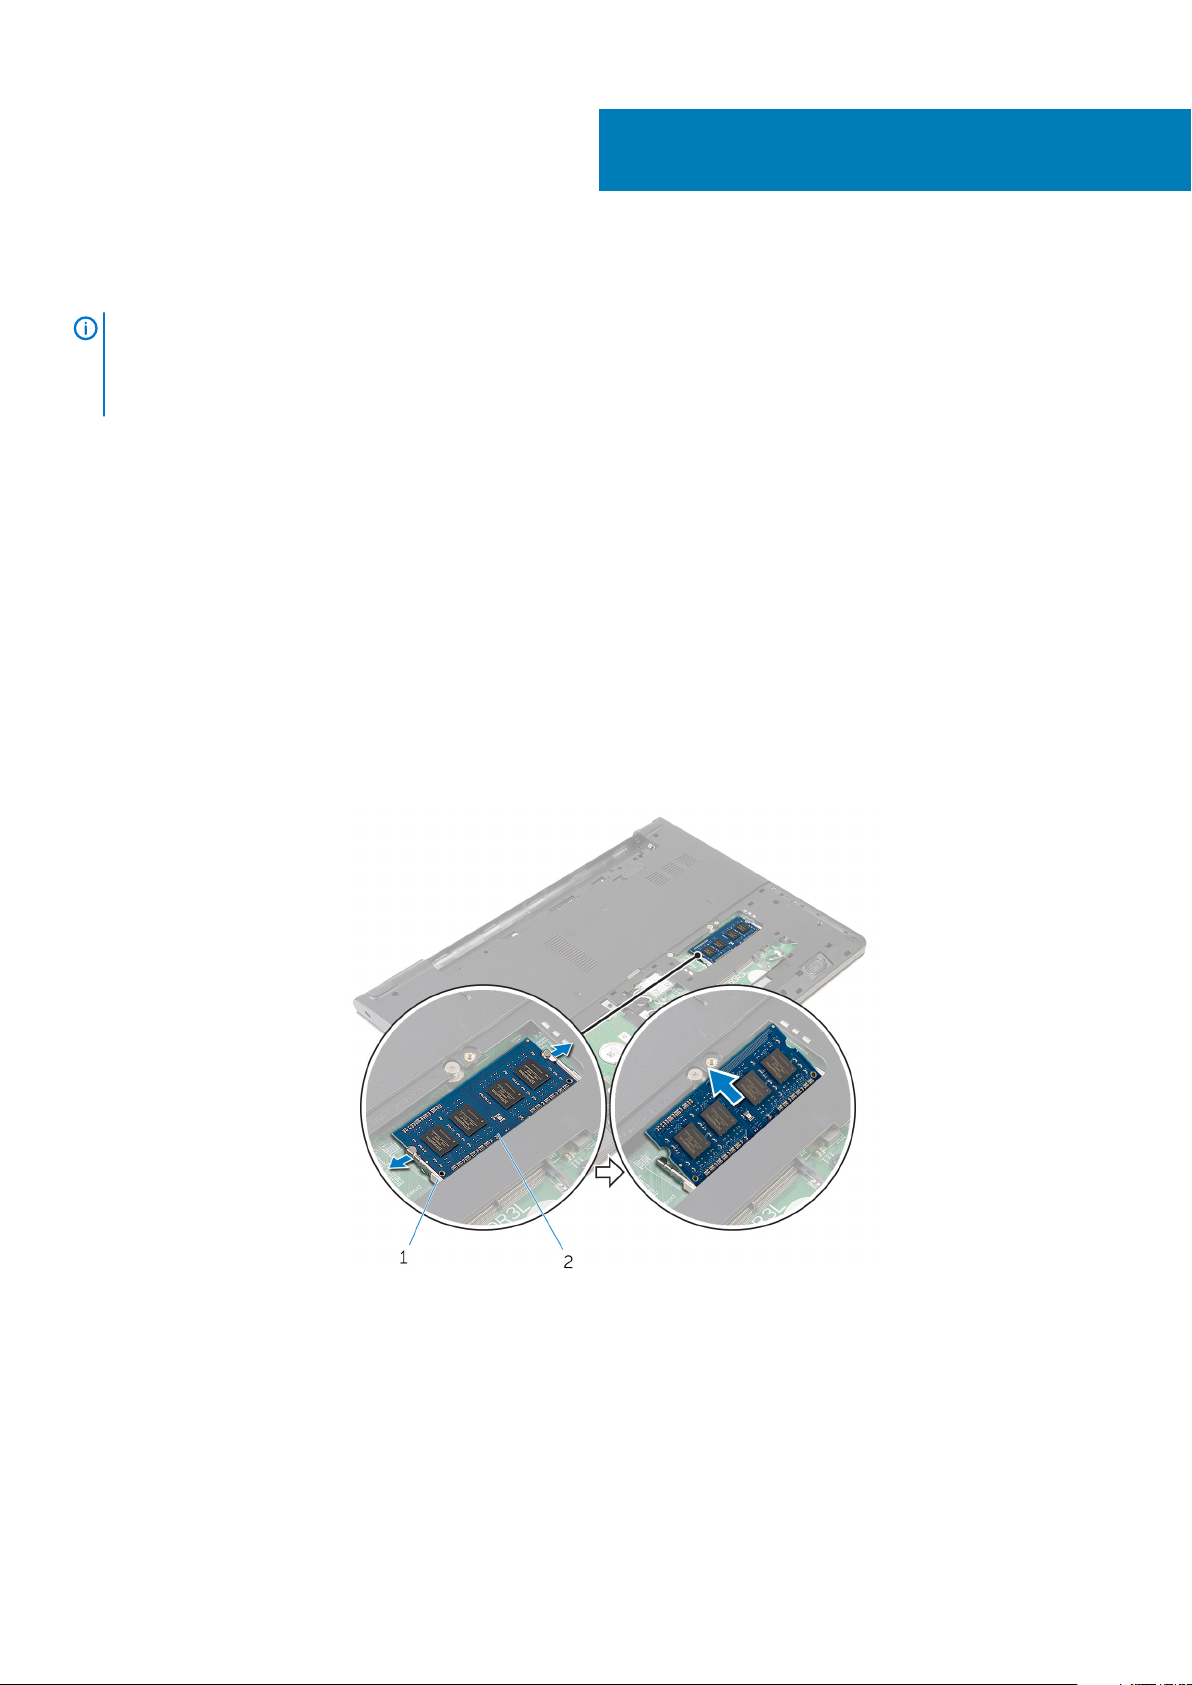
1. Using your fingertips, pry apart the securing clips on each end of the memory-module slot until the memory module pops up.
2. Slide and remove the memory module from the memory-module slot.
9
securing clips 2. memory module
1.
Como remover os módulos de memória 17
Como substituir os módulos de memória
NOTA: Before working inside your computer, read the safety information that shipped with your computer and follow
the steps in Before working inside your computer. After working inside your computer, follow the instructions in After
working inside your computer. For more safety best practices, see the Regulatory Compliance home page at
www.dell.com/regulatory_compliance.
Tópicos
• Procedure
• Pós-requisitos
Procedure
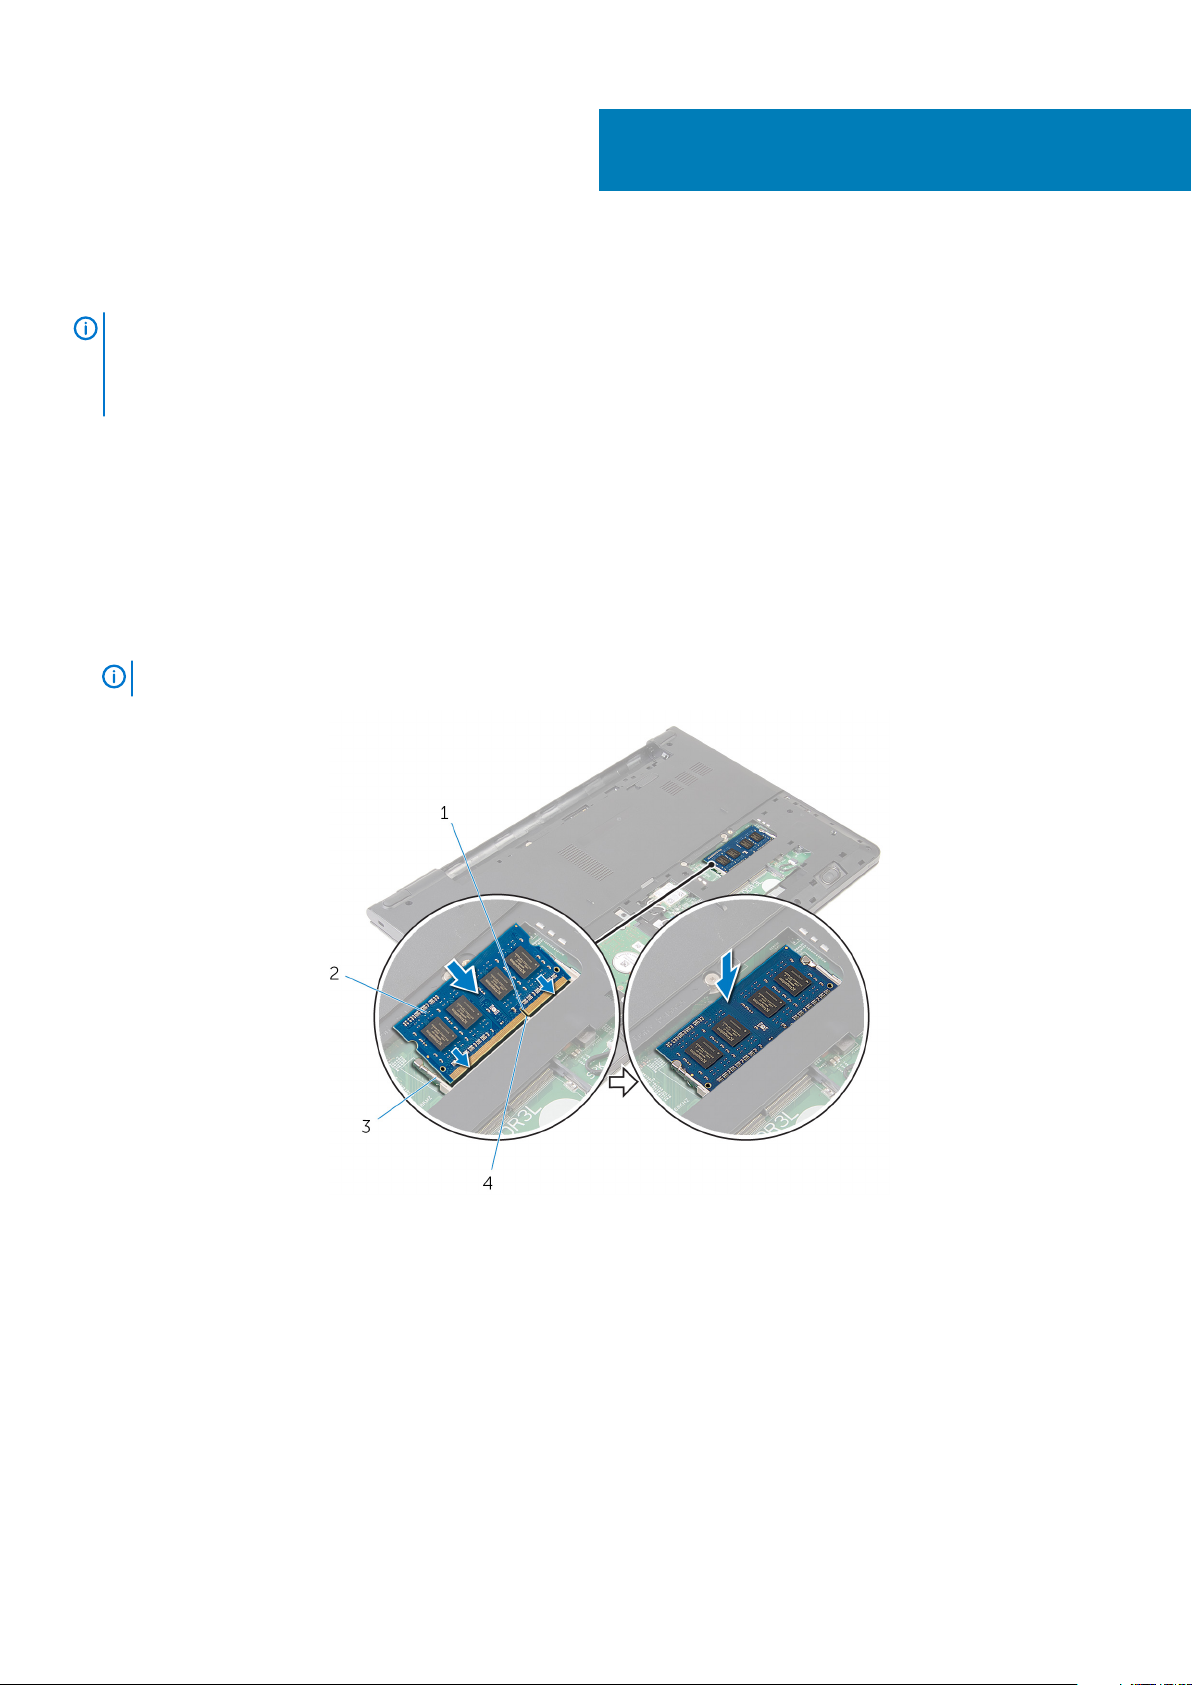
1. Align the notch on the memory module with the tab on the memory-module slot.
2. Slide the memory module firmly into the slot at an angle and press the memory module down until it clicks into place.
10
NOTE:
1. notch 2. memory module
3. securing clips 4. tab
If you do not hear the click, remove the memory module and reinstall it.
Pós-requisitos
1. Volte a colocar o painel de base.
2. Volte a colocar a bateria.
18 Como substituir os módulos de memória
Retirar a placa sem fios
NOTA: Before working inside your computer, read the safety information that shipped with your computer and follow
the steps in Before working inside your computer. After working inside your computer, follow the instructions in After
working inside your computer. For more safety best practices, see the Regulatory Compliance home page at
www.dell.com/regulatory_compliance.
Tópicos
• Pré-requisitos
• Procedure
Pré-requisitos
1. Retire a bateria.
2. Retire o painel de base.
Procedure
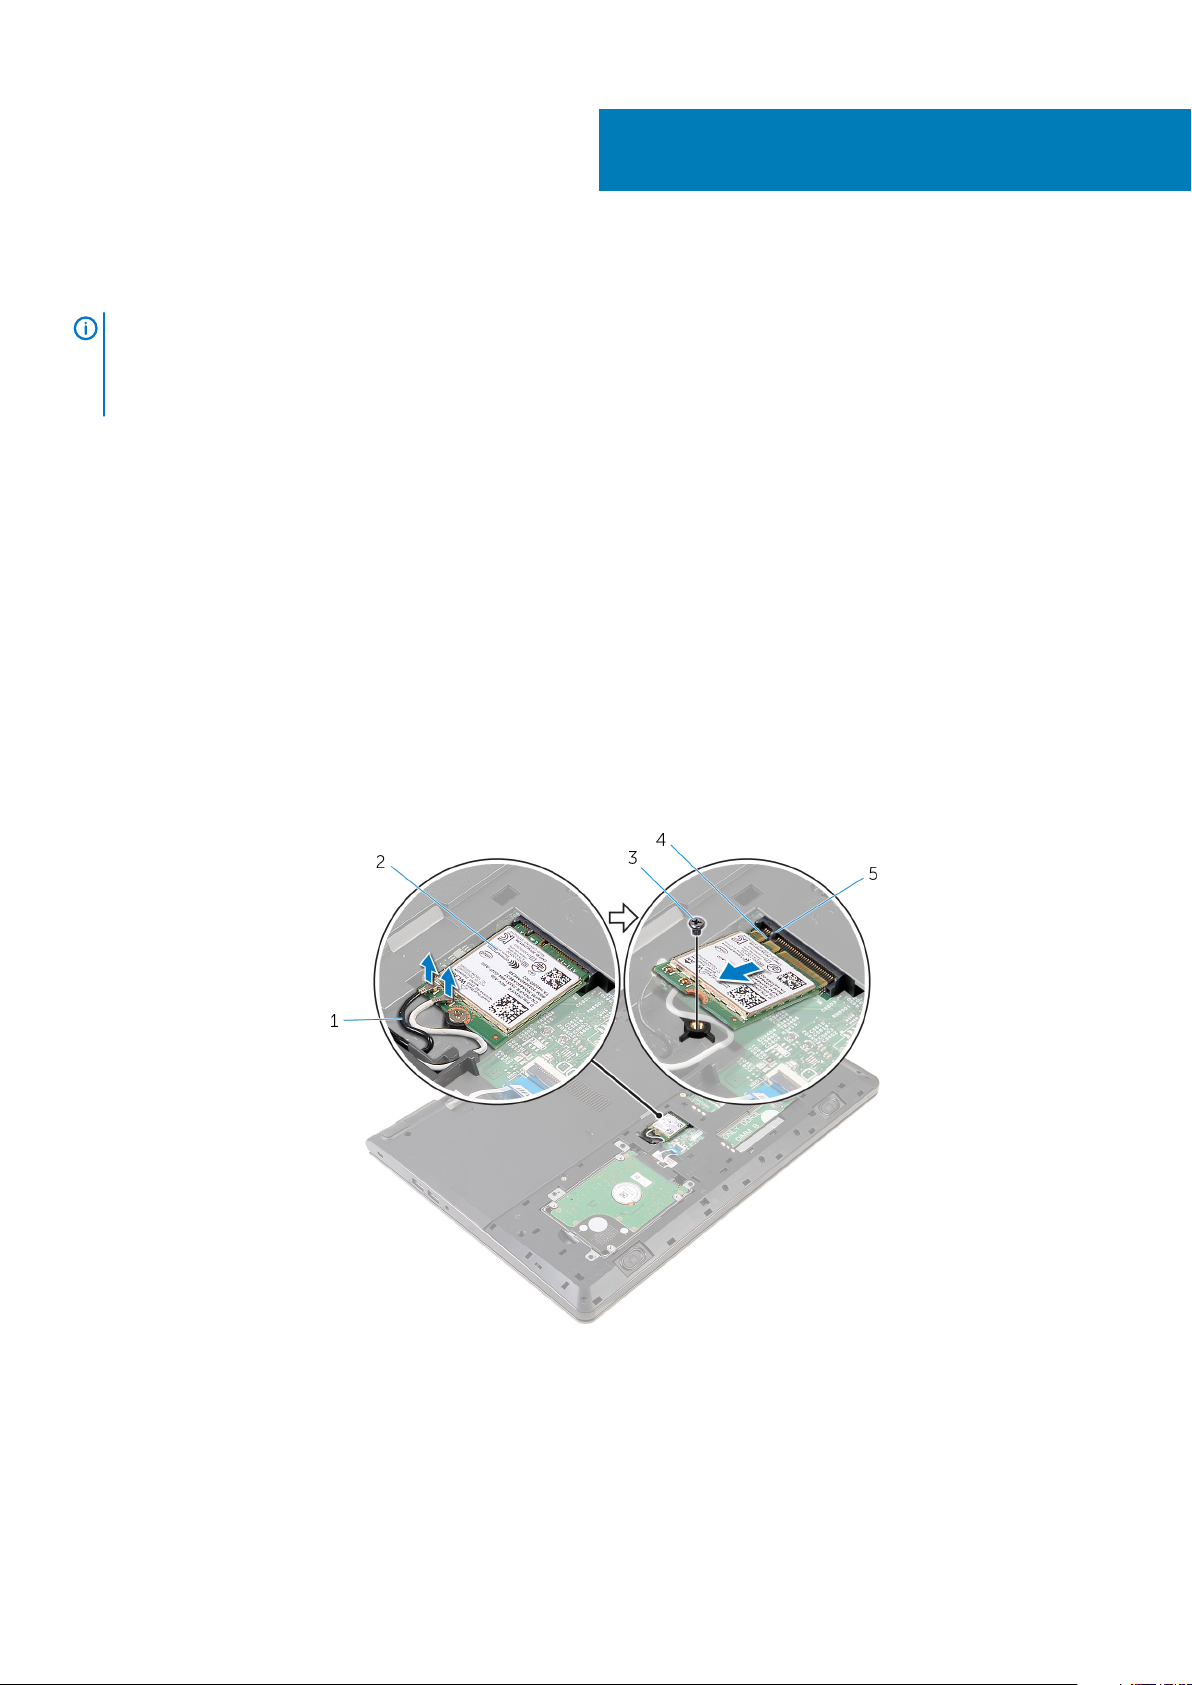
1. Disconnect the antenna cables from the wireless card.
2. Remove the screw that secures the wireless card to the system board.
3. Lift the wireless card, and then slide and remove it from the system board.
11
antenna cables (2) 2. wireless card
1.
3. screw 4. notch
5. tab
Retirar a placa sem fios 19
Volte a colocar a placa sem fios.
NOTA: Before working inside your computer, read the safety information that shipped with your computer and follow
the steps in Before working inside your computer. After working inside your computer, follow the instructions in After
working inside your computer. For more safety best practices, see the Regulatory Compliance home page at
www.dell.com/regulatory_compliance.
Tópicos
• Procedimento
• Pós-requisitos
Procedimento
12
AVISO:
1. Alinhe o encaixe na placa sem fios com a patilha no encaixe da placa e deslize-a para o encaixe.
2. Volte a colocar o parafuso que fixa a placa sem fios à placa de sistema.
3. Ligue os cabos de antena à placa sem fios. A tabela seguinte apresenta os esquemas de cores dos cabos de antena para a placa sem
fios suportada pelo computador:
Connectors on the wireless card
Main (white triangle) White
Auxiliary (black triangle) Black
Para evitar causar danos na placa sem fios, não coloque cabos sob a mesma.
Antenna-cable color
Pós-requisitos
1. Volte a colocar o painel de base.
2. Volte a colocar a bateria.
20 Volte a colocar a placa sem fios.
Retirar o teclado
NOTA: Before working inside your computer, read the safety information that shipped with your computer and follow
the steps in Before working inside your computer. After working inside your computer, follow the instructions in After
working inside your computer. For more safety best practices, see the Regulatory Compliance home page at
www.dell.com/regulatory_compliance.
Tópicos
• Pré-requisitos
• Procedimento
Pré-requisitos
Retire a bateria.
Procedimento
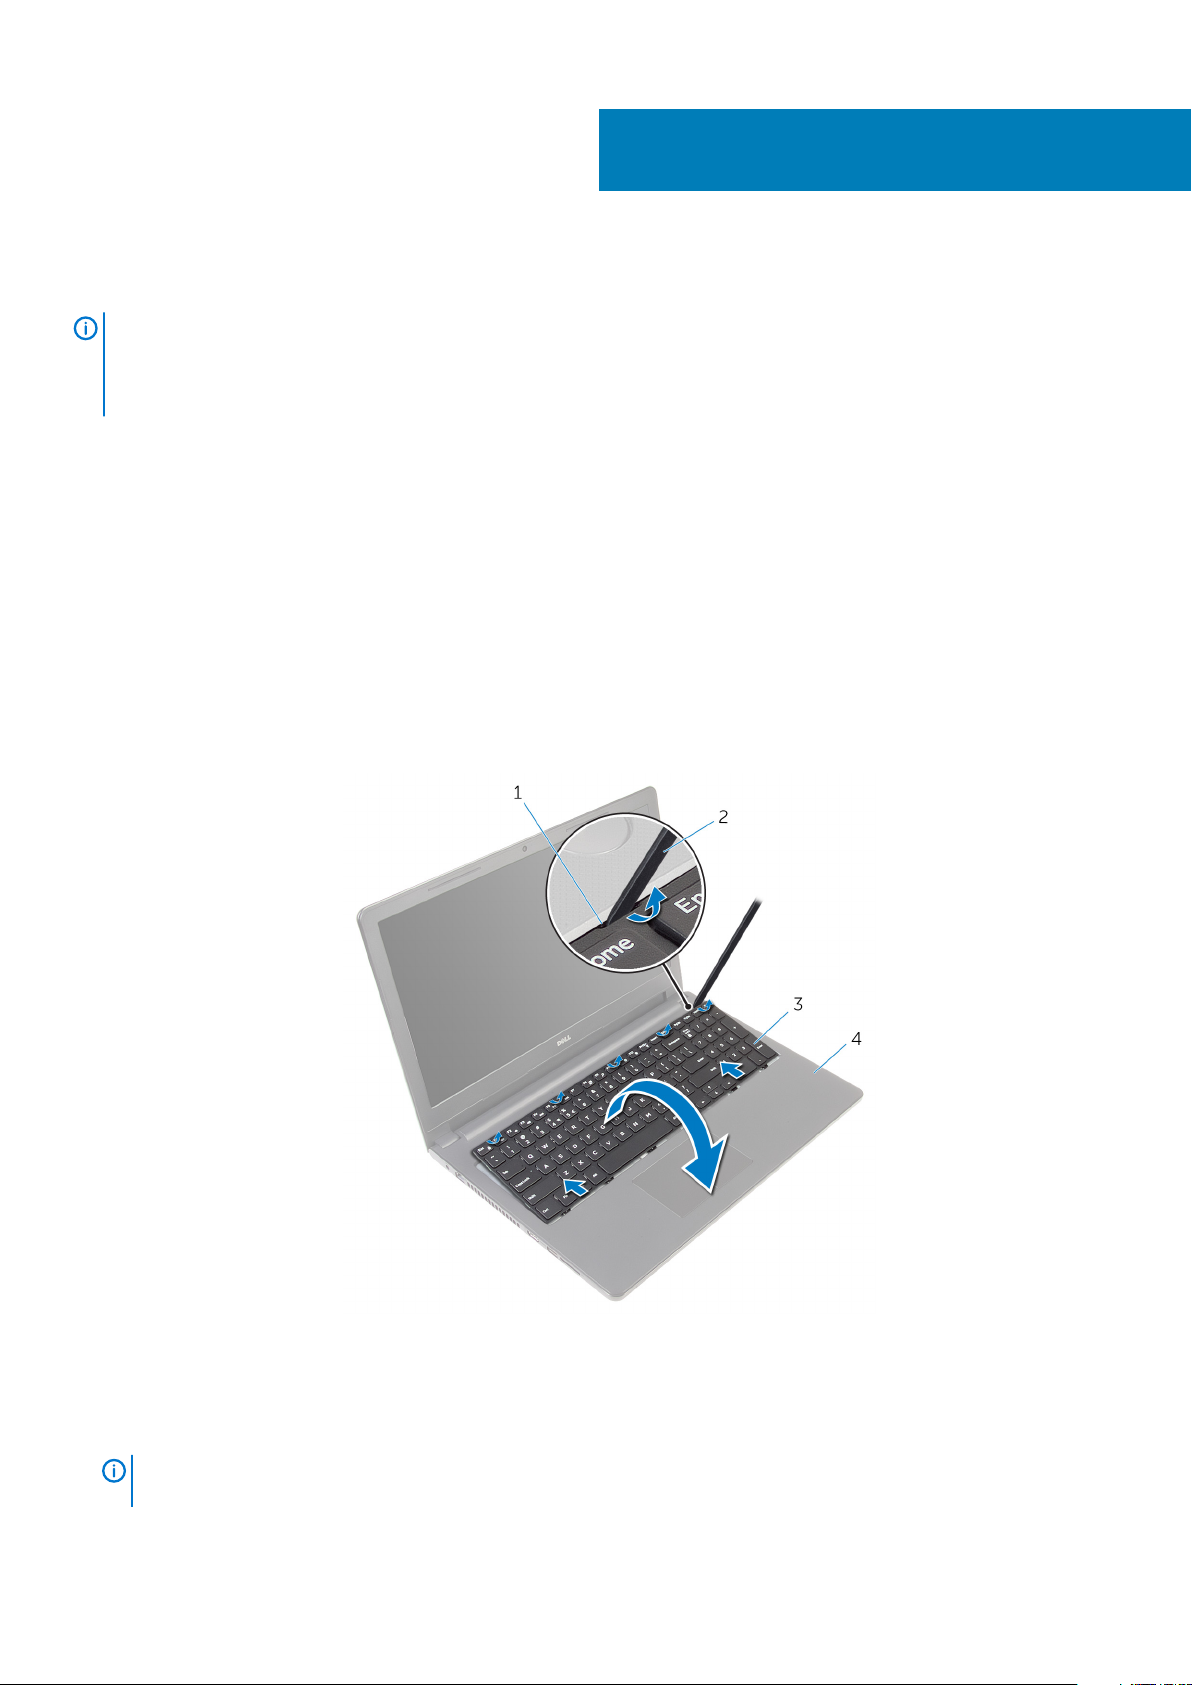
1. Vire o computador ao contrário e abra o ecrã o mais possível.
2. Utilizando um instrumento aguçado em plástico, solte as patilhas que fixam o teclado ao conjunto do apoio para as mãos.
13
patilha 2. instrumento de plástico pontiagudo
1.
3. teclado 4. conjunto do apoio para mãos
3. Vire cuidadosamente o teclado ao contrário e coloque-o sobre o conjunto do apoio para as mãos.
4. Levante os trincos e desligue da placa de sistema os cabos do teclado e da retroiluminação do teclado.
NOTA:
teclado retroiluminado.
O cabo da retroiluminação do teclado só está presente se o computador portátil tiver sido fornecido com um
Retirar o teclado 21
 Loading...