

Dell Inspiron 20 3000 Series, Inspiron 20 3060, Inspiron 20-3064 Setup And Specifications

Inspiron 20 3000
Setup and Specications
Computer Model: Inspiron 20-3064
Regulatory Model: W15B
Regulatory Type: W15B005

Notas, precauciones y avisos
NOTA: Una NOTA indica información importante que le ayuda a hacer un
mejor uso de su producto.
PRECAUCIÓN: Una PRECAUCIÓN indica la posibilidad de daños en el
hardware o la pérdida de datos, y le explica cómo evitar el problema.
AVISO: Un mensaje de AVISO indica el riesgo de daños materiales,
lesiones corporales o incluso la muerte.
© 2016-2018 Dell Inc. or its subsidiaries. All rights reserved. Dell, EMC, and other
trademarks are trademarks of Dell Inc. or its subsidiaries. Other trademarks may be
trademarks of their respective owners.
2018 - 05
Rev. A01

Contents
Set up your computer................................................... 5
Vistas........................................................................... 11
Front........................................................................................................11
Left......................................................................................................... 12
Right....................................................................................................... 13
Back........................................................................................................14
Tilt...........................................................................................................15
Easel stand........................................................................................15
Pedestal stand.................................................................................. 16
Especicaciones.......................................................... 18
Dimensions and weight........................................................................... 18
Easel stand (maximum dimensions)...................................................18
Pedestal stand (maximum dimensions)............................................. 19
System information................................................................................ 20
Memory..................................................................................................20
Communications.....................................................................................20
Audio.......................................................................................................21
Storage................................................................................................... 21
Media-card reader...................................................................................21
Display....................................................................................................22
Camera...................................................................................................22
Ports and connectors.............................................................................22
Video......................................................................................................23
Power adapter........................................................................................23
Stand......................................................................................................24
Computer environment...........................................................................24
3

Getting help and contacting Dell................................. 25
Self-help resources.................................................................................25
Contacting Dell.......................................................................................25
4

Set up your computer
CAUTION: Place the computer on a soft and clean surface to avoid
scratching the display.
5
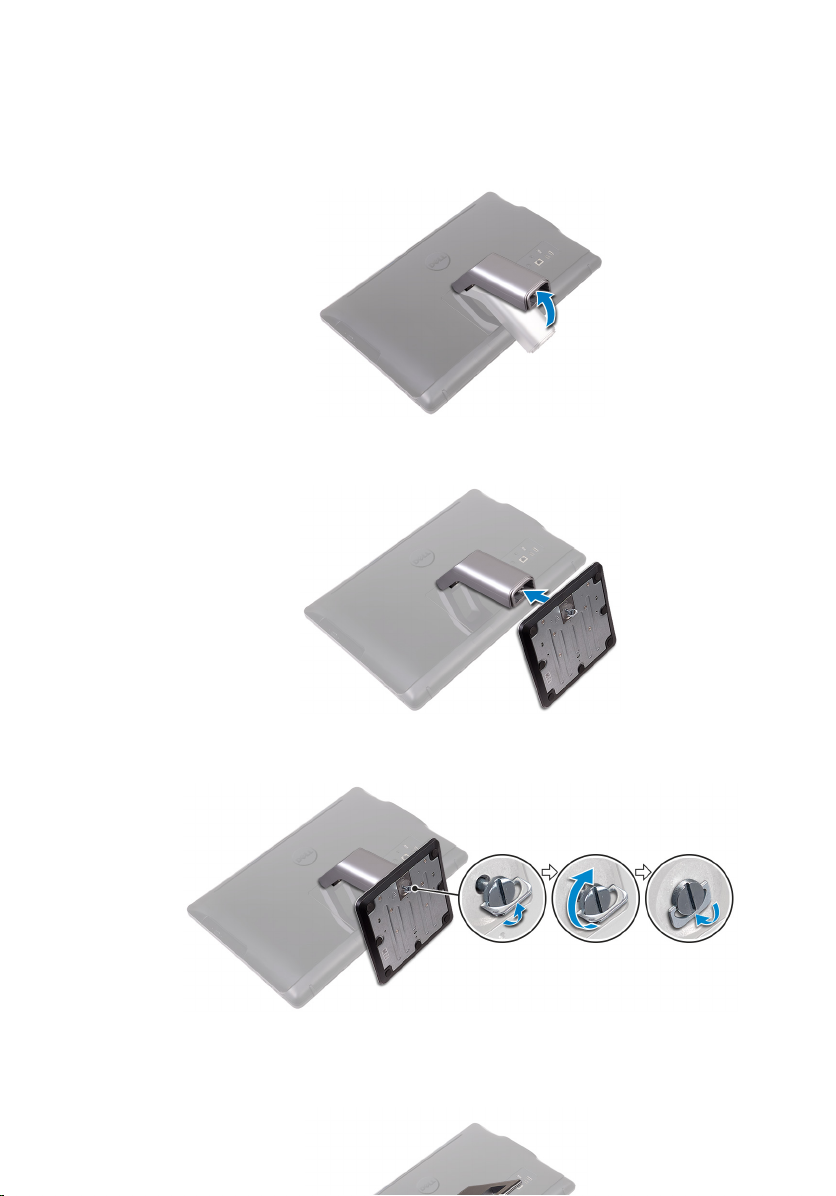
1 Set up the stand.
Pedestal stand
a) Lift the stand riser.
Figure 1. Lifting the stand riser
b) Attach the base.
Figure 2. Attaching the base
c) Tighten the captive screw to secure the base to the stand riser.
Figure 3. Tightening the captive screw to secure the base to the stand
Easel stand
Lift the stand.
6

2 Set up the keyboard and mouse.
See the documentation that shipped with the keyboard and mouse.
3 Route the power cable through the routing guide on the stand and connect the
power adapter.
Easel stand
Figure 5. Connecting the power adapter with the easel stand
Pedestal stand
Figure 6. Connecting the power adapter with the pedestal stand
7

4 Press the power button.
Figure 7. Pressing the power button
8
 Loading...