

Dell Inspiron 11 User Manual

Me and My Dell
© 2013 Dell Inc.

NOTE: A NOTE indicates important information that helps you make
better use of your computer.
CAUTION: A CAUTION indicates potential damage to hardware or
loss of data if instructions are not followed.
WARNING: A WARNING indicates a potential for property damage,
personal injury, or death.
© 2013 Dell Inc.
Trademarks used in this text: Dell
™
, the DELL logo, and Inspiron™ are
trademarks of Dell Inc.; Intel®, Centrino®, and Core™ are either trademarks
or registered trademarks of Intel Corporation in the U.S. and other
countries; Microsoft®, Windows®, and Windows start button logo are
either trademarks or registered trademarks of Microsoft Corporation
in the United States and/or other countries; Bluetooth® is a registered
trademark owned by Bluetooth SIG, Inc. and is used by Dell under license;
Blu-ray Disc™ is a trademark owned by the Blu-ray Disc Association(BDA)
and licensed for use on discs and players.
2013 – 08 Rev. A01

Contents
Windows 8 Features 13
Signing in 13
Microsoft account 13
Local account 13
Locking and unlocking your computer 13
Accessing the desktop 14
Turning off your computer 14
Charms 14
Start screen and tiles 15
Apps 15
Closing an app 15
Snapping apps 15
More Information 15
About Your Computer 16
Power Adapter 16
Battery 17
Coin-Cell Battery 17
Touchpad 18
Display 18
Touchscreen 18
3D 18
Wireless Display 19
Contents 3

Keyboard 19
Physical Keyboard 20
Keyboard Backlight 20
On-Screen Keyboard 21
Keyboard Connection Types 21
Wired 21
Wireless 21
Service Tag and Express-Service Code 22
Locating the Label on Your Computer 22
Dell Support Website 22
System Setup 22
Storage Device 23
Internal Storage Devices 23
Removable Storage Devices 23
Optical Drives and Discs 23
Memory Cards 24
Memory Module 26
System Board 27
Chipset 28
Processor 28
Computer Fan 29
Thermal Grease 29
Video Card 30
TV Tuners 31
Internal 31
External 31
4 Contents

Speakers 32
2.1 Audio 32
5.1 Audio 32
7.1 Audio 32
Webcam 33
ExpressCards 33
Network 35
Modem 35
Network-Interface Controller (NIC) 35
Wireless Local-Area Network (WLAN) Adapter 36
Wireless Wide Area Network (WWAN) Adapter 36
Bluetooth 36
Near-Field Communication 36
Setting Up Your Computer 37
Connecting To The Internet 37
Connecting to the Internet Using LAN 37
Connecting to the Internet Using WLAN 37
Connecting to the Internet Using WWAN 38
Setting up Audio 39
Configuring 5.1/7.1 Audio 39
Connecting 5.1 Speakers 40
Connecting 7.1 Speakers 41
Setting Up Your Printer 42
Setting Up Your Webcam 43
Integrated Webcam 43
External Webcam 43
Setting up Bluetooth 43
Contents 5

Using Your Computer 44
Charging the Battery 44
Using your Keyboard 44
Keyboard Shortcuts 44
Keyboard Shortcuts — Windows 8/Windows RT 47
Customizing Your Keyboard 48
Changing Keyboard Input Language 49
Using Numeric Keypad on a Laptop 50
Using Your Touchpad 50
Touchpad Gestures 51
Scroll 51
Zoom 52
Rotate 53
Flick 53
Quick Launch 54
Using Your Touchscreen 54
Touchscreen Gestures 54
Zoom 55
Dwell 55
Flick 55
Rotate 56
Scroll 56
Using Bluetooth 57
Pairing a Bluetooth device with your computer 57
Using the Webcam 58
Capturing a Still Image 58
Recording a Video 58
Selecting the Camera and Microphone 58
6 Contents

Ports and Connectors 59
Audio 59
Types of Audio Ports 59
USB 60
USB Ports 60
USB Standards 61
eSATA 61
IEEE 1394 62
Key Features 62
Types of IEEE 1394 Connectors 62
Visual Graphics Array (VGA) 63
Digital Visual Interface (DVI) 63
DisplayPort 63
Mini-DisplayPort 63
Advantages of DisplayPort 64
HDMI 64
Advantages of HDMI 64
Mini HDMI 64
Micro HDMI 65
S/PDIF 65
Network 66
Local Area Network (LAN) 66
Wireless Local Area Network (WLAN) 67
Wireless Wide Area Network (WWAN) 67
Wireless Personal Area Network (WPAN) 67
Contents 7

Software and Applications 68
Computrace 68
Enabling Computrace 69
Getting Help on Computrace 69
My Dell Downloads 69
My Dell 70
Downloading or Upgrading My Dell 70
Accessing My Dell: 70
PC Checkup 70
Solution Station 71
Solution Station Offerings 72
Quickset 72
Installing Quickset 73
NVIDIA 3D Applications 73
Playing Games in 3D 73
Keyboard Shortcuts 74
DellConnect 75
Restoring Your Operating System 76
System Recovery Options 76
Dell Backup and Recovery 77
Dell Backup and Recovery Basic 77
Accessing Dell Backup and Recovery 77
Creating System Reinstall Discs 78
Restoring Your Computer 78
Dell Backup and Recovery Premium 78
Upgrading to Dell Backup and Recovery Premium 78
Restoring system data 78
8 Contents

Restoring specific files or folders from
a Full System Backup 78
Restoring specific files or folders from
a File & Folder Backup 79
Creating a Full System Backup 79
Dell DataSafe Local Backup 79
Dell DataSafe Local Backup 80
Dell DataSafe Local Backup Basic 80
Launching Dell DataSafe Local Backup 80
Creating system reinstall disks 80
Restoring your computer to a previous date
or factory settings 80
Dell DataSafe Local Backup Premium 81
Upgrading to Dell DataSafe Local Backup Premium 81
Restoring system data 81
Restoring data using File and Folder Local Backup 81
Restoring specific files or folders from
a Full System Backup 81
Restoring specific files or folders from
a File & Folder Backup 81
Dell Factory Image Restore 82
Accessing Dell Factory Image Restore 82
Starting Dell Factory Image Restore 83
System Restore 84
Windows 8 84
Using System Restore 84
Undoing the Last System Restore 84
Windows 7 85
Using System Restore 85
Undoing the Last System Restore 85
Contents 9

Operating System Disc 86
Reinstalling the Operating System Using the Operating
System Disc 86
System Reinstall Discs 86
Restoring Your Computer Using System Reinstall Disc 87
Troubleshooting 88
Basic Troubleshooting Steps 88
Diagnostics 88
Pre-Boot System Assessment 88
Invoking PSA 88
Enhanced PSA 89
LCD BIST 90
Starting LCD BIST 90
Invoking ePSA 91
Beep Codes 92
BIOS 93
Changing BIOS Settings 93
Entering System Setup 93
Resetting BIOS Password 94
Remove the CMOS Battery 94
Use System-Board Jumper 94
Changing the Boot Sequence 95
Using Boot Menu 95
Using System Setup 95
10 Contents

Getting Help and ContactingDell 96
Getting Help 96
Contacting Dell 96
References 97
Computer Maintenance 97
Power Management 97
Configuring Power Settings 98
Configuring the Power Button Behavior 98
Improving Battery Life 99
Dell Longevity Mode 100
Dell Desktop Mode 100
Migration Tips 101
Migrating from one Windows Operating System to
a newer OperatingSystem 101
Ergonomic Instructions 101
Dell and the Environment 103
Regulatory Compliance Policy 104
Contact Details for Regulatory Compliance Web site 104
Additional Compliance Information 104
Contents 11


Windows 8 Features
Signing in
You can sign in to Windows 8 using either a Microsoft account or a
localaccount.
Microsoft account
NOTE: To sign in using a Microsoft account for the first time,
yourcomputer must be connected to the Internet.
Using a Microsoft account synchronizes settings, customizations, and soon,
with your Microsoft account and other Windows8 devices that you sign in
to using the same email ID. It also associates the email, SkyDrive, and other
linked accounts with your user profile on the computer. The settings of your
computer are backed up in your Microsoft account so that you can restore
them if needed.
To sign in using an existing Microsoft account, type the email ID
andpassword.
To create a new Microsoft account, tap or click Sign up for a new email
address and follow the instructions on the screen.
Local account
Tap or click Sign in without a Microsoft account and follow the instructions
on the screen.
Locking and unlocking your computer
Locking your computer:
1. Access the charms sidebar and tap or click Start.
2. Tap or click your account picture in the upper-right corner and then
select Lock.
Unlocking your computer:
1. Swipe-up from the bottom edge of the screen (or press any key if you
are using a keyboard) to dismiss the lock screen.
2. In the log on screen, login to your computer using the method of your
choice.
NOTE: To use a different sign-in method, tap or click Sign-in options
to see the available options.
Signing in 13
Accessing the desktop
To access the desktop interface — like in the previous versions of
Windows— tap or click the Desktop tile on the Start screen.
Turning off your computer
1. Access the charms sidebar and tap or click Settings.
2. Tap or click Power and then select Shut down.
NOTE: You can access the sleep and hibernate options by following
the same steps.
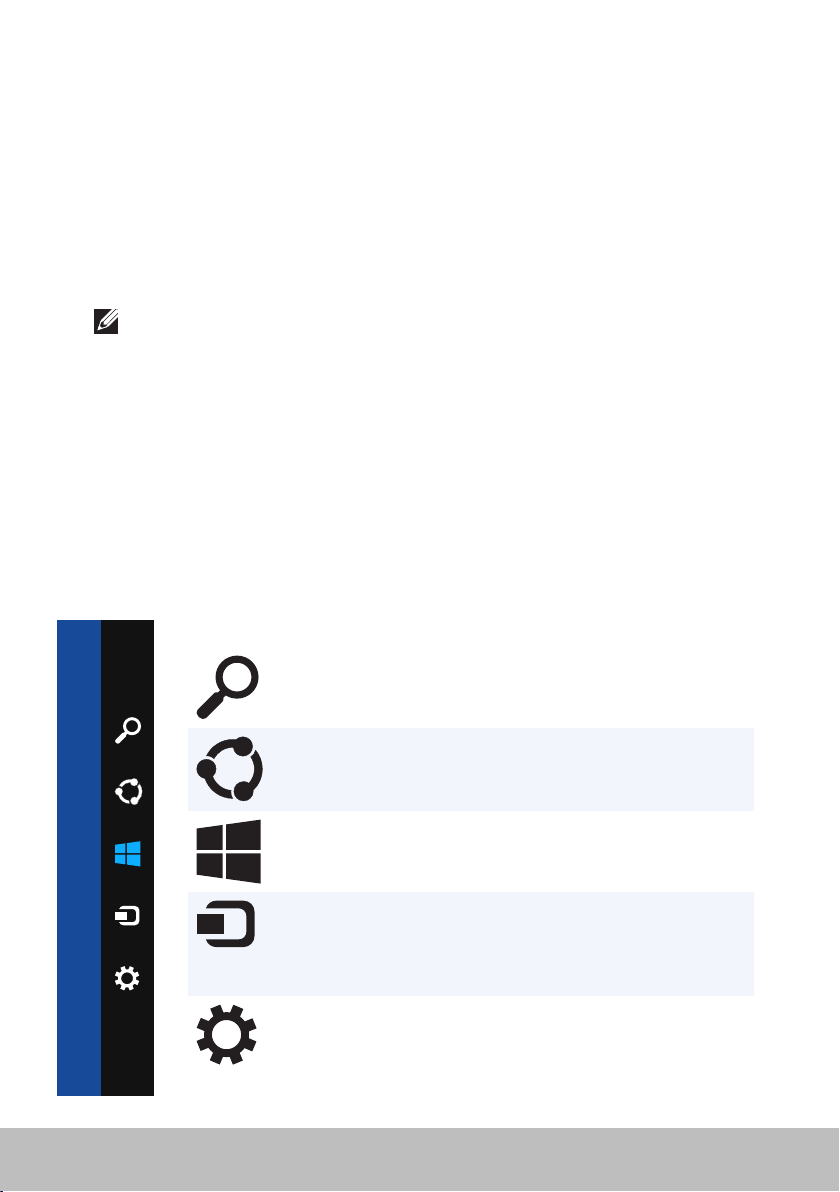
Charms
Charms provides quick access to the most common tasks such as search,
share, settings, and so on. The charms sidebar displays a list of charms
available depending on the screen or app that is active. To open the charms
sidebar, swipe-in from the right edge of the screen or point your mouse to
the upper/lower-right corner of the screen. If you are using a multi-touch
touchpad, swipe-in from the right edge of the touchpad.
The most common charms are Search, Share, Start, Devices, and Settings.
Search Allows you to find apps, settings,
and files on your computer and the
internet.
Share Allows you to share photos, links,
and so on with your friends and
social networks.
Start Toggles between the Start screen
Devices Allows you to send files to printers,
Settings Provides access to notifications,
14 Accessing the desktop
and last used app.
other computer, and so on. Also
allows to send video and audio to
supported devices, such as a TV.
volume controls, brightness
controls, and other computer
settings.

Start screen and tiles
Start Screen provides access to apps, friends, files and folders, and so on.
You can customize the Start screen by adding, resizing, or removing tiles.
You can also move tiles around and group them together.
Some of the tiles are automatically updated and lets you read the news
headlines, status updates, and so on.
You can also search from the Start screen by typing the keyword and
tapping or pressing the <Enter> key.
Apps
Apps are programs created specifically to utilize the metro interface of
Windows 8. Apps run in full-screen mode and are generally integrated with
the Windows 8 user interface. Tap or click on the apptile to launch the app.
Closing an app
•If you are using a touchscreen, drag the app to the bottom of the screen
and release the app.
•If you are using a mouse, click and drag the app from the top of the
screen to the bottom of the screen and release the app.
Snapping apps
You can view two apps simultaneously by snapping them together.
To snap apps:
1. Open the two apps.
2. Drag and release one of the apps to the right-side of the screen to dock
the app.
3. Drag and release the other app to the left-side of the screen to dock
theapp.
You may resize the apps by holding the resize button and dragging it.
More Information
You can get more information on Windows 8 and the new features using
any of the following resources.
•Getting Started tile
•dell.com/support
•microsoft.com
Start screen and tiles 15

About Your Computer
Power Adapter
Power adapters are used to supply power to portable computers and certain
desktop computers. The Dell power-adapter kit consists of the power
adapter and the power cable. The power-adapter rating (65 W, 90 W, and
soon) depends on the computer it is designed for, and the power cable
varies based on the country where the power adapter is shipped.
CAUTION: To avoid damaging your computer, it is recommended
touse only the power adapter that shipped with your computer or
aDell‑approved replacement power adapter.
16 Power Adapter

Battery
Batteries are mainly classified by their power ratings, such as 45WHr,
65WHr, and soon. The battery allows you to use your device when it is not
connected to a power outlet.
The life cycle of the battery is the number of time it can be discharged
and recharged without affecting the operating time significantly. After the
battery life-cycle reaches its end, you must replace the battery.
Depending on the computer model, the battery on your computer may be
user replaceable or may require a Dell service technician to replace.
NOTE: High-capacity batteries generally have a longer life-cycle, since
you need to charge high-capacity batteries less often compared to
lowcapacity batteries.
NOTE: For tips on improving the battery life, see Improving Battery Life.
Coin‑Cell Battery
Coin-cell battery provides power to the Complementary Metal-Oxide
Semiconductor (CMOS) chip while the computer is turned off. The CMOS
chip contains the time, date, and other configuration information about
your computer.
Under normal usage conditions, the coin-cell battery can last for several
years. The factors that affect coin-cell battery life are type of system board,
temperature, the time for which the computer is powered off, and soon.
Battery 17

Touchpad
A touchpad is available on most laptops and provides the functionality
of amouse. It has a touch-sensitive surface that senses the motion
and position of your finger(s). You can use the touchpad to move the
cursor, drag or move selected items, and click by tapping the surface.
Gesture-enabled touchpads support gestures such as zoom, pinch, rotate,
scroll, andso on. You can also purchase external touchpads.
NOTE: For information on using the touchpad, see Using Your
Touchpad.
Display
Displays are classified based on their screen size, resolution, color gamut,
and so on. Generally, a screen with higher resolution and better color
support provides better image quality. Some external displays also have
USBports, media-card readers, and so on.
Displays may also support features such as, touchscreen, 3D,
andwirelessconnection.
Touchscreen
Touchscreen is a display device that lets you interact with the objects on
the screen by touching the display instead of using a mouse, touchpad, or a
keyboard. You can operate a touchscreen with a finger, or another passive
object, such as a stylus. Touchscreens are commonly used in phones,
tablets, computers, and so on. Commonly used touchscreen technologies
are capacitive touch and resistive touch.
NOTE: Touchscreen may not be supported on all computers.
NOTE: For information on using the touchscreen, see Using Your
Touchscreen.
3D
3D-capable displays can display 3D images and videos. 3D works by
presenting separate 2D images to the left and right eye. These images are
then combined and interpreted by the brain as one image with depth.
NOTE: You may need specially designed 3D glasses to be able to view
3D images.
18 Touchpad

Wireless Display
The wireless feature allows you to share your computer display with a
compatible TV without the use of cables. To check if your TV supports this
feature, see the documentation of the TV.
Minimum requirements for setting up wireless display are:
Processor Intel Core i3-3xx
Video Controller Intel HD Graphics
WLAN card Intel Centrino 6100/6200/6300 or
IntelCentrinoAdvanced-N + WiMAX 6250
Operating System Windows 7 Home Premium or
Windows 8
Driver Latest wireless-card drivers and Intel Wireless
Display Connection Manager available at
dell.com/support.
NOTE: Wireless display may not be supported on all computers.
Keyboard
Keyboards allow you to type characters and perform special functions using
shortcut keys. The number of keys and the characters available may differ
based on the country where the keyboard is shipped.
Laptops have built-in keyboards. Tablets generally have on-screen
keyboards and some tablets also support external keyboards. Dell desktops
have an external keyboard connected using USB or wireless signals.
The common keys available on the keyboard are:
•Alphanumeric keys for typing letters, numbers, punctuation, andsymbols
•Multimedia and application shortcut keys
•Control keys such as <Ctrl>, <Alt>, <Esc>, and the Windows key
•Shortcut keys to perform specific tasks or to launch specific features
•Function keys, <F1> through <F12>
•Navigation keys for moving the cursor around in documents or
windows: <Home>, <End>, <Page Up>, <Page Down>, <Delete>,
<Insert>, and arrow keys
Keyboard 19
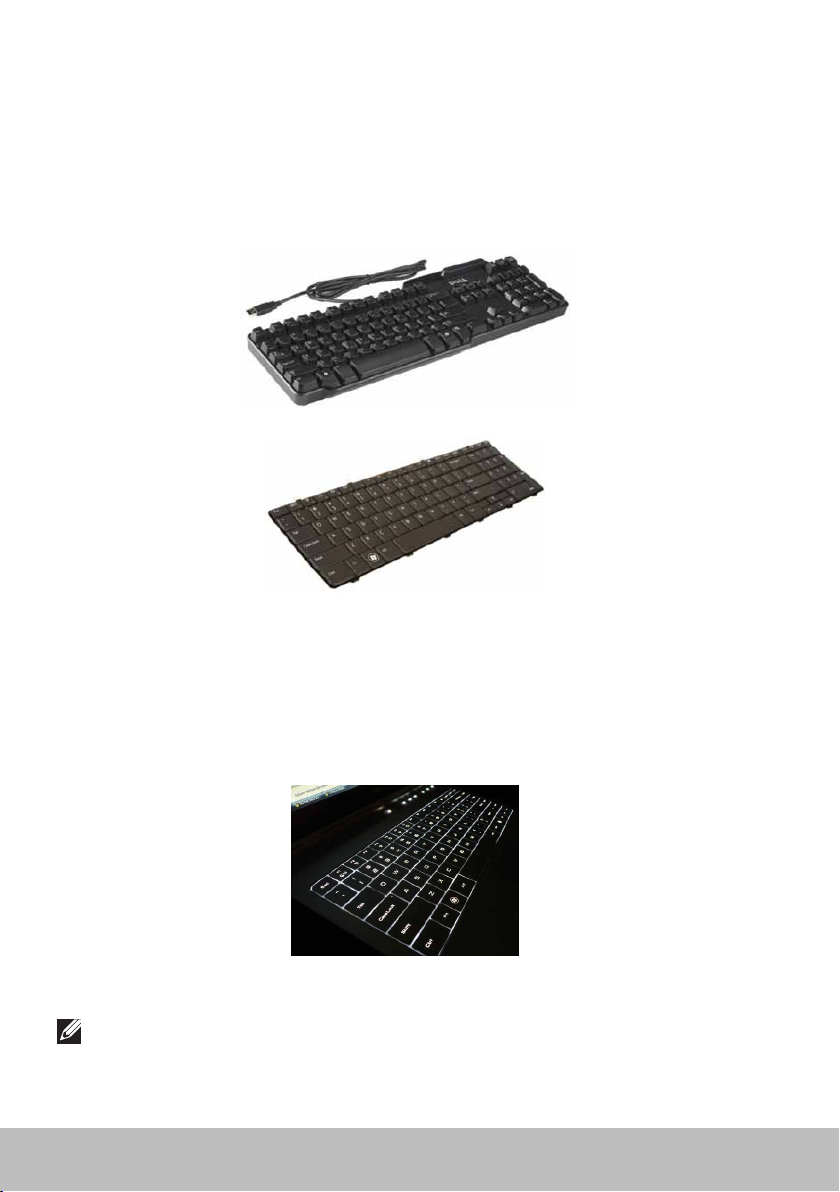
Physical Keyboard
Physical keyboards are used with laptop and desktop computers.
Laptopsgenerally have a built-in keyboard. External keyboards are generally
used with desktop computers. Some keyboards may have features such
as keys for volume adjustment, application shortcuts, built-in touchpad,
programmable shortcut keys, backlight, and so on.
Keyboard Backlight
The backlit present on some physical keyboards illuminates the symbols
on the keys to allow for using the keyboard in dark environments. You
can turn on the backlight manually or configure the backlight to turn on
automatically when your computer is placed in a dark environment.
The backlit keyboard on Dell laptops have different lighting states. Press the
<Fn> and the right-arrow key to toggle between the various lighting states.
NOTE: Backlit keyboard may not be available on all computers. See the
Specifications of your computer at dell.com/support.
20 Keyboard

On‑Screen Keyboard
On screen keyboard are available on almost all computers and tablets,
however, they generally used in touchscreen devices such as tablets and
all-in-one computers. You can select the keys using a mouse or by touching
the keys on a touchscreen.
Keyboard Connection Types
Keyboards can be connected to your computer with a cable (wired) or using
wireless signals (wireless).
Wired
Wired keyboards are connected to the computer using a cable (generally
USB) and do not require additional power source, such as batteries.
Wireless
Wireless keyboards are may be use Radio Frequency (RF) or Bluetooth (BT)
to connect to your computer. This reduces cable clutter and gives you the
flexibility to use the keyboard from a more comfortable position within a few
meters from the computer. Such keyboards require batteries to operate.
Keyboard that use RFtechnology usually ship with a receiver that you
must connect to your computer. Bluetooth keyboards can pair with your
computer’s built-in Bluetooth card or an external Bluetooth adapter.
Keyboard 21

Service Tag and Express‑Service Code
You can find the Service Tag and the Express-Service Code of your
computer using one of the following:
•Label on the computer or tablet
•My Dell tile or My Dell software on your computer. For more
information, see My Dell.
•Dell support website at dell.com/support
•System Setup
Locating the Label on Your Computer
Laptops — Bottom of the laptop (under system badge or in battery bay)
Desktops — Back or top of the computer chassis
Tablets — Back of the tablet
NOTE: For the specific location of the label on your device,
seetheQuick Start Guide that shipped with your computer or at
dell.com/support.
Dell Support Website
1. Go to dell.com/support.
2. Click Detect Service Tag and follow the instructions on the screen.
System Setup
1. Turn on (or restart) your computer.
2. When the DELL logo is displayed, watch for the F2 prompt to appear
andthen press <F2> immediately to enter System Setup.
NOTE: The F2 prompt stays active only for a short time. If you miss
the prompt, wait for your computer to boot up to the desktop, then
turn off your computer and try again.
3. Navigate to the Main tab and look for Service Tag.
For more information about System Setup, see the Owner’s Manual of
your computer at dell.com/support.
22 Service Tag and Express‑Service Code

Storage Device
Storage devices allow you to store data for later use. Storage devices can
be internal or external. Most storage devices store data till you manually
delete the data. Examples of storage devices are hard-disk drives (HDD),
solid-statedrives (SSD), optical-disc drives, flash drives, and so on.
Internal Storage Devices
Internal storage devices are installed within your computer and generally
cannot be removed while the computer is turned on. The most common
internal storage devices are HDDs and SSDs.
HDDs and SSDs use SATA interface to transfer information. SSDs are
alsophysically similar to HDDs, which makes them compatible with
existingcomputers.
HDDs have disk platters, whereas SSDs have flash memory. This makes
SSDsfaster, quieter, energy efficient, and shock resistant.
Removable Storage Devices
Storage devices that you can remove from your computer without turning
the computer off are called removable storage devices. Commonly used
removable storage devices include:
•Optical discs
•Memory cards
•Flash drives
•External hard drives
Optical Drives and Discs
Your computer may support a DVD RW or a DVD RW and Blu-ray combo
drive. Optical discs can be read-only, write-once, or re-writeable.
Some of the common types of drives are:
•Blu-ray writer — Reads and writes to Blu-ray Discs, DVDs, and CDs.
•Blu-ray reader + DVD RW combo — Reads Blu-ray Discs. Reads and
writes to DVDs and CDs.
•DVD RW — Reads and writes DVDs and CDs.
Storage Device 23
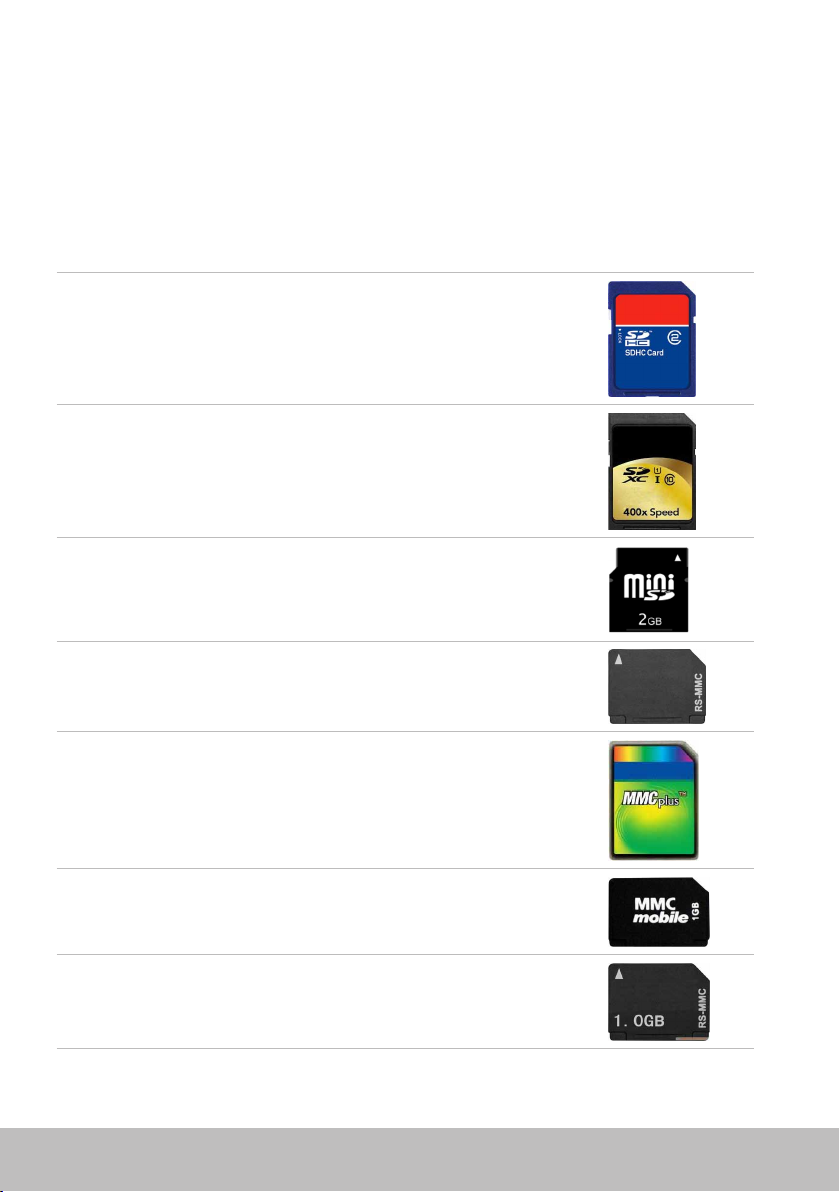
Memory Cards
Memory cards, also referred to as media or flash cards, use flash memory
to store data. They are re-writeable, fast, and retain data even when
power supply is cut off. They are commonly used in devices such as digital
cameras, mobile phones, media players, gaming consoles, and so on. Your
computer may have a media-card reader to read and write to these cards.
Some common types of memory cards are:
Secure Digital (SD)/Secure Digital High Capacity (SDHC)
Secure Digital Extended Capacity (SDXC) [card with
Ultra High Speed (UHS)]
Secure Digital miniSD
Multimedia Card (MMC)
MultiMedia Card plus (MMC+)
Multi Media Card (MMC) Mobile
RS MMC
24 Storage Device

Extreme Digital (xD)
Memory Stick XC (MSXC)
Compact Flash I , II/Compact Flash MD
Memory Stick Duo
Memory Stick Pro Duo
Memory Stick Pro‑HG Duo
Memory Stick (MS)/Memory Stick Pro (MS Pro)
Smart Media/Smart Media XD
Storage Device 25
Memory Module
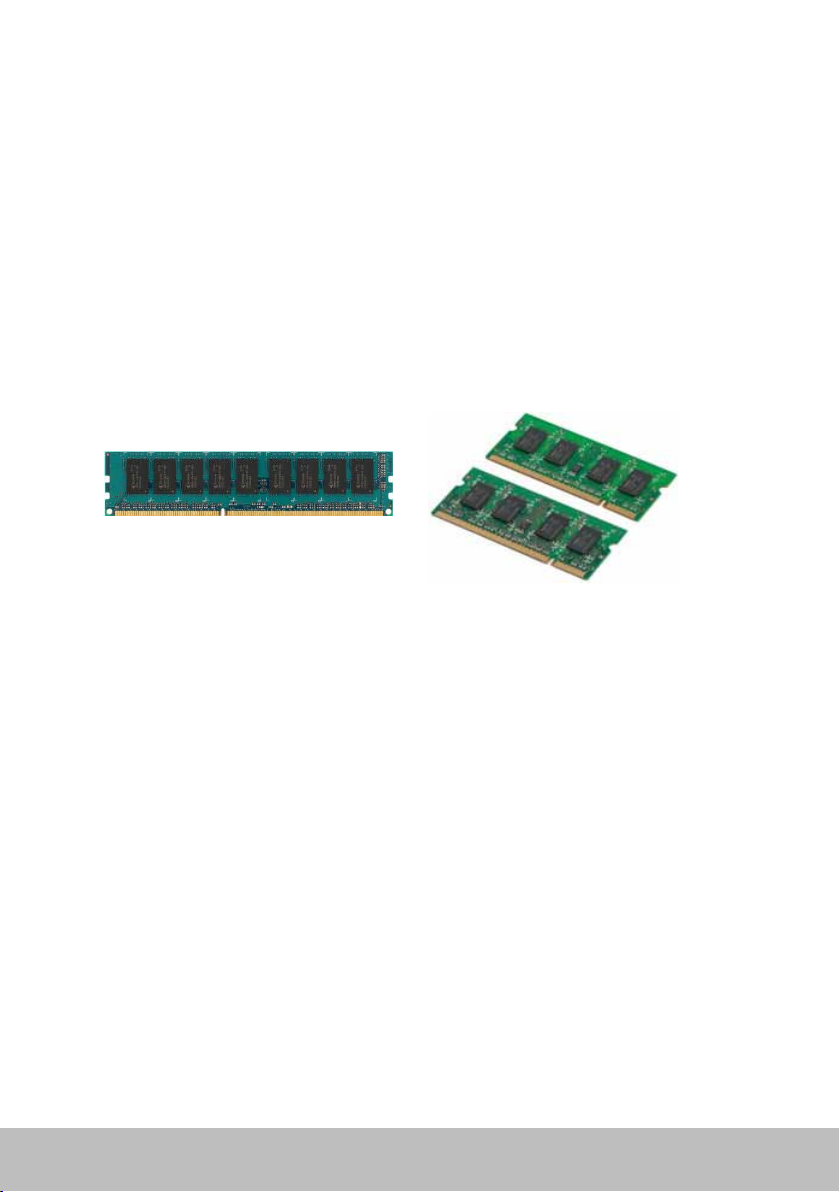
A memory module stores temporary data that your computer needs to
perform tasks. Any file or application loads in the memory modules before
you can open or use them. Memory modules are categorized based on
their capacity (in GB) and speed (in MHz). Faster and higher amount of
memory generally provides better performance. Common memory-module
typesare:
•Dual In-line Memory Module (DIMM) — Used in desktop computers.
•Small Outline Dual In-line Memory Module (SODIMM) — Smaller in size
than DIMMs. Generally used in notebook computers, however, may also
be used in some compact desktops and all-in-one computers.
26 Memory Module
System Board
A system board forms the central part of computers. All other devices
connect to the system board to be able to interact with each other.
The system board holds various controllers and connectors that help in
exchange of data among various components of the computer. A system
board may also have integrated graphics, sound, and networkcapabilities.
Some important components of a system board are:
•Processor socket
•Memory-module connectors
•Expansion-card slots
•CMOS to store the BIOS
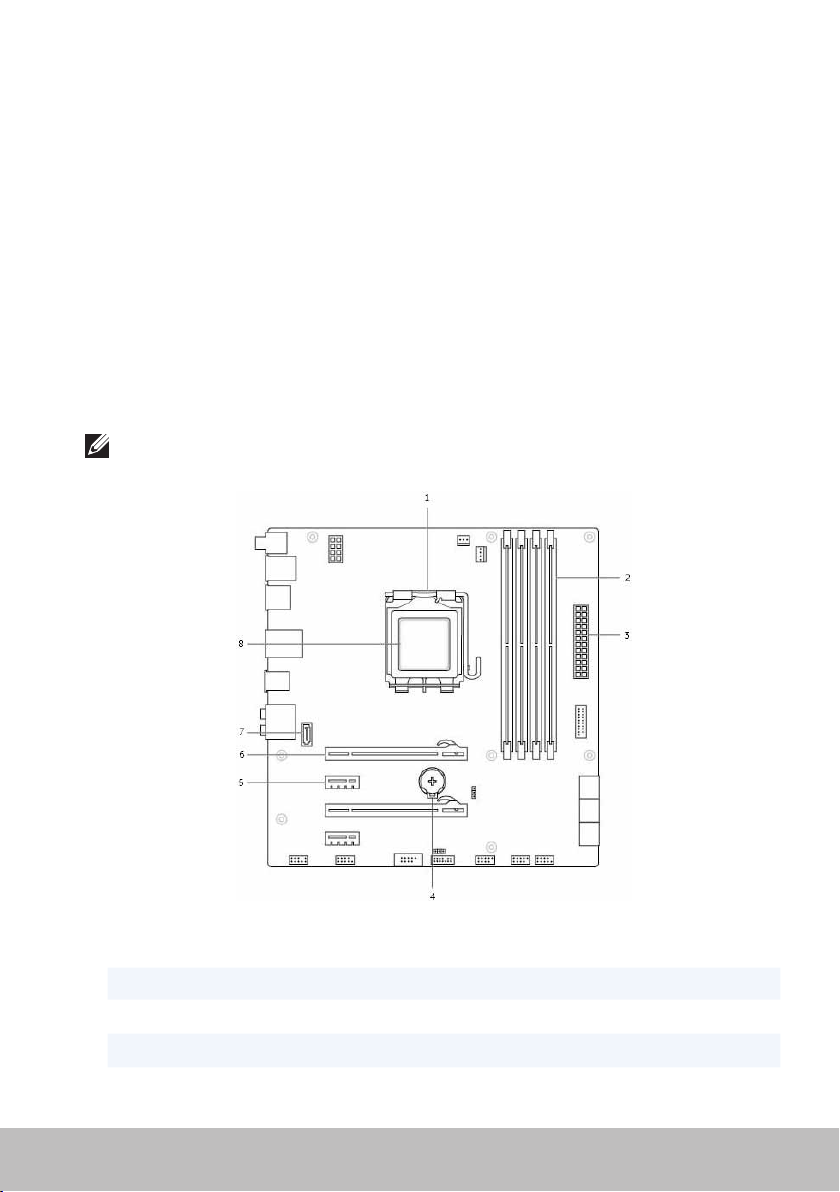
The figure below lists the basic components of a desktop system board.
NOTE: Size, shape, and location of components may vary based on the
type of system board and the computer it is designed for.
1 processor socket 2 memory-module connector
3 power connector 4 battery socket
5 PCI-Express x1 connector 6 PCI-Express x16 connector
7 eSATA connector 8 processor
System Board 27
Chipset
The chipset provides controls the components on the system board and
allows communication between various components. Generally, the chipset
is part of the system board, however, with some new generation processors,
the chipset may be integrated in the processor.
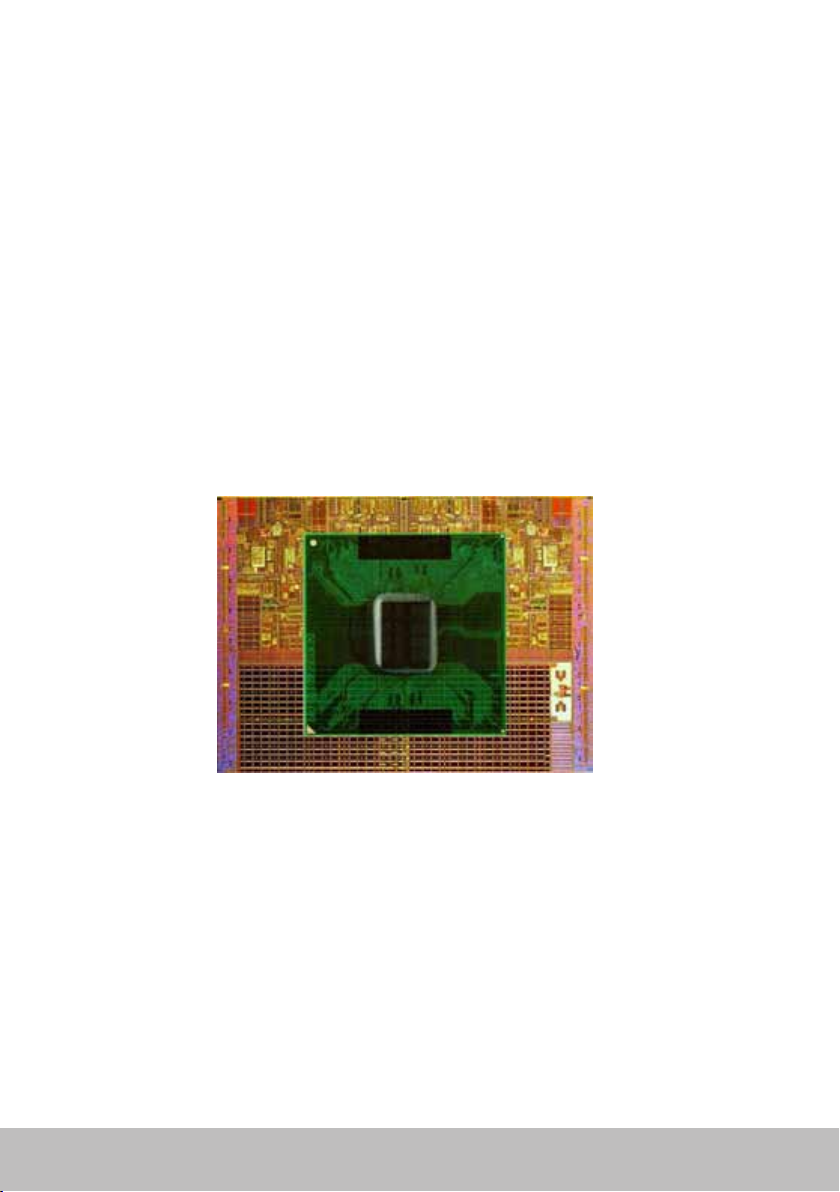
Processor
Processors receive data and instructions from applications and process the
data as requested by the software.
Processors are designed specifically for desktops, laptops, mobile devices,
and so on. Generally the processor designed for one type of device cannot
be used on another type of device.
Processors designed for laptops and mobile devices consume less power
compared to the processors designed for desktops or servers.
Processors are mainly classified based on:
•Number of processing cores
•Speed or frequency measured in GigaHertz (GHz) or MegaHertz (MHz)
•On-board memory, also referred to as cache
These aspects also determine the performance of the processor.
Highervalues generally mean better performance. Some processors may
beintegrated on the system board.
Some of the processor manufactures are Intel, AMD, Qualcomm, and so on.
28 Chipset

Computer Fan
A computer fan cools the internal components of a computer by expelling
hot air from the computer. Computer fans are commonly used to cool
components that have high power consumption and thus generate a high
amount of heat. Keeping the components cool helps in protecting them
from overheating, malfunctioning, and damage.
Heat Sink
Heat sinks are used to dissipate heat generated by the processor, some
high-end graphics cards and on-board chipsets. Heat sinks generally have
afan mounted above or beside them to increase airflow.
A heat sink is made up of fins or blades instead of a single block of metal.
This helps increase the surface area for increased heat dissipation. A layer
of thermal grease is applied between the processor/graphics card and the
heatsink for easy exchange of heat.
Thermal Grease
Thermal grease, also called thermal gel or thermal compound, is used to
create a heat-inductive layer between a processor and heat sink. Applying
thermal grease between the processor and heat sink increases the heat
transfer from the processor to the heat sink, as the thermal grease has better
conductivity than air.
Computer Fan 29

Video Card
Video cards process graphics data and sends video output to a display
device such as a monitor or projector.
Video cards can be of two types:
•Integrated — Often referred to as on-board video card, it is integrated
on the system board. In some computers, the video card is integrated
on the processor. Integrated video cards generally share the system
memory (RAM) and the may also utilize the processor to perform
videoprocessing.
An Accelerated Processing Unit (APU) is integrated on the same die as
the processor and provides higher data transfer rates while reducing the
power consumption.
•Discrete — Discrete video cards are installed separately on the system
board. Discrete video cards have dedicated memory on the cards
and generally provide higher performance than integrated video
cards. Thesecards are best suited for graphic intensive applications,
high-definition video games, and so on.
NOTE: When a discrete video card is installed on a computer that
alsohas an integrated video card, the integrated video card is disabled
by default. Use the System Setup to select which card to use.
Switchable graphics allow computers equipped with both a low-power
integrated graphics chip, and a high-power discrete graphics card to switch
between either cards, depending on the load and requirements.
30 Video Card
 Loading...