

Page 1
About Cautions
CAUTION: A CAUTION indicates a potential for property damage, personal injury, or death.
Removing the Hard Drive
Before You Begin
Unless otherwise noted, each procedure assumes that the following conditions exist:
• You have performed the steps in "Turning Off Your Computer" and "Before Working Inside
Your Computer."
• You have read the safety information in your Dell™
Turning Off Your Computer
NOTICE: To avoid losing data, save and close any open files and exit any open programs before you turn
off your computer.
Shut down the operating system:
1
a
Save and close any open files, exit any open programs, click the
click
Turn Off Computer
b
In the
Turn off computer
The computer turns off after the operating system shutdown process finishes.
2
Ensure that the computer and any attached devices are turned off. If your computer and
attached devices did not automatically turn off when you shut down your operating system,
press and hold the power button for 4 seconds.
.
window, click
Turn off
Product Information Guide.
Start
button, and then
.
www.dell.com | support.dell.com
Before Working Inside Your Computer
Use the following safety guidelines to help protect your computer from potential damage and to
help ensure your own personal safety.
CAUTION: Before you begin any of the procedures in this section, follow the safety instructions in the
Product Information Guide..
NOTICE: Handle components and cards with care. Do not touch the components or contacts on a card.
Hold a card by its edges or by its metal mounting bracket. Hold a component such as a processor by its
edges, not by its pins.
NOTICE: Only a certified service technician should perform repairs on your computer. Damage due to
servicing that is not authorized by Dell is not covered by your warranty.
May 2004
Page 2
NOTICE: When you disconnect a cable, pull on its connector or on its strain-relief loop, not on the cable
itself. Some cables have a connector with locking tabs; if you are disconnecting this type of cable, press
in on the locking tabs before you disconnect the cable. As you pull connectors apart, keep them evenly
aligned to avoid bending any connector pins. Also, before you connect a cable, ensure that both
connectors are correctly oriented and aligned.
NOTICE: To avoid damaging the computer, perform the following steps before you begin working inside
the computer.
Ensure that the work surface is flat and clean to prevent the computer cover from being
1
scratched.
2
Turn off your computer (see page 1).
www.dell.com | support.dell.com
NOTICE: To disconnect a network cable, first unplug the cable from your computer and then unplug it
from the network wall jack.
Disconnect any telephone or telecommunication lines from the computer.
3
4
Disconnect your computer and all attached devices from their electrical outlets, and then
press the power button to ground the system board.
NOTICE: To connect a network cable, first plug the cable into the network wall jack and then plug it into
the computer.
Remove any installed PC Cards from the PC Card slot.
5
6
Close the display and turn the computer upside down on a flat work surface.
NOTICE: To avoid damaging the system board, you must remove the main battery before you service the
computer.
Slide and hold the battery-bay latch release on the bottom of the computer, and then remove
7
the battery from the bay.
Hard Drive
CAUTION: If you remove the hard drive from the computer when the drive is hot, do not touch the metal
housing of the hard drive.
CAUTION: Before working inside your computer, follow the safety instructions located in the Product
Information Guide.
NOTICE: To prevent data loss, turn off your computer before removing the hard drive (see page 1). Do
not remove the hard drive while the computer is on, in standby mode, or in hibernate mode.
NOTICE: Hard drives are extremely fragile; even a slight bump can damage the drive.
NOTE: Dell does not guarantee compatibility or provide support for hard drives from sources other
than Dell.
Page 3
1
Follow the procedures in "Before You Begin" (see page 1).
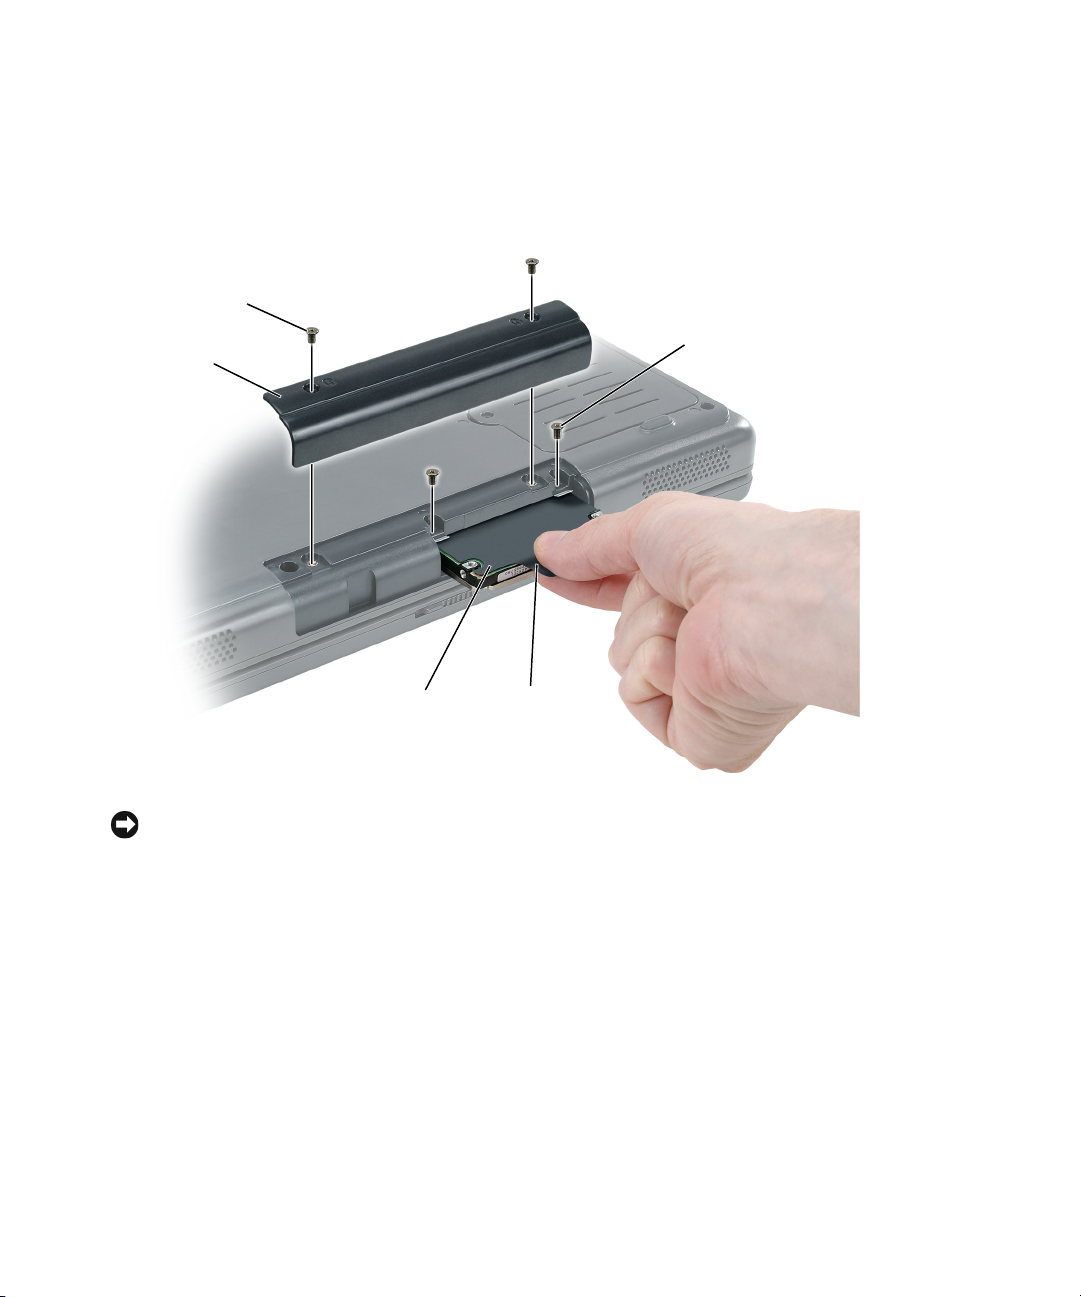
2
Turn the computer over and remove the hard drive cover screws, the cover, and the hard drive
screws.
hard drive cover
screws (2)
www.dell.com | support.dell.com
hard drive
hard drive screws (2)
cover
hard drive
pull-tab
NOTICE: When the hard drive is not in the computer, store it in protective antistatic packaging. See
"Protecting Against Electrostatic Discharge" in the Product Information Guide.
Slide the hard drive out of the computer.
3
____________________
Information in this document is subject to change without notice.
© 2004 Dell Inc. All rights reserved.
Reproduction in any manner whatsoever without the written permission of Dell Inc. is strictly forbidden.
Trademarks used in this text: Dell and the DELL logo are trademarks of Dell Inc.
Other trademarks and trade names may be used in this document to refer to either the entities claiming the marks and names
or their products. Dell Inc. disclaims any proprietary interest in trademarks and trade names other than its own.
Page 4

À propos des précautions
PRÉCAUTION : Une PRÉCAUTION indique un danger d'endommagement du matériel, de blessure
personnelle ou de mort.
Retrait de l'unité de disque dur
Avant de commencer
À moins d'indication contraire, les conditions suivantes doivent être remplies préalablement à
chaque procédure :
• Vous avez effectué les étapes dans les sections «Mise hors tension de l'ordinateur» et «Avant
d'intervenir à l'intérieur de votre ordinateur».
www.dell.com | support.dell.com
• Vous avez lu les consignes de sécurité qui figurent dans votre
produit
Mise hors tension de l'ordinateur
AVIS : Afin d'éviter toute perte de données, enregistrez et fermez tous les fichiers ouverts, puis quittez
tous les programmes avant d'éteindre l'ordinateur.
Arrêt du système d'exploitation :
1
a
Enregistrez et fermez tous les fichiers ouverts, quittez tous les programmes, cliquez sur le
bouton
b
Dans la fenêtre
L'ordinateur s'éteint une fois le processus d'arrêt terminé.
de Dell™
Démarrer
.
, puis cliquez sur
Arrêter l'ordinateur
Arrêter l'ordinateur
, cliquez sur
Arrêter/Éteindre
Guide d'information sur le
.
.
2
Vérifiez que l'ordinateur et ses périphériques sont éteints. Si votre ordinateur et ses
périphériques ne se sont pas automatiquement éteints lors de l'arrêt du système
d'exploitation, appuyez sur le bouton d'alimentation et maintenez-le enfoncé pendant 4
secondes.
Avant d'intervenir à l'intérieur de votre ordinateur
Utilisez les consignes de sécurité suivantes pour vous aider à protéger votre ordinateur de
dommages éventuels et pour garantir votre sécurité personnelle.
PRÉCAUTION : Avant de commencer toute procédure de cette section, suivez les consignes de
sécurité qui figurent dans le Guide d'information sur le produit.
AVIS : Manipulez les composants et les cartes avec précaution. Ne touchez pas les composants ou les
contacts d'une carte. Tenez une carte par les bords ou par la patte pour montage métallique. Tenez un
composant, tel qu'un processeur par les bords et non par les broches.
Page 5

AVIS : Seul un technicien de service certifié devrait effectuer les réparations sur votre ordinateur. Les
dommages causés par une personne non agréée par Dell ne sont pas couverts par votre garantie.
AVIS : Lorsque vous débranchez un câble, tirez sur le connecteur ou sur la boucle prévue, mais jamais
sur le câble lui-même. Certains câbles sont munis d'un connecteur à languettes verrouillables ; si vous
déconnectez un câble de ce type, appuyez vers l'intérieur sur les languettes verrouillables avant de
déconnecter le câble. Quand vous séparez les connecteurs en tirant dessus, veillez à les maintenir
alignés pour ne pas plier de broches de connecteur. De même, lorsque vous connectez un câble,
assurez-vous que les deux connecteurs sont bien orientés et alignés.
AVIS : Avant d'intervenir à l'intérieur de l'ordinateur, suivez les étapes ci-dessous pour éviter de
l'endommager.
Assurez-vous que la surface de travail est plane et propre afin d'éviter de rayer le capot de
1
l'ordinateur.
2
Mettez votre ordinateur hors tension (reportez-vous à la page 1).
AVIS : Pour déconnecter un câble de réseau, débranchez d'abord le câble de votre ordinateur, puis de
la prise réseau murale.
Débranchez tous les fils de téléphone ou de télécommunication de l'ordinateur.
3
4
Déconnectez l'ordinateur et tous ses périphériques de leurs prises électriques, puis appuyez
sur le bouton d'alimentation pour mettre la carte système à la masse.
AVIS : Pour connecter un câble de réseau, branchez d'abord le câble sur la prise réseau murale, puis
sur l'ordinateur.
5
Retirez toutes les cartes PC installées de leur logement.
6
Fermez l'écran, retournez l'ordinateur et placez-le sur une surface plane.
AVIS : Pour éviter d'endommager la carte système, veillez à retirer la batterie principale avant de
réparer l'ordinateur.
7
Faites glisser et maintenez le loquet de la baie de batterie, situé sur le dessous de l'ordinateur,
puis retirez la batterie.
www.dell.com | support.dell.com
Disque dur
PRÉCAUTION : Si vous enlevez le disque dur lorsqu'il est chaud, ne touchez pas son habitacle en
métal.
PRÉCAUTION : Avant toute intervention à l'intérieur de votre ordinateur, suivez les consignes de
sécurité qui figurent dans le Guide d'information sur le produit.
AVIS : Pour éviter toute perte de données, éteignez votre ordinateur avant de retirer l'unité de disque
dur (reportez-vous à la page 1). Ne retirez jamais le disque dur lorsque l'ordinateur est allumé, en mode
Veille ou Mise en veille prolongée.
AVIS : Les disques durs sont très fragiles ; même un léger choc peut les endommager.
REMARQUE : Dell ne garantit ni la compatibilité ni la prise en charge des unités de disque dur
provenant de sources autres que Dell.
Page 6

1
Suivez les instructions de la section «Avant de commencer» (reportez-vous à la page 1).
2
Retournez l'ordinateur et retirez les vis du capot de l'unité de disque dur, le capot, puis les vis
de l'unité de disque dur.
vis du capot de l'unité
de disque dur (2)
capot de l'unité
de disque dur
www.dell.com | support.dell.com
AVIS : Lorsque le disque dur n'est pas dans l'ordinateur, conservez-le dans son emballage protecteur
antistatique. Reportez-vous à la section «Protection contre les décharges électrostatiques» du Guide
d'information sur le produit.
3
Sortez l'unité de disque dur de l'ordinateur.
unité de
disque dur
vis de l'unité de
disque dur (2)
languette
de retrait
____________________
Les informations contenues dans ce document sont sujettes à modification sans préavis.
© 2004 Dell Inc. Tous droits réservés.
La reproduction de ce document, de quelque manière que ce soit, sans l'autorisation écrite de Dell Inc. est strictement interdite.
Marques utilisées dans ce document : Dell et le logo DELL sont des marques de Dell Inc.
D'autres marques et noms commerciaux peuvent être utilisés dans ce document pour faire référence aux entités se réclamant
de ces marques et de ces noms ou à leurs produits. Dell Inc. rejette tout intérêt propriétaire dans les marques et les noms
commerciaux autres que les siens.
Page 7

警告について
警告 : 物的損害、けが、または死亡の原因となる可能性があることを示します。
ハードドライブの取り外し
はじめに
特に指示がない限り、それぞれの手順では以下の条件を満たしていることを前提とします。
•
「コンピュータの電源を切る」および「コンピュータ内部の作業を始める前に」の手順をすでに
終えていること。
•
Dell™
『製品情報ガイド』の安全に関する情報をすでに読んでいること。
コンピュータの電源を切る
注意 : データの損失を避けるため、コンピュータの電源を切る前に、開いているファイルをすべて保存し
てから閉じ、実行中のプログラムをすべて終了します。
1
オペレーティングシステムをシャットダウンします。
a
開いているファイルをすべて保存してから閉じ、実行中のプログラムをすべて終了します。
スタート ボタンをクリックして、
次に、
b
コンピュータの電源を切る ウィンドウで、
オペレーティングシステムのシャットダウンプロセスが終了した後に、コンピュータの電
源が切れます。
2
コンピュータおよび接続されているデバイスの電源が切れていることを確認します。オペレー
ティングシステムをシャットダウンしても、コンピュータおよび接続されているデバイスの電
源が自動的に切れなかった場合は、電源ボタンを
コンピュータ内部の作業を始める前に
コンピュータの損傷を防ぎ、ご自身の身体の安全を守るために、以下の点にご注意ください。
終了オプション をクリックします。
電源を切る をクリックします。
4
秒間押し続けてください。
www.dell.com | support.dell.com
警告 : 本項の手順を開始する前に、『製品情報ガイド』の安全手順に従ってください。
注意 : 部品やカードの取り扱いには十分注意してください。カード上の部品や接続部分には触れないで
ください。カードを持つ際は縁を持つか、金属製の取り付けブラケットの部分を持ってください。プロ
セッサのようなコンポーネントは、ピンの部分ではなく端を持つようにしてください。
注意 : コンピュータシステムの修理は、資格を持っているサービス技術者のみが行ってください。デル
で認められていない修理による損傷は、保証の対象となりません。
注意 : ケーブルを外すときは、コネクタまたはストレインリリーフループの部分を持ち、ケーブル自身
を引っ張らないでください。ロックタブ付きのコネクタがあるケーブルもあります。このタイプのケー
ブルを抜く場合、ロックタブを押し入れてからケーブルを抜きます。コネクタを抜く際は、コネクタの
ピンを曲げないようにまっすぐに引き抜きます。また、ケーブルを接続する前に、両方のコネクタが正
しい向きに揃っているか確認します。
注意 : コンピュータの損傷を防ぐため、コンピュータ内部の作業を始める前に、次の手順を実行します。
1
コンピュータのカバーに傷がつかないように、作業台が平らであり、汚れていないことを確認
します。
2
コンピュータの電源を切ります(1ページを参照)。
Page 8

注意 : ネットワークケーブルを外すには、まずネットワークケーブルをコンピュータから外し、次に、
壁のネットワークジャックから外します。
3
電話回線や通信回線のケーブルをコンピュータから外します。
4
コンピュータと取り付けられているすべてのデバイスをコンセントから取り外し、電源ボタン
を押して、システム基板の静電気を除去します。
注意 : ネットワークケーブルを接続するには、まずネットワークケーブルを壁のネットワークジャック
に差し込み、次に、コンピュータに差し込みます。
5
PC
カードスロットに取り付けられている
6
ディスプレイを閉じ、コンピュータを平らな作業台に裏返します。
注意 : システム基板の損傷を防ぐため、コンピュータで作業を行う前にメインバッテリーを取り外して
ください。
7
コンピュータの底面にあるバッテリーベイリリースラッチをスライドしたまま、バッテリーを
バッテリーベイから取り外します。
www.dell.com | support.dell.com
ハードドライブ
警告 : ドライブがまだ熱いうちにハードドライブをコンピュータから取り外す場合は、ハードドライブ
の金属製のハウジングに手を触れないでください
警告 : コンピュータ内部の作業を始める前に、『製品情報ガイド』の安全に関する指示に従ってください。
注意 : データの損失を防ぐため、ハードドライブを取り外す前に必ずコンピュータの電源を切ってくだ
さい(
1ページを参照)。コンピュータの電源が入っているとき、スタンバイモードのとき、または休止
状態モードのときにハードドライブを取り外さないでください。
注意 : ハードドライブは大変壊れやすく、わずかにぶつけただけでもドライブが損傷を受ける場合があ
ります。
メモ : デルではデル製品以外のハードドライブに対する互換性の保証およびサポートの提供は行ってお
りません。
1
「はじめに」にある手順に従ってください(1ページを参照)。
2
コンピュータを裏返し、ハードドライブカバーネジ、カバー、およびハードドライブネジを外
してください。
PC
カードを取り外します。
。
Page 9

ハードドライブ
カバーネジ(
2)
www.dell.com | support.dell.com
ハードドライブ
カバー
ハードドライブ
プルタブ
ハードドライブネジ(2)
注意 : ハードドライブをコンピュータに取り付けていないときは、保護用静電気防止パッケージに保管
します。『製品情報ガイド』の「静電気障害への対処」を参照してください。
3
ハードドライブをコンピュータから引き出します。
____________________
この文書の情報は、事前の通知なく変更されることがあります。
© 2004すべての著作権は Dell Inc. にあります。
Dell Inc.
本書に使用されている商標:
このマニュアルでは、上記記載以外の商標や会社名が使用されている場合があります。これらの商標や会社名
は、一切
の書面による許可のない複写は、いかなる形態においても厳重に禁じられています。
Dell、DELL のロゴは Dell Inc. の商標です。
Dell Inc. に所属するものではありません。
 Loading...