

Page 1
Dell DJ™
User’s Guide
Model HV02T
www.dell.com | support.dell.com
Page 2

Notes, Notices, and Cautions
NOTE: A NOTE indicates important information that helps you
make better use of your device.
NOTICE: A NOTICE indicates either potential damage to
hardware or loss of data and tells you how to avoid the problem.
CAUTION: A CAUTION indicates a potential for property
damage, personal injury, or death.
Abbreviations and Acronyms
For a complete list of abbreviations and acronyms, see
"Glossary" on page 51.
____________________
Information in this document is subject to change without notice.
© 2004 Dell Inc. All rights reserved.
Reproduction in any manner whatsoever without the written permission of Dell
Inc. is strictly forbidden.
Trademarks used in this text: Dell, the DELL logo, Dell DJ and Dell Pocket DJ
are trademarks of Dell Inc.; Microsoft and Windows are registered trademarks
of Microsoft Corporation; Musicmatch is a registered trademark of Musicmatch
Inc.
Other trademarks and trade names may be used in this document to refer to either
the entities claiming the marks and names or their products. Dell Inc. disclaims
any proprietary interest in trademarks and trade names other than its own.
Model HV02T
November 2004
Page 3

Contents
Finding Information
1 About Your Device
Introduction . . . . . . . . . . . . . . . . . . . . . . . . . . . . . . . . . . . . . . . . . . . . . . 6
Front and Top Views . . . . . . . . . . . . . . . . . . . . . . . . . . . . . . . . . . . . . . 7
Bottom View . . . . . . . . . . . . . . . . . . . . . . . . . . . . . . . . . . . . . . . . . . . . . 8
Wired Remote (Optional) . . . . . . . . . . . . . . . . . . . . . . . . . . . . . . . . . . 9
Charging the Battery . . . . . . . . . . . . . . . . . . . . . . . . . . . . . . . . . . . . . 10
Installing Software . . . . . . . . . . . . . . . . . . . . . . . . . . . . . . . . . . . . . . 12
Connecting to a Computer . . . . . . . . . . . . . . . . . . . . . . . . . . . . . . . . 13
Using the Cradle. . . . . . . . . . . . . . . . . . . . . . . . . . . . . . . . . . . . . 13
Using the USB Synchronization Cable. . . . . . . . . . . . . . . . . . 15
Performing a Reset. . . . . . . . . . . . . . . . . . . . . . . . . . . . . . . . . . . . . . . 16
2 Using Your Dell DJ
Playing Digital Music . . . . . . . . . . . . . . . . . . . . . . . . . . . . . . . . . . . . 17
Playing Tracks Using Music Library . . . . . . . . . . . . . . . . . . . . 17
Transferring Music to the Dell DJ. . . . . . . . . . . . . . . . . . . . . . . . . . 20
Transferring Music Tracks Using Musicmatch
Your Dell DJ . . . . . . . . . . . . . . . . . . . . . . . . . . . . . . . . . . . . . . . . 20
®
to
Contents 3
Page 4

Transferring Music Tracks from Musicmatch Library. . . . . 20
Transferring Music Tracks Using Dell DJ Explorer . . . . . . . 21
Recording Voice and FM Radio Using the Dell DJ
(Available with Inline FM Tuner only) . . . . . . . . . . . . . . . . . . . . . . 24
Storing Data Files on the Dell DJ . . . . . . . . . . . . . . . . . . . . . . . . . . 25
Managing Files from the Main Menu. . . . . . . . . . . . . . . . . . . . . . . 26
Music Library . . . . . . . . . . . . . . . . . . . . . . . . . . . . . . . . . . . . . . . 26
Now Playing and the Selected Music List. . . . . . . . . . . . . . . 30
Play Mode. . . . . . . . . . . . . . . . . . . . . . . . . . . . . . . . . . . . . . . . . . 35
Date and Time. . . . . . . . . . . . . . . . . . . . . . . . . . . . . . . . . . . . . . . 36
Settings . . . . . . . . . . . . . . . . . . . . . . . . . . . . . . . . . . . . . . . . . . . . 37
Information . . . . . . . . . . . . . . . . . . . . . . . . . . . . . . . . . . . . . . . . . 40
3 Frequently Asked Questions
Installation. . . . . . . . . . . . . . . . . . . . . . . . . . . . . . . . . . . . . . . . . . . . . . 41
Usage . . . . . . . . . . . . . . . . . . . . . . . . . . . . . . . . . . . . . . . . . . . . . . . . . . 42
General. . . . . . . . . . . . . . . . . . . . . . . . . . . . . . . . . . . . . . . . . . . . . . . . . 43
Error Indications. . . . . . . . . . . . . . . . . . . . . . . . . . . . . . . . . . . . . . . . . 44
Troubleshooting in Rescue Mode . . . . . . . . . . . . . . . . . . . . . . . . . . 45
4 Appendix
Specifications. . . . . . . . . . . . . . . . . . . . . . . . . . . . . . . . . . . . . . . . . . . 49
Glossary . . . . . . . . . . . . . . . . . . . . . . . . . . . . . . . . . . . . . . . . . . . . . . . . 51
Index . . . . . . . . . . . . . . . . . . . . . . . . . . . . . . . . . . 53
Contents 4
Page 5

Finding Information
What are you looking for? Find it here:
How to set up my device and
information on the connectors and
buttons on my device.
Information on using my device. Dell DJ™
Information on using Musicmatch
with my device.
Information on using Dell DJ
Explorer with my device.
Connecting to and synchronizing
with a computer.
Up-to-date information on your
device including the latest software
downloads, latest versions of the
User’s Guide, Getting Started Guide
and answers to the most Frequently
Asked Questions.
My Service Tag Located on the back of the device.
Getting Started Guide
User’s Guide
User’s Guide
Musicmatch® online help
Start
Click
→
Musicmatch
Click
Help
in Musicmatch.
Start
Click
DJ Explorer
Dell DJ™
online help
support.dell.com
,
→
→
User’s Guide
and the Dell DJ™
Programs
→
Programs
Dell DJ Explorer Help
→
Musicmatch Jukebox
→
Dell
and Musicmatch
→
www.dell.com | support.dell.com
.
Dell
Finding Information 5
Page 6

About Your Device
Introduction
Congratulations on purchasing the Dell DJ™! In this document, you can
find instructions on how to use the key features of your new Dell DJ with the
accompanying software.
You can also find more sources of useful information in "Finding
Information" on page 5.
Your Dell DJ comes with a
that you can use to install software onto your computer. The software
includes the Dell DJ drivers, Dell DJ Explorer, and Musicmatch
You can use the software to manage your music library and to transfer audio
tracks and data files between your Dell DJ and your computer. In order to
transfer these files, your Dell DJ must be connected to your computer using
the USB synchronization cable or cradle included with your Dell DJ. See
"Installing Software" on page 12 to get started.
After installing the software on your computer, you can use your Dell DJ in a
number of ways:
• As a digital music player
• As a data storage device
For details about using these features and getting the most out of your Dell
DJ, see "Using Your Dell DJ" on page 17.
Dell DJ™/Dell Pocket DJ™ Product Software
®
.
CD
NOTICE: Dell's Limited Warranty does not cover data loss resulting from the
unlikely failure of the hard disk drive in the device.
NOTICE: While your device is robust, do not subject it to excessive force or
impact. This may damage the hard disk drive in your device.
Page 7
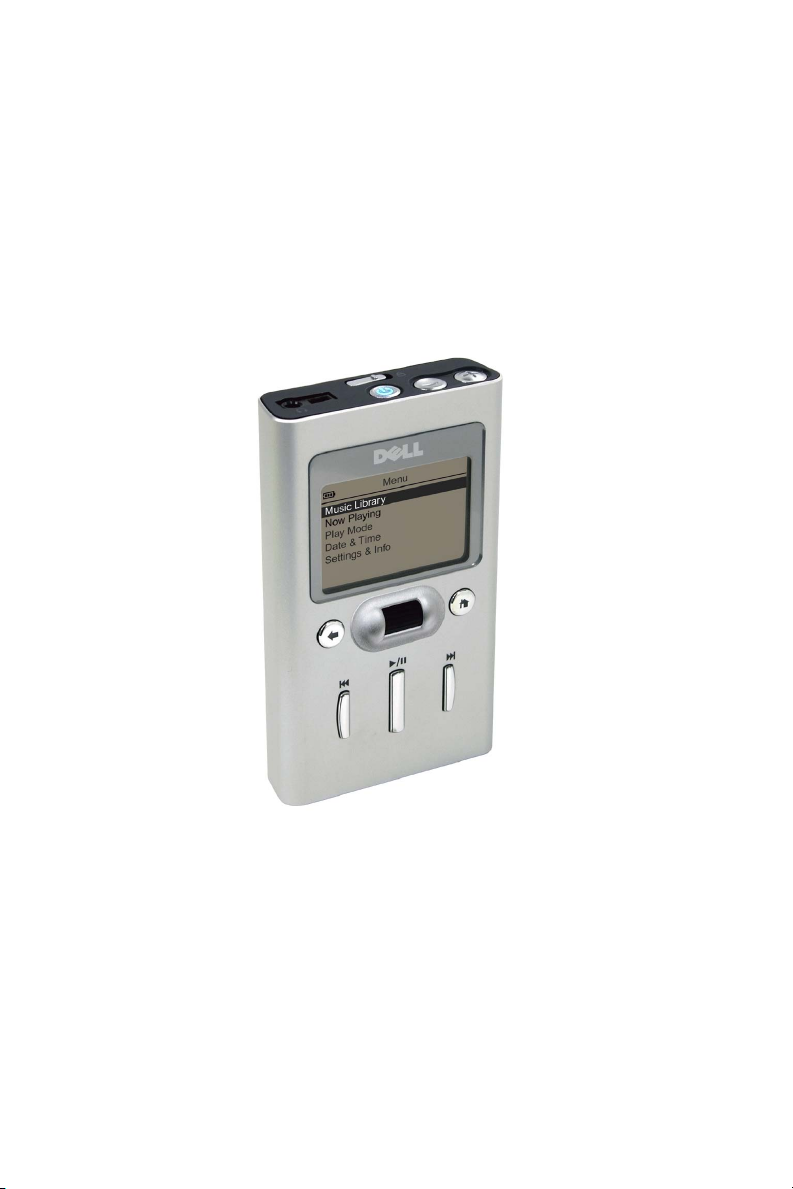
Front and Top Views
www.dell.com | support.dell.com
lock
switch
headphone
connector
back
button
rewind/skip
back button
VOLUME BUTTONS —Press and hold the volume buttons to increase or decrease
the volume.
POWER BUTTON —Press and hold the power button for 2 seconds to turn the
device on or off.
LOCK SWITCH —Move this to lock or unlock the buttons on your device. Lock the
buttons when you want to prevent them from being pressed accidentally.
NOTE: When your device is locked, you cannot turn your device on or off.
HEADPHONE CONNECTOR —Attach the earphones, headphones, or optional wired
remote. See "Wired Remote (Optional)" on page 9 for information.
BACK BUTTON —Press the back button to return to the previous view, or to move
back one character.
REWIND/SKIP BACK BUTTON —Press the rewind/skip back button to move to the
start of the current track, or to go to the previous track. Press and hold the
rewind/skip back button to move back within a track.
play/pause button
power
button
volume
buttons
Home
button
scroll
dial
fast forward / skip
forward button
About Your Device 7
Page 8
PLAY/PAUSE BUTTON —Press the play/pause button to start or pause a track or
recording.
SCROLL DIAL
• Press the scroll dial to perform actions similar to pressing <Enter> on
a keyboard.
• Rotate the scroll dial up or down to perform actions similar to using
the up- and down-arrow keys on a keyboard.
NOTE: In other parts of this User’s Guide, scroll-select means to rotate and
then press the scroll dial. You can scroll-select menu options and tracks.
FAST FORWARD/SKIP FORWARD BUTTON —Press the fast forward/skip forward
button to go to the next track, or to move ahead within a track.
HOME BUTTON —Press the Home button to access other functions in the device.
See "Using Your Dell DJ" on page 17 for information.
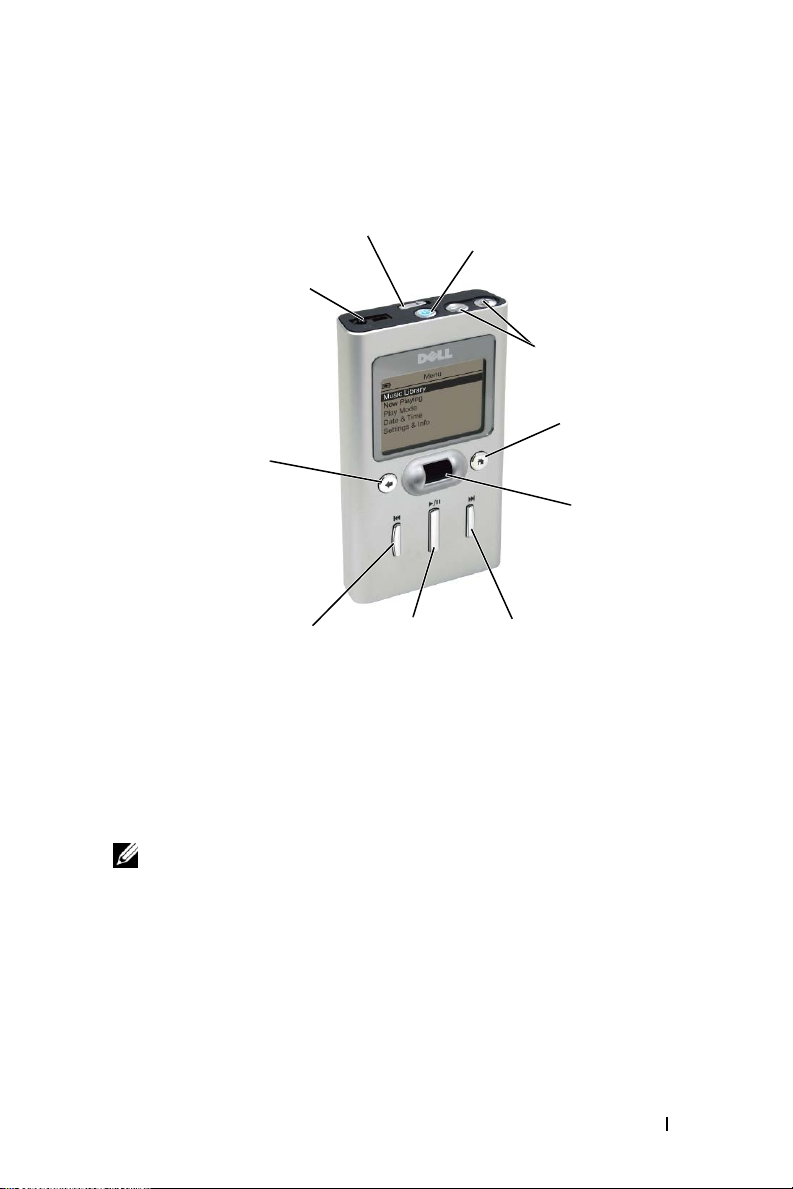
Bottom View
reset
button
www.dell.com | support.dell.com
dock
connector
DOCK CONNECTOR—Connect your device to your AC adapter or computer. See
"Charging the Battery" on page 10 and "Connecting to a Computer" on page 13 for
information.
RESET BUTTON —See "Performing a Reset" on page 16 for information on using
the reset button.
About Your Device 8
Page 9
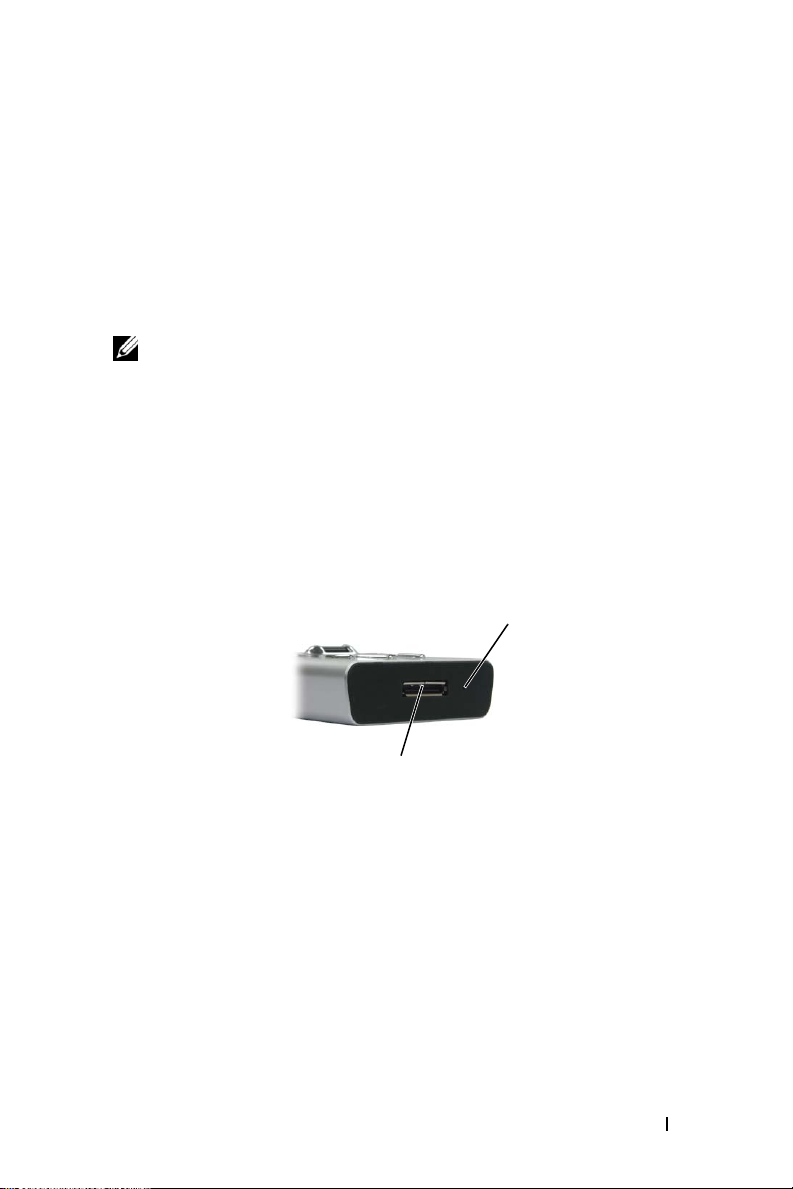
Wired Remote (Optional)
www.dell.com | support.dell.com
rewind/skip
back button
play/pause
button
volume
buttons
headphone
connector
REWIND/SKIP BACK BUTTON —Press the rewind/skip back button to move to the
start of the current track, or to go to the previous track. Press and hold the
rewind/skip back button to move back within a track.
PLAY/PAUSE BUTTON —Press the play/pause button to start or pause a track or
recording. Press and hold the play/pause button for 2 seconds to turn the device on
or off.
VOLUME BUTTONS —
volume.
HEADPHONE CONNECTOR —
LOCK SWITCH —
the buttons when you want to prevent them from being pressed accidentally.
lock
switch
Press and hold
Attach earphones or headphones.
Move this to lock or unlock the buttons on your wired remote. Lock
fast forward/skip
forward button
the volume buttons
to increase or decrease the
NOTE: When your device is locked, you cannot turn your device on or off.
FAST FORWARD/SKIP FORWARD BUTTON —Press the fast forward/skip forward
button to go to the next track, or to move ahead within a track
About Your Device 9
.
Page 10
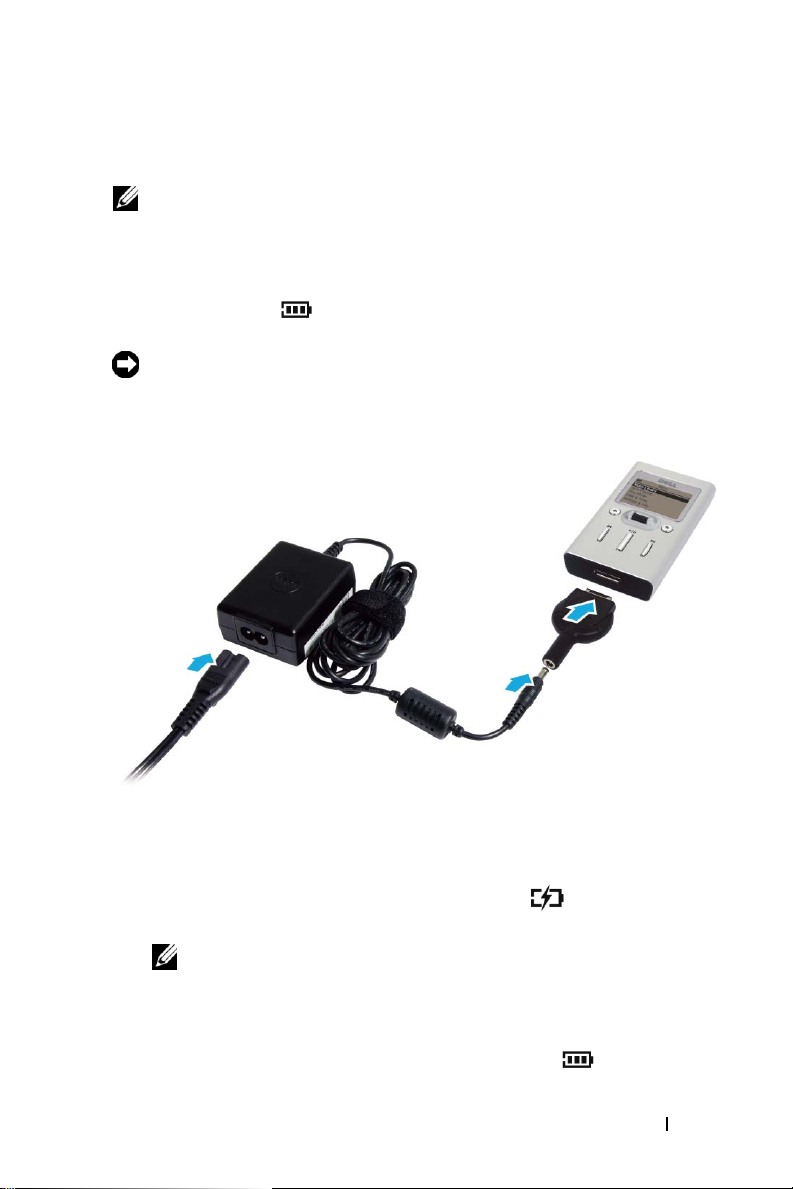
Charging the Battery
NOTE: Do not use your device until you have charged the battery for at least 2.5
hours.
Your device has an integrated, rechargeable, lithium-ion battery. Before you
use your device for the first time, you must charge the battery.
Use the battery icon on your device’s screen to monitor the battery
charge.
NOTICE: Do not attempt to replace or remove the integrated battery from your
device. You may damage the device permanently. Any attempt to open your
device voids the warranty.
www.dell.com | support.dell.com
1
Connect the power cable to your travel charger connector, and connect
the travel charger connector to your Dell DJ as shown.
2
Connect the other end of the power cable into a wall outlet.
Your device displays the Charging Battery icon on the top left
corner of the screen.
NOTE: You can still use your device when the battery is charging from the
AC adapter.
3
To check if the battery is fully charged after 2.5 hours, disconnect the
travel charger connector from your device. If the battery is fully
charged, your device displays the Full Battery icon .
About Your Device 10
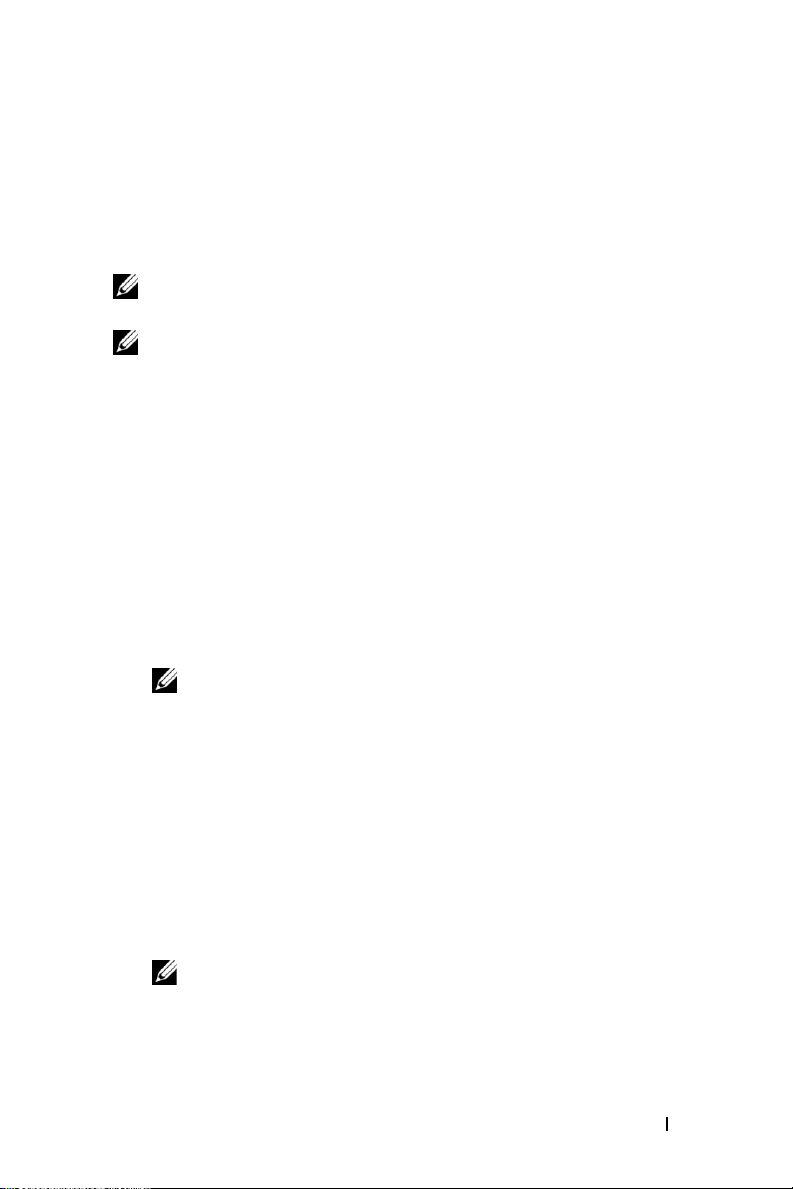
Page 11

NOTICE: To avoid damaging the travel charger connector or USB
synchronization cable, disconnect the connectors from your device by pressing
the two buttons on the sides of the connectors to release the self-lock
structure.
The other options to charge the battery:
• Connect the USB synchronization cable to the device and computer.
See "Using the USB Synchronization Cable" on page 15 for
information.
• Insert the device into the cradle. See "Using the Cradle" on page 13 for
information.
NOTE: You can charge your device through the USB connector on your
computer only if the battery icon indicates your device has at least a 25 percent
charge remaining. If it is less than 25 percent, you must use the AC adapter to
charge your device. To charge your device from your computer’s USB
connector, your computer must be turned on, and your device turned off.
www.dell.com | support.dell.com
About Your Device 11
Page 12
Installing Software
Your device comes with software that helps you create audio tracks and
manage your Music Library.
To install drivers and software:
NOTE: Ensure that your device is not connected to your computer during the
software installation process.
NOTE: Close all other applications while installing the software.
1
Insert the
CD drive.
The CD runs automatically, and the installation process begins.
If the CD does not run automatically:
a
b
2
When the Dell DJ installation screen appears, click
software installation process. Follow the instructions on the screen and
click
3
After the software installation is complete, a message appears asking if
you want to restart your computer now or later. Select
your computer immediately or
later.
Dell DJ™/Dell Pocket DJ™ Product Software
Using Windows® Explorer® or the
to the drive where you loaded the
Product Software
Double-click
OK, Next,
NOTE: The software may determine that you have a newer version of
Musicmatch already on your computer. If so, you will be asked whether or
not you would like to continue installing Musicmatch from the CD. Make
your selection to proceed.
If you select "Yes", the installation process will continue. You must select
"Yes" if you intend to use Musicmatch with your Dell DJ.
If you select "No", you will be asked to confirm the selection. Select "Yes"
to quit the installation.
CD.
setup.exe
or
Ye s
when prompted.
.
No
My Computer
Dell DJ™/Dell Pocket DJ™
if you will restart you computer
CD into your
icon, navigate
OK
to start the
Ye s
to restart
www.dell.com | support.dell.com
NOTE: The software is not enabled until after you restart your computer.
4
After restarting your computer, connect your Dell DJ to your computer.
See "Connecting to a Computer" on page 13 for more information.
About Your Device 12
Page 13

Connecting to a Computer
You can connect your device to a computer using the USB synchronization
cable or cradle provided. Connect your device to a computer to transfer data
files or audio tracks, and to charge your battery.
See "Transferring Music to the Dell DJ" on page 20 for information on
transferring data files and audio tracks.
Using the Cradle
You can use the cradle to:
• Transfer data files or audio tracks.
• Charge the battery.
• Connect to speakers.
To connect your device to the cradle:
1
Place the cradle on a flat, level surface near your computer.
2
Connect the smaller end of the USB cable to the USB connector on
the cradle.
3
Connect the larger end of the USB cable to the USB connector on your
computer.
www.dell.com | support.dell.com
About Your Device 13
Page 14

4
Align the dock connector on the bottom of your device to the
connector on the cradle, while facing the front of the device toward the
Dell logo, and insert the device gently but firmly onto the connector.
dock
connector
Optional
(For charging)
www.dell.com | support.dell.com
NOTE: To charge your device from your computer’s USB connector, your
computer must be turned on, and your device turned off.
NOTE: To charge your device with the AC adapter, connect the power cable to
the AC adapter connector on your cradle, and the other end of the power cable
into a wall outlet.
About Your Device 14
Page 15
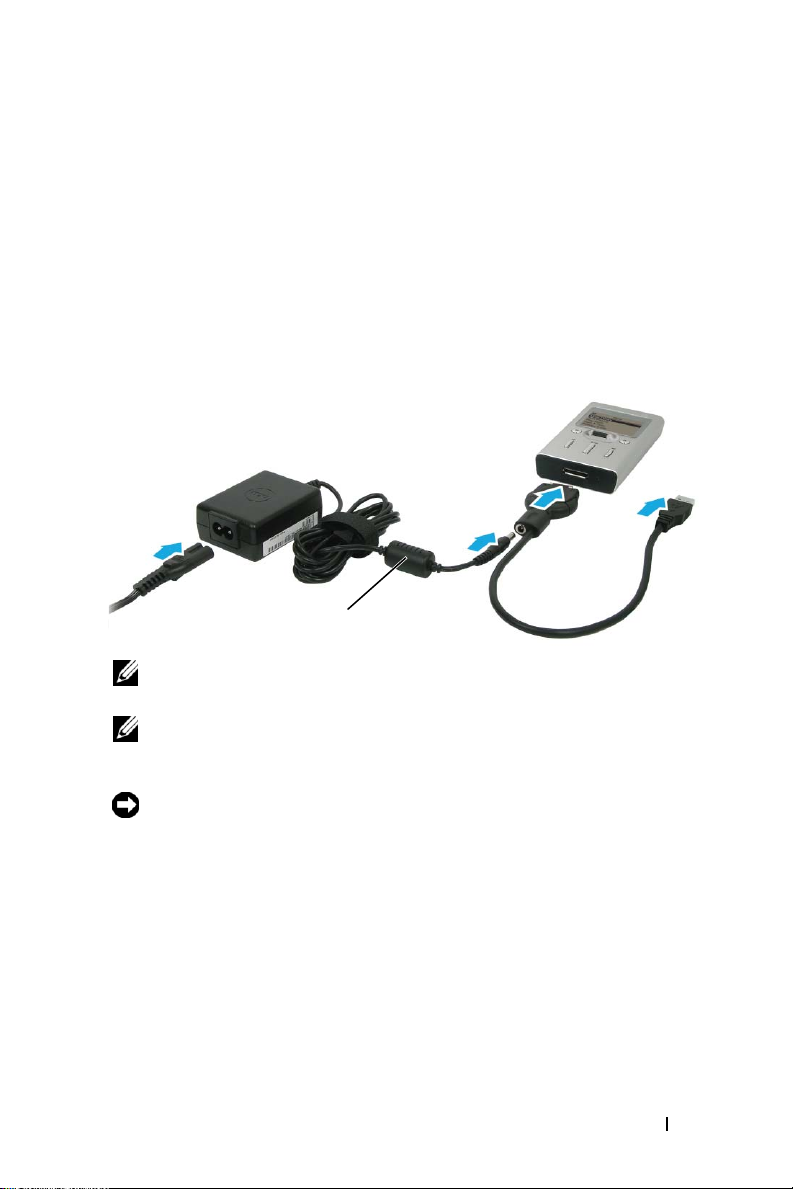
Using the USB Synchronization Cable
Use the USB synchronization cable to connect your device directly to the
computer
To conn e c t your de v i c e to the USB synchronization cable:
1
2
without using the cradle.
Connect the larger end of the USB synchronization cable to the dock
connector on your device.
Connect the smaller end of the USB synchronization cable to the USB
connector on your computer.
Optional
(For charging)
NOTE: To charge your device from your computer’s USB connector, your
computer must be turned on, and your device turned off.
NOTE: To charge your device with the AC adapter, connect the power cable to
the AC adapter connector on your USB synchronization cable, and the other
end of the power cable into a wall outlet.
NOTICE: To avoid damaging the travel charger connector or USB
synchronization cable, disconnect the connectors from your device by pressing
the two buttons on the sides of the connectors to release the self-lock
structure.
www.dell.com | support.dell.com
About Your Device 15
Page 16
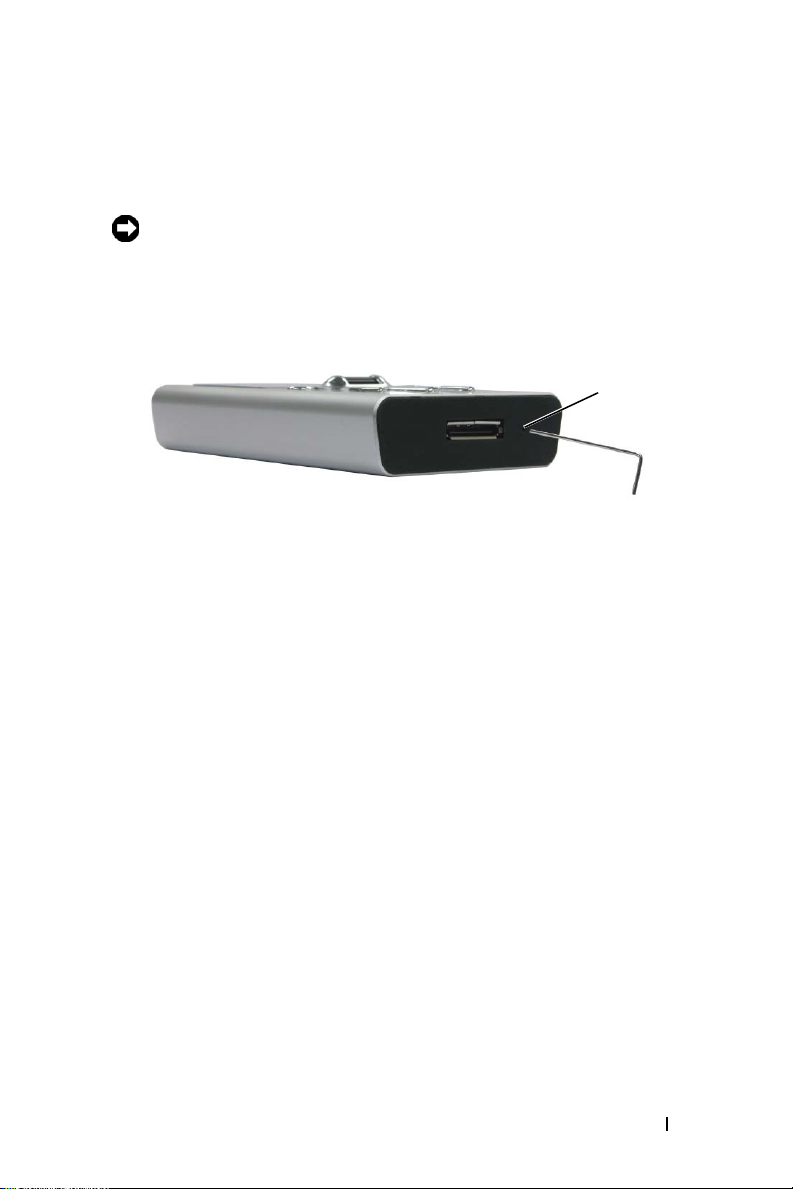
Performing a Reset
If your device stops responding, perform a reset.
NOTICE: Files or tracks that are being transferred may be lost but other data is
normally retained.
To perform a reset, insert the end of a thin object, such as a straightened
paper clip, into the reset button.
reset
button
www.dell.com | support.dell.com
About Your Device 16
Page 17

Using Your Dell DJ
Your Dell DJ can be used in different ways:
• As a digital music player (see below), or
• As a data storage device (see "Transferring Music to the Dell DJ" on
page 20).
Playing Digital Music
The Dell DJ can play tracks in MP3, WMA, or WAV file formats. The Dell
DJ comes with a few sample MP3 tracks already loaded into the Music
Library. To load your own music files onto the Dell DJ, see "Transferring
Music to the Dell DJ" on page 20.
NOTE: Scroll-select means to rotate and then press the scroll dial.
Listed below are some quick tips on playing music on your Dell DJ. See
"Music Library" on page 26 for more information.
Playing Tracks Using Music Library
Tracks on your Dell DJ can be viewed and played by category (playlist,
album, artist, or genre).
To play all tracks within a particular category:
1
Press the Home button on your Dell DJ.
2
Scroll-select
Music Library
.
Page 18

3
Scroll-select
Playlists, Albums, Artists
albums, artists, or genres appears.
, or
Genres
. A list of playlists,
www.dell.com | support.dell.com
To play a playlist, scroll-select a playlist in
Play Playlist
.
To play an album, scroll-select an album in
Play Album
.
To play an artist, scroll-select an artist in
Artist
.
To play a genre, scroll-select a genre in
Genre
.
NOTE: If you have no playlists in your Dell DJ, see "Creating a Playlist" on
page 33.
Playlists
Albums
Artists
, then scroll-select
Genres
, then scroll-select
, then scroll-select
, then scroll-select
To find and play an album by a particular artist:
1
Press the Home button on your Dell DJ.
2
Scroll-select
3
Scroll-select
4
Scroll-select an artist. A list of options appears.
5
Scroll-select
6
Scroll-select an album, and then scroll-select
Music Library
Artists
.
View Albums
.
. A list of albums by the artist appears.
Play Album
To play one track within a category:
1
Press the Home button on your Dell DJ.
2
Scroll-select
3
Scroll-select
Music Library
.
Playlists, Albums, Artists
, or
Genres
. A list of playlists,
albums, artists, or genres appears.
4
Scroll-select a playlist, album, artist, or genre, then scroll-select
Tr ac ks
.
5
Scroll-select the track, and then select
Play Track
.
Play
Play
.
View
To play one track using View All Tracks:
1
Scroll-select
2
Scroll-select
Music Library
View All Tracks
.
.
Using Your Dell DJ 18
Page 19

3
Scroll-select a track, and then scroll-select
Play Track
.
To play all music tracks:
1
Press the Home button on your Dell DJ.
2
Scroll-select
3
Scroll-select
Music Library
.
Play All Music Tracks
.
All tracks are added to the Selected Music list. Playback starts after all music
tracks have been queued.
After selecting
Play All Music Tracks
, your Dell DJ plays all music tracks in
the sequence determined by the Play Mode setting.
To change the Play Mode setting, see "Play Mode" on page 35.
www.dell.com | support.dell.com
Using Your Dell DJ 19
Page 20

Transferring Music to the Dell DJ
With Musicmatch®, you can transfer music tracks from your personal music
library to the Dell DJ. Musicmatch has the capability to ’rip’ or convert
music CDs to digital music files on your computer. See the Musicmatch
Help tutorial to create digital music files from your music CDs.
With Dell DJ Explorer, you can organize and transfer music tracks, voice
recordings and data files between your computer and the Dell DJ using
familiar Microsoft
and-drop.
NOTE: Before transferring data files or music tracks, you must first connect
your Dell DJ to your computer using the included USB synchronization cable or
cradle.
NOTE: Dell DJ Explorer will not transfer out of the Dell DJ files that are
copyright protected by Digital Rights Management (DRM).
Transferring Music Tracks Using Musicmatch® to Your Dell DJ
Dell DJ software powered by Musicmatch® makes buying and enjoying
digital music easy by providing a simple graphical interface between your
computer and the Dell DJ, as well as access to the Musicmatch Downloads
service.
Some of the basic features of Musicmatch are covered below, but for
complete instructions on how to use the Musicmatch software, click
Programs
Musicmatch (see "Finding Information" on page 5).
→
®
Windows® methods such as copy-and-paste and drag-
Musicmatch
→
Musicmatch Jukebox
. Click Help in
Start
→
www.dell.com | support.dell.com
Transferring Music Tracks from Musicmatch Library
1
Connect the Dell DJ to your computer using the included USB
synchronization cable or cradle.
2
Start Musicmatch by clicking
Musicmatch Jukebox
3
Click
Vie w
→
Portable Device Manager.
. The Musicmatch main window appears.
Using Drag-and-Drop or Copy-and-Paste:
1
Follow steps 1 through 3 above.
Start
→
Programs
→
Musicmatch
Using Your Dell DJ 20
→
Page 21

2
With the Portable Device Manager (PDM) open, you can transfer
tracks or playlists in a drag-and-drop or copy-and-paste operation from
your computer's Musicmatch Jukebox playlists onto the DJ.
3
To drag-and-drop, locate and click the track or playlist that you want to
copy, then drag it to Dell DJ or one of its playlists.
4
To copy-and-paste, locate and right-click the track or playlist that you
want to copy, then click Copy. Right-click Dell DJ or one of its
playlists, then click Paste.
Using the Add button:
1
Open the Portable Device Manager (PDM) as described above.
2
Click the
3
Click the
side of the
4
To add all categories, click
category, select the category and click
Add
button.
Library Tracks, Playlists
Adding tracks to Dell DJ
Select All
or
My Computer
window.
and then click
Add
. Double-click a category to
icon on the left
Add
. To add one
see its sub-categories and tracks.
Musicmatch displays the main PDM window when all selected tracks
are added.
Using Synchronization:
1
Open the Portable Device Manager (PDM) as described above.
2
Click the
Sync
button to update your device with tracks from your
computer.
www.dell.com | support.dell.com
NOTE: Synchronization is a one-way process. It will only copy files from the
computer to the Dell DJ. It will not copy files from the Dell DJ to the computer.
Select
Help
on the Musicmatch toolbar for more information.
Transferring Music Tracks Using Dell DJ Explorer
With Dell DJ Explorer, you can transfer music tracks using the copy-andpaste or drag-and-drop method.
Using Your Dell DJ 21
Page 22

NOTE: When transferring music tracks to your Dell DJ, be sure to transfer
them to the Music Library folder of your Dell DJ. If you transfer music files from
your computer to the Data Library folder of your Dell DJ, these music tracks will
be stored as data files and will not be playable on your Dell DJ.
Access the Music Library folder on your Dell DJ:
1
Connect your Dell DJ to your computer using the included USB
synchronization cable or cradle.
2
Select
Start
→
Explorer
Programs
,
→
Dell
→
Dell DJ Explorer
→
Dell DJ
or
Open Microsoft Windows Explorer, then double-click
Explorer
3
With Dell DJ Explorer open, click
.
Folders
in the Dell DJ Explorer
Dell DJ
toolbar.
The drives and main directories associated with the computer are
displayed in the left window. The right window displays the contents of
the drive, directory or folder that is selected in the left window.
4
Click
5
Dell DJ Explorer
Click
Dell DJ
beneath
in the left window to expand its contents.
Dell DJ Explorer
in the left window to expand
its contents.
6
Click
Music Library
beneath
Dell DJ
in the left window to expand its
contents.
www.dell.com | support.dell.com
Using Copy-and-Paste:
1
Using Dell DJ Explorer, locate the track, file, or folder you want to
copy.
2
Right-click the track, file, or folder you want to copy and click
3
Locate and right-click the folder in which you want to place the copy,
and then click
Paste
. A copy of the track, file, or folder is placed in the
selected folder.
Using Drag-and-Drop:
1
Using Dell DJ Explorer, locate the track, file, or folder you want to
copy.
Using Your Dell DJ 22
Copy
.
Page 23

2
Click the track, file, or folder you want to copy, and drag it to the folder
in which you want to place the track, file, or folder.
NOTE: To select several files, hold down the <CTRL> key and click the files.
NOTE: To select consecutive files, hold down the <SHIFT> key and click the
first and last files.
NOTE: To learn more about using Dell DJ Explorer, click the Help icon on
the Dell DJ Toolbar.
www.dell.com | support.dell.com
Using Your Dell DJ 23
Page 24

Recording Voice and FM Radio Using the Dell DJ (Available with Inline FM Tuner only)
You can create recordings of interviews, lectures, meetings, personal notes or
your favorite FM radio stations using Dell DJ's Inline FM Tuner (optional).
See the Inline FM Tuner Getting Started Guide for the voice or FM
recording steps.
www.dell.com | support.dell.com
Using Your Dell DJ 24
Page 25

Storing Data Files on the Dell DJ
Using the included Dell DJ Explorer software, your Dell DJ can be used as a
data storage device. You can transfer data files between your Dell DJ and any
computer with Dell DJ Explorer installed.
NOTE: Data files cannot be transferred between the Dell DJ and a computer
unless Dell DJ Explorer is installed on the computer. Files stored in the Dell DJ
Data Library are not accessible using Musicmatch. This includes music tracks
or recordings that are stored in the Dell DJ data library.
Access the Data Library folder on your Dell DJ:
1
Connect your Dell DJ to your computer using the included USB
synchronization cable or cradle.
2
Select
Start
→
Programs
Explorer
,
or
Open Microsoft Windows Explorer, then double-click
Explorer
3
With Dell DJ Explorer open, click
.
toolbar.
The drives and main directories associated with the computer will be
displayed in the left window. The right window will display the
contents of the drive, directory, or folder that is selected in the left
window.
4
Click
Dell DJ Explorer
5
Click
Dell DJ
beneath
its contents.
6
Click
Data Library
contents.
→
Dell
→
Dell DJ Explorer
→
Dell DJ
Dell DJ
Folders
in the Dell DJ Explorer
in the left window to expand its contents.
Dell DJ Explorer
beneath
Dell DJ
in the left window to expand
in the left window to expand its
www.dell.com | support.dell.com
Transfer data files between the Dell DJ Data Library and the computer
using the same copy-and-paste or drag-and-drop methods previously
described in "Transferring Music Tracks Using Dell DJ Explorer" on
page 21.
Using Your Dell DJ 25
Page 26

Managing Files from the Main Menu
The Main Menu of Dell DJ is the starting place for the Dell DJ operations.
To get to the Main Menu, press the Home button on your Dell DJ.
www.dell.com | support.dell.com
Music Library
Now Playing
tracks.
Play Mode
are played.
Date & Time
sleep timer, and access your calendar.
Settings & Info
your personal preference, and provides you with data such as firmware
version and space on your Dell DJ.
NOTE: Songs and recordings are stored on the Dell DJ as individual files called
tracks. Tracks can be viewed in lists or sorted into categories according to
playlist, album, artist, and genre.
is your window to the music tracks stored on your Dell DJ.
provides you access to the currently playing track or selected
enables you to change the sequence and manner in which tracks
enables you to change the date and time settings, adjust your
enables you to customize certain settings, such as EQ, to
Music Library
You can use Music Library to:
• Access music tracks via Playlists, Albums, Artists, Genres, and View All
Tr a ck s
• Play all music tracks
By accessing a playlist, album, artist, or genre, you can perform tasks such as:
• Locating tracks
Using Your Dell DJ 26
Page 27

• Playing playlists, albums, artists, or genres or tracks within these
categories
• Viewing track information
• Adding to and managing the Selected Music list, then creating playlists
from the Selected Music list
• Deleting tracks, playlists, albums, artists, or genres in your Dell DJ
NOTE: Recordings made with your Dell DJ automatically become tracks and
can be found in View All Tracks in Music Library, or in Recordings found in your
Music Library. For the instructions that follow, recordings will be known as
"tracks."
NOTE: "View All Tracks" is a list containing all files from the various categories.
Tracks can be found in more than one category. Tracks with no album names,
artist names, or genres are located under "<unknown>". This sub-category is
found in the album, artist, and genre categories.
Locating Tracks in Music Library
You can locate a track by category if you know the album, artist, or genre to
which the track belongs.
To find a track in Music Library:
1
Press the Home button on your Dell DJ.
2
Scroll-select
3
Scroll-select a category. For example, if you want to find a track in a
particular album, scroll-select
4
Scroll-select the sub-category. For example, under
Music Library
.
Albums
.
Albums
, scroll-
select an album.
5
Scroll-select
View Tracks
. The tracks within the sub-category appear.
www.dell.com | support.dell.com
You can also find tracks using the
1
Press the Home button on your Dell DJ.
2
Scroll-select
3
Scroll-select
Music Library
View All Tracks
View all Tracks
.
, then scroll-select the desired track.
To find a track alphabetically in Music Library:
1
Press the Home button on your Dell DJ.
option:
Using Your Dell DJ 27
Page 28

2
Scroll-select
3
Scroll-select
4
Scroll-select
5
Scroll-select the first character of the track name.
Music Library
View All Tracks
Find Track
. A list of characters appears.
.
.
The Dell DJ displays music tracks in alphabetical order, beginning with
the character you selected. Scroll-select a different first character to
view tracks beginning with that character.
6
Press the Back button on your Dell DJ.
You can now scroll through the tracks. Scroll-select a track to play it,
view track details, add it to the Selected Music list, or to delete it.
Playing Tracks
See "Playing Tracks Using Music Library" on page 17 for the steps to select
and play tracks and categories on your Dell DJ.
Viewing Track Information
With Music Library, you can view track information such as track title,
artist, album, genre, or duration.
To view track information:
1
Find the track using one of the methods described in "Locating Tracks
in Music Library" on page 27.
2
Scroll-select the desired track. A list of options appears.
www.dell.com | support.dell.com
Using Your Dell DJ 28
Page 29

3
Scroll-select
View Track Details
. A message box appears, listing track
information.
If the names do not fit in the screen, press the scroll dial to scroll right
or left to view the details.
Viewing an Album
In Music Library, you can view the contents of an album by an artist.
To locate an album by artist:
1
Press the Home button on your Dell DJ.
2
Scroll-select
3
Scroll-select
4
Scroll-select an artist. A list of options appears.
5
Scroll-select
Music Library
Artists
.
View Albums
.
. A list of albums for the selected artist
appears.
6
Scroll-select an album. A list of options appears.
www.dell.com | support.dell.com
You can then scroll-select an option to:
•Play the album
• View the tracks in the album
• Add the album to the Selected Music list, or
• Delete the album from Music Library.
Using Your Dell DJ 29
Page 30

Now Playing and the Selected Music List
The Selected Music list contains all of the music that you have selected for
playback in a given session. Use the Now Playing option to view and manage
the contents of the Selected Music list.
The Selected Music list is initially created by selecting a track or category of
tracks for playback. You can then add to the Selected Music list by selecting
additional tracks or categories of tracks and then selecting the
Selected
selection by selecting the
option. Or, you can replace the Selected Music list with a new
Play
option.
The Selection Music list can easily be cleared using the
option.
Creating and Viewing a Selected Music List
To create a Selected Music list, locate and play a track or category of tracks
using one of the previously described methods.
To view the Selected Music list:
1
Press the Home button on your Dell DJ.
2
Scroll-select
3
Scroll-select
Viewing Track Information
Now Playing
.
Selected Music
.
In the Selected Music list, you can view track information such as track title,
track length, artist, album, or genre.
Add to
Clear Selection
www.dell.com | support.dell.com
To view information about a track in the Selected Music list:
1
Press the Home button on your Dell DJ.
2
Scroll-select
3
Scroll-select
4
Scroll-select a track.
Now Playing
.
Selected Music
. A list of tracks appears.
Using Your Dell DJ 30
Page 31

5
Scroll-select
View Track Details.
A message box appears, listing track
information.
If the names do not fit in the screen, press the scroll dial to scroll right
or left to view the details.
Adding Tracks to the Selected Music List
You can add tracks from Music Library to the Selected Music list using the
Add to Selected
the
Play
option.
option, or replace the tracks in the Selected Music list using
To add tracks:
1
Press the Home button on your Dell DJ.
2
Scroll-select
3
Scroll-select a category. For example, if you want to add a track from a
particular album, scroll-select
4
Scroll-select the sub-category. For example, under
Music Library
.
Albums
.
Albums
, scroll-
select an album.
www.dell.com | support.dell.com
NOTE: If you are adding an entire album, artist, genre, or playlist, skip to
step 6.
5
Scroll-select
6
Scroll-select
View Tracks
. Use the scroll dial to highlight a track.
Add to Selected
.
To replace the current Selected Music list with a new Selected Music list,
locate and play new tracks:
1
Press the Home button on your Dell DJ.
2
Scroll-select
Music Library
.
Using Your Dell DJ 31
Page 32

3
Scroll-select an audio category, for example,
4
Scroll-select the sub-category . For example, under
Albums
.
Albums
, scroll-
select an album.
NOTE: If you are replacing the Selected Music list with an entire album,
artist, genre, or playlist, skip to step 7.
5
Scroll-select
6
Scroll-select a track.
7
Depending on the sub-category you selected, scroll-select
Play Album, Play Artist, Play Genre
Clearing the Selected Music List
View Tracks
.
Play Track
, or
Play Playlist
.
You can clear all tracks from the Selected Music list without deleting the
tracks from your Dell DJ.
To clear all tracks from the Selected Music list:
1
Press the Home button on your Dell DJ.
2
Scroll-select
3
Scroll-select
Now Playing
.
Clear Selection
, then scroll-select
Ye s
,
OR
1
Press the Home button on your Dell DJ.
2
Scroll-select
3
Scroll-select
4
Scroll-select
5
Press the Home button on your Dell DJ to return to the Main Menu.
Now Playing
.
Selected Music
Clear Selection
, then scroll-select a track.
, then scroll-select
Ye s
.
www.dell.com | support.dell.com
,
NOTE:
Tracks that are cleared or removed from the Selected Music list
are not deleted from your device. To delete a track from Music Library,
see "Deleting Tracks From Your Dell DJ" on page 33 for information.
Removing a Track from the Selected Music List
To remove a track from the Selected Music list:
1
Press the Home button on your Dell DJ.
2
Scroll-select
Now Playing
.
Using Your Dell DJ 32
Page 33

3
Scroll-select
4
Scroll-select a track.
5
S
croll-select
Creating a Playlist
Selected Music
Clear Track
.
to display the Selected Music list.
If you like the contents and arrangement of your current Selected Music list,
you can save the list as a playlist for retrieval and playback later.
To cre a t e a playl i s t:
1
Press the Home button on your Dell DJ.
2
Scroll-select
3
Scroll-select
4
Scroll-select any track in the list. A list of options appears.
5
Scroll-select
6
Use the scroll dial to enter a name for the playlist.
NOTE: For different character sets, such as accented characters or
numerals, scroll-select Charset.
7
When you have finished entering the name, scroll-select OK.
Deleting Tracks From Your Dell DJ
Now Playing
.
Selected Music
Save as Playlist
to display the Selected Music list.
.
To permanently delete tracks, albums, artists, genres, or playlists, you must
remove them from Music Library.
You can remove tracks from the Selected Music list without permanently
deleting the tracks from your Dell DJ. See "Clearing the Selected Music
List" and "Removing a Track from the Selected Music List" on page 32.
www.dell.com | support.dell.com
To delete a track:
1
Follow steps 1 through 5 in "Locating Tracks in Music Library" on
page 27.
2
Scroll-select the track you want to delete. A list of options appears.
3
Scroll-select
Delete Track
. A message box appears, asking if you want
to delete the selected track.
Using Your Dell DJ 33
Page 34

4
Scroll-select
Ye s
to delete the track from your Dell DJ.
To delete an entire album, artist, genre, or playlist:
1
Press the Home button on your Dell DJ.
2
Scroll-select
3
Scroll-select an audio category. For example, if you want to delete a
particular album, scroll-select
4
Scroll-select the sub-category . For example, under
Music Library
.
Albums
.
Albums
select the album you want to delete. A list of options appears.
5
Depending on the sub-category you selected, scroll-select
Album
,
Delete Artist, Delete Genre
, or
Delete Playlist
. A message box
appears, asking if you want to delete the selected album, artist, genre,
or playlist.
6
Scroll-select
Ye s
, to delete the album, artist, genre, or playlist from
your Dell DJ.
www.dell.com | support.dell.com
, scroll-
Delete
Renaming a Playlist
To rename a playlist, you must load the playlist into the Selected Music list
as previously described and then save it under a new name. You can then
delete the old playlist.
To rename a playlist:
1
Clear the Selected Music List using the Clear Selection feature
described in "Clearing the Selected Music List" on page 32.
2
Load the playlist to the Selected Music list. See "Adding Tracks to the
Selected Music List" on page 31 for more information.
3
Save the Selected Music list as a new playlist.
Using Your Dell DJ 34
Page 35

4
Delete the old playlist.
Play Mode
You can use the Play Mode function to determine the sequence of playing
the selected tracks.
To view play mode options:
1
Press the Home button on your Dell DJ.
2
Scroll-select
3
To change the play mode, scroll-select a play mode.
Play Mode
.
www.dell.com | support.dell.com
Normal
Repeat Track
plays each selected track one time in sequential order.
repeatedly plays the selected track until you turn off the Dell
DJ or change the play mode.
Repeat All
repeatedly plays all of the selected tracks until you turn off the
Dell DJ or change the play mode.
Shuffle
randomly plays the selected tracks one time without repeating any
tracks.
Shuffle Repeat
randomly plays the selected music tracks, then repeats them
in a different random sequence until you turn off the Dell DJ or change the
play mode.
Track O nce
plays the selected track one time and then stops.
Using Your Dell DJ 35
Page 36

Play Mode Icons
Icon Description
Repeat Track Play and repeat the selected track.
Repeat All Play and repeat all Selected Music tracks.
Shuffle Randomly play all Selected Music tracks once
without repeating.
Shuffle Repeat Randomly play all Selected Music tracks once, then
repeat in a different random sequence.
Track Once Play the selected track once.
Date and Time
You can change the date and time settings on the Dell DJ.
Yo u c an s e t:
• Date and time — view time, change the date and time, format, and
date separator
• Sleep timer — choose how much time passes before your Dell DJ shuts
itself off during playback of a song
• Calendar view — view the calendar
www.dell.com | support.dell.com
To view or set the time, date and day:
1
Press the Home button.
2
Scroll-select
3
Scroll-select
4
Scroll-select
Date & Time
Time
.
.
Set Date & Time
.
To set the time and date, scroll-select the item you want to change,
then rotate the scroll dial to change.
NOTE: The day is updated automatically when you adjust the date.
5
To save your setting or exit, scroll-select the check mark icon.
Using Your Dell DJ 36
Page 37

To format the time and date:
1
Press the Home button.
2
Scroll-select
3
Scroll-select
4
Scroll-select a format option. A list of options appears.
5
Depending on the format option you selected, scroll-select the option
Date & Time
Time
.
.
you want.
To set the sleep timer:
1
Press the Home button.
2
Scroll-select
3
Scroll-select
4
Scroll-select a duration.
NOTE: This is different from the Idle Shutdown time, as the sleep timer is only
activated when you play audio tracks. If you do not press a player button during
the selected duration, your Dell DJ turns itself off.
Date & Time
Sleep Timer
.
. A list of available times appears.
To view or set the time, date and day:
1
Press the Home button.
2
Scroll-select
3
Scroll-select
Date & Time
View Calendar
.
.
www.dell.com | support.dell.com
Settings
You can customize the Dell DJ to your preferences by adjusting the settings.
Yo u c an s e t:
• Owner name — enter your name, or a name for your Dell DJ
• EQ preset — choose from available presets or create a custom EQ
• Backlight duration — choose how long the back light remains lit
• Contrast level — choose a contrast level for optimal viewing
• Idle shutdown time — choose how much idle time passes before your
Dell DJ shuts itself off
Using Your Dell DJ 37
Page 38
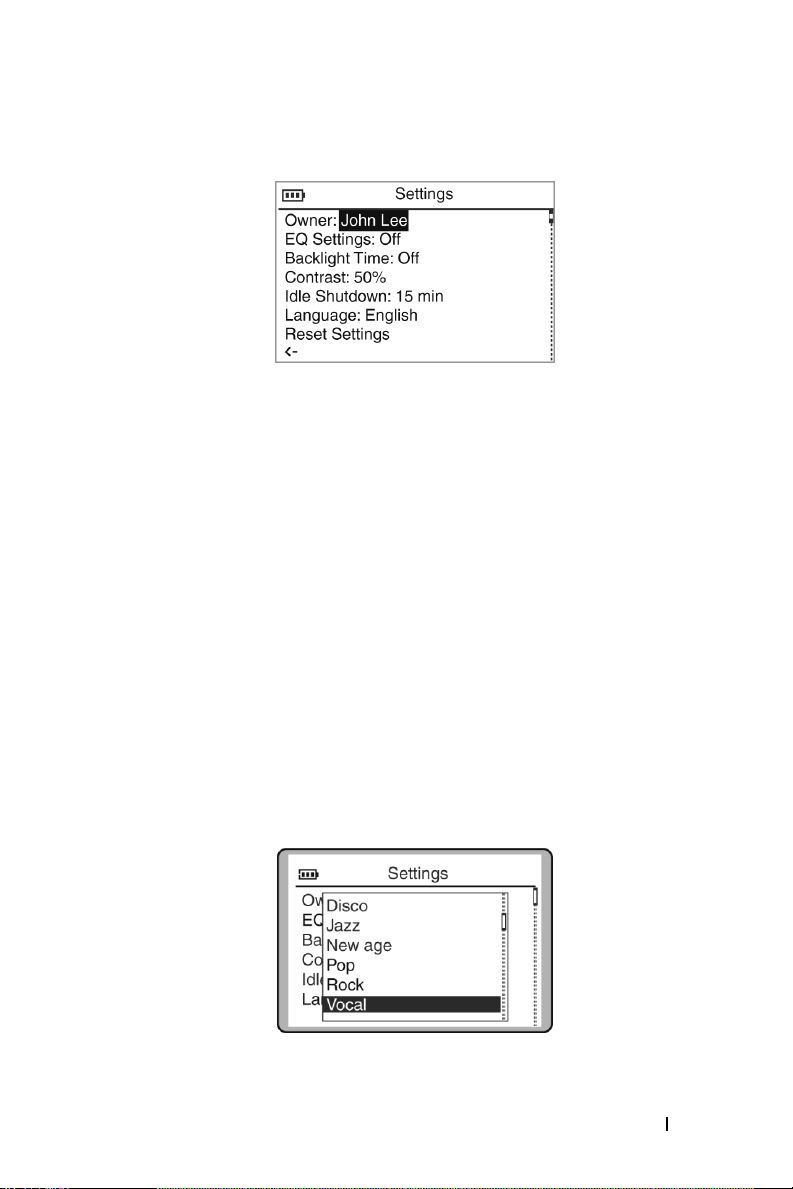
• Language — choose the Dell DJ’s display language
To set the owner’s name:
1
Press the Home button.
2
Scroll-select
3
Scroll-select
4
Scroll-select the owner’s name. A list of characters appear.
5
Scroll-select characters to form the name.
To select other characters, scroll-select
6
Scroll-select
Settings & Info
Settings
OK
.
.
.
Charset
.
To select an EQ setting:
1
Press the Home button.
2
Scroll-select
3
Scroll-select
4
Scroll-select the current EQ setting. A list of EQ presets appears. To
Settings & Info
Settings
.
.
select one of the EQ presets, scroll-select the preset.
www.dell.com | support.dell.com
Using Your Dell DJ 38
Page 39

To create a custom EQ setting:
1
Scroll-select
2
Scroll-select a frequency slider and rotate the scroll dial to adjust sound
Custom EQ
. The equalizer control box appears.
output.
3
To save your EQ setting, scroll-select the check mark icon.
To set the backlight duration:
1
Press the Home button.
2
Scroll-select
3
Scroll-select
4
Scroll-select the current backlight time. A list of available durations
Settings & Info
Settings
.
.
appears.
5
Scroll-select a duration.
www.dell.com | support.dell.com
To set the contrast level:
1
Press the Home button.
2
Scroll-select
3
Scroll-select
4
Scroll-select the current contrast level. A list of available levels appears.
5
Scroll-select a level.
Settings & Info
Settings
.
.
To set the idle shutdown time:
1
Press the Home button.
2
Scroll-select
3
Scroll-select
Settings & Info
Settings
.
.
Using Your Dell DJ 39
Page 40

4
Scroll-select the current idle shutdown time. A list of available times
appears.
5
Scroll-select a shutdown time.
NOTE: Your player is "idle" when you do not press a player button, or if you do
not have any tracks playing during the specified duration.
To set the display language:
1
Press the Home button.
2
Scroll-select
3
Scroll-select
4
Scroll-select the current display language. A list of available languages
Settings & Info
Settings
.
.
appears.
5
Scroll-select a language.
Information
You can check your Dell DJ for the following information:
• Firmware version
• Total amount of space for storing music or data
• Available space for storing music or data
• Number of tracks stored
• Number of albums stored
• Number of playlists stored
www.dell.com | support.dell.com
To check the information for your Dell DJ:
1
Press the Home button.
2
Scroll-select
3
Scroll-select
Settings & Info
Information
.
.
Using Your Dell DJ 40
Page 41

Frequently Asked Questions
This section covers common problems you might encounter or questions
you might have while using your Dell DJ. If you have a problem that is not
addressed in this chapter, visit
Installation
support.dell.com
for more information.
I can’t install the Dell DJ software on my computer, which has Microsoft®
Windows
halfway.
You cannot install the Dell DJ software on a computer with Windows 98 or
Windows 95.
Upgrade your computer’s operating system to Windows XP or Windows
2000 before attempting to install the Dell DJ.
My Dell DJ is not recognized by Musicmatch or Dell DJ Explorer, after
installing the software from the Dell DJ™/Dell Pocket DJ™ Product
Software CD.
In Musicmatch or Dell DJ Explorer, I can’t see my Dell DJ.
Your Dell DJ was probably connected to your computer during the installation.
Your Dell DJ may not be properly connected to your computer.
Disconnect your Dell DJ and restart your computer. You may also have to
re-install the software from the
CD. Be sure to follow the installation steps carefully. Do not connect your
Dell DJ to your computer during software installation.
®
95 or Windows 98 installed on it. The installation stops
Dell DJ™/Dell Pocket DJ™ Product Software
NOTE: During installation, if you choose not to install Musicmatch from the
Dell DJ™/Dell Pocket DJ™ Product Software CD, you must still install the
Musicmatch plug-in, when prompted, in order to use Musicmatch with the Dell
DJ. See "Installing Software" on page 12.
Page 42

Your Dell DJ may not have sufficient battery charge to operate on your
computer’s USB power.
Connect your Dell DJ to the AC adapter as described in "Charging the
Battery" on page 10.
Usage
I can’t turn my Dell DJ on.
I can’t turn my Dell DJ on, and all the buttons flash when I hold down the
Power button.
You may not be holding down the Power button long enough.
Press and hold the Power button for at least 2 seconds.
The lock switch on the Dell DJ is in the locked position (red).
Move the switch to the unlocked position (black).
I can’t turn my Dell DJ off.
I was using my Dell DJ, and now all the buttons are flashing, and the Dell
DJ is not responding.
The lock switch on the Dell DJ is in the locked position (red).
Move the switch to the unlocked position (black).
The Dell DJ’s operating system may be locked.
Insert the end of a thin object, such as a straightened paper clip, into the
reset button, located on the left side of your Dell DJ.
The buttons on my Wired Remote don’t work anymore.
The lock switch on the Wired Remote is in the locked position (red).
Move the switch to the unlocked position (black).
I’ve disconnected my Dell DJ from my computer, but the display still
shows that it is connected.
The Dell DJ’s operating system may be locked.
Insert the end of a thin object, such as a straightened paper clip, into the
reset button, located on the left side of your Dell DJ.
www.dell.com | support.dell.com
Frequently Asked Questions 42
Page 43

My computer does not recognize my Dell DJ.
You may be using a USB hub to connect your Dell DJ to your computer.
Connect your Dell DJ directly to your computer’s USB port.
I don’t see the charging icon anymore, but my Dell DJ seems to be working.
The charging icon disappears when the Dell DJ’s battery is fully charged.
This is not a problem. You can verify that the battery is fully charged by
following these steps:
1
Run your Dell DJ on battery power for thirty minutes.
2
Charge your Dell DJ as described in "Charging the Battery" on page 10.
3
While the battery is charging, note if the charging icon appears.
The Power button flashes regularly until the battery is fully charged.
The charging icon disappears.
Whenever I turn my Dell DJ on, it starts up in Rescue Mode.
Your Dell DJ’s firmware or operating system may be damaged.
Go to
support.dell.com
latest firmware into your player. For more information on what you can do in
Rescue mode, see "Troubleshooting in Rescue Mode" on page 45.
When I turn my Dell DJ on, a "Re-building Library" message appears.
The Dell DJ sometimes needs to re-map the location of music tracks and files.
Wait for your player to finish verifying the location of music tracks, files, and
playlists.
for the latest updates for your Dell DJ, and load the
www.dell.com | support.dell.com
General
When I listen to music tracks, I hear a lot of noise or drop-outs.
The track you are listening to was not recorded or encoded properly.
Verify that the music track sounds the same when you play it from the Dell
DJ and from your computer. You can then acquire a better recording of the
track and transfer it to your Dell DJ.
Frequently Asked Questions 43
Page 44

I want to delete all the music tracks on my Dell DJ, but I can’t find the
option in the main menu.
From the main menu, you can only delete one track, album, artist, genre or
playlist at a time.
To delete all content from your Dell DJ, enter Rescue mode and use the
Format All
mode, see "Troubleshooting in Rescue Mode" on page 45.
option. For more information about what you can do in Rescue
Error Indications
Rescue mode firmware error indication.
Your Dell DJ’s firmware has been erased or damaged.
Reload the firmware as described in "Troubleshooting in Rescue Mode" on
page 45.
Rescue mode hard disk problem.
Your Dell DJ’s internal storage space may be corrupted.
Use the
Mode" on page 45.
All the buttons on my Dell DJ flash when I try to turn my player on.
The lock switch on the Dell DJ is in the locked position (red).
Move the switch to the unlocked position (black).
Format All
option as described in "Troubleshooting in Rescue
www.dell.com | support.dell.com
Frequently Asked Questions 44
Page 45

Troubleshooting in Rescue Mode
In Rescue mode, you can quickly resolve issues that involve your Dell DJ’s
firmware and hard disk operations.
To activate Rescue mode:
Press the Play button while inserting the end of a thin object such as a
straightened paper clip into the reset at the same time, then hold the Play
button until your Dell DJ turns on.
In Rescue mode, you can select the following options:
•
Clean Up
No files, music tracks, or playlists are lost.
NOTE: This option resets your player settings to their factory default..
•
Format All
NOTICE: All files, music tracks, and playlists are lost. You must reload all files,
music tracks, and playlists.
•
Reload Firmware
updated firmware.
NOTE: Do not choose this option until you have downloaded updated firmware
into your computer.
•
Reboot
— searches for and fixes fragmented files and lost clusters.
— reformats the Dell DJ’s hard disk.
— clears firmware in the Dell DJ so that you can load
— restarts the Dell DJ after testing.
www.dell.com | support.dell.com
Clean Up
Choose this option if you experience audio drop-outs, repeated
Library
messages, or if your player is frequently unresponsive.
NOTE: No files, music tracks, or playlists are lost when this option is selected.
Re-building
To clean up your Dell DJ:
1
Activate Rescue mode as described above.
2
Scroll-select
3
Scroll-select
Clean Up
Ye s
.
. A progress display appears.
The cleanup can take more than a few minutes, depending on how many
music tracks you have in your Dell DJ.
Frequently Asked Questions 45
Page 46

Format All
Choose this option if you experience audio drop-outs, repeated
Library
messages, or if your player is frequently unresponsive.
NOTICE: All files, music tracks, or playlists are lost when this option is
selected.
Re-building
To format your Dell DJ:
1
Activate Rescue mode as described above.
2
Scroll-select
3
Scroll-select
Reload Firmware
Format All
Ye s
. A progress display appears.
.
Choose this option to upgrade your Dell DJ’s firmware, or if you want to
correct firmware problems. You should also choose this option when your
player becomes unresponsive frequently.
NOTICE: This option removes the firmware in your Dell DJ so that you can load
updated firmware or reload current firmware. You should have the firmware file
on your computer before choosing this option.
You can download updated firmware from
support.dell.com
. No files, music
tracks, or playlists are lost when you reload or upgrade firmware.
To reload firmware:
1
Activate Rescue mode as described above.
2
Scroll-select
3
Scroll-select
4
Connect your Dell DJ to your computer using the included USB
Reload Firmware
Ye s
.
.
synchronization cable or cradle. See "Connecting to a Computer" on
page 13 for information.
5
Turn your Dell DJ on, and double-click the firmware file on your
computer.
Your Dell DJ is automatically detected. The firmware is loaded and the
Dell DJ restarts.
6
Restart your computer if prompted.
www.dell.com | support.dell.com
Frequently Asked Questions 46
Page 47

Reboot
Choose this option to get out of Rescue mode, and return to your Dell DJ’s
normal display.
When in Rescue mode, scroll-select
Reboot
. Your player restarts
automatically.
You can also press and hold the Power button to turn your player off.
www.dell.com | support.dell.com
Frequently Asked Questions 47
Page 48

Appendix
Page 49

Specifications
Hardware
Display LCD
160 x 104 resolution
blue EL back light
Storage media 20/30 GB HDD
Battery Embedded lithium-ion polymer
AC-in power (through dock connector) 5–5.4V, ≤ 2.4A
www.dell.com | support.dell.com
PC connection (through dock
connector)
Dock connector 26-pin connector
Performance Parameters
Audio quality (specifications based on 32-ohm load at
Signal-to-noise ratio
Channel separation
Frequency response
Harmonic distortion
USB 2.0/1.1
1-kHz tone are typical values)
up to 94 dB
up to 90 dB (line-out)
up to 65 dB (headphones)
20 Hz–20 kHz (line-out)
24 Hz–20 kHz (headphones)
< 0.05% (line-out)
< 0.1% (headphones)
Appendix 49
Page 50

Performance Parameters
Playtime up to 12 hours (based on 128 kbps MP3
songs, continuous playback)
Battery charging AC adapter charging — full charge in
2.5 hours
USB cable charging — full charge in 4.5
hours (battery must have at least 25%
charge for USB charging)
www.dell.com | support.dell.com
Appendix 50
Page 51

Glossary
BITRATE —A bitrate indicates the average number of bits in 1 second of a digital
audio track. MP3 encoders allow you to specify the bitrate when making MP3 files.
The higher the bitrate, the better the audio quality. Unfortunately, this also means
a larger file size.
C
ATEGORY —A general grouping of audio tracks, for example, artist, album, or
genre.
IGITAL RIGHTS MANAGEMENT (DRM) —A technology enabling the copyright owner of
D
intellectual property, like a digital audio track, to control file usage. It is normally
used to allow you to download digital audio tracks while preventing you from
distributing the files to other people or other devices. With DRM, digital audio
tracks contain digital signatures. Your device is DRM-compliant.
G
IGABYTE (GB) —About a thousand million bytes. A 1-GB device can store 1000 MB
worth of MP3 files. If your MP3 files are encoded at 128 kbps and each file is about
4 minutes long, a 10-GB device can store about 2500 MP3 files.
FIRMWARE —The software in your device that allows you to perform numerous
functions including playing and recording audio.
KBPS —Kilobits-per-second. A measure of how good the bitrate is. 128 kbps is the
standard bitrate for MP3 files. 128-kbps MP3s are near-CD quality. Some other
commonly used encoding rates are 160 or 192Kbps.
L
ITHIUM-ION BATTERY (LI-ION) —A battery composed of lithium, a light metal with
high electrochemical potential. Lithium batteries are light and store high amounts
of electrical energy. Because of this, lithium-ion batteries are ideal for portable
devices like yours. Lithium-ion batteries do not use poisonous metals, such as lead,
mercury, or cadmium, and have no memory effect problems. However, they are
more expensive than conventional nickel-cadmium (NiCad) and nickel metalhydride (NiMH) batteries. Your device uses a Li-Ion battery.
M
EGABYTE (MB) —About 1 million bytes. Bytes, megabytes, and gigabytes are
measures of how much data a storage device can hold. For example, a 3-minute
MP3 encoded at standard bitrates is approximately 3 MB in size.
MEMORY EFFECT —A property of some NiCad batteries that can surface when a
battery is not fully used or discharged before it is recharged. This can cause the
battery to have a false ‘memory’ as to how much electrical energy it can store. This
results in significantly lower battery levels, even after a full charge.
MP3 —A member of the MPEG compression family, MP3 is a commonly used
compressed digital-audio format. MP3 encoding transforms digital audio files (like
WAV) to provide reasonable audio quality in relatively small file sizes.
www.dell.com | support.dell.com
Appendix 51
Page 52

MUSIC LIBRARY —An organized collection of audio tracks in your device. Tracks are
grouped by categories: All tracks, Albums, Artists, and Genres.
PLAYLIST —A grouping of audio tracks. Using a playlist, you can create a playback
sequence of audio tracks from multiple albums or categories without actually
rearranging any audio tracks in the device’s Music Library. You can also name a
playlist, for example, My Favorite Pop Songs.
S
ELECTED MUSIC LIST —The Selected Music list is a line of tracks. You can choose an
album or a playlist of tracks to be played. In Normal mode, tracks are played in the
order in which they are queued.
SHUFFLE —A Play mode that randomly plays tracks once only from the Selected
Music list.
SHUFFLE REPEAT —A Play Mode that randomly plays tracks from the Selected Music
List repeatedly.
USB —Universal Serial Bus. A moderately high-speed input/output technology for
"hot swap" data transfers, meaning that you can connect or disconnect a USB
device without turning off your computer. Your device uses the newer USB 2.0
standard that allows for higher speed transfers than USB 1.1
W
IRED REMOTE —An accessory for your device that you can use to remotely access
the device controls.
www.dell.com | support.dell.com
Appendix 52
Page 53

Index
A
AC adapter charging, 10
adding tracks, 31
automatic shutdown, 37
available space, 40
B
backlight duration, 37, 39
battery charging, 10
bitrate, 51
buttons
back, 7
fast forward/skip forward, 8-9
play/pause, 8-9
power, 7
reset, 8
rewind/skip back, 7, 9
scroll dial, 8
volume, 7, 9
C
categories, 51
charset, 38
checking device
information, 40
connecting to a computer, 13
connecting your device, 13
connectors
dock, 8
headphone, 7, 9
travel charger, 10
contrast, 37
contrast level, 39
creating a playlist, 33
custom EQ, 37
D
date, 36
formatting, 36
deleting tracks, 33
deleting tracks from your
device, 33
device connection, 13
display language, 38, 40
category, 51
character sets, 38
charging the battery, 10
E
EQ setting, 37-38
Index 53
Page 54

F
file management, 26
file transfer, 20
locating tracks, 27
lock switch, 7, 9
firmware, 51
firmware version, 40
G
gigabyte (GB), 51
glossary, 51
H
hardware specifications, 49
Home button, 8
I
idle shutdown, 37
idle shutdown time, 39
K
kbps, 51
M
managing files, 26
megabyte (MB), 51
MP3, 51
MP3 encoding, 51
Music Library, 26, 28, 52
N
now playing, 30
number of albums, 40
number of playlists, 40
number of tracks, 40
O
owner’s name, 37
P
performance parameters, 49
L
language, 38
lithium-ion battery
(Li-Ion), 51
performing a reset, 16
play mode icons, 36
playing digital music, 17
playlist, 52
Index 54
Page 55

R
removing tracks, 33
renaming a playlist, 34
resetting your device, 16
S
screen contrast, 37
scroll dial, 8
scroll-select, 8
selected music, 30
selected music list, 31, 52
settings, 37
settings & info, 37
shuffle, 52
shuffle repeat, 52
specifications, 49
using
cradle, 13
Musicmatch, 20
Selected Music list, 30
USB synchronization cable, 15
using your Dell DJ, 17
V
viewing an album, 29
viewing track information, 28,
30
views
front, 7
side, 7
top, 7
W
wired remote, 7, 9, 52
T
time, 36
formatting, 36
transferring files, 20
U
USB, 52
USB cable charging, 13
Index 55
 Loading...