


 Loading...
Dell™ Color Cloud Multifunction Printer | H625cdw Dell™ Color Cloud Multifunction Printer | H825cdw Dell™ Color Smart Multifunction Printer | S2825cdn
User's Guide
Regulatory Model: H625cdw
H825cdw
S2825cdn

Notes, Cautions, and Warnings
NOTE:
• A NOTE indicates important information that helps you make better use of the printer.
CAUTION:
•A CAUTION indicates potential damage to hardware or loss of data if instructions are not followed.
WARNING:
• A WARNING indicates a potential for property damage, personal injury, or death.
Information in this document is subject to change without notice.
© 2015 Dell Inc. All rights reserved.
Reproduction of these materials in any manner whatsoever without the written permission of Dell Inc. is strictly forbidden.
Trademarks used in this text:
Dell and the DELL logo are trademarks of Dell Inc.
Microsoft, Windows, Windows Server, and Windows Vista are either trademarks or registered trademarks of Microsoft Corporation in the United States and/or other countries.
Apple, Bonjour, iPhone, Macintosh, Mac OS, AirPrint, and the AirPrint logo are trademarks of Apple Inc.
Adobe, PostScript, and Photoshop are either registered trademarks or trademarks of Adobe Systems Incorporated in the United States and/or other countries.
RSA and BSAFE are either registered trademarks or trademarks of EMC Corporation in the United States and/or other countries.
Microsoft product screen shot(s) reprinted with permission from Microsoft Corporation.
Other trademarks and trade names may be used in this document to refer to either the entities claiming the marks and names or their products. Dell Inc. disclaims any proprietary interest in trademarks and trade names other than its own.
About License
XML Paper Specification (XPS): This product may incorporate intellectual property owned by Microsoft Corporation. The terms and conditions upon which Microsoft is licensing such intellectual property may be found at http://go.microsoft.com/fwlink/?LinkId=52369; DES: This product includes software developed by Eric Young (eay@mincom.oz.au); AES: Copyright (c) 2003, Dr Brian Gladman, Worcester, UK. All rights reserved. This product uses published AES software provided by Dr Brian Gladman under BSD licensing terms; TIFF (libtiff): Copyright (c) 1988-1997 Sam Leffler and Copyright (c) 1991-1997 Silicon Graphics, Inc.; ICC Profile (Little cms): Copyright (c) 1998-2004 Marti Maria.
As for RSA BSAFE
This printer includes RSA® BSAFE® Cryptographic software from EMC Corporation.
ICC Profile Header
Copyright (c) 1994-1996 SunSoft, Inc.
Rights Reserved
2|
Permission is hereby granted, free of charge, to any person obtaining a copy of this software and associated documentation files (the "Software"), to deal in the Software without restriction, including without limitation the rights to use, copy, modify, merge, publish distribute, sublicense, and/or sell copies of the Software, and to permit persons to whom the Software is furnished to do so, subject to the following conditions:
The above copyright notice and this permission notice shall be included in all copies or substantial portions of the Software.
THE SOFTWARE IS PROVIDED "AS IS", WITHOUT WARRANTY OF ANY KIND, EXPRESS OR IMPLIED, INCLUDING BUT NOT LIMITED TO THE WARRANTIES OF MERCHANTABILITY, FITNESS FOR A PARTICULAR PURPOSE AND NON-INFRINGEMENT. IN NO EVENT SHALL SUNSOFT, INC. OR ITS PARENT COMPANY BE LIABLE FOR ANY CLAIM, DAMAGES OR OTHER LIABILITY, WHETHER IN AN ACTION OF CONTRACT, TORT OR OTHERWISE, ARISING FROM, OUT OF OR IN CONNECTION WITH THE SOFTWARE OR THE USE OR OTHER DEALINGS IN THE SOFTWARE.
Except as contained in this notice, the name of SunSoft, Inc. shall not be used in advertising or otherwise to promote the sale, use or other dealings in this Software without written authorization from SunSoft Inc.
JPEG Library
Independent JPEG Group's free JPEG software
____________________
This package contains C software to implement JPEG image encoding, decoding, and transcoding. JPEG is a standardized compression method for full-color and gray-scale images.
The distributed programs provide conversion between JPEG "JFIF" format and image files in PBMPLUS PPM/PGM, GIF, BMP, and Targa file formats. The core compression and decompression library can easily be reused in other programs, such as image viewers. The package is highly portable C code; we have tested it on many machines ranging from PCs to Crays.
We are releasing this software for both noncommercial and commercial use. Companies are welcome to use it as the basis for JPEG-related products. We do not ask a royalty, although we do ask for an acknowledgement in product literature (see the README file in the distribution for details). We hope to make this software industrial-quality --- although, as with anything that's free, we offer no warranty and accept no liability.
For more information, contact jpeg-info@jpegclub.org.
Contents of this directory
____________________
jpegsrc.vN.tar.gz contains source code, documentation, and test files for release N in Unix format.
jpegsrN.zip contains source code, documentation, and test files for release N in Windows format.
jpegaltui.vN.tar.gz contains source code for an alternate user interface for cjpeg/djpeg in Unix format.
jpegaltuiN.zip contains source code for an alternate user interface for cjpeg/djpeg in Windows format.
wallace.ps.gz is a PostScript file of Greg Wallace's introductory article about JPEG. This is an update of the article that appeared in the April 1991 Communications of the ACM.
jpeg.documents.gz tells where to obtain the JPEG standard and documents about JPEG-related file formats.
jfif.ps.gz is a PostScript file of the JFIF (JPEG File Interchange Format) format specification.
|3
jfif.txt.gz is a plain text transcription of the JFIF specification; it's missing a figure, so use the PostScript version if you can.
TIFFTechNote2.txt.gz is a draft of the proposed revisions to TIFF 6.0's JPEG support.
pm.errata.gz is the errata list for the first printing of the textbook "JPEG Still Image Data Compression Standard" by Pennebaker and Mitchell.
jdosaobj.zip contains pre-assembled object files for JMEMDOSA.ASM. If you want to compile the IJG code for MS-DOS, but don't have an assembler, these files may be helpful.
Math Library
Copyright (C) 1993 by Sun Microsystems, Inc. All rights reserved.
Developed at SunPro, a Sun Microsystems, Inc. business.
Permission to use, copy, modify, and distribute this software is freely granted, provided that this notice is preserved.
====================================================
copysignf.c: * Copyright (C) 1993 by Sun Microsystems, Inc. All rights reserved.
math_private.h: * Copyright (C) 1993 by Sun Microsystems, Inc. All rights reserved.
powf.c: * Copyright (C) 1993 by Sun Microsystems, Inc. All rights reserved.
scalbnf.c: * Copyright (C) 1993 by Sun Microsystems, Inc. All rights reserved.
libtiff
Copyright (C) 1988-1997 Sam Leffler
Copyright (C) 1991-1997 Silicon Graphics, Inc.
Permission to use, copy, modify, distribute, and sell this software and its documentation for any purpose is hereby granted without fee, provided that (i) the above copyright notices and this permission notice appear in all copies of the software and related documentation, and (ii) the names of Sam Leffler and Silicon Graphics may not be used in any advertising or publicity relating to the software without the specific, prior written permission of Sam Leffler and Silicon Graphics.
THE SOFTWARE IS PROVIDED "AS-IS" AND WITHOUT WARRANTY OF ANY KIND, EXPRESS, IMPLIED OR OTHERWISE, INCLUDING WITHOUT LIMITATION, ANY WARRANTY OF MERCHANTABILITY OR FITNESS FOR A PARTICULAR PURPOSE.
IN NO EVENT SHALL SAM LEFFLER OR SILICON GRAPHICS BE LIABLE FOR ANY SPECIAL, INCIDENTAL, INDIRECT OR CONSEQUENTIAL DAMAGES OF ANY KIND, OR ANY DAMAGES WHATSOEVER RESULTING FROM LOSS OF USE, DATA OR PROFITS, WHETHER OR NOT ADVISED OF THE POSSIBILITY OF DAMAGE, AND ON ANY THEORY OF LIABILITY, ARISING OUT OF OR IN CONNECTION WITH THE USE OR PERFORMANCE OF THIS SOFTWARE.
Zlib
zlib.h -- interface of the 'zlib' general purpose compression library version 1.2.8, April 28th, 2013
Copyright (C) 1995-2013 Jean-loup Gailly and Mark Adler
This software is provided 'as-is', without any express or implied warranty. In no event will the authors be held liable for any damages arising from the use of this software.
Permission is granted to anyone to use this software for any purpose, including commercial applications, and to alter it and redistribute it freely, subject to the following restrictions:
4|
1.The origin of this software must not be misrepresented; you must not claim that you wrote the original software. If you use this software in a product, an acknowledgment in the product documentation would be appreciated but is not required.
2.Altered source versions must be plainly marked as such, and must not be misrepresented as being the original software.
3.This notice may not be removed or altered from any source distribution.
Jean-loup Gailly |
Mark Adler |
jloup@gzip.org madler@alumni.caltech.edu
____________________
UNITED STATES GOVERNMENT RESTRICTED RIGHTS
This software and documentation are provided with RESTRICTED RIGHTS. Use, duplication or disclosure by the Government is subject to restrictions as set forth in subparagraph (c)(1)(ii) of the Rights in Technical Data and Computer Software clause at DFARS 252.227-7013 and in applicable FAR provisions: Dell Inc., One Dell Way, Round Rock, Texas, 78682, USA.
October 2015 Rev. A00
|5
Contents
Notes, Cautions, and Warnings |
2 |
1 Before Beginning |
13 |
About This Guide |
14 |
Conventions |
14 |
Finding Information |
15 |
Product Features |
16 |
Printer Overview |
19 |
Front and Rear View |
19 |
Duplex Automatic Document Feeder (DADF) |
21 |
Operator Panel |
21 |
Optional Accessory |
23 |
Graphic Symbols on the Printer and Their Meanings |
24 |
2 Setting Up the Printer |
25 |
Overview of the Printer Setup |
26 |
Preparing to Set Up the Printer |
27 |
Space Requirements |
27 |
Securing the Printer |
27 |
Connecting Your Printer to a Telephone Line |
28 |
Connecting the Printer to the Wall Jack |
28 |
Connecting the Printer to a Modem |
29 |
Connecting a Telephone or Answering Machine |
29 |
Turning On/Off the Printer |
31 |
Turning On the Printer |
31 |
Turning Off the Printer |
32 |
Setting Initial Settings on the Operator Panel |
32 |
Connecting Your Printer to a Computer |
38 |
Overview |
38 |
Connecting to a Wireless Network |
39 |
Connecting to a Wired (Ethernet) Network |
44 |
Connecting to a Computer With USB |
45 |
Installing the Software for Windows® Computers |
46 |
Installing the Software for Macintosh Computers |
53 |
6 | Contents
Connecting Your Printer to Mobile Devices |
56 |
Wi-Fi Direct |
56 |
Dell Document Hub |
59 |
AirPrint |
59 |
Google Cloud Print |
60 |
Mopria Print Service |
64 |
Installing Printer Drivers on Linux Computers (CUPS) |
65 |
Operation on Red Hat Enterprise Linux 6 Desktop |
65 |
Operation on SUSE Linux Enterprise Desktop 11 |
67 |
Operation on Ubuntu 12.04 LTS |
70 |
Setting the IP Address |
73 |
Assigning an IP Address |
73 |
Verifying the IP Settings |
75 |
3 Using Your Printer |
76 |
Using the Operator Panel |
77 |
About the Home Screen |
77 |
Basic Operations on the Touch Panel |
78 |
Moving, Adding or Deleting Tiles |
79 |
Using the Keyboard Displayed on the Touch Panel |
80 |
Changing the Language |
81 |
Panel Lock |
81 |
Setting the Power Saver Timer |
82 |
About the Concurrent Jobs Feature |
82 |
Understanding the System Menus |
83 |
Report / List |
83 |
Wi-Fi | WPS |
85 |
Paired Device |
85 |
Admin Settings |
85 |
Default Settings |
114 |
Tray Management |
115 |
Language Settings |
117 |
Resetting Defaults |
117 |
Understanding the Job Menus |
119 |
119 |
|
Copy |
120 |
ID Copy |
123 |
Multiple-Up Copy |
123 |
Scan to Email |
124 |
Scan to Network Folder |
124 |
Contents | 7
Scan to USB |
124 |
Scan to Computer |
124 |
Fax |
127 |
Print PDF/TIFF |
128 |
Print JPEG |
128 |
Dell Document Hub |
130 |
SharePoint |
133 |
Add App |
134 |
Dell™ Printer Configuration Web Tool |
135 |
Preparing to Use Dell Printer Configuration Web Tool |
135 |
Starting Dell Printer Configuration Web Tool |
136 |
Page Display Format |
136 |
Changing the Settings of the Menu Items |
138 |
Print Media Guidelines |
188 |
Supported Print Media |
188 |
Supported Paper Weight |
191 |
Unacceptable Print Media |
191 |
Recommended Print Media |
191 |
Print Media Storage Guidelines |
193 |
Loading Print Media |
194 |
Before Loading |
194 |
Loading Print Media in Tray1 and the Optional 550-Sheet Feeder |
194 |
Loading Print Media in the Multipurpose Feeder (MPF) |
199 |
Loading Letterhead, Pre-Printed, and Pre-Punched Paper |
204 |
Linking Trays |
204 |
Loading Documents |
205 |
Before Loading Documents in the DADF |
205 |
Loading a Document in the Duplex Automatic Document Feeder (DADF) |
206 |
Loading a Document on the Document Glass |
206 |
4 Printing, Copying, Scanning, Faxing, and Dell Document |
|
Hub |
208 |
Printing |
209 |
Sending a Job to Print |
209 |
Canceling a Print Job |
209 |
Duplex Printing |
210 |
Using Stored Print |
212 |
Printing From USB Flash Drive |
215 |
Printer Settings |
216 |
8 | Contents
Copying |
218 |
Making Copies From the Document Glass |
218 |
Making Copies From the DADF |
218 |
Using the ID Copy |
219 |
Changing the Default Copy Settings |
219 |
Scanning |
221 |
Scanning Overview |
221 |
Scanning to a Computer With a USB Connection |
222 |
Scanning to a Computer With a Network Connection |
222 |
Scanning From a Computer Using Web Services on Devices (WSD) |
225 |
Scanning Using the TWAIN Driver |
225 |
Scanning Using the Windows® Image Acquisition (WIA) Driver |
226 |
Scanning Using Wi-Fi Direct |
227 |
Scanning to a Computer or Server With SMB/FTP |
228 |
Scanning to a USB Flash Drive |
238 |
Sending a Scanned Data via E-Mail |
239 |
Managing the Scanner |
244 |
Changing the Default Scan Setting |
246 |
Faxing |
247 |
Initial Settings |
247 |
Changing the Fax Settings |
248 |
Sending a Fax |
248 |
Sending a Delayed Fax |
250 |
Sending a Fax Directly From a Computer |
251 |
Automatic Dialing |
255 |
Phone Book |
258 |
Receiving a Fax |
259 |
Reports Related to Fax |
262 |
Changing the Default Fax Setting |
262 |
Dell Document Hub |
263 |
Registering the User and Signing In to Dell Document Hub |
263 |
Searching for and Printing Files |
265 |
Browsing and Printing Files |
266 |
Scanning |
267 |
Scanning the Document Using Optical Character Recognition (OCR) |
269 |
Sending the Scanned Data to Yourself via E-Mail |
270 |
Sending a Scanned Data of a Business Card to Yourself via E-Mail |
271 |
Printing and Scanning Directly From SharePoint® |
272 |
Registering the SharePoint® Server |
272 |
Signing In to the SharePoint® Server |
273 |
Contents | 9
Browsing and Printing Files |
273 |
Scanning |
274 |
5 Know Your Printer |
276 |
Understanding the Software of Your Printer |
277 |
Overview |
277 |
Using the Status Monitor Widget for Macintosh |
280 |
Using the Status Monitor Console for Linux |
284 |
Software Update |
290 |
User Authentication |
291 |
Creating and Editing the User Accounts |
291 |
Logging In to the User Account |
293 |
Multiple Desktop - Tile Customization |
295 |
Adding a New Tile |
295 |
Using the Address Book and Phone Book |
297 |
Types of Address Books |
297 |
Adding and Editing Entries to the Address Books |
297 |
Using Operator Panel of the Printer |
298 |
Using Address Book Editor |
298 |
Using Dell Printer Configuration Web Tool |
299 |
Using the Server Address Book and Server Phone Book |
299 |
Using Digital Certificates |
304 |
Managing Certificates |
304 |
Setting the Features |
308 |
Understanding Printer Messages |
313 |
Status Codes |
313 |
Error Messages |
320 |
Specifications |
323 |
Operating System Compatibility |
323 |
Power Supply |
323 |
Dimensions |
324 |
Weight |
324 |
Memory |
324 |
Page Description Language (PDL)/Emulation, Operating System, and Interface |
324 |
Environment |
325 |
Cables |
325 |
Print Specifications |
326 |
Copy Specifications |
326 |
Scanner Specifications |
327 |
10 | Contents
|
Fax Specifications |
327 |
|
Wireless Connection Specifications |
328 |
6 |
Maintaining Your Printer |
329 |
|
Maintaining Your Printer |
330 |
|
Checking the Status of Supplies |
330 |
|
Conserving Supplies |
330 |
|
Ordering Supplies |
331 |
|
Storing Print Media |
331 |
|
Storing Consumables |
332 |
|
Replacing the Toner Cartridges |
332 |
|
Replacing the Drum Cartridges |
334 |
|
Replacing the Waste Toner Box |
340 |
|
Cleaning Inside the Printer |
342 |
|
Cleaning the Scanner |
347 |
|
Cleaning the DADF Feed Rollers |
349 |
|
Moving the Printer |
349 |
|
Removing Options |
351 |
7 |
Troubleshooting |
353 |
|
Troubleshooting |
354 |
|
Clearing Jams |
354 |
|
Basic Printer Problems |
366 |
|
Display Problems |
366 |
|
Printing Problems |
366 |
|
Print Quality Problems |
367 |
|
Jam/Alignment Problems |
381 |
|
Noise |
385 |
|
Copy Problems |
386 |
|
Fax Problems |
386 |
|
Scanning Problems |
388 |
|
Digital Certificate Problems |
390 |
|
Wireless Problems |
391 |
|
Problems With Installed Optional 550-sheet feeder |
391 |
|
Wi-Fi Direct Problems |
392 |
|
Scanner Driver/Printer Utility Problems |
392 |
|
Other Problems |
392 |
|
Contacting Service |
393 |
|
Appendix |
394 |
|
Appendix |
395 |
|
Dell™ Technical Support Policy |
395 |
Contents | 11
Warranty and Return Policy |
395 |
Contacting Dell |
395 |
New Zealand PTC200 Warnings |
396 |
USA/Canada Wi-Fi Warnings |
397 |
12 | Contents
Before Beginning |
1 |
|
|
About This Guide |
14 |
Finding Information |
15 |
Product Features |
16 |
Printer Overview |
19 |
Graphic Symbols on the Printer and Their Meanings |
24 |
|13

About This Guide
Click the bookmarks to the left for information on the features, optional accessory, and operation of your Dell H625cdw, Dell H825cdw, or Dell S2825cdn. For details about other documentation included with your printer, see "Finding Information."
NOTE:
•In this manual, Dell H625cdw, Dell H825cdw, or Dell S2825cdn is referred to as the "printer."
•In this manual, the procedures for the computer are explained using Microsoft® Windows® 7 unless stated otherwise.
•The images and screenshots used in this manual are those of Dell H825cdw unless otherwise mentioned.
Conventions
The following describe the meaning of the symbols and fonts used in this manual:
Item |
|
Description |
|
|
|
Texts in Bold |
• Names of hardware button on the operator panel. |
|
|
|
• Menus, commands, windows, or dialog boxes displayed on the |
|
|
computer screen. |
|
|
|
Texts in Courier New font |
• Menus and messages displayed on the touch panel. |
|
|
|
• Screen name on the touch panel. |
|
|
• Characters entered from the computer. |
|
|
• Directory paths. |
|
|
|
< |
> |
• Key on the keyboard of the computer. |
|
|
|
|
|
• Indicates a process flow. |
|
|
|
" |
" |
• Cross references in this manual. |
|
|
• Characters entered from the operator panel. |
|
|
• Messages displayed on the computer screen. |
|
|
|
14 |
| |
About This Guide |
Finding Information
What are you looking for? |
Find it here |
Drivers and manuals for my printer Software and Documentation disc: |
|
|
The Software and Documentation disc contains manuals, drivers, and |
|
software for the printer. You can use the Software and |
|
Documentation disc to install drivers and software, and refer to |
|
manuals. |
|
Readme files may be included on your Software and Documentation |
|
disc to provide last-minute updates about technical changes to the |
|
printer or advanced technical reference material for experienced |
|
users or technicians. |
How to set up my printer |
Setup Guide |
How to use my printer |
|
Safety information |
Important Information |
Warranty information |
WARNING: |
|
• Read and follow all safety instructions in the Important |
|
Information prior to setting up and operating the printer. |
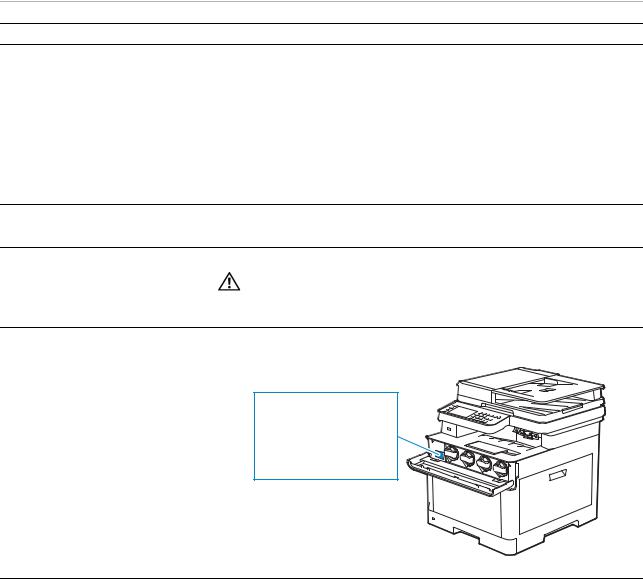
Express Service Code and Service |
The Express Service Code and Service Tag are located inside the front |
Tag |
cover of the printer. |
|
Service Tag |
|
ABCD123 |
|
Express Service Code |
|
01234567890 |
Latest drivers for my printer |
Visit www.dell.com/support. |
Documentation for my printer |
|
|
|
Answers to technical service and |
Visit www.dell.com/support. Select your region, and fill in the |
support questions |
requested details to access help tools and information. |
|
www.dell.com/support provides several online tools, including: |
|
• Solutions — Troubleshooting hints and tips, articles from |
|
technicians, and online courses |
|
• Upgrades — Upgrade information for components, such as the |
|
print drivers |
|
• Customer Care — Contact information, order status, warranty, and |
|
repair information |
|
• Downloads — Drivers |
|
• Manuals— Printer documentation and product specifications |
|
|
Finding Information |
| |
15 |

Product Features
This chapter describes the product features and indicates their links.
Dell Document Hub app
Easily access and share documents, images and digital content with the Dell Document Hub app. This innovative cloud collaboration solution connects your printer and devices to popular cloud services, providing a flexible and secure way to collaborate from virtually anywhere. Using your computer or mobile device, you can search file across multiple cloud services simultaneously to print documents or you can scan documents directly to the cloud using the app. Visit Windows Store, Google Play™ store, and App Store to
download the apps.
If you use an NFC-enabled Android mobile device, you can also do the following:
•Tap your device on the printer to download the app (only when the app is not installed on your device)
•Tap your device on the printer to launch the app, to start printing, or to start scanning.
For more information about using Dell Document Hub, see the FAQs in Dell.com/documenthub.
Dell Printer Hub
(Dell H625cdw and Dell H825cdw)
Dell Printer Hub is a program that monitors and informs you of the printer status and allows you to customize the printer settings. The program also notifies you of the firmware/software updates. For convenient use, you can access Dell Document Hub from Dell Printer Hub. Dell Printer Hub is included on your Software and Documentation disc and is installed with the manuals, drivers, and software for the printer. For more information, open the program and click  on the top right of the main window to see the FAQs.
Dell Printer Management Tool
(Dell S2825cdn)
Dell Printer Management Tool is a program that monitors and informs you of the printer status and allows you to customize the printer settings. The program also notifies you of the firmware/software updates. Dell Printer Management Tool is included on your Software and Documentation disc and is installed with the manuals, drivers, and software for the printer. For more information, open the program and click on the top right of the main window to see the FAQs.
16 |
| |
Product Features |
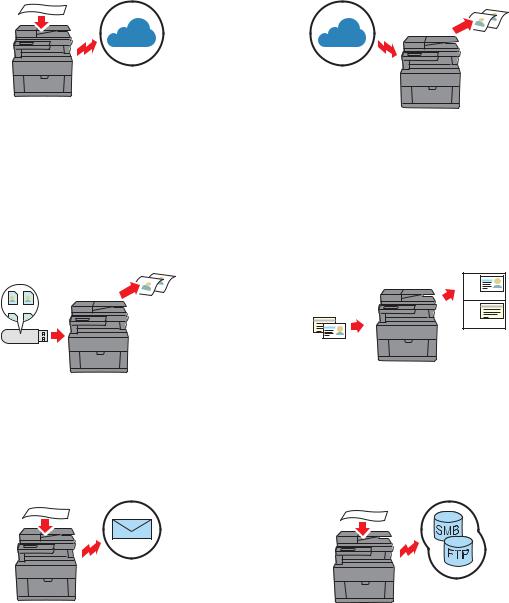
Converting and storing with Dell Document Hub (Dell H625cdw and Dell H825cdw)
You can scan hard copy documents and store them directly in your preferred cloud storage service with Dell Document Hub. You can also convert hard copy documents into editable digital content before sending them to the cloud storage. See "Scanning the Document Using Optical Character Recognition (OCR)."
USB Direct Print
You can print files directly from a USB flash drive
without requiring you to start your computer and a program with the USB Direct Print feature.
See "Printing From USB Flash Drive."
Scan to Email
You can send scanned data by e-mail as an attachment with the Scan to Email feature. After scanning, select destination e-mail addresses from the address book on the printer or server or enter the address from the touch panel of the printer. See "Sending a Scanned Data via E-Mail."
Printing with Dell Document Hub (Dell H625cdw and Dell H825cdw)
You can easily locate and print documents stored in cloud storage with Dell Document Hub. You can also search for files across multiple clouds storage services simultaneously.
See "Searching for and Printing Files."
ID Copy
You can copy both sides of an ID card on one side of a single sheet of paper in its original size by a simple operation with the ID Copy feature.
See "Using the ID Copy."
Scan to Network Folder
You can transfer scanned data to a PC or a server via Server Message Block (SMB) or FTP without software. Although prior registration of the destination FTP server or PC on the address book is required, it helps save your time.
See "Scanning to a Computer or Server With SMB/FTP."
Product Features |
| |
17 |
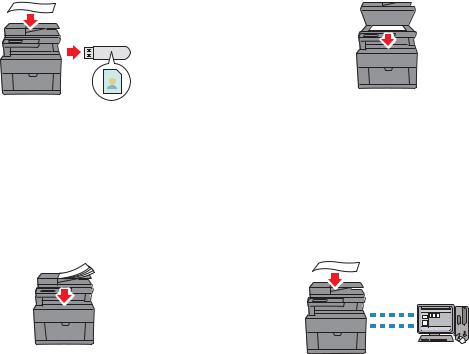
Scan to USB
You don't need a PC to save scanned data to a USB flash drive with the Scan to USB feature. Specify the USB flash drive inserted into the printer's port as a data saving location when you scan data.
See "Scanning to a USB Flash Drive."
Scanning from the document glass
You can scan the pages of a book or a brochure from the document glass.
See "Making Copies From the Document Glass."
Scanning from the Duplex Automatic Document Feeder (DADF)
You can scan pieces of unbound paper using the DADF.
See "Making Copies From the DADF."
Managing the documents with PaperPort (Dell S2825cdn)
You can organize, search, and share your scanned document using the bundled PaperPort software.
18 |
| |
Product Features |
Printer Overview
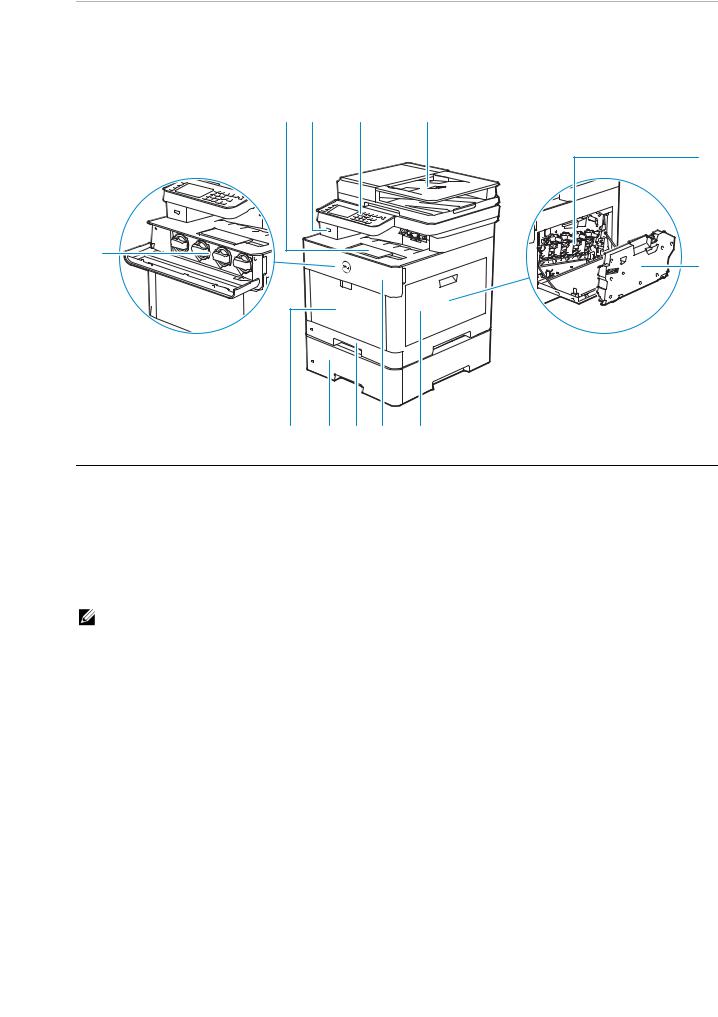
Front and Rear View
Front View
12 |
1 |
2 |
3 |
4 |
11 |
10 |
9 |
8 |
7 |
5 |
6 |
1 |
Output Tray Extension |
7 |
Right Side Cover |
|
|
|
|
2 |
Front USB Port |
8 |
Front Cover |
|
|
|
|
3 |
Operator Panel |
9 |
Tray1 |
|
|
|
|
4 |
Duplex Automatic Document Feeder (DADF) |
10 |
Optional 550-Sheet Feeder (Tray2) |
|
|
|
|
5 |
Drum Cartridges |
11 |
Multipurpose Feeder (MPF) |
|
|
|
|
6 |
Waste Toner Box |
12 |
Toner Cartridges |
|
|
|
|
NOTE:
• Do not remove or insert the toner cartridges when the printer is in operation.
Printer Overview |
| |
19 |
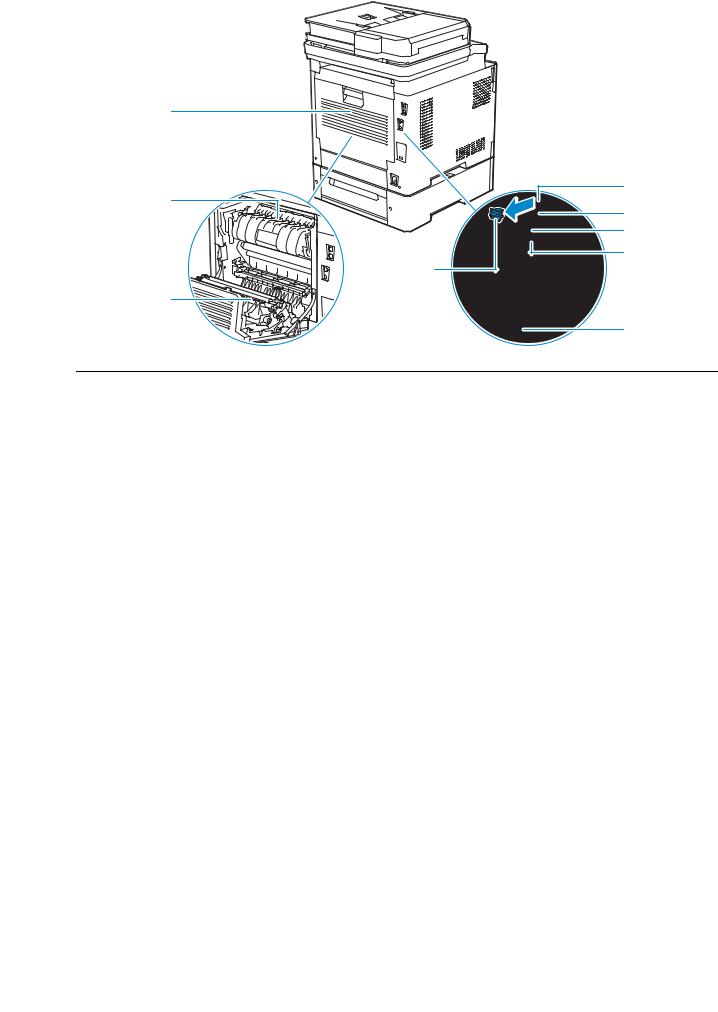
Rear View
9
8 |
7 |
1
2
3
4
6
5
1 |
Phone Connector |
6 |
"Blue" Plug |
|
|
|
|
2 |
Wall Jack Connector |
7 |
Duplex Unit |
|
|
|
|
3 |
Ethernet Port |
8 |
Fusing Unit |
|
|
|
|
4 |
USB Port |
9 |
Rear Cover |
|
|
|
|
5 |
Power Connector |
|
|
|
|
|
|
20 | Printer Overview
Duplex Automatic Document Feeder (DADF)
1 |
2 |
|
3 |
8 |
|
|
4 |
|
5 |
|
6 |
|
7 |
1 |
DADF Cover |
5 |
Document Feeder Tray |
2 |
Document Guides |
6 |
Document Stopper |
3 |
DADF Chute Cover |
7 |
Document Output Tray |
4 |
Document Glass |
8 |
DADF Feed Rollers |
NOTE:
• Pull out the document stopper to prevent the document from falling off the printer.
Operator Panel
Dell H625cdw/Dell H825cdw |
|
|
|
|
|
|
|
|
1 |
2 |
3 |
4 |
5 |
6 |
7 |
8 |
9 |
|
|
|
|
|
|
|
|
|
|
|
|
|
|
|
|
|
|
|
|
|
|
|
|
|
|
|
|
|
|
|
|
|
|
|
|
|
|
|
|
|
|
|
|
14 |
|
|
13 |
12 |
|
11 |
10 |
|||
Printer Overview |
| |
21 |
Dell S2825cdn
1 |
2 |
3 |
4 |
5 |
7 |
8 |
9 |
|
|
|
|
|
|
|
|
|
|
|
|
|
|
|
|
|
|
|
|
|
|
|
|
|
|
|
|
|
|
|
|
|
|
|
|
|
|
|
|
|
|
|
|
|
|
|
|
|
|
|
|
|
14 |
|
|
|
|
|
13 |
|
12 |
|
11 |
|
|
|
|
|
|
|
|
|
|
|
|
|
|
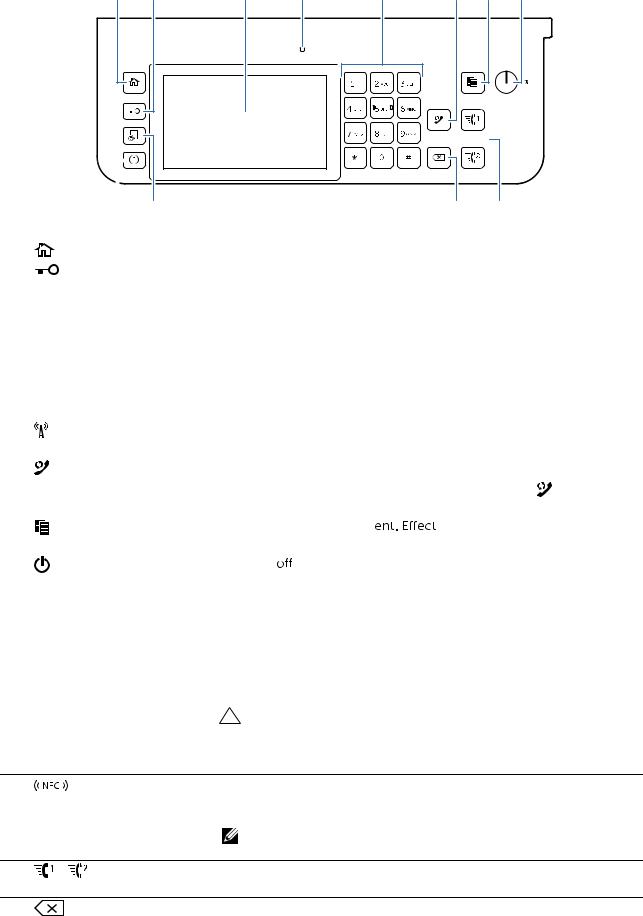
1 |
(Home) button |
Moves to the Home screen. |
|
|
|
|||||||
2 |
(Log In/Out) button |
Logs out if pressed while the user is logged in. |
||||||||||
|
|
|
|
|
|
|
|
|
|
|
|
|
3 |
Touch Panel |
|
Specifies the settings by directly tapping the screen. |
|||||||||
|
|
|
|
|
|
|
|
|
Displays various settings, instructions, and error messages. |
|||
|
|
|
|
|
|
|
|
|
|
|
|
|
4 |
Ready/Error LED |
|
Shows a green light when the printer is ready and a blinking green |
|||||||||
|
|
|
|
|
|
|
|
|
light when data is being received. |
|
|
|
|
|
|
|
|
|
|
|
|
Shows an amber light when an error occurs and a blinking amber |
|||
|
|
|
|
|
|
|
|
|
light when an unrecoverable print error occurs. |
|||
|
|
|
|
|
|
|
|
|
|
|
|
|
5 |
Number Pad |
|
Enters numbers and characters. |
|
|
|
||||||
|
|
|
|
|
|
|
|
|
|
|
||
6 |
(Wi-Fi) button* |
Shows a white light when the Wi-Fi® is activated and blinks in certain |
||||||||||
|
|
|
|
|
|
|
|
|
conditions. See "Status of Wi-Fi Button LED." |
|
||
|
|
|
|
|
|
|
|
|
|
|
|
|
7 |
(Redial/Pause) button |
Re-dials a telephone number. |
|
|
|
|||||||
|
|
|
|
|
|
|
|
|
Inserts a pause into a telephone number. When the |
|||
|
|
|
|
|
|
|
|
|
(Redial/Pause) button is pressed, "-" appears on the touch panel. |
|||
|
|
|
|
|
|
|
|
|
|
|
|
|
8 |
(Copy) button |
|
Starts copying the docum |
ive only from the Home screen |
||||||||
|
|
|
|
|
|
|
|
|
while you are logged in to the printer. |
|
||
|
|
|
|
|
|
|
|
|
|
|
||
9 |
(Power) button |
Turns on/ the printer or switches the printer between two modes: |
||||||||||
|
|
|
|
|
|
|
|
|
standby and power saver. |
|
|
|
•Pressing and releasing the button turns on the printer. To tu the printer, press and hold the button until the Power Management screen appears on the touch panel, and then tap
Power Off.
•Each press of the button switches the standby and power saver modes alternately. When the printer enters the power saver mode, the button blinks slowly.
CAUTION:
•Pressing and holding the button for six or more seconds can
tur ter immediately. However, note that this may result in the loss of data in memory.
10 |
(NFC) reader* |
Starts communication between the printer and an NFC card or a |
|
|
mobile device with the NFC function when the card or the device is |
|
|
tapped to or waved over the reader. |
NOTE:
• NFC detection may vary with device type.
11 |
/ |
(Speed Dial 1/ |
|
Speed Dial 2) button |
|
Dials the number registered as "001" or "002" respectively of the FAX Speed Dial ective only when the Home screen is displayed.
12 |
(Delete) button |
Deletes numbers and characters. |
22 |
| |
Printer Overview |

13 |
|
(Job Status) button |
Moves to the Job Status screen. From this screen, you can check or |
|
|||
|
|
|
cancel active jobs. |
|
|
|
|
14 |
|
(Information) button |
Moves to the Information screen. You can access various |
|
|||
|
|
|
information and settings menu, check consumable levels and |
|
|
|
network status, and print various types of reports and lists. |
|
|
|
|
*This is available on Dell H625cdw and Dell H825cdw.
NOTE:
•Moving to a different menu or returning to a previous screen cancels the current entry or setting. Make sure to select OK to save the current entry or setting.
Status of Wi-Fi Button LED
(Wi-Fi) LED |
Printer Status |
Off |
Wi-Fi has been turned off. |
|
|
|
Connecting to the network via Ethernet cable |
|
|
|
Entering the power saver mode |
|
|
On |
Wireless link established |
|
|
Blinking |
Searching/Connecting with wireless LAN access point or router |
|
|
Blinking slowly |
Wi-Fi is turned on but not connected to an access point or router. |
Optional Accessory
The optional 550-sheet feeder is available for the printer.
To install the optional 550-sheet feeder, refer to the installation instruction that comes with the optional 550-sheet feeder.
Printer Overview |
| |
23 |
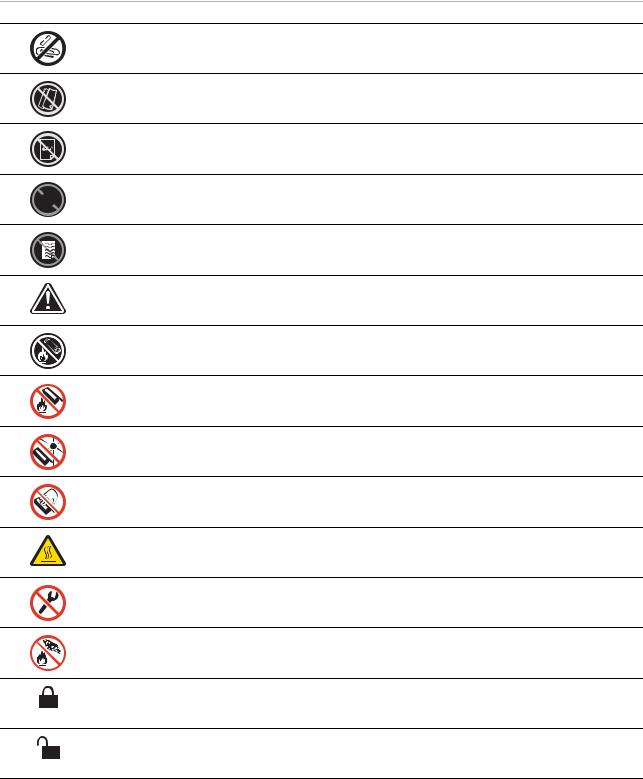
Graphic Symbols on the Printer and Their Meanings
Do not use stapled or clip on paper.
Do not use folded, creased, or curled paper.
Do not use ink-jet printing paper.
Do not use OHP sheets.
Do not use paper printed or used on one side.
Caution
Do not throw a toner cartridge into an open flame.
Do not throw a drum cartridge into an open flame.
Do not expose to light.
Do not touch.
Caution (Hot surface)
Do not disassemble the product.
Do not throw a waste toner box into an open flame.
Locking
Unlocking
24 |
| |
Graphic Symbols on the Printer and Their Meanings |
Setting Up the Printer |
2 |
|
|
Overview of the Printer Setup |
26 |
Preparing to Set Up the Printer |
27 |
Connecting Your Printer to a Telephone Line |
28 |
Turning On/Off the Printer |
31 |
Connecting Your Printer to a Computer |
38 |
Connecting Your Printer to Mobile Devices |
56 |
Installing Printer Drivers on Linux Computers (CUPS) |
65 |
Setting the IP Address |
73 |
|25

Overview of the Printer Setup
The following are the procedures necessary to set up the printer.
Hardware preparations/Initial settings
"Preparing to Set Up the Printer" "Turning On/Off the Printer"
"Setting Initial Settings on the Operator Panel"
Connections/Printer setup
"Connecting Your Printer to a Telephone Line" "Connecting Your Printer to a Computer" "Connecting Your Printer to Mobile Devices"
26 |
| |
Overview of the Printer Setup |

Preparing to Set Up the Printer
Space Requirements
Provide enough room to open the printer trays, covers, and optional accessory, and for proper ventilation.
260 mm/
10.24 inches
500 mm/
19.69 inches
|
250 mm/9.84 inches |
100 mm/ |
|
3.94 inches |
503.5 mm/19.82 inches |
420 mm/16.54 inches |
|
340 mm/13.4 inches |
560 mm/22 inches |
|
Securing the Printer
To protect the printer from theft, you can use a Kensington lock.
Attach the Kensington lock to the security slot of the printer.
Security Slot |
Security Slot |
Refer to the operating instructions supplied with the Kensington lock.
Preparing to Set Up the Printer |
| |
27 |
Connecting Your Printer to a Telephone Line
CAUTION:
•Do not connect the printer directly to a Digital Subscriber Line (DSL). This may damage the printer. To use a DSL, you are required to use an appropriate DSL filter. Contact your service provider for the DSL filter.
•To reduce the risk of shock or fire, use only a No. 26 AWG or larger telephone cable.
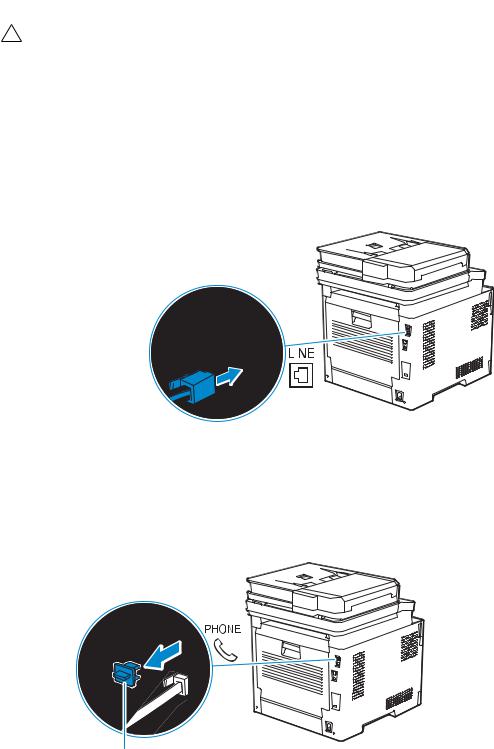
Connecting the Printer to the Wall Jack
To connect the printer to a telephone line, connect a telephone cable into the wall jack connector on the rear of the printer. Connect the other end of the cord into an active wall jack.
To the wall jack
If the phone communication is serial in your country (such as Germany, Sweden, Denmark, Austria, Belgium, Italy, France, and Switzerland), and a "Yellow" terminator is supplied, perform the following procedure:
1 Remove the "Blue" plug from the phone connector.
"Blue" plug
28 |
| |
Connecting Your Printer to a Telephone Line |
2 Insert the "Yellow" terminator into the phone connector.
"Yellow" terminator
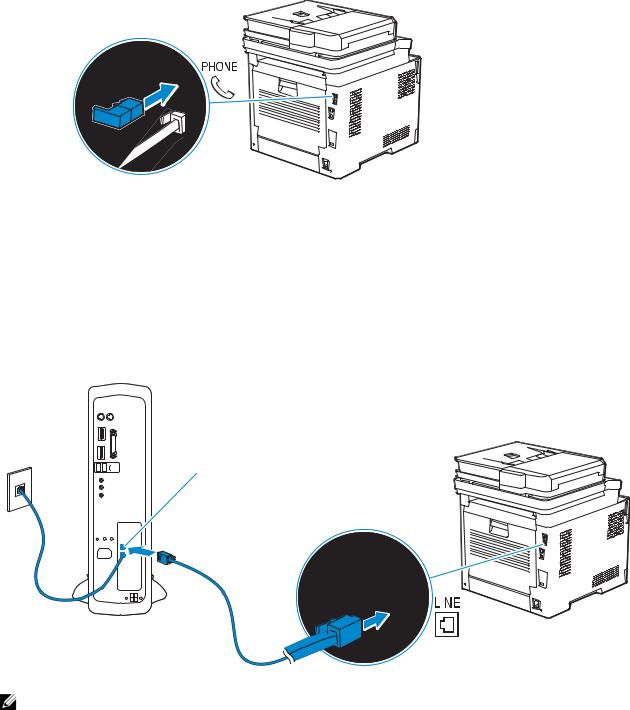
Connecting the Printer to a Modem
You can connect the printer to a computer with a modem on the same telephone line as the printer.
Make sure that the modem is connected to an active wall jack connector, and then connect a telephone cable into the phone connector on the modem. Connect the other end of the cord into the wall jack connector on the rear of the printer.
To an active wall jack
Phone connector
Wall jack connector
NOTE:
•When using the fax function of the printer, turn off the fax-receive feature of the computer modem.
•Do not use the computer modem if the printer is sending or receiving a fax.
•To fax via the computer modem, follow the instructions provided with your computer modem and fax program.
Connecting a Telephone or Answering Machine
If you share a telephone line with voice calls and fax, you can connect a telephone or an answering machine to the printer to take the voice calls.
1 Make sure that a telephone line is connected to the printer.
Connecting Your Printer to a Telephone Line |
| |
29 |
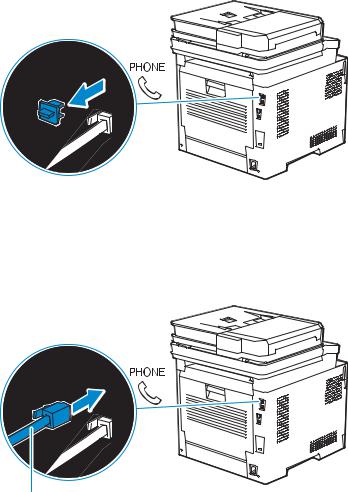
See "Connecting the Printer to the Wall Jack."
2 Remove the "Blue" plug from the phone connector.
"Blue" plug
3Connect a telephone or answering machine line cord into the phone connector on the rear of the printer. Connect the other end of the cord into an external telephone or answering machine.
To an external telephone or answering machine
30 |
| |
Connecting Your Printer to a Telephone Line |
Loading...