

Page 1

Dellt Line-Interactive Rack UPS
1000W, 1920/1500W, and 2700/2300W
User's Guide
H919N, J718N, K792N, H928N, K802N, H945N, J727N
w w w . d e l l . c o m | s u p p o r t . d e l l . c o m
J735N, K811N
Page 2

Notes and Warnings
NOTE: A NOTE indicates important information that helps you make better use of your software.
DANGER: A DANGER indicates an imminently hazardous situation which, if not avoided, will result in death or
serious injury.
WARNING: A WARNING indicates a potentially hazardous situation which, if not avoided, could result in death or
injury.
CAUTION: A CAUTION indicates a potentially hazardous situation which, if not avoided, may result in minor or
moderate injury or in property damage incidents.
DANGER: Observe the following instruction to help prevent an imminently hazardous situation which, if not
avoided, will result in death or serious injury:
S This UPS contains LETHAL VOLTAGES. All repairs and service should be performed by
AUTHORIZED SERVICE PERSONNEL ONLY. There are NO USER SERVICEABLE PARTS
inside the UPS.
Information in this document is subject to change without notice.
E 2009 Dell Inc. All rights reserved.
Reproduction in any manner whatsoever without the written permission of Dell Inc. is strictly forbidden.
Trademarks used in this text: Dell and the DELL logo are trademarks of Dell Inc.; National Electrical Code and NEC are registered
trademarks of National Fire Protection Association, Inc.; Phillips is a registered trademark of Phillips Screw Company.
Other trademarks and trade names may be used in this document to refer to either the entities claiming the marks and names or their
products. Dell Inc. disclaims any proprietary interest in trademarks and trade names other than its own.
September 2009 S 164201787 4
Page 3

Table of Contents
1 Introduction
Finding Information 8. . . . . . . . . . . . . . . . . . . . . . . . . . . . . . . . . . . . . . . . . . . . . . .
2 Safety Warnings
3 Installation
Inspecting the Equipment 12. . . . . . . . . . . . . . . . . . . . . . . . . . . . . . . . . . . . . . . . . .
Unpacking the Cabinet 13. . . . . . . . . . . . . . . . . . . . . . . . . . . . . . . . . . . . . . . . . . . .
Identifying the UPS Rear Panels 15. . . . . . . . . . . . . . . . . . . . . . . . . . . . . . . . . . . . .
Identifying the UPS Front Panel 18. . . . . . . . . . . . . . . . . . . . . . . . . . . . . . . . . . . . .
UPS Setup 19. . . . . . . . . . . . . . . . . . . . . . . . . . . . . . . . . . . . . . . . . . . . . . . . . . . . . .
Rackmount Setup 19. . . . . . . . . . . . . . . . . . . . . . . . . . . . . . . . . . . . . . . . . . . . .
Tower Setup 24. . . . . . . . . . . . . . . . . . . . . . . . . . . . . . . . . . . . . . . . . . . . . . . . .
Installing the EBM 28. . . . . . . . . . . . . . . . . . . . . . . . . . . . . . . . . . . . . . . . . . . . . . .
Installing the UPS 30. . . . . . . . . . . . . . . . . . . . . . . . . . . . . . . . . . . . . . . . . . . . . . . .
Installing Remote Emergency Power-off 30. . . . . . . . . . . . . . . . . . . . . . . . . . . . . .
UPS Initial Startup 32. . . . . . . . . . . . . . . . . . . . . . . . . . . . . . . . . . . . . . . . . . . . . . .
4 Operation
UPS Startup and Shutdown 37. . . . . . . . . . . . . . . . . . . . . . . . . . . . . . . . . . . . . . . . .
Starting the UPS 37. . . . . . . . . . . . . . . . . . . . . . . . . . . . . . . . . . . . . . . . . . . . . .
Starting the UPS on Battery 38. . . . . . . . . . . . . . . . . . . . . . . . . . . . . . . . . . . . .
UPS Shutdown 38. . . . . . . . . . . . . . . . . . . . . . . . . . . . . . . . . . . . . . . . . . . . . . .
Control Panel Functions 39. . . . . . . . . . . . . . . . . . . . . . . . . . . . . . . . . . . . . . . . . . .
Changing the Language 40. . . . . . . . . . . . . . . . . . . . . . . . . . . . . . . . . . . . . . . . . . .
Table of Contents
|
3
Page 4

Display Functions 40. . . . . . . . . . . . . . . . . . . . . . . . . . . . . . . . . . . . . . . . . . . . . . . .
Startup Screen 40. . . . . . . . . . . . . . . . . . . . . . . . . . . . . . . . . . . . . . . . . . . . . . .
Screen Locked 41. . . . . . . . . . . . . . . . . . . . . . . . . . . . . . . . . . . . . . . . . . . . . . .
UPS Status 41. . . . . . . . . . . . . . . . . . . . . . . . . . . . . . . . . . . . . . . . . . . . . . . . . .
Event Log 44. . . . . . . . . . . . . . . . . . . . . . . . . . . . . . . . . . . . . . . . . . . . . . . . . . .
Measurements 44. . . . . . . . . . . . . . . . . . . . . . . . . . . . . . . . . . . . . . . . . . . . . . .
Control Screens 45. . . . . . . . . . . . . . . . . . . . . . . . . . . . . . . . . . . . . . . . . . . . . .
Identification 46. . . . . . . . . . . . . . . . . . . . . . . . . . . . . . . . . . . . . . . . . . . . . . . . .
Settings 46. . . . . . . . . . . . . . . . . . . . . . . . . . . . . . . . . . . . . . . . . . . . . . . . . . . . .
Retrieving the Event Log 50. . . . . . . . . . . . . . . . . . . . . . . . . . . . . . . . . . . . . . . . . . .
Behavior on Overload 50. . . . . . . . . . . . . . . . . . . . . . . . . . . . . . . . . . . . . . . . . . . . .
Configuring Load Segments 51. . . . . . . . . . . . . . . . . . . . . . . . . . . . . . . . . . . . . . . .
Controlling Load Segments Through the Display 51. . . . . . . . . . . . . . . . . . . . .
Configuring Automatic Start Delay 52. . . . . . . . . . . . . . . . . . . . . . . . . . . . . . . .
Configuring Automatic on Battery Shutdown 53. . . . . . . . . . . . . . . . . . . . . . . .
Configuring Battery Settings 54. . . . . . . . . . . . . . . . . . . . . . . . . . . . . . . . . . . . . . . .
Configuring the UPS for an EBM 54. . . . . . . . . . . . . . . . . . . . . . . . . . . . . . . . . .
Running Automatic Battery Tests 55. . . . . . . . . . . . . . . . . . . . . . . . . . . . . . . . .
Configuring Automatic Battery Tests 55. . . . . . . . . . . . . . . . . . . . . . . . . . . . . .
Configuring Automatic Restart 55. . . . . . . . . . . . . . . . . . . . . . . . . . . . . . . . . . . . . .
5 Additional UPS Features
RS-232 and USB Communication Ports 56. . . . . . . . . . . . . . . . . . . . . . . . . . . . . . . .
Dell Network Management Card (Optional) 58. . . . . . . . . . . . . . . . . . . . . . . . .
Dell UPS Management Software 59. . . . . . . . . . . . . . . . . . . . . . . . . . . . . . . . . . . .
|
4
Table of Contents
Page 5

6 UPS Maintenance
UPS and Battery Care 60. . . . . . . . . . . . . . . . . . . . . . . . . . . . . . . . . . . . . . . . . . . . .
Transporting the UPS 61. . . . . . . . . . . . . . . . . . . . . . . . . . . . . . . . . . . . . . . . . . . . .
Storing the UPS and Batteries 63. . . . . . . . . . . . . . . . . . . . . . . . . . . . . . . . . . . . . .
When to Replace Batteries 64. . . . . . . . . . . . . . . . . . . . . . . . . . . . . . . . . . . . . . . . .
Testing Batteries 64. . . . . . . . . . . . . . . . . . . . . . . . . . . . . . . . . . . . . . . . . . . . . . . .
Updating the UPS Firmware 64. . . . . . . . . . . . . . . . . . . . . . . . . . . . . . . . . . . . . . . .
7 Specifications
8 Troubleshooting
Accessing Alarms and Conditions 69. . . . . . . . . . . . . . . . . . . . . . . . . . . . . . . . . . .
UPS Status Menu 69. . . . . . . . . . . . . . . . . . . . . . . . . . . . . . . . . . . . . . . . . . . . .
Event Log Menu 70. . . . . . . . . . . . . . . . . . . . . . . . . . . . . . . . . . . . . . . . . . . . . .
Typical Alarms and Conditions 70. . . . . . . . . . . . . . . . . . . . . . . . . . . . . . . . . . . . . .
Silencing the Alarm 73. . . . . . . . . . . . . . . . . . . . . . . . . . . . . . . . . . . . . . . . . . . . . .
Table of Contents
|
5
Page 6
1
Introduction
The Dellt Line-Interactive Rack uninterruptible power system (UPS) protects your sensitive electronic
equipment from basic power problems such as power failures, power sags, power surges, brownouts, and
line noise.
Power outages can occur when you least expect them and power quality can be erratic. These power
problems have the potential to corrupt critical data, destroy unsaved work sessions, and damage
hardware — causing hours of lost productivity and expensive repairs.
With the Dell Line-Interactive Rack UPS, you can safely eliminate the effects of power disturbances
and guard the integrity of your equipment. The UPS's flexibility to handle an array of network devices
makes it the perfect choice to protect your LANs, servers, workstations, and other electrical equipment.
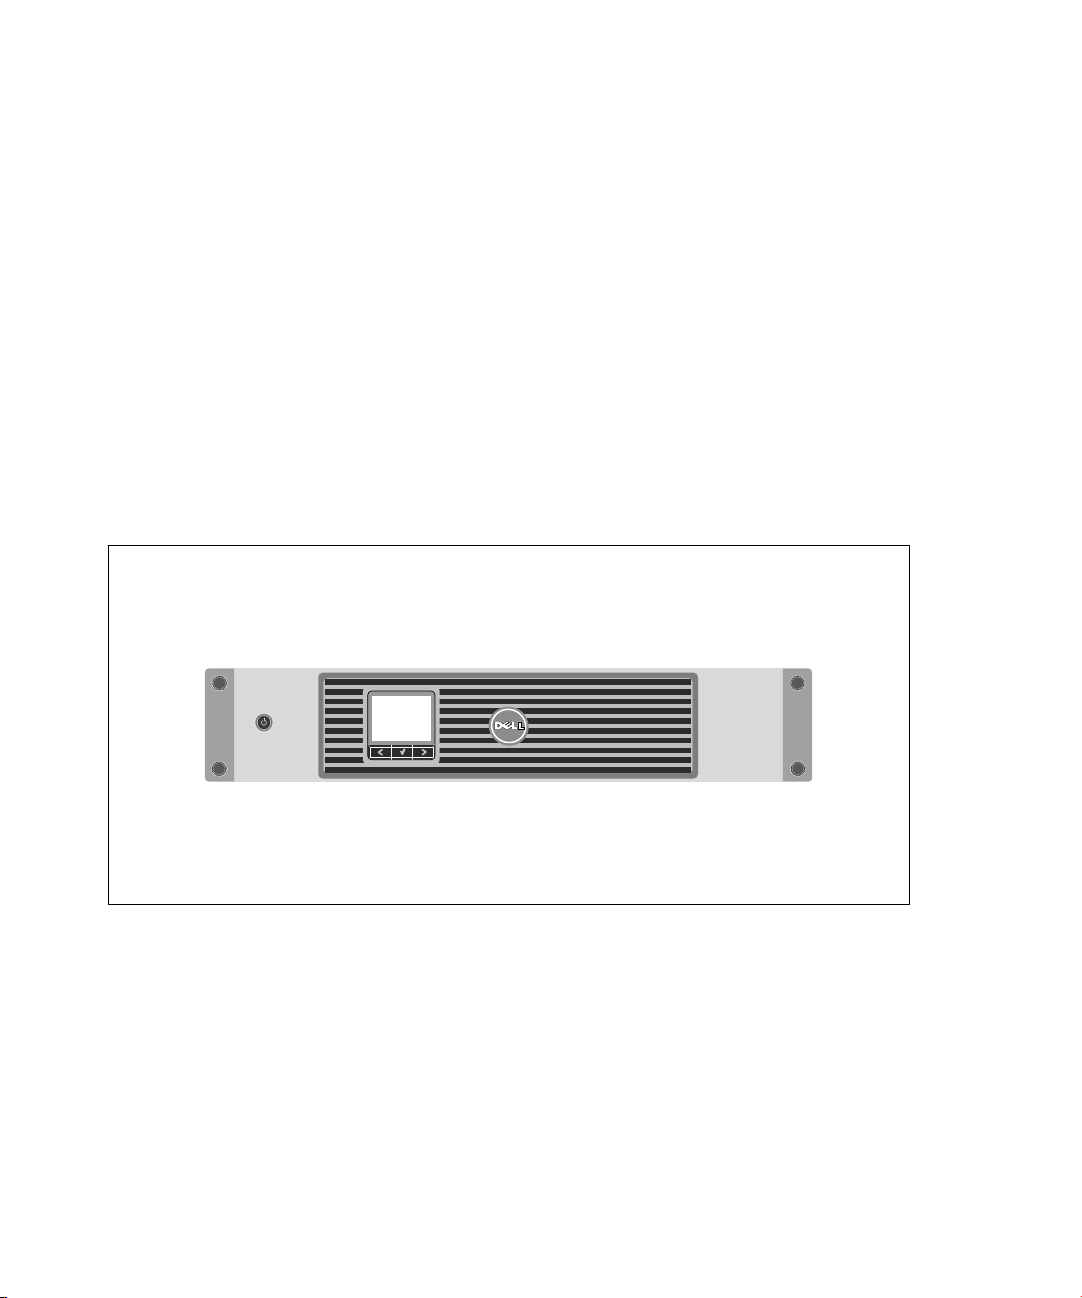
Figure 1 shows the Dell Line-Interactive Rack UPS.
Figure 1. The Dell Line-Interactive Rack UPS
|
6
Introduction
Page 7

Providing outstanding performance and reliability, the UPS's unique benefits include:
S Buck and Boost voltage regulation that ensures regulated voltage to your load by correcting voltage
fluctuations.
S Start‐on‐battery capability for powering up the UPS even if utility power is not available.
S Maintenance is simplified by allowing the safe replacement of batteries without powering down the
UPS.
S Extended runtime with an optional External Battery Module (EBM) for 1500–2700W UPS models.
S 2700/2300W 3U UPS models only. Two-in-one form factor using the UPS in a rackmount
configuration or as a standalone cabinet.
S Emergency shutdown control through the Remote Emergency Power-off (REPO) ports.
S Two standard communication ports (USB and DB-9 serial port).
S Optional Dell Network Management Card with enhanced communication capabilities for
increased power protection and control.
S Advanced power management with the Dell UPS Management Software for graceful shutdowns
and power monitoring.
S Sequential shutdown and load management through separate receptacle groups called load
segments.
S Firmware that is easily upgradable without a service call.
S Backed by worldwide agency approvals.
Introduction
|
7
Page 8
Finding Information
CAUTION: The Safety, Environmental, and Regulatory Information document provides important safety and
regulatory information.
What are You Looking For?
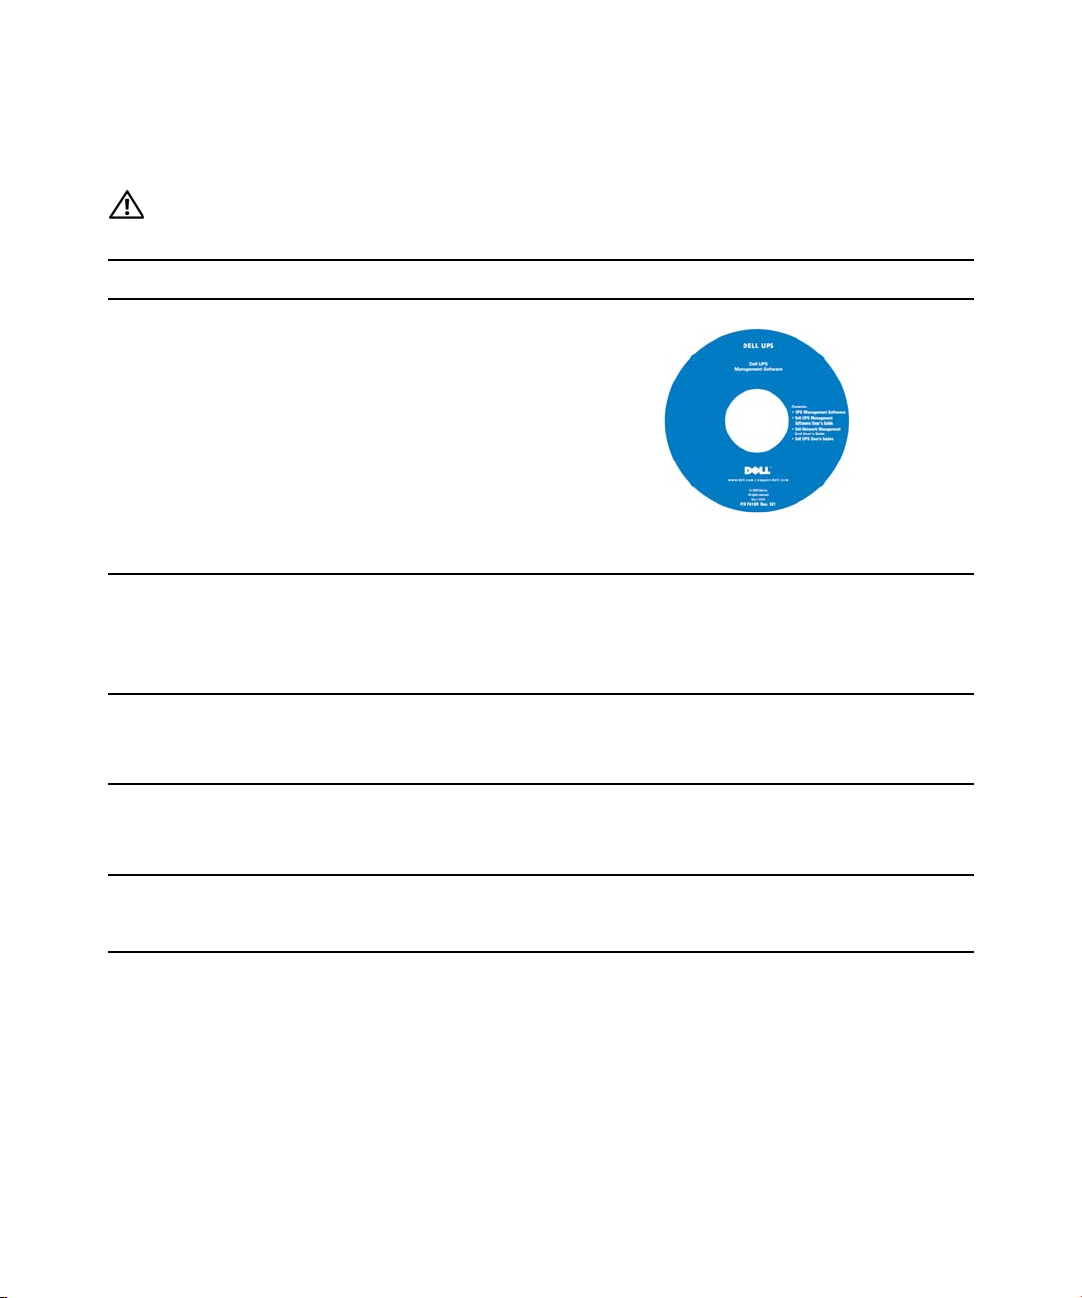
S The user's guide for my UPS
S The user's guide for the Dell Network Management
Card
S Dell UPS Management Software
Find It Here
Dell UPS Disc
NOTE: Documentation and software updates can be
found at
S Specifications
S How to configure UPS settings
S How to troubleshoot and solve problems
S How to install REPO control
S Safety instructions
S Regulatory information
S Recycling information
S Warranty information
S Terms and Conditions (U.S. only)
S End User License Agreement
S Support information Dell Support Website — support.dell.com
Dell UPS User's Guide
The user's guide is available on the Dell UPS disc and
on support.dell.com.
Safety, Environmental, and Regulatory Information
Dell Warranty and Support Information
support.dell.com.
NOTE: Select your region or business segment to view
the appropriate support site.
|
8
Introduction
Page 9

2
Safety Warnings
CAUTION: Before performing the procedures in this document, read and follow the safety instructions and
important regulatory information in your Safety, Environmental, and Regulatory Information document.
IMPORTANT SAFETY INSTRUCTIONS
SAVE THESE INSTRUCTIONS
This manual contains important instructions that you should follow during installation and
maintenance of the UPS and batteries. Please read all instructions before operating the equipment and
save this manual for future reference.
DANGER:
avoided, will result in death or serious injury:
S This UPS contains LETHAL VOLTAGES. All repairs and service should be performed by
AUTHORIZED SERVICE PERSONNEL ONLY. There are NO USER SERVICEABLE
PARTS inside the UPS.
WARNING:
avoided, could result in death or injury:
S This UPS contains its own energy source (batteries). The output receptacles may carry live voltage
even when the UPS is not connected to an AC supply.
S Do not remove or unplug the input cord when the UPS is turned on. This removes the safety
ground from the UPS and the equipment connected to the UPS.
S To reduce the risk of fire, connect only to a circuit provided with branch circuit overcurrent
protection with an ampere rating in accordance with the National Electrical Code
ANSI/NFPA 70 or your local electrical code:
UPS Output Power 120V 208V 230V
1000W 15A — 15A
1500W (at 100V)
1920W
2300W (at 100V)
2700W
Observe the following instruction to help prevent an imminently hazardous situation which, if not
Observe the following instructions to help prevent a potentially hazardous situation which, if not
®
(NEC®),
20A — 15A
30A 20A 16A
S To reduce the risk of fire or electric shock, install this UPS in a temperature and humidity
controlled, indoor environment, free of conductive contaminants. Ambient temperature must not
exceed 40°C (104°F). Do not operate near water or excessive humidity (95% maximum).
Safety Warnings
|
9
Page 10

S Unpacking the cabinet in a low-temperature environment may cause condensation to occur in and
on the cabinet. Do not install the cabinet until the inside and outside of the cabinet are absolutely
dry (hazard of electric shock).
S If the UPS requires any type of transportation, disconnect the internal UPS batteries before
transporting (see page 61).
CAUTION:
avoided, may result in minor or moderate injury or in property damage incidents:
Observe the following instructions to help prevent a potentially hazardous situation which, if not
S For PLUGABLE EQUIPMENT, the power outlet shall be installed near the equipment and shall
be easily accessible.
S Servicing of batteries should be performed or supervised by personnel knowledgeable about
batteries and the required precautions. Keep unauthorized personnel away from batteries.
S Batteries can present a risk of electrical shock or burn from high short-circuit current. The
following precautions should be observed: 1) Remove watches, rings, or other metal objects; 2) Use
tools with insulated handles; 3) Wear rubber gloves and boots; 4) Do not lay tools or metal parts on
top of batteries; 5) Disconnect the charging source prior to connecting or disconnecting battery
terminals.
S Determine if the battery is inadvertently grounded. If inadvertently grounded, remove the utility
source from the ground. Contact with any part of a grounded battery can result in electrical shock.
The likelihood of such shock can be reduced if such grounds are removed during installation and
maintenance (applicable to equipment and remote battery supplies not having a grounded supply
circuit).
S ELECTRIC ENERGY HAZARD. Do not attempt to alter any battery wiring or connectors.
Attempting to alter wiring can cause injury.
S Replace batteries with the same number and type of batteries as originally installed in the UPS.
S Proper disposal of batteries is required. Refer to your local codes for disposal requirements.
S Never dispose of batteries in a fire. Batteries may explode when exposed to flame.
S Do not open or mutilate the battery or batteries. Released electrolyte is harmful to the skin and
eyes and may be extremely toxic.
S The 1500–2700W UPS may be connected to a maximum of one External Battery Module (EBM).
10
|
Safety Warnings
Page 11

WARNING: Additional instructions for Rack-Mounted Systems
S Your rack kit has been approved only for the rack cabinet provided. It is your responsibility to
ensure that installation of the equipment into any other rack complies with all applicable
standards. Dell disclaims all liability and warranties with respect to combinations of equipment
with any other rack.
S Before installing your equipment in a rack, install all front and side stabilizers. Failure to install
stabilizers can allow the rack to tip over.
S Always load from the bottom up, and load the heaviest items first.
S Do not overload the AC power supply branch circuit that provides power to the rack.
S Do not stand or step on any components in the rack.
WARNING:
Slide/rail mounted equipment is not to be used as a shelf or work space.
Do not add weight to slide/rail mounted equipment.
Safety Warnings
|
11
Page 12

3
Installation
This chapter explains:
S Equipment inspection
S Unpacking the cabinet
S UPS rear panels
S UPS setup and installation, including the External Battery Module (EBM)
S Remote Emergency Power-off (REPO) installation
S Initial startup
Inspecting the Equipment
If any equipment has been damaged during shipment, keep the shipping cartons and packing materials
for the carrier or place of purchase and file a claim for shipping damage. If you discover damage after
acceptance, file a claim for concealed damage.
To file a claim for shipping damage or concealed damage: 1) File with the carrier within 15 days of
receipt of the equipment; 2) Send a copy of the damage claim within 15 days to your service
representative.
NOTE:
Check the battery recharge date on the shipping carton label. If the date has passed and the batteries
were never recharged, do not use the UPS. Contact your service representative.
12
|
Installation
Page 13
Unpacking the Cabinet
CAUTION: Unpacking the cabinet in a low-temperature environment may cause condensation to occur in and
on the cabinet. Do not install the cabinet until the inside and outside of the cabinet are absolutely dry (hazard
of electric shock).
CAUTION: The cabinet is heavy (see page 65). Use caution to unpack and move the cabinet.
Use care when moving and opening the carton. Leave the components packaged until ready to install.
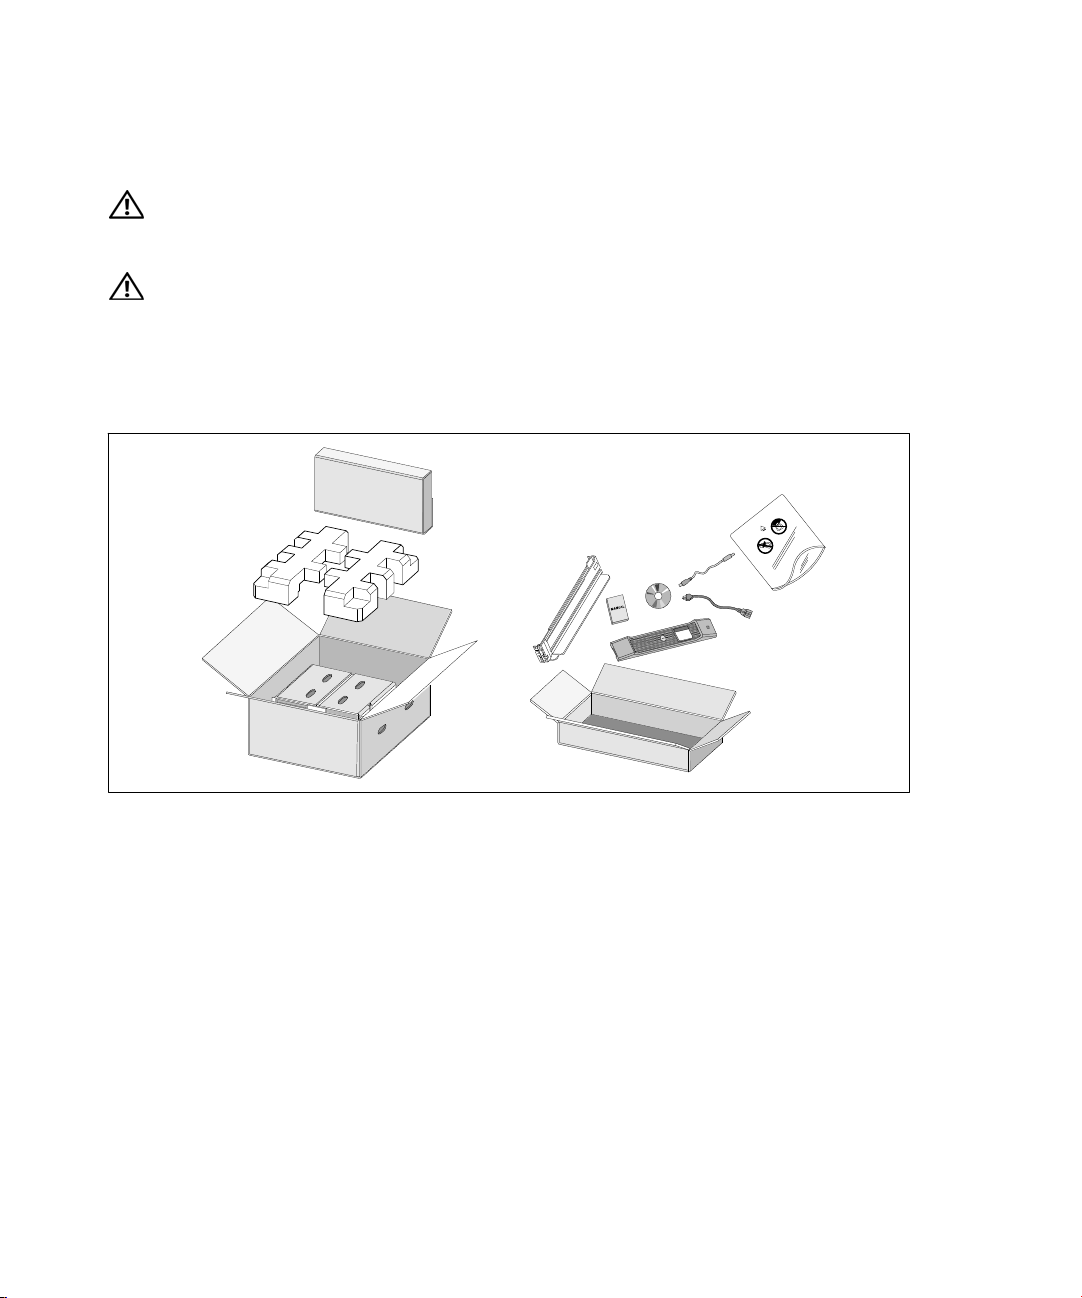
To unpack the system:
1 Open the outer carton and remove the accessories packaged with the cabinet (see Figure 2).
Figure 2. Unpacking the Cabinet
Installation
|
13
Page 14
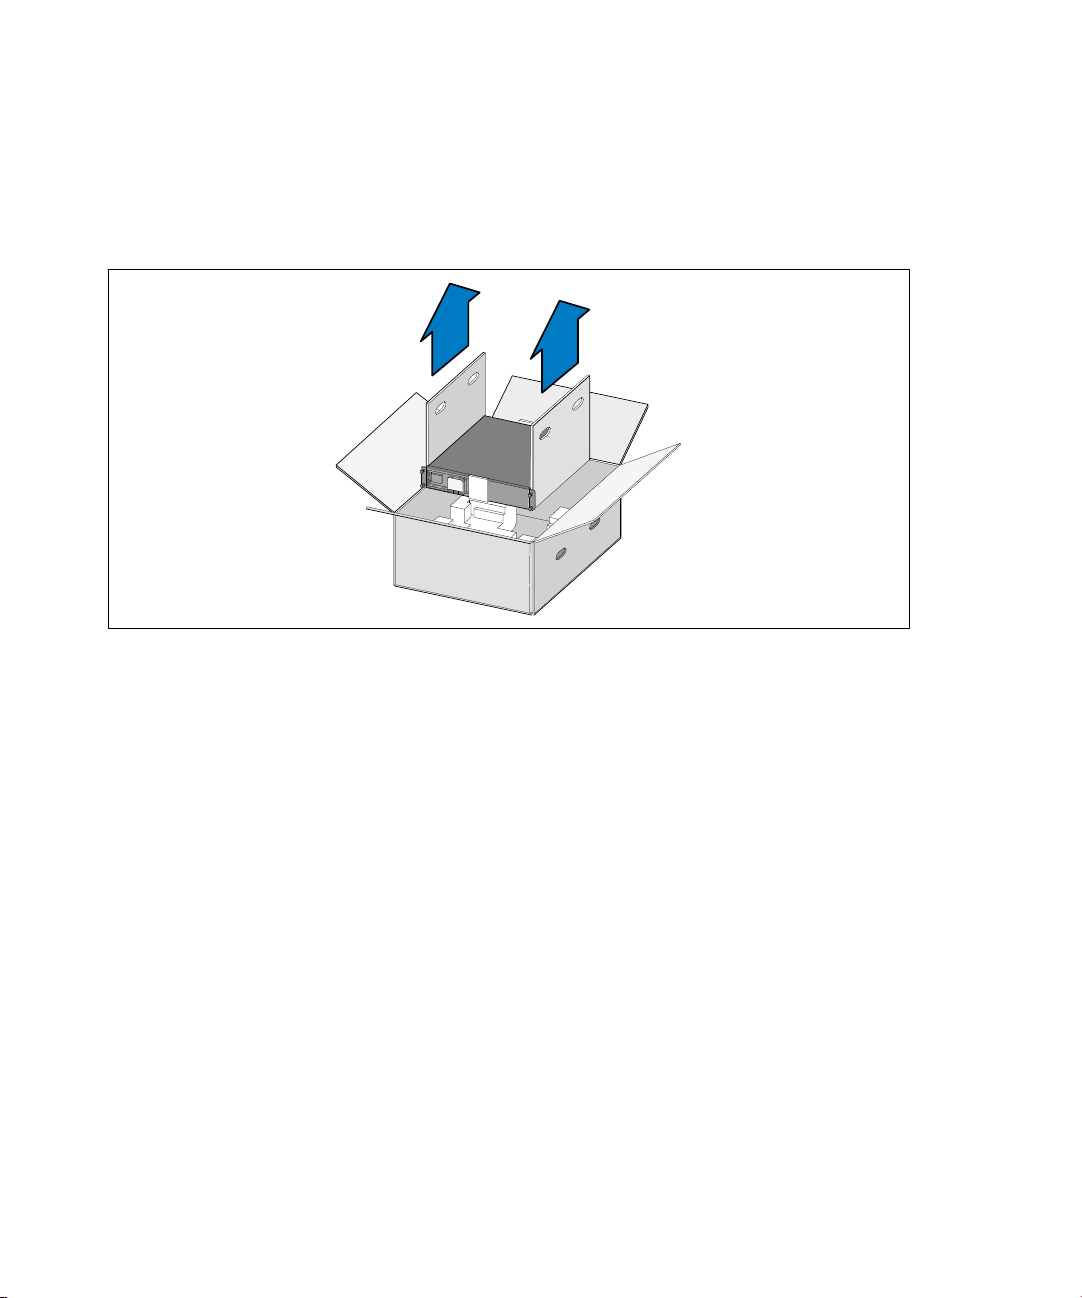
2 With one person on each side, carefully lift the cabinet out of the outer carton using the handles
on the cardboard and set it on a flat, stable surface (see Figure 3).
Place the cabinet in a protected area that has adequate airflow and is free of humidity, flammable
gas, and corrosion.
Figure 3. Lifting the Cabinet
3 Discard or recycle the packaging in a responsible manner, or store it for future use.
14
|
Installation
Page 15
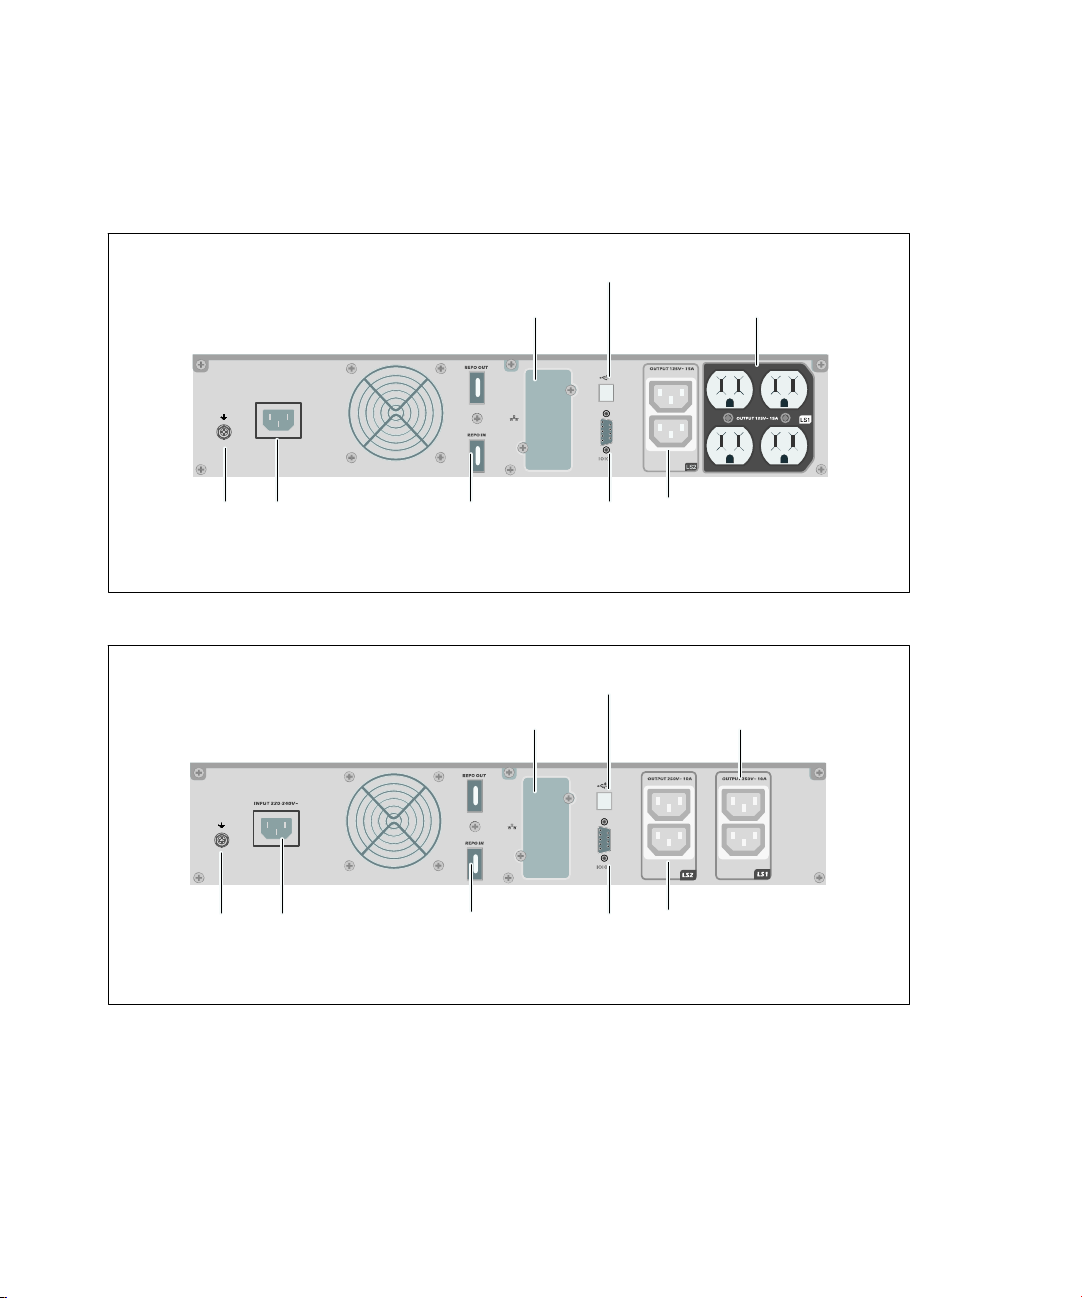
Identifying the UPS Rear Panels
This section shows the rear panels of the Dell Line-Interactive Rack models.
IN PU T 10 0−120V~
Ground Screw
IEC-C14 Input
Connector
Figure 4. 1000W, 100V/120V Rear Panel
USB Port
UPS Communication Bay
REPO Ports RS-232 Port
USB Port
UPS Communication Bay
Four 5‐15 Receptacles
(Load Segment 1)
Two IEC 320-C13 Receptacles
(Load Segment 2)
Two IEC 320-C13
Receptacles
(Load Segment 1)
Ground Screw
IEC-C14 Input
Connector
Figure 5. 1000W, 230V Rear Panel
REPO Ports
RS-232 Port
Two IEC 320-C13 Receptacles
(Load Segment 2)
Installation
|
15
Page 16
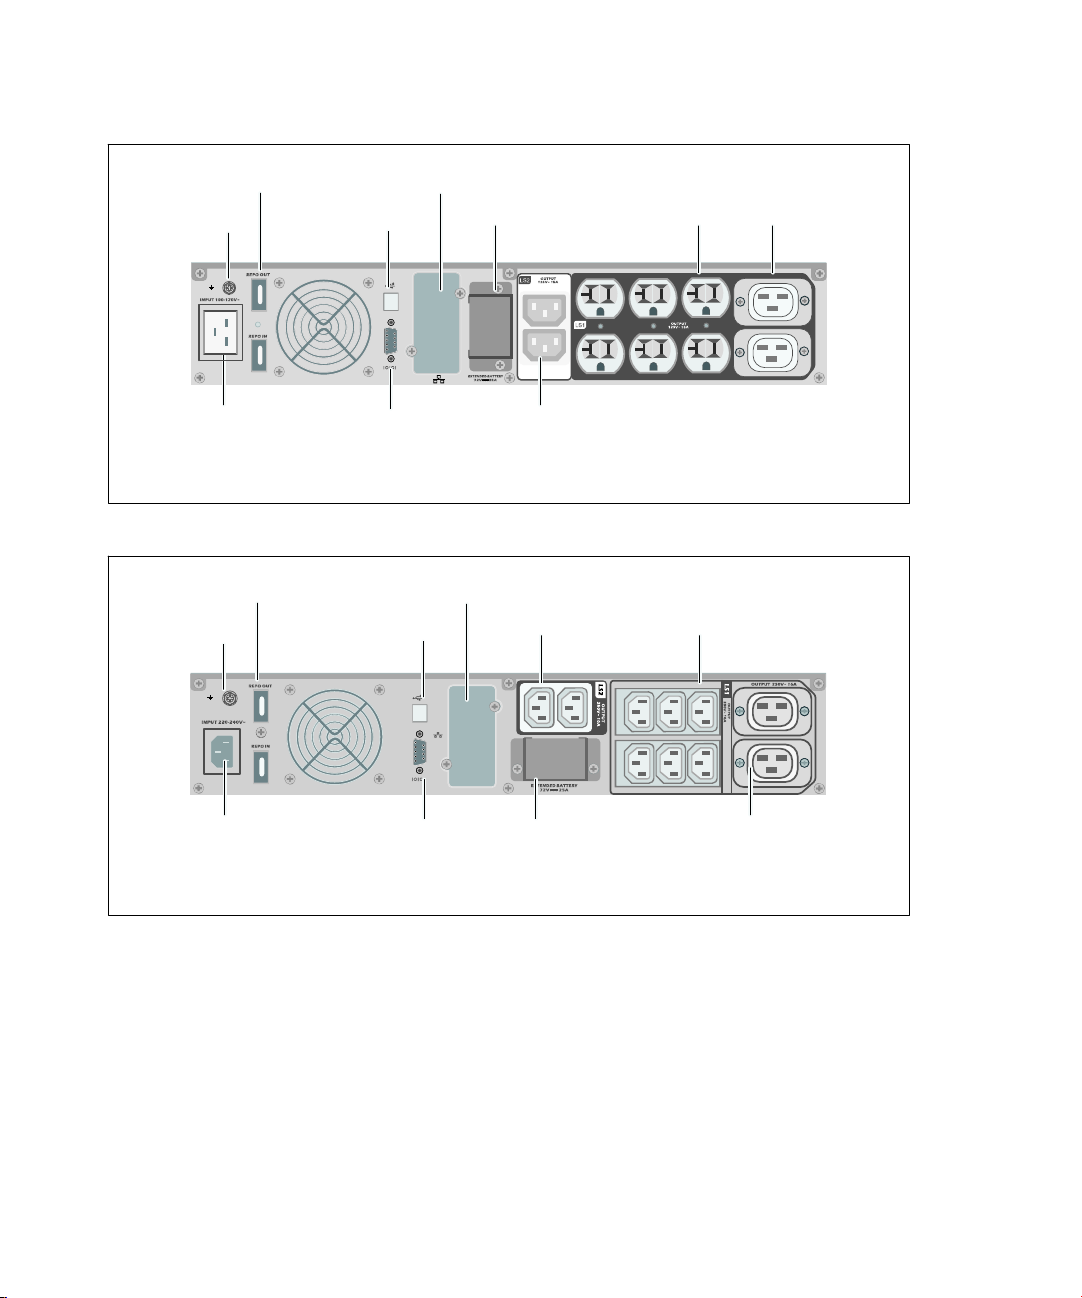
REPO Ports
Ground Screw
UPS Communication Bay
USB Port
EBM Connector Cover/Strain
Relief Bracket
Six 5-15/5-20 and Two
IEC 320-C19 Receptacles
(Load Segment 1)
IEC-C20 Input
Connector
RS-232 Port
Figure 6. 1920W/120V, 1500W/100V Rear Panel
REPO Ports
Ground Screw
IEC-C14 Input
Connector
UPS Communication Bay
USB Port
RS-232 Port
Figure 7. 1920W, 230V Rear Panel
Two IEC 320-C13 Receptacles
(Load Segment 2)
Two IEC 320-C13
Receptacles
(Load Segment 1)
EBM Connector Cover/Strain
Relief Bracket
Six IEC 320-C13
Receptacles
(Load Segment 2)
Two IEC 320-C19
Receptacles
(Load Segment 2)
16
|
Installation
Page 17

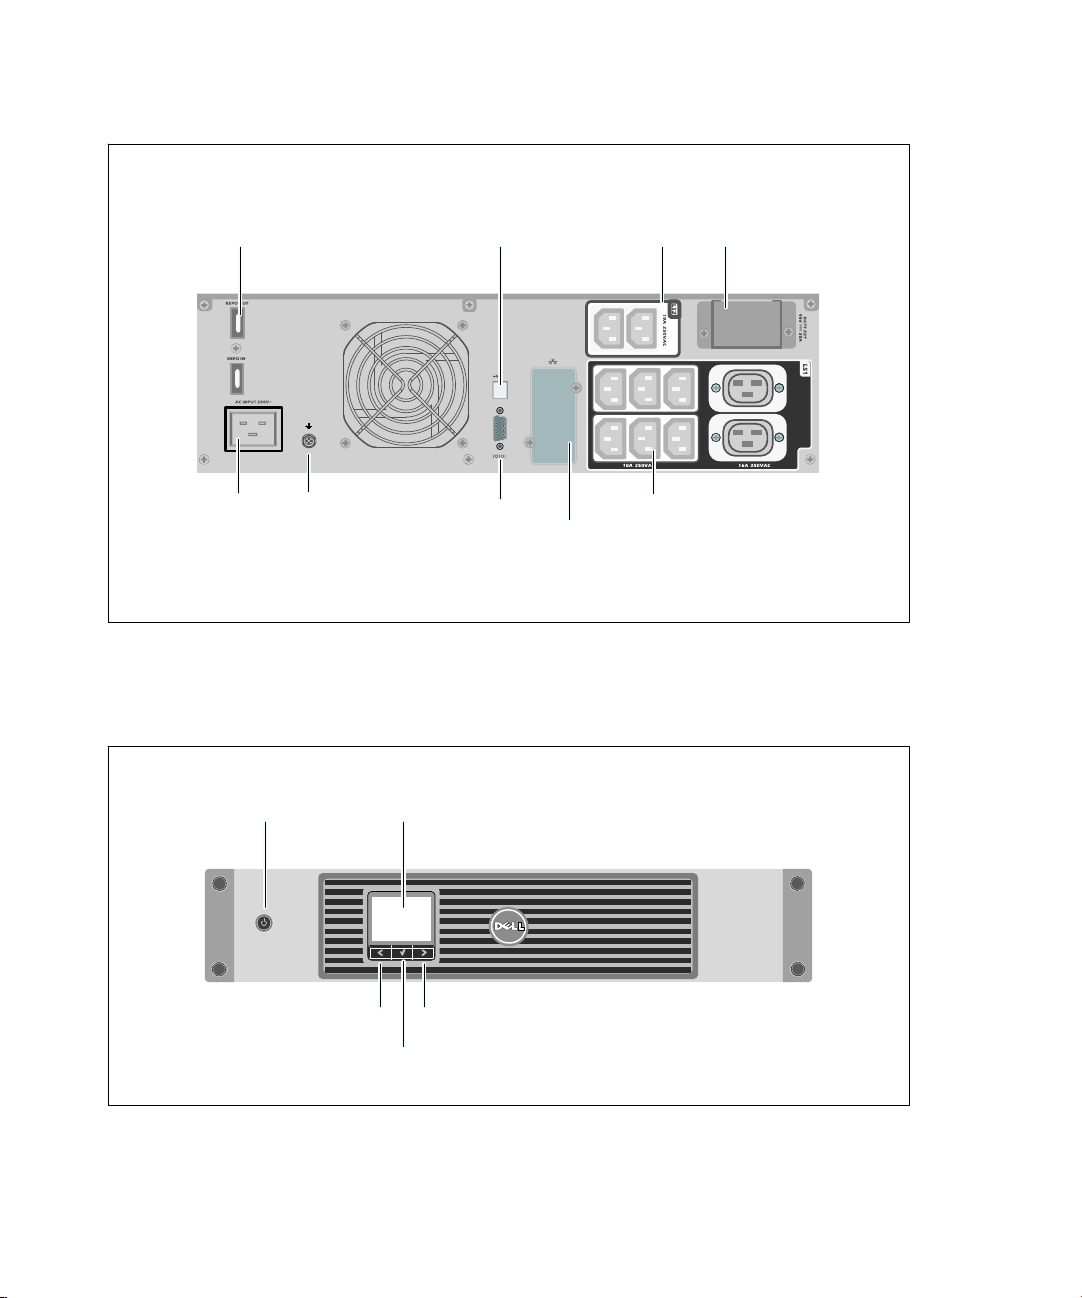
REPO Ports
Output Circuit Breakers
RS-232 Port
Two IEC 320-C13
Receptacles
(Load Segment 2)
EBM Connector
Cover/Strain Relief
Bracket
2m, L5-30P Input Cord
Ground Screw
Figure 8. 2700W/120V, 2300W/100V Rear Panel
REPO Ports
IEC-C20 Input
Connector
Ground Screw
USB Port
Communication
USB Port
RS-232 Port
Communication
UPS
Bay
Two IEC 320-C13
Receptacles
(Load Segment 2)
UPS
Bay
One L5-20, Two 5-15/5-20, and
Two IEC 320-C19 Receptacles
(Load Segment 1)
EBM Connector
Cover/Strain Relief
Bracket
Two L6-20 and
Two IEC 320-C19 Receptacles
(Load Segment 1)
Figure 9. 2700W, 208V Rear Panel
Installation
|
17
Page 18
REPO Ports
USB Port
Two IEC 320-C13
Receptacles
(Load Segment 2)
EBM Connector
Cover/Strain Relief
Bracket
IEC-C20 Input
Connector
Ground Screw
RS-232 Port
Communication
Figure 10. 2700W, 230V Rear Panel
Identifying the UPS Front Panel
On/Off Button
Scroll Button (Up or Back)
LCD Panel
Scroll Button (Down or Forward)
Select Button
UPS
Bay
Six IEC 320-C13 and
Two IEC 320-C19 Receptacles
(Load Segment 1)
Figure 11. The Dell Line-Interactive Rack UPS Front Panel
|
18
Installation
Page 19
UPS Setup
The Dell Line-Interactive Rack UPS can be installed in 19-inch racks and needs only 2U of valuable rack
space (3U for 2700/2300W UPS models).
NOTE:
No tools are needed to attach the rack rails to a round- or square-hole EIA rack.
The 2700/2300W UPS models are designed for flexible configurations and can be installed in a rack or
as a standalone cabinet.
If you are installing the UPS in a rack, continue to the following section, “Rackmount Setup.” To install
the 2700/2300W UPS as a standalone cabinet, continue to “Tower Setup” on page 24.
Rackmount Setup
CAUTION: The cabinet is heavy (see page 65): 1) Dell strongly recommends to remove the battery tray from the
UPS before lifting. 2) Lifting the cabinets into the rack requires a minimum of two people.
CAUTION: Removing the batteries should be performed or supervised by personnel knowledgeable about
batteries and the required precautions. Keep unauthorized personnel away from batteries.
CAUTION: If installing an optional EBM, install the EBM directly below the UPS.
NOTE: Mounting rails are required for each individual cabinet.
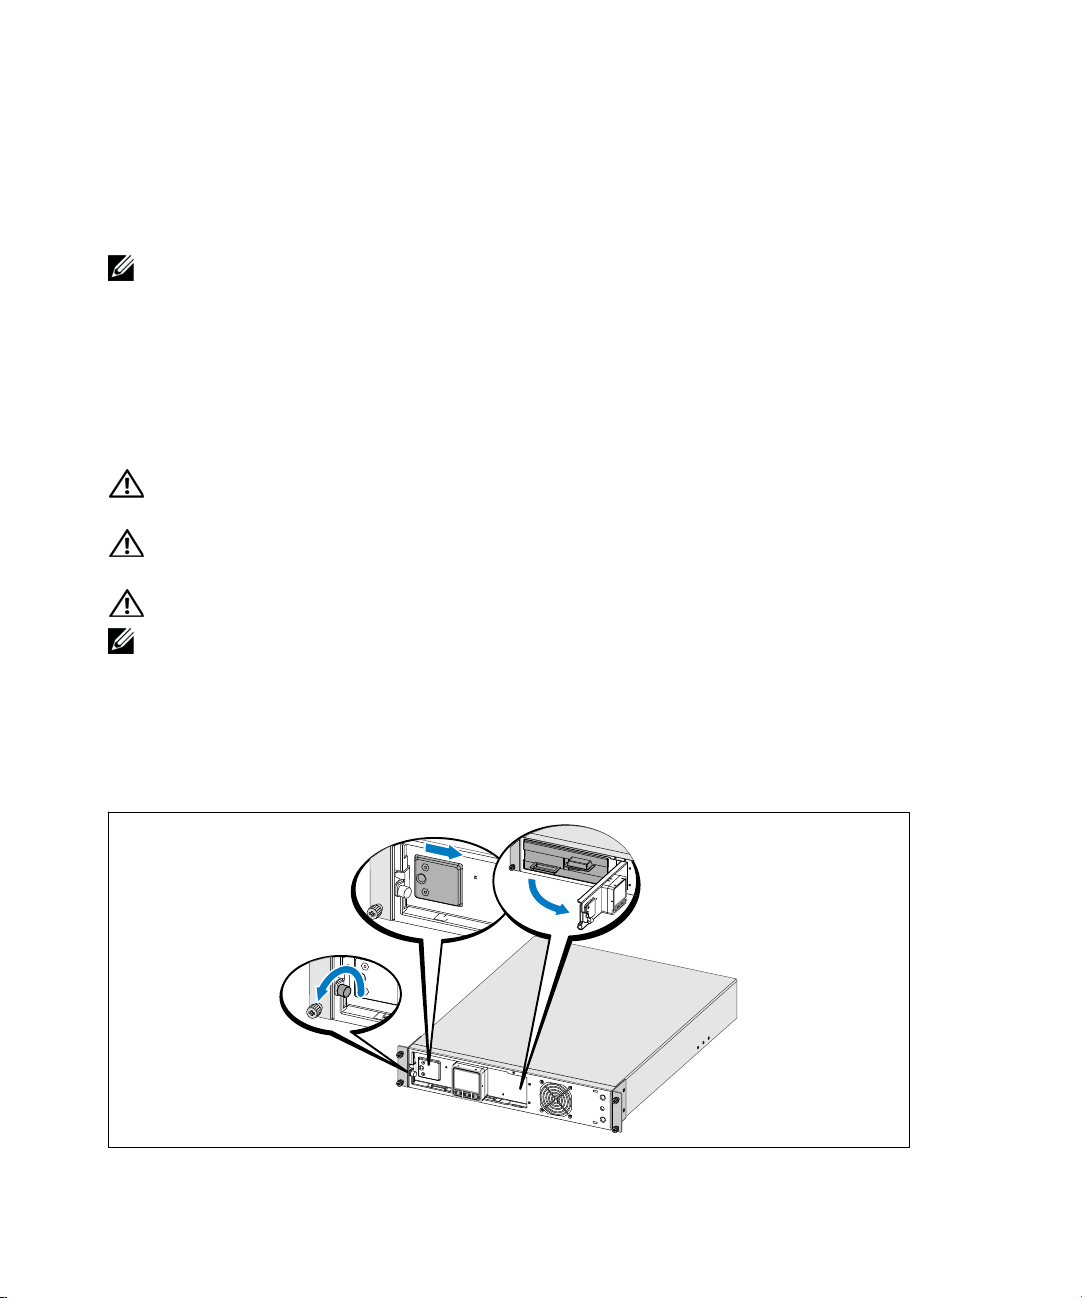
To install the UPS and optional EBM in a rack:
1 Remove the internal battery tray from the UPS:
Loosen the thumbscrew on the metal battery cover, slide the cover to the right, and open (see
Figure 12).
Figure 12. Opening the Metal Battery Cover
Installation
|
19
Page 20
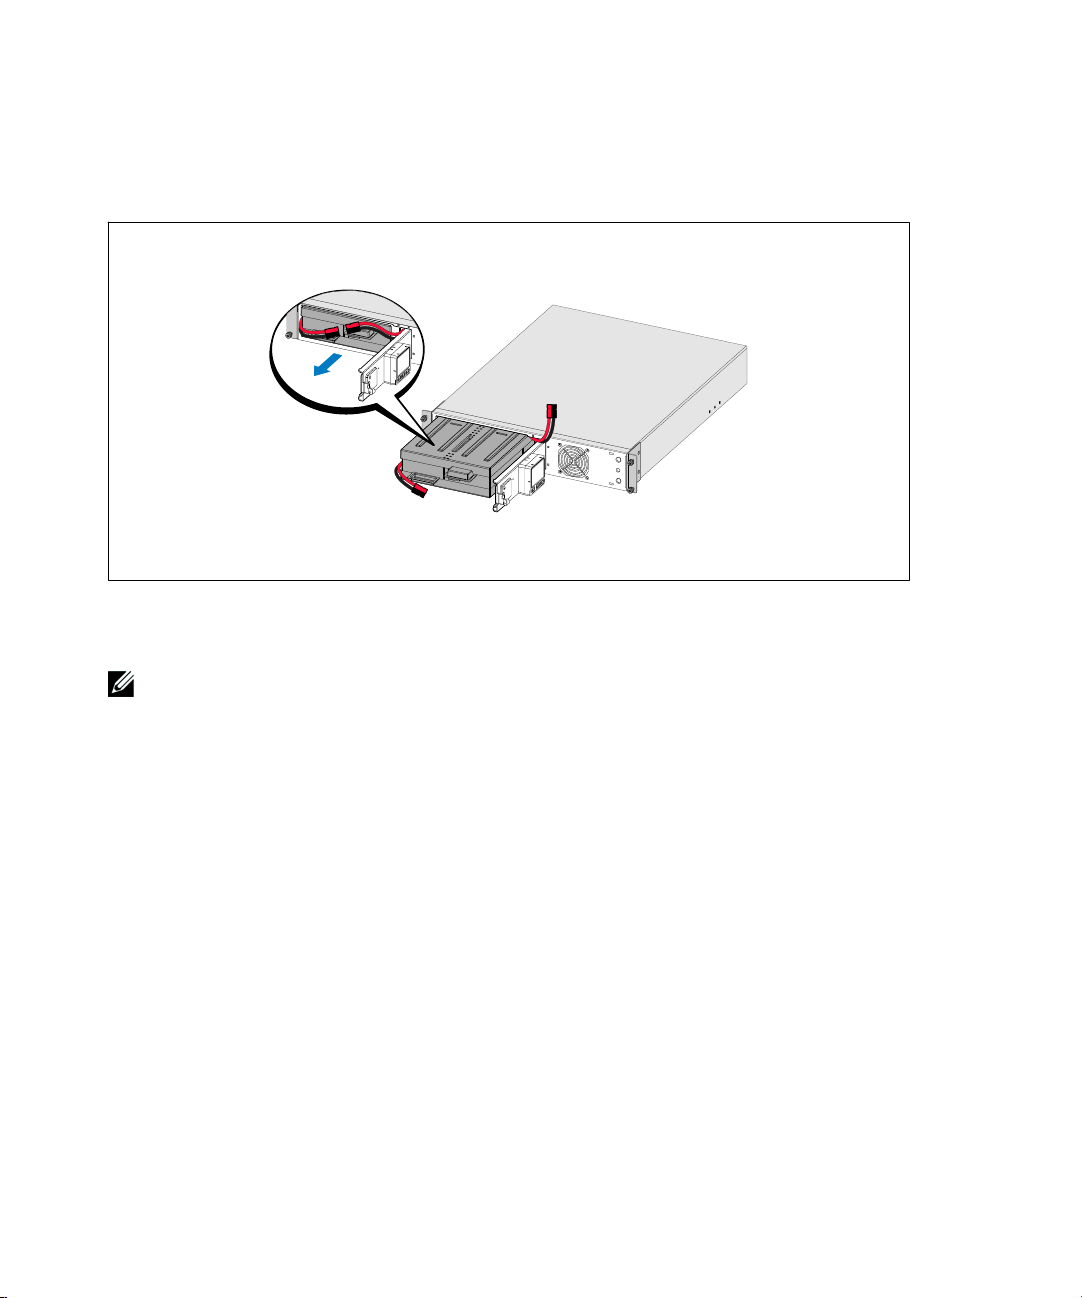
Unclip the right battery connector and move the connector out of the way.
Pull the battery tray out using the plastic tabs and remove the battery tray (see Figure 13).
Figure 13. Removing the Battery Tray
2 If installing additional UPSs, repeat Step 1 for each cabinet.
NOTE:
The instructions are the same for square-hole racks and unthreaded, round-hole racks. The rails fit both
rack styles. The square-hole rack is shown in the illustrations.
3 Select the proper holes in the rail for positioning the cabinet in the desired location in the rack.
The rails should be located at the bottom of the 2U (or 3U for 2700/2300W UPS models) space
allocated for the UPS or EBM.
4 Position the end of the left and right rails labeled FRONT facing inward.
|
20
Installation
Page 21
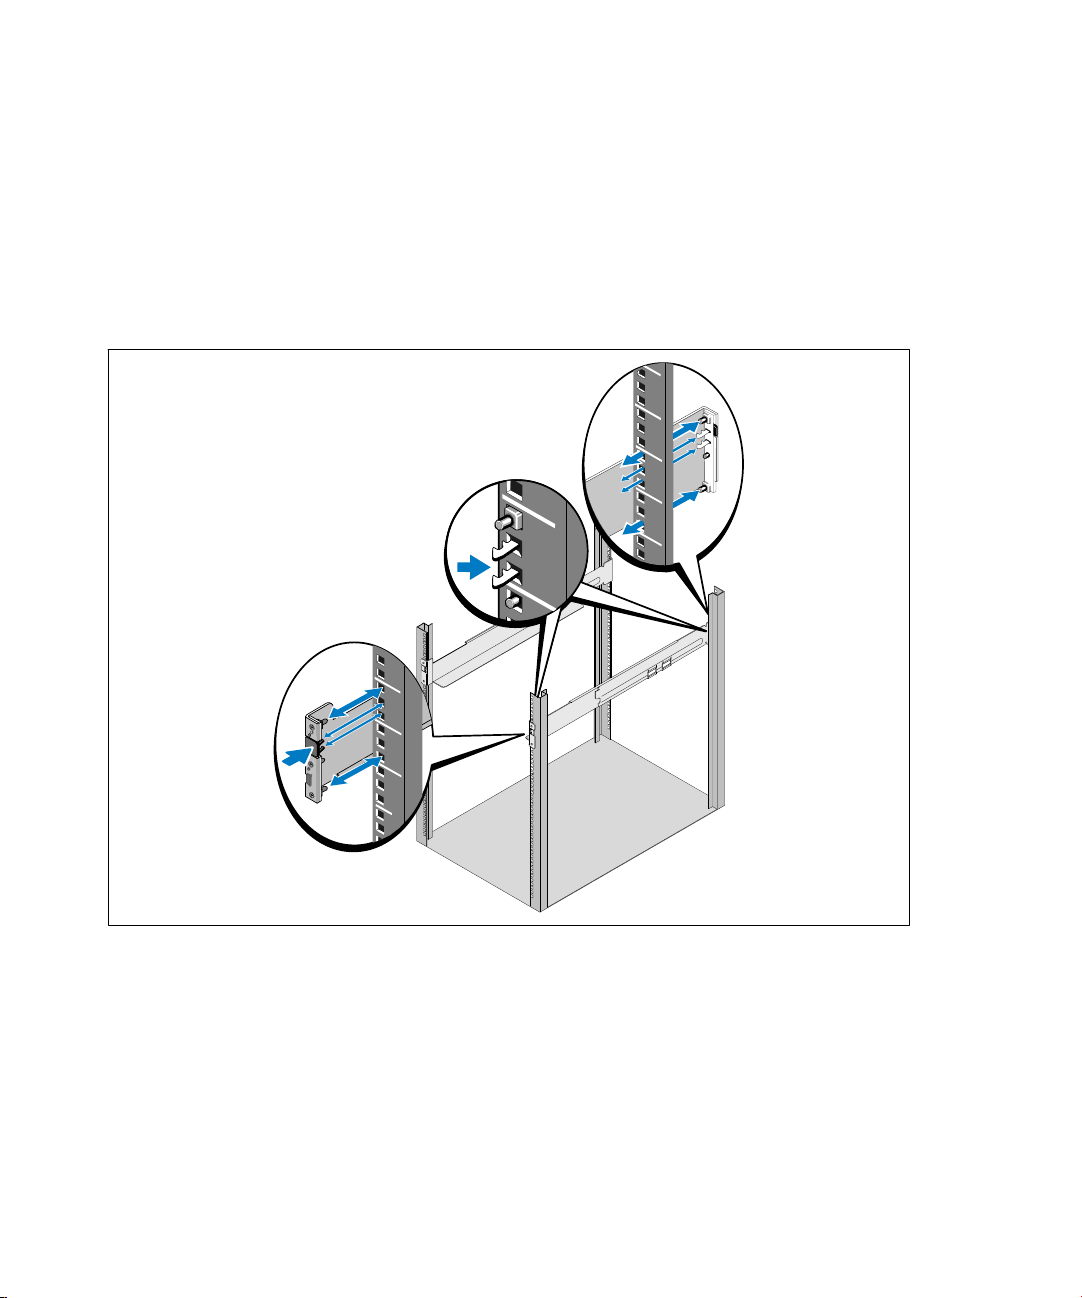
5 Attach the rails to the rack:
Engage the back end of the rail until it fully seats on the vertical rack flange and the hook latch
locks in place (see Figure 14).
Pull the rail toward the front.
Push the front end of the rail until it fully seats on the vertical rack flange and the hook latch locks
in place.
Figure 14. Installing the Rails
Installation
|
21
Page 22
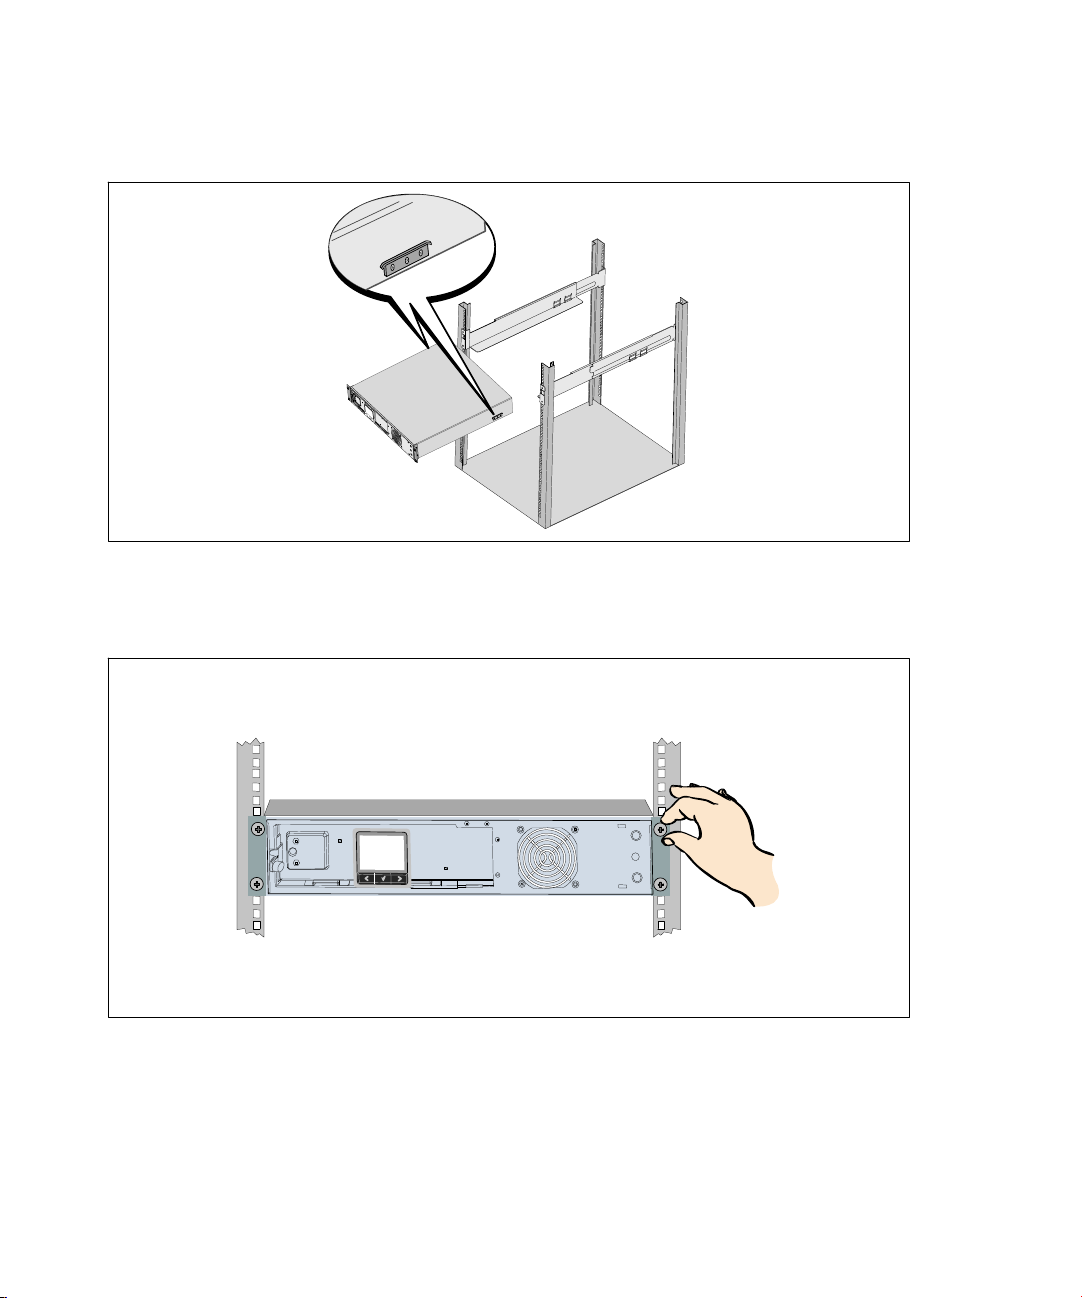
6 Slide the cabinet into the rack (see Figure 15). Repeat for any additional cabinets.
Figure 15. Installing the Cabinet
7 Secure the front of the cabinet to the rack using the four thumbscrews on the mounting brackets
(see Figure 16). Tighten by hand; do not use power tools. Repeat for any additional cabinets.
Figure 16. Securing the Cabinet
|
22
Installation
Page 23

8 Install the UPS battery tray (see Figure 17).
NOTE:
A small amount of arcing may occur when connecting the batteries. This is normal and does not damage
the unit or present any safety concern.
9 Connect the internal battery connector and reclip the right battery connector.
10 Close the metal battery cover.
Adjust the battery connector so that the door closes properly. Push the door slightly to the right
and then to left.
11 Tighten the thumbscrew.
Torque the screw to 0.7 Nm (6.2 lb in).
Figure 17. Installing the Battery Tray
Installation
|
23
Page 24

12 Install the UPS front cover (see Figure 18).
Figure 18. Installing the UPS Front Cover
Tower Setup
CAUTION: The UPS and EBM are heavy (see page 65). Lifting the cabinets into the pedestals requires a
minimum of two people.
To install the 2700/2300W 3U UPS model in a tower configuration:
1 Remove the mounting brackets and the rear hold-down brackets from the UPS using a Phillips
#2 screwdriver (see Figure 19).
®
Figure 19. Removing the Mounting Brackets and Rear Hold-Down Brackets
|
24
Installation
Page 25

2 Loosen the thumbscrew on the metal battery cover, slide the cover to the right, and open (see
Figure 20).
Figure 20. Opening the Metal Battery Cover
3 Connect the internal battery connector.
Figure 21. Connecting the Internal Battery Connector
Installation
|
25
Page 26

4 Rotate the control panel 90° counterclockwise (see Figure 22).
Figure 22. Adjusting the UPS Control Panel Orientation
5 Close the metal battery cover and tighten the thumbscrew.
Torque the screw to 0.7 Nm (6.2 lb in).
6 Rotate the Dell logo 90° counterclockwise and install the UPS front cover (see Figure 23).
Figure 23. Installing the UPS Front Cover
|
26
Installation
Page 27

NOTE: Dell recommends a minimum of 63.5 mm (2.5”) free space behind the UPS rear panel, and a minimum of
127 mm (5”) between cabinets.
7 Place the cabinet horizontally so that the right end of the cabinet is accessible (see Figure 24).
8 Align the pedestals with the holes on the end of the cabinet. Push the pedestals in place.
Figure 24. Installing the Pedestals
9 Carefully position the cabinet upright (see Figure 25).
Figure 25. Tower Configuration
Installation
|
27
Page 28

Installing the EBM
NOTE: A small amount of arcing may occur when connecting an EBM to the UPS. This is normal and will not
harm personnel. Insert the EBM cable into the UPS battery connector quickly and firmly.
An optional EBM can be installed for 1920–2700W UPS models.
To install the optional EBM:
1 Remove the battery connector cover from the rear panel as shown in Figure 26. Retain the cover
and screws.
NOTE:
If the UPS is stored or used without an EBM, the battery connector cover must be installed as a safety
precaution.
Figure 26. Removing the Battery Connector Cover
28
|
Installation
Page 29

2 Install the battery connector cover under the EBM cable to provide strain relief (see Figure 27).
Rotate the battery connector cover on its side and position under the EBM cable.
Figure 27. Installing the Battery Connection Cover
3 Plug the EBM cable into the UPS battery connector (see Figure 28).
Secure the battery connector cover to the UPS rear panel using the screws removed in Step 1.
Figure 28. EBM Installation for 1920–2700W UPS Models Only
Installation
|
29
Page 30

Installing the UPS
To install the UPS:
1 If you plan to use Dell UPS Management Software, connect your computer to the USB port using
the supplied cable. For more information about communication options, see page 56.
2 If your rack has conductors for grounding or bonding of ungrounded metal parts, connect the
ground cable (not supplied) to the ground bonding screw. See “Identifying the UPS Rear Panels”
on page 15 for the location of the ground bonding screw for each model.
3 If an emergency power-off (disconnect) switch is required by local codes, see the following section,
“Installing Remote Emergency Power-off” (REPO) to install the REPO switch before powering on
the UPS.
4 Plug the equipment to be protected into the UPS output receptacles, but do not turn on the
protected equipment.
NOTE:
Verify that the total equipment ratings do not exceed the UPS capacity to prevent an overload alarm.
Installing Remote Emergency Power-off
REPO is used to shut down the UPS from a distance. For example, this feature can be used for shutting
down the load and the UPS by thermal relay, in the event of room overtemperature. When REPO is
activated, the UPS shuts down the output and all its power converters immediately. The UPS logic
power remains on to issue an alarm.
The REPO feature shuts down the protected equipment immediately and does not follow the orderly
shutdown procedure initiated by any power management software. Any devices that are operating on
battery power are also shut down immediately.
When the REPO switch is reset, the equipment will not return to utility or battery power until the UPS
is manually restarted.
The REPO contacts are normally open.
WARNING:
separated from any hazardous voltage circuits by reinforced insulation.
CAUTION: The REPO must not be connected to any utility connected circuits. Reinforced insulation to the
utility is required. The REPO switch must have a minimum rating of 24 Vdc and 20 mA and be a dedicated
latching-type switch not tied into any other circuit. The REPO signal must remain active for at least 250 ms for
proper operation.
CAUTION: To ensure the UPS stops supplying power to the load during any mode of operation, the input
power must be disconnected from the UPS when the emergency power-off function is activated.
|
30
The REPO circuit is an IEC 60950 safety extra low voltage (SELV) circuit. This circuit must be
Installation
Page 31

NOTE: For Europe, the emergency switch requirements are detailed in Harmonized document HD-384-48 S1,
“Electrical Installation of the Buildings, Part 4: Protection for Safety, Chapter 46: Isolation and Switching.”
REPO Connections
Wire Function Terminal Wire Size Rating Suggested Wire Size
REPO
L1
L2
4–0.32 mm2 (12–22 AWG) 0.82 mm2 (18 AWG)
NOTE: The pins must be open to keep the UPS running. If the UPS shuts down because the REPO connector
pins are shorted, restart the UPS by re-opening the REPO connector pins and turning on the UPS manually.
Maximum resistance in the shorted loop is 10 ohm.
NOTE: Always test the REPO function before applying your critical load to avoid accidental load loss.
Remove Jumper if
installed
Figure 29. REPO Connector
To install the REPO switch:
1 Verify that the UPS is off and unplugged.
2 Remove the REPO connector from the accessory kit.
NOTE:
Verify that there is no jumper installed in the REPO connector. If a jumper is installed, remove it before
connecting to the REPO port.
3 Connect the REPO connector to the REPO port labeled “IN” on the UPS rear panel.
4 Optional. If you are daisy-chaining the REPO function with another UPS, you can shut down the
entire system using a single switch.
Connect the second REPO connector to the REPO port labeled “OUT.”
Installation
|
31
Page 32

NOTE: A separate contact must simultaneously cause UPS input AC power to be removed.
5 Connect the switch or circuit to the REPO connector on the UPS rear panel using insulated
0.75 mm
Optional. If you are daisy-chaining the REPO function with another UPS, connect the REPO port
2
–0.5 mm2 (18–20 AWG) wire.
labeled “OUT” to the REPO port labeled “IN” on the next UPS. Continue for each UPS. On the
last UPS in the daisy-chain, connect a REPO connector (without a jumper) in the REPO port
labeled “OUT.”
6 Verify that the externally-connected REPO switch is not activated to enable power to the UPS
output receptacles.
7 Continue to the following section, “UPS Initial Startup.”
UPS Initial Startup
To start up the UPS:
1 Verify that the internal batteries are connected.
2 If an optional EBM is installed, verify that the EBM is connected to the UPS.
3 Verify that the power input to the UPS has adequate upstream overcurrent protection:
Table 1. Minimum Upstream Circuit Breaker Rating
UPS Output Power
1000W 15A — 15A
1500W (at 100V)
1920W
2300W (at 100V)
2700W
120V 208V 230V
20A — 15A
30A 20A 16A
32
|
Installation
Page 33

The power cord current ratings are listed in Table 2.
Table 2. Power Cord Ratings
Dell UPS Model and Voltage
1000W 100V JIS C8303 to C13 12A Japan Optional
1000W 120V
1000W 230V
100V
1920W (1500W
in Japan and
Taiwan)*
* There are two power cords in the box, one with BSMI and PSE certified markings that can be used in Taiwan
and Japan, another cord is for regions other than Taiwan and Japan.
120V
Power Cord Rating Country Supplied Cord Set
NEMA 5-15P to C13 15A North America Yes
CNS 10917-2 to C13 15A Taiwan Optional
C13 to C14 Jumper 12A Japan Optional
NBR 14136 to C13 10A Brazil Optional
NBR 6147 to C13 10A Brazil Optional
C13 to C14 Jumper 10A China/Korea/Australia Yes
C13 to C14 Jumper 12/10A North America/Europe Yes
CEE 7/7 Schuko to C13 10A Europe (Schuko) Optional
SEV 1011 to C13 10A Switzerland Optional
AS 3112 to C13 10A Australia Optional
IEC 60884-1 to C13 10A Switzerland Optional
IRAM2073 to C13 10A Argentina Optional
SANS 164-1 to C13 10A United Kingdom (Old) Optional
BS 1363 to C13 10A United Kingdom (New) Optional
CEI 23-50 to C13 10A Italy Optional
KSC8305 to C13 10A South Korea Optional
GB2099.1 to C13 10A China Optional
NBR 6147 to C13 10A Brazil Optional
NBR 14136 to C13 10A Brazil Optional
TI16S3 to C13 10A Thailand Optional
SANS 164-1 to C13 10A South Africa Optional
IS 1293 to C13 10A India Optional
SB107-2-DI to C13 10A Denmark Optional
NEMA L5-20P to C19 15A Japan Yes
NEMA 5-20P to C19 20A North America Yes
NEMA L5-20P to C19 15A Taiwan Yes
C19 to C20 Jumper 16A North America Optional
Installation
|
33
Page 34

Table 2. Power Cord Ratings (continued)
Dell UPS Model and Voltage Supplied Cord SetCountryRatingPower Cord
C13 to C14 Jumper 10A China/Korea/Australia Yes
C13 to C14 Jumper 12/10A North America/Europe Yes
CEE 7/7 Schuko to C13 10A Europe (Schuko) Optional
SEV 1011 to C13 10A Switzerland Optional
AS 3112 to C13 10A Australia Optional
GB2099 to C13 10A China Optional
IS 1293 to C13 10A India Optional
SANS 164-1 to C13 10A United Kingdom (Old) Optional
1920W 230V
2700W 208V
BS 1363 to C13 10A United Kingdom (New) Optional
SB107-2-DI to C13 10A Denmark Optional
CEI 23-50 to C13 10A Italy Optional
IRAM2073 to C13 10A Argentina Optional
NBR 6147 to C13 10A Brazil Optional
NBR 14136 to C13 10A Brazil Optional
KSC8305 to C13 10A South Korea Optional
TI16S3 to C13 10A Thailand Optional
SANS 164-1 to C13 10A South Africa Optional
L6-20P to C19 15A North America Yes
C19 to C20 Jumper 16A North America Optional
34
|
Installation
Page 35

Table 2. Power Cord Ratings (continued)
Dell UPS Model and Voltage Supplied Cord SetCountryRatingPower Cord
CEE 7/7 Schuko to C19 16A Europe (Schuko) Yes
BS 1363 to C19 13A United Kingdom (New) Yes
GB2009.1 to C19 16A China Yes
C19 to C20 Jumper 16A Europe/Australia Yes
C19 to C20 Jumper 16A China Yes
BS 546 to C19 15A United Kingdom(Old) Optional
TI16S3 to C19 16A Thailand Optional
2700W 230V
AS 3112 to C19 15A Australia Optional
IRAM2073 to C19 16A Argentina Optional
CEI 23-50 to C19 16A Italy Optional
KSC8305 to C19 15A South Korea Optional
IS 1293 to C19 16A India Optional
NBR 14136 to C19 16A Brazil Optional
C19 to C20 Jumper 16A North America Optional
L6-20P to C19 15A North America Optional
4 For models with a detachable power cord. Plug the detachable UPS power cord into the input
connector on the UPS rear panel.
5 Plug the UPS power cord into a power outlet.
The UPS front panel display illuminates. The Dell startup screen changes to the UPS status
summary screen. The UPS front panel display shows the flashing Standby icon
.
6 Press the button on the UPS front panel.
After the startup is complete, the status icon changes to the appropriate icon based on the UPS
operating mode (see Table 4 on page 42).
7 On the UPS status summary screen, press the button to check for active alarms or notices.
Resolve any active alarms before continuing. See “Troubleshooting” on page 69.
If there are no active alarms, a “No Active Alarms” message appears.
8 Verify that the Normal icon appears on the UPS status summary screen, indicating that the
UPS is operating normally and any loads are powered (see Table 4 on page 42).
9 If an optional EBM is installed, see “Configuring the UPS for an EBM” on page 54.
Installation
|
35
Page 36

10 To change other factory-set defaults, see “Operation” on page 37.
11 If you installed an optional REPO, test the REPO function:
Activate the external REPO switch. Verify the status change on the UPS display.
Deactivate the external REPO switch and restart the UPS.
NOTE:
Dell recommends setting the date and time.
NOTE: At initial startup, the UPS sets system frequency according to input line frequency (input frequency
auto-sensing is enabled by default). After initial startup, auto-sensing is disabled until manually re-enabled by
output frequency setting.
NOTE: At initial startup, input voltage auto-sensing is enabled by default. After the subsequent startup,
auto-sensing is disabled until manually re-enabled by output voltage setting.
NOTE: The internal batteries charge to 90% capacity in less than 4 hours. However, Dell recommends that the
batteries charge for 48 hours after installation or long-term storage. If an optional EBM is installed, see the
recharge time listed in Table 15 on page 68.
36
|
Installation
Page 37

Operation
This chapter contains information on how to use the UPS, including:
S UPS startup and shutdown
S Control panel and display functions
S Retrieving the Event Log
S Behavior on overload
S Configuring load segments, battery settings, and automatic restart
UPS Startup and Shutdown
NOTE: The button controls only the UPS output. The button has no effect on equipment connected to
the UPS.
To start up or shut down the UPS, see:
S “Starting the UPS” on page 37
S “Starting the UPS on Battery” on page 38
S “UPS Shutdown” on page 38
Starting the UPS
To start the UPS:
4
1 Verify that the UPS power cord is plugged in.
2 Switch on utility power where the UPS is connected.
The UPS front panel display illuminates. The Dell startup screen changes to the UPS status
summary screen. The UPS front panel display shows the Standby mode icon
3 Press the button on the UPS front panel.
After the startup is complete, the status icon changes to the appropriate icon based on the UPS
operating mode (see Table 4 on page 42).
4 On the UPS status summary screen, press the button to check for active alarms or notices.
Resolve any active alarms before continuing. See “Troubleshooting” on page 69.
If there are no active alarms, a “No Active Alarms” message appears.
5 Verify that the Normal mode icon appears on the UPS status summary screen, indicating that
the UPS is operating normally and any loads are powered.
.
Operation
|
37
Page 38

Starting the UPS on Battery
NOTE: Before using this feature, the UPS must have been powered by utility power with output enabled at least
once.
NOTE: Utility power cannot be present at startup.
To start the UPS on battery:
1 Press the button on the UPS front panel until the UPS beeps.
The UPS front panel display illuminates, and the UPS begins the startup sequence.
The UPS cycles through Standby mode to Battery mode. The Battery mode icon
displays on
the UPS status summary screen. The UPS supplies power to your equipment.
NOTE:
The UPS does not assume the load if you press the button less than three seconds.
2 Press the button to check for active alarms or notices.
Ignore the “UPS on Battery” notice and notices that indicate missing utility power. Resolve other
active alarms before continuing. See “Troubleshooting” on page 69. After correcting the alarms,
restart if necessary.
You can prevent a battery start (requiring utility power at the next startup) by simultaneously pressing
the
and buttons for three seconds. Battery start can be disabled. See the Start on Battery setting
on page 47.
UPS Shutdown
To shut down the UPS:
1 Press the button on the front panel for three seconds.
The UPS begins to beep. The UPS transfers to Standby mode.
NOTE:
Releasing the button before three seconds returns the UPS to its original operating state.
2 Switch off utility power where the UPS is connected.
After utility power is removed, the UPS fully shuts down in ten seconds.
38
|
Operation
Page 39

Control Panel Functions
The UPS has a three-button graphical LCD with dual color backlight. Standard backlight is used to
light up the display with white text and a blue background. When the UPS has a critical alarm, the
backlight changes the text to dark amber and the background to amber. See Figure 30.
Figure 30. Dell Line-Interactive Rack UPS Control Panel
There are three buttons on the control panel:
S Scroll up or back
S Select
S Scroll down or forward
Table 3 describes the functions of the LCD control buttons.
Table 3. Control Button Functions
Control Button
Sequence Function
Press for less than one second Scroll back or up to the previous menu.
Press for longer than one
second
Press for less than one second Select the menu or option to be changed.
Press for longer than one
second
Press for less than one second Scroll forward or down to the next menu option.
Press both buttons for three
seconds
Press all three buttons for five
seconds
Return/exit back one menu layer without initiating a command
or changing a setting.
Save the setting being edited.
Temporarily disable the battery startup feature until the next
power cycle. The buzzer emits a one second beep to indicate
that Battery Start has been disabled.
Shortcut for defaulting the language back to English. The
buzzer emits a one second beep to indicate that the setting has
changed to English.
|
Operation
39
Page 40

To select an option:
1 When scrolling through the settings, the present setting displays for each selection.
2 Press the button to select the option.
The current setting for the option flashes when selected.
3 Use the or buttons to toggle the available options.
4 Set the new option by holding the button again for one second.
The option stops flashing.
Changing the Language
Language selection is controlled through the user settings. See Table 7 page 46 for information on
available languages.
Display Functions
The UPS provides useful information about the UPS itself, load status, events, measurements,
identification, and settings through the front panel display.
Startup Screen
During startup, the Dell logo is the default screen. This startup screen displays for five seconds and then
defaults to the UPS status summary screen.
The display automatically returns to the UPS status summary screen when no button has been pushed
for 15 minutes and no other screen has been locked by a user. When you return to the status summary
screen, press the
from the main menu list enables you to scroll through all of the UPS status menu screens, including the
status summary screen.
|
40
Operation
button for one second to exit back to the menu selections. Selecting UPS Status
Page 41

Screen Locked
To lock a screen, press the button. The current view stays locked and does not automatically return
to the default screen after time-out. When the screen is locked, the image of a key appears on the UPS
status summary screen just to the left of the status icon. See Figure 31.
Pushing any button returns the normal button function, unlocks the screen, and removes the lock
symbol.
Figure 31. A Locked Screen
Only screens that have dynamic, real-time data updates can be locked. Applicable screens include the
status summary screen, measurement screens, active alarms, and the battery status screen.
UPS Status
The UPS status provides separate screens for the following information:
S Status summary, including mode and load
S Notice or alarm status, if any are present
S Battery status, including state and charge level
See Table 4 for examples of the UPS status summary screens. The status icon in the upper right corner
of each status summary screen conveys the UPS status or mode.
Basic operating modes include:
S Normal mode
S Battery mode
S Standby mode
|
Operation
41
Page 42

Table 4. Status Summary Screens
Status Summary Screen
Description
UPS Critical Failure
The UPS is in Fault mode. The status icon and background are flashing.
Battery Mode
The status icon and background of the icon are flashing.
An audible alarm (0.5 seconds on/4.5 seconds off) accompanies the switch to
Battery mode.
When the utility power returns, the UPS transfers to Normal mode operation
while the battery recharges.
UPS in Overload Condition
The status icon and background of the icon are flashing.
Bad Battery Detected or Battery Disconnected
The status icon and background of the icon are flashing, along with the outer
shell of the battery symbol at the bottom.
42
|
UPS General Alarms Active
The status icon and background of the icon are flashing.
Battery Test Status
The status when the UPS is performing a battery test.
Operation
Page 43

Table 4. Status Summary Screens (continued)
Status Summary Screen Description
Normal Mode
The UPS is operating in Normal mode from utility power. The UPS monitors and
charges the batteries as needed and provides filtered power protection to your
equipment.
Standby Mode
When the UPS is turned off and remains plugged into a power outlet, the UPS is
in Standby mode and utility power supplies the connected equipment. The UPS
is not supporting the load, but is ready to assume the load on command.
The notice and alarm screens are visible only when notices or alarms are active. There is a separate
screen for each active notice or alarm. If there are no active notices or alarms, a “No Active Alarms”
message appears in a single screen between the UPS status summary and the battery status screen. If
there are multiple notices or alarms, scroll through each notice or alarm screen to reach the first battery
status screen.
NOTE:
Events are not shown in status summary screens. They appear only in the Event Log.
Table 5 describes the available battery status screens. Only one battery status is available at a time.
Table 5. Battery Status Screens
Battery Status Screen
Battery charging Batteries are charged in constant current mode.
Battery floating Batteries are charged in constant voltage mode.
Battery resting Batteries are connected but are not being charged or discharged.
Battery discharging Batteries are discharging.
Battery disconnected Batteries are unavailable because they are disconnected.
Charger disabled The battery charger is off. You can enable the Charger setting from the Settings
Description
(This is part of the normal charging cycle.)
menu (see page 48).
Operation
|
43
Page 44

Event Log
The Event Log holds up to 50 events. You can scroll through the event screens, beginning with the most
recent event.
NOTE:
The date format is dependent on the language selection.
The first row of each event screen contains the date (MM/DD/YYYY) and time (hh:mm:ss) at which the
event occurred. The second row contains the type of event and code. The event description begins on
the third row and may continue to the fourth row. The bottom right corner of the event screen displays
two numbers: an ordering number of the event in the log, followed by the total number of events in the
log.
If there are no events in the log, the event screen displays “No events in log.”
See “Retrieving the Event Log” on page 50.
Measurements
The measurements screens provide useful measurement information on:
S Output watts VA, current, power factor, voltage, and frequency
S Input voltage and frequency
S Battery voltage and percentage charged
S Instantaneous Headroom Watts remaining
S Peak Headroom Watts (the remaining watts available to support the load at peak demand,
includes the date and timestamp of the peak demand)
S Peak Consumption Watts (the peak power demand on the UPS, includes the date and timestamp
of the peak demand)
S Present kWh Consumption (the kWh demand on the UPS averaged over the past hour)
S Cumulative kWh Consumption (the total kWh usage, includes the date and timestamp since it
was last reset)
44
|
Operation
Page 45

Control Screens
Table 6 describes the available control screens.
Table 6. Control Screens
Control Screens
Battery Test Schedule Battery Test: yes | Cancel Battery test: no
Reset Error State Reset Alarms: yes | no
Load Segments Load segment 1: on | off
Restore Factory Settings Restore Factory Settings: yes | no
Description
Starts a manual battery test.
See “Testing Batteries” on page 64.
Manually clears any latched alarms, such as bad battery detected or DC Bus
OV/UV.
If a bad battery alarm was also active, reset the battery test status to “Not
Tested.”
Load segment 2: on | off
These on/off commands override automatic load segment on/off controls made by
the Automatic Start Delay and Automatic On Battery Shutdown settings. See
“Configuring Load Segments” on page 51.
Available only in Standby mode.
Restoring the factory settings:
S Returns all user-configurable EEPROM settings to default factory settings
S Resets all pending on/off commands
S Clears the Event Log and resets all time stamps
S Resets the battery test status
S Initiates the Self Diagnostics test
Operation
|
45
Page 46

Identification
The identification screens display the following UPS information:
S Type and model
S Part number
S Serial number
S UPS firmware
S Network Management Card firmware
NOTE:
The NMC firmware screen displays only if the Network Management Card is installed. See “Dell
Network Management Card“ on page 58.
Settings
Only available options are displayed.
User settings are not protected by default. You can enable the password through the User Password
setting.
Table 7 displays the options that can be changed by the user.
Table 7. Settings
Description
Change Language [English] [French] [German] [Spanish] [Japanese]
User Password [Enabled] [Disabled]
Audible Alarms [Enabled] [Disabled]
|
46
Operation
Available Settings Default Setting
[Simplified Chinese] [Russian] [Korean]
[Traditional Chinese]
If Enabled, the default password is USER.
NOTE: If you enter an incorrect password, the
message “Wrong Password” appears. Press any
button to return to the password screen and retry
the password.
NOTE: If you disable audible alarms, it takes effect
instantly and remains disabled, even after a power
cycle. This differs from the mute feature where the
horn is temporarily silenced on any button press,
but turns on again if a new alarm is triggered.
English
Disabled
Enabled
Page 47

Table 7. Settings (continued)
Description Default SettingAvailable Settings
Set Date and Time Set Month, Day, Year, Hours, Minutes, and Seconds
Date:mm/dd/yyyy
Time: hh:mm:ss
NOTE: The date format is dependent on the
01/01/2009
12:00:00
language selection.
NOTE: Time is a 24-hour clock.
Control Commands from Serial
Port
[Enabled] [Disabled]
If Enabled, control commands are accepted through
Enabled
the serial port, USB ports, or option card.
If Disabled, configuration and load control
commands are restricted to LCD only.
Output Voltage
[100V] [110V] [120V] [Auto-sensing]
Auto-sensing
[200V] [208V]
[220V] [230V] [240V]
Output Frequency [50Hz] [60Hz] [Auto-sensing] Auto-sensing
Overload Alarm Level [10%] [20%] [30%]...[100%]
100%
If 100%, the UPS issues an Output Overload alarm
at load > 100%.
NOTE: Output Overload Level 1 by default is set to
100% and is configurable from 10% to 100% in 10%
increments through the LCD setting menu. This
allows customers to be alerted before the UPS has
reached its rated capacity limits.
Automatic Start Delay [Off] [0s] [1s] [2s]...[32767s]
0s
See “Configuring Load Segments” on page 51.
Automatic on Battery Shutdown [Off] [0s] [1s] [2s]...[32767s]
Off
See “Configuring Load Segments” on page 51.
Start on Battery [Enabled] [Disabled]
NOTE: Battery start is disabled from the factory and
Enabled
remains disabled until the UPS has been powered
from utility and enters Standby mode. After the
UPS has been started once from utility, the Start on
Battery feature is automatically enabled. After this is
set by the user, it remains set.
Operation
|
47
Page 48

Table 7. Settings (continued)
Description Default SettingAvailable Settings
Battery Saving Mode [Disabled] [10%] [20%] [30%]...[100%]
The UPS output is turned off in five minutes if the
UPS is on battery and output power is below the
selected level.
On Battery Notice Delay [0] [1s] [2s]...[99s]
The UPS issues a “UPS on battery” notice in the
specified number of seconds after the UPS starts to
discharge the batteries.
Site Wiring Fault Alarm [Enabled] [Disabled] Disabled for 208V
External Battery Module (EBM) [0] [1]
See “Configuring the UPS for an EBM” on page 54.
Charger [Enabled] [Disabled]
If Enabled, batteries charge normally.
If Disabled, the battery charger is off.
Battery Charge % to Restart [0%] [10%] [20%] [30%]...[100%]
When enabled, automatic restart is made when the
battery charge state reaches the selected level. If set
to 0, the feature is disabled.
Battery Low Alarm [Immediate] [2 min] [3 min] [5 min]
If you select a value, the battery low alarm triggers
when the set amount of backup time
(approximately) remains in the batteries.
Automatic Battery Tests [Enabled] [Disabled]
See “Running Automatic Battery Tests” on page 55.
Disabled
0s
models; Enabled for
all others
0
Enabled
0%
3 min
Enabled
48
|
Operation
Page 49

Table 7. Settings (continued)
Description Default SettingAvailable Settings
Reset Peak Consumption Watts [No] [Yes]
If No, no action.
If Yes, the Peak Consumption Watts value is
cleared and the date and time stamp for this
statistic is set to the current date and time.
Reset Cumulative Consumption
kWh
Reset Peak Headroom Watts [No] [Yes]
Clear Event Log
LCD Contrast [-5], [-4], [-3], [-2], [-1], [+0], [+1], [+2], [+3],
[No] [Yes]
If No, no action.
If Yes, the Cumulative Consumption kWh value is
cleared and the date and time stamp for this
statistic is set to the current date and time.
If No, no action.
If Yes, the Peak Headroom Watts value is cleared
and the date and time stamp for this statistic is set
to the current date and time.
The number after “Total events” shows how
many events are currently stored in the log.
Press the button for one second to reset
the event count to zero and clear the log.
[+4], [+5]
The LCD Contrast is adjustable and the valid range
is from -5 to +5. This range covers the maximum
adjustment for contrasting the background with the
text in the visual display of the control panel.
No
No
No
—
[+0]
Operation
|
49
Page 50

Retrieving the Event Log
To retrieve the Event Log through the display:
1 Press the button for one second to go to the main menu selection and scroll down to the
Event Log menu using the
2 Press the button to enter the Event Log list.
3 Scroll through the listed events, notices, and alarms using either the button or the button.
4 To return to the main menu, press the button for one second. The Event Log displays.
5 Press the button. The UPS status screen displays.
button.
Behavior on Overload
See Table 8 for an explanation of how the UPS responds to an overload condition.
Table 8. Behavior on Overload
Overload Severity
Level 1 100% to 101% Overload alarm only and
Level 2 102% to 110% Transfer to Fault mode in
Level 3 > 110% Transfer to Fault mode in
Load Level On Utility Power On Battery
Overload alarm only, support load until
support load indefinitely
2 minutes (±1 sec)
300 ms to 1 sec
low battery shutdown level is reached
Transfer to Fault mode in 12 seconds
(±1 sec) or until low battery shutdown
level is reached
Transfer to Fault mode in 300 ms to
1 sec
50
|
Operation
Page 51

Configuring Load Segments
Load segments are sets of receptacles that can be controlled by the Dell UPS Management Software,
the Dell Network Management Card, or through the LCD display, providing an orderly shutdown and
startup of your equipment. For example, during a power outage, you can keep key pieces of equipment
running while you turn off other equipment. This feature allows you to save battery power.
Each Dell Line-Interactive Rack model has two configurable load segments. See “Identifying the UPS
Rear Panels” on page 15 for the load segment locations.
To control the load segments with power management software, see your power management software
manual for details (refer to the Software CD or www.dell.com for the latest information).
Controlling Load Segments Through the Display
To control the load segments through the display:
1 Press the button for one second to go to the main menu selection and scroll down to the
Control menu using the
2 Press the button to enter the Control menu.
3 Use the button to scroll to Load Segments.
4 Press the button.
The current setting for the option flashes when selected.
button.
5 Select the desired load segment using the and buttons.
6 Set the desired load segment ON or OFF using the button.
7 Press the button for one second to confirm.
8 Set the other load segment if applicable.
Operation
|
51
Page 52

Configuring Automatic Start Delay
You can configure the load segment to turn on automatically after the utility power returns, if it was
shut down by:
S The button
S An external command with auto-restart option
S Battery under voltage state
S Automatic on battery shutdown command
You can specify the restart delay time for each load segment: select zero seconds (0s is the default) to
restart immediately, select 1–32767 seconds to delay for the specified time, or select Off.
To set the restart delay times for each load segment:
1 Press the button for one second to go to the main menu selection and scroll down to the
Settings menu using the
2 Press the button to enter the Settings menu.
3 Use the button to scroll to the Automatic Start Delay option and press the button.
button.
The current setting for the option flashes when selected.
4 Set the restart delay for one load segment using the and buttons.
5 Press the button to confirm.
6 Set the restart delay for the other load segment if applicable.
7 Press the button to confirm.
NOTE:
Load segment On/Off commands issued through the Control menu override the user settings for load
segments.
NOTE: A single load segment delay applies to both outlets. However, there is an additional built-in one-second
delay between closing segment 1 and 2. The delay is always present when an On command is issued for both
segments at the same time.
|
52
Operation
Page 53

Configuring Automatic on Battery Shutdown
If set to Off (default), the load segment turns off only when commanded manually by the button,
an external command, or through the display (Control > Load Segments).
If set to zero seconds (0s), the load segment turns off automatically when the UPS on Battery state
activates.
If you select a value, the load segment turns off automatically after the selected delay while the UPS
operates on battery, but the shutdown is cancelled if the utility returns before the delay has expired.
To set the shutdown times for each load segment:
1 Press the button for one second to go to the main menu selection and scroll down to the
Settings menu using the
2 Press the button to enter the Settings menu.
3 Use the button to scroll to the Automatic on Battery Shutdown option and press the button.
The options display and the current settings flash when selected.
4 Set the shutdown delay for one load segment using the and buttons.
5 Press the button to confirm.
6 Set the shutdown delay for the other load segment if applicable.
7 Press the button to confirm.
button.
Operation
|
53
Page 54

Configuring Battery Settings
Configure the UPS settings for an installed EBM, including whether to run automatic battery tests and
automatic restart configuration.
Configuring the UPS for an EBM
If the UPS is not configured for the EBM, the UPS reports less battery time remaining on the UPS front
panel and to any remote software. You may receive a shutdown warning prematurely. To ensure
maximum battery runtime when using power management software, configure the UPS for the EBM:
1 Press the button for one second to go to the main menu selection and scroll down to the
Settings menu using the
2 Press the button to enter the Settings menu.
3 Use the button to scroll to the External Battery Module option and press the button.
The battery number value begins to flash.
4 Set the battery number value using the and buttons.
button.
Configuration
UPS only (internal batteries) 0 (default)
UPS + 1 EBM 1
NOTE: Runtime is automatically adjusted based on present load levels and whether an EBM is configured.
5 Press the button to confirm.
Setting
54
|
Operation
Page 55

Running Automatic Battery Tests
The automatic discharge test, enabled by default, runs during the transition from Float to Rest mode.
After the test completes, the charge cycle restarts to completely charge the batteries and then continues
to Rest mode normally. The automatic test runs approximately once every three months and does not
run again until after three more Float to Rest mode transitions. If a manual battery test is requested, the
automatic battery test timer is reset so it will not run for the next three months.
For an automatic battery test to run:
S The Automatic Battery Tests setting must be enabled for the automatic battery tests to run. (See
the following section, “Configuring Automatic Battery Tests.”)
S The batteries must be fully charged.
S The UPS must be in Normal mode with no active alarms.
S The load must be higher than 10%.
Configuring Automatic Battery Tests
To configure the automatic battery tests:
1 Press the button for one second to go to the main menu selection and scroll down to the
Settings menu using the
2 Press the button to enter the Settings menu.
3 Use the button to scroll to the Automatic Battery Tests option and press the button.
button.
The option begins to flash.
4 Select whether to enable or disable the automatic battery test using the and buttons.
5 Press the button to confirm.
Configuring Automatic Restart
The UPS automatically restarts if the utility power returns after the output was shut off due to depleted
batteries, a shutdown input signal, or automatic shutdown command.
You can set the load segment for the amount of time to delay the restart when utility power returns,
using the Automatic Start Delay setting. You can also configure UPS restart to depend on the battery
charge level, using the Battery Charge % to Restart setting.
|
Operation
55
Page 56

5
Additional UPS Features
This chapter describes:
S Communication ports (RS-232 and USB)
S Dell Network Management Card
S Dell UPS Management Software
RS-232 and USB Communication Ports
To establish communication between the UPS and a computer, connect your computer to one of the
UPS communication ports using an appropriate communication cable (not supplied). See “Identifying
the UPS Rear Panels” on page 15 for the communication port locations.
When the communication cable is installed, power management software can exchange data with the
UPS. The software polls the UPS for detailed information on the status of the power environment. If a
power emergency occurs, the software initiates the saving of all data and an orderly shutdown of the
equipment.
The cable pins for the RS-232 communication port are identified in Figure 32, and the pin functions are
described in Table 9.
1
2
3
4
5
Figure 32. RS-232 Communication Port (DB-9 Connector)
|
56
Additional UPS Features
6
7
8
9
Page 57

Table 9. RS-232 Communication Port Pin Assignment
Pin
1 Unused —
2 Tx Transmit to external device Out
3 Rx Receive from external device In
4 Unused —
5 GND Signal common (tied to chassis) —
6 Unused —
7 Unused —
8 Unused —
9 Unused —
*Unused pins must be left free on all models.
Signal Name Function Direction from the UPS
Additional UPS Features
|
57
Page 58

Dell Network Management Card (Optional)
The Dell Line-Interactive Rack UPS has one available communication bay, which supports the optional
Dell Network Management Card. See Figure 33 for the location of the communication bay.
It is not necessary to shut down the UPS before installing a communication card.
1 Remove the slot cover secured by two screws. Retain the screws.
2 Insert the communication card into the slot.
3 Secure the card with both screws.
IN PU T 100−120V~
Figure 33. Dell Network Management Card
For details on disabling control commands from the Dell Network Management Card, see the Control
Commands from Serial Port setting on page 47.
Refer to the Dell Network Management Card User's Guide for more information.
|
58
Additional UPS Features
Page 59

Dell UPS Management Software
Each Dell Line-Interactive Rack UPS ships with Dell UPS Management Software.
Dell UPS Management Software provides up-to-date graphics of UPS power and system data and power
flow. It also gives you a complete record of critical power events, and it notifies you of important UPS or
power information. If there is a power outage and the Dell Line-Interactive Rack UPS battery power
becomes low, the software can automatically shut down your computer system to protect your data
before the UPS shutdown occurs.
For details on disabling control commands from the software, see the user setting for Control
Commands from Serial Port setting on page 47.
Additional UPS Features
|
59
Page 60

6
UPS Maintenance
This chapter explains how to:
S Care for the UPS and batteries
S Transport the UPS
S Store the UPS and batteries
S Test the batteries
S Update the UPS firmware
UPS and Battery Care
For the best preventive maintenance, keep the area around the UPS clean and dust‐free. If the
atmosphere is very dusty, clean the outside of the system with a vacuum cleaner. For full battery life,
keep the UPS at an ambient temperature of 25°C (77°F).
NOTE:
The batteries in the UPS are rated for a 3–5 year service life. The length of service life varies, depending
on the frequency of usage and ambient temperature. Batteries used beyond expected service life will often
have severely reduced runtimes. Replace batteries at least every 5 years to keep units running at peak
efficiency.
60
|
UPS Maintenance
Page 61

Transporting the UPS
NOTE: The internal UPS batteries MUST be disconnected before transportation.
CAUTION: The following procedure should be performed or supervised by personnel knowledgeable about
batteries and the required precautions. Keep unauthorized personnel away from batteries.
If the UPS requires any type of transportation, the batteries must be disconnected (but not removed)
before the unit is transported:
1 Verify that the UPS is off and unplugged.
2 Place the UPS on a flat, stable surface with the front of the cabinet facing you.
3 Remove the UPS front cover (see Figure 34).
Figure 34. Removing the UPS Front Cover
UPS Maintenance
|
61
Page 62

4 Open the metal battery cover.
Loosen the thumbscrew on the metal battery cover, slide the cover to the right, and open (see
Figure 35).
Figure 35. Opening the Metal Battery Cover
5 Disconnect the internal battery connectors (see Figure 36).
Figure 36. Disconnecting the Internal Battery Connector
|
62
UPS Maintenance
Page 63

6 Close the metal battery cover.
Adjust the battery connector so that the door closes properly. Push the door slightly to the right
and then to left.
7 Tighten the thumbscrew.
Torque the screw to 0.7 Nm (6.2 lb in).
8 Replace the UPS front cover (see Figure 37).
Figure 37. Replacing the UPS Front Cover
Storing the UPS and Batteries
If you store the UPS for a long period, recharge the battery every 6 months by plugging the UPS into a
power outlet. The batteries charge to 90% capacity in approximately 4 hours. However, it is
recommended that the batteries charge for 48 hours after long-term storage.
Check the battery recharge date on the shipping carton label. If the date has passed and the batteries
were never recharged, do not use the UPS. Contact your service representative.
|
UPS Maintenance
63
Page 64

When to Replace Batteries
When the status summary screen displays the UPS fault icon with the “Service Battery” alarm and the
audible alarm sounds continuously, the batteries may need replacing. Contact your service
representative to order new batteries.
NOTE:
With the user-replaceable battery feature, UPS batteries can be replaced easily without turning the UPS
off or disconnecting the load.
Testing Batteries
For a battery test to run:
S The batteries must be fully charged.
S The UPS must be in Normal mode with no active alarms.
S The load must be higher than 10%.
To test the batteries:
1 Plug the UPS into a power outlet for at least 48 hours to charge the batteries.
2 Press the button for one second to go to the main menu selection and scroll down to the
Control menu using the
3 Press the button to enter the Control menu.
button.
4 Use the button to scroll to the Battery Test option.
5 Press the button to start the battery test.
During the battery test, the UPS transfers to Battery mode and discharges the batteries for 25% of
the original expected runtime. The front panel displays “Battery test running” and the percentage
of the test completed. The results display on the UPS front panel when complete.
Updating the UPS Firmware
To keep the UPS firmware updated with the latest improvements and benefits, visit www.dell.com for
updates. You can download the latest firmware version and the instructions for installing it.
|
64
UPS Maintenance
Page 65

Specifications
This chapter provides the following specifications:
S Model list
S Dimensions and weights
S Electrical input and output
S Environmental and safety
S Battery
S UPS block diagram
Table 10. Model List
100/120V Models 208V Model 230V Models
UPS Models 1000R LV (H919N),
1000W
1920R LV (K792N),
1920W (1500W at 100V)
2700R/T LV (K802N),
2700W
(2300W at 100V)
External Battery Module
(EBM)
2700R/T HV-US
(H945N), 2700W
1920R EBM (J735N), 72 Vdc
2700 R/T EBM (K811N), 96 Vdc
7
1000R HV (J718N),
1000W
1920R LV (H928N),
1920W
2700R/T HV (J727N),
2700W
Table 11. Dimensions and Weights
UPS Models EBM Model
Dimensions
(W H D)
Weights 1000W: 19.0 kg (41.8 lb)
1000W: 438.0 84.5 483.0 mm
(17.2” 3.3” 23.3”) - 2U
1920/1500W: 438.0 84.5 593.0 mm
(17.2” 3.3” 23.3”) - 2U
2700/2300W: 438.0 127.0 541.0 mm
(17.2” 5.0” 21.3”) - 3U
1920/1500W: 31.0 kg (68.34 lb)
2700/2300W: 41.0 kg (90.38 lb)
1920–2700W: 438.0 84.5 593.0 mm
(17.2” 3.3” 23.3”) - 2U
1920–2700W: 54.0 kg (118.9 lb)
|
Specifications
65
Page 66

Table 12. Electrical Input
100/120V Models 208V Models 230V Models
Nominal Voltage 100/120V 208V 230V
Voltage Range 84–150V auto-sensing 160–278V auto-sensing 160–286V auto-sensing
Nominal Frequency 50/60 Hz auto-sensing, ±3 Hz
Efficiency (Normal mode) >95%
Noise Filtering Full-time EMI/RFI filtering
Connections 1000W: IEC 320-C14
input connector, 15A
1920/1500W: IEC
320-C20 input connector,
20A
2700/2300W: 2m, L5-30P
attached power cord
Table 13. Electrical Output
100/120V Models 208V Models 230V Models
Power Levels
(rated at nominal inputs)
Regulation (Normal mode) 100V: 92–108V
Regulation (Battery mode),
Nominal Voltage ±5%
Voltage Waveform Sine wave
Output Receptacles 1000W: (4) 5-15R, 15A;
(2) IEC 320-C13, 15/10A
1920/1500W:
(6) 5-15/5-20R, 20A;
(2) IEC 320-C19, 20/16A;
(2) IEC 320-C13, 15/10A
2700/2300W: (1) L5-20R,
20A; (2) 5-15/5-20R, 20A;
(2) IEC 320-C19, 20/16A;
(2) IEC 320-C13, 15/10A
1000W
1920/1500W
2700/2300W
110V: 100–121V
120V: 106–132V
2700W: IEC 320-C20
input connector, 16A
2700W 1000W
200V: 180–220V
208V: 184–228V
Same as line mode
2700W: (2) L6-30R, 20A;
(2) IEC 320-C19, 20A;
(2) IEC 320-C13, 15/10A
1000W: IEC 320-C14
input connector, 10A
1920W: IEC 320-C14
input connector, 10A
2700W: IEC 320-C20
input connector, 16A
1920W
2700W
220V: 198–243
230V: 208–253V
240V: 216–264V
1000W: (4) IEC 320-C13,
15/10A; (2) IEC 320-C13,
15/10A
1920W: (2) IEC 320-C19,
20/16A; (6) IEC 320-C13,
15/10A; (2) IEC 320-C13,
15/10A
2700W: (2) IEC 320-C19,
20/16A; (6) IEC 320-C13,
15/10A; (2) IEC 320-C13,
15/10A
66
|
Specifications
Page 67

Table 14. Environmental and Safety
100/120V Models 208V Models 230V Models
Operating Temperature Up to 1,500 meters: 0°C to 40°C (32°F to 104°F)
Above 1,500 meters: 0°C to 35°C (32°F to 95°F)
Transit/Storage
Temperature
Relative Humidity 0–95% noncondensing
Operating Altitude Up to 3,048 meters (0–10,000 ft) above sea level
Audible Noise Normal mode: less than 40 dBA typical
Fan Speed Off: when the UPS is in Standby mode or there is no load
High speed: when the load is >80% or the UPS is in Battery mode
Surge Suppression ANSI/IEEE C62.41; 2002 Category B
Safety Conformance UL 1778 4th Edition
CSA C22.2, No. 107.3
Agency Markings UL, cUL, NOM/NYCE UL, cUL UL, cUL, CE, GS, GOST,
EMC FCC, VCCI, ICES-003,
BSMI
-15°C to 60°C (5°F to 140°F)
Battery mode: less than 50 dBA typical
Low speed: when the load is < 80%
UL 1778 4th Edition;
CSA C22.2, No. 107.3;
IEC/EN 62040-1-1;
IEC/EN 60950-1
BSMI, S-MARK, KC,
CQC, NRCS, SIRIM
FCC, VCCI CE, BSMI, CQC, C-tick
Specifications
|
67
Page 68

Table 15. Battery
Configuration 1000W: (3) 12V, 9 Ah internal batteries (no EBM)
1920/1500W: (6) 12V, 9 Ah internal batteries; (12) 12V, 9 Ah EBM
2700/2300W: (8) 12V, 9 Ah internal batteries; (16) 12V, 9 Ah EBM
Voltage 1000W: 36 Vdc internal (no EBM)
1920/1500W: 72 Vdc internal; 72 Vdc EBM
2700/2300W: 96 Vdc internal; 96 Vdc EBM
Fuses Internal batteries: (2) 30A fuses
EBM: (4) 30A fuses
Type Sealed, maintenance‐free, valve‐regulated, lead‐acid
Charging Approximately 4 hours to 90% usable capacity at nominal line and no
supplementary power supply load
Monitoring Advanced monitoring for earlier failure detection and warning
Battery Runtimes* Internal batteries: 5 minutes at full load/14 minutes at half load
1920/1500W with one EBM: 19 minutes at full load/46 minutes at half load
2700/2300W with one EBM: 19 minutes at full load/45 minutes at half load
*Battery runtimes are approximate and vary depending on the load configuration and battery charge.
Input
Filter
Battery
Figure 38. Line-Interactive UPS Block Diagram
|
68
Specifications
Charger
DC/DC
Converter
AVR
Output
Filter
DC/AC
Inverter
Page 69

8
Troubleshooting
The Dell Line-Interactive Rack UPS is designed for durable, automatic operation and issues alarms to
alert you whenever potential operating problems occur. Usually the alarms shown by the control panel
do not mean that the output power is affected. Instead, they are preventive alarms intended to alert the
user. Active alarms and active notices are accompanied by an audible buzzer.
Accessing Alarms and Conditions
The control panel provides troubleshooting information from two main menus:
S UPS Status menu: access to all active alarms
S Event Log menu: access to the most recent 50 events, which may include active and closed alarms
UPS Status Menu
From the UPS Status menu, you can access the following screens for troubleshooting information:
S Status summary screen: The status summary screen provides information on both mode and load.
When there is a critical alarm, the status summary screen changes from its normal white text on a
blue background to dark amber text on an amber background.
S Notice or alarm screens: A separate screen appears for each active notice or alarm. If there are no
active alarms or notices, the display reads “No Active Alarms.”
S Battery status screen: The battery status screen indicates the battery charge mode, the percent the
battery is charged, and the runtime with the present load level.
NOTE:
When an alarm is active, the control panel automatically displays an active alarm screen unless the
screen lock is enabled by the user.
To access troubleshooting information using the UPS Status menu:
1 Press the button for one second to go to the main menu selection.
2 Press the button to access the UPS Status menu.
3 Press the button to access the UPS status summary screen.
The UPS status summary screen provides load information. The status icon indicates the UPS
operating mode (see Table 4 on page 42).
4 Use the button to scroll through the active notice and active alarm screens.
5 After scrolling through all alarms, press the button to access the Battery Status screen.
Troubleshooting
|
69
Page 70

Event Log Menu
From the Event Log menu, you can access the last 50 events, which includes events, notices, and
alarms, arranged from newest to oldest.
Events are silent conditions that are recorded in the Event Log as status information, such as “Clock Set
Done.” Events do not require a response.
Notices and alarms are records of when events occurred and, if applicable, when they were cleared.
S Notices, including active notices, are recorded in the Event Log. Active notices, such as “UPS on
Battery,” are announced by an intermittent beep. Notices do not normally require a response.
S Alarms, including active alarms, are recorded in the Event Log. Active alarms are announced by an
intermittent beep. Examples are “Output Overload” and “Heatsink Overtemperature.” Active
alarms require a response.
The Main Status Menu displays by default. To access troubleshooting information using the Event Log
menu:
1 Press the button for one second to go to the main menu selection and scroll down to the
Event Log menu using the
2 Click the button to enter the Event Log list.
3 Scroll through the listed events, notices, and alarms using the or button.
button.
Typical Alarms and Conditions
Table 16 describes typical alarms and conditions.
Table 16. Typical Alarms and Conditions
Alarm or Condition
The UPS does not provide or
indicate the expected backup
time.
Power is not available at the
UPS output receptacles.
The UPS does not start. (The
LCD is off.)
The UPS operates normally,
but some or all of the
protected equipment is not
on.
|
70
Troubleshooting
Possible Cause Action
The batteries need charging or
service.
The UPS is in Standby mode. Supply power to the connected equipment by
Power is not connected. Check the power cord connections. Also
The equipment is not
connected correctly to the UPS.
Apply utility power for 48 hours to charge the
batteries. If the condition persists, contact
your service representative.
pressing the On/Off button until the front
panel displays the UPS status summary screen.
ensure that the battery is plugged in.
Verify that the equipment is plugged into the
UPS receptacles. Also verify that the load
segment is on.
Page 71

Table 16. Typical Alarms and Conditions (continued)
Alarm or Condition ActionPossible Cause
Battery test did not run or
was interrupted.
UPS on Battery
(Notice 168)
Intermittent Alarm
Battery Disconnected
(Alarm 199)
Continuous Alarm
Low Battery Warning
(Alarm 56)
Continuous Alarm
Shutdown Imminent
(Alarm 55)
Continuous Alarm
Battery Test Failed
(Alarm 191)
Intermittent Alarm
Service Battery
(Alarm 149)
Continuous Alarm
Utility Not Present
(Alarm 59)
Intermittent Alarm
One of the conditions listed in
“Running Automatic Battery
Tests” on page 55 was not
present.
A utility failure has occurred
and the UPS is in Battery mode.
The UPS does not recognize the
internal batteries.
Battery voltage is lower than the
batteries disconnected level
defined for this UPS. This may
be due to a blown fuse,
intermittent battery
connection, or battery cable
being disconnected.
Battery time remaining or
battery capacity is lower than
the battery low warning level
defined for this UPS.
Communication to external
devices stops because the UPS
has entered a state where it may
abruptly stop operating without
further notice unless utility
returns.
A weak battery string was
detected during the last battery
test.
A faulted battery string has
been detected and as a result,
the charger is disabled.
Utility level has fallen below the
Utility Not Present threshold
(typically <25 to 50V).
Resolve the condition, then restart the test.
The UPS is powering the equipment with
battery power. Prepare your equipment for
shutdown.
If the condition persists, contact your service
representative.
Verify that all batteries are properly connected.
If the condition persists, contact your service
representative.
This warning is approximate. The actual time to
shutdown may vary depending on the UPS load
and presence of an External Battery Module
(EBM).
The alarm is issued when the battery time
remaining reaches zero. All connected devices
should have already shut down gracefully.
This is a warning notice. Dell recommends
that you replace the batteries soon.
Contact your service representative.
The UPS transfers to Battery mode if
supporting the load. The UPS shuts down if it
is not supporting the load.
Troubleshooting
|
71
Page 72

Table 16. Typical Alarms and Conditions (continued)
Alarm or Condition ActionPossible Cause
Input AC Over Voltage
(Alarm 6)
Intermittent Alarm
Input AC Under Voltage
(Alarm 7)
Intermittent Alarm
Input Under/Over Frequency
(Alarm 8)
Intermittent Alarm
Site Wiring Problem
(Alarm 194)
Continuous Alarm
Remote Emergency Power
Off
(Alarm 12)
Continuous Alarm
Output Overload
(Alarm 25)
Continuous Alarm
Output Overload Level 2
(Alarm 159)
Continuous Alarm
Output Overload Level 3
(Alarm 162)
Continuous Alarm
Battery DC Over Voltage
(Alarm 68)
Continuous Alarm
Utility voltage exceeds the
maximum operating range.
Utility voltage is below the
minimum operating range.
The utility frequency is out of
usable frequency range.
An alarm triggers when the
difference between ground and
neutral voltage is >15V.
The external contacts in the
rear of the UPS are configured
for REPO operation and they
have been activated.
The load level is at or has
exceeded the configurable
threshold limit for a Level 1
Overload condition.
The load level is >101% and
<110% of the UPS rating.
The load is >110% of the UPS
rating.
Battery voltage levels have
exceeded the maximum
allowable limits.
The UPS transfers to Battery mode if
supporting load.
The UPS transfers to Battery mode if
supporting load.
The UPS transfers to Battery mode if
supporting load.
Have a qualified electrician correct the wiring
problem. If the UPS is not wired with a neutral
wire, Site Fault should be disabled in the
Settings menu (see page 46).
The UPS de-energizes the load and enters
Standby mode. See “Installing Remote
Emergency Power-off” on page 30 for more
information.
The UPS can support the load indefinitely at
this load level.
The alarm clears when the load drops below
5% of the set point.
Remove some of the equipment from the
UPS. The UPS continues to operate, but
transfers to Fault mode in two minutes.
The alarm clears when the load drops below
5% of the set point.
Remove some of the equipment from the
UPS. The UPS continues to operate, but
transfers to Fault mode in 300 ms to one
second.
The alarm clears when the load drops below
5% of the set point.
The UPS turns off the charger until the next
power recycle. Contact your service
representative.
72
|
Troubleshooting
Page 73

Table 16. Typical Alarms and Conditions (continued)
Alarm or Condition ActionPossible Cause
Charger Failure
(Alarm 34)
Continuous Alarm
Output Short Circuit
(Alarm 58)
Continuous Alarm
Heatsink Over Temperature
(Alarm 73)
Continuous Alarm
Fatal EEPROM Fault
(Alarm 53)
Continuous Alarm
Fan Failure
(Alarm 193)
Continuous Alarm
A battery charger fault has been
detected.
The UPS has detected an
abnormally low impedance
placed on its output and
considers it a short circuit.
The UPS has detected that one
of its heat sinks has exceeded
the maximum defined
operating temperature. Possible
fan failure.
There is EEPROM data
corruption due to a failed
device or incorrect flash
upgrade.
The UPS has detected that one
or more fans are not
functioning properly.
The UPS turns off the charger until the next
power recycle. Contact your service
representative.
The UPS shuts down after five line cycles.
Ensure that the fans are spinning and that the
air intake vents on the UPS are not blocked.
Once the maximum temperature is reached,
the UPS shuts down.
Contact your service representative.
This is an alarm only. Contact your service
representative immediately and remove the
load.
Silencing the Alarm
Press any button on the control panel to silence the alarm. Check the alarm condition and perform the
applicable action to resolve the condition. If any new alarm becomes active, the audible alarm resumes,
overriding the previously silenced alarm.
|
Troubleshooting
73
 Loading...