

Page 1
Dell™ E771mm Color Monitor
Quick Setup Guide
Safety Instructions
Observe the following safety guidelines when connecting and using your monitor:
• Be sure that your monitor i s electrically rated to operat e with t he AC power available in your location.
• Locate your monitor near an easily accessible electrical outlet.
• Place the monitor on a s ol i d surface and treat it carefull y. The screen can be damaged if dropped, sharply
hit, or touched with a sharp or abrasive implement.
• Put your monitor in a location with low humidity and a minimum of dust.
• Never use your monitor if the power cable has been damaged. Do not allow anything to rest on t he power
cable, and keep the cable away from where people coul d trip over it.
• Never insert anything metallic into the monitor openings. Doing so may create the danger of electric shock.
• To avoid electric shock, never touch the inside of the monitor. Only a qualified techni cian should open the
monitor’s case.
• Be sure to hold the plug, not the cable, when disconnecting the m oni tor from an electrical out l et.
• Openings in the monitor cabi net are provided for ventilation. To prevent overheat i ng, these openings
should not be blocked or covered. A l so, avoid using the monit or on a bed, sofa, rug, or other soft s urface.
Doing so may block the ventilation openings in the bottom of the cabinet. If you put the monitor in a
bookcase or some other enclosed space, be sure to provide adequat e ventilation.
• Do not expose the monitor to rain or use it near water. If the monitor ac cidentally gets wet, unplug it and
contact an authorized dealer immediately. You can c l ean t he exterior of the monitor with a damp cl oth
when necessary, but be sure to unplug the monitor first.
• If your monitor does not operat e normally—in particular, if there are any unusual sounds or smell s coming
from it—unplug the m oni t or immediately and cont act an authorized dealer or service center.
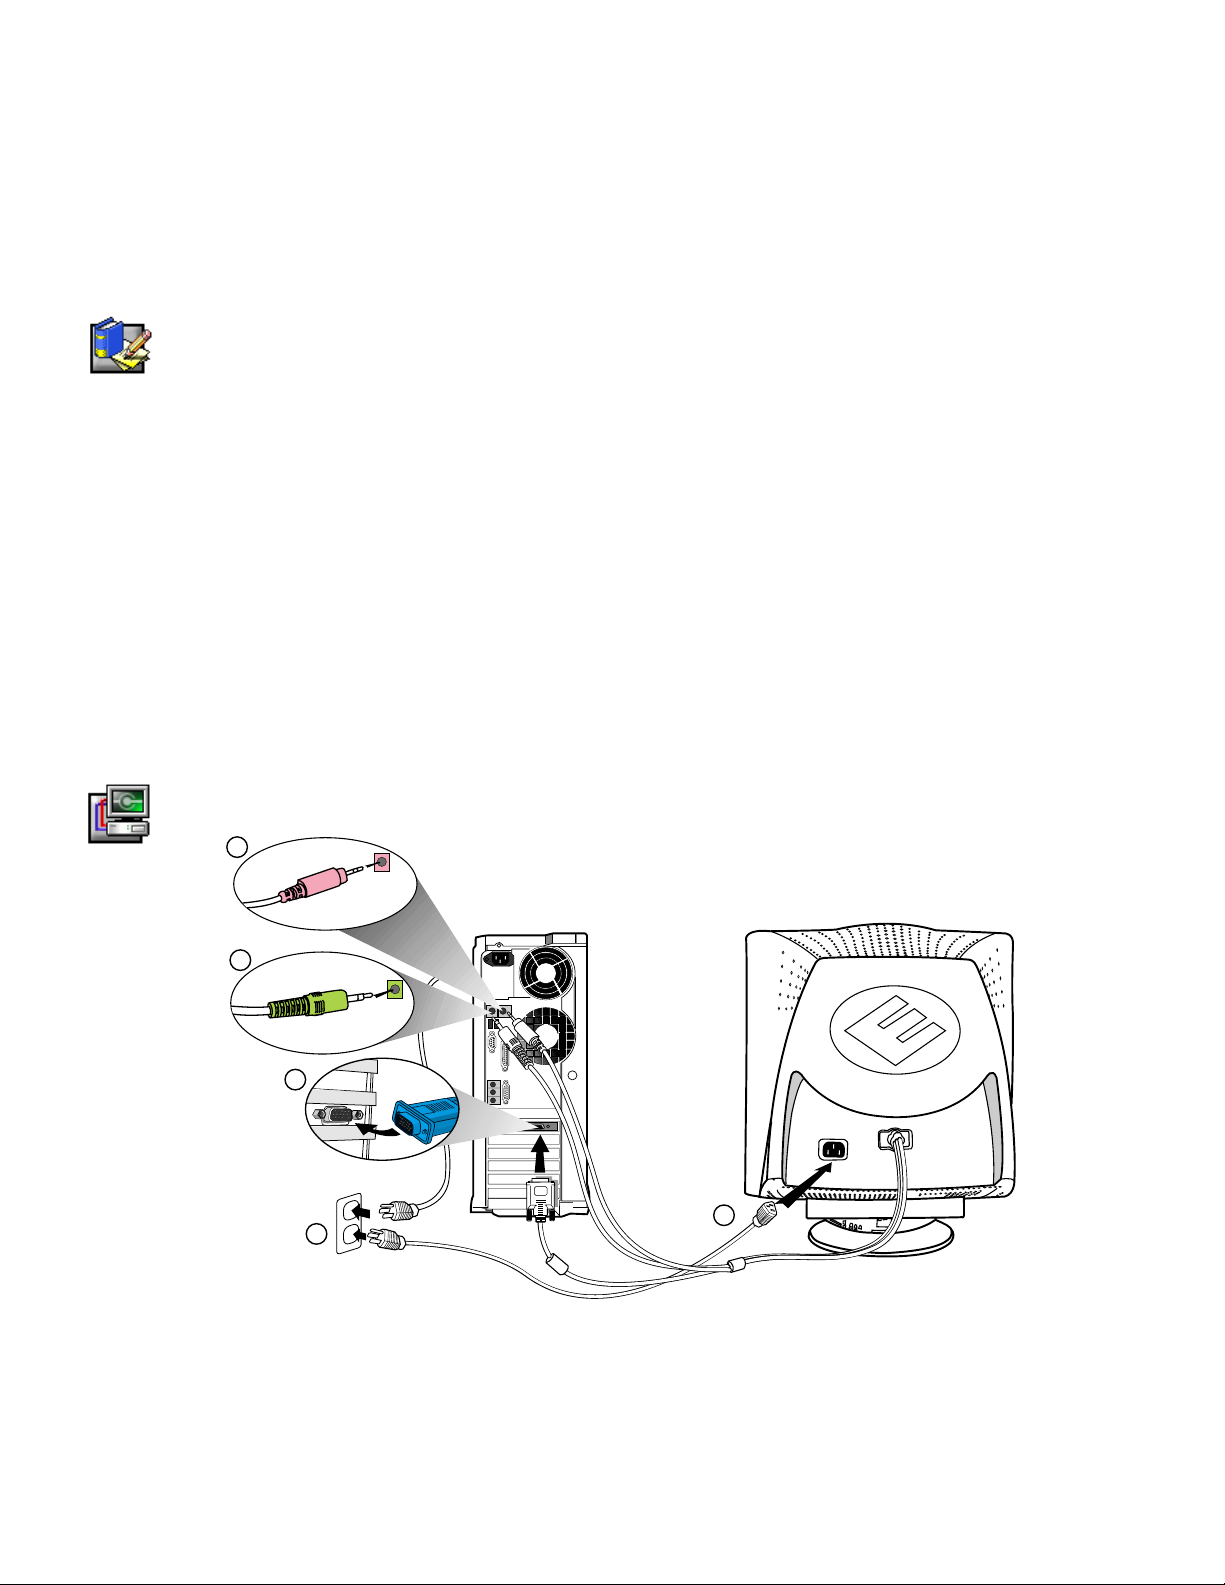
Connecting Your Monitor to a Computer
4
3
2
6
5
1. Turn off your computer and unplug your computer’s power cable.
2. Connect the blue connector of the monitor’s signal cable to the blue video connector on the back of your
computer. Tighten the c onnector screws finger-tight. Do not overtighten.
3. Insert the green audio plug to the green audio “l i ne out” on the back of your comput er.
4. Insert the red microphone pl ug to the red audio “mic in” on the back of your computer.
5. Fully insert the monitor power cable i nto the power port on the back of the monitor.
Dell E771mm Color Monitor Quick Setup Guide
1
Page 2
6. Plug the power cables of your computer and your monitor into a nearby elect rical outlet.
7. Turn on your computer and monitor. If the monitor does not display an image, refer to the troubleshooting
section of this guide.
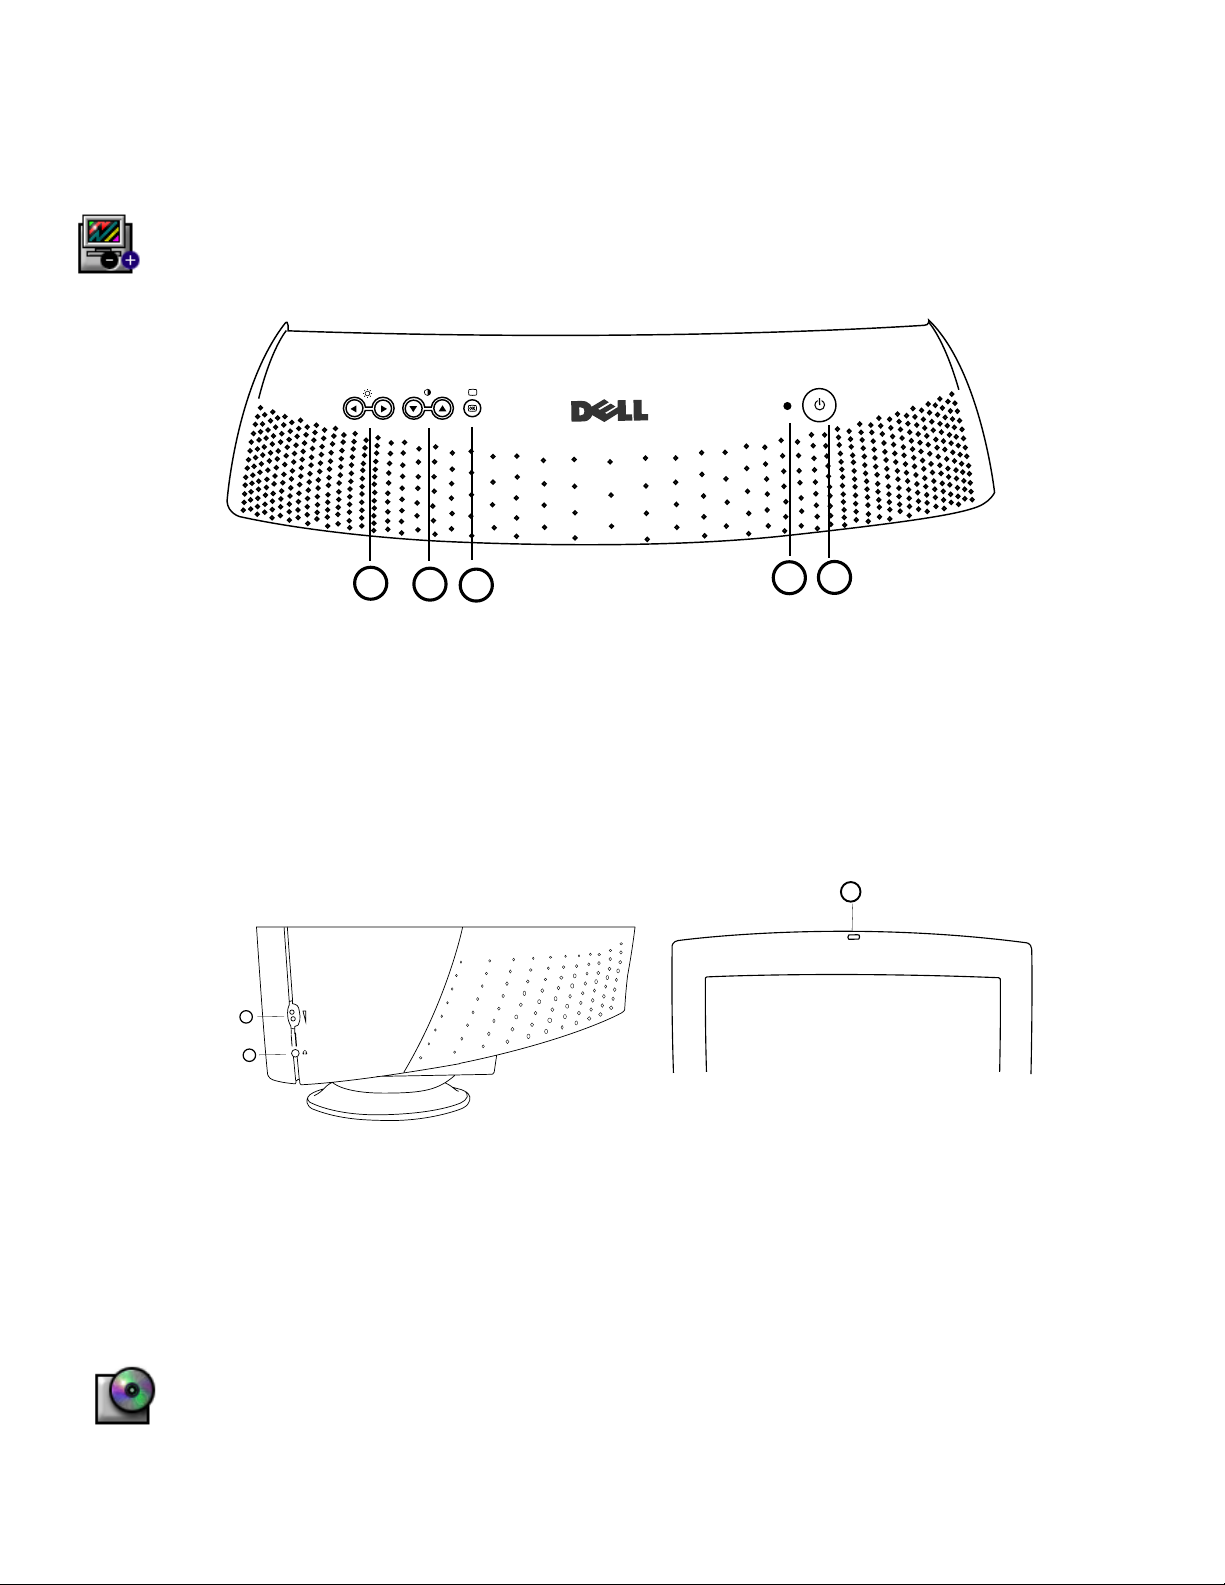
Monitor Controls and Indicators
1
5
4
3
1. Power button - Switches your monitor on.
2. Power Indicator - This light glows green duri ng normal operation
3. "OK" button - W hen pres sed it will take you to the Main OSD Menu controls.
4. Contrast hotkeys - Pressing eit her Up or Down arrow directly will adjust sc reen contrast (CONTRAST
control bar will appear on screen).
UP and DOWN buttons - These are also used for selecting other functions in the Main OSD Menu of your
monitor.
5. Brightness hotkeys - Pressing either Left or Right arrow directly will adjust screen brightness
(BRIGHTNESS control bar will appear on screen).
LEFT and RIGHT buttons - These are also us ed for adjusting other functions i n the Main OSD Menu of
your monitor.
2
Audio Controls
3
1
2
1. Volume Control: Turn the rotary knob upwards (clockwise) to increase the sound volume.
2. Earphone connection – connect your earphone plug to the earphone connector (the speakers will be
switched off when earphone is plugged in).
3. Microphone located at top of front bezel : When recording sound, s peak towards this location.
Driver Installation
Dell E771mm Color Monitor Quick Setup Gui de
2
Use the monitor CD to install the appropriate monit or dri ver f or your operating system.
Page 3

Microsoft
To manually install or update t he dri ver, perform the following steps:
1. Insert the monitor CD into the CD-ROM drive.
2. Click Start−−−−> Control Panel−−−−> Appearance & Themes and then click the Display icon.
3. In the Display Properties window, click the Settings tab, and then c l i ck Advanced.
4. Click the Monitor tab, and then click Properties Driver tab Update Driver.
5. When the Hardware Update Wi zard dialog box appears, choose “Install the software automaticall y, ” and
6. Close the Display Properties window.
Windows
click Next> and then Finish to complete the installation.
XP Operating System
Microsoft
To manually install or update t he dri ver, perform the following steps:
1. Click Start−−−−> Settings−−−−> Control Panel and then double-click Display.
2. In the Display Properties window, click the Settings tab, and then c l i ck Advanced.
3. Click the Monitor tab, and then click Change Specify the location of the driverNext.
4. When the Update Device Driver W i zard dialog box appears, select “Displ ay a l i st of all the drivers in a
5. Insert the monit or CD i nto the CD-ROM drive, then click Have Disk…
6. Type d:\ (change the drive let ter to match your CD-ROM drive if it i s not drive D) in the Copy
7. Click Next>, Next>, and then Finish to complete the installation.
8. Close the Display Properties window.
Microsoft
To manually install or update t he dri ver, perform the following steps:
1. Click Start−−−−> Settings−−−−> Control Panel and then double-click Dis pl ay.
2. In the Display Properties window, click the Settings tab, and then click Advanced.
3. Click the Monitor tab, and then click Properties Driver Update Driver.
4. When the Update Device Driver Wizard dialog box appears, choose “S earch for a suitable driver for my
5. Insert the monitor CD i n t o the CD-ROM drive, type d:\ (change the drive letter to match your CD-ROM
6. Close the Display Properties window.
Microsoft
Windows 98 automat i cally detects the new monit or and di splays the Add New Hardware Wizard dialog box if
the monitor driver is not al ready i nstalled.
1. Insert the monitor CD into the CD-ROM drive, and click Next> twice when the Add New Hardware Wizard
2. Click the CD-ROM drive box to install the drivers from the CD and then click Next>.
3. Confirm that the driver was found on t he CD, and click Next> twice to install the driver.
4. Click Finish to exit the Add New Hardware Wizard dialog box.
To manually install or update t he dri ver, perform the following steps:
5. Click Start−−−−> Settings−−−−> Control Panel and then double-click Display.
6. In the Display Properties window, click the Settings tab, and then click Advanced.
7. Click the Monitor tab, and then click Change.
8. When the Update Device Driver Wizard dialog box appears, follow the st eps in the previous paragraph.
Windows
specific locat i on, so you can select the driver you want,” and click Next>.
manufacturer’s files from: box, then clic k OK.
Windows
device,” and click Next>.
drive if it is not drive D) in the Copy manufacturer’s files from: box, and click Next> and then Finish to
complete the installation.
Windows
dialog box appears.
Millennium Operating System
2000 Operating System
98 Operating System
Setting Display Resolution
For optimal monitor performance while using Microsoft® Windows® XP, Windows® 2000, Windows 98,
Windows 95 or Windows NT®, set the display resol ution to 1024 x 768 as follows:
1. Click Start Settings Control Panel.
2. Double-click the Display icon in the Control Panel window, and the click the Settings tab.
3. In the Desktop area, m ove t he slidebar to 1024 x 768 pixels. Then click OK.
Dell E771mm Color Monitor Quick Setup Guide
3
Page 4
Accessing the User’s Guide Online or via CD
To view the latest monitor User’s Guide, access the SUPPORT section of the Dell Web site
(http://support.dell.com).
If you do not have Internet acc ess, you can access the guide on the monitor CD:
1. Insert the monitor CD into your CD-ROM dri ve.
A start-up document should launc h automatically; however, i f the start-up document does not launch
automatically, cli ck Start
drive letter if it is not the D drive.)
2. Click the appropriate icon t o open the User’s Guide in the desired language.
NOTE: All applicable warranty and regulatory information regarding your monit or i s contained in the User’s
Guide on your CD.
−−−−
> Run, type D:\monitor.htm, and click OK. (Substitute the correct CD-ROM
Troubleshooting Tips
Monitor Has No Power
If the monitor’s power indic ator is off and no image appears on t he di splay, perform the following che cks:
• Ensure that the power cable is full y i nserted in the monitor’s power port and t he el ectrical outlet.
• Test the electrical outlet by plugging in a working electrical devi ce such as a lamp.
• Ensure that the power button has been depress ed, and wait for the power indicator to light.
• Try another power cable on the monitor. Use the computer’s power cable and turn on the monitor with the
signal cable disconnected. If the monitor i s working correctly, a self-test pattern appears.
No Image Is Displayed on the Monitor
If the monitor power indicat or i s on but no image appears on the display, perform the following checks:
• Ensure that the video connect or i s seated properly. Tighten the connec tor screws securely with your
fingers.
• Ensure that the computer is on.
• Increase brightness and contrast controls.
• Turn off the monitor and unplug the signal cable. Check the c abl e connector for bent or broken pins.
• With the signal cable still disconnected, turn on t he monitor. If the monitor is working correctly, a self-test
pattern appears.
• Perform a monitor reset or recall.
No Sound from Speakers
If there is no sound from speakers after Windows start up, perform t he following checks:
Ensure that all audio cables are connected properly.
Ensure that the monit or i s not in power save mode.
Increase audio volume by turni ng the rotary volume control upwards.
Turn up the volume by click i ng t he yel l ow speak er i con in the windows taskbar and adjusting the
volume setting. Make sure that none of the mute boxes below the sli der bars are selected. Use an
audio CD and start CD player via Start-Programs-Accessories-Entertainment.
IMPORTANT!
Before contacting Dell for technical assistance, refer to the Troubleshooting section in the User’s Guide on your
monitor CD. This section contains detailed information for resolving most monitor problems.
____________________________________
Information i n t his document is subject t o c ha nge w ithout notice.
2001 Dell Computer Corporation. All rights reserved.
Reproduction in any manner whatsoever without the written permission of Dell Computer Corporation is strictly
forbidden.
Trademarks used in this text: Dell and the DELL logo are trademarks of Dell Computer Corporation; Microsoft
and Windows are regist ered t rademarks of Microsoft Corporation.
Other trademarks and trade names may be used in this document to refer to either the entities claim i ng the
marks and names or their products. Dell Com put er Corporation disclaims any propri et a ry i nt erest in trademarks
and trade names other than its own.
September 2001
Dell E771mm Color Monitor Quick Setup Gui de
4
 Loading...