

Dell DX6000, DX6004S, DX6012S, DX Storage Cluster Services Node 2.0 Installation And Configuration Manual
Page 1

Cluster Services Node (CSN)
Installation and Configuration Guide
Version 2.0
Page 2

Cluster Services Node (CSN) Installation and Configuration Guide:
Version 2.0
Copyright © 2010 Caringo, Inc.
All Rights Reserved.
No part of this document may be reproduced, transmitted, or transcribed without the written consent of Caringo, Inc.
Page 3

Table of Contents
1. Introduction to the DX Object Storage Cluster Services Node ................................................. 1
1.1. DX Object Storage Cluster Services Node Overview ................................................... 1
1.2. Components ............................................................................................................. 1
1.3. About this Document ................................................................................................. 2
1.3.1. Audience ....................................................................................................... 2
1.3.2. Scope ............................................................................................................ 2
2. Installation and Configuration ............................................................................................... 3
2.1. Requirements ........................................................................................................... 3
2.1.1. Operating System ........................................................................................... 3
2.1.2. Network ......................................................................................................... 3
2.2. Primary vs. Secondary .............................................................................................. 3
2.3. Installation Steps ...................................................................................................... 4
2.3.1. Primary CSN Configuration ............................................................................. 4
2.3.2. Secondary CSN Configuration ......................................................................... 6
2.3.3. Configuring Object Storage Cluster Licensing ................................................... 6
2.4. Booting DX Storage Nodes ....................................................................................... 9
2.5. CSN Hardware Validation ........................................................................................ 10
2.6. Upgrading the CSN ................................................................................................. 10
2.6.1. Backup Compatibility Across Software Versions ............................................. 11
2.7. CSN-Reset ............................................................................................................. 11
3. Running and Managing the CSN ........................................................................................ 12
3.1. Modifying CSN Network Configuration ...................................................................... 12
3.1.1. Updating the Internal Interface ...................................................................... 13
3.2. Modifying SNMP Access ......................................................................................... 14
3.3. Updating the DX Storage software version ............................................................... 14
3.4. Editing User Access ................................................................................................ 15
3.5. Configuration File Backup and Restore ..................................................................... 16
3.5.1. Backup Manifest ........................................................................................... 17
3.5.2. Automatic Backups ....................................................................................... 18
3.5.3. Manual Backups ........................................................................................... 18
3.5.4. Restoring a Backup ...................................................................................... 18
3.5.5. Failover ........................................................................................................ 18
3.6. Configuring the SCSP Proxy .................................................................................... 20
3.7. Syslog Configuration ............................................................................................... 22
3.8. Password Management ........................................................................................... 22
4. Running and Managing DX Storage .................................................................................... 23
4.1. Adding DX Storage Nodes ....................................................................................... 23
4.2. Updating Configuration Settings ............................................................................... 23
4.3. DX Storage User Access ......................................................................................... 24
4.4. DX Storage Admin Console ..................................................................................... 25
4.5. Gathering SNMP Statistics ...................................................................................... 26
4.5.1. SNMP Command Examples .......................................................................... 26
5. Configuring and Managing DX Content Router .................................................................... 27
5.1. Configuring DX Content Router ................................................................................ 27
5.1.1. Publisher ...................................................................................................... 27
5.1.2. Replicator ..................................................................................................... 28
5.2. Managing DX Content Router .................................................................................. 30
5.2.1. Publisher Console ........................................................................................ 30
5.2.2. Gathering SNMP Statistics ............................................................................ 30
A. Open Source Software ...................................................................................................... 32
Copyright © 2010 Caringo, Inc.
All rights reserved iii
Version 2.0
December 2010
Page 4

Chapter 1. Introduction to the DX Object Storage Cluster
Services Node
1.1. DX Object Storage Cluster Services Node Overview
The DX Storage Cluster Services Node (CSN) is an integrated services node that centralizes
installation and configuration of both the network services required to run a DX Storage cluster and
the software used to interface with it.
1.2. Components
The DX Storage CSN infrastructure is made up of the following components:
1. A collection of required network services configured to support a DX Storage cluster, including
DHCP, PXE network boot, TFTP, syslog, NTP and several others
2. An integrated PXE network boot and configuration server for DX Storage nodes booted onto the
DX Storage CSN's internal network
3. Several SNMP MIBs with operational and status information for all nodes in the associated DX
Storage cluster as well as the DX Content Router Publisher and Replicator services
4. Integrated installation and configuration of DX Content Router and the SCSP Proxy
5. An administrative web console that provides easy configuration of common settings and
parameters as well as access to useful utilities like updating DX Storage software versions and
backup and restore of configuration files
Copyright © 2010 Caringo, Inc.
All rights reserved 1
Version 2.0
December 2010
Page 5

1.3. About this Document
1.3.1. Audience
This document is intended for people in the following roles.
1. Storage system administrators
2. Network administrators
3. Technical architects
Throughout this document, the storage system administrator and network administrator roles will
be referred to as the administrator. DX Storage CSN administrators are normally responsible for
installation and configuration, license management, monitoring storage system health, software
upgrades, backup/recovery, and capacity management.
1.3.2. Scope
This document covers the steps needed to install and configure the DX Storage CSN. The reader is
expected to have a background in RHEL system administration, TCP/IP networking, and monitoring
via SNMP.
Copyright © 2010 Caringo, Inc.
All rights reserved 2
Version 2.0
December 2010
Page 6
Chapter 2. Installation and Configuration
2.1. Requirements
2.1.1. Operating System
DX Storage CSN has been developed and tested with 64-bit RHEL 5.5; other RHEL versions or
Linux distributions are not currently supported. Subsequent installation instructions will assume a
pre-installed RHEL Linux environment with either internet connectivity or an alternately configured
RHEL yum repository for use in installing required 3rd party packages.
2.1.2. Network
The CSN requires access to both the external network as well as a dedicated internal network.
The internal private network ensures the DX Storage cluster traffic is protected from unauthorized
access and also that the external network is isolated from both the PXE network boot server
(including DHCP) and cluster multicast traffic. Allocation of the address space in the internal network
is broken down as follows, depending on the network size selected during initial configuration (small
or large):
Network Size CSN 3rd Party DHCP DX Storage
Netboot
small (/24) x.y.z.0-16 x.y.z.17-32 x.y.z.33-48 x.y.z.49-254
large (/16) x.y.0.0-254 x.y.1.0-254 x.y.2.0-254 x.y.3.0-
x.y.255.254
The CSN range provides IPs for the various services on the Primary and Secondary CSNs. The
3rd Party range is provided for 3rd party applications that need to run on the internal network to
interface with the DX Storage cluster. The DHCP range provides an initial IP to DX Storage nodes
during their initial boot until permanent addresses can be assigned to each DX Storage process by
the CSN. Other applications using the CSN's DHCP server on the internal network will reduce the
number of DX Storage that can be booted at the same time. The Netboot range is used to provide
the permanent IPs for all DX Storage processes.
From a network configuration standpoint, the CSN will automatically allocate half of the detected
NICs to the internal network and half of detected NICs to the external network. All NICs allocated
to a network are bonded into a bond interface using Linux mode 6, or balance-alb, bonding. In
configurations where there is both an onboard NIC card as well as an add-on card and the hardware
supports detection of the difference between the two, the internal/external network allocation will
be disbursed across both cards for redundancy. The CSN NIC assignments may not match the
physical NIC ports.
Note
Network switch configuration is outside the scope of the CSN software. Switches must
be properly configured by an experienced system administrator to ensure correct
connectivity and bonding mode support. In particular, administrators must be careful to
not connect the configured internal network ports to the external network.
2.2. Primary vs. Secondary
With two CSNs on an internal network, there must be one CSN designated as the primary. The
primary CSN is responsible for responding to DHCP requests for the internal network and also
Copyright © 2010 Caringo, Inc.
All rights reserved 3
Version 2.0
December 2010
Page 7

listening for all communication on the well-known IP addresses for the internal and external network.
When a secondary CSN joins the internal network, it registers with the primary CSN via a privileged
SSH channel using the primary root password entered during the initial configuration process. This
allows the primary to sync needed information to the secondary, specifically the Primary's Backup
Manifest UUID. The secondary CSN provides redundancy for all services on the primary CSN in the
event of a disaster and also provides scalability for incoming SCSP requests to the SCSP Proxy.
2.3. Installation Steps
The CSN distribution is available as a collection of RPM packages that are installed with a shell
script. The packages and their dependencies must be installed as the 'root' user from an attached
monitor and keyboard with at least one NIC connected to the external network using the following
steps. Please reference the Upgrade section for additional steps required for upgrading the
software:
1. Copy the distributed zip file to your Cluster Services Node and unzip it into the directory of your
choice. The following example command would unzip the version of the software which was
previously copied to the /tmp/csninstall directory:
$ sudo su # cd /tmp/csninstall
# unzip caringo-csn-2.0.0.zip
Note
The full zip name may include additional descriptive labeling related to versions or
distribution channel depending on how the CSN software release is delivered.
2. Install the CSN by running the self-extracting script from the directory location where the shell
script was unzipped. For instance, continuing the example above from the /tmp/csninstall
directory:
# cd caringo-csn-2.0.0
# ./caringo-csn-bundle-install.sh
This command will initiate installation of the CSN and its dependent packages. When the
installation is complete, the following prompt will display:
Would you like to proceed with CSN network configuration? (yes/no):
Answer 'yes' to proceed with configuring the CSN. If you answer 'no', you may return to the
configuration screen at a later time by running the command: /opt/caringo/csn/bin/
firstcsnboot.
If you run the configuration at a later time, it must still be from an attached monitor and keyboard.
2.3.1. Primary CSN Configuration
After installing the CSN, you will automatically be prompted to enter some minimal configuration
data to configure the server on the overall network. Network settings are central to all CSN
services and should be planned with care in advance by an administrator knowledgeable about the
environment. The initial configuration process is only required once after the initial installation. Any
necessary subsequent updates to the initial configuration parameters can be made from the CSN
Console.
Copyright © 2010 Caringo, Inc.
All rights reserved 4
Version 2.0
December 2010
Page 8

Several prompts will suggest a default value in brackets that can be accepted by simply pressing
enter.
Is this the Primary CSN (yes/no)? [yes]:: This prompt allows specification of whether
or not the CSN is a primary or secondary CSN. The default value is yes. Administrators should
take care to ensure that only a single primary CSN is configured on the internal network to prevent
conflicts with both DHCP and DX Storage netboot configuration. The primary server must be
configured prior to configuration of a secondary. DHCP is not started on the secondary CSN.
Half of the NIC ports on this system will be bonded and assigned to the
external network. The following questions configure the external network:
Enter the CSN IP address []:
This parameter requires entry of an external IP address for the CSN node. The entered address
must be in a valid w.x.y.z format and must not already be in use on the network.
Enter the cluster IP address. This IP address will remain with the Primary
CSN in the event of a CSN failover []: This parameter requires entry of an external IP
address for the CSN cluster address. This well-known address remains with the primary CSN in the
event of a failover, meaning the cluster can always be reached at this address. The entered address
must be in a valid w.x.y.z format and must not already be in use on the network.
Enter the subnet mask [255.255.255.0]: This parameter requires entry of the subnet
mask for the external network that corresponds with the entered IP address. The default is
255.255.255.0.
Enter the gateway IP address []: This parameter requires entry of the gateway
associated with the entered IP address for the external interface.
Half of the NIC ports on this system will be bonded and assigned to the
internal network. The following questions configure the internal network:
Enter the network address, e.g. 192.168.100.0 (small network),
192.168.0.0, 172.20.0.0 (large network) []:
This parameter allows specification of the network interface that should be used for the internal
network. Enter an interface in the format of 192.168.100.0 to use a small interface that will support
128 DX Storage nodes. Enter an interface in the format of 192.168.0.0 or 172.20.0.0 to use a larger
network that will support much larger DX Storage clusters. The entered interface will be divided
between the CSN(s) and privileged applications on the internal network and the DX Storage nodes.
The initial configuration process automatically creates multiple alias IP addresses on the internal
network for use by various system services and reserves similar IP addresses for a Secondary
CSN.
Enter a list of IP addresses (separated by spaces) for external name
servers [8.8.8.8 8.8.4.4]: This parameter allows specification of one or more DNS servers
for the external interface. Entries must be separated by spaces. Publicly available name servers
have been defaulted.
Enter a list of IP addresses or server names (separated by a space) for
external time servers [0.pool.ntp.org 1.pool.ntp.org 2.pool.ntp.org]: This
parameter allows specification of one or more NTP servers for the external interface. The defaults
are public NTP servers.
Enter a unique storage cluster name. This name cannot be changed once
assigned. A fully qualified domain name is recommended []: This parameter
Copyright © 2010 Caringo, Inc.
All rights reserved 5
Version 2.0
December 2010
Page 9

is used to populate the name of the storage cluster on the admin console as well as in stream
metadata for all streams written to the local cluster. The CSN also uses this name to detect all the
nodes participating in the cluster. For all of these purposes, the name must be unique. An IANA fully
qualified domain name is recommended.
Are these values correct (yes/no)? This last step allows you to review the values entered
for all prompts before submitting them. Answering yes will allow the initial configuration process to
proceed with network and service configuration, resulting in a fully functional CSN. Answering no to
the final initial configuration prompt will restart the initial configuration script at the first prompt, with
the previously entered values populated.
At the completion of a successful initial configuration, the CSN will immediately reboot the server
to initialize all services. When the node comes back up all network services will be configured
and available including SNMP, syslog, DHCP, DNS, NTP, and firewall. Additionally, the CSN
Console will be available, the SCSP Proxy will be configured and started and the DX Content Router
Publisher will be configured and started.
2.3.2. Secondary CSN Configuration
Once a Primary CSN has been configured on the network, a Secondary CSN may also be
configured. The Secondary only requires entry of a single unique external IP address and
identification of the internal interface that is already defined on the Primary. The Secondary will then
pull much of its network configuration data from the Primary. To facilitate this, a one-time use of the
Primary's root password is required as follows:
Additional information about the network will be obtained from the
primary CSN
Please enter the primary csn root password []:
Please re-enter the primary csn root password []:
Taken from the confirmation at the end of the initial configuration script, the Secondary configuration
parameters are simply:
Primary: no
External CSN IP address: 192.168.66.11
Internal network interface: 172.20.20.0
Are these values correct (yes/no)?
2.3.3. Configuring Object Storage Cluster Licensing
Subsequent to rebooting after configuration and prior to booting any storage cluster nodes, an
aggregate license file comprised of any capacity keys included with your hardware or sent by your
hardware manufacturer must be entered and published via the administrative CSN Console. The
console allows web-based configuration of all CSN services after the initial network configuration.
Please reference subsequent chapters for a full overview of console capabilities.
To access the console initially for license publication, enter the following address:http://
<CSNExternalIP>:8090 . You will be required to authenticate prior to being granted access. The
username for the console is 'admin' and the default password is 'dell'. Once authenticated, click on
the Licensing link under the Content Storage tab to access the licensing interface.
Copyright © 2010 Caringo, Inc.
All rights reserved 6
Version 2.0
December 2010
Page 10

After installation, a license shell is defaulted into the licensing interface. If published as is, this
license will provide 0 TB of capacity for storing content. To correctly publish a license the following
high-level steps are required:
1. Enter License Contact and Storage Information
2. Enter capacity keys one at a time
3. After all keys have been entered, publish the license
Copyright © 2010 Caringo, Inc.
All rights reserved 7
Version 2.0
December 2010
Page 11
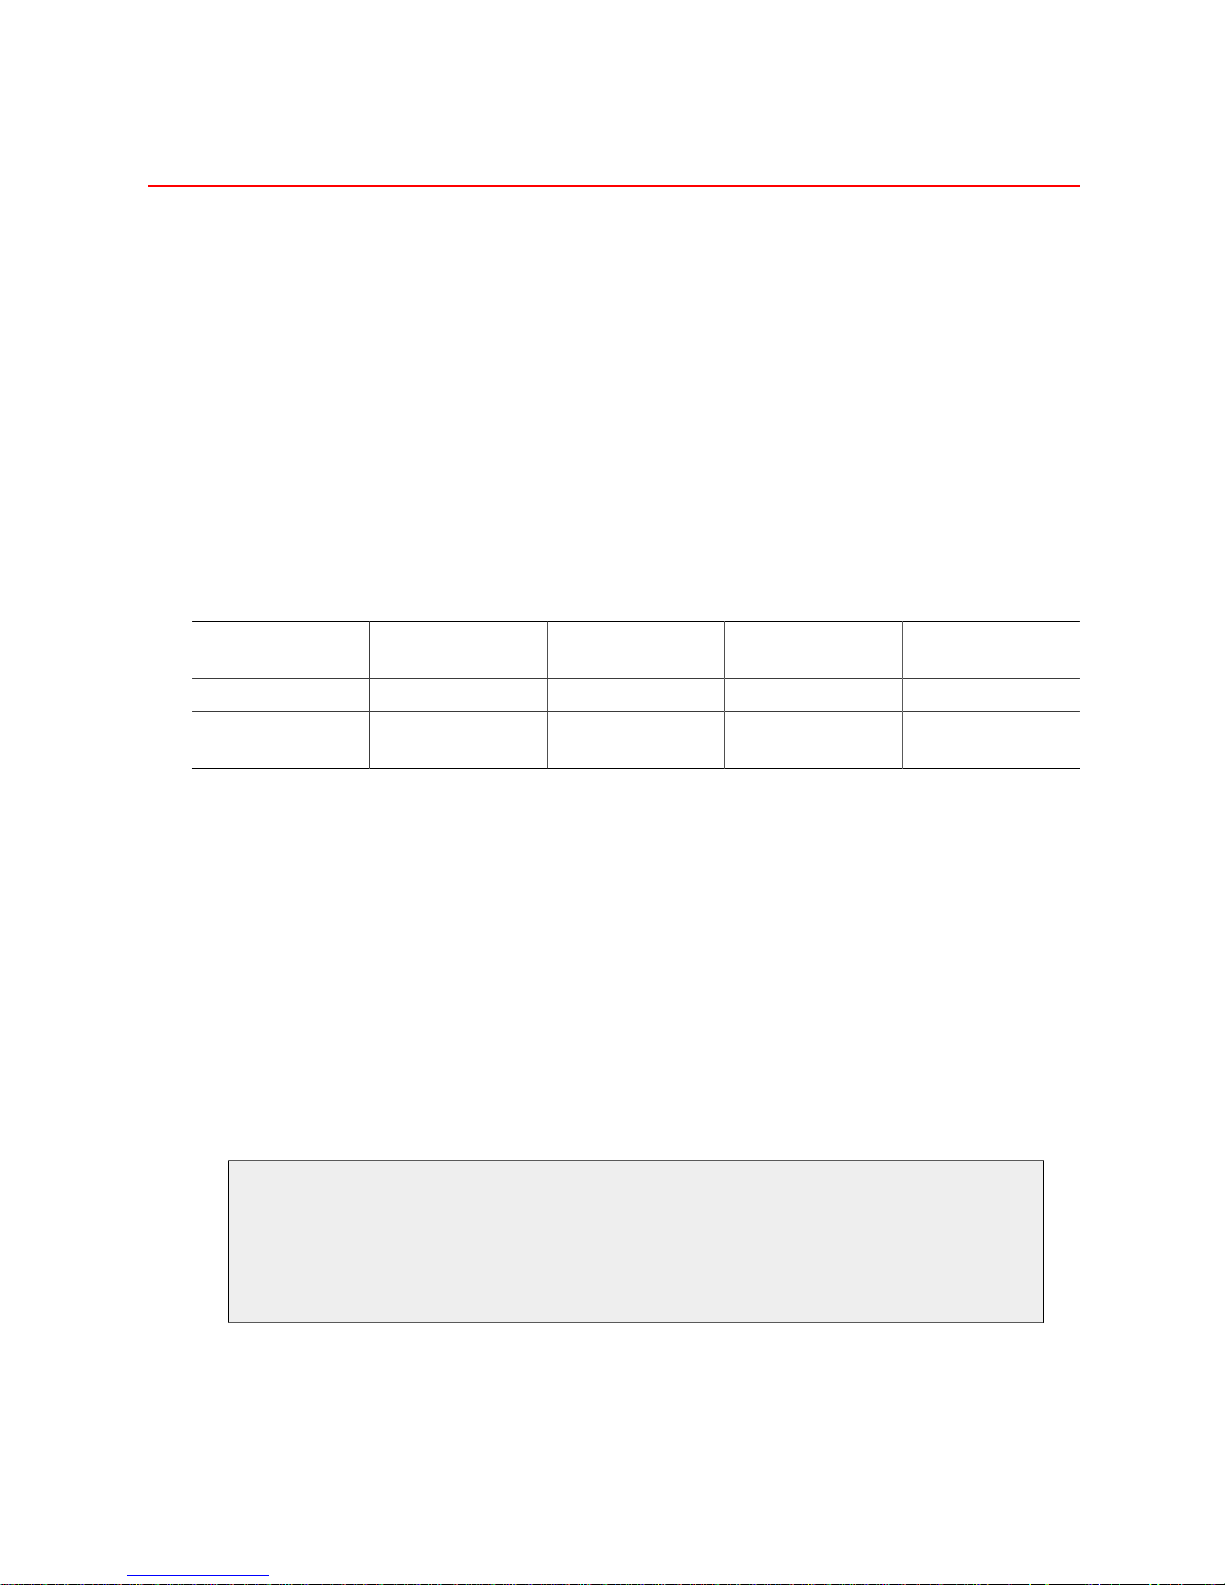
2.3.3.1. Contact and Storage Information
The license information is displayed once the license is published as part of the license details
popup on the DX Storage admin console. To add or update this information, click the 'Edit' button
under the License Contact and Storage Information section of the interface and enter the desired
company name, address and cluster description information. Only the company name is required
but populating the address and description fields is recommended to assist with easily distinguishing
licenses from multiple locations. When all the desired information has been entered, click the
'Update' button to save the changes.
2.3.3.2. Entering License Keys
The license interface supports entry of two different types of license keys: hardware keys and
capacity keys. Hardware keys are used to determine the validity of the host hardware for each
storage node at boot. Unauthorized hardware will log a critical error followed by a forced shutdown.
Hardware keys are updated infrequently and, in most installs, pre-populated so additional entry is
not required. Once entered hardware keys cannot be deleted. Administrators who receive hardware
validation errors for storage nodes that are believed to be authorized should contact their support
representative.
Capacity keys are more commonly entered than hardware keys. Printed capacity keys are delivered
in conjunction with a hardware shipment. The capacity increment for an individual capacity key
usually corresponds to the capacity of an individual storage node. Each key represents a preallocated amount of license space from 3TB to 480 TB. The sum of all entered capacity keys
determines the total amount of available licensed capacity for the cluster as a whole. The total
capacity for all keys is displayed at the bottom of the license key grid for easy validation.
Both types of license keys are represented by an encoded string broken down into 6 groups of 5
characters each, separated by dashes (XXXXX-XXXXX-XXXXX-XXXXX-XXXXX-XXXXX). To enter
a new key, click the 'Add License Key' button on the main licensing page and enter the capacity
key exactly as printed. When complete, click the 'Add' button to submit the key. Invalid or mistyped
keys will result in an error on the screen. To proceed, either correct the key entry or click 'Cancel'
Copyright © 2010 Caringo, Inc.
All rights reserved 8
Version 2.0
December 2010
Page 12

to return to the main licensing page. Valid keys will be reflected on the main licensing page after
successful entry.
2.3.3.3. Publishing a License
Entering hardware and capacity keys in the licensing interface will save the keys to the CSN's local
storage. To create a single license file that can be used by the storage cluster, administrators must
publish all the saved changes. The licensing interface denotes any saved but not published keys
with an 'Unpublished' icon in the 1st column to visually assist with determining when a license needs
to be published. To Publish all saved changes, click the blue 'Publish' button at the bottom of the
page. This will create a signed license file with all saved changes and update the license file location
the storage cluster monitors for license updates. Once the license file has been created after the
initial install, the storage nodes can be booted.
Note
DX Storage scans for license updates every 15 minutes so it may be up to that long
before a newly published license is registered in a running storage cluster.
2.3.3.4. Repurposing License Keys
In the event of a cluster reorganization or decommission, an administrator may remove one or more
license keys from one cluster and reuse them in another cluster. To remove a key, simply click the
'Remove' button next to an individual license key. The banner at the top of the page will denote that
there are unpublished changes that need to be saved for the reduced capacity license associated
with the removed key. Once a license key has been removed from the published license for one
cluster it can then be entered into the license interface for a different cluster.
2.4. Booting DX Storage Nodes
Once the CSN has been configured and rebooted and a DX Storage license has been published
with licensed capacity, DX Storage nodes may be powered on on the internal network. DX Storage
nodes require no additional pre-configuration other than to ensure they are configured in BIOS to
network boot. As long as that's the case the nodes will automatically receive an IP address from the
CSN as well as the pre-configured CAStor software and cluster configuration.
Admins may wish to first ensure that the CSN has had adequate time to sync with a reliable NTP
source as a precautionary step prior to booting the nodes. To do this simply type 'ntptrace' at a
system command line. The returned output should contain a stratum value of '15' or lower indicating
Copyright © 2010 Caringo, Inc.
All rights reserved 9
Version 2.0
December 2010
Page 13

that the CSN's local time server is less than 15 layers separated from a reliable source and is
therefore reliable enough to serve as an NTP server for the DX Storage on the internal network.
2.5. CSN Hardware Validation
With every boot of the CSN after the initial install, the CSN software checks the validity of the
host hardware. Unauthorized hardware will fail to boot after printing the following error: 'CSN was
unable to authorize the hardware license for this server'. Administrators who receive environment
validation errors for CSN hardware that is believed to be authorized should contact their support
representative.
2.6. Upgrading the CSN
The CSN supports upgrade from one software version to the next via a script process similar to
initial installation. The CSN will not be functional during the upgrade and will need to be rebooted
after the software is updated so administrators should schedule the upgrade during off peak hours
to ensure DX Storage and DX Content Router activities are not disrupted.
Cancellation of the upgrade mid-process (via Ctrl-C) is not supported and will be prevented if
attempted. If a network or hardware outage interrupts the upgrade, administrators should use the
csn-reset functionality to restore the previous software version and then attempt the upgrade again.
If csn-reset followed by a reinstall does not work for some reason, please contact your support
representative for alternate instructions.
If upgrading a previously installed CSN to a new version, the following steps should be taken:
1. Upgrade the CSN's operating system to RHEL 5.5 if it has not already been upgraded. Similar to
the initial installation, a Red Hat yum repository must be configured and available for upgrade to
proceed.
2. Remove any multi-server configurations that were manually added to the custom
sn<macaddress>.cfg files as multi-server is now automatically configured on the CSN. Please
contact your support representative if you are unsure how or where to do this.
3. Ensure a license file has been published to the DX Storage cluster. Upgrading the software
without fully configuring it first (i.e. installing 1.0 and then immediately installing 2.0 without
configuration) is not supported.
4. Upgrade the CSN software using the same install script and steps described above in the
Installation Steps section. Agree to the reboot option at the end of the installation; the CSN will
not be functional until it has been rebooted. In the interim between upgrade and reboot, the
Netboot component may log errors related to a port conflict. These errors are harmless and will
be resolved with the reboot.
5. From the Netboot page, select the new CAStor version.
6. From the storage console, reboot the DX Storage cluster.
7. Optionally, installations wishing to take advantage of a larger internal network in 2.0 should run
the 'changeinternalnetwork' script described in the Running and Managing Chapter while the
storage cluster is rebooting. Please reference the 'Updating the Internal Interface' section for
complete instructions on updating the internal interface.
After upgrade, no further configuration is required; all existing configuration and service states are
preserved from their previously configured values.
Copyright © 2010 Caringo, Inc.
All rights reserved 10
Version 2.0
December 2010
Page 14

2.6.1. Backup Compatibility Across Software Versions
During upgrade, the backup process will not be able to complete and may log errors as a result.
After upgrade, previous backup sets may be marked on the Backup and Restore page of the CSN
Admin Console as being compatible with a previous software version. These backups cannot be
restored with the current version but will remain available if the software is reverted to a previous
version. Please reference the csn-reset section for instructions on how to install different versions of
the CSN using the csn-reset functionality.
2.7. CSN-Reset
The csn-reset script allows an administrator to reset a server to a state in which a fresh software
version may be installed from scratch and the initial configuration re-run. This can be useful to
restart upgrades that are interrupted by network outages or to revert to a previous software version.
The script can be run using the following command:
/opt/caringo/csn/bin/csn-reset
It will prompt for confirmation prior to proceeding and will log its steps to both the screen and to the
system syslog (/var/log/messages). During the csn-reset process, configuration backups will not be
able to complete and may log errors as a result. csn-reset allows one option, '--remove-cr', which will
optionally remove the DX Content Router data stores for both Publisher and Replicator. By default,
these data stores are not removed. Existing log files are never removed so they remain available for
troubleshooting.
The csn-reset script is not meant as a general purpose uninstall script as it does not return
service and network configuration files to their original state. It will not leave the server in a state
usable for other purposes; if a server needs to be repurposed as a non-CSN a fresh OS install is
recommended.
Copyright © 2010 Caringo, Inc.
All rights reserved 11
Version 2.0
December 2010
Page 15

Chapter 3. Running and Managing the CSN
The CSN Console is the primary administrative interface for the CSN as well as the other services
and software installed on the shared server. It allows both basic configuration changes as well
as more complex functions like creating manual configuration backups or changing DX Storage
software versions. Javascript must be enabled in browser options when viewing the CSN Console or
the console will not function correctly; the console will print a warning if it detects that Javascript is
disabled.
Warning
Concurrent updates to the same CSN Console page from two or more browser sessions
are not supported. Administrators should take care to ensure they are looking at a current
version of the saved configuration prior to submitting any changes.
3.1. Modifying CSN Network Configuration
Administrators can update network parameters specified during the initial bootstrap configuration
process via the Configuration link under the Cluster Services tab:
Copyright © 2010 Caringo, Inc.
All rights reserved 12
Version 2.0
December 2010
Page 16

Please reference the 'Configuring the CSN' section of the Installation and Configuration chapter
above for full information about each of the parameters.
When changing values for any network parameter, the console may return a list of resulting actions
that will need to be taken by each of the services and installed software modules. Because the
network configuration is central to so many services, it is not unusual for the action list to contain
service restarts and possibly a server reboot. The console will ask you to confirm you still want
to make the requested change(s) prior to proceeding after you have seen the full list of resulting
actions.
3.1.1. Updating the Internal Interface
Updating the internal interface for a CSN can be extremely disruptive as it requires a coordinated
update between the CSN and the DX Storage cluster to ensure the two are using the same
internal network interface. Updates to the internal interface should be made only when absolutely
necessary, using the following command:
/opt/caringo/csn/bin/changeinternalnetwork 172.20.0.0
Copyright © 2010 Caringo, Inc.
All rights reserved 13
Version 2.0
December 2010
Page 17
where 172.20.0.0 is the desired new internal network interface.
Best practice is to reboot the DX Storage cluster from the DX Storage admin console and then
run the changeinternalnetwork script while the cluster is rebooting so that when the nodes come
back online they are assigned a new IP address from the new internal network interface range.
Alternatively, administrators may run the script and then manually power cycle the nodes; the DX
Storage admin console will no longer be able to route the reboot request after the internal network
has been updated. Several CSN processes, including the NTP server and DX Content Router
Publisher and Replicator, will be restarted when the script completes. After the Primary CSN has
changed its internal network and the storage cluster is back online, the Secondary CSN should also
have its internal network changed to the same as the Primary.
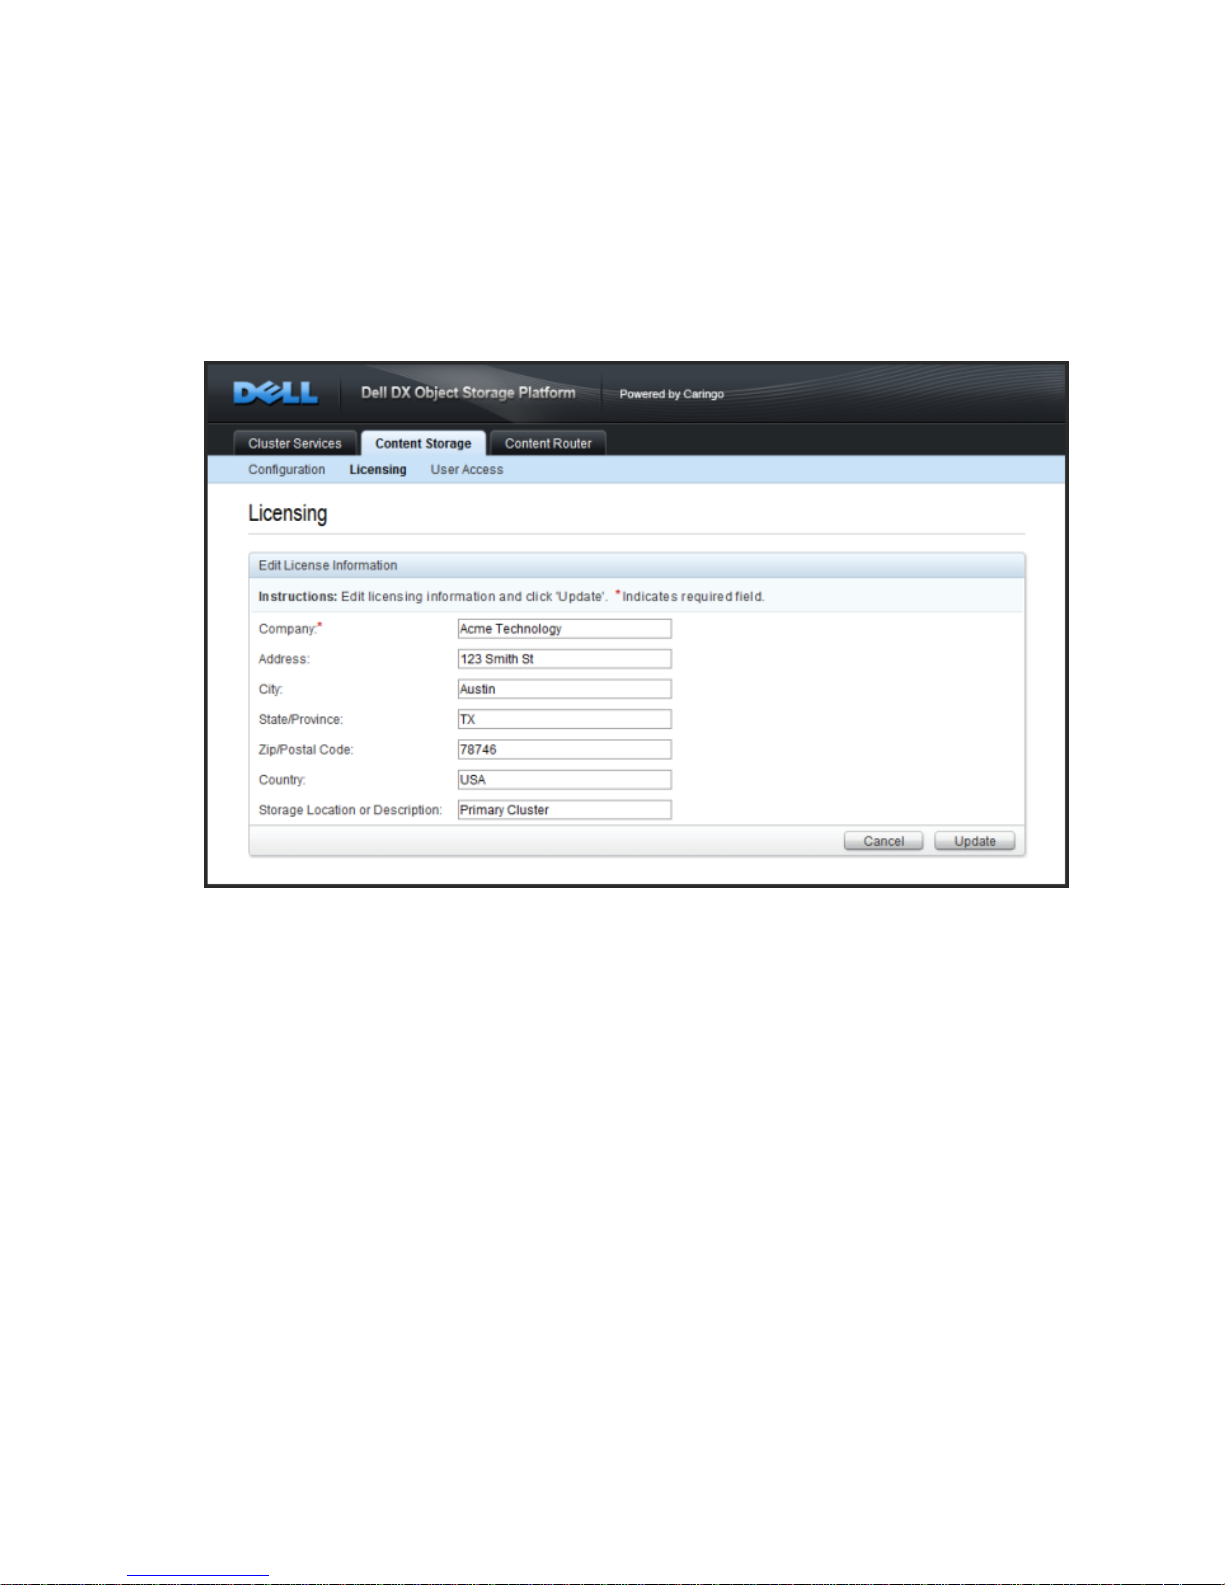
3.2. Modifying SNMP Access
The CSN installs the Net-SNMP command line tool for use in collecting SNMP data from the MIB.
The tool utilizes standard SNMP commands like 'snmpwalk', 'snmpget' and 'snmpset'. For readonly commands (snmpwalk, snmpget), the CSN expects a password of 'public' by default. For write
commands, it expects a 'private' password by default. The default passwords may be updated from
the SNMP Access link under the Cluster Services tab of the CSN Console:
3.3. Updating the DX Storage software version
To update the version of DX Storage software being used in the storage cluster, you must install the
new rpm using the following command from a standard RHEL terminal window:
yum install [new DX Storage version]
After the install, a new DX Storage software version will appear on the Netboot Management page
of the Cluster Services tab of the CSN Console:
Copyright © 2010 Caringo, Inc.
All rights reserved 14
Version 2.0
December 2010
Page 18

To switch to an alternate DX Storage software version, select the desired version and click 'Update'.
This will change the software image used to network boot all DX Storage nodes. The DX Storage
cluster must be rebooted to pick up the new version. You may reboot the DX Storage cluster all at
once or with a rolling upgrade one node at a time from the DX Storage admin console to pick up the
new version.
Note
Prior to rebooting, you may wish to suspend volume recovery from the DX Storage Admin
Console or SNMP if using a rolling upgrade to prevent cluster churn as individual nodes
reboot. Please reference the DX Object Storage Getting Started Guide for complete
details on suspending volume recovery.
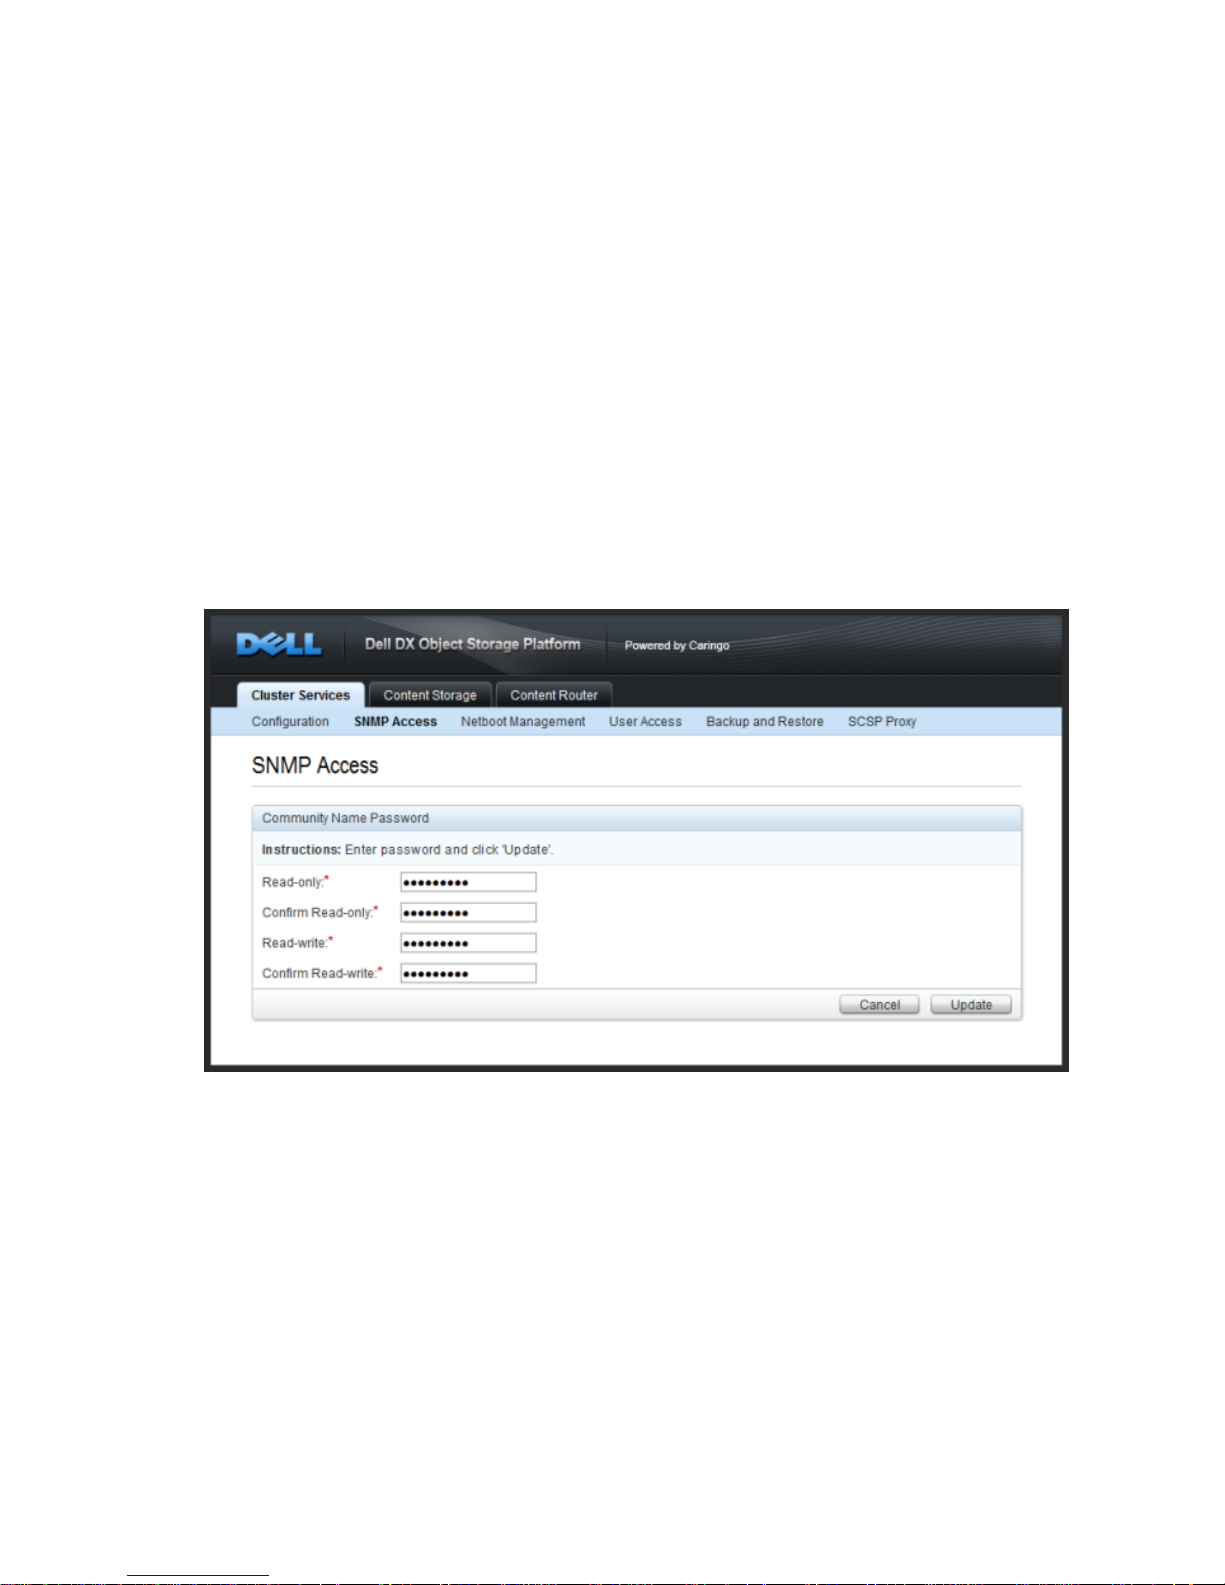
3.4. Editing User Access
The username used to access the CSN console is 'admin'. The admin password can be updated
from the User Access link under the Cluster Services tab. The default password is 'dell'. Characters
are obscured when entered on the page so double entry is required to ensure accuracy. The
obscured character count does not necessarily correspond to the number of characters in the
password.
Copyright © 2010 Caringo, Inc.
All rights reserved 15
Version 2.0
December 2010
Page 19
3.5. Configuration File Backup and Restore
To help with recovery in the event of a hardware failure, the CSN includes a backup mechanism that
backs up its configuration files to DX Storage and then allows restore of those backups at a later
date. The backup list and functions can be accessed from the Backup and Restore link under the
Cluster Services tab of the CSN Console:
Copyright © 2010 Caringo, Inc.
All rights reserved 16
Version 2.0
December 2010
Page 20
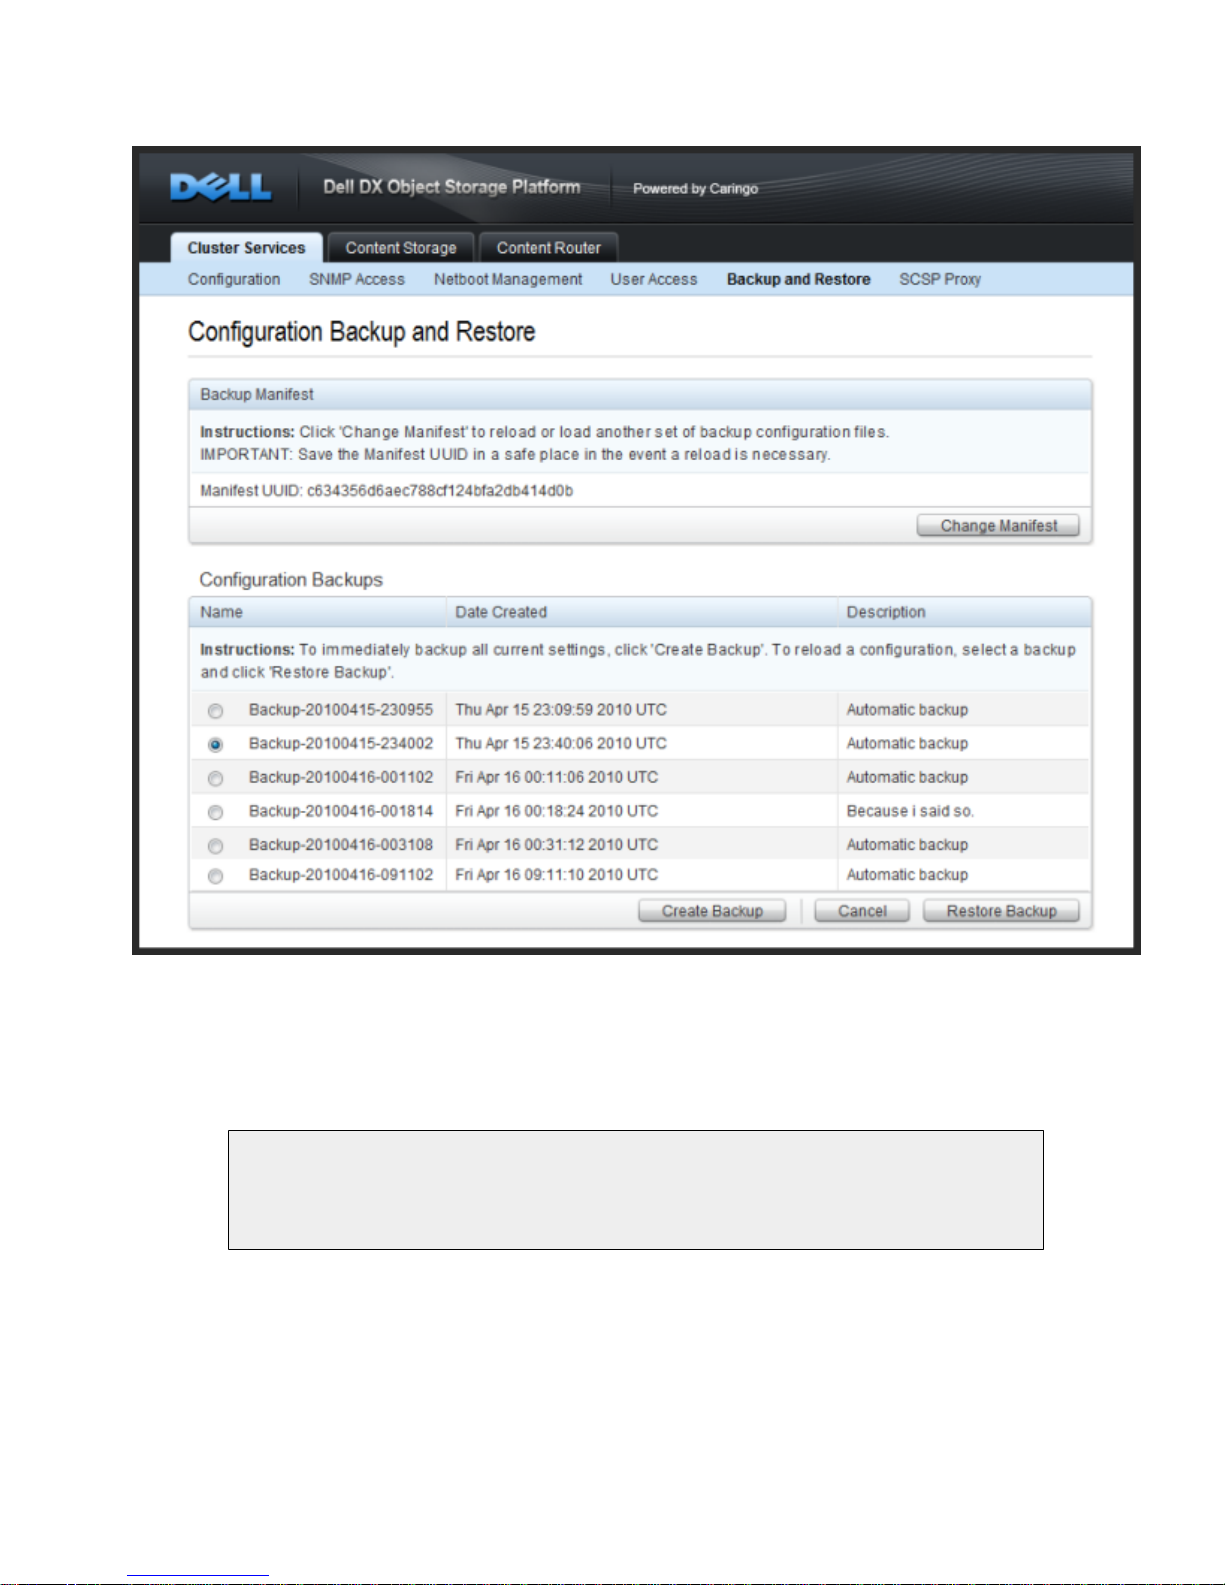
3.5.1. Backup Manifest
A manifest anchor stream is created in the storage cluster with the first backup set and updated with
every subsequent backup. The UUID for the manifest is displayed at the top of the backup interface.
It will not display until after the 2nd backup has been created.
Note
Administrators should copy this UUID into a safe location so that in the event of a
complete system failure the list of backup sets can be retrieved from the storage cluster.
The backup manifest is written with metadata that allows retrieval from the cluster with DX Content
Router if the UUID is ever lost. Specifically the two following headers will be present on the manifest
anchor stream:
CAStor-Application: backup_csn
CAStor-Application-Component: manifest
Copyright © 2010 Caringo, Inc.
All rights reserved 17
Version 2.0
December 2010
Page 21
3.5.2. Automatic Backups
The backup utility watches a pre-determined list of CSN configuration files for file metadata
changes. When a change is detected, the utility waits until the changes stabilize to prevent multiple
incremental backups in a short time period and then creates a gzipped tar file with a complete set of
all designated configuration files. This tar file is staged locally and then written to the storage cluster
for protection. If for any reason, a backup fails to write to DX Storage, an error will be logged and
the backup will be retried periodically. The UUID of the backup set is also written into the Backup
Manifest but is not displayed in the user interface. If the Backup Manifest is not retrievable for any
reason, the backup set is written with metadata that allows retrieval from the DX Storage cluster
using DX Content Router. Specifically, the following two headers will be present:
CAStor-Application-Automatic-Backup: yes
CAStor-Application-Component: saveset
The backup utility will periodically purge backups based on both age and backup count. The utility
will keep at least 20 backups and, if there are more than 20 backups, it will purge any that are more
than 30 days old.
Note
All backup times are displayed in Universal Time (UTC) and may not, therefore,
correspond with the local system clock.
3.5.3. Manual Backups
Administrators may wish to occasionally create a backup manually in conjunction with CSN
maintenance activities (system updates, server downtime, etc). To create a manual backup set at
anytime, click the 'Create Backup' button. You will be prompted to enter a description for the backup
to allow you to easily identify it in the backup list at a later date. The user interface will confirm that
the backup request has been successfully received but cannot display errors if the backup fails
several minutes later. Administrators may wish to monitor system logs for Error messages as a
result. Aside from the manual initiation and description, manual backups are identical to automatic
backups. Manual backups are supported once every 30 seconds.
3.5.4. Restoring a Backup
To restore the service configuration files and enabled/disabled status as they existed as part of a
specific backup set, select the radio button next to the desired backup set and click the 'Restore
Backup' button. This will restore all configuration files and each service's status (enabled or
disabled) to their saved state at the time of the selected backup and reboot the server to reinitialize
the network with the previous configuration. Following a successful reboot, administrators should
immediately restart their DX Storage cluster to ensure the internal networks are aligned and the
node IP addresses are maintained.
After upgrade, previous backup sets may be marked as being compatible with a previous software
version if the backup format or system layout has been changed. These backups cannot be restored
with the current version but will remain available if the software is reverted to a previous version
using the csn-reset functionality.
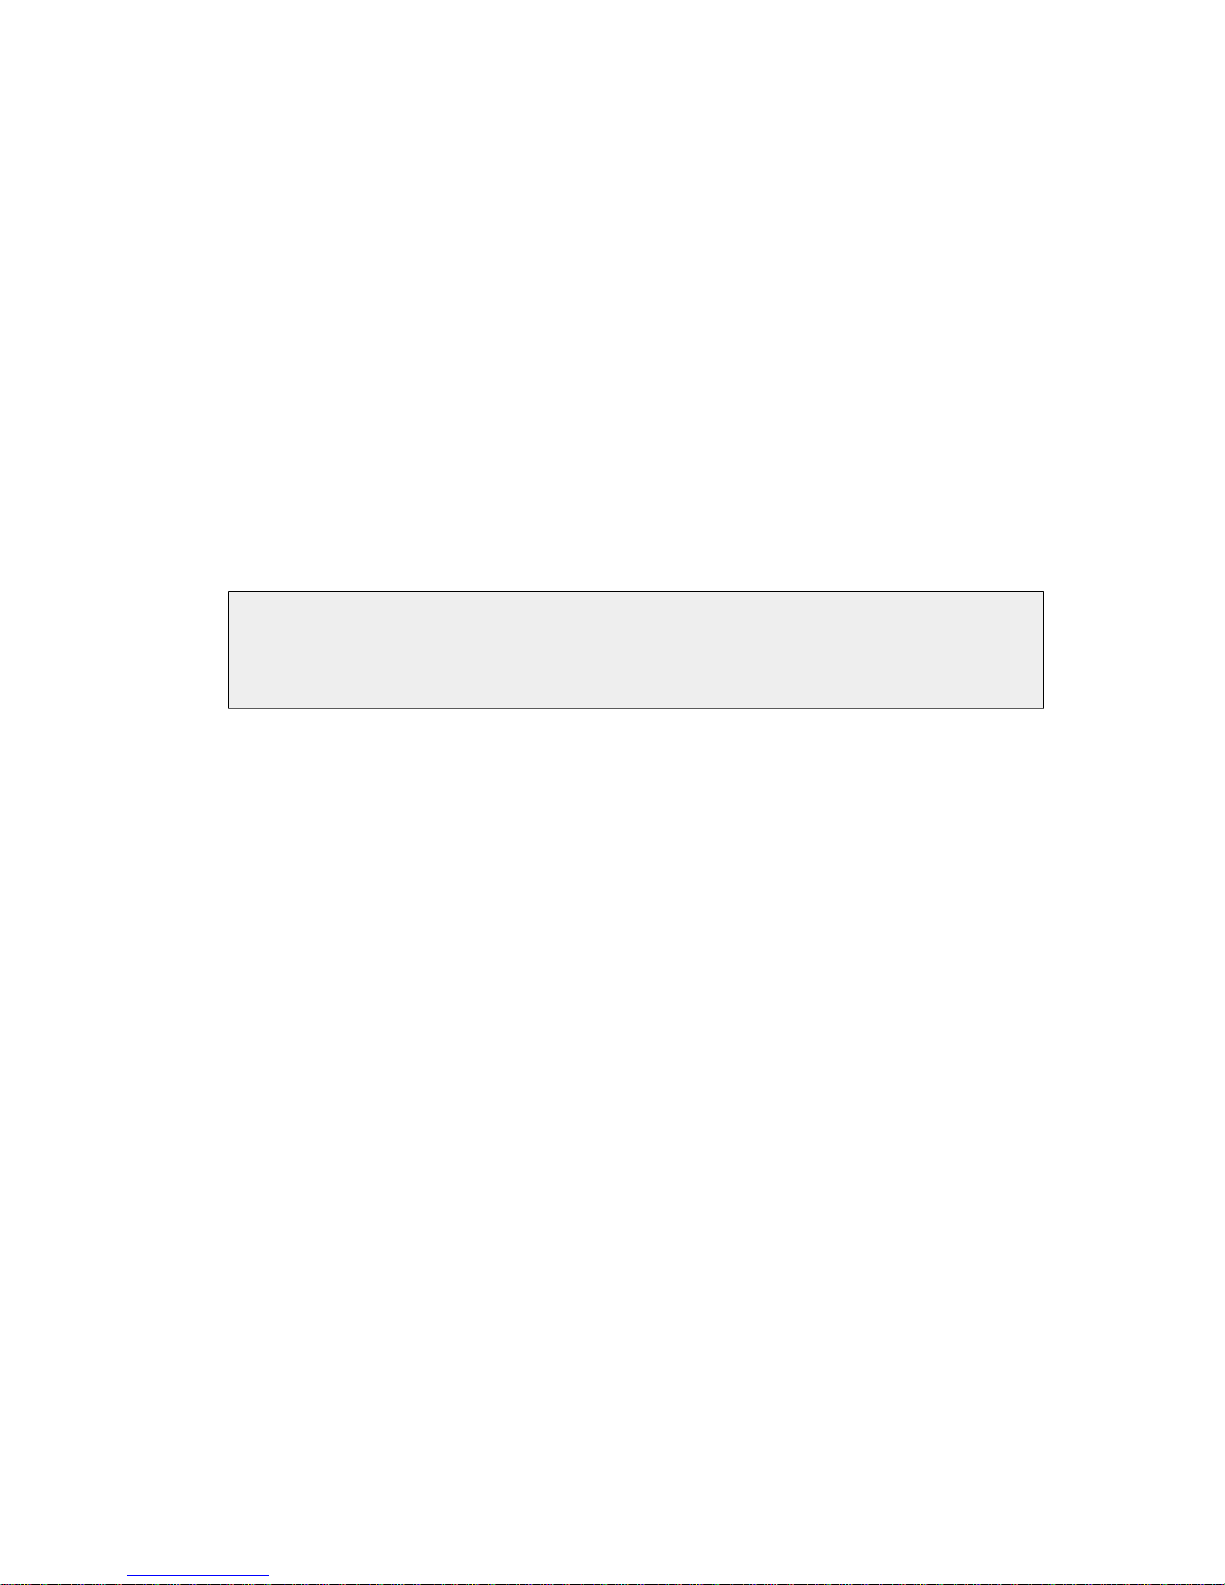
3.5.5. Failover
If a primary CSN fails, an administrator can choose to promote a secondary CSN to the primary
CSN role by restoring the primary's backup manifest UUID onto the secondary and then restoring
Copyright © 2010 Caringo, Inc.
All rights reserved 18
Version 2.0
December 2010
Page 22
a backup set from the restored manifest list. The primary's backup manifest must have at least
2 backups in it prior to being used for failover. To assist with this transition, the secondary CSN
periodically pulls the primary's Backup Manifest UUID via the privileged SSH channel and stores
it in the following location on the secondary: /etc/caringo/csn/primary-manifest.txt. A
timestamp on this file will notate the last time it was updated.
To restore a manifest, click the 'Change Manifest' button at the top of the backup interface. This
will bring up a entry box where the UUID you would like to restore can be entered. The entered
UUID must be for a valid backup manifest created by the backup utility. If restoring a manifest on
a machine that has an existing manifest and associated backups, admins must be aware that the
backup list will be completely overwritten when the entered manifest is restored.
Administrators should be aware that the secondary will effectively take on the identify of the primary
when the manifest and a selected backup within it are restored.
Note
Demotion of a Secondary CSN's backup set onto a Primary CSN is not supported.
Failover should only be done when the Primary is not expected to return to service soon
enough for the environment's needs. A complete software rebuild of the original Primary
to reconfigure it as a Secondary will be necessary before returning it to service after a
Secondary has taken over its role.
3.5.5.1. Failover Without DX Storage
If the failure or demotion of the Primary CSN coincides with an outage of the DX Storage cluster,
you will be unable to pull the Primary's Backup Manifest UUID from the cluster to restore it onto
the Secondary. In this scenario, an administrator can manually restore the Primary CSN's last
recorded backup set, which is updated hourly on the Secondary CSN if it has changed. The
following command will restore the Primary's backup set onto the Secondary, effectively making
the Secondary assume the role of the Primary CSN. The script should only be performed from the
Secondary CSN with both the Primary CSN and the DX Storage cluster offline:
/opt/caringo/csn/bin/failover_without_castor
The script will restart the Secondary CSN after the Primary's configuration has been restored.
Copyright © 2010 Caringo, Inc.
All rights reserved 19
Version 2.0
December 2010
Page 23
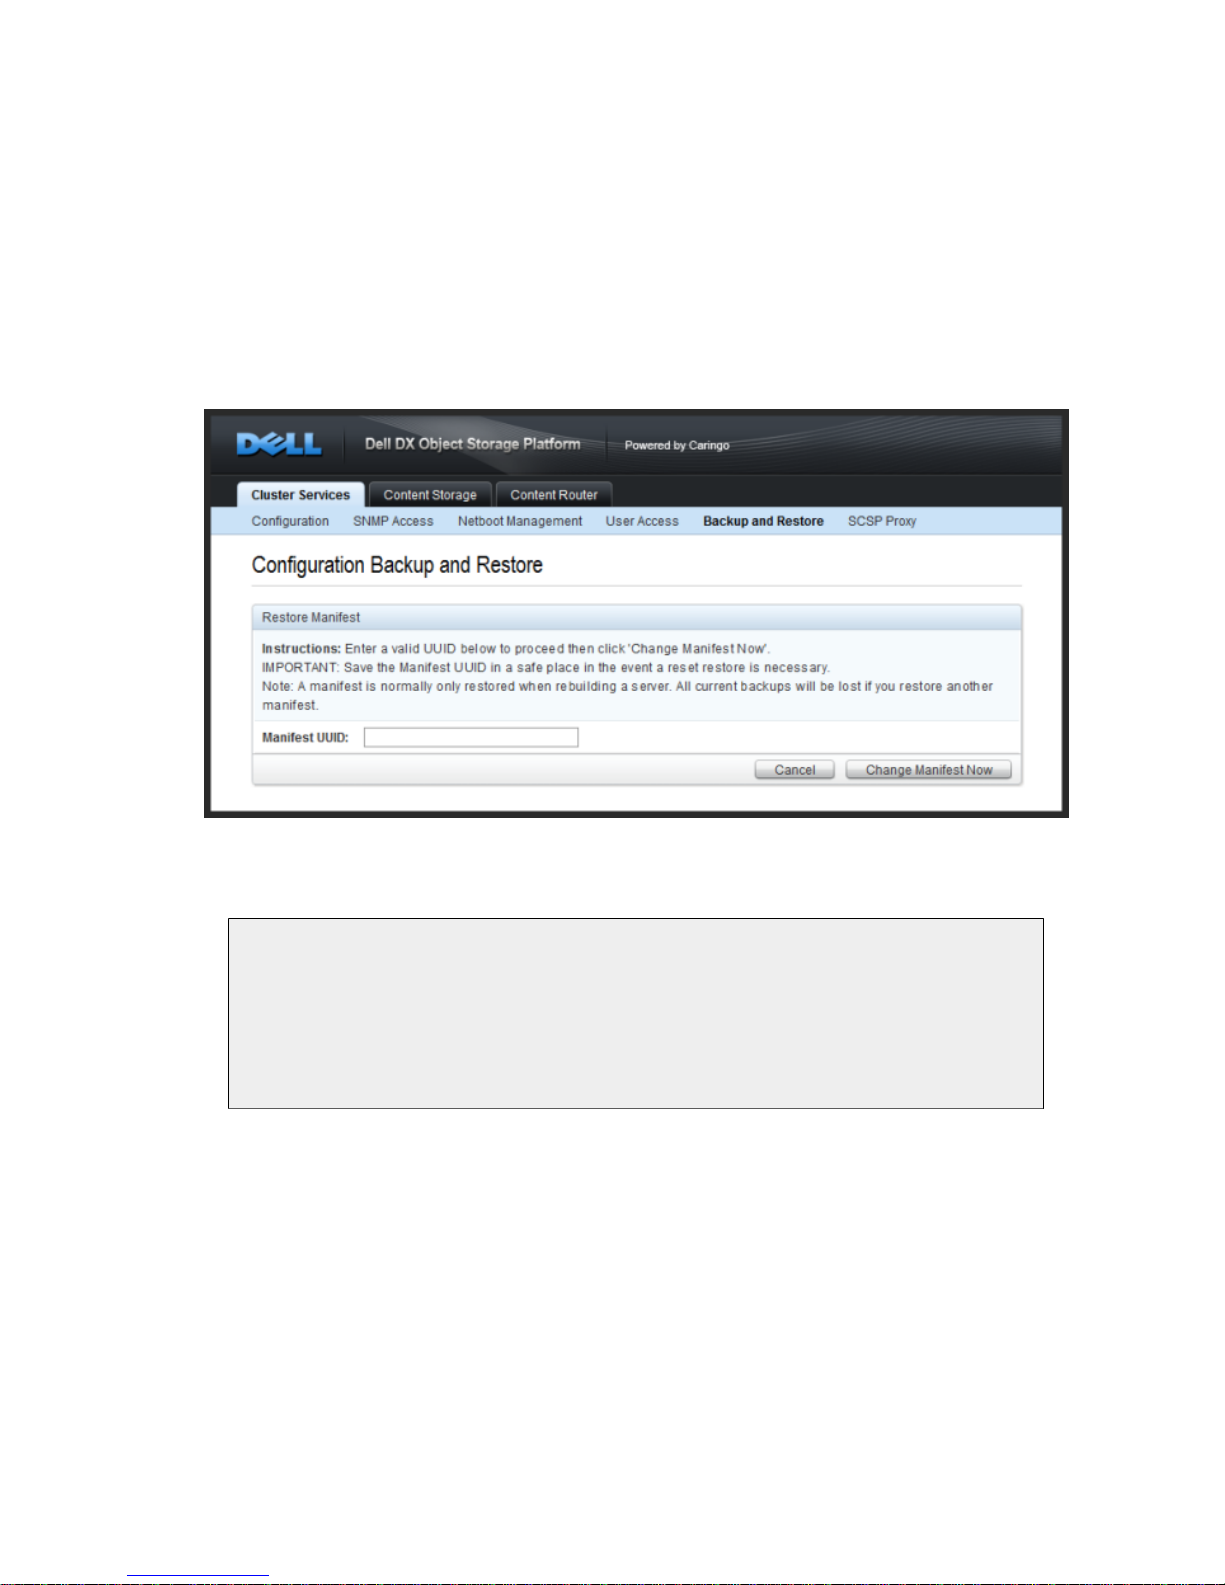
3.6. Configuring the SCSP Proxy
The SCSP Proxy installation on the CSN allows for clients on the external network, including remote
clusters using DX Content Router, to send and receive SCSP requests to and from DX Storage
nodes on the internal network. The SCSP Proxy is configured during the network bootstrap process
to listen on port 80 of both the external and internal interfaces. The log level for the Proxy can be
changed from the user interface by selecting an alternate value from the dropdown and clicking
'Update'.
The SCSP Proxy is also capable of communicating with remote clusters to perform operations like
global infos for one or more objects. Please reference the SCSP Proxy Overview for a full overview
of the supported remote methods. To add a remote cluster to the configured list, click the 'Add
Cluster' button. To edit an existing remote cluster, click the 'Edit' button. To delete a cluster from the
list, click the checkbox in the Delete column next to the cluster that should be deleted and then click
'Update'.
Copyright © 2010 Caringo, Inc.
All rights reserved 20
Version 2.0
December 2010
Page 24
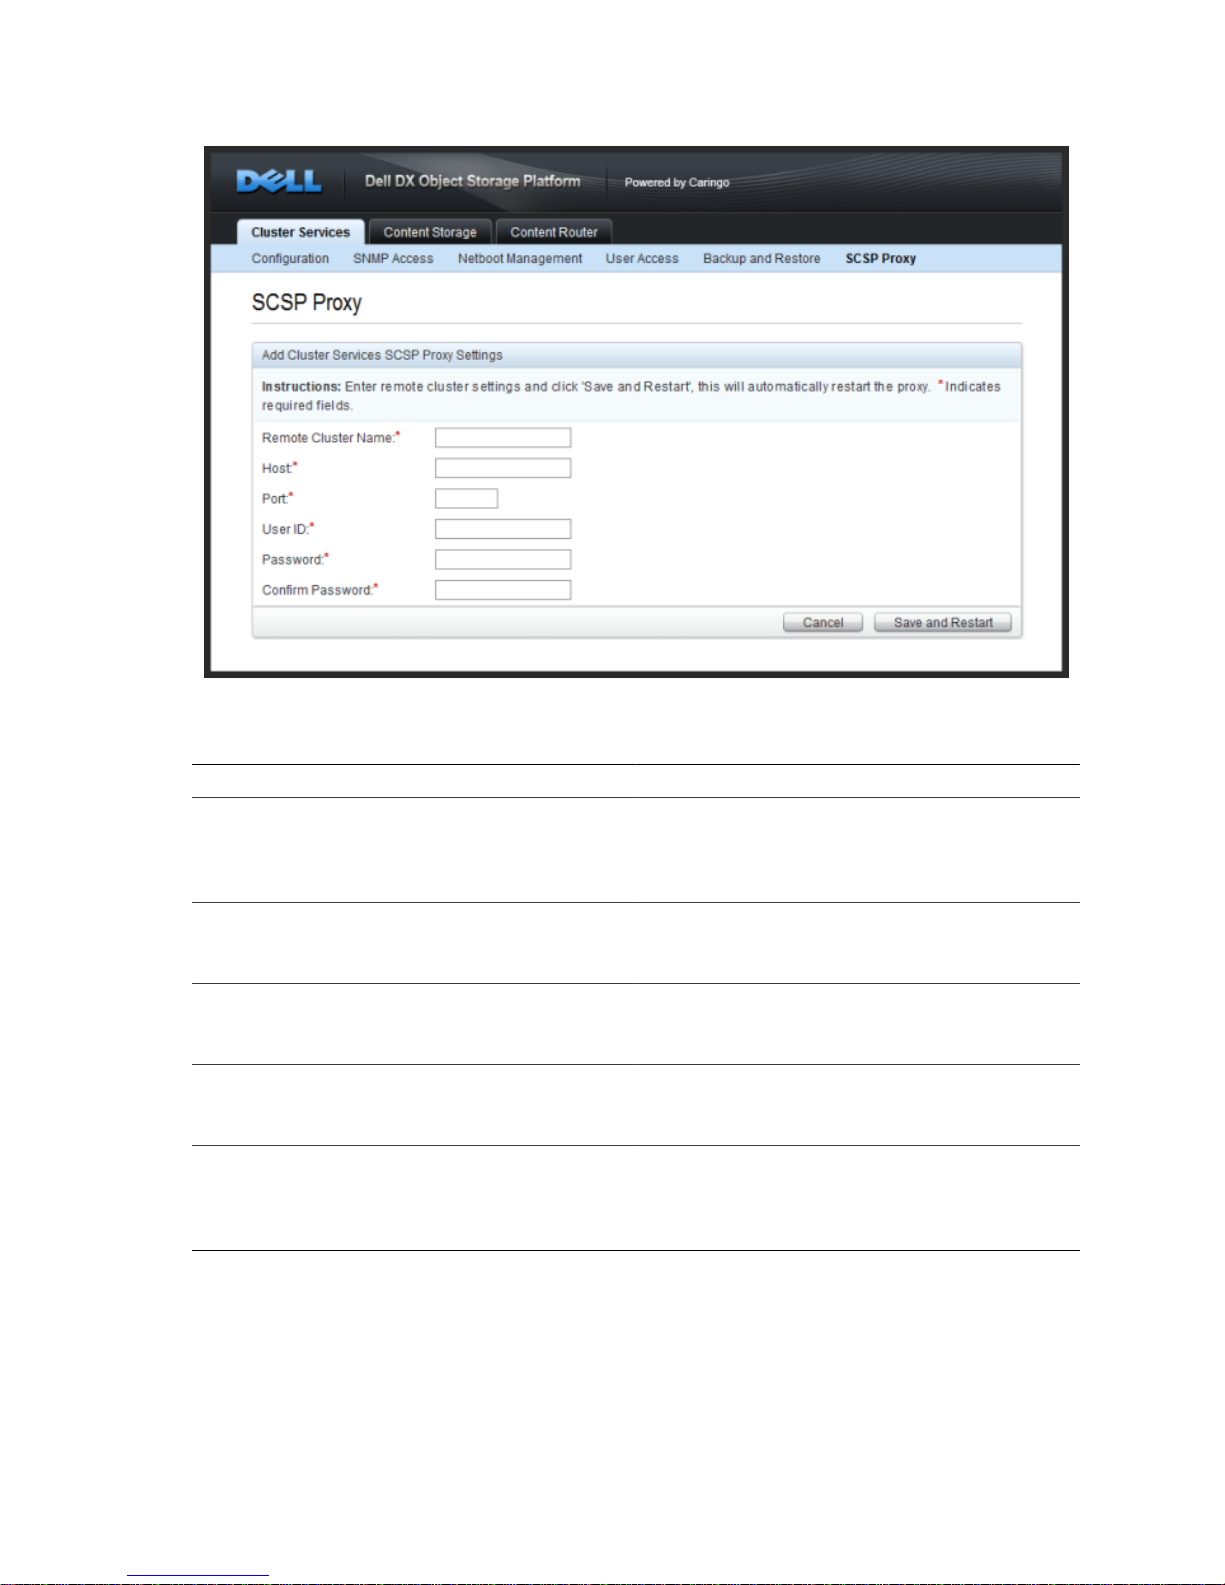
The following information is required for all configured remote clusters:
Parameter Description
Remote Cluster Name The alpha-numeric name for a remote cluster
that will be used in requests sent to the proxy.
May not contain whitespace. May be the DNS
name for the cluster but that is not required.
Host The IP address or hostname of the remote
proxy the local proxy will communicate with.
May not contain whitespace.
Port The port on which the remote proxy will listen
incoming requests. This is usually port 80. May
not contain preceding or trailing whitespace.
User ID The name of an administrator that belongs to
the DX Storage Administrators group for the
remote cluster. May not contain whitespace.
Password/Confirm Password The password for the administrator specified
in the User ID field. This value may contain
spaces as long as they are not leading or
trailing.
The CSN Console should be used for all configuration updates, but, for reference purposes, all
SCSP Proxy configuration parameters are stored in the configuration file: /etc/caringo/scspproxy/
scspproxy.cfg and /etc/caringo/scspproxy/hosts.cfg. These files are automatically generated and
should never be manually edited unless under direction of your support personnel.
The scspproxy service will be started automatically after the initial configuration of the CSN. If
needed, it can be started, stopped or restarted via a standard init.d script:
Copyright © 2010 Caringo, Inc.
All rights reserved 21
Version 2.0
December 2010
Page 25

/etc/init.d/scspproxy {start|stop|status|restart}
3.7. Syslog Configuration
The bootstrap process, the CSN, DX Content Router, SCSP Proxy and DX Storage are all
configured at install to log to the syslog server on the local CSN. Each application logs to a different
log facility so the syslog server can separate the incoming log messages by product/function. The
resulting log files are all located in /var/log/caringo:
• csnconfig.log
• castor.log
• cr.log (DX Content Router)
• csn.log
• scspproxy.log
All log files are rotated regularly and compressed. The logrotate process checks hourly to see if the
log files need to be rotated based on either a size > 512mb or a created date > 1 week.
3.8. Password Management
The following passwords can be managed from the CSN Console for various functions:
Password Default Username Default Password Impact
CSN Console admin dell Access to the CSN
Console.
DX Storage
Administrator
admin dell Ability to modify
settings and take
actions like Reboot on
the DX Storage admin
console.
SNMP Read-Only n/a public Ability to read
(snmpwalk, snmpget)
the SNMP MIBs
available on the CSN.
SNMP Read-Write n/a private Ability to read
(snmpwalk, snmpget)
and write (snmpset)
to the SNMP MIBs
available on the CSN.
Content Router
Console
n/a dell Ability to execute
the Republish
and Republish All
mechanisms on the
Publisher console.
Copyright © 2010 Caringo, Inc.
All rights reserved 22
Version 2.0
December 2010
Page 26

Chapter 4. Running and Managing DX Storage
The CSN currently provides network and configuration services for a single DX Storage cluster with
nodes on the shared private network.
4.1. Adding DX Storage Nodes
Upon boot of a new node onto the internal network via network boot, the CSN will automatically
provide the needed configuration and software. With subsequent boots of a previously known
node on the network, the CSN will recognize the DX Storage node and use its previously assigned
configuration to boot the node.
As of the 2.0 release, the CSN will automatically configure DX Storage in multi-server mode to take
advantage of all available CPU cores. The number of DX Storage processes assigned to each node
is dynamically determined based on system information provided by the node when it requests its
network boot configuration. IP addresses are statically assigned to each node and then maintained
by a CSN process that pings each node every 5 minutes. If a node has not responded to a ping
in an hour, its IP address will be released and a new one assigned if the node should come back
online at a later time. The maximum number of allowed processes per node (no default), the interval
at which nodes are pinged (default 5 minutes) and the length of time the CSN waits before releasing
the IP address for a node that has not responded (default 1 hour) are all configurable. Please
contact your support representative for instructions on modifying these parameters.
A list of all IP address assignments and the associated node's MAC address can be obtained by
running the following command line script:
/opt/caringo/csn/bin/ip-assignments
MAC addresses will appear multiple times in the output if the nodes have enough CPU cores to
support more than one DX Storage process. The script will not return any results if no storage nodes
have been booted yet from a CSN running 2.x software. Node IPs assigned previously under CSN
1.0 will not appear in the script output until the nodes have been rebooted under a 2.x CSN.
4.2. Updating Configuration Settings
In addition to the default network configuration information gathered from the initial configuration
of the CSN, the CSN Console allows editing of several additional configuration parameters.
Any changes to these settings will not take effect until the cluster is rebooted to pick up the new
configuration.
Copyright © 2010 Caringo, Inc.
All rights reserved 23
Version 2.0
December 2010
Page 27

Field Description
Cluster Name The read-only name of the cluster that was
specified during the initial network configuration
process.
Persistent Settings UUID Use this field to enter the UUID displayed in
the settings popup of the DX Storage admin
console the first time a settings change is
made. This will ensure the settings will persist
across reboots.
minreps The minimum number of stream instances that
must be kept in the cluster. This is required to
be 1 or higher. 2 is recommended and provided
as the default value.
maxreps The maximum number of stream instances that
can be specified in the cluster. This is required
to be 1 or higher and must equal or exceed the
value of minreps.
Please reference the Node Configuration appendix of the DX Object Storage Advanced
Administration Guide for complete details of all DX Storage configuration options. The CSN
Console should be used for all configuration updates, but, for reference purposes, all clusterwide configuration parameters set for DX Storage are stored in a single configuration file (/var/opt/
caringo/netboot/cluster.cfg). This file is automatically generated and should never be manually
edited unless under direction of DX Storage support.
4.3. DX Storage User Access
The User Access page allows addition of new or updates to existing users who have write access
(administrators) to the DX Storage SNMP MIB and the DX Storage admin console. By default the
console gives read access to all users and an administrative user with the username of 'admin'
and a password of 'dell' is created on the system. Users can be deleted from the list by clicking the
Copyright © 2010 Caringo, Inc.
All rights reserved 24
Version 2.0
December 2010
Page 28

checkbox next to one or more usernames and clicking Delete. The admin user cannot be deleted.
Any changes to these settings will not take effect until the cluster is rebooted to pick up the new
configuration.
New users can be added by clicking the 'Add User' button. Usernames and passwords must be
alphanumeric with no spaces and must not be blank.
4.4. DX Storage Admin Console
DX Storage includes its own administrative console, which can be reached directly from the external
network by entering the following address: http://CSNExternalIP:8090/services/storage/. The DX
Storage admin console may also be accessed by clicking the 'View Storage Console' button on any
page of the Content Storage tab of the CSN Console. For additional information on the DX Storage
admin console, please refer to the DX Object Storage Administration Guide.
Copyright © 2010 Caringo, Inc.
All rights reserved 25
Version 2.0
December 2010
Page 29

4.5. Gathering SNMP Statistics
The CSN includes an aggregate SNMP MIB called CARINGO-CASTOR-MGR-MIB with operational
and health status for all nodes in the associated DX Storage cluster, including:
• Cluster stats like total available capacity
• Cluster-wide settings like a cluster shutdown
• Individual node statistics including IP address and status
• Node-level actions like shutdown and retire
• Volume statistics including used and available capacity, operational activity and hardware status
information
The MIB is located in /usr/share/snmp/mibs. The SNMP agent collects statistics from the DX
Storage cluster at a default interval of 5 minutes. SNMP collection is only enabled on Primary CSNs.
The collection interval can be configured by overriding the default for the collectormain.sh line of
the /etc/cron.d/caringo_castormgr_snmp_collector file to any frequency greater than 2 minutes. If
queried, SNMP will report errors after the DX Storage nodes come online for the first time until data
is available when the first configured collection period has passed. DX Storage clusterState may
return as 'Unknown' or change frequently right after a cluster wide reboot or start until all nodes are
online and reporting their status.
4.5.1. SNMP Command Examples
The following example shows an snmpwalk command that will return all results for the CASTORMGR-MIB:
snmpwalk -v 2c -c public -m +CARINGO-CASTOR-MGR-MIB 192.168.1.101
caringo.castorMgr
The following example demonstrates an snmpget command that retrieves the total GB of available
capacity for the cluster:
snmpget -v 2c -c public -m +CARINGO-CASTOR-MGR-MIB 192.168.1.101
caringo.castorMgr.stats.totalGBAvailable
The following example shows an snmpset command that sends a shutdown command to the 1st
node in the indexed list for the cluster:
snmpset -v 2c -c private -m +CARINGO-CASTOR-MGR-MIB 192.168.1.101
caringo.castorMgr.nodes.castorNodesActionTable.nodeActionEntry.
nodeShutdown.1 s shutdown
The following example shows an snmptable command that retrieves the data for all node-specific
actions:
snmptable -v2c -cpublic -OQs -m +CARINGO-CASTOR-MGR-MIB localhost
caringo.castorMgr.nodes.castorNodesActionTable
Copyright © 2010 Caringo, Inc.
All rights reserved 26
Version 2.0
December 2010
Page 30

Chapter 5. Configuring and Managing DX Content Router
5.1. Configuring DX Content Router
DX Content Router allows replication of content between remote clusters as well as enumeration
of DX Storage content for other purposes like search indexing or virus scanning. There are two
separate DX Content Router services both of which may optionally be configured on the CSN:
Publisher and Replicator. Please reference the DX Content Router Setup and Configuration Guide
for complete details of each service and how to configure it.
Some basic network configuration information is defaulted into the configuration for both Publisher
and Replicator at install but further configuration is needed, for Replicator in particular. To further
configure DX Content Router on the CSN for 1.0, you will need to navigate to the DX Content
Router section of the CSN Console and configure and enable each service.
5.1.1. Publisher
The Publisher processes all streams stored in a cluster, filters them based on stream metadata,
and publishes UUIDs to remote Subscribers. To configure Publisher on the CSN, navigate to the
Content Router tab of the CSN Console and click on the 'Publisher' link:
The following options are available:
Parameter Description
Service Status Whether or not the Publisher service is enabled
Proxy Communication Enable proxy communication if subscribers will
Copyright © 2010 Caringo, Inc.
All rights reserved 27
or disabled. Publisher is enabled by default.
need to access local cluster content from the
Version 2.0
December 2010
Page 31

Parameter Description
external network; Disable proxy communication
if subscribers will access content from the
internal network or via custom firewall rules
IP Address The read-only IP address on which the
Publisher will communicate with the local
cluster on the internal network. Remote
subscribers wishing to communicate with the
Publisher should use the external cluster IP
address for the CSN but privileged applications
on the internal network may use this IP
address.
Port The read-only port Publisher uses to publish
UUID data. This port must be included when
configuring remote subscribers.
Log Level The level of logging verbosity
Console Password The password used for authentication on the
Publisher console when issuing a Republish or
Republish All. Default value is 'dell'.
Rules File Path The name and location of the XML rules file the
Publisher uses to filter UUIDs
Note that a default rules.xml file is created with a 'ReplicateAll' rule. Administrators will likely wish to
customize the published channels to filter a more granular set of objects. Please reference the DX
Content Router Setup and Configuration Guide for full details on creating filter rules.
The CSN Console should be used for all configuration updates, but, for reference purposes, all
Publisher configuration parameters are stored in the configuration file: /etc/caringo/contentrouter/
publisher.cfg. This file is automatically generated and should never be manually edited unless under
direction of your support personnel.
5.1.2. Replicator
Replicator retrieves one or more lists of UUIDs from remote cluster via the Publisher service and
sends replication requests to local DX Storage nodes. To configure Replicator on the CSN, navigate
to the DX Content Router tab of the CSN Console and click on the 'Replicator' link:
Copyright © 2010 Caringo, Inc.
All rights reserved 28
Version 2.0
December 2010
Page 32
The following options are available:
Parameter Description
Service Status Whether or not the Replicator service is
enabled or disabled. The Replicator is disabled
by default.
IP Address The ipaddress on which the Replicator will
communicate with the local cluster on the
internal network.
Log Level The level of logging verbosity
Subscription Check Interval Time in seconds between checks for new
UUIDs; values can be between 5 - 3600
seconds.
Offline After Time in seconds before the Publisher displays
Replicator as offline in the Publisher console.
Minimum of 60 seconds.
Error Offline After Time in seconds before the Publisher logs a
critical error message if a Subscriber has not
been heard from. Minimum of 60 seconds.
Timeout After Time in seconds before the Publisher will
terminate a Subscriber if it has not been heard
from. Minimum of 9000 seconds.
Copyright © 2010 Caringo, Inc.
All rights reserved 29
Version 2.0
December 2010
Page 33
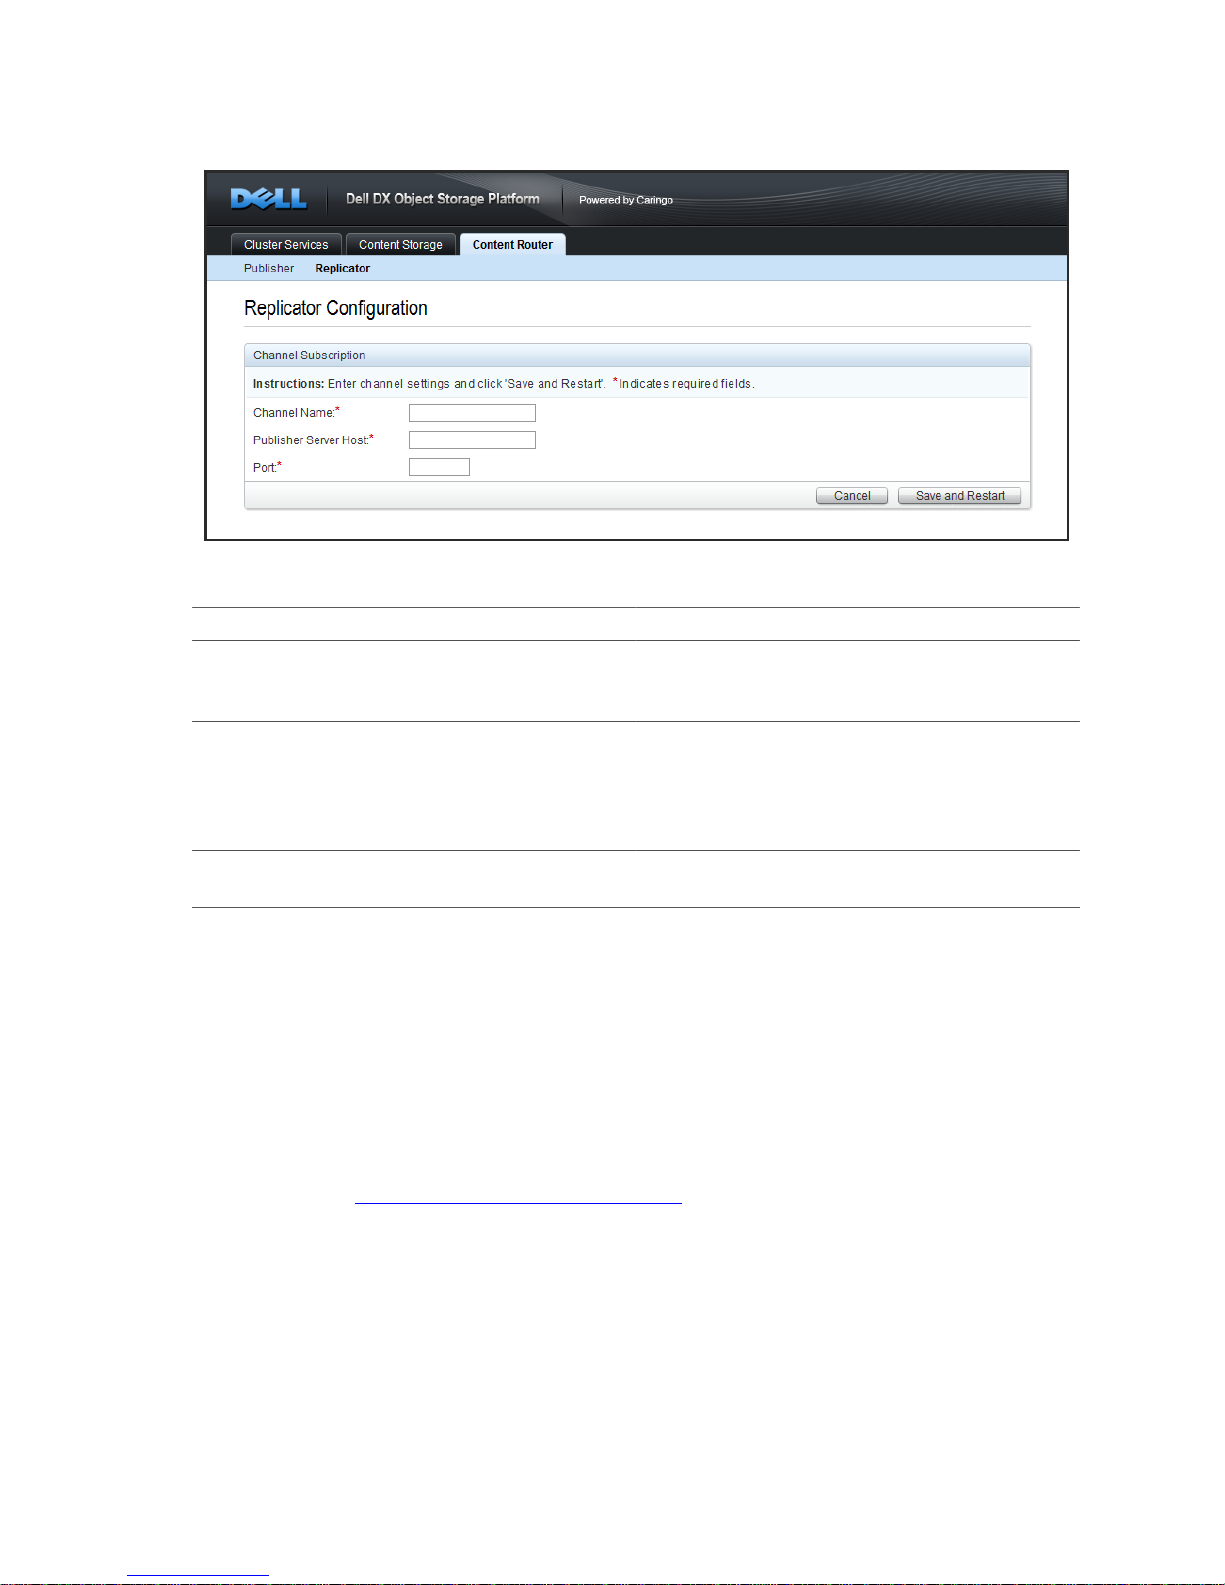
A single Replicator can subscribe to multiple Publisher channels by using the 'Add Channel' button:
A channel subscription consists of the following components:
Parameter Description
Channel Subscriptions: Channel Name The name of the channel the Replicator
will subscribe to (from the remote Publisher
rules.xml file)
Channel Subscriptions: Publisher Server Host The IP address or hostname of the Publisher
to which the Replicator will subscribe. If the
Publisher is remote, this must be the external
cluster IP address for the CSN on which the
Publisher is installed.
Channel Subscriptions: Publisher Server Port The port on which the Publisher publishes
UUIDs
The CSN Console should be used for all configuration updates, but, for reference purposes, all
Replicator configuration parameters are stored in the configuration file: /etc/caringo/contentrouter/
replicator.cfg. This file is automatically generated and should never be manually edited unless under
direction of your support personnel.
5.2. Managing DX Content Router
5.2.1. Publisher Console
The Publisher console publishes current status for the Publisher and all the Replicator Subscribers it
is currently communicating with. From a browser on the external network, the Publisher console can
be accessed from http://CSNExternalIP:8090/publisher/. Alternatively the Publisher console can be
accessed by clicking the View Publisher Console button on the Publisher Configuration page under
the Content Router tab of the CSN Console. The Publisher console will not be reachable if Publisher
is not running on the CSN. The default password for the console when issuing a Republish or
Republish All is 'dell'. Please reference the DX Content Router Setup and Configuration Guide for a
complete overview of the data available from the Publisher console.
5.2.2. Gathering SNMP Statistics
Similar to DX Storage, the CSN populates SNMP MIBs that report status and operational data for
both Publisher and Replicator independently based on DX Content Router's HTTP status reporting.
Copyright © 2010 Caringo, Inc.
All rights reserved 30
Version 2.0
December 2010
Page 34

The MIBs are CARINGO-CR-PUBLISHER-MGR-MIB and CARINGO-CR-REPLICATOR-MGR-MIB
respectively. They can be accessed from the Net-SNMP client installed on the CSN. Both MIBs are
read-only currently. They contain:
• Basic settings like host IP and host/target cluster
• Operational stats like up time, events in process, filter backlogs, etc
Please refer to the MIB located in /usr/share/snmp/mibs for full details of the included values and to
the 'SNMP Command Examples' section in the 'Running and Managing DX Storage chapter of this
guide for example SNMP commands using the DX Storage MIB.
Copyright © 2010 Caringo, Inc.
All rights reserved 31
Version 2.0
December 2010
Page 35

Appendix A. Open Source Software
Regarding certain third party open source components also shipped with the product, please see
the detailed information that appears on the product/stick distribution in the “/doc” directory, in the
document “DX Object Storage OSS License Notices for 3rd Party Software.txt”.
Your vendor will ship open/free/libre (e.g., GPL-covered) source code for certain 3rd party items
shipped with the product after receiving at vendor HQ a written request specifying the code
component(s) that you seek accompanied by prepayment (check on U.S. bank or money order) for
$25.00 USD (to recover our costs) provided you specify your physical address for our shipping you
a CD. This does not apply to DX Storage proprietary code.
Copyright © 2010 Caringo, Inc.
All rights reserved 32
Version 2.0
December 2010
 Loading...