

Page 1

Dell DX Object Storage
Platform
User’s Guide
Page 2
Notes, Cautions, and Warnings
NOTE: A NOTE indicates important information that helps you make better use of
your computer.
CAUTION: A CAUTION indicates potential damage to hardware or loss of data if
instructions are not followed.
WARNING: A WARNING indicates a potential for property damage, personal
injury, or death.
____________________
Information in this publication is subject to change without notice.
© 2010 Dell Inc. All rights reserved.
Reproduction of these materials in any manner whatsoever without the written permission of Dell Inc.
is strictly forbidden.
Trademarks used in this text: Dell™, the DELL logo, PowerEdge™, and OpenManage™ are
trademarks of Dell Inc. Red Hat Enterprise Linux
of Red Hat, Inc. in the United States and/or other countries.
Other trademarks and trade names may be used in this publication to refer to either the entities claiming
the marks and names or their products. Dell Inc. disclaims any proprietary interest in trademarks and
trade names other than its own.
October 2010 Rev. A01
®
and Enterprise Linux® are registered trademarks
Page 3

Contents
1 Introduction . . . . . . . . . . . . . . . . . . . . . . . . 7
2 DX Object Storage Platform Overview . . . 9
Network Topologies . . . . . . . . . . . . . . . . . . . . 9
Local Cluster Configuration
Subcluster Configuration
. . . . . . . . . . . . . 10
. . . . . . . . . . . . . . 15
Remote Cluster Configuration . . . . . . . . . . . 17
Application Access to DX Object
Storage Platform
Communicating With a Local Cluster
Communicating With a Remote Cluster
. . . . . . . . . . . . . . . . . . . . . 19
. . . . . . . . 19
. . . . . . 19
3 Setting Up the DX Object
Storage Platform . . . . . . . . . . . . . . . . . . . 21
Installing the Initial Cluster or Redundant
Cluster Services Node
Configuring the DX Object Storage Platform . . . . . . 21
. . . . . . . . . . . . . . . . . . 21
Adding Additional DX Storage Nodes
Installing the System in a Rack
Cabling the Appliance
. . . . . . . . . . . . . . . 23
Turning On the DX Storage Node
Enabling Capacity in DX Cluster
Services Console
. . . . . . . . . . . . . . . . . . 23
. . . . . . . . . . 22
. . . . . . . . . . . 22
. . . . . . . . . . 23
Contents 3
Page 4

Adding Network Adapter to DX
Storage Nodes
. . . . . . . . . . . . . . . . . . . 23
Adding Network Adapters to DX Cluster
Services Nodes
. . . . . . . . . . . . . . . . . . . 24
4 Updating the Dell DX Object
Storage Platform Software . . . . . . . . . . . 25
Checking Software Version Compatibility . . . . . . . 26
Using the DX Object Storage Platform
Compatibility Manager
. . . . . . . . . . . . . . . 26
Troubleshooting the Compatibility Manager
Updating the DX Cluster Services Node Software
. . . . 27
. . . 28
Updating the DX Storage Node Software . . . . . . . . 28
Receiving System Software Update
Notifications
Updating OpenManage Server Administrator
. . . . . . . . . . . . . . . . . . . . 29
. . . 29
5 Disaster Recovery . . . . . . . . . . . . . . . . . 31
Recovery Solution Map . . . . . . . . . . . . . . . . . 31
Recovering From Disk Failures
Single Disk Failure
Two Disk Failure
. . . . . . . . . . . . . . . . . 33
. . . . . . . . . . . . . . . . . . . 33
Detecting and Monitoring Disk Failures
. . . . . . . . . . . . . 33
. . . . . . . . 33
Reinstalling the Operating System
Configuring and Managing RAID
Recovering the Operating System
4 Contents
. . . . . . . . . . . . 34
. . . . . . . . . . . . 34
. . . . . . . . . . . . 35
Page 5

Configuring the Partitions During
Operating System Recovery
. . . . . . . . . . . . . . . 35
Reinstalling the DX Cluster Services
Node Software
. . . . . . . . . . . . . . . . . . . . . . 37
Setting Up and Configuring the Network
. . . . . . 37
Connecting the DX Cluster Services Node to the
Private and Public Networks
. . . . . . . . . . . . . . 38
Connecting the DX Storage Nodes to the
Private Network
. . . . . . . . . . . . . . . . . . . . . 38
Creating a Local YUM Repository on the
DX6000 System
. . . . . . . . . . . . . . . . . . . . . . 38
Installing Dell DX Compatibility Manager . . . . . . . 40
Installing Dell OpenManage
Server Administrator
Installing DX Cluster Services Node Software
. . . . . . . . . . . . . . . . . . . 40
. . . . . 41
Configuring the DX Cluster Services
Node Software
. . . . . . . . . . . . . . . . . . . . . . 42
Restoring the Cluster Configurations
Bringing Up the DX Storage Cluster
. . . . . . . . . . 42
. . . . . . . . . . . 42
6 Additional References. . . . . . . . . . . . . . . 43
Software Documents . . . . . . . . . . . . . . . . . . 43
Hardware Documents
Systems Management Documents
. . . . . . . . . . . . . . . . . . 44
. . . . . . . . . . . 45
Contents 5
Page 6

6 Contents
Page 7

1
Introduction
The Dell DX Object Storage Platform provides a simple and cost effective
pool of storage for less active or fixed content. The object storage platform
allows you to:
• Expand the capacity to meet rapidly changing needs without disrupting
services.
• Set policies for file retention and replication.
• Distribute information to multiple geographic locations.
• Integrate through an HTTP based interface.
The DX Object Storage Platform includes the following hardware and
software:
•Dell DX6
• Two or more Dell DX6
• A preinstalled operating system and Dell OpenManage software on the DX
Cluster Services Node.
• Dell DX Object Storage Platform software.
The Dell DX solution components are uniquely identified with the following
naming conventions:
•Storage Node (SN)—DX6
generation, and
DX6012S platform), and
a storage node).
• Cluster Services Node (CSN)—DX6
generation).
a00
Cluster Services Node.
axy
S Object Storage Nodes.
axy
xy
is a variable depicting the number of drives (12 for the
S
is a fixed alphanumeric character that indicates
S (where a is a variable depicting the
a00
(the “a” is a variable depicting
Introduction 7
Page 8

Table 1-1 lists the terms used in this document to refer to various
components of the DX Object Storage Platform.
Table 1-1. Terms Used in the Document
Component Description
DX Object Storage Cluster DX6a00S system and two or more DX6axyS
systems
DX Cluster Services Node,
Cluster Services Node or CSN
DX Object Storage Node, DX
Storage Node or SN
DX Content Router Software component on the DX6a00 system
DX Object Storage Software Software component on the DX6axyS system
DX6
a00 system
DX6axyS system
8 Introduction
Page 9
2
DX Object Storage Platform
Overview
Network Topologies
The Dell DX Object Storage Platform network consists of one or more DX
Storage Clusters connected by DX Content Router services. There are many
possible network topologies depending on the storage network goals. All
networks share the following features:
• One or two DX Cluster Services Nodes that provide services to the storage
cluster.
• Two or more DX Storage Nodes that provide data storage services.
• Ethernet switches to enable required services within a storage cluster
(private network) and access to the storage nodes from outside the cluster
(public network).
• Services such as Domain Name System (DNS) and Dynamic Host
Configuration Protocol (DHCP).
NOTE: DX Storage Cluster requires a dedicated internal network to ensure that the
storage cluster traffic is protected from unauthorized access. The dedicated
network also ensures that the external or corporate network is isolated from both
the PXE boot server and cluster multicast traffic.
All network services required by the cluster are present in the
Services Node
The DX Storage Cluster is automatically configured with defaults for all
network parameters that should be sufficient for most simple configurations.
All network parameters can be set manually to support more complex
configurations. For detailed information about setting network parameters,
see the DX Object Storage Getting Started Guide, and the DX Object Storage
Advanced Administration Guide at support.dell.com/manuals.
software bundle and preinstalled on the
Cluster Services Node
DX Cluster
.
DX Object Storage Platform Overview 9
Page 10
Network switch configuration depends on both the network topology and the
customer environment. To ensure proper functioning with default network
parameters and to maximize cluster performance, it is recommended that you
follow the best practices listed below, while configuring both the private and
public networks switches.
• Disable link aggregation configuration as the DX Object Storage Nodes
bond the system NIC ports in balanced-alb modes.
• Disable jumbo frames.
• Disable spanning tree protocol, if the switches are not being trunked.
• Disable Flow Control.
NOTE: If switches are trunked, enable spanning tree protocol and port fast on the
data intensive ports.
Contact Dell to customize the network configurations to meet the solution
needs. For more information about configuring the network for the Dell DX
Object Storage Platform, see "Network Topology" in the DX Object Storage
Advanced Administration Guide at support.dell.com/manuals.
Local Cluster Configuration
A basic Dell DX Storage Cluster consists of at least one
Node
and at least two
DX Storage Nodes
, along with the necessary Ethernet
infrastructure to connect them. See Figure 2-1.
Within a cluster,
DX Storage Nodes
communicate with each other through
User Datagram Protocol (UDP) and IP multicast. All nodes within a cluster
must be on the same IP subnet. The
DX Cluster Services Node
participates in UDP and multicast communication and must be located
within the same subnet.
The Layer 3 switch (IP router) used to create the storage cluster subnet must:
• Restrict UDP and multicast network to the cluster subnet
• Pass TCP (HTTP) traffic to and from the DX Cluster Services Node and
DX Storage Nodes
NOTE: You do not require a load-balancer in front of the storage cluster. The
applications communicate directly with the DX Object Storage Platform through
HTTP.
DX Cluster Services
also
10 DX Object Storage Platform Overview
Page 11

It is recommended that you configure the network topology to enable
applications to communicate with the
DX Storage Nodes
on private and
secure networks. This is the primary method to store and retrieve data from a
local DX Storage Cluster.
NOTE: If applications write to a cluster through an unsecure network, then to
prevent malicious activity, it is recommended that you allow the application to
encrypt the data before writing the data to the cluster.
DX Object Storage Platform Overview 11
Page 12
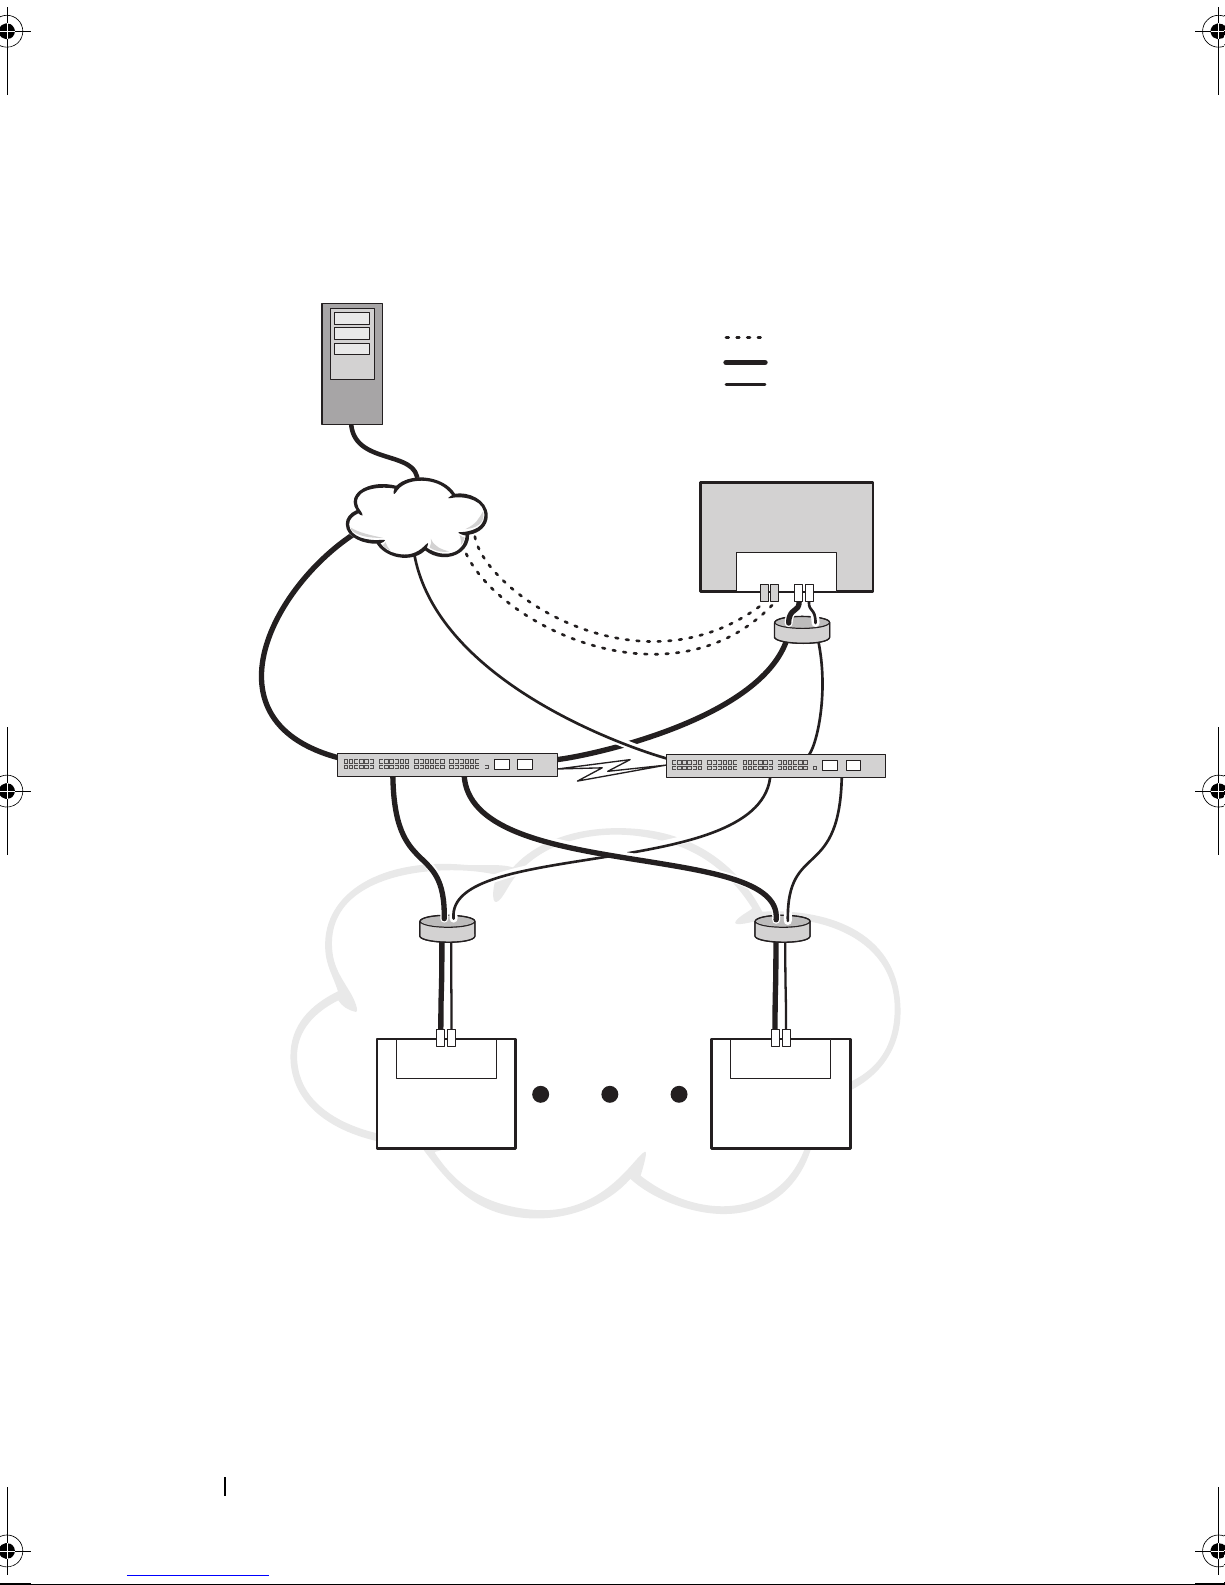
Figure 2-1. Local Cluster Configuration
applications
public network
primary
NIC
teamed
interlink
private network
redundant connections
multi-cast
DX CSN
2 Port LOM
2 Port LOM
DX Storage
Node
DX Storage
Node
4 Port LOM
12 DX Object Storage Platform Overview
Page 13

Redundant DX Cluster Services Nodes
The Dell DX Storage Cluster supports redundant
In a redundant model, the active
the primary node and the redundant
DX Cluster Services Node
node
is configured as the secondary
DX Cluster Services Node
is configured as
s.
node, see Figure 2-2.
The primary
Cluster Services Node
contains the cluster configuration files,
active networking utilities, and active content router services. A manual
failover process is required to demote the primary
and promote the secondary
combined virtual IP address for the primary
failover to a redundant
DX Cluster Services Node
DX Cluster Services Node
DX Cluster Services Node
DX Cluster Services Node
. Since there is a
, a
is transparent to all
applications. When a failover is transparent, an IP address change is not
required. However, the application services remain unavailable until the
manual failover of the
Cluster Services Node
is complete. For more
information, see the Cluster Services Installation and Configuration Guide at
support.dell.com/manuals.
DX Object Storage Platform Overview 13
Page 14
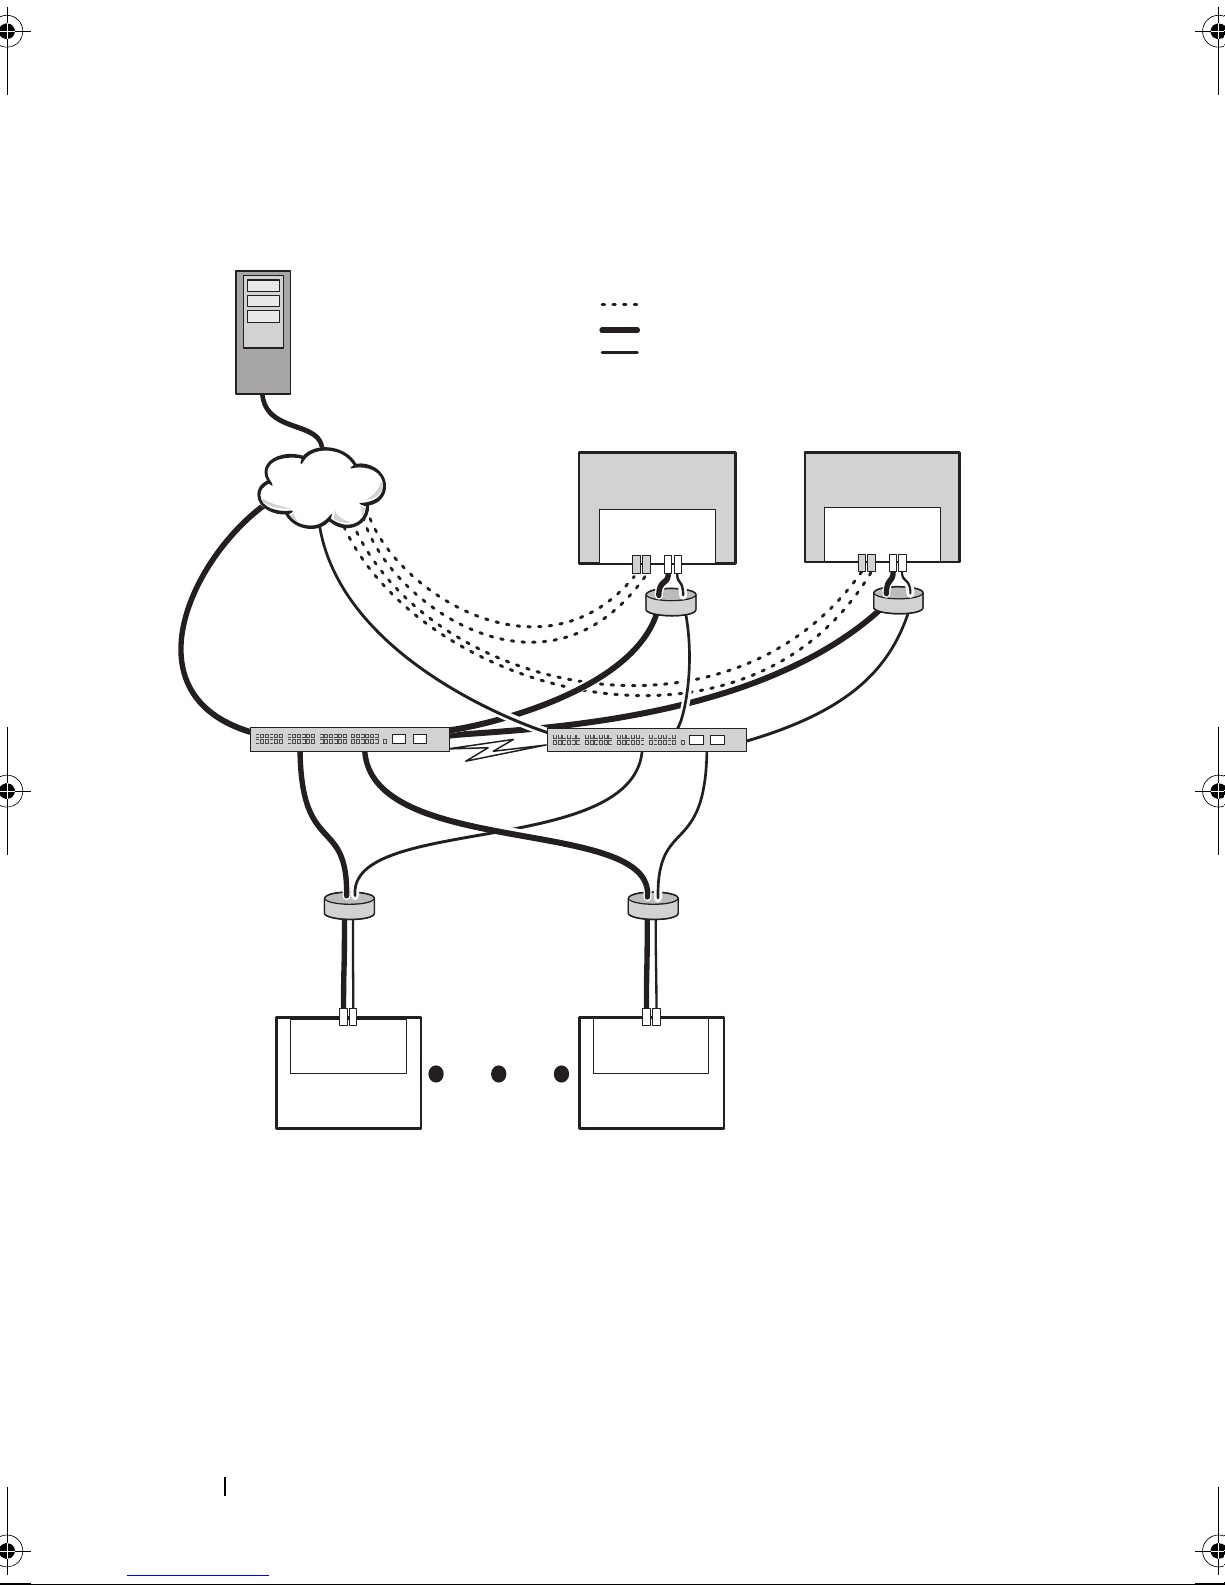
Figure 2-2. Redundant DX Cluster Services Nodes
public network
private network
redundant connections
primary
multi-cast
interlink
NIC
teamed
secondary
applications
DX CSN
DX CSN
2 Port LOM
DX Storage
Node
2 Port LOM
DX Storage
Node
4 Port LOM
4 Port LOM
14 DX Object Storage Platform Overview
Page 15

Subcluster Configuration
A Dell DX Storage Cluster can be split into two or more subclusters. The
subclusters are physically part of the same cluster but are recognized as
logically separate entities by the DX Object Storage software that provides
local area replication.
A subcluster can be:
• A set of nodes within one physical group (such as building, floor, wing,
and so on)
• An environmental group (such as rack, network switch, and power
circuit)
• Any other defined groups
If the building or power circuit fails, other nodes have an optimal set of data
replicas. See Figure 2-3.
All
DX Storage Nodes
connectivity requirements. The DX Storage Nodes must be in the same IP
subnet, must be able to participate in multicast and UDP traffic, and so on.
Clients may address
redirected to the proper
of a subcluster configuration is not required.
within the DX Storage Cluster have the same network
DX Storage Nodes
DX Storage Node
within any subcluster and are
. As a result, application awareness
For more information about subclusters, see "Local Area Replication" in the
DX Object Storage Advanced Administration Guide at
support.dell.com/manuals.
DX Object Storage Platform Overview 15
Page 16
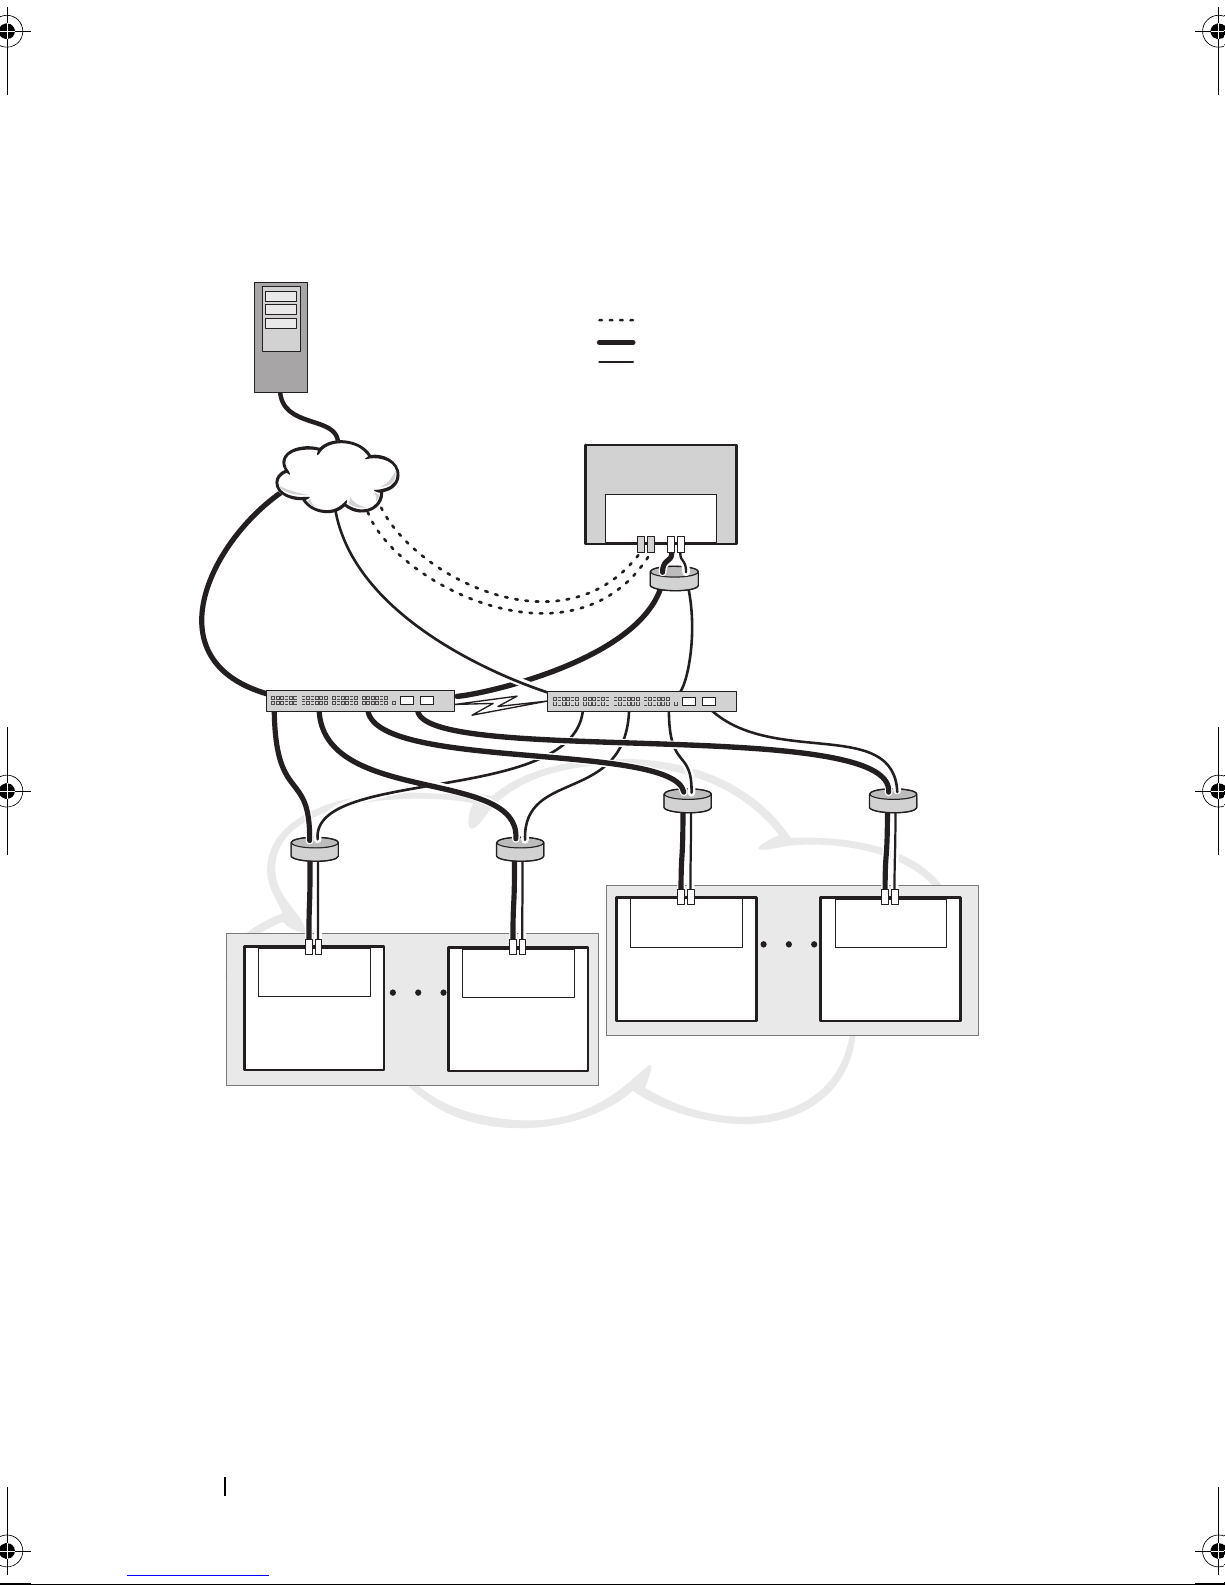
public network
private network
redundant connections
primary
interlink
subcluster 1
subcluster 2
NIC
teamed
applications
multi-cast
DX CSN
2 Port LOM
DX Storage
Node
2 Port LOM
2 Port LOM
2 Port LOM
4 Port LOM
DX Storage
Node
DX Storage
Node
DX Storage
Node
Figure 2-3. Subcluster Configuration
16 DX Object Storage Platform Overview
Page 17
Remote Cluster Configuration
When you deploy multiple DX Storage Clusters (for example multiple sites,
offsite backup, and so on), the DX Cluster Services Node provides the ability
to replicate data between DX Storage Clusters using the DX Content Router
software.
The DX Content Router provides two services:
•Publisher service
• Replicator service
Clusters are connected by one cluster's replicator service to another cluster's
publisher service. This link can either be one-way (for offsite backup) or
two-way (for mirrored configurations).
Each publisher can support a number of replicators with a specific set of
replication rules. The publisher does not provide same set of data objects to
each replicator.
For redundancy, more than one DX Cluster Services Node may be present in a
cluster, but only one DX Cluster Services Node can be active as a publisher at
any time.
NOTE: There can be multiple publishers per cluster, but only the active (or primary)
Cluster Services Node can be the active subscriber.
Clusters may be connected by any type of link that can handle the desired
traffic volume. This link must be secured to prevent reading cluster data
being passed between clusters. See Figure 2-4.
Cluster data is passed directly between the two
DX Cluster Services Node
s. It
is not recommended to have direct communication between storage nodes in
remote clusters.
For more information about multiple cluster configurations, see the Content
Router Setup and Configuration Guide at support.dell.com/manuals.
DX Object Storage Platform Overview 17
Page 18
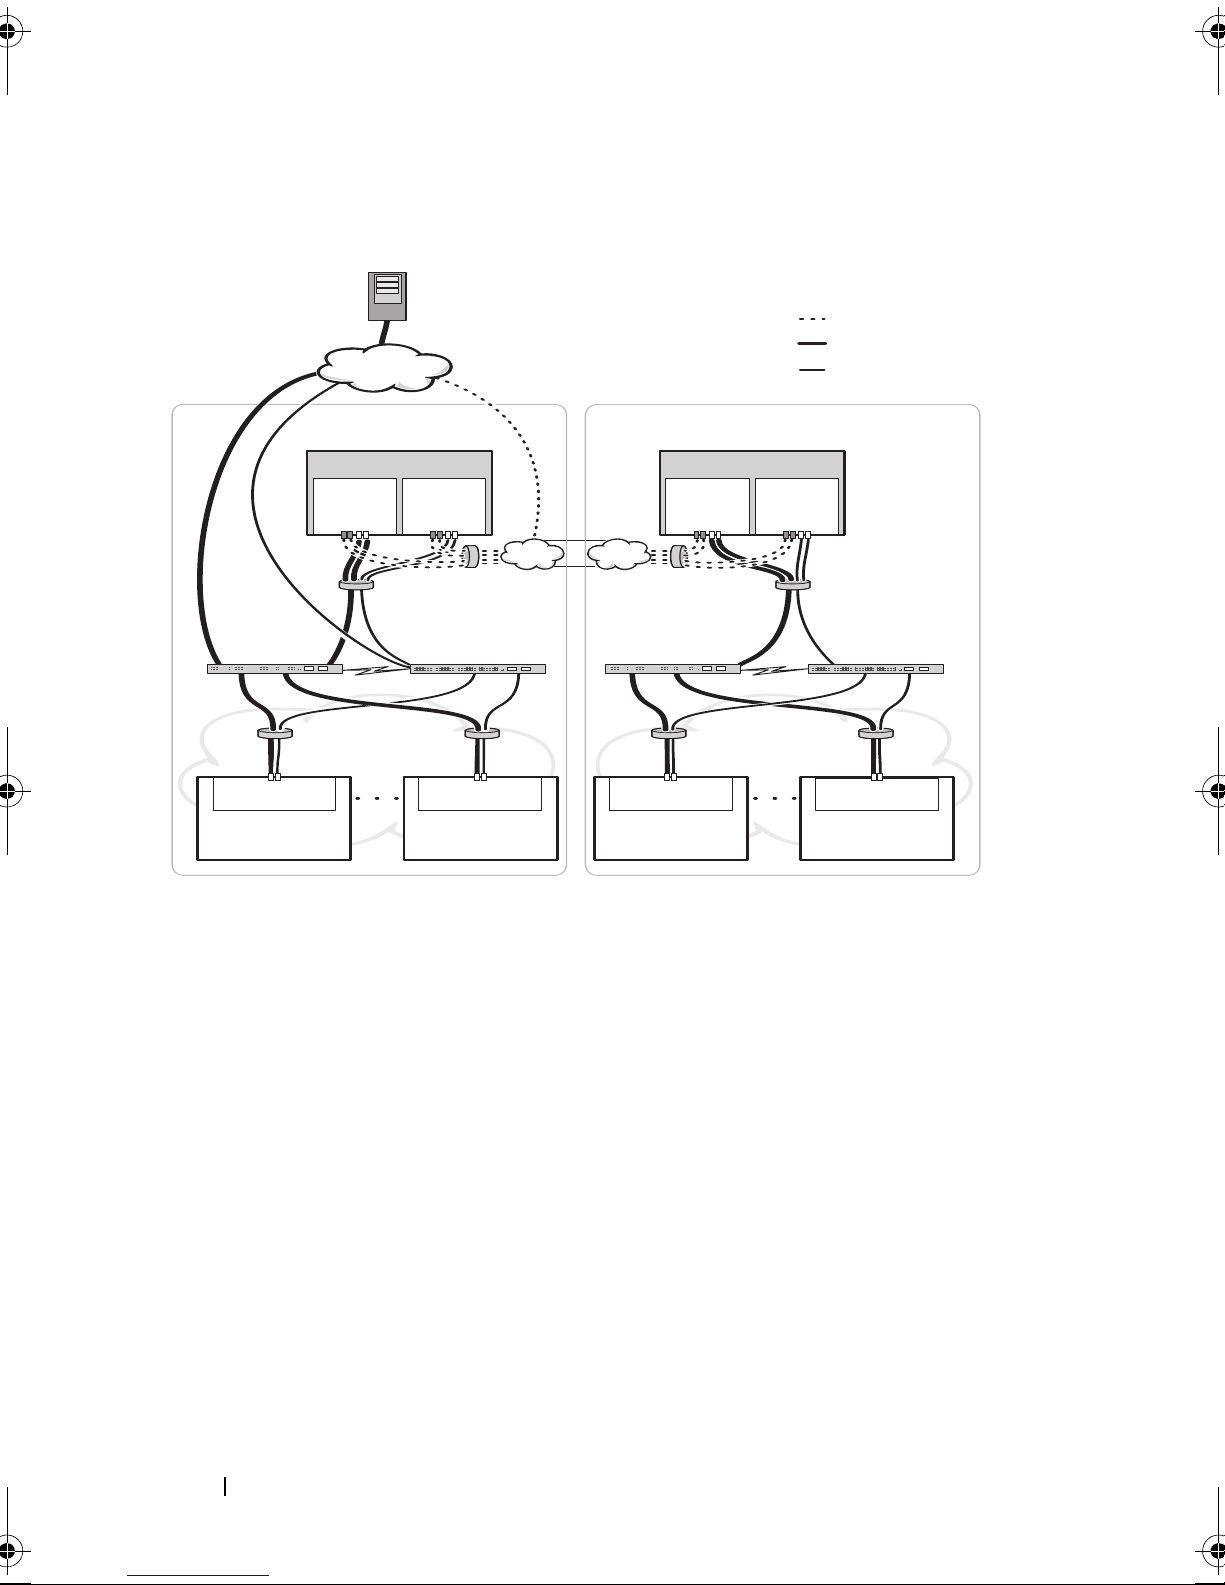
Figure 2-4. Multiple Cluster Configuration
multi-cast
multi-cast
local cluster
remote cluster
NIC
teamed
interlink
interlink
NIC
teamed
primary
primary
WAN VPN
secure network
applications
public network
private network
DX CSN DX CSN
4 Port
NIC
4 Port
NIC
4 Port
NIC
4 Port
NIC
2 Port LOM
DX Storage
Node
2 Port LOM
2 Port LOM
2 Port LOM
DX Storage
Node
DX Storage
Node
DX Storage
Node
redundant
connections
18 DX Object Storage Platform Overview
Page 19

Application Access to DX Object Storage
Platform
Communicating With a Local Cluster
Applications can communicate with a DX Storage Node at any time. The DX
Object Storage software automatically redirects applications to the proper
node even if the addressed node is an incorrect node to handle a request. If
both
Cluster Services Node
communicate with the remote cluster by addressing the remote Cluster
Storage Nodes or remote
configurations, it is recommended to create a single name through DNS
which maps to the DX Storage Nodes. A single name allows communication
with the DX Storage Nodes using one domain name. DNS automatically
rotates addressing through the storage nodes. For more information, see the
DX Object Storage Application Guide at support.dell.com/manuals.
Communicating With a Remote Cluster
and cluster nodes are not responding, you can
Cluster Services Node
directly. For many
Applications may communicate with a remote DX Storage Cluster during
local-cluster disaster recovery. For an application to communicate to a remote
DX Storage Cluster, the
network must be addressed. A proxy server on the
(on the local cluster) accepts HTTP requests from the application and
forwards them to a DX Storage Node in the DX Storage Cluster. The DX
Storage Node redirects the requests if necessary, and returns the response
back to the requester.
DX Cluster Services Node
on the remote public
DX Cluster Services Node
DX Object Storage Platform Overview 19
Page 20

20 DX Object Storage Platform Overview
Page 21

3
Setting Up the DX Object Storage
Platform
Installing the Initial Cluster or Redundant Cluster
Services Node
The Dell DX Object Storage Platform consists of at least one DX Cluster
Services Node and two DX Storage Nodes. Installation of the initial cluster or
additional cluster services nodes require deployment services from Dell. For
information about setting up the hardware, see the Getting Started Guide for
your Dell DX6a00 system at support.dell.com/manuals, and the Dell
DX6axyS system that shipped with your storage platform.
Configuring the DX Object Storage Platform
Dell DX Object Storage Platform includes a Cluster Services Node to enable
a centralized management interface for the DX Cluster. Default settings are
defined and recommended for system operation. However, there are a number
of configuration options which may be used to configure the storage platform
which are as follows:
• Reset administrator and operator passwords for the DX Cluster Services
console
• Default object replication parameters
• Cluster name
• Port number for management console and other services
• IP parameters
• Logging options
• SNMP options
• Setting persistent cluster settings
• Storing configuration files
Setting Up the DX Object Storage Platform 21
Page 22

For more information about these options, see the Cluster Services Node
Installation and Configuration Guide at support.dell.com/manuals.
NOTE: Use the Cluster Services Console for normal management and
configuration. Only experienced administrators should use the configuration files
for advanced configurations, described in the DX Object Storage Advanced
Administration Guide and the DX Object Storage Content Router Setup and
Configuration Guide. Contact your account team for professional services
consulting on advanced configurations.
DX Content Router services are not automatically configured. To enable
replication to remote clusters, publisher and subscriber services must be
configured through the DX Cluster Services console. For information about
configuring DX Content Router services, see the Cluster Services Installation
and Configuration Guide at support.dell.com/manuals.
For a complete list of reference documents, see "Additional References" on
page 43.
Adding Additional DX Storage Nodes
Before setting up the DX Storage Node, locate the Getting Started Guide for
your Dell DX6axyS system. Unpack and set up the DX platform hardware.
To set up the DX Storage Node hardware:
1
Rack and cable the DX6
2
Tur n o n th e D X 6
3
Enable capacity in the DX Cluster Services console
NOTE: The DX Storage Node is preconfigured to network boot from the DX Cluster
Services Node. The network ports must be connected to the private network before
the system is turned on.
axy
axy
S system
S system
Installing the System in a Rack
If the DX6axyS system includes a rail kit, locate the Rack Installation
Instructions supplied with the rail kit. Follow the instructions to install the
rails in the rack unit and to install the DX6axyS system in the rack.
22 Setting Up the DX Object Storage Platform
Page 23
Cabling the Appliance
Locate the Dell DX6axyS Getting Started Guide that shipped with your
system and follow the instructions to attach the power cables and network
cables to the DX6axyS system. Connect the network ports to the cluster's
private network on the same IP subnet as the other storage nodes. The DX
Storage Node is preconfigured to network boot from the DX Cluster Services
Node and the NIC ports are preconfigured in balanced-alb modes.
Turning On the DX Storage Node
After cabling the storage node, turn it on, and verify that the network boot is
successful.
NOTE: If the network boot is not successful, verify that the cables are correctly
connected to the private network.
Enabling Capacity in DX Cluster Services Console
The DX Storage Cluster capacity is licensed. To expand the cluster capacity,
you must purchase a capacity license. When you purchase a capacity license,
you receive a capacity license card that contains an activation code. Enter the
activation code in the DX Cluster Services console to enable the additional
cluster capacity.
NOTE: The capacity is only applicable to the cluster in which it is entered.
To activate the additional capacity, follow the instructions in the Cluster
Services Node Installation and Configuration Guide.
Adding Network Adapter to DX Storage Nodes
You can add additional network adapters to the DX Storage Nodes to expand
the network bandwidth to the storage nodes. To add additional network
adapters:
1
Turn off the DX Storage Node.
2
Follow the steps to add a network adapter in the Dell DX6
Hardware Owner's Manual
3
Connect the Ethernet ports to the private network.
4
Turn on the DX Storage Node.
.
The DX Storage Node is automatically configured with all network ports bonded.
axy
S system
Setting Up the DX Object Storage Platform 23
Page 24
Adding Network Adapters to DX Cluster Services Nodes
public network private network
4 Port
NIC
4 Port
NIC
DX 6a00
You can add additional network adapters to the DX Cluster Services Nodes to
expand the network bandwidth on both the private and public network.
NOTE: Access to remote clusters is interrupted when the primary Cluster Services
Node is offline. Do not promote a secondary Cluster Services Node to primary as it
cannot be demoted back to secondary. Demoting the original primary Cluster
Services Node as a secondary Cluster Services Node requires re-imaging the
original primary Cluster Services Node.
To add additional network adapters:
1
Turn off the DX Cluster Services Node.
2
Follow the steps in the Dell DX6
add a network adapter.
3
Connect the Ethernet cable(s) for the external and internal network
accordingly. See Figure 3-1.
4
Turn on the DX Cluster Services Node.
5
Change the IP address of the external network interface to a new valid IP
address from the
Content Services Configuration
Services Administration console.
a00
system
Hardware Owner's Manual
page of the DX Cluster
to
The first half of the Ethernet ports on the additional network adapter
automatically bonds with the existing network ports on the external
network and the second half automatically bonds with the existing
network ports on the internal private network.
NOTE: The external network interface IP address can be set back to its original
value. Modifying the external network IP address detects and bonds the additional
network ports.
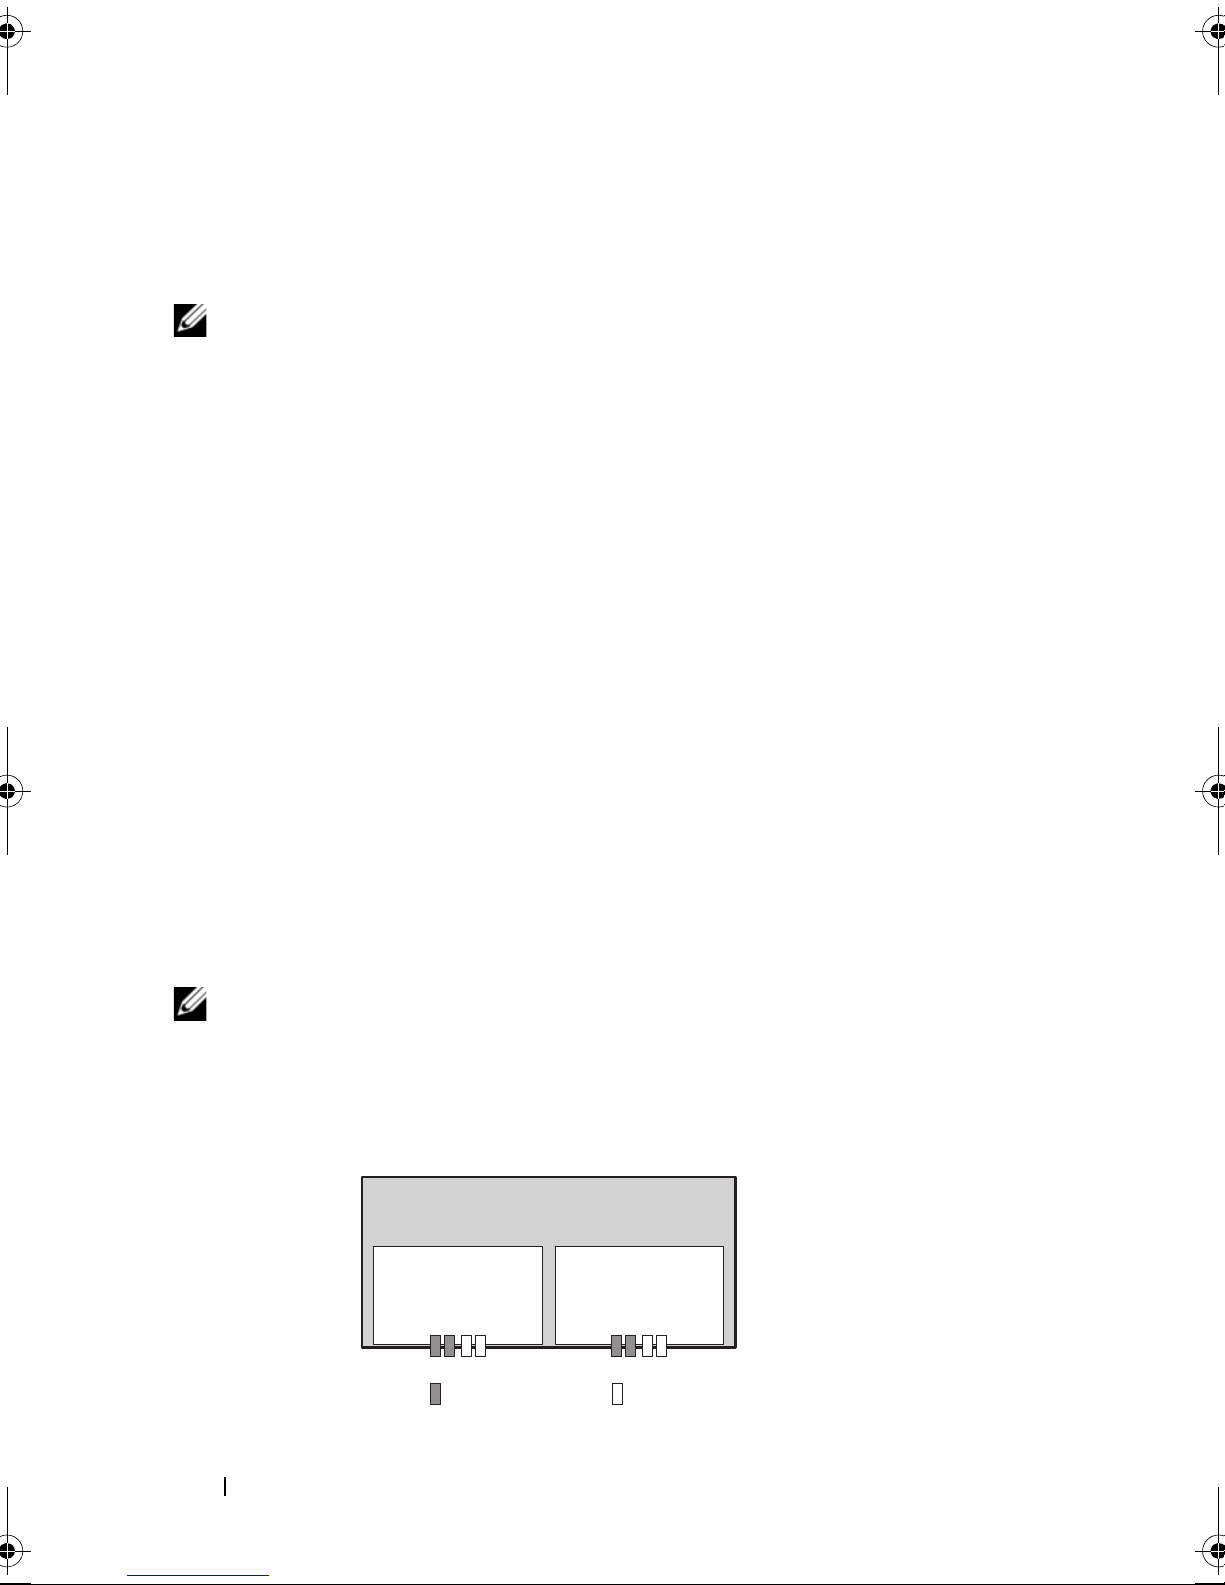
Figure 3-1. Ethernet Cable Connections to the External and Internal Networks
24 Setting Up the DX Object Storage Platform
Page 25
4
Updating the Dell DX Object
Storage Platform Software
Updates for the Dell DX Object Storage Platform software are periodically
made available to correct problems, improve performance, introduce new
capabilities, and support additional hardware. It is recommended that you
download the updates to ensure that the cluster runs optimally. See the Dell
DX Object Storage Platform Interoperability Guide at
support.dell.com/manuals to determine the minimum software versions
supported.
DX Cluster Services Node updates may include:
• System BIOS
• System firmware
• System device drivers
• Operating system
• DX Cluster Services Node software
•DX Storage Node software
DX Storage Nodes updates may include:
• System BIOS
• System firmware
NOTE: DX Storage Node operating system and associated drivers are part of the
storage node software image hosted on the DX Cluster Services Node. To update
the storage node software across the cluster, see "Updating the DX Storage Node
Software" on page 28.
Updating the Dell DX Object Storage Platform Software25
Page 26

Checking Software Version Compatibility
Dell DX Compatibility Manager is a utility that is installed on the DX Cluster
Services Nodes. This utility collects and provides information about the
current BIOS, firmware, drivers, and software versions in your cluster.
Compatibility Manager compares these versions to a predetermined profile of
a released version of DX Storage Platform components and identifies
potential conflicts.
Using the DX Object Storage Platform Compatibility Manager
Compatibility Manager is an application that runs in the background on the
Cluster Services Nodes. It checks the installed versions of the software and
hardware components within the cluster. The Compatibility Manager
compares this data against a known profile of compatible versions and writes
the status to a text file. It is recommended that you check the file after a
change in the software or hardware has occurred within the cluster.
NOTE: The primary Cluster Services Node checks the configuration of the storage
nodes. The secondary Cluster Services Node only checks its own versions.
Each software and hardware component in the cluster displays a status level
as described in Table 4-1.
Table 4-1. Status Levels
Status Level Description
OK The component is compatible
Warning It is recommended to upgrade or downgrade the
component
Critical It is required to upgrade or downgrade the
component
Error An internal error occurred while checking the status
Disabled The Compatibility Manager is disabled
26 Updating the Dell DX Object Storage Platform Software
Page 27

To verify cluster compatibility:
1
Open the file
/opt/dell/dellACM/CMREPORT.TXT
on the primary
Cluster Services Node.
2
Review the status information for the Cluster Services Node and the
individual Storage Nodes.
3
For more detailed component status information, run the following
command:
#cd /opt/dell/dellACM/dellacmscr.sh -report -host=
<host name>
where <host name> is the name of the cluster services node or a storage
node and can be obtained from the CMREPORT.txt file.
For more information on updating the Cluster Services Node and the Storage
Node software, see "Updating the DX Cluster Services Node Software" on
page 28 and "Updating the DX Storage Node Software" on page 28.
Troubleshooting the Compatibility Manager
If you experience problems with Compatibility Manager, verify that the latest
version is installed. Compatibility Manager can be downloaded from
support.dell.com. Run the following commands to determine the current
version of:
•The package name—
•The package details—
#rpm -q -a|grep dellacm
#rpm -q -i <package name>
If the problems persist, contact Dell.
Updating the Dell DX Object Storage Platform Software 27
Page 28

Updating the DX Cluster Services Node Software
Updates for the system operating system, BIOS, firmware, device drivers, and
the application software are available at support.dell.com/downloads.
NOTE: Ensure that you provide the Service Tag or system model on the Driver and
Downloads page before you search for system software updates.
You can update the system BIOS, firmware, operating system, and device
drivers using:
• Dell Unified Server Configurator-LifeCycle Controller Enabled
(USC-LCE)—USC-LCE uses iDRAC6 Express and/or Enterprise along
with UEFI firmware to access and manage the hardware including
component and subsystem management. It provides platform updates,
hardware configuration, operating system deployment, and hardware
diagnostics in a pre-operating system environment. For more information,
see the
support.dell.com/manuals
• Dell Management Console (DMC)—DMC is the next generation one-tomany systems management application with enhanced discovery,
inventory, monitoring, and reporting features. It is a web-based graphical
user interface (GUI), which is installed on a management station in a
networked environment. For more information, see the
Console User's Guide
Dell LifeCycle Controller User's Guide
.
at
support.dell.com/manuals
at
Dell Management
.
Updating the DX Storage Node Software
You can update system BIOS and firmware using:
• USC-LCE—This method requires a USB storage device with at least 5 GB
of space.
• DMC—This method requires a DMC server present on the internal
private network.
Storage node software updates are installed on the DX Cluster Services Node.
The DX Storage Nodes are network booted from images residing on the
cluster services node.
28 Updating the Dell DX Object Storage Platform Software
Page 29
To update the software used in the storage cluster:
1
Install the new rpm using the following command:
rpm -ivh [new version]
A new DX Storage Node software version is displayed on the Cluster
Services Node console after a successful installation of the storage node
software on the DX Cluster Services Node.
2
To view the DX Storage Node software version, click
Cluster Services Netboot Management
3
From the
Netboot Management
page, select the newly installed storage
.
node software and reboot the DX Storage Cluster to apply the new
software version.
NOTE: If concurrent data availability is a concern, you must reboot your cluster
nodes one at a time. Suspend volume recovery from the DX Object Storage console
or SNMP during the reboot process to prevent cluster churn.
Receiving System Software Update Notifications
Dell technical update subscriptions allow you to receive critical product
alerts, updates to files, drivers and utilities for your system.
To register for these notifications:
1
Go to
2
Click on the
Downloads
support.dell.com/support/downloads
Technical Subscriptions
link under the
section.
.
Drivers and
Updating OpenManage Server Administrator
To download updates for the OpenManage Server Administrator:
1
Go to
2
Select
Systems Management
3
Follow the installation instructions provided on the download page.
support.dell.com/support/downloads
.
OpenManage Server Administrator Managed Node
category.
under the
Updating the Dell DX Object Storage Platform Software 29
Page 30

30 Updating the Dell DX Object Storage Platform Software
Page 31

5
Disaster Recovery
You can recover the Dell DX Cluster Services Node from a number of
hardware or software failures. Depending on the type of failure, you must:
• Recover the server disk
• Reinstall the operating system
• Reinstall the DX Cluster Services Node software
• Reinstall Dell OpenManage system management applications
Recovery Solution Map
Keep the following guidelines in mind:
• Reinstallation of the operating system requires you to reinstall all the
applications on the system.
• A non-recoverable failure of the disk group containing the operating
system requires reinstallation of the operating system and all applications.
• For all non-disk related hardware failures, see the
Manual
for the DX6
a00
system
at support.dell.com/manuals.
Hardware Owner's
Disaster Recovery 31
Page 32

Table 5-1. System Recovery Map
Potentially Affected System Components
Hardware Software
Failure Type
Server RAID Group
Failure (Disk
Failure)
Operating System
Cluster Services
Node
OpenManage
Server
Administrator
Recovery Methods
Use the following
steps to resolve
these issues.
Server Disk Group
Operating System
Node Software
Cluster Services
Administration
OpenManage Server
DX Compatibility Manager
X XXXX
XXXX
X
X
1,2,3,4,5
2,3,4,5
3
4
DX Compatibility
X
Manager
1—"Recovering From Disk Failures" on page 33
2—"Reinstalling the Operating System" on page 34
3—"Reinstalling the DX Cluster Services Node Software" on page 37
4—"Installing Dell OpenManage Server Administrator" on page 40
5—"Installing Dell DX Compatibility Manager" on page 40
32 Disaster Recovery
5
Page 33
Recovering From Disk Failures
NOTE: The DX Cluster Services Node system's internal disk storage is
preconfigured as RAID 5.
Single Disk Failure
RAID 5 provides uninterrupted operation of the system if a single disk fails. If
a single disk failure occurs, replace the failed hard drive. For more
information, see Dell DX6a00 systems Hardware Owner's Manual at
support.dell.com/manuals. After the hard drive is replaced, it is automatically
assigned by the RAID controller and rebuilt into the disk group. After the disk
group is rebuilt, the RAID 5 disk group continues to operate normally.
CAUTION: If a second drive fails before the disk group rebuild is complete, data
loss occurs.
Two Disk Failure
If the system experiences a two disk failure, the RAID 5 group must be
reconfigured and the operating system must be reinstalled. Follow the steps
for recovering from operating system failure listed in Table 5-1.
Detecting and Monitoring Disk Failures
To optimize the protection of the RAID group on the system, it is essential
that you detect hard drive failures immediately. Replacing failed disks
immediately reduces the risk of unplanned downtime and loss of critical data.
Ensure that you replace the failed disk with a new disk of the same or greater
capacity. If drives of greater capacity are used, some usable disk space is lost in
the RAID 5 configuration.
You can use the following methods to monitor the health of the disks:
• Hard drive LED indicators—Monitors the drive activity and reports
failures. For more information, see the Dell DX6
Manual
• Dell OpenManage Server Administrator—Monitors the health of the
internal disks.
at support.dell.com/manuals.
a00
Hardware Owner's
Disaster Recovery 33
Page 34
• Dell Management Console—Centrally monitors the status of Dell
systems. For more information about installing and using DMC, see the
Dell Management Console User's Guide at support.dell.com/manuals.
Reinstalling the Operating System
The operating system is preinstalled on the DX Cluster Services Node. After a
multiple disk failure of the DX6a00 system RAID group, reinstall the
operating system:
1
Replace the failed disks.
2
Create a RAID 5 disk group across all disks of the DX Cluster Services
Node.
3
Reinstall the operating system. For more information on replacing the
drive, see "Recovering From Disk Failures" on page 33.
NOTE: If the RAID group has not failed and you are reinstalling the operating
system, skip "Configuring and Managing RAID" on page 34.
Configuring and Managing RAID
The BIOS Configuration Utility (<Ctrl><R>), is a storage management
application embedded on the PERC H700 card that configures and maintains
RAID disk groups and virtual disks. The BIOS Configuration Utility is
independent of the operating system and is available during system startup.
See the Dell PowerEdge RAID Controller (PERC) H700 and H800 User's
Guide at support.dell.com/manuals for specific instructions on the BIOS
Configuration Utility and virtual disk management.
Create a single RAID 5 group across all six internal drives. When creating the
RAID group, configure two virtual disks.
• Set virtual disk 0 to 75 GB
• Set virtual disk 1 to size of the remaining capacity
34 Disaster Recovery
Page 35

Recovering the Operating System
Use the Unified Server Configurator - LifeCycle Controller Enabled (USCLCE) utility on the DX6a00 system to recover the operating system. For
specific instructions, see "Deploying the Operating System using the OS
Deployment Wizard" in the Dell Unified Server Configurator - LifeCycle
Enabled User Guide at support.dell.com/manuals.
CAUTION: Reinstalling the operating system on existing disk drives erases all
installed applications and data.
Locate the operating system media that came with the system and proceed to
the operating system deployment option from USC-LCE. Follow the
instructions on the screen to install the operating system.
• When prompted to enter an installation number, select
Installation Number
at a later stage.
• The DX Cluster Services Node software installation process requires a
YUM repository for updating package dependencies. Skip the installation
number entry to save time during the dependency update process.
• To save time during the dependency update process, select
Connect
connect to the Red Hat network once the DX Cluster Services Node
software installation is complete.
•To
configure the operating system partitions, see "Configuring the
Partitions During Operating System Recovery
when prompted to connect to the Red Hat Network. You may
option. The installation number can also be entered
" on page 35
Skip Entering
Do Not
.
Configuring the Partitions During Operating
System Recovery
To configure the required partitions:
1
On the
Modify Partitioning Layout
2
Click
3
Click
4
In the
Linux Partition Configuration
Next
.
New
.
Allowable Drives
screen, select the
option.
field, de-select the sdb volume.
Disaster Recovery 35
Review and
Page 36

5
Create a 10 GB restore partition of the file system type physical volume
(LVM) within the sda and click
6
7
8
9
Select
Select
In the
The
Click
/dev/sdb1
from the
Format partition
Mount Point
/u01
mount point occupies the entire space of the sdb.
Next
.
field, enter
Device
as
OK
list and click
ext3
.
/u01
.
and click OK.
Edit
.
The /u01 mount path can also be configured after installing the operating
system. To configure the mount path after installing the operating system:
1
Identify the disk to be formatted. To identify the disk to be formatted, run
the following command:
fdisk -l | grep '^Disk'
2
Create a partition on the /dev/sdb block device using
parted
:
parted /dev/sdb
3
Create a gpt label on the block device:
(parted) mklabel
Yes/No: Yes
New disk label type? [gpt]? gpt
4
Create a partition that consumes the entire available space on /dev/sdb:
(parted) mkpart primary ext3 0 -1
Once the partition is created, exit using the following command:
(parted) quit
5
Create a file system on the formatted partition table. For example, run the
following command:
mkfs.ext3 -m1 /dev/sdb1
6
Create the
the
/u01
/u01
directory in root directory and mount the file system to
directory. For example, run the following command:
mkdir /u01
mount /dev/sdb1 /u01
36 Disaster Recovery
Page 37

7
To keep the mount path persistent across reboot, add the mount path to
/etc/fstab
. For example, run the following command:
vi /etc/fstab
Table 5-2 lists the options that must be selected to create a mount path.
Table 5-2. Options to Create a Mount Path
# device name Mount
Path
/dev/sdb1 /u01 ext3 defaults 1 2
fs type options dump-freq pass-num
Reinstalling the DX Cluster Services Node
Software
Setting Up and Configuring the Network
The DX Cluster Services Node software requires access to both the external
network and to a dedicated internal network. The internal private network
ensures that the DX Storage Cluster traffic is protected from unauthorized
access and that the external network is isolated from both the PXE boot
server and cluster multicast traffic. The DX Cluster Services Node software
automatically allocates the first half of the Ethernet ports detected on each
NIC interface card to the external network and the second half of the
Ethernet ports detected on each NIC interface card to the internal network.
All NICs allocated to a network are bonded into a bond interface using
mode 6 or balance alb bonding. For example, on a server with four LOM ports
and a quad port NIC adapter, LOM ports 0-1 and NIC adapter ports 0-1 are
allocated to the external network in a balance-alb bond interface and LOM
ports 2-3 and NIC adapter ports 2-3 are allocated to the internal network in a
balance-alb bond interface.
NOTE: Network switch configuration is outside the scope of the DX Cluster
Services Node software. Switches must be properly configured by a system
administrator to ensure correct connectivity and bonding mode support.
Administrators must not connect the configured internal network ports to the
external network.
Disaster Recovery 37
Page 38
Connecting the DX Cluster Services Node to the
Private and Public Networks
• Connect the lower NIC ports 0-1 of the DX Cluster Services Node to the
external private network switch.
• Connect the upper NIC ports 2-3 of the DX Cluster Services Node to the
internal network switch.
Connecting the DX Storage Nodes to the Private
Network
Connect all the NIC ports (LOM as well as add on card, if available) of each
storage node to the internal private network switch.
NOTE: Do not turn on the storage nodes at this time.
Creating a Local YUM Repository on the DX6000
System
The DX Cluster Services Node software installation process is dependent on
additional rpm packages that are not installed on the DX6a00 system by
default. These packages are available on the Red Hat Enterprise Linux
distribution media included with the system. A local YUM repository is
required to update the system with the package dependencies for the DX
Cluster Services Node software installation.
To create a local YUM repository on your system:
1
Turn on the DX Cluster Services Node.
2
Insert the
optical drive and allow the file system to auto mount. The default
directory path for the auto mounted file system is
x86_64\ DVD
YUM setup process. If the drive auto mounts, run the following
commands:
# mkdir /media/dvd
operating system
. The white spaces in this file path causes errors during the
media that came with the system into the
/media/RHELx.x\
# mount --move /media/RHEL_x.x\ x86_64\ DVD
/media/dvd
38 Disaster Recovery
Page 39
If the CDROM does not auto mount, perform the following commands.
# mkdir /media/dvd
# mount /dev/dvd /media/dvd
NOTE: For more information on the compatible RHEL versions, see the Dell DX
Object Storage Platform Interoperability Guide at support.dell.com/manuals.
3
Define the repository where your copy of rpm packages are stored. To
define the repository, create a new file in /etc/yum.repos.d named rheldvd.repo using the following commands:
# cd /etc/yum.repos.d
# cp rhel-debuginfo.repo rhel-dvd.repo
# vi rhel-dvd.repo
4
Change the following lines in
rhel-dvd.repo
file:
[base]
name=Red Hat Enterprise Linux $releasever $basearch - Base
baseurl=file:///media/dvd/Server
gpgcheck=1
enabled=1
gpgkey=file:///etc/pki/rpm-gpg/RPM-GPG-KEYredhat-release
5
Remove any cached packages from the system and enable the local YUM
repository:
# yum clean all
# yum repolist
The DX6a00 system is now ready to be updated with all the dependencies
required to install the DX Cluster Services Node software.
NOTE: The DX Cluster Services Node software install script calls YUM update
upon execution.
Disaster Recovery 39
Page 40

Installing Dell DX Compatibility Manager
The Dell DX Compatibility Manager is available as an rpm package. To install
the DX Compatibility Manager:
1
Download the latest version of rpm package from
2
Copy the rpm package to a directory on your system.
3
Install the rpm package using the following command:
# rpm –i <package>.rpm
support.dell.com
.
Installing Dell OpenManage Server Administrator
Dell Server Administrator provides a comprehensive, one-to-one systems
management solution from:
• An integrated, web browser-based graphical user interface (GUI)
• A command line interface (CLI) through the operating system
The Server Administrator is designed for system administrators to manage
systems locally and remotely on a network. It allows system administrators to
focus on managing their entire network by providing comprehensive one-toone systems management.
You can install Server Administrator using the Dell Systems Management Tools
and Documentation media. The media provides a setup program to install,
upgrade, and uninstall the Server Administrator, managed system and
management station software components. Additionally, you can install the
Server Administrator on multiple systems through an unattended installation
across a network.
The Dell OpenManage installer provides installation scripts and RPM
packages to install and uninstall the Server Administrator and other managed
system software components on your managed system. For more information,
see the Dell OpenManage Server Administrator Installation Guide and the
Dell OpenManage Management Station Software Installation Guide at
support.dell.com/manuals.
40 Disaster Recovery
Page 41

Installing DX Cluster Services Node Software
If you have at least one data replica, any data on the failed storage node or
hard drive is replicated to another storage node in the cluster. Hardware status
for the DX Storage Nodes can be monitored from the DX Object Storage
Node Administration Console. Replace any failed hardware components on
the DX Storage Nodes as required to bring the failed node back into service.
The DX Cluster Services Node software distribution is available as a
collection of rpm packages that are installed with a self-extracting shell script.
The packages and their dependencies must be installed on the DX6a00
system as the root user. To install DX Cluster Services Node software:
1
Download the latest version of the DX Cluster Services Node software
distribution available online at
2
Copy the distributed zip file to your DX Cluster Services Node system and
unzip it into the directory of your choice.
3
Install the DX Cluster Services Node software by running the
self-extracting script from inside the bundle directory location where the
shell script was unzipped.
support.dell.com/downloads
.
This initiates installation of the DX Cluster Services Node software and its
dependent packages. For more information, see the
Installation and Configuration Guide
4
Eject the
following command:
# eject /media/dvd
5
Reboot the DX6
Use the following command to reboot the system:
# reboot
operating system
a00
system when the installation completes.
media from the optical drive using the
at
support.dell.com/manuals
Cluster Services Node
.
Disaster Recovery 41
Page 42

Configuring the DX Cluster Services Node
Software
After installing and rebooting the DX Cluster Services Node, you are
automatically prompted to enter some minimal configuration data to
configure and deploy the DX Cluster Services Node. This configuration
process is required only once after the initial installation. Any necessary
updates to the parameters entered during this initial boot process can be
made from the Cluster Services Node Console. For more information about
configuring the Cluster Services node, see the Cluster Services Node
Installation and Configuration Guide at support.dell.com/manuals.
Restoring the Cluster Configurations
Previous cluster configuration files can be restored through the Cluster
Services Node Console (Cluster Services TAB Backup and Restore). For more
information on restoring cluster configurations, see the Cluster Services Node
Installation and Configuration Guide at support.dell.com/manuals.
Bringing Up the DX Storage Cluster
Turn on the storage nodes in your cluster. Each storage node network boots
from a DX Storage Node image located on the DX Cluster Services Node.
42 Disaster Recovery
Page 43

Additional References
Software Documents
Table 6-1. Software Documents
Document Description Location
6
Dell DX Object Storage
Platform User's Guide
Cluster Services Node
Installation and
Configuration Guide
DX Object Storage Getting
Started Guide
DX Object Storage
Advanced Administration
Guide
Provides an overview of the
DX Object Storage
Platform and steps to
upgrade and recover the
platform.
Provides information on
configuration and
administration tasks for
deploying and monitoring a
DX Cluster Services Node.
Covers the basic steps
necessary to deploy and
administer a DX Storage
Cluster.
Covers advanced
configuration and
administration tasks for
deploying and monitoring a
DX Storage Cluster.
support.dell.com/manuals
support.dell.com/manuals
support.dell.com/manuals
support.dell.com/manuals
DX Object Storage
Application Guide
Guides application
programmers who are
developing or customizing
client-side programs.
Additional References 43
support.dell.com/manuals
Page 44

Table 6-1. Software Documents
Document Description Location
(continued)
Content Router Setup and
Configuration Guide
SCSP Proxy Overview Provides an overview of the
Dell DX Object Storage
Platform Interoperability
Guide
Cluster Services Node
Release Notes
DX Object Storage Release
Notes
Covers the steps required
to configure Content
Router and the
administration actions
necessary to monitor and
run one or more Content
Router nodes.
SCSP proxy and covers the
steps for configuring and
running the proxy.
Provides details of
supported platforms,
peripherals, and software.
Contains late-breaking
information about your
appliance.
support.dell.com/manuals
support.dell.com/manuals
support.dell.com/manuals
support.dell.com/manuals
Content Router Release
Notes
Hardware Documents
Table 6-2. Hardware Documents
Document Description Location
Dell DX6000 Getting
Started With Your System
Dell DX6000 Hardware
Owner's Manual
Dell DX6012S Getting
Started With Your System
Helps you get started with
the Dell DX6000 systems.
Contains information
specific to your Dell
hardware.
Helps you get started with
the Dell DX6012S systems.
support.dell.com/manuals
support.dell.com/manuals
support.dell.com/manuals
44 Additional References
Page 45

Table 6-2. Hardware Documents
(continued)
Document Description Location
Dell DX6012S Hardware
Owner's Manual
Contains information
specific to your Dell
hardware.
Dell DX6004S Getting
Started With Your System
Contains information
specific to your Dell
hardware.
Dell DX6004S Hardware
Owner's Manual
Contains information
specific to your Dell
hardware.
Rack Installation Guide Contains information on
installing the system in a
rack.
Dell PowerEdge RAID
Controller (PERC) H200
and 6Gbps SAS HBA
Contains information on the
Serial Attached SCSI H200
adapter.
User's Guide
Dell PowerEdge RAID
Controller (PERC) H700
and H800 User's Guide
Contains information on the
Serial Attached SCSI H700
adapter.
support.dell.com/manuals
support.dell.com/manuals
support.dell.com/manuals
support.dell.com/manuals
support.dell.com/manuals
support.dell.com/manuals
Dell DX Support Matrix Compatibility Matrix for the
DX Object Storage Platform.
Additional References 45
support.dell.com/manuals
Page 46

Systems Management Documents
Table 6-3. Systems Management Documents
Document Description Location
Dell OpenManage
Software Installation and
Security User's Guide
Dell OpenManage Server
Administrator User's
Guide
Dell Management Console
User's Guide
Describes how to install Dell
OpenManage Server
Administrator software.
Describes how to use Dell
OpenManage Server
Administrator to manage
your system.
Describes how to use Dell
Management console to
manage your systems.
support.dell.com/manuals
support.dell.com/manuals
support.dell.com/manuals
46 Additional References
 Loading...