

Page 1
086-002937-017
DS8118 Manual-6 langs. (086-002937-017)
DS8118
User Manual
Mode d’emploi
Bedienungsanleitung
Manuale dell’utente
Manual del Usuario
Manual do Utilizador
Page 2
ENGLISH
FRANÇAIS
DEUTSCH
ITALIANO
ESPAÑOL
PORTUGUÊS
DS8118 Manual-6 Lang. (086-002937-017)
1.3 Mega-Pixel Digital Camera (DS8118)
USER MANUAL
TABLE OF CONTENTS
Introduction ................................................................................................................... 1
Brief Description ...................................................................................................... 1
Important Notice ...................................................................................................... 1
Safety Notes ............................................................................................................. 1
Notes on the Digital Camera .................................................................................... 2
Key Features .................................................................................................................. 3
Front View ................................................................................................................ 3
Back View ................................................................................................................ 3
Mode Switch ............................................................................................................ 4
4-Way Controller ...................................................................................................... 4
Liquid Crystal Display ............................................................................................. 4
Battery Level Indicator ............................................................................................. 4
Getting Started .............................................................................................................. 5
Package Contents ..................................................................................................... 5
Installing the Batteries .............................................................................................. 5
Using an AC Adapter ................................................................................................ 5
Attaching the Strap and Lens Cap ............................................................................ 6
Secure Digital (SD) Card / Multi-Media Card (MMC) .......................................... 6
Basic Photography ......................................................................................................... 7
Quick Start .............................................................................................................. 7
Preparing the Camera ......................................................................................... 7
Holding the Camera ........................................................................................... 7
Taking Basic Pictures ......................................................................................... 7
Shutting Off the Camera .................................................................................... 7
Basic Functions and Settings .................................................................................... 8
Toggling OSD (On-Screen Display) Information .............................................. 8
Selecting a Focus Mode ..................................................................................... 8
Selecting a Flash Mode ...................................................................................... 9
Zooming ............................................................................................................. 10
Using the Self-Timer .......................................................................................... 10
Playing Back Last Picture Taken ....................................................................... 11
Introduction to Camera Modes .................................................................................... 11
Guide to Menus ........................................................................................................ 11
Setup Menu ........................................................................................................ 12
P.Counter (Picture Counter) ........................................................................ 12
Set Clock ..................................................................................................... 12
Set City ........................................................................................................ 13
Show Time ................................................................................................. 13
Language ..................................................................................................... 14
Beep Tone .................................................................................................... 14
Auto Off (Auto Power-Off) ......................................................................... 14
TV Output ................................................................................................... 14
File No. ....................................................................................................... 14
ENGLISH
FRANÇAIS
DEUTSCH
ITALIANO
ESPAÑOL
PORTUGUÊS
Page 3

Format ......................................................................................................... 15
Reset ............................................................................................................ 15
USB Mode ................................................................................................... 15
Camera Menu ..................................................................................................... 16
Size (Image Size) ........................................................................................ 16
ENGLISH
FRANÇAIS
DEUTSCH
ITALIANO
ESPAÑOL
PORTUGUÊS
Quality (Picture Quality) ............................................................................. 17
White Bal. (White Balance) ........................................................................ 17
Metering ...................................................................................................... 18
ISO .............................................................................................................. 18
Con. Shoot (Continuous Shooting) ............................................................. 19
EV (Exposure Compensation) .................................................................... 19
Audio Tag .................................................................................................... 19
Shooting Movies ............................................................................................................. 19
Movie Mode Functions ............................................................................................. 20
Movie Menu ............................................................................................................. 20
Playback Functions ....................................................................................................... 21
Playback of Images .................................................................................................. 21
Zooming Functions ............................................................................................ 22
Deleting Playback Image ................................................................................... 22
Playback of Movies .................................................................................................. 22
Deleting Playback Movie .................................................................................. 23
Multi-Frame Review ................................................................................................ 23
Playback Menu ......................................................................................................... 24
Delete ................................................................................................................. 24
Deleting Selected Images and Movies ........................................................ 24
Deleting All ................................................................................................. 24
Protect (Protecting Images) ............................................................................... 24
Protecting / Unprotecting Selected Images and Movies ............................. 25
Protecting / Unprotecting All ...................................................................... 25
DPOF (Specifying Digital Print Order Format) ................................................ 25
DPOF of Selected Images ........................................................................... 25
DPOF of All Images .................................................................................... 25
Slide (Slideshow) ............................................................................................... 26
Connecting to External Devices ................................................................................... 26
Using a Tripod with the Camera ............................................................................... 26
Connecting to a TV ................................................................................................... 26
Connecting to a Windows-Based PC ........................................................................ 27
Installing Drivers and Software ......................................................................... 27
Connecting the Camera to the PC ...................................................................... 27
Disconnecting the Camera ................................................................................. 28
Connecting to a Macintosh ....................................................................................... 28
Connecting the Camera to the Macintosh .......................................................... 28
Addendum ...................................................................................................................... 29
List of Compatible Memory Cards ........................................................................... 29
Memory Capacity, Picture Size and Quality ............................................................ 29
Troubleshooting ............................................................................................................. 30
Specifications ................................................................................................................. 32
Trademark Information ............................................................................................... 33
Additional Resources .................................................................................................... 33
DS8118 Manual-6 Lang. (086-002937-017)
INTRODUCTION
BRIEF DESCRIPTION
Thank you for selecting the Oregon ScientificTM 1.3 Mega-Pixel Digital Camera as
your personal product of choice. Your digital camera is designed to give you many
years of reliable service. It includes the following features:
• LCD Screen Display
State-of-the-art LCD display lets you review pictures taken and informs you of
the status of the various operations and functions.
• Great Image Quality
With 1.3 Mega-Pixel resolution, you are assured of clear, natural-looking images
every time you take a photo.
• Multimedia Features
You can record movie clips (with sound) that can be played back on your personal
computer.
• Advanced Camera Functions
In addition to the Auto Flash and 2x Zooming functions, you can take advantage
of advanced functions such as White Balancing, Manual Exposure Compensation,
and Metering Setting.
• Connection to External Devices
Your digital camera can be connected to external devices such as your PC or TV.
IMPORTANT NOTICE
Statement of Responsibility
Oregon Scientific assumes no responsibility for any incidental losses (such as the
costs of photography or the loss of income from photography) incurred as a result of
faults with this product.
Notes on Copyright
Images recorded using your digital camera cannot be used in ways that infringe
copyright laws without the consent of the owner, unless intended only for personal
use. Note that some restrictions apply to the photographing of stage performances,
entertainments and exhibits, even when intended purely for personal use. Users are
also asked to note that the transfer of memory containing images or data protected
under copyright laws is only permissible within the restrictions imposed.
SAFETY NOTES
To ensure that you use your camera correctly , read these Safety Notes and your User
Manual carefully beforehand. The warnings given here provide important safety
information and should be observed at all times.
GENERAL WARNINGS
• The enclosed disc is a computer CD-ROM disc. Never attempt to play this disc
on an ordinary music CD player, as it can produce extremely high noise levels
that could damage your hearing or your audio system.
• Do not immerse the device in water or subject the camera to impact or shock.
1
ENGLISH
FRANÇAIS
DEUTSCH
ITALIANO
ESPAÑOL
PORTUGUÊS
Page 4
• Do not, under any circumstances, touch the exposed electronic circuitry of the
device, as there is a danger of electric shock.
• Take special care when handling a damaged LCD display, as the liquid crystals
can be harmful to your health.
• Do not use or store the device in locations that may adversely affect the product
ENGLISH
such as rain, snow, desert, and magnetic fields.
• Check all major functions when the device is unused for a long period of time.
This is to ensure its full operation. Maintain regular testing and cleaning of your device.
• Do not look through the viewfinder at the sun or other strong lights. This could
damage your eyesight.
• Avoid leaving the camera exposed to direct sunlight, as the action of the lens
could cause fires.
• Remove the batteries and memory card before storing the camera for long periods
of time. Then, keep it in a well-ventilated place in order to prevent moulding.
FRANÇAIS
NOTES ON THE DIGITAL CAMERA
Cleaning your Camera
Lens / Viewfinder Use a blower or a lens brush to remove dirt or dust. Wipe
Body Clean with a damp cloth; dry immediately.
DEUTSCH
• Do not use benzene, thinner, or similar cleaning agents to clean your camera, as
these may cause permanent damage not covered by the warranty.
• Do not scratch hard objects against the lens, LCD or viewfinder as these surfaces
are easily damaged.
Handling your Camera
• For important photographs (such as weddings and overseas trips), always take a test
ITALIANO
photograph and view the image to make sure that the camera is functioning normally.
• Do not use the camera while you are walking, running, driving or operating
machinery. This can result in serious accidents.
• Do not use this device in aircrafts or hospitals. It can cause malfunctions in the
control devices of other equipment.
• If the camera is carried suddenly from a cold location into a warm place, con
densation may form inside the device. Switch the camera off in such cases and
wait an hour before using it again.
ESPAÑOL
PORTUGUÊS
carefully with a soft cloth to remove fingerprints and other
stains. Do not touch with fingers.
2 3
DS8118 Manual-6 Lang. (086-002937-017)
KEY FEATURES
FRONT VIEW
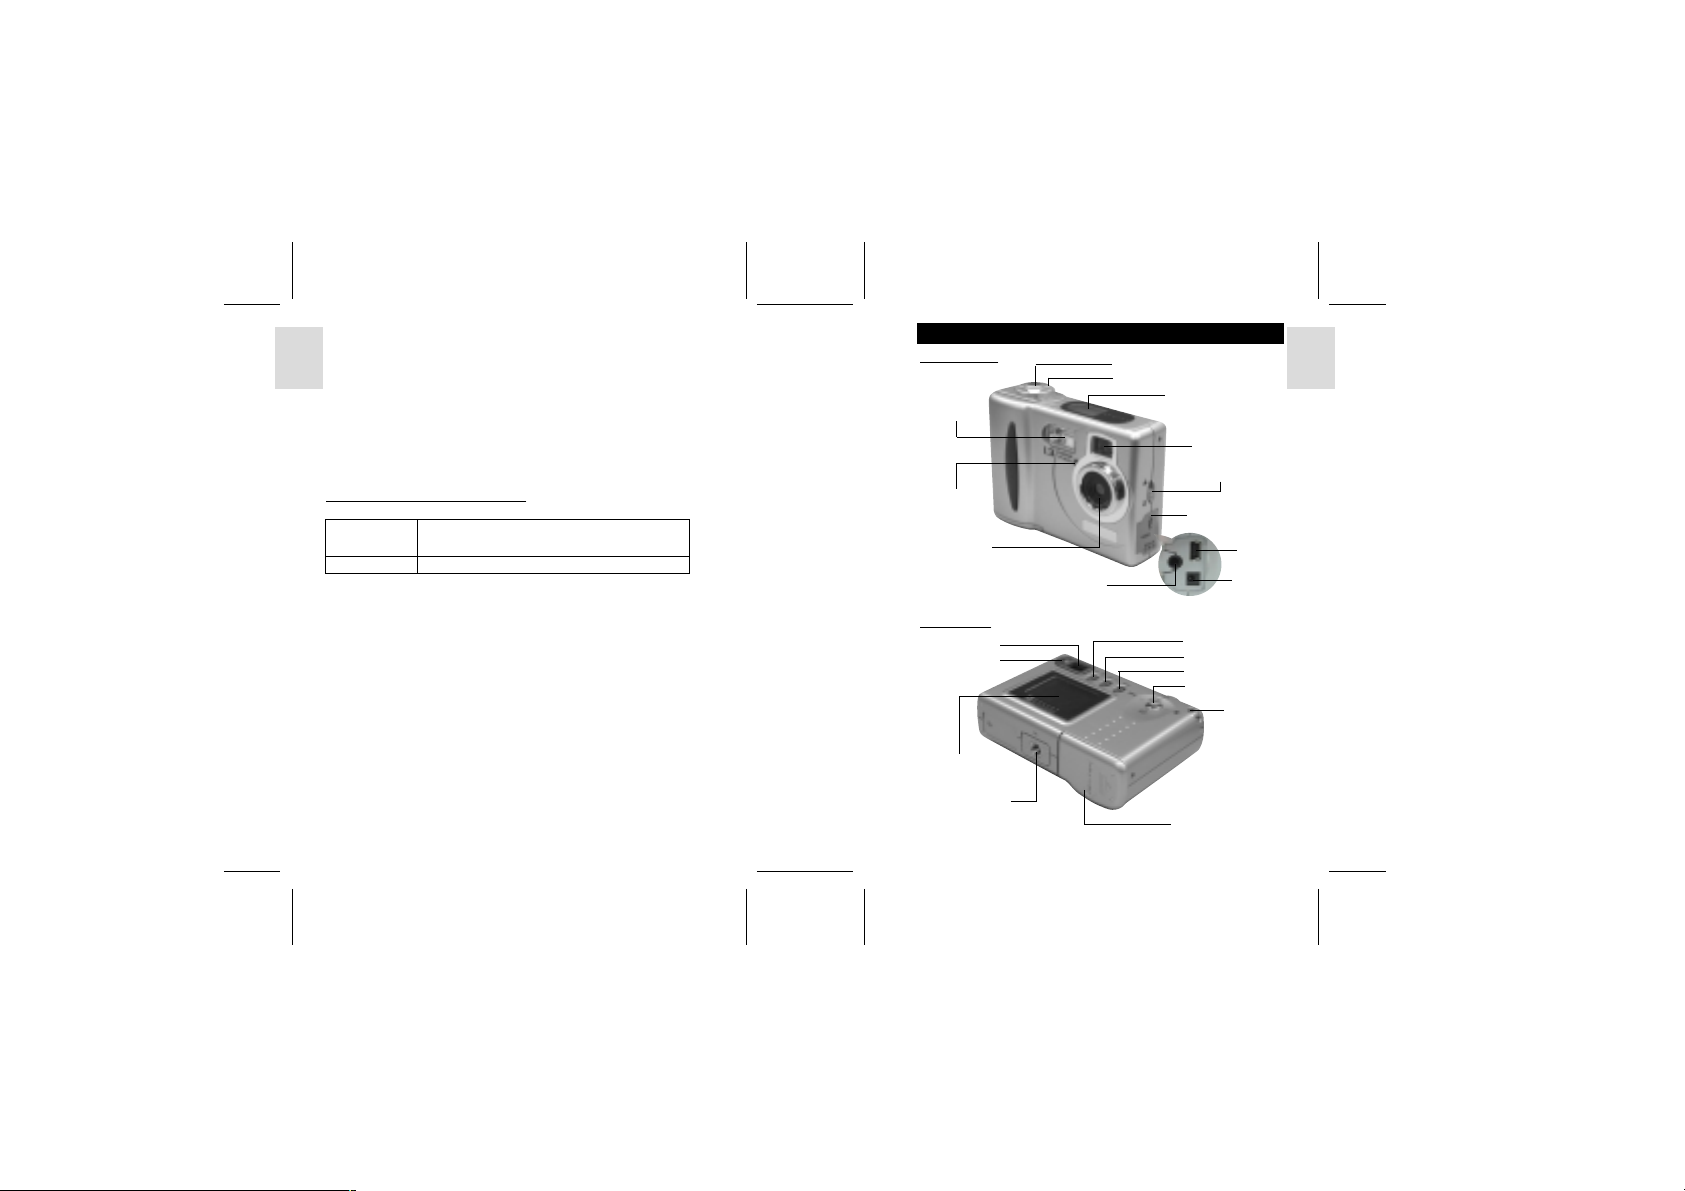
Built-In Flash
Self-Timer
Lamp
Lens
BACK VIEW
Viewfinder
Flash Lamp
On-Screen Display
Tripod Hole
Video/Audio Socket
Shutter Release Button
Mode Dial
Status LCD
Viewfinder
Focus Switch
Terminal Cover
Flash/Delete Button
Display/OK Button
Menu Button
4-Way Controller
Battery Door
Mini-USB
Terminal
AC Adaptor
Socket
Strap Ring
ENGLISH
FRANÇAIS
DEUTSCH
ITALIANO
ESPAÑOL
PORTUGUÊS
Page 5
MODE SWITCH
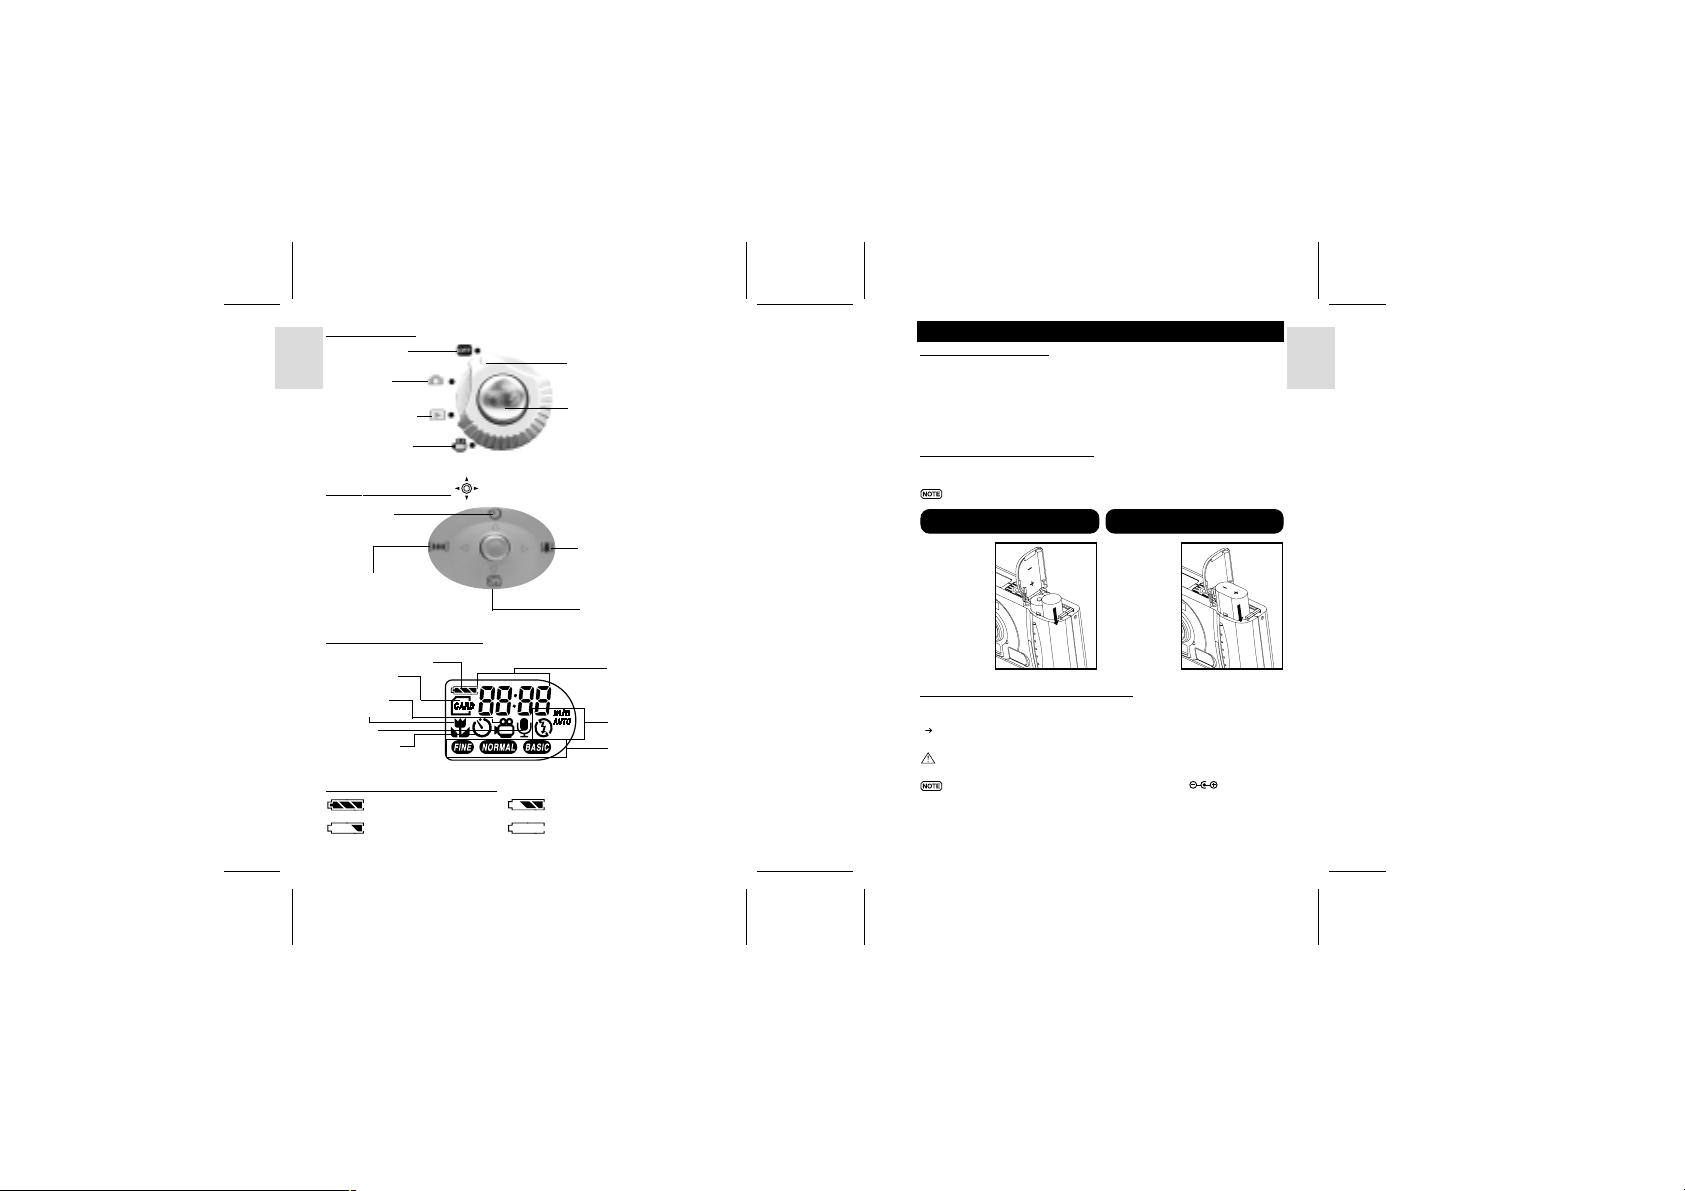
Camera Off
Camera
ENGLISH
Mode
Playback Mode
Movie Mode
FRANÇAIS
4-WAY CONTROLLER
Self-Timer
DEUTSCH
Digital Zoom-Out
Current Mode Indicator
Shutter Release Button
LIQUID CRYSTAL DISPLAY
ITALIANO
Battery Level Indicator
CompactFlash
Card installed
Movie Mode
Macro Mode Icon
Audio Tag
Self-Timer Icon
ESPAÑOL
BATTERY LEVEL INDICATOR
Adequate power remains. Battery is running low.
Battery is running very low Battery is exhausted.
PORTUGUÊS
4 5
DS8118 Manual-6 Lang. (086-002937-017)
Digital Zoom-In
Instant Review Function
Picture Counter
Flash Mode Icon
Image Quality Icon
GETTING STARTED
PACKAGE CONTENTS
When you unpack your Digital Camera, make sure to keep all the packing materials
in a safe place, in case you need to later transport the device or return it for servicing.
In the box, you will find:
• Digital Camera (DS8118) • Video/Audio Cable • Hand Strap
• Two Batteries (AA x 2) • USB Cable • User Manual
• Lens Cover with Strap • Software CD-ROM • Quick Start Guide
INSTALLING THE BATTERIES
Your camera is shipped with two AA-sized batteries. You may also use one CRV3
battery (sold separately).
You may damage your camera if the batteries are installed incorrectly.
Using 2 x AA Batteries
Insert the
batteries as
shown on the
compartment lid.
USING AN AC ADAPTER (OPTIONAL)
If you intend to leave the camera on for a long period of time, you may opt to use an
AC adapter. Connect the AC adapter to your Digital Camera’s AC Adapter Socket
(
p.3).
Caution: Make sure the camera is turned off before connecting the AC adapter.
An AC adapter of DC3V +/- 10% (Voltage) and 1A (Current) MUST be
used. Using adapters other than indicated may cause fires or electric shocks.
Please only use adapters with the following polarity:
Using CRV3 Battery
Insert the
battery with its
polarity
REVERSED.
ENGLISH
FRANÇAIS
DEUTSCH
ITALIANO
ESPAÑOL
PORTUGUÊS
Page 6
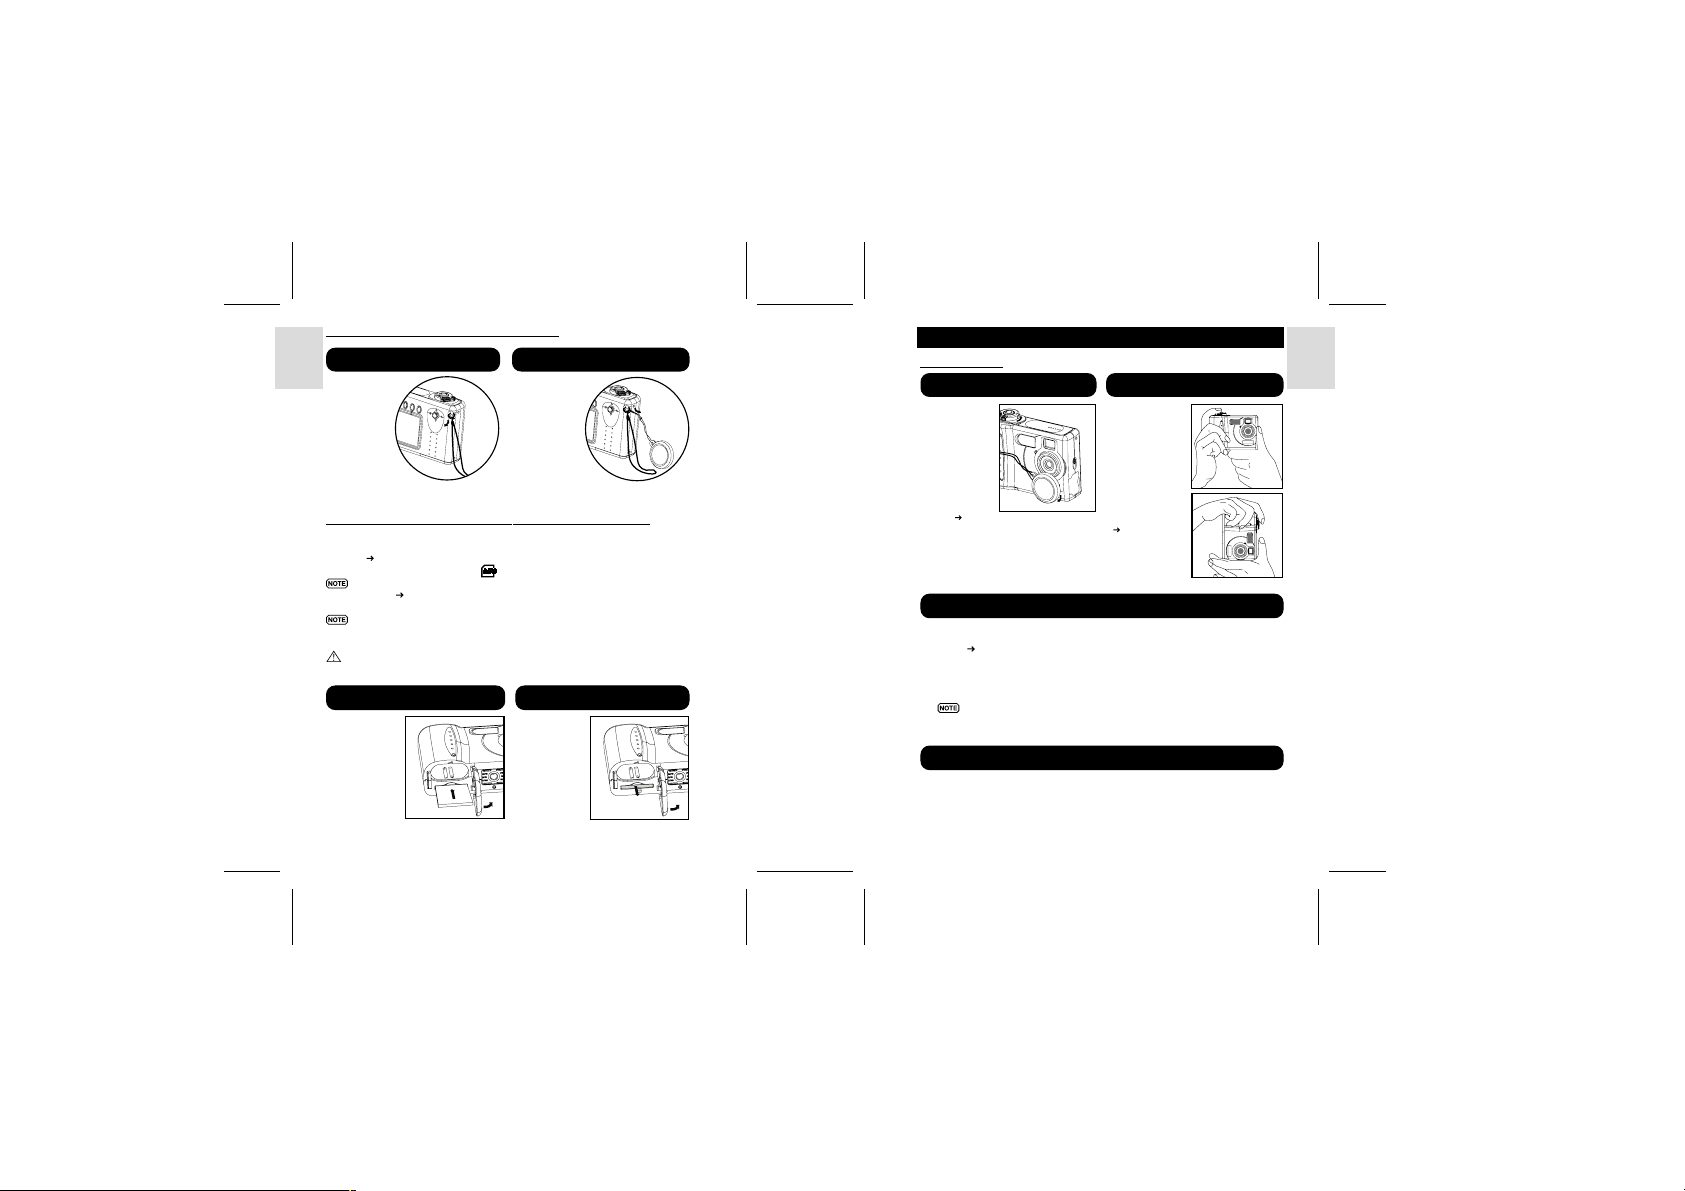
ATTACHING THE STRAP AND LENS CAP
Attaching the Strap Attaching the Lens Cap
ENGLISH
1. Pass the short,
thin loop of the
strap through
the camera’s
strap hole.
2. Pass the
other end of
the strap through.
3. Tighten by
FRANÇAIS
pulling the loop.
SECURE DIGITAL (SD) AND MULTI-MEDIA CARD (MMC)
The Secure Digital (SD) and Multi-Media Card (MMC) are external memory cards
that can be plugged into your Digital Camera to extend the memory capacity. Please
refer to (
p.29) for the list of memory cards compatible with this digital camera.
DEUTSCH
When an external card is installed,
It is recommended that all memory cards are formatted using the Format
option (
p.15) before using them with this digital camera. Memory cards
formatted using other devices may be incompatible.
When the SD card is installed, all images and movies taken are automatically
stored on the card. Images and movies in the internal memory cannot be
accessed until the card is removed.
The SD card will not insert fully into the slot if it is facing the wrong way. Be
ITALIANO
careful not to apply undue force to the card.
Installing Secure Digital /
Multi-Media Card
1. Turn off the
camera.
2. Open the
ESPAÑOL
battery door.
3. Insert the card
following the
printed remark.
4. Close the
battery door.
PORTUGUÊS
1. Pull the lens
cap cord through
the camera’s
strap hole.
2. Pass the lens
cap through the
loop.
3.Tighten by
pulling.
4. Fit the lens cap
onto the lens.
will be displayed on the Status LCD.
Removing Secure Digital /
Multi-Media Card
1. Turn off the
camera.
2. Open the
battery door.
3. Press the
card to release.
4. Close the
battery door.
6 7
DS8118 Manual-6 Lang. (086-002937-017)
BASIC PHOTOGRAPH
QUICK START
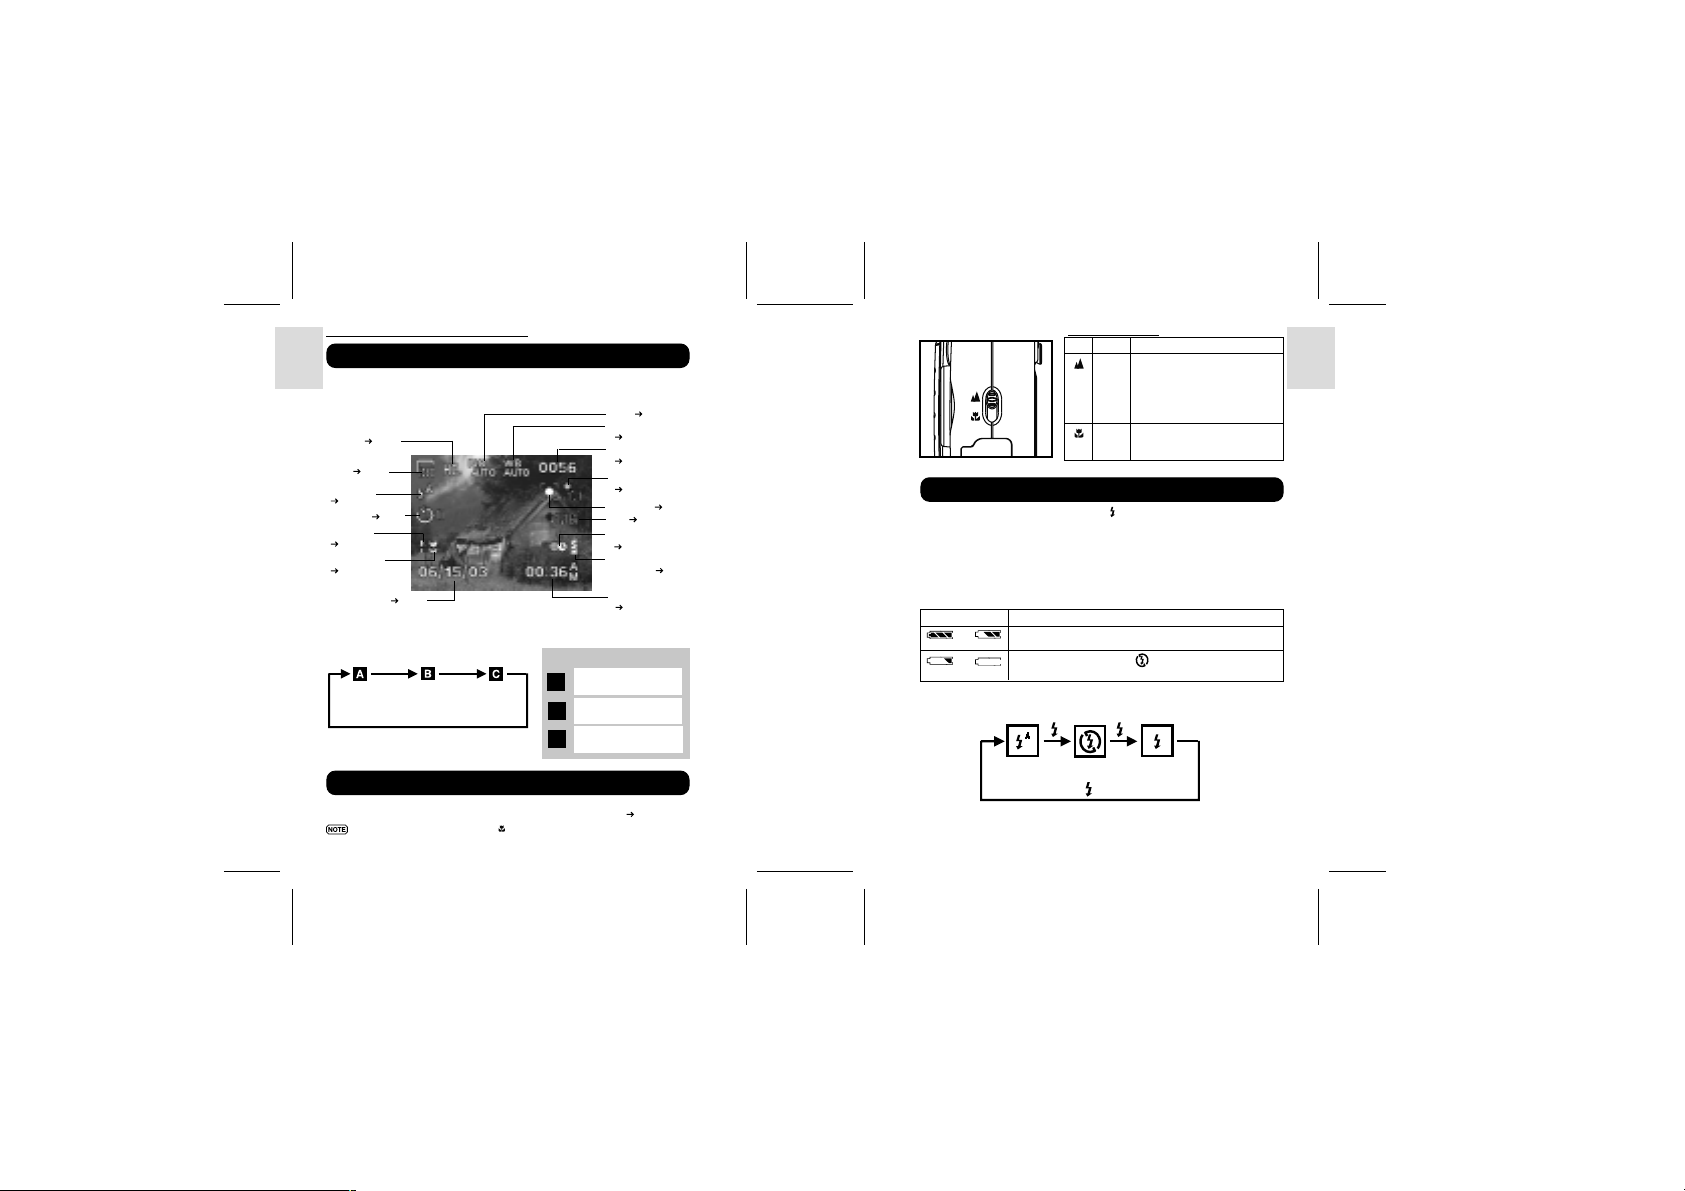
Preparing the camera
1. Remove the
lens cover from
the lens.
2. Turn the Mode
Dial to Camera
Mode.
3. Check the
battery indicator,
making sure
there is enough
power ( p.4).
Holding the camera
1. Loop the strap
over your wrist.
2. Hold the camera
firmly.
3. Avoid blocking
the lens and flash.
4. Do not move nor
remain in motion
while taking
pictures. Use a
tripod if necessary
( p.26).
Taking Basic Pictures
1. Frame your subject in the viewfinder. The frame in the middle of the viewfinder
indicates the zone of automatic focusing. You can also view the subject on the
OSD (
p.8).
2. Press the Shutter Release Button.
3. The image taken is displayed on the OSD for approximately a second (Auto
Review).
4. Once the Auto Review has finished, you may proceed to take the next picture.
When memory is full, no more images can be stored. The camera will
beep and the words “Internal Memory Full” will appear on the LCD if
you press the Shutter Release Button.
Shutting Off the Camera
When you have finished taking your pictures:
1. Turn to Mode Dial to Off.
2. Place the lens cover securely over the lens.
ENGLISH
FRANÇAIS
DEUTSCH
ITALIANO
ESPAÑOL
PORTUGUÊS
Page 7
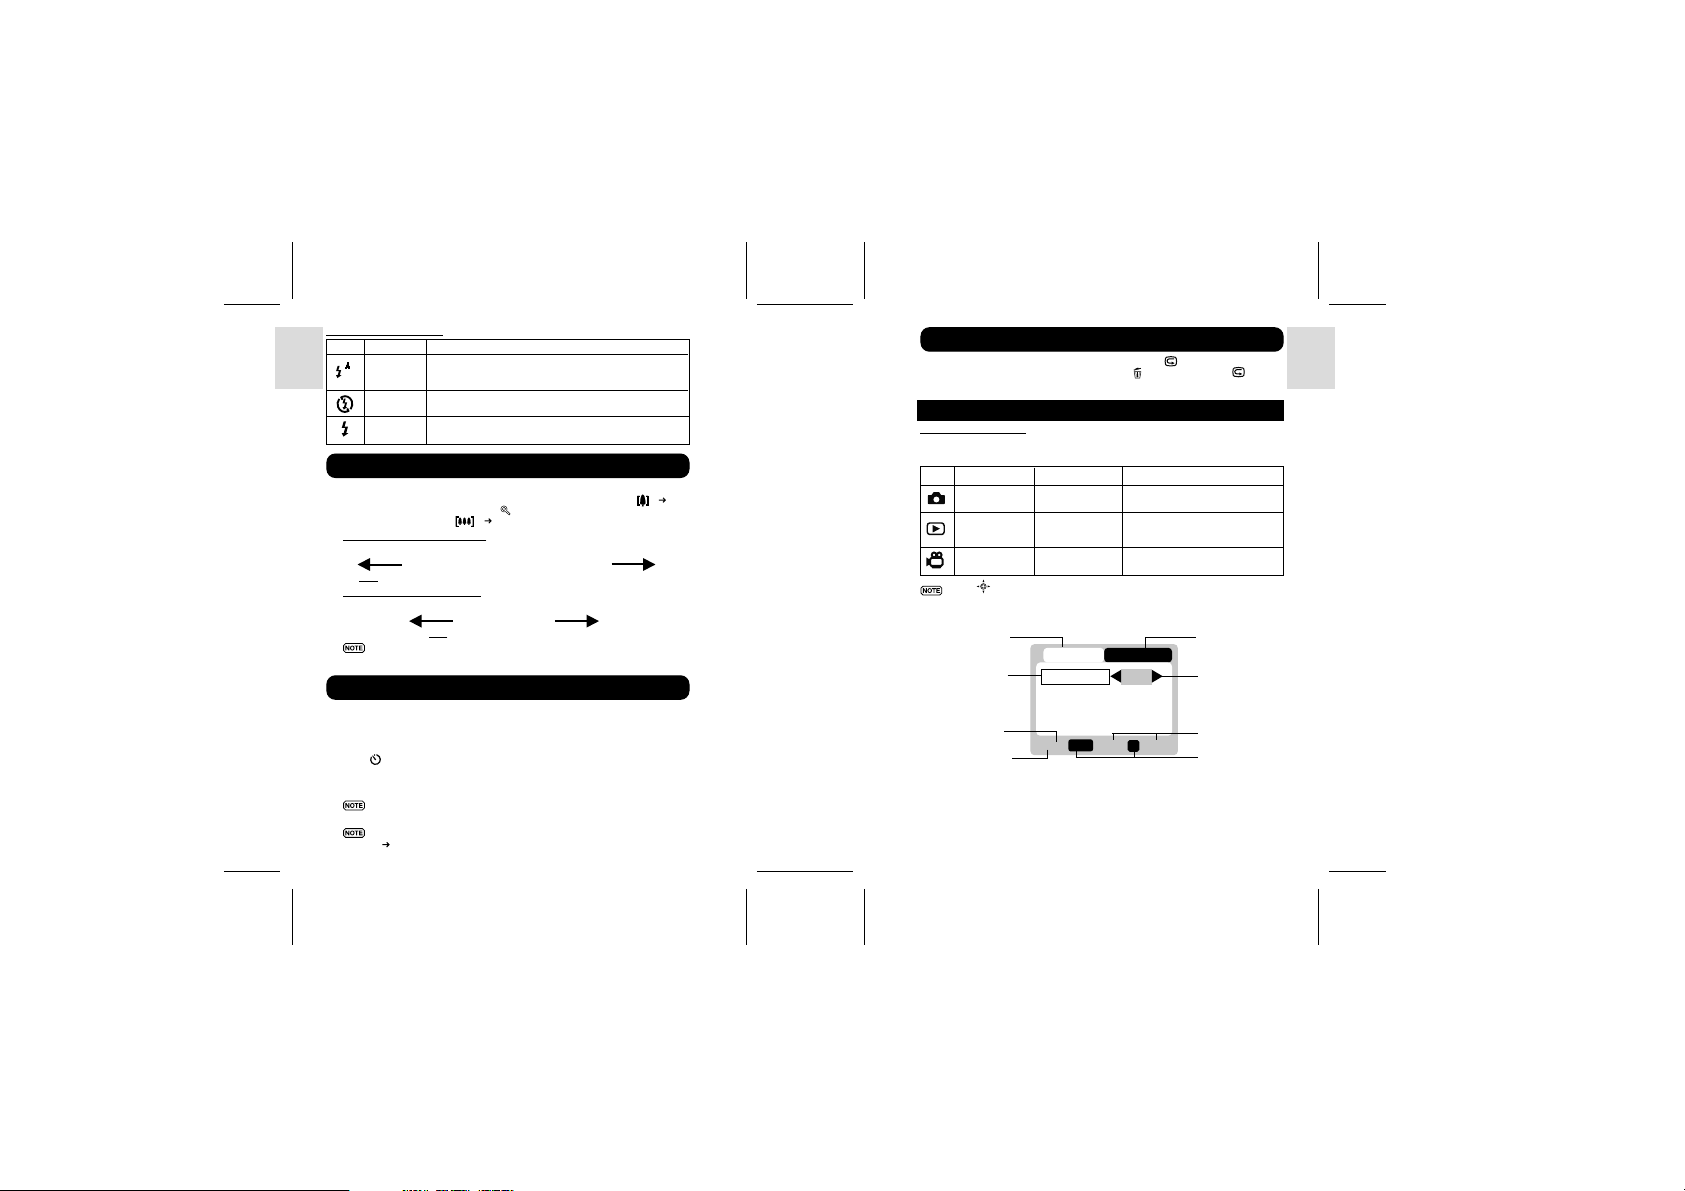
BASIC FUNCTIONS AND SETTINGS
Toggling On-Screen Display Information
When you slide the Mode Switch to any modes, the On-Screen Display (OSD) is
ENGLISH
automatically switched on.
Camera Mode On-Screen Display
Quality ( p.17)
Size ( p.16)
FRANÇAIS
Flash Icon
( p.9)
Set Timer ( p.10)
Audio Tag
( p.19)
Macro Mode
DEUTSCH
( p.9)
Current Date ( p.12)
ISO ( p.18)
White Balance
( p.17)
File Number
( p.14)
Zoom Level
( p.10)
Metering ( p.18)
EV ( p.19)
World Time
( p.13)
Battery Level
Indicator ( p.4)
Current Time
( p.12)
Toggling Between On-Screen Display Settings
Press
DISP
Press
DISP
Legend:
OSD with All Shooting
A
Information Displayed
OSD with Only Key
B
Information Displayed
C
OSD is turned off
ITALIANO
ESPAÑOL
Press
DISP
Selecting a Focus Mode
Your digital camera has two different Focus Modes: Scene Mode and Macro mode.
You can select between the two options by using the Focus Switch (
When the focus mode is set on , the range of the resulting picture may
differ from what is seen in the viewfinder.
PORTUGUÊS
8 9
p.3).
DS8118 Manual-6 Lang. (086-002937-017)
Focus Options Table
Icon Mode Description
Scene This mode is used when the
subject is far. The camera will
focus on the subject in the
viewfinder’s frame when the
Shutter Release Button is pressed
halfway. Range: 1.5M to ∞ .
Macro This mode is used when the
subject is near. Range: approx.
24cm.
Selecting a Flash Mode
To toggle between Flash Modes, press the
Flash Icon on the Status LCD and OSD. The red Flash Lamp on the camera lights up
when flash is enabled, signalling that the flash is ready for use. When a picture with
flash is taken, the Flash Lamp will blink for a second to recharge. Once it stops
blinking, you can resume taking pictures again.
Inital Flash Settings
When you turn on your camera, the inital flash setting will vary depending on the
level of your battery.
Battery Status Inital Flash Setting
or The flash setting is always on Auto at these battery levels when
or The inital flash setting is . However, you can manually
the mode switch changes to camera mode.
set the flash to other settings.
Toggling Between Flash Modes
Press Press
button on the camera and observe the
Press
ENGLISH
FRANÇAIS
DEUTSCH
ITALIANO
ESPAÑOL
PORTUGUÊS
Page 8
Flash Mode Options Table
Icon Function Description
Auto The flash may discharge automatically, depending on the
ENGLISH
FRANÇAIS
Your digital camera comes with a x2 zooming function. By default, the zooming is
not enabled. In Camera, or Movie mode, increase zooming by pressing
The Digital Zoom Icon on the OSD,
decrease the zooming, press
Camera Mode Zooming Options
Default Zoom Larger
DEUTSCH
x1.0 / x1.1 / x1.2 / x1.3 / x1.4 / x1.5 / x1.6 / x1.7 / x1.8 / x1.9 / x2.0
Movie Mode Zooming Options
ITALIANO
light conditions. The Flash Lamp lights red when this is
selected.
Flash Off The flash will not discharge. The Flash Lamp lights red
when this is selected.
Flash On The flash discharge regardless of lighting condition. The
flash lamp lights green when this is selected.
Zooming
, indicates the current zoom level. To
( p.4).
Default Zoom Larger
x1.0 / x1.2 / x1.4 / x1.6 / x1.8 / x2.0
In movie mode, once the shutter button is pressed and recording starts,
zooming cannot be further adjusted for the duration of the recording.
( p.4).
Using the Self-Timer
The Self-Timer function counts down before the camera automatically takes a picture
by itself. This is useful when you want to be in the picture, and there is no one else
to press the Shutter Release Button.
1. Turn the Mode Dial to Camera Mode.
ESPAÑOL
2. Press
on the 4-Way Controller. The Self-Timer will engage.
3. Press & hold the Shutter Release Button. Audible beeps can be heard, and the
red Self-Timer Lamp will start blinking. The number displayed next to the OSD
a Self-Timer icon will appear and start counting down.
To hasten the countdown to 3 seconds, press the Shutter Release Button once again.
4. Once the picture has been taken, the Self-Timer will be disabled.
The Self-Timer cannot be used while the Continuous Shooting function
(
PORTUGUÊS
p.19) is enabled.
10 11
DS8118 Manual-6 Lang. (086-002937-017)
Playing Back Last Picture Taken
You can display the last still picture taken by pressing . When viewing the last
image, you may choose to delete it by pressing
return to shooting.
and confirm. Press again to
INTRODUCTION TO CAMERA MODES
GUIDE TO MENUS
Press MENU to access the menu screens, where settings can be specified. To switch
between Primary and Secondary Menus, highlight the top menu fields.
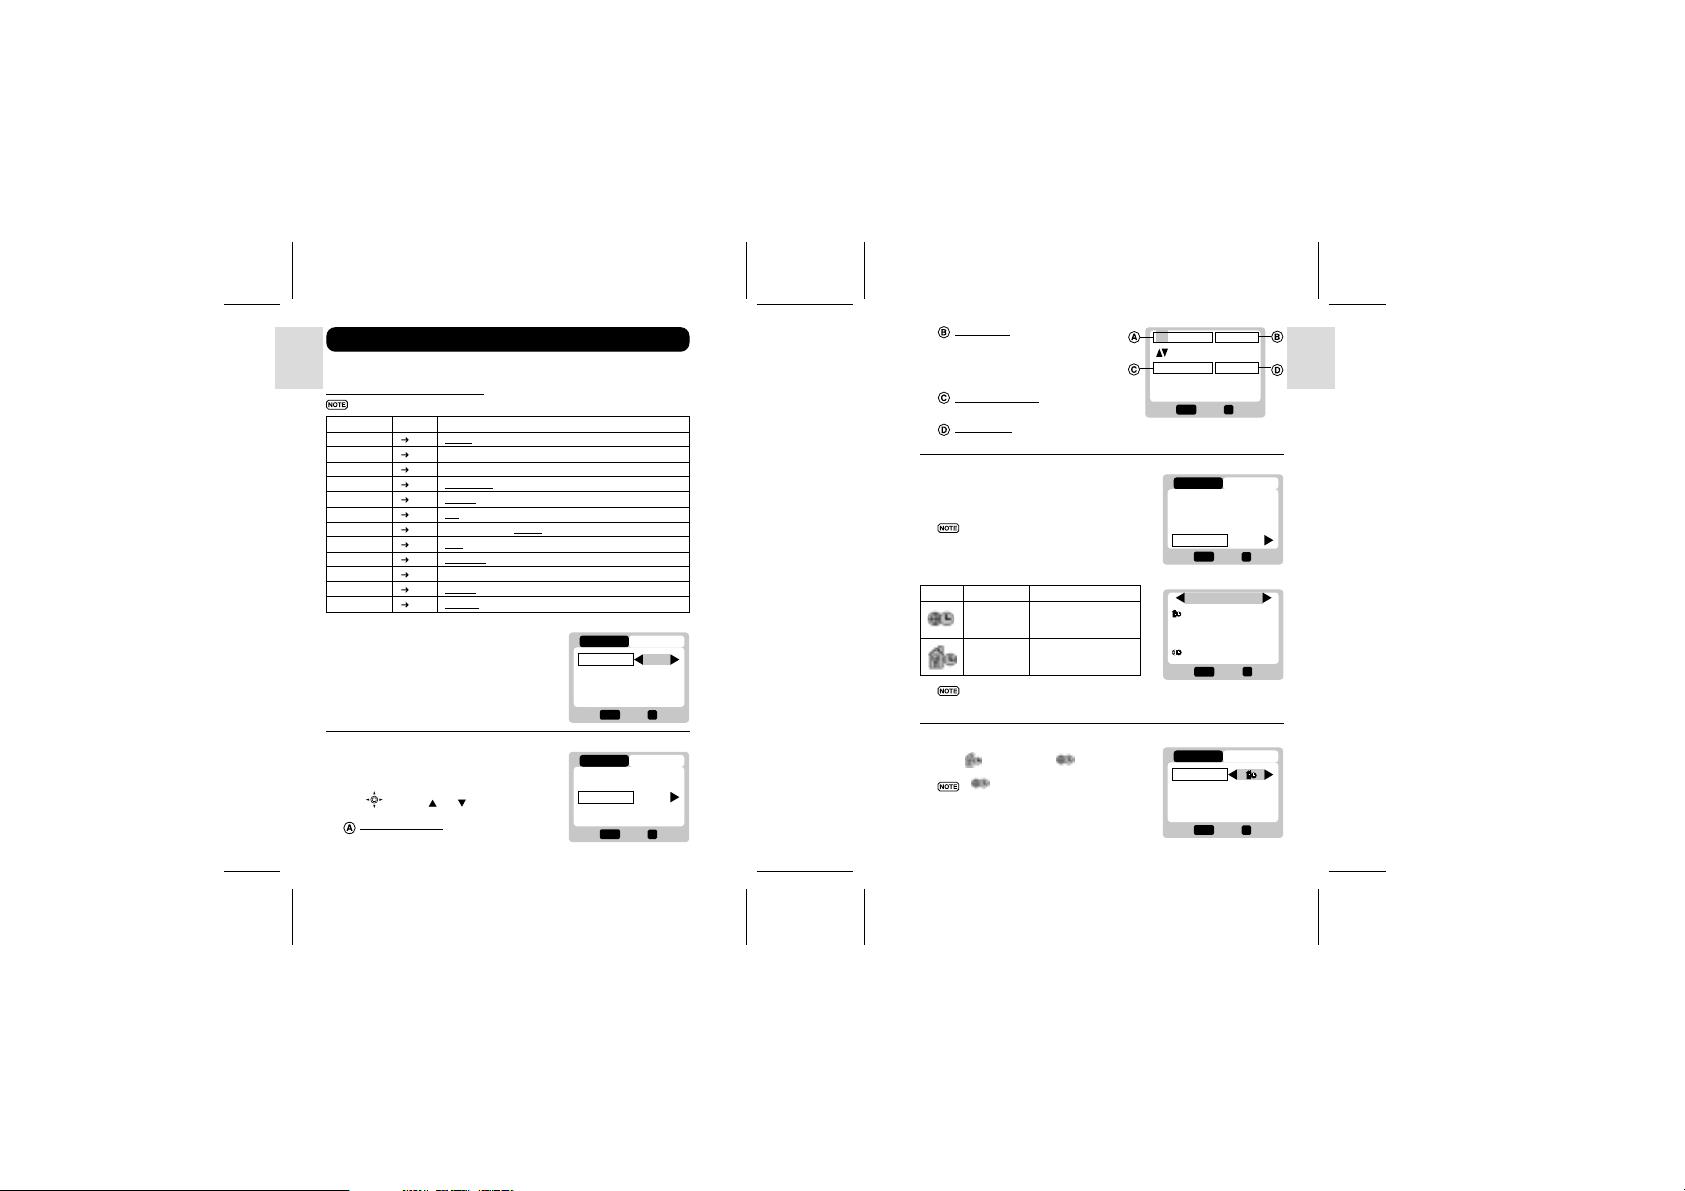
Mode Primary Menu Secondary Menu Description
Camera Menu Setup Menu Photography mode with adjustable
Playback Menu Setup Menu Lets you play back all images &
Movie Menu Setup Menu Allows you to shoot movies with
Use to navigate the menu screen . Press OK to confirm setting changes.
Example of a Menu Screen
Primary Menu Field
(currently accessed)
Highlighted Setting
CAMERA SETUP
Size
Quality
Total No. of Menu
Pages
Current Menu Page
White Bal
1/3
settings.
movies recorded onto the camera’s
internal or external memory card.
the camera.
1280
H.Q.
WB
AUTO
Menu
OK
Exit
OK
Secondary Menu
Field (not currently
accessed)
Option Currently
Chosen
Descriptions of
Button Functions
Button On Camera
ENGLISH
FRANÇAIS
DEUTSCH
ITALIANO
ESPAÑOL
PORTUGUÊS
Page 9
Setup Menu
Under the Setup Menu, which is available in all modes, the basic settings of the
camera can be adjusted.
ENGLISH
Setup Menu Settings and Options
The options underlined and in italics are initial defaults.
Settings Page Options
P.Counter
Set Clock
Set City
FRANÇAIS
Show Time
Language
Beep Tone
Auto Off
TV Out
File No.
DEUTSCH
Format
Reset
USB Mode
P. Counter (Picture Counter)
The Picture Counter can count the number of
images already taken (count up) or available
ITALIANO
to be saved onto memory (count down).
Set Clock
ESPAÑOL
This sets the Date and Home Time of the
camera. When accessed, a new Set Clock
configuration screen will appear.
Use
values of each field below.
PORTUGUÊS
p.12 Down / Up
p.12 Adjust date and time settings
p.13 Toggles between Home or World City time
p.13 Home City / World City
p.14 English / Français / Deutsch / Español / Italiano / Português
p.14 On / Off
p.14 None / 1 min. / 3 min. /5 min.
p.14 PAL / NTSC
p.14 Continue / New
p.15 Format internal memory or memory card
p.15 Cancel / Reset
p.15 Storage / Webcam
to press or and adjust the
Current Date Field
Adjust the current date of the camera.
12
CAMERA SETUP
P.Counter
Down
Set Clock
Set City
Menu
1/4
OK
Exit
CAMERA SETUP
P.Counter
Down
Set Clock
Set City
Menu
1/4
OK
Exit
DS8118 Manual-6 Lang. (086-002937-017)
Date Format
Choose from the following date formats:
• DD/MM/YY (date, month, year)
• MM/DD/YY (month, date, year)
• YY/MM/DD (year, month, date)
Current Time Field
Adjust the current time of the camera.
Time Format
Choose between 12-hr (AM/PM) or 24-hr display.
Set City
You can choose to display the current time
in two different time zones. Configure your
Home and World Cities’ time zone from a
list of city names.
The World Time cannot be directly
set. It automatically adjusts itself via
the time zone offset, using the Home
Time values specified in the Set
Clock setting.
Icon Function Description
World Time Select the time zone
Home Time Select the time zone
If your city is not selectable, choose
another city within your time zone
OK
OK
instead.
Show Time
You can choose to display either the Home
Time
camera.
World Time is selected. However,
no Icon is displayed if Home time
is selected.
for another location
across the world.
where your residence
is located.
or World Time on your
icon is shown on the OSD if
13
01/02/03 M/D/Y
01:48 AM 12-hr
Menu
OK
OK
Exit
CAMERA SETUP
P.Counter
Down
Set Clock
Set City
Menu
1/4
Exit
London
(GMT +00:00)
London
(GMT +00:00)
Menu
Exit
CAMERA SETUP
Show Time
Language
Beep Tone
2/4
Menu
Eng.
On
Exit
ENGLISH
FRANÇAIS
OK
OK
DEUTSCH
OK
ITALIANO
OK
ESPAÑOL
OK
OK
PORTUGUÊS
Page 10
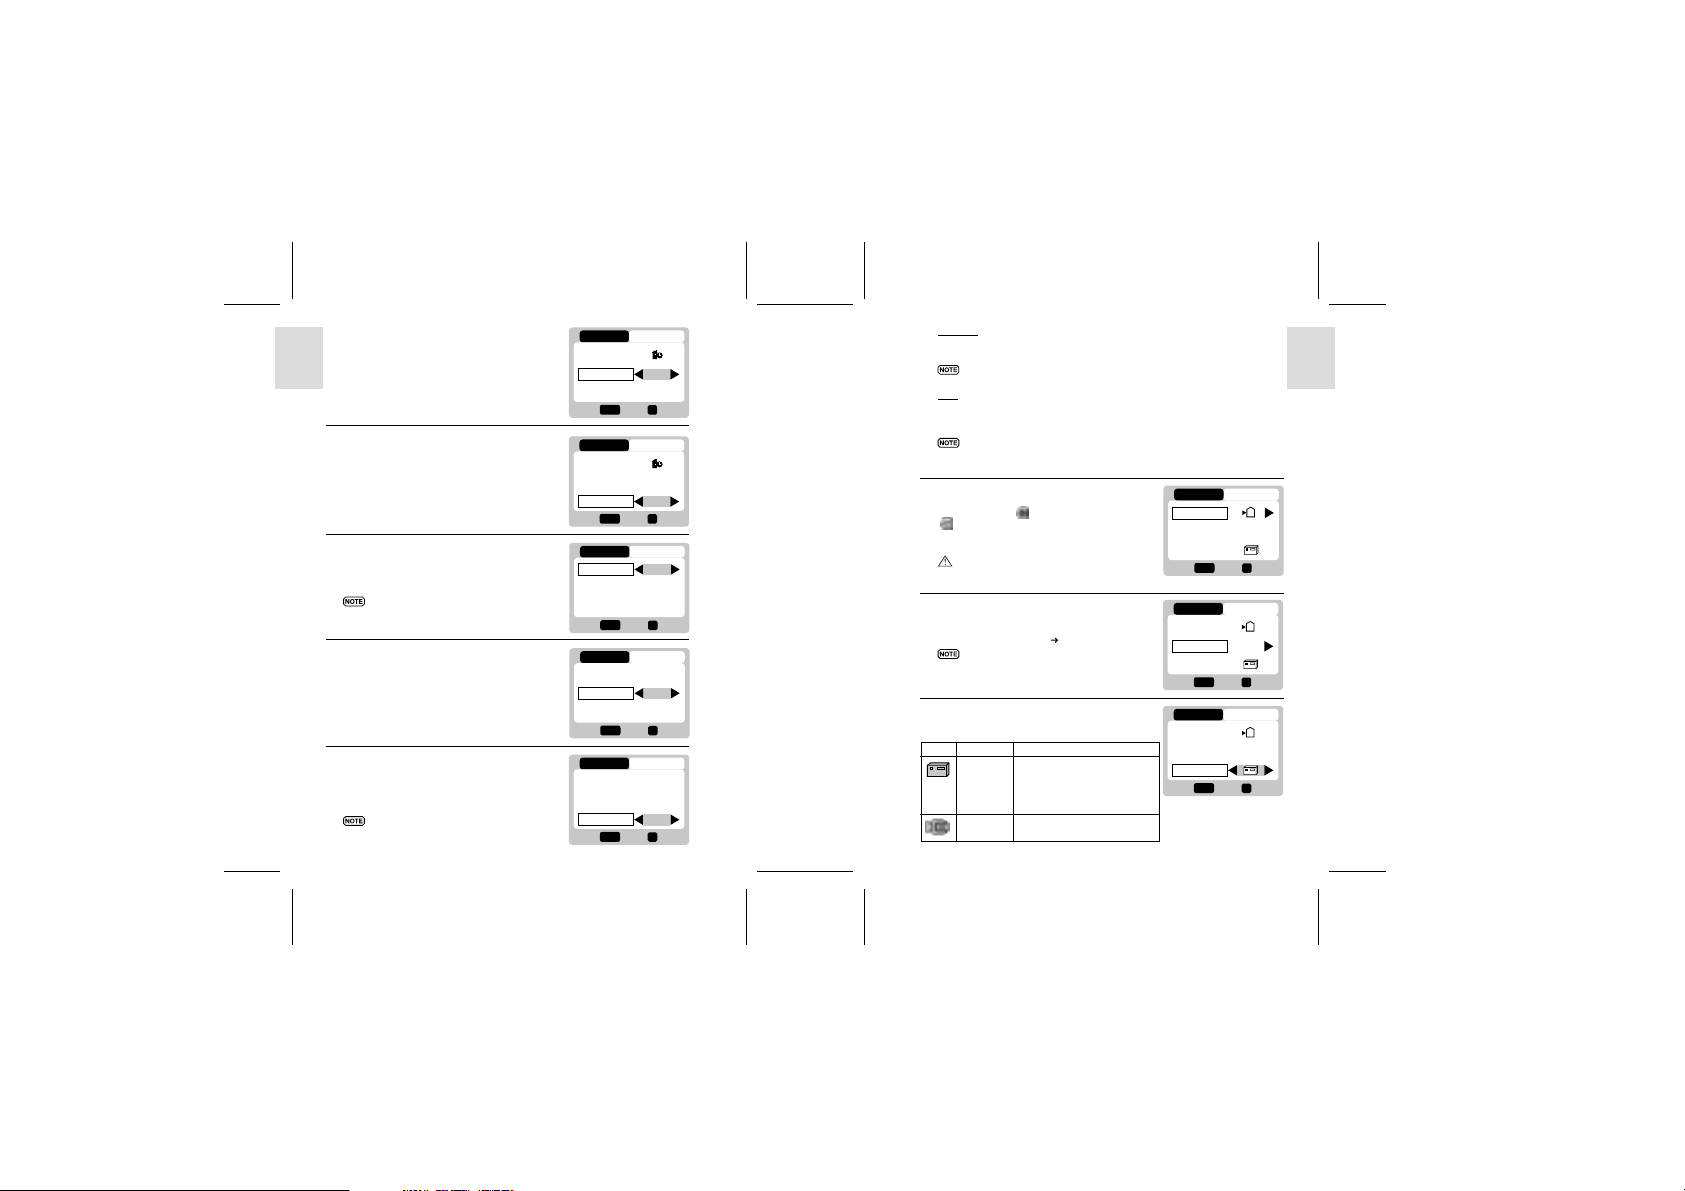
Language
Choose your menu language: English, French,
German, Spanish, Italian, and Portuguese.
The default language is English.
ENGLISH
Beep Tone
The camera will make “beeping” sounds
during certain functions, such as the Set Timer
function’s countdown. This “beeping” sound
FRANÇAIS
can be turned on or off.
Auto Off (Auto Power-Off)
You can set the camera to turn off automatically
DEUTSCH
when no operation is performed. The period
of time before shut-down can be adjusted.
Auto Off is not available in slideshow
mode or when the camera is connected
to a PC.
TV Out
ITALIANO
If connecting the camera to a TV, you can
set the camera’s TV output system to either
the PAL (Europe) or NTSC (North America)
standards.
ESPAÑOL
File No.
Your camera keeps an internal file counter
for every image and movie taken that can
be reset. The setting options are Continue
and New.
All files are stored within a designated
folder. The initial folder is always
PORTUGUÊS
numbered at 100.
14 15
DS8118 Manual-6 Lang. (086-002937-017)
CAMERA SETUP
Show Time
Language
Beep Tone
2/4
Menu
Eng.
On
OK
Exit
CAMERA SETUP
Show Time
Language
Beep Tone
2/4
Menu
Eng.
On
OK
Exit
CAMERA SETUP
Auto off
TV Out
File No.
3/4
Menu
None
NTSC
Cont
OK
Exit
CAMERA SETUP
Auto off
TV Out
File No.
3/4
Menu
None
NTSC
Cont
OK
Exit
CAMERA SETUP
Auto off
TV Out
File No.
3/4
Menu
None
NTSC
Cont
OK
Exit
Continue
Under this default option, the internal file counter is first set to “0001”. Every
subsequent picture is assigned an incremental File Number.
The internal file counter increments by 1 regardless of the media type,
unless it is reset.
OK
OK
OK
OK
OK
New
Under this option, the internal file counter to “0001” for new media only. But in
case there are picture files already present inside the storage media, it will start
counting from the highest file number of the media.
It is advisable to set the File Number setting to New only in the following cases:
• Either the internal memory or SD card has been newly formatted .
• A completely new SD card has been installed.
Format
This option will format all data in either the
internal memory
, including all protected image files.
Caution: Do not eject the SD card while the card
is being formatted, as this may damage the card.
Formatting deletes all data from the memory
device chosen. The images and files will not
be recoverable.
Reset
You can reset all the settings to factory default.
Refer to the Setup Menu table to see the
defaults for each setting (
USB mode
This setting allows you to use your digital camera to
transfer images and movies recorded or as a webcam.
Icon Function Description
Storage When connected to a PC,
Mode by default the camera is in
Webcam This enables you to use your
Mode camera as a webcam.
or the external card
The reset function can reset all the
settings to factory default except for
the current time and date.
p.12).
Storage mode. This allows
you to transfer photos from
the camera to your computer.
CAMERA SETUP
Format
Reset
USB Mode
Menu
4/4
Exit
CAMERA SETUP
Format
Reset
USB Mode
Menu
4/4
Exit
CAMERA SETUP
Format
Reset
USB Mode
Menu
4/4
Exit
ENGLISH
FRANÇAIS
IN
OK
DEUTSCH
OK
IN
ITALIANO
OK
OK
IN
ESPAÑOL
OK
OK
PORTUGUÊS
Page 11
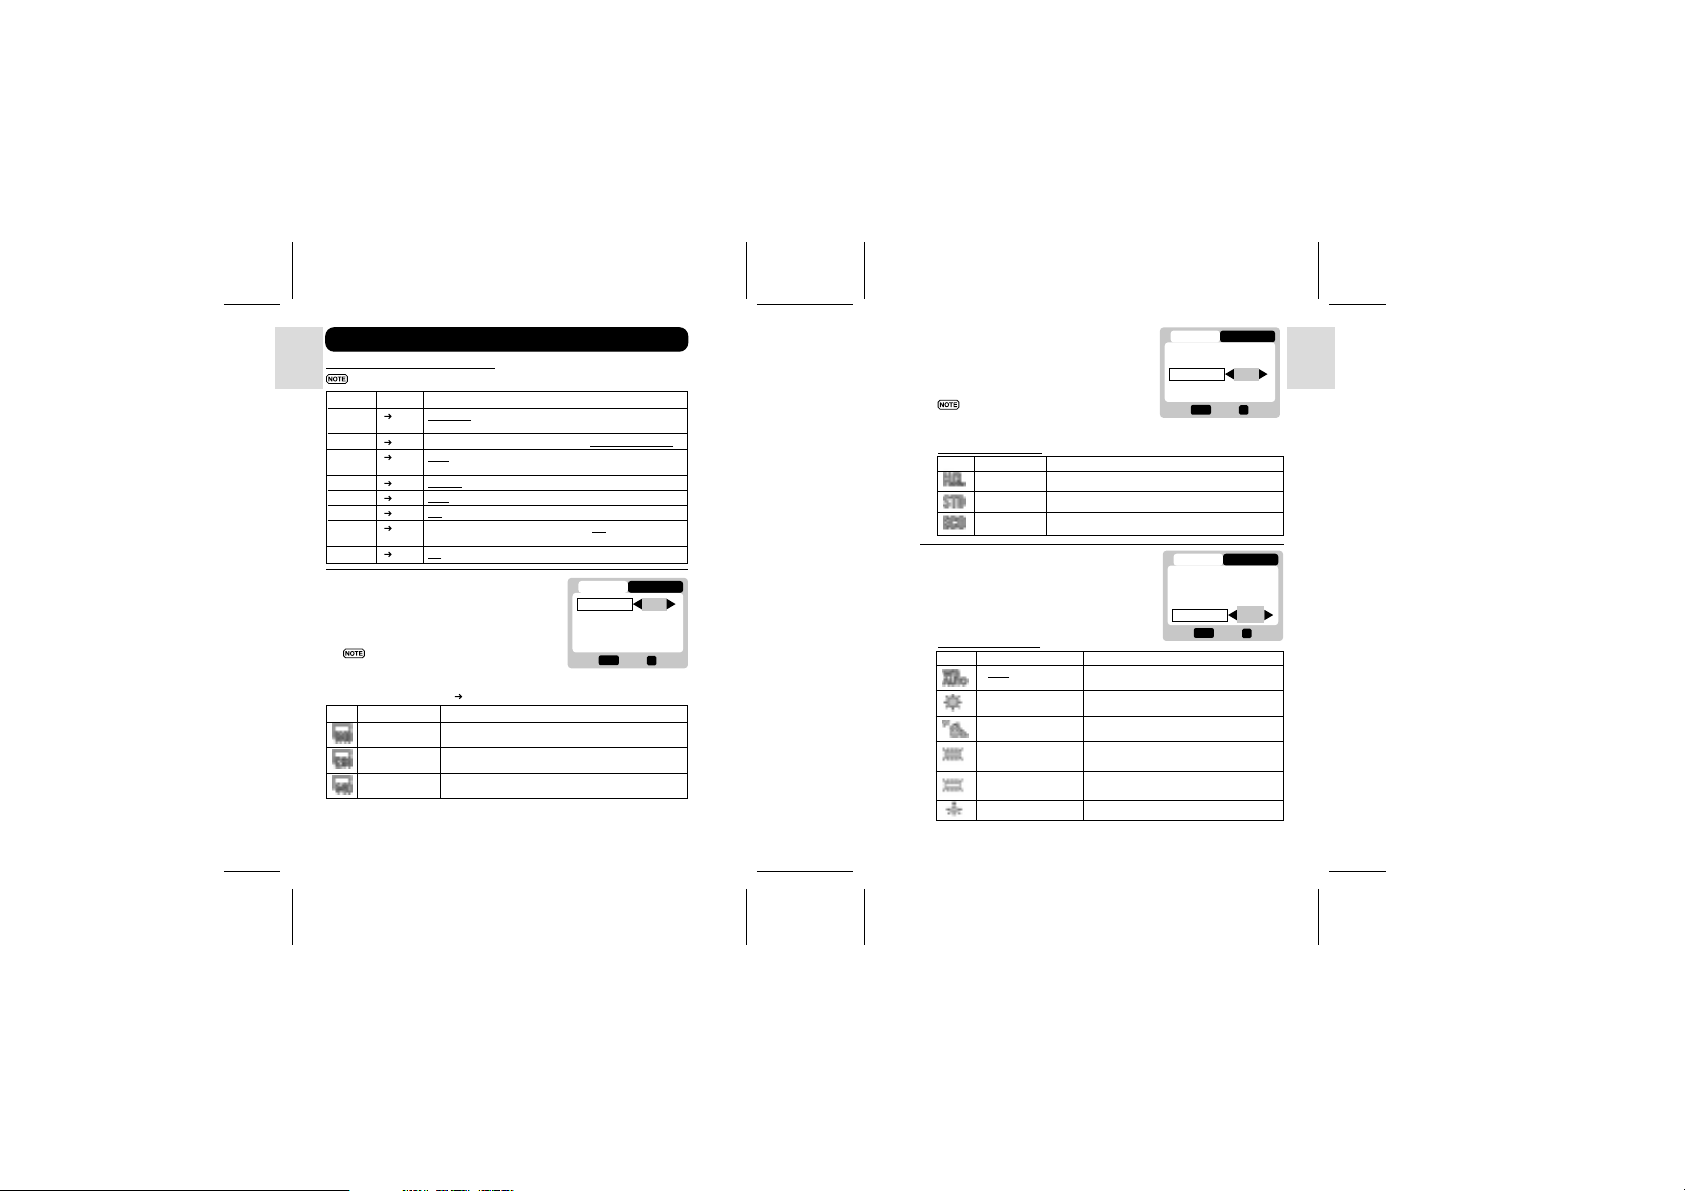
Camera Menu
Camera Menu Settings and Options
The options underlined and in italics are initial defaults.
ENGLISH
Settings Page Options
Size
Quality
White Bal
FRANÇAIS
Metering
ISO
Con.Shoot
EV
Audio T a g
DEUTSCH
Size (Image Size)
ITALIANO
Icon Type of Media Descriptions
ESPAÑOL
• The DS8118 comes with a 1.3 Mega-pixel sensor with true 1280 x 1024 pixels
PORTUGUÊS
p.16 Fine 1600 (software interpolated 2.0 Mega-Pixel) / Normal 1280
(1.3 Mega-Pixel) / Basic 640 (VGA)
p.17 ECO (Economy) / STD (Standard) / HQ (High Quality)
p.17 Auto / Sunlight / Shade/ Yellow F.L. (Fluorescent Lamp) /
White F.L. (Fluorescent Lamp) / Tungsten
p.18 Central / Spot / Matrix
p.18 Auto / 100 / 200
p.19 Off / On
p.19 +2.0 / + 1.7 / +1.3 / +1.0 / +0.7 / +0.3 / 0.0 / -0.3/ -0.7 / -1.0 /
-1.3 / -1.7 / -2.0
p.19 On / Off
Image size represents the resolution of the
picture. The resolution is, in turn, directly
related to the number of pixels of the camera.
As such, 1.3 Mega-pixel can be arranged as
1280 x 1024 pixels or lower.
The higher the resolution size of an
image, the larger the memory space
it occupies. Please refer to “Memory
Capacity, Size and Quality” section
for more details (
Fine Image Very good detail and resolution (1600x1200 2.0 Mega-
Normal Image Good clarity and resolution (1280x1024 1.3 Mega-
Basic Image Basic quality and resolution (640x480 VGA).
output. When you choose 1600 on the menu, the software interpolation is enabled
automatically. This enhances the image output to 2.0 Mega-pixel.
p.29).
Pixel) (output by software interpolation)
Pixel).
CAMERA SETUP
Size
Quality
White Bal
1/3
Menu
1280
H.Q.
WB
AUTO
OK
Exit
16 17
DS8118 Manual-6 Lang. (086-002937-017)
Quality (Picture Quality)
The picture quality represents the compression
rate of the images taken. For images with
higher quality, the memory space it takes is
also higher. Conversely, images with low
quality take up less space.
The higher the resolution size of an
image, the larger the memory space
it occupies.
Picture Quality Options
Name Option Description
High Quality Good image quality, high amount of image data.
CAMERA SETUP
Size
Quality
White Bal
1/3
Menu
1280
AUTO
Exit
H.Q.
WB
OK
ENGLISH
OK
FRANÇAIS
Standard Standard quality, medium amount of image data.
Economy Lowest quality, taking up the least memory space.
White Bal. (White Balance)
You can take pictures according to the light
conditions by setting the white balance. By
using this, the images will have the correct
balance of colour.
White Balance Options
OK
Icon Settings Options
Auto Adjusts the white balance automatically.
CAMERA SETUP
Size
Quality
White Bal
1/3
Menu
1280
H.Q.
WB
AUTO
OK
Exit
DEUTSCH
OK
ITALIANO
Sunlight Use outside in sunlight.
Shade Use outside in the shade.
Yellow F.L. Use under yellow fluorescent lamp.
(Fluorescent Lamp)
White F.L. Use under white fluorescent lamp.
(Fluorescent Lamp)
ESPAÑOL
Tungsten Use under electric or other tungsten light.
PORTUGUÊS
Page 12
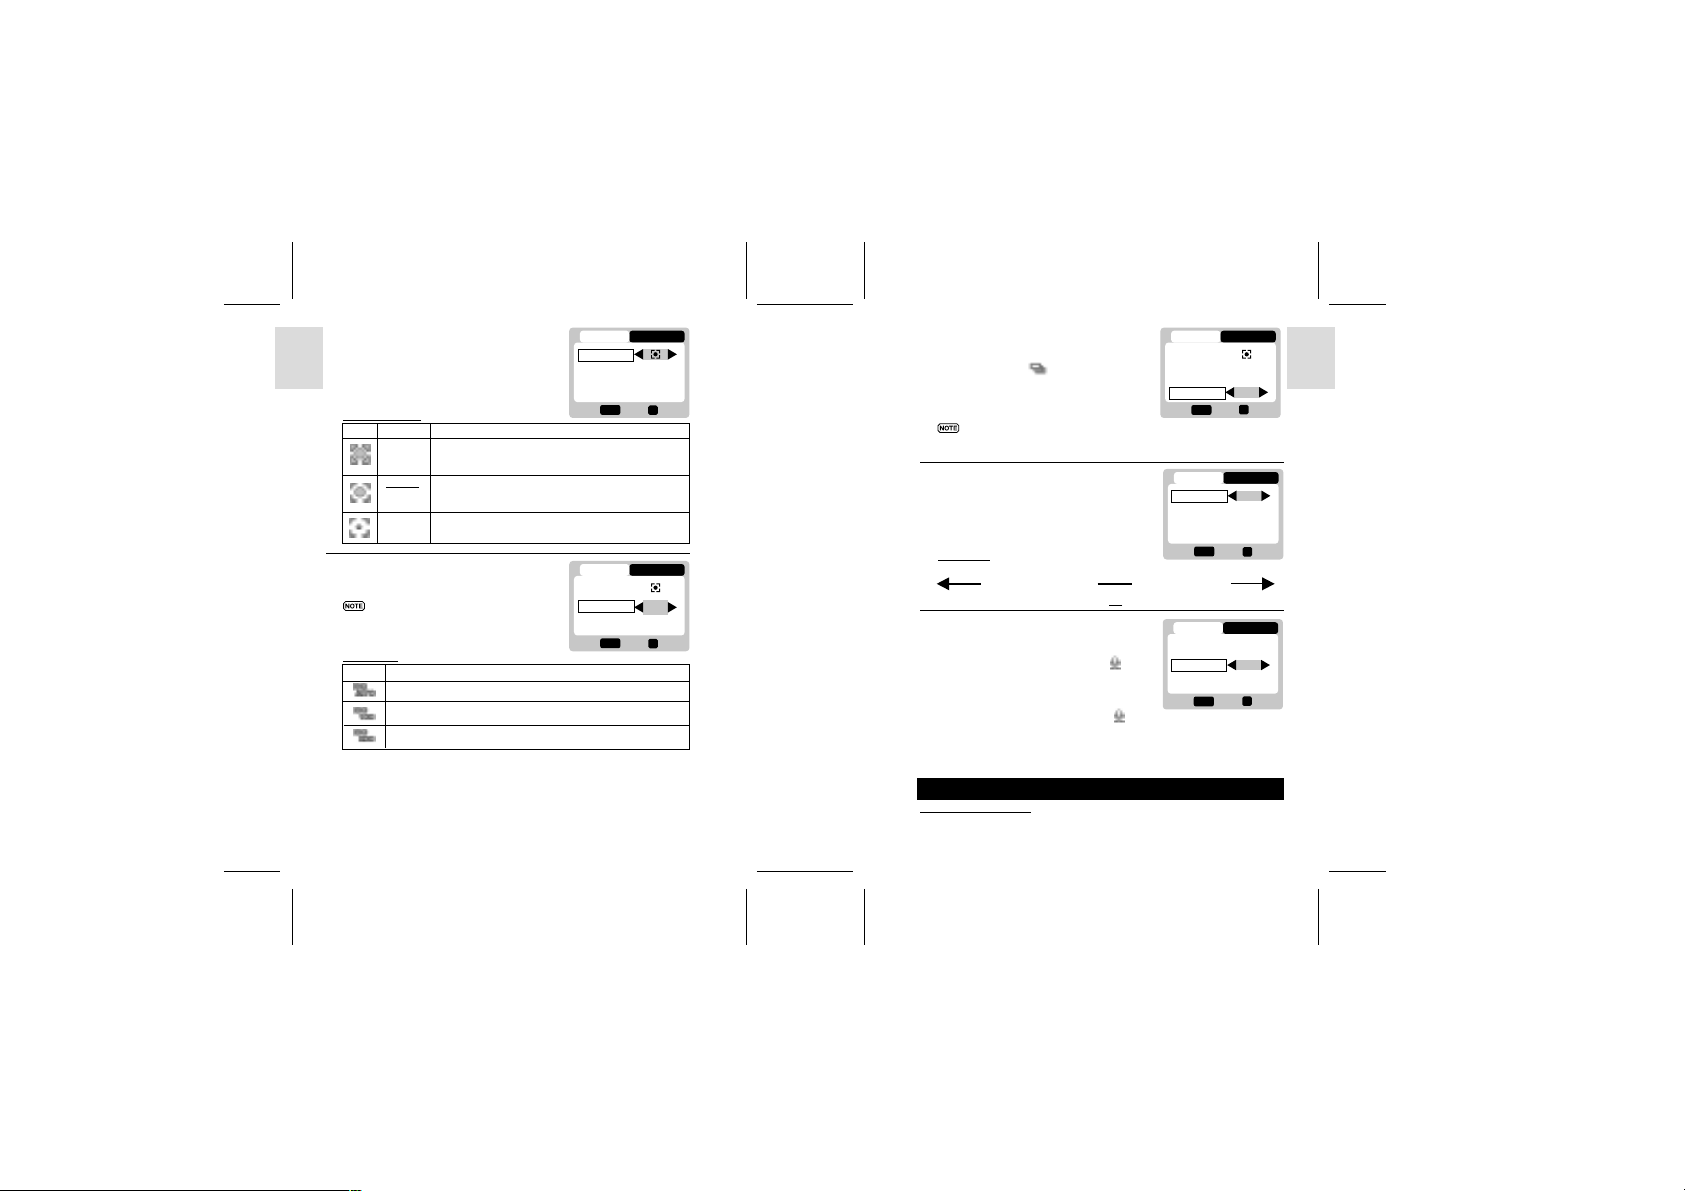
Metering
Metering is a setting that determines your
subject’s correct exposure. The camera will
compute the brightness levels, contrast, and
amount of bright to dark parts in the scene
ENGLISH
automatically.
Metering Options
Icon Settings Options
Matrix Evaluated by splitting the scene into multiple zones,
(Multi- then calculate each zone’s exposure via the camera’s
FRANÇAIS
DEUTSCH
ITALIANO
segment) computations. Ideal for general picture-taking.
Central Averages the exposure of the entire scene but gives
(Centre- extra weight to the centre. Use for backlit subjects.
Weighed)
Spot Only the small area at the centre of the screen determines
the exposure. Ideal for highlighting the main subject.
ISO
The ISO setting affects the camera’s
sensitivity to light.
An image taken at higher ISO
speeds may contain more “noise”
or graininess than an image taken
at lower speeds.
ISO Options
Speed Description
The camera sets the speed automatically.
ISO rating 100. Use for brightly lit scenes.
ESPAÑOL
PORTUGUÊS
ISO rating 200. Use for normally lit scenes.
18 19
DS8118 Manual-6 Lang. (086-002937-017)
CAMERA SETUP
Metering
ISO
Con. Shoot
2/3
Menu
ISO
AUTO
Off
OK
Exit
CAMERA SETUP
Metering
ISO
Con. Shoot
2/3
Menu
ISO
AUTO
Off
OK
Exit
Con.Shoot (Continuous Shooting)
With this setting, pictures can be taken
continuously when you press the Shutter
Release button. The
on-screen. A maximum of 2 continuous
pictures can be taken, with brief 0.5-second
OK
pauses between each shot.
Continuous Shooting cannot be used with flash or when the Self-Timer
is set. Moreover, it may not be suitable for night time or dark scenes
because flash is disabled.
EV (Exposure Compensation Setting)
Exposure compensation is required when
there is an extreme difference in brightness
between the background and the subject.
Use this setting to manually brighten or
darken an image.
EV Options
Brighter Default Darker
icon will appear
CAMERA SETUP
Metering
ISO
Con. Shoot
2/3
Menu
ISO
AUTO
Off
OK
Exit
CAMERA SETUP
Menu
0.0
On
Exit
EV
Audio Tag
3/3
ENGLISH
OK
FRANÇAIS
OK
OK
DEUTSCH
+2.0 / +1.7 / +1.3 / +1.0 / +0.7 / +0.3 / 0.0 / -0.3/ -0.7 / -1.0 / -1.3 / -1.7 / -2.0
Audio Tag
OK
You can record approximately 10 seconds of
audio to go along with an image. This is called
an Audio Tag. If the setting is enabled,
displayed on the Status LCD and OSD.
To record audio tags:
1) Within 3 seconds after a picture is taken,
press OK to start the audio tag. The
icon will flash during the recording.
2) To stop recording, press any button. The
recording will also automatically stop
after 10 seconds.
is
CAMERA SETUP
Menu
0.0
On
OK
Exit
EV
Audio Tag
3/3
ITALIANO
OK
ESPAÑOL
SHOOTING MOVIES
BASIC FUNCTIONS
The Movie Mode enables you to take moving images. The length of the movie that
can be taken depends on the amount of memory available within your camera’s
current memory storage.
PORTUGUÊS
Page 13
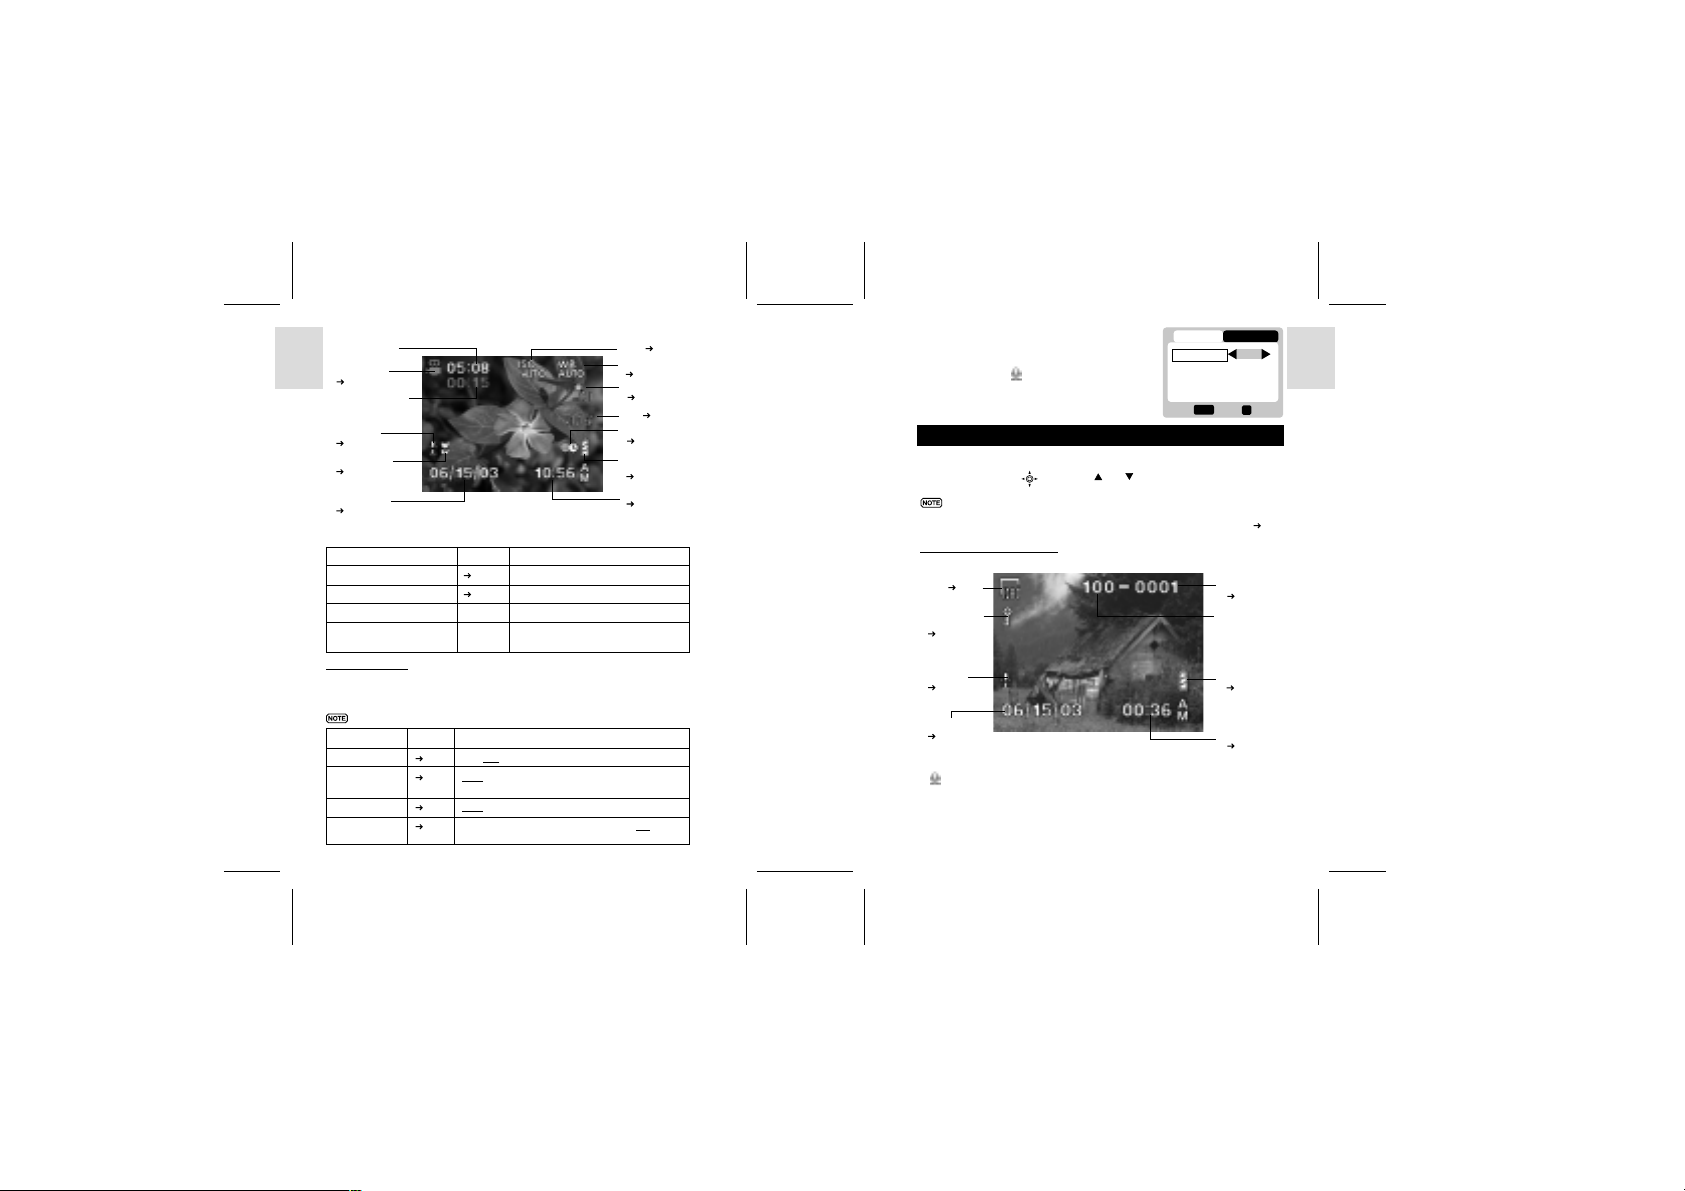
Movie Mode On-Screen Display
Total Available
Time for Recording
Movie Mode
( p.20)
ENGLISH
Current Elapsed
Recording Time
(in hh:mm:ss)
Audio Tag
( p.19)
Macro Mode
( p.9)
FRANÇAIS
Current Date
( p.12)
Movie Mode Functions
Function Page Description
DEUTSCH
Toggling OSD Information
Zooming
p.8 Identical procedures to Camera Modes
p.10 Identical procedures to Camera Modes
ISO ( p.18)
White Balance
( p.17)
Zoom Level
( p.10)
EV ( p.19)
World Time
( p.13)
Battery Level
Indicator
( p.4)
Current Time
( p.12)
Begin Recording Movie N/A Press the Shutter Release Button
Stop Recording Movie N/A Press the Shutter Release Button again
ITALIANO
MOVIE MENU
Press MENU to access the Movie Menu.
after recording has started.
Movies Settings and Options
The options underlined and in italics are initial defaults.
Settings Page Options
ESPAÑOL
Mic.
White Balance
ISO
EV
PORTUGUÊS
p.21 Off / On
p.17 Auto / Sun light/ Shade/ Yellow F.L. (Fluorescent
Lamp) / White F.L. (Fluorescent Lamp) / Tungsten
p.18 Auto / 100 / 200
p.19 +2.0 / + 1.7 / +1.3 / +1.0 / +0.7 / +0.3 / 0.0 / -0.3/
-0.7 / -1.0 / -1.3 / -1.7 / -2.0
20 21
DS8118 Manual-6 Lang. (086-002937-017)
Mic. (Microphone)
You can enable or disable audio recording while
shooting a movie. The microphone icon (same as
Audio Tag icon)
and OSD.
is displayed on the Status LCD
MOVIE SETUP
Mic.
White Bal
ISO
1/2
Menu
On
WB
AUTO
ISO
AUTO
OK
Exit
OK
PLAYBACK FUNCTIONS
In Playback Mode, you can review the images and movies stored within your current
active storage memory. The last image or movie taken is displayed on the OSD in
Playback Mode. Use and press or to view through the images and
movies taken.
If the Secure Digital card / Multi-Media Card is installed, the Playback Mode
will only show the images and movies stored on the card. To access the data
stored within the internal memory, the SD card must first be removed (
PLAYBACK OF IMAGES
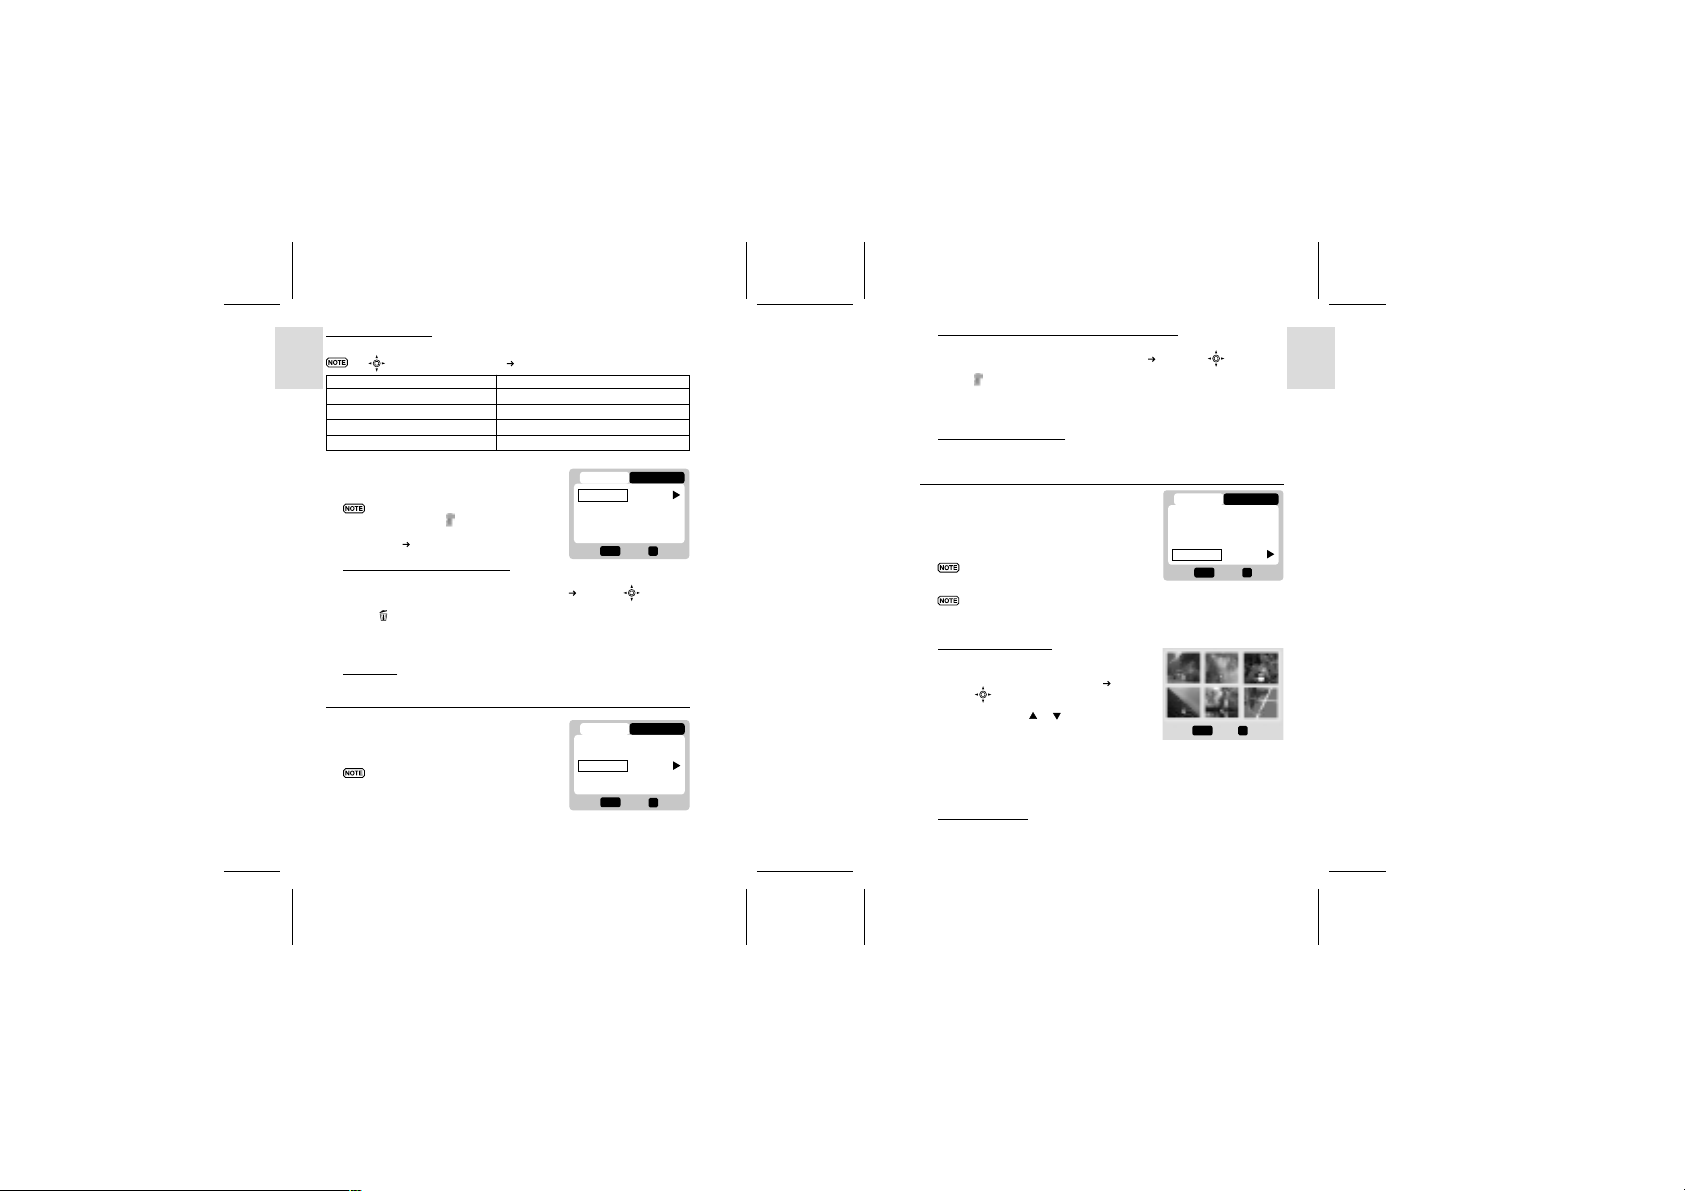
Image Playback Mode On-Screen Display
Size ( p.16)
Protect Mode
Indicator
( p.24)
Auido Tag
( p.19)
Current Date
( p.12)
Playback of Audio Tag
If is shown with the image, then Audio Tag can be played back:
• Press shutter button to play back the audio tag.
• Press shutter button again to stop the audio tag.
p.6).
File number
( p.14)
Folder number
Battery Level
Indicator
( p.4)
Current Time
( p.12)
ENGLISH
FRANÇAIS
DEUTSCH
ITALIANO
ESPAÑOL
PORTUGUÊS
Page 14
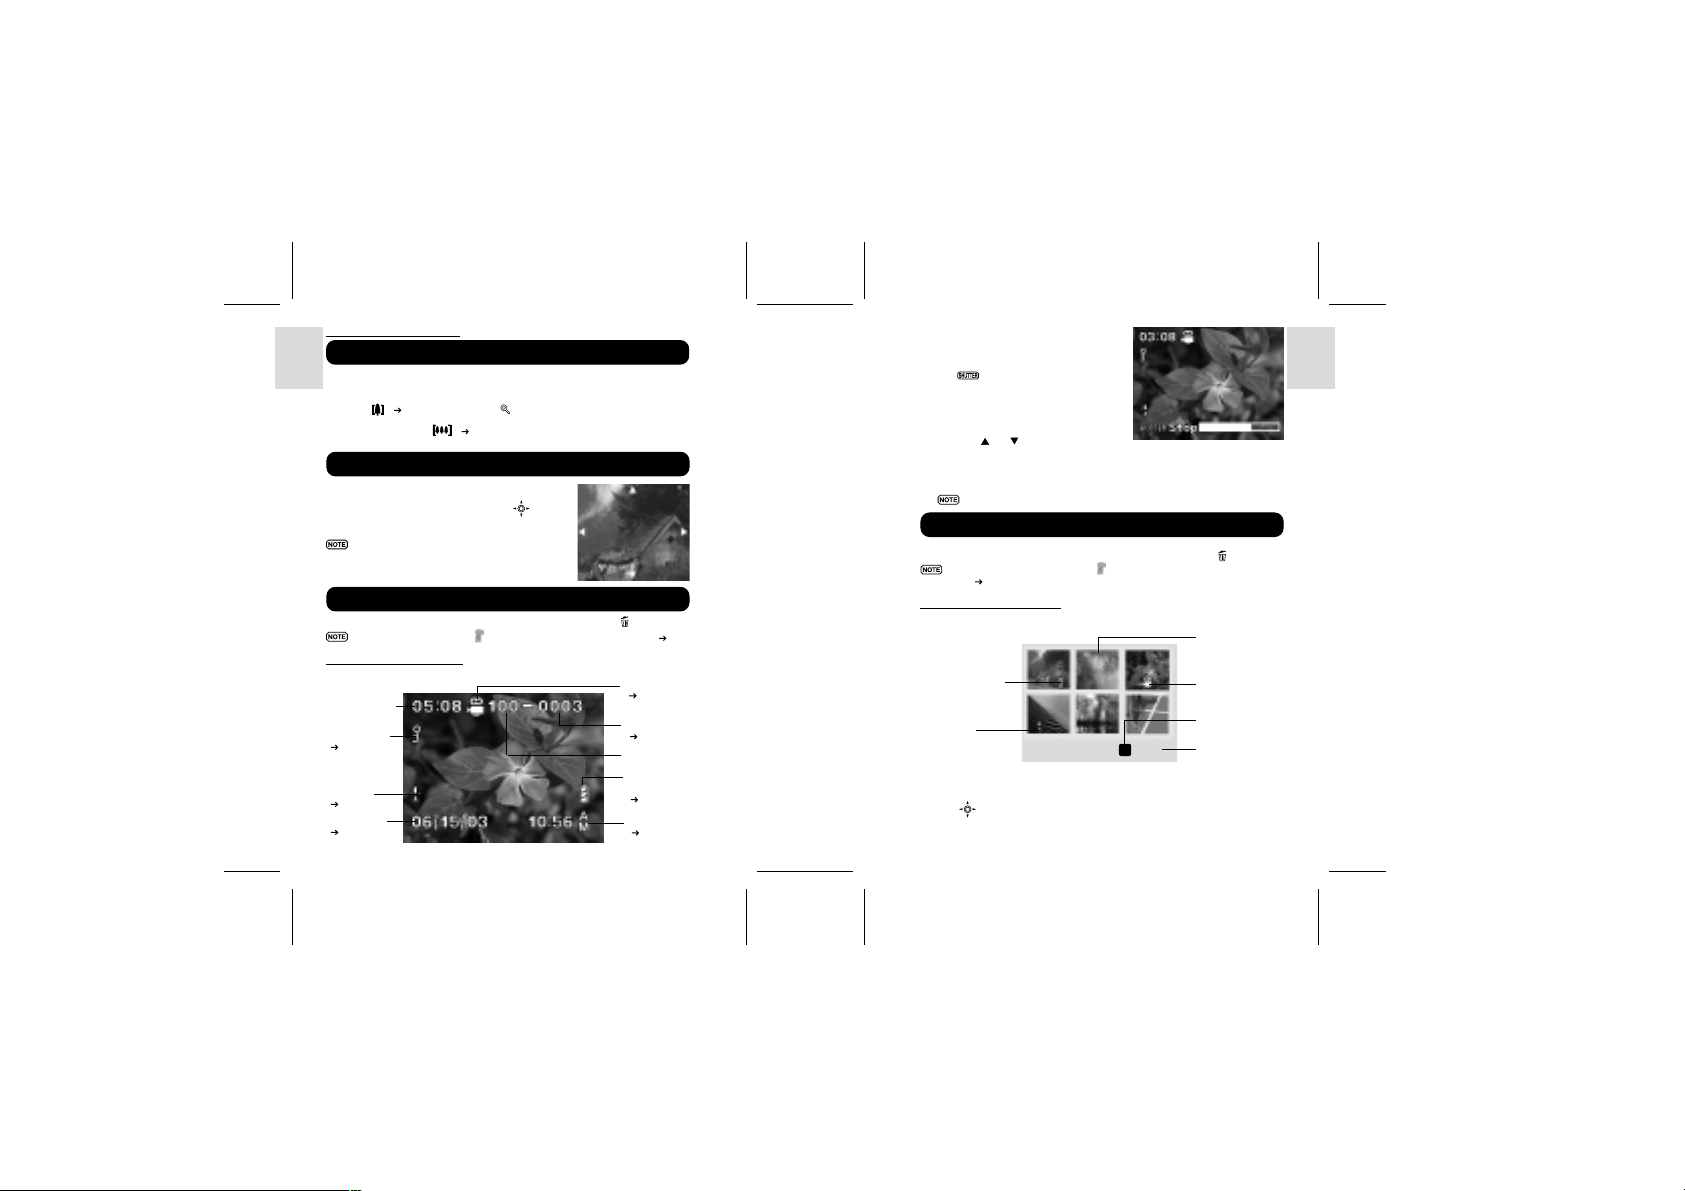
ZOOMING FUNCTIONS
Select
OK
Zooming into Pictures
The zooming function can magnify images up to x5.0 on the On-Screen Display:
ENGLISH
FRANÇAIS
DEUTSCH
x1.0 / x1.5 / x2.0 / x2.5 / x3.0 / x3.5 / x4.0 / x4.5 / x5.0
1. Wait until the icons disappear from the playback image.
( p.4) to zoom in. The icon appears, as well as the current
2. Press
magnification level.
3. To zoom out, press ( p.4).
4. Press OK to exit zooming mode.
Scrolling a Magnified Image
While an image is magnified, only a portion of the
image will be visible. Press the Shutter Release
Button to enable/disable scrolling, then use
scroll to other parts of the image.
All zooming functions are disabled while
the Scrolling Mode is enabled.
to
Deleting Playback Image
To delete the image currently being viewed during playback, press
Protected images (indicated with ) cannot be deleted and must be unpro tected first ( p.24).
ITALIANO
PLAYBACK OF MOVIES
Movie Playback Mode On-Screen Display
Total Recorded
Time
Protect Mode
( p.24)
ESPAÑOL
Audio Tag
( p.19)
Current Date
( p.12)
PORTUGUÊS
22 23
and confirm.
Movie Mode
( p.20)
File Number
( p.14)
Folder Number
Battery Level
Indicator
( p.4)
Current Time
( p.12)
DS8118 Manual-6 Lang. (086-002937-017)
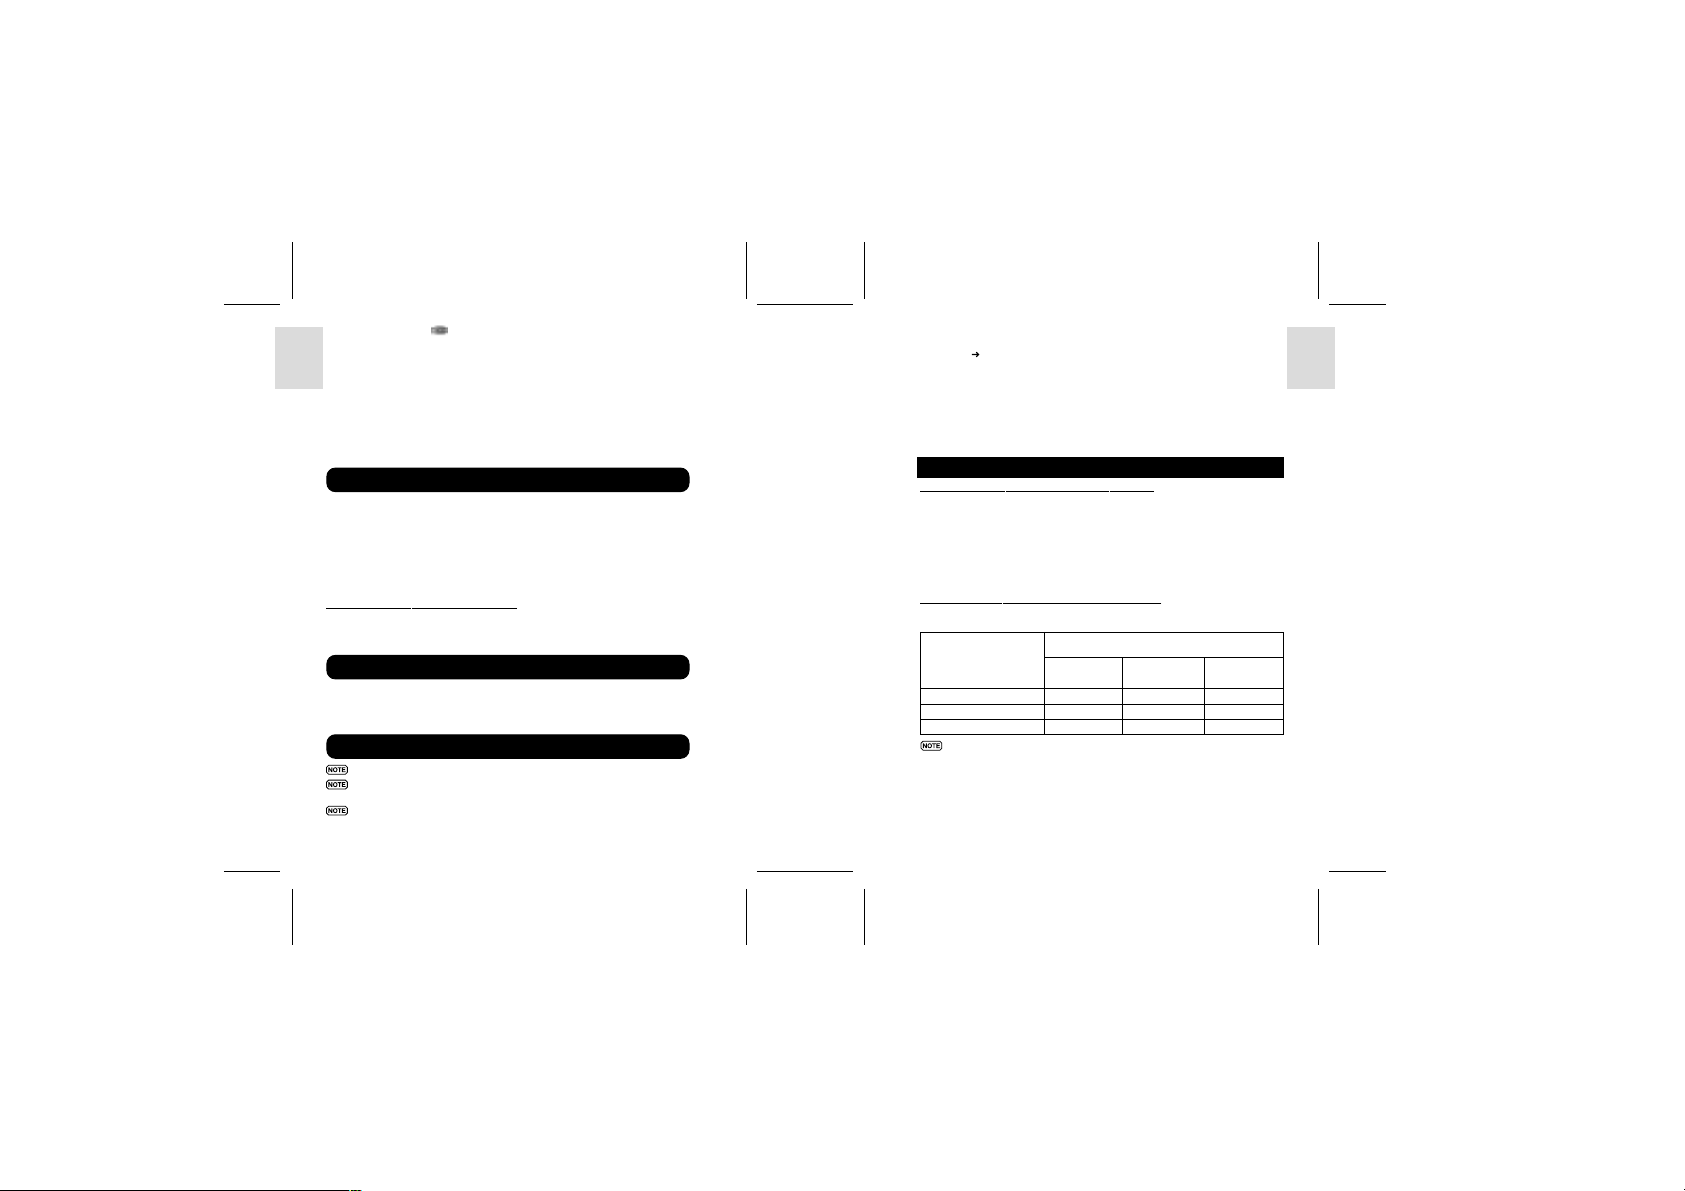
To playback movies:
. Wait until the icons disappear from the
1
playback movie.
The
icon will then appear.
2. Press the Shutter Release Button to start
playback.
3. During playback,
a) Press OK to hide the Progress Bar,
Press again to restore the Progress Bar.
b) Press
or to adjust the playback
volume.
4. Press the Shutter Release Button again to
stop the playback. The movie will return
to Movie Playback OSD screen.
All zooming functions are disabled during Movie Playback mode.
Deleting Playback Movie
To delete the movie currently being viewed, stop the playback, press
Protected movies (indicated with ) cannot be deleted and must be unpro-
tected first (
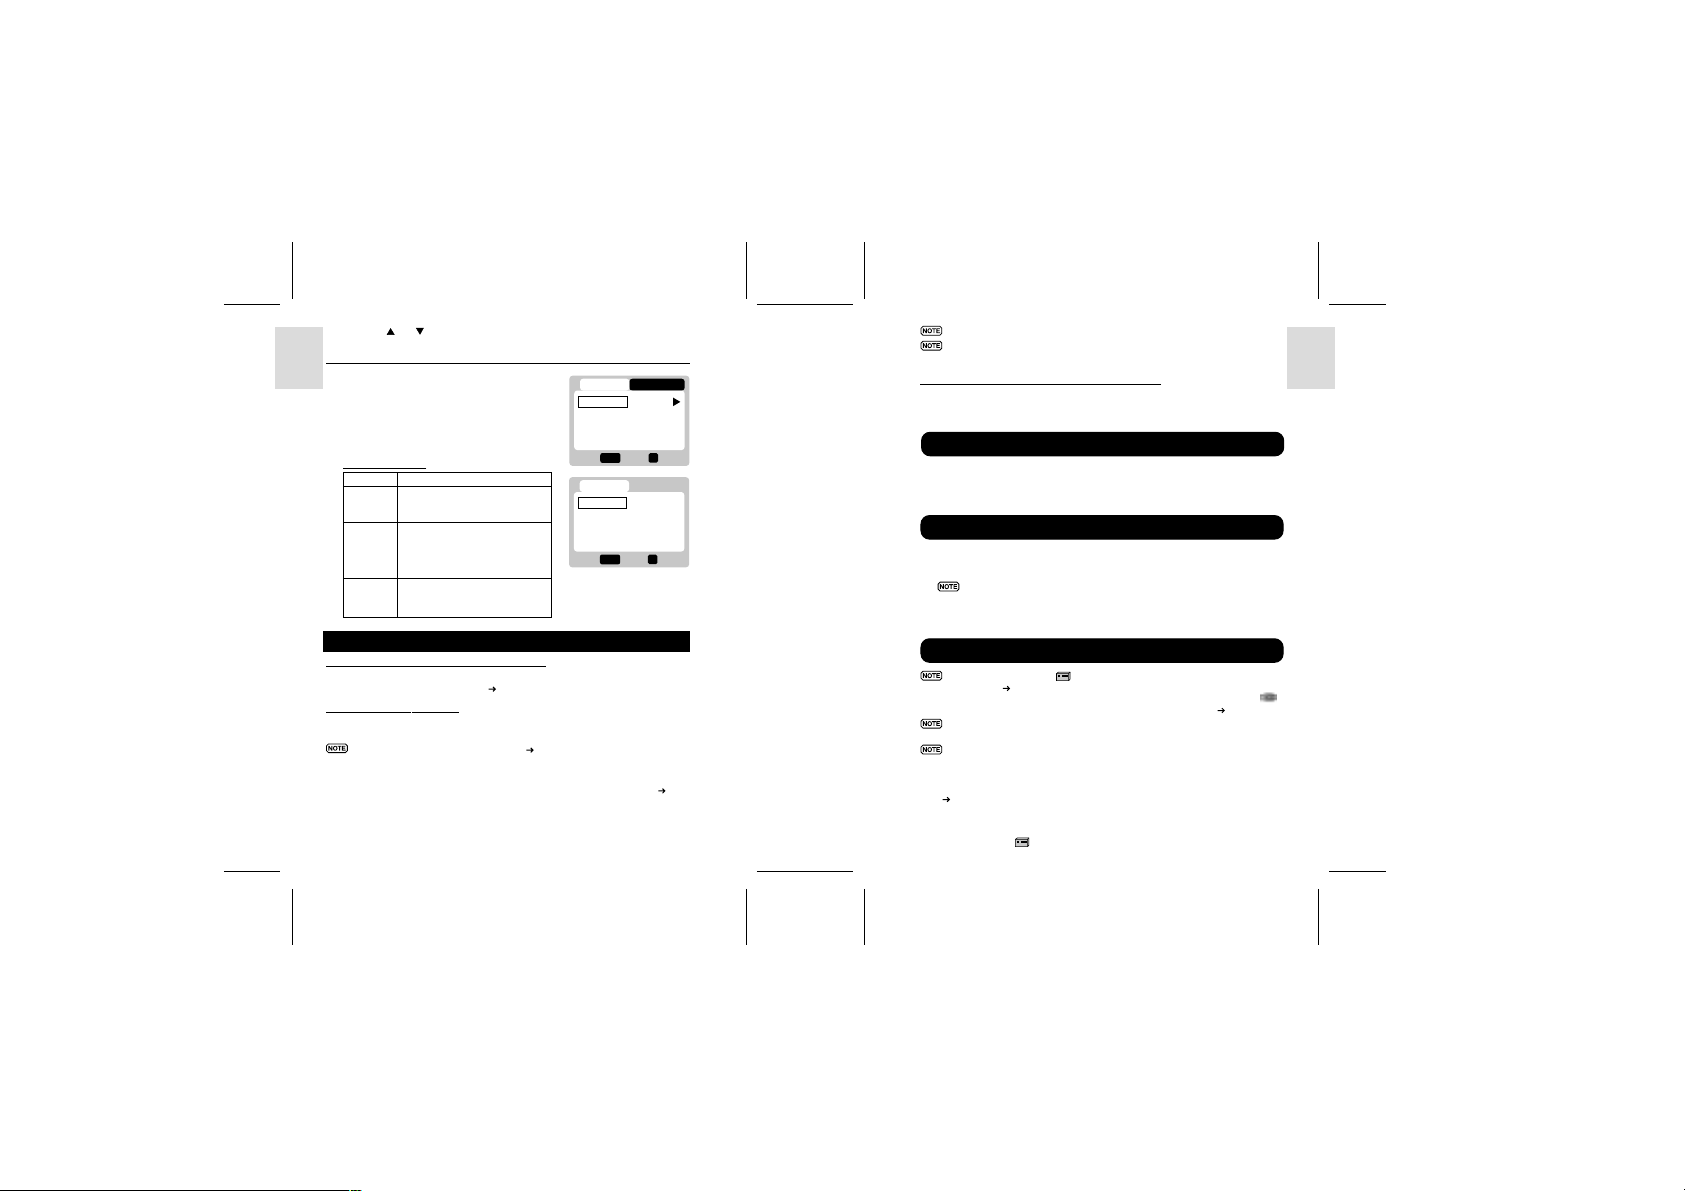
MULTI-FRAME REVIEW
The Multi-Frame Review shows, as thumbnails, up to six recorded images and movies
on the OSD. For movies, the first frame is displayed.
1. In playback mode, press DISP. Thumbnails of images will appear on the OSD.
2. Use
p.24).
Protected Image
Audio Tag
to navigate the thumbnails. Press OK to view a chosen image or movie
fully.
and confirm.
Current
Selected File
Movie File
Button On Camera
Description Of
Button Function
ENGLISH
FRANÇAIS
DEUTSCH
ITALIANO
ESPAÑOL
PORTUGUÊS
Page 15
PLAYBACK MENU
Press the MENU button to access the Playback Menu.
Use to navigate the menu screen ( p.4). Press OK to confirm setting changes.
ENGLISH
Function Options
Delete Cancel / Select Images / All Images
Protect Select Images / All Images
DPOF (Digital Print Order Format) Select Images / All Images
Slide Start / Interval / Repeat
Delete
FRANÇAIS
The Delete options within the Playback Menu
can delete multiple or all images and movies.
Protected images and movies
(indicated with
deleted and must be unprotected
first (
Deleting Selected Images and Movies
DEUTSCH
1. When Select Image(s) is selected, the OSD displays up to six thumbnail
images similar to the Multi-Frame Review setting (
2. Highlight an image, then press directly onto OK to confirm your selection.
icon will then indicate that the image is set for deletion. To cancel the
The
deletion, press OK again. Repeat this step to set multiple images or movies
for deletion.
3. Follow the rest of the on-screen options to confirm deletion.
ITALIANO
Deleting All
When “All Images” is selected, follow the rest of the options to confirm the
deletion of all images and movies.
) cannot be
p.24).
Protect (Protecting Images)
This option can be used to protect images
ESPAÑOL
and movies from deletion.
Protected files will still be erased
if the memory is formatted.
PORTUGUÊS
24 25
PLAY SETUP
Delete
Protect
DPOF
Menu
1/2
p.23). Use to navigate.
PLAY SETUP
Delete
Protect
DPOF
Menu
1/2
DS8118 Manual-6 Lang. (086-002937-017)
Protecting / Unprotecting Selected Images and Movies
1. When Select Image(s) is selected, the OSD displays up to six thumbnail images
similar to the Multi-Frame Review setting (
2. Highlight an image, then press directly onto OK to confirm your selection.
icon will then indicate that the image is set for protection. To cancel
The
the protection, press OK again. Repeat this step to set multiple images or
movies for protection.
3. Follow the rest of the on-screen options to confirm protection.
Protecting / Unprotecting All
• When “All Images” is selected, select the “Set Protect All” to On to confirm
the protection of all images and movies.
• To unprotect all images and movies, select the “Set Protect All” to Off.
DPOF (Specifying Digital Print Order Format)
The DPOF option in the Playback Menu is used
to specify the quantity of each image for printing
from the SD Card. When used, the SD card can
OK
OK
Exit
OK
OK
Exit
then be used in printers or taken to specialists in
order to print the images.
This function is only used for still pictures.
Movies cannot be transferred to digital prints.
You can only specify the DPOF of the internal memory by transferring
the images to a blank SD /MMC Card via a Secure Digital card / MultiMedia card reader (sold separately).
DPOF of Selected Images
1. When Select Image(s) is selected, the OSD
displays up to six thumbnail images similar to
the Multi-Frame Review setting (
to navigate.
Use
. Select an image to specify the DPOF and
2
press OK. Press
of prints for the selected image (up to a
maximum of 9 copies). When done, press
OK again. Repeat this step to select more
images for printing or change the previously
specified numbers.
3. Follow the rest of the on-screen options to
confirm the DPOF setting.
DPOF of All Images
1. When “All Images” is selected, all images will be set to the same specified
printing number.
or to set the number
p.23). Use to navigate.
p.23).
PLAY SETUP
Delete
Protect
DPOF
Menu
Menu
Next
OK
Exit
OK
1/2
OK
Set
ENGLISH
FRANÇAIS
DEUTSCH
ITALIANO
ESPAÑOL
PORTUGUÊS
Page 16
2. Press
or to set the number of prints of all stored images in the SD
card, for up to a maximum of 9 copies.
3. Follow the rest of the options to confirm the DPOF setting.
Slide (Slideshow)
ENGLISH
You can play back all the images and movies in
a slideshow format. The interval between images
can be specified.
During the slideshow, press MENU to stop.
From here, you may choose to continue or
exit the current slideshow.
Slideshow Options
FRANÇAIS
Settings Descriptions
Start Start Slideshow according to
the specified Interval and
Repeat options.
Interval Specifies the amount of time
the camera will display an image
before moving on to the next
DEUTSCH
CONNECTING TO EXTERNAL DEVICES
ITALIANO
USING A TRIPOD WITH THE CAMERA
You can secure your digital camera to a tripod to prevent camera shakes. To install,
screw the tripod to the Tripod Hole (
CONNECTING TO A TV
You can playback the images and movies you have recorded on your TV. Connect
your digital camera to the TV via the video/audio cable included in the camera’s gift box.
ESPAÑOL
Caution: Turn off the TV and digital camera before connecting the video/audio cable.
1. Plug the video/audio cable into the Video/Audio Socket of the camera (
2. Connect the cable’s yellow connector to the yellow AV input terminal of your
TV. Likewise, connect the white connector to the TV’s white terminal. Refer to
your TV’s manual for more information.
3. Turn the TV and digital camera on. Make sure to switch the TV to the
appropriate AV channel display.
PORTUGUÊS
image. The options are 3 sec.,
5 sec., and 10 sec.
Repeat When set to On, the slideshow
immediately replays when the
final image is displayed.
p.3).
Be sure to adjust the TV Out setting ( p.14) to correspond with your
country’s system (PAL or NTSC) before connecting the camera to the TV.
26 27
PLAY SETUP
Slide
Menu
Menu
OK
Exit
5s
Off
OK
Exit
2/2
Slide Show
Start
Interval
Repeat
DS8118 Manual-6 Lang. (086-002937-017)
OK
OK
p.3).
The OSD is automatically off when the camera is connected to a TV.
Use an AC Adapter if you intend to connect the camera to a TV for a long
period of time.
CONNECTING TO A WINDOWS-BASED PC
Use the USB cable included to connect to your Windows PC. This enables you to
upload, download, edit, and playback pictures and movies onto your PC. However,
the software must be installed first.
Pre-Installation Checklist
• Pentium 166MHz • 16-bit colour display at 800x600
• 64MBytes RAM • USB 1.1 interface
• 350MBytes Hard disk space • Windows 98/98SE/ME/2000/XP
• CD-ROM drive
Installing Drivers and Software
1. Insert the CD labelled “DS8118_8238” into your CD-ROM drive. The installation
will start automatically.
If the “autorun” feature is disabled on your PC, start the installation by
running [x:\setup.exe] where “x:” is the drive letter of the CD-ROM drive.
2
. Follow the on-screen instruction to complete the installation of the camera drivers
and software. When done, click on the [Finish] button on-screen to restart the PC.
Connecting the Camera to the PC
For file transfer, select under USB mode before connecting the Camera
to the PC (
p.15). To use the camera as a Webcam, make sure that a video
conferencing software is installed first (sold separately). Then, select
under USB mode before connecting the Camera to the PC ( p.15).
Only the images and movies stored in the camera’s current memory device
(SD card or internal memory) will be visible on the PC.
The OSD is automatically off when the camera is connected to the PC.
1
. Turn on your PC and allow your system’s Windows operating system to boot up.
2. Turn off your digital camera. Connect the camera and your PC via the USB
cable. The USB terminal on your camera is located inside the Terminal Cover
(
p.3). Refer to your PC’s manual to locate the USB connection on the PC.
3. Turn on your digital camera to any Mode. The Status LCD on the camera now
shows - PC -.
4. The digital camera now appears as Removable Disk drive on your system’s [My
Computer] when
is selected.
ENGLISH
FRANÇAIS
DEUTSCH
ITALIANO
ESPAÑOL
PORTUGUÊS
Page 17
* Alternately, when is selected, the digital camera appears as Video Capture
Device under your videoconferencing software.
5. Double-click on the [Removable Disk] drive. Two folders, [DCIM] and [MISC],
are now visible. Ignore the [MISC] file (it contains DPOF information) and
double-click on the [DCIM] folder.
ENGLISH
6. New subfolder is now visible - [100DSHOT]. The [100DSHOT] subfolder contains
all the Economy, Standard, and High Quality images stored as .JPG files. Movie
clips are also stored here as .AVI files which can be played using Windows
Media Player.
7. You can double-click on the images and movies to view them (provided the
appropriate Picture Viewer and Movie Player are installed). These files can also
be deleted, copied, or moved like normal computer files.
FRANÇAIS
Disconnecting from the PC (Windows ME, 2000, and XP users only)
For PC users with Windows ME, 2000, or XP operating systems, the camera device
driver should be stopped before disconnecting the USB cable.
1
. Find the “Unplug or Eject Hardware” icon in your Windows system tray.
2. Right-click on the icon. The “Stop USB Disk” option will pop up. Highlight and
left-click on the option.
3. Wait for a second. A pop-up window will inform you that the USB Device can
DEUTSCH
now be safely removed.
4. Disconnect the USB cable from the camera and/or from the PC.
CONNECTING TO A MACINTOSH
Use the USB cable included to connect to your Macintosh. Your Macintosh will
treat the camera as a mass-storage device. The images and movies within the camera can then be uploaded and downloaded.
ITALIANO
• Power PC • 16-bit colour display at 800x600
• 350 MB free hard disk space • USB 1.1 interface
• 64 MB RAM • MAC OS 9.x or higher
• CD-ROM drive
ESPAÑOL
Webcam function is not supported on Macintosh.
Only the images and movies stored in the camera’s current memory device
(SD card or internal memory) will be visible on the Macintosh.
The OSD is automatically off when the camera is connected to the Macintosh.
1
. Turn on your Macintosh and allow MAC OS operating system to boot up.
PORTUGUÊS
Pre-Installation Checklist
Connecting the Camera to the Macintosh
28 29
DS8118 Manual-6 Lang. (086-002937-017)
2. Turn off your digital camera. Connect the camera and your Macintosh via the
USB cable. The USB terminal on your camera is located inside the Terminal
Cover (
p.3). Refer to your Macintosh’s manual to locate the USB connection
on the Macintosh.
3. Turn on your digital camera to any Mode. The OSD screen on the camera now
show - PC -.
4. A camera icon will appear on your Macintosh’s screen. Click on it to access the
images and movies that are stored on your camera.
5. You can double-click on the images and movies to view them (provided the
appropriate Picture Viewer and Movie Player are installed). These files can also
be deleted, copied, or moved just like normal computer files.
ADDENDUM
LIST OF COMPATIBLE MEMORY CARDS
The following Secure Digital cards have been tested and are verified to be
compatible for use with the DS8118:
SanDisk : 64MB, 128MB, 256MB
Panasonic : 32MB, 64MB, 128MB, 256MB
Toshiba : 32MB, 64MB, 128MB, 256MB
Operation is not guaranteed for other, unlisted memory cards. For more details on
the above cards, please contact the manufacturer directly.
MEMORY CAPACITY, SIZE AND QUALITY
The table below indicates the number of images that can be stored when using a
8MB Secure Digital / Multi-Media card.
Resolution
Fine (1600x1200)
Normal (1280x1024)
Basic (640x480)
The above table is based on standard shooting conditions tested by Oregon
Scientific and may vary depending on the subject, shooting conditions,
capture modes, and SD card memory capacity.
Approximate Number of Pictures Stored under
the Following Picture Quality Selections
High
Quality
9
15
52
Standard
Quality
15
22
78
Economy
Quality
22
39
112
ENGLISH
FRANÇAIS
DEUTSCH
ITALIANO
ESPAÑOL
PORTUGUÊS
Page 18
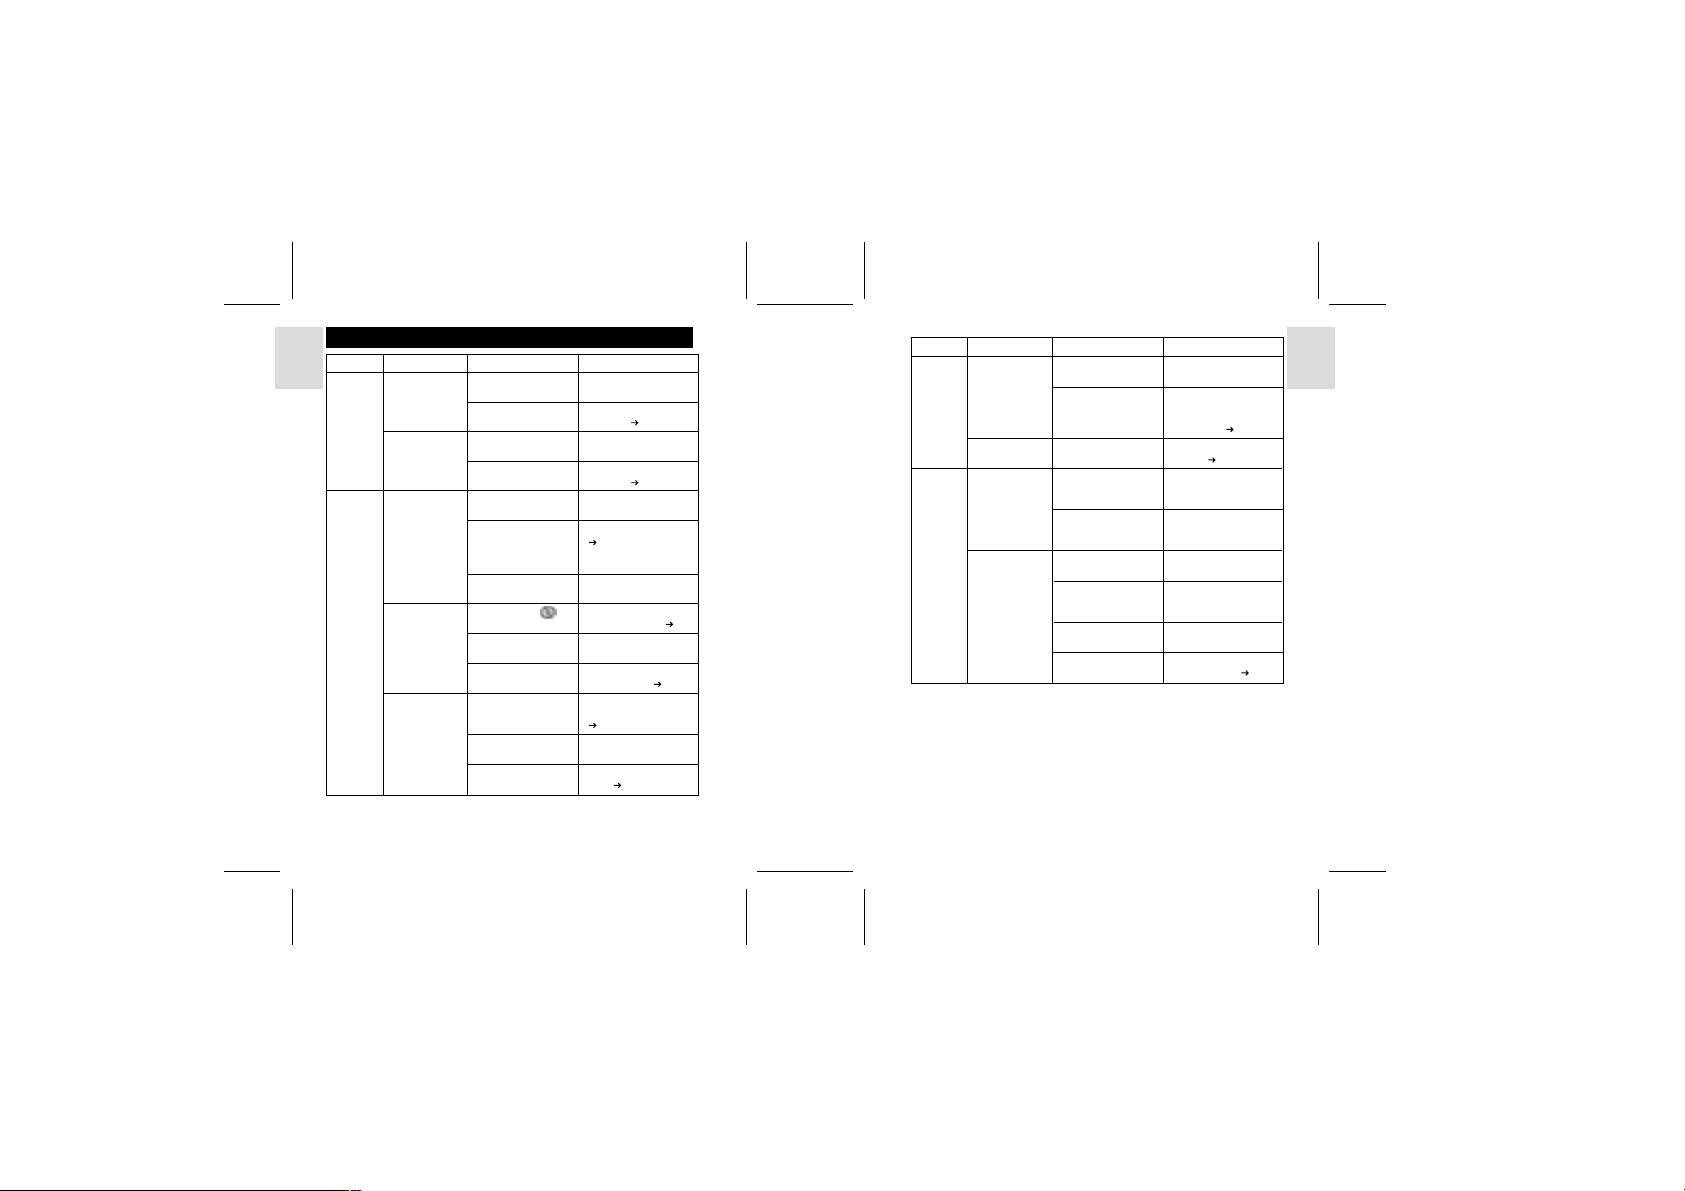
TROUBLESHOOTING
Problem Symptom Check This Remedy
No Power
ENGLISH
Power will not
turn on.
Power turns off
after turning on.
FRANÇAIS
Taking
Cannot take
Pictures
pictures when
the Shutter
Release Button
is pressed.
DEUTSCH
Flash does not go
off as expected.
ITALIANO
Image taken
appears too dark
or blurred.
ESPAÑOL
Batteries are exhausted.
Batteries are inserted
incorrectly.
Battery level is too low.
Auto Off Function is
enabled.
Camera not turned on.
No space on the Secure
Digital card / Multi-Media
card / internal Memory.
Mode Switch is set to
Playback mode.
Flash is set to
flash)
Mode Switch is set to
Playback or Movie Mode.
Flash has not finished
charging.
Check your Flash Mode.
The subject is too far
away.
The lens is dirty.
(no
Replace with new batteries.
Insert the batteries
correctly (
Replace with new batteries
Disable the Auto Off
Function (
Turn on the camera.
Delete unwanted files
(
p.24) or insert a new
Secure Digital card / MultiMedia card.
Change the Mode Switch
to Camera or Movie Mode.
Enable flash by changing
it to another setting (
Change the Mode Switch
to Camera Mode.
Wait until the Status Lamp
stops blinking (
Turn on the flash by
changing the Flash Mode
(
p.9).
Move closer to the subject.
Clean the lens with a soft
cloth (
p.2).
p.5).
p.14).
p.9).
p.9).
Continued:
Problem Symptom Check This Remedy
Playback
Connecting
with
External
Devices
Cannot play back
images or movies.
Cannot delete
images or movies.
Picture not shown
on TV when
connected.
Camera does not
appear as
Removable Disk
when connected
to a PC.
Mode Switch is not set
to Playback Mode.
No images or movies
are recorded.
Images or movies are
protected.
Check cable connection.
Check channel on TV.
Camera or TV is not
turned on.
Check the USB cable
connection.
Camera is not turned
on.
Camera switched to
Webcam Mode.
Set Mode Switch to
Playback Mode.
Images located in internal
memory instead. Remove
Secure Digital card / MultiMedia card (
Unprotect the images or
p.24).
movies (
Make sure yellow video
cable is plugged into the
TV’s AV terminal.
TV channel should be
switched to the
appropriate A V channel.
Turn on the camera and
TV.
Make sure both ends of
the USB cable are
connected.
Turn the camera on.
Change the USB Mode
to Storage Mode (
p.6)
p.15).
ENGLISH
FRANÇAIS
DEUTSCH
ITALIANO
ESPAÑOL
PORTUGUÊS
30
DS8118 Manual-6 Lang. (086-002937-017)
31
PORTUGUÊS
Page 19
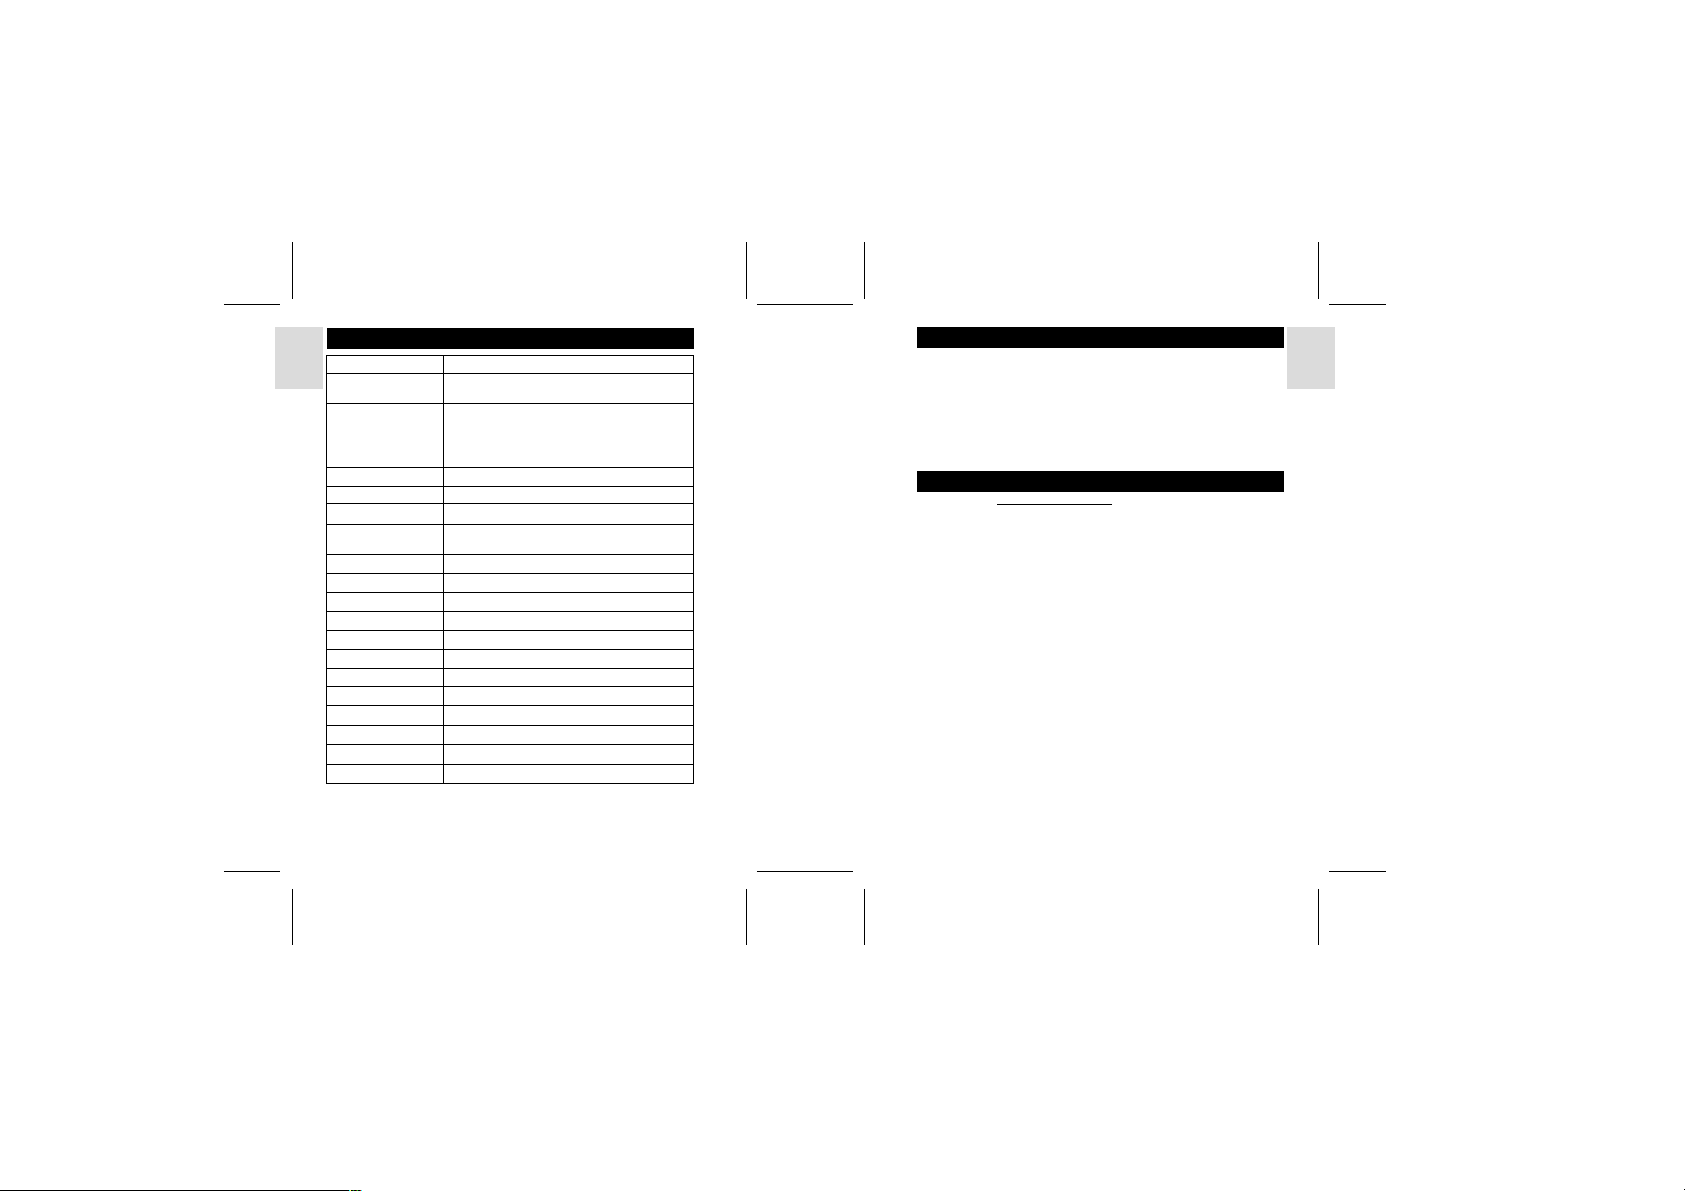
SPECIFICATIONS
Type Description
ENGLISH
Sensor 1 / 2" high-density CMOS
Image size Selectable from:
FRANÇAIS
File Format DCF-compliant (Exif ver.2.1 JPEG-compliant)
Lens F = 2.8
Digital zoom 2x
Shooting distance Normal: 1.5 M to ∞
Flashlight Distance Approx. 1m ~ 3m
DEUTSCH
Operation Environment Temperature: Approx. 0˚C ~ 40˚C
Monitor 1.4" CSTN LCD
Internal Memory 8MB
Digital Video Recording 320 x 240 pixels (with audio)
ITALIANO
TV Video Output NTSC / PAL compatible
Storage Media Secure Digital memory card / Multi-Media Card
Digital Output USB1.1 interface to PC
Software ArcSoft PhotoImpression 3.0
Product Dimension 99.6 x 67.5 x 26.6 mm
ESPAÑOL
Unit Weight Approx. 122g
Battery Specification 2 AA-sized batteries (LR6) or 1 CRV3 battery
Total number of pixels: 1.3 million
1600 x 1200 pixels (*Output resolution by software
interpolation)
1280 x 1024 pixels
640 x 480 pixels (VGA)
Macro: 24cm
TRADEMARK INFORMATION
Microsoft, Windows, and Windows Media Player are trademarks of the Microsoft
Corporation of the United States and other countries. Windows is an abbreviated
term referring to the Microsoft Windows Operating System.
Macintosh™ is registered trademark of Apple Computer, Inc.
Arcsoft Impression™ and Arcsoft Impression™ logo are registered trandemarks of
Arcsoft Inc.
All other trademarks mentioned in this manual or other documentations provided
with your Oregon Scientific product are trademarks or registered trademarks of their
respective holders.
ADDITIONAL RESOURCES
Visit our website (www .oregonscientific.com) to learn more about your digital camera
and other Oregon Scientific products such as hand-held organizers, alarm clocks,
and weather stations. The website also includes contact information for our
customer service department, in case you need to reach us.
©
2003 Oregon Scientific. All rights reserved.
ENGLISH
FRANÇAIS
DEUTSCH
ITALIANO
ESPAÑOL
PORTUGUÊS
32
DS8118 Manual-6 Lang. (086-002937-017)
33
PORTUGUÊS
Page 20
FCC NOTICE
This equipment has been tested and found to comply with the limits for a Class B
digital device, pursuant to Part 15 of the FCC Rules. These limits are designed to provide
reasonable protection against harmful interference in a residential installation. This
ENGLISH
equipment generates, uses, and can radiate radio frequency energy and, if not installed and
used in accordance with the instructions, may cause harmful interference to radio
communications.
However, there is no guarantee that interference will not occur in a particular
installation. If this equipment does cause harmful interference to radio or television
reception, which can be determined by turning the equipment off and on, the user is
encouraged to try to correct the interference by one or more of the following measures:
FRANÇAIS
• Reorient or relocate the receiving antenna.
• Increase the separation between the equipment and receiver.
Changes or modifications not expressly approved by Oregon Scientific for compliance
could void the warranty and your authority to use this equipment.
ENGLISH
FRANÇAIS
DEUTSCH
ITALIANO
ESPAÑOL
PORTUGUÊS
34 35
DS8118 Manual-6 Lang. (086-002937-017)
DEUTSCH
ITALIANO
ESPAÑOL
PORTUGUÊS
 Loading...