

Page 1

Setting up RDA Backup to Dell™ DR Series
™
Deduplica tion Appliance on Dell
A Dell Technical White Paper
Dell Engin e er in g
May 2014
NetVault
Page 2

Revisions
Date
Description
January 2014
Initial re lease
May 2014
Updated to add suggested block size on NVBU device configuration.
This document is for informati onal purposes only and may contain typographical errors a nd tec hnic al inaccuracies. The
content is provided as is, without express or i mplied warranties of any kind.
© 2014 Dell Inc. All rights reserved. Reproduction of this material in any manner whatsoever without the express written permission
of Dell Inc. is strictly forbidden. For more information, contact Dell.
PRODUCT WARRANTIES APPLICABLE TO THE DELL PRODUCTS DESCRIBED IN THIS DOCUMENT MAY BE FOUND
AT: http://www.dell.com/learn/us/en/19/terms-of-sale-commercial-and-public-sector
discussed in this document may vary with differing deployment conditions, network loads, and the like. Third party products ma y be
inclu ded in refer ence archi tectures for the con ven ience of the reader. Inclusion of such thir d party produ ct s d oes not necessarily
constitute Dell’s recommendation of those products. Please consult your Dell representative for additional information.
Trademarks used in this text:
Dell™, the Dell logo, Dell Boomi™, Dell Precision™ ,OptiPlex™, Latitude™, PowerEdge™, PowerVau lt™, PowerConn ect™ ,
OpenManage™, EqualLogic™, Compellent™, KACE™, FlexAddress™, Force10™ and Vostro™ are trademarks of Dell Inc. Other
Dell trademarks may be used in this document. Cisco Nexus®, Cisco MDS
®
trad emarks of Cisco S ystem In c. EMC V N X
®
, Core® and C eleron® are registered trademarks of Intel Corporation in the U.S. and other countries. AMD® is a registered
Xeon
, and EMC Unisphere® are registered trademarks of EMC Corporation. Intel®, Pentium®,
trad emark and AMD Opteron™, AM D Phenom™ and AM D Sem pron™ are tra demarks of Adva nced Mi cr o Devi ces, In c. Microsoft
®
Windows
, Windows Server®, Internet Explorer®, MS-DOS®, Windows Vista® and Act ive Directory® are ei ther trademarks or
registere d trademarks of Microsoft Corporation in the United States and/or other countries. Red Hat
are reg istered tr ademark s of Red Hat, Inc. in th e United Sta tes and/or other countr ies. Novell
®
Novell I nc. in the Uni ted Stat es an d other countr ies. Oracle
®
, Xen®, XenSer ver® and Xe nMot ion® are either registered tra d emarks or trademark s of Ci trix Syste ms , I nc. in the Unite d States
Citrix
and/or other countries. VMware
®
, Virtual SMP®, vMotion®, vCenter® and vSphere® are registered tr ademark s or trademarks of
VMware, Inc. in the United States or other countries. IBM
®
Broadcom
and Net Xtreme® are registered trademarks of Broadcom Corporation. Qlogic is a registered trademark of QLogic
is a registered trademark of Oracle Corporation and/or its affiliates.
®
is a registered trademark of International Business Machines Corporation.
Corporation. Other trademarks and trade names may be used in this document to refer to either the entities claiming the marks and/or
names or their prod u cts and are th e property of their respective owners. Dell discla ims proprietary int erest in the marks and names of
others.
Perfor mance of networ k r eference architect u res
®
, Cisco NX-0S®, and other Cisco Catalyst® are registered
®
®
an d Red Hat® Enterprise Linux®
and SUSE® are registered trademarks of
®
,
Page 3

Table of contents
Revisions...................................................................................................................................................................................... 2
Execut ive summary ...................................................................................................................................................................... 4
1 Install and Configure the DR Series Deduplication Appl iance Appliance ................................................................................ 5
2 Set up NVBU for Backup..................................................................................................................................................... 10
3 Configure Backu p Job on N V BU ......................................................................................................................................... 13
4 Set Up the D R Series Ded u pl ication A p p liance Cleaner ........................................................................................................ 19
5 Monitoring Deduplication, Compression and Performance ................................................................................................... 20
3 Settin g up RDA Backup to Dell™ DR4x00 Disk Backup Applianc e on Dell™ NetVault
Page 4

Executive summary
This paper provides informa t ion a bout how to set up the Dell DR Series Ded u plicati on A p p liance as a
backup target device for Del l NetVa ult (NVBU®) Backup™ software using RDA technology. Th is paper
is a quick r eference g u id e and does not include all D R Series Ded u p licati on Appliance deployment best
practices.
Abbreviations and Mea ni ng :
RDA : Rapid Data Access, D ell propri etary technology for fa s ter data access.
Dedupe Backup : In this mode D ed u p lication is done on th e Client an d then the ded up licated pa ck ets are
sent to DR Series Dedu plicati on A p p liance.
Passthrough Backup : In this mode Deduplication is done on DR Series Deduplication A p p liance after
data is transferred from Clients and backup media server.
See th e DR Ser ies Dedup licati on A p pl iance documentation for other data management application best
pract ices whitepaper s at
dr4100, under “Manuals & Documentati on”.
http://www.dell.com/support/troubleshooting/us/en/04/Product/powervault-
NOTE: The DR Series Deduplication Appliance/NetVault build version and screenshots used for this
paper may vary slightly, depending on the version of the DR Series D ed u p licati on App liance/NetVault
software version used.
4 Settin g up RDA Backup to Dell™ DR4x00 Disk Backup Applianc e on Dell™ NetVault
Page 5

1 Install and Configure the DR Series Deduplication
Appliance
1. Rack an d cable the DR Series Ded u plicati on A p pl iance ap pl iance, and p ower it on.
2. Please refer to Dell DR Series Syst e m Administ ra t o r Guide, under secti ons of “iDRAC Connect ion”,
“Logging in and Initializing the DR Series System”, and “Accessing IDRAC6/Idrac7 Using
RACADM” for using iDRAC connection and ini tializing the app li ance.
3. Log in to iDRAC using the default address 192.168.0.120, or the IP th at is a ssigned to t he iDRA C
interface. Use user name and pass wor d of “root/calvin”.
4. Laun ch the virtual console.
5. After the virtual console is open, log in to the system as user administrator and the password
St0r@ge! (The “0” in the password is the numeral zero).
5 Settin g up RDA Backup to Dell™ DR4x00 Disk Backup Applianc e on Dell™ NetVault
Page 6

6. Set th e u ser-defined networking preferenc es.
7. View th e s um mary of prefer ences an d confirm th at i t is correct.
6 Settin g up RDA Backup to Dell™ DR4x00 Disk Backup Applianc e on Dell™ NetVault
Page 7

8. Log on to DR Series D ed u plicati on A p p liance administrator console, using the IP address you just
pr ovided for the DR Series D ed uplication Appl iance, with username administrator and passwo rd
St0r@ge! (The “0” in the password is the numeral zero.).
9. Join the DR Seri es D ed u plicati on A p pl iance to Act ive Dir ectory.
NOTE: if you d o not want t o add DR Seri es D ed u p lication Applian ce to Active Directory, plea s e s ee the
DR Series Deduplication Appliance Owner’s Manual for guest login instructions.
a. Select Active Directory from the menu panel on the left side of the management interface.
7 Settin g up RDA Backup to Dell™ DR4x00 Disk Backup Applianc e on Dell™ NetVault
Page 8

Enter Active Direct ory Inf o
b. Enter your Active Dir ect ory creden tials.
10. Creat e the RDS container. Select Containers in the tr ee on the left side of the dashboard, an d then
click the Create at the t op of the page.
8 Settin g up RDA Backup to Dell™ DR4x00 Disk Backup Applianc e on Dell™ NetVault
Page 9

11. Enter a Container Name and select Connection Type as RDA, then select RDA type as RDS.
12. Click Create a New Container. Confi r m that the contain er is added.
9 Settin g up RDA Backup to Dell™ DR4x00 Disk Backup Applianc e on Dell™ NetVault
Page 10
2 Set up NVBU for Backup
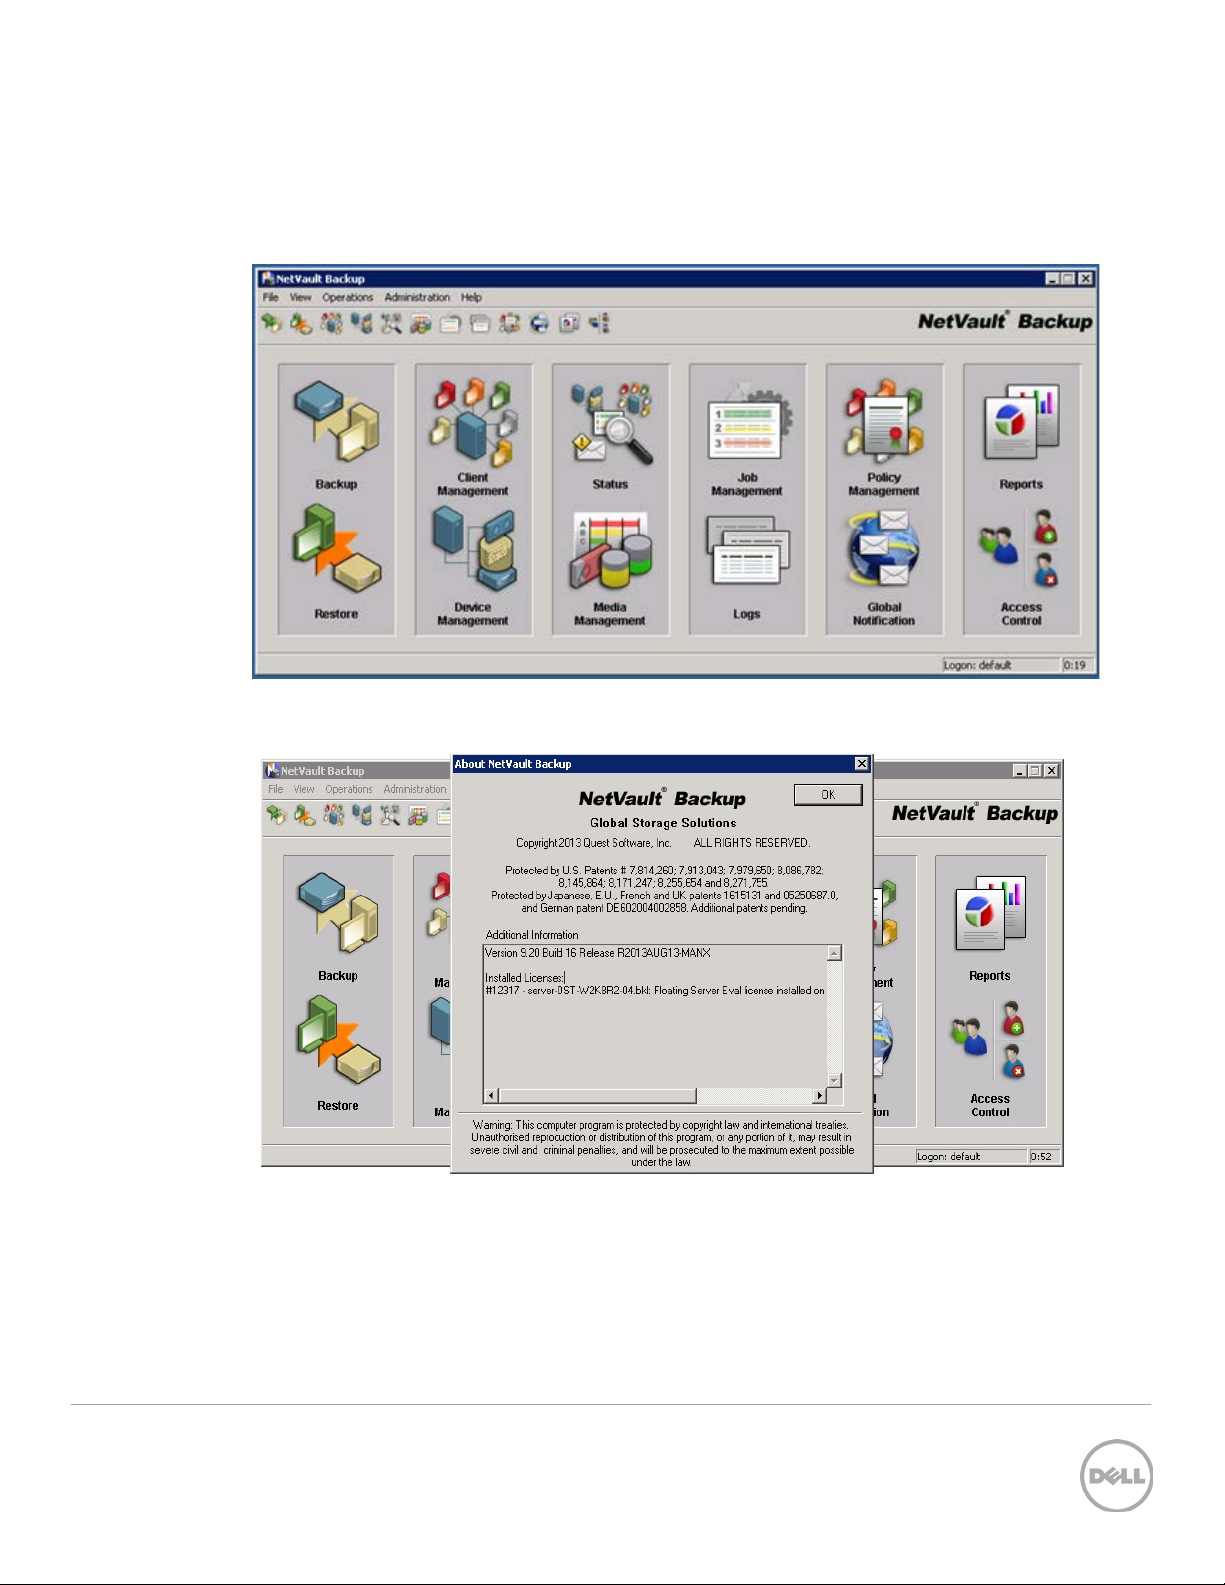
1. Open NVBU Console.
2. Confirm NVBU server vers ion i s 9.2, or greater: NVBU console -> Help -> About
10 Settin g up RDA Backup to Dell™ DR4x00 Disk Backup Applianc e on Dell™ NetVault
Page 11

3. Add RDA con t ain er to NVBU: Device Management -> Add -> Add Dell RDA Device.
Enter DR Series Ded u plicati on Appliance hostname, username and passw ord to add RDA device, en t er
RDA container nam e and save. Default user n ame is backup_user and pas s w ord for it is St0r@ge!
(The “0” in the password is the numeral zero). Suggested Block Size i s 524288 bytes (512KB) to
achieve optima l p erformance.
4. Confirm RDA device is created: Go to Device Management.
11 Settin g up RDA Backup to Dell™ DR4x00 Disk Backup Applianc e on Dell™ NetVault
Page 12

5. Add client(s) to NVBU ser ver: Go to NVBU Client Management, high-light the client machine from
Available NVBU Machines, right click on i t an d s el ect Add As Client
12 Settin g up RDA Backup to Dell™ DR4x00 Disk Backup Applianc e on Dell™ NetVault
Page 13

3 Configure Backup Job on NVBU
There ar e two tra nsp ort mode s f or backin g up data over RDA – Optimized / Dedup and Passthrough.
Optimized backup does source side dedupe on the NVBU clients. The Passthrough mode does tar g et
side dedupe, that is on the DR Series Dedupl ication Ap pl iance.
The default mode for each cli ent is decided ba sed on the number of CPU cores in th e client machine
and whether the architecture is 32-bit or 64 -bi t. In general there is no need to change mode. But in case
you want to chang e th e mode, it can be done by settin g RDA mode in DR Series Ded u pl ication
Appliance com man d prompt or th rough GUI.
CLI: Open ssh session to DR Seri es Dedupli cation Appl iance and run ‘rda --update_client --name
<hostname of client> --mode <dedupe/passthrough>
GUI: Bro wse t o C lients pa g e, s elect RDA ta b. The list of cli ents th a t have active connections are
shown. Select th e client for which you want to chang e th e mode. On top ri ght side, click on Update
Client link. Sele c t req uire d mode from th e drop down box and Su bmit.
NOTE: Except for NVBU’s file system plug-in, all the other pl ug -ins are 32 Bit binaries on
Windows (64-bit or 32-bit versions). There is a known iss u e beca use of which optim ized back-ups
13 Settin g up RDA Backup to Dell™ DR4x00 Disk Backup Applianc e on Dell™ NetVault
Page 14

with 32 bit plug-ins provide less per formance than pass thr ou g h back-ups. It is recommended to stick
to the d efa u lt that DR ch ose to use rath er th an forcing the mode to be optimized even if the clien t h as
more horse power. N VBU clie nt running on a 6 4-bit Linux machine has 64-bit plug ins.
1. On NVBU console, select Backup. On Selections tab, choos e the data s et n eed s to be backed up.
2. On Backup Options t ab, choose appr opria te options .
14 Settin g up RDA Backup to Dell™ DR4x00 Disk Backup Applianc e on Dell™ NetVault
Page 15

NOTE: Before doing any Incremental/Differential backup, make sure you have a Full backup run
with same ‘Backup Selection Set’.
NOTE: NVBU’s “consolidated incremental plugin” might not be very efficient with RDA device, as
optimized synthetic backups are not yet supported with NVBU RDA. This works functionally, but
performance might suffer.
3. On Schedule tab, configure t he bac kup job sche dule.
15 Settin g up RDA Backup to Dell™ DR4x00 Disk Backup Applianc e on Dell™ NetVault
Page 16

4. On Target tab, choose t he RDA d evi ce created in step 2.
5. On Advanced ta b, make select ions on the advanced backup opti ons.
16 Settin g up RDA Backup to Dell™ DR4x00 Disk Backup Applianc e on Dell™ NetVault
Page 17

Selecting ‘Cre ate Sec ondar y Copy’:
If you want to Duplicate/Replicate the backup Image after the backup is done, select Create
Secondary copy option . Th en select target and sou rce devices.
To select target d evice navi gate to: Advanced opti ons -> Enable ‘Create Secondary Copy’ -> Using
target Set -> Manag e -> Select Device
To select source device: Using Source Set -> Manage -> Select Device
Selecting ‘optimized replication’:
17 Settin g up RDA Backup to Dell™ DR4x00 Disk Backup Applianc e on Dell™ NetVault
Page 18

Select ‘Use optimized replication betwee n devices t hat support this feat ure ’ . Thi s enables
Optimized duplicat ion between s ource and target Cont ainers.
Additional Advance d opti ons:
Encryption: Advanced opti ons -> Enable Encryption. Make sure this is unchecked. Deduplication
savings as well as throughput would be lower if encryption is enabled.
Deduplicati on: Advance d options -> Enable Deduplication. This does not apply when backing-up
to RDA devic es. Leave i t uncheck ed . Refer to NVBU 9. 2 A dm in istrat ors Guide for more detail s .
Network Compression: Advanced options -> Enable Network Compression. This does not apply
when backing-up to RDA device s . Leave it unchecked.
6. Click on Save m enu but ton to save the job.
18 Settin g up RDA Backup to Dell™ DR4x00 Disk Backup Applianc e on Dell™ NetVault
Page 19

4 Set Up the DR Series Deduplication Appliance Cleaner
The cleaner will run during idle time. If you workflow does not have a sufficient amount of idle time
on a daily basis then you should consider scheduling the cleaner which will force it to run during that
schedu led tim e.
If necessary you can do the follo wi ng procedure described in the screen shot to force the cleaner to run.
Once al l the backup jobs are setup the DR4x00 cleaner can be schedu led. The DR Ser ies Dedup li cation
Appliance cleaner should run at least 6 hours per week when backup s are not takin g place, generally
after a backup job has completed.
Perfor ming sch ed uled disk sp ace reclamation operations are recommended as a m ethod for recov ering
disk s pa ce from system contain er s in which files were delet ed as a result of deduplication.
19 Settin g up RDA Backup to Dell™ DR4x00 Disk Backup Applianc e on Dell™ NetVault
Page 20

Monitor Dedupe,
5 Monitoring Deduplication, Compression and
Performance
After bac kup jobs have completed, the DR Series Deduplica tion Appl iance tracks capacity, storage
savings and throughput on the DR Seri es Ded uplication Appli ance dashboard. This information is
valua bl e in understanding th e benefits the DR Series Deduplication Appliance.
NOTE: Deduplication ratios increase over time; it is not u nc ommon to se e a 2-4x reduction (25-50% total
savings) on the initial backup. As additional full backup jobs complete, the ratios will increase. Backup
jobs with a 12-week retention will average a 15x ratio in most cases.
Compression &
Performance
20 Settin g up RDA Backup to Dell™ DR4x00 Disk Backup Applianc e on Dell™ NetVault
 Loading...