

Page 1

Contents: Dell PowerVault 110T DLT VS160 Tape Drive User's Guide
Dell™ PowerVault™ 110T DLT VS160 Tape Drive User's Guide
Introduction
Getting Started and Setup
Using the Tape Drive
Using the Tape Backup Software
Troubleshooting
Specifications
Drive Connectors
Jumpers
See the Dell Support website at support.dell.com if you require further help and assistance or to obtain drivers and/or firmware
upgrades.
Notes, Notices, and Cautions
NOTE: A NOTE indicates important information that helps you make better use of your computer.
NOTICE: A NOTICE indicates either potential damage to hardware or loss of data and tells you how to avoid the
problem.
CAUTION: A CAUTION indicates a potential for property damage, personal injury, or death.
The System Information Guide provides important safety and regulatory information. Warranty information may be included within
this document or as a separate document.
Information in this document is subject to change without notice.
© 2003 Dell Computer Corporation. All rights reserved.
Reproduction in any manner whatsoever without the written permission of Dell Computer Corporation is strictly forbidden.
Trademarks used in this text: Dell, PowerVault, and the DELL logo are trademarks of Dell Computer Corporation. Microsoft,
Windows, and Windows NT are registered trademarks of Microsoft Corporation. Novell and NetWare are registered trademarks of
Novell Corporation. VERITAS and Backup Exec are trademarks of VERITAS Software.
Other trademarks and trade names may be used in this document to refer to either the entities claiming the marks and names or
their products. Dell Computer Corporation disclaims any proprietary interest in trademarks and trade names other than its own.
Initial release: August 2003
file:///C|/Users/rishi_sood/Desktop/Temp/MissingDocsPosted/110t_dlt/UG/index.htm[3/8/2013 11:46:09 AM]
Page 2

Introduction: Dell PowerVault 110T DLT VS160 Tape Drive User's Guide
Back to Contents Page
Introduction: Dell™ PowerVault™ 110T DLT VS160 Tape Drive
User's Guide
Overview
Features
Tape Backup Software
Obtaining Drivers and Firmware Upgrades
Front Panel Controls and Indicators
Overview
The Dell™ PowerVault™ 110T DLT VS160 Tape drive is a value-priced, high-reliability, high -capacity linear streaming cartridge
tape drive designed for use on entry to midrange computing platforms. With a combination of data compression and compaction,
the PowerVault 110T DLT VS160 Tape drive offers a formatted cartridge capacity of 80GB (160GB assuming a 2:1 compression
ratio) and a sustained user data transfer rate of 8 MB/s (up to 16 MB/s with 2:1 compression). The capacity you realize in practice
depends on the data set, which affects the actual compression ratio.
The PowerVault 110T DLT VS160 Tape drive is a 5.25-inch, half - height form-factor, using a 1/2 - inch tape. Its design includes a
four- channel read/write head, Lempel -Ziv (DLZ) high- efficiency hardware data compression, and tape-mark directory to achieve
fast data throughput and data access times.
The PowerVault 110T DLT VS160 Tape drive is read/write-compatible the DLT VS160 format using DLTtape VS1 cartridges and
read compatible with the DLT1 format using DLTtape™ IV cartridges. The PowerVault 110T DLT VS160 Tape drive is an Ultra 160
SCSI device that works with any wide- ultra, Ultra2, Ultra160, or Ultra3 Low-Voltage Differential (LVD) or Single-Ended (SE), narrow
or wide, SCSI bus.
Features
The PowerVault 110T DLT VS160 Tape drive has the following features:
Supported formats: DLT VS160 (read/write using DLTtape VS1 cartridges), DLT1 (read only using DLTtape™ IV cartridges)
Uses DLTtape VS1 cartridges
5.25-inch half-height form-factor
Formatted cartridge capacity of 80GB native, 160GB compressed*
Sustained user data transfer rate of 8 MB/s native, up to 16 MB/s with compression*
The PowerVault 110T DLT VS160 Tape drive requires a wide - ultra, Ultra2, Ultra160, or Ultra3, Low - Voltage Differential
(LVD) or Single-Ended (SE) SCSI bus
* Assumes 2:1 compression ratio. The capacity and data transfer rates realized in practice depend on the data set, which
determines the actual compression ratio.
Obtaining Drivers and Firmware Upgrades
If the tape backup software does not detect the tape drive or to obtain the latest operating system drivers and/or firmware
upgrades, see the Dell Support website at
support.dell.com.
Tape Backup Software
Drivers
file:///C|/Users/rishi_sood/Desktop/Temp/MissingDocsPosted/110t_dlt/UG/intro.htm[3/8/2013 11:46:11 AM]
Page 3
Introduction: Dell PowerVault 110T DLT VS160 Tape Drive User's Guide
Microsoft® Windows® 2000 and Windows® Server™ 2003: QSDLT32.SYS
Native Operating System Backup Utilities
Microsoft® Windows® 2000 and Windows® Server™ 2003
Windows Backup
Red Hat Linux versions 7.3 and 8.0 and 9.0
Tar
Tape Backup Applications
NOTICE: See the Dell Support website at support.dell.com to obtain the latest patches and upgrades for the
Tape Backup Applications noted below.
Microsoft® Windows® 2000 and Windows® Server™ 2003
VERITAS™ BackupExec™ for Windows NT/2000 version 9.0 or later
Yosemite Tapeware® version 7.0 or later
Novell® NetWare®
VERITAS™ BackupExec™ for NetWare™ version 9.0 or later
Yosemite Tapeware® version 7.0 or later
Red Hat Linux versions 7.3, 8.0, and 9.0
Yosemite Tapeware® version 7.0 or later
Front Panel Controls and Indicators
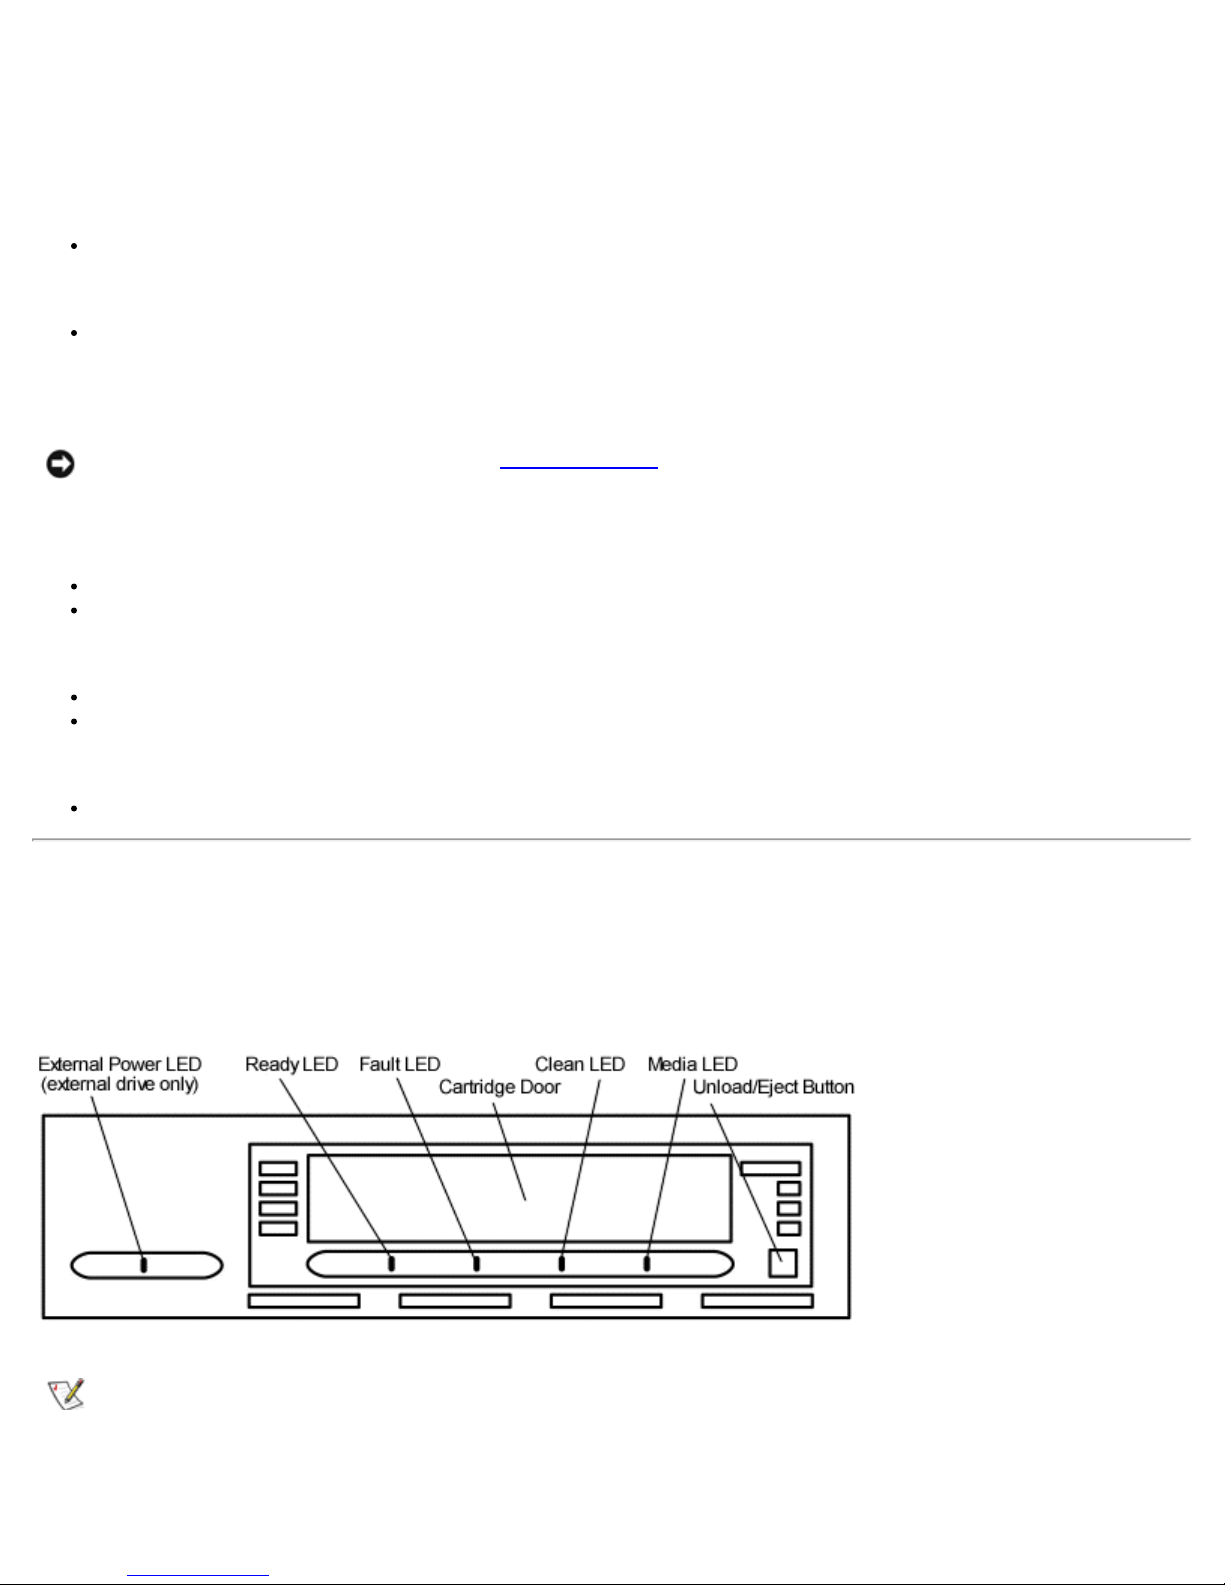
Location of the Controls and Indicators
Figure 1. PowerVault 110T DLT VS160 Tape drive front panel
NOTE: The front panel controls and indicators are in the same locations on both the internal and external drives. The
internal drive does not have a Power LED.
Indicator Activity During Power-On Self-Test (POST)
file:///C|/Users/rishi_sood/Desktop/Temp/MissingDocsPosted/110t_dlt/UG/intro.htm[3/8/2013 11:46:11 AM]
Page 4

Introduction: Dell PowerVault 110T DLT VS160 Tape Drive User's Guide
Every time you turn on or reset the drive, it conducts a Power-On Self -Test (POST). This test ensures that the drive is working
properly and is ready to use. While POST is in progress, watch the front panel LEDs to see the progress and results of the test.
During POST, the following actions take place:
The LEDs illuminate one at a time, from left to right, starting with the Ready LED, next the Fault LED, and finally the Clean
LED, at approximately one second intervals
About four seconds later, the Media LED illuminates
Each LED signals a different part of the POST process
All LEDs then turn off momentarily
If a cartridge is not loaded, the Ready LED illuminates and POST is complete, the entire process taking approximately eight
seconds
If a cartridge is loaded, the Ready LED flashes while the drive mounts the cartridge, a process that can take several
minutes depending upon the position of the media in the tape path
As POST completes, the drive makes a slight buzzing noise for several seconds. This noise is normal and should be
ignored
The drive is now ready to use.
Indicator Activity During Normal Operation - Ready LED
When the PowerVault 110T DLT VS160 Tape drive is in use, the Ready LED indicates the three states detailed in Table 1. The
Ready LED operates independently of the other three LEDs.
Table 1. Ready LED activity and drive status
Ready LED
Activity Drive Status
Off No power to the drive
On Power is on; no cartridge loaded or a loaded cartridge is idle with
no tape motion
Blinking The drive is loading a cartridge or a loaded cartridge has tape
motion indicating read, write, seek, rewind, calibration, or other
cartridge activity
Indicator Activity During Normal Operation - Fault/Clean/Media LEDs
The Fault, Clean, and Media LEDs indicate the status of the drive. Note that the LEDs can indicate more than one of the indicated
operating conditions simultaneously. For example:
If cleaning is required while a DLT1 format cartridge is loaded, both the Clean and Media LEDs are on
If an internal write/read diagnostic fails as a result of a permanent write error, both the Fault and Clean LEDs blink slowly.
Table 2 describes what each front panel indicator means.
Table 2. Fault/Clean/Media LED activity and drive status
Indicator Activity Operating Condition
Fault Slow Blink (1x per second) User initiated write/read diagnostic failed
Fast Blink (3x per second) Servo or mechanism error
On Internal firmware error
Clean Slow Blink (1x per second) Calibration error or permanent write/read error
Medium Blink (2x per second) Cleaning in progress
On Cleaning required
file:///C|/Users/rishi_sood/Desktop/Temp/MissingDocsPosted/110t_dlt/UG/intro.htm[3/8/2013 11:46:11 AM]
Page 5
Introduction: Dell PowerVault 110T DLT VS160 Tape Drive User's Guide
Media Slow Blink (1x per second) Unsupported format, or damaged or unsupported cartridge type
inserted into drive
On DLT1 format DLTtape™ IV cartridge loaded
Troubleshooting the Drive in Troubleshooting for more details on error conditions.
See
Unload/Eject Button Features
The Unload/Eject button provides features in addition to unloading and ejecting a cartridge. To activate one of these features, press
and hold the Unload/Eject button for the amount of time specified in
LED sequence is displayed.
If you do nothing for 15 seconds after accessing any of the additional features that require an action, such as loading a cartridge,
the drive returns to normal operating mode.
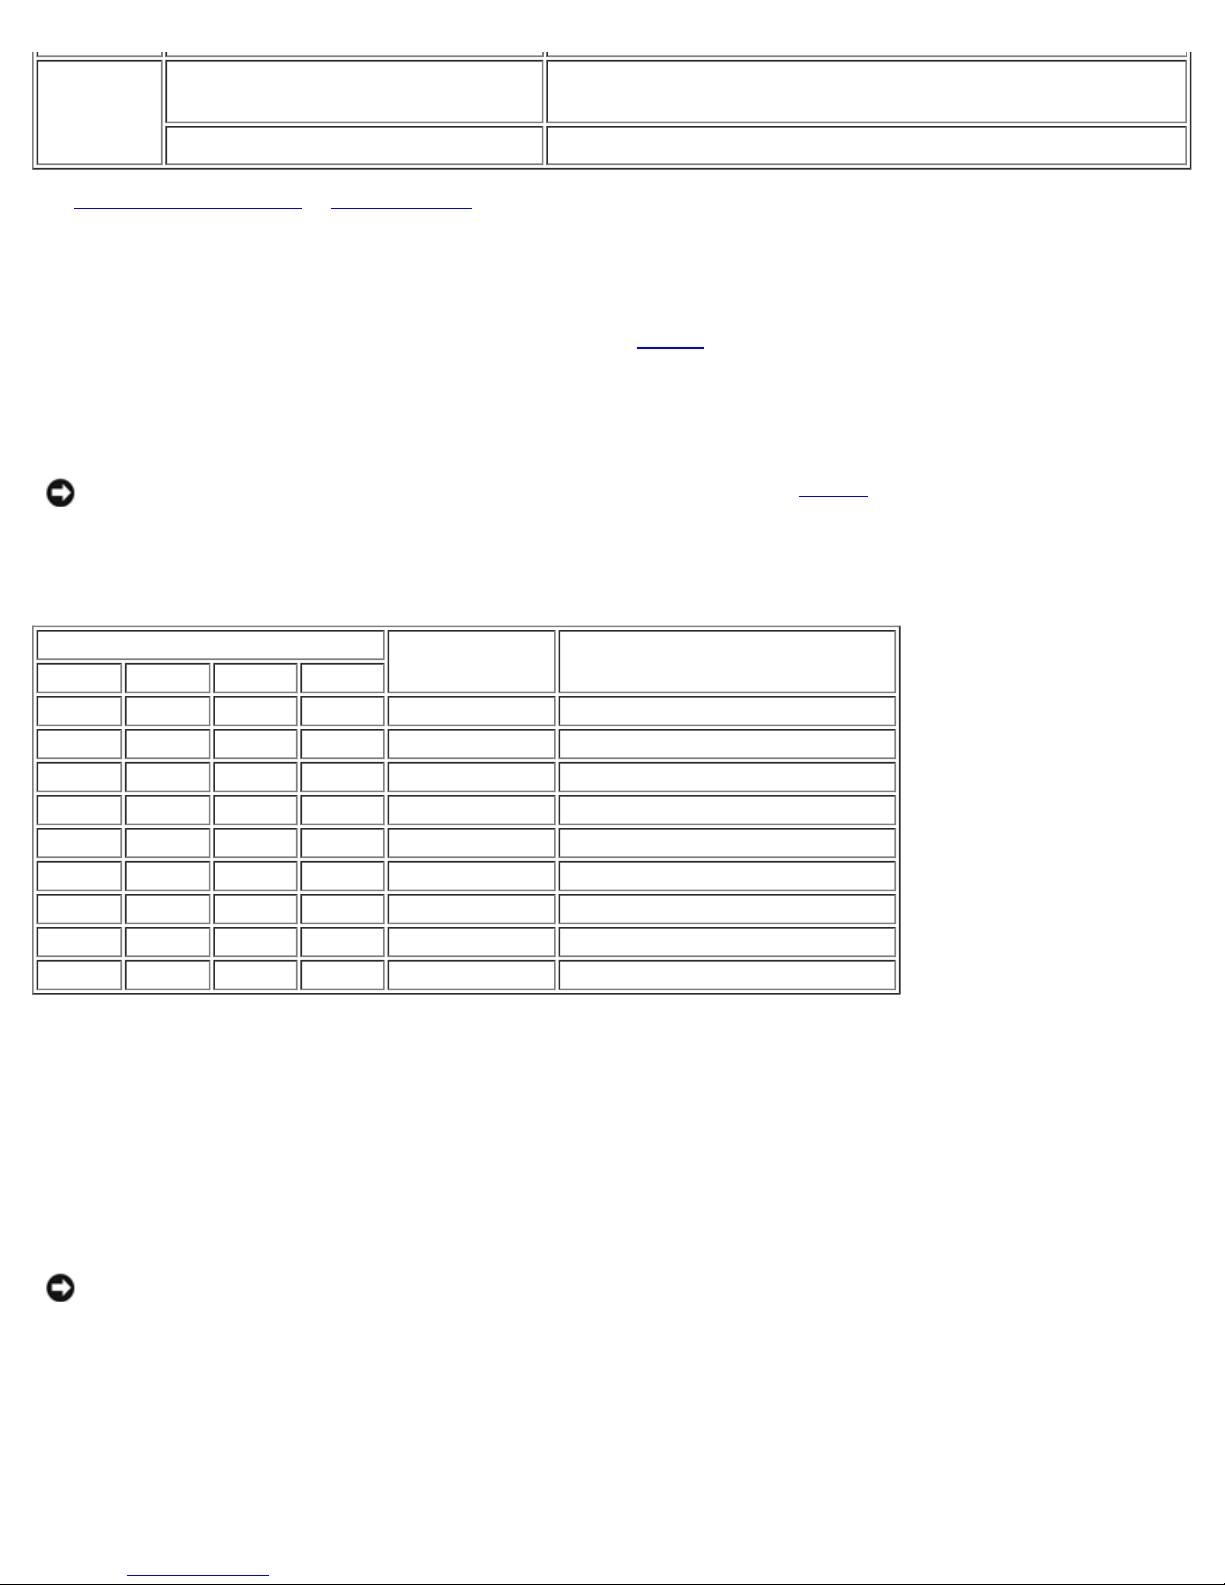
NOTICE: The Unload/Eject button features indicated by an asterisk (*) in Table 3 overwrite all data on the
cartridge loaded in the drive. Use extreme caution when accessing these features to avoid loss of important
data.
Table 3. Unload/Eject button features
Table 3 . Release the Unload/Eject button when the desired
LED Status
Ready Fault Clean Media
On N/A N/A N/A 0-6 Normal unload/eject function
Blinking Off Off Off 6-9 Reserved
Blinking Blinking Blinking Off 12-15 Reserved
Blinking Blinking Blinking Blinking 15-18 Reserved
On Off Off Off 18-21 Revert to normal operating mode
On On Off Off 21-24 Write/read diagnostic mode*
On On On Off 24-27 Reserved*
On On On On 27-30 Emergency reset
Off Off Off Off 30+ Revert to normal operating mode
Button Hold
Time (seconds)
Feature Description
Unload/Eject Button Feature Description
Normal Unload/Eject
When you release the button, the drive unloads and ejects the cartridge.
Write/Read Diagnostic Mode
NOTICE: This mode overwrites all data on the cartridge in the drive. Use extreme caution when using this
feature to avoid loss of important data.
When you release the button, the drive initiates an internal write/read diagnostic. The diagnostic requires that you first load a
cartridge that is blank or does not contain valuable data. When the diagnostic begins, the drive writes and then reads approximately
400MB of data and then unloads and ejects the cartridge. The process takes about two minutes. If the diagnostic test detects no
errors, the drive returns to normal operating mode. If an error occurs, the appropriate LEDs illuminate.
Emergency Reset
file:///C|/Users/rishi_sood/Desktop/Temp/MissingDocsPosted/110t_dlt/UG/intro.htm[3/8/2013 11:46:11 AM]
Page 6

Introduction: Dell PowerVault 110T DLT VS160 Tape Drive User's Guide
When you release the button, the drive performs a hard reset, behaving as if it had been turned off and then on. A standard POST
then takes place.
Revert to Normal Operating Mode
When you release the button, the drive returns to normal operation.
Back to Contents Page
file:///C|/Users/rishi_sood/Desktop/Temp/MissingDocsPosted/110t_dlt/UG/intro.htm[3/8/2013 11:46:11 AM]
Page 7

Getting Started and Setup: Dell PowerVault 110T DLT VS160 Tape Drive User's Guide
Back to Contents Page
Getting Started and Setup: Dell™ PowerVault™ 110T DLT VS160
Tape Drive User's Guide
Obtaining Drivers and Firmware Upgrades
Dell -Installed Drives
Installing the PowerVault 110T DLT VS160 Tape Internal Drive
Installing the PowerVault 110T DLT VS160 Tape External Drive
Installing the Device Drivers
Installing the Tape Backup Software
Installing the Dell PowerVault Tools Diagnostic Package
Obtaining Drivers and Firmware Upgrades
If the tape backup software does not detect the tape drive or to obtain the latest operating system drivers and/or firmware
upgrades, see the Dell Support website at
support.dell.com.
Dell-Installed Drives
Dell™ performs the installation and setup of tape drives that are shipped as part of a system. Dell also installs tape backup drivers
and most software applications.
Installing the PowerVault 110T DLT VS160 Tape Internal Drive
SCSI Requirements
The Dell PowerVault™ 110T DLT VS160 Tape Internal drive incorporates a wide -ultra 160 Low-Voltage Differential (LVD) SCSI
bus, but may also be attached to a Single - Ended (SE) SCSI bus.
Make sure your SCSI host adapter or controller supports these standards. If you connect the drive to an SE SCSI bus or if there
are SE devices attached to the same SCSI bus, the drive's performance is limited to the maximum data transfer speed and
maximum cable lengths of the SE bus. The PowerVault 110T DLT VS160 Tape is not compatible with a standard differential (Diff)
or High-Voltage Differential (HVD) SCSI bus. If you attach the drive to a narrow (50- pin) SCSI bus, you must use a customersupplied 68 -pin to 50 -pin adapter that terminates the unused 18 pins. These adapters are sometimes labeled "high-byte
termination."
Make sure the total length of the SCSI bus does not exceed the ANSI SCSI standard of 19 feet (6 meters) for an SE bus, 40 feet
(12 meters) for an LVD SCSI bus with multiple devices, or 82 feet (25 meters) for an LVD SCSI bus with a single device.
Unpacking the Internal Drive
NOTE: If the room in which you are working differs from the temperature in which the tape drive was shipped or stored
by 30 degrees F (15 degrees C) or more, let the drive acclimate to the surrounding environment for at least 12 hours
before operating.
Unpack and inspect the PowerVault 110T DLT VS160 Tape Internal drive for shipping damage. If you notice any damage, report it
to both Dell and the shipping company immediately.
file:///C|/Users/rishi_sood/Desktop/Temp/MissingDocsPosted/110t_dlt/UG/setup.htm[3/8/2013 11:46:12 AM]
Page 8
Getting Started and Setup: Dell PowerVault 110T DLT VS160 Tape Drive User's Guide
NOTE: Save the packing materials in case you need to move or ship your drive in the future. You must ship the
PowerVault 110T DLT VS160 Tape Internal drive in the original or equivalent packing materials or your warranty may be
invalidated.
Setting the SCSI ID
Regardless of the number of SCSI devices attached to the server that is to be the host for the PowerVault 110T DLT VS160 Tape
Internal drive, each must have a unique SCSI ID. Check the SCSI IDs on all other SCSI devices on the selected server, including
the SCSI host adapter, and select an unused SCSI ID for the PowerVault 110T DLT VS160 Tape Internal drive. The factory default
SCSI ID is 6. If another device is not already using the factory default SCSI ID, you do not need to change the drive's SCSI ID.
NOTE: If you attach the drive to a narrow (50- pin) bus, you can only use SCSI IDs 0 through 7.
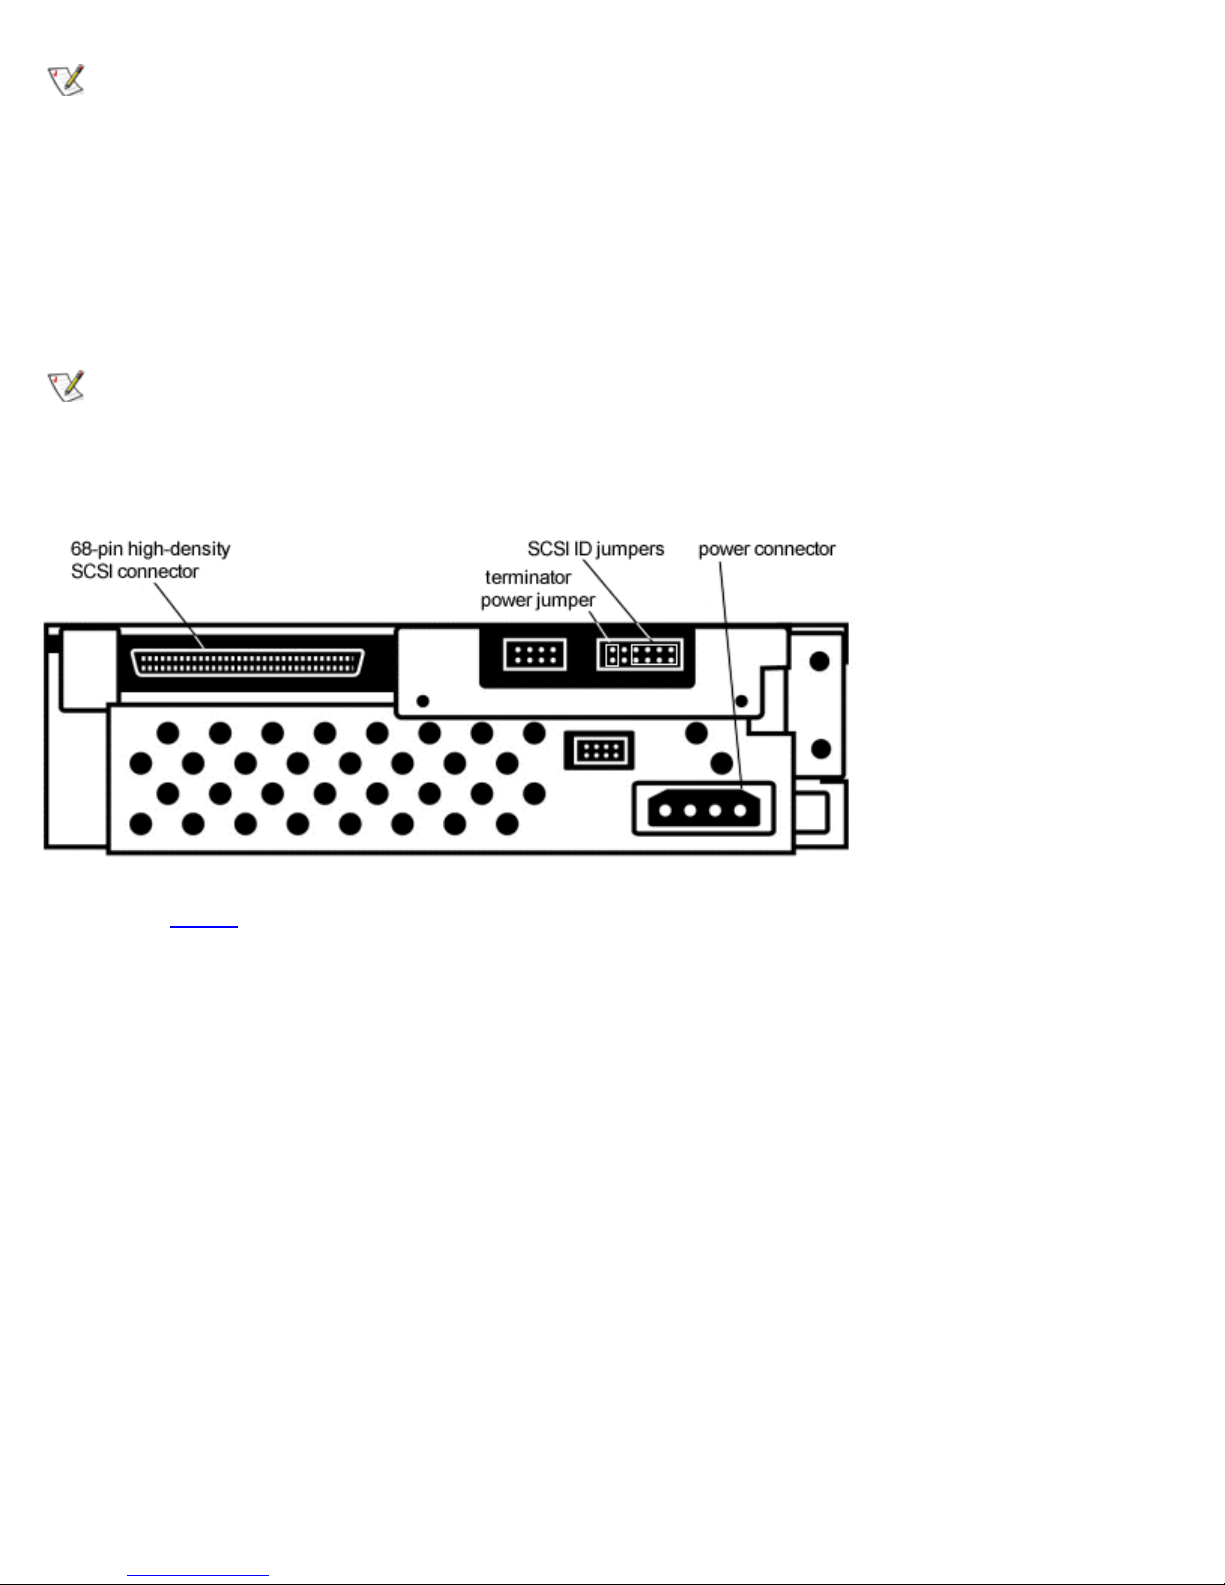
Locate the SCSI ID jumpers on the rear panel of the drive as shown in Figure 1.
Figure 1. SCSI ID jumpers on rear panel of drive
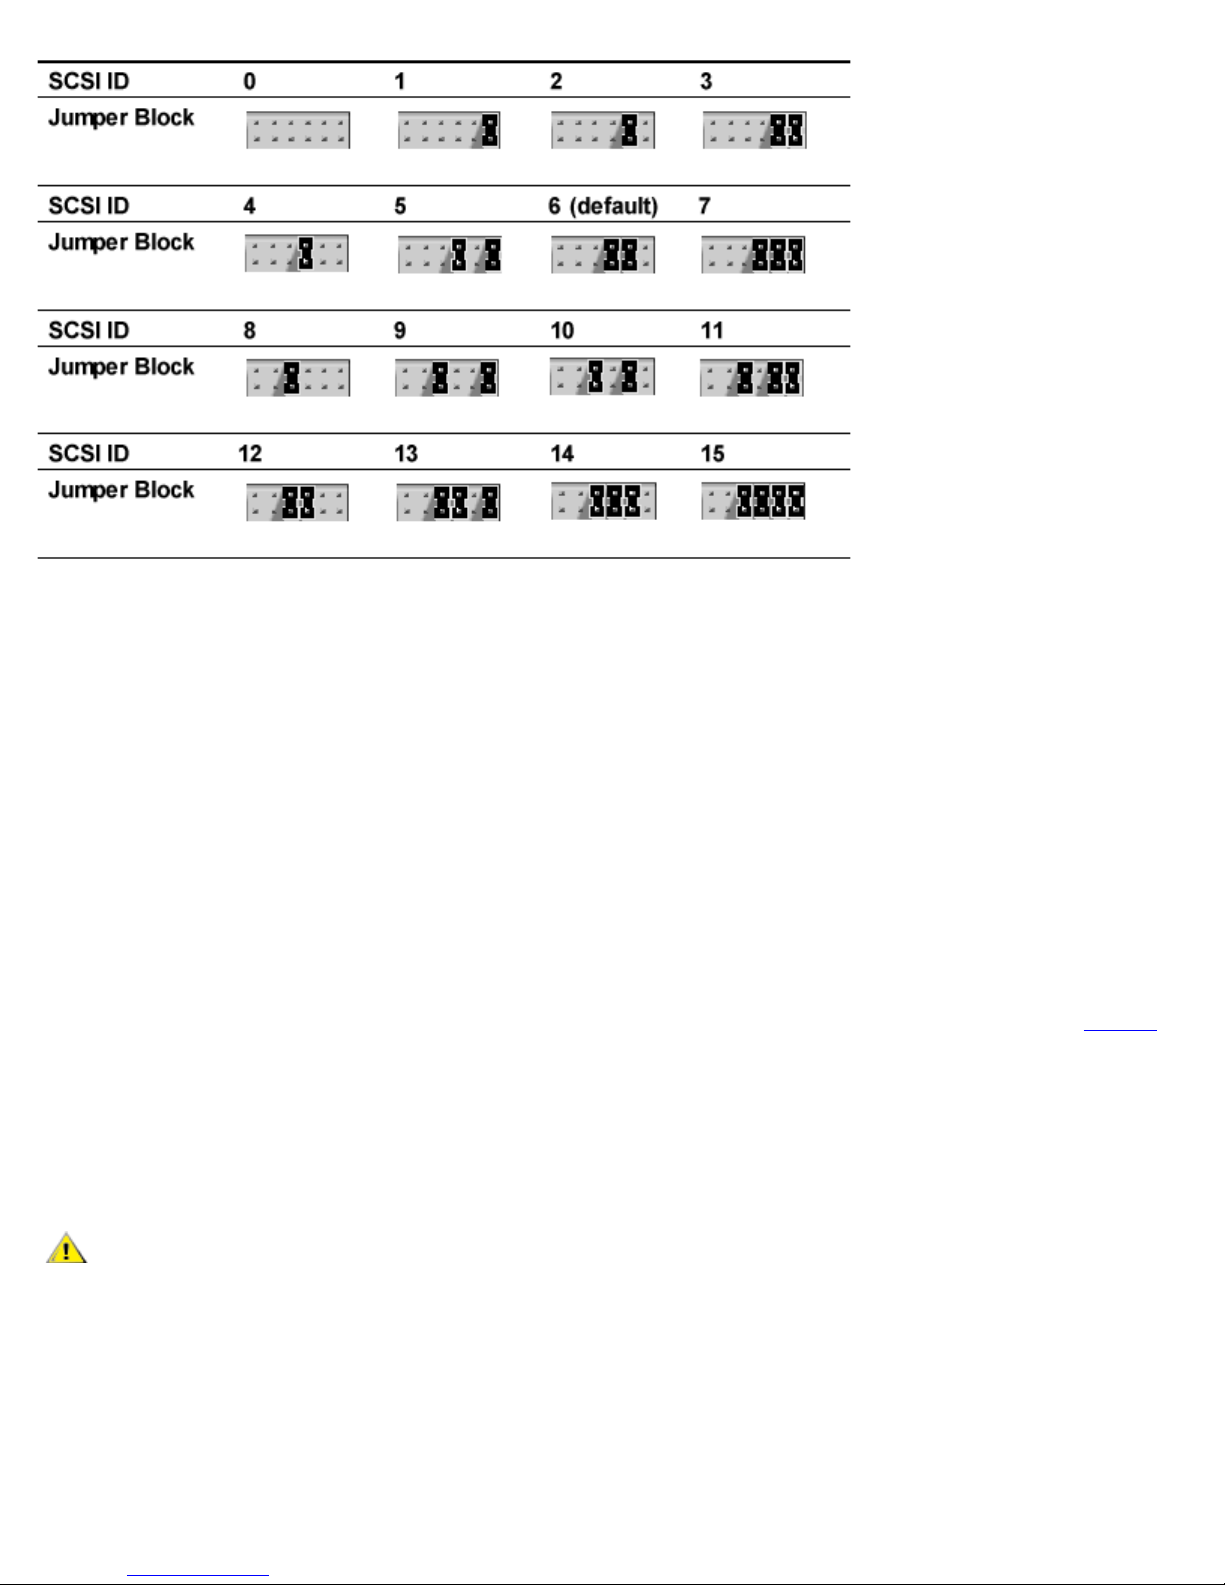
To set the SCSI ID on the PowerVault 110T DLT VS160 Tape Internal drive, use the supplied jumpers to select the desired SCSI
ID as shown in
Table 1 . After you change the SCSI ID, restart the host server to activate the new SCSI ID and to allow the server
to recognize the drive at the new ID.
Table 1. SCSI ID jumper settings
file:///C|/Users/rishi_sood/Desktop/Temp/MissingDocsPosted/110t_dlt/UG/setup.htm[3/8/2013 11:46:12 AM]
Page 9
Getting Started and Setup: Dell PowerVault 110T DLT VS160 Tape Drive User's Guide
When to Use Termination
If the PowerVault 110T DLT VS160 Tape Internal drive is the only SCSI device on the selected server other than the SCSI host
adapter, or it is the last physical device on the SCSI bus (at the end of the SCSI cable), it must be terminated. If another SCSI
device is the last device on the SCSI bus, confirm that it is properly terminated and do not terminate the PowerVault 110T DLT
VS160 Tape drive. Regardless of which device is used to terminate the SCSI bus, it must have power applied and be turned on for
proper termination to occur.
To terminate the PowerVault 110T DLT VS160 Tape Internal drive, install an active Low-Voltage Differential/Single-Ended
(LVD/SE) cable -end or inline terminator on the SCSI cable you intend to use with the PowerVault 110T DLT VS160 Tape Internal
drive. See the terminator's instructions for more information.
Terminator Power
At least one device on the SCSI bus must supply terminator power (TERMPWR). The factory default for the PowerVault 110T DLT
VS160 Tape Internal drive is TERMPWR enabled, which is the recommended setting. It is acceptable for more than one device on
the SCSI bus to provide TERMPWR. If you need to disable TERMPWR, remove the terminator power jumper shown in
Figure 1 .
Installing the PowerVault 110T DLT VS160 Tape Internal Drive
1. Shut down the operating system and turn off the selected server. Turn off all attached accessory devices, such as printers
and other SCSI devices. Remove the power cables from the host server and all attached accessories. Failure to follow these
instructions may result in damage to the PowerVault 110T DLT VS160 Tape Internal drive or other devices.
CAUTION: Do not move on to step 2 until you have shut down the operating system and turned off the server
that is to be the host for the PowerVault 110T DLT VS160 Tape Internal drive. Turn off all attached accessory
devices, such as printers and other SCSI devices. Remove the power cables from the host server and all
attached accessories.
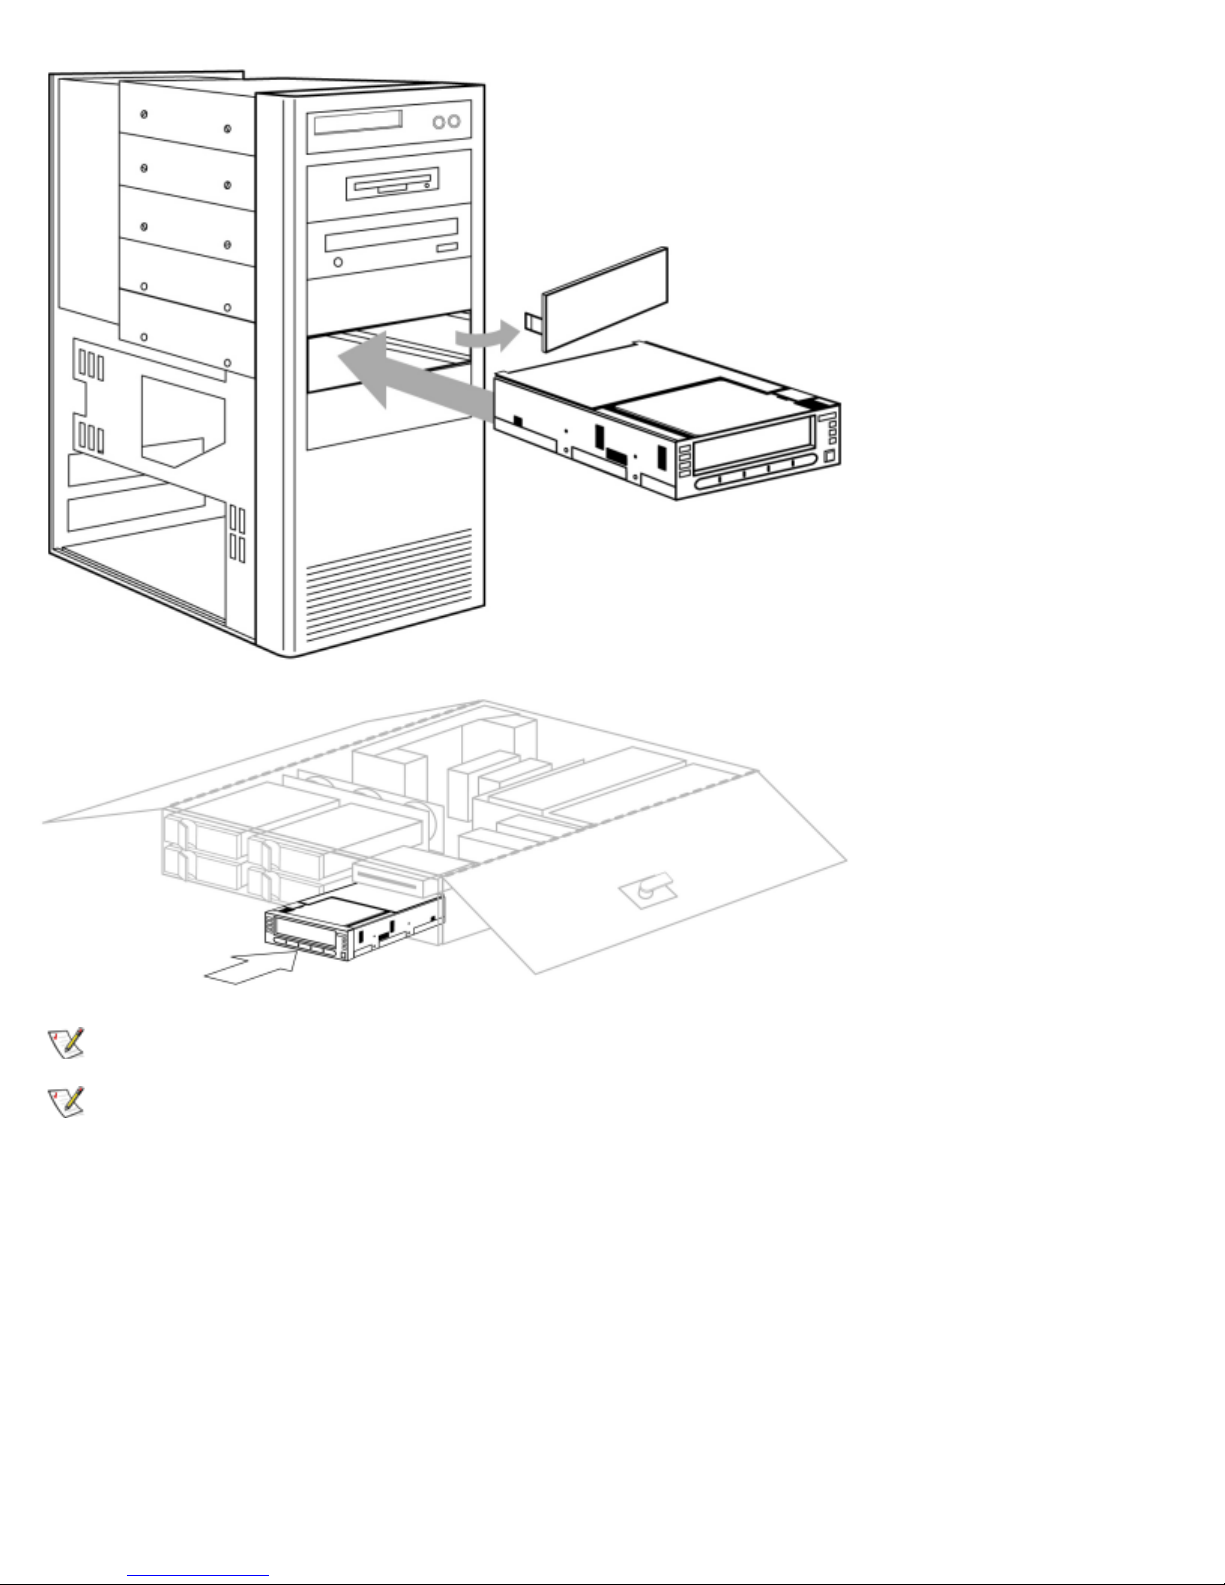
2. Locate an available half-height, 5¼ - inch drive bay and remove the front cover from the drive bay as described in the
server's manuals (see Figure 2).
3. Slide the PowerVault 110T DLT VS160 Tape Internal drive into the open drive bay (see Figure 2).
Figure 2. Install Drive in an Open Half- height Bay; tower, 2U server shown
file:///C|/Users/rishi_sood/Desktop/Temp/MissingDocsPosted/110t_dlt/UG/setup.htm[3/8/2013 11:46:12 AM]
Page 10
Getting Started and Setup: Dell PowerVault 110T DLT VS160 Tape Drive User's Guide
NOTE: Install a SCSI host adapter in the selected server now, if necessary.
NOTE: If your SCSI host adapter already has a ribbon cable with an open 68 -pin, high- density connector, you can use
the existing cable instead of the cable supplied with the PowerVault 110T DLT VS160 Tape Internal drive.
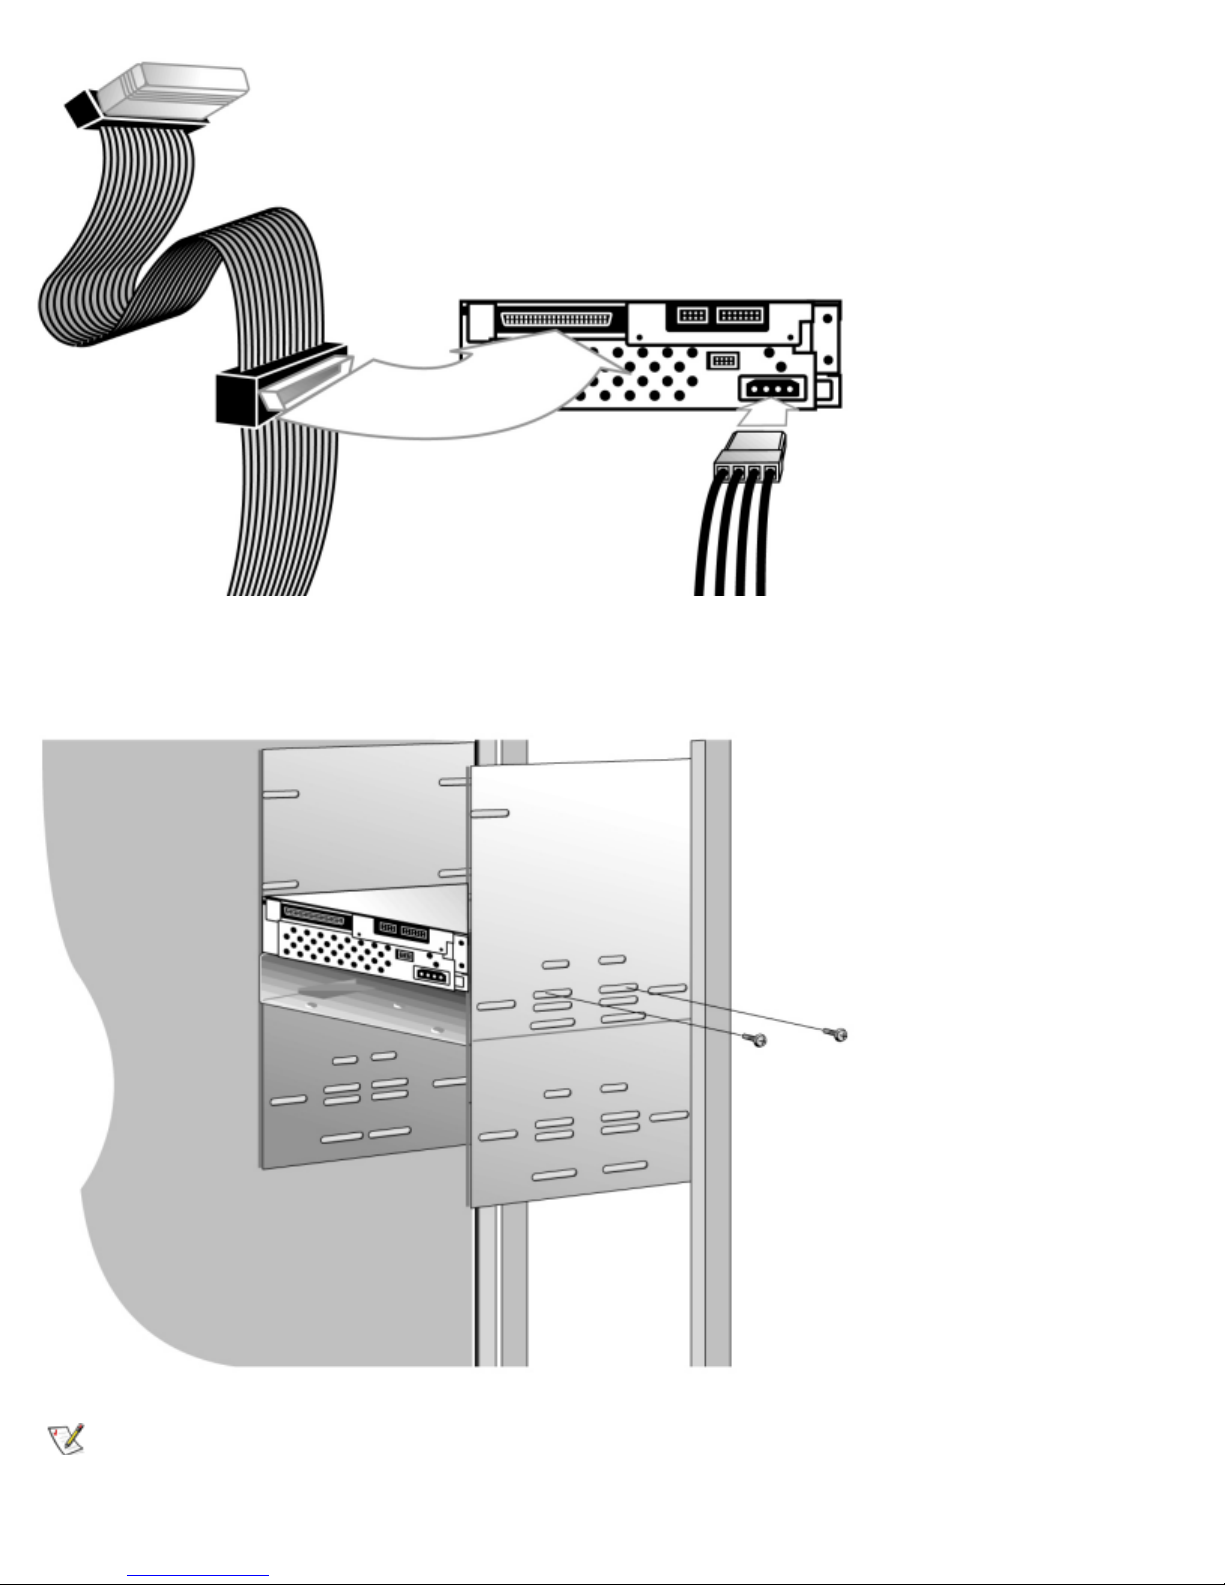
4. Locate the SCSI ribbon cable in the accessories package. Attach one end of the SCSI ribbon cable to the SCSI connector
on the rear panel of the PowerVault 110T DLT VS160 Tape Internal drive. The SCSI connectors are keyed, preventing
improper connection. Use a 50 - to 68- pin adapter with "high-byte termination" if the existing SCSI cable uses a 50 -pin
connector.
5. Attach the other end of the SCSI ribbon cable to the SCSI host adapter. The SCSI connectors are keyed, preventing
improper connection.
6. Locate an available power cable in the host server and attach it to the power connector on the rear panel of the PowerVault
110T DLT VS160 Tape Internal drive. The connectors are keyed, preventing improper connection.
Figure 3. Attach SCSI and power cables to drive
file:///C|/Users/rishi_sood/Desktop/Temp/MissingDocsPosted/110t_dlt/UG/setup.htm[3/8/2013 11:46:12 AM]
Page 11
Getting Started and Setup: Dell PowerVault 110T DLT VS160 Tape Drive User's Guide
7. Secure the PowerVault 110T DLT VS160 Tape Internal drive with the appropriate mounting screws, either in the sides or
bottom of the drive sled, as appropriate for the server chassis.
Figure 4. Secure drive in installation bay (side mounting screws shown)
NOTE: Some servers require mounting rails for internal devices. Use the supplied mounting rails as needed. See your
system user manuals for information regarding the necessary mounting rails or hardware.
file:///C|/Users/rishi_sood/Desktop/Temp/MissingDocsPosted/110t_dlt/UG/setup.htm[3/8/2013 11:46:12 AM]
Page 12

Getting Started and Setup: Dell PowerVault 110T DLT VS160 Tape Drive User's Guide
8. Install the cover on the server.
9. Attach the power cables to the server and all attached accessories.
10. Turn on the host server and allow its operating system to start.
11. See
Installing the Device Drivers and Installing the Tape Backup Software to complete the installation.
Installing the PowerVault 110T DLT VS160 Tape External Drive
SCSI Requirements
The PowerVault 110T DLT VS160 Tape External drive incorporates a wide - ultra 160 Low- Voltage Differential (LVD) SCSI bus, but
may also be attached to a Single-Ended (SE) SCSI bus.
Make sure your SCSI host adapter or controller supports these standards. If you connect the drive to an SE SCSI bus or if there
are SE devices attached to the same SCSI bus, the drive's performance is limited to the maximum data transfer speed and
maximum cable lengths of the SE bus. The PowerVault 110T DLT VS160 Tape is not compatible with a standard differential (Diff)
or High-Voltage Differential (HVD) SCSI bus. If you attach the drive to a narrow (50- pin) SCSI bus, you must use a customersupplied 68 -pin to 50 -pin adapter that terminates the unused 18 pins. These adapters are sometimes labeled "high-byte
termination."
Make sure the total length of the SCSI bus does not exceed the ANSI SCSI standard of 19 feet (6 meters) for an SE bus, 40 feet
(12 meters) for an LVD SCSI bus with multiple devices, or 82 feet (25 meters) for an LVD SCSI bus with a single device.
Selecting a Location for the Drive
Select a location for the PowerVault 110T DLT VS160 Tape External drive that is flat, sturdy, level, and close to the host server. A
desk or table top is most suitable. Regardless of the location you choose for the PowerVault 110T DLT VS160 Tape External drive,
make sure the environment is free from dust and excessive temperature and humidity. See the
Specifications for acceptable operating humidity limits.
Be sure to follow these additional guidelines when selecting a location for the PowerVault 110T DLT VS160 Tape External drive:
Allow at least 6 inches (15.2 cm) behind the drive for proper cooling.
Avoid locations near printers or photocopy machines, both of which produce paper fiber and other types of dust and airborne
contaminants.
Do not place the drive on the floor.
Avoid locations near generators, electric motors, audio speakers, or other sources of magnetic fields. Magnetic fields can
adversely affect the drive and media.
Environmental limits in
Unpacking the PowerVault 110T DLT VS160 Tape External Drive
NOTE: If the room in which you are working differs from the temperature in which the tape drive was shipped or stored
by 30 degrees F (15 degrees C) or more, let the drive acclimate to the surrounding environment for at least 12 hours
before operating.
Unpack and inspect the PowerVault 110T DLT VS160 Tape External drive for shipping damage. If you notice any damage, report it
to both Dell and the shipping company immediately.
NOTE: Save the packing materials in case you need to move or ship your drive in the future. You must ship the
PowerVault 110T DLT VS160 Tape External drive in the original or equivalent packing materials or your warranty may
be invalidated.
Setting the SCSI ID
Regardless of the number of SCSI devices attached to the server that is to be the host for the PowerVault 110T DLT VS160 Tape
file:///C|/Users/rishi_sood/Desktop/Temp/MissingDocsPosted/110t_dlt/UG/setup.htm[3/8/2013 11:46:12 AM]
Page 13
Getting Started and Setup: Dell PowerVault 110T DLT VS160 Tape Drive User's Guide
External drive, each device must have a unique SCSI ID. Check the SCSI IDs on all other devices on the selected server,
including the SCSI host adapter, and select an unused SCSI ID for the PowerVault 110T DLT VS160 Tape External drive. The
factory default SCSI ID is 6. If another device is not already using the factory default SCSI ID, you do not need to change the
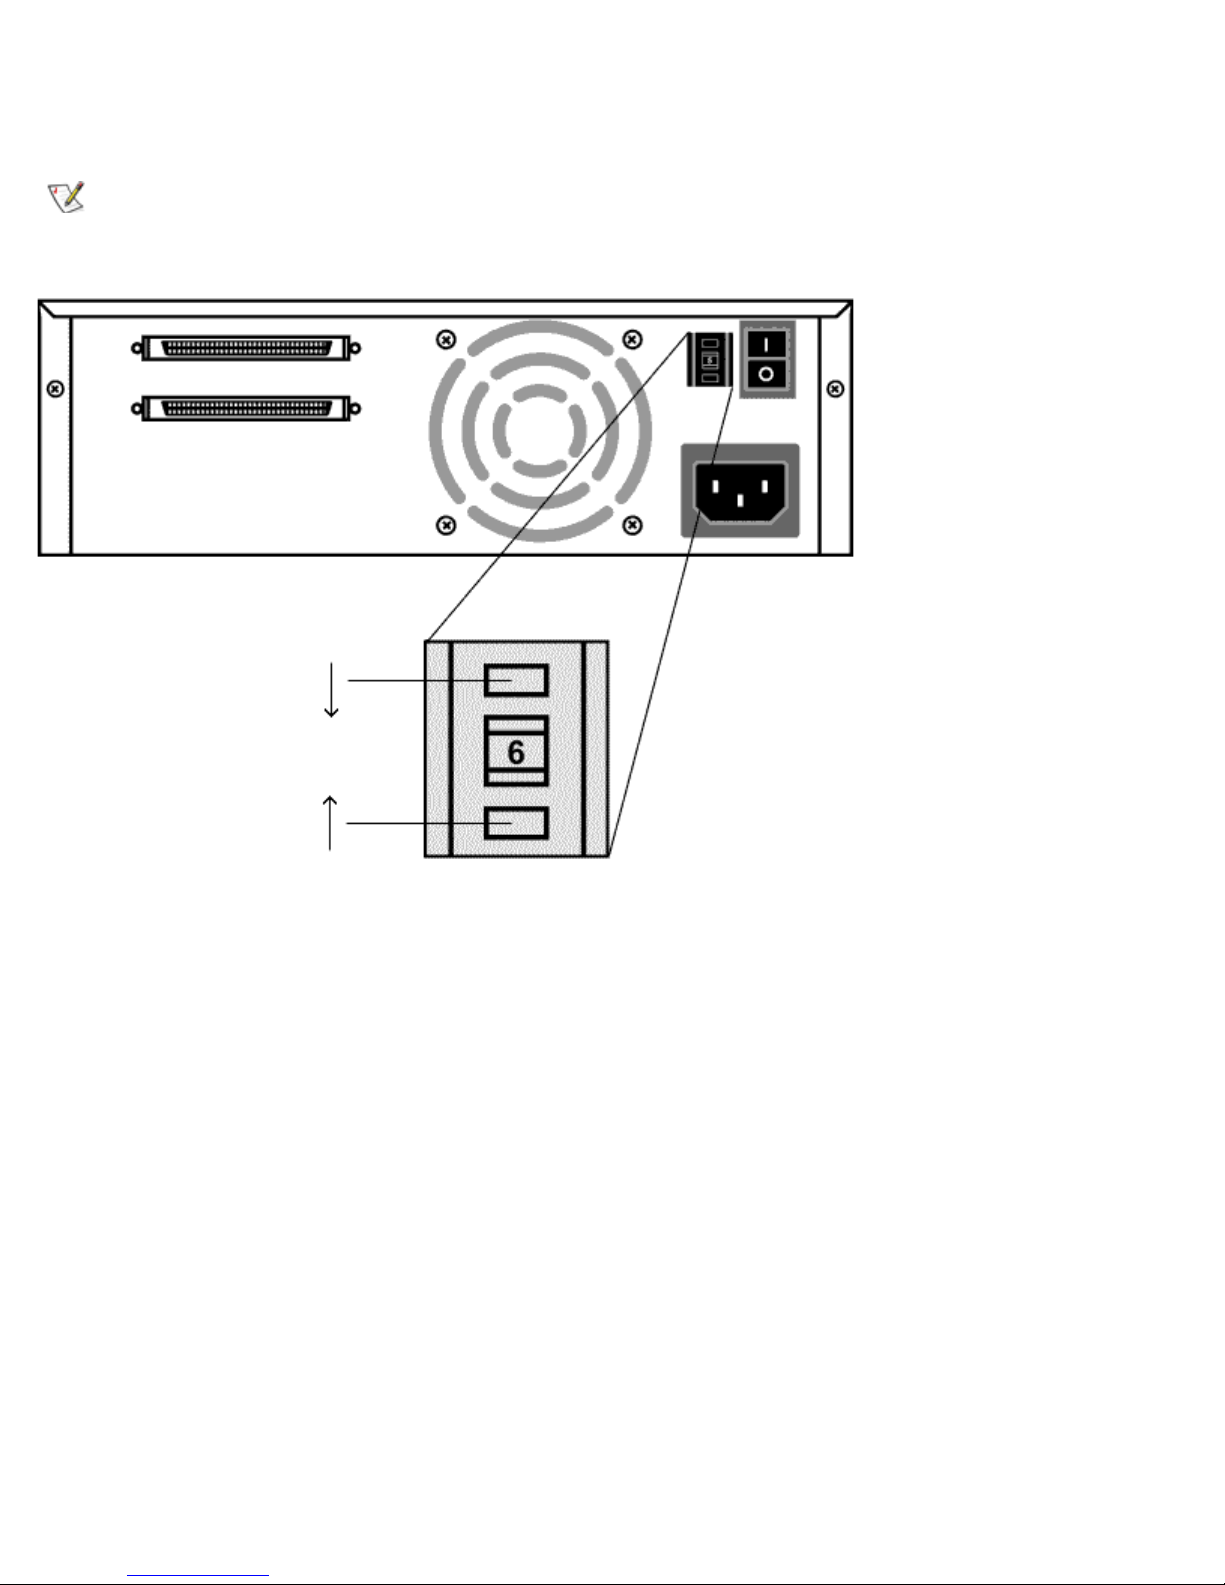
drive's SCSI ID. Locate the SCSI ID switch on the rear panel of the drive as shown in Figure 5.
NOTE: If you attach the drive to a narrow (50- pin) bus, you can only use SCSI IDs 0 through 7.
Figure 5. PowerVault 110T DLT VS160 Tape External drive rear panel layout and SCSI ID switch
To set the SCSI ID on the PowerVault 110T DLT VS160 Tape External drive, use a small screwdriver or ball-point pen to press the
button above the SCSI ID display to select the next lower SCSI ID. Press the button below the SCSI ID display to select the next
higher SCSI ID. Each time you press one of these buttons, the SCSI ID increases or decreases by one. Press the appropriate
button until the desired SCSI ID appears on the switch display.
After you change the SCSI ID, turn the drive off and on again to activate the new SCSI ID. Then restart the host server or rescan
the SCSI bus so the server can recognize the drive at the new SCSI ID.
When to Use Termination
If the PowerVault 110T DLT VS160 Tape External drive is the only SCSI device on the selected server other than the SCSI host
adapter, or it is the last physical device on the SCSI bus (at the end of the SCSI cable), it must be terminated. If another SCSI
device is the last device on the SCSI bus, confirm that it is properly terminated and do not terminate the PowerVault 110T DLT
VS160 Tape drive. Regardless of which device is used to terminate the SCSI bus, it must have power applied and be turned on for
proper termination to occur.
To terminate the PowerVault 110T DLT VS160 Tape External drive, locate the terminator in the accessories package and press it
firmly into either of the two SCSI connectors on the rear panel of the drive. Secure the terminator by tightening the screws until
snug.
Terminator Power
At least one device on the SCSI bus must supply terminator power (TERMPWR). The factory default for the PowerVault 110T DLT
VS160 Tape External drive is TERMPWR enabled, which is the recommended setting. It is acceptable for more than one device on
file:///C|/Users/rishi_sood/Desktop/Temp/MissingDocsPosted/110t_dlt/UG/setup.htm[3/8/2013 11:46:12 AM]
Page 14
Getting Started and Setup: Dell PowerVault 110T DLT VS160 Tape Drive User's Guide
the SCSI bus to provide TERMPWR. Only an authorized service provider can disable the PowerVault 110T DLT VS160 Tape
External drive TERMPWR setting.
Connecting the Cables
1. Shut down the operating system and turn off the selected server. Turn off all attached accessory devices, such as printers
and other SCSI devices. Remove the power cable from the host server and all attached accessory devices. Failure to follow
these instructions may result in damage to the PowerVault 110T DLT VS160 Tape External drive or other devices.
CAUTION: Do not move on to step 2 until you have shut down the operating system and turned off the server
that is to be the host for the PowerVault 110T DLT VS160 Tape External drive. Turn off all attached accessory
devices, such as printers and other SCSI devices. Remove the power cables from the host server and all
attached accessory devices.
NOTE: If the selected server does not already have an installed SCSI host adapter, install one now.
2. Locate the SCSI cable in the accessories package.
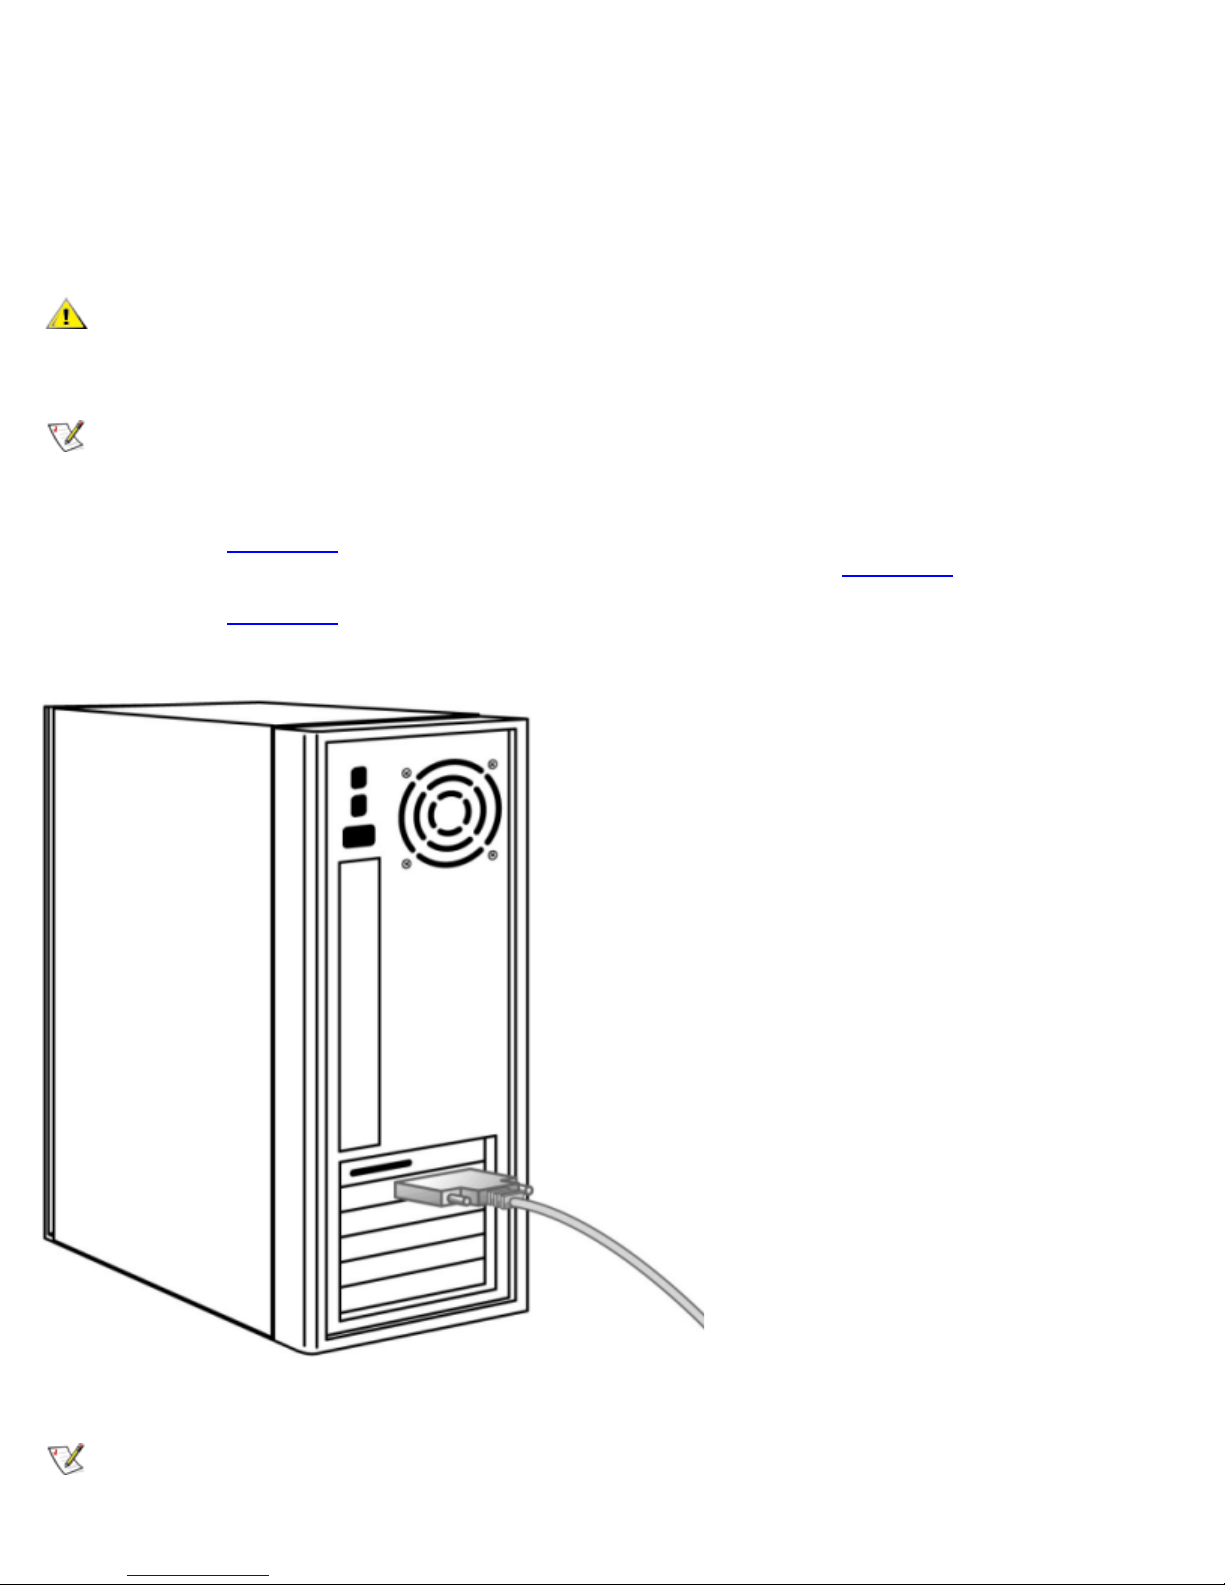
3. Attach one end of the SCSI cable to one of the connectors on the rear panel of the PowerVault 110T DLT VS160 Tape
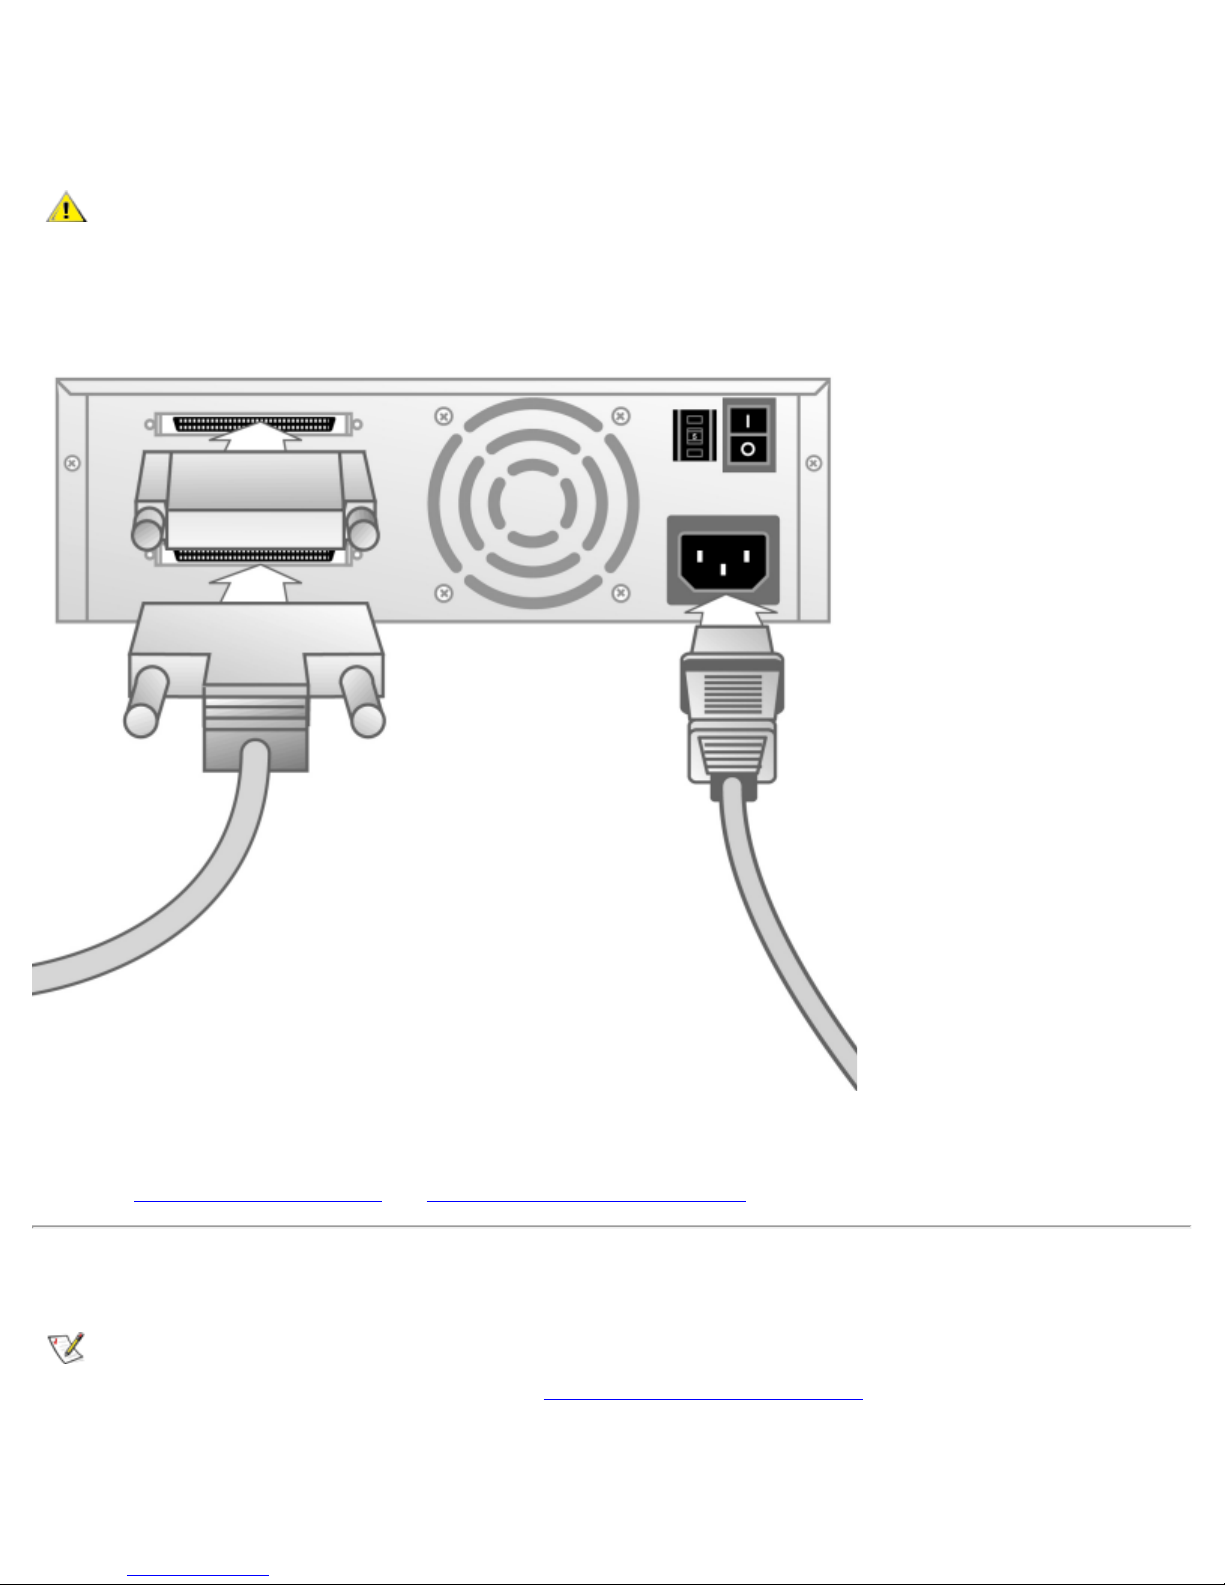
External drive (
4. Attach the other end of the SCSI cable to the connector on your SCSI host adapter (
see Figure 7 ).
see Figure 6 ).
5. Attach the supplied terminator to the remaining connector on the rear panel of the PowerVault 110T DLT VS160 Tape
External drive (
see Figure 7 ).
Figure 6. Attach SCSI cable to server
6. Secure the SCSI cable connectors by tightening the screws until snug.
NOTE: If the supplied SCSI cable does not fit the connector on your SCSI host adapter, you either have an
incompatible SCSI host adapter or you need to purchase a cable adapter. Contact the SCSI host adapter manufacturer
file:///C|/Users/rishi_sood/Desktop/Temp/MissingDocsPosted/110t_dlt/UG/setup.htm[3/8/2013 11:46:12 AM]
Page 15
Getting Started and Setup: Dell PowerVault 110T DLT VS160 Tape Drive User's Guide
for information.
7. Make sure the power switch on the rear panel of the PowerVault 110T DLT VS160 Tape External drive is in the OFF
position. Attach the female connector on the power cable to the power connector on the rear panel of the drive.
CAUTION: Use caution when plugging the power cord into an electrical outlet. Hazardous voltages are present
in the sockets of the outlet.
8. Plug in the power cable to a nearby power outlet.
Figure 7. Attach terminator, SCSI, and power cables to the drive
9. Attach the power cables to the host server and all attached devices.
10. Turn on the PowerVault 110T DLT VS160 Tape External drive and any other devices you turned off earlier.
11. Turn on the host server and allow its operating system to start.
12. See
Installing the Device Drivers and Installing the Tape Backup Software to complete the installation.
Installing the Device Drivers
NOTE: The device drivers supplied on the Dell PowerVault 110T DLT VS160 Tape Drive User's Manual and Drivers CD
are required if you intend to use native operating system backup applications. Commercial backup applications generally
provide all necessary device driver support. See
applications.
Microsoft® Windows® 2000:
file:///C|/Users/rishi_sood/Desktop/Temp/MissingDocsPosted/110t_dlt/UG/setup.htm[3/8/2013 11:46:12 AM]
Installing the Tape Backup Software for a list of compatible backup
Page 16

Getting Started and Setup: Dell PowerVault 110T DLT VS160 Tape Drive User's Guide
1. Make sure that you are logged on to the host server with Administrator privileges.
2. Insert the Dell PowerVault 110T DLT VS160 Tape Drive User's Manual and Drivers CD into the CD drive on the host server.
3. Right-click the My Computer icon on the Windows desktop, click Manage, then click Device Manager.
The PowerVault 110T DLT VS160 Tape drive should be listed under the "? Other Devices" item as "QUANTUM VS160
SCSI Sequential Device."
4. Right-click the QUANTUM VS160 SCSI Sequential Device listing, click Uninstall, and then click the OK button to confirm
that you want to remove the device.
5. Click the Action button in the upper-left corner of the Computer Management dialog box or right -click anywhere in the righthand pane of the dialog box.
6. Click Scan for Hardware Changes. Windows 2000 now scans for the PowerVault 110T DLT VS160 Tape drive. The
PowerVault 110T DLT VS160 Tape drive appears under "? Other Devices" again.
7. Right-click the QUANTUM VS160 SCSI Sequential Device listing and click Properties.
8. Click the Reinstall Driver button.
9. When the Upgrade Device Driver Wizard appears, click the Next button.
10. Click Display a list... and then click the Next button.
11. Click the Tape Drives item in the list. You may have to scroll down to see this item.
12. Click the Have Disk button, type d:\Drivers\W2K, replacing d: with the drive letter for the CD drive into which you inserted
the Dell PowerVault 110T DLT VS160 Tape Drive User's Manual and Drivers CD, and click the OK button.
13. Click the DLT VS Tape Drive entry and click the Next button.
14. Click the Next button to install the driver.
15. Click the Finish button.
16. Close the Device Properties dialog box.
The drive now appears in Device Manager under Tape Drives, listed as "DLT VS Tape Drive," and is ready to use.
Microsoft® Windows® Server™ 2003:
1. Make sure that you are logged on to the host server with Administrator privileges.
2. Insert the Dell PowerVault 110T DLT VS160 Tape Drive User's Manual and Drivers CD into the CD drive on the host server.
3. Click the Start button on the Windows taskbar, point to Programs, click Administrative Tools, and click Computer
Management.
4. Click Device Manager.
The PowerVault 110T DLT VS160 Tape drive should be listed under the "? Other Devices" item as "QUANTUM VS160
SCSI Sequential Device."
5. Right-click the QUANTUM VS160 SCSI Sequential Device listing, click Uninstall, and then click the OK button to confirm
that you want to remove the device.
6. Click the Action button in the upper-left corner of the Computer Management dialog box or right -click anywhere in the righthand pane of the dialog box.
7. Click Scan for Hardware Changes. Windows Server 2003 now scans for the PowerVault 110T DLT VS160 Tape drive. The
PowerVault 110T DLT VS160 Tape drive appears under "? Other Devices" again.
Right-click the QUANTUM VS160 SCSI Sequential Device listing and click Properties.
8.
9. Click the Driver tab, then click the Update Driver... button.
10. When the Hardware Update Wizard appears, click the Next button.
11. Click the Finish button.
12. Click the Close button to close the Device Properties dialog box.
The drive now appears in Device Manager under Tape Drives, listed as "Dell(TM) PowerVault(TM) VS160," and is ready to use.
Installing the Tape Backup Software
See the instructions supplied with the tape backup software.
Drivers
Microsoft® Windows® 2000 and Windows® Server™ 2003: QSDLT32.SYS
Native Operating System Backup Utilities
file:///C|/Users/rishi_sood/Desktop/Temp/MissingDocsPosted/110t_dlt/UG/setup.htm[3/8/2013 11:46:12 AM]
Page 17

Getting Started and Setup: Dell PowerVault 110T DLT VS160 Tape Drive User's Guide
Microsoft® Windows® 2000 and Windows® Server™ 2003
Windows Backup
Red Hat Linux versions 7.3 and 8.0 and 9.0
Tar
Tape Backup Applications
NOTICE: See the Dell Support website at support.dell.com to obtain the latest patches and upgrades for the
Tape Backup Applications noted below.
Microsoft® Windows® 2000 and Windows® Server™ 2003
VERITAS™ BackupExec™ for Windows NT/2000 version 9.0 or later
Yosemite Tapeware® version 7.0 or later
Novell® NetWare®
VERITAS™ BackupExec™ for NetWare™ version 9.0 or later
Yosemite Tapeware® version 7.0 or later
Red Hat Linux versions 7.3, 8.0, and 9.0
Yosemite Tapeware® version 7.0 or later
Installing the Dell PowerVault Tools Diagnostic Package
Requirements
Microsoft® Windows® 2000
PowerVault 110T DLT1, PowerVault 110T DLT VS80, or PowerVault 110T DLT VS160 Tape drive
Before Installing the Diagnostic Package
1. Make sure the tape drive is powered on and that the SCSI bus is in an idle state (stop and/or hold all backup applications).
2. Print these instructions. In the event the server needs to be restarted, you can resume where you left off.
Installing the Diagnostic Package
1. Decide where on the server you plan to install the PowerVault Tools application and related files. You can place the
application on your desktop, in an existing folder, or you can create a new folder for this purpose. Note that when the
application runs, it creates a log file, which also resides in the designated folder. As a result, you should not run the
application directly from the CD as this prevents the application from creating the log file. The log file is useful for Technical
Support in the event that troubleshooting the drive becomes necessary.
2. Insert the Dell PowerVault 110T DLT VS160 Tape Drive User's Manual and Drivers CD into the CD drive.
3. Open the folder d:\Diags on the Dell PowerVault 110T DLT VS160 Tape Drive User's Manual and Drivers CD, where d: is
the drive letter of the CD drive.
4. Drag or copy the PowerVault Tools application to the location chosen in step 1.
5. Browse to the folder chosen in step 1 and double -click the PowerVault Tools icon to run the diagnostic application. You
can run the diagnostic application at any time by double-clicking the PowerVault Tools icon.
6. From the folder d:\Diags on the Dell PowerVault 110T DLT VS160 Tape Drive User's Manual and Drivers CD, where d: is
the drive letter of the CD drive, view the README file for usage instructions, explanation of options, and troubleshooting
guidelines for the PowerVault Tools application. You may want to copy this README file to the location chosen in step 1 for
future use.
file:///C|/Users/rishi_sood/Desktop/Temp/MissingDocsPosted/110t_dlt/UG/setup.htm[3/8/2013 11:46:12 AM]
Page 18

Getting Started and Setup: Dell PowerVault 110T DLT VS160 Tape Drive User's Guide
NOTE: In some cases, the server may need to restart at this time. If you are prompted to do so, restart the server now.
Back to Contents Page
file:///C|/Users/rishi_sood/Desktop/Temp/MissingDocsPosted/110t_dlt/UG/setup.htm[3/8/2013 11:46:12 AM]
Page 19
Using the Tape Drive: Dell PowerVault 110T DLT VS160 Tape Drive User's Guide
Indicator Activity During Normal Operation - Ready LED
Back to Contents Page
Using the Tape Drive: Dell™ PowerVault™ 110T DLT VS160 Tape
Drive User's Guide
Operating the Tape Drive
Caring for Tape Cartridges
Cleaning the Tape Mechanism
Operating the Tape Drive
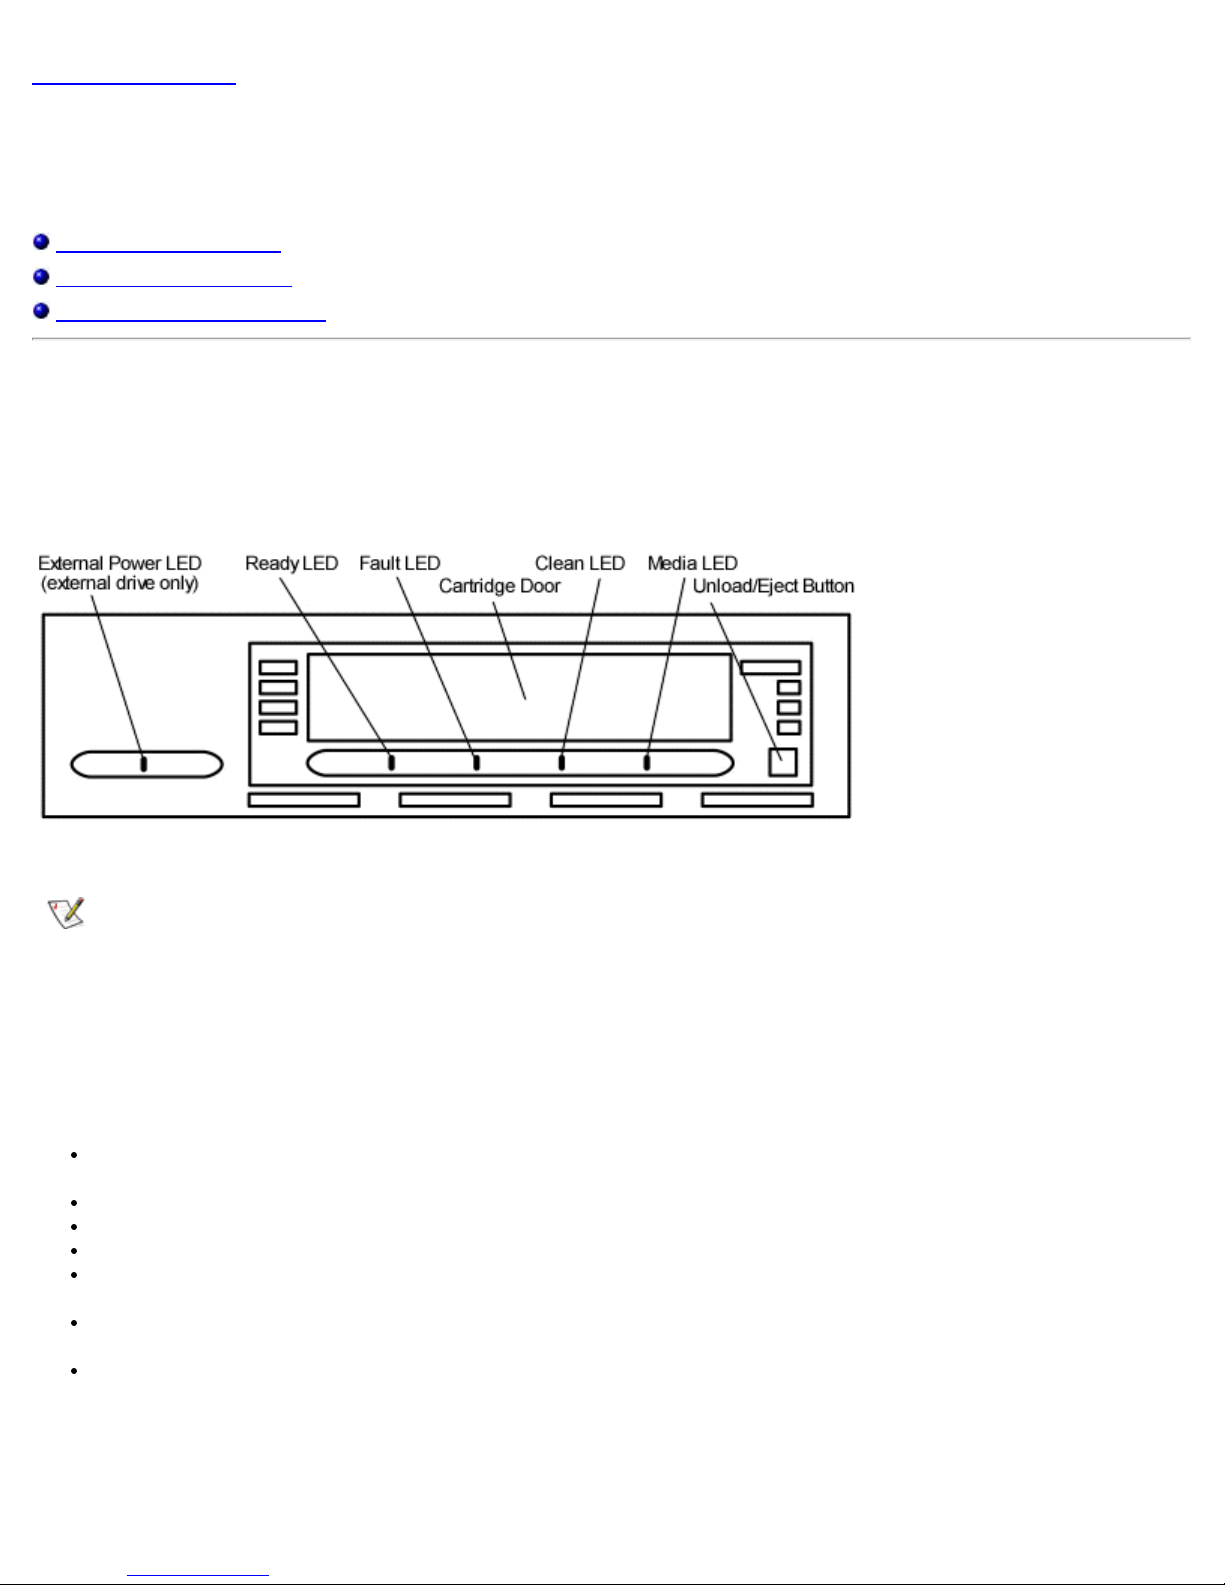
Location of the Controls and Indicators
Figure 1. PowerVault 110T DLT VS160 Tape drive front panel
NOTE: The front panel controls and indicators are in the same locations on both the internal and external drives. The
internal drive does not have a Power LED.
Indicator Activity During Power-On Self-Test (POST)
Every time you turn on or reset the drive, it conducts a Power-On Self -Test (POST). This test ensures that the drive is working
properly and is ready to use. While POST is in progress, watch the front panel LEDs to see the progress and results of the test.
During POST, the following actions take place:
The LEDs illuminate one at a time, from left to right, starting with the Ready LED, next the Fault LED, and finally the Clean
LED, at approximately one second intervals
About four seconds later, the Media LED illuminates
Each LED signals a different part of the POST process
All LEDs then turn off momentarily
If a cartridge is not loaded, the Ready LED illuminates and POST is complete, the entire process taking approximately eight
seconds
If a cartridge is loaded, the Ready LED flashes while the drive mounts the cartridge, a process that can take several
minutes depending upon the position of the media in the tape path
As POST completes, the drive makes a slight buzzing noise for several seconds. This noise is normal and should be
ignored
The drive is now ready to use.
file:///C|/Users/rishi_sood/Desktop/Temp/MissingDocsPosted/110t_dlt/UG/usage.htm[3/8/2013 11:46:13 AM]
Page 20

Using the Tape Drive: Dell PowerVault 110T DLT VS160 Tape Drive User's Guide
When the PowerVault 110T DLT VS160 Tape drive is in use, the Ready LED indicates the three states detailed in Table 1. The
Ready LED operates independently of the other three LEDs.
Table 1. Ready LED activity and drive status
Ready LED
Activity Drive Status
Off No power to the drive
On Power is on; no cartridge loaded or a loaded cartridge is idle with
no tape motion
Blinking The drive is loading a cartridge or a loaded cartridge has tape
motion indicating read, write, seek, rewind, calibration, or other
cartridge activity
Indicator Activity During Normal Operation - Fault/Clean/Media LEDs
The Fault, Clean, and Media LEDs indicate the status of the drive. Note that the LEDs can indicate more than one of the indicated
operating conditions simultaneously. For example:
If cleaning is required while a DLT1 format cartridge is loaded, both the Clean and Media LEDs are on
If an internal write/read diagnostic fails as a result of a permanent write error, both the Fault and Clean LEDs blink slowly.
Table 2 describes what each front panel indicator means.
Table 2. Fault/Clean/Media LED activity and drive status
Indicator Activity Operating Condition
Fault Slow Blink (1x per second) User initiated write/read diagnostic failed
Fast Blink (3x per second) Servo or mechanism error
On Internal firmware error
Clean Slow Blink (1x per second) Calibration error or permanent write/read error
Medium Blink (2x per second) Cleaning in progress
On Cleaning required
Media Slow Blink (1x per second) Unsupported format, or damaged or unsupported cartridge type
inserted into drive
On DLT1 format DLTtape™ IV cartridge loaded
Troubleshooting the Drive in Troubleshooting for more details on error conditions.
See
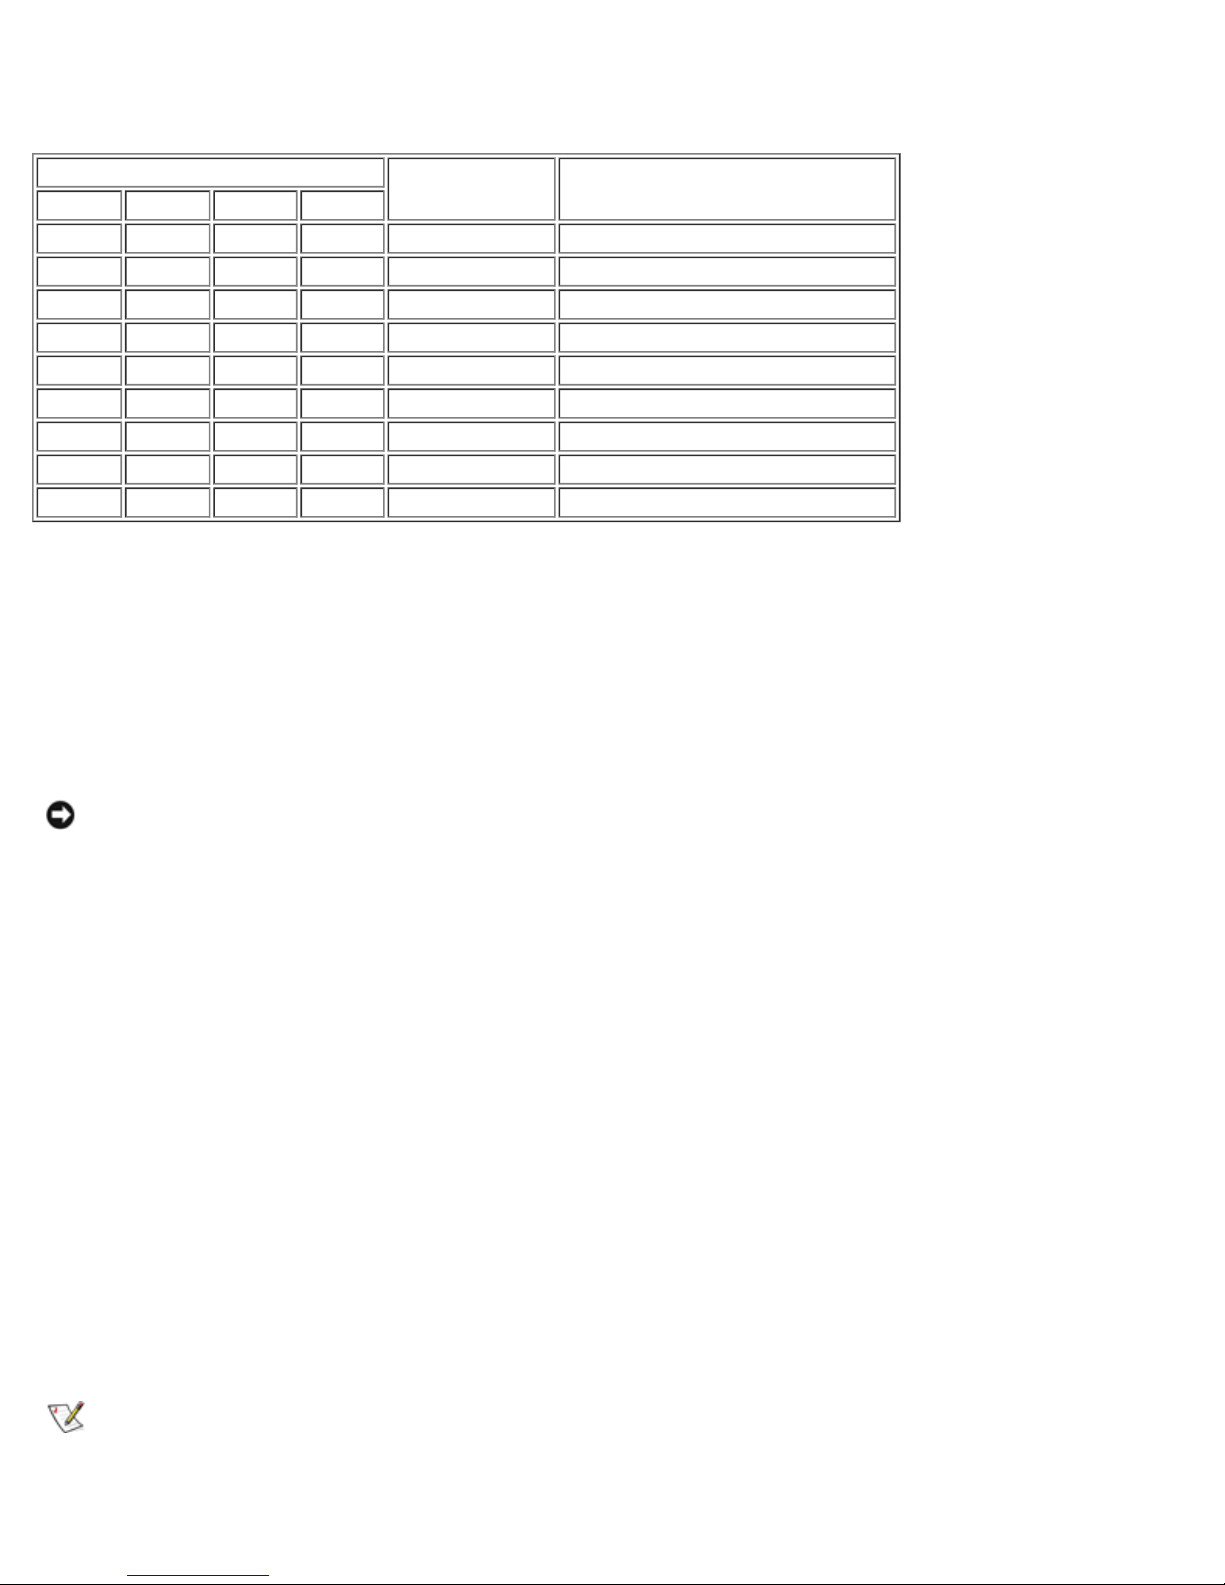
Unload/Eject Button Features
The Unload/Eject button provides features in addition to unloading and ejecting a cartridge. To activate one of these features, press
and hold the Unload/Eject button for the amount of time specified in
LED sequence is displayed.
If you do nothing for 15 seconds after accessing any of the additional features that require an action, such as loading a cartridge,
the drive returns to normal operating mode.
NOTICE: The Unload/Eject button features indicated by an asterisk (*) in Table 3 overwrite all data on the
cartridge loaded in the drive. Use extreme caution when accessing these features to avoid loss of important
file:///C|/Users/rishi_sood/Desktop/Temp/MissingDocsPosted/110t_dlt/UG/usage.htm[3/8/2013 11:46:13 AM]
Table 3 . Release the Unload/Eject button when the desired
Page 21
Using the Tape Drive: Dell PowerVault 110T DLT VS160 Tape Drive User's Guide
data.
Table 3. Unload/Eject button features
LED Status
Ready Fault Clean Media
On N/A N/A N/A 0-6 Normal unload/eject function
Blinking Off Off Off 6-9 Reserved
Blinking Blinking Blinking Off 12-15 Reserved
Blinking Blinking Blinking Blinking 15-18 Reserved
On Off Off Off 18-21 Revert to normal operating mode
On On Off Off 21-24 Write/read diagnostic mode*
On On On Off 24-27 Reserved*
On On On On 27-30 Emergency reset
Off Off Off Off 30+ Revert to normal operating mode
Button Hold
Time (seconds)
Feature Description
Unload/Eject Button Feature Description
Normal Unload/Eject
When you release the button, the drive unloads and ejects the cartridge.
Write/Read Diagnostic Mode
NOTICE: This mode overwrites all data on the cartridge in the drive. Use extreme caution when using this
feature to avoid loss of important data.
When you release the button, the drive initiates an internal write/read diagnostic. The diagnostic requires that you first load a
cartridge that is blank or does not contain valuable data. When the diagnostic begins, the drive writes and then reads approximately
400MB of data and then unloads and ejects the cartridge. The process takes about two minutes. If the diagnostic test detects no
errors, the drive returns to normal operating mode. If an error occurs, the appropriate LEDs illuminate.
Emergency Reset
When you release the button, the drive performs a hard reset, behaving as if it had been turned off and then on. A standard POST
then takes place.
Revert to Normal Operating Mode
When you release the button, the drive returns to normal operation.
Loading a Tape Cartridge
The PowerVault 110T DLT VS160 Tape drive reads and writes DLTtape VS1 cartridges. The PowerVault 110T DLT VS160 Tape
drive can read - but not write - DLTtape™ IV cartridges written using the DLT1/VS80 format.
NOTE: The PowerVault 110T DLT VS160 Tape drive automatically ejects any other cartridge types and any cartridges
whose format it cannot read. Make sure all cartridges that you want to use for writing are DLTtape VS1 cartridges.
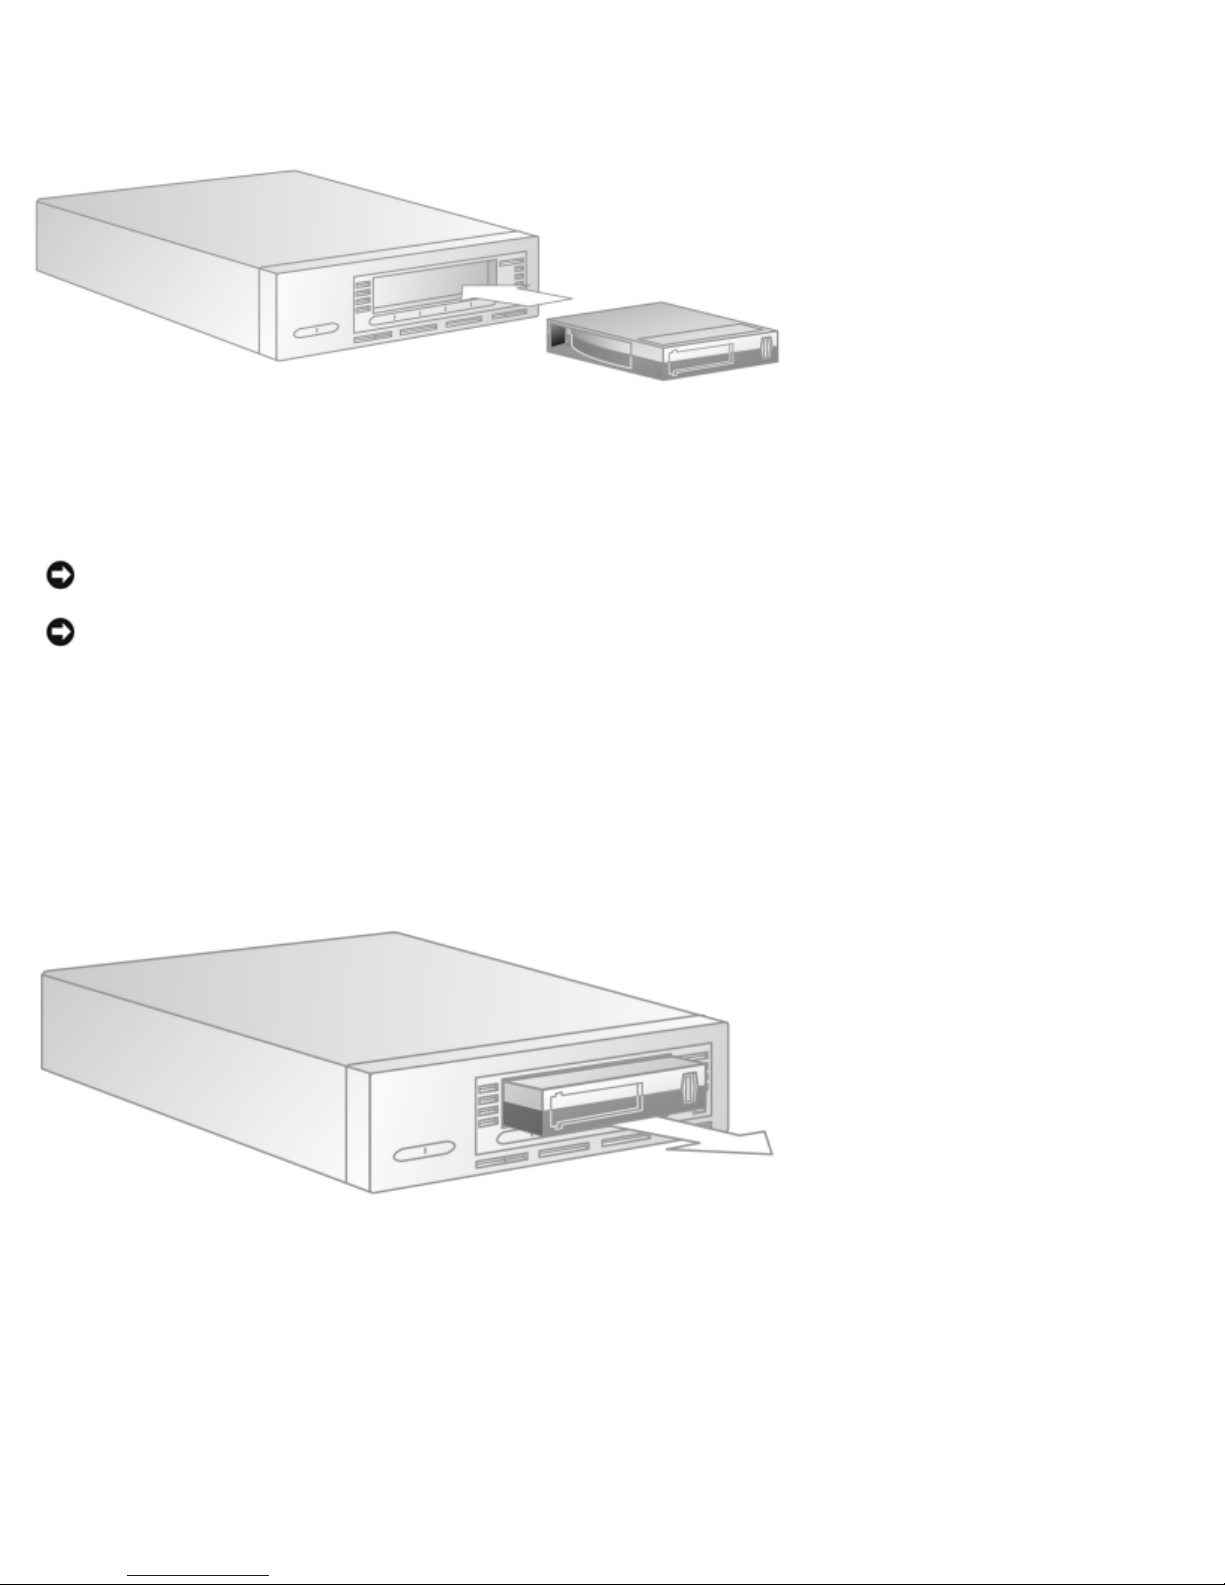
Loading a cartridge into the PowerVault 110T DLT VS160 Tape drive is fast and easy. After the drive completes POST, insert the
file:///C|/Users/rishi_sood/Desktop/Temp/MissingDocsPosted/110t_dlt/UG/usage.htm[3/8/2013 11:46:13 AM]
Page 22
Using the Tape Drive: Dell PowerVault 110T DLT VS160 Tape Drive User's Guide
DLTtape VS1 cartridge into the cartridge slot, oriented as shown in Figure 2, and push the cartridge gently into the drive until it
stops.
Figure 2. Loading a tape cartridge
The Ready LED blinks while the drive loads the cartridge. When the cartridge is ready to use, the Ready LED is steadily
illuminated. If the cartridge is a DLTtape™IV written using the DLT1/VS80 format, the Media LED is also steadily illuminated.
Unloading a Tape Cartridge
NOTICE: Do not remove a tape cartridge while the Ready LED is blinking.
NOTICE: Remove the cartridge from the PowerVault 110T DLT VS160 Tape drive before turning off the external
drive or the host server for an internal drive. Leaving a cartridge in the drive when power is off can result in
cartridge and drive damage. When you remove the cartridge from the drive, return the cartridge to its storage
case to prolong cartridge life.
To eject a cartridge from the PowerVault 110T DLT VS160 Tape drive, follow these steps:
1. Press the Unload button or use your backup software to eject the cartridge. The Ready LED blinks while the drive rewinds
the tape.
2. When the drive has rewound the tape, it ejects the cartridge.
Figure 3. Unloading a tape cartridge
3. Remove the cartridge from the drive.
4. Return the cartridge to its storage case to prolong cartridge life.
Setting the Write-Protect Switch on Tape Cartridges
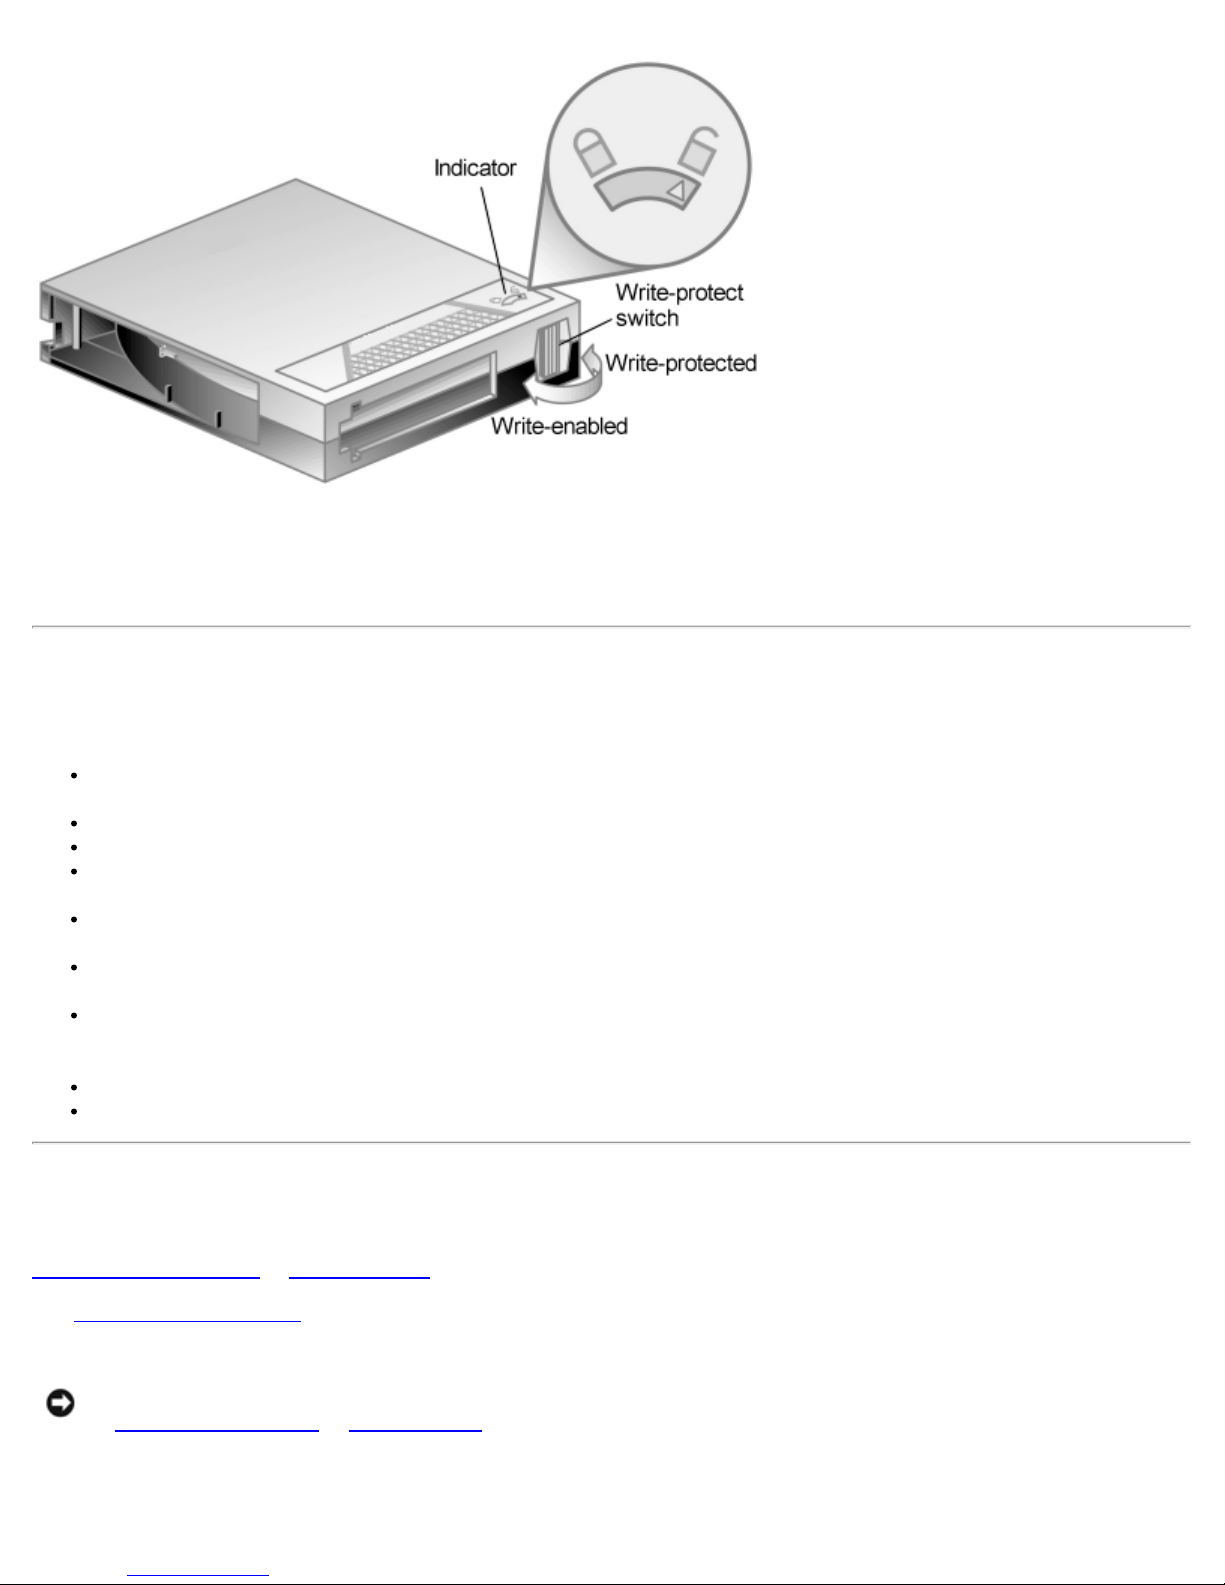
All Tape cartridges have a write- protect switch to prevent accidental erasure of data. Before loading a tape cartridge into the
PowerVault 110T DLT VS160 Tape drive, make sure the write -protect switch on the front of the cartridge is positioned as desired.
Figure 4. DLTtape VS1 cartridge write-protect switch
file:///C|/Users/rishi_sood/Desktop/Temp/MissingDocsPosted/110t_dlt/UG/usage.htm[3/8/2013 11:46:13 AM]
Page 23
Using the Tape Drive: Dell PowerVault 110T DLT VS160 Tape Drive User's Guide
Slide the switch to the right to write- protect the cartridge. The "locked" icon appears on the switch indicating that the cartridge is
write- protected. Slide the switch to the left to allow the PowerVault 110T DLT VS160 Tape drive to write data to the cartridge. The
"unlocked" icon appears on the switch. The indicator on the top of the cartridge also points to the appropriate icon, indicating the
write- protect status of the cartridge.
Caring for Tape Cartridges
To ensure the longest possible life for all of your tape cartridges, follow these guidelines:
Do not drop or strike a cartridge. Excessive shock can displace the tape leader, making the cartridge unusable and possibly
damaging the PowerVault 110T DLT VS160 Tape drive.
Store tape cartridges in their storage cases.
Do not expose tape cartridges to direct sunlight or sources of heat, including portable heaters and heating ducts.
The operating temperature range for tape cartridges is 50° F to 104° F (10° C to 40° C). The storage temperature range is
60° F to 90° F (16° C to 32° C).
If a tape cartridge has been exposed to temperatures outside the ranges specified above, stabilize the cartridge at room
temperature for the same amount of time it was exposed to extreme temperatures, up to 24 hours.
Store tape cartridges in a dust- free environment in which relative humidity is always between 20% and 80%
(noncondensing). The ideal storage relative humidity is 40%, ± 20%.
Do not place tape cartridges near sources of electromagnetic energy or strong magnetic fields, such as computer monitors,
electric motors, speakers, or X - ray equipment. Exposure to electromagnetic energy or magnetic fields can destroy data on
cartridges.
Place identification labels only in the slide-in slot on the front of the cartridge.
Never use any type of adhesive labels on tape cartridges.
Cleaning the Tape Mechanism
When the Clean LED is on, the PowerVault 110T DLT VS160 Tape drive's read/write head needs to be cleaned. See
Troubleshooting the Drive in Troubleshooting for other conditions that may indicate drive cleaning is necessary.
Loading a Tape Cartridge to load the cleaning cartridge. Cleaning typically takes several minutes, during which the Clean LED
See
blinks.
NOTICE: Use only Dell approved cleaning cartridges in the PowerVault 110T DLT VS160 Tape drive. See
Recommended Tapes in Specifications for a list of approved cleaning cartridges. Use of any other type of
cleaning cartridge could damage the read/write head in your drive. If you attempt to load any other type of
cleaning cartridge, the PowerVault 110T DLT VS160 Tape drive prevents damage by ejecting the cartridge after
approximately 25 seconds without allowing the cleaning tape to come into contact with the read/write head.
file:///C|/Users/rishi_sood/Desktop/Temp/MissingDocsPosted/110t_dlt/UG/usage.htm[3/8/2013 11:46:13 AM]
Page 24
Using the Tape Drive: Dell PowerVault 110T DLT VS160 Tape Drive User's Guide
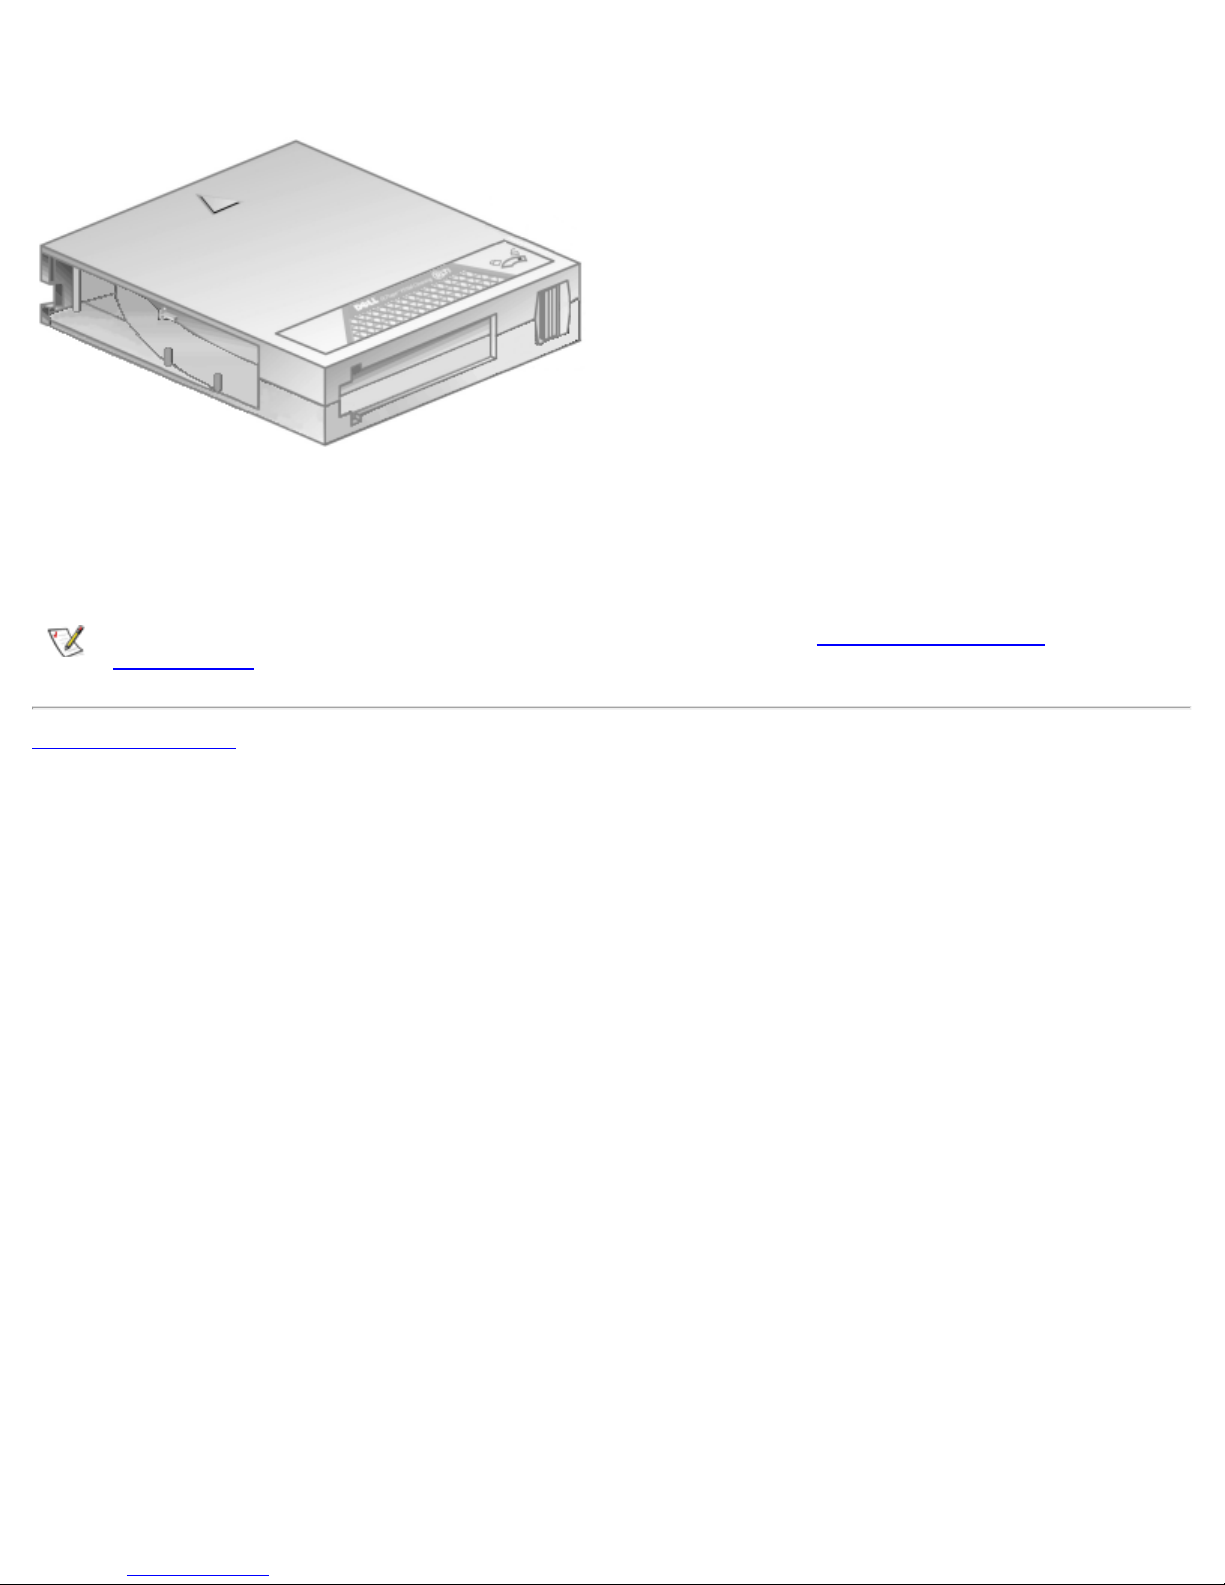
Figure 5. DLTtape VS1 cleaning cartridge
Each cleaning cartridge has a useful life of 20 cleanings. The cleaning cartridge includes a label with 20 small boxes printed on it.
Always place a check mark in a box each time you use the cartridge to clean the drive. Replace the cleaning cartridge when all
boxes are checked.
When the cleaning cartridge has cleaned the read/write head, the Clean LED turns off and the drive ejects the cleaning cartridge.
NOTE: If the previous error condition occurs again with the next data tape, see Troubleshooting the Drive in
Troubleshooting for more information.
Back to Contents Page
file:///C|/Users/rishi_sood/Desktop/Temp/MissingDocsPosted/110t_dlt/UG/usage.htm[3/8/2013 11:46:13 AM]
Page 25

Using the Tape Backup Software: Dell PowerVault 110T DLT VS160 Tape Drive User's Guide
Back to Contents Page
Using the Tape Backup Software: Dell™ PowerVault™ 110T DLT
VS160 Tape Drive User's Guide
See the User's Operating Guide supplied with your Tape Backup software application. If the tape backup software does not detect
the tape drive or to obtain the latest operating system drivers and/or firmware upgrades, see the Dell Support website at
support.dell.com.
Back to Contents Page
file:///C|/Users/rishi_sood/Desktop/Temp/MissingDocsPosted/110t_dlt/UG/software.htm[3/8/2013 11:46:14 AM]
Page 26

Troubleshooting: Dell PowerVault 110T DLT VS160 Tape Drive User's Guide
Back to Contents Page
Troubleshooting: Dell™ PowerVault™ 110T DLT VS160 Tape Drive
User's Guide
Obtaining Drivers and Firmware Upgrades
Troubleshooting the Drive
If the Drive Becomes Unresponsive
Running the Dell PowerVault Tools Diagnostic Package
Reinstalling the Tape Backup Software
Reinstalling Drivers for Windows 2000/Server 2003
Drive Makes Noises During System Startup
Drive Failures During Backup or Restore Operations
Tape-Backup Software Errors
Obtaining Drivers and Firmware Upgrades
If the tape backup software does not detect the tape drive or to obtain the latest operating system drivers and/or firmware
upgrades, see the Dell Support website at
support.dell.com.
Troubleshooting the Drive
Power-On Self-Test (POST) and Drive Connectivity Failures
Every time you turn on or reset the drive, it conducts a Power-On Self -Test (POST). This test ensures that the drive is working
properly and is ready to use. While POST is in progress, watch the front panel LEDs to see the progress and results of the test.
Operating the Tape Drive in Using the Tape Drive for details on normal LED activity during during POST.
See
A successful POST will always finish with a solid Ready LED. POST takes approximately eight seconds with no tape loaded and
up to several minutes with a tape loaded, depending on the position of the media in the tape path. When a tape is loaded, other
expected LED indications may exist. See
indications during POST may indicate a failure. Use the information in
contact Technical Support.
Table 1. Troubleshooting errors indicated by front panel LEDs
Symptom Problem Solution
None of the
drive’s LEDs
illuminate.
The drive is not receiving
power.
Operating the Tape Drive in Using the Tape Drive for details. Any unexpected LED
Table 1 to troubleshoot the drive. If the condition persists,
Check the drive's power cable. If an external drive, check the power cable
connections. Plug the power cable into a different power outlet.
Media LED:
Slow blink
Media LED: A DLT1 (DLT VS80) format The PowerVault 110T DLT VS160 Tape drive can read, but not write, this
file:///C|/Users/rishi_sood/Desktop/Temp/MissingDocsPosted/110t_dlt/UG/trouble.htm[3/8/2013 11:46:14 AM]
Unsupported format,
unsupported cartridge type, or
damaged cartridge.
Loading an unsupported cartridge, such as a DLTtape™III, an SDLT
cartridge, or an incompatible cleaning cartridge, damaged media, a
DLTtape™ IV cartridge that is either blank or was written using an
unsupported format such as DLT4000, DLT7000 or DLT8000, or an
unsuccessful buckle operation causes this condition. The drive ejects the
cartridge. Inspect cartridge and confirm format, type, and integrity. If
repeatable with a known -good cartridge, replace drive or call Technical
Support.
Page 27

Troubleshooting: Dell PowerVault 110T DLT VS160 Tape Drive User's Guide
Illuminated DLTtape™ IV cartridge is
cartridge. If attempting to read, no action is required. Because this cartridge
device on the SCSI bus.
loaded.
Clean LED:
Slow blink
Clean LED:
Calibration error or permanent
write/read error.
Cleaning required. Drive continues to function, although increased soft error rates may be
Illuminated
Fault LED: Slow
blink
Fault LED: Fast
User initiated write/read
diagnostic failed.
Servo or mechanical error. Power cycle or reset the drive. Try the operation again with a known -good
blink
cannot be written, if you attempt a write operation, your backup application
should return a "Write Protected" message.
The drive cannot read the calibration tracks on the tape or has encountered
a permanent write or read error. If the failure is the result of a calibration
error, the drive ejects the cartridge. If the failure is the result of a permanent
read/write error, the drive does not eject the cartridge. Try a known- good
cartridge. If condition persists with a particular cartridge, discard or degauss
that cartridge. If repeatable with a known -good cartridge, try cleaning the
drive. If cleaning does not help, replace the drive or contact Technical
Support.
encountered. Clean the drive at your earliest convenience. LED indication
remains until drive is cleaned.
Eject tape, power cycle or reset drive. Try diagnostic again with a different,
known- good tape.
NOTICE: This feature overwrites any data currently on the cartridge.
Confirm that the selected cartridge does not contain important data.
If this condition persists with a known - good cartridge, contact Technical
Support.
cartridge. If condition persists, contact Technical Support.
Fault LED:
Illuminated
Other LED
Indications
Internal firmware error. Power cycle or reset the drive. Try the operation again with a known -good
cartridge. If condition persists, contact Technical Support.
Unspecified. If you encounter any LED indications that are not covered in this manual,
contact Technical Support. See
Introduction for a complete LED indicator reference.
Table 2 helps you troubleshoot other drive and connectivity problems.
Table 2. Drive and connectivity troubleshooting
Symptom Problem Solution
The host server
does not
recognize the
drive.
The drive's SCSI ID might not be
unique.
Regardless of the number of SCSI devices attached to the server that
is to be the host for the PowerVault 110T DLT VS160 Tape Internal
drive, each must have a unique SCSI ID. Check the SCSI IDs on all
other SCSI devices on the selected server, including the SCSI host
adapter, and select an unused SCSI ID for the PowerVault 110T DLT
VS160 Tape Internal drive.
NOTE: If you attach the drive to a narrow (50- pin) bus, you can
only use SCSI IDs 0 through 7.
The SCSI host adapter might be
incorrectly configured.
Check the SCSI host adapter configuration. Refer to the SCSI host
adapter manuals for instructions.
Front Panel Controls and Indicators in
The SCSI cable might be loose. Check both ends of the SCSI cable, both for the external and internal
drives.
The SCSI terminator might be
loose or missing.
1. Make sure an active Low-Voltage Differential/Single-Ended
(LVD/SE) terminator is properly seated on the open SCSI
connector on the rear panel of the external drive or on the last
file:///C|/Users/rishi_sood/Desktop/Temp/MissingDocsPosted/110t_dlt/UG/trouble.htm[3/8/2013 11:46:14 AM]
Page 28

Troubleshooting: Dell PowerVault 110T DLT VS160 Tape Drive User's Guide
2. Make sure an active LVD/SE terminator is in place on the SCSI
ribbon cable for the internal drive.
The SCSI bus might be improperly
terminated.
The SCSI terminator might not be
at the end of the SCSI bus or more
than two terminators might be
present on the SCSI bus.
The SCSI host adapter might be in
a defective expansion slot.
1. If the PowerVault 110T DLT VS160 Tape drive is the last or
only device on the SCSI bus, make sure the drive is properly
terminated.
2. If the PowerVault 110T DLT VS160 Tape drive is not the last or
only device on the SCSI bus, check all SCSI cable connections
and make sure the last device on the SCSI bus is terminated.
3. Make sure termination is set properly on the SCSI host adapter.
4. If you attach the drive to a narrow (50 -pin) SCSI bus, you must
use a customer-supplied 68 -pin to 50-pin adapter that
terminates the unused 18 pins. These adapters are sometimes
labeled "high - byte termination."
5. Regardless of which device is used to terminate the SCSI bus,
it must have power applied and be turned on for proper
termination to occur.
Make sure the terminators are placed only at each end of the SCSI
bus — normally one at the host adapter and one on the last device on
the bus. However, if both internal and external devices are attached to
the same SCSI host adapter, the adapter may be positioned in the
middle of the SCSI bus and should not be terminated. In that case,
the SCSI devices on each end of the bus must be terminated.
Move the SCSI host adapter to a different expansion slot.
There are fatal or
nonfatal errors for
which you cannot
find the cause.
The SCSI bus might be too long. Make sure the total length of the SCSI bus does not exceed the ANSI
SCSI standard of 19 feet (6 meters) for a Single - Ended (SE) bus, 40
feet (12 meters) for a Low-Voltage Differential (LVD) SCSI bus with
multiple devices, or 82 feet (25 meters) for an LVD SCSI bus with a
single device. If you attach the drive to an SE bus or if there are any
SE devices attached to the bus, the bus is limited to the maximum
cable lengths of an SE bus.
The SCSI bus might be improperly
terminated.
1. If the PowerVault 110T DLT VS160 Tape drive is the last or
only device on the SCSI bus, make sure the drive is properly
terminated. Make sure only the last device is terminated.
2. If the PowerVault 110T DLT VS160 Tape drive is not the last or
only device on the SCSI bus, check all SCSI cable connections
and make sure the last device on the SCSI bus is terminated.
3. Make sure termination is set properly on the SCSI host adapter.
4. If you attach the drive to a narrow (50 -pin) SCSI bus, you must
use a customer-supplied 68 -pin to 50-pin adapter that
terminates the unused 18 pins. These adapters are sometimes
labeled "high - byte termination."
5. Regardless of which device is used to terminate the SCSI bus,
it must have power applied and be turned on for proper
termination to occur.
The AC power source may not be
properly grounded (PowerVault
110T DLT VS160 Tape External
drive only).
1. Plug the PowerVault 110T DLT VS160 Tape External drive's
power cable into a power outlet on the same circuit as the host
server.
2. Plug the PowerVault 110T DLT VS160 Tape External drive’s
power cable into a different power outlet.
The backup
application does
file:///C|/Users/rishi_sood/Desktop/Temp/MissingDocsPosted/110t_dlt/UG/trouble.htm[3/8/2013 11:46:14 AM]
Application not compatible or
improper device drivers installed.
If the operating system recognizes the drive, but not the backup
application, confirm that you are using a compatible backup
Page 29

Troubleshooting: Dell PowerVault 110T DLT VS160 Tape Drive User's Guide
not recognize the
application. Also confirm that you have the proper device drivers, if
in Using the Tape Drive for detailed instructions.
drive.
The drive cannot
write data to or
read data from a
cartridge.
The drive is not
backing up data
efficiently.
necessary, installed. See the Dell Support website at support.dell.com
to obtain the latest operating system drivers and/or firmware upgrades.
Cartridge or drive problem. 1. Make sure that the cartridge is write-enabled. Move the write-
protect switch to the write- enabled position. See
Setting the
Write-Protect Switch on Tape Cartridges in Using the Tape
Drive for detailed instructions.
2. If you are attempting to write data, make sure you are using a
DLTtape VS1 cartridge.
3. Make sure that the cartridge has not been exposed to harsh
environmental or electrical conditions and is not physically
damaged in any way.
4. Many backup applications do not read or write to cartridges that
were created using a different backup application. In this case,
you may have to perform an erase, format, or label operation
on the cartridge using your backup application.
5. Make sure you understand any data protection or overwrite
protection schemes that your backup application may be using,
any of which could prevent you from writing to a given cartridge.
6. Retry the operation with a different, known-good cartridge.
7. Clean the tape drive. See
Cleaning the Tape Mechanism in
Using the Tape Drive for detailed instructions.
Network, cartridge, SCSI bus,
backup data set, or backup
application problem.
1. Check the network bandwidth from the host server. If you are
backing up data over a network, compare to a local-only
backup for relative backup speed indication.
2. Make sure that the drive is on its own SCSI bus and not daisychained to another tape drive or to the hard drive being backed
up.
3. Clean the tape drive. See
Cleaning the Tape Mechanism in
Using the Tape Drive for detailed instructions.
4. Try a new cartridge. A marginal cartridge can cause
performance problems due to bad spots on the tape requiring
retries.
5. Make sure that the data is being compressed. See your backup
application user documentation for details.
6. Check the size of the files in the backup set. Small file size can
impact performance.
7. Confirm that the backup application is using block sizes of at
least 32KB, and preferably 64KB. See your backup application
user documentation for details.
The drive does
not eject a
cartridge.
Timing or drive problem. 1. Allow sufficient time for the drive to complete any operations,
such as POST, reset, load, unload, rewind, etc. Worst case is
when powering up or resetting the drive with the tape
positioned at the physical end of the media. Recovery from this
state could take several minutes.
2. Allow sufficient time for the backup application to release any
hold it may have on the drive. Worst case could be several
minutes. Confirm that the backup application is not set to
prevent media removal.
3. Try a software eject, using your backup application, allowing
sufficient time for the command to execute.
4. If the drive still does not eject the cartridge, power down the
drive and remove all connectors except power from the rear of
the tape drive. Apply power to the drive and allow it to complete
POST. Press the Unload/Eject button, allowing sufficient time
for the command to execute. See
file:///C|/Users/rishi_sood/Desktop/Temp/MissingDocsPosted/110t_dlt/UG/trouble.htm[3/8/2013 11:46:14 AM]
Unload/Eject Button Features
Page 30

Troubleshooting: Dell PowerVault 110T DLT VS160 Tape Drive User's Guide
5. See If the Drive Becomes Unresponsive for instructions on
performing an emergency reset to eject the cartridge.
6. If the drive still does not eject the cartridge, contact Technical
Support.
The drive
repeatedly rejects
a cartridge.
Cartridge or drive problem. The PowerVault 110T DLT VS160 Tape Drive rejects any unsupported
cartridge, such as a DLTtape™ III, an SDLT cartridge, an incompatible
cleaning cartridge, damaged media, a DLTtape™ IV cartridge that is
either blank or was written using an unsupported format such as
DLT4000, DLT7000 or DLT8000, as well as any cartridge that causes
an unsuccessful buckle operation. Inspect the cartridge and confirm
format, type, and integrity. If repeatable with a known - good cartridge,
try cleaning the drive. If cleaning does not help, replace the drive or
call Technical Support.
If the Drive Becomes Unresponsive
On rare occasions, the drive may become unresponsive. If this should happen, use this procedure to reset the drive and unload
the cartridge:
1. Press and hold the Unload/Eject button for approximately 27 seconds until all four LEDs are steadily illuminated (not
blinking).
2. Release the Unload/Eject button while all four LEDs are steadily illuminated. The drive initiates a device reset, then
performs a POST. See
LED activity.
3. Upon completion of POST, press and release the Unload/Eject button as soon as the Ready LED begins to blink and/or you
hear tape motion. The drive attempts to eject the cartridge as soon as the device reset is complete and the drive completes
a mid-tape load. This may take several minutes, depending on the where the media is positioned in the tape path.
4. If you do not press the Unload/Eject button again as indicated in Step 3, the cartridge in the drive is ready to use after the
drive resets and loads the cartridge.
Indicator Activity During Power-On Self-Test (POST) in Introduction for information on normal POST
Unload/Eject Button Features in Using the Tape Drive for further instructions on initiating an emergency reset. See Front
See
Panel Controls and Indicators in Introduction for complete information on LED activity during a reset and POST.
Running the Dell PowerVault Tools Diagnostic Package
NOTE: See Installing the Dell PowerVault Tools Diagnostic Package in Getting Started and Setup for installation
instructions.
Requirements
Microsoft® Windows® 2000
PowerVault 110T DLT1, PowerVault 110T DLT VS80, or PowerVault 110T DLT VS160 Tape drive
Before Running the Diagnostic Application
Make sure the tape drive is powered on and that the SCSI bus is in an idle state (stop and/or hold all backup applications).
Running the Diagnostic Application
1. Browse to the folder to which you copied the PowerVault Tools application. See step 1 under Installing the Dell PowerVault
Tools Diagnostic Package in Getting Started and Setup for more information.
2. Double-click the PowerVault Tools icon to run the diagnostic application. Note that when the application runs, it creates a
file:///C|/Users/rishi_sood/Desktop/Temp/MissingDocsPosted/110t_dlt/UG/trouble.htm[3/8/2013 11:46:14 AM]
Page 31

Troubleshooting: Dell PowerVault 110T DLT VS160 Tape Drive User's Guide
log file in the application folder. As a result, you should not run the application directly from the CD as this prevents the
application from creating the log file. The log file is useful for Technical Support in the event that troubleshooting the drive
becomes necessary.
3. The diagnostic application searches for attached PowerVault 110T DLT1, PowerVault 110T DLT VS80, or PowerVault 110T
DLT VS160 Tape drives, which it then displays on the left pane of the application main window.
4. Click the drive on which you want to run diagnostics.
5. Select the Test tab.
6. Choose the test you want to run on the selected drive from the pull-down menu under Select Test To Run . View the
README file in the folder d:\Diags, where d: is the drive letter of the CD drive, on the Dell PowerVault 110T DLT VS160
Tape Drive User's Manual and Drivers CD for details on each available test.
7. Click the Run Test button.
For more detailed instructions on using the diagnostic application, view the README file in the folder d:\Diags, where d: is the
drive letter of the CD drive, on the Dell PowerVault 110T DLT VS160 Tape Drive User's Manual and Drivers CD.
Reinstalling the Tape Backup Software
See the User's Operating Guide supplied with your Tape Backup software application.
Reinstalling Drivers for Windows 2000/Server 2003
NOTE: The device drivers supplied on the Dell PowerVault 110T DLT VS160 Tape Drive User's Manual and Drivers CD
are required if you intend to use native operating system backup applications. Commercial backup applications provide
all necessary device driver support. See
compatible backup applications.
Microsoft® Windows® 2000:
1. Make sure that you are logged on to the host server with Administrator privileges.
2. Insert the Dell PowerVault 110T DLT VS160 Tape Drive User's Manual and Drivers CD into the CD drive on the host server.
3. Right-click the My Computer icon on the Windows desktop, click Manage, then click Device Manager.
The PowerVault 110T DLT VS160 Tape drive should be listed under the "? Other Devices" item as "QUANTUM VS160
SCSI Sequential Device."
4. Right-click the QUANTUM VS160 SCSI Sequential Device listing, click Uninstall, and then click the OK button to confirm
that you want to remove the device.
5. Click the Action button in the upper-left corner of the Computer Management dialog box or right -click anywhere in the righthand pane of the dialog box.
6. Click Scan for Hardware Changes. Windows 2000 now scans for the PowerVault 110T DLT VS160 Tape drive. The
PowerVault 110T DLT VS160 Tape drive appears under "? Other Devices" again.
7. Right-click the QUANTUM VS160 SCSI Sequential Device listing and click Properties.
8. Click the Reinstall Driver button.
9. When the Upgrade Device Driver Wizard appears, click the Next button.
10. Click Display a list... and then click the Next button.
11. Click the Tape Drives item in the list. You may have to scroll down to see this item.
12. Click the Have Disk button, type d:\Drivers\W2K, replacing d: with the drive letter for the CD drive into which you inserted
the Dell PowerVault 110T DLT VS160 Tape Drive User's Manual and Drivers CD, and click the OK button.
13. Click the DLT VS Tape Drive entry and click the Next button.
14. Click the Next button to install the driver.
15. Click the Finish button.
16. Close the Device Properties dialog box.
Installing the Tape Backup Software in Getting Started and Setup for a list of
The drive now appears in Device Manager under Tape Drives, listed as "DLT VS Tape Drive," and is ready to use.
Microsoft® Windows® Server™ 2003:
1. Make sure that you are logged on to the host server with Administrator privileges.
2. Insert the Dell PowerVault 110T DLT VS160 Tape Drive User's Manual and Drivers CD into the CD drive on the host server.
file:///C|/Users/rishi_sood/Desktop/Temp/MissingDocsPosted/110t_dlt/UG/trouble.htm[3/8/2013 11:46:14 AM]
Page 32

Troubleshooting: Dell PowerVault 110T DLT VS160 Tape Drive User's Guide
3. Click the Start button on the Windows taskbar, point to Programs, click Administrative Tools, and click Computer
Management.
4. Click Device Manager.
The PowerVault 110T DLT VS160 Tape drive should be listed under the "? Other Devices" item as "QUANTUM VS160
SCSI Sequential Device."
5. Right-click the QUANTUM VS160 SCSI Sequential Device listing, click Uninstall, and then click the OK button to confirm
that you want to remove the device.
6. Click the Action button in the upper-left corner of the Computer Management dialog box or right -click anywhere in the righthand pane of the dialog box.
7. Click Scan for Hardware Changes. Windows Server 2003 now scans for the PowerVault 110T DLT VS160 Tape drive. The
PowerVault 110T DLT VS160 Tape drive appears under "? Other Devices" again.
8. Right-click the QUANTUM VS160 SCSI Sequential Device listing and click Properties.
9. Click the Driver tab, then click the Update Driver... button.
10. When the Hardware Update Wizard appears, click the Next button.
11. Click the Finish button.
12. Click the Close button to close the Device Properties dialog box.
The drive now appears in Device Manager under Tape Drives, listed as "Dell(TM) PowerVault(TM) VS160," and is ready to use.
Drive Makes Noises During System Startup
During system startup, the computer accesses the tape drive and retensions any tape cartridge in the drive to prepare the drive for
operation. The noise and vibration associated with this activity are normal for this technology and do not indicate a problem with
the drive.
Drive Failures During Backup or Restore Operations
Make sure you are using the correct type of tape cartridge.
Make sure tape cartridge is not write -protected.
Remove and reinsert the tape cartridge.
Try a different tape cartridge, preferably a new one.
Clean the tape drive read/write head.
Verify drive settings in the system setup program.
Check all cable connections.
Tape-Backup Software Errors
DMA conflicts during backup or compare operations.
Media unreadable.
See the User's Operating Guide supplied with your Tape Backup software application for more information.
Back to Contents Page
file:///C|/Users/rishi_sood/Desktop/Temp/MissingDocsPosted/110t_dlt/UG/trouble.htm[3/8/2013 11:46:14 AM]
Page 33

Specifications: Dell PowerVault 110T DLT VS160 Tape Drive User's Guide
Back to Contents Page
Specifications: Dell™ PowerVault™ 110T DLT VS160 Tape Drive
User's Guide
General
Performance
Reliability
Recommended Tapes
Physical
Power
Environmental
General
Manufacturer Manufactured for Dell
Model number PowerVault 110T DLT VS160
Interface type 16- bit Wide -Ultra 160 SCSI Low-Voltage Differential (LVD). Also compatible with a
Single-Ended (SE) bus
Performance
Formatted capacity, without data
compression
Formatted capacity, with data
compression
Type of compression Hardware DLZ
Effective backup rate 8.0MB/second without data compression
Raw data transfer rate >8.0MB/second (includes format data, user data, post amble, etc.)
Tape speed, Read/write 122 inches per second
80GB of User Data
160GB of User Data assuming 2:1
compression
Up to 16.0MB/second with data compression,
2:1 compression ratio typical
Tape speed, Search/rewind 160 inches per second
Load time from BOT for previously
recorded cartridge
Recording method PRML
Recording media DLTtape VS1
Cartridge size 4.1 inch x 4.1 inch x 1.0 inch
Data density 175 Kbpi (linear bit density)
Tracks 60 Logical Tracks, 240 physical tracks
file:///C|/Users/rishi_sood/Desktop/Temp/MissingDocsPosted/110t_dlt/UG/specs.htm[3/8/2013 11:46:15 AM]
80 seconds
Page 34

Specifications: Dell PowerVault 110T DLT VS160 Tape Drive User's Guide
Reliability
Recording unrecoverable errors
MTBF 250,000 hours
1 in 10
Dell Computer Corporation does not warrant that predicted MTBF is representative of
any particular unit installed for customer use. Actual figures vary from unit to unit.
(MTBF is measured at 100% duty cycle, excluding head life.)
17
Recommended Tapes
Type of Tape Manufacturer
DLTtape VS1
Cleaning Dell branded
Dell branded media
Physical
Specification PowerVault 110T DLT VS160 Tape Internal PowerVault 110T DLT VS160 Tape
External
Height 1.618 in (41.1 mm) without bezel
1.656 in (42.06 mm) with bezel
Width 5.748 in (146 mm) behind bezel
5.807 in (147.5 mm) with bezel
Depth 8.571 in (217.7 mm) measured from back of
front bezel
8.770 in (222.76 mm) including the bezel
Weight 3.0 lbs (1.36 Kg) 8.0 lbs (3.63 Kg)
2.608 in (66.24 mm)
8.352 in (212.13 mm)
10.728 in (272.49 mm)
Power
Specification PowerVault 110T DLT VS160 Tape Internal PowerVault 110T DLT VS160 Tape
External
Voltage +5VDC, +12VDC 100- 240VAC (auto -ranging), 50/60Hz
Voltage tolerance ± 5% N/A
Operational current 1.2A Typical @ +5VDC
0.5A Typical @ +12VDC
0.9A
Peak 1.9A @ +5VDC, ~300ms duration
2.7A @ +12VDC, ~300ms duration
Power use (nominal) DC 11.5W steady state, > 14W maximum > 35W
file:///C|/Users/rishi_sood/Desktop/Temp/MissingDocsPosted/110t_dlt/UG/specs.htm[3/8/2013 11:46:15 AM]
N/A
Page 35

Specifications: Dell PowerVault 110T DLT VS160 Tape Drive User's Guide
Environmental
Specification Operating Storage
Temperature 10 to 40 degrees C -40 to 66 degrees C
Thermal gradient 11 degrees C/h (across range) 20 degrees C/h with 5 degree margin
(across range)
Relative humidity 20% to 80% noncondensing 10% to 95% noncondensing
Maximum wet bulb temperature 25 degrees C 46 degrees C
Altitude -500 to 30,000 feet - 500 to 30,000 feet
Shock 5g @ 11 ms, 62g @ 2 ms 142g @ 2 ms
Back to Contents Page
file:///C|/Users/rishi_sood/Desktop/Temp/MissingDocsPosted/110t_dlt/UG/specs.htm[3/8/2013 11:46:15 AM]
Page 36
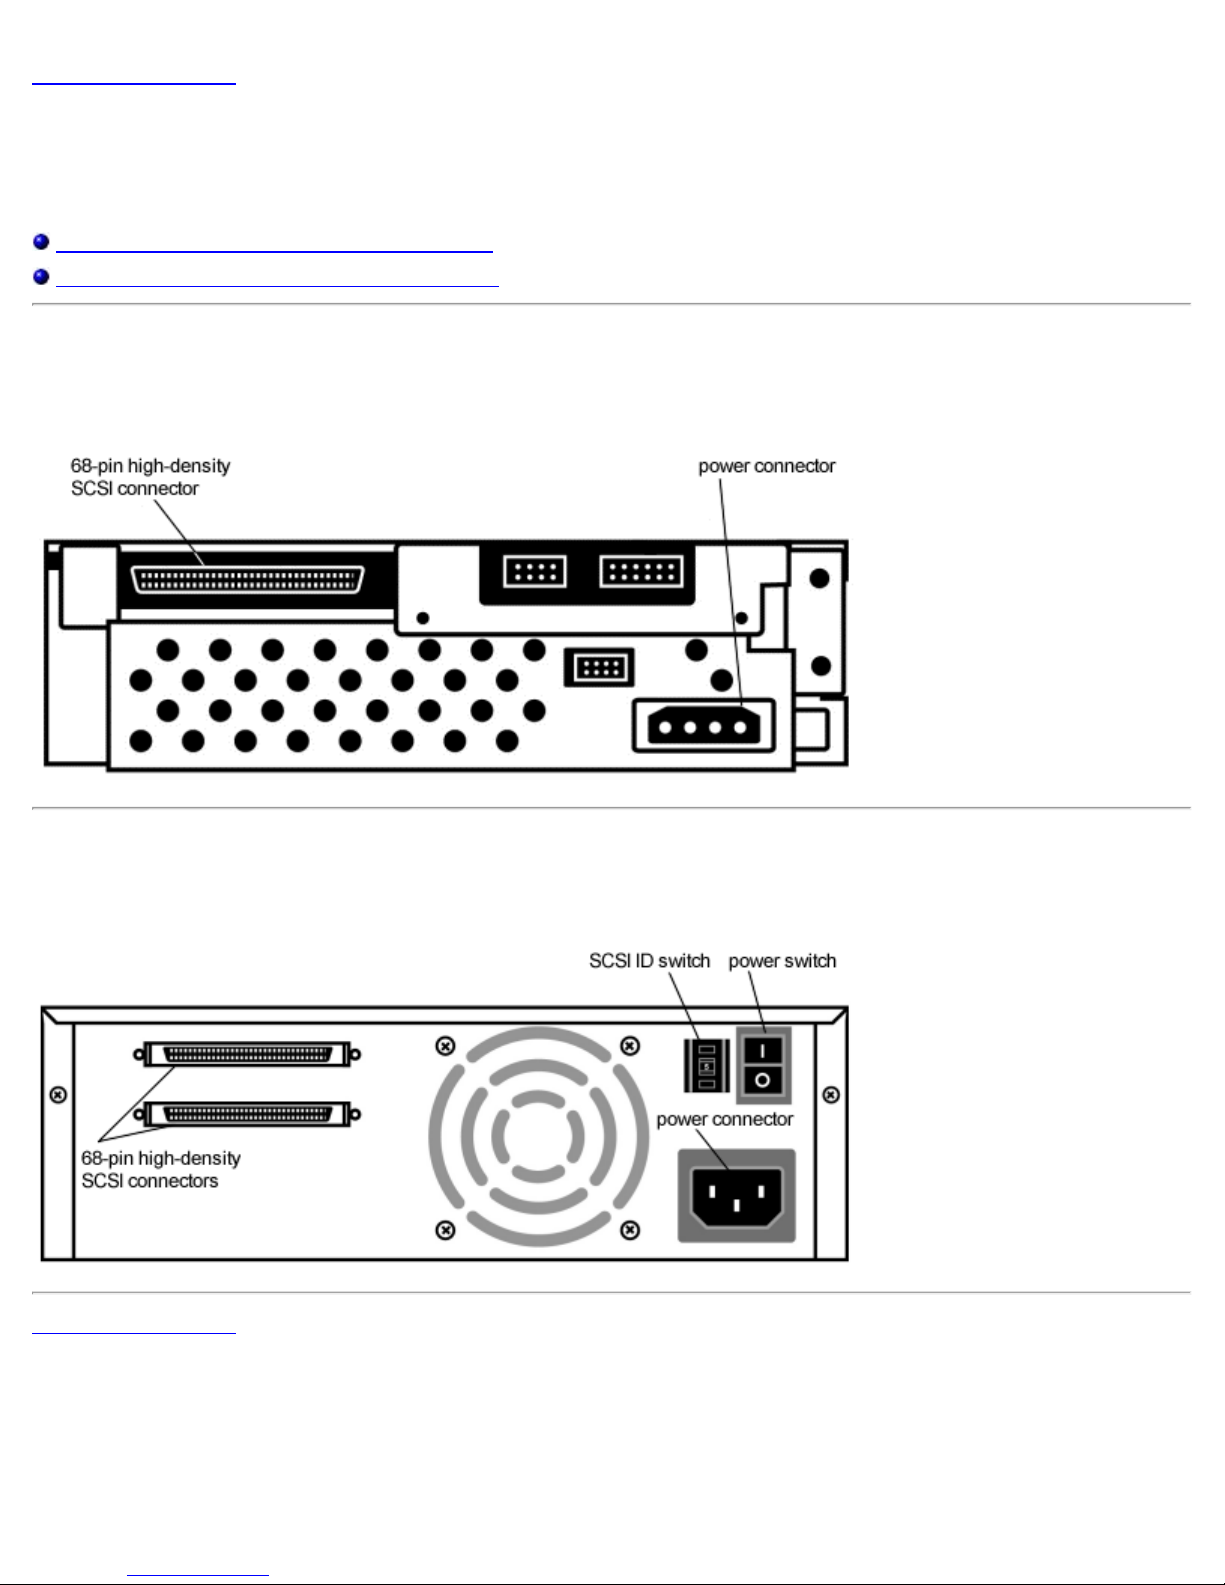
Drive Connectors: Dell PowerVault 110T DLT VS160 Tape Drive User's Guide
Back to Contents Page
Drive Connectors: Dell™ PowerVault™ 110T DLT VS160 Tape
Drive User's Guide
PowerVault 110T DLT VS160 Tape Internal Drive
PowerVault 110T DLT VS160 Tape External Drive
PowerVault 110T DLT VS160 Tape Internal Drive
Figure 1. PowerVault 110T DLT VS160 Tape Internal drive connectors
PowerVault 110T DLT VS160 Tape External Drive
Figure 2. PowerVault 110T DLT VS160 Tape External drive connectors
Back to Contents Page
file:///C|/Users/rishi_sood/Desktop/Temp/MissingDocsPosted/110t_dlt/UG/connect.htm[3/8/2013 11:46:16 AM]
Page 37
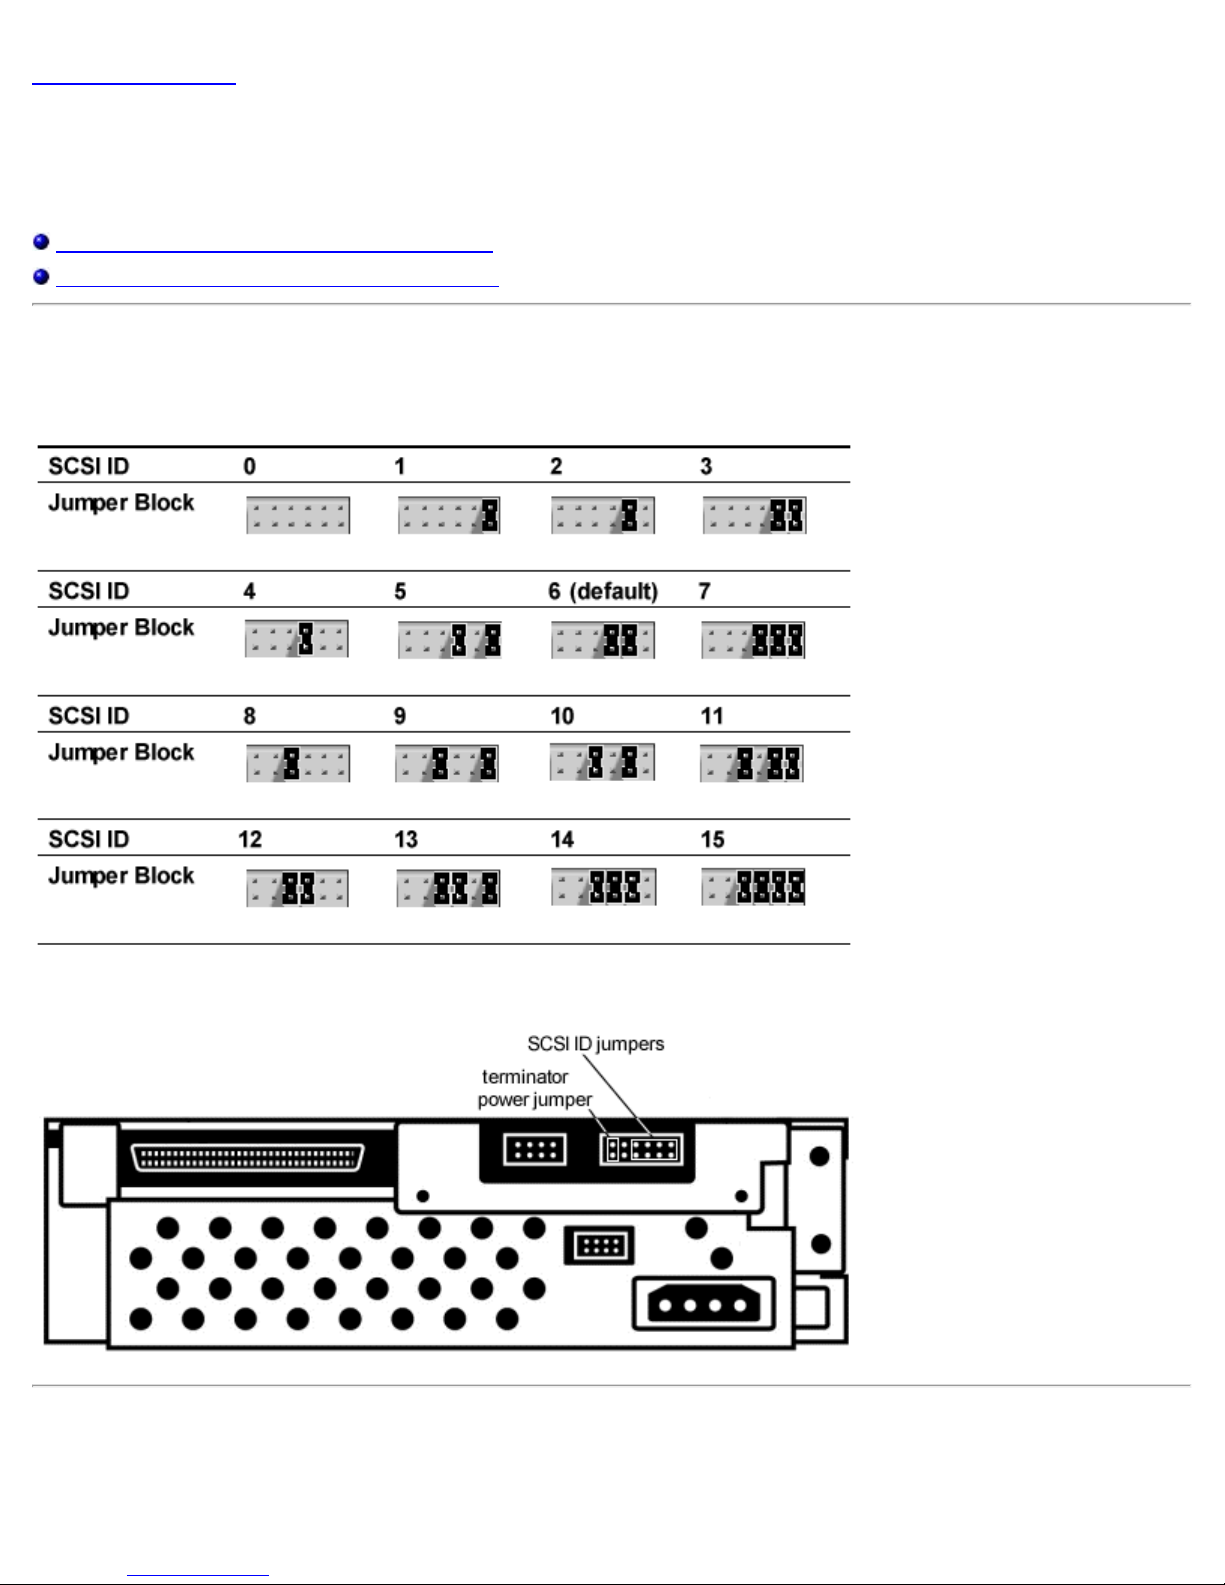
Jumpers: Dell PowerVault 110T DLT VS160 Tape Drive User's Guide
Back to Contents Page
Jumpers: Dell™ PowerVault™ 110T DLT VS160 Tape Drive User's
Guide
PowerVault 110T DLT VS160 Tape Internal Drive
PowerVault 110T DLT VS160 Tape External Drive
PowerVault 110T DLT VS160 Tape Internal Drive
Figure 1. SCSI jumper block settings
Figure 2. SCSI jumper block location
PowerVault 110T DLT VS160 Tape External Drive
Figure 3. SCSI ID switch (default = ID 6)
file:///C|/Users/rishi_sood/Desktop/Temp/MissingDocsPosted/110t_dlt/UG/jumpers.htm[3/8/2013 11:46:16 AM]
Page 38
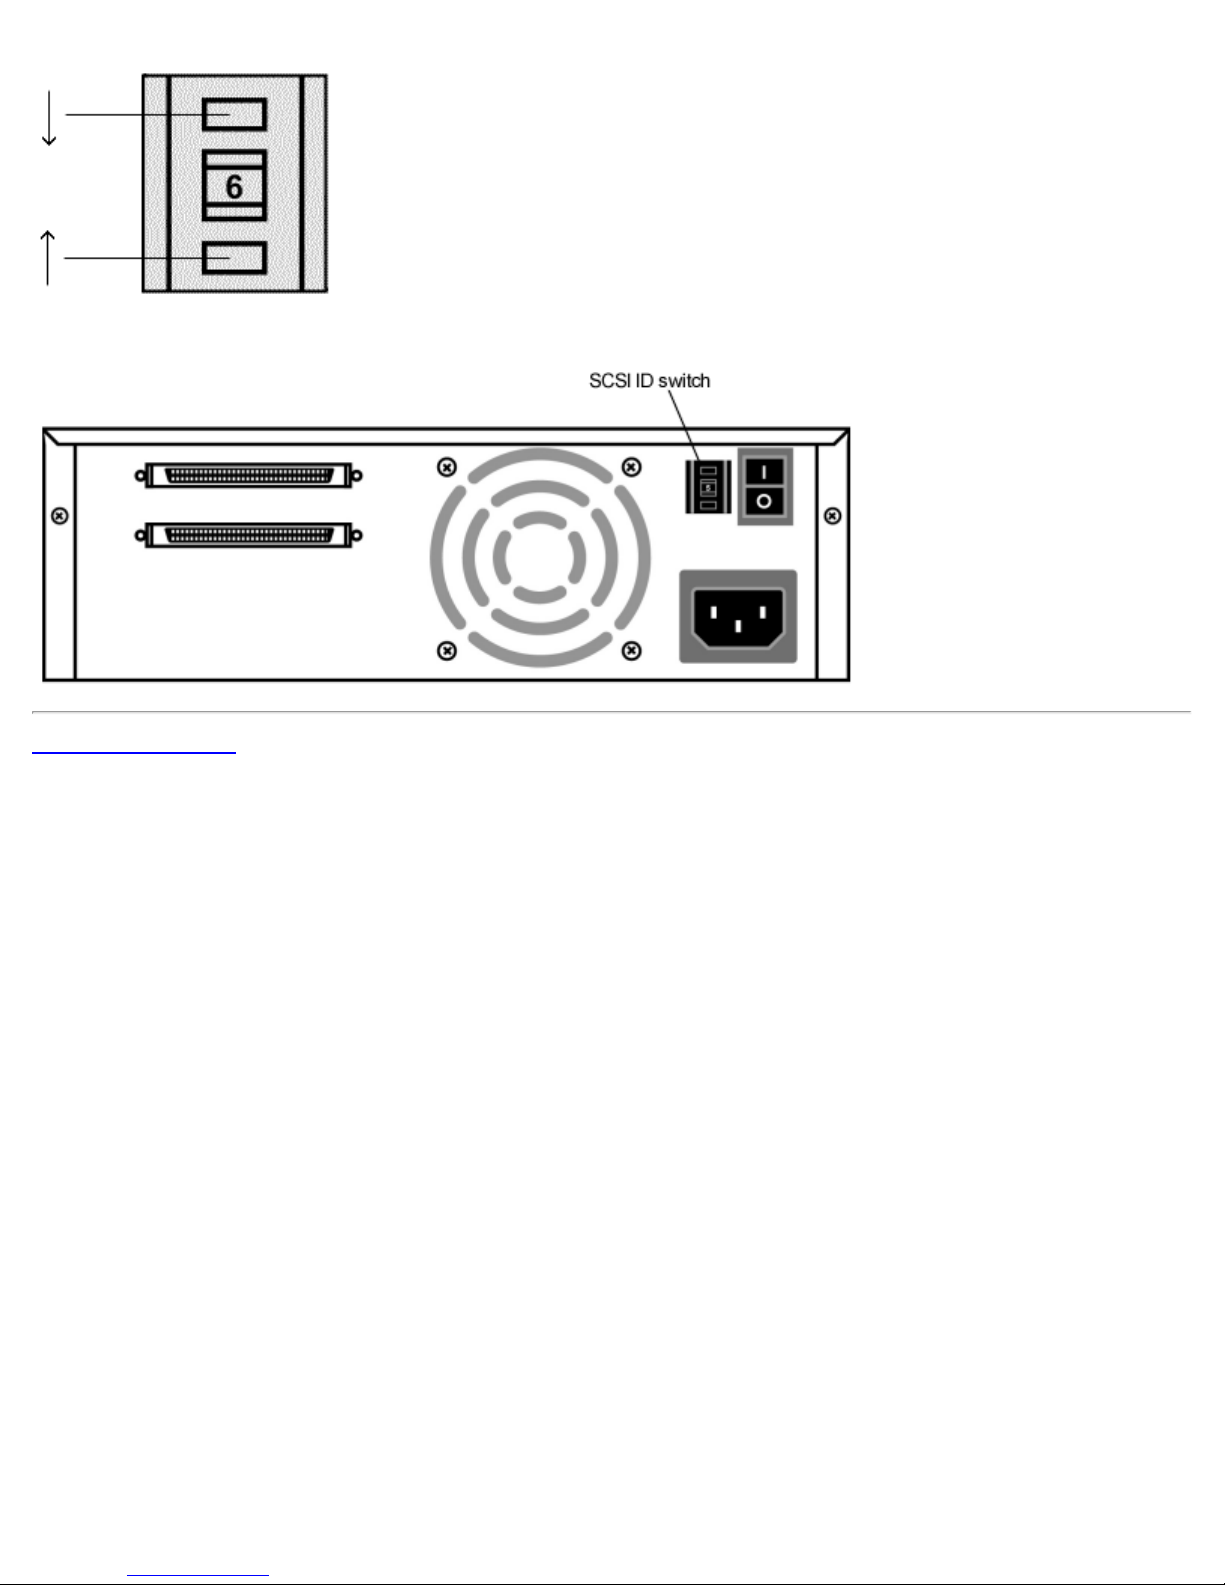
Jumpers: Dell PowerVault 110T DLT VS160 Tape Drive User's Guide
Figure 4. SCSI ID switch location
Back to Contents Page
file:///C|/Users/rishi_sood/Desktop/Temp/MissingDocsPosted/110t_dlt/UG/jumpers.htm[3/8/2013 11:46:16 AM]
 Loading...