

Dell Desktop Virtualization Solutions Simplified 1020 Owner's Manual

Dell Desktop Virtualization Solutions—Simplified 1020
Deployment Guide

Notes, Cautions, and Warnings
NOTE: A NOTE indicates important information that helps you make better use of your computer.
CAUTION: A CAUTION indicates either potential damage to hardware or loss of data and tells you how to avoid the
problem.
WARNING: A WARNING indicates a potential for property damage, personal injury, or death.
© 2013 Dell Inc.
Trademarks used in this text: Dell™, the Dell logo, Dell Boomi™, Dell Precision™ , OptiPlex™, Latitude™, PowerEdge™, PowerVault™,
PowerConnect™, OpenManage™, EqualLogic™, Compellent™, KACE™, FlexAddress™, Force10™ and Vostro™ are trademarks of Dell
Inc. Intel®, Pentium®, Xeon®, Core® and Celeron® are registered trademarks of Intel Corporation in the U.S. and other countries. AMD
is a registered trademark and AMD Opteron™, AMD Phenom™ and AMD Sempron™ are trademarks of Advanced Micro Devices, Inc.
Microsoft®, Windows®, Windows Server®, Internet Explorer®, MS-DOS®, Windows Vista® and Active Directory® are either trademarks
or registered trademarks of Microsoft Corporation in the United States and/or other countries. Red Hat® and Red Hat
Enterprise Linux® are registered trademarks of Red Hat, Inc. in the United States and/or other countries. Novell® and SUSE® are
registered trademarks of Novell Inc. in the United States and other countries. Oracle® is a registered trademark of Oracle Corporation
and/or its affiliates. Citrix®, Xen®, XenServer® and XenMotion® are either registered trademarks or trademarks of Citrix Systems, Inc. in
the United States and/or other countries. VMware
trademarks of VMware, Inc. in the United States or other countries.
Corporation.
2013 – 05
®
,
vMotion
®
,
vCenter
®
,
vCenter SRM
®
is a registered trademark of International Business Machines
IBM
™
and
vSphere
®
are registered trademarks or
®
®
Rev. A04

Contents
Notes, Cautions, and Warnings................................................................................................... 2
1 Introduction..................................................................................................................................5
System Requirements...............................................................................................................................................7
Contacting Technical Support.................................................................................................................................. 7
2 Setting Up DVS Simplified 1020 ................................................................................................9
Connecting And Configuring Physical Connections.................................................................................................9
Configuring The Hypervisor..............................................................................................................................10
Configuring The vdiManager.................................................................................................................................. 11
Determine The IP Address Of The vdiManager............................................................................................... 11
Connecting To The vdiManager.......................................................................................................................13
Configuring A Grid............................................................................................................................................ 13
Creating A Windows Reference VM.......................................................................................................................15
Creating A Windows Reference VM Using Citrix XenServer...........................................................................15
Creating A Windows Reference VM Using Microsoft Hyper-V....................................................................... 15
Creating A Windows Reference VM Using VMware ESXi...............................................................................15
Generating a Base Desktop Image.........................................................................................................................16
NIC Bonding............................................................................................................................................................16
Enabling NIC Bonding Using Citrix XenServer.................................................................................................16
Enabling NIC Bonding Using Microsoft Windows Server 2008 R2 SP1........................................................... 17
Enabling NIC Bonding Using VMware ESXi..................................................................................................... 18
3 Upgrading Citrix XenServer And VDI-in-a-Box.................................................................... 19
Upgrading Citrix XenServer.................................................................................................................................... 19
Upgrading VDI-in-a-Box......................................................................................................................................... 21
Upgrading the Existing Images...............................................................................................................................22
Refreshing The Desktops........................................................................................................................................23
4 Licensing Information...............................................................................................................25
XenServer Licensing...............................................................................................................................................25
Microsoft Hyper-V Licensing..................................................................................................................................25
VMware ESXi Licensing..........................................................................................................................................25
Generating A License For VDI-in-a-Box................................................................................................................. 25
Applying A License To VDI-in-a-Box...................................................................................................................... 26
KMS Licensing........................................................................................................................................................26
Windows Activation......................................................................................................................................... 26

Microsoft Office 2010 Activation......................................................................................................................27
5 Connecting Dell Wyse Thin Clients To A DVS Simplified Environment............................29
Configuring The T10 Thin Client.............................................................................................................................. 29
Configuring The T10 Thin Client Using The Wyse Zero ToolBar...................................................................... 29
Configuring The T10 Thin Client Using DHCP................................................................................................... 29
Configuring The Z50D Thin Client............................................................................................................................31
Configuring The Z90D7 Thin Client..........................................................................................................................31

Introduction
The Dell Desktop Virtualization Solutions (DVS) Simplified 1020 is a Dell PowerEdge T620 system or a PowerEdge R720
system powered by Citrix VDI-in-a-Box (VIAB) and the hypervisor of your choice:
• Citrix XenServer
• Microsoft Hyper-V
• VMware vSphere ESXi
If the Dell PowerEdge T620 or the PowerEdge R720 systems do not meet your requirements, choose from the following
supported Dell PowerEdge systems:
1
PowerEdge Rack
Systems
PowerEdge
Tower Systems
• PowerEdge R210 II
• PowerEdge R310
• PowerEdge R320
• PowerEdge R415
• PowerEdge R420
• PowerEdge R515
• PowerEdge R520
• PowerEdge R610
• PowerEdge R620
• PowerEdge R715
• PowerEdge R720
• PowerEdge R720xd
• PowerEdge R815
• PowerEdge R820
• PowerEdge R910
• PowerEdge T110 II
• PowerEdge T320
• PowerEdge T420
• PowerEdge T620
• PowerEdge T710
PowerEdge
Modular Systems
• PowerEdge M420
• PowerEdge M520
• PowerEdge M610x
• PowerEdge M620
• PowerEdge M820
5

• PowerEdge M915
PowerEdge Cseries Systems
NOTE: If you choose from one of the listed systems, the Dell DVS Simplified 1020 software is not factory-installed.
This document provides the necessary steps required to configure the Dell DVS Simplified 1020 appliance.
NOTE: For more information, see the VDI-in-a-Box documentation at support.citrix.com/proddocs/topic/vdi/vdilanding-page-52.html.
NOTE: For known issues, see the VDI-in-a-Box documentation at support.citrix.com/proddocs/topic/vdi-52/vdiknown-issues-52.html.
NOTE: For the latest VDI-in-a-Box updates, see the VDI-in-a-Box documentation at support.citrix.com/cms/kc/vdiin-a-box.
• PowerEdge C1100
• PowerEdge C2100
• PowerEdge C410x
• PowerEdge C5000
• PowerEdge C5125
• PowerEdge C5220
• PowerEdge C6100
• PowerEdge C6105
• PowerEdge C6145
• PowerEdge C6220
• PowerEdge C8000
• PowerEdge C8000xd
• PowerEdge C8220
• PowerEdge C8220x
The components of the single server solution architecture are illustrated in the following figure:
6
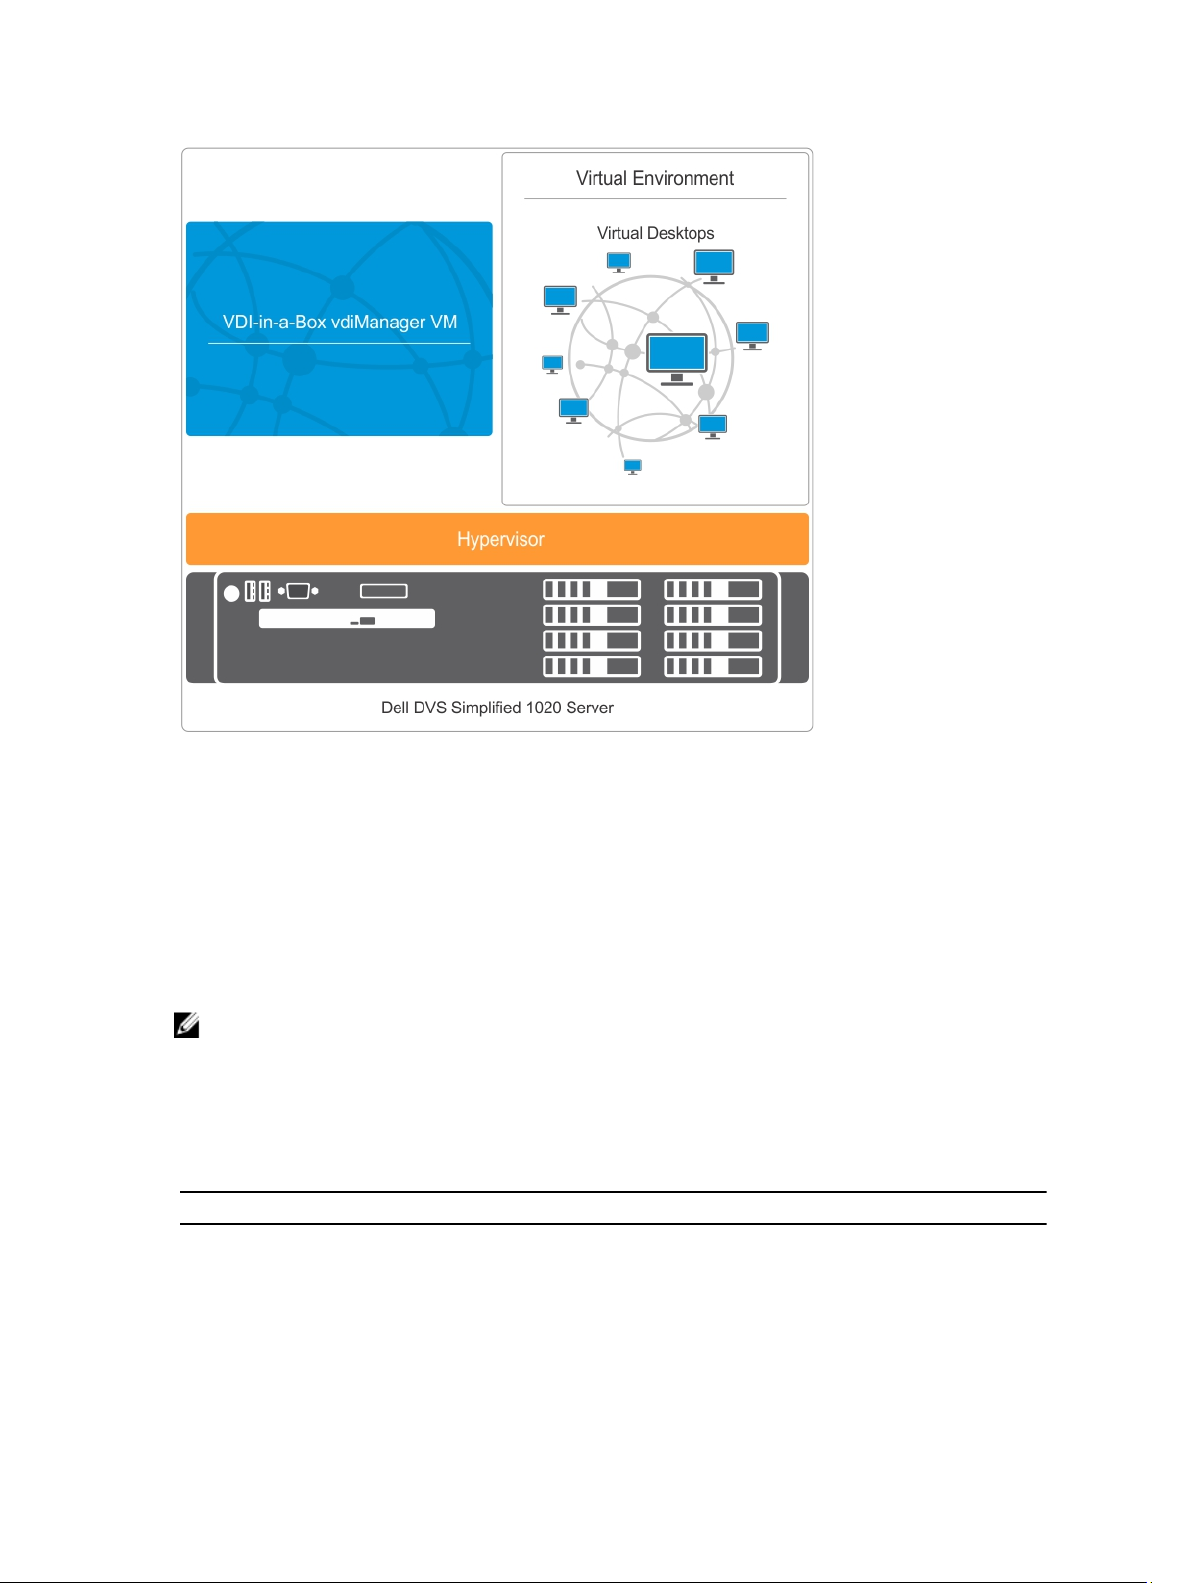
Figure 1. Single Server Architecture
System Requirements
Before you proceed with the configuration of Dell DVS Simplified 1020, ensure the following requirements:
• The Dynamic Host Configuration Protocol (DHCP) server is available in your environment.
• The appropriate Windows Volume Licensing is available for your virtual desktops.
For more information on supported virtual desktops and client systems, see the Compatibility Matrix in
Virtualization Solutions—Simplified 1020 Solutions Guide
NOTE: It is highly recommended to not install additional services, software, or virtual machines to the hypervisor
running on your DVS Simplified server.
at dell.com/support/manuals.
Dell Desktop
Contacting Technical Support
Your Dell DVS Simplified Appliance is entitled to Dell service and maintenance. Use the following table to contact the
Technical Support team for your region:
Country Contact Numbers Extension
United States of America and Canada 1-877-459-7304 N/A
United Kingdom 0844 444 3844 3480157
France 0825 004 686 3250127
7

Country Contact Numbers Extension
Germany 069 9792 2064 3122046
Netherlands 0031 206 74 5914 3480158
Austria 82024058256 3122046 (German) 3480108 (English)
Switzerland 0848330092 3122048 (German) 3250121 (French)
Belgium 0248 28 690 3250124 (French) 3480159 (English)
Luxembourg 24871036 3250127
Ireland 1850964270 3480157
Australia 1300 662 370 N/A
New Zealand 800 703 355 N/A
China 800-858-0612
400-886-8617
Japan 0120 912738 N/A
India 1800 425 2070 N/A
Singapore 1800 395 7935 N/A
Hong Kong 29693187 N/A
Philippines 1800 1601 0061 N/A
Malaysia 1800 880 438 N/A
Vietnam 12060119 N/A
Taiwan 0800 160 1255 N/A
NOTE: To ensure a faster service from your Technical Support representative, have the Service Tag Code for your
product ready in advance. If you do not have the Service Tag Code, mention your product type as “Flex computing”
or “part of a Flex solution”.
N/A
8
Setting Up DVS Simplified 1020
The following steps must be completed to set up the DVS Simplified 1020 before virtual desktops can be deployed:
1. Connecting and configuring physical connections
2. Configuring the hypervisor
3. Configuring the vdiManager
4. Creating a Windows reference virtual machine (VM)
5. Generating a Base Desktop Image
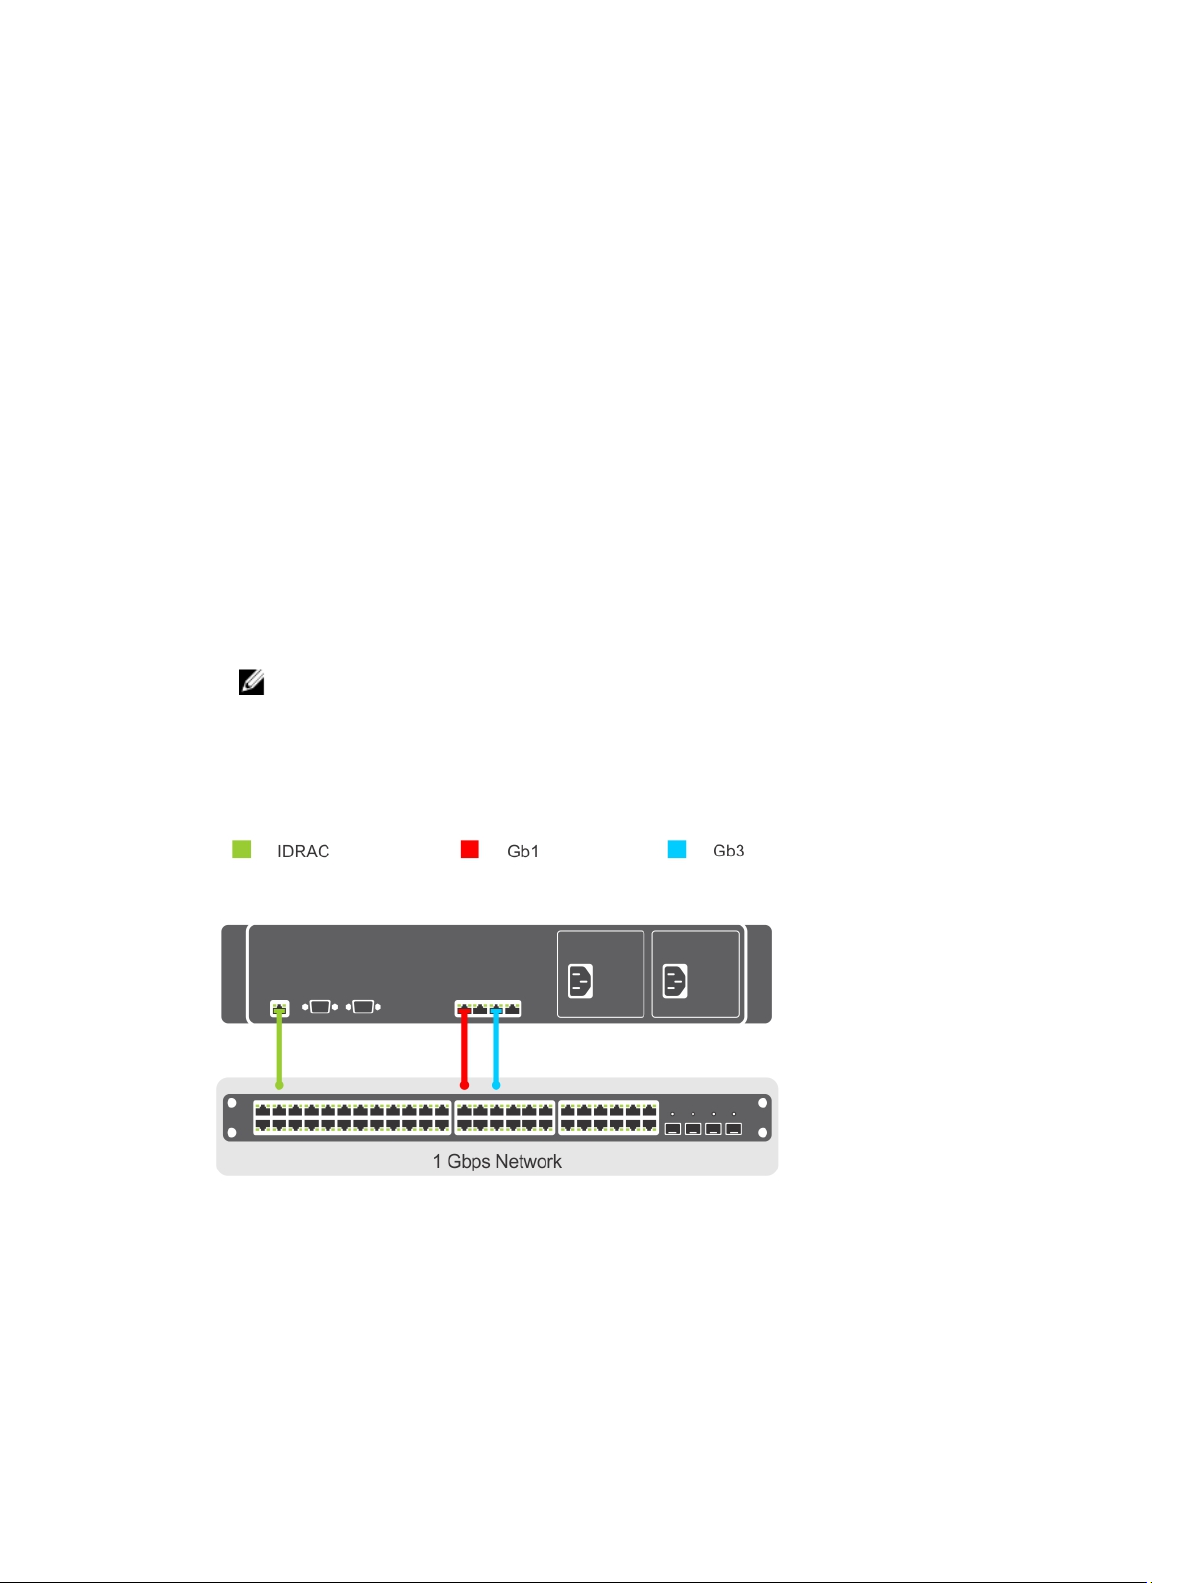
Connecting And Configuring Physical Connections
You can use the following types of network ports to configure your physical connections:
• Gb1 Network Connection—Used to access the vdiManager and virtual desktops.
NOTE: Gb1 network must reach Dynamic Host Configuration Protocol (DHCP) server as it dynamically
assigns IP addresses to vdiManager and virtual desktops. This IP address is used to access the
vdiManager after the appliance boots.
• Gb3 Network Connection—Used to manage and access the hypervisor and the host server.
• Integrated Dell Remote Access Controller (iDRAC)—Used for hardware management.
2
Figure 2. Physical Network Connections
Connect to the server console using one of the following options:
• iDRAC
• KVM switch (not included)
9

• Keyboard, mouse, and monitor (not included)
NOTE: You can use the mouse for systems installed with Microsoft Windows Server 2008.
Configuring The Hypervisor
After all the connections are established and the system is powered on, follow the steps for your hypervisor.
Configuring The Hypervisor Using Citrix XenServer
1. Connect to the server console to configure the hypervisor. See the Connecting and Configuring Physical
Connections
After the server boots, the End User License Agreement (EULA) is displayed.
2. Select the checkbox to accept the EULA.
3. Enter the root password for the hypervisor.
4. To assign an IP address for the XenServer hypervisor:
a) Select Network and Management Interface.
b) Select the Configure Management interface and enter the required credentials.
c) Select the eth2 Gb3 network connection as the management interface.
d) Select Static.
e) Enter the IP address, netmask, and hostname of the hypervisor.
Configuring The Hypervisor Using Microsoft Hyper-V
section in this document.
NOTE: Save the password to connect to the hypervisor at a later stage.
1. Connect to the server console to configure the hypervisor. See the Connecting and Configuring Physical
Connections section in this document.
2. When prompted, set the country, time, and keyboard layout and click Next.
3. Accept the license terms and click the Start button.
4. Press <Ctrl><Alt><Delete> to log on.
5. Select Administrator to log on as the administrator.
NOTE: The kaviza account is a service account created by the VIAB software.
6. Change the administrator password when prompted.
7. Click the Server Manager icon on your desktop notification area to start the Server Manager.
8. In the Server Manager console, navigate to Roles and Hyper-V → Hyper-V Manager and select your server.
9. Under the Action tab, select Virtual Network Manager.
10. In the Virtual Network Manager window, click HVSwitch1.
11. Under Connection type in the right panel of the Virtual Network Manager window, note the NIC port assigned to the
external network.
This network connection corresponds to Gb1 in the Physical Network Connections diagram.
NOTE: The virtual switch binds to the first physical port. This may not follow the numerical order of the number
assigned to the port by the operating system. For example, the first physical NIC port (Gb1) may be labeled
Ethernet #2.
12. Open the Initial Configuration Tasks console and click the Configure networking to open the Network Connections
window.
The first physical NIC port assigned to the external network is displayed here along with another network
connection labeled as HVInternalEthernetPort1. Both these connections are applicable for Hyper-V.
10
 Loading...