

Page 1

Dell Desktop Virtualization Solutions—Simplified 1010
Deployment Guide
Page 2

Notes, Cautions, and Warnings
NOTE: A NOTE indicates important information that helps you make better use of your computer.
CAUTION: A CAUTION indicates either potential damage to hardware or loss of data and tells you how to avoid the
problem.
WARNING: A WARNING indicates a potential for property damage, personal injury, or death.
© 2012 Dell Inc.
Trademarks used in this text: Dell™, the Dell logo, Dell Precision™ , OptiPlex™, Latitude™, PowerEdge™, PowerVault™,
PowerConnect™, OpenManage™, EqualLogic™, Compellent™, KACE™, FlexAddress™, Force10™ and Vostro™ are trademarks of Dell
Inc. Intel®, Pentium®, Xeon®, Core® and Celeron® are registered trademarks of Intel Corporation in the U.S. and other countries. AMD
is a registered trademark and AMD Opteron™, AMD Phenom™ and AMD Sempron™ are trademarks of Advanced Micro Devices, Inc.
Microsoft®, Windows®, Windows Server®, Internet Explorer®, MS-DOS®, Windows Vista® and Active Directory® are either trademarks
or registered trademarks of Microsoft Corporation in the United States and/or other countries. Red Hat® and Red Hat
Enterprise Linux® are registered trademarks of Red Hat, Inc. in the United States and/or other countries. Novell® and SUSE® are
registered trademarks of Novell Inc. in the United States and other countries. Oracle® is a registered trademark of Oracle Corporation
and/or its affiliates. Citrix®, Xen®, XenServer® and XenMotion® are either registered trademarks or trademarks of Citrix Systems, Inc. in
the United States and/or other countries. VMware
trademarks of VMware, Inc. in the United States or other countries.
Corporation.
2012 – 07
®
,
Virtual SMP
®
®
,
vMotion
®
is a registered trademark of International Business Machines
IBM
,
vCenter
®
and
vSphere
®
are registered trademarks or
®
®
Rev. A01
Page 3

Contents
Notes, Cautions, and Warnings...................................................................................................2
1 Introduction..................................................................................................................................5
System Requirements...............................................................................................................................................5
2 DVS Simplified 1010 Setup.........................................................................................................7
Step 1: Connecting And Configuring Physical Connections.....................................................................................7
Step 2: Configuring The Hypervisor..........................................................................................................................7
Step 3: Configuring The vdiManager........................................................................................................................8
Creating A New VDI-in-a-Box Grid....................................................................................................................8
Joining An Existing Grid.....................................................................................................................................9
3 Licensing Information...............................................................................................................11
Activating A Free XenServer Product.....................................................................................................................11
Generating A License For VDI-in-a-Box.................................................................................................................11
Applying A License To VDI-in-a-Box......................................................................................................................12
Page 4

4
Page 5
1
Introduction
The Dell Desktop Virtualization Solutions (DVS) Simplified 1010 is a Dell PowerEdge R710 system powered by Citrix
XenServer and VDI-in-a-Box. This document provides the necessary steps required to configure the Dell DVS Simplified
1010 appliance.
NOTE: Dell DVS Simplified 1010 must be configured and managed before virtual desktops can be deployed.
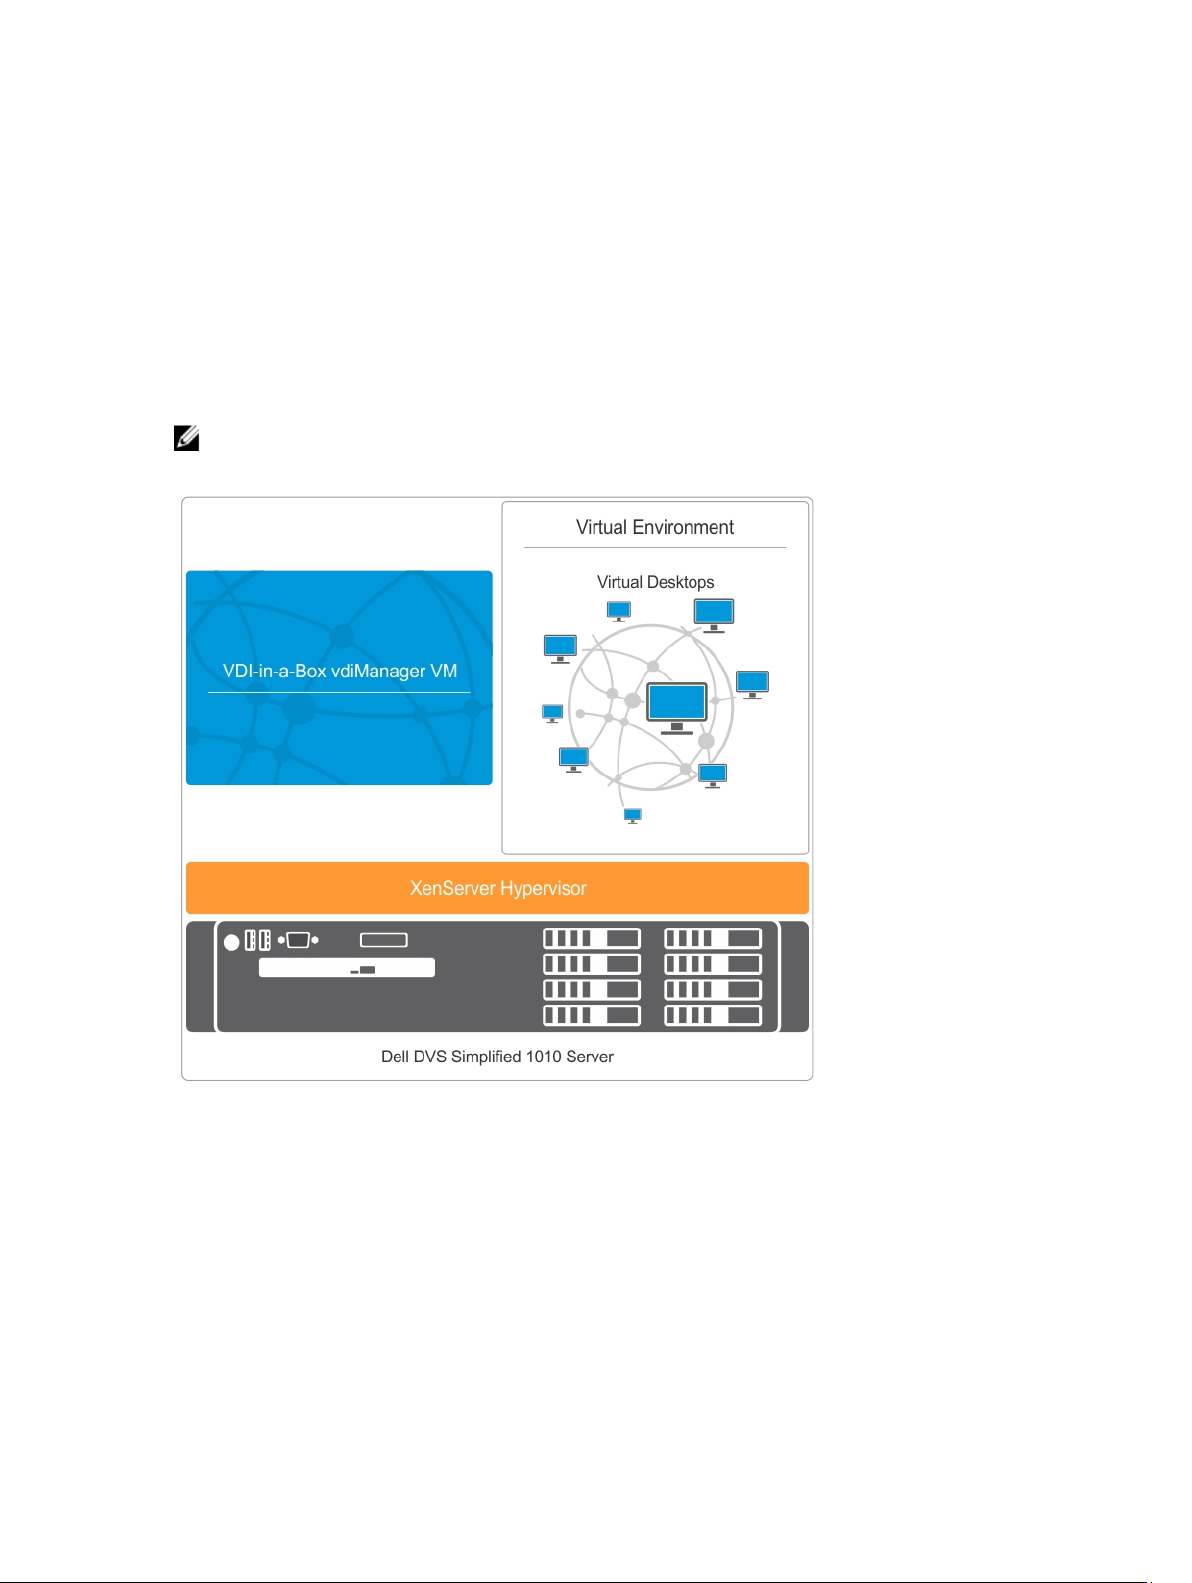
The components of the single server solution architecture are illustrated in the figure below:
Figure 1. Single Server Architecture
System Requirements
Before you proceed with the configuration of Dell DVS Simplified 1010, ensure that the Dynamic Host Configuration
Protocol (DHCP) server is available in your environment. For more information on supported virtual desktops and client
systems, see the Compatibility Matrix in
support.dell.com/manuals.
Dell Desktop Virtualization Solutions—Simplified 1010 Solutions Guide
at
5
Page 6

6
Page 7

DVS Simplified 1010 Setup
This section explains three steps to configure the DVS Simplified 1010 before virtual desktops can be deployed.
1. Connect and Configure Physical Connections
2. Configure the Hypervisor
3. Configure the vdiManager
Step 1: Connecting And Configuring Physical Connections
You can use the following types of networks to configure your physical connections:
• Gb1 Network Connection—Used to access the vdiManager and virtual desktops.
NOTE: Gb1 network must reach Dynamic Host Configuration Protocol (DHCP) server as it dynamically assigns IP
addresses to vdiManager and virtual desktops. This IP address is used to access the vdiManager after the
appliance boots.
• Gb3 Network Connection—Used to manage and access the XenServer hypervisor.
• Integrated Dell Remote Access Controller (iDRAC)—Used for hardware management.
2
Figure 2. Physical Network Connections
Step 2: Configuring The Hypervisor
After all the network connections are established, to configure the hypervisor (XenServer):
1. Connect to the console on the server to configure the hypervisor.
7
Page 8

After the server is booted, an End User License Agreement (EULA) is displayed.
2. Click the checkbox to accept the EULA.
3. Enter the root password for the hypervisor.
NOTE: Save the password to configure the vdiManager at a later stage.
4. To assign an IP address for the XenServer hypervisor:
a) Select the Network and Management interface.
b) Select the Configure Management interface and enter the required credentials.
c) Select eth2 (Gb3 network connection) as the management interface.
d) Select Static.
e) Enter the IP address, netmask, and hostname of the hypervisor.
Step 3: Configuring The vdiManager
After the hypervisor is setup, configure the Citrix VDI-in-a-Box vdiManager, using either of the following conditions:
• Creating A New VDI-in-a-Box Grid.
• Joining An Existing Grid.
NOTE: The IP address of vdiManager is required to access the web interface of Citrix VDI-in-a-Box environment.
Creating A New VDI-in-a-Box Grid
To setup VDI-in-a-Box grid for the first time:
1. Connect XenCenter to the VDI-in-a-Box appliance.
2. Select the Virtual Machine (VM) named vdiManager_Xen.
NOTE: If vdiManager is not started, highlight the VM , right click and select Start.
3. Select the Networking tab to find the IP address of the vdiManager.
4. Open a web browser and enter the following URL to access the console: http://<IP ADDRESS>/admin, where
ADDRESS
5. Login to the web console with the following credentials:
User name: vdiadmin
Password: kaviza
A welcome screen is displayed.
6. Click Get Started.
A window is displayed listing the steps and pre-requisites required to generate desktops for user.
7. Select Set up your Hypervisor and VDI-in-a-Box grid and click Continue.
VDI-in-a-Box Initial Set up window is displayed.
8. In the Hypervisor section, enter IP address, User name, and password to configure and connect the XenSever
hypervisor in step 5, click
9. In the Datastore section, select Local storage from the Datastore drop down menu and select Network 0 for the
Network Label field, click Next.
NOTE: Network 0 corresponds to Gb1, the name for VDI network.
10. In the Grid section, select Create a new VDI-in-a-Box grid radio button and click Next.
11. In the Configuration section, enter the New Grid name and select the User Database.
12. Select Active Directory to integrate VDI-in-a-Box desktops to the Active Directory domain and click Next.
is the address of the vdiManager obtained in Step 3.
Next.
IP
8
Page 9

NOTE: If Microsoft Active Directory is selected, the details such as IP address, Domain, User name, and Password
must be provided to access the directory server.
After the configuration, a pop-up window is displayed asking if vdiManager has a dedicated IP address.
13. Select Yes or No according to your requirement and click Done.
Joining An Existing Grid
To join an existing grid:
1. Follow steps 1– 9 to complete the first time VDI-in-a-Box setup.
2. In the Grid section, select Join a VDI-in-a-Box server on an existing grid and click Next.
3. In the Configuration section, enter the IP address of the vdiManager in the existing grid.
4. Enter your vdiManager console user name and password in the User name and Password fields.
5. Click Next.
The grid is configured.
For more information on how to begin the import and deployment of desktop images, see support.citrix.com/proddocs/
topic/vdi.
9
Page 10

10
Page 11

Licensing Information
NOTE: To start or create new virtual guests, you must activate your free XenServer edition within 30 days from first
boot. To request and activate your free license, see the
citrix.com/mycitrix.
Activating A Free XenServer Product
1. To request an activation key from Citrix using XenCenter:
a) On the Tools menu, select License Manager.
b) Select one or more hosts that you want to activate, click Activate Free XenServer, and select Request
Activation Key.
The Citrix XenServer Activation page is displayed on your default web browser.
NOTE: If you are unable to connect to the activation page, you can save a .txt file locally with the activation request
information. You can upload this .txt file to activate.vmd.citrix.com at a later time.
c) Enter your details in the activation form and click Submit.
You will receive the activation key (.xslic file) in an e-mail. It may take up to 30 minutes to receive the license
key on e-mail.
d) Save the activation key to a location on the computer running XenCenter.
2. To apply the activation key to your XenServer host using XenCenter:
a) On the Tools menu, select License Manager.
XenServer 5.6 Feature Pack 2 Installation Guide
3
at
NOTE: To open the XenCenter License Manager, double-click the activation key file (.xslic file).
b) Select the appropriate host, click Activate Free XenServer, and select Apply Activation Key.
NOTE: You can activate only one host at a time.
c) Browse to the location where you saved the activation key file and select Open.
To install an activation key using the xe command line interface (CLI), open a console on the host (or connect to
the host via Secure Shell (SSH) protocol) and run the following command:
xe host-license-add [license-file=<<path/license_filename>>]
Generating A License For VDI-in-a-Box
To get VDI-in-a-Box license from Citrix:
1. Log on to MyCitrix.com using the credentials given by Citrix.
2. Navigate to MyTools → Choose a Toolbox → Manage Licenses.
3. Select Allocate.
4. Select the Citrix VDI-in-a-Box license pertaining to your order and click Continue.
5. In Quantity, enter the quantity of licenses to allocate and click Continue.
6. Click Confirm to complete the license allocation and generate the license.
A message prompts you to download the license file(s).
11
Page 12

7. Click OK and download the license file(s).
Applying A License To VDI-in-a-Box
After receiving the license from Citrix, apply the license to VDI-in-a-Box. Before applying the license, put the grid in
maintenance mode.
1. Go to Admin Tab → Click Grid Maintenance and click OK.
2. On Admin page, click Grid Upgrade.
The Grid Upgrade dialog box is displayed.
Click Choose File, browse to the upgrade or license file, and click OK.
3.
4. Click Submit.
When the upgrade completes, the server status changes to Success.
5. Log on to vdiManager when prompted.
6. Go to Admin Tab → Click Grid Maintenance and click OK.
After applying the license, take the grid out of maintenance mode.
For more information, see support.citrix.com/proddocs.
12
 Loading...