

Page 1

Dell™ OptiPlex™ SX Systems
Setup and Quick
Reference Guide
Guide de configuration et de référence rapide
Setup- und Schnellreferenzhandbuch
Guida di installazione e consultazione rapida
Guía de instalación y de referencia rápida
Kurulum ve Hızlı Başvuru Kılavuzu
Model DCT
www.dell.com | support.euro.dell.com
Page 2

Page 3

Dell™ OptiPlex™ SX Systems
Setup and Quick Reference Guide
Model DCT
www.dell.com | support.euro.dell.com
Page 4

Notes, Notices, and Cautions
NOTE: A NOTE indicates important information that helps you make better
use of your computer.
NOTICE: A NOTICE indicates either potential damage to hardware or loss of
data and tells you how to avoid the problem.
CAUTION: A CAUTION indicates a potential for property damage,
personal injury, or death.
Abbreviations and Acronyms
For a complete list of abbreviations and acronyms, see the “Glossary” in the
User’s Guide.
If you purchased a Dell™ n Series computer, any references in this
®
document to Microsoft
Windows® operating systems are not applicable.
____________________
Information in this document is subject to change without notice.
© 2002–2003 Dell Computer Corporation. All rights reserved.
Reproduction in any manner whatsoever without the written permission of Dell Computer
Corporation is strictly forbidden.
Trademarks used in this text: Dell, OptiPlex, and the DELL logo are trademarks of Dell Computer
Corporation; Microsoft, MS-DOS, W indows NT, and Windows are registered trademarks of Microsoft
Corporation.
Other trademarks and trade names may be used in this document to refer to either the entities claiming
the marks and names or their products. Dell Computer Corporation disclaims any proprietary interest
in trademarks and trade names other than its own.
July 2003 P/N 2U454 Rev. A03
Page 5

Contents
About This Guide . . . . . . . . . . . . . . . . . . . . . . . . . . 5
Features
CAUTION: Safety Instructions
When Using Your Computer
. . . . . . . . . . . . . . . . . . . . . . . . . . . . . . . 5
. . . . . . . . . . . . . . . . . . . 7
General
When Working Inside Your Computer
. . . . . . . . . . . . . . . . . . . . . . . . . . . . . 7
. . . . . . . . . . . . . . . . . . . . 9
. . . . . . . . . . . . . . 10
Protecting Against Electrostatic Discharge
Battery Disposal
Getting Started/Setup
. . . . . . . . . . . . . . . . . . . . . . . . 11
. . . . . . . . . . . . . . . . . . . . . . . 12
Determine the Computer’s Placement and Orientation
Installing a Device in the Module Bay
Attaching the Stand
Connecting the AC Adapter
Connecting External Devices
Attaching the Cable Cover
. . . . . . . . . . . . . . . . . . . . . . . 14
. . . . . . . . . . . . . . . . . . . 15
. . . . . . . . . . . . . . . . . . 16
. . . . . . . . . . . . . . . . . . . . 17
. . . . . . . . . . . . . . 13
Attaching the Stand to the Mounting Plate
Finding Information and Assistance
Solving Problems
Troubleshooting Tools
. . . . . . . . . . . . . . . . . . . . . . . . . . 22
. . . . . . . . . . . . . . . . . . . . . . 23
Using the Dell Drivers and Utilities CD
Running the Dell Diagnostics
. . . . . . . . . . . . . . . . 21
. . . . . . . . . . . . . 23
. . . . . . . . . . . . . . . . . . 24
Running the Dell IDE Hard-Drive Diagnostics
. . . . . . . . . . . 11
. . . . . . 12
. . . . . . . . . . . 19
. . . . . . . . . . 25
Regulatory Information . . . . . . . . . . . . . . . . . . . . . . . 26
Contents 3
Page 6

4 Contents
Page 7
About This Guide
T
USB sl
l
This document contains getting started/setup; solving problems; and safety, regulatory, and
warranty information about your Dell
™ OptiPlex™ computer.
To obtain the latest versions of the documents on your hard drive, go to the Dell Support
website at support.dell.com.
Regulatory Model Number
and Chassis Type
DCT = Ultra small formfactor (USF) computer
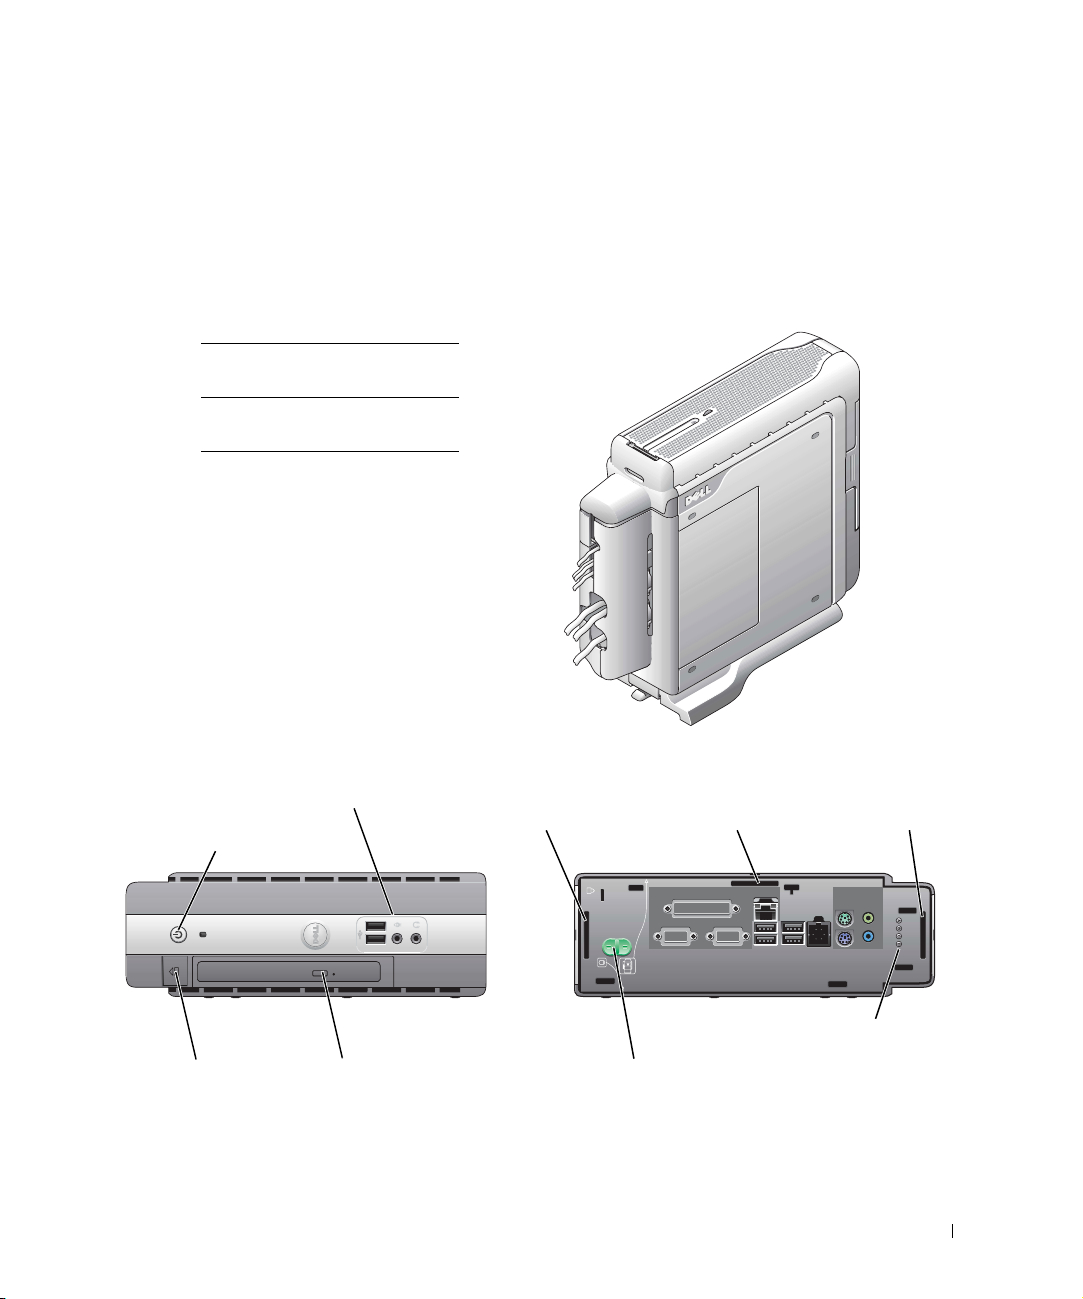
Features
wo
and microphone connectors
ots, headphone
power button
button
mounting slot
(insert stand for
vertical position)
module baymodule release
mounting s
stand for hanging
horizontal position)
ot (insert
computer cover/hard-drive
cover release button
Setup and Quick Reference Guide 5
mounting slot (insert
stand for hanging
vertical position)
diagnostic LEDs
Page 8
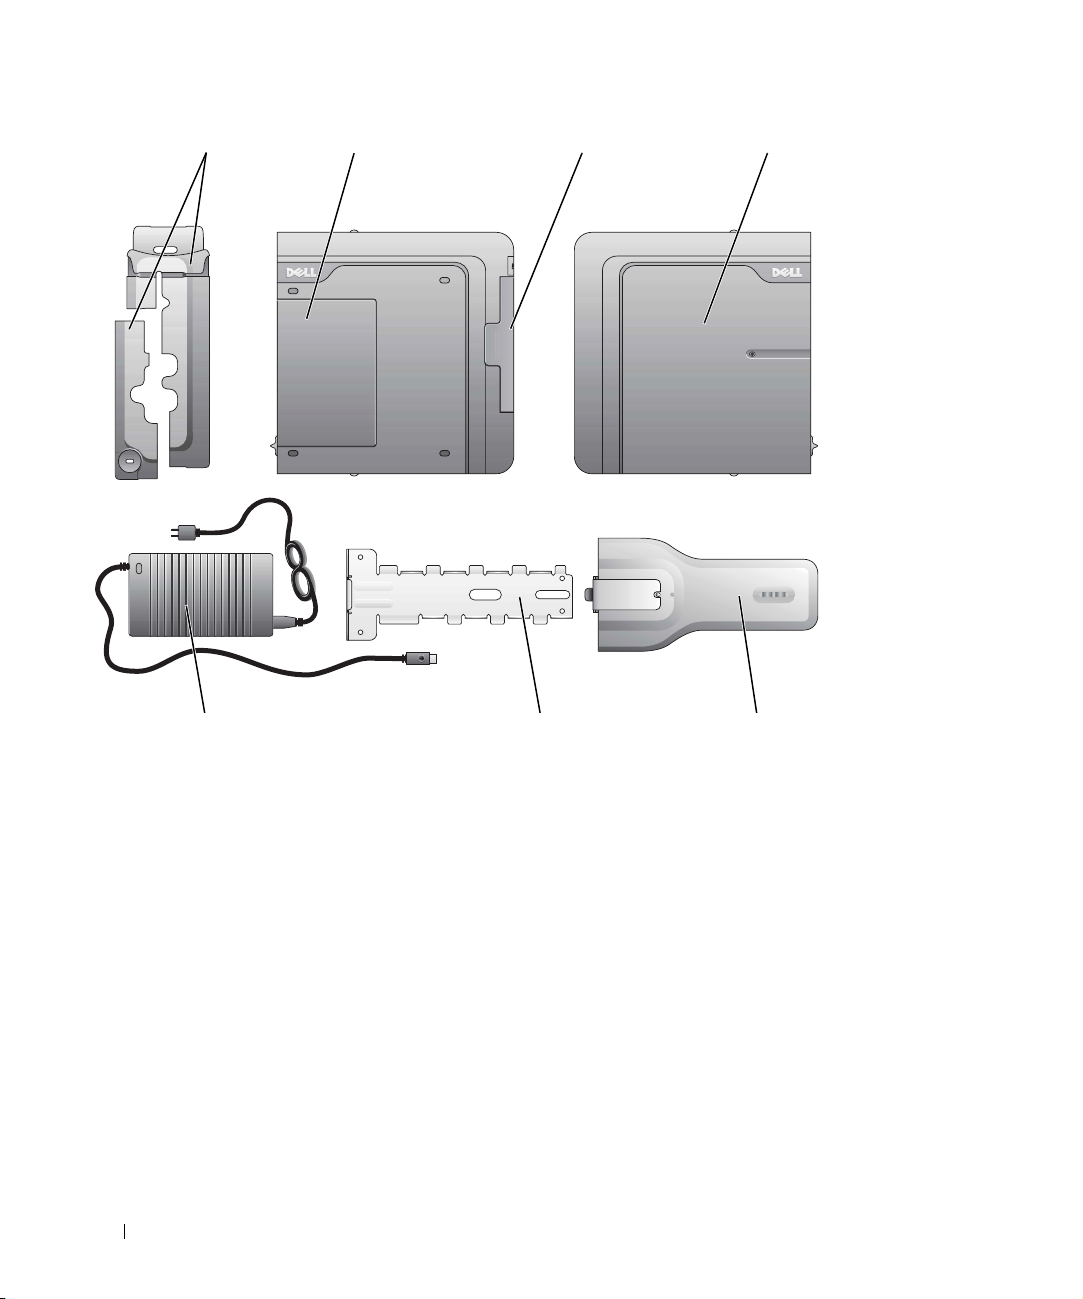
cable cover hard-drive cover (open
www.dell.com | support.euro.dell.com
module bay computer cover
cover to access module
device locking switch)
power adapter
6 Setup and Quick Reference Guide
chassis-stand
mounting plate
computer
stand
Page 9

CAUTION: Safety Instructions
Use the following safety guidelines to help ensure your own personal safety and to help protect your
computer and working environment from potential damage.
General
• Do not attempt to service the computer yourself unless you are a trained service technician. Always
follow installation instructions closely.
• To help prevent electric shock, plug the computer and device power cables into properly grounded
electrical outlets. These cables are equipped with 3-prong plugs to help ensure proper grounding. Do
not use adapter plugs or remove the grounding prong from a cable. If you must use an extension
cable, use a 3-wire cable with properly grounded plugs.
• To help avoid the potential hazard of electric shock, do not use your computer during an electrical
storm.
• To help avoid the potential hazard of electric shock, do not connect or disconnect any cables or
perform maintenance or reconfiguration of this product during an electrical storm.
• If your computer includes a modem, the cable used with the modem should be manufactured with a
minimum wire size of 26 American wire gauge (AWG) and an FCC-compliant RJ-11 modular plug.
• Before you clean your computer, disconnect the computer from the electrical outlet. Clean your
computer with a soft cloth dampened with water. Do not use liquid or aerosol cleaners, which may
contain flammable substances.
• To help avoid possible damage to the system board, wait 5 seconds after turning off the computer
before disconnecting a device from the computer.
Setup and Quick Reference Guide 7
Page 10

CAUTION: Safety Instructions (continued)
• To avoid shorting out your computer when disconnecting a network cable, first unplug the cable
from the network adapter on the back of your computer, and then from the network jack. When
reconnecting a network cable to your computer, first plug the cable into the network jack, and then
into the network adapter.
• To help protect your computer from sudden, transient increases and decreases in electrical power,
use a surge suppressor, line conditioner, or uninterruptible power supply (UPS).
• Ensure that nothing rests on your computer’s cables and that the cables are not located where they
can be stepped on or tripped over.
• Do not push any objects into the openings of your computer. Doing so can cause fire or electric
shock by shorting out interior components.
www.dell.com | support.euro.dell.com
• Keep your computer away from radiators and heat sources. Also, do not block cooling vents. Avoid
placing loose papers underneath your computer; do not place your computer in a closed-in wall unit
or on a bed, sofa, or rug.
• Do not spill food or liquids on your computer.
• Do not use your computer during an electrical storm unless the AC adapter cable has been
disconnected from the electrical outlet.
• When you use the AC adapter to run the computer, place the AC adapter in a ventilated area, such
as a desk top or on the floor.
• The AC adapter may become hot during normal operation of your computer. Use care when
handling the adapter during or immediately after operation.
8 Setup and Quick Reference Guide
Page 11
When Using Your Computer
As you use your computer, observe the following safe-handling guidelines.
CAUTION: Do not operate your computer with any cover(s) (including computer covers,
bezels, filler brackets, front-panel inserts, and so on) removed.
• Your computer is equipped with one of the following:
– A fixed-voltage power supply — Computers with a fixed-voltage power supply do not have a
voltage selection switch on the back panel and operate at only one voltage (see the regulatory
label on the outside of the computer for its operating voltage).
– An auto-sensing voltage circuit — Computers with an auto-sensing voltage circuit do not have
a voltage selection switch on the back panel and automatically detect the correct operating
voltage.
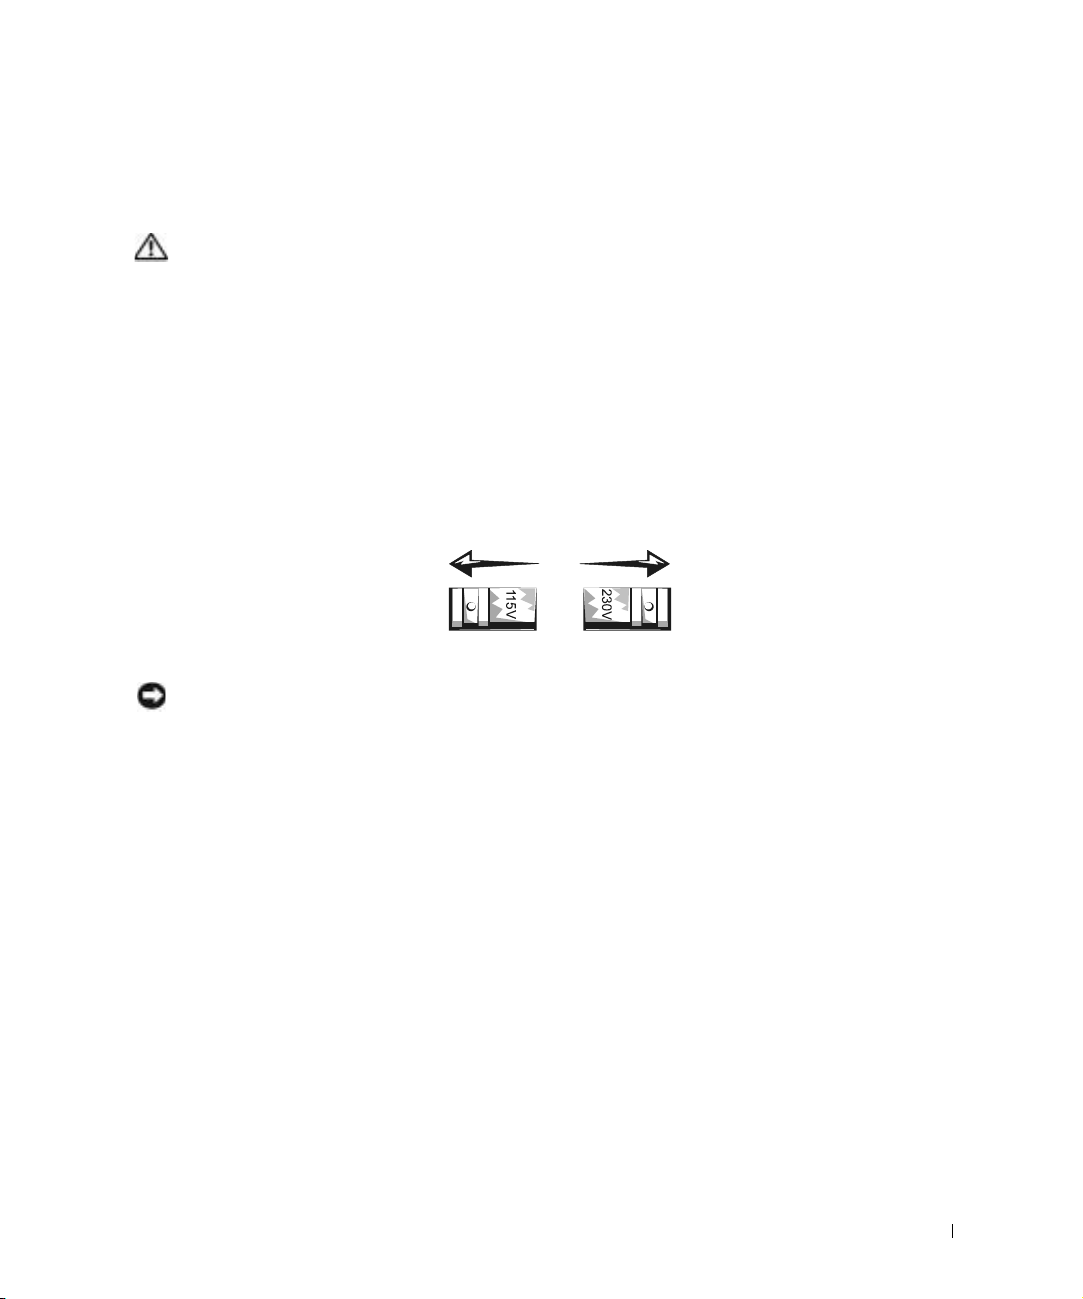
– A manual voltage selection switch — Computers with a voltage selection switch on the back
panel must be manually set to operate at the correct operating voltage.
Set the switch to the position that most closely matches the voltage used in your location.
NOTICE: To help avoid damaging a computer with a manual voltage selection switch, set the switch for the
voltage that most closely matches the AC power available in your location. For Japan, the voltage selection
switch must be set to the 115-V position even though the AC power available in Japan is 100 V. Also, ensure
that your monitor and attached devices are electrically rated to operate with the AC power available in your
location.
• Before working inside the computer, unplug the computer to help prevent electric shock or system
board damage. Certain system board components continue to receive power any time the computer
is connected to AC power.
Setup and Quick Reference Guide 9
Page 12

When Using Your Computer (continued)
When Working Inside Your Computer
Before you open the computer cover, perform the following steps in the sequence indicated.
CAUTION: Do not attempt to service the computer yourself, except as explained in your
online Dell™ documentation or in instructions otherwise provided to you by Dell. Always
follow installation and service instructions closely.
NOTICE: To help avoid possible damage to the system board, wait 5 seconds after turning off the computer
before removing a component from the system board or disconnecting a device from the computer.
Perform an orderly computer shutdown using the operating system menu.
1
2 Turn off your computer and any devices connected to the computer.
www.dell.com | support.euro.dell.com
3 Ground yourself by touching an unpainted metal surface on the chassis, such as the metal at the
back of the computer, before touching anything inside your computer.
While you work, periodically touch an unpainted metal surface on the computer chassis to dissipate
any static electricity that might harm internal components.
4 Disconnect your computer and devices, including the monitor, from their electrical outlets. Also,
disconnect any telephone or telecommunication lines from the computer.
Doing so reduces the potential for personal injury or shock.
In addition, take note of these safety guidelines when appropriate:
• When you disconnect a cable, pull on its connector or on its strain-relief loop, not on the cable
itself. Some cables have a connector with locking tabs; if you are disconnecting this type of cable,
press in on the locking tabs before disconnecting the cable. As you pull connectors apart, keep them
evenly aligned to avoid bending any connector pins. Also, before you connect a cable, ensure that
both connectors are correctly oriented and aligned.
• Handle components and cards with care. Do not touch the components or contacts on a card. Hold
a card by its edges or by its metal mounting bracket. Hold a component such as a microprocessor
chip by its edges, not by its pins.
CAUTION: There is a danger of a new battery exploding if it is incorrectly installed. Replace
the battery only with the same or equivalent type recommended by the manufacturer. Do not
dispose of the battery along with household waste. Contact your local waste disposal agency
for the address of the nearest battery deposit site.
10 Setup and Quick Reference Guide
Page 13

When Using Your Computer (continued)
Protecting Against Electrostatic Discharge
Static electricity can harm delicate components inside your computer. To prevent static damage,
discharge static electricity from your body before you touch any of your computer’s electronic
components, such as the microprocessor. You can do so by touching an unpainted metal surface
on the computer chassis.
As you continue to work inside the computer, periodically touch an unpainted metal surface to remove
any static charge your body may have accumulated.
You can also take the following steps to prevent damage from electrostatic discharge (ESD):
• Do not remove components from their antistatic packing material until you are ready to install the
component in your computer. Just before unwrapping the antistatic packaging, discharge static
electricity from your body.
• When transporting an electrostatic sensitive component, first place it in an antistatic container
or packaging.
• Handle all electrostatic sensitive components in a static-safe area. If possible, use antistatic floor
pads and workbench pads.
Battery Disposal
Your computer uses a lithium coin-cell battery. The lithium coin-cell battery is a long-life battery, and it is
very possible that you will never need to replace it. However, should you need to replace it, see your User’s
Guide.
Do not dispose of the battery along with household waste. Contact your local waste disposal agency for
the address of the nearest battery deposit site.
Setup and Quick Reference Guide 11
Page 14
Getting Started/Setup
CAUTION: Before performing any of the procedures listed below, read and follow
the safety instructions on page 7.
NOTICE: Do not turn on your computer until all setup steps are completed.
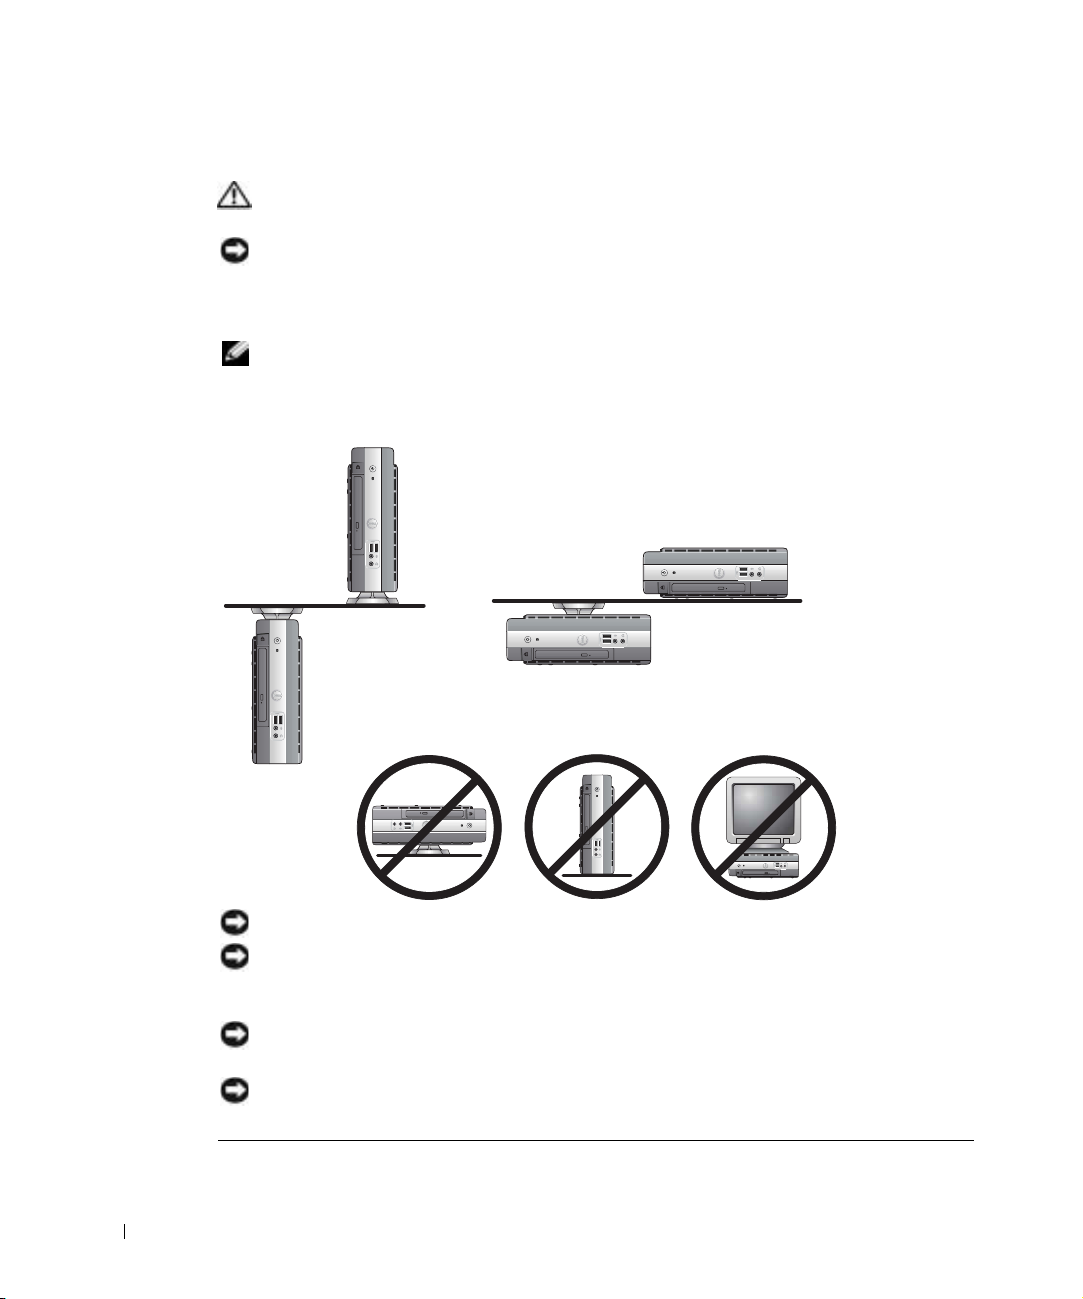
Determine the Computer’s Placement and Orientation
1
NOTE: If you want to orient your computer vertically or horizontally under a desktop or
tabletop, see "Attaching the Stand" on page 14 and "Attaching the Stand to the Mounting Plate"
on page 19.
www.dell.com | support.euro.dell.com
NOTICE: Do not place your monitor on the computer. Use a monitor stand.
NOTICE: In a high-vibration environment, when installing the computer under a desktop or
tabletop, use the optional wall-mount bracket instead of the chassis stand. To order this bracket,
contact Dell.
NOTICE: To ensure proper ventilation, do not place your computer vertically on a desktop
without using the computer stand (see "Attaching the Stand").
NOTICE: To ensure proper ventilation, do not block the cooling vents.
12 Setup and Quick Reference Guide
Page 15

Installing a Device in the Module Bay
2
NOTE: To locate the module device locking switch, remove the hard-drive cover.
Your Dell computer ships with either a floppy drive or an airbay installed in the module bay.
To install a CD, DVD, or second hard drive in the module bay, first remove the airbay and
then install the device.
module device
locking switch
Setup and Quick Reference Guide 13
Page 16

Attaching the Stand
3
NOTE: If you are installing the computer under a desktop or tabletop, first attach all cables,
and then attach the stand to the mounting plate (see "Attaching the Stand to the Mounting Plate"
on page 19).
www.dell.com | support.euro.dell.com
1
Raise the captive screw and slide the chassis stand slat into one of three mounting slots
on the back of the computer.
2 When the stand is in place, tighten the screw.
NOTICE: If your computer is oriented under a desktop or tabletop and is in a high-vibration
environment, use the optional wall-mount bracket instead of the computer stand.
14 Setup and Quick Reference Guide
Page 17
Connecting the AC Adapter
4
NOTE: The power adapter LED will light when the adapter is properly plugged into a wall
outlet and into the computer.
Connect the power adapter to the connector on the back of the computer.
1
2 Connect the power cable to the power adapter.
NOTICE: The following steps apply to Japan only.
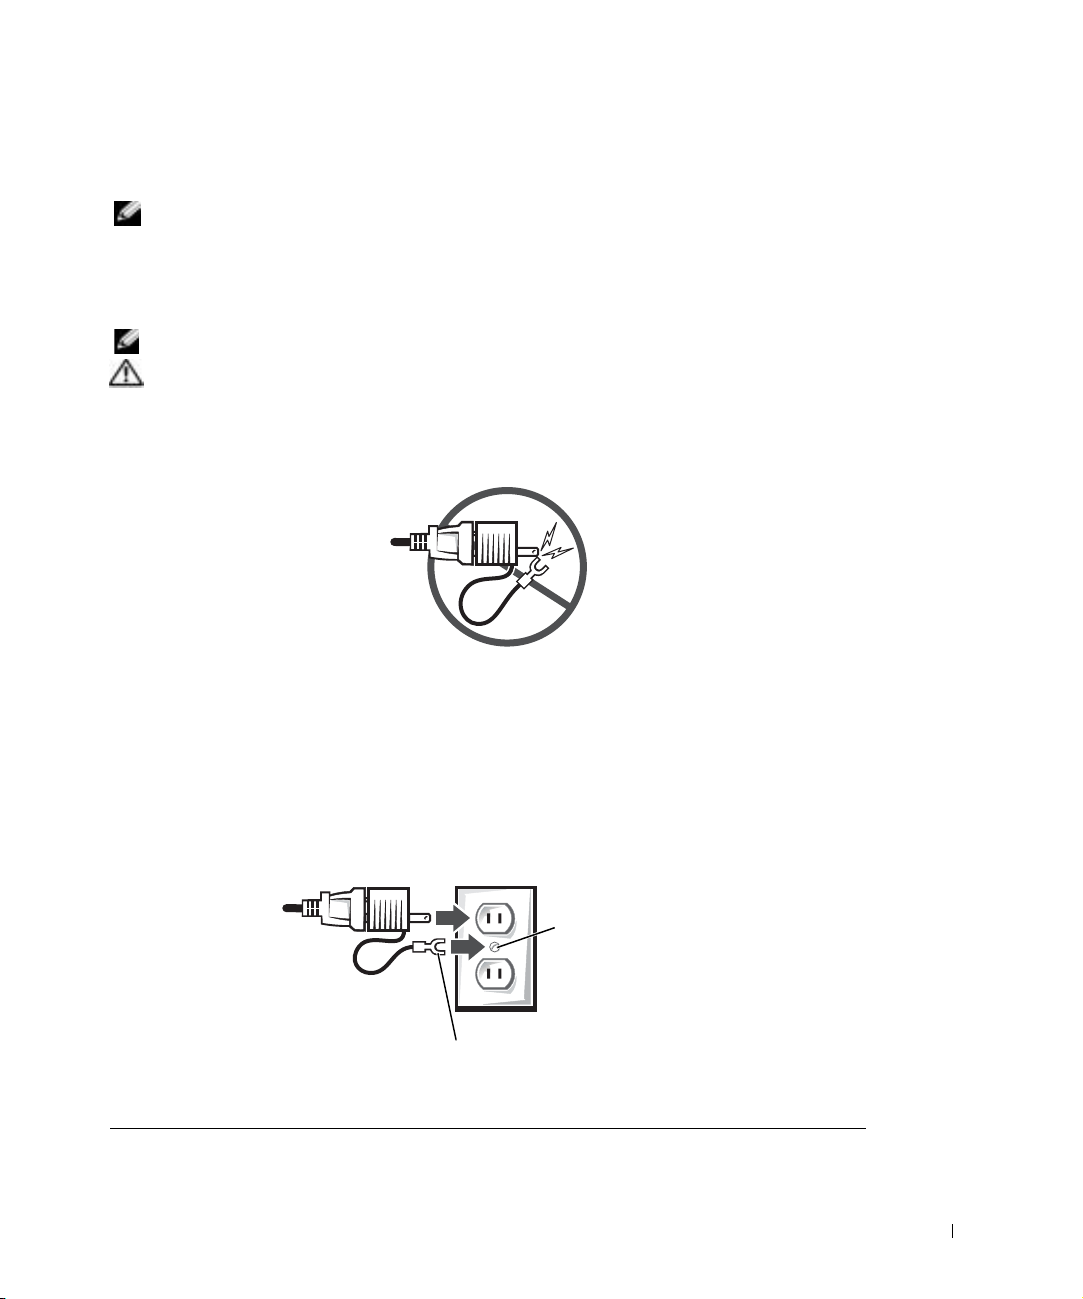
CAUTION: If you decide to connect the green ground wire to an electrical outlet,
do not permit contact between the green ground wire and power leads because
electrical shock, fire, or damage to your computer can occur (see the following
figure).
If you decide not to connect the green ground wire to an electrical outlet, go to step 4.
3 Connect the metal ground connector to the grounding source on the outlet (see the
following figure):
a Loosen the grounding source.
b Slide the metal ground connector behind the grounding source, and then tighten
the grounding source.
grounding source
metal ground connector
4 Connect the AC power cable to the outlet.
Setup and Quick Reference Guide 15
Page 18
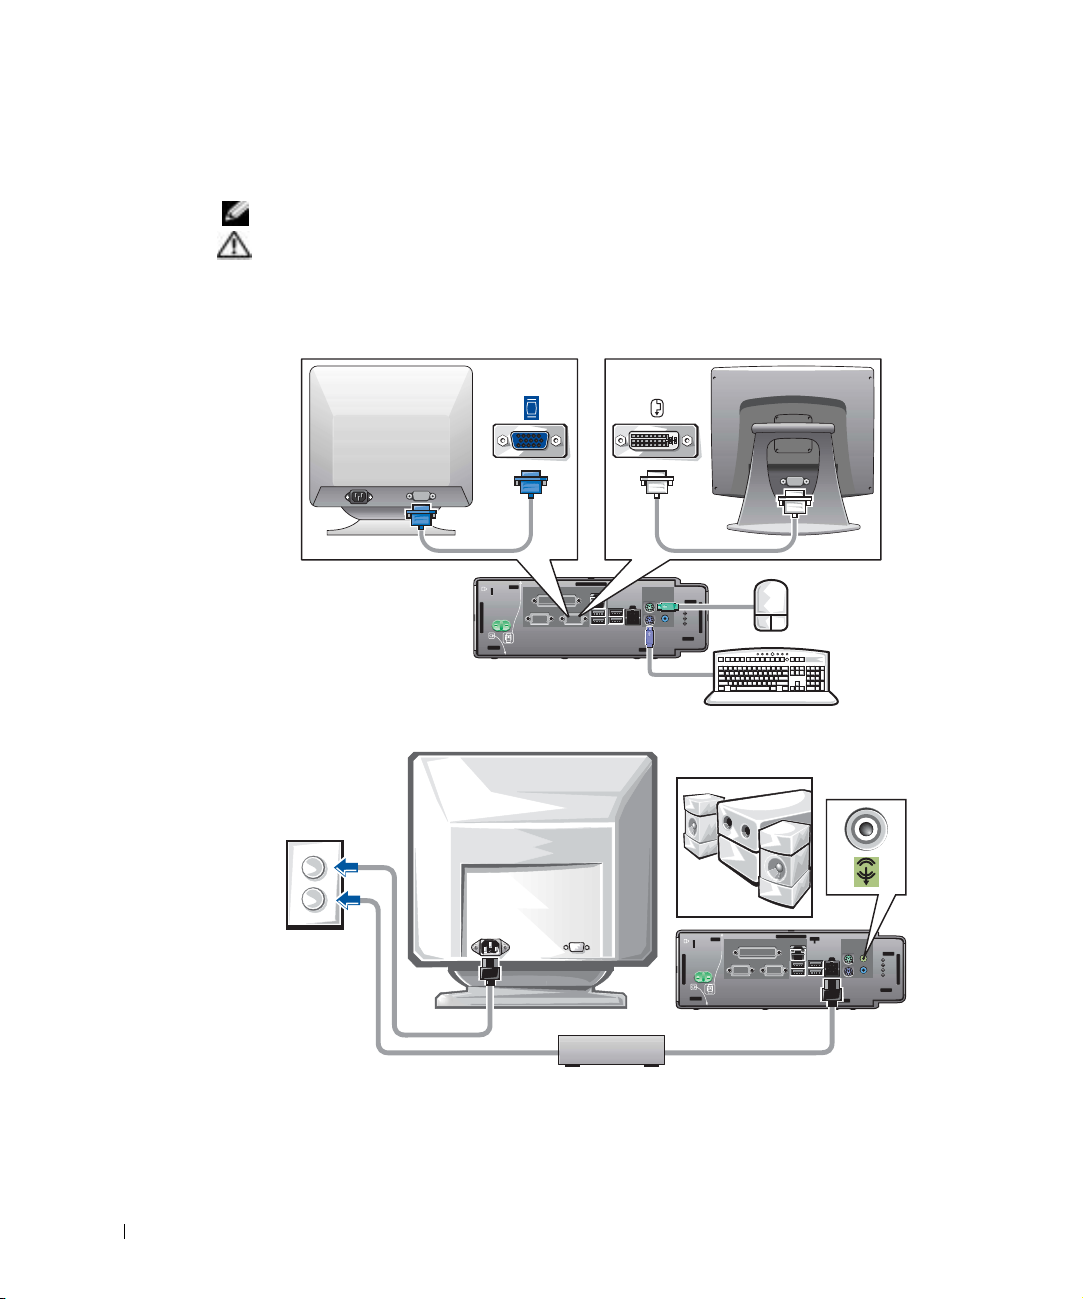
Connecting External Devices
5
NOTE: Connect only one keyboard and one mouse.
CAUTION: To help prevent electric shock, use only the power adapter and power
cable provided, and ensure that they are plugged into a properly grounded power
source.
www.dell.com | support.euro.dell.com
SX270SX260
16 Setup and Quick Reference Guide
Page 19

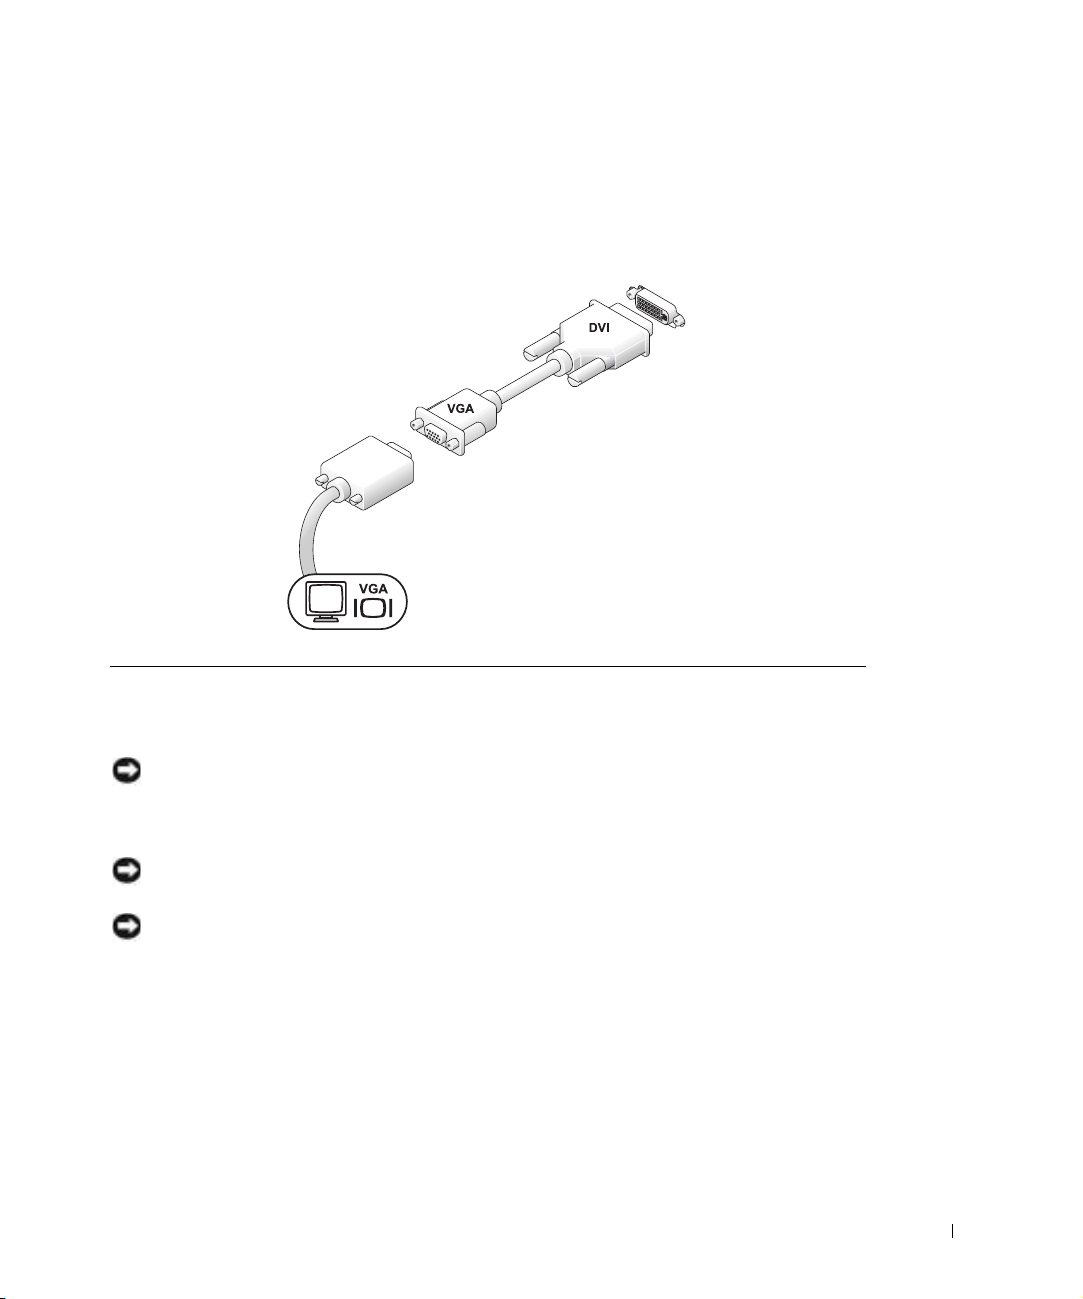
Connecting a VGA Monitor
If you have a VGA monitor and a DVI connector on the back of your computer, plug the
VGA-DVI adapter into the DVI connector and connect the monitor cable to the adapter
as shown.
Attaching the Cable Cover
6
NOTICE: If you are installing the computer under a desktop or tabletop, do not attach the
cable cover until the computer is firmly attached to the mounting plate (see Step 7, "Attaching
the Stand to the Mounting Plate" on page 19).
NOTICE: If you use the stand on your computer, attach the stand before attaching the cable
cover.
NOTICE: When attaching the cable cover, do not place the computer face-down so that the
surface comes in contact with a hard surface. Doing so may press the power button and may
scratch the face of the computer.
Attach all of the cables to the back of the computer.
1
2 Hold the bottom piece of the cable cover and align the four tabs with the four slots
on the computer’s back panel.
3 Insert the tabs into the slots and slide the piece toward the diagnostic lights
(see the illustration) until it is securely positioned.
Setup and Quick Reference Guide 17
Page 20

4 Grasp the top piece of the cable cover and align the two tabs with the two slots
in the computer’s back panel.
5 Insert the tabs into the slots and slide the piece toward the diagnostic lights
(see the illustration).
6 Install a security device in the security cable slot (optional).
www.dell.com | support.euro.dell.com
security cable
slot
Do not place the
computer facedown on the bezel
18 Setup and Quick Reference Guide
Page 21
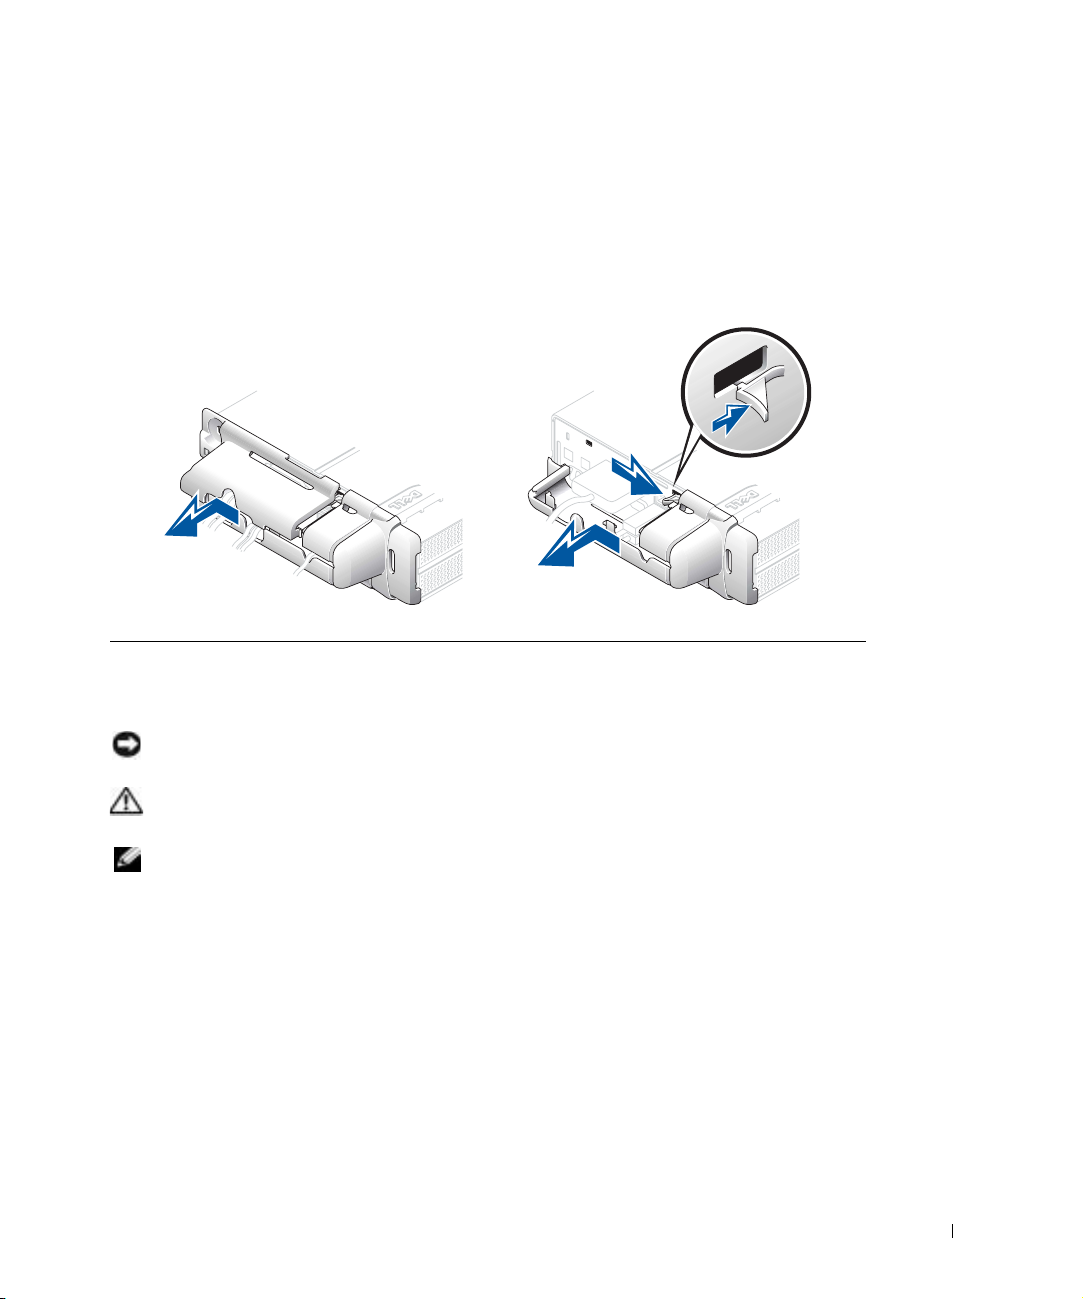
To remove the cable cover, remove the device installed in the security cable slot, if used.
1 Grasp the top piece of the cable cover and slide it to the left until it stops, and then lift
it up and away.
2 To remove the bottom piece of the cable cover, while pressing the lever, slide the piece
to the left until it stops, and then lift it up and away.
Attaching the Stand to the Mounting Plate
7
NOTICE: When installing the computer in the hanging orientation, avoid locations where it will
be bumped by a user’s legs or chair.
CAUTION: Attach the mounting plate to a solid surface capable of supporting
40 lbs (18.1 kg) hanging weight.
NOTE: Before attaching the mounting plate to a surface, first orient yourself with how the
stand will attach to the mounting plate.
Using the four #6 wood screws (0.625 inch; 15.88 mm) provided, attach the mounting
1
plate to a solid surface with a minimum thickness of 1 inch (2.5 cm) (see the
illustration).
2 Orient the computer and stand under the mounting plate approximately 1 inch
(2.5 cm) from the edge of the mounting plate.
Setup and Quick Reference Guide 19
Page 22

3 Lift the computer and stand, insert the stand into the mounting bracket, and slide the
stand until the release-lever tab is inserted through the slot in the mounting plate.
4 Attach the cable cover (if used).
screw holes (4)
mounting-plate slot
release-lever tab
www.dell.com | support.euro.dell.com
NOTICE: When completing your computer setup, secure all cables toward the back of your
work area to prevent the cables from being pulled, tangled, or stepped on.
Turn on the computer, read the software license agreement, and follow the
8
operating system setup instructions on the screen.
solid surface with a
1-inch (2.5 cm)
minimum thickness
Congratulations! You have completed your system setup.
9
20 Setup and Quick Reference Guide
Page 23
Finding Information and Assistance
What Are You Looking For? Find it Here
• A diagnostic program for my computer
• Drivers for my computer
• My computer documentation
• My device documentation
Drivers and Utilities CD (also known as the
ResourceCD)
You can use this CD to access
documentation, reinstall drivers,
or run diagnostics tools.
• Express Service Code and Service Tag
Number
• Microsoft
• How to remove and replace parts
• Technical specifications
• How to configure system settings
• How to troubleshoot and solve problems
• How to reinstall my operating system Operating System CD
®
Windows® License Label
Express Service Code and Product Key
User’s Guide
Depending on your operating system, double-click the
User’s Guides icon on your desktop or click the Start
button and then click Help and Support to access the
electronic documentation stored on your hard drive.
Located on your computer.
If you reinstall your operating
system, use the Drivers and Utilities
CD to reinstall drivers for the devices
that came with your computer.
Setup and Quick Reference Guide 21
Page 24

What Are You Looking For? Find it Here
• Latest drivers for my computer
• Answers to technical service and
support questions
• Online discussions with other users
and technical support
• Documentation for my computer
www.dell.com | support.euro.dell.com
• Service call status and support history
• Top technical issues for my computer
• Details on my computer configuration
• How to use Windows XP
• Documentation for my computer
• Documentation for devices
(such as a modem)
Dell Support website
The Dell Support website provides several online tools, including:
• Solutions — Troubleshooting tips, Knowledge Base articles
• Community — Online discussion with other Dell customers
• Upgrades — Upgrade information for components, operating
system, drivers, and information about online classes
• Customer Care — Contact information, order status, warranty,
and repair information
• Downloads — Drivers, patches, and software updates
• Reference — Computer documentation, product
specifications, white papers, and a glossary of computer terms
Dell Premier Support website
The Dell Premier Support website is customized for corporate,
government, and education customers. This site may not be
available in all regions.
Windows XP Help and Support Center
1 Click the Start button, and then click Help and Support.
2 Type a word or phrase that describes your problem, and then
click the arrow icon.
3 Click the topic that describes your problem.
4 Follow the instructions shown on the screen.
Solving Problems
Dell provides a number of tools to help you if your system does not perform as expected.
For the latest troubleshooting information available for your system, see the Dell Support
website at support.dell.com. You can also find descriptions of Dell troubleshooting tools in
the section titled "Getting Help" in your online User’s Guide.
If computer problems occur that require help from Dell, write a detailed description of the
error, beep codes, or diagnostics light patterns; record your Express Service Code and
Service Tag Number below; and then contact Dell from the same location as your computer.
See "Finding Information and Assistance" on page 21 for an example of the express service
code and service tag numbers.
Express Service Code:___________________________
Service Tag Number:___________________________
22 Setup and Quick Reference Guide
Page 25

Troubleshooting Tools
The Dell Diagnostics tests various components in your computer and helps to identify the
cause of computer problems. For more information, see "Running the Dell Diagnostics" on
page 24.
The following features can indicate a possible failure and help you troubleshoot a computer
problem:
• System Lights — Located on the front of the computer.
• Diagnostic Lights — Located on the back of the computer.
• System Messages — Appear on your monitor screen.
• Beep Codes — A series of audible beeps emitted by your computer.
See your User’s Guide for more information about these features.
Using the Dell Drivers and Utilities CD
To use the Dell Drivers and Utilities CD while you are running the Microsoft® Windows®
operating system, perform the following steps:
NOTE: To access device drivers and user documentation, you must use the Drivers and Utilities
CD while you are running Windows.
Turn on the computer and allow it to boot to the Windows desktop.
1
2 Insert the Dell Drivers and Utilities CD into the CD drive.
If you are using the Drivers and Utilities CD for the first time on this computer, the
installation window opens to inform you that the CD is about to begin installation.
3 Click OK to continue.
To complete the installation, respond to the prompts offered by the installation
program.
4 Click Next at the Welcome Dell System Owner screen.
5 Choose the appropriate System Model, Operating System, Device Type, and Topic.
Setup and Quick Reference Guide 23
Page 26

Drivers for Your Computer
To display a list of device drivers for your computer, perform the following steps:
1 Click My Drivers in the Topic pull-down menu.
The Drivers and Utilities CD scans your computer’s hardware and operating system,
and then a list of device drivers for your system configuration is displayed on the
screen.
2 Click the appropriate driver and follow the instructions to download the driver to your
computer.
To view all available drivers for your computer, click Drivers from the Topic pull-down
menu.
www.dell.com | support.euro.dell.com
Running the Dell Diagnostics
The Dell Diagnostics is a program that tests various components in your computer. Run
this program whenever you have a computer problem to help you identify the source of the
problem. You can run the Dell Diagnostics from your hard drive or the Drivers and Utilities
CD.
From the Hard Drive:
NOTICE: If your hard drive fails, run the Dell IDE Hard-Drive Diagnostics (see "Running the
Dell IDE Hard-Drive Diagnostics" on page 25).
Shut down and restart the computer.
1
2 When the DELL™ logo appears, press <F12> immediately.
NOTE: If you receive a message stating that no Diagnostics utility partition has been found,
follow the instructions to run the Dell Diagnostics from your Drivers and Utilities CD.
If you wait too long and the Windows logo appears, continue to wait until you see the
Windows desktop. Then shut down your computer through the Start menu and try
again.
3 When the boot device list appears, highlight Boot to Utility Partition and press
<Enter>.
4 When the Dell Diagnostics Main Menu appears, select the test you want to run.
5 Close the test screen to return to the Main Menu screen. To exit the Dell Diagnostics
and restart the computer, close the Main Menu screen.
24 Setup and Quick Reference Guide
Page 27

From the Drivers and Utilities CD:
1 Insert the Drivers and Utilities CD into the CD drive.
2 Shut down and restart the computer.
When the DELL logo appears, press <F12> immediately.
If you wait too long and the Windows logo appears, continue to wait until you see the
Windows desktop. Then shut down your computer through the Start menu and try
again.
NOTE: This feature changes the boot sequence for one time only. On the next start-up, the
computer boots according to the devices specified in system setup.
3
When the boot device list appears, highlight IDE CD-ROM Device and press
<Enter>.
4 Select the IDE CD-ROM Device option from the CD boot menu.
5 Select the Boot from CD-ROM option from the menu that appears.
6 Ty p e 1 to start the ResourceCD menu.
7 Ty p e 2 to start the Dell Diagnostics.
8 Select Run the 32 Bit Dell Diagnostics from the numbered list. If multiple versions
are listed, select the version appropriate for your platform.
9 When the Dell Diagnostics Main Menu appears, select the test you want to run.
10 When the tests are completed, remove the CD.
Running the Dell IDE Hard-Drive Diagnostics
The Dell IDE Hard-Drive Diagnostics is a utility that tests the hard drive to troubleshoot or
confirm a hard-drive failure.
1 Turn on your computer (if your computer is already on, restart it).
2 When F2 = Setup appears in the upper-right corner of the screen, press
<Ctrl><Alt><D>.
3 Follow the instructions on the screen.
If a failure is reported, see "Hard Drive Problems" in your User’s Guide.
Setup and Quick Reference Guide 25
Page 28

Regulatory Information
Electromagnetic Interference (EMI) is any signal or emission, radiated in free space or
conducted along power or signal leads, that endangers the functioning of a radio navigation
or other safety service or seriously degrades, obstructs, or repeatedly interrupts a licensed
radio communications service. Radio communications services include but are not limited
to AM/FM commercial broadcast, television, cellular services, radar, air-traffic control,
pager, and Personal Communication Services (PCS). These licensed services, along with
unintentional radiators such as digital devices, including computer systems, contribute to
the electromagnetic environment.
Electromagnetic Compatibility (EMC) is the ability of items of electronic equipment to
function properly together in the electronic environment. While this computer system has
www.dell.com | support.euro.dell.com
been designed and determined to be compliant with regulatory agency limits for EMI, there
is no guarantee that interference will not occur in a particular installation. If this equipment
does cause interference with radio communications services, which can be determined by
turning the equipment off and on, you are encouraged to try to correct the interference by
one or more of the following measures:
• Reorient the receiving antenna.
• Relocate the computer with respect to the receiver.
• Move the computer away from the receiver.
• Plug the computer into a different outlet so that the computer and the receiver
are on different branch circuits.
If necessary, consult a Dell Technical Support representative or an experienced
radio/television technician for additional suggestions.
NOTE: Additional regulatory information regarding your system can be found in your
User’s Guide.
26 Setup and Quick Reference Guide
Page 29

Systèmes Dell™ OptiPlex™ SX
Guide de configuration et de référence rapide
Modèle DCT
www.dell.com | support.euro.dell.com
Page 30

Remarques, avis et précautions
REMARQUE : Une REMARQUE indique des informations importantes qui
vous aident à mieux utiliser votre ordinateur.
AVIS : Un AVIS vous avertit d'un risque de dommage matériel ou de perte
de données et vous indique comment éviter le problème.
PRÉCAUTION : Une PRÉCAUTION indique un risque potentiel
d'endommagement du matériel, de blessure corporelle ou de mort.
Abréviations et acronymes
Pour obtenir une liste complète des abréviations et des acronymes,
reportez-vous au « glossaire » du Guide d'utilisation.
Si vous avez acheté un ordinateur Dell™ série n, aucune des
références faites dans ce document aux systèmes d'exploitation
Microsoft
®
Windows® n'est applicable.
____________________
Les informations de ce document sont sujettes à modifications sans préavis.
© 2002 – 2003 Dell Computer Corporation. Tous droits réservés.
Toute reproduction sans l'autorisation écrite de Dell Computer Corporation est strictement interdite.
Marques utilisées dans ce document : Dell, OptiPlex et le logo DELL sont des marques de
Dell Computer Corporation ; Microsoft, MS-DOS, Windows NT et Windows sont des marques
déposées de Microsoft Corporation.
D'autres marques et noms commerciaux peuvent être utilisés dans ce document pour
faire référence aux entités se réclamant de ces marques et de ces noms ou à leurs produits.
Dell Computer Corporation dénie tout intérêt propriétaire aux marques et aux noms commerciaux
autres que les siens.
Juillet 2003 Réf. 2U454 Rév. A03
Page 31

Sommaire
Présentation de ce guide . . . . . . . . . . . . . . . . . . . . . . 31
Caractéristiques
PRÉCAUTION : Consignes de sécurité
Généralités
Lors de l'utilisation de votre ordinateur
. . . . . . . . . . . . . . . . . . . . . . . . . . 31
. . . . . . . . . . . . . . . 33
. . . . . . . . . . . . . . . . . . . . . . . . . . . 33
. . . . . . . . . . . . . . 35
Intervention à l'intérieur de votre ordinateur
Protection contre les décharges électrostatiques
Mise au rebut de la batterie
Mise en route/configuration
. . . . . . . . . . . . . . . . . . . 37
. . . . . . . . . . . . . . . . . . . . 38
Déterminez l'emplacement et l'orientation de l'ordinateur
Installation d'un périphérique dans la baie modulaire
Installation du support
Connexion de l'adaptateur CA/CC
Connexion de périphériques externes
. . . . . . . . . . . . . . . . . . . . . 40
. . . . . . . . . . . . . . . . 41
. . . . . . . . . . . . . . 42
Installation du capot de l'emplacement pour câble
Installation du support sur la plaque de montage
Recherche d'informations et d'assistance
Résolution des problèmes
Outils de dépannage
. . . . . . . . . . . . . . . . . . . . . 49
. . . . . . . . . . . . . . . . . . . . . . . 49
Utilisation du CD Pilotes et utilitaires Dell
Exécution des Diagnostics Dell
. . . . . . . . . . . . . . . . . 51
. . . . . . . . . . . . . 47
. . . . . . . . . . . 50
Exécution des Diagnostics Dell de disque dur IDE
. . . . . . . . . . 36
. . . . . . . . . 37
. . . . 38
. . . . . . 39
. . . . . . . . 43
. . . . . . . . 45
. . . . . . . . 52
Informations de réglementation . . . . . . . . . . . . . . . . . . 53
Sommaire 29
Page 32

30 Sommaire
Page 33

Présentation de ce guide
f
f
Ce document contient des informations sur la mise en route/configuration, la résolution
des problèmes ainsi que sur les instructions de sécurité, les réglementations et la garantie
concernant votre ordinateur Dell
Pour obtenir les dernières versions des documents sur votre disque dur, visitez le site
Web de support de Dell à l'adresse support.dell.com.
Numéro de modèle de
réglementation et type de châssis
DCT = Ultra small form-factor (USF)
(ordinateur petit format)
™ OptiPlex™.
Caractéristiques
deux prises USB, connecteurs
d'écouteurs et de microphone
bouton d'alimentation
baie modulaire
bouton de déblocage du module
fente de montage
(insérez le support en
position verticale)
Guide de configuration et de référence rapide 31
ente de montage
(insérez le support en
position horizontale
suspendue)
voyants de diagnostic
bouton de déblocage du capot de l'unité
de disque dur/capot de l'ordinateur
ente de montage
(insérez le support
en position verticale
suspendue)
Page 34

capot de
l'emplacement
pour câble
www.dell.com | support.euro.dell.com
capot de l'unité de disque dur
(ouvrez le capot pour accéder
au loquet de verrouillage du
périphérique modulaire)
baie modulaire capot de
l'ordinateur
adaptateur de courant
32 Guide de configuration et de référence rapide
plaque de montage du
support de châssis
support de
l'ordinateur
Page 35

PRÉCAUTION : Consignes de sécurité
Pour votre sécurité et pour protéger votre ordinateur ainsi que votre environnement de travail contre
d'éventuels dommages, respectez les consignes de sécurité ci-dessous.
Généralités
• Ne tentez pas d'assurer vous-même l'entretien de votre ordinateur à moins que vous ne soyez un
technicien de maintenance qualifié. Suivez toujours scrupuleusement les instructions d'installation.
• Pour éviter toute décharge électrique, branchez les câbles d'alimentation de l'ordinateur et de
ses périphériques à des prises électriques avec terre adéquates. Ces câbles sont équipés de prises à
3 fiches pour assurer une mise à la terre correcte. N'utilisez pas les fiches intermédiaires ou ne retirez
pas la broche de masse d'un câble. Si vous devez utiliser une rallonge, utilisez une rallonge à trois fils
avec des prises avec mise à la terre appropriées.
• Pour éviter tout risque de décharge électrique, n'utilisez pas votre ordinateur pendant un orage.
• Pour réduire le danger lié à un choc électrique, n'effectuez aucun branchement ou
débranchement pendant un orage électrique, ni aucune opération de maintenance ou de
reconfiguration de ce produit.
• Si votre ordinateur comprend un modem, le câble utilisé avec le modem doit avoir une taille
minimale de 26 AWG (American Wire Gauge) et une fiche modulaire RJ-11 conforme à la
norme FCC.
• Débranchez l'ordinateur de la prise électrique avant de le nettoyer. Nettoyez votre ordinateur
avec un tissu doux et humidifié avec de l'eau. N'utilisez pas de liquide ni d'aérosol nettoyants,
ceux-ci peuvent contenir des substances inflammables.
• Pour éviter d'endommager la carte système, patientez 5 secondes après avoir éteint l'ordinateur
avant de déconnecter un périphérique de l'ordinateur.
• Pour éviter de provoquer un court-circuit dans votre ordinateur lorsque vous déconnectez un
câble réseau, débranchez d'abord le câble de la carte réseau situé à l'arrière de l'ordinateur, puis
débranchez-le de la prise murale du réseau. Pour reconnecter un câble réseau à votre ordinateur,
branchez d'abord le câble sur la prise du réseau, puis sur la carte réseau.
Guide de configuration et de référence rapide 33
Page 36

PRÉCAUTION : Consignes de sécurité (suite)
• Pour aider à protéger votre ordinateur contre des augmentations et des diminutions soudaines
et passagères de l'alimentation électrique, utilisez un protecteur de surtension, un élément de
conditionnement de ligne ou un onduleur (UPS).
• Assurez-vous qu'aucun élément ne repose sur les câbles de votre ordinateur et que les câbles ne
sont pas placés à un endroit où l'on pourrait marcher ou trébucher dessus.
• N'insérez pas d'objets dans les ouvertures de votre ordinateur. Cela risquerait de provoquer un
incendie ou un choc électrique dû à un court-circuit des composants internes.
• Conservez votre ordinateur à distance des radiateurs et sources de chaleur. Veillez à ne pas bloquer
les grilles d'aération. Évitez de placer des papiers volants sous votre ordinateur ; ne placez pas votre
ordinateur dans une unité murale fermée ou sur un lit, un canapé ou un tapis.
www.dell.com | support.euro.dell.com
• Ne renversez ni nourriture ni liquide sur votre ordinateur.
• N'utilisez pas votre ordinateur pendant un orage sauf si l'adaptateur CA/CC est débranché de la
prise électrique.
• Lorsque l'adaptateur CA/CC est utilisé pour alimenter l'ordinateur, placez-le dans une zone aérée,
comme sur un bureau ou sur le sol.
• L'adaptateur CA/CC risque de chauffer lorsque vous utilisez votre ordinateur. Faites donc très
attention lorsque vous manipulez l'adaptateur pendant ou après son fonctionnement.
34 Guide de configuration et de référence rapide
Page 37

Lors de l'utilisation de votre ordinateur
Lorsque vous utilisez votre ordinateur, observez les consignes de sécurité suivantes :
PRÉCAUTION : Ne faites pas fonctionner votre ordinateur avec le(s) capot(s) retiré(s)
(y compris le capot de l'ordinateur, les cadres, les languettes métalliques, les inserts du
panneau avant, etc.).
• Votre ordinateur est équipé de l'un des éléments suivants :
– Un bloc d'alimentation à tension fixe — Les ordinateurs dotés d'un bloc d'alimentation à
tension fixe ne disposent pas de commutateur de sélection de la tension sur le panneau arrière
et fonctionnent avec une seule tension (voir l'étiquette de réglementation située à l'extérieur
de l'ordinateur pour connaître sa tension de fonctionnement).
– Un circuit de tension à détection automatique — Les ordinateurs dotés d'un circuit de tension
à détection automatique ne disposent pas de commutateur de sélection de la tension sur le
panneau arrière et détectent automatiquement la tension de fonctionnement correcte.
– Un commutateur manuel de sélection de la tension — Les ordinateurs dotés d'un commutateur
de sélection de la tension sur le panneau arrière doivent être configurés manuellement pour
fonctionner avec la tension correcte.
Placez le commutateur dans la position la plus proche de la tension utilisée.
AVIS : Pour éviter d'endommager votre ordinateur, réglez le sélecteur de tension manuel de sorte qu'il
corresponde bien au courant alternatif (CA) de votre pays. Pour le Japon, le sélecteur de tension doit être
réglé sur 115 V, même si dans ce pays la puissance en CA est de 100 V. Assurez-vous également que votre
moniteur et tous ses périphériques sont électriquement réglés pour fonctionner avec la puissance en CA
disponible dans votre zone géographique.
• Avant de travailler à l'intérieur de votre ordinateur, débranchez celui-ci pour prévenir tour risque
de décharge électrique et éviter d'endommager la carte système. Certains composants de la carte
système sont alimentés en permanence lorsque l'ordinateur est branché à une source de CA.
Guide de configuration et de référence rapide 35
Page 38

Lors de l'utilisation de votre ordinateur (suite)
Intervention à l'intérieur de votre ordinateur
Avant de retirer le capot de l'ordinateur, effectuez les étapes suivantes dans l'ordre indiqué.
PRÉCAUTION : Ne tentez pas d'assurer vous-même l'entretien de l'ordinateur, sauf comme
expliqué dans la Dell™ documentation Dell™ en ligne ou dans les in instructions fournies par
Dell. Suivez toujours de près les instructions d'installation et d'entretien.
AVIS : Pour éviter d'endommager la carte système, patientez 5 secondes après avoir éteint l'ordinateur avant
de retirer un composant de la carte système ou de déconnecter un périphérique de l'ordinateur.
Arrêtez correctement votre ordinateur à l'aide du menu du système d'exploitation.
1
2 Éteignez l'ordinateur et tous les périphériques connectés à celui-ci.
www.dell.com | support.euro.dell.com
3 Mettez-vous à la terre en touchant une surface métallique non peinte sur le châssis, telle que la
partie métallique située à l'arrière de l'ordinateur, avant de toucher un élément à l'intérieur de
votre ordinateur.
Pendant votre travail à l'intérieur de l'ordinateur, touchez régulièrement une surface métallique non
peinte sur le châssis de l'ordinateur pour dissiper toute électricité statique qui pourrait endommager
les composants internes.
4 Déconnectez votre ordinateur et ses périphériques, ainsi que le moniteur, de leurs prises électriques.
Déconnectez également les lignes téléphoniques ou de télécommunication de l'ordinateur.
Vous réduirez ainsi le risque de blessure ou de décharge électrique.
En outre, gardez ces consignes de sécurité en mémoire, le cas échéant :
• Lorsque vous débranchez un câble, tirez sur le connecteur ou sur la boucle prévue à cet effet,
mais jamais sur le câble lui-même. Certains câbles ont des connecteurs avec des onglets de blocage ;
pour déconnecter ce type de câble, appuyez sur les onglets de blocage avant de déconnecter le câble.
Quand vous séparez des connecteurs, conservez-les alignés de manière égale afin d'éviter de tordre
leurs broches. De même, lorsque vous connectez un câble, vérifiez que les connecteurs sont bien
orientés et alignés.
• Manipulez les composants et les cartes avec précaution. Ne touchez pas les composants ou
les contacts d'une carte. Tenez une carte par ses bords ou par son support de montage métallique.
Prenez un composant (comme la puce d'un microprocesseur) par ses bords, et non par ses broches.
PRÉCAUTION : Une nouvelle batterie mal installée risque d'exploser. Remplacez la batterie
uniquement par une batterie de type identique ou équivalent à celui recommandé par le
fabricant. Ne jetez pas la batterie avec les ordures ménagères. Contactez le service municipal
de traitement des déchets pour connaître l'adresse du site de dépôt de batteries le plus
proche de votre domicile.
36 Guide de configuration et de référence rapide
Page 39

Lors de l'utilisation de votre ordinateur (suite)
Protection contre les décharges électrostatiques
L'électricité statique peut endommager les composants fragiles à l'intérieur de votre ordinateur.
Pour éviter de tels dommages, déchargez l'électricité statique de votre corps avant de toucher tout
composant électronique de votre ordinateur, comme un microprocesseur. Pour ce faire, touchez une
surface métallique non peinte du châssis de l'ordinateur.
Pendant votre travail à l'intérieur de l'ordinateur, touchez régulièrement une surface métallique non
peinte pour décharger toute électricité statique que votre corps peut avoir accumulée.
Vous pouvez également prendre les mesures suivantes pour éviter les dommages dus aux décharges
électrostatiques :
• Ne retirez pas les composants de leur matériau d'emballage antistatique jusqu'à ce que vous soyez
prêt à les installer dans votre ordinateur. Juste avant d'ôter l'emballage antistatique, déchargez votre
corps de son électricité statique.
• Quand vous transportez un composant électrostatique sensible, placez-le d'abord dans un
emballage ou un conteneur antistatique.
• Manipulez tous les composants électrostatiques sensibles dans une zone antistatique. Si possible,
utilisez des tapis antistatiques sur le sol et sur votre plan de travail.
Mise au rebut de la batterie
Votre ordinateur utilise une pile bouton au lithium. La durée de vie de cette pile bouton est telle qu'il est
fort probable que vous n'ayez jamais besoin de la remplacer. Si vous êtes toutefois amené à la remplacer,
reportez-vous à votre Guide d'utilisation.
Ne jetez pas la batterie avec les ordures ménagères. Contactez le service municipal de traitement des
déchets pour connaître l'adresse du site de dépôt de batteries le plus proche de votre domicile.
Guide de configuration et de référence rapide 37
Page 40

Mise en route/configuration
PRÉCAUTION : Avant d'effectuer l'une des procédures énumérées ci-après,
lisez attentivement les consignes de sécurité de la page 33.
AVIS : Ne mettez pas votre ordinateur sous tension tant que la procédure de configuration
n'est pas terminée.
Déterminez l'emplacement et l'orientation de l'ordinateur
1
REMARQUE : Si vous souhaitez placer votre ordinateur verticalement ou horizontalement,
sous un bureau ou une table, reportez-vous aux chapitres « Installation du support » à la
page 40 et « Installation du support sur la plaque de montage » à la page 45.
www.dell.com | support.euro.dell.com
AVIS : Ne placez pas le moniteur sur l'ordinateur. Utilisez un support de moniteur.
AVIS : Dans un environnement à fortes vibrations, lors de l'installation de l'ordinateur sous un
bureau ou une table, utilisez le support de montage mural en option à la place du support de
châssis. Pour commander ce support, contactez Dell.
AVIS : Pour assurer une ventilation correcte, ne placez pas votre ordinateur verticalement sur un
bureau sans utiliser le support d'ordinateur (reportez-vous à la section « Installation du support »).
AVIS : Afin d'assurer une ventilation appropriée, ne bloquez pas les ventilateurs de refroidissement.
38 Guide de configuration et de référence rapide
Page 41

Installation d'un périphérique dans la baie modulaire
2
REMARQUE : Pour trouver le loquet de verrouillage du périphérique modulaire, retirez le
capot de l'unité de disque dur.
Votre ordinateur Dell est livré avec un lecteur de disquette ou un emplacement prédécoupé
dans la baie modulaire. Pour installer un CD, un DVD ou une deuxième unité de disque
dur dans la baie modulaire, retirez d'abord l'emplacement prédécoupé et installez le
périphérique.
Loquet de
verrouillage du
périphérique
modulaire
Guide de configuration et de référence rapide 39
Page 42

Installation du support
3
REMARQUE : Si vous installez l'ordinateur sous un bureau ou une table, connectez d'abord
tous les câbles, puis installez le support sur la plaque de montage (reportez-vous à la section
« Installation du support sur la plaque de montage » à la page 45).
www.dell.com | support.euro.dell.com
1
Soulevez la vis imperdable et faites glisser le support de châssis dans l'une des trois
fentes de montage à l'arrière de l'ordinateur.
2 Lorsque le support est en place, resserrez la vis.
AVIS : Si l'ordinateur est installé sous un bureau ou une table et dans un environnement
à fortes vibrations, utilisez le support de montage mural en option à la place du support
d'ordinateur.
40 Guide de configuration et de référence rapide
Page 43

Connexion de l'adaptateur CA/CC
4
REMARQUE : Le voyant de l'adaptateur d'alimentation s'allume lorsque l'adaptateur
est correctement branché à la fois à une prise murale et à l'ordinateur.
Connectez le câble d'alimentation au connecteur situé à l'arrière de l'ordinateur.
1
2 Connectez le câble d'alimentation à l'adaptateur.
AVIS : Seules les installations japonaises sont concernées par la procédure suivante.
PRÉCAUTION : Si vous décidez de relier le fil vert de masse à une prise
électrique, n'autorisez aucun contact entre la masse et les conducteurs car
cela pourrait provoquer un choc électrique, un incendie ou endommager
votre ordinateur (consultez la figure suivante).
Si vous choisissez de ne pas relier le fil vert de masse à une prise électrique,
passez à étape 4.
3 Reliez le connecteur métallique de masse à la source de masse sur la prise
(consultez la figure suivante) :
a Desserrez la source de masse.
b Faites glisser le connecteur en métal derrière la source de masse, puis vissez
la source de masse.
source de masse
connecteur métallique
de masse
4 Connectez le câble d'alimentation CA à la prise.
Guide de configuration et de référence rapide 41
Page 44

Connexion de périphériques externes
5
REMARQUE : Connectez seulement un clavier et une souris.
PRÉCAUTION : Pour prévenir tout risque d'électrocution, n'utilisez que
l'adaptateur et le câble d'alimentation fournis et vérifiez qu'ils sont branchés
sur une source d'alimentation électrique correctement reliée à la terre.
www.dell.com | support.euro.dell.com
SX270SX260
42 Guide de configuration et de référence rapide
Page 45
Connexion d'un moniteur VGA
Si vous disposez d'un moniteur VGA et d'un connecteur DVI à l'arrière de votre ordinateur,
branchez l'adaptateur VGA-DVI au connecteur DVI et le câble du moniteur à l'adaptateur
de la façon indiquée.
Installation du capot de l'emplacement pour câble
6
AVIS : Si vous installez l'ordinateur sous un bureau ou une table, ne refermez pas le capot
de l'emplacement pour câble tant que l'ordinateur n'est pas correctement fixé sur la plaque de
montage (reportez-vous à l'étape 7, « Installation du support sur la plaque de montage » à la
page 45).
AVIS : Si vous utilisez le support sur votre ordinateur, fixez-le avant de refermer le capot de
l'emplacement pour câble.
AVIS : Lors de l'installation du capot de l'emplacement pour câble, ne placez pas l'ordinateur
face en bas pour éviter que la surface de celui-ci ne soit en contact avec une surface dure.
Vous risquez d'appuyer sur le bouton d'alimentation et de rayer la surface de l'ordinateur.
1
Branchez tous les câbles à l'arrière de l'ordinateur.
2 Maintenez la partie inférieure du capot et alignez les quatre onglets avec les
quatre fentes sur le panneau arrière de l'ordinateur.
3 Insérez les onglets dans les fentes et faites glisser cette partie vers les voyants
de diagnostic (voir illustration) jusqu'à ce qu'elle se positionne correctement.
Guide de configuration et de référence rapide 43
Page 46

4 Saisissez la partie supérieure du capot et alignez les deux onglets avec les deux
fentes sur le panneau arrière de l'ordinateur.
5 Insérez les onglets dans les fentes et faites glisser cette partie vers les voyants
de diagnostic (voir illustration) jusqu'à ce qu'elle se positionne correctement.
6 Installez un appareil de sécurité dans le capot de la fente pour câble de sécurité
(en option).
www.dell.com | support.euro.dell.com
emplacement pour
câble de sécurité
Ne placez pas
l'ordinateur face
en bas sur le cadre
44 Guide de configuration et de référence rapide
Page 47

Pour retirer le capot, enlevez l'appareil installé dans la fente pour câble de sécurité
(le cas échéant).
1 Saisissez la partie supérieure du capot de l'emplacement pour câble et faites-la
glisser sur la gauche jusqu'à ce qu'elle s'arrête, puis soulevez-la pour la retirer.
2 Pour retirer la partie inférieure du capot de l'emplacement pour câble, tout en
appuyant sur le levier, faites glisser la pièce sur la gauche jusqu'à ce qu'elle s'arrête,
puis soulevez-la pour la retirer.
Installation du support sur la plaque de montage
7
AVIS : Lorsque vous installez l'ordinateur en position suspendue, évitez de le placer à des
endroits où il risque d'être bousculé (par une chaise, par exemple).
PRÉCAUTION : Fixez la plaque de montage sur une surface fixe capable de
supporter un poids de 18,1 kg (40 livres) en suspension.
REMARQUE : Avant de fixer la plaque de montage sur une surface, vérifiez la manière
dont le support sera fixé à la plaque de montage.
1
À l'aide des quatre vis à bois #6 (15,88 mm ; 0,625 pouces) fournies, fixez la plaque
de montage sur une surface fixe d'une épaisseur minimum de 2,5 cm (1 pouce)
(voir illustration).
2 Orientez l'ordinateur et le support sous la plaque de montage à environ 2,5 cm
(1 pouce) du bord de la plaque.
Guide de configuration et de référence rapide 45
Page 48

3 Soulevez l'ordinateur et le support, insérez le support dans le support de montage et
faites-le glisser jusqu'à ce que l'onglet de verrouillage soit inséré dans la fente sur la
plaque de montage.
4 Fixez le capot de l'emplacement pour câble (le cas échéant).
emplacement de la
plaque de montage
languette du levier
de verrouillage
www.dell.com | support.euro.dell.com
trous de vis (4)
surface fixe d'une
épaisseur minimum
de 2,5 cm (1 pouce)
AVIS : Lors de la configuration de votre ordinateur, fixez tous les câbles à l'arrière de la zone
de travail afin qu'ils ne soient pas tirés, emmêlés ou piétinés.
Allumez l'ordinateur, lisez l'accord de licence du logiciel et suivez les instructions
8
d'installation du système d'exploitation à l'écran.
Félicitations ! Vous avez terminé la configuration du système.
9
46 Guide de configuration et de référence rapide
Page 49

Recherche d'informations et d'assistance
Que recherchez-vous ? Retrouvez les éléments ici
• Programme de diagnostics pour
mon ordinateur
• Pilotes pour mon ordinateur
• La documentation de mon ordinateur
• Documentation concernant mon
périphérique
CD Pilotes et utilitaires (appelé aussi
ResourceCD)
Vous pouvez utiliser ce CD
pour accéder à la documentation,
réinstaller des pilotes ou exécuter
les outils de diagnostic.
• Code de service express et numéro
de service
• Étiquette de licence Microsoft
Windows
• Comment retirer et remplacer des
composants
• Caractéristiques techniques
• Comment configurer les paramètres
système
• Comment dépanner et résoudre les
problèmes
• Comment réinstaller mon système
d'exploitation
®
®
Code de service express et clé du produit
Située sur votre ordinateur.
Guide d'utilisation
En fonction du système d'exploitation installé sur
votre ordinateur, double-cliquez sur l'icône User's Guides
(Guides d'utilisation) située sur le bureau, ou cliquez sur
le bouton Start (Démarrer), puis sur Help and Support
(Aide et support) pour accéder à la documentation
électronique stockée sur l'unité de disque dur.
CD-ROM du système d'exploitation
Si vous réinstallez le système
d'exploitation, utilisez le CD Pilotes
et utilitaires pour réinstaller les
pilotes des périphériques fournis
avec votre ordinateur.
Guide de configuration et de référence rapide 47
Page 50

Que recherchez-vous ? Retrouvez les éléments ici
• Pilotes les plus récents pour mon
ordinateur
• Réponses aux questions posées sur
le service et le support technique
• Discussions en ligne avec le support
technique et d'autres utilisateurs
• Documentation sur mon ordinateur
www.dell.com | support.euro.dell.com
• État des appels de demande d'assistance
et historique de support technique
• Principaux problèmes techniques de
mon ordinateur
• Détails sur la configuration de mon
ordinateur
• Comment utiliser Windows XP
• Documentation sur mon ordinateur
• Documentation pour les périphériques
(pour un modem, par exemple)
Site Web de support technique de Dell
Le site Web de support technique de Dell fournit plusieurs outils
en ligne, notamment :
• Solutions — Astuces de dépannage, articles de la Base de
connaissance
• Forum clients — Discussion en ligne avec d'autres clients Dell
• Mises à niveau — Mises à niveau des informations concernant
les composants, le système d'exploitation et les classes en ligne
• Service clientèle — Coordonnées des contacts, état des
commandes, garantie et informations sur les réparations
• Téléchargements — Pilotes, correctifs et mises à jour logicielles
• Référence — Documentation relative à l'ordinateur,
caractéristiques du produit, livres blancs et glossaire des termes
informatiques
Site Web de support technique de Dell Premier
Le site Web de support technique de Dell Premier est
personnalisé par type de clients : entreprises, administrations et
domaine de l'éducation. Ce site n'est pas disponible dans toutes
les régions.
Centre d'aide et de support Windows XP
1 Cliquez sur le bouton Démarrer, puis sur Aide et support.
2 Entrez un mot ou une expression qui décrive votre problème,
puis cliquez sur l'icône en forme de flèche.
3 Cliquez sur la rubrique qui décrit votre problème.
4 Suivez les instructions qui s'affichent à l'écran.
48 Guide de configuration et de référence rapide
Page 51

Résolution des problèmes
Dell fournit un certain nombre d'outils qui vous aideront si votre système ne fonctionne
pas de la manière escomptée. Pour obtenir les dernières informations sur le dépannage
disponibles pour votre système, consultez le site Web du support technique de Dell à
l'adresse support.dell.com. Vous pouvez aussi trouver une description des outils de
dépannage Dell dans la section « Obtention de l'aide » du Guide d'utilisationen ligne.
Si des problèmes nécessitant l'aide de Dell surviennent, rédigez une description détaillée de
l'erreur, des codes sonores ou des voyants de diagnostics, notez votre Code de service express
et votre Numéro de service et contactez Dell depuis l'endroit où se trouve votre ordinateur.
Reportez-vous à la section « Recherche d'informations et d'assistance » à la page 47 pour
obtenir un exemple de code de service express et de numéros de service.
Code de service express :___________________________
Numéro de service :___________________________
Outils de dépannage
Les Diagnostics Dell testent les différents composants de votre ordinateur et aident à
identifier l'origine des problèmes. Pour plus d'informations, reportez-vous à « Exécution des
Diagnostics Dell » à la page 51.
Les caractéristiques suivantes peuvent indiquer la possibilité d'une panne et vous aider à
résoudre un problème d'ordinateur :
• Voyants du système — Situés à l'avant de l'ordinateur.
• Voyants de diagnostic — Situés à l'arrière de l'ordinateur.
• Messages du système — S'affichent sur l'écran du moniteur..
• Codes sonores — Série de bips sonores émis par votre ordinateur..
Consultez le Guide d'utilisation pour plus d'informations sur ces caractéristiques.
Guide de configuration et de référence rapide 49
Page 52

Utilisation du CD Pilotes et utilitaires Dell
Pour utiliser le CD Pilotes et utilitaires Dell pendant l'exécution du système d'exploitation
Microsoft
1
2 Insérez le CD Pilotes et utilitaires Dell dans le lecteur de CD.
3 Cliquez sur OK pour continuer.
®
Windows®, procédez comme suit :
REMARQUE : Pour accéder aux pilotes de périphériques et à la documentation utilisateur,
vous devez utiliser le CD Pilotes et utilitaires pendant l'exécution de Windows.
Allumez l'ordinateur et démarrez-le à partir du bureau Windows.
Si vous utilisez le CD Pilotes et utilitaires pour la première fois sur cet ordinateur, la
fenêtre d'installation s'ouvre et vous indique que le CD va commencer l'installation.
www.dell.com | support.euro.dell.com
Pour terminer l'installation, suivez les invites du programme d'installation.
4 Cliquez sur Next (Suivant) dans l'écran Welcome Dell System Owner (Bienvenue au
propriétaire du système Dell).
5 Sélectionnez la liste appropriée System Model (Modèle de système), Operating
System (Système d'exploitation), Device Type (Type de périphérique) ou Topic
(Rubrique).
Des pilotes pour votre ordinateur
Pour afficher la liste de tous les pilotes de périphériques pour votre ordinateur, procédez
comme suit :
1 Cliquez sur My Drivers (Mes pilotes) dans le menu déroulant Topic (Rubrique).
Le CD Pilotes et utilitaires analyse le système d'exploitation et les éléments matériels
de votre ordinateur, puis une liste de pilotes de périphériques pour la configuration de
votre système s'affiche.
2 Cliquez sur le pilote approprié, puis suivez les instructions pour télécharger le pilote
sur votre ordinateur.
Pour afficher la liste de tous les pilotes disponibles pour votre ordinateur, cliquez sur Pilotes
dans le menu Rubrique.
50 Guide de configuration et de référence rapide
Page 53

Exécution des Diagnostics Dell
Le programme de Diagnostics Dell teste les différents composants de votre ordinateur.
Exécutez ce programme en cas de problème avec l'ordinateur pour vous aider à identifier
l'origine du problème. Vous pouvez exécuter les Diagnostics Dell à partir de l'unité de
disque dur ou du CD Pilotes et utilitaires.
À partir de l'unité de disque dur :
AVIS : En cas de défaillance de votre unité de disque dur, exécutez les Diagnostics Dell de
disque dur IDE (reportez-vous à la section « Exécution des Diagnostics Dell de disque dur IDE »
à la page 52).
Arrêtez, puis redémarrez l'ordinateur.
1
2 Lorsque le logo DELL™ apparaît, appuyez immédiatement sur <F12>.
REMARQUE : Si un message vous informe qu'aucune partition d'utilitaire de diagnostics n'a
été trouvée, suivez les instructions pour exécuter les Diagnostics Dell à partir de votre CD Pilotes
et utilitaires.
Si vous attendez trop longtemps et que le logo Windows apparaît, attendez encore
jusqu'à ce que le bureau Windows s'affiche. Arrêtez ensuite votre ordinateur à partir
du menu Start (Démarrer) et faites une nouvelle tentative.
3 Lorsque la liste des périphériques d'initialisation s'affiche, mettez en surbrillance
l'option Boot to Utility Partition (Initialisation sur la partition de l'utilitaire)
et appuyez sur <Entrée>.
4 Lorsque le menu principal des Diagnostics Dell s'affiche, sélectionnez le test à
exécuter.
5 Fermez l'écran de test pour revenir à l'écran Main Menu (Menu principal). Pour
quitter les Diagnostics Dell et redémarrer l'ordinateur, fermez l'écran Menu principal.
Guide de configuration et de référence rapide 51
Page 54

À partir du CD Pilotes et utilitaires :
1 Insérez le CD Pilotes et utilitaires dans le lecteur de CD.
2 Arrêtez, puis redémarrez l'ordinateur.
Lorsque le logo DELL apparaît, appuyez immédiatement sur <F12>.
Si vous attendez trop longtemps et que le logo Windows apparaît, attendez encore
jusqu'à ce que le bureau Windows s'affiche. Arrêtez ensuite votre ordinateur à partir
du menu Start (Démarrer) et faites une nouvelle tentative.
REMARQUE : Cette fonctionnalité change la séquence d'initialisation pour une fois seulement.
Lors du prochain démarrage, l'ordinateur s'initialisera en fonction des périphériques spécifiés
dans la configuration du système.
3
Lorsque la liste des périphériques d'initialisation s'affiche, mettez en surbrillance l'option
www.dell.com | support.euro.dell.com
IDE CD-ROM Device (Périphérique CD-ROM IDE) et appuyez sur <Entrée>.
4 Sélectionnez IDE CD-ROM Device (Périphérique CD-ROM IDE) dans le menu
d'initialisation du CD.
5 Sélectionnez l'option Boot from CD-ROM (Initialiser à partir du CD-ROM) dans le
menu qui s'affiche.
6 Entrez 1 pour lancer le menu ResourceCD.
7 Entrez 2 pour démarrer les Diagnostics Dell.
8 Sélectionnez Run the 32-Bit Dell Diagnostics (Exécuter les Diagnostics Dell 32 bits)
dans la liste numérotée. Si plusieurs versions sont répertoriées, sélectionnez la version
appropriée pour votre plate-forme.
9 Lorsque le menu principal des Diagnostics Dell s'affiche, sélectionnez le test à exécuter.
10 Lorsque les tests sont terminés, retirez le CD.
Exécution des Diagnostics Dell de disque dur IDE
L'utilitaire de Diagnostics Dell de disque dur IDE teste l'unité de disque dur pour résoudre
ou confirmer une défaillance de celle-ci.
1 Allumez l'ordinateur (s'il est déjà allumé, redémarrez-le).
2 Lorsque F2 = Setup (Configuration) s'affiche dans le coin supérieur droit de
l'écran, appuyez sur <Ctrl><Alt><D>.
3 Suivez les instructions qui s'affichent à l'écran.
En cas de défaillance, reportez-vous à la section « Problèmes liés au disque dur » de
votre Guide d'utilisation.
52 Guide de configuration et de référence rapide
Page 55

Informations de réglementation
Une interférence électromagnétique (EMI, Electromagnetic Interference) est un signal
ou une émission, véhiculé(e) dans l'espace libre ou par des conducteurs électriques ou de
signaux, qui peut mettre en danger le fonctionnement d'une radionavigation ou d'un autre
service de sécurité ou encore sérieusement dégrader, obstruer ou interrompre de manière
répétée un service de communications radio autorisé. Les services de communications
radio incluent, de manière non limitative, les services de radiodiffusion commerciale
AM/FM, la télévision, les services de téléphonie cellulaire, la radiodétection, le contrôle de
la circulation aérienne, les récepteurs de radio messagerie et les systèmes GSM. Ces services
autorisés, ainsi que les éléments rayonnants parasites involontaires tels que les dispositifs
numériques, y compris les systèmes informatiques, contribuent à l'environnement
électromagnétique.
La compatibilité électromagnétique (EMC) est la capacité des éléments d'un équipement
électronique à interagir correctement dans l'environnement électronique. Bien que ce
système informatique ait été conçu dans le respect de cette compatibilité et soit conforme
aux seuils fixés en matière d'interférences électromagnétiques par l'organisme de
réglementation, il n'y a aucune garantie concernant les interférences susceptibles de se
produire sur une installation particulière. Si cet équipement entraîne des interférences avec
des services de communications radio, ce qui peut être vérifié en allumant et en éteignant
cet équipement, vous êtes encouragé à essayer de corriger les interférences en prenant une
ou plusieurs des mesures suivantes :
• Changez l'orientation de l'antenne de réception.
• Repositionnez l'ordinateur en fonction du récepteur.
• Éloignez l'ordinateur du récepteur.
• Branchez l'ordinateur sur une autre prise de sorte que celui-ci et le récepteur soient
sur des circuits de branchement différents.
Si nécessaire, consultez un représentant du support technique de Dell ou un technicien
radio/télévision expérimenté pour des suggestions supplémentaires.
REMARQUE : Pour des informations complémentaires sur votre système en matière
de réglementation, consultez le Guide d'utilisation.
Guide de configuration et de référence rapide 53
Page 56

www.dell.com | support.euro.dell.com
54 Guide de configuration et de référence rapide
Page 57

Dell™ OptiPlex™ SX Computersysteme
Setup- und Schnellreferenzhandbuch
Modell DCT
www.dell.com | support.euro.dell.com
Page 58

Hinweise, Vorsichtshinweise und
Warnungen
HINWEIS: Ein HINWEIS macht auf wichtige Informationen aufmerksam,
mit denen Sie das System besser einsetzen können.
VORSICHT: VORSICHT warnt vor möglichen Beschädigungen der Hardware
oder vor Datenverlust und zeigt, wie diese vermieden werden können.
WARNUNG: Eine WARNUNG weist auf Gefahrenquellen hin,
die materielle Schäden, Verletzungen oder sogar den Tod von
Personen zur Folge haben können.
Abkürzungen und Akronyme
Eine vollständige Liste von Abkürzungen und Akronymen finden Sie im
Benutzerhandbuch unter „Glossar“.
Wenn Sie einen Dell™-Computer der N-Serie besitzen, treffen alle
®
Referenzen in diesem Dokument auf die Microsoft
Windows®-
Betriebssysteme nicht zu.
____________________
Irrtümer und technische Änderungen vorbehalten.
© 2002–2003 Dell Computer Corporation. Alle Rechte vorbehalten.
Nachdrucke jeglicher Art ohne die vorherige schriftliche Genehmigung der Dell Computer
Corporation sind strengstens untersagt.
Marken in diesem Text: Dell, OptiPlex und das DELL-Logo sind Marken der Dell Computer
Corporation; Microsoft, MS-DOS, Windows NT und Windows sind eingetragene Marken der
Microsoft Corporation.
Alle anderen in dieser Dokumentation genannten Marken und Handelsbezeichnungen sind
Eigentum der entsprechenden Hersteller und Firmen. Die Dell Computer Corporation verzichtet
auf alle Besitzrechte an Marken und Handelsbezeichnungen, die nicht ihr Eigentum sind.
Juli 2003 P/N 2U454 Rev. A03
Page 59

Inhalt
Über dieses Handbuch . . . . . . . . . . . . . . . . . . . . . . . 59
Leistungsmerkmale
WARNUNG: Sicherheitshinweise
Allgemein
Arbeiten mit dem Computer
. . . . . . . . . . . . . . . . . . . . . . . . . 59
. . . . . . . . . . . . . . . . . . 61
. . . . . . . . . . . . . . . . . . . . . . . . . . . . 61
. . . . . . . . . . . . . . . . . . . . 63
Bei der Arbeit an Komponenten im Inneren des Computers
Schutz vor elektrostatischen Entladungen
Entsorgen von Batterien
. . . . . . . . . . . . . . . . . . . . 65
Erste Schritte und Einrichten des Computers
. . . . . . . . . . . . 65
. . . . . . . . . . . 66
Aufstellungsort und Gehäuseausrichtung festlegen
Einsetzen eines Gerätes in den Modulschacht
Anbringen des Standrahmens
Anschließen des Netzadapters
Anschließen von externen Geräten
Anbringen der Kabelabdeckung
. . . . . . . . . . . . . . . . . . 68
. . . . . . . . . . . . . . . . . . 69
. . . . . . . . . . . . . . . . 70
. . . . . . . . . . . . . . . . . 71
. . . . . . . . . . 67
Befestigen des Standrahmens am Montageblech
Informationsquellen und Unterstützung
Problemlösung
Tools zur Fehlerbehebung
. . . . . . . . . . . . . . . . . . . . . . . . . . . 76
. . . . . . . . . . . . . . . . . . . . 77
Verwenden der Drivers and Utilities-CD
. . . . . . . . . . . . . . 75
. . . . . . . . . . . . . 77
Ausführen des Programms „Dell Diagnostics“
Ausführen des Programms „Dell IDE Hard-Drive
Diagnostics“
. . . . . . . . . . . . . . . . . . . . . . . . . . 79
. . . 64
. . . . . . . . 66
. . . . . . . . . 73
. . . . . . . . . . 78
Zulassungsbestimmungen
. . . . . . . . . . . . . . . . . . . . . 80
Inhalt 57
Page 60

58 Inhalt
Page 61

Über dieses Handbuch
Dieses Dokument enthält Informationen zum Einrichten, Hinweise zur Problemlösung, zur
Sicherheit sowie zu den Zulassungsbestimmungen für den Dell
™ OptiPlex™-Computer.
Die neuesten Versionen der Dokumentation für Ihr Festplattenlaufwerk können Sie im
Internet von der Support-Website von Dell unter support.dell.com herunterladen.
Modellnummer und
Gehäusetyp
DCT = USF-Computer
(Ultra Small Form-factor)
Leistungsmerkmale
Zwei USB-Steckplätze, Kopfhörer-und Mikrofonanschlüsse
Netzschalter
taste
Montage-Einschub
(Standrahmen
für vertikale
Position einsetzen)
ModulschachtModulfreigabe-
Montage-Einschub
(Standrahmen für
hängende, horizontale
Position einsetzen)
Freigabetaste für
Computer-/Festplattenabdeckung
Setup- und Schnellreferenzhandbuch 59
Montage-Einschub
(Standrahmen für
hängende, vertikale
Position einsetzen)
Diagnoseanzeigen
Page 62

Kabelabdeckung
www.dell.com | support.euro.dell.com
Festplattenabdeckung
(Abdeckung öffnen, um
auf Modulverriegelungsschalter zuzugreifen)
Modulschacht
Systemgehäuse
Systemgehäuse
Netzadapter
60 Setup- und Schnellreferenzhandbuch
ComputerträgerMontageblech für
Gehäusestandrahmen
Page 63

WARNUNG: Sicherheitshinweise
Die folgenden Sicherheitshinweise schützen den Computer sowie die Arbeitsumgebung vor möglichen
Schäden und dienen der persönlichen Sicherheit des Benutzers.
Allgemein
• Wartungsarbeiten dürfen nur von qualifizierten Servicetechnikern vorgenommen werden. Beachten
Sie alle Installationsanweisungen stets genau.
• Um Stromschläge zu vermeiden, schließen Sie Computer und Peripheriegeräte an geerdete Steckdosen an. Diese Kabel haben drei Kontakte, mit denen eine sichere Erdung gewährleistet ist. Verwenden Sie keine Adapterstecker, und entfernen Sie den Massekontakt eines Kabels nicht. Wenn
Sie ein Verlängerungskabel benötigen, verwenden Sie ein dreiadriges Kabel mit ordnungsgemäß
geerdeten Steckern.
• Verwenden Sie den Computer nicht bei einem Gewitter, um das Risiko eines Stromschlages zu
vermeiden.
• Um das Risiko eines Stromschlages zu vermeiden, sollten Sie bei einem Gewitter weder Kabel
anschließen oder abziehen, noch eine Wartung oder Neukonfiguration des Gerätes vornehmen.
• Wenn Ihr Computer mit einem Modem ausgestattet ist, sollte das für das Modem verwendete
Kabel mindestens einen AWG-Wert (American Wire Gauge [Amerikanisches Eichmaß für Kabel])
von 26 sowie einen FCC-konformen, modularen RJ-11-Stecker aufweisen.
• Trennen Sie den Computer vor der Reinigung vom Stromnetz. Reinigen Sie den Computer mit
einem weichen Tuch, das mit Wasser befeuchtet wurde. Verwenden Sie keine flüssigen Reinigungsmittel oder Sprühreiniger, die eventuell entflammbare Stoffe enthalten.
• Warten Sie nach dem Ausschalten des Computers fünf Sekunden, bevor Sie eine Komponente vom
Computer trennen, um eine mögliche Beschädigung der Systemplatine zu vermeiden.
• Um beim Trennen eines Netzwerkkabels einen Kurzschluss am Computer zu vermeiden, ziehen Sie
erst das Kabel vom Netzwerkadapter auf der Rückseite des Computers ab und dann aus der Netzwerkbuchse. Wird das Netzwerkkabel wieder angeschlossen, schließen Sie es erst an die Netzwerkwandbuchse an, und verbinden Sie es dann mit dem Netzwerkadapter des Computers.
Setup- und Schnellreferenzhandbuch 61
Page 64

WARNUNG: Sicherheitshinweise (Fortsetzung)
• Schützen Sie den Computer vor plötzlichen Spannungsschwankungen durch einen Überspannungsschalter, Leitungsfilter oder eine unterbrechungsfreie Stromversorgung (USV).
• Die Kabel zum Computer sollten so verlegt werden, dass keine Gegenstände darauf stehen und
niemand darüber stolpern kann.
• Stecken Sie keine Gegenstände in die Öffnungen des Computergehäuses. Dies kann zu einem
Kurzschluss der internen Komponenten führen und folglich einen Brand oder einen Stromschlag
verursachen.
• Stellen Sie den Computer nicht in der Nähe von Heizgeräten und anderen Wärmequellen auf.
Achten Sie darauf, die Belüftungsöffnungen nicht zu blockieren. Legen Sie kein Papier unter den
Computer, und stellen Sie den Computer nicht in einem Schrank oder auf einem Bett, Sofa oder
www.dell.com | support.euro.dell.com
Teppich auf.
• Lassen Sie keine Flüssigkeiten in das Innere des Systems gelangen.
• Verwenden Sie den Computer nicht während eines Gewitters, es sei denn, der Computer ist nicht
an das Stromnetz angeschlossen.
• Um eine Überhitzung des Netzadapters zu vermeiden, sollte er in einer gut belüfteten Umgebung,
z. B. auf einer Schreibtischoberfläche oder auf dem Fußboden untergebracht werden.
• Der Netzadapter kann während des Normalbetriebs des Computers heiß werden. Gehen Sie
vorsichtig vor, wenn Sie den Netzadapter während oder direkt nach dem Betrieb berühren.
62 Setup- und Schnellreferenzhandbuch
Page 65

Arbeiten mit dem Computer
Beim Arbeiten mit dem Computer sind folgende Sicherheitshinweise zu beachten:
WARNUNG: Betreiben Sie den Computer nicht, wenn Gehäuseteile (einschließlich
Systemabdeckung, Verkleidung, Abdeckbleche, Frontblenden u. a.) entfernt wurden.
• Ihr Computer verfügt über eines der drei folgenden Ausstattungsmerkmale:
– Festspannungsnetzteil – Computer mit einem Festspannungsnetzteil verfügen über keinen
Spannungswahlschalter auf der Rückseite und können nur mit einer einzigen, vorgegebenen
Spannung betrieben werden (Betriebsspannung: siehe Normenschild auf dem
Computergehäuse).
– Netzteil für automatische Erkennung der Betriebsspannung – Computer mit einem derartigen
Netzteil verfügen über keinen Spannungswahlschalter auf der Rückseite und erkennen die
richtige Betriebsspannung automatisch.
– Spannungswahlschalter für manuelle Auswahl der Betriebsspannung – Bei Computern mit
einem Spannungswahlschalter auf der Rückseite muss die richtige Betriebsspannung manuell
eingestellt werden.
Stellen Sie den Schalter in eine Position, die der ortsüblichen Spannung so weit wie möglich
entspricht.
VORSICHT: Um zu vermeiden, dass der Computer durch eine falsche Einstellung des Spannungswahlschalters
beschädigt wird, sollte der manuell eingestellte Wert der ortsüblichen Spannung so weit wie möglich entsprechen. Beim Einsatz in Japan muss der Spannungswahlschalter auf 115 Volt eingestellt werden, obwohl die
tatsächlich vorherrschende Spannung 100 Volt beträgt. Stellen Sie auch für den Monitor und angeschlossene
Geräte sicher, dass die Stromversorgungskomponenten für den Betrieb am jeweiligen Einsatzort ausgelegt sind.
• Trennen Sie den Computer von der Stromversorgung, um Stromschläge sowie Beschädigungen
der Systemplatine zu vermeiden, wenn Sie Arbeiten an Systemkomponenten im Inneren des Computers durchführen. Bestimmte Komponenten der Systemplatine werden weiterhin mit Strom
versorgt, solange das System an das Netz angeschlossen ist.
Setup- und Schnellreferenzhandbuch 63
Page 66

Arbeiten mit dem Computer (Fortsetzung)
Bei der Arbeit an Komponenten im Inneren des Computers
Vor dem Öffnen des Systemgehäuses führen Sie die folgenden Schritte in der angegebenen Reihenfolge
aus.
WARNUNG: Führen Sie nur Wartungsarbeiten aus, die in der Onlinedokumentation oder
einer anderen Dokumentation von Dell beschrieben werden. Halten Sie sich stets strikt an
die Installationsanweisungen und Wartungsanleitungen.
VORSICHT: Warten Sie nach dem Ausschalten des Computers fünf Sekunden, bevor Sie eine Komponente
von der Systemplatine entfernen oder ein Gerät vom Computer trennen.
Den Computer über das Menü des Betriebssystems ordnungsgemäß herunterfahren.
1
www.dell.com | support.euro.dell.com
2 Den Computer und alle angeschlossenen Geräte ausschalten.
3 Bevor Sie Komponenten im Inneren des Computers berühren, erst erden. Dazu eine nicht lackierte
Metalloberfläche am Gehäuse berühren, beispielsweise Metallteile an der Rückseite des Computers.
Diese Erdung während der Arbeit im System regelmäßig wiederholen, um statische Elektrizität
abzuleiten, die interne Bauteile beschädigen könnte.
4 Den Computer und die Geräte einschließlich des Monitors von der Stromversorgung trennen.
Außerdem alle Telefon- und Datenübertragungskabel vom System trennen.
So wird die Gefahr von Verletzungen oder Stromschlägen verringert.
Weiterhin sind folgende Richtlinien, soweit zutreffend, zu beachten:
• Ziehen Sie beim Trennen eines Kabels vom Gerät nur am Stecker oder an der Zugentlastung und
nicht am Kabel selbst. Manche Kabel besitzen einen Stecker mit Sicherungsklammern. Wenn Sie
ein solches Kabel abziehen, vor dem Herausziehen des Steckers die Sicherungsklammern nach
innen drücken. Achten Sie darauf, dass die Stecker unverkantet abgezogen werden, um ein Verbiegen der Kontaktstifte zu vermeiden. Vor dem Anschließen eines Kabels achten Sie darauf, dass
der Stecker geradlinig ohne Verkanten in die Buchse eingeführt werden kann.
• Gehen Sie mit Komponenten und Erweiterungskarten vorsichtig um. Berühren Sie keine Komponenten oder Kontakte auf der Karte. Halten Sie die Karte möglichst an ihren Kanten oder dem
Montageblech. Halten Sie Komponenten wie einen Mikroprozessorchip an den Kanten und nicht
an den Kontaktstiften.
WARNUNG: Bei unsachgemäßem Einbau eines neuen Akkus besteht Explosionsgefahr.
Tauschen Sie den Akku nur gegen denselben oder einen gleichwertigen, vom Hersteller
empfohlenen Typ aus. Entsorgen Sie die Batterie nicht über den Hausmüll. Die Adresse
der nächstgelegenen Annahmestelle für Altbatterien und Akkus erhalten Sie bei Ihrem
örtlichen Abfallentsorgungsbetrieb.
64 Setup- und Schnellreferenzhandbuch
Page 67

Arbeiten mit dem Computer (Fortsetzung)
Schutz vor elektrostatischen Entladungen
Statische Elektrizität kann die empfindlichen Komponenten im Computer beschädigen. Um derartige
Schäden zu vermeiden, muss die statische Elektrizität aus dem Körper abgeleitet werden, bevor Sie
elektronische Komponenten im System (z. B. den Mikroprozessor) berühren. Berühren Sie dazu eine
nicht lackierte Metallfläche am Computergehäuse.
Wiederholen Sie während der Arbeit im Inneren des Systems diese Erdung regelmäßig, um statische
Aufladungen abzuleiten, die sich mittlerweile im Körper aufgebaut haben könnten.
Beachten Sie auch folgende Hinweise, um Beschädigungen durch elektrostatische Entladung (ESE)
zu vermeiden:
• Nehmen Sie die Komponente erst unmittelbar vor dem Einbau in den Computer aus der antistatischen Verpackung. Leiten Sie vor dem Entfernen der Schutzhülle die statische Elektrizität
aus Ihrem Körper ab.
• Verwenden Sie für den Transport einer elektrostatisch empfindlichen Komponente einen
antistatischen Behälter oder eine antistatische Verpackung.
• Arbeiten Sie mit allen elektrostatisch empfindlichen Komponenten in einer elektrostatisch
unbedenklichen Umgebung. Verwenden Sie nach Möglichkeit antistatische Fußmatten und
Schreibtischauflagen.
Entsorgen von Batterien
In Ihrem Computer wird eine Lithium-Knopfzellenbatterie verwendet. Die Lithium-Knopfzellenbatterie
hat eine lange Lebensdauer und muss voraussichtlich nie ausgewechselt werden. Falls diese doch einmal
ausgetauscht werden muss, beachten Sie die Informationen im Benutzerhandbuch.
Entsorgen Sie die Batterie nicht über den Hausmüll. Die Adresse der nächstgelegenen Annahmestelle
für Altbatterien und Akkus erhalten Sie bei Ihrem örtlichen Abfallentsorgungsbetrieb.
Setup- und Schnellreferenzhandbuch 65
Page 68

Erste Schritte und Einrichten des Computers
WARNUNG: Lesen Sie die Sicherheitshinweise auf Seite 61 gründlich, und
befolgen Sie diese, wenn Sie die nachfolgenden Schritte durchführen.
VORSICHT: Schalten Sie den Computer erst dann ein, wenn alle vorbereitenden Schritte
zum Einrichten des Systems abgeschlossen sind.
Aufstellungsort und Gehäuseausrichtung festlegen
1
HINWEIS: Weitere Informationen zur vertikalen oder horizontalen Ausrichtung des Compu-
ters unter einer Tisch- oder Schreibtischplatte finden Sie unter „Anbringen des Standrahmens“
auf Seite 68 und „Befestigen des Standrahmens am Montageblech“ auf Seite 73.
www.dell.com | support.euro.dell.com
VORSICHT: Stellen Sie den Bildschirm nicht auf den Computer. Verwenden Sie einen
Bildschirmträger.
VORSICHT: Verwenden Sie für die Montage unter einer Tisch- oder Schreibtischplatte
die optionale Wandbefestigungshalterung anstelle des Gehäusestandrahmens, wenn Sie den
Computer in einer Umgebung mit starken Vibrationen einsetzen. Diese Wandbefestigungshalterung können Sie bei Dell bestellen.
66 Setup- und Schnellreferenzhandbuch
Page 69

VORSICHT: Stellen Sie den Computer nicht ohne Gehäusestandrahmen senkrecht auf den
2
Schreibtisch, damit eine ausreichende Belüftung gewährleistet ist. Weitere Informationen hierzu
finden Sie unter Anbringen des Standrahmens.
VORSICHT: Blockieren Sie die Belüftungsöffnungen nicht, damit eine ausreichende Belüftung
gewährleistet ist.
Einsetzen eines Gerätes in den Modulschacht
HINWEIS: Entfernen Sie die Festplattenabdeckung, damit Sie auf den Modulverriegelungs-
schalter zugreifen können.
Ihr Dell-Computer wird entweder mit einem Diskettenlaufwerk oder einer Modulattrappe
im Modulschacht ausgeliefert. Entfernen Sie die Modulattrappe, bevor Sie ein CD-, DVDoder ein zweites Festplattenlaufwerk im Modulschacht installieren.
Modulverriegelungsschalter
Setup- und Schnellreferenzhandbuch 67
Page 70

Anbringen des Standrahmens
3
HINWEIS: Bringen Sie erst alle Kabel an, bevor Sie für die Montage unter einer Tisch- oder
Schreibtischplatte den Standrahmen befestigen. Weitere Informationen hierzu finden Sie unter
„Befestigen des Standrahmens am Montageblech“ auf Seite 73.
www.dell.com | support.euro.dell.com
1
Die selbstsichernde Schraube lösen und die Gehäusestandrahmenleiste in einen
von drei Montage-Einschüben auf der Rückseite des Computers schieben.
2 Wenn der Standrahmen richtig platziert ist, die Schraube festziehen.
VORSICHT: Verwenden Sie für die Montage unter einer Tisch- oder Schreibtischplatte
die optionale Wandbefestigungshalterung anstelle des Gehäusestandrahmens, wenn Sie den
Computer in einer Umgebung mit starken Vibrationen einsetzen.
68 Setup- und Schnellreferenzhandbuch
Page 71

Anschließen des Netzadapters
4
HINWEIS: Wenn der Adapter richtig an die Stromversorgung angeschlossen bzw. in die
Steckdose eingesteckt ist, leuchtet die LED des Netzadapters.
Den Netzadapter an den Anschluss auf der Rückseite des Computers anschließen.
1
2 Das Netzkabel mit dem Netzadapter verbinden.
VORSICHT: Der folgende Abschnitt gilt nur für Japan.
WARNUNG: Wenn Sie den grünen Erdungsleiter an eine Steckdose anschließen,
sorgen Sie dafür, dass der grüne Erdungsleiter und stromführende Leitungen
nicht miteinander in Kontakt geraten können. Es besteht andernfalls die Gefahr
von Stromschlägen, Brand oder Beschädigungen an Ihrem Computer
(siehe Abbildung).
Wenn Sie den grünen Erdungsleiter nicht an eine Steckdose anschließen, fahren
Sie mit Schritt 4 fort.
3 Den Kabelschuh des Erdungsleiters entsprechend der Abbildung mit der Erdungs-
schraube der Steckdose verbinden:
a Die Erdungsschraube lösen.
b Den Kabelschuh des Erdungsleiters hinter die Erdungsschraube schieben und
anschließend die Erdungsschraube festziehen.
Erdungsschraube
Kabelschuh des Erdungsleiters
4 Das Netzkabel an die Steckdose anschließen.
Setup- und Schnellreferenzhandbuch 69
Page 72

Anschließen von externen Geräten
5
HINWEIS: Schließen Sie nur eine Tastatur und eine Maus an.
WARNUNG: Um Stromschläge zu vermeiden, dürfen nur die mitgelieferten
Netzteile und -kabel verwendet werden. Außerdem muss sichergestellt sein,
dass die Anschlüsse ordnungsgemäß geerdet sind.
www.dell.com | support.euro.dell.com
SX270SX260
70 Setup- und Schnellreferenzhandbuch
Page 73

Anschließen eines VGA-Bildschirms
Wenn Sie einen VGA-Bildschirm besitzen und der Computer auf der Rückseite mit
einem DVI-Anschluss ausgestattet ist, verbinden Sie den VGA-DVI-Adapter mit dem
DVI-Anschluss und das Bildschirmkabel mit dem Adapter, wie in der Abbildung gezeigt
wird.
Anbringen der Kabelabdeckung
6
VORSICHT: Wenn Sie den Computer unter einer Schreibtisch- oder Tischplatte montieren,
bringen Sie die Kabelabdeckung erst an, wenn der Computer richtig am Montageblech befestigt
ist (siehe Schritt 7, „Befestigen des Standrahmens am Montageblech“ auf Seite 73).
VORSICHT: Wenn Sie einen Standrahmen für Ihren Computer verwenden, müssen Sie diesen
montieren, bevor die Kabelabdeckung angebracht wird.
VORSICHT: Stellen Sie beim Anbringen der Kabelabdeckung den Computer nicht auf der
Gehäusefront auf. Wenn die Gehäusevorderseite auf einer harten Unterlage aufliegt, kann
die Front verkratzt und versehentlich der Netzschalter gedrückt werden.
1
Alle Kabel auf der Rückseite anschließen.
2 Die vier Haken des unteren Teils der Kabelabdeckung an den vier Öffnungen auf der
Rückseite des Computers ausrichten.
3 Die Haken in die Öffnungen einführen und das Teil entsprechend der Abbildung
in Richtung Diagnoseanzeigen schieben, bis die untere Hälfte der Abdeckung sicher
einrastet.
Setup- und Schnellreferenzhandbuch 71
Page 74

4 Die beiden Haken der oberen Hälfte der Kabelabdeckung an den zwei Öffnungen
auf der Rückseite des Computers ausrichten.
5 Die Haken in die Öffnungen einführen und das Teil entsprechend der Abbildung
in Richtung Diagnoseanzeigen schieben.
6 Gegebenenfalls eine Schutzvorrichtung im Sicherungskabeleinschub anbringen.
www.dell.com | support.euro.dell.com
Sicherungskabeleinschub
Stellen Sie den
Computer nicht auf der
Gehäusefront auf.
72 Setup- und Schnellreferenzhandbuch
Page 75

Entfernen Sie gegebenenfalls eine im Sicherungskabeleinschub installierte Schutzvorrichtung, um die Kabelabdeckung zu entfernen.
1 Die obere Hälfte der Kabelabdeckung bis zum Anschlag nach links schieben und
abnehmen.
2 Den Hebel drücken und die untere Hälfte der Kabelabdeckung bis zum Anschlag
nach links schieben und anschließend abnehmen.
Befestigen des Standrahmens am Montageblech
7
VORSICHT: Wenn Sie den Computer hängend montieren möchten, achten Sie bei der Wahl
des Standortes darauf, dass er nicht durch Beinbewegungen des Benutzers oder Stuhlkanten
unterhalb der Tischplatte erschüttert werden kann.
WARNUNG: Befestigen Sie das Montageblech an einer massiven Fläche, die
mindestens 18,1 kg trägt.
HINWEIS: Bevor Sie das Montageblech an einer Oberfläche anbringen, informieren Sie sich
zunächst darüber, wie der Standrahmen am Montageblech befestigt wird.
Das Montageblech mit den vier mitgelieferten Holzschrauben (16 mm) an einer
1
mindestens 2,5 cm dicken massiven Fläche befestigen (siehe Abbildung).
2 Den Computer und den Standrahmen unter dem Montageblech ungefähr 2,5 cm von
der Kante des Montageblechs entfernt ausrichten.
Setup- und Schnellreferenzhandbuch 73
Page 76

3 Den Computer und den Standrahmen anheben und den Standrahmen in das Mon-
tageblech einführen. Anschließend den Standrahmen nach hinten schieben, bis der
Freigabehebel in den Einschub des Montageblechs einrastet.
4 Die Kabelabdeckung gegebenenfalls wieder anbringen.
MontageblechEinschub
Freigabehebel
www.dell.com | support.euro.dell.com
Schraubenbohrungen (4)
Massive Fläche
mit einer Dicke von
mindestens 2,5 cm
VORSICHT: Abschließend verlegen Sie alle Kabel im hinteren Arbeitsbereich. So können
Sie ein Gewirr von Kabeln vermeiden und verhindern, dass Kabel versehentlich herausgezogen
werden oder auf die Kabel getreten wird.
Den Computer einschalten, den Software-Lizenzvertrag lesen und den
8
Anweisungen auf dem Bildschirm folgen.
Herzlichen Glückwunsch! Das Einrichten des Computers ist abgeschlossen.
9
74 Setup- und Schnellreferenzhandbuch
Page 77

Informationsquellen und Unterstützung
Wonach suchen Sie? Hier finden Sie es.
• Ein Diagnoseprogramm für den
Computer.
• Treiber für den Computer
• Die Dokumentation für den Computer
• Die Dokumentation für das Gerät
Die Drivers and Utilities-CD
(diese wird auch als ResourceCD bezeichnet).
Mit Hilfe dieser CD können Sie auf die
Dokumentation zugreifen, Treiber neu
installieren oder das Diagnoseprogramm
ausführen.
• Expressdienst-Codenummer und
Service-Kennnummer
• Microsoft
• Informationen zum Entfernen
und Austauschen von Teilen
• Technische Daten
• Informationen zum Konfigurieren
der Systemeinstellungen
• Informationen zur Fehlerbeseitigung
und Problemlösung
• Informationen zum Neuinstallieren
des Betriebssystems
®
Windows®-Lizenzetikett
Expressdienst-Codenummer und Produktschlüssel
Auf dem Computer angebracht.
Benutzerhandbuch
Doppelklicken Sie, je nach Betriebssystem, auf das Symbol für
die Benutzerhandbücher auf dem Desktop. Sie können auch auf
die Schaltfläche Start klicken und Help and Support (Hilfe und
Support) wählen, um auf die auf der Festplatte gespeicherte
Dokumentation zuzugreifen.
Betriebssystem-CD
Verwenden Sie die Drivers and Utilities-CD,
um neuere Treiber für die mit Ihrem Computer ausgelieferten Geräte zu installieren,
wenn Sie das Betriebssystem Ihres Computers neu installieren.
Setup- und Schnellreferenzhandbuch 75
Page 78

Wonach suchen Sie? Hier finden Sie es.
• Aktuelle Treiber für den Computer
• Informationen zum technischen Support
und Kundendienst
• Online-Diskussionen mit anderen
Benutzern und dem technischen Support
• Dokumentation für den Computer
www.dell.com | support.euro.dell.com
• Status der Service-Anfrage und
Supportverlauf
• Aktuelle technische Themen für
den Computer
• Details zur Konfiguration des
Computers
• Anleitung zum Arbeiten mit
Windows XP
• Dokumentation für meinen Computer
• Dokumentation für Geräte
(z. B. Modems)
Dell Support-Website
Die Support-Website von Dell bietet verschiedene Online-Werkzeuge,
unter anderem:
• Lösungen – Tipps zur Fehlerbehebung und Artikel aus der
Wissensdatenbank
• Kundenforum – Online-Diskussion mit anderen Dell-Kunden
• Upgrades – Upgrade-Informationen für Komponenten,
Betriebssystem, Treiber sowie Informationen zu Online-Kursen
• Kundenbetreuung – Kontaktinformationen, Bestellstatus, Garantie
und Informationen in Notfällen.
• Downloads – Treiber, Patches und Software-Updates
• Referenzmaterial – Computer-Dokumentation, Produktspezifikationen, White Papers und ein Glossar mit Computerbegriffen
Dell Premier Support-Website
Die Dell Premier Support-Website ist speziell auf Großkunden und
Kunden aus den Bereichen öffentlicher Dienst, Regierung/Verwaltung
und Bildungswesen zugeschnitten. Diese Website ist möglicherweise
nicht in allen Ländern verfügbar.
Hilfe- und Supportcenter unter Windows XP
1 Auf die Schaltfläche Start und anschließend auf Help and Support
(Hilfe und Support) klicken.
2 Ein Wort oder einen Ausdruck eingeben, das bzw. der Ihr
Problem beschreibt, und anschließend auf das Pfeilsymbol klicken.
3 Auf das Thema klicken, das Ihr Problem beschreibt.
4 Den Anweisungen auf dem Bildschirm folgen.
Problemlösung
Dell stellt eine Reihe von Hilfewerkzeugen zur Verfügung, die Ihnen bei Problemen mit
dem Computer weiterhelfen. Neueste Informationen zur Fehlerbehebung finden Sie auf
der Support-Website von Dell unter support.dell.com. Online-Informationen über Tools
zur Fehlerbehebung finden Sie auch im Kapitel „Weitere Hilfe“ des Benutzerhandbuchs.
Wenn Probleme mit dem Computer auftreten, für deren Lösung Sie die Hilfe von Dell
benötigen, erstellen Sie eine detaillierte Beschreibung der Fehler, des Signaltoncodes
oder der Diagnoseanzeigen. Tragen Sie unten die Expressdienst-Codenummer und
Service-Kennnummer ein, und wenden Sie sich an die für Ihren Standort zuständige
Service-Adresse.
76 Setup- und Schnellreferenzhandbuch
Page 79

Weitere Informationen über Service-Kennnummer und die Expressdienst-Codenummer
finden Sie unter „Informationsquellen und Unterstützung“ auf Seite 75.
Expressdienst-Codenummer:___________________________
Service-Kennnummer:___________________________
Tools zur Fehlerbehebung
Mit den Tests des Programms „Dell Diagnostics“ werden verschiedene Systemkomponenten getestet. Sie unterstützen Sie bei der Fehlersuche. Weitere Informationen hierzu finden
Sie unter „Ausführen des Programms
‚Dell Diagnostics‘“ auf Seite 78.
Folgende Anzeigen bzw. Signale können auf mögliche Fehlfunktionen hinweisen und Ihnen
beim Lösen von Problemen mit dem Computer behilflich sein:
• Systemanzeigen – Befinden sich auf der Vorderseite des Computers.
• Diagnoseanzeigen – Befinden sich auf der Rückseite des Computers.
• Systemmeldungen – Werden auf dem Bildschirm angezeigt.
• Signaltoncodes – Werden als akustische Signale vom Computer ausgegeben.
Weitere Informationen zu diesen Funktionen finden Sie im Benutzerhandbuch.
Verwenden der Drivers and Utilities-CD
Führen Sie folgende Schritte aus, um unter dem Betriebssystem Microsoft® Windows® die
Drivers and Utilities-CD zu verwenden:
HINWEIS: Verwenden Sie für den Zugriff auf Gerätetreiber und die Benutzer-Dokumentatio-
nen die Drivers and Utilities-CD, während Windows ausgeführt wird.
1
Den Computer einschalten und warten, bis Windows gestartet wurde.
2 Die Dell Drivers and Utilities-CD in das Laufwerk einlegen.
Wenn Sie die Drivers and Utilities-CD zum ersten Mal verwenden, wird das Fenster
Installation geöffnet, das Sie über den Beginn der Installation von der CD informiert.
3 Auf OK klicken, um fortzufahren.
Den Bildschirmanweisungen des Installationsprogramms folgen, um die Installation
abzuschließen.
4 Im Fenster Welcome Dell System Owner (Willkommen) auf Next (Weiter) klicken.
5 Die geeignete Auswahl für System Model (Systemmodell), Operating System
(Betriebssystem) und Topic (Thema) treffen.
Setup- und Schnellreferenzhandbuch 77
Page 80

Treiber für Ihren Computer
Führen Sie folgende Schritte aus, um eine Liste der Treiber für Ihren Computer
anzuzeigen:
1 Im Listenfeld Thema auf die Option My Drivers (Geeignete Treiber) klicken.
Die Drivers and Utilities-CD prüft die Hardwarekonfiguration des Computers und
das Betriebssystem und zeigt dann eine Liste der Gerätetreiber an, die für Ihre
Systemkonfiguration am besten geeignet sind.
2 Den geeigneten Treiber auswählen und den Anweisungen zum Herunterladen folgen.
Um eine Liste aller verfügbaren Treiber für Ihren Computer anzuzeigen, im Listenfeld
Thema auf Drivers (Treiber) klicken.
www.dell.com | support.euro.dell.com
Ausführen des Programms „Dell Diagnostics“
Das Programm „Dell Diagnostics“ überprüft verschiedene Systemkomponenten und
unterstützt Sie bei der Fehlersuche. Führen Sie dieses Programm aus, wenn ein Problem
mit dem Computer auftritt, um die Ursache des Problems herauszufinden. Sie können das
Programm „Dell Diagnostics“ von der Festplatte oder über die Drivers and Utilities-CD
ausführen.
Vom Festplattenlaufwerk:
VORSICHT: Wenn das Festplattenlaufwerk Fehler aufweist, führen Sie das Programm „Dell
IDE Hard-Drive Diagnostics” aus. Weitere Informationen hierzu finden Sie unter „Ausführen
des Programms „Dell IDE Hard-Drive Diagnostics““ auf Seite 79.
Den Computer herunterfahren und neu starten.
1
2 Wenn das DELL™-Logo angezeigt wird, sofort <F12> drücken.
HINWEIS: Wenn eine Meldung erscheint, dass keine Partition mit dem Diagnosedienst-
programm gefunden wurde, folgen Sie den Anweisungen, um das Programm „Dell Diagnostics”
von der Drivers and Utilities-CD auszuführen.
Falls so lange gewartet wurde, bis das Windows-Logo erscheint, noch warten, bis der
Windows-Desktop angezeigt wird. Den Computer über das Menü Start
herunterfahren und ihn dann erneut starten.
3 Wenn die Liste der Startgeräte erscheint, die Option Boot to Utility Partition
(In Dienstprogrammpartition starten)
markieren und <Eingabe> drücken.
4 Wenn das Hauptmenü des Programms „Dell Diagnostics“ erscheint, den gewünschten
Test auswählen.
78 Setup- und Schnellreferenzhandbuch
Page 81

5 Das Testfenster schließen, um zum Bildschirm Main Menu (Hauptmenü) zurück-
zukehren. Um das Programm „Dell Diagnostics“ zu verlassen und den Computer neu
zu starten, das Fenster des Hauptmenüs schließen.
Von der Drivers and Utilities-CD aus:
1 Die Drivers and Utilities-CD in das Laufwerk einlegen.
2 Den Computer herunterfahren und erneut starten.
Wenn das DELL-Logo angezeigt wird, sofort <F12> drücken.
Falls so lange gewartet wurde, bis das Windows-Logo erscheint, noch warten, bis
der Windows-Desktop angezeigt wird. Den Computer über das Menü Start herunterfahren und ihn dann erneut starten.
HINWEIS: Durch diese Funktion wird die Startreihenfolge nur einmal geändert. Beim
nächsten Neustart startet der Computer wieder von den im System-Setup-Programm
angegebenen Geräten.
3
Wenn die Liste der Startgeräte erscheint, die Option IDE CD-ROM Device
(IDE CD-ROM-Gerät)
4 Die Option IDE CD-ROM-Gerät im CD-Startmenü auswählen.
5 Im anschließend erscheinenden Menü die Option Boot from CD-ROM
markieren und <Eingabe> drücken.
(Von CD-ROM starten) auswählen.
6 1 eingeben, um das ResourceCD-Menü aufzurufen.
7 2 eingeben, um das Programm „Dell Diagnostics“ aufzurufen.
8 Run Dell 32-bit Diagnostics (Dell 32-Bit-Diagnose ausführen) aus der nummerier-
ten Liste auswählen. Wenn mehrere Versionen aufgeführt werden, die Ihrer Plattform
entsprechende Version wählen.
9 Wenn das Hauptmenü des Programms „Dell Diagnostics“ erscheint, den gewünschten
Test auswählen.
10 Nach Abschluss der Tests die CD aus dem Laufwerk nehmen.
Ausführen des Programms „Dell IDE Hard-Drive Diagnostics“
Das Programm „Dell IDE Hard-Drive Diagnostics“ ist ein Dienstprogramm, mit dem
Sie die Festplatte auf Fehler überprüfen bzw. testen können, ob das Festplattenlaufwerk
ausgefallen ist.
1 Den Computer einschalten oder einen Neustart durchführen, falls er bereits
eingeschaltet ist.
Setup- und Schnellreferenzhandbuch 79
Page 82

2 Wenn F2 = Setup in der rechten oberen Ecke des Bildschirms angezeigt wird, die
Tastenkombination <Strg><Alt><D> drücken.
3 Die Anweisungen auf dem Bildschirm befolgen.
Im Benutzerhandbuch den Abschnitt „Probleme mit dem Festplattenlaufwerk“ lesen,
wenn das Laufwerk ausgefallen ist.
Zulassungsbestimmungen
Elektromagnetische Interferenz (EMI) ist ein Signal oder eine Emission, die in den
freien Raum abgegeben bzw. entlang von Strom- oder Signalleitungen geleitet wird und
den Betrieb der Funknavigation oder anderer Sicherheitsgeräte beeinträchtigt bzw. deren
Qualität extrem verschlechtert, behindert oder wiederholt lizenzierte Funkdienste unter-
www.dell.com | support.euro.dell.com
bricht. Funkdienste umfassen kommerziellen AM-/FM-Radio- und Fernsehrundfunk,
Funktelefondienste, Radar, Flugsicherung, Anrufmelder und Dienste für personenbezogene
Kommunikation (PCS [Personal Communication Services]), sind jedoch nicht nur auf
diese beschränkt. Diese lizenzierten Dienste sowie die unbeabsichtigte Abstrahlung durch
andere, z. B. digitale Geräte (unter anderem auch Computersysteme), tragen zum Aufbau
elektromagnetischer Felder bei.
Unter elektromagnetischer Verträglichkeit (EMV) versteht man die Fähigkeit elektronischer Bauteile, in einer elektronischen Umgebung störungsfrei zu funktionieren. Zwar
wurde dieses Computersystem so konzipiert, dass es die behördlicherseits vorgesehenen
Grenzwerte für EMI erfüllt; dennoch kann nicht ausgeschlossen werden, dass bei
bestimmten Installationen nicht doch Störungen auftreten. Wenn dieses Gerät die Funkkommunikation durch Interferenzen beeinträchtigt, was durch Ein- und Ausschalten des
Gerätes festgestellt werden kann, wird der Benutzer aufgefordert, die Störungen durch eine
oder mehrere der folgenden Maßnahmen zu beheben:
• Die Empfangsantenne neu ausrichten.
• Die Position des Computers gegenüber dem Empfänger ändern.
• Den Abstand zwischen Computer und Empfänger vergrößern.
• Den Computer an eine andere Steckdose anschließen, so dass Computer und
Empfänger über verschiedene Stromkreise versorgt werden.
Wenden Sie sich gegebenenfalls an einen Mitarbeiter des technischen Supports von Dell
oder an einen erfahrenen Radio- und Fernsehtechniker.
HINWEIS: Weitere Informationen zu Betriebsbestimmungen für den Computer finden Sie
im Benutzerhandbuch.
80 Setup- und Schnellreferenzhandbuch
Page 83

Sistemi Dell™ OptiPlex™ SX
Guida di installazione e consultazione rapida
Modello DCT
www.dell.com | support.euro.dell.com
Page 84

Note, avvisi e messaggi di attenzione
NOTA: una NOTA evidenzia informazioni importanti per un uso ottimale
del computer.
AVVISO: un AVVISO può indicare un potenziale danno a livello di hardware
o una perdita di dati e consiglia come evitare il problema.
ATTENZIONE: un messaggio di ATTENZIONE indica un rischio di
danni alla proprietà, lesioni personali o morte.
Abbreviazioni ed acronimi
Per un elenco completo delle abbreviazioni e degli acronimi, vedere la
sezione Glossario nella Guida dell’utente.
Se il computer acquistato è un Dell n Series, qualsiasi riferimento fatto
®
in questo documento al sistema operativo Microsoft
Windows® non
è applicabile.
____________________
Le informazioni contenute nel presente documento sono soggette a modifiche senza pr eavviso.
© 2002–2003 Dell Computer Corporation. Tutti i diritti riservati.
È severamente vietata la riproduzione, con qualsiasi strumento, senza l’autorizzazione scritta di
Dell Computer Corporation.
Marchi di fabbrica usati nel presente documento: Dell, OptiPlex e il logo DELL sono marchi di
fabbrica di Dell Computer Corporation; Microsoft, MS-DOS, W indows NT e Windows sono marchi
depositati di Microsoft Corporation.
Altri marchi di fabbrica e nomi commerciali possono essere utilizzati in questo documento sia in
riferimento alle aziende che rivendicano il marchio e i nomi che ai prodotti stessi. Dell Computer
Corporation nega qualsiasi partecipazione di proprietà relativa a marchi di fabbrica e nomi
commerciali diversi da quelli di sua proprietà.
Luglio 2003 N/P 2U454 Rev. A03
Page 85

Sommario
Informazioni sulla guida . . . . . . . . . . . . . . . . . . . . . . 85
Funzioni
ATTENZIONE: Istruzioni di sicurezza
Uso del computer
. . . . . . . . . . . . . . . . . . . . . . . . . . . . . . . 85
. . . . . . . . . . . . . . . 87
Informazioni generali
. . . . . . . . . . . . . . . . . . . . . . 87
. . . . . . . . . . . . . . . . . . . . . . . . . . 89
Interventi sui componenti interni del computer
Protezione dalle scariche elettrostatiche
Smaltimento della pila
Operazioni preliminari e installazione
. . . . . . . . . . . . . . . . . . . . . 91
. . . . . . . . . . . . . . . 92
Determinazione della posizione e dell’orientamento
del computer
. . . . . . . . . . . . . . . . . . . . . . . . . . 92
Installazione di una periferica nell’alloggiamento
dei moduli
Installazione del sostegno
Collegamento dell’adattatore c.a.
Connessione di periferiche esterne
Montaggio della protezione per i cavi
. . . . . . . . . . . . . . . . . . . . . . . . . . . . 93
. . . . . . . . . . . . . . . . . . . . 94
. . . . . . . . . . . . . . . . 95
. . . . . . . . . . . . . . . . 96
. . . . . . . . . . . . . . 97
Montaggio del sostegno alla piastra di montaggio
Ricerca di informazioni e assistenza
Soluzione di problemi
. . . . . . . . . . . . . . . . . . . . . . . 103
. . . . . . . . . . . . . . . 100
Strumenti per la risoluzione dei problemi
Uso del CD Dell Drivers and Utilities
. . . . . . . . . . . . . 104
Esecuzione del programma Dell Diagnostics
Esecuzione del programma Dell IDE Hard-Drive
Diagnostics
. . . . . . . . . . . . . . . . . . . . . . . . . . 106
. . . . . . . . . 90
. . . . . . . . . . . . . 91
. . . . . . . . 99
. . . . . . . . . . . 103
. . . . . . . . . . 105
Informazioni sulle normative
. . . . . . . . . . . . . . . . . . . 107
Sommario 83
Page 86

84 Sommario
Page 87

Informazioni sulla guida
D
USB
Guida d
Guida d
Il presente documento contiene informazioni introduttive e di configurazione, sulla
sicurezza, sulle normative e sulla garanzia relative al computer Dell
Per accedere alle versioni più recenti dei documenti presenti sul disco rigido, visitare il sito
Web del supporto tecnico di Dell all’indirizzo support.dell.com.
Numero di modello e tipo
di telaio in conformità
alle normative
DCT = computer USF
(ultra small form-factor)
™ OptiPlex™.
Funzioni
ue slot
per cuffia e microfono
Pulsante di accensione
Alloggiamento dei moduli
Pulsante di sblocco del modulo
e connettori
i montaggio
(per l’inserimento del
sostegno sospeso in
posizione orizzontale)
Guida di montaggio
(per l’inserimento del
sostegno sospeso in
posizione verticale)
Guida di installazione e consultazione rapida 85
i montaggio
(per l’inserimento del
sostegno sospeso in
posizione verticale)
Indicatore di diagnostica
Pulsante di sblocco del coperchio del
disco rigido/coperchio del computer
Page 88

Protezione per
i cavi
Coperchio del disco rigido (aprire il
coperchio per accedere all’interruttore di
accesso all’alloggiamento dei moduli)
Coperchio del
computer
www.dell.com | support.euro.dell.com
Adattatore di alimentazione
Alloggiamento dei moduli
Piastra di montaggio del
sostegno del telaio
Sostegno del
computer
86 Guida di installazione e consultazione rapida
Page 89

ATTENZIONE: Istruzioni di sicurezza
Per proteggere il computer e l’ambiente di lavoro da eventuali danni e per la sicurezza personale, attenersi
alle seguenti indicazioni di sicurezza.
Informazioni generali
• Non cercare di riparare il computer da soli se non si è un addetto esperto al supporto tecnico. Seguire
sempre attentamente le istruzioni di installazione.
• Per evitare scariche elettriche, collegare i cavi di alimentazione del computer e delle periferiche a
prese elettriche correttamente messe a terra. I cavi sono forniti di spina a tre poli per garantire una
corretta messa a terra. Non usare adattatori per spine né rimuovere il polo di messa a terra dai cavi.
Se è necessario l’uso di un cavo di prolunga, usare un cavo a tre fili con spine correttamente messe
a terra.
• Per evitare potenziali rischi di scariche elettriche, non usare il computer durante un temporale.
• Per evitare potenziali rischi di scariche elettriche, non collegare o scollegare cavi, né eseguire
operazioni di manutenzione o riconfigurazione del prodotto durante un temporale.
Guida di installazione e consultazione rapida 87
Page 90

ATTENZIONE: Istruzioni di sicurezza (cont.)
• Se il computer è dotato di modem, il cavo usato con il modem deve avere dimensioni minime pari a
26 AWG (American Wire Gauge) e un connettore modulare RJ-11 conforme alle normative FCC.
• Prima di eseguire la pulizia del computer, scollegarlo dalla presa elettrica. Pulire il computer con un
panno morbido inumidito con acqua. Non usare detergenti spray o liquidi che potrebbero contenere
sostanze infiammabili.
• Per evitare possibili danni alla scheda di sistema, attendere 5 secondi dallo spegnimento del
computer prima di scollegare una periferica.
• Per evitare di causare un corto circuito del computer quando si disconnette un cavo di rete,
scollegare prima il cavo dall’adattatore di rete sul retro del computer, poi dalla spinotto di rete a
muro. Quando si riconnette un cavo di rete al computer, inserire prima il cavo nello spinotto di
rete a muro, poi collegarlo all’adattatore di rete.
www.dell.com | support.euro.dell.com
• Per proteggere il computer da sovracorrenti transitorie e cali di tensione improvvisi, utilizzare un
soppressore di sovracorrente, uno stabilizzatore di tensione o un gruppo di continuità (UPS).
• Accertarsi che non vi siano oggetti appoggiati sopra i cavi del computer e che i cavi non siano di
intralcio o possano essere calpestati.
• Non inserire oggetti nelle fessure del computer. Ciò potrebbe causare un corto circuito dei
componenti interni, con conseguenti incendi o scariche elettriche.
• Mantenere il computer lontano da termosifoni e fonti di calore e non ostruire le prese di
raffreddamento. Non appoggiare il computer su pile di carta, non racchiuderlo tra pareti o posarlo su
letti, divani o tappeti.
• Non rovesciare cibo o liquidi sul computer.
• Non usare il computer durante un temporale a meno che il cavo dell’adattatore c.a. sia stato
scollegato dalla presa di corrente.
• Quando si usa l’adattatore c.a. per alimentare il computer, posizionarlo in una zona ventilata, ad
esempio il piano di una scrivania o il pavimento.
• Durante il normale funzionamento del computer l’adattatore c.a. può raggiungere temperature
elevate. Maneggiare con cautela l’adattatore durante o subito dopo il funzionamento.
88 Guida di installazione e consultazione rapida
Page 91

Uso del computer
Durante l’utilizzo del computer, attenersi alle seguenti indicazioni di sicurezza.
ATTENZIONE: non usare il computer senza le relative coperture di protezione, inclusi i
coperchi del computer, il pannello frontale, le staffe di copertura, gli inserti del pannello
frontale, ecc.
• Il computer Dell viene fornito con una delle opzioni di alimentazione descritta di seguito.
– Alimentatore a tensione fissa. I computer con un alimentatore a tensione fissa non dispongono
dell’interruttore di selezione della tensione sul pannello posteriore e possono operare solo a una
determinata tensione (vedere l’etichetta di conformità alle normative sulla parte esterna del
computer per determinare la tensione di funzionamento del computer).
– Circuito di regolazione automatica della tensione. I computer con un circuito di regolazione
automatica della tensione non dispongono dell’interruttore di selezione della tensione sul
pannello posteriore e rilevano automaticamente la corretta tensione di funzionamento.
– Interruttore manuale di selezione della tensione. Nei computer che dispongono di un
interruttore di selezione della tensione sul pannello posteriore è necessario impostare
manualmente la corretta tensione di funzionamento.
Posizionare l’interruttore in modo che la tensione impostata sia compatibile con quella
usata localmente.
AVVISO: per evitare di danneggiare il computer, accertarsi che l’interruttore manuale di selezione della
tensione sia impostato compatibilmente con l’alimentazione c.a. disponibile localmente. In Giappone,
l’interruttore di selezione della tensione deve essere impostato su 115 V anche se la tensione di alimentazione
in Giappone è di 100 V. Assicurarsi inoltre che il monitor e le periferiche collegate siano compatibili con la
tensione di alimentazione disponibile localmente.
• Prima di eseguire qualsiasi operazione all’interno del computer, scollegare il sistema dalla rete
elettrica per evitare scariche elettriche o danni alla scheda di sistema. Alcuni componenti della
scheda di sistema sono alimentati quando il computer è collegato alla fonte di alimentazione c.a.
Guida di installazione e consultazione rapida 89
Page 92

Uso del computer (cont.)
Interventi sui componenti interni del computer
Prima di aprire il coperchio del computer, eseguire la procedura descritta rispettando la
sequenza indicata.
ATTENZIONE: non eseguire interventi di riparazione sul computer da soli se non attenendosi
alle istruzioni fornite nella documentazione Dell™ in linea o in altro modo indicate da Dell.
Seguire sempre attentamente le istruzioni di installazione e di riparazione.
AVVISO: per evitare possibili danni alla scheda di sistema, attendere 5 secondi dallo spegnimento del
computer prima di rimuovere un componente dalla scheda di sistema o scollegare una periferica dal computer.
Eseguire la normale procedura di chiusura della sessione di lavoro dal menu del sistema operativo.
1
www.dell.com | support.euro.dell.com
2 Spegnere il computer e tutte le periferiche ad esso collegate.
3 Prima di toccare qualsiasi componente interno del computer, scaricare a terra l’elettricità statica del
corpo toccando una superficie metallica non verniciata del telaio, ad esempio sul retro del computer.
Durante l’intervento toccare periodicamente una superficie metallica non verniciata sul telaio del
computer per scaricare l’elettricità statica eventualmente accumulata che potrebbe danneggiare i
componenti interni.
4 Scollegare il computer e le periferiche, incluso il monitor, dalle prese elettriche. Scollegare dal
computer eventuali linee telefoniche o altre linee di telecomunicazione.
Tale accorgimento contribuisce a ridurre il rischio di scariche elettriche e lesioni personali.
Inoltre attenersi alle seguenti indicazioni di sicurezza, qualora appropriato.
• Per scollegare un cavo, afferrare il connettore o il serracavo, non il cavo stesso. Alcuni cavi sono
dotati di connettore con linguette di bloccaggio; per scollegare questo tipo di cavo, fare pressione
sulle linguette di blocco prima di estrarlo. Mentre si estrae il connettore, tenerlo correttamente
allineato per evitare che i piedini si pieghino. Inoltre, prima di collegare un cavo accertarsi che
entrambi i connettori siano allineati e orientati in modo corretto.
• Maneggiare con cura componenti e schede. Non toccare i microcomponenti o i contatti di una
scheda, bensì afferrarla per i bordi o per la staffa metallica di montaggio. I componenti quali il
microprocessore devono essere afferrati dai bordi e non dai piedini.
ATTENZIONE: se la pila non viene correttamente installata, potrebbe esplodere. Sostituire la
pila con una dello stesso tipo o di tipo equivalente consigliato dal produttore. Non gettare le
pile insieme ai rifiuti domestici. Per informazioni sul più vicino centro di raccolta di pile
esaurite, contattare i responsabili del servizio smaltimento rifiuti di zona.
90 Guida di installazione e consultazione rapida
Page 93

Uso del computer (cont.)
Protezione dalle scariche elettrostatiche
L’elettricità statica può danneggiare i componenti interni più delicati del computer. Per evitare possibili
danni, scaricare l’elettricità statica dal proprio corpo prima di toccare un qualsiasi componente
elettronico del computer, ad esempio il microprocessore. A tale scopo è sufficiente toccare una
superficie metallica non verniciata sul telaio del computer.
Mentre si lavora sui componenti interni del computer, toccare periodicamente una superficie metallica
non verniciata per scaricare l’eventuale carica elettrostatica accumulata dal proprio corpo.
Per evitare danni causati dalle scariche elettrostatiche è inoltre possibile adottare le seguenti precauzioni:
• Rimuovere i componenti dall’involucro antistatico solo al momento dell’installazione nel computer.
Prima di aprire l’involucro antistatico, scaricare l’elettricità statica dal corpo.
• Prima di trasportare un componente sensibile alle cariche elettrostatiche, riporlo in un contenitore o
un involucro antistatico.
• Maneggiare tutti i componenti sensibili alle cariche elettrostatiche in un’area priva di energia
elettrostatica. Se possibile, usare tappeti antistatici per il pavimento e il banco di lavoro.
Smaltimento della pila
Il computer usa una pila a disco al litio. La durata della pila a disco al litio è estremamente lunga ed è
possibile che non ne sia mai richiesta la sostituzione. Se fosse necessario sostituirla, vedere la
Guida dell’utente.
Non gettare le pile insieme ai rifiuti domestici. Per informazioni sul più vicino centro di raccolta di pile
esaurite, contattare i responsabili del servizio smaltimento rifiuti di zona.
Guida di installazione e consultazione rapida 91
Page 94

Operazioni preliminari e installazione
ATTENZIONE: prima di eseguire le procedure descritte in questa sezione, seguire
le istruzioni di sicurezza descritte a pagina 87.
AVVISO: non accendere il computer prima del completamento della procedura di installazione.
Determinazione della posizione e dell’orientamento del computer
1
NOTA: per orientare il computer verticalmente od orizzontalmente sotto una scrivania o un
tavolo, vedere “Installazione del sostegno” a pagina 94 e “Montaggio del sostegno alla piastra
di montaggio” a pagina 99.
www.dell.com | support.euro.dell.com
AVVISO: non appoggiare il monitor sul computer. Usare un piedistallo del monitor.
AVVISO: in ambienti soggetti a vibrazioni, usare la staffa opzionale di montaggio a muro
anziché il sostegno del telaio per installare il computer sotto il piano di una scrivania o un
tavolo. Per ordinare la staffa, contattare Dell.
AVVISO: per garantire una corretta ventilazione, non posizionare il computer verticalmente su
un piano senza utilizzare l’apposito sostegno (vedere Installazione del sostegno).
AVVISO: per assicurare una ventilazione appropriata, non ostruire le prese di raffreddamento.
92 Guida di installazione e consultazione rapida
Page 95

Installazione di una periferica nell’alloggiamento dei moduli
2
NOTA: per individuare l’interruttore di accesso all’alloggiamento dei moduli, rimuovere il
coperchio del disco rigido.
Dell fornisce il computer con un’unità a dischetti o un modulo di riempimento installato
nell’alloggiamento dei moduli. Per installare un’unità CD, DVD o un secondo disco rigido
nell’alloggiamento dei moduli, rimuovere prima il modulo di riempimento.
Interruttore di accesso
all’alloggiamento dei moduli
Guida di installazione e consultazione rapida 93
Page 96

Installazione del sostegno
3
NOTA: se il computer viene installato sotto il piano di una scrivania o di un tavolo, collegare
prima tutti i cavi quindi montare il sostegno alla piastra di montaggio (vedere “Montaggio del
sostegno alla piastra di montaggio” a pagina 99).
www.dell.com | support.euro.dell.com
1
Sollevare la vite prigioniera e fare scivolare il sostegno del telaio in una delle tre guide
di montaggio sul retro del computer.
2 Quando il sostegno è in posizione, stringere la vite.
AVVISO: in ambienti soggetti a vibrazioni, usare la staffa opzionale di montaggio a muro
anziché il sostegno del computer per installare il computer sotto il piano di una scrivania o
un tavolo.
94 Guida di installazione e consultazione rapida
Page 97

Collegamento dell’adattatore c.a.
4
NOTA: l’indicatore dell’adattatore di alimentazione si illumina quando l’adattatore è
correttamente collegato a una presa di corrente e al computer.
Collegare l’adattatore di alimentazione al connettore sul retro del computer.
1
2 Collegare il cavo di alimentazione all’adattatore di alimentazione.
AVVISO: la seguente procedura è applicabile solo al Giappone.
ATTENZIONE: se si collega il filo verde di messa a terra a una presa di corrente,
evitare il contatto tra tale filo e i conduttori della linea di alimentazione, in
quanto potrebbe causare scariche elettriche, incendi o danni al computer
(vedere la seguente figura).
Se non si collega il filo verde di messa a terra a una presa di corrente, passare
al punto 4.
3 Collegare il connettore metallico di messa a terra alla vite di messa a terra della presa
(vedere la seguente figura).
a Allentare la vite di messa a terra.
b Inserire il connettore metallico di messa a terra dietro la vite di messa a terra,
quindi stringere la vite.
Vite di messa
a terra
Connettore metallico di
messa a terra
4 Collegare il cavo di alimentazione c.a. alla presa elettrica.
Guida di installazione e consultazione rapida 95
Page 98

Connessione di periferiche esterne
5
NOTA: collegare solo una tastiera e un mouse.
ATTENZIONE: per evitare scariche elettriche, usare solo l’adattatore e il cavo di
alimentazione forniti e assicurarsi di collegarli a una fonte di alimentazione
correttamente messa a terra.
www.dell.com | support.euro.dell.com
SX270SX260
96 Guida di installazione e consultazione rapida
Page 99

Collegamento di un monitor VGA
Se si dispone di un monitor VGA e sul retro del computer è presente un connettore DVI,
collegare l’adattatore VGA-DVI al connettore DVI e il cavo del monitor all’adattatore, come
illustrato di seguito.
Montaggio della protezione per i cavi
6
AVVISO: se il computer viene installato sotto il piano di una scrivania o di un tavolo,
non montare la protezione per i cavi fino a quando il computer non è saldamente fissato
alla piastra di montaggio (vedere il punto 7 in “Montaggio del sostegno alla piastra di
montaggio” a pagina 99).
AVVISO: se si usa il sostegno del telaio, montarlo sul computer prima della protezione
per i cavi.
AVVISO: quando si monta la protezione per i cavi, non appoggiare il computer sul pannello
frontale perché potrebbe venire in contatto con una superficie rigida. Se questo avviene, il
pulsante di accensione potrebbe essere attivato accidentalmente e il pannello frontale
potrebbe rigarsi.
1
Collegare tutti i cavi sul retro del computer.
2 Allineare le quattro linguette del pezzo inferiore della protezione per i cavi ai quattro
slot sul pannello posteriore del computer.
Guida di installazione e consultazione rapida 97
Page 100

3 Inserire le linguette negli slot e fare scorrere il pezzo di protezione verso gli indicatori
di diagnostica (come illustrato in figura) in modo che risulti saldamente fissato.
4 Allineare le due linguette del pezzo superiore della protezione per i cavi ai due slot sul
pannello posteriore del computer.
5 Inserire le linguette negli slot e fare scorrere il pezzo di protezione verso gli indicatori
di diagnostica (come illustrato in figura).
6 Installare un dispositivo di sicurezza nello slot per il cavo di sicurezza (opzionale).
www.dell.com | support.euro.dell.com
Slot per cavo
di sicurezza
Non appoggiare il
computer sul
pannello frontale
98 Guida di installazione e consultazione rapida
 Loading...