

Page 1

Dell™ B2375dfw Mono MFP
Dell™ B2375dnf Mono MFP
User’s Guide
Page 2
Dell™ B2375dfw/ B2375dnf Mono MFP User’s Guide
Click the links to the left for information on the features, options, and
operation of your printer. For information on other documentation included
with your printer, see "Finding Information".
To order replacement toner cartridges or supplies from Dell:
1
Double-click the
Utility
or
Dell B2375dfw Mono MFP Dell Supplies Ordering Utility
on your desktop.
OR
2
Visit Dell's website.
http://www.dell.com/supplies
Dell B2375dnf Mono MFP Dell Supplies Ordering
icon
Contacting Dell
NOTE: If you do not have an active Internet connection, you can find
contact information on your purchase invoice, packing slip, bill, or Dell
product catalog.
Dell provides several online and telephone-based support and service
options. Availability varies by country and product, and some services may
not be available in your area. To contact Dell for sales, technical support, or
customer service issues:
1
Visit
www.dell.com/support
2
Verify your country or region in the
drop-down menu at the bottom of the page.
3
Click
Contact Us
4
Select the appropriate service or support link based on your need.
5
Choose the method of contacting Dell that is convenient for you.
on the left side of the page.
Choose A Country/Region
- 1 -
Page 3

Notes, Notices, and Cautions
NOTE: A NOTE indicates important information that helps you make better
use of your printer.
NOTICE: A NOTICE indicates either potential damage to hardware or loss of
data and tells you how to avoid the problem.
CAUTION: A Caution indicates a potential for property damage, personal
injury, or death.
____________________
Information in this document is subject to change without notice.
2013 Dell Inc. All rights reserved.
Reproduction of these materials in any manner whatsoever without the
written permission of Dell Inc. is strictly forbidden.
Trademarks used in this text: Dell, the DELL logo, Inspiron, Dell Precision,
Dimension, OptiPlex,
Latitude, PowerEdge, PowerVault, PowerApp, Dell OpenManage and the
YOURS IS HERE logo are trademarks of Dell Inc.; Intel, Pentium, and Celeron
are registered trademarks of Intel Corporation in the U.S. and other
countries; Microsoft, Windows, Windows Server, MS-DOS , Windows Vista,
,Windows 7, Windows8 are either trademarks or registered trademarks of
Microsoft Corporation in the United States and/or other countries.
Other trademarks and trade names may be used in this document to refer to
either the entities claiming the marks and names or their products. Dell Inc.
disclaims any proprietary interest in trademarks and trade names other than
its own.
Google Cloud Print is a trademark of Google Inc.
Google, Picasa, Google Docs, Android and Gmail are either registered
trademarks or trademarks of Google Inc.
iPad, iPhone, iPod touch, Mac and Mac OS are trademarks of Apple Inc.,
registered in the U.S and other countries.
Wi-Fi Direct™, Wi-Fi Protected Setup™,and WPA2™ logo are trademarks of
Wi-Fi Alliance.
All other brand or product names are trademarks of their respective
companies or organizations.
- 2 -
Page 4

Refer to the 'LICENSE.txt' file in the provided CD-ROM for the open source
license information.
Rev.1.00
____________________
- 3 -
Page 5
Finding Information
Dell™ B2375dfw / B2375dnf Mono MFP
Quick Reference Guide
About Your Printer
Locating the Service Tag
Operator Panel Button Functions
Understanding the Status LED
12345
12 4356
1110 9 8 7
1011121314 9 8 7 6
1 Operator Panel
3 Document Width Guide
5 Document Output Tray
7 Control Board Cover
9 Output Tray
11 Tray 1
13 Paper Output Extension
2 Duplex Automatic Document Feeder (DADF)
4 Document Input Tray
6 Document Glass
8 USB Memory Port
10 Front Cover
12 Multipurpose Feeder (MPF)
14 Toner Cartridge
1 Home Go to home screen.
2 Log In/Out You can log in or log out.
3 Status LED Status LED indicates the status of your machine.
4 Redial/Pause Redials the recently sent fax number or received caller ID in ready mode,
or inserts a pause(-) into a fax number in edit mode.
5 Copy Start copy job using copy default setting regardless of which screen
the user is in if it is selected.
6 Power Saver You can enter or exit Power Save mode.
7 Speed Dial1 Fax image to destination from stored speed dial1.
8 Speed Dial2 Fax image to destination from stored speed dial2.
9 Wi-Fi/WPS Configures the wireless network connection easily without a computer.
(Dell B2375dfw Mono MFP only)
10 Job Status Job status shows the jobs currently running and in queue.
11 Info Gives detailed information about product feature guide machine’s info.
reports, troubleshooting guide, and quick reference guide.
LED
Status
Wireless
Status
O
Green
Orange
Blue
Blinking
On
Blinking
Blinking
On
O
Description
• The machine is o-time.
• The machine is in power save mode. When data is received,
or any button is pressed, it switches to on-line automatically.
The machine is warming up or ready to receive the data.
The machine is on-line and can be used.
• A minor error has occurred and the machine is waiting for the error to be
cleared. Check the display message. When the problem is cleared, the
machine resumes operation.
• The toner cartridge is low. Order a new toner cartridge.
You can temporarily improve print quality by redistribution.
• The toner cartridge is totally empty. Remove the old toner cartridge and
install a new one.
• A paper jam has occurred.
• There is no paper in the tray. Load paper in the tray.
• The machine has stopped due to a major error. Check the display message.
• The machine is connecting to a wireless network.
• The machine is connected to a wireless network.
• The machine is disconnected from a wireless network.
HMCWMA01
JC68-03031A00
Service Tag XXXXXXX
Service Tag
XXXXXXX
000 000 000 00
Express Service Code
lenaP rotarepO
Touch Screen
Front
Back
Quick Reference Guide
Quick Reference Guide
Front
1. LCD: Display.
2. Status LED: Shows the status of your machine.
3. Job Status button: Shows the jobs.
4. M/C Setup button: Leads you to the machine setup and advanced settings.
5 Start button: Initiate operation.
6. Cancel button: Cancel displayed operation.
1. LCD: Display.
2. Status LED: Shows the status of your machine.
3. Job Status button: Shows the jobs.
4. M/C Setup button: Leads you to the machine setup and advanced settings.
5 Start button: Initiate operation.
6. Cancel button: Cancel displayed operation.
1. LCD: Display.
2. Status LED: Shows the status of your machine.
3. Job Status button: Shows the jobs.
4. M/C Setup button: Leads you to the machine setup and advanced settings.
5 Start button: Initiate operation.
6. Cancel button: Cancel displayed operation.
1. USB port
2. Locking slot
3. Network port
4. Optional tray 2 cable
connector
5. Telephone line socket (Line)
6. Extension telephone socket (EXT)
7. Rear door
8. Power receptacle
9. Power switch
10. Express ervice code
11. Optional memory
12. Optional wireless card
1.
Copy: Enters the copy menu.
2. Fax: Enters the fax menu.
3. Scan: Enters the scan menu.
4. Setup: Enters the advanced settings.
5. None: You can set the option which is frequently uses on
main screen. Also you can change shortcut name as well.
6. : Shows the main screen.
7. : Enters the LCD brightness, the USB memory,
language, and job status.
8. : Return to the upper menu.
9. : Scroll through available options.
10. : Start a job.
Front
Front
Operator Panel
Operator Panel
Touch ScreenTouch Screen
13
1
7
1
3
4
7
8
5
2
6
9
10
11
12
14
15
1. DADF
2. Document width guides
3. Document input tray
4. Document output tray
5. Operator panel
6. Output tray (face down)
7. MPF (Multi purpose feeder)
8. Front cover
9. Tray 1
10. Optional tray 2
11. USB memory port
12. Paper output extension
13. Document glass
14. Toner cartridge
15. Express ervice code
Back
Back
1
2
3
5
4
6
8
9
10
11
12
1. USB port
2. Locking slot
3. Network port
4. Optional tray 2 cable
connector
5. Telephone line socket (Line)
6. Extension telephone socket (EXT)
7. Rear door
8. Power receptacle
9. Power switch
10. Express ervice code
11. Optional memory
12. Optional wireless card
1. USB port
2. Locking slot
3. Network port
4. Optional tray 2 cable
connector
5. Telephone line socket (Line)
6. Extension telephone socket (EXT)
7. Rear door
8. Power receptacle
9. Power switch
10. Express ervice code
11. Optional memory
12. Optional wireless card
1.
Copy: Enters the copy menu.
2. Fax: Enters the fax menu.
3. Scan: Enters the scan menu.
4. Setup: Enters the advanced settings.
5. None: You can set the option which is frequently uses on
main screen. Also you can change shortcut name as well.
6. : Shows the main screen.
7. : Enters the LCD brightness, the USB memory,
language, and job status.
8. : Return to the upper menu.
9. : Scroll through available options.
10. : Start a job.
Dell™ B2375dfw / B2375dnf Mono MFP
1
3 4
2
Setting Up Your Printer
Configuration de votre imprimante| Configurazione della stampante
Einrichten des Druckers| Configuración de la impresora
Verify the contents of the box
Vérifiez le contenu de votre carton
Verificare il contenuto della confezione
Überprüfen Sie den Inhalt der Box
Compruebe el contenido de la caja
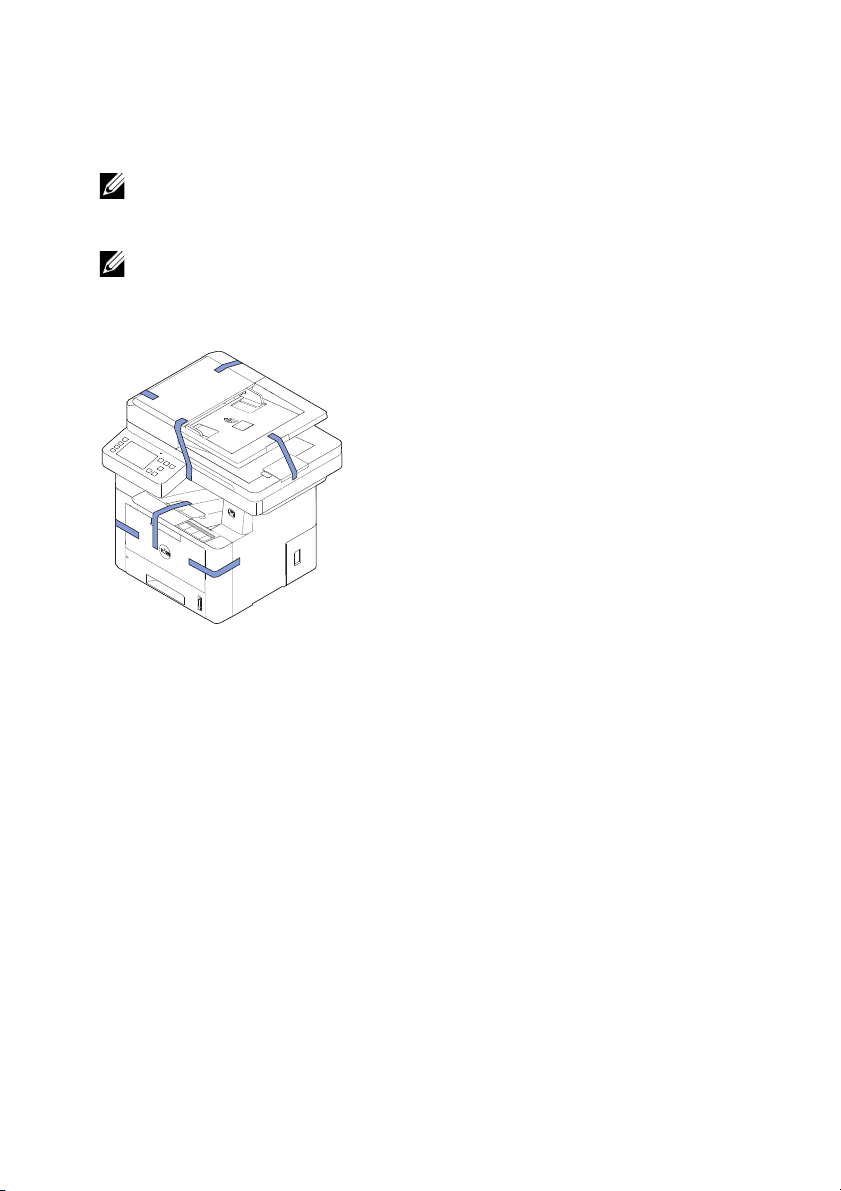
Remove the packing material
Retirez les matériaux d’emballage
Rimuovere il materiale di imballo
Entfernen Sie das Verpackungsmaterial
Retire el material de embalaje
(For Ethernet connection only)
Insert Ethernet cable
(Uniquement pour la connexion Ethernet) Insérez le câble Ethernet
(solo per la connessione Ethernet) Inserire il cavo Ethernet
(Nur für Ethernet-Verbindung) Schließen Sie das Ethernet-Kabel an
(Solamente para la conexión Ethernet) Inserte el cable Ethernet
Mettez l’imprimante sous tension
Accendere la stampante
Schalten Sie den Drucker ein
Encienda la impresora
Set the language, country, time zone, date, and time.
Wait until "Ready" appears on the screen.
Réglez la langue, le pays, le fuseau horaire, la date et l’heure. Patientez jusqu’à ce que "Prêt" s’ache à l’écran.
Impostare la lingua, il paese, il fuso orario, la data e l’ora. Attendere finché non viene visualizzato "Pronto" sullo
schermo.
Legen Sie Sprache, Land, Zeitzone, Datum und Uhrzeit fest. Warten Sie, bis "Bereit" im Display angezeigt wird.
Configure el idioma, el país, la zona horaria, la fecha y la hora. Espere hasta que aparezca "Lista" en la pantalla.
Turn on the printer
What Are You Looking For? Find It Here
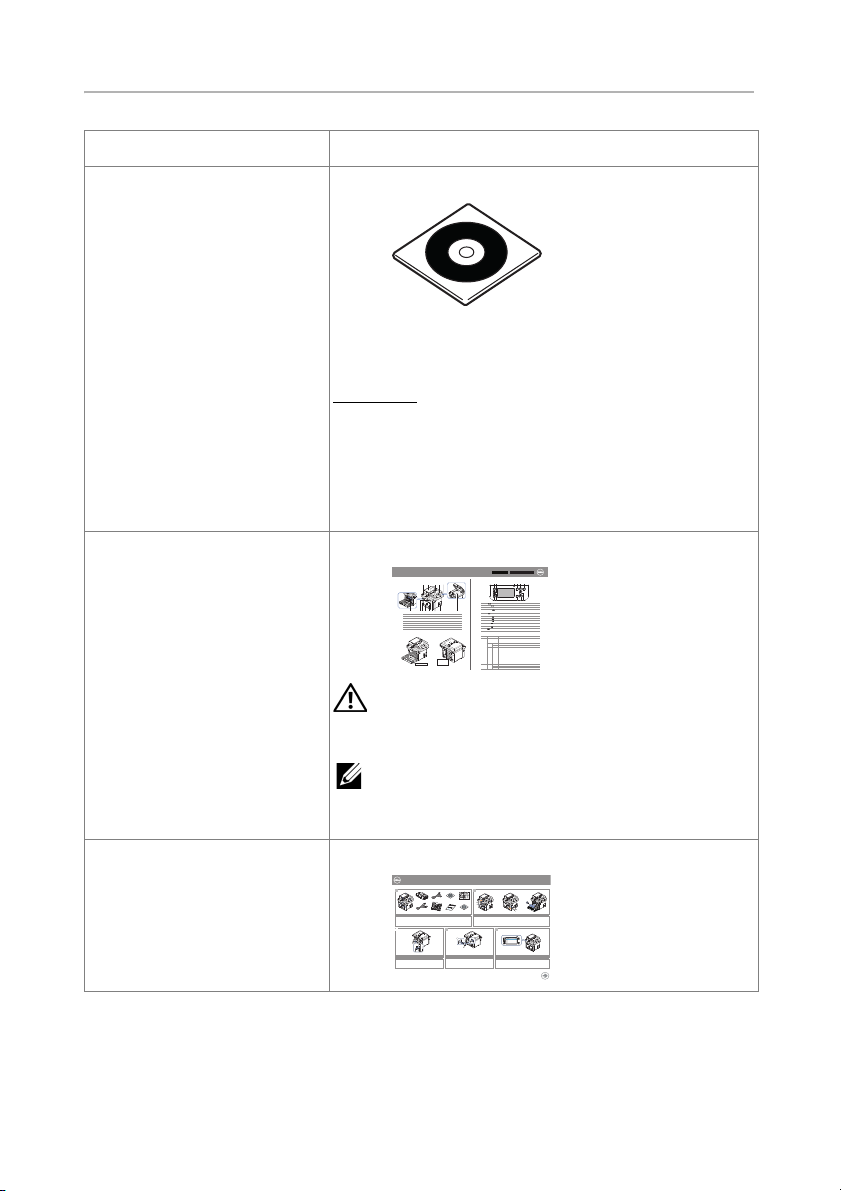
• Drivers for my printer
•My User’s Guide
• How to use my printer
Drivers and Documentation CD
You can use the Drivers and Documentation CD to
install, uninstall, or reinstall drivers and utilities or
access your User’s Guide. For details, see
"
Software".
Readme files may be included on your Drivers and
Documentation CD to provide last-minute updates
about technical changes to your printer or
advanced technical reference material for
experienced users or technicians.
Quick Reference Guide
CAUTION: Read and follow all safety
instructions in your Important Information
prior to setting up and operating your printer.
NOTE: Quick Reference Guide may not be
provided with your product depending on
your country.
•
How to set up my
printer
Setup diagram
Dell 2355dn MFP Quick Reference Guide
- 4 -
Page 6
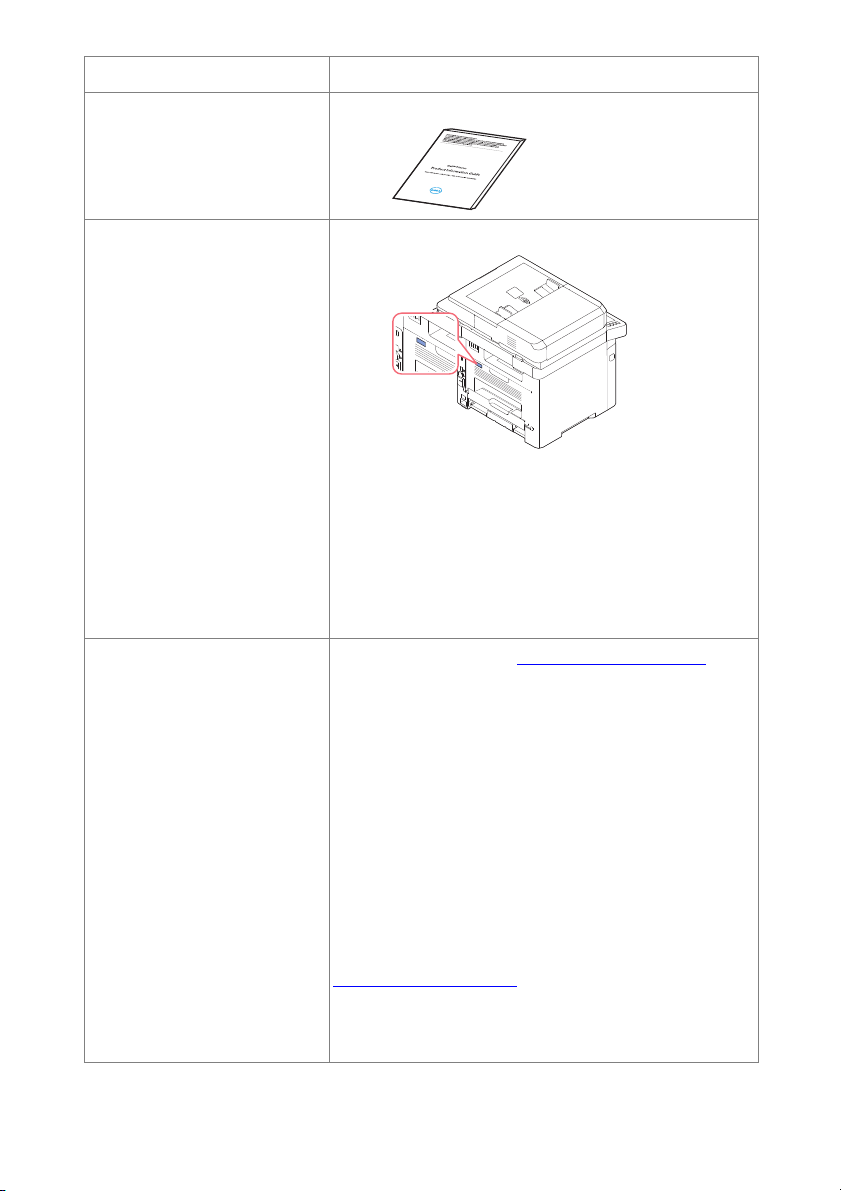
What Are You Looking For? Find It Here
• Safety information
• Warranty information
•Regulatory Notice
Express Service Code and
Service Tag
• Latest drivers for my
printer
• Answers to technical
service and support
questions
• Documentation for my
printer
Important Information
Express Service Code and Service Tag
Identify your printer when you use
www.dell.com/support or contact technical
support.
Enter the Express Service Code and Service Tag to
direct your call when contacting technical support.
The Express Service Code is not available in all
countries.
Dell Support Website: www.dell.com/support
The Dell Support Website provides several online
tools, including:
• Solutions - Troubleshooting hints and tips, articles
from technicians, and online courses
• Upgrades - Upgrade information for components,
such as memory
• Customer Care - Contact information, order
status, warranty, and repair information
• Downloads - Drivers
• Reference - Printer documentation and product
specifications
You can access Dell Support at
www.dell.com/support
WELCOME TO DELL SUPPORT page, and fill in the
requested details to access help tools and
information.
. Select your region on the
- 5 -
Page 7

Contents
Dell™ B2375dfw/ B2375dnf Mono MFP User’s Guide . . . . . . . . . . . . . . . 1
Contacting Dell . . . . . . . . . . . . . . . . . . . . . . . . . . . . . . . . . . . . . . . . . . . . . . . . 1
Finding Information . . . . . . . . . . . . . . . . . . . . . . . . . . . . . . . . . . . . . . . . . . . . 4
About . . . . . . . . . . . . . . . . . . . . . . . . . . . . . . . . . . . . . . . . . . 18
Unpacking Your Printer . . . . . . . . . . . . . . . . . . . . . . . . . . . . . . . . . . . . . . . . 19
About Your Printer. . . . . . . . . . . . . . . . . . . . . . . . . . . . . . . . . . . . . . . . . . . . . 21
Front View . . . . . . . . . . . . . . . . . . . . . . . . . . . . . . . . . . . . . . . . . . . . . . . 21
Rear View . . . . . . . . . . . . . . . . . . . . . . . . . . . . . . . . . . . . . . . . . . . . . . . . 22
Operator Panel Button Functions. . . . . . . . . . . . . . . . . . . . . . . . . . . . 23
Introducing the Screen. . . . . . . . . . . . . . . . . . . . . . . . . . . . . . . . . . . . . . . . . 25
Home screen mode . . . . . . . . . . . . . . . . . . . . . . . . . . . . . . . . . . . . . . . 25
All Applications screen mode . . . . . . . . . . . . . . . . . . . . . . . . . . . . . . . 28
Editing the Home Screen. . . . . . . . . . . . . . . . . . . . . . . . . . . . . . . . . . . 29
Searching application for an entry . . . . . . . . . . . . . . . . . . . . . . . . . . . 30
Understanding the Keyboard. . . . . . . . . . . . . . . . . . . . . . . . . . . . . . . . 30
User Profile. . . . . . . . . . . . . . . . . . . . . . . . . . . . . . . . . . . . . . . . . . . . . . . 31
Log In . . . . . . . . . . . . . . . . . . . . . . . . . . . . . . . . . . . . . . . . . . . . . . . . . . . 31
Setting the Job Management . . . . . . . . . . . . . . . . . . . . . . . . . . . . . . . 32
Internal Fonts . . . . . . . . . . . . . . . . . . . . . . . . . . . . . . . . . . . . . . . . . . . . . . . . . 32
Printing the PCL Font list . . . . . . . . . . . . . . . . . . . . . . . . . . . . . . . . . . . 32
Printing the PS3 Font list . . . . . . . . . . . . . . . . . . . . . . . . . . . . . . . . . . . 32
Setting up the hardware. . . . . . . . . . . . . . . . . . . . . . . . . . . . . . . . . . . . . . . . 33
Installing the Toner Cartridge. . . . . . . . . . . . . . . . . . . . . . . . . . . . . . . . . . . 34
Loading Paper. . . . . . . . . . . . . . . . . . . . . . . . . . . . . . . . . . . . . . . . . . . . . . . . . 37
Making Connections . . . . . . . . . . . . . . . . . . . . . . . . . . . . . . . . . . . . . . . . . . . 41
Connecting the Telephone Line . . . . . . . . . . . . . . . . . . . . . . . . . . . . . 41
Connecting the Printer Cable . . . . . . . . . . . . . . . . . . . . . . . . . . . . . . . 44
Powering on the Printer. . . . . . . . . . . . . . . . . . . . . . . . . . . . . . . . . . . . . . . . 46
Setting fax setup boot sequence . . . . . . . . . . . . . . . . . . . . . . . . . . . . 47
- 6 -
Page 8

Using USB memory device. . . . . . . . . . . . . . . . . . . . . . . . . . . . . . . . . . . . . . 47
About USB Memory . . . . . . . . . . . . . . . . . . . . . . . . . . . . . . . . . . . . . . . 47
Plugging in a USB memory key. . . . . . . . . . . . . . . . . . . . . . . . . . . . . . 47
Direct USB . . . . . . . . . . . . . . . . . . . . . . . . . . . . . . . . . . . . . . . . . . . . . . . 48
Scan to USB . . . . . . . . . . . . . . . . . . . . . . . . . . . . . . . . . . . . . . . . . . . . . . 49
Changing the Scan Feature Settings . . . . . . . . . . . . . . . . . . . . . . . . . 50
Managing the USB Memory . . . . . . . . . . . . . . . . . . . . . . . . . . . . . . . . . . . . . 51
Deleting an Image File . . . . . . . . . . . . . . . . . . . . . . . . . . . . . . . . . . . . . 51
Printing from a USB memory device . . . . . . . . . . . . . . . . . . . . . . . . . 51
Viewing the USB Memory Status. . . . . . . . . . . . . . . . . . . . . . . . . . . . . 52
Import (Administrator only) . . . . . . . . . . . . . . . . . . . . . . . . . . . . . . . . . 52
Export (Administrator only) . . . . . . . . . . . . . . . . . . . . . . . . . . . . . . . . . 53
Setting up Address Book . . . . . . . . . . . . . . . . . . . . . . . . . . . . . . . . . . . . . . . 53
Storing Individual address . . . . . . . . . . . . . . . . . . . . . . . . . . . . . . . . . . 53
Using speed dial numbers . . . . . . . . . . . . . . . . . . . . . . . . . . . . . . . . . . 53
Storing Group address . . . . . . . . . . . . . . . . . . . . . . . . . . . . . . . . . . . . . 54
Editing group dial numbers . . . . . . . . . . . . . . . . . . . . . . . . . . . . . . . . . 54
Searching the address book for an entry. . . . . . . . . . . . . . . . . . . . . . 54
Exporting Address Book (Administrator only) . . . . . . . . . . . . . . . . . . 55
Importing Address Book (Administrator only) . . . . . . . . . . . . . . . . . . 55
Printing Address Book . . . . . . . . . . . . . . . . . . . . . . . . . . . . . . . . . . . . . 56
Using Favorite Menu (Administrator only). . . . . . . . . . . . . . . . . . . . . . . . 56
Creating Favorite Menu . . . . . . . . . . . . . . . . . . . . . . . . . . . . . . . . . . . . 56
Email Setup (Administrator only) . . . . . . . . . . . . . . . . . . . . . . . . . . . . . . . . 57
Setting up the Email . . . . . . . . . . . . . . . . . . . . . . . . . . . . . . . . . . . . . . . 57
Menu Overview . . . . . . . . . . . . . . . . . . . . . . . . . . . . . . . . . 58
Dell™ B2375dfw/ B2375dnf Mono MFP Menu Functions . . . . . . . . . . 59
Printing the Printer Setting and Op-panel Menu Setting. . . . . . . . . . . 61
Printing the Printer Setting. . . . . . . . . . . . . . . . . . . . . . . . . . . . . . . . . . 61
Printing the Op-panel Menu setting. . . . . . . . . . . . . . . . . . . . . . . . . . 61
Access Google Drive . . . . . . . . . . . . . . . . . . . . . . . . . . . . . . . . . . . . . . . . . . . 61
Scan to Google Drive . . . . . . . . . . . . . . . . . . . . . . . . . . . . . . . . . . . . . . 62
Print from Google Drive . . . . . . . . . . . . . . . . . . . . . . . . . . . . . . . . . . . . 62
Scan to SharePoint Online. . . . . . . . . . . . . . . . . . . . . . . . . . . . . . . . . . . . . . 63
- 7 -
Page 9

Scan to SharePoint® Online . . . . . . . . . . . . . . . . . . . . . . . . . . . . . . . . 63
My Files . . . . . . . . . . . . . . . . . . . . . . . . . . . . . . . . . . . . . . . . . . . . . . . . . . . . . . . 64
Creating a My Files . . . . . . . . . . . . . . . . . . . . . . . . . . . . . . . . . . . . . . . . 64
Using My Files . . . . . . . . . . . . . . . . . . . . . . . . . . . . . . . . . . . . . . . . . . . . 64
My Forms . . . . . . . . . . . . . . . . . . . . . . . . . . . . . . . . . . . . . . . . . . . . . . . . . . . . . 65
Scanning a Form . . . . . . . . . . . . . . . . . . . . . . . . . . . . . . . . . . . . . . . . . . 65
Browse to Print . . . . . . . . . . . . . . . . . . . . . . . . . . . . . . . . . . . . . . . . . . . 65
My Calendar . . . . . . . . . . . . . . . . . . . . . . . . . . . . . . . . . . . . . . . . . . . . . . . . . . 67
Machine Setup . . . . . . . . . . . . . . . . . . . . . . . . . . . . . . . . . . . . . . . . . . . . . . . . 68
Setting the Machine ID (Administrator only) . . . . . . . . . . . . . . . . . . . 68
Changing the Display Language (Administrator only) . . . . . . . . . . . 68
Selecting Country (Administrator only) . . . . . . . . . . . . . . . . . . . . . . . 68
Setting Day light Saving (Administrator only) . . . . . . . . . . . . . . . . . . 68
Power Save Mode (Administrator only) . . . . . . . . . . . . . . . . . . . . . . . 69
Setting the Time and Date (Administrator only) . . . . . . . . . . . . . . . . 69
Setting the Clock Mode (Administrator only) . . . . . . . . . . . . . . . . . . 69
Setting the Sound/Volume (Administrator only). . . . . . . . . . . . . . . . 70
Setting the Timeout Option (Administrator only) . . . . . . . . . . . . . . . 70
Setting the Toner Save Mode (Administrator only). . . . . . . . . . . . . . 70
Setting the Timing of Toner Status Alert (Administrator only). . . . . 71
Ignoring Blank Pages (Administrator only) . . . . . . . . . . . . . . . . . . . . 71
Ignoring the Toner Low Message (Only for Fax) (Administrator only) . 71
Setting the Language (Administrator only) . . . . . . . . . . . . . . . . . . . . 71
Setting the Quick Dial (Administrator only) . . . . . . . . . . . . . . . . . . . . 72
Setting the Media Overwrite (Administrator only) . . . . . . . . . . . . . . 72
Changing Admin Password (Administrator only) . . . . . . . . . . . . . . . 72
Setting the Security (Administrator only) . . . . . . . . . . . . . . . . . . . . . . 73
Setting the Altitude Adjustment (Administrator only). . . . . . . . . . . . 74
Checking the Firmware Version (Administrator only) . . . . . . . . . . . 75
Reports . . . . . . . . . . . . . . . . . . . . . . . . . . . . . . . . . . . . . . . . . . . . . . . . . . 75
Setting the Application Management (Administrator only) . . . . . . . 77
Factory Reset (Administrator only) . . . . . . . . . . . . . . . . . . . . . . . . . . . 77
Software. . . . . . . . . . . . . . . . . . . . . . . . . . . . . . . . . . . . . . . . 78
Software Overview . . . . . . . . . . . . . . . . . . . . . . . . . . . . . . . . . . . . . . . . . . . . 79
Installing Software in Microsoft® Windows® Operating System . . . . 80
- 8 -
Page 10

Installing Dell Software for Local Printing . . . . . . . . . . . . . . . . . . . . . 81
Accessing management tools . . . . . . . . . . . . . . . . . . . . . . . . . . . . . . . . . . . 83
Firmware Update Utility . . . . . . . . . . . . . . . . . . . . . . . . . . . . . . . . . . . . . . . . 83
Using the Dell Supplies Ordering Utility. . . . . . . . . . . . . . . . . . . . . . . . . . 84
Using the Dell Printer Manager . . . . . . . . . . . . . . . . . . . . . . . . . . . . . . . . . 85
Understanding Dell Printer Manager . . . . . . . . . . . . . . . . . . . . . . . . . 85
Advanced settings user interface overview . . . . . . . . . . . . . . . . . . . . 87
Using Dell Printer Status . . . . . . . . . . . . . . . . . . . . . . . . . . . . . . . . . . . . . . . 88
Dell Printer Status overview. . . . . . . . . . . . . . . . . . . . . . . . . . . . . . . . . 88
Using Wireless Setup Utility . . . . . . . . . . . . . . . . . . . . . . . . . . . . . . . . . . . . 90
Uninstalling Software . . . . . . . . . . . . . . . . . . . . . . . . . . . . . . . . . . . . . . . . . . 91
Embedded Web Service . . . . . . . . . . . . . . . . . . . . . . . . . . 92
Embedded Web Service . . . . . . . . . . . . . . . . . . . . . . . . . . . . . . . . . . . . . . . . 93
What is Embedded Web Service . . . . . . . . . . . . . . . . . . . . . . . . . . . . . . . . . 93
Required web browser . . . . . . . . . . . . . . . . . . . . . . . . . . . . . . . . . . . . . . . . . 93
Logging into Embedded Web Service. . . . . . . . . . . . . . . . . . . . . . . . . . . . 94
Embedded Web Service overview . . . . . . . . . . . . . . . . . . . . . . . . . . . . . . . 94
Information tab . . . . . . . . . . . . . . . . . . . . . . . . . . . . . . . . . . . . . . . . . . . 94
Address Book tab . . . . . . . . . . . . . . . . . . . . . . . . . . . . . . . . . . . . . . . . . 95
Settings tab. . . . . . . . . . . . . . . . . . . . . . . . . . . . . . . . . . . . . . . . . . . . . . . 98
Network Settings tab . . . . . . . . . . . . . . . . . . . . . . . . . . . . . . . . . . . . . 104
Security tab . . . . . . . . . . . . . . . . . . . . . . . . . . . . . . . . . . . . . . . . . . . . . 116
Maintenance tab . . . . . . . . . . . . . . . . . . . . . . . . . . . . . . . . . . . . . . . . . 128
Paper Handling . . . . . . . . . . . . . . . . . . . . . . . . . . . . . . . . 130
Print Media Guidelines . . . . . . . . . . . . . . . . . . . . . . . . . . . . . . . . . . . . . . . . 131
Paper . . . . . . . . . . . . . . . . . . . . . . . . . . . . . . . . . . . . . . . . . . . . . . . . . . . 131
Transparencies. . . . . . . . . . . . . . . . . . . . . . . . . . . . . . . . . . . . . . . . . . . 135
Envelopes . . . . . . . . . . . . . . . . . . . . . . . . . . . . . . . . . . . . . . . . . . . . . . . 135
Labels . . . . . . . . . . . . . . . . . . . . . . . . . . . . . . . . . . . . . . . . . . . . . . . . . . 137
Card Stock . . . . . . . . . . . . . . . . . . . . . . . . . . . . . . . . . . . . . . . . . . . . . . 137
- 9 -
Page 11

Storing Print Media . . . . . . . . . . . . . . . . . . . . . . . . . . . . . . . . . . . . . . . . . . . 138
Identifying Print Media Sources and Specifications . . . . . . . . . . . . . . 138
Selecting an Output Location . . . . . . . . . . . . . . . . . . . . . . . . . . . . . . . . . . 142
Printing to the Output Tray (Face down) . . . . . . . . . . . . . . . . . . . . . 143
Printing to the Rear Door (Face up) . . . . . . . . . . . . . . . . . . . . . . . . . 143
Loading Print Media in the Paper Tray . . . . . . . . . . . . . . . . . . . . . . . . . . 144
Using the MPF (Multi purpose feeder) . . . . . . . . . . . . . . . . . . . . . . . . . . 145
Setting the Paper Size . . . . . . . . . . . . . . . . . . . . . . . . . . . . . . . . . . . . . . . . . 148
Setting the Paper Type . . . . . . . . . . . . . . . . . . . . . . . . . . . . . . . . . . . . . . . . 148
Setting the Paper Margin . . . . . . . . . . . . . . . . . . . . . . . . . . . . . . . . . . . . . . 148
Setting the Paper Tray. . . . . . . . . . . . . . . . . . . . . . . . . . . . . . . . . . . . . . . . . 149
Setting the Tray linking . . . . . . . . . . . . . . . . . . . . . . . . . . . . . . . . . . . . 149
Substitute Tray . . . . . . . . . . . . . . . . . . . . . . . . . . . . . . . . . . . . . . . . . . . 149
Setting the Default Tray . . . . . . . . . . . . . . . . . . . . . . . . . . . . . . . . . . . 149
Setting the paper feeding flow . . . . . . . . . . . . . . . . . . . . . . . . . . . . . 150
Setting the paper auto feeding . . . . . . . . . . . . . . . . . . . . . . . . . . . . . 150
Substitute Size . . . . . . . . . . . . . . . . . . . . . . . . . . . . . . . . . . . . . . . . . . . 150
Configure MPF. . . . . . . . . . . . . . . . . . . . . . . . . . . . . . . . . . . . . . . . . . . 150
Bypass Mode . . . . . . . . . . . . . . . . . . . . . . . . . . . . . . . . . . . . . . . . . . . . 151
Tray Mode. . . . . . . . . . . . . . . . . . . . . . . . . . . . . . . . . . . . . . . . . . . . . . . 151
Printing . . . . . . . . . . . . . . . . . . . . . . . . . . . . . . . . . . . . . . . 152
Printing a Document. . . . . . . . . . . . . . . . . . . . . . . . . . . . . . . . . . . . . . . . . . 153
Canceling a Print Job . . . . . . . . . . . . . . . . . . . . . . . . . . . . . . . . . . . . . 153
Opening printing preferences . . . . . . . . . . . . . . . . . . . . . . . . . . . . . . . . . 154
Basic Tab. . . . . . . . . . . . . . . . . . . . . . . . . . . . . . . . . . . . . . . . . . . . . . . . 155
Paper Tab . . . . . . . . . . . . . . . . . . . . . . . . . . . . . . . . . . . . . . . . . . . . . . . 156
Graphic Tab . . . . . . . . . . . . . . . . . . . . . . . . . . . . . . . . . . . . . . . . . . . . . 159
Dell Tab . . . . . . . . . . . . . . . . . . . . . . . . . . . . . . . . . . . . . . . . . . . . . . . . . 166
Using a Favorite Setting . . . . . . . . . . . . . . . . . . . . . . . . . . . . . . . . . . . 166
Using Help . . . . . . . . . . . . . . . . . . . . . . . . . . . . . . . . . . . . . . . . . . . . . . 167
Printing Multiple Pages on One Sheet of the Paper . . . . . . . . . . . . . . 167
Change Percentage of Your Document . . . . . . . . . . . . . . . . . . . . . . . . . 169
- 10 -
Page 12

Printing Posters . . . . . . . . . . . . . . . . . . . . . . . . . . . . . . . . . . . . . . . . . . . . . . 170
Printing Booklets . . . . . . . . . . . . . . . . . . . . . . . . . . . . . . . . . . . . . . . . . . . . . 172
Printing on Both Sides of Paper . . . . . . . . . . . . . . . . . . . . . . . . . . . . . . . . 173
Using Watermarks . . . . . . . . . . . . . . . . . . . . . . . . . . . . . . . . . . . . . . . . . . . . 175
Using an Existing Watermark . . . . . . . . . . . . . . . . . . . . . . . . . . . . . . . 175
Creating a Watermark. . . . . . . . . . . . . . . . . . . . . . . . . . . . . . . . . . . . . 176
Editing a Watermark . . . . . . . . . . . . . . . . . . . . . . . . . . . . . . . . . . . . . . 176
Deleting a Watermark. . . . . . . . . . . . . . . . . . . . . . . . . . . . . . . . . . . . . 176
Using Overlays . . . . . . . . . . . . . . . . . . . . . . . . . . . . . . . . . . . . . . . . . . . . . . . 177
What is an Overlay?. . . . . . . . . . . . . . . . . . . . . . . . . . . . . . . . . . . . . . . 177
Creating a New Page Overlay . . . . . . . . . . . . . . . . . . . . . . . . . . . . . . 177
Using a Page Overlay . . . . . . . . . . . . . . . . . . . . . . . . . . . . . . . . . . . . . 179
Deleting a Page Overlay. . . . . . . . . . . . . . . . . . . . . . . . . . . . . . . . . . . 181
Copying . . . . . . . . . . . . . . . . . . . . . . . . . . . . . . . . . . . . . . . 182
Loading Paper for Copying . . . . . . . . . . . . . . . . . . . . . . . . . . . . . . . . . . . . 183
Selecting the Paper Tray. . . . . . . . . . . . . . . . . . . . . . . . . . . . . . . . . . . . . . . 183
Preparing a Document . . . . . . . . . . . . . . . . . . . . . . . . . . . . . . . . . . . . . . . . 183
Loading an Original Document . . . . . . . . . . . . . . . . . . . . . . . . . . . . . . . . 184
Making Copies . . . . . . . . . . . . . . . . . . . . . . . . . . . . . . . . . . . . . . . . . . . . . . . 187
Using Copy and Setting Options . . . . . . . . . . . . . . . . . . . . . . . . . . . . . . . 187
Number of Copies. . . . . . . . . . . . . . . . . . . . . . . . . . . . . . . . . . . . . . . . 187
Duplex. . . . . . . . . . . . . . . . . . . . . . . . . . . . . . . . . . . . . . . . . . . . . . . . . . 188
Zoom. . . . . . . . . . . . . . . . . . . . . . . . . . . . . . . . . . . . . . . . . . . . . . . . . . . 188
Darkness . . . . . . . . . . . . . . . . . . . . . . . . . . . . . . . . . . . . . . . . . . . . . . . . 188
Original Size . . . . . . . . . . . . . . . . . . . . . . . . . . . . . . . . . . . . . . . . . . . . . 189
Original Type . . . . . . . . . . . . . . . . . . . . . . . . . . . . . . . . . . . . . . . . . . . . 189
Tray . . . . . . . . . . . . . . . . . . . . . . . . . . . . . . . . . . . . . . . . . . . . . . . . . . . . 189
Layout . . . . . . . . . . . . . . . . . . . . . . . . . . . . . . . . . . . . . . . . . . . . . . . . . . 189
Collation . . . . . . . . . . . . . . . . . . . . . . . . . . . . . . . . . . . . . . . . . . . . . . . . 195
Stamp . . . . . . . . . . . . . . . . . . . . . . . . . . . . . . . . . . . . . . . . . . . . . . . . . . 195
Watermark . . . . . . . . . . . . . . . . . . . . . . . . . . . . . . . . . . . . . . . . . . . . . . 196
Eco Copying. . . . . . . . . . . . . . . . . . . . . . . . . . . . . . . . . . . . . . . . . . . . . 196
Changing the Default Settings . . . . . . . . . . . . . . . . . . . . . . . . . . . . . . . . . 197
- 11 -
Page 13

Scanning . . . . . . . . . . . . . . . . . . . . . . . . . . . . . . . . . . . . . . 198
Scanning Overview . . . . . . . . . . . . . . . . . . . . . . . . . . . . . . . . . . . . . . . . . . . 199
Scan to Email. . . . . . . . . . . . . . . . . . . . . . . . . . . . . . . . . . . . . . . . . . . . . . . . . 200
Setting up an email account . . . . . . . . . . . . . . . . . . . . . . . . . . . . . . 200
Scanning and sending an email . . . . . . . . . . . . . . . . . . . . . . . . . . . 200
Scan to PC/Network PC . . . . . . . . . . . . . . . . . . . . . . . . . . . . . . . . . . . . . . . 201
Scan to Network Folder/FTP Server . . . . . . . . . . . . . . . . . . . . . . . . . . . . 202
Setting up an Network Folder/FTP server . . . . . . . . . . . . . . . . . . . . 202
Scanning and sending to Network Folder/FTP server . . . . . . . . . . 203
Scan to Fax Server . . . . . . . . . . . . . . . . . . . . . . . . . . . . . . . . . . . . . . . . . . . . 204
Scan to WSD . . . . . . . . . . . . . . . . . . . . . . . . . . . . . . . . . . . . . . . . . . . . . . . . . 205
Installing a WSD Printer Driver . . . . . . . . . . . . . . . . . . . . . . . . . . . . . 205
Scanning using the WSD feature. . . . . . . . . . . . . . . . . . . . . . . . . . . . 205
Email & Fax . . . . . . . . . . . . . . . . . . . . . . . . . . . . . . . . . . . . . . . . . . . . . . . . . . 206
Scanning from image editing program. . . . . . . . . . . . . . . . . . . . . . . . . . 207
Scanning using the WIA driver . . . . . . . . . . . . . . . . . . . . . . . . . . . . . . . . . 208
Networking . . . . . . . . . . . . . . . . . . . . . . . . . . . . . . . . . . . . 209
Network setup (Administrator only) . . . . . . . . . . . . . . . . . . . . . . . . . . . . 210
Useful network programs . . . . . . . . . . . . . . . . . . . . . . . . . . . . . . . . . . . . . 211
Dell Printer Configuration Web Tool . . . . . . . . . . . . . . . . . . . . . . . . 211
SetIP wired network setup . . . . . . . . . . . . . . . . . . . . . . . . . . . . . . . . . 211
Printing a network configuration report . . . . . . . . . . . . . . . . . . . . . 211
Printing Across a Network . . . . . . . . . . . . . . . . . . . . . . . . . . . . . . . . . 212
Setting IP address . . . . . . . . . . . . . . . . . . . . . . . . . . . . . . . . . . . . . . . . . . . . 212
IPv4 configuration using SetIP . . . . . . . . . . . . . . . . . . . . . . . . . . . . . 212
Installing driver over the network . . . . . . . . . . . . . . . . . . . . . . . . . . . . . . 213
IPv6 configuration . . . . . . . . . . . . . . . . . . . . . . . . . . . . . . . . . . . . . . . . . . . . 216
From the control panel. . . . . . . . . . . . . . . . . . . . . . . . . . . . . . . . . . . . 216
Activating IPv6 . . . . . . . . . . . . . . . . . . . . . . . . . . . . . . . . . . . . . . . . . . . 217
Setting IPv6 addresses . . . . . . . . . . . . . . . . . . . . . . . . . . . . . . . . . . . . 217
Wireless network setup (Dell B2375dfw only) . . . . . . . . . . . . . . . . . . . 218
- 12 -
Page 14

Getting started. . . . . . . . . . . . . . . . . . . . . . . . . . . . . . . . . . . . . . . . . . . 218
Introducing wireless set up methods . . . . . . . . . . . . . . . . . . . . . . . . 219
Using the WPS button (Dell B2375dfw Mono MFP only) . . . . . . . . . . 220
Items to prepare . . . . . . . . . . . . . . . . . . . . . . . . . . . . . . . . . . . . . . . . . 220
Choosing your type . . . . . . . . . . . . . . . . . . . . . . . . . . . . . . . . . . . . . . 220
Using the menu button . . . . . . . . . . . . . . . . . . . . . . . . . . . . . . . . . . . 222
Setup using Windows (Dell B2375dfw Mono MFP only). . . . . . . . . . . 223
Dell Printer Easy Wi-Fi Install. . . . . . . . . . . . . . . . . . . . . . . . . . . . . . . 223
Access point via USB cable in Windows . . . . . . . . . . . . . . . . . . . . . 227
Ad hoc via USB cable in Windows . . . . . . . . . . . . . . . . . . . . . . . . . . 232
Using a network cable . . . . . . . . . . . . . . . . . . . . . . . . . . . . . . . . . . . . 235
Turning the Wi-Fi network on/off (Dell B2375dfw Mono MFP only) 236
Setting the Wi-Fi Direct for mobile printing . . . . . . . . . . . . . . . . . . . . . 237
Setting up Wi-Fi Direct . . . . . . . . . . . . . . . . . . . . . . . . . . . . . . . . . . . . 237
Setting up the mobile device. . . . . . . . . . . . . . . . . . . . . . . . . . . . . . . 238
Troubleshooting for wireless network . . . . . . . . . . . . . . . . . . . . . . . . . . 239
Other problems . . . . . . . . . . . . . . . . . . . . . . . . . . . . . . . . . . . . . . . . . 240
Mobile Printing. . . . . . . . . . . . . . . . . . . . . . . . . . . . . . . . . . . . . . . . . . . . . . . 242
Android™ OS . . . . . . . . . . . . . . . . . . . . . . . . . . . . . . . . . . . . . . . . . . . . 242
Apple® iOS. . . . . . . . . . . . . . . . . . . . . . . . . . . . . . . . . . . . . . . . . . . . . . 242
AirPrint . . . . . . . . . . . . . . . . . . . . . . . . . . . . . . . . . . . . . . . . . . . . . . . . . . . . . . 243
Setting up AirPrint . . . . . . . . . . . . . . . . . . . . . . . . . . . . . . . . . . . . . . . . 243
Printing via AirPrint . . . . . . . . . . . . . . . . . . . . . . . . . . . . . . . . . . . . . . . 243
Google Cloud Print™ . . . . . . . . . . . . . . . . . . . . . . . . . . . . . . . . . . . . . . . . . 244
Registering your Google account to the printer . . . . . . . . . . . . . . 244
Printing with Google Cloud Print™ . . . . . . . . . . . . . . . . . . . . . . . . . 245
Faxing . . . . . . . . . . . . . . . . . . . . . . . . . . . . . . . . . . . . . . . . . 246
Setting the Printer ID . . . . . . . . . . . . . . . . . . . . . . . . . . . . . . . . . . . . . . . . . 247
Setting up the Fax System . . . . . . . . . . . . . . . . . . . . . . . . . . . . . . . . . . . . . 247
Changing the Fax Setup Options . . . . . . . . . . . . . . . . . . . . . . . . . . . 247
Available Fax Defaults Options . . . . . . . . . . . . . . . . . . . . . . . . . . . . . 247
Testing Fax line connection . . . . . . . . . . . . . . . . . . . . . . . . . . . . . . . . 248
- 13 -
Page 15

Sending a Fax . . . . . . . . . . . . . . . . . . . . . . . . . . . . . . . . . . . . . . . . . . . . . . . . 249
Adjusting the Document Darkness. . . . . . . . . . . . . . . . . . . . . . . . . . 249
Adjusting the Document Quality . . . . . . . . . . . . . . . . . . . . . . . . . . . 249
Sending a Fax. . . . . . . . . . . . . . . . . . . . . . . . . . . . . . . . . . . . . . . . . . . . 250
Speed Dial Fax . . . . . . . . . . . . . . . . . . . . . . . . . . . . . . . . . . . . . . . . . . . 251
Group Dial Fax . . . . . . . . . . . . . . . . . . . . . . . . . . . . . . . . . . . . . . . . . . . 252
On Hook Fax . . . . . . . . . . . . . . . . . . . . . . . . . . . . . . . . . . . . . . . . . . . . 253
Confirming Transmissions . . . . . . . . . . . . . . . . . . . . . . . . . . . . . . . . . 253
Automatic Redialing . . . . . . . . . . . . . . . . . . . . . . . . . . . . . . . . . . . . . . 254
Redialing fax number . . . . . . . . . . . . . . . . . . . . . . . . . . . . . . . . . . . . . 254
Receiving a Fax . . . . . . . . . . . . . . . . . . . . . . . . . . . . . . . . . . . . . . . . . . . . . . . 255
About Receiving Modes . . . . . . . . . . . . . . . . . . . . . . . . . . . . . . . . . . . 255
Loading Paper for Receiving Faxes. . . . . . . . . . . . . . . . . . . . . . . . . . 255
Receiving Automatically in the Fax Mode . . . . . . . . . . . . . . . . . . . . 255
Receiving Automatically in the Ans/Fax Mode . . . . . . . . . . . . . . . . 255
Receiving Manually Using an Extension Telephone . . . . . . . . . . . . 255
Receiving Faxes Using the DRPD Mode. . . . . . . . . . . . . . . . . . . . . . 256
Receiving Faxes in the Memory. . . . . . . . . . . . . . . . . . . . . . . . . . . . . 257
Automatic Dialing . . . . . . . . . . . . . . . . . . . . . . . . . . . . . . . . . . . . . . . . . . . . 257
Speed Dialing . . . . . . . . . . . . . . . . . . . . . . . . . . . . . . . . . . . . . . . . . . . . 257
Group . . . . . . . . . . . . . . . . . . . . . . . . . . . . . . . . . . . . . . . . . . . . . . . . . . 259
Other Ways to Fax . . . . . . . . . . . . . . . . . . . . . . . . . . . . . . . . . . . . . . . . . . . . 260
Sending a fax in the computer . . . . . . . . . . . . . . . . . . . . . . . . . . . . 260
Sending a Delayed Fax . . . . . . . . . . . . . . . . . . . . . . . . . . . . . . . . . . . 260
Fax Forward to Email addresses . . . . . . . . . . . . . . . . . . . . . . . . . . . . 261
Additional Features . . . . . . . . . . . . . . . . . . . . . . . . . . . . . . . . . . . . . . . . . . . 261
Toll Save Mode (Administrator only). . . . . . . . . . . . . . . . . . . . . . . . . 261
Using the Secure Receiving Mode (Administrator only) . . . . . . . . 262
Using Advanced Fax Settings. . . . . . . . . . . . . . . . . . . . . . . . . . . . . . . 263
Mac . . . . . . . . . . . . . . . . . . . . . . . . . . . . . . . . . . . . . . . . . . . 267
Installing Software for Mac . . . . . . . . . . . . . . . . . . . . . . . . . . . . . . . . . . . . 268
Install the printer driver . . . . . . . . . . . . . . . . . . . . . . . . . . . . . . . . . . 268
ReInstallation the printer driver. . . . . . . . . . . . . . . . . . . . . . . . . . . . . 269
Installing driver over the network . . . . . . . . . . . . . . . . . . . . . . . . . . . 269
Printing. . . . . . . . . . . . . . . . . . . . . . . . . . . . . . . . . . . . . . . . . . . . . . . . . . . . . . 270
- 14 -
Page 16

Printing a Document . . . . . . . . . . . . . . . . . . . . . . . . . . . . . . . . . . . . . 270
Changing Printer Settings . . . . . . . . . . . . . . . . . . . . . . . . . . . . . . . . . 270
Printing Multiple Pages on One Sheet . . . . . . . . . . . . . . . . . . . . . . . 270
Printing on Both Sides of the Paper . . . . . . . . . . . . . . . . . . . . . . . . . 270
Scanning . . . . . . . . . . . . . . . . . . . . . . . . . . . . . . . . . . . . . . . . . . . . . . . . . . . . 272
Wireless network setup . . . . . . . . . . . . . . . . . . . . . . . . . . . . . . . . . . . . . . . 272
Access point via USB cable in Mac . . . . . . . . . . . . . . . . . . . . . . . . . . 272
Ad hoc via USB cable in Mac . . . . . . . . . . . . . . . . . . . . . . . . . . . . . . . 274
Linux . . . . . . . . . . . . . . . . . . . . . . . . . . . . . . . . . . . . . . . . . . 277
Getting Started. . . . . . . . . . . . . . . . . . . . . . . . . . . . . . . . . . . . . . . . . . . . . . . 278
Installing the MFP Driver . . . . . . . . . . . . . . . . . . . . . . . . . . . . . . . . . . . . . . 278
System Requirements. . . . . . . . . . . . . . . . . . . . . . . . . . . . . . . . . . . . . 278
Installing the MFP Driver . . . . . . . . . . . . . . . . . . . . . . . . . . . . . . . . . . 278
Reinstalling the MFP Driver . . . . . . . . . . . . . . . . . . . . . . . . . . . . . . . . 279
Installing driver over the network . . . . . . . . . . . . . . . . . . . . . . . . . . . . . . 280
Install the Linux driver and add network printer . . . . . . . . . . . . . . 280
Add a network printer. . . . . . . . . . . . . . . . . . . . . . . . . . . . . . . . . . . . 280
Using the Unified Driver Configurator . . . . . . . . . . . . . . . . . . . . . . . . . . 281
Printers Configuration . . . . . . . . . . . . . . . . . . . . . . . . . . . . . . . . . . . . 282
MFP Ports Configuration . . . . . . . . . . . . . . . . . . . . . . . . . . . . . . . . . 284
Printing a Document. . . . . . . . . . . . . . . . . . . . . . . . . . . . . . . . . . . . . . . . . . 285
Printing from Applications . . . . . . . . . . . . . . . . . . . . . . . . . . . . . . . . . 285
Printing Files . . . . . . . . . . . . . . . . . . . . . . . . . . . . . . . . . . . . . . . . . . . . . . . . . 285
Configuring Printer Properties . . . . . . . . . . . . . . . . . . . . . . . . . . . . . . . . . 286
Scanning a Document . . . . . . . . . . . . . . . . . . . . . . . . . . . . . . . . . . . . . . . . 287
Editing an image with Image Manager. . . . . . . . . . . . . . . . . . . . . . 289
Unix. . . . . . . . . . . . . . . . . . . . . . . . . . . . . . . . . . . . . . . . . . . 290
Installing driver over the network . . . . . . . . . . . . . . . . . . . . . . . . . . . . . . 291
System Requirements. . . . . . . . . . . . . . . . . . . . . . . . . . . . . . . . . . . . . 291
Install the Unix driver and add network printer. . . . . . . . . . . . . . . . 291
- 15 -
Page 17

Uninstalling the printer driver . . . . . . . . . . . . . . . . . . . . . . . . . . . . . . . . . 292
Setting up the printer . . . . . . . . . . . . . . . . . . . . . . . . . . . . . . . . . . . . . . . . . 292
Printing a Document. . . . . . . . . . . . . . . . . . . . . . . . . . . . . . . . . . . . . . . . . . 293
Changing the machine settings . . . . . . . . . . . . . . . . . . . . . . . . . . . . . . . . 293
General tab. . . . . . . . . . . . . . . . . . . . . . . . . . . . . . . . . . . . . . . . . . . . . . 293
Image tab . . . . . . . . . . . . . . . . . . . . . . . . . . . . . . . . . . . . . . . . . . . . . . . 294
Text tab . . . . . . . . . . . . . . . . . . . . . . . . . . . . . . . . . . . . . . . . . . . . . . . . . 294
Margins tab. . . . . . . . . . . . . . . . . . . . . . . . . . . . . . . . . . . . . . . . . . . . . . 294
Printer-Specific Settings tab . . . . . . . . . . . . . . . . . . . . . . . . . . . . . . . 294
Maintenance. . . . . . . . . . . . . . . . . . . . . . . . . . . . . . . . . . . 295
Clearing the printer NVRAM . . . . . . . . . . . . . . . . . . . . . . . . . . . . . . . . . . . 296
Backing up Data . . . . . . . . . . . . . . . . . . . . . . . . . . . . . . . . . . . . . . . . . . . . . . 297
Backing up Data . . . . . . . . . . . . . . . . . . . . . . . . . . . . . . . . . . . . . . . . . 297
Restoring Data . . . . . . . . . . . . . . . . . . . . . . . . . . . . . . . . . . . . . . . . . . . 297
Cleaning Your Printer . . . . . . . . . . . . . . . . . . . . . . . . . . . . . . . . . . . . . . . . . 298
Cleaning the Exterior . . . . . . . . . . . . . . . . . . . . . . . . . . . . . . . . . . . . 298
Cleaning the Interior. . . . . . . . . . . . . . . . . . . . . . . . . . . . . . . . . . . . . 298
Cleaning the scanner . . . . . . . . . . . . . . . . . . . . . . . . . . . . . . . . . . . . 300
Maintaining the Toner Cartridge . . . . . . . . . . . . . . . . . . . . . . . . . . . . . . . 301
Storing the Toner Cartridge . . . . . . . . . . . . . . . . . . . . . . . . . . . . . . . . 301
Redistributing Toner . . . . . . . . . . . . . . . . . . . . . . . . . . . . . . . . . . . . . . 301
Replacing the Toner Cartridge . . . . . . . . . . . . . . . . . . . . . . . . . . . . . 303
Cleaning the Drum . . . . . . . . . . . . . . . . . . . . . . . . . . . . . . . . . . . . . . 304
Replacement Parts. . . . . . . . . . . . . . . . . . . . . . . . . . . . . . . . . . . . . . . . . . . . 305
Ordering Supplies . . . . . . . . . . . . . . . . . . . . . . . . . . . . . . . . . . . . . . . . . . . . 306
Troubleshooting . . . . . . . . . . . . . . . . . . . . . . . . . . . . . . . 307
Clearing Jams in the DADF . . . . . . . . . . . . . . . . . . . . . . . . . . . . . . . . . . . . 308
Clearing Jams in the Paper Tray. . . . . . . . . . . . . . . . . . . . . . . . . . . . . . . . 311
Paper Feed Jam (tray 1) . . . . . . . . . . . . . . . . . . . . . . . . . . . . . . . . . . . 312
Paper Feed Jam (optional tray 2) . . . . . . . . . . . . . . . . . . . . . . . . . . . 313
MPF Jam. . . . . . . . . . . . . . . . . . . . . . . . . . . . . . . . . . . . . . . . . . . . . . . . 314
- 16 -
Page 18

Fuser Area Jam . . . . . . . . . . . . . . . . . . . . . . . . . . . . . . . . . . . . . . . . . . 315
Paper Exit Jam . . . . . . . . . . . . . . . . . . . . . . . . . . . . . . . . . . . . . . . . . . . 316
Duplex Jam . . . . . . . . . . . . . . . . . . . . . . . . . . . . . . . . . . . . . . . . . . . . . 319
Tips for Avoiding Paper Jams. . . . . . . . . . . . . . . . . . . . . . . . . . . . . . . 321
Clearing LCD Error Messages . . . . . . . . . . . . . . . . . . . . . . . . . . . . . . . . . . 321
Solving Problems . . . . . . . . . . . . . . . . . . . . . . . . . . . . . . . . . . . . . . . . . . . . . 325
Paper Feeding Problems . . . . . . . . . . . . . . . . . . . . . . . . . . . . . . . . . . 325
Printing Problems . . . . . . . . . . . . . . . . . . . . . . . . . . . . . . . . . . . . . . . . 327
Printing Quality Problems . . . . . . . . . . . . . . . . . . . . . . . . . . . . . . . . . 330
Fax Problems . . . . . . . . . . . . . . . . . . . . . . . . . . . . . . . . . . . . . . . . . . . . 335
Copying Problems. . . . . . . . . . . . . . . . . . . . . . . . . . . . . . . . . . . . . . . . 338
Scanning Problems . . . . . . . . . . . . . . . . . . . . . . . . . . . . . . . . . . . . . . . 339
Global address problems . . . . . . . . . . . . . . . . . . . . . . . . . . . . . . . . . 340
Common Windows Problems . . . . . . . . . . . . . . . . . . . . . . . . . . . . . . 341
Common Linux Problems . . . . . . . . . . . . . . . . . . . . . . . . . . . . . . . . . 342
Common Mac Problems . . . . . . . . . . . . . . . . . . . . . . . . . . . . . . . . . . 345
Troubleshooting PostScript (PS) Errors . . . . . . . . . . . . . . . . . . . . . . 346
Installing Accessories . . . . . . . . . . . . . . . . . . . . . . . . . . . 347
Installing Printer Accessories . . . . . . . . . . . . . . . . . . . . . . . . . . . . . . . . . . 348
Installing an Optional Tray 2 . . . . . . . . . . . . . . . . . . . . . . . . . . . . . . . . . . . 348
Specifications . . . . . . . . . . . . . . . . . . . . . . . . . . . . . . . . . . 352
General Specifications . . . . . . . . . . . . . . . . . . . . . . . . . . . . . . . . . . . . . . . . 353
Dell technical support policy . . . . . . . . . . . . . . . . . . . . . . . . . . . . . . . . . . 354
China only . . . . . . . . . . . . . . . . . . . . . . . . . . . . . . . . . . . . . . . . . . . . . . . . . . . 354
Contacting Dell . . . . . . . . . . . . . . . . . . . . . . . . . . . . . . . . . . . . . . . . . . . . . . 355
Warranty and return policy . . . . . . . . . . . . . . . . . . . . . . . . . . . . . . . . . . . . 355
- 17 -
Page 19

About
Unpacking Your Printer
About Your Printer
Introducing the Screen
Internal Fonts
Setting up the hardware
Installing the Toner Cartridge
Loading Paper
Making Connections
Powering on the Printer
Using USB memory device
Managing the USB Memory
Setting up Address Book
Using Favorite Menu (Administrator only)
Email Setup (Administrator only)
- 18 -
Page 20
Unpacking Your Printer
Dell™ B2375dfw / B2375dnf Mono MFP
Quick Reference Guide
About Your Printer
Locating the Service Tag
Operator Panel Button Functions
Understanding the Status LED
12345
12 4356
1110 9 8 7
1011121314 9 8 7 6
1 Operator Panel
3 Document Width Guide
5 Document Output Tray
7 Control Board Cover
9 Output Tray
11 Tray 1
13 Paper Output Extension
2 Duplex Automatic Document Feeder (DADF)
4 Document Input Tray
6 Document Glass
8 USB Memory Port
10 Front Cover
12 Multipurpose Feeder (MPF)
14 Toner Cartridge
1 Home Go to home screen.
2 Log In/Out You can log in or log out.
3 Status LED Status LED indicates the status of your machine.
4 Redial/Pause Redials the recently sent fax number or received caller ID in ready mode,
or inserts a pause(-) into a fax number in edit mode.
5 Copy Start copy job using copy default setting regardless of which screen
the user is in if it is selected.
6 Power Saver You can enter or exit Power Save mode.
7 Speed Dial1 Fax image to destination from stored speed dial1.
8 Speed Dial2 Fax image to destination from stored speed dial2.
9 Wi-Fi/WPS Configures the wireless network connection easily without a computer.
(Dell B2375dfw Mono MFP only)
10 Job Status Job status shows the jobs currently running and in queue.
11 Info Gives detailed information about product feature guide machine’s info.
reports, troubleshooting guide, and quick reference guide.
LED
Status
Wireless
Status
O
Green
Orange
Blue
Blinking
On
Blinking
Blinking
On
O
Description
• The machine is o-time.
• The machine is in power save mode. When data is received,
or any button is pressed, it switches to on-line automatically.
The machine is warming up or ready to receive the data.
The machine is on-line and can be used.
• A minor error has occurred and the machine is waiting for the error to be
cleared. Check the display message. When the problem is cleared, the
machine resumes operation.
• The toner cartridge is low. Order a new toner cartridge.
You can temporarily improve print quality by redistribution.
• The toner cartridge is totally empty. Remove the old toner cartridge and
install a new one.
• A paper jam has occurred.
• There is no paper in the tray. Load paper in the tray.
• The machine has stopped due to a major error. Check the display message.
• The machine is connecting to a wireless network.
• The machine is connected to a wireless network.
• The machine is disconnected from a wireless network.
HMCWMA01
JC68-03031A00
Service Tag XXXXXXX
Service Tag
XXXXXXX
000 000 000 00
Express Service Code
1
Select a location for your printer.
CAUTION: The printer requires at least two people to lift it safely.
• Leave enough room to open the printer tray, covers, doors, and options. It is also
important to allow enough space around the printer for proper ventilation.
• Provide the proper environment:
• A firm, level surface.
• Away from the direct airflow of air conditioners, heaters, or ventilators.
• Away from sunlight, extreme humidity, or high fluctuations in temperature.
• A clean, dry, and dust free location.
• Select a level, stable place with adequate space for air circulation. See "
up the hardware".
• Do not set the machine close to the edge of your desk or table.
NOTE: Leave the printer in the box until you are ready to install it.
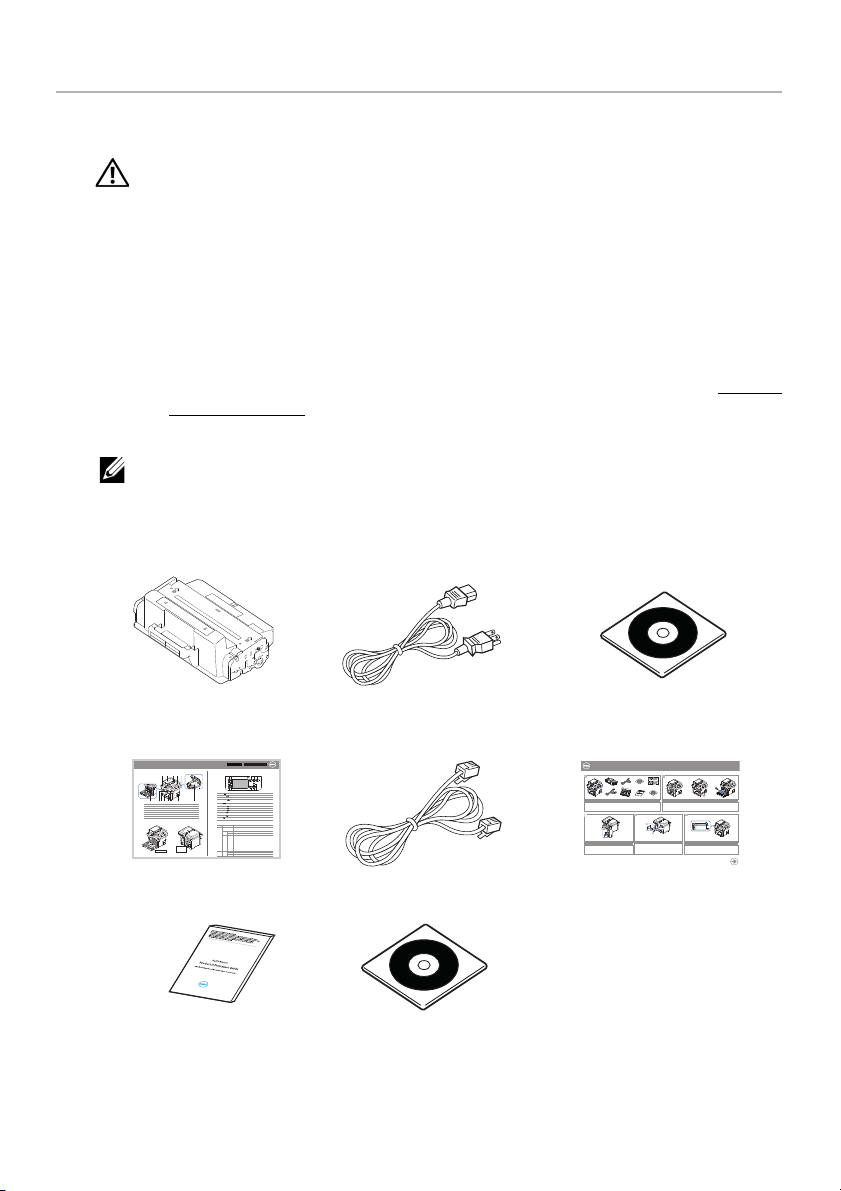
2
In addition to the
you have the following items in the box. If there is a missing item, contact Dell:
Dell B2375dfw Mono MFP
or
Dell B2375dnf Mono MFP
Setting
, ensure that
Toner cartridge
Power cord
a
Drivers and Documentation
CD
Dell™ B2375dfw / B2375dnf Mono MFP
1
Verify the contents of the box
Vérifiez le contenu de votre carton
Verificare il contenuto della confezione
Überprüfen Sie den Inhalt der Box
Compruebe el contenido de la caja
3 4
(For Ethernet connection only)
Turn on the printer
Insert Ethernet cable
Mettez l’imprimante sous tension
Accendere la stampante
(Uniquement pour la connexion Ethernet) Insérez le câble Ethernet
Schalten Sie den Drucker ein
(solo per la connessione Ethernet) Inserire il cavo Ethernet
Encienda la impresora
(Nur für Ethernet-Verbindung) Schließen Sie das Ethernet-Kabel an
(Solamente para la conexión Ethernet) Inserte el cable Ethernet
c
Quick Reference Guide
Important Information
Telephone line cord
PaperPort14 CD
a The appearance of the power cord and the telephone line cord may differ according
to your country’s specifications.
- 19 -
a
Setup diagram
Dell 2355dn MFP Quick Reference Guide
2
1
Front
Front
3
Front
4
13
5
14
11
12
Front
6
7
8
9
1
15
10
1. DADF
1. DADF
1. DADF
2. Document width guides
2. Document width guides
2. Document width guides
3. Document input tray
3. Document input tray
3. Document input tray
4. Document output tray
4. Document output tray
4. Document output tray
5. Operator panel
5. Operator panel
5. Operator panel
6. Output tray (face down)
6. Output tray (face down)
6. Output tray (face down)
7. MPF (Multi purpose feeder)
7. MPF (Multi purpose feeder)
7. MPF (Multi purpose feeder)
8. Front cover
8. Front cover
8. Front cover
9. Tray 1
9. Tray 1
9. Tray 1
10. Optional tray 2
10. Optional tray 2
10. Optional tray 2
11. USB memory port
11. USB memory port
11. USB memory port
12. Paper output extension
12. Paper output extension
12. Paper output extension
13. Document glass
13. Document glass
13. Document glass
14. Toner cartridge
14. Toner cartridge
14. Toner cartridge
15. Express ervice code
15. Express ervice code
15. Express ervice code
Back
11
Back
1
Back
10
7
2
9
12
3
4
5
68
1. USB port
1. USB port
1. USB port
2. Locking slot
2. Locking slot
2. Locking slot
3. Network port
3. Network port
3. Network port
4. Optional tray 2 cable
4. Optional tray 2 cable
4. Optional tray 2 cable
connector
connector
connector
5. Telephone line socket (Line)
5. Telephone line socket (Line)
5. Telephone line socket (Line)
6. Extension telephone socket (EXT)
6. Extension telephone socket (EXT)
6. Extension telephone socket (EXT)
7. Rear door
7. Rear door
7. Rear door
8. Power receptacle
8. Power receptacle
8. Power receptacle
9. Power switch
9. Power switch
9. Power switch
10. Express ervice code
10. Express ervice code
10. Express ervice code
11. Optional memory
11. Optional memory
11. Optional memory
12. Optional wireless card
12. Optional wireless card
12. Optional wireless card
Quick Reference Guide
Quick Reference Guide
Operator Panel
Operator Panel
lenaP rotarepO
1. LCD: Display.
1. LCD: Display.
2. Status LED: Shows the status of your machine.
2. Status LED: Shows the status of your machine.
3. Job Status button: Shows the jobs.
3. Job Status button: Shows the jobs.
4. M/C Setup button: Leads you to the machine setup and advanced settings.
4. M/C Setup button: Leads you to the machine setup and advanced settings.
5 Start button: Initiate operation.
5 Start button: Initiate operation.
6. Cancel button: Cancel displayed operation.
6. Cancel button: Cancel displayed operation.
1. LCD: Display.
2. Status LED: Shows the status of your machine.
3. Job Status button: Shows the jobs.
4. M/C Setup button: Leads you to the machine setup and advanced settings.
5 Start button: Initiate operation.
6. Cancel button: Cancel displayed operation.
Touch ScreenTouch Screen
Touch Screen
1.
Copy: Enters the copy menu.
8. : Return to the upper menu.
2. Fax: Enters the fax menu.
9. : Scroll through available options.
3. Scan: Enters the scan menu.
10. : Start a job.
4. Setup: Enters the advanced settings.
5. None: You can set the option which is frequently uses on
main screen. Also you can change shortcut name as well.
6. : Shows the main screen.
7. : Enters the LCD brightness, the USB memory,
language, and job status.
b
2
Remove the packing material
Retirez les matériaux d’emballage
Rimuovere il materiale di imballo
Entfernen Sie das Verpackungsmaterial
Retire el material de embalaje
Setting Up Your Printer
Configuration de votre imprimante| Configurazione della stampante
Einrichten des Druckers| Configuración de la impresora
Set the language, country, time zone, date, and time.
Wait until "Ready" appears on the screen.
Réglez la langue, le pays, le fuseau horaire, la date et l’heure. Patientez jusqu’à ce que "Prêt" s’ache à l’écran.
Impostare la lingua, il paese, il fuso orario, la data e l’ora. Attendere finché non viene visualizzato "Pronto" sullo
schermo.
Legen Sie Sprache, Land, Zeitzone, Datum und Uhrzeit fest. Warten Sie, bis "Bereit" im Display angezeigt wird.
Configure el idioma, el país, la zona horaria, la fecha y la hora. Espere hasta que aparezca "Lista" en la pantalla.
Page 21
b The Drivers and Documentation CD contains Dell printer drivers, Scan drivers, Printer
Settings Utility, Set IP, Mac driver, Linux driver, Dell Toner Management System and a
User’s Guide.
c Quick Reference Guide may not be provided with your product depending on your
country.
NOTE: Use the telephone line cord supplied with your printer. If you choose to
use a different cord, use an AWG #26 or lower gauge cord that is not more
than 250 cm (98 inches) in length.
NOTE: The power cord must be plugged into a grounded power socket.
Save the carton and packing material in case the printer needs to be repacked.
3
4
Remove the packing tape from the front, back, and sides of the printer.
- 20 -
Page 22
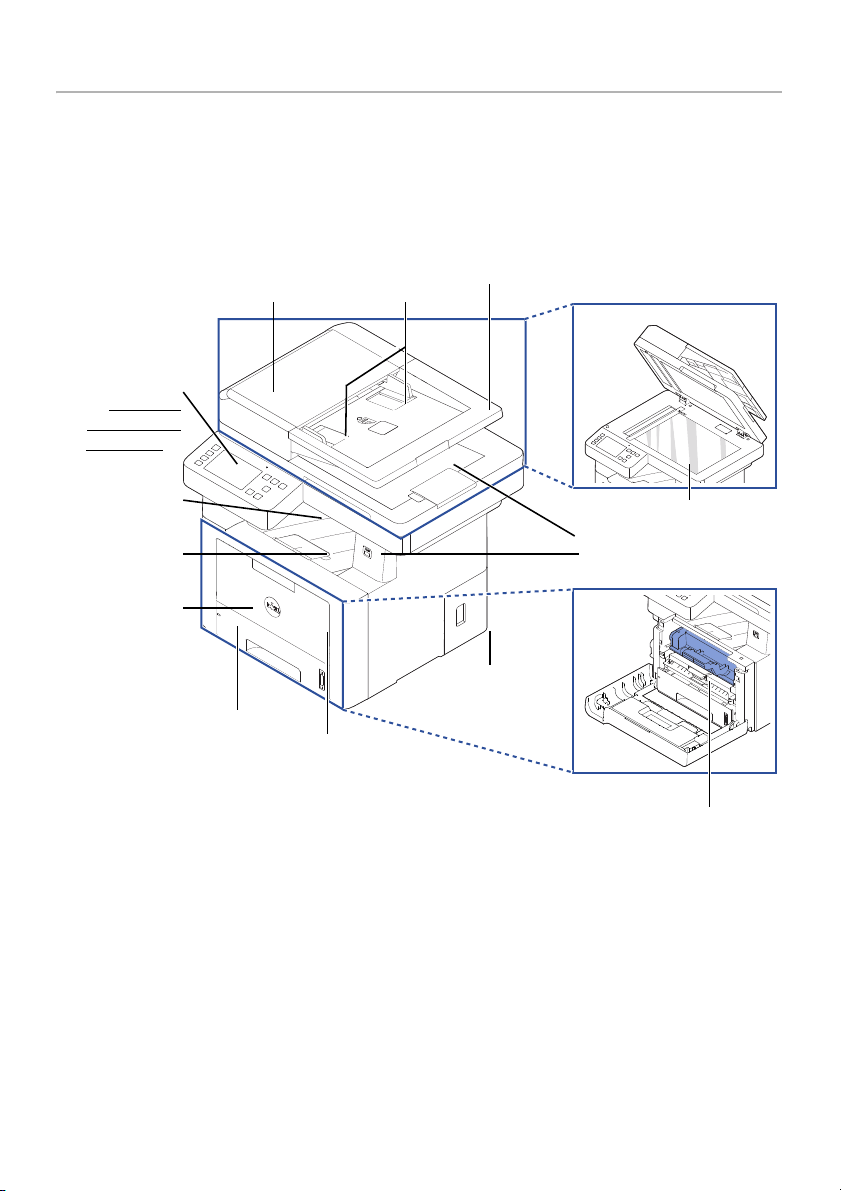
About Your Printer
DADF (Duplex Automatic
Document Feeder)
document width
guides
tray 1
(250-sheet paper feeder)
front cover
document glass
document input tray
MPF
(multi purpose
feeder)
output tay
(face down)
document output tray
toner cartridge
paper output
extension
operator panel
(See "
Operator
Panel Button
Functions".)
USB memory port
control board
cover
These are the main components of your printer. The following illustrations show the
standard
Dell B2375dfw Mono MFP
attached:
Front View
or
Dell B2375dnf Mono MFP
and an optional tray 2
- 21 -
Page 23
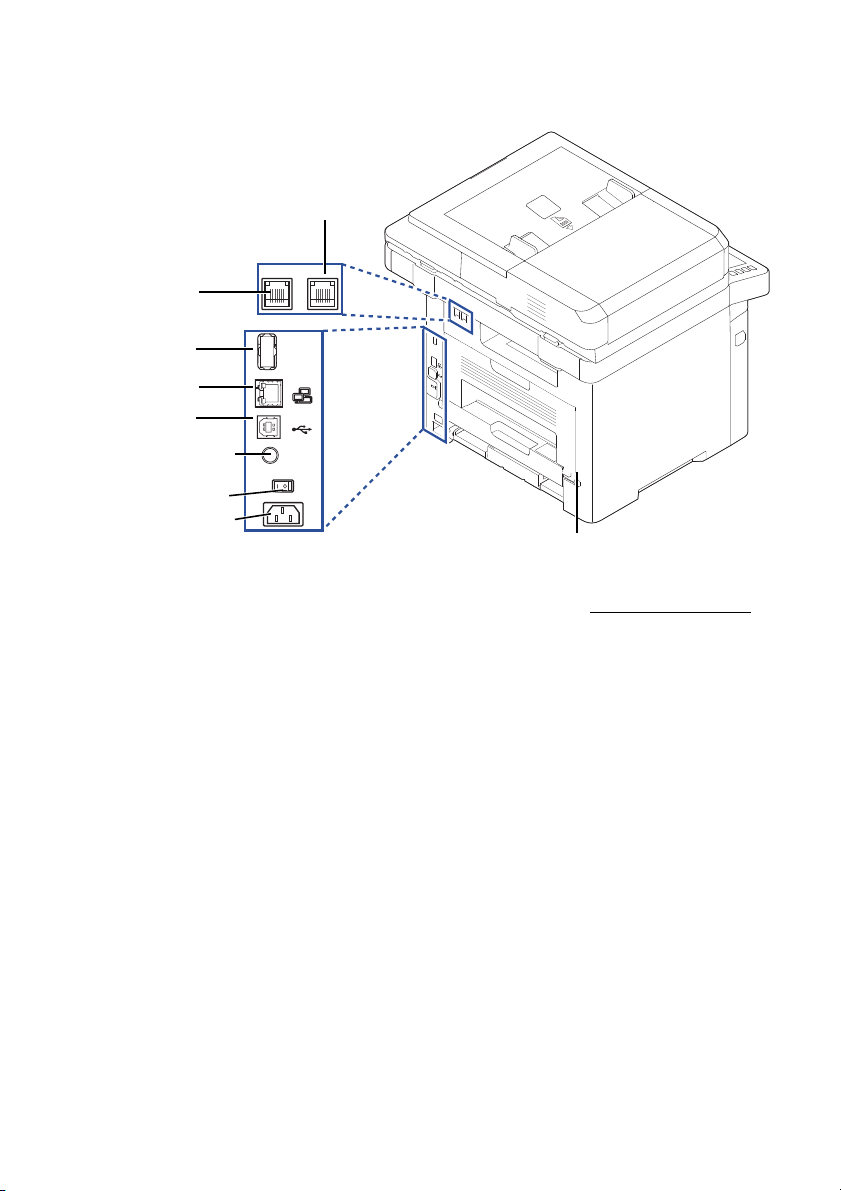
Rear View
LINE EXT
EDI
OUTPUT
5V
a
If you want to connect the extension phone or
answering machine, see "
Making Connections".
5V output port for IEEE
1284 parallel
connectorab
extension telephone
socket (EXT)
a
telephone line
socket (Line)
power switch
Network port
EDI port
USB port
power receptacle
rear door
- 22 -
Page 24
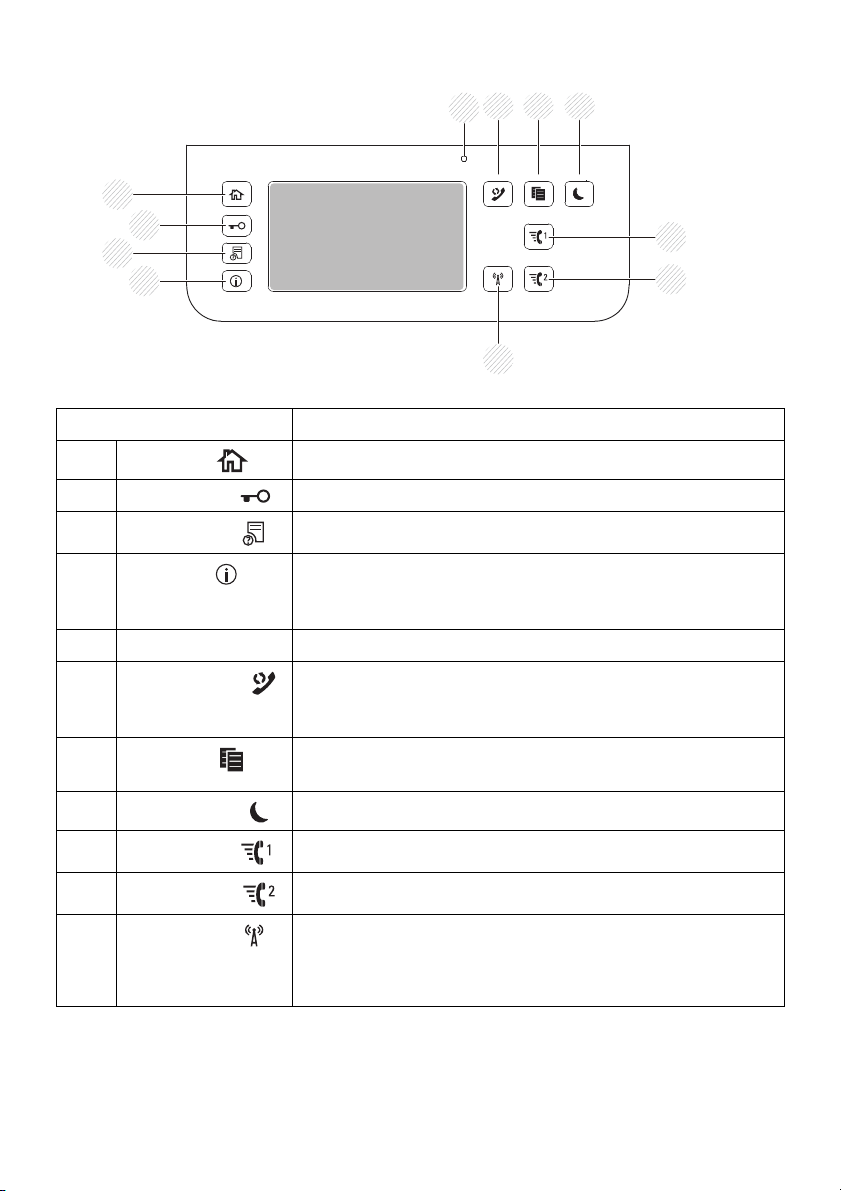
Operator Panel Button Functions
1
3
2
657 8
11
4
9
10
Press: To:
1
2
3
Home
Log In/Out ( )
Job Status ( )
()
Go to home screen.
You can Log in or log out.
Job status shows the jobs currently running and in queue.
4
5 Status LED
6
7
8
9
10
11
Info ( )
Redial/Pause ( )
Copy ( )
Power Saver( )
Speed Dial1( )
Speed Dial2 ( )
Wi-Fi/WPS ( )
(
Dell B2375dfw
Mono MFP
only)
Gives detailed information about product feature guide
machine’s info., reports, troubleshooting guide, and quick
reference guide.
Status LED is Indicates the status of your machine.
Redials the recently sent fax number or received caller ID
in ready mode, or inserts a pause(-) into a fax number in
edit mode.
Start copy job using copy default setting regardless of
which screen the user is in if it is selected
You can enter or exit Power Save mode
Fax image to destination from stored speed dial1.
Fax image to destination from stored speed dial2.
Configures the wireless network connection easily
without a computer.
- 23 -
Page 25

Understanding the Status LED
When the problem occurs, the Status LED indicates the machine's condition by the light
color of it's action.
LED Status Description
Off
Green Blinking The machine is warming up or ready to receive the
Status
Orange Blinking
Wireless Blue
On The machine is on-line and can be used.
Blinking
On
Off
• The machine is off-line.
• The machine is in power save mode. When data is
received, or any button is pressed, it switches to
on-line automatically.
data.
• A minor error has occurred and the machine is
waiting for the error to be cleared. Check the display
message. When the problem is cleared, the machine
resumes.
• The toner cartridge is low. Order a new toner
cartridge. You can temporarily improve print quality
by redistributing the toner.
• The toner cartridge is totally empty. Remove the old
toner cartridge and install a new one.
• A paper jam has occurred.
• There is no paper in the tray. Load paper in the tray.
• The machine has stopped due to a major error.
Check the display message.
• The machine is connecting to a wireless network.
• The machine is connected to a wireless network
• The machine is disconnected from a wireless
network.
• The machine is in power save mode.
• The machine's operation mode is ad-hoc mode.
- 24 -
Page 26
Introducing the Screen
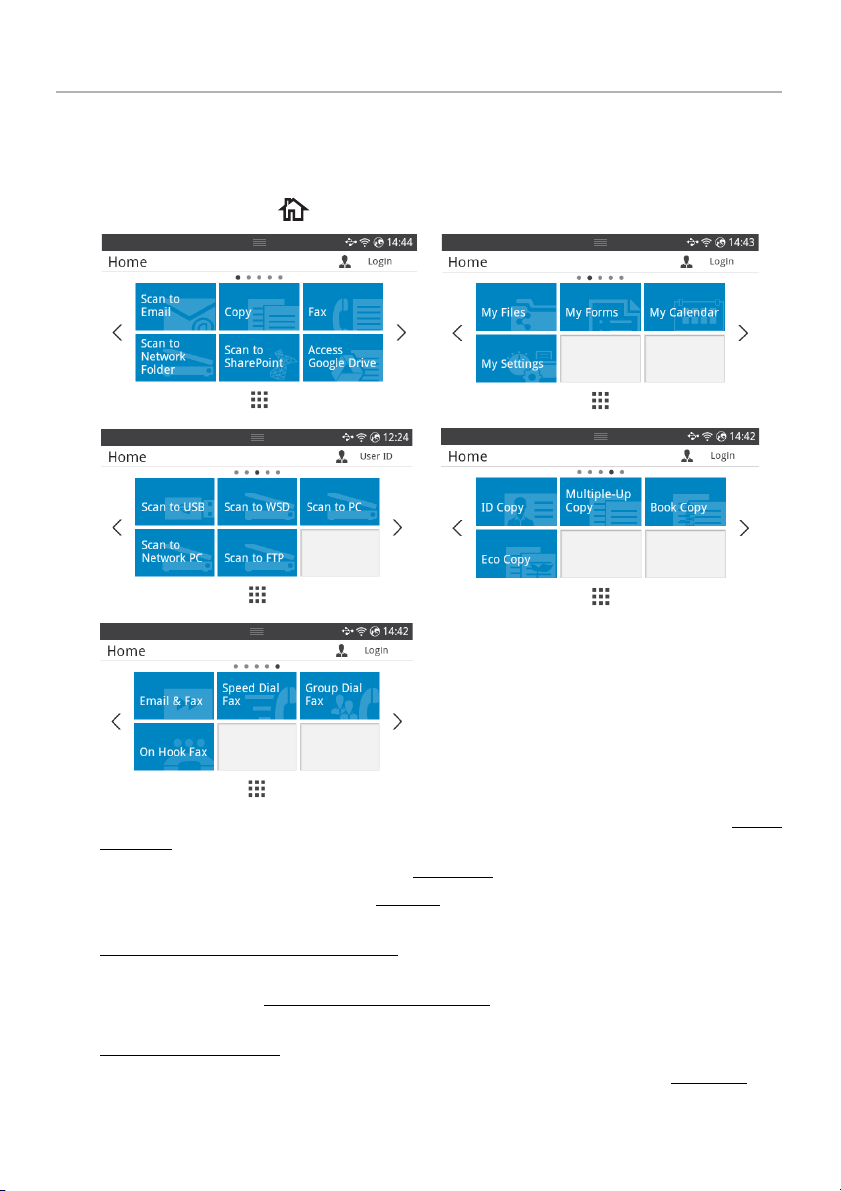
Home screen mode
The home screen on the control panel allows user-friendly operation of the machine. Once
you press the home button( ) on the panel, it shows the home screen.
Scan to Email
•
to Email"
•
Copy
: You can use Copy function. see
•
Fax
: You can use Fax function. see
•
Scan to Network Folder
"Scan to Network Folder/FTP Server"
•
Scan to SharePoint Online
Online account. see
•
Access Google Drive
"Access Google Drive"
•
My Files
: You can send a scanned image through your email account. see
: You can save the scanned image onto a network folder. see
: You can scan a document to your Microsoft SharePoint
"Scan to SharePoint Online"
: You can scan to or print from your Google Drive account. see
: You can access, scan to or print from this internal storage. see
"Scan
"Copying"
"Faxing"
"My Files"
- 25 -
Page 27

•
My Forms
external storage. see
•
My Calender
Calendar"
•
My Settings
Scan to USB
•
to USB"
•
Scan to WSD
•
Scan to PC
•
Scan to Network PC
to PC/Network PC"
•
Scan to FTP
Folder/FTP server"
•
ID Copy
•
Multiple-Up Copy
(N-up)"
•
Book Copy
•
Eco Copy
•
Email & Fax
Fax"
•
Speed Dial Fax
•
Group Dial Fax
•
On Hook Fax
• , : Press the left/right arrows to move Previous/next page.
•
All Applicatons
: You can scan forms or print pre-set form templates from internal or
"My Forms"
: You can print the calendar from your Google Calendar account. see
: You can browse current machine settings or change machine values.
: You can save the scanned image onto a USB memory device. see
: You can save the scanned image through WSD. see
: You can save the scanned image onto a PC. see
: You can save the scanned image onto a network PC. see
: You can save the scanned image onto a FTP. see
: You can use ID Copy. see
: You can use Multiple-Up Copy. see
: You can use Book Copy. see
: You can use Eco Copy. see
: You can fax and email the scanned image in one operation. see
: You can send fax using speed dial. see
: You can send fax using group dial. see
: You can send fax using On Hook Fax. see
( ) : Shows all applications.
"ID Copying"
"Book Copying"
"Eco Copying"
"Scan to PC/Network PC"
"2-Up or 4-Up copying
"Speed Dial Fax"
"Group Dial Fax"
"On Hook Fax"
"My
"Scan
"Scan to WSD"
"Scan
"Setting up an Network
"Email &
- 26 -
Page 28
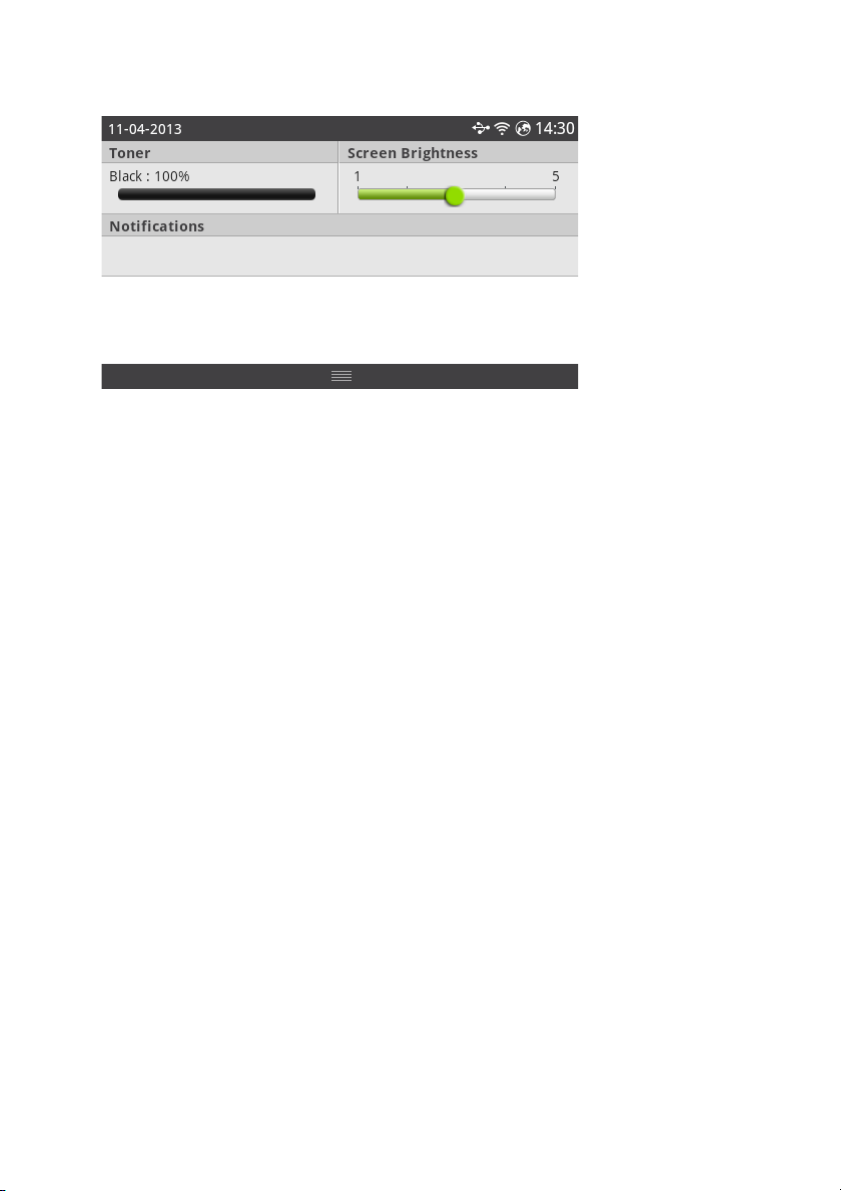
•
Notification Bar
screen appear:
: Press the black bar on top of the display screen. The following
If you want to close the
–
Toner
: Shows the amount of remaining toner capacity.
–
Screen Brightness
–
Notifications
: Shows machine status informations.
Notification Bar
: Adjusts brightness of the display screen.
, re-press the black bar.
- 27 -
Page 29
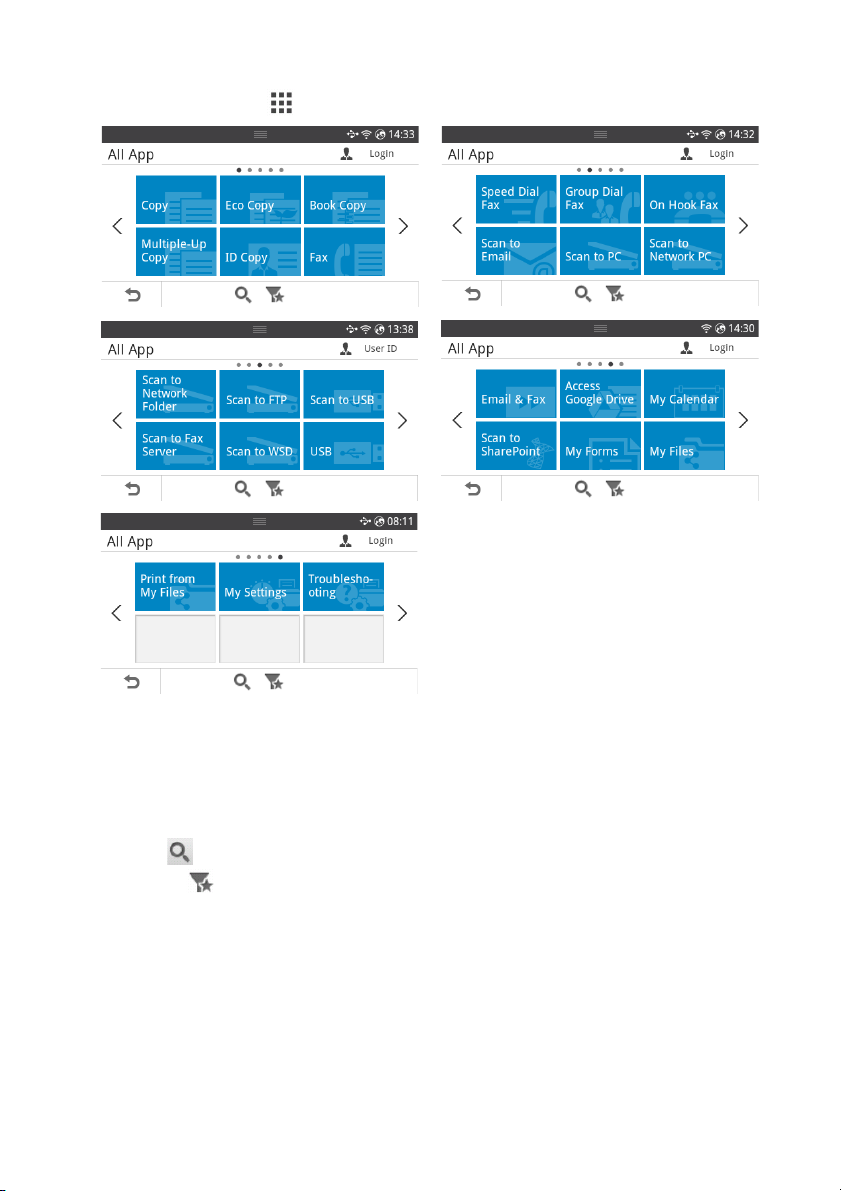
All Applications screen mode
Press the
All Applicatons
( ) from the home screen, it shows the applications screen.
•
USB
: You can connect to USB.
Scan to Fax Server
•
•
Scan to Network Folder
•
Print from My Files
•
Troubleshooting
•
Search
( ) : You can search applications.
•
Category
( ) : Shows the frequently used applications list.
: You can save the scanned image via a Fax Server.
: You can save the scanned image onto a network folder.
: You can print from My Files.
: Helpful information for what to do if you encounter an error.
- 28 -
Page 30
Editing the Home Screen
You can edit the applictions on the home screen using
Edit Mode
Touch and hold the home display area (excluding the icon) until
NOTE: You need to Log in to use this function.
•
Add Apps
and click a application to add you want.
•
Remove Apps
Move Apps
•
move the application.
: You can add applications. Press the left/right arrows to select the screen
: You want to remove the applicaions, select the applications.
: You can move applicaions to other screen. Press the left/right arrows to
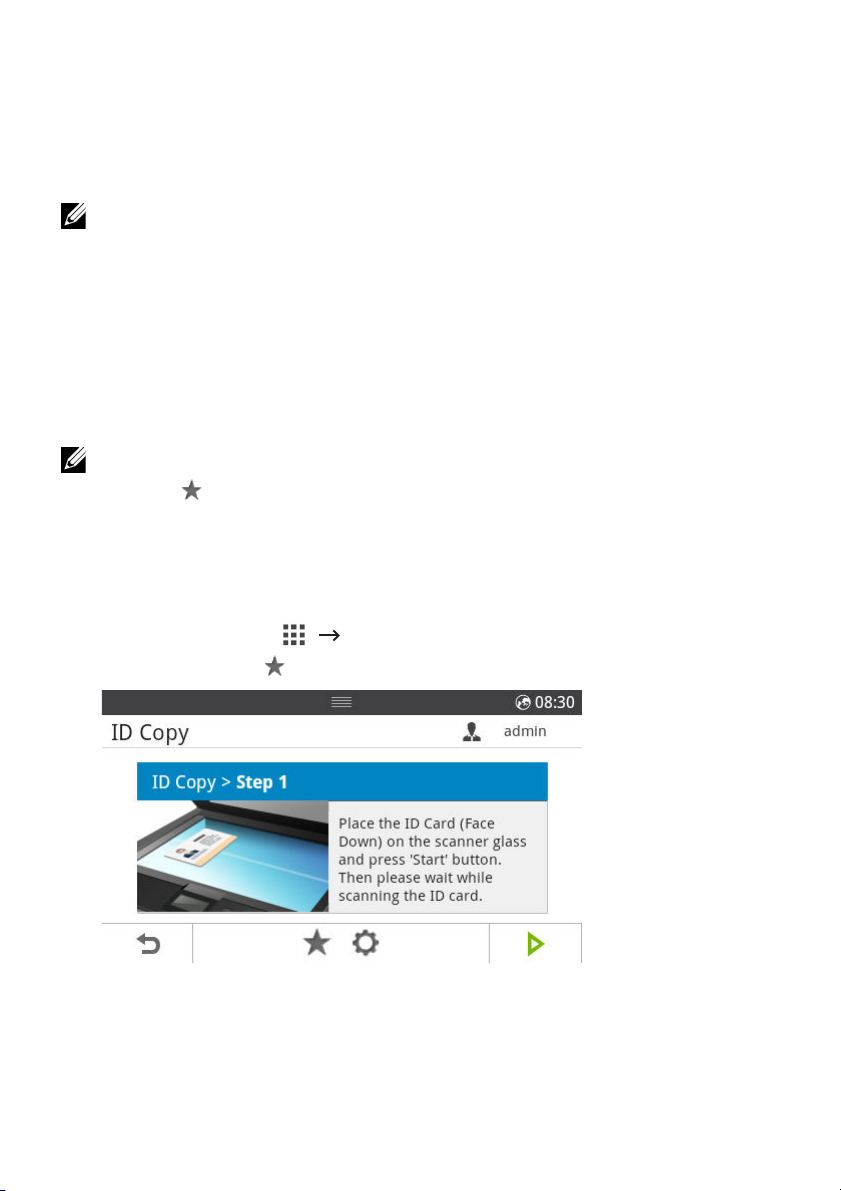
Using Favorite
You can set the application which is frequently used on the home screen.
NOTE: You need to Log in to use this function.
Press
Favorite
For example:
If you want to ID Copy setting to favorite as below :
1
Press
OR
Press
2
Check the
( ) button when each applications setting.
ID Copy
All Applicatons
from the home screen.
()
Favorite
( ) button.
ID Copy
from the home screen.
Edit Mode
and favorite function.
Edit Mode
appears.
3
Select the setting you want to add to the home screen.
•
Change Title Color
•
Change Tile Color
•
Set Tilte
: Set the title text.
: Select the title color.
: Select the tile color.
- 29 -
Page 31

4
Press
Check
( ) from the screen.
5
You can find ID Copy short cut menu on the home Screen.
Searching application for an entry
You can search using
1
Press
All Applicatons
•Press
the pop up keyboard.
•Press
Favorite App
–
–
Copy
Fax
–
–
–
2
Press the home icon ( ) to return to the home Screen.
: Shows fax related applications.
Scan
USB
: Shows USB related applications.
Search
() ,
Category
( ) from the home screen.
Search
( ) from the screen : Enter the application name in the field with
Category
: Shows copy related applications.
: Shows scan related applications.
( ) from the screen
: Shows favorite applications.
().
Understanding the Keyboard
You can enter alphabet characters, numbers, diacritical marks, or special symbols using the
keyboard. This keyboard is specially arranged like a normal keyboard for better usability to
the user.
Touch the input area where you need to enter alphabet characters, numbers, diacritical
marks, or special symbols and the keyboard pops up on the screen.
• : Hide pop up keyboard.
• : Deletes characters in the input area.
• : Moves the cursor between characters in the input area.
• : Toggles between lowercase keys and uppercase keys or vice versa.
: Switches from the alphanumeric keyboard to the numbers or special symbols keyboard.
•
•: Space bar.
- 30 -
Page 32

User Profile
Administrator can register 20 users. General user can register himself.
Create ID
1
Press
My Settings
home screen.
2
3
Input ID,
Press
Password, Confirm Password
Check
Delete ID
You can delete your ID only. If you want to delete other user, you need to Log in
as an administrator.
1
Press
My Settings
home screen.
2
Press
Yes
from the screen.
Change Password
You can change your password only. If you want to delete other user, you need to Log in
as an administrator.
1
Press
My Settings
password
2
Input
3
Press
( ) from the home screen.
Password, Confirm Password
Check
Machine Setup
( ) from the screen.
Machine Setup
Machine Setup
you want.
( ) from the screen.
User Profile
you want.
User Profile
User Profile
Add
( ) button from the
Delete
( ) button from the
Check your ID
Change
Log In
Depending on the authentication settings you selected, you may need to Log in as an
administrat or User with authority to access some options under Machine Setup menu.
1
Press
My Settings
2
Select the option you want. If the option is available for the administrator or User with
authority, log in page screen appears.
3
Input ID,
press each field.
• You can also use the
• When you Log in, you can see the ID of the logged in user on the display.
4
Press
Password
Domain List
Check
from the display screen.
and
Domain
button to find the domain from the list stored in the machine
( ) from the screen.
using the pop-up keyboard which appears when you
Recent Users
button to find the recently used ID and
- 31 -
Page 33

Setting the Job Management
Press
1
2
My Settings
Set each option as you want.
•
Stored Print Job
•
Secure Receive Print
Press the home icon ( ) to return to Home Screen.
Machine Setup
: Print jobs currently stored in the RAM disk.
: Print secure received jobs currently stored in the RAM disk.
Job Management
from the home screen..
Internal Fonts
The
Dell B2375dfw Mono MFP
and PS fonts. If you want to see the PCL and PS font list, follow these steps:
Printing the PCL Font list
1
Press
My Settings
screen.
2
Press the
3
PCL Font list pages print out.
Start
() button.
Printing the PS3 Font list
1
Press
My Settings
screen.
2
Press the
3
PS Font list pages print out.
Start
() button.
or
Dell B2375dnf Mono MFP
Machine Setup
Machine Setup
Reports
Report
Laser printer supports the PCL
PCL Font List
PS Font List
from the home
from the home
NOTE: You can add additional PCL fonts and PS fonts in Printer Settings
Utility. See "
Using the Dell Supplies Ordering Utility".
- 32 -
Page 34

Setting up the hardware
200 mm
(7.8 inches)
100 mm
(3.9 inches)
200 mm
(7.8 inches)
485 mm (19 inches)
This section shows the steps to set up the hardware which is explained in the Placemat.
Make sure you read the Placemat and complete the following steps:
1
Select a stable location.
Select a level, stable place with adequate space for air circulation. Allow extra space to
open covers and trays.
The area should be well-ventilated and away from direct sunlight or sources of heat,
cold, and humidity. Do not set the machine close to the edge of your desk or table.
2
3
4
Place the machine on a flat, stable surface so that there is no incline greater than 2
mm (0.08 inch). Otherwise, printing quality may be affected.
Unpack the machine and check all the enclosed items.
Remove the tape holding the machine tightly.
Install the print cartridge.
- 33 -
Page 35

5
Load paper. See "Loading Paper".
6
Make sure that all the cables are connected to the printer.
7
Turn the printer on.
NOTE: When you move the printer, do not tilt or turn it upside down.
Otherwise, the inside of the printer may be contaminated by toner, which can
cause damage to the printer or result in bad printing quality.
Installing the Toner Cartridge
1
Open the front cover.
CAUTION: To prevent damage, do not expose the toner cartridge to light for
more than a few minutes.
CAUTION: Do not touch the green underside of the toner cartridge. Use the
handle on the cartridge to avoid touching this area.
- 34 -
Page 36

2
Remove and discard the packing foam.
3
Pull the toner cartridge straight out.
4
Remove the label and the protective film from the toner cartridge.
- 35 -
Page 37

5
Thoroughly shake the cartridge from side-to-side to distribute the toner evenly inside
the cartridge.
NOTE: If toner comes into contact with your clothing, wipe the toner off with
a dry cloth and wash your clothing in cold water. Hot water sets toner into
fabric.
Holding the toner cartridge by the handle, slide it into the printer until it locks firmly
6
into place.
7
Close the front cover.
- 36 -
Page 38

Loading Paper
Load up to 250 sheets of plain paper (80 g/m2, 20lb bond) in the paper tray.
NOTE: Set the paper type and size after loading paper into the paper tray. See
Setting the Paper Type" and "Setting the Paper Size" for the paper used in copying
"
and faxing, or "
Load the paper:
1
Pull the paper tray out of the printer.
2
If you load paper that is longer than a standard (Letter or A4) size, such as Legal paper,
press and unlatch the guide lock, and then slide the paper length guide out completely
to extend the paper tray to its full length.
Paper Tab" for computer printing.
- 37 -
Page 39

3
Slide in the paper length guide until it rests against the end of the paper stack.
For paper smaller than Letter size, adjust the rear paper length guide so that it lightly
touches the paper stack.
4
Pinch the paper width guide, and move it towards the stack of paper until it touches
the side of the stack.
- 38 -
Page 40

5
Flex the sheets back and forth to loosen them, and then fan them out. Do not fold or
crease the print media. Align the edges on a level surface.
6
Insert the paper stack into the paper tray with the side to be printed on facing down.
7
Do not exceed the maximum stack height indicated by the paper limit marks on both
the inside walls of the tray.
NOTE: Overloading the paper tray may cause paper jams.
NOTE: Improper adjustment of paper guides can result in paper jams.
- 39 -
Page 41

8
Slide the paper tray back into the printer.
9
Set the paper type and size. For more information, see "Setting the Paper Type" and
"
Setting the Paper Size".
- 40 -
Page 42

Making Connections
RJ11 telephone line
socket (Line)
To the wall jack
Connecting the Telephone Line
1
Plug one end of a telephone line cord into the RJ11 telephone line socket (FAX) and
the other end into an active wall jack.
To connect a telephone and/or answering machine to your printer, remove the plug
from the extension telephone socket (EXT.) ( ) and plug the telephone or answering
machine into the extension telephone socket (EXT.).
2
Alternative setup of Fax connected to a wall socket and a external phone or Telephone
answering device (TAD):
- 41 -
Page 43

If connecting a FAX using an answering machine or telephone answering device (TAD):
LINE EXT
Computer
Telephone Answering Device
LINE EXT
Telephone Answering Device
NOTE: Set rings to answer to digit greater than the "Using an Answering
machine" setting for the telephone answering device (TAD).
If connecting a FAX using a computer modem:
NOTE: Set rings to answer to digit greater than the "Using an Answering
machine" setting for the telephone answering device (TAD).
NOTE: For additional information, see "
Using an Answering machine" or "Using
a Computer Modem".
- 42 -
Page 44

NOTE: Phone adaptor not supplied for the United Kingdom. You are advised to
buy from local suppliers.
If the phone communication is serial in your country (such as Germany, Sweden,
Denmark, Austria, Belgium, Italy, France, and Switzerland), connect the telephone or
answering machine as shown in the following figure.
- 43 -
Page 45

Connecting the Printer Cable
Connecting the Printer Locally
Local printer refers to a printer connected to your computer using a USB cable. If your
printer is attached to a network instead of your computer, skip this step and go on to
Connecting the Printer to the Network".
"
NOTE: USB cables are sold separately. Contact Dell to purchase a USB cable.
NOTE: Connecting the printer to the USB port of the computer requires a certified
USB cable. You will need to buy a USB 2.0-compliant cable that is about 3 m in
length.
Ensure that the printer, computer, and any other attached devices are powered off and
1
unplugged.
2
Connect a USB cable to the USB port on your printer.
3
Connect the other end of the cable to an available USB port on the computer, not the
USB keyboard.
- 44 -
Page 46

Connecting the Printer to the Network
Ensure that the printer, computer, and any other attached devices are powered off and
1
unplugged.
2
Connect one end of a standard category 5 Unshielded Twisted Pair (UTP) network
cable to a LAN drop or hub, and the other end to the Ethernet network port on the
back of the printer. The printer automatically adjusts for the network speed.
NOTE: After connecting the printer, you need to configure the network parameters
on the operator panel. See "
Panel".
Configuring Network Parameters on the Operator
- 45 -
Page 47

Powering on the Printer
CAUTION: The fusing area at the rear part of the inside of your printer becomes hot
once the printer is powered on.
CAUTION: Be careful not to be burned when you access this area.
CAUTION: Do not disassemble the printer when it is powered on. If you do, it may
give you an electric shock.
To power on the printer:
1
Plug one end of the power cord into the power receptacle at the back of the printer
and the other end into a properly grounded outlet.
2
Press the power switch to turn on the printer. The home screen appears on the display
indicating that the printer is now on.
NOTE: If you power on the printer for the first time, you have to set the language,
date, time, country and fax setup sequence. These settings may be needed also
after the firmware upgrade or after the printer is reset.
- 46 -
Page 48

Setting fax setup boot sequence
Use only the metal/shielded
USB memory key.
Set the language. See "Changing the Display Language (Administrator only)".
1
2
Select the country. See "Selecting Country (Administrator only)".
3
Set the date and time. See "Setting the Time and Date (Administrator only)".
4
When
fax setup confirmation window
If you selected , your printer restores the fax settings as default.
If you selected
a
Enter the machine ID. See "Setting the Printer ID".
b
Select the receive mode and ring to answer. See "Setting up the Fax System".
c
Test the fax line. See "Testing Fax line connection".
5
Your printer returns to Home Screen.
Check
():
appears, select or .
Using USB memory device
This chapter explains how to use a USB memory device with your machine.
About USB Memory
USB memory devices are available with a variety of memory capacities to give you more
room for storing documents, presentations, downloaded music and videos, high resolution
photographs or whatever other files you want to store or move.
You can do the following features using an optional USB memory:
• Scan documents and save them on the USB Memory.
• Print data stored on a USB memory device.
• Restore backup files to the machine’s memory
• Format the USB Memory.
• Check the available memory space.
Plugging in a USB memory key
The USB memory port on the front of your printer is designed for USB V1.1 and USB V2.0
memory.Your machine supports USB memory devices with FAT16/FAT32 and a sector size
of 512 bytes.
Check your USB memory device’s file system from your dealer.
- 47 -
Page 49

Insert a USB memory key into the USB memory port on the front of your printer.
CAUTION:
writing to or reading from USB memory. The machine warranty does not cover damage
caused by user’s misuse.
CAUTION: If your USB memory device has certain features such as security settings
and password settings, your machine may not automatically detect it. For details
about these features, see the user’s guide of the USB memory device.
Do not remove the USB memory device while the machine is in operation or
Direct USB
1
Insert the USB memory device into the USB memory port on your machine.
NOTE: Insert the USB memory key as soon as the pop-up window appears.
Item Description
Print from USB
Scan to USB
File Manager
Folder Size
Import
Export
You can directly print files stored on a USB memory device.
You can scan a document and save the scanned image onto a
USB memory device.
You can delete image files stored in the USB memory.
You can check the amount of memory space available for saving
documents.
You can restore the backup file to the machine.
You can backup
memory.
Setup Data
and
Address Book
files
to the USB
- 48 -
Page 50

Scan to USB
Insert a USB memory device into the USB memory port on your machine.
1
2
Load the document(s) face up with top edge in first into the DADF.
OR
Place a single document face down on the document glass.
For details about loading a document, see "
3
Press
All Applicatons
4
If necessary, customize the scan settings including scan resolution, scan color, scan
format, pdf encryption, duplex, original size and original type by using
from the screen.
5
Press
Start
( ) from the screen.
Your printer begins scanning the document and saves it to your USB memory.
6
After scanning is completed, you can remove the USB memory device from the
machine.
()
Scan to USB
Loading an Original Document".
from the home screen.
Setting
()
- 49 -
Page 51

Changing the Scan Feature Settings
The following table shows the options you can select.
Original Type Original Size Resolution Color Format Duplex
Te xt ,
Text & Pho t o,
Photo
1
Press
USB
2
Click
Original Type
•
•
Original Size
•
Resolution
•
Color
JPEG in Scan Format and vice versa.
•
Format
If you select
selected scan type, this option may not appear.
•
Duplex
scanned are two-sided.
•
File Policy
proceed with the scan job through USB. If the USB memory already has the same
name when you entered a new file name, you can rename ,overwrite or cancel it.
3
Press the home icon ( ) to return to Home Screen.
DADF : Letter,
A4, A5, JIS
B5,Legal,
Folio, Oficio,
Executive
Platten :
Letter, A4, A5,
JIS B5,
Executive,
Statement
My Settings
Options
: Sets the color mode. If you select Mono in this option, you cannot select
Machine Setup
to adjust the settings for each scan.
: Sets the original’s type.
: Sets the image size.
: Sets the image resolution.
: You can select the file format before you proceed with the scanning job.
Mono
: This feature especially applies when the original documents to be
: You can choose the policy for generating file name before you
100, 200,
300, 600
in
Scan Format
, do not select
Color,
Gray,
Mono
Default Setting
JPEG, BMP,
TIFF, PDF,
Separate
PDF,Multi-Pag
e TIFF, XPS,
Multi-Page XPS
JPEG
Scan Default
. Depending on the
Off, Short
Edge, Long
Edge
Scan to
- 50 -
Page 52

Managing the USB Memory
You can delete image files stored in the USB memory.
Deleting an Image File
To delete an image file that you scanned and saved on your USB memory stick.
1
Insert the USB memory key into the USB memory port on your printer.
NOTE: Insert the USB memory key as soon as the pop-up window appears.
OR
All Applicatons
Press
2
Press
File Manage
3
Press the mark next to the file you want to delete.
4
Press OK when the confirmation window appears.
5
Press to go to the upper menu.
()
.
USB
from the home screen.
Printing from a USB memory device
You can directly print files stored on a USB memory device.
File is supported by Direct Print option.
• PRN: Only files created by provided driver with your machine are compatible.
NOTE: If you print PRN files created from other machine, the printout would be
different.
•TIFF
• JPEG: JPEG Baseline
•PDF: PDF 1.7 or lower version.
- 51 -
Page 53

1
Insert the USB memory key into the USB memory port on your printer.
NOTE: Insert the USB memory key as soon as the pop-up window appears.
OR
Press
All Applicatons
2
Press
Print From USB
3
Press the up/down arrows to select the folder or file you want.
4
Select the number of copies to be printed or enter the number.
5
Press
Start
( )from the screen.
Printing is started.
6
Press OK when
press the left/right arrow to select
7
Press to go to the upper menu.
()
.
Yes
appears to print another job, and repeat from step 2. Otherwise,
USB
from the home screen.
No
and press OK.
Viewing the USB Memory Status
You can check the amount of memory space available for scanning and saving documents.
1
Insert the USB memory key into the USB memory port on your printer.
NOTE: Insert the USB memory key as soon as the pop-up window appears.
OR
All Applicatons
Press
2
Press
Show Space
The available memory space appears on the display.
3
Press to go to the upper menu.
()
.
USB
from the home screen.
Import (Administrator only)
Insert the USB memory device on which the backup data is stored in to the USB
1
memory port.
NOTE: Insert the USB memory key as soon as the pop-up window appears.
OR
All Applicatons
Press
2
Press
Import
.
3
Select
Setup Data, Address Book
4
Select the file you want to restore and press OK.
5
Press OK when
6
Press to go to the upper menu.
()
Yes
appears to restore the backup file to the machine.
USB
from the home screen.
and press OK.
- 52 -
Page 54

Export (Administrator only)
Insert the USB memory device into the USB memory port on your machine.
1
NOTE: Insert the USB memory key as soon as the pop-up window appears.
OR
All Applicatons
Press
2
Press
Export
.
3
Select
Setup Data, Address Book
4
Select the file you want to restore and press OK.
5
Press OK when
6
Press to go to the upper menu.
()
Yes
appears to restore the backup file to the machine.
USB
from the home screen.
and press OK.
Setting up Address Book
You can set up Address Book with the email addresses you use frequently via
Web Service
numbers assigned to them in Address Book.
and then easily and quickly enter email addresses by entering the location
Embedded
Storing Individual address
1
Press
My Settings
2
Press
Add
() icon.
3
Press
New Individual
4
Enter the name, email address and phone number in the each field with the pop up
keyboard. And then Press the left/right arrows to select speed dial number.
NOTE: Check
find them from the search results.
5
Press
Check
NOTE: Press the home icon ( ) to return to Home Screen
Address Book
.
Favorite
( ) from the screen.
( ) icon for addresses you often use. You can easily
Address Book
from the home screen.
Using speed dial numbers
When you are prompted to enter a destination number while sending a fax, enter the speed
dial number at which you stored the number you want.
NOTE: For a one-digit (0-9) speed dial number, press and hold the corresponding
digit button on the number keypad for more than 2 seconds.
- 53 -
Page 55

NOTE: For a two- or three-digit speed dial number, press the first digit button(s)
and then hold down the last digit button for more than 2 seconds.
Press
NOTE: You can print the address book list by selecting
Address Book
or
My Settings
Press
the home screen.
Print
Start
( ) from the home screen.
Machine Setup
Reports
Address Book
My Settings
Start
Storing Group address
1
Press
My Settings
2
Press
Add
() icon.
3
Press
New Group
4
Enter the group name then press the
5
Select the email address you want at list.
6
Press
Check
7
Press the home icon ( ) to return to Home Screen.
Address Book
.
( ) from the screen.
Address Book
Add
( ) icon from the screen.
from the home screen.
Editing group dial numbers
() from
My Settings
1
2
Select group you want.
3
You can edit
4
Press
5
Press the home icon ( ) to return to Home Screen.
Address Book
Group Name
Check
( ) from the screen.
Address Book
and add or delete member.
from the home screen.
Searching the address book for an entry
you can search using
1
Press
My Settings
•Press
name in the field with the pop up keyboard.
•Press
•Press
server.
2
Press the home icon ( ) to return to Home Screen.
Search
() ,
Category
Address Book
Search
( ) from the screen : Enter the email address, phone number or
Category
Server
( ) from the screen : shows the frequently used addresses.
( ) from the screen : the shows addresses stored in the
().
Address Book
from the home screen.
- 54 -
LDAP
Page 56

Exporting Address Book (Administrator only)
You can edit the exported address book in CSV file format and send it back to the machine
by exporting to the machine from your computer.
1
Access the
2
Click
3
Set the option you want and click the
Then the address book file stored in your computer.
•
•
–
–
–
Embedded Web Service
Address Book
BOM
: Exports address list with BOM(Byte Order Mark) information.
Encryption
No Encryption
No Encryption without confidential
confidential.
Encryption
Export
: Exports non-encrypted address list.
: Exports encypted address list.
. See "Embedded Web Service".
in
task
drop down list.
Export
button.
: Exports non-encypted address list without
Importing Address Book (Administrator only)
You can import the address book saved in the machine to the computer in CSV file format
Embedded Web Service
using
• Password-protected or security enhanced CSV file cannot be edited.
• The CSV file needs to be saved in Notepad program in UTF-8.
• Do not change the first row (model name, version, title field).
• Use comma(,) as a separator.
• When importing the address book data from a computer to the machine, the
existing address book data is deleted.
• Make sure to enter valid data. If you enter invalid data, unexpected errors can
occur. Refer to the below rules for entering valid data.
–
Speed dial
numbers. Only numbers are allowed.
User Name
–
>, \ in not allowed.
–
Fax
and special characters (#,*,-).
–
Email
format (ex: printer@domain.com)
: A number is required for each address. You cannot use duplicate
: This field is not mandatory. You can enter up to 64 byte in UTF-8. <, “,
: This field is not mandatory. You can enter up to 40 byte using numbers (0-9)
: This field is not mandatory. You can enter up to 128 byte in email address
.
1
2
3
Access the
Click
Address Book
Select
Browse
Embedded Web Service
Import
in
, and select the stored file.
. See "Embedded Web Service".
task
area.
- 55 -
Page 57

4
Setting the option you want and click the
Decryption
•
–
No Decryption
No Decryption without confidential
–
confidential.
–
Decryption
: Imports non-decrypted address list.
: Imports decrypted address list.
Import
button.
: Imports non-decrypted address list without
Printing Address Book
You can check your email address book list by printing it on the paper.
1
Press
My Settings
2
Press
Start
The machine begins printing.
Address Book
( ) from the screen.
Print
from the home screen.
Using Favorite Menu (Administrator only)
You can set the option which is frequently used on home screen.
Creating Favorite Menu
Press
1
2
3
4
5
My Settings
Press the up/down arrows to select the menu item you want.
If necessary, press the left/right arrows until the submenu item appears.
Enter the required information or select the desired status.
Press the home icon ( ) to return to Home Screen.
Machine Setup
Email Setup
from the home screen.
- 56 -
Page 58

Email Setup (Administrator only)
To use email features such as Scan to Email and Fax Forward to email addresses, you first
need to configure the SMTP server settings under network settings. See "
(Administrator only)" for network parameters.
Setting up the Email
Press
1
2
3
4
5
My Settings
Press the up/down arrows to select the menu item you want.
If necessary, press the left/right arrows until the submenu item appears.
Enter the required information or select the desired status.
Press the home icon ( ) to return to Home Screen.
Available Options for Email Account Setup
Option Description
SMTP Server
a
Machine Setup
You can set the printer to access an SMTP server for outgoing mail.
•
SMTP Server
the SMTP server. This can be given in dotted decimal notation or as a
domain name. (e.g. 111. 121. 211. 211 or smtp.xyz.com)
•
Max Mail Size
which can be sent.
Email Setup
: Enables you to enter the IP address or host name of
: Enables you to specify the maximum size of mail
from the home screen.
Network setup
Send to Self You can set whether or not your outgoing emails are sent to your
email account.
Default [To:]
Address
Default [From:]
Address
Default Subject You can set the default subject in your emails.
a If you want to use the host name in SMTP server, you must set the DNS server first.
You can set the default email address that appears on the
display(Max9).
You can set the default email address that appears on the
display(Max1).
- 57 -
Page 59

Menu Overview
Dell™ B2375dfw/ B2375dnf Mono MFP Menu Functions
Printing the Printer Setting and Op-panel Menu Setting
Access Google Drive
Scan to SharePoint Online
My Files
My Forms
My Calendar
Machine Setup
- 58 -
Page 60

Dell™ B2375dfw/ B2375dnf Mono MFP Menu Functions
The control panel provides access to various menus to set up the machine or use the
machine's functions. These menus can be accessed by touching them on the display
screen.
NOTE: Some menus may not appear in the display depending on options or setup.
Refer to the following table:
Copy Scan Fax
Copy
Eco Copy
Book Copy
ID Copy
Multiple-up Copy
Access Google Drive
Scan to SharePoint Online
My Files
Scan to Email
Scan to PC
Scan to Network PC
Scan to Network Folder
Scan to FTP
Scan to USB
Scan to Fax Server
Scan to WSD
Email & Fax
Fax
Speed Dial Fax
Group Dial Fax
On Hook Fax
- 59 -
Page 61

My Forms
My Calender
My Settings
USB
Print from My files
Troubleshooting
Machine Setup Default Setting
Paper Setup
Tray B e h avior
Reports
Fax Setup
Email Setup
Network Setup
Security
User Profile
Initial Setup
Quick Dial Setup
Restore Options
Factory Reset
Job Management
Stamp
Application Management
- 60 -
Page 62

Printing the Printer Setting and Op-panel Menu Setting
NOTE: This will be helpful for the users to maneuver through the op-panel setting
and tree in changing the defaults.
Printing the Printer Setting
1
Press
2
3
My Settings
screen.
Press
Start
The
Printer Settings
Machine Setup
( ) on screen.
page prints out.
Reports
Printer Settings
from the home
Printing the Op-panel Menu setting
1
Press
home screen.
2
Press
3
The
My Settings
Start
Op-panel Menu Tree
Machine Setup
( ) on screen.
prints out.
Reports
Op-panel Menu Tree
from the
Access Google Drive
You should be registered to the Google account to use this function.
follow
Google
1
Press
OR
Press
2
Enter
I f you want to log in automatically, check
shows up. If you want to Log in another google account, press
Access Google Drive
3
Press
•
•
•
•
•
Log in policy.
Access Google Drive
All Applicatons
Email id
Sign in
from the screen.
Back
icon ( ) : Quits
Search
( ) : Searchs files.
Favorite
only)"
Options
Preview
( ) button : Setting Favorite. See
: Setting options.
: See the preview.
and
Password
()
and re-Log in.
from the home screen.
Access Google Drive
.
Remember me
Access Google Drive
.
"Using Favorite Menu (Administrator
from the home screen.
. Then click
- 61 -
Access Google Drive
Yes
when pop up
Logout
from Screen in
Page 63

•
Logout
: Logs out from the
CAUTION: If you do not log out, other people can use your ID.
Access Google Drive
.
Scan to Google Drive
1
Load the document(s) face up with top edge in first into the DADF.
OR
Place a single document face down on the document glass. For details about loading
a document, see "
2
Press
Access Google Drive
OR
Press
All Applicatons
home screen.
3
Select the folder you want.
If necessary, customize the scan settings including
Original Size, Original Type, Duplex, PDF Encryption, File Name, File Conversion
Create Folder
4
Press
Start
Loading an Original Document".
Scan to Google Dive
()
Access Google Drive
by pressing
( ) on the screen.
Setting
( ) from the screen.
from the home screen.
Scan to Google Drive
Resolution, Color, Format
Print from Google Drive
Press
1
2
3
Access Google Drive
OR
Press
All Applicatons
the home screen.
If necessary, customize the print settings including
Duplex
and
Tray
by pressing
Select the file you want to print.
Press
Start
( ) on screen.
Print from Google Drive
()
Access Google Drive
Options
from the home screen.
Print from Google Drive
Number of Copies, Auto Fit
.
from the
,
and
from
,
- 62 -
Page 64

Scan to SharePoint Online
You can use
Microsoft office 365
Microsoft
1
2
3
4
CAUTION: If you do not Log out, other people can use your ID.
Scan to SharePoint Online
account to use this function.
Log in policy.
Press
Scan to SharePoint Online
OR
Press
All Applicatons
Enter
URL, User ID
I f you want to log in automatically, check
shows up. Then you can using without Log in next time. If you want to Log in another
Microsoft office 365
Online
and re-Log in.
press
Check
( ) from the screen.
You can also add the URL to
select
Service
General
•
•
•
•
•
.
Back
icon ( ) : Quit
Search
: Searches files.
Options
Preview
Logout
: Setting options.
: See the preview.
: Logs out from the
()
and
account, press
Settings
Password
tab
in the machine. You should be registered to the
Scan to SharePoint Online
from the home screen.
Scan to SharePoint Online
.
Remember me
Logout
from Screen in
Scan to SharePoint Online
Solution Settings
Scan to SharePoint Online
Scan to SharePoint Online
from the home screen.
. Then click
Scan to SharePoint
List. From the
Scan to SharePoint Online
.
.
follow
Yes
when pop up
Embedded Web
Scan to SharePoint® Online
1
Load the document(s) face up with top edge in first into the DADF.
OR
Place a single document face down on the document glass. For details about loading
a document, see "
2
Press
Scan to SharePoint® Online
OR
Press
All Applicatons
3
Select the folder you want.
If necessary, customize the scan settings including
Original Size, Original Type, Duplex, PDF Encryption, File Name, File Conversion
Create Folder
4
Press
Start
Loading an Original Document".
()
by pressing
( ) on screen.
Scan to SharePoint® Online
Setting
( ) from the screen.
from the home screen.
from the home screen.
Resolution, Color, Format
,
and
- 63 -
Page 65

My Files
This feature allows you to use the device shared folder as a
feature is that you can conveniently use the shared folder through your computer’s window.
My Files
. The advantage of this
Creating a My Files
Open the Windows Explore window from the computer.
1
2
Enter the printer’s \\[
press the enter key or click
ip address
Go
] (
example
.
:\\169.254.133.42) in the address field, and
Using My Files
You can use
the folder or file as a normal Windows folder. You can also store scanned data in
You can directly print files stored in
PCL files.
•Press
NOTE: All files stored in My Files are not encrypted and can be accessed by all
My Files
My Files
OR
Press
All Applicatons
a
Scan to My Files
b
Print from My Files
c
File Manager
d
Folder Size
users.
in the exactly same way as a normal computer. Create, edit and delete
My Files
My Files
from the home screen.
()
My Files
: Scans and save to
: Prints files in
: Creates folder, delete folder and files.
: Shows hard disk information.
. You can print TIFF, PDF, JPEG,PRN, PDF and
from the home screen.
My Files
My Files
.
.
.
- 64 -
Page 66

My Forms
This feature allows you to use scan to
, Network location(
Files
HTTP, HTTPS, Network Folder, FTP
My Files, Network Folder, FTP
) and also manage
and print from
My Files
Scanning a Form
Load the document(s) face up with top edge in first into the DADF.
1
OR
Place a single document face down on the document glass. For details about loading
a document, see "
2
Press
My Forms
OR
Press
All Applicatons
3
Select folder you want.
My Files
•
•
Network Folder
•
FTP
: Scans to
If necessary, customize the scan settings including
Original Size, Original Type, Duplex, PDF Encryption, File Name
4
pressing
–
–
–
Press
Setting
Search
Add Bookmark
Preview
Start
Loading an Original Document".
Scan a Form
()
: Scans to
( ) : Searches folder and files.
( ) : Preview a document.
( ) from the screen.
My Files
: Scans to
FTP
.
( ) from the screen.
( ) : Adds bookmark.
from the home screen.
My Forms
.
Network Folder
Scan a Form
.
from the home screen.
Resolution, Color, Format
, and
Overwite
My
.
,
by
Browse to Print
Browse from My Files
You can print documents stored on
1
Press
My Forms
OR
Press
All Applicatons
from the home screen.
Files
If necessary, print settings including
pressing
–
Search
–
Add Bookmark
Browse to Print
()
Setting
( ) from the screen.
( ) : Searches folders and files.
( ) : Adds bookmark.
My Files
.
Browse from My Files
My Forms
Browse to Print
Number of Copies, Auto Fit, Duplex
- 65 -
from the home screen.
Browse from My
and
Tray
by
Page 67

–
Preview
2
Select the file for print.
Start
Press
( ) : Preview a document.
( ) from the screen.
Print from Network Location
You can print on Network location (
1
Press
My Forms
home screen.
OR
Press
All Applicatons
Network Location
If necessary, print settings including
pressing
–
Add Bookmark
Save
–
–
Preview
2
Select
Type
Type
–
–
Path
Press
Start
( ) on the screen.
Browse to Print
()
from the home screen.
Setting
( ) from the screen.
() : Add bookmark.
( ) : Save Forms.
( ) : Preview a document (JPEG Only).
and input
: Choosing protocol (support navigation function in FTP only).
: Input network location path.
Path
HTTP, HTTPs, Network Folder, FTP
Select from Network Location
My Forms
.
Number of Copies, Auto Fit, Duplex
Managing My Files
You can search, add, delete the files and folders in
1
Press
My Forms
OR
Press
All Applicatons
2
You can add folder, delete file and folder.
–
Add Folder
Delete
–
Manage My Files
()
( ) : Adds folder.
( ) : Deletes files and folders.
from the home screen.
My Forms
Browse to Print
My Files
Manage My Files
.
).
from the
Select from
and
Tray
by
from the home screen.
- 66 -
Page 68

My Calendar
You should be registered to the Google CalendarTM account to use this function.
follow
Google
Calendar
1
Press
My Calendar
OR
Press
All Applicatons
2
Enter
Email
I f you want to log in automatically, check
shows up. Then you can using without Log in next time. If you want to Log in another
google account, press
re-Log in.
3
If necessary, customize the print settings including
pressing
–
–
–
–
–
CAUTION: If you do not Log out, other people can use your ID. If you do not log
out, other people can use your ID.
Select calender you want.
4
Press
Options
Favorite
only)"
Log out
Back
icon ( ) : Quit
Options
Start icon
Start
( ) on the screen.
Log in policy.
from the home screen.
()
and
Password
Log In/Out
( ) from the screen.
( ) button : Setting Favorites. See
: Logs out from
: Setting options.
( ) : Print the calendar for the selected Range.
My Calendar
, press the
( ) from control panel in
My Calendar
My Calendar
from the home screen.
Sign in
from the screen.
Remember me
Number of Copies, Tray
"Using Favorite Menu (Administrator
.
.
. Then click
My Calendar
Yes
when pop up
My
and
by
- 67 -
Page 69

Machine Setup
Setting the Machine ID (Administrator only)
You can set the machine ID and fax number which will be printed at the top of each page. If
you have installed the fax multi-line kit, you need to select a line first, follow these steps:
1
Press
My Settings
from the home screen.
2
Enter
Fax
and ID using the keyboard on the display.
Keyboard" for more information about using the keyboard.
3
Press OK then home icon ( ) to return to Home Screen.
Changing the Display Language (Administrator only)
To change the displayed language that the operator panel displays, follow these steps:
1
Press
My Settings
screen.
2
Press the language you want.
3
Press the home icon ( ) to return to Home Screen.
Selecting Country (Administrator only)
To change the country that appears on the operator panel, follow these steps:
1
Press
My Settings
home screen.
2
Press the country you want.
3
Press the home icon ( ) to return to Home Screen.
Machine Setup
Machine Setup
Machine Setup
Initial Setup
Initial Setup
Initial Setup
Machine ID & Fax Number
See "Understanding the
Language
Select Country
from the home
from the
Setting Day light Saving (Administrator only)
If your country switches to Daylight Savings Time each year, use this procedure to
automatically switch to Daylight Savings Time and to Standard time.
1
Press
My Settings
home screen.
2
Press the left/right arrows to select
3
Enter the
arrows.
4
If you select
Start Date
Machine Setup
Manual
,
Start Time, End Date
Yes
, system reboot immediately.
Initial Setup
- 68 -
.
and
End Time
Day Light Saving
each using the up/down
from the
Page 70

Power Save Mode (Administrator only)
If your country switches to Daylight Savings Time each year, use this procedure to
automatically switch to Daylight Savings Time and to Standard time.
1
Press
My Settings
screen.
2
Press the left/right arrows to select the time settings you want.
3
Press the home icon ( ) to return to Home Screen.
NOTE: Available setting range is from 1min. to 120 min. and you can also access this
mode from the EWS (Printer Settings Print Settings Setup Menu and select
Print Power Save).
Machine Setup
Initial Setup
Power Save
from the home
Setting the Time and Date (Administrator only)
The time and date are printed on all faxes.
NOTE: It may be necessary to reset the correct time and date if loss of power to the
printer occurs.
To set the time and date:
1
Press
My Settings
screen.
2
Enter the date and time each using the up/down arrows.
Day= 01 ~ 31
Month= 01 ~ 12
Year= 2000 ~ 2036
Hour= 01 ~ 12 (12-hour mode)
00 ~ 23 (24-hour mode)
Minute= 00 ~ 59
3
Press the home icon ( ) to return to Home Screen.
Machine Setup
Initial Setup
Date & Time
from the home
Setting the Clock Mode (Administrator only)
To set the clock mode:
1
Press
My Settings
screen.
2
Press the left/right arrows to select the appropriate option you want.
Hour= 01 ~ 12 (12-hour mode)
3
Press the home icon ( ) to return to Home Screen.
00 ~ 23 (24-hour mode)
Machine Setup
Initial Setup
- 69 -
Clock Mode
from the home
Page 71

Setting the Sound/Volume (Administrator only)
You can set the volume for key sounds, alarm sounds, and the sound that occurs during a
fax job.
1
Press
My Settings
home screen.
2
Press the appropriate option you want.
•
Key Sound
can select
•
Alram Sound
2(mid), and 3(high).
•
Fax Sound
–
Speaker Volume
The sounds from the telephone line through the speaker, such as a dial tone or a
fax tone. With this option set to Comm. which means Comm., the speaker is on
until the remote machine answers.
Ring Volume
–
Mute
, 1(low)-7(high).
–
Dial Tone Volume
select
3
Press
Check
Machine Setup
: You can set the key sound volume for when pressing the button, you
Mute
, 1(low), 2(mid), and 3(high)
: You can set the alram sound volume, you can select
(only in communication): You can select
: Adjusts the ringer volume. For the ringer volume, you can select
: Adjusts the dial tone volume. For the dial tone volume, you can
Mute
, 1(low)-7(high).
( ) then home icon ( ) to return to Home Screen.
Initial Setup
Sound/Volume
Mute
from the
Mute
, 1(low) ~7(high).
, 1(low),
Setting the Timeout Option (Administrator only)
You can set the time the printer waits before it restores the default copy or fax settings if you
do not start copying or faxing after changing the settings on the operator panel.
1
Press
My Settings
screen.
2
Press the left/right arrows to select on/off.
3
Enter the timeout value using the up/down arrows or direct input using the popup
keyboard.
4
Press
Check
Machine Setup
( ) then home icon ( ) to return to Home Screen.
Initial Setup
Timeo ut
from the home
Setting the Toner Save Mode (Administrator only)
Toner save mode allows your machine to use less toner on each page. Activating this mode
extends the life of the toner cartridge beyond what one would experience in the normal
mode, but it reduces print quality.
1
Press
My Settings
screen.
2
Press the left/right arrows to select On.
3
Press the home icon ( ) to return to Home Screen.
Machine Setup
Initial Setup
- 70 -
Toner S av e
from the home
Page 72

Setting the Timing of Toner Status Alert (Administrator only)
You can customize the level to alert toner low or toner almost empty. If the current toner
amount drops below the setting level, the printer will display a warning message on the
operator panel.
1
Press
My Settings
home screen.
2
Press the option you want.
3
Press the left/right arrows to select the option in
4
Press the home icon ( ) to return to Home Screen.
Machine Setup
Initial Setup
Toner Status Alert
Warning Level
and
Alert On Panel
from the
.
Ignoring Blank Pages (Administrator only)
The printer detects the printing data from computer whether a page is empty or includes
any data. To skip the blank pages at printing document, follow these steps:
1
Press
My Settings
home screen.
2
Press the left/right arrows to select On.
3
Press the home icon ( ) to return to Home Screen.
Machine Setup
Initial Setup
Print Blank Pages
from the
Ignoring the Toner Low Message (Only for Fax) (Administrator only)
When the toner cartridge has almost reached its estimated cartridge life, the printer shows
the toner empty message and continues printing except incoming faxes. In this case,
incoming faxes are saved in memory. However, you can set the machine to print incoming
faxes, even though print quality is not optimal.
1
Press
My Settings
home screen.
2
Press the left/right arrows to select On.
3
Press the home icon ( ) to return to Home Screen.
Machine Setup
Initial Setup
Allow Toner Low
from the
Setting the Language (Administrator only)
Sets the language of the text that appears on the control panel display.
1
Press
My Settings
screen.
Or
Press
My Settings
2
Select language you want.
3
Press and home icon ( ) to return to Home Screen.
Machine Setup
Language
Initial Setup
from the home screen.
- 71 -
Language
from the home
Page 73

Setting the Quick Dial (Administrator only)
Set the speed dial numbers.
1
Press
My Settings
Or
Press and hold the
panel for less than 2 seconds.
2
Select number you want.
3
Choose the appropriate option.
•Add () Quick Dial number1 : Stroed at Quick Dial 1.
• Add ( ) Quick Dial number2 : Stored at Quick Dial 2.
• Delete ( ) Quick Dial number : Delete the Quick Dial number.
4
Press and home icon ( ) to return to Home Screen.
Machine Setup
Speed Dial1( ) or Speed Dial2 ( )
Speed Dial Setting
from the home screen.
button on the control
Setting the Media Overwrite (Administrator only)
You can select the method for overwriting the secure non-volatile memory (hard disk).
1
Press
My Settings
home screen.
2
Selects option you want.
DoD 5220.28M
•
times, patterns 0x35, 0xCA, 0x97 are used to overwrite the disk’s content. This
method of overwriting the disk is specified by US DoD.
Australian ACSI 33
•
times, character “C” and its complement alternatively are used to overwrite the
disk. After the 2nd time, there is a mandatory validation. For the 5th time, random
data is used.
•
German VSITR
6 times, alternate 0x00 and 0xff are used to overwrite the disk, and, in the 7th
time, the disk is written with 0xAA.
•
Custom
overwritten. The hard disk will be overwritten as many times as the number you
select.
3
Press
Start
If you select Yes, all jobs will be delete and system reboot immediately.
Machine Setup
: Select to overwrite the memory 3 times. When overwriting three
: Select to overwrite the memory 5 times. When overwriting 5
: Select to overwrite the memory 7 times. When overwriting for the
: Select to determine the number of times the memory will be
( ) on the screen.
Initial Setup
Media Overwrite
from the
Changing Admin Password (Administrator only)
You can change admin passwod.
1
Press
My Settings
from the home screen.
2
Enter the new password and confirm password.
Press
Check
Machine Setup
( ) then home icon ( ) to return to Home Screen.
Initial Setup
Change Admin Password
- 72 -
Page 74

Setting the Security (Administrator only)
Authentication
This feature allows you to choose the authentication method for user authentication.
1
Press
My Settings
screen.
2
Select the
•
Device Mode
user to login before being able to use the device. Users cannot use any
application without logging in.
Application Mode
•
choose the application(s) to require user to login to use. Users cannot use the
selected application(s) without logging-in. Press Application mode to enable
authentication.
•
Basic Mode
select options that are only available to administrators.
3
Select the
•
Local Authentification
information stored at HDD in the device.
Kerberos Authentification
•
information stored at kerberos server.
•
SMB Authentification
information stored at smb server.
•
LDAP Authentification
information stored at LDAPserver.
Standard Accounting Only
•
4
Press and home icon ( ) to return to Home Screen.
Machine Setup
Mode
.
: Activate device authentication. Device authentication requests a
: Activate application authentication. An administrator can
: Activate basic authentication. Users are asked to login when they
Method
.
: Executes authentification process based on the user
: Executes authentification process based on the user
: Executes authentification process based on the user
Security
: Executes authentification process based on the user
: Allows users to login by entering ID and password.
Authentication
from the home
Accounting
You can set usage limits for each user to use each feature if Standard accounting method is
chosen.
1
Press
My Settings
screen.
2
Select the appropriate accounting option.
•
No Accounting
•
Standard Accounting
3
Press and home icon ( ) to return to Home Screen.
Machine Setup
: Select not to use this feature.
: Select to use the installed job accounting method.
Security
- 73 -
Accounting
from the home
Page 75

Setting the Altitude Adjustment (Administrator only)
0
4,000 m
(13,123 ft)
3,000 m
(9,842 ft)
2,000 m
(6,561 ft)
1,000 m
(3,280 ft)
4
3
2
1
5,000 m
(16,404 ft)
5
You can choose the altitude of the place where your machine is located. The print quality is
affected by atmospheric pressure, which is determined by the height of the machine above
sea level. Therefore, it is important to set the right altitude.
1
Press
My Settings
the home screen.
2
Press the left/right arrows to select altitude your machine is in.
Press and home icon ( ) to return to Home Screen.
Machine Setup
1High 4
2High 3
3High 2
4High 1
5Normal
Initial Setup
Altitude Adjustment
from
- 74 -
Page 76

Checking the Firmware Version (Administrator only)
You can check the firmware version used in the machine.
1
Press
My Settings
home screen.
2
You can check the firmware version used in the machine.
Machine Setup
Initial Setup
Firmware Version
from the
Reports
The following reports are available:
Printer Settings Report
This list shows the status of the user-selectable options. You may print this list to confirm
your changes after changing any settings.
Op-panel Menu Tree Report
This report shows information about the menu functions list.
Address Book Report
This report shows information about the Address Book list.
Out-going Fax Report
This report shows information about the faxes you recently sent.
In-coming Fax Report
This report shows information about the faxes you recently received.
Scheduled Jobs Report
This list shows the documents currently stored for Delayed faxes or Toll Save faxes. The list
shows the starting time and the type of operation.
MSG Confirm Report
This report shows the fax number, the number of pages, the elapsed time of the job, the
communication mode, and the communication results.
Junk Fax List Report
This list shows up to 10 fax numbers specified as junk fax numbers by using the
Setup
menu; see "Using Advanced Fax Settings". When the Junk Fax Setup feature is turned
on, incoming faxes from those numbers will be blocked.
This feature recognizes the last 6 digits of the fax number set as a remote machine’s ID.
- 75 -
Junk Fax
Page 77

Demo Page Report
Prints a demo page to ensure that the printer is operating correctly.
PCL Font List or PS Font List Report
This report shows the PCL or PS font list.
Network Settings Report
This list shows the status of the network options. You may print this list to confirm your
changes after changing any settings.
Email Sent Report
This report shows information about the emails that you have recently sent.
Printing a Report
1
Press
My Settings
2
Select
Reports
3
Select the reports you want and Press
•
Printer Settings
•
Network Settings
•
Address Book
•
Out-going Fax
•
In-coming Fax
•
Scheduled Jobs
•
MSG Confirm
•
Junk Fax List
•
Email Sent
•
Op-panel Menu Tree
•
Demo Page
•
PCL Font List
•
PS Font List
The selected information prints out.
Machine Setup
.
: Printer Settings list
: Network Settings list
: Individual / Group list
: Sent fax report
: Received fax report
: Scheduled job information
: Message confirmation
: Junk fax number lists
: Sent Email report
: Menu Tree list
: Demo page
: PCL Font list
: PS Font list
from the home screen.
Start
( ) from the screen.
- 76 -
Page 78

Setting the Application Management (Administrator only)
You can add/delete/enable/disable applications.But, OOB features cannot be added or
deleted.
Adding an application
You can add applications.
1
Press
My Settings
2
Click the
3
Find the application file by entering the URL in
Stick
4
Press
Deleting an application
You can delete applications.
1
Press
2
Select the application you want.
3
Click the
4
Press
Disabling an application
You can enable or disable applications.
1
Press
2
Select the application.
3
Click the
4
Press the home icon ( ) to return to Home Screen.
Install
.
Start
My Settings
Uninstall
Yes
.
My Settings
Enabled
Machine Setup
() icon.
( ) from the screen.
Machine Setup
() icon.
Machine Setup
button then it will be changed
Application Management
Manual Input(URL)
Application Management
Application Management
Disabled
or by using the
.
USB
Confirming application information
You can check the detail information of applications.
1
Press
My Settings
2
Select the application.
3
Click the
Detail
Machine Setup
() icon.
Application Management
Factory Reset (Administrator only)
Clears all of the data stored in the memory and resets all of your settings to the factory
default.
1
Press
My Settings
2
Press
Start
3
After factory reset, machine will reboot automatically.
Machine Setup
( ) on the screen.
Factory Reset
- 77 -
Page 79

Software
Software Overview
Installing Software in Microsoft® Windows® Operating
System
Accessing management tools
Firmware Update Utility
Using the Dell Supplies Ordering Utility
Using the Dell Printer Manager
Using Dell Printer Status
Using Wireless Setup Utility
Uninstalling Software
- 78 -
Page 80

Software Overview
After setting up your printer and connecting it to your computer, you must install the drivers
and utilities from the "Installing Software in Microsoft
included with your printer. If you purchased a Dell
time, the drivers and utilities are automatically installed. You don’t need to install them. The
"Installing Software in Microsoft
•
Dell Printer PCL driver
use your printer as a printer in Windows, you must install the printer driver(s). For
information about installing the printer drivers in Windows, see "Installing Software in
Microsoft® Windows® Operating System".
•
PS driver
print documents.
Firmware Update Utility
•
"
Firmware Update Utility".
Embedded Web Service
•
without leaving your desk.
•
Dell Supplies Ordering Utility
supplies from Dell.
Printer Settings Utility
•
options from your computer desktop.
•
SetIP
•
Dell Printer Manager
machine settings into one location.
•
Dell Printer Status
you when an error occurs during printing.
•
Scan Driver
scanning documents on your printer.
User’s Guide
•
printer.
•
LDAP
method of securing LDAP communication via SSL.
you can set the LDAP server attributes.
- PostScript Printer Description (PPD) file. You can use the PostScript driver to
- Use this program to set your printer's TCP/IP addresses.
- TWAIN or Windows Image Acquisition (WIA) drivers are available for
- PDF documentation provides detailed information about using your
- enables you to store Email addresses in the (LDAP) server. Also,
®
Windows® Operating System" CD contains the following:
- allows your computer to communicate with your printer. To
- use this program to update your machine’s firmware. See
- enables you to monitor the status of your network printer
- allows you to order replacement toner cartridges or
- allows you to set up fax phonebook and the printer's other
- Dell Printer Manager is an application that combines Dell
- This program allows you to monitor the printer’s status and alerts
®
Windows® Operating System" CD
TM
computer and your printer at the same
supports a
In the
Embedded Web Service
,
- 79 -
Page 81

Installing Software in Microsoft® Windows® Operating System
Before you begin, ensure that your system meets the "Minimum Requirements".
NOTE: For Microsoft Windows® XP, Windows Server® 2003 Server® 2008, Windows
®
, Windows 7 and Windows Server® 2008 R2, Windows 8 the system
Vista
administrator should install Dell software.
Supported Operating Systems
• Windows XP Home edition or Professional
• Windows Server 2003,
•Windows Vista
Windows 7
•
•
Windows 8
Minimum Requirements
• Disk space: Windows XP/Server 2003/Server 2008/Vista: 1 GB
Windows 7: 16 GB
Windows 8: 16 GB
Windows Server 2008 R2: 10 GB
• Memory: Windows XP/Server 2003: 128 MB
Windows Vista/Server 2008: 512 MB
Windows 7: 1 GB
Windows 8: 1 GB (2 GB)
Windows Server 2008 R2: 512 MB (2048 MB)
• CPU: Windows XP/Server 2003/Server 2008/Vista: Pentium III 933 MHZ or higher
Windows 7: Pentium IV 1 GHz 32 bit or 64 bit processor or higher
Windows 8: Pentium IV 1 GHz 32-bit or 64-bit processor or higher
Windows Server 2008 R2: Pentium IV 1 GHz (x86) or 1.4 GHz (x64) processors (2
GHz or faster)
• Required software: Internet Explorer 6.0 or higher
Windows Server 2008, Windows Server 2008 R2
- 80 -
Page 82

Installing Dell Software for Local Printing
A local printer is a printer attached to your computer using a USB cable. If your printer is
attached to a network instead of your computer, skip this step and go on to "Installing Dell
Software for Network Printing" or attached to a network instead of your computer,go on to
A printer driver is a software that lets your computer communicate with your printer. The
procedure to install drivers depends on the operating system you are using.
NOTE: If you attach a USB printer cable while your printer and computer are
powered on, the Found New Hardware Wizard launches immediately. Cancel the
screen and use the "Installing Software in Microsoft
CD to install the Dell software.
Make sure that the machine is connected to your computer and powered on.
1
2
Insert the supplied software CD into your CD-ROM drive. If the installation window
Start
does not appear, click
3
X:\
Setup.exe
OK
click
– For Windows 8, If the installation window does not appear, from
Search
letter that represents your CD-ROM drive and click
happens with this disk"
Setup.exe
4
Select
replacing “X” with the letter, which represents your CDROM drive and
.
Apps
and search for
.
Setup...
All Programs
Run
pop-up window appears, click the window and select
. Type in X:\Setup.exe, replacing “X” with the
®
Windows® Operating System"
Accessories
Run
OK
. If
"Tap to choose what
.
Charms
, select
Run
- 81 -
Page 83

5
Select
USB
on the
Select a Connection Method
6
Enter the your printer name. Then click
Next
.
.
7
Follow the instructions in the installation window.
- 82 -
Page 84

Accessing management tools
Dell
provides a variety of management tools for Dell printers.
1
Make sure that the machine is connected to your computer and powered on.
2
From the
• For Windows 8, from the
3
Find
4
You can see installed management tools.
5
Click the management tool you want to use.
Dell
Start
menu, select
Dell Printers
Programs
Charms
Dell B2375dfw Mono MFP
or
All Programs
, select
Search
.
Apps
.
or
Dell B2375dnf Mono MFP
Firmware Update Utility
You can update your printer’s firmware using the
1
From the
or
2
Download the latest firmware. Click
3
If your printer is connected with an USB cable, click
4
Click
5
Click
Start
menu, select
Dell B2375dnf Mono MFP
Browse
and select the downloaded firmware file.
Update Firmware
.
Programs
Firmware Update Utility
www.dell.com/support
Firmware Update Utility
Dell Printers
Dell B2375dfw Mono MFP
.
USB Connected Printer
.
.
- 83 -
Page 85

Using the Dell Supplies Ordering Utility
Shows the toner level
for your printer.
Click to order replacement
toner cartridges online.
See "
Ordering Supplies".
Select your location.
Shows phone number.
You can find for more
information on recycling.
To order replacement toner cartridges or supplies from Dell:
NOTE: Availabe for Windows or Mac OS users only.
Double-click the
1
OR
From the
or
Start
Dell B2375dnf Mono MFP
NOTE: For Mac,
Open the
2
The
Applications
Dell Supplies Ordering Utility
Dell Supplies Ordering Utility
menu, select
Programs
folder
Dell Supplies Ordering Utility
Dell
folder
window opens.
icon on your desktop.
Dell Printers
Dell B2375dfw Mono MFP
.
Dell Supplies Ordering Utility
.
- 84 -
Page 86

Using the Dell Printer Manager
• Available for Windows and Mac OS users only.
• For Windows, Internet Explorer 6.0 or higher requirement for Dell Printer
Manager.
Dell Printer Manager is an application that combines Dell machine settings into one
location. Dell Printer Manager combines device settings as well as printing environments,
settings/actions and launching. All of these features provide a gateway to conveniently use
your Dell machine. Dell Printer Manager provides two different user interfaces for the user
to choose from: the basic user interface and the advanced user interface. Switching
between the two interfaces is easy:
just click a button.
Understanding Dell Printer Manager
To open t h e progr a m :
For Windows,
Select
Start
Programs
Dell B2375dfw Mono MFP
or
All Programs
Dell Printer Manager
Dell Printers
Dell B2375dnf Mono MFP
.
or
• For Windows 8, from
B2375dnf Mono MFP
• For Mac, Open the
The Dell Printer Manager interface is comprised of various basic sections as described in the
table that follows:
NOTE: The screenshot may differ depending on the operating system you are
using.
Charms
or
Applications
, select
Dell B2375dfw Mono MFP
Search
folder
Apps Dell Printers
Dell Printer Manager
Dell
folder
Dell
.
Dell Printer Manager
.
- 85 -
Page 87

1 Printer list The Printer List displays printers installed on your computer and
network printers added by network discovery (Windows only).
2 Printer
information
3 Application
information
4 Quick links Displays Quick links to machine specific functions. This section
5 Contents area Displays information about the selected machine, remaining
6 Order supplies Click on the Order button from the supply ordering window. You
This area gives you general information about your machine. You
can check information, such as the machine’s model name, IP
address (or Port name), and machine status.
NOTE: You can view the online User’s Guide.
Includes links for changing to the advanced settings, preference,
help, and about.
NOTE: The
to the advanced settings user interface. See
Web Service".
also includes links to applications in the advanced settings.
NOTE: If you connect your machine to a network, the
Embedded Web Service icon is enabled.
toner level, and paper. The information will vary based on the
machine selected. Some machines do not have this feature.
can order replacement toner cartridge(s) from online.
button is used to change the user interface
"Embedded
- 86 -
Page 88

Advanced settings user interface overview
The advanced user interface is intended to be used by the person responsible for managing
the network and machines.
NOTE: Some menus may not appear in the display depending on options or
models. If so, it is not applicable to your machine.
Device Settings
You can configure various machine settings such as machine setup, paper, layout,
emulation, network, and print information.
Scan to PC Settings
This menu includes settings to create or delete scan to PC profiles.
Scan Activation
•
•
Profile
: Displays the scanning profiles saved on the selected device.
•
Basic tab
Image tab
•
Fax to PC Settings
This menu includes settings related to the basic fax functionality of the selected device.
Disable
•
•
: If Disable is On, incoming faxes will not be received on this device.
Enable Fax Receiving from Device
options to be set.
: Determines whether or not scanning is enabled on the device.
: Contains general scan related settings and device settings
: Contains settings related to image alterations.
: Enables faxing on the device and allow more
Alert Settings (Windows only)
This menu includes settings related to error alerting.
•
Printer Alert
Email Alert
•
•
Alert History
: Provides settings related to when alerts will be received.
: Provides options relating to receiving alerts via email.
: Provides a history of device and toner related alerts.
- 87 -
Page 89

Using Dell Printer Status
The Dell Printer Status is a program that monitors and informs you of the machine status.
• The Dell Printer Status window and its contents shown in this user’s guide may
differ depending on the machine or operating system in use.
• Available for Windows OS users only
Dell Printer Status overview
If an error occurs while operating, you can check the error from the Dell Printer Status. Dell
Printer Status is installed automatically when you install the machine software.
You can also launch Dell Printer Status manually. Go to the
Basic
tab
These icons appear on the Windows task bar:
Icon Mean Description
Printer Status
Normal The machine is in ready mode and experiencing no errors or
Warning The machine is in a state where an error might occur in the
Error The machine has at least one error.
button.
warnings.
future. For example, it might be in toner low status, which
may lead to toner empty status.
Printing Preferences
, click the
- 88 -
Page 90

1Toner Level You can view the level of toner remaining in each toner cartridge.
The machine and the number of toner cartridge(s) shown in the
above window may differ depending on the machine in use.
Some machines do not have this feature.
2Option You can set printing job alert related settings.
3 Order Supplies You can order replacement toner cartridge(s) from online.
4 User’s Guide You can view the online User’s Guide.
5Close Close the window.
- 89 -
Page 91

Using Wireless Setup Utility
This program is for the wireless configuration.
NOTE: You can only use
1
Connect the USB cable to your machine.
2
Print the Network Configuration page of the printer to see the current network
configuration.
3
From the
Start
menu, select
Wireless Setup Utility
SetIP
when your printer is connected to a network.
Programs
.
Dell Printers
Dell B2375dfw Mono MFP
4
Follow the instructions in the installation window.
- 90 -
Page 92

Uninstalling Software
You should remove the printer drivers if you are upgrading the software or if your driver
installation fails. You can remove the software using the "Installing Software in Microsoft
Windows
®
Operating System" CD or the Windows uninstall option.
NOTE: Close all programs before uninstalling software, and then restart your
computer after uninstalling the software.
From the
1
or
Start
menu, select
Dell B2375dfw Mono MFP
Programs
Uninstall
Dell Printers
.
Dell B2375dnf Mono MFP
®
2
Select the software you want to remove. Click
The selected driver and all of its components are removed from your computer.
3
After the software is removed, click
Finish
Next
.
.
- 91 -
Page 93

Embedded Web Service
Embedded Web Service
What is Embedded Web Service
Required web browser
Logging into Embedded Web Service
Embedded Web Service overview
- 92 -
Page 94

Embedded Web Service
This chapter gives you step-by-step instructions for setting up the network environment
through
without leaving your desk.
Embedded Web Service
. Enables you to monitor the status of your network printer
What is Embedded Web Service
If you have connected your machine to a network and set up TCP/IP network parameters
correctly, you can manage the machine via
Service
to:
• View the machine’s device information and check its current status.
• Change TCP/IP parameters and set up other network parameters.
• Change the printer preference.
• Set the email notifications advising of the machine’s status.
• Get support for using the machine.
• Upgrade machine software.
Embedded Web Service
. Use
Embedded Web
Required web browser
You need one of the following web browsers to use
• Internet Explorer® 8.0 or higher
• Chrome 4.0 or higher
• FireFox 3.0 or higher
• Safari 3.0 or higher
- 93 -
Embedded Web Service
.
Page 95

Logging into Embedded Web Service
Before configuring options in
administrator. You can still use
have access to
1
Click
2
Type i n t he ID and
•ID: admin
• Password: admin
Settings
Login
on the upper right of the Embedded Web Service website.
Embedded Web Service
Embedded Web Service
tab and
Password
Security
then click
tab.
Login
, you need to Log in as an
without Logging in but you won’t
.
Embedded Web Service overview
NOTE: Some tabs may not appear depending on your model.
Information tab
This tab gives you general information about your machine. You can check things, such as
remaining amount of toner. You can also print reports, such as an error report.
Active Alerts
You can check the current alerts in the machine. Use this information to troubleshoot
machine errors.
You can view all the alerts in details by clicking the
on the
Collapse All
Severity
•
•
Status Code
representatives; this code to the service person when calling for service.
•
Description
•
Skill Level
button to close the alert list.
: Shows the severity of the alert.
: Shows the machine alert status code. This code is for service
: Shows the description of the alert.
: Shows the level of skill required to fix the problem.
Expand All
button. Click
Supplies
You can check the supplies’ information. For toner cartridges and imaging units, supplies’
status is displayed with a visual graph showing you the amount of each supply left. Page
counts are also available which can help you predict when to change the supplies.
- 94 -
Page 96

Usage Counters
You can check the billing information and usage counter of the machine.
•
Billing Information
Counters
•
: Shows the usage counter information by job types.
: Shows the billing information such as machine’s serial number.
Current Settings
Shows the current settings of the machine and network.
Machine Information
•
–
System
: Shows the system related machine settings such as general settings and
detailed tray settings.
–
Printer
: Shows printing related settings.
–
Copy
: Shows copy related settings.
–
Fax
: Shows fax related settings.
Scan to Email
–
–
Scan to Network Folder
–
Scan to FTP
Scan to USB
–
–
Scan to Fax Server
–
Scan Security
Network Information
•
reference and change the necessary settings needed for using the network.
: Shows the current machine settings.
: Shows scan to email related settings.
: Shows scan to network foler related settings.
: Shows scan to FTP related settings.
: Shows scan to USB related settings.
: Shows scan to fax server related settings.
: Shows scan security related settings.
: Shows the current network settings. Use this page as a
Security Information
Shows the current security settings of the machine and network.
Print information
You can print all the reports provided by your machine. You can use these reports to help
you maintain your machine.
Address Book tab
You can manage the address book. This feature is also available from the machine.
Individual
You can manage individual entries in the address book.
Adding an individual address book entry
NOTE: You need to Log in as an administrator to manage the address book(Import /
Export). See "
Logging into Embedded Web Service"
- 95 -
Page 97

1
From the
2
Click the
A pop-up window appears.
3
Enter the
4
Enter the
5
Enter the
6
Select the server(s) you are using among
server information. Click the
7
Click
Deleting an individual address book entry
NOTE: You need to Log in as an administrator to manage the address book. See
"
Logging into Embedded Web Service"
1
From the
2
Check the checkbox(es) of the entry you want to delete from the list and click the
Delete
3
When confirmation message appears, click OK.
Editing an individual address book entry
NOTE: You need to Log in as an administrator to manage the address book. See
"
Logging into Embedded Web Service"
1
From the
2
Click the
A pop-up window appears.
3
Change the value as you want.
4
Click
Embedded Web Service
Add
button above the list.
General
Email
Phone No.
Apply
Embedded Web Service
button above the list.
Embedded Web Service
Edit
Apply
information.
address.
.
.
button above the list.
.
, select the
Test
button to test the server.
, select the
, select the
Address Book
Network Folder, FTP
Address Book
Address Book
tab
tab
tab
Individual
and enter the necessary
Individual
Individual
.
.
.
Searching an individual address book entry
NOTE: You need to Log in as an administrator to manage the address book. See
Logging into Embedded Web Service"
"
1
From the
2
Enter the key word for your search and from the drop down list select the category to
narrow your search.
3
Click the button.
The search result appears on the list.
Importing an individual address book entry
NOTE: You need to Log in as an administrator to manage the address book. See
Logging into Embedded Web Service"
"
Embedded Web Service
, select the
Address Book
tab
Individual
- 96 -
.
Page 98

1
From the
2
Select
3
Select the way to find the location for address book.
•
•
–
–
–
4
Click on OK.
A pop-up message showing the result appear. If you have failed try again.
Exporting an individual address book entry
You can export the address book as .csv file and save it on the computer.
NOTE: You need to Log in as an administrator to manage the address book. See
Logging into Embedded Web Service"
"
1
From the
2
Select
3
Click on the
4
Select the option you want and click the
5
The address book entry is saved as a
book entry.
Embedded Web Service
Import
from the
File
: Click the
located.
Decryption
No Decryption
No Decryption without confidential
confidential.
Decryption
Export
: Imports address list with decryption.
Embedded Web Service
from the
Export
Tas k
Browse
: Import address list without decryption.
Tas k
button. A pop-up window appears.
, select the
drop down list. A pop-up window appears.
button to find the path for where the address book is
, select the
drop down list. A pop-up window appears.
.csv
Address Book
: Imports address list without decryption and
Address Book
Export
button.
format. You can save or open the address
tab
tab
Individual
Individual
.
.
Group
You can manage group address books.
Adding a group address book
NOTE: You need to Log in as an administrator to manage the address book. See
Logging into Embedded Web Service"
"
1
From the
2
Click the
A pop-up window appears.
3
Enter the group information.
If you want to add individual address book entries to the group address book, check
Add individual(s) after this group is created. You can add individuals to the group right
away with a pop-up window.
4
Click
Embedded Web Service
Add Group
Apply
.
button above the list.
, select the
- 97 -
Address Book
tab
Groups
.
Page 99

Deleting a group
NOTE: You need to Log in as an administrator to manage the address book. See
Logging into Embedded Web Service"
"
1
From the
2
Check the checkbox(es) of the group(s) you want to delete from the list and click the
Delete Group
3
Click OK when confirmation window pops up.
Editing a group
NOTE: You need to Log in as an administrator to manage the address book. See
Logging into Embedded Web Service"
"
1
From the
2
Check the checkbox(es) of the group(s) you want to delete from the list and click the
Edit Group
A pop-up window appears.
3
Change the value as you want.
4
Click
Embedded Web Service
button above the list.
Embedded Web Service
button above the list.
Apply
.
, select the
, select the
Address Book
Address Book
tab
tab
Groups
Groups
Settings tab
Settings tab has sub menus,
You cannot view or access this tab if you do not Log in as an administrator.
into Embedded Web Service"
Machine Settings, Network Settings
and
Solution Settings
See "Logging
.
.
.
Machine Settings
You can set machine related settings.
System
•
Setup
: You can set general system related settings.
•
Input Tray
Sound/Volume
•
sound that occurs during a fax job.
•
Stamp
Time
•
fax/print jobs or will be printed on reports
Printer
You can set copy related settings such as darkness or adjust the background.
•
General
•
Graphic
: You can set paper size, type for each tray and other tray related settings.
: You can set the volume for button sounds, notice alarms, and the
: You can adjust the stamp on printouts.
: When you set the time and date, it will be used for sending/printing delayed
: You can set the basic settings for printing.
: You can set the
Print Resolution
for printing.
- 98 -
Page 100

•
Layout
: You can set paper layout related settings. For more information about the
options, refer to the setting this option from the machine.
PCL
•
•
•
•
•
Copy
You can set copy related settings such as a darkness.
•
Fax
You can set fax related settings such as fax number or redial attempt.
•
•
•
•
•
: You can set PCL font related settings.
PostScript
PDF
XPS
Font and Macro Download
Change Default
General
Change Default
Received Fax Printing
–
Send Forward
forward sent faxes to other destinations such as Fax, Email, Network Foler, FTP. Fax
forwarding to several destinations is also possible.
Received Forward
user to forward received faxes to other destinations such as Fax, Email, Network Foler,
FTP. Fax forwarding to several destinations is also possible.
: You can set PostScript related settings.
: You can set PDF related settings.
: You can set XPS related settings.
: You can download fonts and macro to the machine.
: You can set copy related default settings.
: You can set general fax related settings.
: You can set fax related default settings.
: You can set received fax printing related settings.
Received Fax Printing
- Print Duplex : Select to print received fax data on both sides of paper.
- Auto Reduction : Set to automatically reduce an incoming page. When
receiving a fax containing pages as long as or longer than the paper loaded in
the paper tray, the machine can reduce the size of the original to fit the size of
the paper loaded in the machine.
If you do not enable this option, the machine cannot reduce the original to fit
onto one page. The original will be divided and printed in actual size on two or
more pages.
- Discard Size : Enter the reduce size for reduction. The machine minuses the
specified segment set as the discard size. If you have selected Auto Reduction,
this option is enabled.
- Stamp Received Name : You can stamp received name on print outs.
: You can set the send fax forward related settings to enable the user to
: You can set the receive fax forward related settings to enable the
: Set the general fax settings.
- 99 -
 Loading...