

Dell A960 All In One Personal Printer Owner's Manual

www.dell.com/supplies | support.dell.com
Dell™ Personal All-In-One Printer A960
Owner’s Manual
Look Inside For:
• Ordering Supplies
• Getting Started
• Understanding the Software
• Ink Cartridge Maintenance
• Troubleshooting

Ordering Ink Cartridges and Supplies
Your Dell™ Personal All-In-One Printer A960 comes with software installed
to detect the ink levels in the printer. During a print job, a screen appears on
your computer to warn you if the ink levels are low. You can order ink online
at www.dell.com/supplies or by phone.
Your printer has been designed to print using the following ink cartridges:
USA 877-465-2968
(877-Ink2You)
Canada 877-501-4803
Mexico 001-800-210-7607
Puerto Rico 800-805-7545
UK 0870 907 4574
Ireland 1850 707 407
France 0825387247
Italy 800602705
Spain 902120385
Germany 0800 2873355
Austria 08 20 - 24 05 30 35
Netherlands 020 - 674 4881
Belgium 02.713 1590
Sweden 08 587 705 81
Norway 231622 64
Denmark 3287 5215
Finland 09 2533 1411
Switzerland 0848 801 888
Item: Part number:
Black ink cartridge 7Y743
Color ink cartridge 7Y745

3
Notes, Notices, and Cautions
NOTE: A NOTE indicates important information that helps you make better use of your
computer.
NOTICE: A NOTICE indicates either potential damage to hardware or loss of data and tells you
how to avoid the problem.
CAUTION: A CAUTION indicates a potential for property damage, personal
injury, or death.
____________________
Information in this document is subject to change without notice.
© 2003 Dell Inc. All rights reserved.
Reproduction in any manner whatsoever without the written permission of Dell Inc. is
strictly forbidden.
Trademarks used in this text: Dell and DELL logo are trademarks of Dell Inc.; Microsoft and
Windows are registered trademarks of Microsoft Corporation.
Other trademarks and trade names may be used in this document to refer to either the
entities claiming the marks and names of their products. Dell Inc. disclaims any proprietary
interest in trademarks and trade names other than its own.
____________________
UNITED STATES GOVERNMENT RESTRICTED RIGHTS
This software and documentation are provided with RESTRICTED RIGHTS. Use,
duplication or disclosure by the Government is subject to restrictions as set forth in
subparagraph (c)(1)(ii) of the Rights in Technical Data and Computer Software clause at
DFARS 252.227-7013 and in applicable FAR provisions: Dell Inc., One Dell Way, Round
Rock, Texas, 78682, USA.

4
www.dell.com/supplies | support.dell.com
Caution: SAFETY INFORMATION
Use the following safety guidelines to help ensure your own personal safety and to help
protect your computer and working environment from potential damage.
• Use only the power supply provided with this product or the manufacturer’s
authorized replacement power supply.
• Connect the power cord to an electrical outlet that is near the product and easily
accessible.
• Refer service or repairs, other than those described in the user documentation, to a
professional service person.
CAUTION: Do not use the fax feature during a lightning storm. Do not set up this
product or make any electrical or cabling connections, such as the power supply
cord or telephone, during a lightning storm.

Contents 5
Contents
Notes, Notices, and Cautions . . . . . . . . . . . . . . . . . . . . 3
Caution: SAFETY INFORMATION
. . . . . . . . . . . . . . . . . 4
1 Getting Started
Understanding the Printer Parts . . . . . . . . . . . . . . . . . . 10
Accessing Your
User’s Guide
. . . . . . . . . . . . . . . . . . . . 13
Setting up Your Printer
. . . . . . . . . . . . . . . . . . . . . . . 13
Installing the Operator Panel . . . . . . . . . . . . . . . . . . . . 14
Using the Operator Panel
. . . . . . . . . . . . . . . . . . . . . . 15
Operator Panel Menus
. . . . . . . . . . . . . . . . . . . . . . 17
Understanding the Automatic Paper Type Sensor
. . . . . . . . . 23
Loading Paper. . . . . . . . . . . . . . . . . . . . . . . . . . . . 25
Print Media Guidelines for the Paper Support
. . . . . . . . . . 26
Load Your Document on the Scanner Glass . . . . . . . . . . . 28
2 Using the Printer
Using the ADF . . . . . . . . . . . . . . . . . . . . . . . . . . . 30
Load Your Document Into the ADF
. . . . . . . . . . . . . . . 30
Print Media Guidelines for the ADF . . . . . . . . . . . . . . . 31
Printing . . . . . . . . . . . . . . . . . . . . . . . . . . . . . . . 32
Print Photos
. . . . . . . . . . . . . . . . . . . . . . . . . . 32
Copying
. . . . . . . . . . . . . . . . . . . . . . . . . . . . . . . 33

6 Contents
Copy Photos . . . . . . . . . . . . . . . . . . . . . . . . . . 34
Scanning
. . . . . . . . . . . . . . . . . . . . . . . . . . . . . . 34
Scan Photos
. . . . . . . . . . . . . . . . . . . . . . . . . . 36
Edit Scanned Images
. . . . . . . . . . . . . . . . . . . . . 36
Scan Multiple Pages or Images
. . . . . . . . . . . . . . . . 37
Edit text found in a scanned document using OCR (Optical Character
Recognition) . . . . . . . . . . . . . . . . . . . . . . . . . . 37
Save an Image on Your Computer
. . . . . . . . . . . . . . . 38
E-mail a Scanned Image or Document . . . . . . . . . . . . . 38
Enlarge or Reduce Images or Documents
. . . . . . . . . . . . 39
Faxing
. . . . . . . . . . . . . . . . . . . . . . . . . . . . . . . 40
Using Dell Printer Fax Tools Fax Software
. . . . . . . . . . . 41
Using Fax Console (Windows XP Only)
. . . . . . . . . . . . . 43
Access the Fax Setup Utility
. . . . . . . . . . . . . . . . . . 44
Send a Fax . . . . . . . . . . . . . . . . . . . . . . . . . . . 46
Receive Faxes
. . . . . . . . . . . . . . . . . . . . . . . . . 48
Print to Fax
. . . . . . . . . . . . . . . . . . . . . . . . . . 50
Viewing Sent Faxes and Received Faxes . . . . . . . . . . . . 51
View the Status of a Fax
. . . . . . . . . . . . . . . . . . . . 51
Using Special Fax Features
. . . . . . . . . . . . . . . . . . 52
3 Understanding the Software
Understanding the Printer Software . . . . . . . . . . . . . . . 56
Using the Dell All-In-One Center
. . . . . . . . . . . . . . . . . 56
Access the Dell All-In-One Center:
. . . . . . . . . . . . . . . 56
The All-In-One Main Page
. . . . . . . . . . . . . . . . . . . 57
Using Print Properties
. . . . . . . . . . . . . . . . . . . . . . . 59
Access Print Properties
. . . . . . . . . . . . . . . . . . . . 59
Print Properties Tabs
. . . . . . . . . . . . . . . . . . . . . . 59
Using the Dell Printer Solution Center
. . . . . . . . . . . . . . 61
Access the Dell Printer Solution Center
. . . . . . . . . . . . 61

Contents 7
Using Dell Picture Studio . . . . . . . . . . . . . . . . . . . . . . 62
Access Dell Picture Studio
. . . . . . . . . . . . . . . . . . . 62
4 Ink Cartridge Maintenance
Replacing Ink Cartridges . . . . . . . . . . . . . . . . . . . . . . 64
Aligning Ink Cartridges . . . . . . . . . . . . . . . . . . . . . . . 65
Cleaning the Ink Cartridge Nozzles
. . . . . . . . . . . . . . . . 67
5 Troubleshooting
Setup Problems . . . . . . . . . . . . . . . . . . . . . . . . . . . 70
General Problems . . . . . . . . . . . . . . . . . . . . . . . . . . 70
Black and White Copy Quality Is Unsatisfactory
. . . . . . . . . 72
Fax Does Not Work . . . . . . . . . . . . . . . . . . . . . . . 73
Printer Is Not Sending or Receiving Faxes
. . . . . . . . . . . . 73
Default Country Was Not Set
. . . . . . . . . . . . . . . . . . 74
Document Misfeeds or Jams . . . . . . . . . . . . . . . . . . . 77
Error Messages and Flashing Lights . . . . . . . . . . . . . . . . 78
Improving Print Quality
. . . . . . . . . . . . . . . . . . . . . . 80
Clean the Ink Cartridge Nozzles
. . . . . . . . . . . . . . . . . 81
Remove and Reinstall the Software
. . . . . . . . . . . . . . . 81
More Troubleshooting Options
. . . . . . . . . . . . . . . . . . . 82
6 Contacting Dell
Technical Assistance . . . . . . . . . . . . . . . . . . . . . . . . 84
Automated Order-Status Service . . . . . . . . . . . . . . . . . . 84
Contacting Dell
. . . . . . . . . . . . . . . . . . . . . . . . . . . 85

8 Contents
7 Appendix
Limited Warranties and Return Policy . . . . . . . . . . . . . . 98
Dell Inc.
Ink and Toner Cartridges Limited Warranties
. . . . . . . . . . . 109
Dell Software License Agreement . . . . . . . . . . . . . . . . . 111
Regulatory Notices
. . . . . . . . . . . . . . . . . . . . . . . . 113

1
SECTION 1
Getting Started
Understanding the Printer Parts
Accessing Your User’s Guide
Setting up Your Printer
Installing the Operator Panel
Using the Operator Panel
Understanding the Automatic Paper Type Sensor
Loading Paper
10 Getting Started
www.dell.com/supplies | support.dell.com
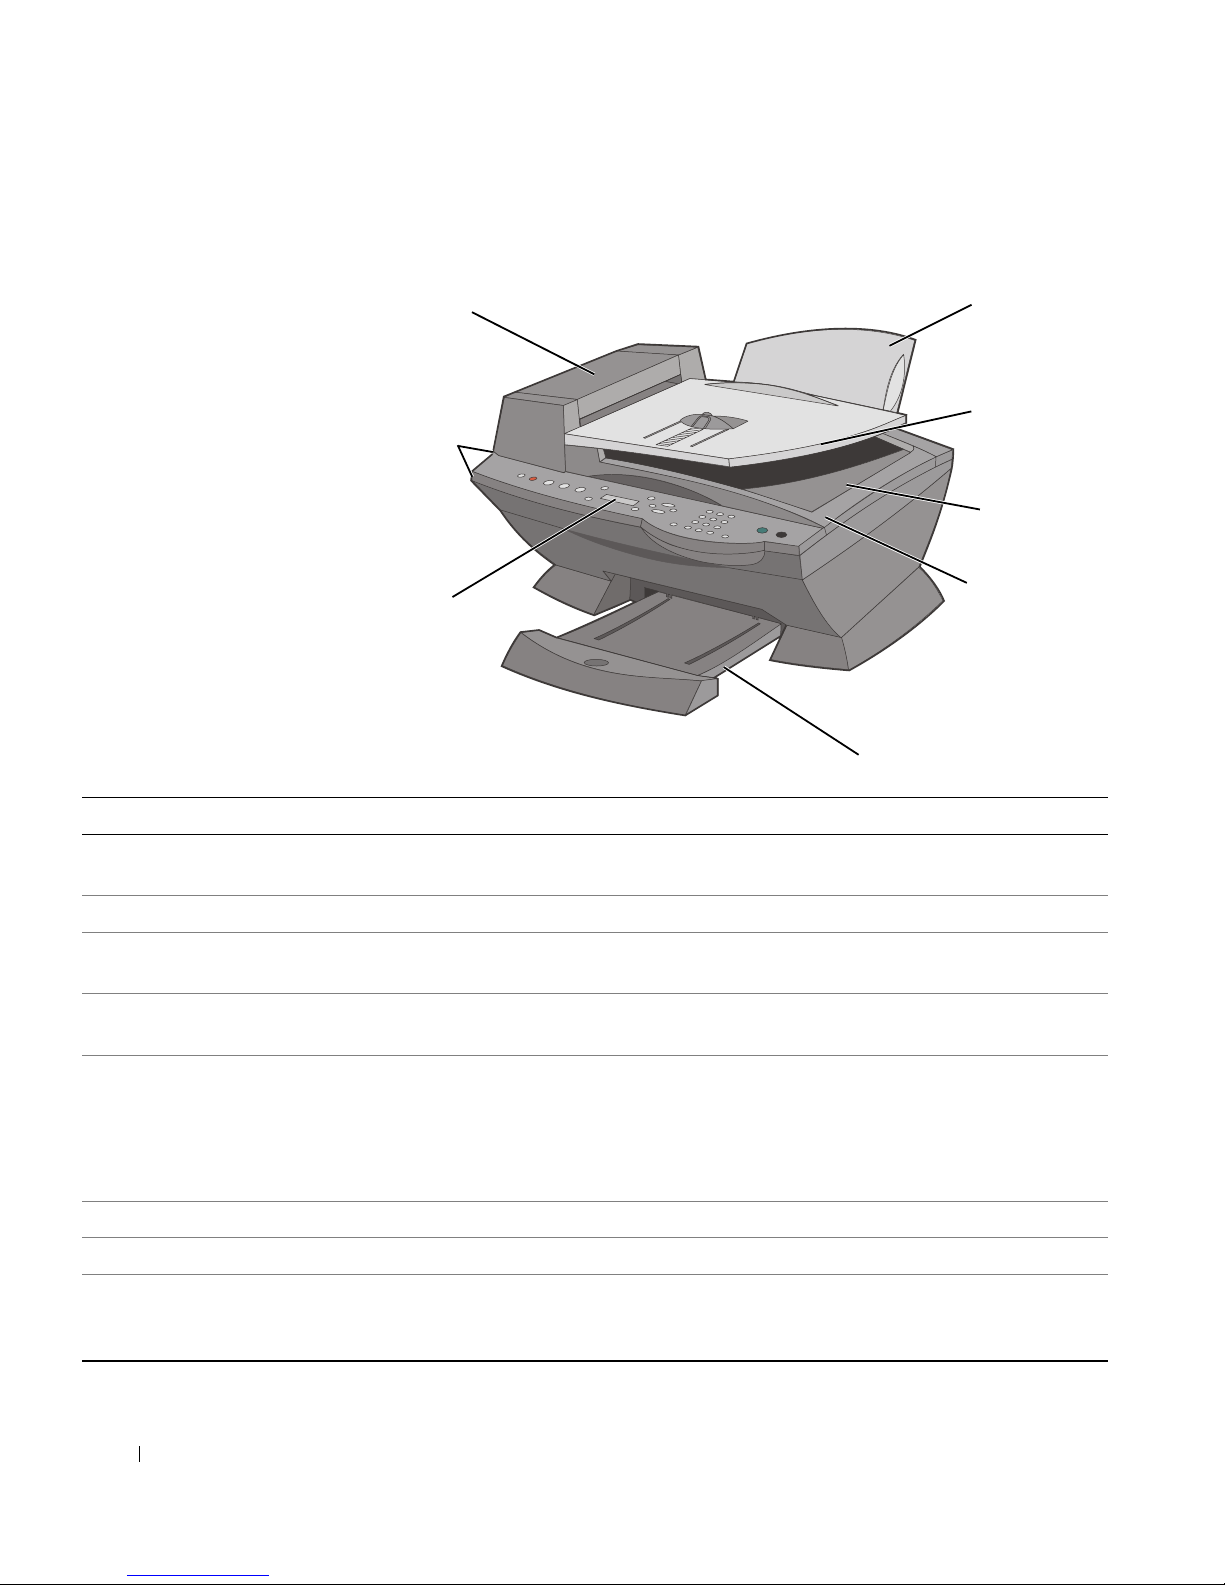
Understanding the Printer Parts
8
2
1
7
5
6
3
4
#Use the: To:
1 Automatic Document Feeder (ADF) Scan, copy or fax multiple page documents and/or legal sized
documents.
2 Paper support Load paper into the printer.
3 ADF input tray Load original documents in the printer. Recommended for
scanning, copying, or faxing multiple page documents.
4 ADF exit tray Pick up your original document after it has gone through the
ADF.
5 Top cover Access the scanner glass:
• Lift top cover to place or remove items on the scanner glass.
• Scanner glass recommended for heavy weight, delicate, or
unusually sized originals that can not be fed through the
ADF.
6 Paper exit tray Stack paper as it exits the printer.
7 Display Check the printer status or view messages, menus, or settings.
8 Operator panel Operate your printer (attached to a computer or unattached).
For more information, see "Using the Operator Panel" on
page 15.

Getting Started 11
3
1
2
4
#Use the: To:
1 Printer (scanner unit) • Lift to install or change ink cartridges.
• Lift to lock or unlock the scanner.
2 Scanner lock Lock or unlock the scanner.
• Push the scanner lock away from you for unlocking.
• Pull the scanner lock toward you for locking.
NOTE: Lock the scanner if you are moving your printer. Unlock
the scanner before use.
3 Scanner support Keep the printer (scanner unit) open when changing ink
cartridges or toggling the scanner lock.
NOTE: To close the printer (scanner unit) for normal operation:
lift the (printer) scanner unit, press the scanner support to the
right, then lower the printer (scanner unit) until it rests on the
main body of the printer.
4 Express Service Code • Identify your printer when you use support.dell.com or
contact technical support.
• Enter the Express Service Code to direct your call when
contacting technical support. The Express Code is not
available in all countries.
12 Getting Started
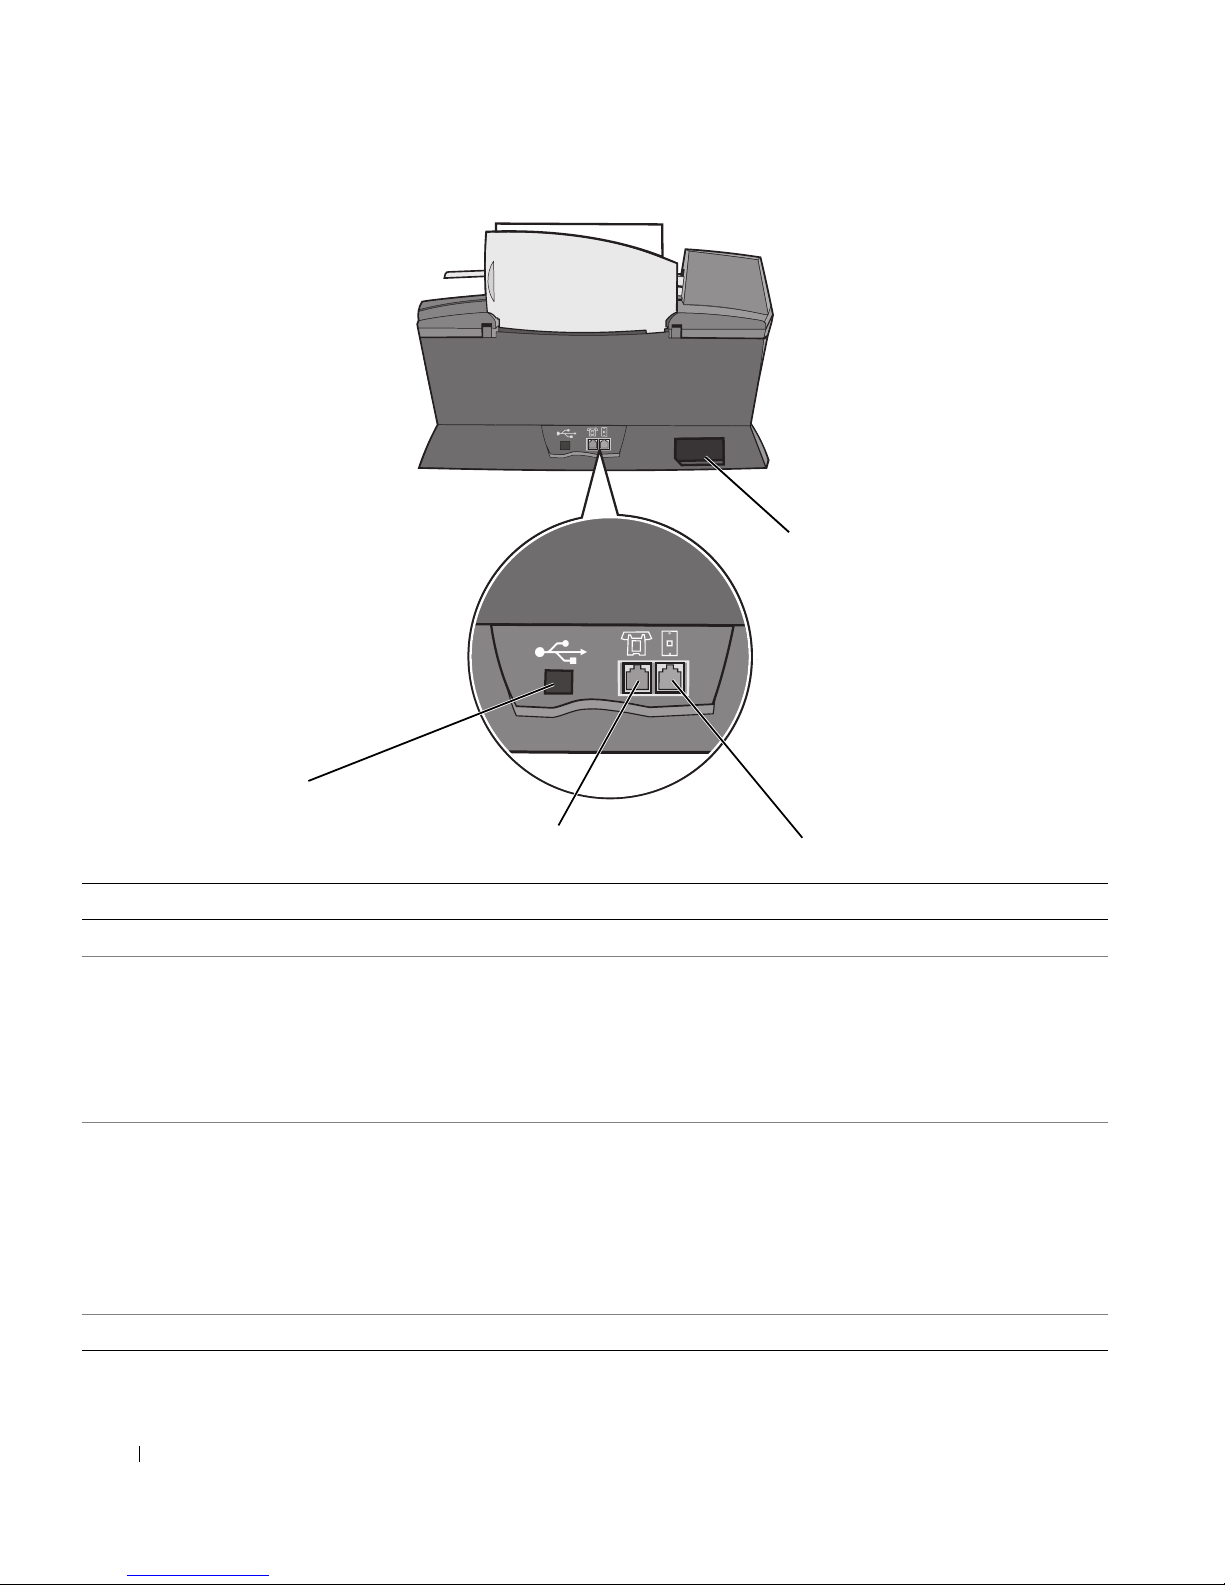
www.dell.com/supplies | support.dell.com
3
2
1
4
#Use the: To:
1 Power supply connector Supply power to the printer.
2 Wall jack connector Connect your printer to an active telephone line to send and
receive faxes. Your printer must be connected to this telephone
line to receive incoming fax calls.
NOTE: Do not connect a DSL (digital subscriber line), ISDN
(integrated services digital network), or cable modem to the
printer.
3 Data/fax modem, answering machine,
and telephone connector
Remove the plug to connect additional devices, such as a
data/fax modem, telephone, or answering machine to your
printer.
NOTE: Do not connect additional devices to the wall jack
connector, and do not connect a DSL (digital subscriber line),
ISDN (integrated services digital network), or cable modem to
the printer.
4 USB cable connector Connect your printer to a computer.

Getting Started 13
Accessing Your
User’s Guide
Click Start →All Programs (or Programs) →Dell Printers →Dell AIO Printer
A960
→View Dell User’s Guide.
Setting up Your Printer
NOTE: The Dell Personal All-In-One Printer A960 supports the Windows XP and Windows
2000 operating systems.
Follow the instructions on your printer Setup Diagram to install the hardware and software.
For setup troubleshooting, see page 70.
You can use the Dell™ AIO Printer A960 to do a variety of things. A few important things to
note:
• If your printer is attached to a computer, you can use either the printer operator panel
or the printer software to create your projects.
•You do need to attach your printer to a computer to scan.
•You do need to attach your printer to a computer to print.
•You do not need to attach your printer to a computer to make photocopies.
•You do not need to attach your printer to a computer to send faxes.
NOTE: The printer must be connected to a telephone line for faxing to function (attached to a
computer or unattached).
14 Getting Started
www.dell.com/supplies | support.dell.com
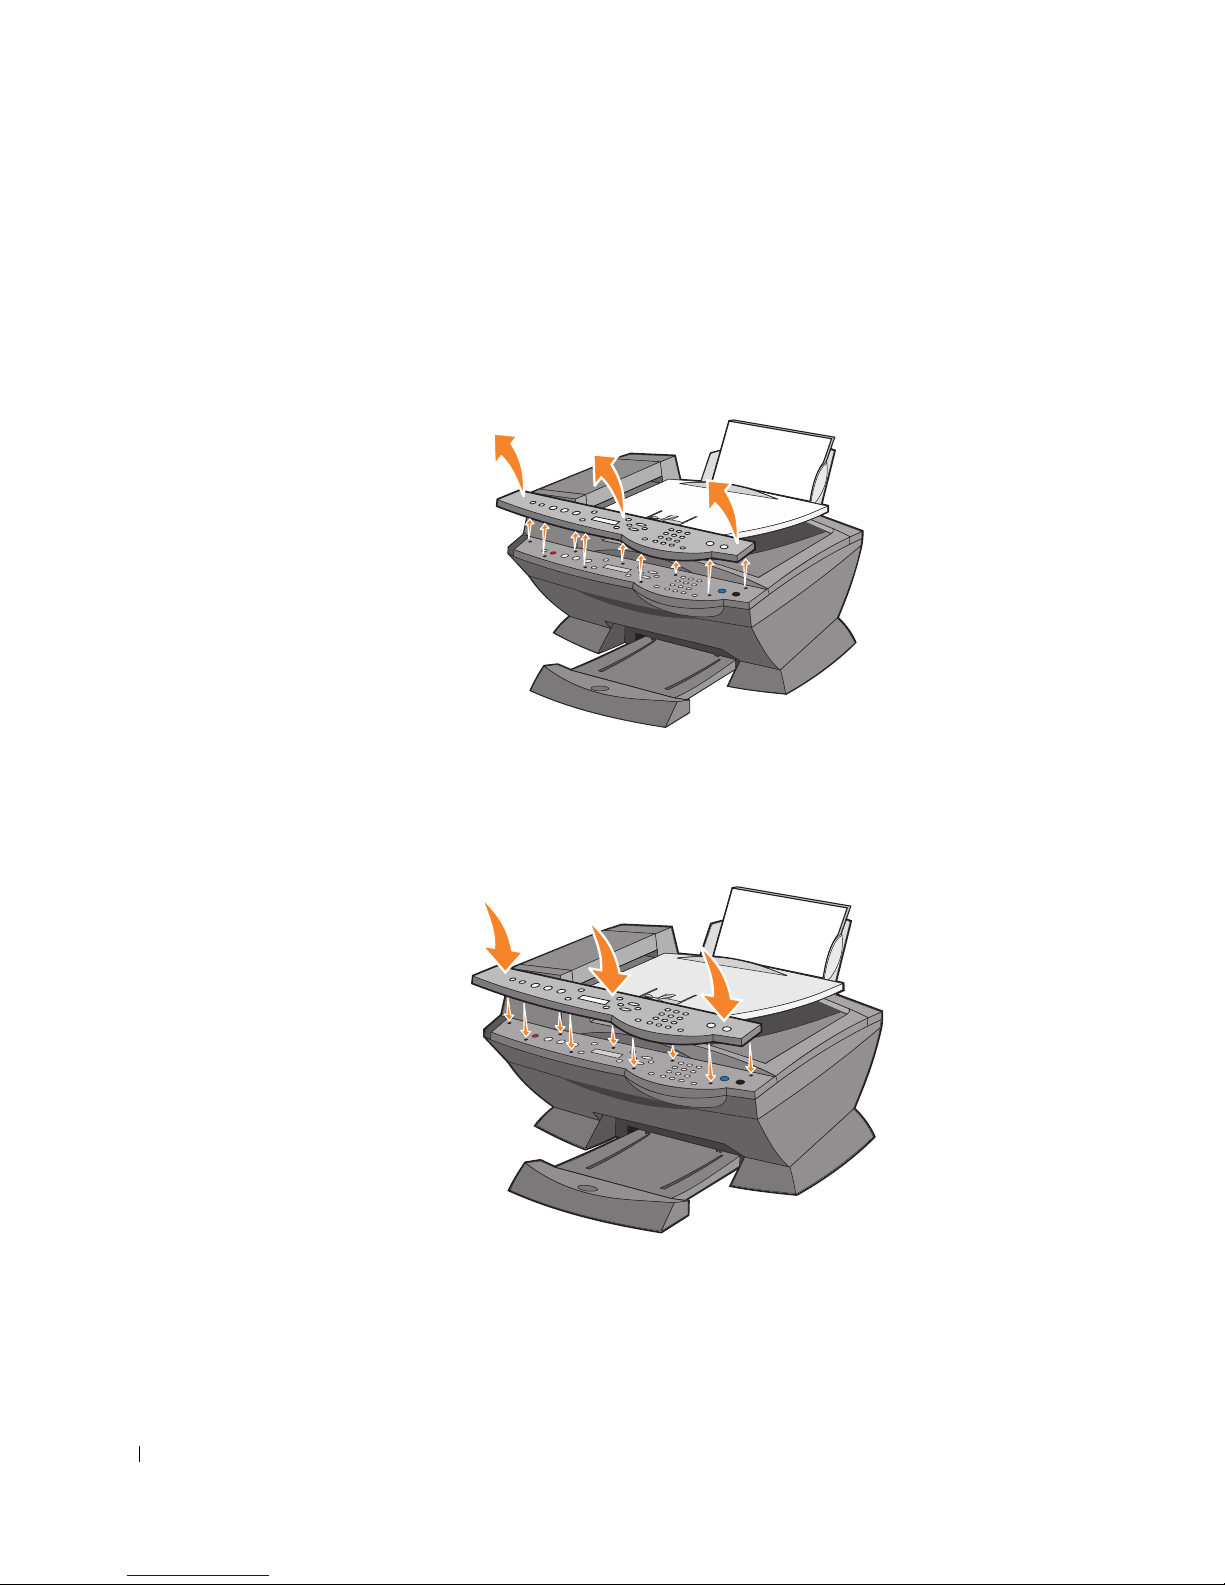
Installing the Operator Panel
The following instructions apply only if you received an additional language operator panel
with your printer.
1 Remove the operator panel (if one is installed).
2 Choose the correct operator panel for your language.
3 Position the clips on the printer, and then press down.
Getting Started 15
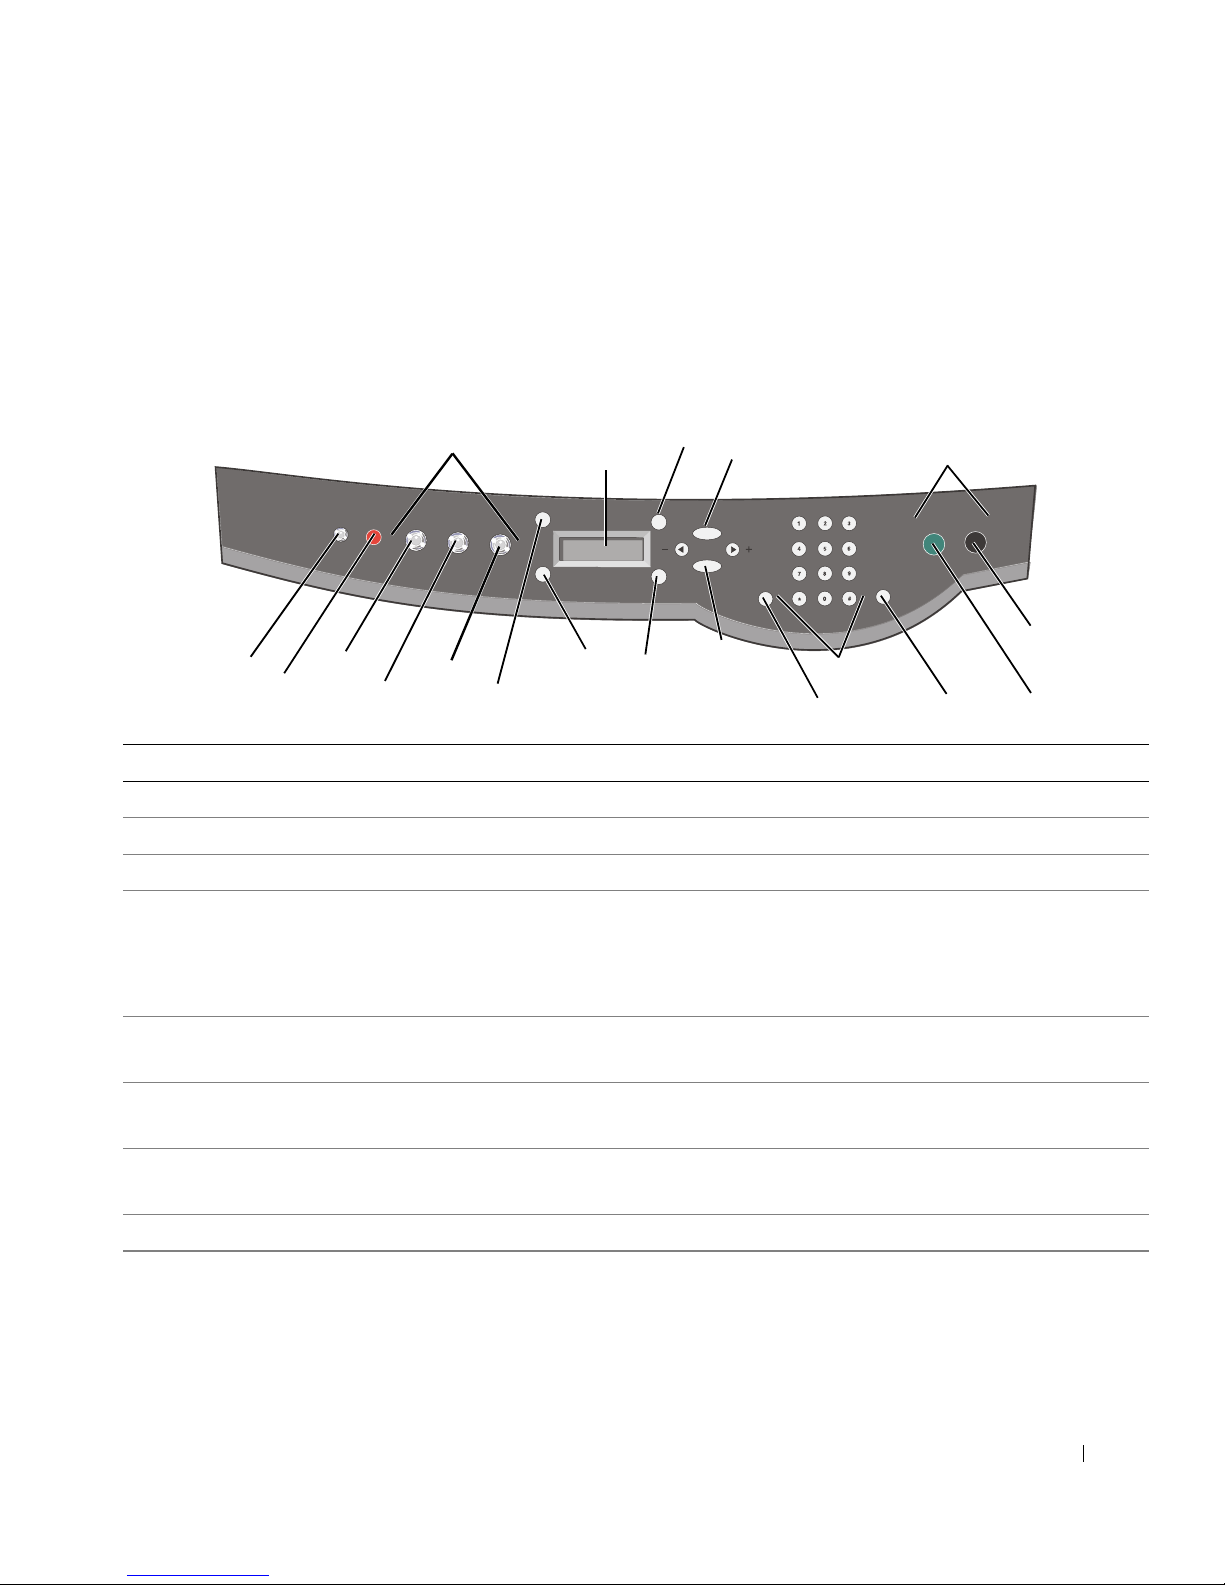
Using the Operator Panel
The operator panel buttons help you scan, copy, fax, and customize documents. When
Power is lit, the printer is on. You can select a mode from the Mode area, select or change
settings using several of the buttons, and initiate a scan, copy, or fax from the Start area on
the far right.
3
4
5
6
7
9
18
10
16
15
14
13
12
19
11
2
1
8
17
Use the: To:
1 Mode area Select a Mode (scan, copy, or fax).
2 Start area Start a color or black and white scan, copy, or fax job.
3Power Turn your printer on or off.
4 Stop/Clear
(Cancel)
• Cancel a scan, print, or copy job in progress.
• Clear a fax number or end a fax transmission and return the display to the fax default.
• Exit a menu.
• Clear current settings and return to default settings.
5 Copy Enter copy mode.
NOTE: This button is lit when the printer is in copy mode.
6Scan Enter scan mode (possible when the printer is attached to a computer).
NOTE: This button is lit when the printer is in scan mode.
7Fax Enter fax mode. The printer can receive a fax while in any mode.
NOTE: This button is lit when the printer is in fax mode.
8Number of CopiesSpecify a number (1-99) of photocopies.
9Quality • Select from the following copy qualities: Quick, Normal, Better, or Best.
• Select a fax resolution: Standard, Fine, Superfine, or Ultrafine.
• Select a scan resolution when the printer is attached to a computer.

16 Getting Started
www.dell.com/supplies | support.dell.com
10 Lighter/Darker Lighten or darken a photocopy or fax.
11 Select Choose the option that appears on the display.
NOTE: If you hold down the Select button, the button acts as a paper feed.
12 Speed Dial Use the speed dial feature while the printer is in fax mode.
NOTE: If you press Speed Dial when your printer is in copy or scan mode, the printer
automatically switches to fax mode.
13 A keypad number
or symbol
• In fax mode:
Enter fax numbers.
Get through an automated answering system.
Select letters when creating a Speed Dial list.
Type numbers to enter or edit the date and time shown on the printer display.
• In copy mode:
Select the number of photocopies you want to make.
14 Redial/Pause • Redial the last number entered when the machine is in fax mode.
• Insert a three-second pause in the number to be dialed.
Enter a pause only when you have already begun entering the number. Press - to insert
a pause before number dialed.
NOTE: If you press Redial/Pause when your printer is in copy or scan mode, the printer
automatically switches to fax mode.
15 Color Start a color copy, fax, or scan job.
NOTE: In the Mode area, make sure the mode you want is lit.
16 Black Start a black and white copy, fax, or scan job.
NOTE: In the Mode area, make sure the mode you want is lit.
17 Display View printer status, messages, and menus.
18 Reduce/Enlarge Customize the size of your original document by a percentage, Fit to Page, or to poster
size.
19 Options Scroll through the list of menu headings (see "Operator Panel Menus" on page 17).
- • Decrease a number on the display.
• Scroll through a list on the display.
• Add a space when entering/editing text or numbers on the LCD display, such as speed
dial information or fax numbers.
+ • Increase a number on the display.
• Scroll through a list on the display.
• Backspace when entering text or numbers on the LCD display, such as speed dial
information or fax numbers.
Use the: To:

Getting Started 17
Operator Panel Menus
See the display for:
• Printer status
• Messages
• Menus
Selecting Operator Panel Menu items
1 Press one of the available Mode buttons on the printer operator panel.
2 Press Options repeatedly until the menu heading you want appears on the display.
3 Press + or - to scroll through the available menu items.
4 Press Select when the menu item you want appears on the display to save the setting.
For more information about using the operator panel, see your User’s Guide.
NOTE: The option currently selected is noted with an asterisk (*) on the display.
18 Getting Started
www.dell.com/supplies | support.dell.com
Copy Mode Menu Items
BLANK PAPER SIZE
Letter
Legal
B5
A4
A5
A6
3x5
4x6
L
2L
CONTENT TYPE
Text&Graphics
Photo
Text Only
Line Drawing
REPEAT IMAGE
1x per page
4x per page
9x per page
16x per page
COLOR
Press + or - to adjust the color
intensity, and then press Select.
ORIGINAL SIZE
Auto Detect
Letter
B5
A4
A5
A6
Wallet
3x5
4x6
5x7
8x10
L
2L
BLANK PAPER TYPE
Auto Detect
Plain
Coated
Photo
Transparency
COLLATE-BLACK
Collate Off
Collate-Black
No of pages <#>
KEY PRESS TONE
Off
Low
High
MAINTENANCE
Ink levels
Change
Align
Clean
Test
LANGUAGE
English
French
German
Spanish
Italian
Dutch
Brazilian Portug
Polish
Russian
Greek
POWER SAVE
Immediately
After 10 min
After 30 min
After 60 min
Never
CLEAR SETTINGS
After 2 min
Never
SET DEFAULTS
Use Factory
Use Current

Getting Started 19
Scan Mode Menu Items
SET DEFAULTS
Use Factory
Use Current
ORIGINAL SIZE
Letter
B5
A4
A5
A6
Wallet
3x5
4x6
5x7
8x10
L
2L
LANGUAGE
English
French
German
Spanish
Italian
Dutch
Brazilian Portug
Polish
Russian
Greek
CLEAR SETTINGS
After 2 min
Never
POWER SAVE
Immediately
After 10 min
After 30 min
After 60 min
Never
20 Getting Started
www.dell.com/supplies | support.dell.com
Fax Mode Menu Items
ANSWER FAX WHEN
After 1 ring
After 2 rings
After 3 rings
After 5 rings
Manual-Press #
Fax tone heard
EDIT SPEED DIAL
Add
Remove
Modify
Print
DELAY UNTIL
Do not delay
Enter Time
PRINT REPORTS
Activity Report
Send log
Receive log
Setting list
BLANK PAPER SIZE
Letter
A4
Legal
RINGER TONE
Off
Low
High
FAX FORWARD
Off
Forward
Print&Forward
ON HOOK DIAL
On hook dial
Press Select
ADVANCED FAX
See "Advanced Fax Mode
Menu Items" on page 22.
PENDING FAXES
None
<#>
KEY PRESS TONE
Off
Low
High
SPEAKER VOLUME
Off
Low
High
EDIT DATE/TIME
Date
Time
PERSONALIZE FAX
Name
Number
ORIGINAL SIZE
Letter
B5
A4
A5
A6
Wallet
3x5
4x6
5x7
8x10
L
2L
BLANK PAPER TYPE
Auto Detect
Plain
Coated
Photo
Transparency
Continued...
Getting Started 21
Fax Mode Menu Items (continued)
MAINTENANCE
Ink levels
Change
Align
Clean
Test
CLEAR SETTINGS
After 2 min
Never
SET DEFAULTS
Use Factory
Use Current
FAX CONFIRMATION
Off
Print for all
Print for errors
FIT FAX TO PAGE
Try to fit
Two pages
RING PATTERN
Normal
Distinctive Ring 1 (Double)
Distinctive Ring 2 (Triple)
Any
LANGUAGE
English
French
German
Spanish
Italian
Dutch
Brazilian Portug
Polish
Russian
Greek
22 Getting Started
www.dell.com/supplies | support.dell.com
Advanced Fax Mode Menu Items
ACTIVITY REPORT
On request
After 40 faxes
MAX SEND SPEED
2400
4800
7200
9600
12000
14400
16800
19200
21600
24000
26400
28800
31200
33600
DIALING METHOD
Touch-Tone
Pulse
Behind a PBX
ERROR CORRECTION
On
Off
REDIAL ATTEMPTS
0 times
1 time
2 times
3 times
4 times
5 times
REDIAL INTERVAL
1 minute
2 minutes
3 minutes
4 minutes
5 minutes
6 minutes
7 minutes
8 minutes
FAX FOOTER
On
Off
DIAL PREFIX
None
Create
SCAN BEFORE DIAL
No
Yes
CALL DIAGNOSTICS
Off
Audio on
Print T.30 signals report
Both Audio and Report
COUNTRY CODE
Select from one of the
available countries.

Getting Started 23
Understanding the Automatic Paper Type
Sensor
Your printer has an automatic paper type sensor that detects the following paper types:
• Plain paper.
• Coated paper.
• Glossy/photo paper.
• Transparencies.
If you load one of these paper types, the printer detects the paper type and automatically
adjusts the paper type settings.
NOTE: Your printer cannot detect the paper size.
To choose the paper size on which you want to print:
1 With your document open, click File →Print.
2 In the Print dialog box, click Preferences or Properties (depending on your program or
operating system).
The Print Properties screen appears.
3 From the Paper Setup tab, select the paper size you are using.
4 Click OK.
The automatic paper type sensor is on unless you turn it off. If you want to turn it off:
1 With your document open, click File → Print.
2 In the Print dialog box, click Preferences or Properties (depending on your operating
system).
The Print Properties screen appears.
3 Click Options.
4 Click Paper Type Sensor Options.
5 Click Allow the Paper Type Sensor to select paper type (default) to clear the setting.
6 Click OK.

24 Getting Started
www.dell.com/supplies | support.dell.com
To permanently turn it off:
1 Click Start →Control Panel →Printers and Other Hardware →Printers and Faxes
(Windows XP).
Click Start →Settings →Printers and Faxes or Printers (Windows 2000).
2 Right-click the printer icon.
3 Click Printing Preferences or Properties.
4 Click Options or the Printer Settings tab, and then click Paper Type Sensor Options.
5 Click the box to clear the setting.
6 Click OK.
7 Click OK.
NOTE: To temporarily override the automatic paper type sensor for a particular print job,
specify a paper type in the software screen under Specialty Paper.
Getting Started 25
The basic functions of your printer are the print, copy, scan, and fax functions. First, learn
how to load paper into your printer with the following instructions. Continue with "Using
the Printer" on page 29 to learn how to print, copy, scan, and fax.
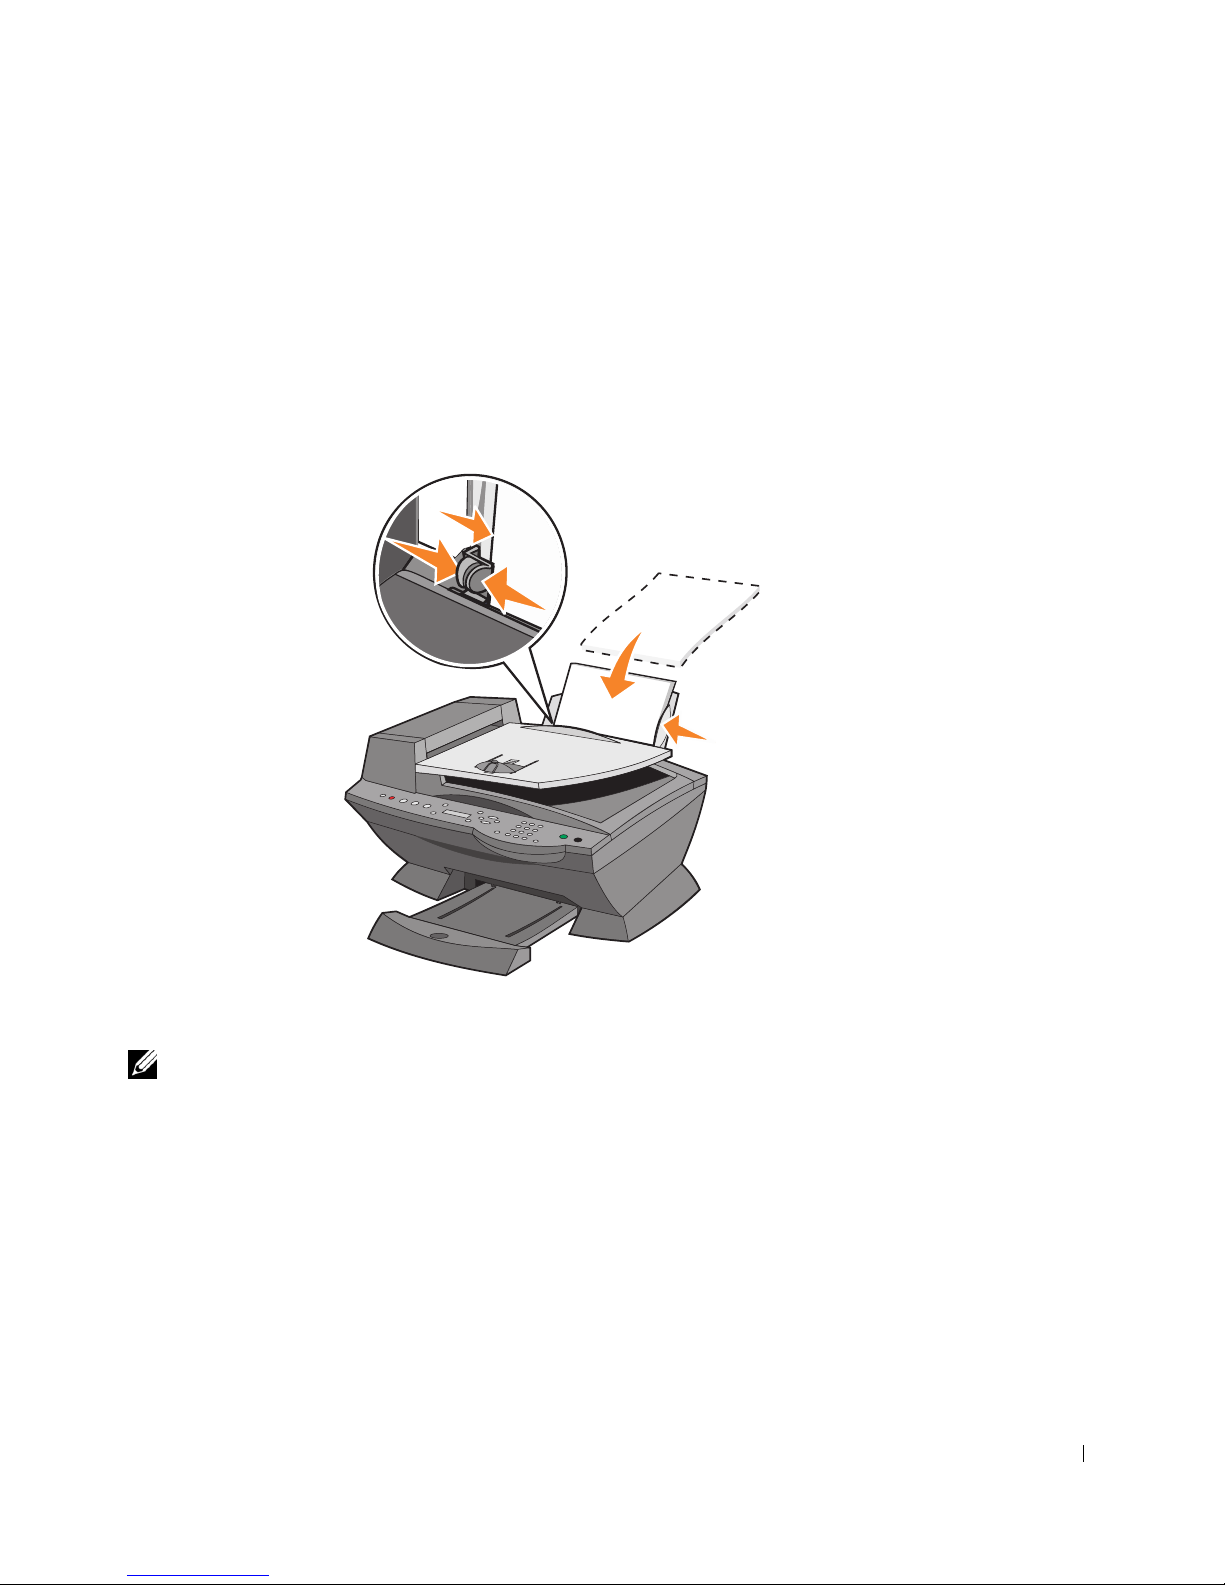
Loading Paper
1 Place the paper against the guide on the right-hand side of the paper support.
2 Squeeze and slide the left-hand paper guide to the left edge of the paper.
NOTE: Do not force paper into the printer. The paper should be flat against the paper support’s
surface and it’s right edge should be flush against the right-hand paper guide.
26 Getting Started
www.dell.com/supplies | support.dell.com
Print Media Guidelines for the Paper Support
Load up to: Make sure:
100 sheets of plain paper • The paper is loaded vertically against the right-hand side of the
paper support.
• The paper guide is against the left edge of the paper.
NOTE: Load letterhead paper into the printer upside down with the
letterhead facing you.
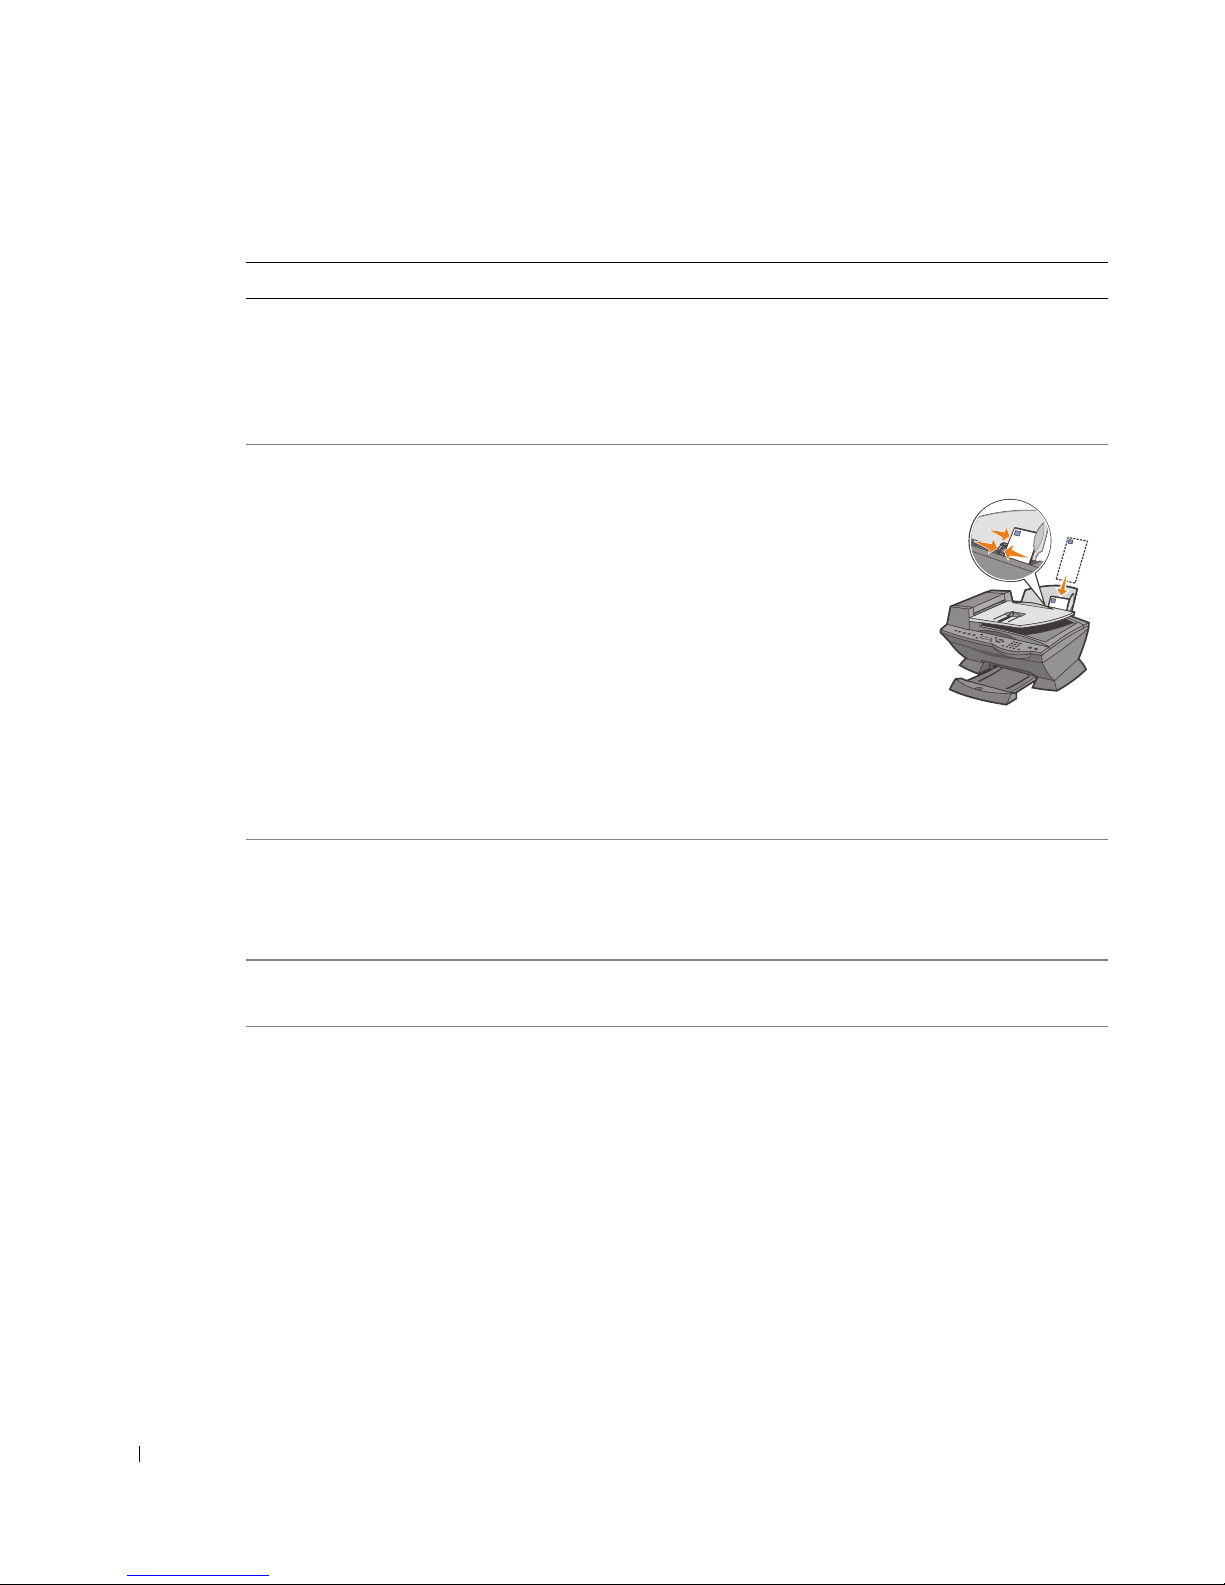
10 envelopes • The print side of the envelopes faces you.
• The envelopes are loaded vertically against
the right-hand side of the paper support.
• The stamp location is in the upper left corner.
• The paper guide rests against the left edge of
the envelopes.
• You choose to print the envelopes with
Landscape orientation.
• You select the correct envelope size.
Select the next biggest size if the exact
envelope size is not listed, and set the left and right margins so
that your envelope text will be correctly positioned.
NOTE: You can load a single envelope into the paper support without
removing plain paper.
10 greeting cards, index
cards, postcards, or photo
cards
• The print side of the cards faces you.
• The cards are loaded vertically against the right-hand side of the
paper support.
• The paper guide rests against the left edge of the cards.
25 sheets of coated,
photo, or glossy paper
• The glossy or coated side of the paper faces you.
• The paper guide rests against the left edge of the photo paper.
10 transparencies • The rough side of the transparencies faces you.
• The paper guide rests against the left edge of the transparencies.
NOTE: You can load a single transparency into the paper support
without removing plain paper.

Getting Started 27
100 sheets of custom size
paper
• The print side of the paper faces you.
• The paper guide rests against the left edge of the paper.
• Your paper size fits within these dimensions:
Width
• 76 mm - 216 mm
• 3.0 in. - 8.5 in.
Length
• 127 mm - 432 mm
• 5.0 in. - 17.0 in.
25 iron-on transfers • You follow the loading instructions on the iron-on transfer
packaging.
• The blank side of the transfers faces you.
• The paper guide is against the left edge of the iron-on transfers.
20 sheets of banner paper • The banner paper is designed for use with inkjet printers.
• You adjust the printer properties.
Load up to: Make sure:
28 Getting Started
www.dell.com/supplies | support.dell.com
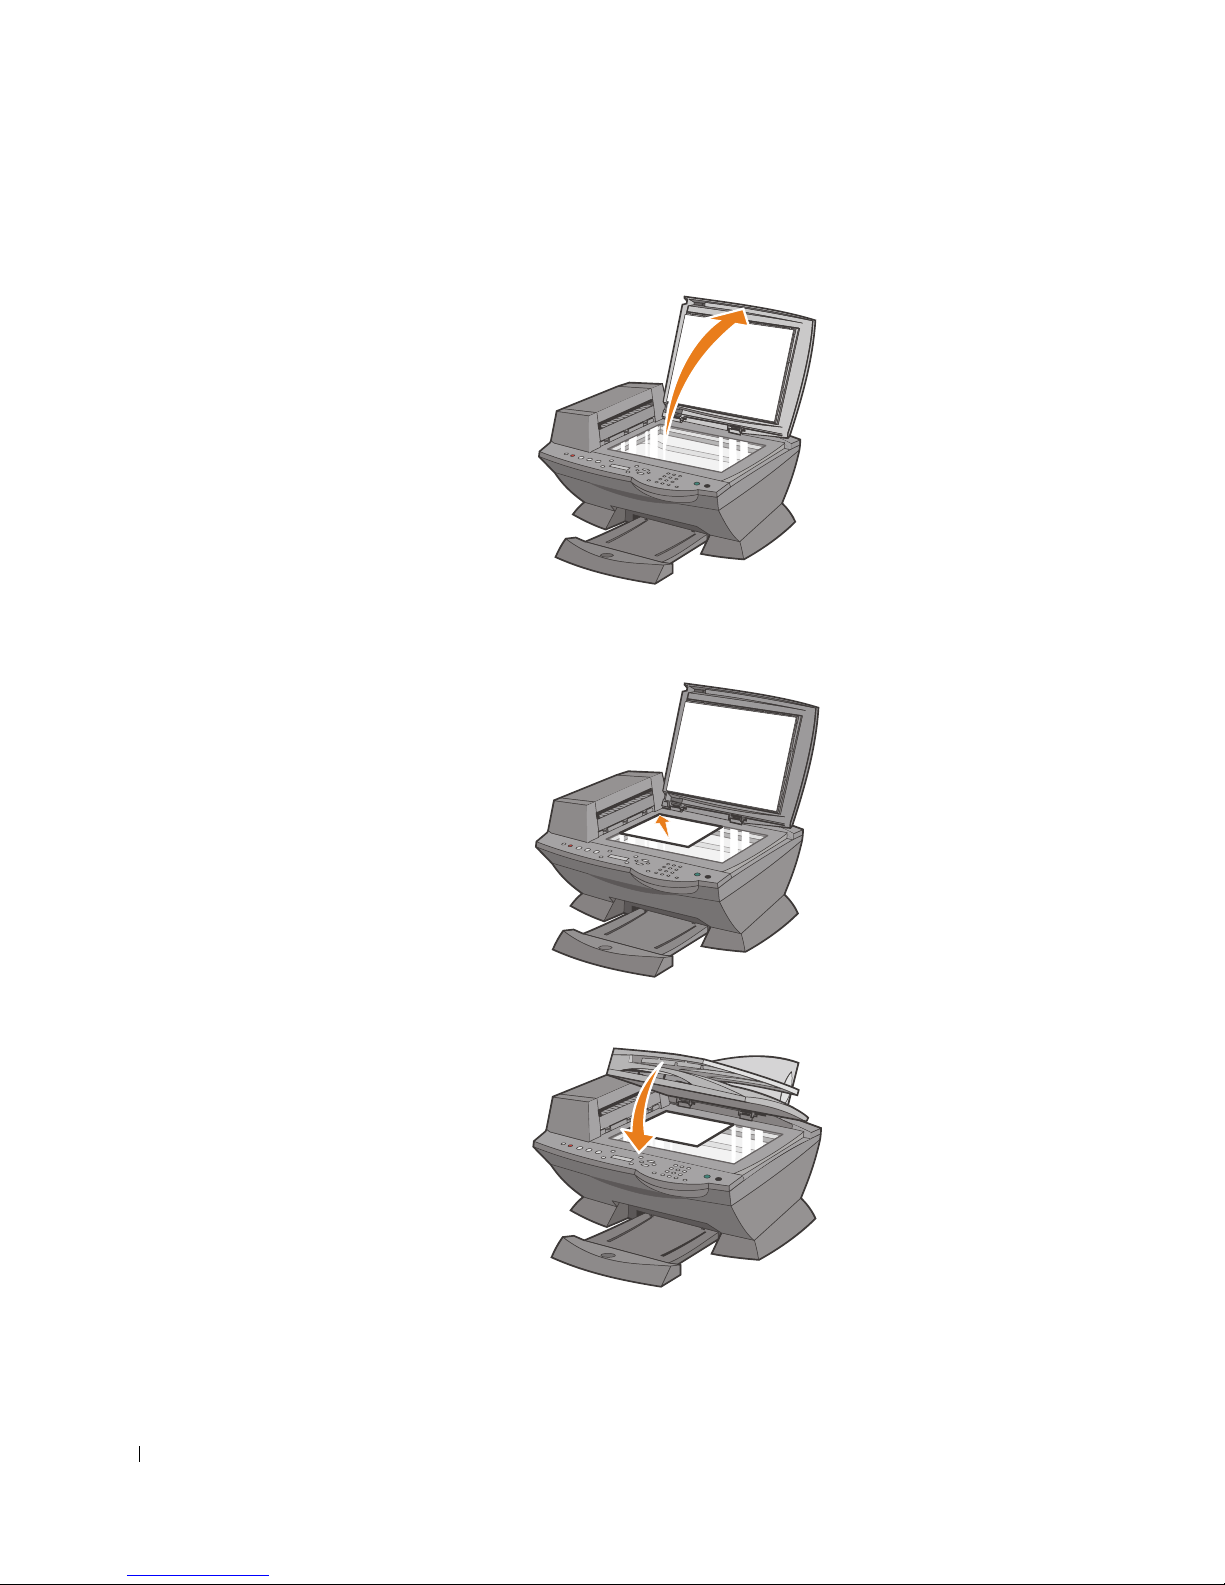
Load Your Document on the Scanner Glass
1 Open the top cover.
2 Place the item you want to copy face down on the scanner glass in the upper left
corner.
3 Close the top cover.

2
SECTION 2
Using the Printer
Using the ADF
Printing
Copying
Scanning
Faxing
30 Using the Printer
www.dell.com/supplies | support.dell.com
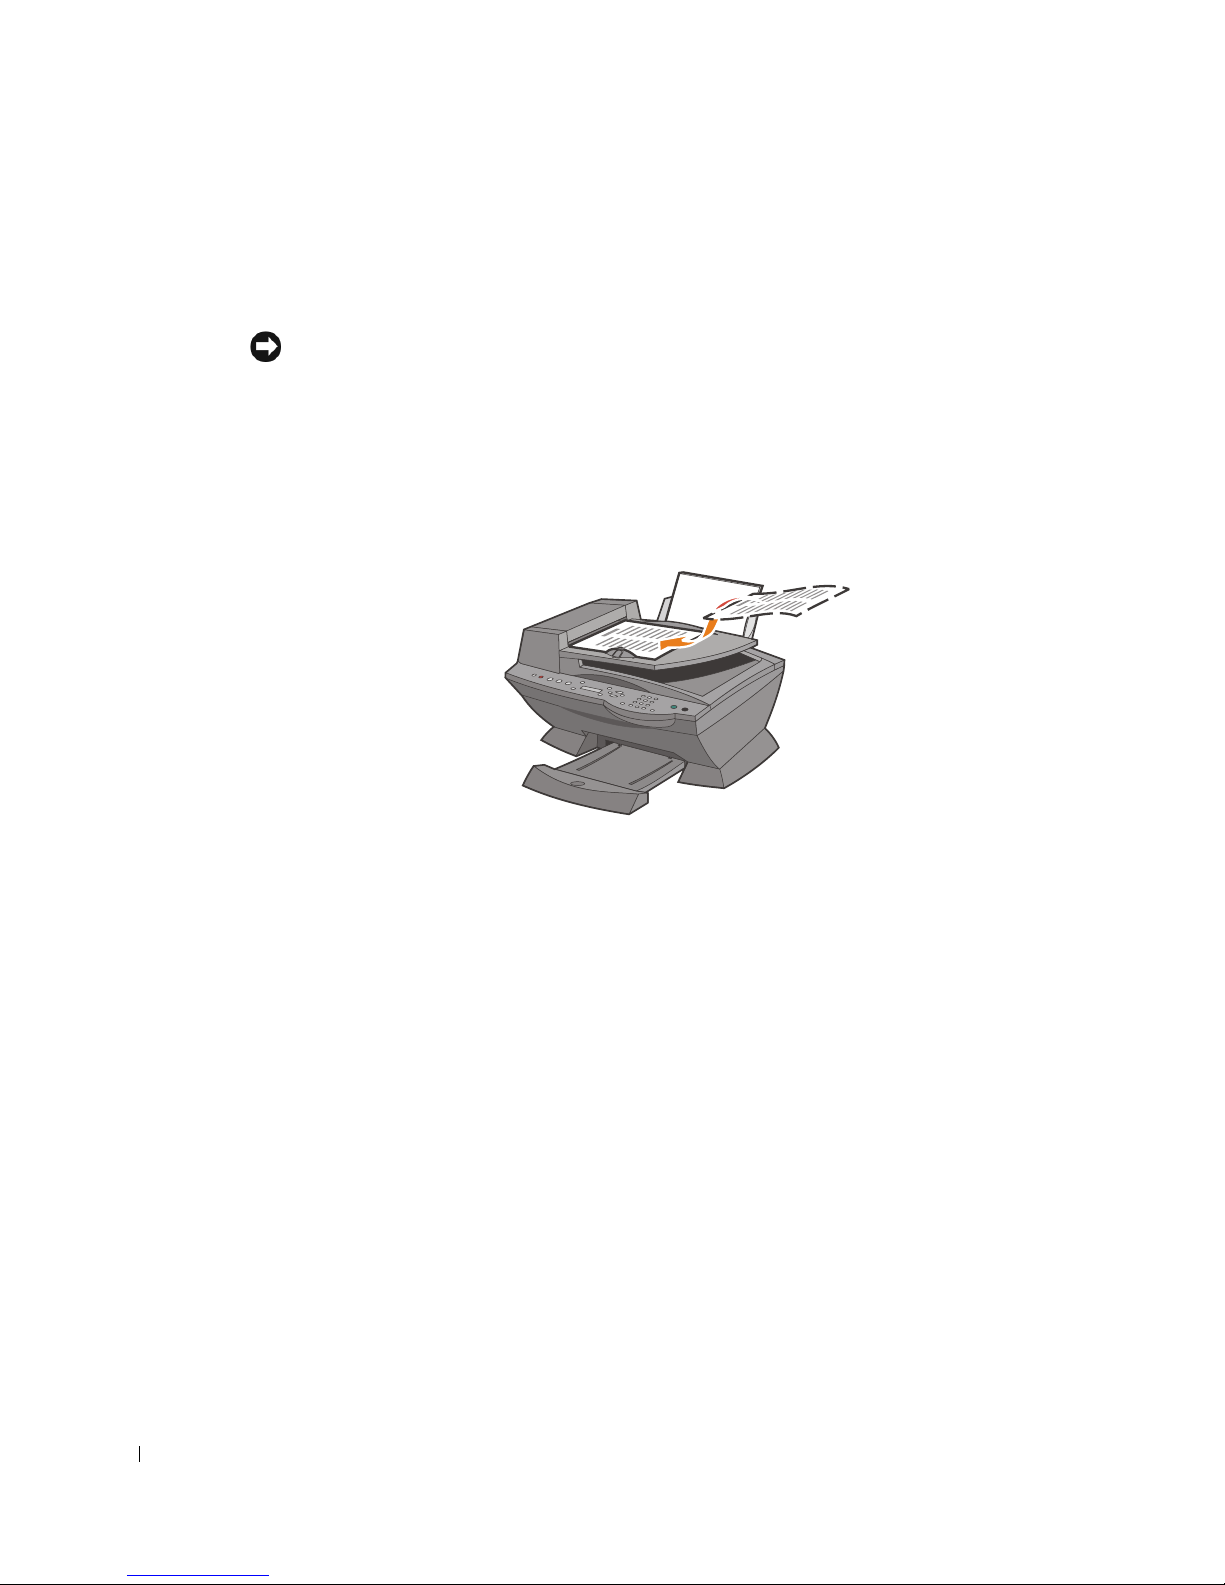
Using the ADF
Load Your Document Into the ADF
NOTICE: Do not load more than 50 sheets into the ADF or allow more than 50 sheets to be fed
to the ADF exit tray. The ADF exit tray should be emptied before it exceeds 50 sheets or your
original documents may be damaged.
You can load up to 50 sheets of your original document (text side up with page one on top)
into the ADF for scanning, copying, and faxing. The ADF is recommended for loading
multiple page documents.
 Loading...