

Page 1

Dell™ Personal All-In-One Printer A960 User's
Guide
Click the links to the left for information on the features and operation of your printer. For information on
other documentation included with your printer, see Finding Information.
To order ink or supplies from Dell:
Double-click the icon on your desktop.1.
Visit Dell's cartridge ordering Web site, or order Dell printer supplies by phone.2.
For best service, have your Dell printer Service Tag available.
For help, locating your Service Tag number, see Express Service Code Number.
Notes, Notices, and Cautions
NOTE: A NOTE indicates important information that helps you make better use of your printer.
NOTICE: A NOTICE indicates either potential damage to hardware or loss of data and tells you how
to avoid the problem.
CAUTION: A CAUTION indicates a potential for property damage, personal, injury, or death.
____________________
Information in this document is subject to change without notice.
© 2003 Dell Inc. All rights reserved.
Reproduction in any manner whatsoever without the written permission of Dell Inc. is strictly forbidden.
Trademarks used in this text: Dell and DELL logo are trademarks of Dell Inc.; Microsoft and Windows are
registered trademarks of Microsoft Corporation.
Other trademarks and trade names may be used in this document to refer to either the entities claiming the
marks and names of their products. Dell Inc. disclaims any proprietary interest in trademarks and trade
Page 2

names other than its own.
____________________
UNITED STATES GOVERNMENT RESTRICTED RIGHTS
This software and documentation are provided with RESTRICTED RIGHTS. Use, duplication or disclosure by
the Government is subject to restrictions as set forth in subparagraph (c)(1)(ii) of the Rights in Technical
Data and Computer Software clause at DFARS 252.227-7013 and in applicable FAR provisions: Dell Inc., One
Dell Way, Round Rock, Texas, 78682, USA.
September 2003 SRV G3738 Rev. A00
Page 3
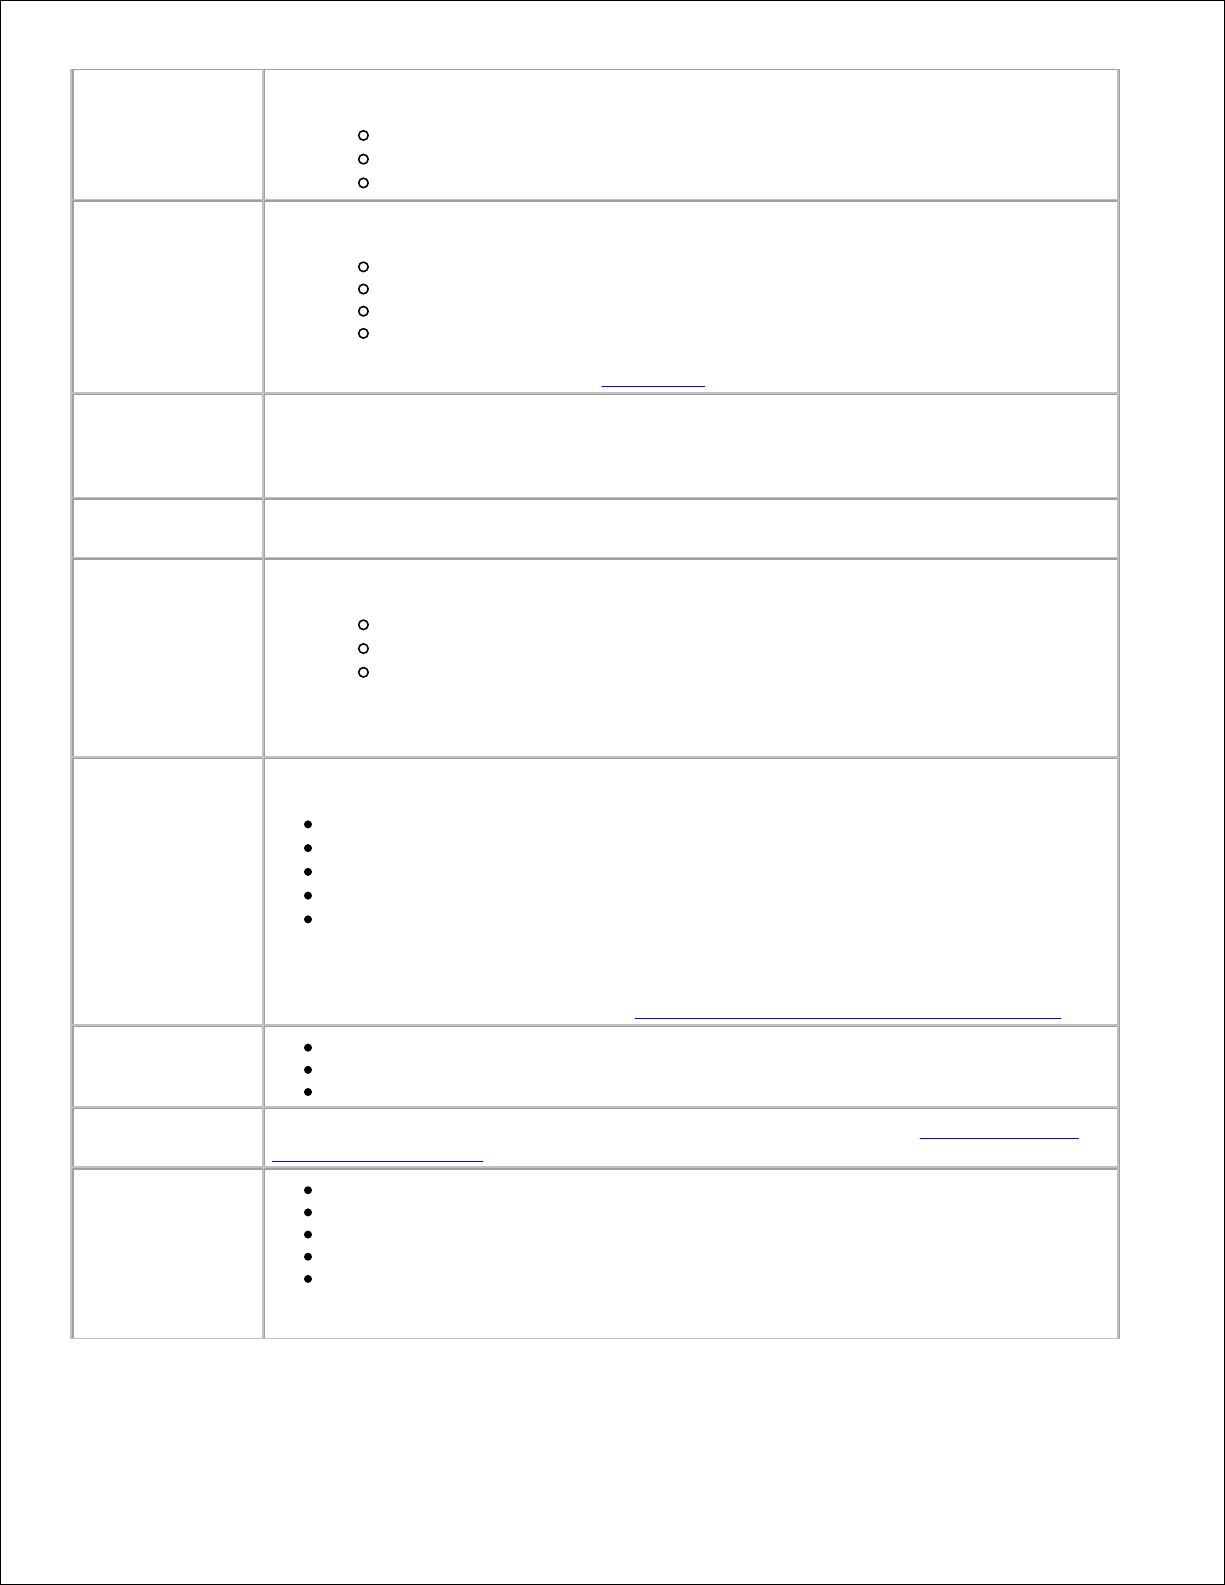
Finding Information
Look here:
For:
Setup Diagram
This document contains complete setup information.
Drivers and
Utilities CD
The Drivers and Utilities CD contains drivers for your AIO printer.
Documentation and drivers for your printer may already be installed on your computer
when purchased together from Dell. You can use the CD to uninstall/reinstall drivers or
access your documentation.
Readme files may be included on your CD to provide last-minute updates about
technical changes to your printer or advanced technical reference material for
experienced users or technicians.
Owner's Manual
This document contains information about:
Basic usage
Scanning, printing, copying, and faxing
Creative projects
Ink cartridge ordering information
Setup troubleshooting
General troubleshooting
Express Service
Code Number
Express Service Code Number.
This label is located on your printer.
Page 4
Dell Support
Website
The Dell Support Website provides several online tools, including:
Solutions - Troubleshooting hints and tips, articles from technicians, and online
courses
Upgrades - Upgrade information for components, such as memory
Customer Care - Contact information, order status, warranty, and repair
information
Downloads - Drivers
Reference - Printer documentation and product specifications
You can access Dell Support at support.dell.com. Select your region on the WELCOME
TO DELL SUPPORT page, and fill in the requested details to access help tools and
information.
Page 5
Getting Started
Understanding the Printer Parts
Setting Up Your Printer
Installing the Operator Panel
Using the Operator Panel
Understanding the Automatic Paper Type Sensor
Loading Paper
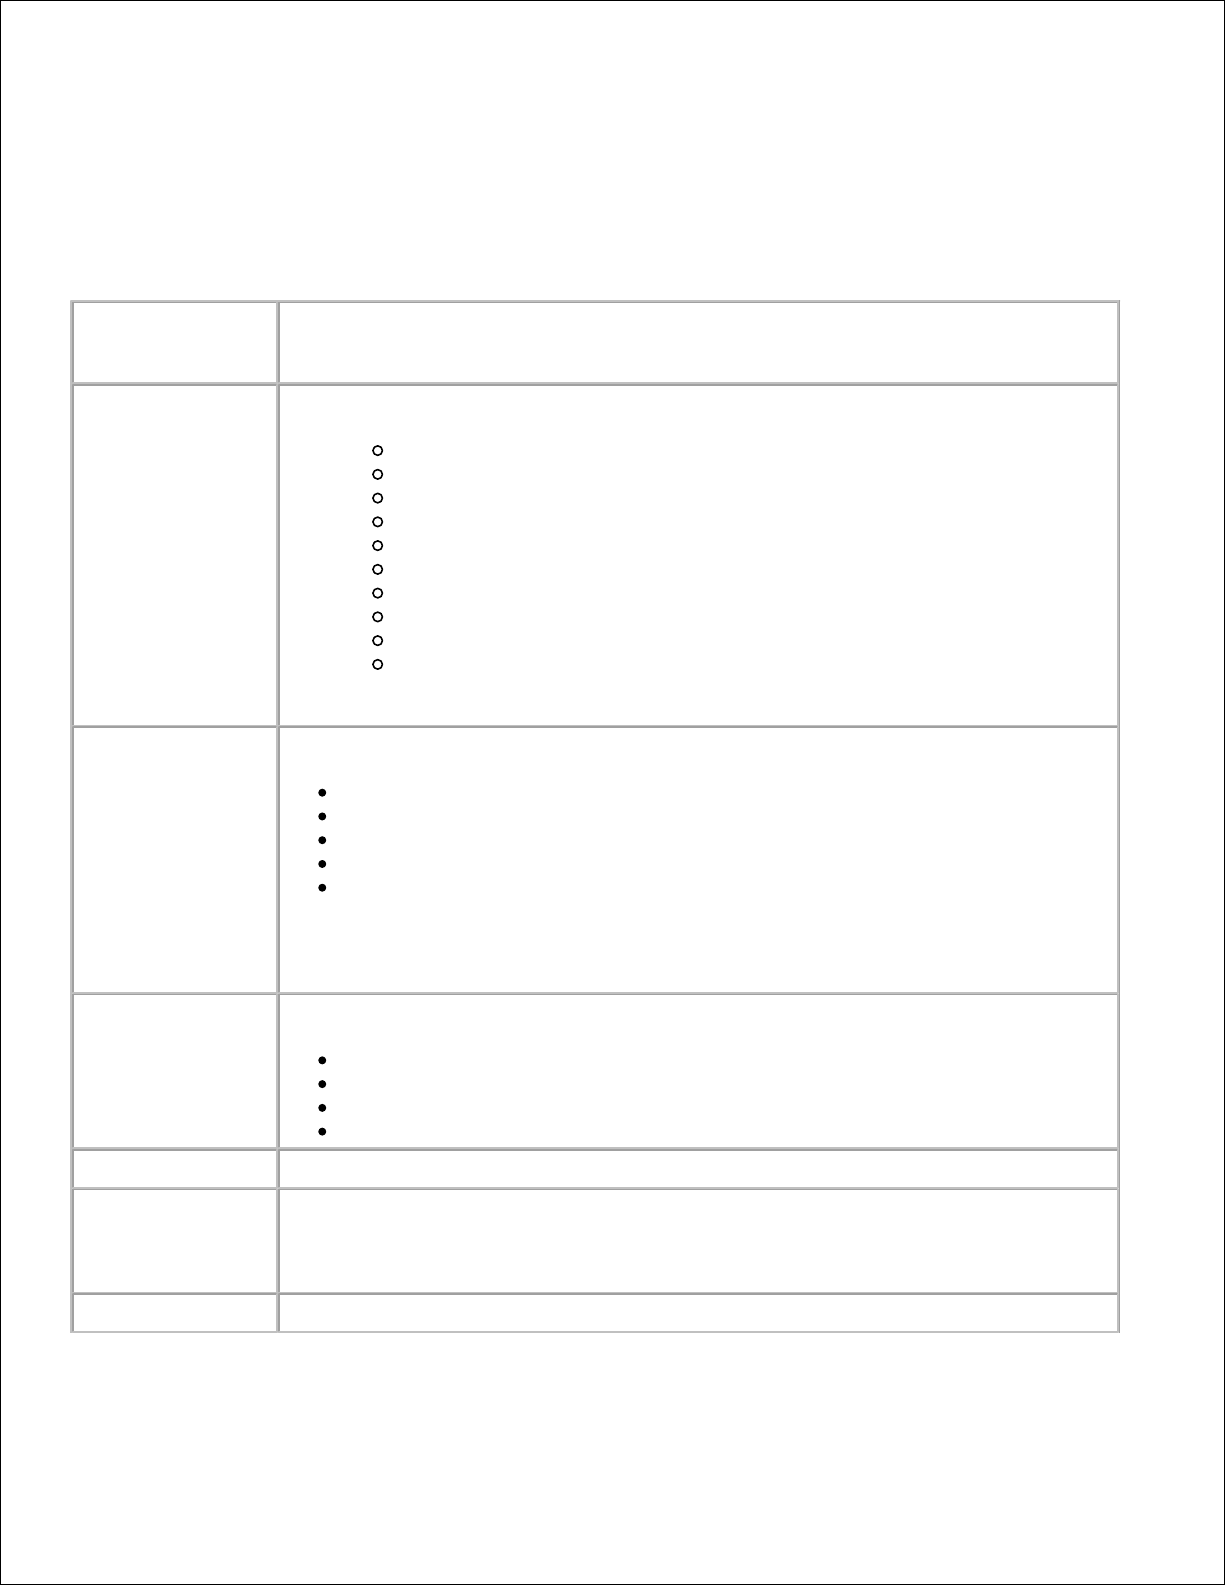
Understanding the Printer Parts
Page 6
#
Use the:
To:
1
Automatic Document
Feeder (ADF)
Scan, copy, or fax multiple page documents and/or legal sized documents.
2
Paper support
Load paper into the printer.
3
ADF input tray
Load original documents in the printer. Recommended for scanning, copying,
or faxing multiple page documents.
4
ADF exit tray
Pick up your original document after it has gone through the ADF.
5
Top cover
Access the scanner glass:
Lift top cover to place or remove items on the scanner glass.
Scanner glass recommended for heavy weight, delicate, or unusually
sized originals that can not be fed through the ADF.
6
Paper exit tray
Stack paper as it exits the printer.
7
Display
Check the printer status or view messages, menus, or settings.
8
Operator panel
Operate your printer (attached to a computer or unattached). For more
information, see Using the Operator Panel.
Page 7
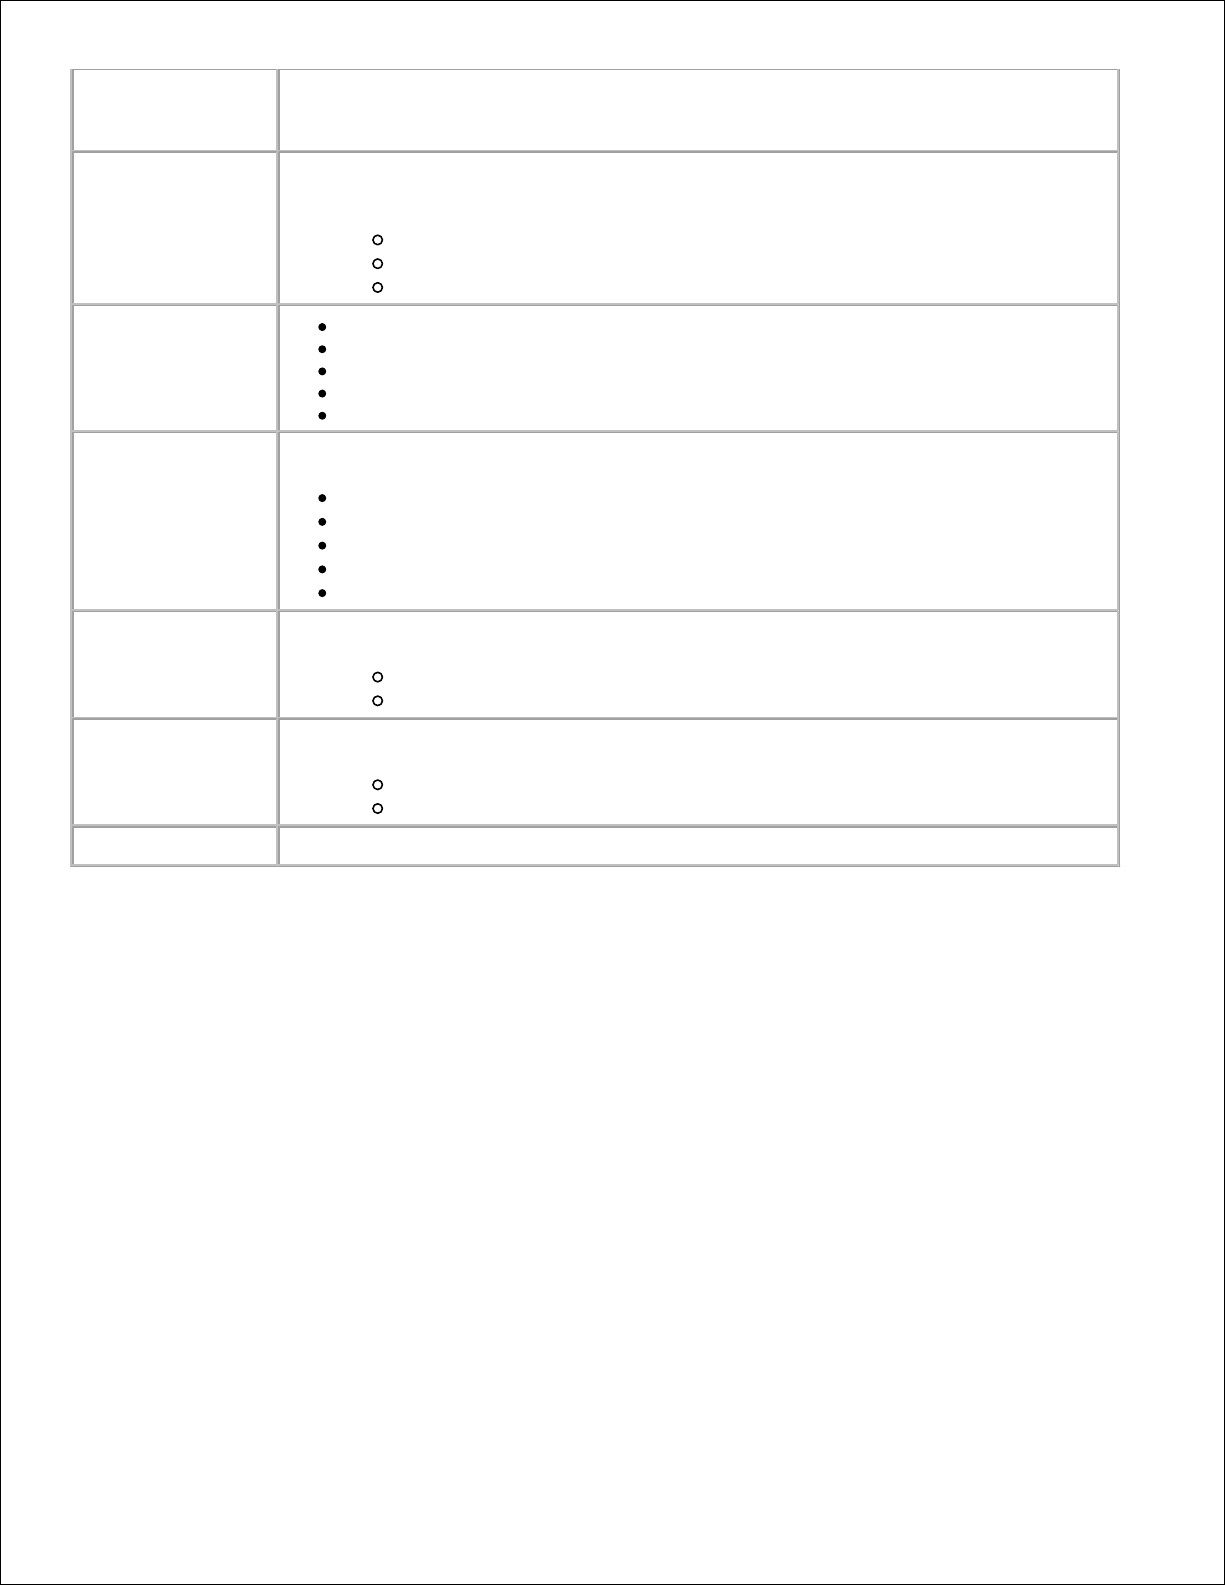
#
Use the:
To:
1
Printer
(scanner
unit)
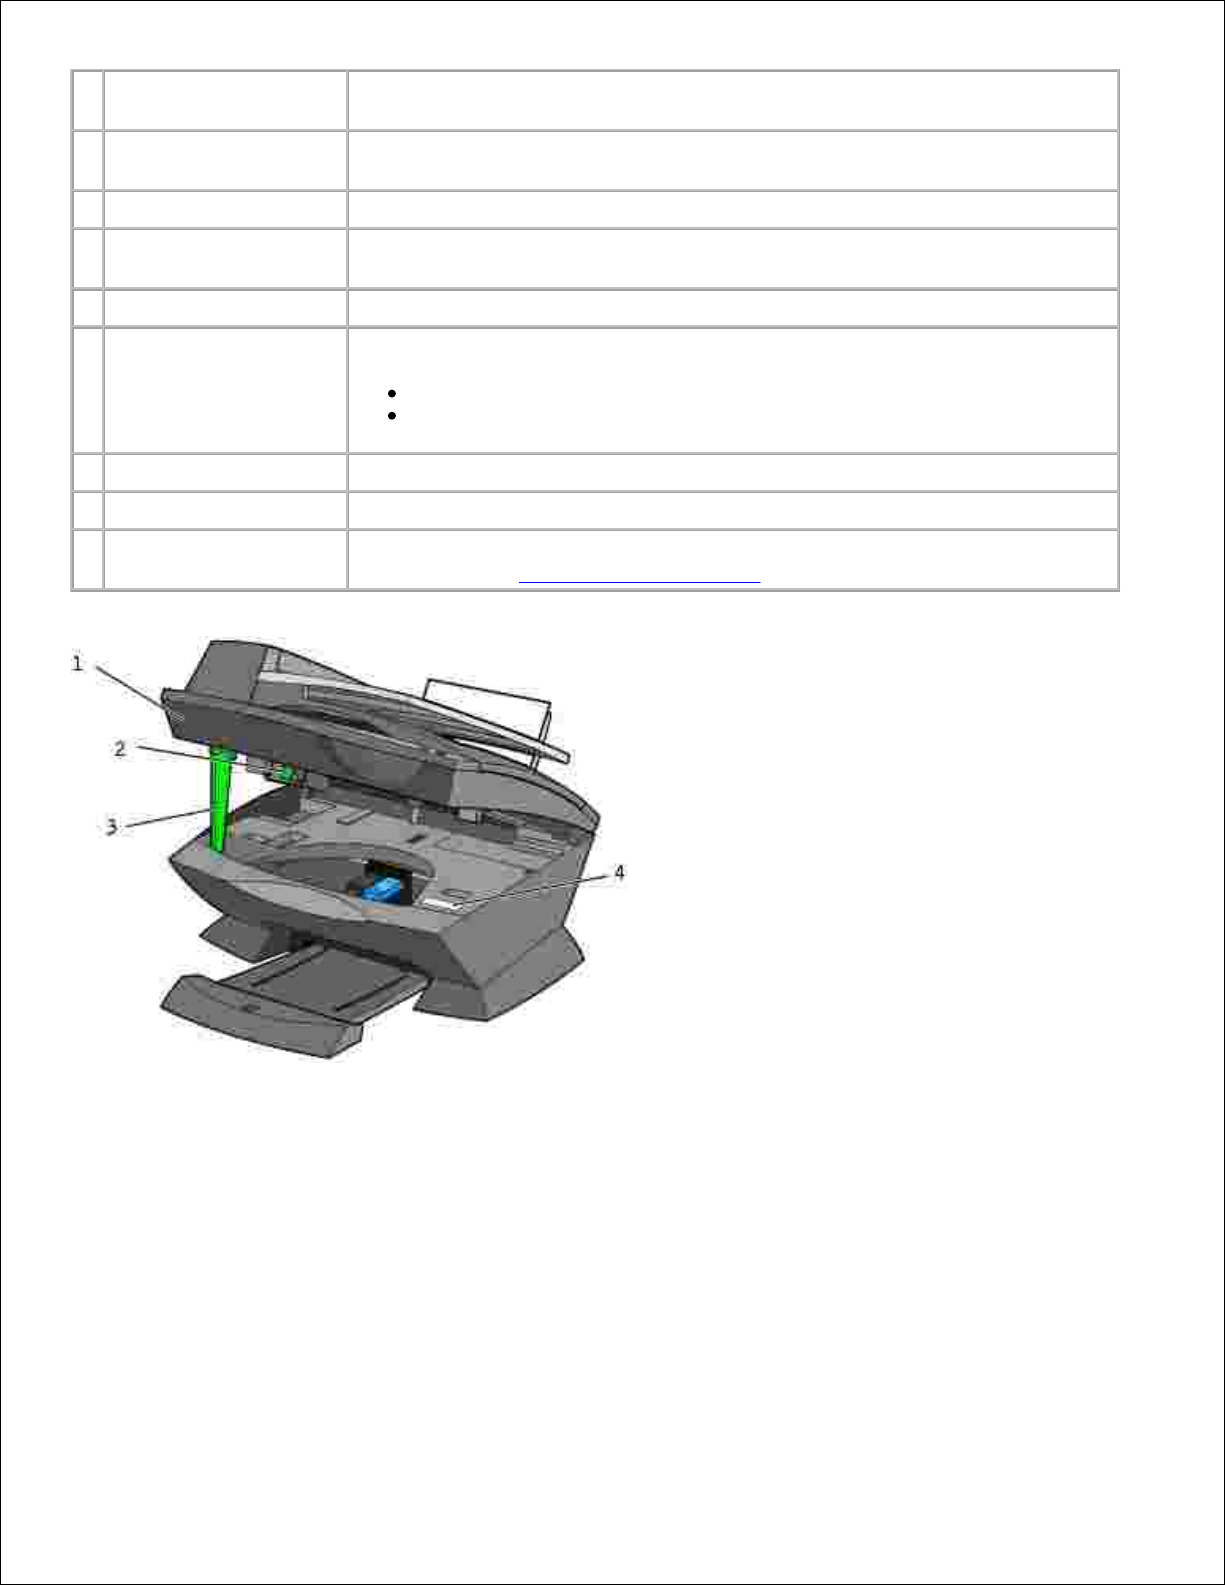
Install or change ink cartridges.
Lock or unlock the scanner.
2
Scanner lock
Lock or unlock the scanner.
Push the scanner lock away from you for unlocking.
Pull the scanner lock toward you for locking.
NOTE: Lock the scanner if you are moving your printer. Unlock the scanner before use.
3
Scanner
support
Keep the printer (scanner unit) open when changing ink cartridges or toggling the
scanner lock.
NOTE: To close the printer (scanner unit) for normal operation: lift the (printer) scanner
unit slightly, press the scanner support to the right, then lower the printer (scanner unit)
until it rests on the main body of the printer.
4
Express
Service
Code
Identify your printer when you use support.dell.com or contact technical support.
Enter the Express Service Code to direct your call when contacting technical
support. The Express Service Code is not available in all countries.
Page 8
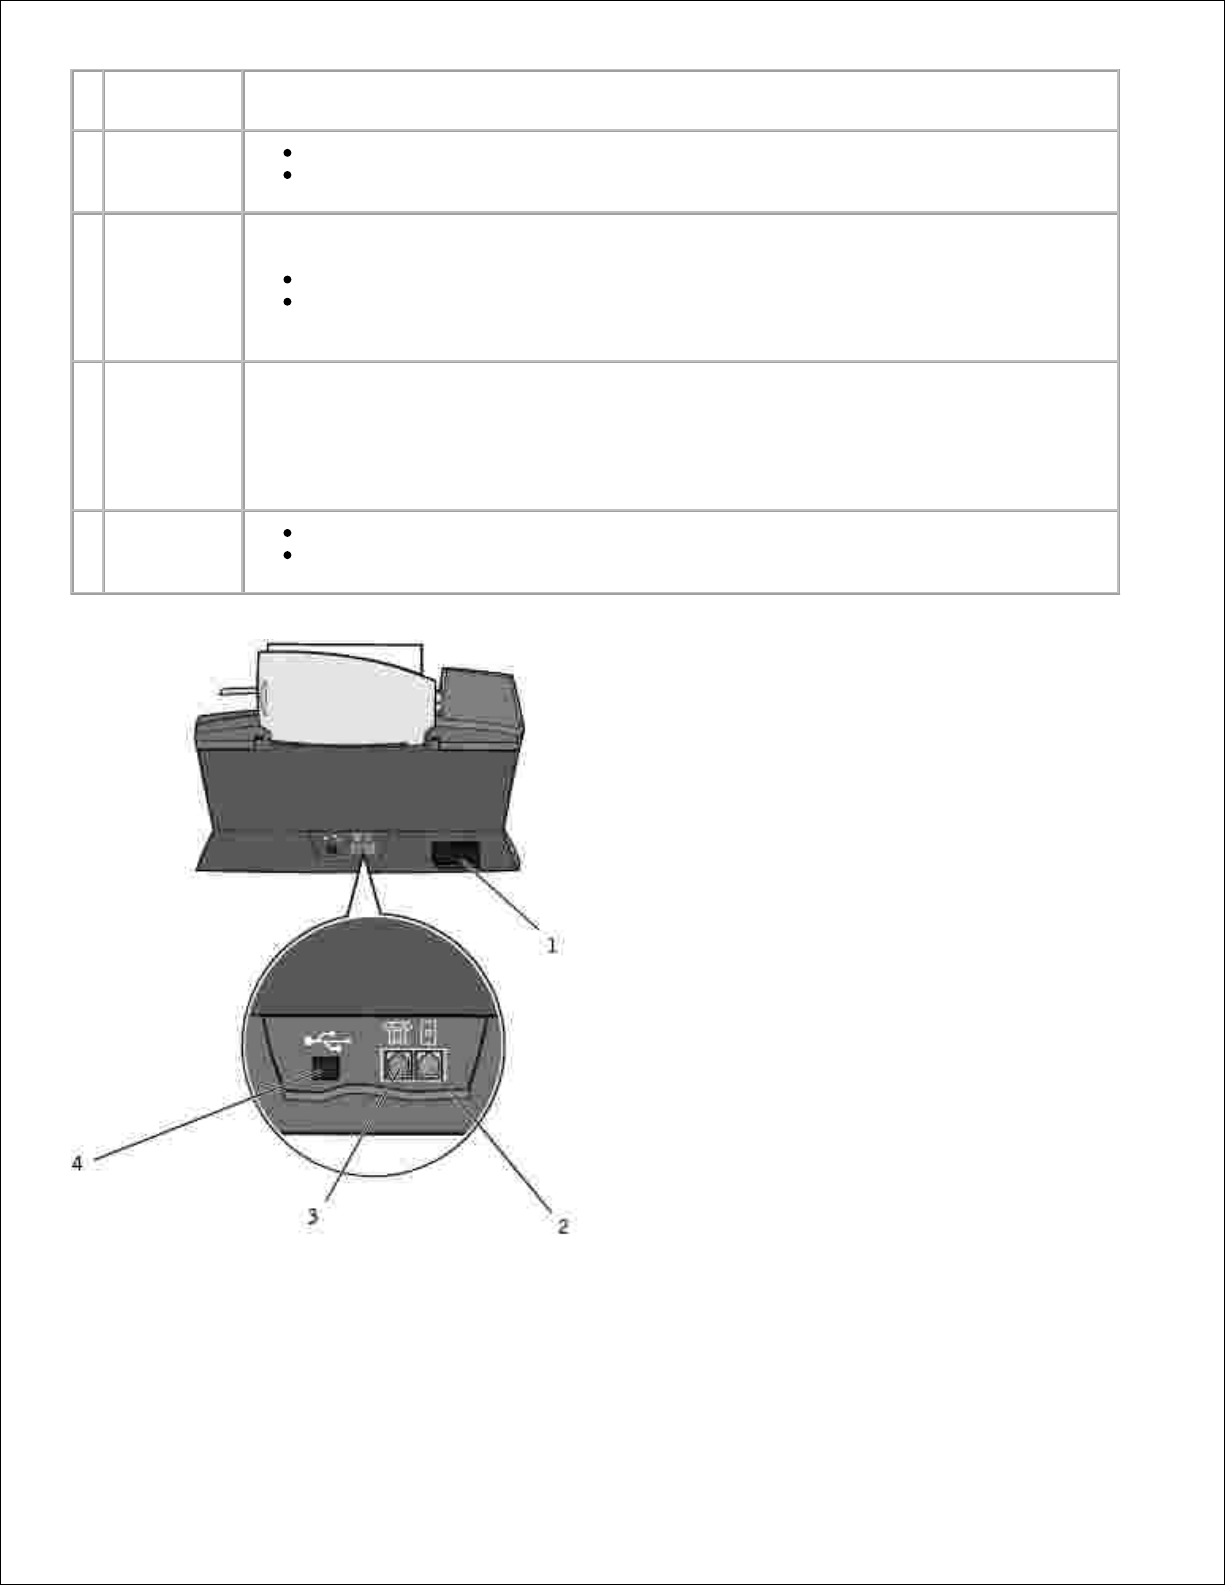
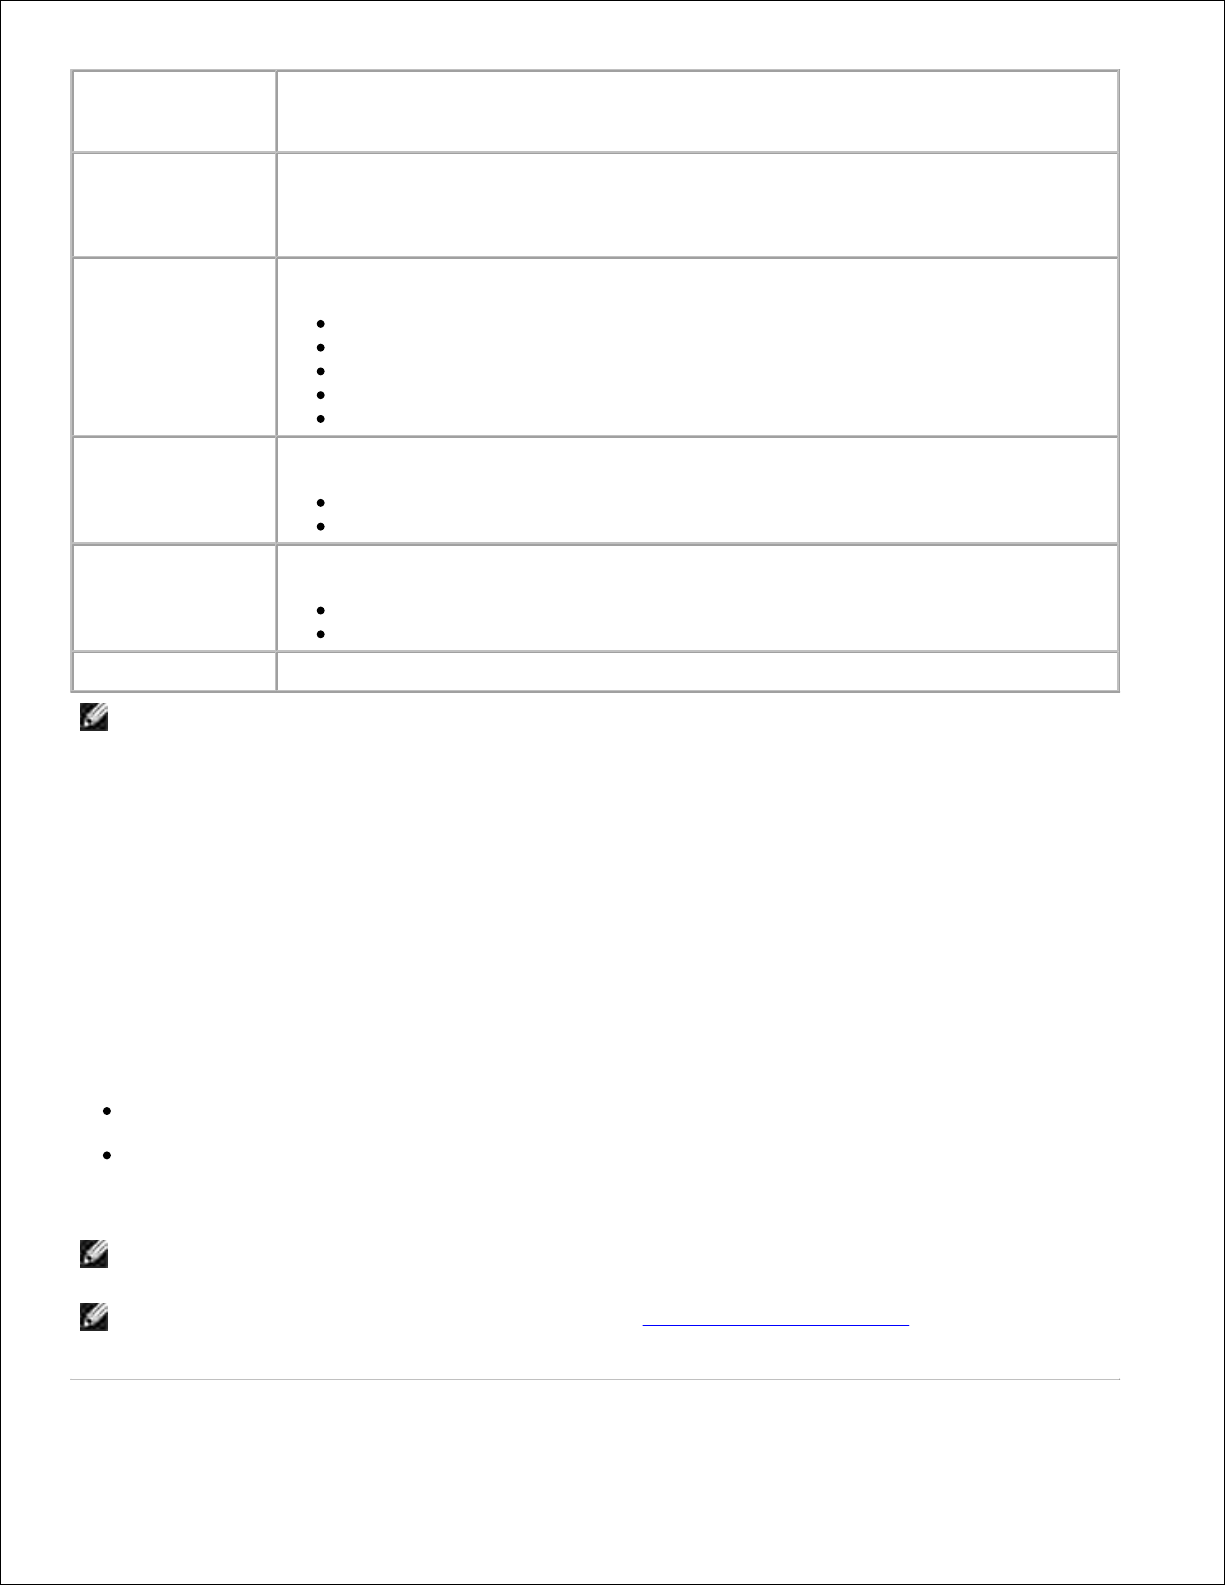
#
Use the:
To:1Power supply connector
Supply power to the printer.
2
Wall jack connector
Connect your printer to an active telephone line to send and receive
faxes. Your printer must be connected to this telephone line to receive
incoming fax calls.
NOTE: Do not connect additional devices to the wall jack connector and
do not connect a DSL (digital subscriber line), ISDN (integrated services
digital network), or cable modem to the printer.
3
Data/fax modem, answering
machine, and telephone
connector
Remove the plug to connect additional devices, such as a data/fax
modem, telephone, or answering machine to your printer.
NOTE: Do not connect additional devices to the wall jack connector, and
do not connect a DSL (digital subscriber line), ISDN (integrated services
digital network), or cable modem to the printer.
4
USB cable connector
Connect your printer to a computer.
Setting Up Your Printer
NOTE: The Dell Personal All-In-One Printer A960 supports the Windows XP and Windows 2000
operating systems.
Follow the instructions on your printer Setup Diagram to install the hardware and software. For setup
troubleshooting, see Setup Problems.
You can use the Dell™ AIO Printer A960 to do a variety of things. A few important things to note:
If your printer is attached to a computer, you can use either the printer operator panel or the printer
software to create your projects.
You do need to attach your printer to a computer to scan.
You do need to attach your printer to a computer to print.
You do not need to attach your printer to a computer to make photocopies.
You do not need to attach your printer to a computer to send faxes.
NOTE: The printer must be connected to a telephone line for faxing to function (attached to a
computer or unattached).
Installing the Operator Panel
The following instructions apply only if you received an additional language operator panel with your printer.
Page 9
Remove the operator panel (if one is installed).1.
Choose the correct operator panel for your language.2.
Position the clips on the printer, and then press down.3.
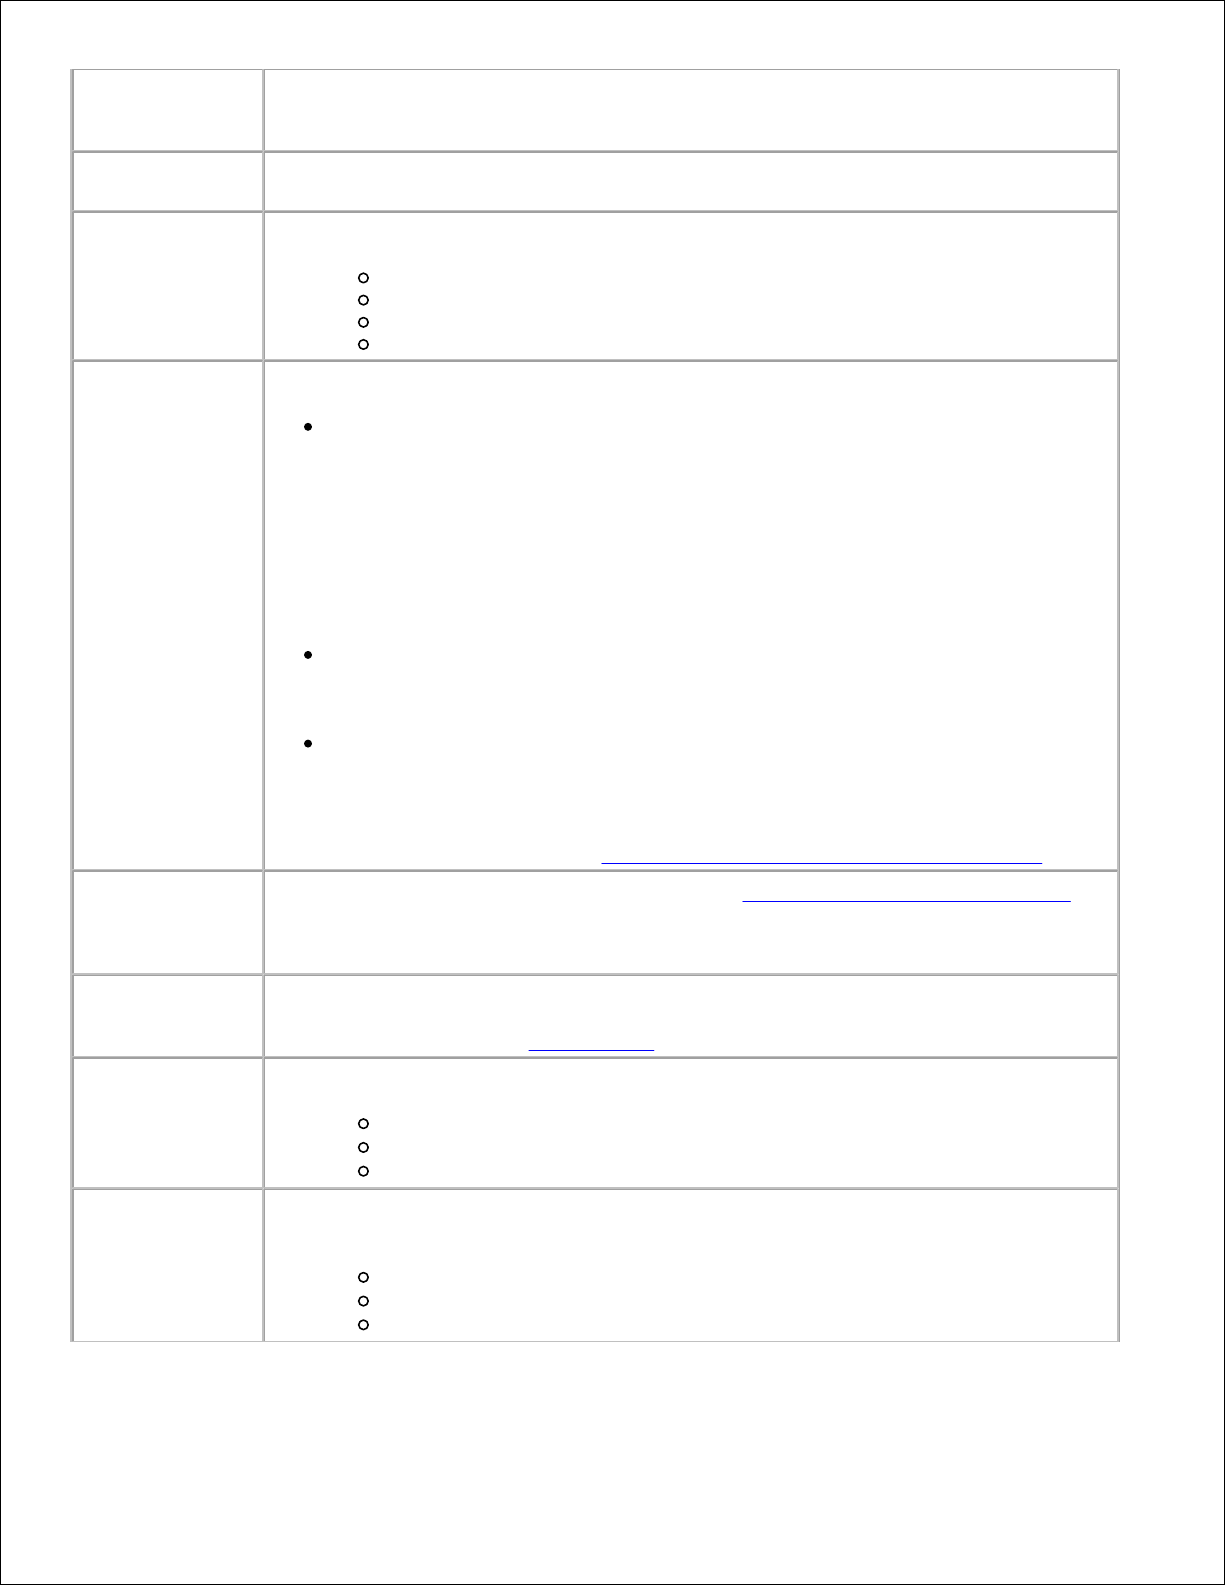
Using the Operator Panel
The operator panel buttons help you scan, copy, fax, and customize documents. When Power is lit, the
printer is on. You can select a mode from the Mode area, select or change settings using several of the
buttons, and initiate a scan, copy, or fax from the Start area on the far right.
Page 10
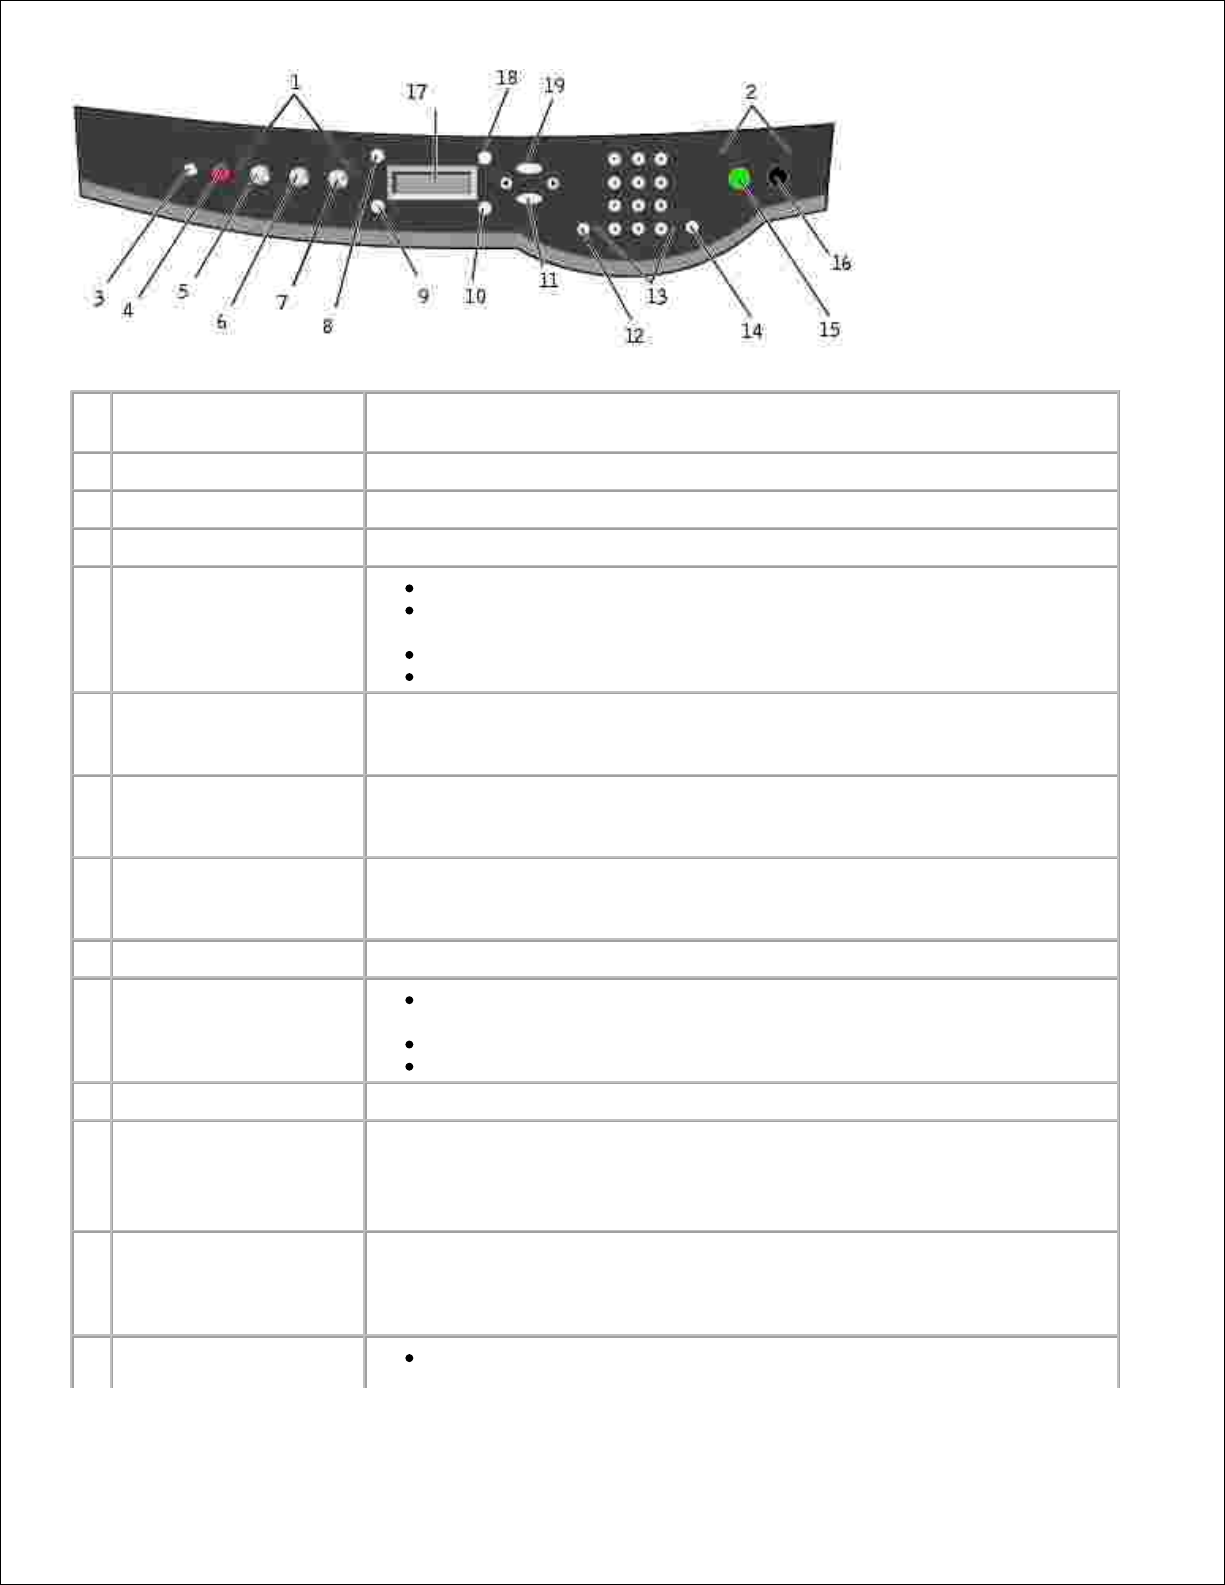
Use the:
To:1Mode area
Select a Mode (scan, copy, or fax).
2
Start area
Start a color or black and white scan, copy, or fax job.
3
Power
Turn your printer on or off.
4
Stop/Clear (Cancel)
Cancel a scan, print, or copy job in progress.
Clear a fax number or end a fax transmission and return the display to
the fax default.
Exit a menu.
Clear current settings and return to default settings.
5
Copy
Enter copy mode.
NOTE: This button is lit when the printer is in copy mode.
6
Scan
Enter scan mode (possible when the printer is attached to a computer).
NOTE: This button is lit when the printer is in scan mode.
7
Fax
Enter fax mode. The printer can receive a fax while in any mode.
NOTE: This button is lit when the printer is in fax mode.
8
Number of Copies
Specify a number (1-99) of photocopies.
9
Quality
Select from the following copy qualities: Quick, Normal, Better, or
Best.
Select a fax resolution: Standard, Fine, Superfine, or Ultrafine.
Select a scan resolution when the printer is attached to a computer.
10
Lighter/Darker
Lighten or darken a photocopy or fax.
11
Select
Choose the option that appears on the display.
NOTE: If you hold down the Select button, the button acts as a paper feed.
12
Speed Dial
Use the speed dial feature while the printer is in fax mode.
NOTE: If you press Speed Dial when your printer is in copy or scan mode,
the printer automatically switches to fax mode.
13
A keypad number or
symbol
In fax mode:
Page 11

Enter fax numbers.
Get through an automated answering system.
Select letters when creating a Speed dial list.
Type numbers to enter or edit the date and time shown on the printer
display.
In copy mode:
Select the number of photocopies you want to make.
14
Redial/Pause
Redial the last number entered when the machine is in fax mode.
Insert a three-second pause in the number to be dialed.
Enter a pause only when you have already begun entering the
number. Press - to insert a pause before number dialed.
NOTE: If you press Redial/Pause when your printer is in copy or scan
mode, the printer automatically switches to fax mode.
15
Color
Start a color copy, fax, or scan job.
NOTE: In the Mode area, make sure the mode you want is lit.
16
Black
Start a black and white copy, fax, or scan job.
NOTE: In the Mode area, make sure the mode you want is lit.
17
Display
View printer status, messages, and menus.
18
Reduce/Enlarge
Customize the size of your original document by a percentage, Fit to Page,
or to poster size.
19
Options
Scroll through the list of menu headings (see Operator Panel Menus).
-
Decrease a number on the display.
Scroll through a list on the display.
Add a space when entering/editing text or numbers on the LCD
display, such as speed dial information or fax numbers.
+
Increase a number on the display.
Scroll through a list on the display.
Backspace when entering text or numbers on the LCD display, such as
speed dial information or fax numbers.
Operator Panel Menus
See the display for:
Printer status
Messages
Menus
Select Copy Mode Menu Items
Page 12
Press Copy to enter the Copy mode.1.
Press Options repeatedly until the menu heading you want appears on the display.2.
Press + or - to scroll through the available menu items.3.
Press Select when the menu item you want appears on the display to save the setting.4.
From this sub
menu:
You can:
BLANK PAPER SIZE
Specify the size of the paper loaded in the paper support:
Letter
Legal
B5
A4
A5
A6
3x5
4x6
L
2L
NOTE: For other specialty sizes, see the All-In-One Center.
BLANK PAPER TYPE
Specify the type of paper loaded in the paper support:
Auto Detect (default)
Plain
Coated
Photo
Transparency
Auto Detect optimizes the setting according to the type of paper loaded.
NOTE: For other specialty types, see the All-In-One Center.
REPEAT IMAGE
Specify how many photocopies of one image you want on one page:
1 x per page
4 x per page
9 x per page
16 x per page
COLOR
Adjust the color intensity of the copy.
ORIGINAL SIZE
Specify the size of the document on the glass. Auto detect is the default.
NOTE: Specify an original size other than Auto Detect to confine the scan area to the
size of the original selected.
CONTENT TYPE
Specify the type of document on the scanner glass.
Page 13
COLLATE-BLACK
Collate multiple black and white photocopies.
NOTE: You can collate color photocopies from the All-In-One software.
KEY PRESS TONE
Turn on or off the sound that is made when you press an operator panel button. The
options are:
Off
Low (default)
High
MAINTENANCE
Check ink levels.
Change cartridges.
Align cartridges.
Clean cartridges.
Print a test page.
POWER SAVE
Select a time to begin reducing power:
Immediately
After 10 min
After 30 min (default)
After 60 min
Never
CLEAR SETTINGS
Select when you want your All-In-One to return to the default settings:
After two min
Never
SET DEFAULTS
Set your default settings to:
Use Factory
Use Current
LANGUAGE
Select a language for all display text.
Select Scan Mode Menu Items
Press Scan to enter the Scan mode.1.
Press Options repeatedly until the menu heading you want appears on the display.2.
Press + or - to scroll through the available menu items.3.
Press Select when the menu item you want appears on the display to save the setting.4.
Page 14
4.
From this sub
menu:
You can:
ORIGINAL SIZE
Specify the size of the document on the scanner glass.
NOTE: Leave this on Auto Detect (default) unless the size of the document you
printed is not satisfactory.
POWER SAVE
Select a time to begin reducing power:
Immediately
After 10 min
After 30 min (default)
After 60 min
Never
CLEAR SETTINGS
Select when you want your All-In-One to return to the default settings:
After two minutes
Never
SET DEFAULTS
Set your default settings to:
Use Factory
Use Current
LANGUAGE
Select a language for all display text.
NOTE: The option currently selected is noted with an asterisk (*) on the display.
Select Fax Mode Menu Items
Press Fax to enter the Fax mode.1.
Press Options repeatedly until the menu heading you wants appears on the display.2.
Press + or - to scroll through the available menu items.3.
Press Select when the menu item you want appears on the display to save the setting4.
In order for faxing to function properly:
The printer must be connected to an active phone line.
If you are using the printer software to fax, the printer must be connected to a computer with a USB
cable.
NOTE: You cannot fax with a DSL (digital subscribe line), ISDN (integrated signature digital network),
or cable modem.
NOTE: You can also use the Fax Utility Software (see Access the Fax Setup Utility) to adjust some of
the printer fax settings.
Page 15
From this sub
menu:
You can:
PENDING FAXES
Cancel any faxes that have not been sent.
PRINT REPORTS
Print:
An activity report (the last 40 sent and received faxes)
A send log
A receive log
A settings list (lists settings such as ringer volume)
ANSWER FAX WHEN
Select how a fax is received.
Automatically:
After 1 ring
After 2 rings
After 3 rings (default)
After 5 rings
Manually:
Press # on the external phone connected to the All-In-One.
Fax tone heard:
When an answering machine is connected to the external phone jack on the AllIn-One.
NOTE: For more information, see Receive Faxes Through an Answering Machine.
DELAY UNTIL
Enter a specific time to send a fax. For help, see To Delay Sending a Broadcast Fax.
NOTE: Make sure the date and time are entered correctly before you set a specific
time to send a fax.
ON HOOK DIAL
Press Select to use On Hook Dial and dial the number when you hear a dial tone.
For more information, see On Hook Dial.
RINGER TONE
Choose a tone for incoming rings:
Off
Low (default)
High
KEY PRESS TONE
Turn on or off the sound that is made when you press an operator panel button. The
options are:
Off
Low (default)
High
Page 16
SPEAKER VOLUME
Turn the All-In-One speaker volume (affects All-In-One fax sounds) to:
Off
Low (default)
High
EDIT SPEED DIAL
Do these things to your speed dial list:
Add a number
Remove a number
Modify a number or the list
Print the list
NOTE: For more information, see Speed Dial.
EDIT TIME/DATE
Edit the time and date.
NOTE: Make sure you enter a number into each of the available spaces. For example,
01:00 for 1:00.
PERSONALIZE FAX
Enter your name or the name of your business and your number. This information
appears as a heading to identify you and your fax machine to the fax recipient.
BLANK PAPER
SIZE
Choose:
Letter
A4
Legal
NOTE: If no asterisk (*) is present, a paper size that is not supported by fax has been
selected through the copy menu.
BLANK PAPER
TYPE
Specify the type of paper loaded in the paper support:
Auto Detect (default)
Plain
Coated
Photo
Transparency
Auto Detect optimizes the setting according to the type of paper loaded.
NOTE: For other specialty types, see Print Media Guidelines for the Paper Support.
FAX FORWARD
Turn this feature off (default).
Enter a number to forward the fax to.
Print the fax and forward it.
ADVANCED FAX
Press Select to see a menu of advanced fax options. For help, See Select Advanced
Fax Mode Menu Items.
MAINTENANCE
Check ink levels.
Change cartridges.
Align cartridges.
Clean cartridges.
Print a test page.
NOTE: Some links do not work while a job is in progress.
Page 17
CLEAR SETTINGS
Select when you want your All-In-One to return to the default settings:
After two minutes
Never
SET DEFAULTS
Set your default settings to:
Use Factory
Use Current
Fax
confirmation
Off (so that no status page is printed)
Print for all (which prints a status report after each fax you send including
jobs that have errors).
Print for errors (which prints a status report only after jobs that did not
send). (default)
Fit fax to page
Try to fit (default)
Two pages
Ring pattern
Normal (default)
Distinctive ring 1 (Double)
Distinctive ring 2 (Triple)
Any
NOTE: You can choose distinctive rings, if they are available from your local telephone
service.
Language
Your language.
Select Advanced Fax Mode Menu Items
Press Fax to enter the Fax mode.1.
Press Options repeatedly until Advanced Fax appears on the display.2.
Press Select.3.
Press + or - to scroll through the available items.4.
Press Select when the menu item you want appears on the display to save the setting.5.
From this Advanced
Fax option:
You can select:
Redial attempts
The number of times you want the machine to try again if your fax does not go
through:
0 times
1 time
2 times (default)
3 times
4 times
5 times
Page 18
Redial interval
The time the machine waits before attempting a fax call again:
1 min
2 min
3 min (default)
4 min
5 min
6 min
7 min
8 min
Activity report
On request (asking for the report to print). (default)
After 40 faxes (which automatically generates a report after 40 faxes
print).
Fax footer
On (if you want the machine to insert the time, date, and page number at
the bottom of each incoming fax). (default)
Off
Dialing method
Touch Tone (default)
Pulse
Behind a PBX (Dial tone detect off) - send a fax without waiting for a dial
tone
Dial prefix
None (default)
Create - you can create an up to 8 character prefix to be added to the
beginning of each number dialed.
Scan before dial
No (default)
Yes - Only works with standard, fine, black and white, or two-page standard
color faxes.
Max send speed
A bps speed:
2400
4800
7200
9600
12000
14400
16800
19200
21600
24000
26400
28800
31200
33600
Error correction
On (default)
Off
NOTE: Usually, error correction should be on. However, if you are having trouble
sending an overseas fax, for example, turn error correction off.
Country code
Argentina
Australia
Austria
Belgium
Brazil
Page 19
Bulgaria
Canada
Chile
Columbia
Croatia
Czech Republic
Denmark
Egypt
Estonia
Ecuador
Finland
France
Germany
Greece
Guam
Hong Kong
Hungary
India
Indonesia
Ireland
Israel
Italy
Japan
Latvia
Lithuania
Luxembourg
Malaysia
Mexico
Netherlands
New Zealand
Norway
Peoples Republic of China
Peru
Philippines
Poland
Portugal
Puerto Rico
Romania
Russia
Saudi Arabia
Singapore
Slovenia
South Africa
Spain
Sweden
Switzerland
Taiwan
Thailand
Turkey
UAE
UK
USA
Venezuela
Virgin Islands
Page 20
NOTE: The option currently selected is noted with an asterisk (*) on the display.
Understanding the Automatic Paper Type Sensor
Your printer has an automatic paper type sensor that detects these paper types:
Plain paper
Coated paper
Glossy/photo paper
Transparencies
If you load one of these paper types, the printer detects the paper type and automatically adjusts the paper
type settings.
NOTE: Your printer cannot detect the paper size.
To choose the paper size on which you want to print:
With your document open, click File Print.1.
In the Print dialog box, click Preferences or Properties (depending on your program or operating
system).
2.
The Print Properties screen appears.
From the Paper Setup tab, select the paper size you are using.3.
Click OK.4.
The automatic paper type sensor is on unless you turn it off. If you want to turn it off:
With your document open, click File Print.1.
In the Print dialog box, click Preferences or Properties (depending on your operating system).2.
The Print Properties screen appears.
Click Options.3.
Click Paper Type Sensor Options.4.
Click Allow the Paper Type Sensor to select paper type (default) to clear the setting.5.
Click OK.6.
Page 21

5.
6.
To permanently turn it off:
Click Start Control Panel Printers and Other Hardware Printers and Faxes (Windows
XP).
Click Start Settings Printers and Faxes or Printers (Windows 2000).
1.
Right-click the printer icon.2.
Click Printing Preferences or Properties.3.
Click Options or the Printer Settings and then click Paper Type Sensor Options.4.
Click the box to clear the setting.5.
Click OK.6.
Click OK.7.
NOTE: To temporarily override the automatic paper type sensor for a particular print job, specify a
paper type in the software screen under Specialty Paper.
The basic functions of your printer are the print, copy, scan, and fax functions. First, learn how to load paper
into your printer with the following instructions. Continue with Using the Printer to learn how to print, copy,
scan, and fax.
Loading Paper
Place the paper against the guide on the right-hand side of the paper support.1.
Page 22
Squeeze and slide the left-hand paper guide to the left edge of the paper.2.
NOTE: Do not force paper into the printer. The paper should be flat against the paper support's
surface and it's right edge should be flush against the right-hand paper guide.
Print Media Guidelines for the Paper Support
Load up to:
Make sure:
100 sheets of plain paper
The paper is loaded vertically against the right-hand side of the
paper support.
The paper guide is against the left edge of the paper.
NOTE: Load letterhead paper into the printer upside down with the
letterhead facing you.
10 envelopes
The print side of the envelopes faces you.
The envelopes are loaded vertically against the right-hand side of
the paper support.
The stamp location is in the upper left corner.
The paper guide rests against the left edge of the envelopes.
You choose to print the envelopes with Landscape orientation.
You select the correct envelope size.
Select the next biggest size if the exact envelope size is not listed,
and set the left and right margins so that your envelope text will be
correctly positioned.
Page 23
NOTE: You can load a single envelope into the paper support without
removing plain paper.
10 greeting cards, index
cards, postcards, or photo
cards
The print side of the cards faces you.
The cards are loaded vertically against the right-hand side of the
paper support.
The paper guide rests against the left edge of the cards.
25 sheets of coated, photo, or
glossy paper
The glossy or coated side of the paper faces you.
The paper guide rests against the left edge of the photo paper.
10 transparencies
The rough side of the transparencies faces you.
The paper guide rests against the left edge of the transparencies.
NOTE: You can load a single transparency into the paper support without
removing plain paper.
100 sheets of custom size
paper
The print side of the paper faces you.
The paper guide rests against the left edge of the paper.
Your paper size fits within these dimensions:
Width
76 mm - 216 mm
3.0 in. - 8.5 in.
Length
127 mm - 432 mm
5.0 in. - 17.0 in.
25 iron-on transfers
You follow the loading instructions on the iron-on transfer packaging.
The blank side of the transfers faces you.
The paper guide is against the left edge of the iron-on transfers.
20 sheets of banner paper
The banner paper is designed for use with inkjet printers.
You adjust the printer properties.
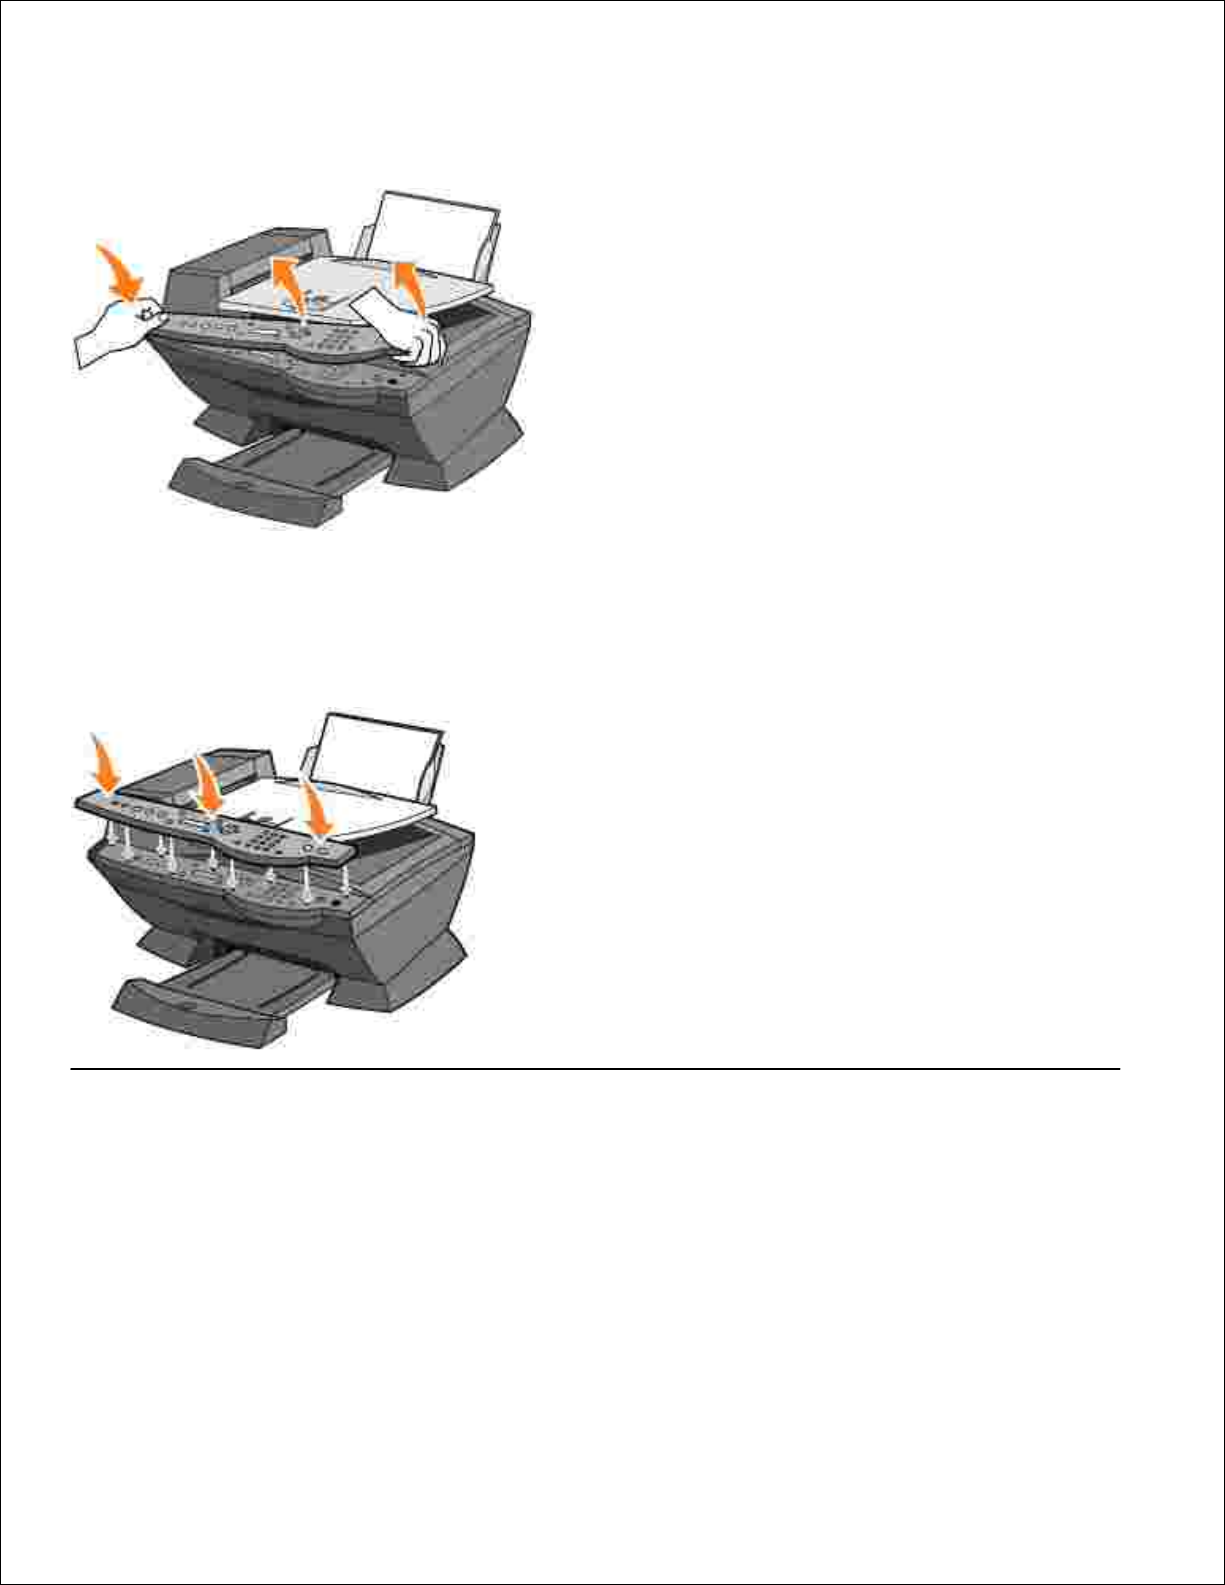
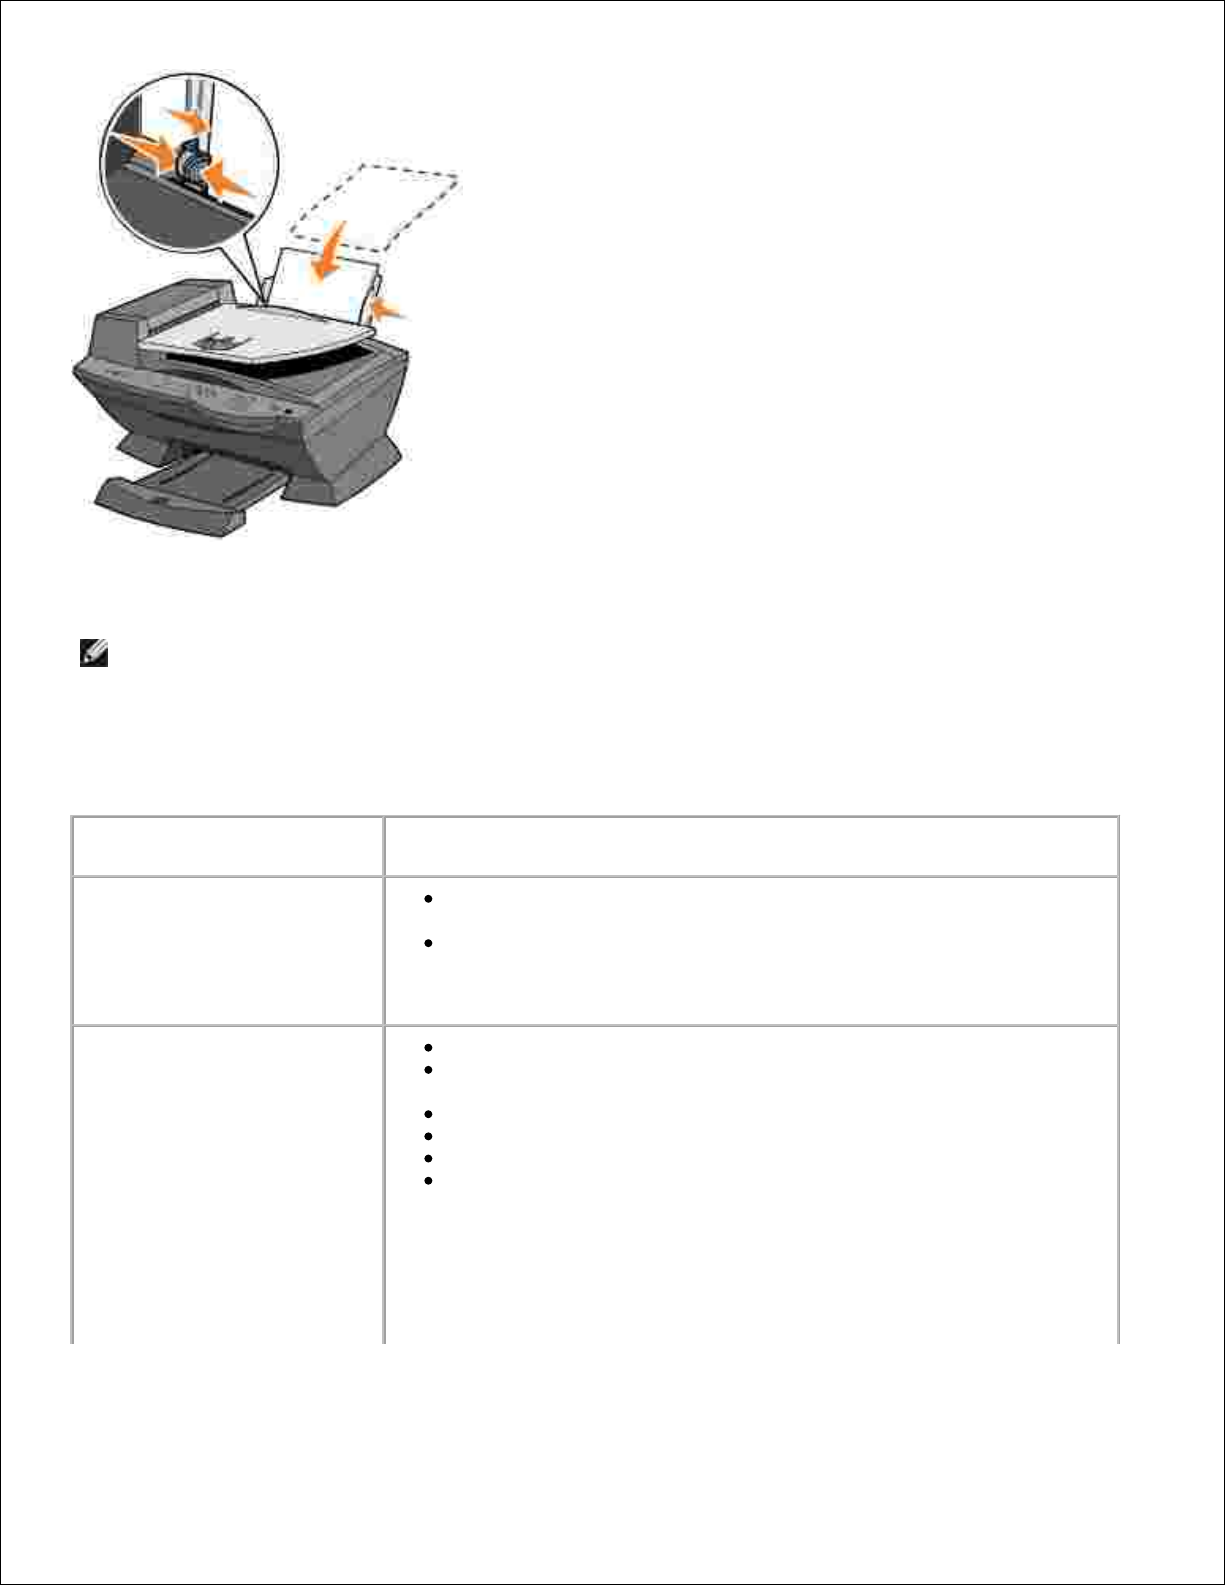
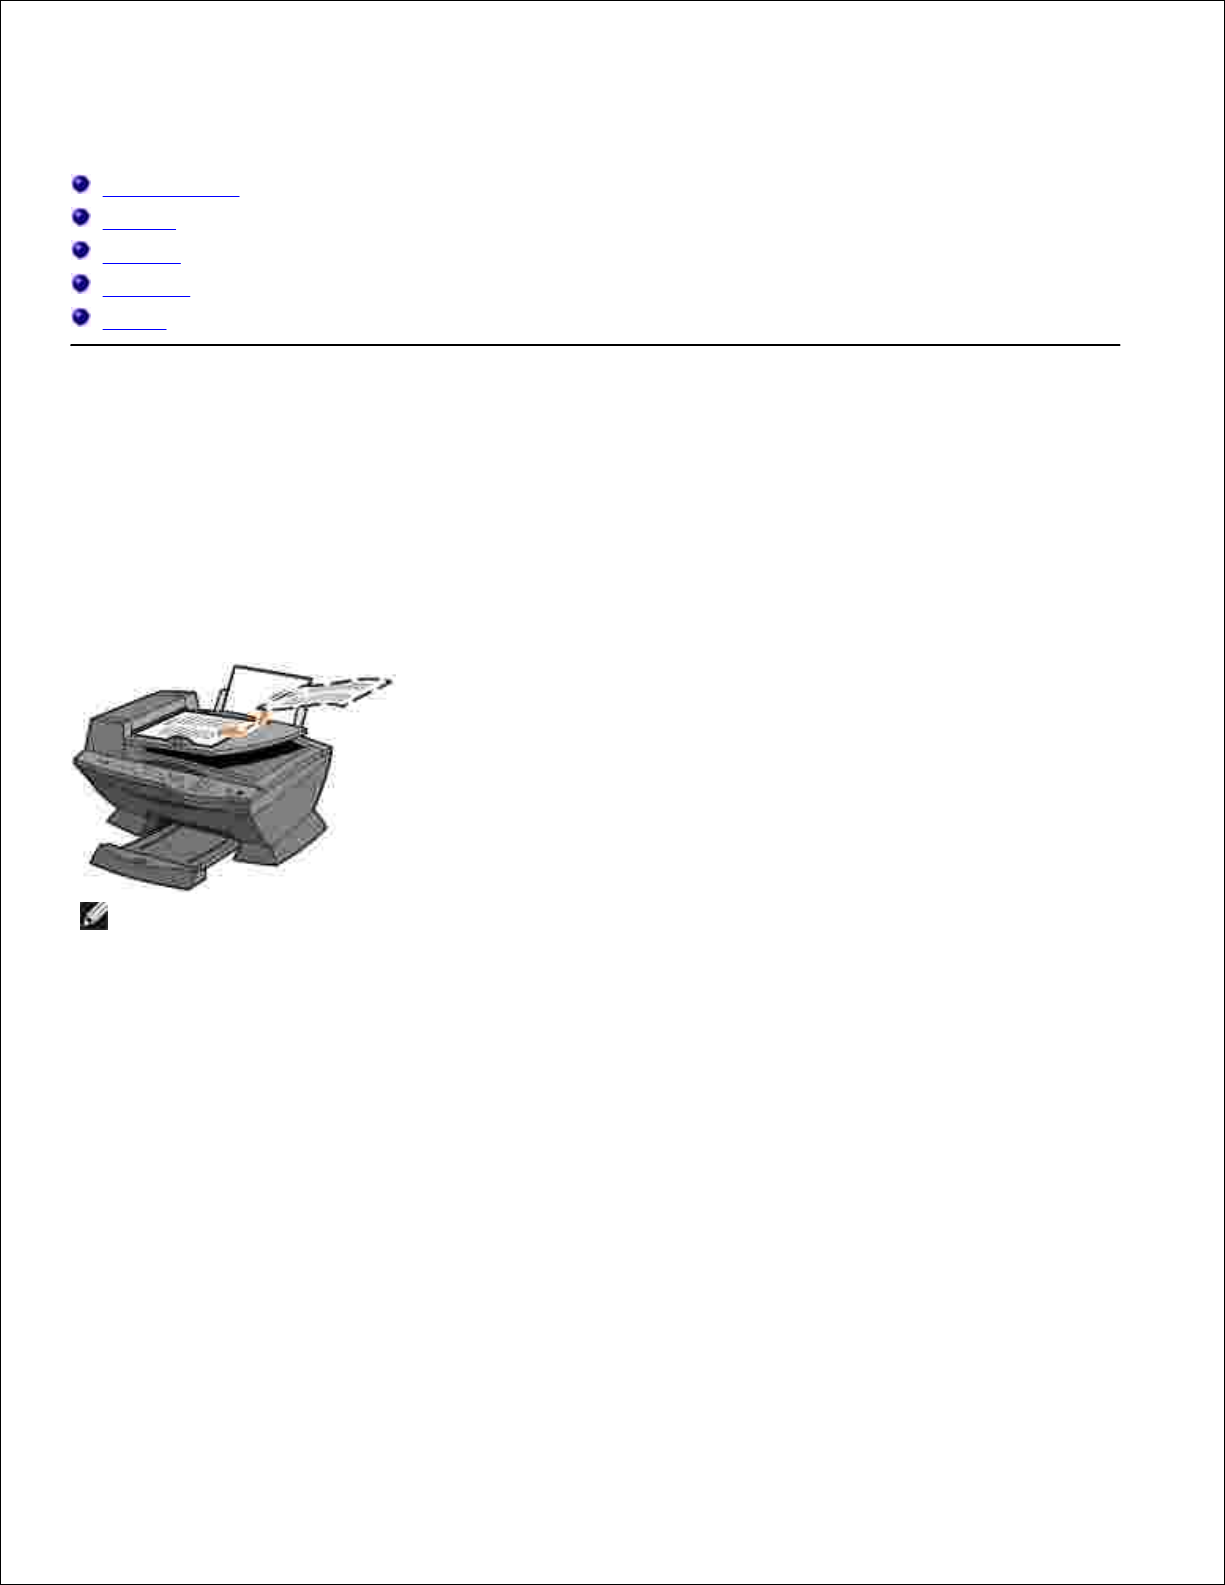
Load Your Document on the Scanner Glass
Open the top cover.1.
Page 24
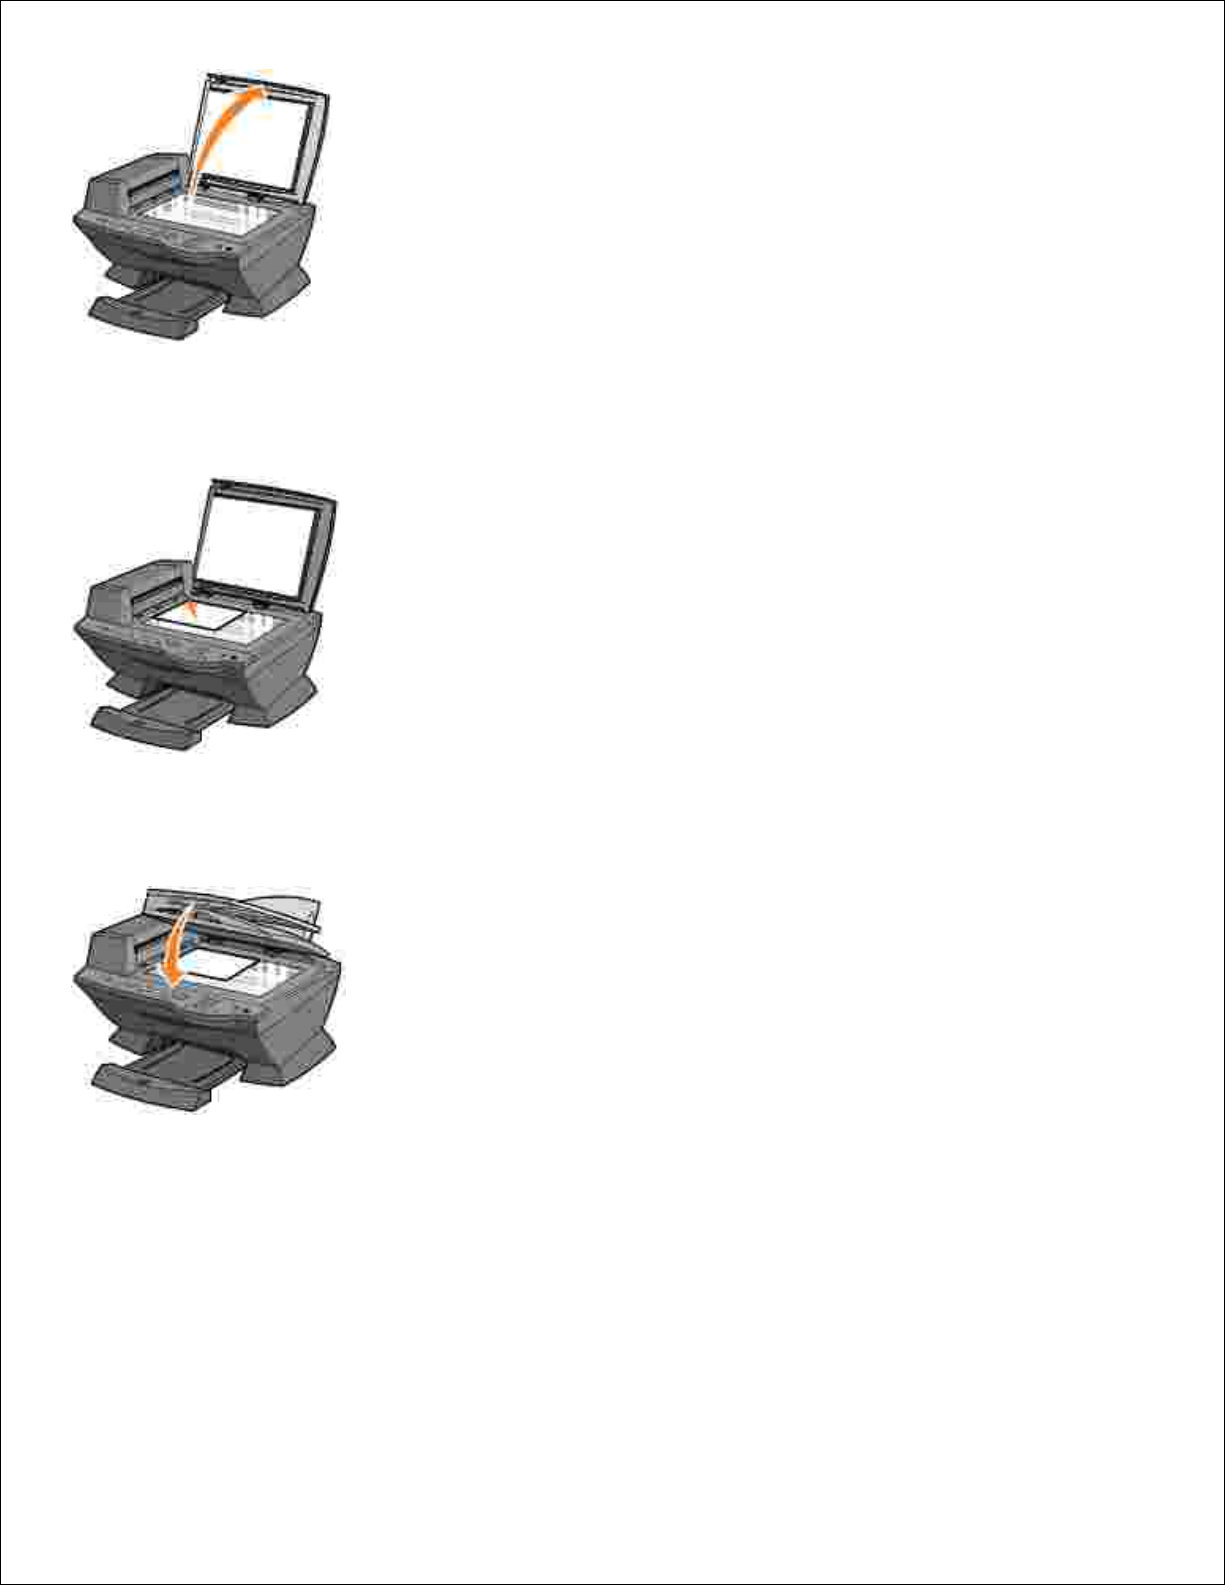
Place the item you want to copy face down on the scanner glass in the upper left corner.2.
Close the top cover.3.
Page 25
Using the Printer
Using the ADF
Printing
Copying
Scanning
Faxing
Using the ADF
Load Your Document Into the ADF
You can load up to 50 sheets of your original document (text side up) into the ADF for scanning, copying,
and faxing. The ADF is recommended for loading multiple page documents.
NOTE: The paper exit tray can hold up to 50 sheets of paper.
Print Media Guidelines for the ADF
Page 26
Load up to:
Make sure:
50 sheets of letter size paper
The document is loaded text side up.
The paper guide is against the edge of the paper.
50 sheets of A4 size paper
The document is loaded text side up.
The paper guide is against the edge of the paper.
50 sheets of legal size paper
The document is loaded text side up.
The paper guide is against the edge of the paper.
50 sheets of custom size paper
The document is loaded text side up.
The paper guide is against the edge of the paper.
Your paper size fits within these dimensions:
Width
210.0 mm - 215.9 mm
8.27 in. - 8.5 in.
Length
279.4 mm - 355.6 mm
11.0 in. - 14.0 in.
50 sheets of two, three, or four hole prepunched media
The document is loaded text side up.
The paper guide is against the edge of the paper.
Your paper size fits within the dimensions allowable.
50 sheets of edge reinforced three hole
copier media
The document is loaded text side up.
The paper guide is against the edge of the paper.
Your paper size fits within the dimensions allowable.
50 sheets of preprinted forms and
letterhead media
The document is loaded text side up.
The paper guide is against the edge of the paper.
Your paper size fits within the dimensions allowable.
You choose a media that absorbs ink well.
You allow the preprinted media to dry thoroughly
before use in the ADF.
You do not use media printed with metallic ink particles
in the ADF.
You avoid embossed designs.
NOTE: Do not load postcards, photo cards, or photo paper into the ADF.
Printing
Make sure your computer and your printer are on.1.
Load paper. For help, see Loading Paper.2.
With your document open, click File Print.3.
To change the printer settings, click Preferences or Properties (depending on the program or
operating system).
4.
5.
Page 27

4.
On the three tabs along the left side (Quality/Copies, Paper Setup, and Print Layout) of the Print
Properties screen, confirm the selections, and then click OK.
5.
Click OK or Print (depending on the program or operating system).6.
Print Photos
Load paper. For help loading photo paper, see Print Media Guidelines for the Paper Support.1.
With your document open, click File Print.2.
Click Preferences or Properties.3.
Select the paper size.4.
If using photo paper, make sure the glossy side is facing you when you insert the paper into the paper
support.
5.
Click Print.6.
Remove your photos from the paper exit tray as they are printed to prevent them from sticking
together or smearing.
7.
NOTE: Before putting your prints in a nonadhesive photo album or framing them, allow sufficient time
for the prints to dry thoroughly (12 to 24-hours, depending on the ambient conditions). This will
maximize the life of your prints.
Print Collated Copies
When your printer is attached to your computer, you can print black and white or color collated photocopies.
To print collated photocopies:
Make sure you have paper loaded in the paper support.1.
Click Start All Programs (or Programs) Dell Printers Dell AIO Printer A960 Dell All-
In-One Center.
The All-In-One Main Page appears on your computer screen.
2.
Click See More Copy Settings.3.
Select the Collate Copies check box.4.
Click Copy Now.5.
When you are using your printer without a computer, you can print black and white collated photocopies:
Make sure you have paper loaded in the paper support.1.
Press Copy.2.
Page 28

1.
2.
Press Options repeatedly until Collate - Black appears.3.
Press + to scroll to the amount of pages you want to collate.4.
Press Select.5.
Print Last Page First
Make sure you have paper loaded in the paper support.1.
Click Start All Programs (or Programs) Dell Printers Dell AIO Printer A960 Dell All-
In-One Center.
The All-In-One Main Page appears on your computer screen.
2.
Click See More Copy Settings.3.
Select the Print Last Page First check box.4.
Click Copy Now.5.
Print Two Images On One Page
You can print two images on one page to save paper or create interesting documents:
Make sure you have paper loaded.1.
Click Start All Programs (or Programs) Dell Printers Dell AIO Printer A960 Dell All-
In-One Center.
The All-In-One Main Page appears on your computer screen.
2.
Click View Saved Images.3.
From the Productivity Tools menu, click Print two different pictures on one page (2 on 1).4.
Follow the instructions on your screen.5.
Print Repeating Images
You can print the same image multiple times, as few as two per page and as many as eight per page, on one
sheet of paper:
Load A4 or letter size paper in the paper support. For help, see Loading Paper.1.
Click Start All Programs (or Programs) Dell Printers Dell AIO Printer A960 Dell All-
In-One Center.
The All-In-One Main Page appears on your computer screen.
2.
From the Productivity Tools menu, click Repeat an image several times on one page.3.
Click Preview Now to view your scanned image.4.
Page 29

3.
4.
NOTE: If the size of the scan (found in the lower right of the preview window) appears in red, you do
not have the system resources available to perform the scan at the resolution or size you have
selected. To correct this problem, either reduce your resolution or the size of your scan area.
Adjust the dotted lines to fit around the portion of the image you want to print.5.
Click Printer Settings to select your paper size.6.
Click OK.7.
When you are finished customizing your image, click Print Now.8.
NOTE: When you print multiple images on one sheet of paper in this way, you cannot use
Reduce/Enlarge. Depending on how many images you want to print per page, the printer reduces
them to fit on the page.
Print More Than One Page On a Sheet of Paper
Make sure you have paper loaded in the paper support.1.
Click Start All Programs (or Programs) Dell Printers Dell AIO Printer A960 Dell All-
In-One Center.
The All-In-One Main Page appears on your computer screen.
2.
From the Productivity Tools area, click More than one page on a sheet of paper.3.
Follow the instructions on your screen.4.
Print an Image as a Multi-Page Poster
You can print a poster of an image that you want to enlarge and extend over multiple pages.
Load A4 or letter size paper. For help, see Loading Paper.1.
Load your document on the scanner glass or into the ADF. For help, see Load Your Document on the
Scanner Glass or Load Your Document Into the ADF.
2.
Click Start All Programs (or Programs) Dell Printers Dell AIO Printer A960 Dell All-
In-One Center.
The All-In-One Main Page appears on your computer screen.
3.
Under Productivity Tools, click Print an image as a multi-page poster.4.
Click Preview Now to view your scanned image.5.
NOTE: If the size of the scan (found in the lower right of the preview window) appears in red, you do
not have the system resources available to perform the scan at the resolution or size you have
selected. To correct this problem, either reduce your resolution or the size of your scan area.
Page 30

Adjust the dotted lines to fit around the portion of the image you want to print.6.
Click Printer Settings to select your paper size.7.
Select your paper size, and then click OK.8.
When you are finished customizing your document, click Print Now.9.
Print a Banner
Place a stack of banner paper (20 sheets or less) on the top cover, and feed in the first sheet.1.
With your document open, click File Print.2.
Click Preferences or Properties.3.
From the I Want To menu, click Print a banner.4.
Follow the instructions on your screen.5.
Click OK, OK, and then OK again.6.
NOTE: Once the printer begins printing, wait until you can see the leading edge of the banner exiting
the printer, and then carefully unfold the paper down to the floor in front of the printer.
Page 31

Copying
You can use your printer to copy using the printer operator panel or the printer software.
Copy Using the Operator Panel
Make sure your printer is on.1.
Load paper. For help, see Loading Paper.2.
Load your document on the scanner glass or into the ADF. For help, see Load Your Document on the
Scanner Glass or Load Your Document Into the ADF.
3.
From the Mode area on the operator panel, press Copy to enter copy mode.4.
If you want to make more than one photocopy, press the numbers on the keypad that correspond with
the number of photocopies you want to make.
5.
From the Start area on the operator panel, press Color to create a color photocopy of your image or
press Black to create a black and white photocopy.
Copying appears on the display.
6.
Copy Using the Printer Software
Make sure your computer and your printer are on.1.
Load paper. For help, see Loading Paper.2.
Load your document on the scanner glass or into the ADF. For help, see Load Your Document on the
Scanner Glass or Load Your Document Into the ADF.
3.
Click Start All Programs (or Programs) Dell Printers Dell AIO Printer A960 Dell All-
In-One Center.
The All-In-One Main Page appears on your computer screen.
4.
Click See More Copy Settings.5.
Select a quantity and color for your photocopies.6.
NOTE: You can also choose a paper size or further customize your copy job on this screen.
Click Copy Now.7.
Copy Photos
Load paper. For help loading photo paper, see Print Media Guidelines for the ADF.1.
Page 32

1.
Load your document on the scanner glass or into the ADF. For help, see Load Your Document on the
Scanner Glass or Load Your Document Into the ADF.
2.
NOTE: Make sure the upper left corner of the front of the photo aligns with the arrow.
Click Start All Programs (or Programs) Dell Printers Dell AIO Printer A960 Dell AllIn-One Center.
The All-In-One Main Page appears on your computer screen.
3.
Click Preview Now.4.
NOTE: If the size of the scan (found in the lower right of the preview window) appears in red, you do
not have the system resources available to perform the scan at the resolution or size you have
selected. To correct this problem, either reduce your resolution or the size of your scan area.
Adjust the dotted lines to fit around the portion of the image you want to print.5.
From the Copy section, select Photo.6.
Select a copy quantity if making multiple photocopies.7.
To further customize your photo, click See More Copy Settings.8.
When you are finished customizing your settings, click Copy Now.9.
Scanning
You can use your printer to scan using the printer operator panel or the printer software.
Using the Operator Panel
Make sure your computer and printer are on, and the computer is connected to the computer.1.
Load your document on the scanner glass or into the ADF. For help, see Load Your Document on the
Scanner Glass or Load Your Document Into the ADF.
2.
From the Mode area on the operator panel, press Scan to put the printer in scan mode.3.
Press + to scroll through the list of possible programs to which you can scan.4.
Press Select when the program to which you want to scan appears.5.
From the Start area on the operator panel, press Black to begin a black and white scan or Color to
begin a color scan.
6.
Using the Printer Software
Page 33

NOTE: Some programs do not support multiple page scanning.
Make sure your computer and printer are on, and the computer is connected to the computer.1.
Load your document on the scanner glass or into the ADF. For help, see Load Your Document on the
Scanner Glass or Load Your Document Into the ADF.
2.
Click Start All Programs (or Programs) Dell Printers Dell AIO Printer A960 Dell All-
In-One Center.
The All-In-One Main Page appears on your computer screen.
3.
Click Preview Now to see your scanned image.4.
NOTE: If the size of the scan (found in the lower right of the preview window) appears in red, you do
not have the system resources available to perform the scan at the resolution or size you have
selected. To correct this problem, either reduce your resolution or the size of your scan area.
Adjust the dotted lines to fit around the part of the image you want to print.5.
From the Send scanned image to drop-down menu, select your scan destination.6.
To further customize your scan job, click See More Scan Settings.7.
When you are finished customizing your image, click Scan Now.8.
Scan photos
Make sure your computer and your printer are on, and the printer is connected to the computer.1.
Place your photo on the scanner glass. For help, see Using the ADF.2.
NOTE: Make sure the upper left corner of the front of the photo aligns with the arrow.
Click Start All Programs (or Programs) Dell Printers Dell AIO Printer A960 Dell AllIn-One Center.
The All-In-One Main Page appears on your computer screen.
3.
Click Preview Now to see your scanned image.4.
NOTE: If the size of the scan (found in the lower right of the preview window) appears in red, you do
not have the system resources available to perform the scan at the resolution or size you have
selected. To correct this problem, either reduce your resolution or the size of your scan area.
Adjust the dotted lines to fit around the portion of the image you want to print.5.
From the Send scanned image to drop-down menu, select your scan destination.6.
To further customize your scan job, click See More Scan Settings.7.
Page 34

6.
7.
When you are finished customizing your image, click Scan Now.8.
When your document has finished processing, it will open in the program you chose.9.
Edit Scanned Images
With most graphics programs, you can customize your image.
From the Dell All-In-One Center, scan your image to the image editor of your choice.1.
Edit the image using the tools available in your program.2.
You may be able to:
Remove red eye
Crop your image
Add text to your image
Adjust the brightness and contrast of your image
For help, see the documentation that came with your graphics program.
Scan Multiple Pages or Images
NOTE: This feature is only available when scanning from the flatbed scanner.
Put the first sheet on the scanner glass.1.
Click Start All Programs (or Programs) Dell Printers Dell AIO Printer A960 Dell All-
In-One Center.
The All-In-One Main Page appears on your computer screen.
2.
Select your scan destination from the drop-down box.3.
In the Scan section, click See More Scan Settings4.
Click Display Advanced Scan Settings.
The Advanced Scan Settings dialog box appears.
5.
On the Scan tab, select Scan multiple items before output.6.
Click OK.7.
When you are finished customizing your settings, click Scan Now.8.
Page 35

7.
8.
NOTE: You are prompted to put the next item on the scanner glass after the first one scans.
Edit Text Found in a Scanned Document Using Optical
Character Recognition (OCR)
Optical Character Recognition is a software feature that turns a scanned image into editable text within a
word processing program.
Load your document on the scanner glass or into the ADF. For help, see Load Your Document on the
Scanner Glass or Load Your Document Into the ADF.
1.
Click Start All Programs (or Programs) Dell Printers Dell AIO Printer A960 Dell All-
In-One Center.
The All-In-One Main Page appears on your computer screen.
2.
From the Productivity Tools section, click Edit text found in a scanned document (OCR).3.
Follow the instructions on your computer screen.4.
When your document has finished processing, it will open in the program you chose.5.
Edit your document.6.
Save your document.7.
Save an Image on Your Computer
Click Start All Programs (or Programs) Dell Printers Dell AIO Printer A960 Dell AllIn-One Center.
The All-In-One Main Page appears on your computer screen.
1.
From the Productivity Tools section, click Save an image on my computer.2.
Follow the directions to save an image on your computer.3.
E-mail a Scanned Image or Document
You can send photographs through e-mail:
Open the top cover.1.
Place the photograph you want to scan face down on the scanner glass.2.
Close the top cover.3.
Click Start All Programs (or Programs) Dell Printers Dell AIO Printer A960 Dell All-
In-One Center.
The All-In-One Main Page appears on your computer screen.
4.
Page 36

4.
Click Preview Now.5.
NOTE: If the size of the scan (found in the lower right of the preview window) appears in red, you do
not have the system resources available to perform the scan at the resolution or size you have
selected. To correct this problem, either reduce your resolution or the size of your scan area.
From the Productivity Tools area, click E-mail an image or document.6.
From the What is being scanned? menu, select Photo.7.
Follow the instructions on the screen to prepare the photograph for e-mail.8.
Click Attach Now.9.
Write a note to accompany the attached photo, and then send it.10.
Enlarge or Reduce Images or Documents
Load paper in the paper support. For help, see Loading Paper.1.
Load your document on the scanner glass or into the ADF. For help, see For help, see Load Your
Document on the Scanner Glass or Load Your Document Into the ADF.
2.
Click Start All Programs (or Programs) Dell Printers Dell AIO Printer A960 Dell All-
In-One Center.
The All-In-One Main Page appears on your computer screen.
3.
Click Preview Now.4.
NOTE: If the size of the scan (found in the lower right of the preview window) appears in red, you do
not have the system resources available to perform the scan at the resolution or size you have
selected. To correct this problem, either reduce your resolution or the size of your scan area.
From the Productivity Tools area, select Enlarge or reduce an image.5.
Follow the instructions on the screen to select the size of your new image.6.
When you are finished customizing your image, click Print Now.7.
Faxing
You can fax using the printer operator panel or the printer software.
NOTE: You do not need to connect your printer to a computer to send faxes.
In order to fax using the printer software:
Page 37

Your computer must have Dell Printer Fax Tools, Classic Phone Tools, or Microsoft Fax Console installed
and configured
See Using Dell Printer Fax Tools Fax Software to use Dell Printer Fax Tools.
See Using Fax Console (Windows XP Only) to use Fax Console.
Your computer must be equipped with a data/fax modem.
An active telephone line must be connected to the line-in connector of your computer's data/fax
modem. Do not connect the data/fax modem to the printer's wall jack connector. See Wall jack
connector for more information.
NOTE: DSL (digital subscriber line), ISDN (integrated services digital network) and cable modems are
not fax modems and are not supported.
Additional devices must be connected to the line-out connector for proper fax operation.
Your printer must be connected to the computer with a USB cable.
Using Dell Printer Fax Tools Fax Software
Install Dell Printer Fax Tools Fax Software
Click the Start All Programs (or Programs).1.
A list of your installed software appears.
Check for any entry referring to Classic PhoneTools or Fax Tools. If you have either of these entries,2.
Page 38

skip to "Configure Dell Printer Fax Tools Fax Software."
2.
Click on the desktop.3.
The All Programs window closes.
Insert the Dell Personal All-In-One Printer A960 Drivers and Utilities CD.4.
An installation window appears.
Click Cancel.5.
Click Start My Computer.6.
Right-click the CD Drive icon.7.
A drop-down menu appears.
Click Explore.8.
Double-click the Fax folder.9.
Double-click the appropriate language folder.10.
Double-click the Setup icon.11.
The Installation Wizard appears.
Follow the instructions on your computer screen to complete the installation.12.
Configure Dell Printer Fax Tools Fax Software
NOTE: Fax service is set by default to automatically answer your phone line after two rings if you click
to select the Enable Receive check box. Change these settings as desired.
Click Start All Programs (or Programs).1.
Click Dell AIO Printer A960 Fax Setup Utility or Classic PhoneTools.2.
The fax configuration wizard begins.
Click Next.3.
Read the license agreement, and then click Yes to continue.4.
Enter your name and company name.5.
Click Next.6.
Enter an identifier, phone number, and fax number.7.
Page 39

6.
7.
Click Next, click Next, Next, and click Next again.8.
Click Finish.9.
Dell Printer Fax Tools fax software launches.
Select your country, enter your area code, and enter any number you must press first before getting to
an outside line.
10.
Click OK.11.
Select your location, and then click OK.12.
Click Next, click Next, select your modem, and click Next again.13.
Click Next, click Next, and then click Finish.14.
Using Fax Console (Windows XP Only)
Install Fax Console
Click Start Control Panel.1.
Click Add or Remove Programs.2.
Click Add/Remove Windows Components.3.
Click to select Fax Services.4.
Click Next.5.
If prompted, insert the Microsoft Windows XP CD, and then click OK. Close the Welcome to
Microsoft Windows XP window when it opens.
Click Finish.6.
Close the Add/Remove Programs window.7.
Configure Fax Console
Click Start All Programs (or Programs) Accessories Communications Fax Fax
Console.
1.
The Welcome to Fax Configuration Wizard appears.
Click Next.2.
Enter any appropriate information, and then click Next.3.
Select your data/fax modem in the drop-down menu under Please select the fax device.4.
Page 40

3.
4.
Select or de-select the Enable Send and Enable Receive check boxes as desired.5.
Click Next.6.
NOTE: De-selecting the Enable Send check box prevents you from sending faxes. Selecting the
Enable Receive check box allows you to receive faxes.
Enter your TSID information, and then click Next.7.
Enter your CSID information, and then click Next.8.
Click to select Print it on. Use the drop-down menu to the right of this field to select Dell AIO Printer
A960 if you want to print all received faxes.
9.
To create an archive copy of each fax, click to select Store a copy in a folder, and then use the
Browse button to select the desired archive location.
10.
Click Next, confirm your settings, and click Finish.11.
Access the Fax Setup Utility
Click Start All Programs (or Programs) Dell Printers Dell AIO Printer A960 Fax
Setup Utility
From the Dell All-In-One Center, click the Maintain/Troubleshoot tab, and then click Display the
Fax Setup Utility.
Page 41

The following table describes what you can do from each of the Fax Setup Utility tabs.
Page 42

On this tab:
You can:
Send
Enter your name and fax number.
Select a maximum send speed and a print quality for outgoing faxes.
Choose whether to scan the entire document before dialing the number.
Choose whether to use error correction.
Select when to print a fax usage report.
Select when to print a fax activity report.
Receive
Choose whether you want to print a footer (date, time, and page number) on
each page.
Automatically reduce an incoming fax to fit to the paper size loaded or print it on
two sheets of paper.
Select whether you want to forward a fax or print it, and then forward it.
Connection/Dialing
Select the number of times you want the machine to redial and the time
between those attempts if the fax cannot be sent on the first try.
Select the phone line format you want to use (Pulse, Touch-tone, Behind a PBX).
Enter a dialing prefix.
Choose how (manually, if fax tones are detected, or after a certain amount of
rings) you want to answer incoming calls.
Choose a distinctive ring.
Speed Dial
Add to, create, or edit the speed dial list.
Group Speed Dial
Create a group number and name and add phone numbers to the group.
Send a Fax
You can send and receive color faxes using the operator panel only. In order to send a color fax from your
printer, the machine to which you are sending the fax must also support color faxes.
You can send faxes using the printer operator panel or the printer software.
Using the Operator Panel
You can use your printer to send color or black and white faxes. You can send and receive A4, legal, and
letter size documents.
Make sure your printer is on.1.
Load your document on the scanner glass or into the ADF. For help, see Load Your Document on the
Scanner Glass or Load Your Document Into the ADF.
2.
Press Fax.3.
Use the keypad to:4.
Enter the fax number, or
Press Speed Dial, and then
Page 43

Press + or - to scroll through the list to find the number you want, or
Enter a two-digit number (viewable in the upper left of the display).
NOTE: If you do not have a Speed dial list, but want to create one, see Speed Dial.
Press Black or Color.
The printer scans your document and sends your fax to the number you entered.
5.
Using Dell Printer Fax Tools Fax Software
Make sure your printer and computer are on.1.
Load your document on the scanner glass or into the ADF. For help, see Load Your Document on the
Scanner Glass or Load Your Document Into the ADF.
2.
Make sure your printer is connected to a computer with a data/fax modem and the modem is
connected to an active telephone line.
3.
Click Start All Programs (or Programs) Dell Printers Dell AIO Printer A960 Dell
All-In-One Center.
4.
Place the document you want to fax face down under the lid of the printer.5.
From the Productivity Tools section, select Fax an image or document.6.
Select No under Is there more than one page.7.
Click Next.8.
The document is scanned and Dell Printer Fax Tools launches.
Send Multiple Page Faxes
You can send multiple page faxes using the printer operator panel or the printer software.
Using the Operator Panel
Make sure your printer is on and connected to a computer with a data/fax modem and the modem is
connected to an active telephone line.
1.
Load your document into the ADF. For help, see Using the ADF.2.
Press Fax.3.
Enter the fax number using the numbers on the keypad.4.
Press Black or Color.5.
Page 44

4.
5.
NOTE: In order to send a color fax from your printer, the machine to which you are sending the fax
must also support color faxes.
Using Dell Printer Fax Tools Fax Software
Click Start All Programs (or Programs) Dell Printers Dell AIO Printer A960 Dell
All-In-One Center.
1.
Click See More Scan Settings.2.
Click Advanced.3.
Click to select Scan multiple items before output (flatbed scanner only).4.
Click OK.5.
Select Fax from the Send scanned image to drop-down menu.6.
Place the document you want to fax face down under the lid of the printer.7.
Click Preview Now.8.
A preview of your document appears. Adjust your document and repeat if necessary.
NOTE: If the size of the scan (found in the lower right of the preview window) appears in red, you do
not have the system resources available to perform the scan at the resolution or size you have
selected. To correct this problem, either reduce your resolution or the size of your scan area.
Click Scan Now.9.
Click Yes until all pages you want to fax are scanned, and then click No.10.
Follow the instructions on your computer screen to send your fax.11.
Receive Faxes
NOTE: Your printer cannot receive soft copy faxes, it can only send them. All incoming faxes print
from your printer.
You can receive faxes using the printer operator panel or the printer software. You can choose to receive
faxes automatically, manually, or through an answering machine.
Receiving Faxes Through the Printer
For information on receiving faxes through the printer, see the following sections.
Receive Faxes Automatically
Receive Faxes Manually
Page 45

Receive Faxes Through an Answering Machine
Receiving Faxes with Fax Console
Click Start All Programs (or Programs) Accessories Communications Fax.1.
Click Fax Console.
You are now ready to receive a fax if you selected the Enable Receive check box when configuring Fax
Console.
2.
Receive Faxes Automatically
To reset your printer to automatic answering mode (default):
From the operator panel, press Fax.1.
Press Options until Answer fax when appears.2.
Press + to scroll through the available options.3.
Choose After 1 ring, After 2 rings, After 3 rings, or After 5 rings, and then press Select.4.
When the number of rings that you set is detected, the printer automatically receives your fax.
NOTE: For your printer to receive a color fax, the machine from which you are receiving must also
support color faxes.
Receive Faxes Manually
From the operator panel, press Fax.1.
Press Options until Answer fax when appears.2.
Press + to scroll through the available options.3.
Press Select when Manual-Press # appears on the display.4.
When it rings, pick up a telephone that is connected to the external jack of the printer and listen for
the fax calling tone.
5.
Press the pound (#) key on the telephone.6.
Hang up the telephone.7.
The printer receives your fax.
Receive Faxes Through an Answering Machine
Page 46

From the operator panel, press Fax.1.
Press Options until Answer fax when appears.2.
Press + to scroll through the available options.3.
When Fax Tone Heard appears on the display, press Select.4.
When a ring is detected, the answering machine picks up the call.
If a fax is detected, the printer receives the fax, and disconnects the answering machine.
If not, the answering machine completes the call.
Print Faxes Using Dell Printer Fax Tools Fax Software
From the main Fax Tools screen, click Configure.1.
Select General Setup.2.
Select the Fax tab.3.
Click the Print received faxes check box, and then click OK.
Incoming faxes automatically go to the printer as they are received.
4.
NOTE: To view all received faxes, click the Fax Inbox button. Click the Fax Outbox button to view a
list of sent faxes.
Print to Fax
The Print to fax feature eliminates the need to print an original document and put it on the scanner glass to
send a fax the conventional way. You can create or receive a soft copy document on your computer and send
a black and white fax of it to someone else.
NOTE: You cannot receive soft copy faxes, only send them. All incoming faxes will print from your
printer.
To send a fax from your computer program using the fax modem in your printer:
With your document open, click File Print.1.
In the printer list, select Dell Printer Fax Tools.2.
Click Print.3.
To Print to fax, follow the instructions in the program that launches.4.
NOTE: All faxes sent using the Print to fax feature use the Fine resolution.
Page 47

Viewing Sent Faxes and Received Faxes
Using Fax Console
Click Start All Programs (or Programs) Accessories Communications Fax.1.
Click Fax Console.2.
Received faxes can be viewed in the Inbox. Sent faxes can be viewed in Sent Items.
View the Status of a Fax
Using Fax Console
Click Start All Programs (or Programs) Accessories Communications Fax Fax
Console.
1.
Click to expand the Fax folder, if necessary.
The following folders appear.:
Incoming - faxes currently being received
Inbox - faxes that have been received
Outbox - faxes scheduled to be sent
Sent Items - faxes successfully sent
2.
Click the folder of your choice.3.
In the right pane, click the fax for which you want to view the status, and then click Preferences or
Properties.
4.
Click the General tab and view the Status line.5.
Click Close when you are finished.6.
Using Special Fax Features
There are several fax features on your Dell A960 that make sending faxes more efficient.
Speed Dial
To make sending faxes easier, you can enter up to 100 speed dial numbers. You can enter 80 individual fax
numbers and 20 groups that can hold up to five phone numbers each.
Using the Operator Panel
Page 48

Press Fax.1.
Press Speed Dial.2.
The first speed dial number in the list appears.3.
Scroll through the list using the + or - button or use the keypad to enter the two-digit speed dial
number.
4.
Using the Printer Software
Click Start All Programs (or Programs) Dell Printers Dell AIO Printer A960 Fax
Setup Utility.
1.
Click the Speed Dial tab.2.
Follow the instructions on the Speed Dial tab to add a new number to your speed dial list.3.
Using Your Speed Dial List
Press Speed Dial, and then:
Use the + or - button to scroll through the speed dial list to find the desired fax number, and
then press Fax.
Press the keypad buttons to enter a two-digit number (viewable in the upper left corner of the
display), and then press Fax.
1.
When the default screen appears, press Options.2.
Press Select.3.
Enter the information about when you want your fax to send.4.
Press Select again, and then press 1 for AM or 2 for PM.
The default screen appears again.
5.
NOTE: You can repeat this process to enter more numbers to which you want to send a delayed fax.
On Hook Dial
On the operator panel, press Fax.1.
Press Options repeatedly until On Hook Dial appears.2.
Press Select to make the printer go off hook.3.
Enter the number to which you want to send a fax.4.
Press the keypad numbers to navigate an automated answering system.5.
Page 49

4.
5.
Press Black or Color when you are ready to send a fax.6.
Broadcast Send
If your printer is attached to a computer, you can send a fax of up to 20 pages to as many as five people at
once.
To Send a Broadcast Fax Immediately
Press Fax.1.
Press Options four times to display Delay Until.2.
Press + or - to display Do not delay, and then press Select.3.
Enter a fax number or press Speed Dial to select numbers from your Speed dial list.4.
Press Black or Color to send the fax immediately or press Select to enter another fax number.5.
Press Black or Color to send the fax to both numbers or press Select to enter another fax number.
Continue this procedure until all of the fax numbers (up to five numbers) have been entered.
6.
To Delay Sending a Broadcast Fax
Manually entering a fax number:
On the operator panel, press Fax.1.
When the default screen appears, press Options until Delay Until appears.2.
Press + or - to scroll to Time.3.
Press Select.4.
Enter the time you want your fax to send.5.
Press Select.6.
If your printer is in 24-hour mode, the screen will return to the default display. If the machine is set to
12-hour mode, press 1 for AM or 2 for PM.
7.
Using the keypad, enter the fax number.8.
Press Black or Color to send your fax to this number or press Select to enter another fax number
(you can do this up to five times and the delayed fax will be sent to as many numbers as you entered).
9.
NOTE: At the designated time, the fax numbers are dialed and the fax transmitted to all of the
designated fax numbers. If the fax transmission is unsuccessful to any of the numbers on the
broadcast list, the unsuccessful numbers will be tried again at the end of the list.
Page 50

Understanding the Software
Understanding the Printer Software
Using the Dell All-In-One Center
Using Print Properties
Using the Dell Printer Solution Center
Using Dell Picture Studio
Understanding the Printer Software
The printer software includes the:
Dell All-In-One Center-helps you perform various scan, copy, and fax operations and manage your
saved images.
Print Properties-helps you adjust printing settings.
Dell Printer Solution Center-provides maintenance and troubleshooting help, provides basic usage
information, and How to's for creating projects.
Dell Picture Studio-helps you edit your photos.
NOTE: Your language may not be supported. If your language is not supported, use the photo editing
software in your Windows operating system.
Fax Setup Utility-helps you set up your fax settings. For help, see Access the Fax Setup Utility.
Using the Dell All-In-One Center
You can use the Dell All-In-One Center to:
Select a scan destination.
Select a photocopy quantity and color.
Scan, copy, print, fax, and do creative tasks.
Access troubleshooting and maintenance information.
Preview images you want to print.
Manage photos (copy them to folders, print them, do creative copying) using the View Saved Images
tab.
Page 51

Access the Dell All-In-One Center
Click Start All Programs (or Programs) Dell Printers Dell AIO Printer A960 Dell AllIn-One Center.
The All-In-One Main Page
The All-In-One Main Page consists of four main sections. The following table describes each of the sections.
From this section:
You can:
Scan
Select a program to send the scanned image to.
Choose what type of image is being scanned.
Choose how the scan will be used.
NOTE: Click See More Scan Settings to view all settings.
Copy
Select the quantity and color of your photocopies.
Select a quality setting for your photocopies.
Adjust the size of the scanned area.
Lighten or darken your photocopies.
Enlarge or reduce your photocopies.
NOTE: Click See More Copy Settings to view all settings.
Productivity Tools
Choose from a variety of creative ideas.
Fax an image or document.
Enlarge or reduce an image.
Repeat an image several times on one page.
Print an image as a multi-page poster.
E-mail an image to a friend.
Save an image on your computer.
Edit text found in a scanned document (Optical Character Recognition).
Modify an image with a photo editor.
Page 52

Preview section
Select a region of the preview image to scan.
View an image of what will be printed or copied.
NOTE: For more information about the All-In-One Main Page, View Saved Images Page, or the
Maintain/Troubleshoot Page, click the Help button located in the upper right corner of the screen.
View Saved Images Page
Use the View Saved Images page (accessed from the All-In-One Main Page) to perform tasks with images
that are saved on the computer. The View Saved Images page consists of three sections.
From this
section:
You can:
Open with
Select a program to send the saved image to.
Print a Copy
Choose the quantity and color of your photocopies.
Select a quality setting for your photocopies.
Lighten or darken your photocopies.
Enlarge or reduce your photocopies.
NOTE: Click See More Copy Settings to view all settings.
Productivity
Tools
Select from a variety of creative ideas. For a list of creative tasks available from the AllIn-One Main Page, see Productivity Tools.
Maintain/Troubleshoot Page
The Maintain/Troubleshoot page (accessed from the All-In-One Main Page) provides you with direct links to
the Dell Printer Solution Center. Choose from these topics:
Maintain or fix quality problems
Troubleshoot printer problems
Device status and ink levels
More printing ideas and how to's
Contact information
Advanced
View the software version and copyright information
For more information about the Dell Printer Solution Center, see Using the Dell Printer Solution Center.
Using Print Properties
Page 53

You can change your printer settings in Print Properties.
Access Print Properties
With your document open, click File Print.
The Print dialog box appears.
1.
In the Print dialog box, click Preferences or Properties (depending on your program or operating
system).
The Print Properties screen appears along with the I Want To menu
2.
.
To access Print Properties when a document is not open:
Click Start Printers.1.
Right-click, and then choose Printer Preferences.2.
The I Want To Menu
The I Want To menu displays when you open Print Properties. It contains a variety of task wizards to help
you select the correct print settings for your project. Close the menu for a full view of the Print Properties
dialog box.
Print Properties Tabs
All of the print settings are on the three main tabs of the Print Properties software. The following table
describes each of the tabs.
Page 54

From this tab:
You can change these settings:
Quality/Copies
Quality/Speed- Select a Quality/Speed setting.
Multiple Copies-Customize how the printer prints several photocopies of a single print
job: collated or normal.
Print Color Images in Black and White- Print your color images in black and white.
Paper Setup
Type- Select the type of media you are using.
Paper Size- Select the size of the paper you are using.
Orientation- Select how you want the document oriented on the printed page. You can
print with portrait or landscape orientation.
Print Layout
Layout- Select the layout you want to print.
Duplexing- Select this when you want to print on both sides of the paper.
NOTE: For additional information about these settings, right-click a setting on the screen, and then
select the What's This? item.
Save Settings Menu
From the Save Settings menu, you can name and save the current Print Properties settings for future use.
You can save up to five custom settings.
Options Menu
Use the Options menu to make changes to the Quality, Layout, and Printing Status Options settings. For
more information on these settings, open the tab dialog box from the menu, and then click the Help button
located in the lower right corner of the screen.
The Options menu also provides you with direct links to different parts of the Dell Printer Solution Center, as
well as software version information.
Using the Dell Printer Solution Center
The Dell Printer Solution Center is a guide you can refer to for printer help and to check the current printer
status.
Access the Dell Printer Solution Center
Click Start All Programs (or Programs) Dell Printers Dell AIO Printer A960 Dell Printer
Solution Center.
Page 55

The following table describes the Dell Printer Solution Center tabs.
From this tab:
You can:
Status (the tab that appears on Start)
Check the current printer status.
See what type of paper is in the printer.
View ink levels.
How To
Receive information about basic features.
Receive scan, copy, fax, and print instructions.
Receive project information.
Search the electronic guide.
Go online to view more ideas.
Troubleshooting
Check the current printer status.
View recommended Help topics.
View common troubleshooting topics.
Search for more specific troubleshooting topics.
Page 56

Visit the support area online.
Maintenance
Learn how to install a new ink cartridge.
View information about how to purchase new ink cartridges.
Print a test page.
Clean the ink cartridge nozzles.
Align the ink cartridges.
Solve other problems.
Visit the supplies area online.
NOTE: Some links will not work while a job is in progress.
Contact Information
View information about ordering ink or supplies.
View information about contacting Dell Customer Support.
View a list of phone numbers.
Visit the Dell Web site.
Register your printer.
Advanced
Change printing status appearance options.
View software version information.
Change the network printing settings.
Using Dell Picture Studio
NOTE: Dell Picture Studio is included on your Driver and Utilities CD.
Dell Picture Studio lets you adjust photo attributes. With Dell Picture Studio, you can:
Eliminate red eye
Rotate images
Attach images to e-mail
Add text to images
Resize images
Create and share slideshows
Add special effects
Create Web pages
Make a series of images into a movie
Access Dell Picture Studio
Click Start All Programs (or Programs) Dell Picture Studio Dell Picture Studio Home.
Page 57

NOTE: Your language may not be supported. If your language is not supported, use the photo editing
software in your Windows operating system.
Page 58

Networking
A network is a group of devices connected to each other for the purpose of sharing information. Here is a
quick look at what you can do if you are considering using your printer across a network:
Print from multiple computers if your printer is attached to a computer.
NOTE: All computers networked to the printer must be running either Windows XP or Windows 2000.
Copy using the operator panel.
Use the Print to fax feature. However, Fax Setup Utility functions are not available. Fax setup must be
done from the operator panel.
NOTE: You cannot use your printer to scan across a network.
Sharing Printers
You can print from multiple computers if your printer is attached to a computer that is connected to a
network.
Using Windows XP
First, follow these instructions while you are at your own computer.
Click Start Control Panel Printers and Other Hardware Printers and Faxes.1.
Right-click the Dell AIO Printer A960 printer icon, and then click Sharing.2.
From the Sharing tab, click Share this printer, and then type a name in the Share name text box.3.
Click Additional Drivers and select the operating systems of all network clients printing to this
computer.
4.
Click OK.5.
If you are missing files, you are prompted to insert the server operating system CD.
Make sure the printer object in the Printers folder shows that it is shared. For example, in Windows
2000, a hand is shown underneath the printer icon.
Browse Network Neighborhood. Find the host name of the server and look for the shared name you
assigned the printer.
Page 59

Now, follow these instructions while you are at the other person's computer:
Click Start Control Panel Printers and Other Hardware Printers and Faxes.1.
Click Add a printer to launch the Add Printer wizard.2.
Click Next.3.
Click Find a printer in the directory, and then click Next.4.
Click the Browse button to the right of location5.
Click the printer location, and then click OK.6.
Click Find Now.7.
Click the printer you want to connect to.8.
Click OK.9.
Print a test page to verify printer installation.
Click Start Control Panel Printers and Other Hardware Printers and Faxes.1.
Select the printer you just created.1.
Click File Properties.2.
From the General tab, click Print Test Page.3.
When a test page prints successfully, printer installation is complete.
Using Windows 2000
Click Start Settings Printers and Faxes or Printers.1.
Select the Dell AIO Printer A960 printer icon.2.
Click File Sharing.3.
Check the Shared as check box, and then type a name in the Shared Name text box.4.
Click Additional Drivers and select the operating systems of all network clients printing to this
computer.
5.
Click OK.6.
If you are missing files, you are prompted to insert the server operating system CD.
Make sure the printer object in the Printers folder shows that it is shared. For example, in Windows
2000, a hand is shown underneath the printer icon.
Browse Network Neighborhood. Find the host name of the server and look for the shared name you
assigned the printer.
Page 60

Now, follow these instructions while you are at the other person's computer:
Click Start Settings Printers and Faxes or Printers.1.
Click Add Printer to launch the Add Printer wizard.2.
Click Network Print Server.3.
Select the network printer from the Shared printers list. If the printer is not listed, type in the path of
the printer in the text box.
4.
For example:\\<server host name>\<shared printer name>
The server host name is the name of the server computer that identifies it to the network. The shared
printer name is the name assigned during the server installation process.
Click OK.5.
If this is a new printer, you may be prompted to install a printer driver. If no system driver is
available, you will need to provide a path to available drivers.
Select whether you want this printer as the default printer for this client, and then click Finish.6.
Print a test page to verify printer installation.
Click Start Settings Printers and Faxes or Printers.1.
Select the printer you just created.2.
Click File Properties.3.
From the General tab, click Print Test Page.4.
When a test page prints successfully, printer installation is complete.
Page 61

Ink Cartridge Maintenance
Replacing Ink Cartridges
Aligning Ink Cartridges
Replacing Ink Cartridges
CAUTION: Before performing any of the procedures listed in this section, read and follow
the Safety Instructions on Notes, Notices, and Cautions.
Dell ink cartridges are available only through Dell. You can order more ink at www.dell.com/supplies.
Make sure the printer is on.1.
Lift the printer (scanner unit) until the scanner support keeps it open.2.
The ink cartridge carrier moves and stops at the loading position, unless the printer is busy.
Squeeze the tabs on the cartridge lids, and then lift the lids.3.
Remove the old cartridges. Store them in an air-tight container or dispose of them.4.
If you are installing new cartridges, remove the stickers and transparent tape from the bottom of the
cartridges.
5.
NOTICE: Do not touch the gold contact area on the cartridges.
Insert the new cartridges. Make sure the black ink cartridge is secure in the left (black) cartridge
carrier and the color cartridge is secure in the right (blue) cartridge carrier, and then snap the lids
closed.
6.
Lift the printer (scanner unit), and then push the scanner support to the right while lowering the
printer (scanner unit) until it is completely closed.
7.
Load paper into the paper support.8.
Use the buttons on the operator panel to answer the questions that appear on the display:
If the color cartridge you installed is new (it has never been used), press Select.a.
9.
If it is old (it has been used), press + once, and then press Select.
If the part number that appears is the number of the cartridge you are using, press Select.b.
If it is not the number of the cartridge you are using, press + until the correct part number
appears, and then press Select.
Page 62

If the black cartridge you installed is new, press Select.c.
If it is old, press + once, and then press Select.
The part number that appears should be the number of the cartridge you are using.
Press Select to choose the part number that appears.d.
Continue with Aligning Ink Cartridges to ensure proper installation.e.
Aligning Ink Cartridges
Align your ink cartridges after installing new cartridges and to solve print quality problems.
Using the Operator Panel
Load plain paper. For help, see Loading Paper.1.
On the operator panel, press Copy.2.
Press Options until Maintenance appears.3.
Press + until Align appears, and then press Select.
Alignment Page Printing appears on the display, and an alignment page prints. Once the alignment
page prints, your automatic alignment is complete.
4.
Using the Printer Software to Automatically Align Ink
Cartridges
When automatically aligning your ink cartridges, a page prints with vertical, horizontal, and slanted lines.
Load paper. For help, see Loading Paper.1.
Click Start All Programs (or Programs) Dell Printers Dell AIO Printer A960 Dell
Printer Solution Center.
2.
From the Maintenance tab, click Align to fix blurry edges.3.
Click Print.
An alignment page prints.
4.
Using the Printer Software to Manually Align Ink Cartridges
When manually aligning your ink cartridges, a page prints with arrows followed by numbers.
Page 63

Load paper. For help, see Loading Paper.1.
Click Start All Programs (or Programs) Dell Printers Dell AIO Printer A960 Dell
Printer Solution Center.
2.
From the Maintenance tab, click Align to fix blurry edges.3.
Click Manual Alignment, and then click Print.
An alignment page prints.
4.
Find the number under the darkest arrow for each alignment group.5.
Use the arrows in the Align Cartridges dialog box to select the number that matches the arrow you
chose from the printed page.
6.
Once you have selected a number for each of the alignment groups, click OK.7.
Page 64

Troubleshooting
Setup Problems
General Problems
Error Messages And Flashing Lights
Improving Print Quality
More Troubleshooting Options
Setup Problems
If you experience problems while setting up your printer, make sure:
You unlock the scanner bed by pushing the scanner lock down. For help locating the scanner lock, see
the picture of the printer on Understanding the Printer Parts.
You select your language and default paper size, and then press Select on the operator panel.
If you skipped selecting your language, default country, date, time or fax number during the setup
process, see:
Display Language Is Not Preferable.
Default Country Was Not Set.
Fax Settings Are Unsatisfactory.
Date and Time On the Display Are Incorrect.
You only have one Dell AIO Printer A960 attached to your computer.
Your operating system is compatible with your printer. The Dell AIO Printer A960 supports Windows XP
and Windows 2000.
General Problems
Try to troubleshoot your problem before contacting Dell by checking the following items.
If your printer is not attached to a computer, make sure:
You read and follow any scrolling text messages on the display.
The power supply is plugged into your printer and an electrical outlet.
Page 65

If your printer is attached to a computer, make sure:
The USB cable (sold separately) is securely attached to your computer and to your printer.
Both your computer and your printer are on.
The Dell AIO Printer A960 is set as your default printer.
Anytime your printer has a problem, make sure:
Your printer is on.
The scanner is unlocked. For help locating the scanner lock, see Scanner lock.
You removed the stickers and tape from the bottom of the ink cartridges. For help, see the Setup
Diagram.
The paper is loaded correctly. For help, see Loading Paper.
You installed both of the ink cartridges. The Dell AIO Printer A960 only works if you have both
cartridges installed. For help installing the cartridges, see the Setup Diagram.
Disconnect, and then reconnect both ends of the USB cable. For help, see the Setup Diagram.
Unplug the power supply from the electrical outlet. Reconnect the power supply (see the Setup
Diagram). Turn the power on.
Restart your computer. If problems persist, remove and then install the printer software. For help, see
Remove and Install the Software.
Document Does Not Print
Make sure the cartridges are properly installed.
Use an undamaged USB cable.
Check your printer status to make sure your document is not being held or paused. To check printer
status:
Start Control Panel Printers and Other Hardware Printers and Faxes (Windows
XP).
Click Start Settings Printers and Faxes or Printers (Windows 2000).
a.
Double-click the Dell AIO Printer A960 icon.b.
Click Printer., and make sure no check mark appears next to Pause Printing.c.
Print a test page:
Click Start All Programs (or Programs) Dell Printers Dell AIO Printer A960
Dell Printer Solution Center.
a.
Page 66

a.
Click the Maintenance tab.b.
From the Maintenance tab, click Print a test page.c.
Document Prints Slowly
Close programs not in use.
Reduce the print quality resolution (Quick and Normal print more quickly than Better and Best).
NOTE: Photos or documents containing graphics may take longer to print than regular text.
Consider purchasing more Random Access Memory (RAM) for your computer.
Document Prints Poorly
Document Is Too Light or Too Dark
You can lighten or darken your document from the operator panel.
Press Copy or Fax from the Mode area.1.
On the operator panel, press Lighter/Darker.1.
Press + to darken your document or - to lighten it.2.
When the asterisk (*) on the display moves to a satisfactory position, press Select.3.
Vertical, Straight Lines Are Not Smooth
To improve the print quality of vertical, straight lines in tables, borders, and graphs:
Test the cartridge alignment. For help, see Aligning Ink Cartridges.
Clean the nozzles. For help, see Clean the Ink Cartridge Nozzles.
Characters Are Missing or Unexpected
Make sure the scanner glass is clean.
Dampen a clean lint-free cloth.1.
Gently wipe the scanner glass.2.
Page 67

1.
2.
NOTE: Make sure all ink or corrective fluid on the document is dry before placing the document on the
scanner glass.
Print Is Too Dark or Smudged
Let the ink dry before handling the paper.
Select the correct paper type and size in Preferences, Properties, or from the All-In-One Center.
Make sure the paper is straight and unwrinkled.
Select the appropriate Quality for the paper type. If you are printing on inkjet paper, select Quick Copy
from the Quality/Copies tab of Preferences, Properties, or from the All-In-One Center.
Clean the cartridge nozzles. For help, see Clean the Ink Cartridge Nozzles.
Printed Pages Have Alternating Bands of Light and Dark Print
(Intermittent Printing)
If your document has alternating bands of light and dark print, you might need to select the highest print
quality.
With your document open, click File Print.1.
In the Print dialog box, click Preferences or Properties (depending on your program or operating
system).
2.
Select Best on the Quality/Copies tab.3.
Print Quality Is Poor at the Edges of the Page
Like other printers, the Dell Personal AIO Printer A960 cannot print in the extreme left, right, top, or bottom
edges of a page. Use these minimum settings:
Left and right margins:
6.35 mm (0.25 inches) for all paper sizes except A4
3.37 mm (0.133 inches) for A4 size paper
Top margin:
1.7 mm (0.067 inches)
Bottom margin:
16.51 mm (0.65 inches)
Colors Are Faded or Not Printing Completely
Page 68

Check the ink level graphic on the Cartridges tab of the Printing Control Program.
Use a different color setting.
Transparencies or Glossy Photo Papers Stick Together
Remove each page as it exits the printer and let it dry completely before stacking.
Use a transparency or photo paper designed for inkjet printers.
Transparencies or Photo Papers Contain White Lines
Clean the ink cartridge nozzles. For help, see Clean the Ink Cartridge Nozzles
Black and White Copy Quality Is Unsatisfactory
You might need to change an Advanced Copy Setting in the All-In-One Center.
If You Are Copying In Black and White and Want To Improve the Quality:
Click Start All Programs (or Programs) Dell Printers Dell AIO Printer A960 Dell AllIn-One Center.
The All-In-One Main Page appears on your computer screen.
1.
In the Copy section, click See More Copy Settings.2.
Click Advanced to display the Advanced Copy Settings dialog box.3.
Click the Scan tab.4.
From the Color depth drop down menu, select Gray.5.
Click OK.6.
Document Has a Checkerboard Pattern
If you scan or copy from a printed source and see a checkerboard pattern on your document, follow the
instructions below to eliminate the pattern.
For scanning:
Click Start All Programs (or Programs) Dell Printers Dell AIO Printer A960 Dell All-
In-One Center.
The All-In-One Main Page appears on your computer screen.
1.
Page 69

1.
Click See More Scan Settings.2.
In the section for What is being scanned?, select Magazine.3.
Click Scan Now.4.
For copying:
Click Start All Programs (or Programs) Dell Printers Dell AIO Printer A960 Dell All-
In-One Center.
1.
Click See More Copy Settings.2.
Click Display Advanced Copy Settings.3.
Select the Image Patterns tab.4.
Make sure the second box is checked to remove image patterns from magazine or newspaper
documents.
5.
Click OK.6.
Edges of My Document Are Cut Off
If your document is cut off at the edges:
On the operator panel, press Copy or Fax.1.
Press Reduce/Enlarge.2.
Press + until Fit to Page appears.3.
Press Select.4.
Scanned Image Is Unsatisfactorily Cropped
You can turn auto-cropping off or adjust how the image is cropped.
To Turn Auto-cropping Off:
Click Start All Programs (or Programs) Dell Printers Dell AIO Printer A960 Dell AllIn-One Center.
The All-In-One Main Page appears on your computer screen.
1.
Click See More Scan Settings.2.
Click Display Advanced Scan Settings.3.
Click Select area to be scanned, and then select a scan area from the drop-down menu.4.
Page 70

3.
4.
Click OK.5.
To Adjust How The Image Is Cropped:
Click Start All Programs (or Programs) Dell Printers Dell AIO Printer A960 Dell AllIn-One Center.
The All-In-One Main Page appears on your computer screen.
1.
Click See More Scan Settings.2.
Click Display Advanced Scan Settings.3.
Click the Scan tab.4.
Select Auto-crop the scanned item.5.
Slide the Tolerance bar to the left to crop less or to the right to crop more.6.
Click OK.7.
Scanner Unit Will Not Close
To close the scanner unit after installing ink cartridges, unlocking the scanner bed, or removing a paper jam,
follow these steps:
Using both hands, lift the scanner unit.1.
With one hand, push the scanner support to the side.2.
Hold the scanner support to the side as you lower the scanner unit.3.
NOTE: Make sure the scanner unit closes completely.
Page 71

Printer Is Scanning and Copying Without a Pre-Scan
On the operator panel, press Scan or Copy.1.
Press Options until ORIGINAL SIZE appears.2.
Press Select to choose Auto Detect (default).
On the operator panel, press Reduce/Enlarge and then press + until Fit to Page appears.3.
Press Color or Black.4.
The scanner pre-scans your original document to determine its size, fits it onto the specified paper
size, and then scans your original document.
NOTE: Resizing an image may affect the scan and copy quality of your document.
Fax Does Not Work
In order for faxing to function properly:
The printer must be connected to an active phone line.
If you are using the printer software to fax, the printer must be connected to a computer with a USB
cable.
The memory may be full. Wait until the faxes in memory have been sent, and then send the current fax
again.
NOTE: You cannot fax with a DSL (digital subscribe line), ISDN (integrated signature digital network),
or cable modem.
For more information, see Faxing.5.
Printer is Not Sending or Receiving Faxes
If you are having trouble sending or receiving a fax through the printer software, ensure that:
Your computer is connected to a working data/fax modem.
An active phone line is connected to the line-in connector of your data/fax modem.
Fax software is installed and configured on your computer.
Your printer is connected to the computer with a USB cable.
Page 72

Display Language Is Not Preferable
If the language on the printer display is not the language you prefer, change the language:
On the operator panel, press Options until Language displays.1.
Use + to scroll through the list of languages.2.
When your preferred language displays, press Select to set that language as the default.3.
Default Country Was Not Set
If you did not select the default country during the setup process:
Press Fax on the printer operator panel.1.
Press Options repeatedly until Advanced Fax appears on the display.2.
Press + repeatedly until Country code appears on the display, and then press Select.3.
Press + until your preferred your country appears on the display, and then press Select to set that
country as the default.
4.
Fax Settings Are Unsatisfactory
Click Start All Programs (or Programs) Dell Printers Dell AIO Printer A960 Dell
All-In-One Center.
The All-In-One Main Page appears on your computer screen.
1.
In the upper left corner, click Maintain/Troubleshoot.2.
Under Fax Setup Utility, click Display the Fax Setup Utility.3.
Adjust the settings you want to change.4.
Click Save Settings.5.
Date and Time On the Display Are Incorrect
To set the current date and time:
On the operator panel, press Fax.1.
To change the date:
Press Options until EDIT DATE/TIME: appears on the display.a.
2.
Page 73

a.
Press Select.b.
Use the keypad buttons to enter the date you want your printer to display.c.
Press Select.d.
NOTE: If the date is entered incorrectly, the date shown will be the default.
To change the time:
Press Options until EDIT DATE/TIME: appears on the display.a.
Press + once, and then press Select.b.
Use the keypad buttons to enter the time you want your printer to display.c.
Press Select.d.
Press 1 for AM, 2 for PM, or 3 for 24-hour time.e.
3.
NOTE: If the time is entered incorrectly, the time shown will be the default.
Paper Misfeeds or Multiple Sheets Feed
Use a paper recommended for inkjet printers.
Do not force the paper into the printer.
Do not load too much paper into the printer. For help, see Loading Paper.
Make sure the paper guide rests against the left edge of the paper and does not cause the paper to
bow in the paper support.
Page 74

Place the printer on a flat, level surface.
Select the correct paper type and size.
Paper Jams
If a paper jam occurs in the paper support, remove the paper from the printer. If the paper is lodged too far
into the printer and cannot be removed:
Press Power to turn the printer off.1.
Pull slowly and firmly on the paper to remove it.2.
If you cannot reach the paper because it is too far into the printer:
Lift the scanner unit, and then pull the paper out.a.
Page 75

Lower the scanner unit to close it.b.
Press Power to turn the printer on, and then print your document.3.
Document Misfeeds or Jams
Turn the printer off.1.
Open the ADF.2.
Page 76

Pull gently to remove the paper jam.3.
Close the ADF.4.
Turn the printer on.5.
Print any missing pages.6.
Error Messages And Flashing Lights
Use this section to understand printer software error messages on your computer screen or operator panel
display and blinking lights on your printer.
Ink Low Message
An ink cartridge is running out of ink. The Ink Low warning occurs when your cartridges are about 25% full,
15% full, and 5% full. When one of these messages appears, you can:
Click OK.
Click the ? to get information about ordering supplies.
Order a new cartridge from Dell at www.dell.com/supplies.
For help installing a new cartridge, see Replacing Ink Cartridges.
Paper Jam Message
If your printer has a paper jam:
Click Start All Programs (or Programs) Dell Printers Dell AIO Printer A960 Dell
Printer Solution Center.
1.
Click the Troubleshooting tab on the left side of the screen.2.
Page 77

1.
2.
Click How to clear and avoid paper jams.3.
Follow the instructions to clear the paper jam.4.
Paper Out Message
If your printer is out of paper, Load paper then press Select appears on the display.
Follow these instructions to clear the message from the display.1.
Print your document.2.
Hardware Error: 0402
The printer has a paper jam in the ADF. See Document Misfeeds or Jams to clear the jam.
Hardware Error: 401
The printer scanner is stalled.
Press Power to turn your printer off.1.
Unplug your printer.2.
Make sure the scanner is unlocked.3.
Plug in your printer.4.
Press Power to turn your printer on.5.
Cartridge Error: 50C
Your ink cartridge has a short.
Press Power to turn your printer off.1.
Unplug your printer.2.
Plug in your printer.3.
Turn your printer on.4.
Uninstall and reinstall the cartridges.5.
Page 78

4.
5.
NOTE: If this does not resolve the problem, see More Troubleshooting Options or replace your
cartridges.
Hardware Error: 502
The printer is stalled.
Press Power to turn your printer off.1.
Unplug your printer.2.
Check for paper jams.3.
Plug in your printer.4.
Press Power to turn your printer on.5.
Power Light Blinks Twice
The ink cartridge carrier might be stalled. Check your computer screen for error messages.
Turn the printer off.1.
Wait a few seconds, and then turn the printer on.2.
Improving Print Quality
If you are not satisfied with the print quality of your document, make sure you:
Use the appropriate paper for the document.
Use paper that is a heavier weight, bright white, or coated. Use Dell™ Premium Photo Paper for
printing photos.
Select a higher print quality:
From your software program, click File Print.a.
The Print dialog box appears.
From the Print dialog box, click Preferences or Properties.b.
From the Quality/Speed area, select Better or Best.c.
Page 79

c.
If your document still does not have the print quality you want, follow these steps:
Reinsert the Ink Cartridges
Remove the ink cartridges.1.
Insert the ink cartridges.2.
Print your document again.3.
If print quality has not improved, continue with Clean the Ink Cartridge Nozzles.4.
Clean the Ink Cartridge Nozzles
Clean the nozzles when:
Characters are not printing completely
White dashes appear in graphics or printed text.
Print is smudged or too dark.
Colors on print jobs are faded or they differ from the colors on the screen.
Vertical, straight lines are not smooth.
To Clean the Nozzles Using the Operator Panel
Load paper in the printer. For help, see Loading Paper.1.
Press Copy.2.
Press Options until Maintenance appears on the display.3.
Press + until Clean appears on the display.4.
Press Select.
A nozzle page prints, forcing ink through the clogged nozzles to clean them.
5.
Print your document again to verify that your print quality has improved.6.
If you are not satisfied with the print quality, continue with Wipe the Ink Cartridge Nozzles and
Contacts, and then print your document again.
7.
To Clean the Nozzles Using the Printer Software
Load paper. For help, see Loading Paper.1.
Click Start All Programs (or Programs) Dell Printers Dell AIO Printer A960 Dell
Printer Solution Center.
2.
Page 80

1.
2.
From the Maintenance tab, click Clean to fix horizontal streaks.3.
Click Print.
A nozzle page prints, forcing ink through the nozzles to clean the clogged nozzles.
4.
Print your document again to verify that your print quality has improved.5.
If you are not satisfied with the print quality, continue with Wipe the Ink Cartridge Nozzles and
Contacts, and then print your document again.
6.
Wipe the Ink Cartridge Nozzles and Contacts
Remove the ink cartridges.1.
Dampen a clean, lint-free cloth with water.2.
Gently hold the cloth against the nozzles for about three seconds, and then wipe in the direction
shown.
3.
Using another clean section of the cloth, gently hold the cloth against the contacts for about three
seconds, and then wipe in the direction shown.
4.
With another clean section of the cloth, repeat steps 3 through 4.5.
Page 81

5.
Let the nozzles and contacts dry completely.6.
Reinsert the ink cartridges.7.
Clean the print nozzles. For help, see Clean the Ink Cartridge Nozzles.8.
Print your document again.9.
If the print quality does not improve, repeat step 8 up to two more times.10.
If print quality is still not satisfactory, replace the ink cartridges. For information, see your Owner's
Manual.
11.
Remove and Install the Software
If the printer is not functioning properly or if a communications error message appears when you try to use
your printer, you may need to remove the printer software, and then reinstall it.
Click Start All Programs (or Programs) Dell Printers Dell AIO Printer
A960 Uninstall Dell AIO Printer A960.
1.
Follow the instructions on your screen to remove the printer software.2.
Restart your computer before reinstalling the printer software.3.
Insert the Driver and Utilities CD, and then follow the instructions on your screen to install the
software.
4.
More Troubleshooting Options
If the preceding solutions do not solve the problem you are having with your printer:
See the Dell Printer Solution Center software for more troubleshooting information:
Click Start All Programs (or Programs) Dell Printers Dell AIO Printer
A960 Dell Printer Solution Center.
a.
Click the Troubleshooting tab on the left side of the screen.b.
Go to support.dell.com for help.
Page 82

Printer Specifications
Overview
Print And Scan Mode Capabilities
Physical Specifications
Operating System Support
Environmental Specifications
Memory Specifications and
Requirements
Power Consumption And
Requirements
Paper
Fax Mode Capabilities
Cables
Overview
Base memory
16 MB
Maximum memory
17 MB
Emulation
Host based data stream printing
Connectivity
USB
Duty cycle (average)
3000 pages/month
Duty cycle (maximum)
5000 pages/month
Printer life
36000 pages or one year (Letter size 5% coverage)
Physical Specifications
Physical dimension
332.58mm (H) x 499.5mm (W) x 520.7mm (D)
12.7 in. (H) x 19.7 in. (W) x 20.5 in. (D)
Weight
11.3 kg
24.93 lb
Environmental Specifications
Temperature/Relative Humidity
Page 83

Condition
Temperature
Relative humidity (non-condensing)
Operation
16° to 32° C
61° to 90° F
15 to 85%
Storage
-40° to 60° C
-40° to 140° F
10 to 90%
Shipping
-40° to 60° C
-40° to 140° F
The recommended temperature and relative humidity for all conditions
61° to 90° F
40 to 70%
Power Consumption And Requirements
Rated AC Input
100V–240V
Rated Frequency
50/60 Hz
Minimum AC input
100V AC
Maximum AC input
240V AC
Maximum input current
1.5A
Average power consumption
Standby mode
Operational mode
<15W
<35W
Fax Mode Capabilities
When you scan to fax, your document will scan in at 100 dpi (dots per inch). You can fax both color and
black and white documents. You can also fax multiple pages. For help, see Send Multiple Page Faxes.
In order for faxing to function properly:
The printer must be connected to an active phone line.
If you are using the printer software to fax, the printer must be connected to a computer with a USB
cable.
NOTE: You cannot fax with a DSL (digital subscribe line), ISDN (integrated signature digital network),
or cable modem.
NOTE: You can also use the Fax Utility Software (see Access the Fax Setup Utility) to adjust some of
the printer fax settings.
Page 84

Print And Scan Mode Capabilities
Your Dell AIO Printer A960 can scan from 50 to 19,200 dpi. Even though your All-In-One has this capability,
we recommend using the preset resolutions.
Print and scan resolution
dpi
Equivalent print resolution
Quick
150 x 150
600 x 300 dpi
Normal
300 x 300
600 x 600 dpi
Better
600 x 600
1200 x 1200 dpi
Best
600 x 600
4800 x 1200 dpi
Operating System Support
The Dell AIO Printer A960 supports:
Windows XP
Windows 2000
Memory Specifications and Requirements
Your operating system must meet the minimum system requirements.
Operating system
Processor speed (Mhz)
RAM (MB)
Hard disk (MB)
Virtual memory (MB)
Windows XP
Pentium 300
128
500
300
Windows 2000
Pentium 200
128
286
286
Paper
See Print Media Guidelines for the Paper Support or Print Media Guidelines for the ADF for information on
what paper sizes and types are supported with your Dell All-In-One Printer A960.
Page 85

Cables
Your Dell AIO Printer A960 uses a Universal Serial Bus (USB) cable (sold separately).
Page 86

Appendix
Dell Technical Support Policy
Contacting Dell
Warranty and Return Policy
Dell Technical Support Policy
Technician-assisted technical support requires the cooperation and participation of the customer in the
troubleshooting process and provides for restoration of the Operating System, application software and
hardware drivers to the original default configuration as shipped from Dell, as well as the verification of
appropriate functionality of the computer unit and all Dell-installed hardware. In addition to this technician
assisted technical support, online technical support is available at Dell Support. Additional technical support
options may be available for purchase.
Dell provides limited technical support for the printer and any Dell-installed software and peripherals.
Support for third-party software and peripherals is provided by the original manufacturer, including those
purchased and/or installed through Software & Peripherals (DellWare), ReadyWare, and Custom Factory
Integration (CFI/DellPlus).
Contacting Dell
You can access Dell Support at support.dell.com. Select your region on the WELCOME TO DELL SUPPORT
page, and fill in the requested details to access help tools and information.
You can contact Dell electronically using the following addresses:
World Wide Web
www.dell.com/
www.dell.com/ap/ (for Asian/Pacific countries only)
www.euro.dell.com (for Europe only)
www.dell.com/la/ (for Latin American countries)
Anonymous file transfer protocol (FTP)
ftp.dell.com/
Log in as user: anonymous, and use your e-mail address as your password.
Electronic Support Service
mobile_support@us.dell.com
support@us.dell.com
apsupport@dell.com (for Asian/Pacific countries only)
support.euro.dell.com (for Europe only)
Electronic Quote Service
sales@dell.com
apmarketing@dell.com (for Asian/Pacific countries only)
Page 87

Electronic Information Service
info@dell.com
Warranty and Return Policy
Dell Inc. ("Dell") manufactures its hardware products from parts and components that are new or equivalent
to new in accordance with industry-standard practices. For information about the Dell warranty for your
printer, refer to your Owner's Manual.
Page 88

Notices
Regulatory Notices
Using the Dell A960 in Germany
FCC Notices (U.S. Only)
Using the Dell A960 in Switzerland
IC Notice (Canada Only)
Industry Canada Compliance
Statement
CE Notice (European Union)
European Community (EC) directives
conformity
CE Mark Notice
The United Kingdom
Telecommunications Act 1984
NOM Information (Mexico Only)
Mercury Statement
ENERGY STAR® Compliance
Copyright Advisory
Notice to users of the Canadian
telephone network
Regulatory Notices
Electromagnetic Interference (EMI) is any signal or emission, radiated in free space or conducted along power or signal
leads, that endangers the functioning of a radio navigation or other safety service or seriously degrades, obstructs, or
repeatedly interrupts a licensed radio communications service. Radio communications services include but are not
limited to AM/FM commercial broadcast, television, cellular services, radar, air-traffic control, pager, and Personal
Communication Services (PCS). These licensed services, along with unintentional radiators such as digital devices,
including computers, contribute to the electromagnetic environment.
Electromagnetic Compatibility (EMC) is the ability of items of electronic equipment to function properly together in the
electronic environment. While this computer has been designed and determined to be compliant with regulatory
agency limits for EMI, there is no guarantee that interference will not occur in a particular installation. If this
equipment does cause interference with radio communications services, which can be determined by turning the
equipment off and on, you are encouraged to try to correct the interference by one or more of the following measures:
· Reorient the receiving antenna.
· Relocate the computer with respect to the receiver.
· Move the computer away from the receiver.
· Plug the computer into a different outlet so that the computer and the receiver are on different branch circuits.
If necessary, consult a Dell Technical Support representative or an experienced radio/television technician for
additional suggestions.
FCC Notices (U.S. Only)
Page 89

Most Dell computers are classified by the Federal Communications Commission (FCC) as Class B digital devices. To
determine which classification applies to your computer, examine all FCC registration labels located on the bottom,
side, or back panel of your computer, on card-mounting brackets, and on the cards themselves. If any one of the
labels carries a Class A rating, your entire computer is considered to be a Class A digital device. If all labels carry an
FCC Class B rating as distinguished by either an FCC ID number or the FCC logo, ( ), your computer is considered
to be a Class B digital device.
Once you have determined your computer's FCC classification, read the appropriate FCC notice. Note that FCC
regulations provide that changes or modifications not expressly approved by Dell could void your authority to operate
this equipment.
This device complies with Part 15 of the FCC Rules. Operation is subject to the following two conditions:
· This device may not cause harmful interference.
· This device must accept any interference received, including interference that may cause undesired operation.
Class B
This equipment has been tested and found to comply with the limits for a Class B digital device pursuant to Part 15 of
the FCC Rules. These limits are designed to provide reasonable protection against harmful interference in a residential
installation. This equipment generates, uses, and can radiate radio frequency energy and, if not installed and used in
accordance with the manufacturer's instruction manual, may cause interference with radio communications. However,
there is no guarantee that interference will not occur in a particular installation. If this equipment does cause harmful
interference to radio or television reception, which can be determined by turning the equipment off and on, you are
encouraged to try to correct the interference by one or more of the following measures:
· Reorient or relocate the receiving antenna.
· Increase the separation between the equipment and the receiver.
· Connect the equipment into an outlet on a circuit different from that to which the receiver is connected.
· Consult the dealer or an experienced radio/television technician for help.
FCC Identification Information
The following information is provided on the device or devices covered in this document in compliance with FCC
regulations:
· Model number:
· Company name:
Dell Inc.
One Dell Way
Round Rock, Texas 78682 USA
512-338-4400
Modem Regulatory Information
This equipment complies with Part 68 of the FCC Rules. On the bottom of your computer is a label that contains,
among other information, the FCC registration number and ringer equivalence number (REN) for your equipment. If
requested, you must provide this information to the telephone company.
The REN is used to determine the quantity of devices that may be connected to the telephone line. Excessive RENs on
the telephone line may result in the devices not ringing in response to an incoming call. In most areas, the sum of all
the RENs on your telephone line should be less than five to ensure proper service from the telephone company. To be
certain of the number of devices that you may connect to a line, as determined by the total RENs, contact your local
telephone company.
The registration jack Universal Service Order Code (USOC) used by this equipment is RJ-11C. An FCC compliant
telephone cord and modular plug is provided with this equipment. This equipment is designed to be connected to the
telephone network or premises wiring using a compatible modular jack that is Part 68 compliant.
Page 90

This equipment cannot be used on public coin-phone service provided by the telephone company. Connection to party
line service is subject to state tariffs.
There are no user serviceable parts on the modem contained in your computer.
If your telephone equipment causes harm to the telephone network, the telephone company will notify you in advance
that service may be temporarily discontinued. If advance notice is not practical, the telephone company will notify you
as soon as possible. Also, you will be advised of your right to file a complaint with the FCC if you believe it is
necessary.
The telephone company may make changes in its facilities, equipment, operations, or procedures that could affect the
operation of this equipment. If this happens, the telephone company will provide advance notice in order for you to
make necessary modifications to maintain uninterrupted service.
If you experience trouble with this telephone equipment, see "Getting Help" in your computer's troubleshooting
documentation or, for some computers, the section titled "Contacting Dell" in your computer's online guide to find the
appropriate telephone number for obtaining customer assistance. If the equipment is causing harm to the telephone
network, the telephone company may request that you disconnect the equipment until the problem is resolved.
Fax Branding
The Telephone Consumer Protection Act of 1991 makes it unlawful for any person to use a computer or other
electronic device, including fax machines, to send any message unless such message clearly contains in a margin at
the top or bottom of each transmitted page or on the first page of the transmission, the date and time it is sent,
identification of the business, other entity, or individual sending the message, and the telephone number of the
sending machine or such business, other entity, or individual. The telephone number provided may not be a 900
number or any other number for which charges exceed local or long-distance transmission charges.
IC Notice (Canada Only)
Most Dell computers (and other Dell digital apparatus) are classified by the Industry Canada (IC) Interference-Causing
Equipment Standard #3 (ICES-003) as Class B digital devices. To determine which classification (Class A or B) applies
to your computer (or other Dell digital apparatus), examine all registration labels located on the bottom, side, or the
back panel of your computer (or other digital apparatus). A statement in the form of "IC Class A ICES-003" or "IC
Class B ICES-003" will be located on one of these labels. Note that Industry Canada regulations provide that changes
or modifications not expressly approved by Dell could void your authority to operate this equipment.
Modem Regulatory Information
The IC label identifies certified equipment. This certification means that the equipment meets telecommunications
network protective, operational, and safety requirements as prescribed in the appropriate Terminal Equipment
Technical Requirements document(s). The IC label does not guarantee that the equipment will operate to the user's
satisfaction.
Before installing this equipment, users should ensure that it is permissible to be connected to the facilities of the local
telecommunications company. The equipment must also be installed using an acceptable method of connection. The
customer should be aware that compliance with the above conditions may not prevent degradation of service in some
situations.
Page 91

Repairs to certified equipment should be coordinated by a representative designated by the supplier. Any repairs or
alteration made by a user to this equipment, or equipment malfunctions, may give the telephone communications
company cause to request the user to disconnect the equipment.
Users should ensure for their own protection, that the electrical ground connections of the power utility, telephone
lines, and internal metallic water-pipe system, if present, are connected together. This precaution may be particularly
important in rural areas.
NOTICE: Users should not attempt to make such connections themselves. Contact the appropriate
electric inspection authority, or electrician, as appropriate.
NOTE: The REN assigned to each terminal device provides an indication of the maximum number of terminals allowed
to be connected to a telephone interface. The termination on an interface may consist of any combination of devices
subject only to the requirement that the sum of the RENs of all the devices does not exceed the number five.
The REN for the internal modem as stated on the IC regulatory label located on the bottom of the computer is 0.6 B.
The following information is provided in compliance with IC regulations:
Dell Inc.
One Dell Way
Round Rock, TX 78682 USA
512-338-4400
CE Notice (European Union)
Marking by the symbol indicates compliance of this Dell computer to the EMC Directive and the Low Voltage
Directive of the European Union. Such marking is indicative that this Dell system meets the following technical
standards:
· EN 55022 - "Information Technology Equipment - Radio Disturbance Characteristics - Limits and Methods of
Measurement."
· EN 55024 - "Information Technology Equipment - Immunity Characteristics - Limits and Methods of Measurement."
· EN 61000-3-2 - "Electromagnetic Compatibility (EMC) - Part 3: Limits - Section 2: Limits for Harmonic Current
Emissions (Equipment Input Current Up to and Including 16 A Per Phase)."
· EN 61000-3-3 - "Electromagnetic Compatibility (EMC) - Part 3: Limits - Section 3: Limitation of Voltage Fluctuations
and Flicker in Low-Voltage Supply Systems for Equipment With Rated Current Up to and Including 16 A."
· EN 60950 - "Safety of Information Technology Equipment."
NOTE: EN 55022 emissions requirements provide for two classifications:
· Class A is for typical commercial areas.
· Class B is for typical domestic areas.
RF INTERFERENCE WARNING: This is a Class A product. In a domestic environment this product may
cause radio frequency (RF) interference, in which case the user may be required to take adequate
measures.
This Dell device is classified for use in a typical Class B domestic environment.
A "Declaration of Conformity" in accordance with the preceding directives and standards has been made and is on file
at Dell Inc. Products Europe BV, Limerick, Ireland.
CE Mark Notice
This equipment complies with the essential requirements of the European Union Directive 1999/5/EC.
Page 92

NOM Information (Mexico Only)
The following information is provided on the device(s) described in this document in compliance with the requirements
of the official Mexican standards (NOM):
Exporter:
Dell Inc.
One Dell Way
Round Rock, TX 78682
Importer:
Dell Computer de México, S.A. de C.V.
Paseo de la Reforma 2620 - 11° Piso
Col. Lomas Altas
11950 México, D.F.
Ship to:
Dell Computer de México, S.A. de C.V.
al Cuidado de Kuehne & Nagel de México S. de R.L.
Avenida Soles No. 55
Col. Peñon de los Baños
15520 México, D.F.
Model number:
Supply voltage:
100/240 VAC
Frequency:
50/60 Hz
Current Consumption:
1.5 A
Output voltage:
20 VDC
Output current:
3.5 A
Page 93

ENERGY STAR® Compliance
Certain configurations of Dell computers comply with the requirements set forth by the Environmental Protection
Agency (EPA) for energy-efficient computers. If the front panel of your computer bears the ENERGY STAR® Emblem,
your original configuration complies with these requirements and all ENERGY STAR® power management features of
the computer are enabled.
Any Dell computer bearing the ENERGY STAR® Emblem is certified to comply with EPA ENERGY STAR® requirements
as configured when shipped by Dell. Any changes you make to this configuration (such as installing additional
expansion cards or drives) may increase the computer's power consumption beyond the limits set by the EPA's
ENERGY STAR® Computers program.
ENERGY STAR® Emblem
The EPA's ENERGY STAR® Computers program is a joint effort between the EPA and computer manufacturers to
reduce air pollution by promoting energy-efficient computer products. The EPA estimates that use of ENERGY STAR
®
computer products can save computer users up to two billion dollars annually in electricity costs. In turn, this
reduction in electricity usage can reduce emissions of carbon dioxide, the gas primarily responsible for the greenhouse
effect, and sulfur dioxide and nitrogen oxides, the primary causes of acid rain.
You can also help reduce electricity usage and its side effects by turning off your computer when it is not in use for
extended periods of time, particularly at night and on weekends.
Notice to users of the Canadian telephone network
This product meets the applicable Industry Canada technical specifications.
The Ringer Equivalence Number (REN) is an indication of the maximum number of terminals allowed to be connected
to a telephone interface. The terminus of an interface may consist of any combination of devices, subject only to the
requirement that the sum of the Ringer Equivalence Numbers of all the devices does not exceed five. The modem REN
is located on the rear of the equipment on the product labeling.
Telephone companies report that electrical surges, typically lightning transients, are very destructive to customer
terminal equipment connected to AC power sources. This has been identified as a major nationwide problem. It is
recommended that the customer install an AC surge arrestor in the AC outlet to which this device is connected. This is
to avoid damage to the equipment caused by local lightning strikes and other electrical surges.
This equipment uses CA11A telephone jacks.
Using the Dell A960 in Germany
The Dell A960 printer requires a German billing tone filter to be installed on any line which receives metering pulses in
Germany. Metering pulses may or may not be present on analog lines in Germany. The subscriber may request that
metering pulses be placed on the line, or can have them removed by calling the German network provider. Normally,
metering pulses are not provided unless specifically requested by the subscriber at the time of installation.
Page 94

Using the Dell A960 in Switzerland
The Dell A960 printer requires a Swiss billing tone filter to be installed on any line which receives metering pulses in
Switzerland. The filter must be used, as metering pulses are present on all analog telephone lines in Switzerland.
The Dell A960 has been tested and found to comply with the limits for a Class B digital device, pursuant to Part 15 of
the FCC Rules. Operation is subject to the following two conditions: (1) this device may not cause harmful
interference, and (2) this device must accept any interference received, including interference that may cause
undesired operation.
The FCC Class B limits are designed to provide reasonable protection against harmful interference in a residential
installation. This equipment generates, uses and can radiate radio frequency energy and, if not installed and used in
accordance with the instructions, may cause harmful interference to radio communications. However, there is no
guarantee that interference will not occur in a particular installation. If this equipment does cause harmful interference
to radio or television reception, which can be determined by turning the equipment off and on, the user is encouraged
to try to correct the interference by one or more of the following measures:
· Reorient or relocate the receiving antenna.
· Increase the separation between the equipment and receiver.
· Connect the equipment into an outlet on a circuit different from that to which the receiver is connected.
· Consult your point of purchase or service representative for additional suggestions.
The manufacturer is not responsible for any radio or television interference caused by using other than recommended
cables or by unauthorized changes or modifications to this equipment. Unauthorized changes or modifications could
void the user's authority to operate this equipment.
NOTE: To assure compliance with FCC regulations on electromagnetic interference for a Class B computing device, use
a properly shielded and grounded cable. Use of a substitute cable not properly shielded and grounded may result in a
violation of FCC regulations.
Any questions regarding this compliance information statement should be directed to:
Dell Products, L.P.
One Dell Way
Round Rock, Texas 78682
Industry Canada Compliance Statement
This Class B digital apparatus meets all requirements of the Canadian Interference-Causing Equipment Regulations.
Avis De Conformité Aux Normes De L'industrie Du Canada
Cet appareil numérique de la classe B respecte toutes les exigences du Règlement sur le matériel brouilleur du
Canada.
European Community (EC) directives conformity
This product is in conformity with the protection requirements of EC Council directives 89/336/EEC, 73/23/EEC, and
1999/5/EC on the approximation and harmonization of the laws of the Member States relating to electromagnetic
compatibility and safety of electrical equipment designed for use within certain voltage limits and on radio equipment
and telecommunications terminal equipment.
A declaration of conformity with the requirements of the directives has been signed by the Director of Manufacturing
and Technical Support, Lexmark International, S.A., Boigny, France.
This product satisfies the Class B limits of EN 55022 and safety requirements of EN 60950.
Page 95

The United Kingdom Telecommunications Act 1984
This apparatus is approved under the approval number NS/G/1234/J/100003 for the indirect connections to the public
telecommunications systems in the United Kingdom.
Mercury Statement
This product contains mercury in the lamp (<5mg Hg). Disposal of mercury may be regulated due to environmental
considerations. For disposal or recycling information, contact your local authorities or the Electronic Industries
Alliance: www.eiae.org.
Copyright Advisory
It may be illegal to copy certain materials without permission or license, including documents, images, and currency.
If you are not sure whether you have permission, seek legal advice.
 Loading...