

Page 1

Dell™ 7700FullHD Projector
User’s Guide
Page 2

Notes, Cautions, and Warnings
NOTE: A NOTE indicates important information that helps you
make better use of your computer.
CAUTION: A CAUTION indicates potential damage to hardware
or loss of data if instructions are not followed.
WARNING: A WARNING indicates a potential for property
damage, personal injury, or death.
____________________
Information in this document is subject to change without notice.
© 2012 Dell Inc. All rights reserved.
Reproduction of these materials in any manner whatsoever without the written
permission of Dell Inc. is strictly forbidden.
Trademarks used in this text: Dell and the DELL logo are trademarks of
Dell Inc.; DLP and DLP logo are trademarks of T
I
NCORPORATED; Microsoft and Windows are either trademarks or registered
trademarks of Microsoft Corporation in the United States and/or other countries.
Other trademarks and trade names may be used in this document to refer to either
the entities claiming the marks and names or their products. Dell Inc. disclaims
any proprietary interest in trademarks and trade names other than its own.
Model 7700FullHD
EXAS INSTRUMENTS
March 2012 Rev. A00
Page 3

Contents
1 Your Dell Projector . . . . . . . . . . . . . . . . . . 7
About Your Projector . . . . . . . . . . . . . . . . . 8
2 Connecting Your Projector . . . . . . . . . . . . 10
Installing the Optional Wireless Dongle . . . . . . 11
Connecting to a Computer . . . . . . . . . . . . . . . . 12
Connecting a Computer Using a VGA Cable
Monitor Loop-Through Connection Using
VGA Cables . . . . . . . . . . . . . . . . . . . . . 13
Connecting a Computer Using a RS232 Cable
Connecting a Computer by USB Cable . . . . . . . 15
. . . . 12
. . . 14
Connecting a Computer Using Wireless Dongle
(Optional) . . . . . . . . . . . . . . . . . . . . . . 16
Connecting a DVD Player . . . . . . . . . . . . . . . . 17
Connecting a DVD Player Using an S-Video Cable
. 17
Connecting a DVD Player Using a
Composite Video Cable . . . . . . . . . . . . . . . 18
Connecting a DVD Player Using a
Component Video Cable
. . . . . . . . . . . . . . 19
Connecting a DVD Player Using a 3 RCA
Component Video Cable
. . . . . . . . . . . . . . 20
Connecting a DVD Player Using an HDMI Cable . . 21
Connecting to Local Area Network . . . . . . . . . . . 22
To project an image and control the projector that is
connected to a network through a RJ45 cable.
. . 22
Contents
3
Page 4

Professional Installation Options: Installation for
Driving Automatic Screen
. . . . . . . . . . . . . 23
Connection With Commercial RS232 Control Box
. 24
3 Using Your Projector . . . . . . . . . . . . . . . . 25
Turning Your Projector On . . . . . . . . . . . . . . . . 25
Turning Your Projector Off
Adjusting the Projected Image
Raising the Projector Height
Lowering the Projector Height
Adjusting the Projector Zoom and Focus
Adjusting Projection Image Size . . . . . . . . . . . . 28
Using the Control Panel
Using the Remote Control
Installing the Remote Control Batteries
Operating Range With Remote Control . . . . . . . . . 36
Using the On-Screen Display
INPUT SOURCE
AUTO ADJUST
BRIGHTNESS/CONTRAST
VIDEO MODE
VOLUME
AUDIO INPUT . . . . . . . . . . . . . . . . . . . . 40
ADVANCED SETTINGS
LANGUAGE
HELP . . . . . . . . . . . . . . . . . . . . . . . . 54
. . . . . . . . . . . . . . . . 25
. . . . . . . . . . . . . 26
. . . . . . . . . . . . 26
. . . . . . . . . . . 26
. . . . . . . . 27
. . . . . . . . . . . . . . . . . 30
. . . . . . . . . . . . . . . . 32
. . . . . . . . 35
. . . . . . . . . . . . . . 37
. . . . . . . . . . . . . . . . . . . 37
. . . . . . . . . . . . . . . . . . . 38
. . . . . . . . . . . . . 39
. . . . . . . . . . . . . . . . . . . . 39
. . . . . . . . . . . . . . . . . . . . . . 40
. . . . . . . . . . . . . . . 40
. . . . . . . . . . . . . . . . . . . . . 54
4
Contents
Page 5

Wireless Networking Installation . . . . . . . . . . . . 55
Enable Wireless on the Projector
Install the Wireless Application Software on Your
Computer . . . . . . . . . . . . . . . . . . . . . . 58
Launch the Wireless Application
. . . . . . . . . . 56
. . . . . . . . . . 61
Presentation to Go (PtG) Installation
PtG Viewer
Photo Viewer
. . . . . . . . . . . . . . . . . . . . . 66
. . . . . . . . . . . . . . . . . . . . 66
. . . . . . . . . . 65
PtG/Photo Function Introduction . . . . . . . . . . 67
PtG Overview
Photo Overview
. . . . . . . . . . . . . . . . . . . . 67
. . . . . . . . . . . . . . . . . . . 68
Buttons-Introduction . . . . . . . . . . . . . . . . 68
Install the PtG Converter Application Software on
Your Computer
. . . . . . . . . . . . . . . . . . . 69
Using the PtG Converter . . . . . . . . . . . . . . 70
Audio Projection Installation
Enable Wireless or LAN on the Projector
Install the Wireless Application Software on
Your Computer
. . . . . . . . . . . . . . . . . . . 73
. . . . . . . . . . . . . . 71
. . . . . 72
Launch the Wireless Application . . . . . . . . . . 74
Login
. . . . . . . . . . . . . . . . . . . . . . . . 75
Video Stream Installation
Video Stream Support Format
Enable Wireless or LAN on the Projector
Install the Wireless Application Software on
. . . . . . . . . . . . . . . . 76
. . . . . . . . . . . 76
. . . . . 77
Your Computer . . . . . . . . . . . . . . . . . . . 77
Launch the Wireless Application
Login
. . . . . . . . . . . . . . . . . . . . . . . . 77
. . . . . . . . . . 77
Managing the Projector From Web Management
Configuring the Network Setting
. . . . . . . . . . 78
Contents
. . . . 78
5
Page 6

Accessing Web Management . . . . . . . . . . . 78
Make Application Token
. . . . . . . . . . . . . . . . 99
4 Troubleshooting Your Projector . . . . . . 101
Guiding Signals . . . . . . . . . . . . . . . . . . . . . 105
Changing the Lamp
. . . . . . . . . . . . . . . . . . . 106
5 Specifications . . . . . . . . . . . . . . . . . . . . 108
6 Contacting Dell . . . . . . . . . . . . . . . . . . . 115
7 Appendix: Glossary . . . . . . . . . . . . . . . 116
Contents 6
Page 7
1
Your Dell Projector
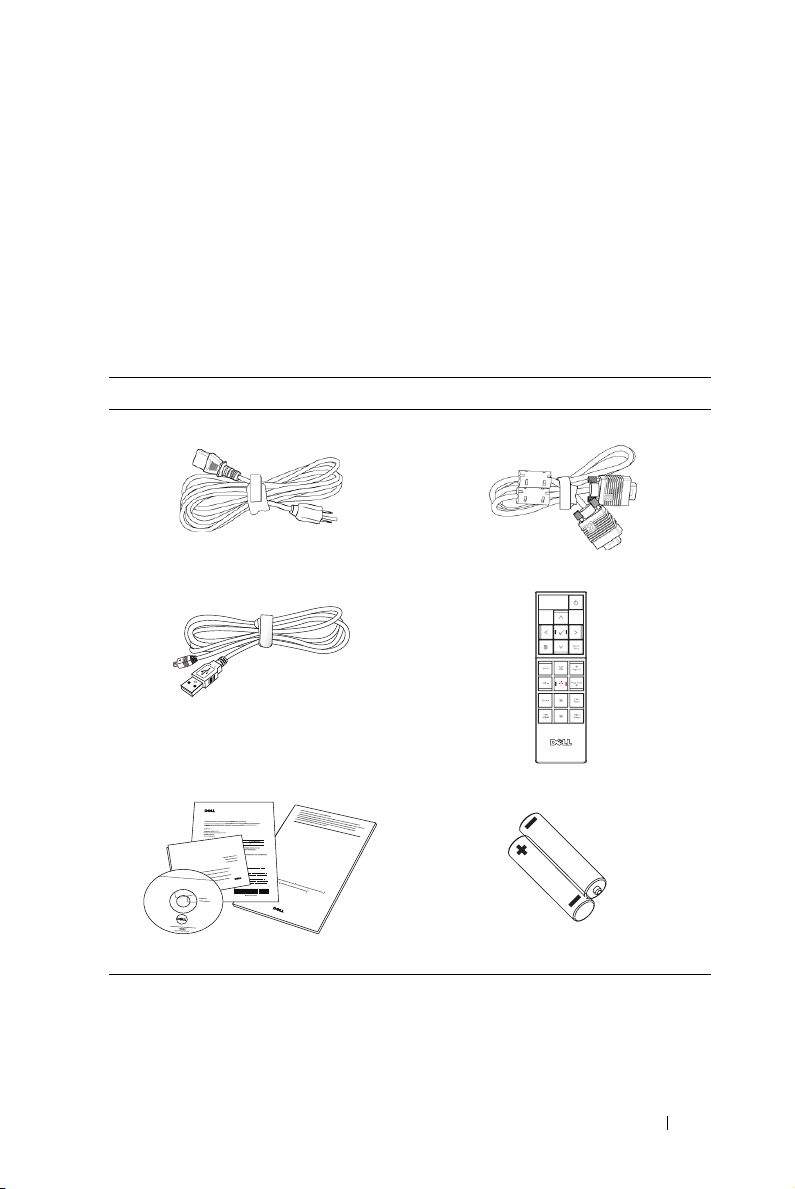
Your projector comes with all the items shown below. Ensure that you have all the
items, and contact Dell™ if anything is missing.
Package Contents
Power cable 1.8 m VGA cable (VGA to VGA)
1.8 m USB cable (USB-A to USB-B) Remote control
CD User’s Guide and Documentation AAA Batteries (2)
Informacion Importante
AAA
AAA
DOCOMENTATION
TM
Dell
7700FullHD Projector
TM
7700FullHD Projector
Dell
Quick Setup Guide
Dell
TM
Projectors
oduct Information Guide
Your Dell Projector 7
Page 8
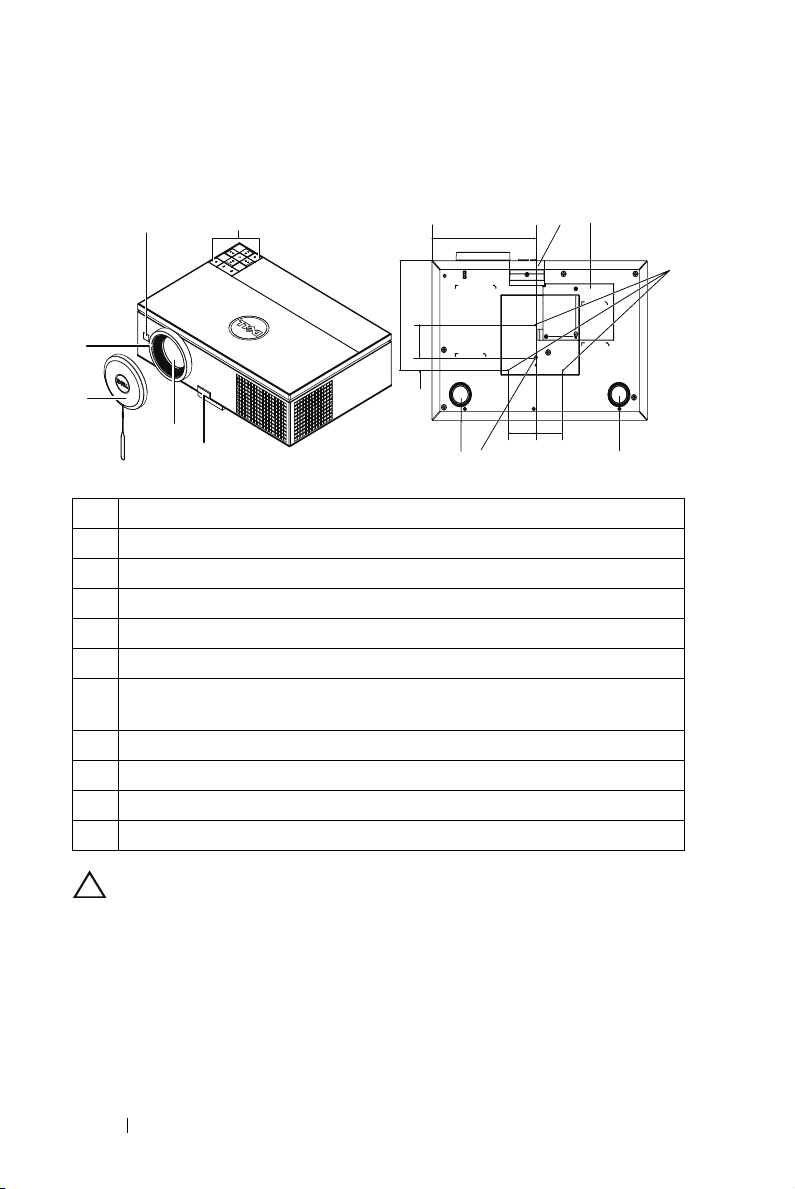
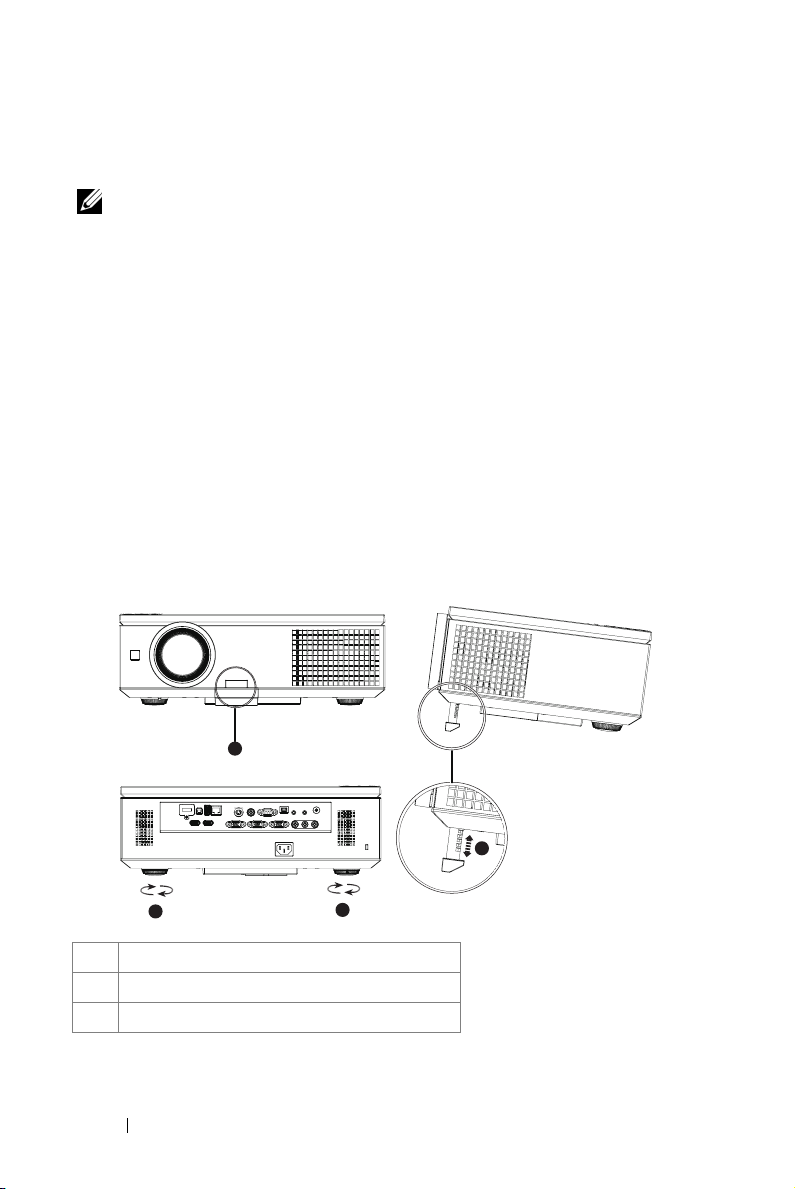
About Your Projector
Top View
2
3
1
Bottom View
202.50
180.50
73.50
11
9
7
6
4
5
8.65
55.00 55.00
8
10
10
1 Control panel
2 IR receivers
3 Focus ring
4 Lens
5 Elevator button for height adjustments
6 Lens cap
7 Mounting holes for ceiling mount: Screw hole M3 x 6.5 mm depth.
Recommended torque <8 kgf-cm
8 Mounting hole for tripod: Insert nut 1/4"*20 UNC
9 Lamp cover
10 Tilt adjustment wheel
11 Elevator foot
CAUTION: Safety Instructions
1
Do not use the projector near appliances that generate a lot of heat.
2
Do not use the projector in areas where there is an excessive amount of dust. The
dust may cause the system to fail and the projector will automatically shut down.
3
Ensure that the projector is mounted in a well-ventilated area.
4
Do not block the ventilation slots and openings on the projector.
5
Ensure the projector operates between ambient temperatures (5 ºC to 35 ºC).
Your Dell Projector 8
Page 9

6
Do not try to touch the ventilation outlet as it can become very hot after the
projector has been turned on or immediately after it is turned off.
7
Do not look into the lens while the projector is on as it may cause injury to your
eyes.
8
Do not place any objects near or in front of the projector or cover its lens while the
projector is on as the heat may cause the object to melt or burn.
9
Do not use the wireless projector near cardiac pacemakers.
10
Do not use the wireless projector near medical equipment.
11
Do not use the wireless projector near microwave ovens.
NOTE:
• Do not attempt to ceiling mount the projector yourself. It should be
installed by a qualified technician.
• Recommended Projector Ceiling Mount Kit (P/N: C3505). For more
information, see the Dell Support website at
• For more information, see the
Safety Information
support.dell.com
that shipped with your
.
projector.
• The 7700FullHD projector can only be used indoors.
Your Dell Projector 9
Page 10
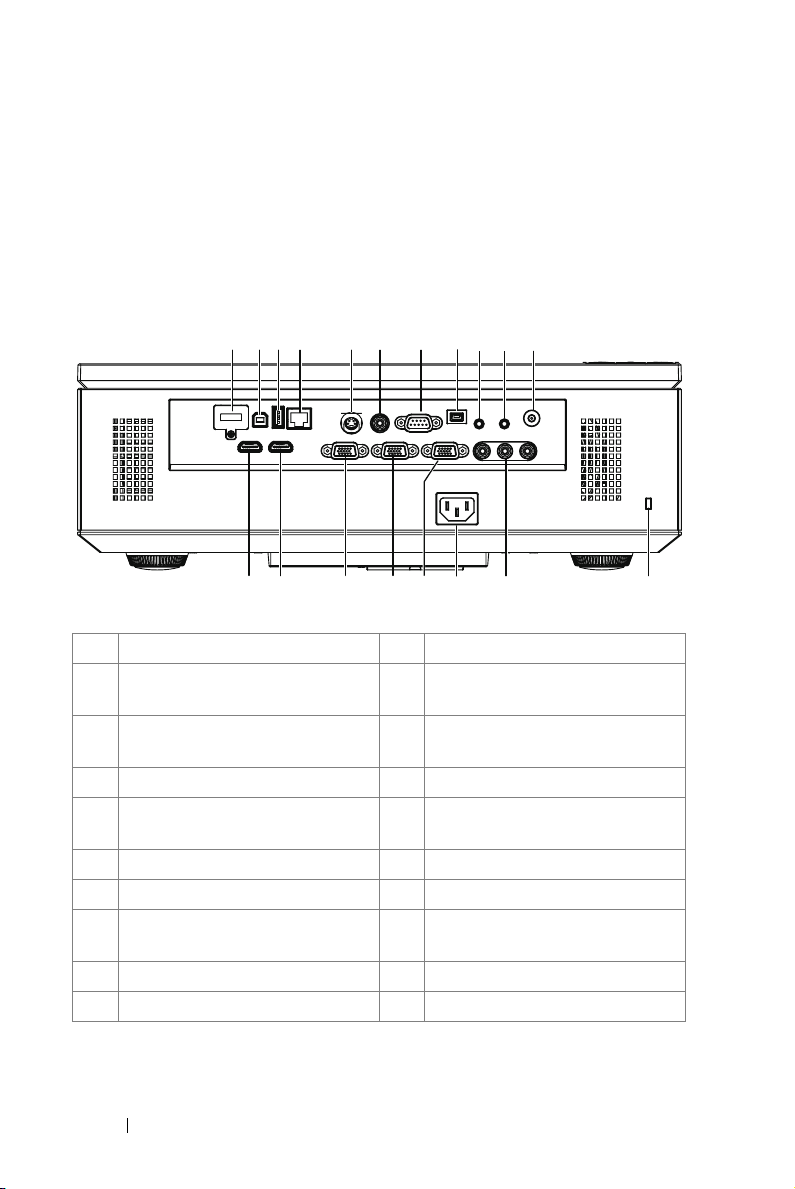
Connecting Your Projector
1 2 3 4 5 6 7 8 910 11
2
19
18 17 16
1 WiFi USB (Type A) connector 11 +12 V DC out connector
2 USB Type B connector for USB
Display
3 USB Type A connector for USB
Viewer
4 RJ45 connector 14 Power cord connector
5 S-Video connector 15 VGA-A output (monitor loop-
6 Composite Video connector 16 VGA-B input (D-sub) connector
7 RS232 (D-sub) connector 17 VGA-A input (D-sub) connector
8 Mini USB (Mini Type B)
connector for remote control
9 Audio output connector 19 HDMI-A connector
10 Audio input connector
Connecting Your Projector 10
15 14
12 Security cable slot
13 Component Video input
connector
through) connector
18 HDMI-B connector
13
12
Page 11
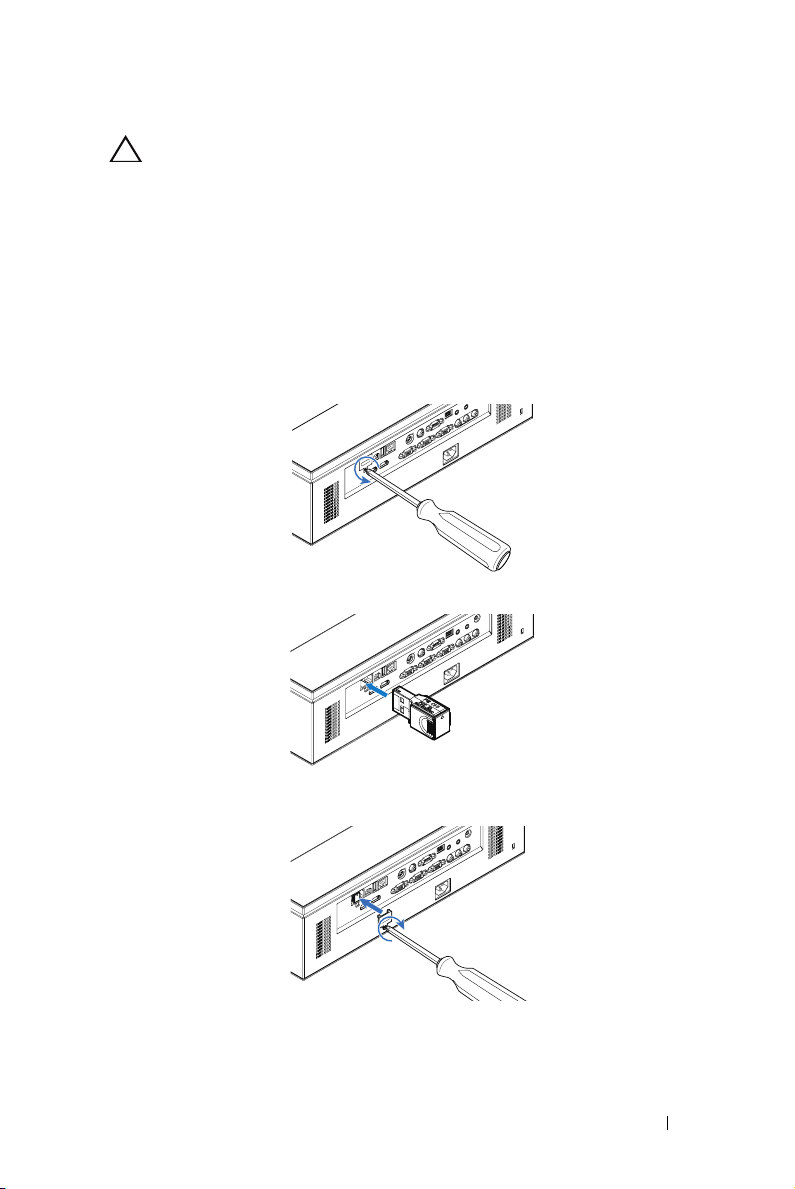
CAUTION: Before you begin any of the procedures in this section, follow the
Safety Instructions as described on page 8.
Installing the Optional Wireless Dongle
Your projector must be installed with a wireless dongle if you want to use the
wireless networking option. Refer to "Wireless Networking Installation" on
page 55. The wireless dongle is not shipped with your projector. You can
purchase it on the Dell website at
1
Unscrew and take off the wireless cover.
2
Plug in the wireless dongle.
www.dell.com
.
3
Assemble the wireless cover.
Connecting Your Projector 11
Page 12
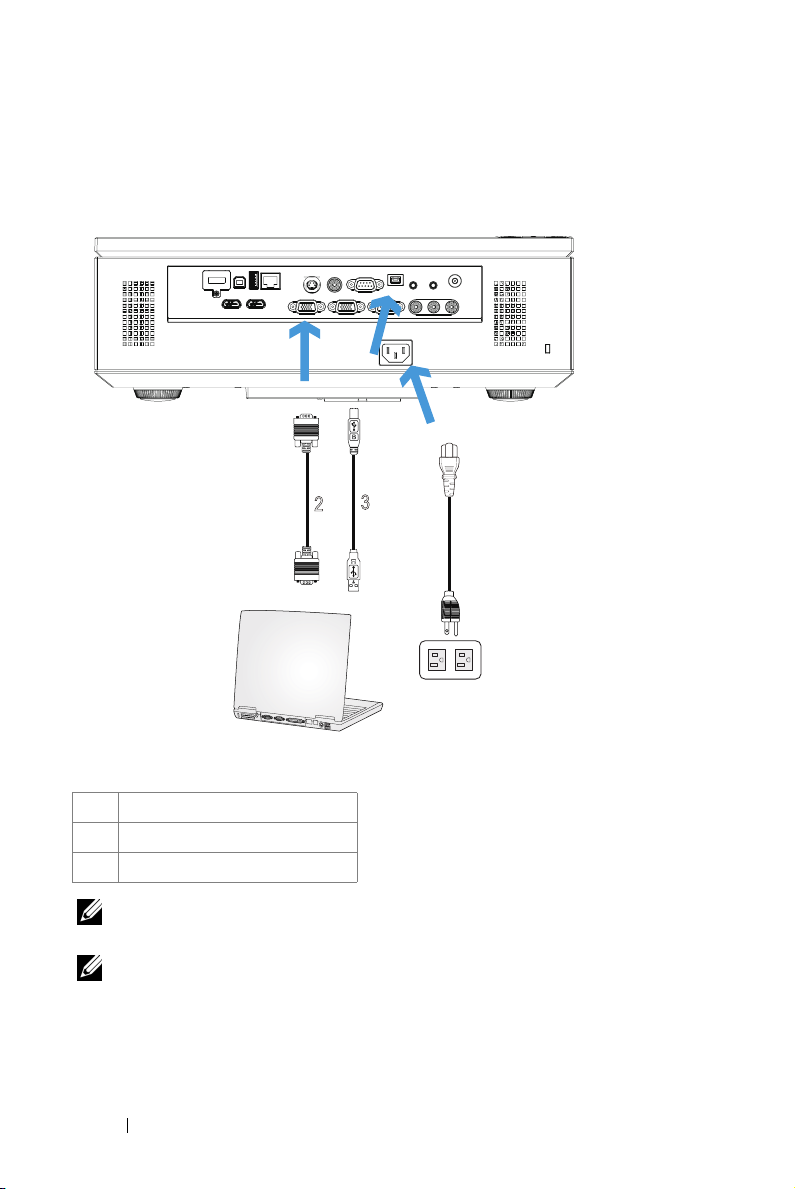
Connecting to a Computer
Connecting a Computer Using a VGA Cable
3
2
MOLEX
1 Power cord
2 VGA to VGA cable
3 USB-A to Mini USB-B cable
NOTE: The Mini USB cable must be connected if you want to use the Page Up
and Page Down features on the remote control.
NOTE: The Mini USB cable is not shipped with your projector. You can
purchase the Mini USB cable on the Dell website at www.dell.com.
Connecting Your Projector 12
1
Page 13
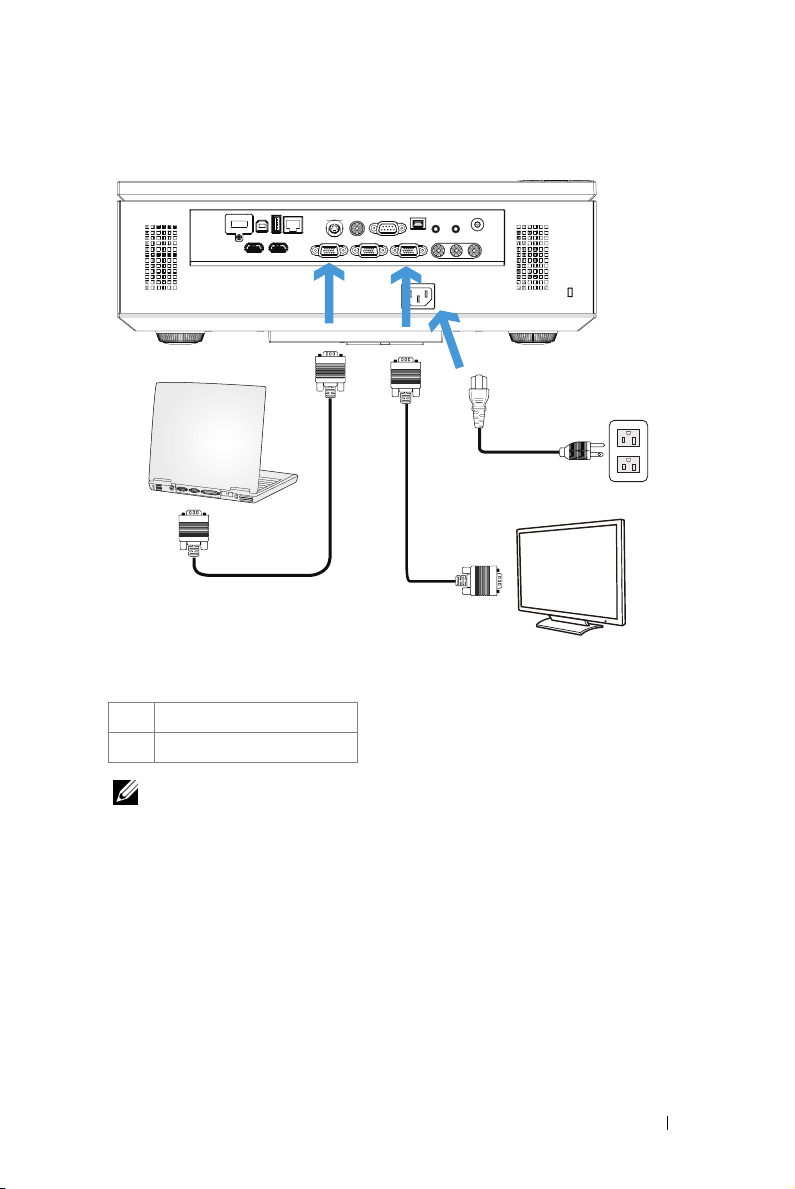
Monitor Loop-Through Connection Using VGA Cables
1
2
2
1 Power cord
2 VGA to VGA cable
NOTE: Only one VGA cable is shipped with your projector. An additional VGA
cable can be purchased on the Dell website at www.dell.com.
Connecting Your Projector 13
Page 14
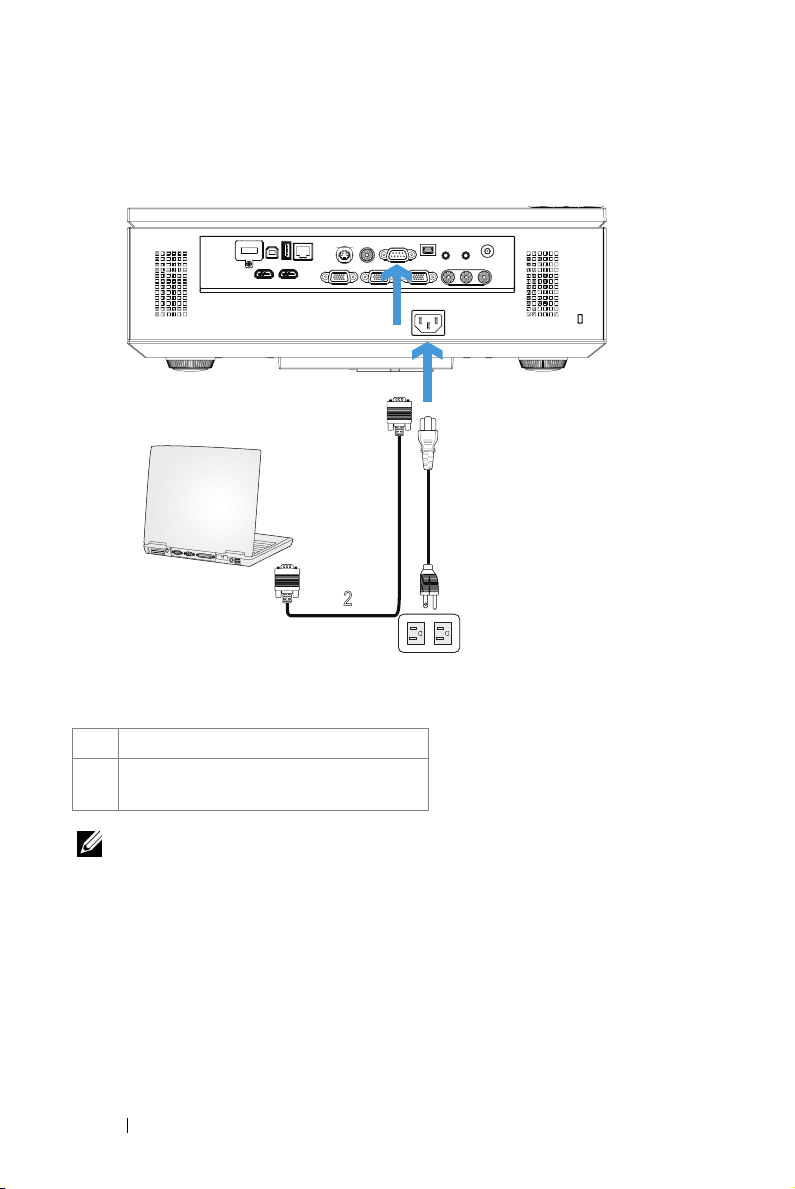
Connecting a Computer Using a RS232 Cable
1
2
1Power cord
2
RS232 (9-pin D-sub female to female
pin2-3 swap) cable
NOTE: The RS232 (9-pin D-sub female to female pin2-3 swap) cable is not
shipped with your projector. Consult a professional installer for the cable and
RS232 remote control software.
Connecting Your Projector 14
Page 15

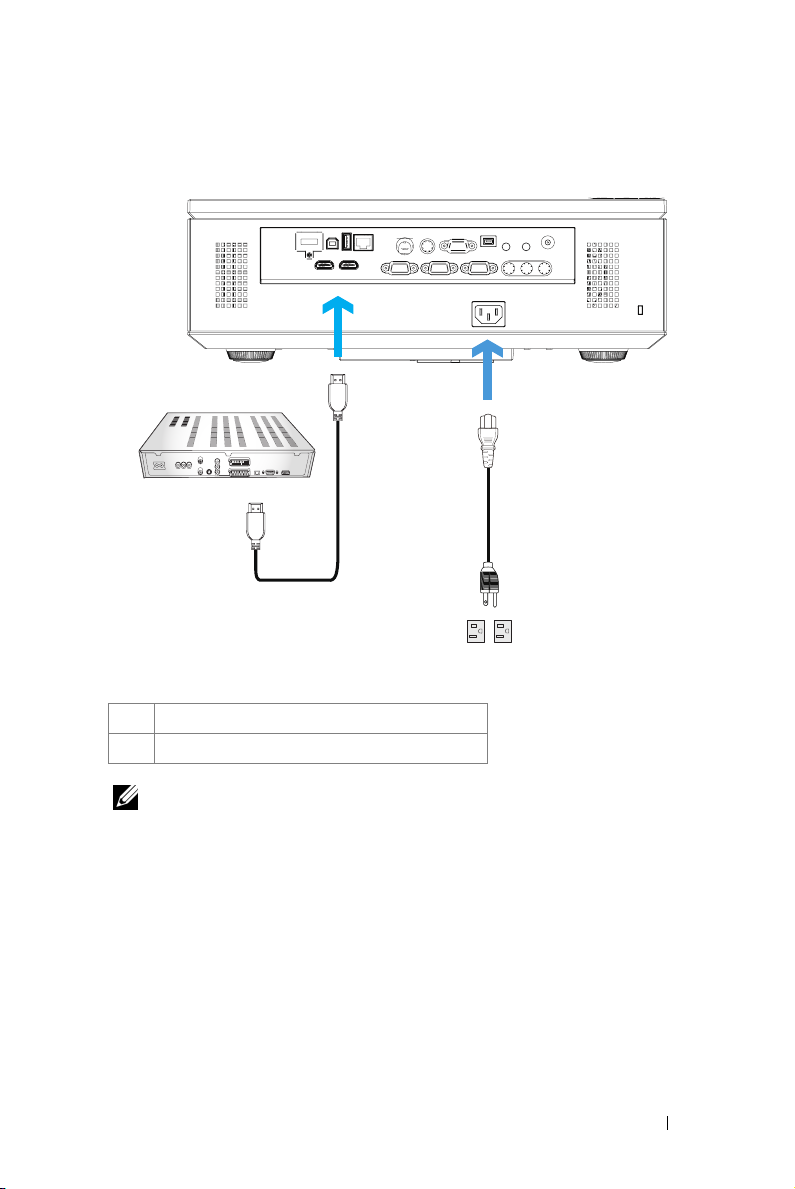
Connecting a Computer by USB Cable
2
MOLEX
1
1Power cord
2
USB-A to USB-B cable
NOTE: Plug and Play. Only one USB cable is shipped with your projector. An
additional USB cable can be purchased on the Dell website at www.dell.com.
Connecting Your Projector 15
Page 16
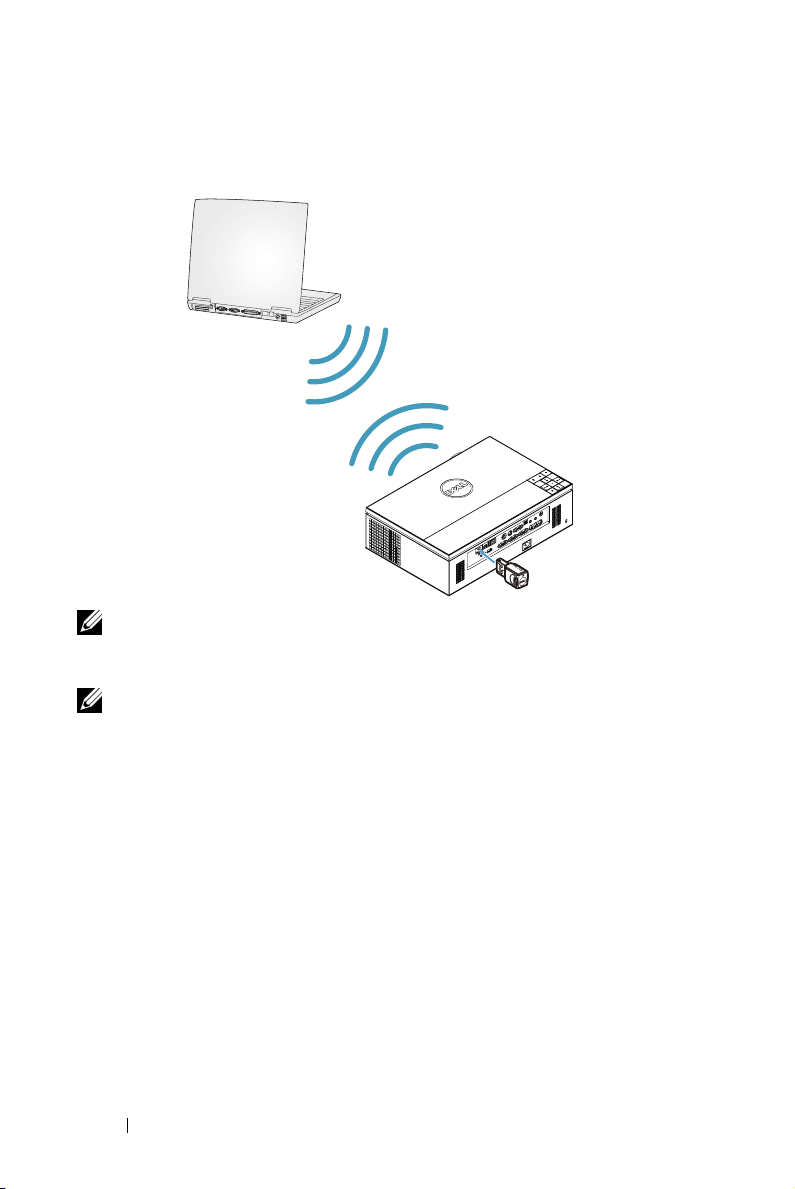
Connecting a Computer Using Wireless Dongle (Optional)
FCC ID:
SUZ-WU5205C
NOTE: Your computer should be equipped with a wireless connector and
properly configured to detect another wireless connection. Refer to your
computer’s documentation on how to configure a wireless connection.
NOTE: Your projector must be installed with a wireless dongle if you want to
use the wireless networking. Refer to "Wireless Networking Installation" on
page 55.
Connecting Your Projector 16
Page 17
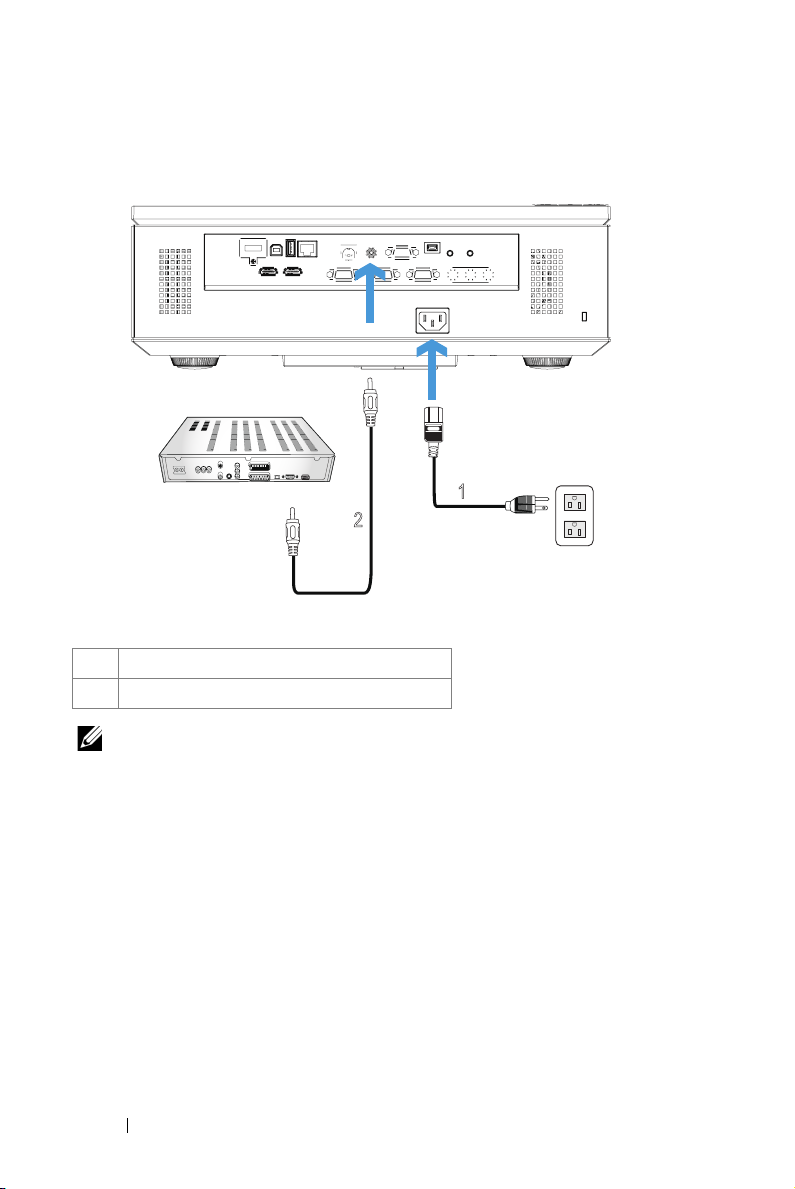
Connecting a DVD Player
Connecting a DVD Player Using an S-Video Cable
1
2
1 Power cord
2 S-Video cable
NOTE: The S-Video cable is not shipped with your projector. You can purchase
the S-Video extension (50 ft/100 ft) cable on the Dell website at www.dell.com.
Connecting Your Projector 17
Page 18
Connecting a DVD Player Using a Composite Video Cable
1
2
1 Power cord
2 Composite Video cable
NOTE: The Composite Video cable is not shipped with your projector. You can
purchase the Composite Video Extension (50 ft/100 ft) cable on the Dell website
at www.dell.com.
Connecting Your Projector 18
Page 19
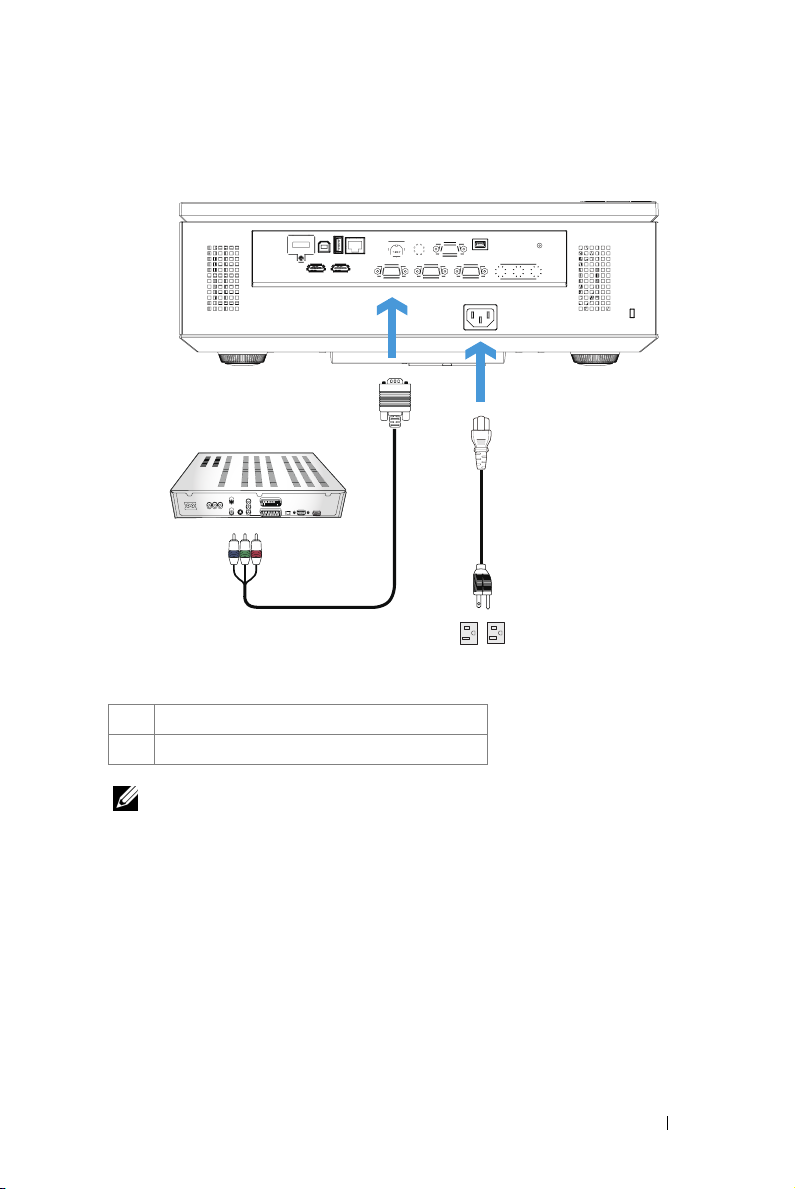
Connecting a DVD Player Using a Component Video Cable
2
1 Power cord
2 VGA to Component Video cable
NOTE: The VGA to Component Video cable is not shipped with your projector.
You can purchase the VGA to Component Video Extension (50 ft/100 ft) cable on
the Dell website at www.dell.com.
1
Connecting Your Projector 19
Page 20
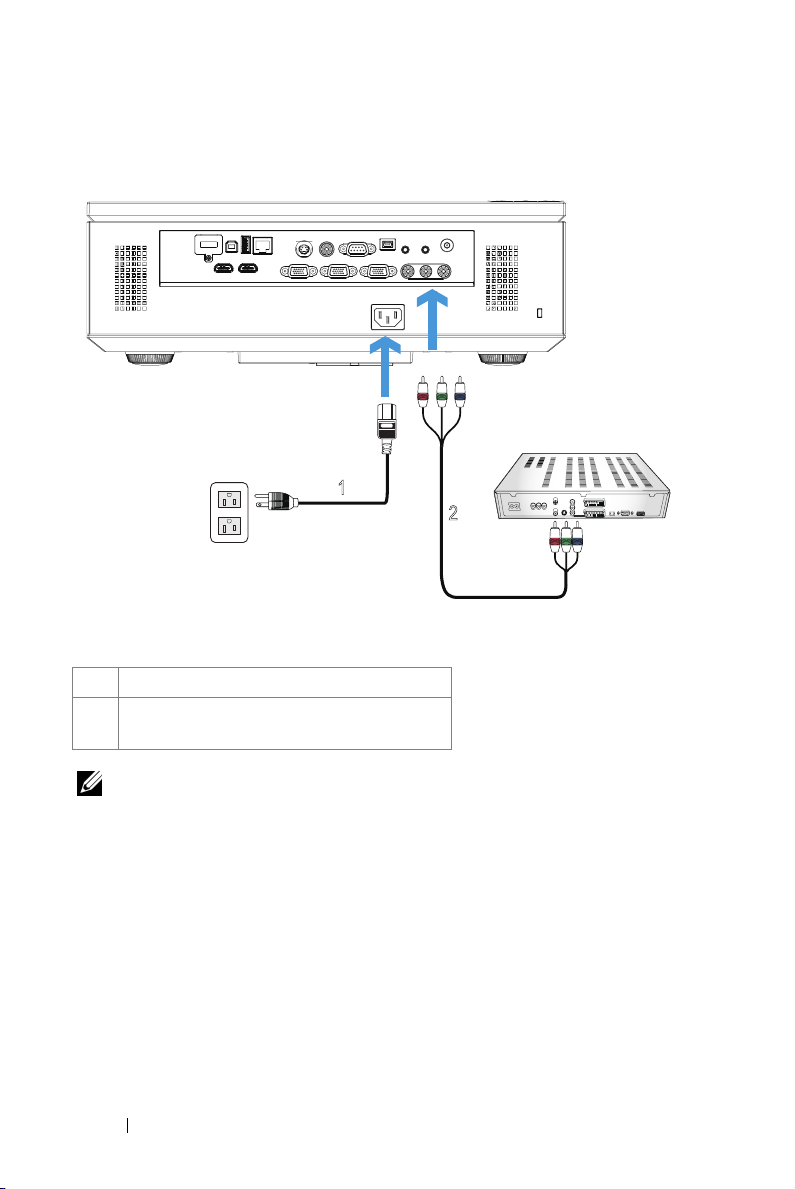
Connecting a DVD Player Using a 3 RCA Component Video Cable
1
2
1Power cord
2
3 RCA to 3 RCA Component Video (Male
to Male) cable
NOTE: The 3 RCA to 3 RCA Component Video (Male to Male) cable is not
shipped with your projector. You can purchase the 3 RCA to 3 RCA Component
Video (Male to Male) cable Extension (50 ft/100 ft) cable on the Dell website at
www.dell.com.
Connecting Your Projector 20
Page 21
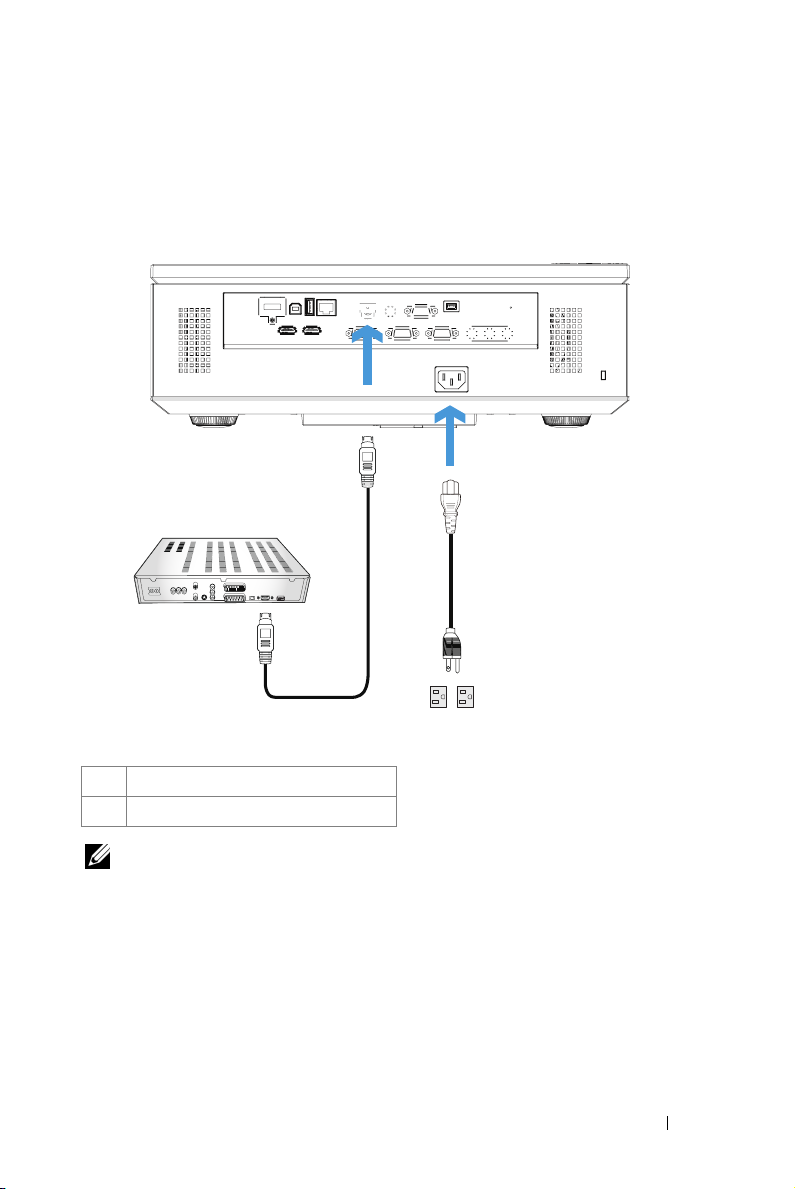
Connecting a DVD Player Using an HDMI Cable
2
1 Power cord
2 HDMI cable
NOTE: The HDMI cable is not shipped with your projector. You can purchase
the HDMI cable on the Dell website at www.dell.com.
1
Connecting Your Projector 21
Page 22
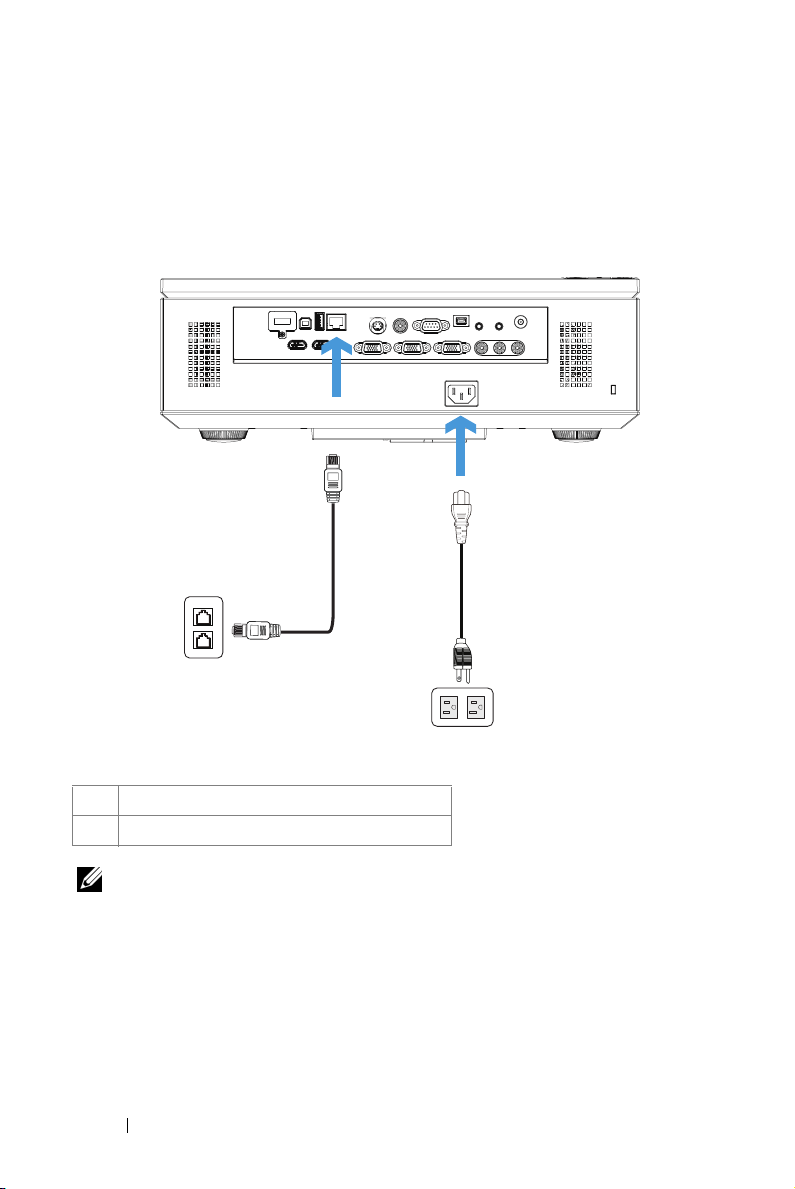
Connecting to Local Area Network
To project an image and control the projector that is connected to a network through a RJ45 cable.
1
Local Area Network (LAN)
1 Power cord
2 RJ45 cable
NOTE: The RJ45 cable is not shipped with your projector. You can purchase the
RJ45 cable on the Dell website at www.dell.com.
Connecting Your Projector 22
Page 23
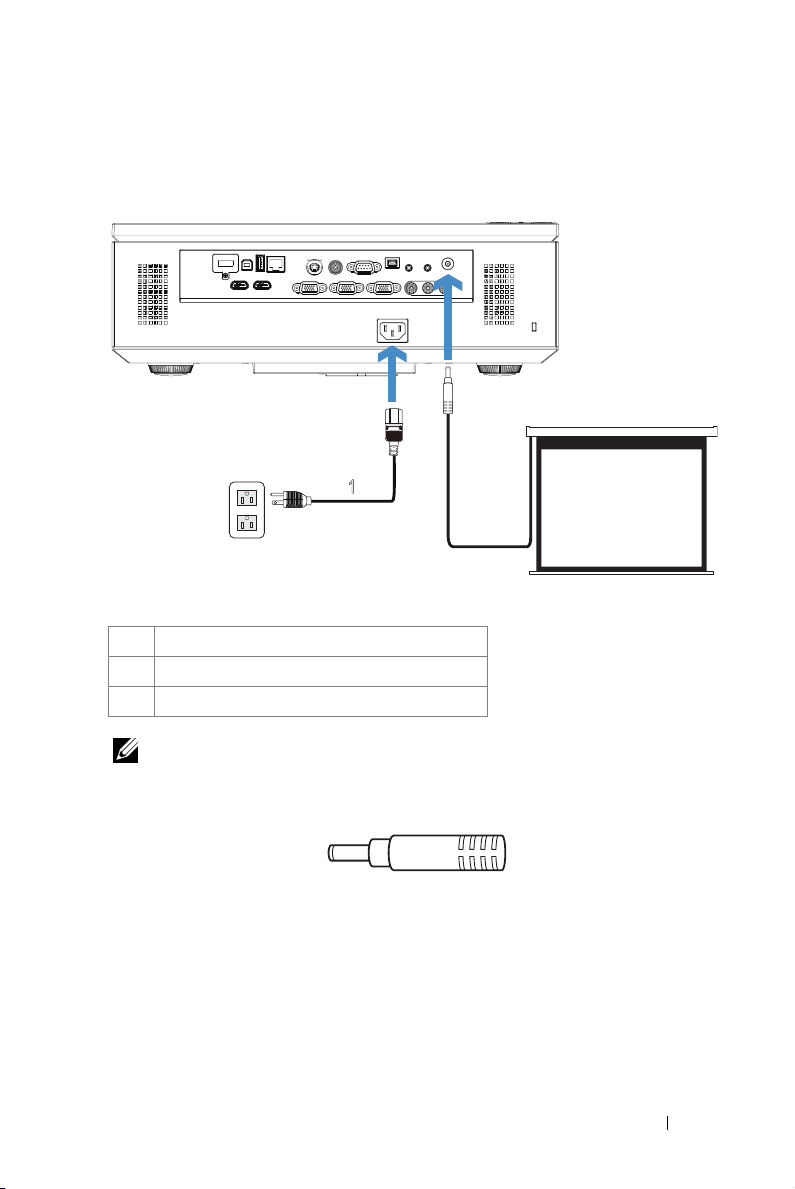
Professional Installation Options: Installation for Driving Automatic Screen
3
1
2
1
Power cord
2
12 V DC Plug
3
Motorized projection screen
NOTE: Use a 12 V DC plug in, 1.7 mm (ID) x 4.00 mm (OD) x 9.5 mm (shaft), to
connect the automatic screen to the projector.
12 V DC Plug
Connecting Your Projector 23
Page 24
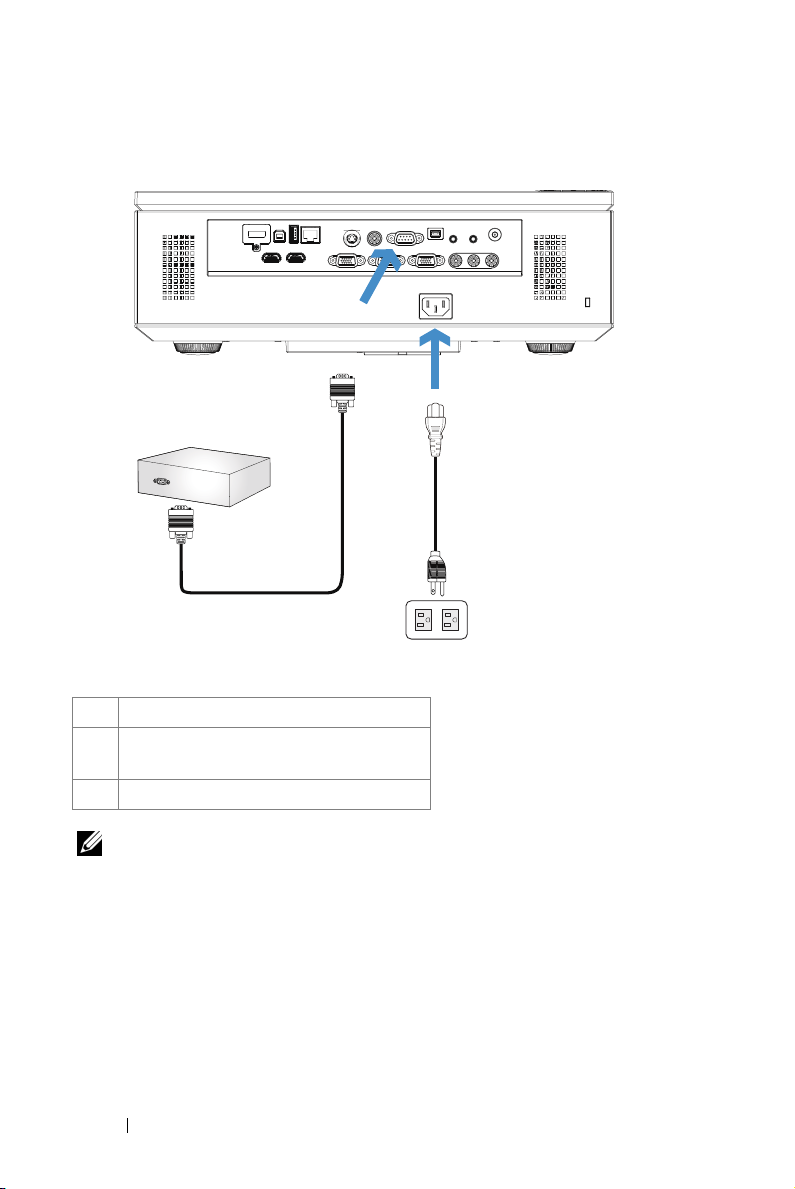
Connection With Commercial RS232 Control Box
3
1
2
1 Power cord
2 RS232 (9-pin D-sub female to female
pin2-3 swap) cable
3 Commercial RS232 control box
NOTE: The RS232 (9-pin D-sub female to female pin2-3 swap) cable is not
shipped with your projector. Consult a professional technician to obtain the
cable.
Connecting Your Projector 24
Page 25

Using Your Projector
Turning Your Projector On
NOTE: Turn on the projector before you turn on the source (computer, DVD
player, etc.). The Power button light blinks blue until pressed.
1
Remove the lens cap.
2
Connect the power cord and appropriate signal cables to the projector. For
information about connecting the projector, see "Connecting Your Projector" on
page 10.
3
Press the
Pow er
4
Turn on your source (computer, DVD player, etc.)
5
Connect your source to the projector using the appropriate cable. See
"Connecting Your Projector" on page 10 for instructions to connect your source to
the projector.
6
By default, the input source of the projector is set to VGA-A. Change the input
source of the projector if necessary.
7
If you have multiple sources connected to the projector, press the
on the remote control or control panel to select the desired source. See "Using the
Control Panel" on page 30 and "Using the Remote Control" on page 32 to locate
the
Power
button (see "Using the Control Panel" on page 30 to locate the
button).
Source
button.
Source
button
3
Turning Your Projector Off
CAUTION: Unplug the projector after properly shutting down as explained in
the following procedure.
1
Press the
turn off the projector.
2
Press the
seconds.
Power
button. Follow the instruction displayed on screen to properly
NOTE: The "Press Power Button to Turn off Projector" message will
appear on the screen. The message disappears after 5 seconds or you can
press the Menu button to clear it.
Power
button again. The cooling fans continue to operate for 120
Using Your Projector 25
Page 26
3
To power off the projector quickly, press the Power button and hold for 1 second
while the projector’s cooling fans are still running.
NOTE: Before you turn on the projector again, wait for 60 seconds to allow the
internal temperature to stabilize.
4
Disconnect the power cord from the electrical outlet and the projector.
Adjusting the Projected Image
Raising the Projector Height
1
Press the
2
Raise the projector to the desired display angle, and then release the button to
lock the elevator foot into position.
3
Use the tilt adjustment wheel to fine-tune the display angle.
Lowering the Projector Height
1
Press the
2
Lower the projector, then release the button to lock the elevator foot into
position.
Elevator
Elevator
button.
button.
1
3
3
1 Elevator button
2 Elevator foot (Angle of tilt: 0 to 8 degrees)
3 Tilt adjustment wheel
Using Your Projector 26
2
Page 27

Adjusting the Projector Zoom and Focus
CAUTION: To avoid damaging the projector, ensure that the side door is fully
closed and the elevator foot is fully retracted before moving the projector.
1
Open the side door of the projector.
2
Unlock the lens shift lock, before you adjust the lens shift.
3
Turn the vertical/horizontal lens shift knob to shift the lens.
4
After adjusting the lens shift, lock the lens shift lock.
5
Pull the zoom ring adjustment up and down to zoom in and out.
6
Rotate the focus ring until the image is clear. THe projector focuses at distances
ranging between 3.28 ft to 39.37 ft (1.0 m to 12.0 m).
7
Close the side door of the projector.
1 234 5 6
1 Side door
2 Vertical lens shift knob
3 Lens shift lock
4 Horizontal lens shift knob
5 Zoom ring
6 Focus ring
Using Your Projector 27
Page 28

Adjusting Projection Image Size
244.17"
(620.19 cm)
199.40"
(506.48 cm)
156.67"
(397.94 cm)
292.9" (743.97 cm)
239.29" (607.80 cm)
188.01" (477.55 cm)
134.29" (341.10 cm)
Projector to screen distance
39.37' (12.0 m)
32.15' (9.8 m)
25.26' (7.7 m)
111.9 1"
(284.25 cm)
18.04' (5.5 m)
69.18"
(175.72 cm)
(51.56 cm)
11.15' (3.4 m)
83.02" (210.87 cm)
24.42" (62.03 cm)
20.3"
3.28' (1.0 m)
Using Your Projector 28
Page 29
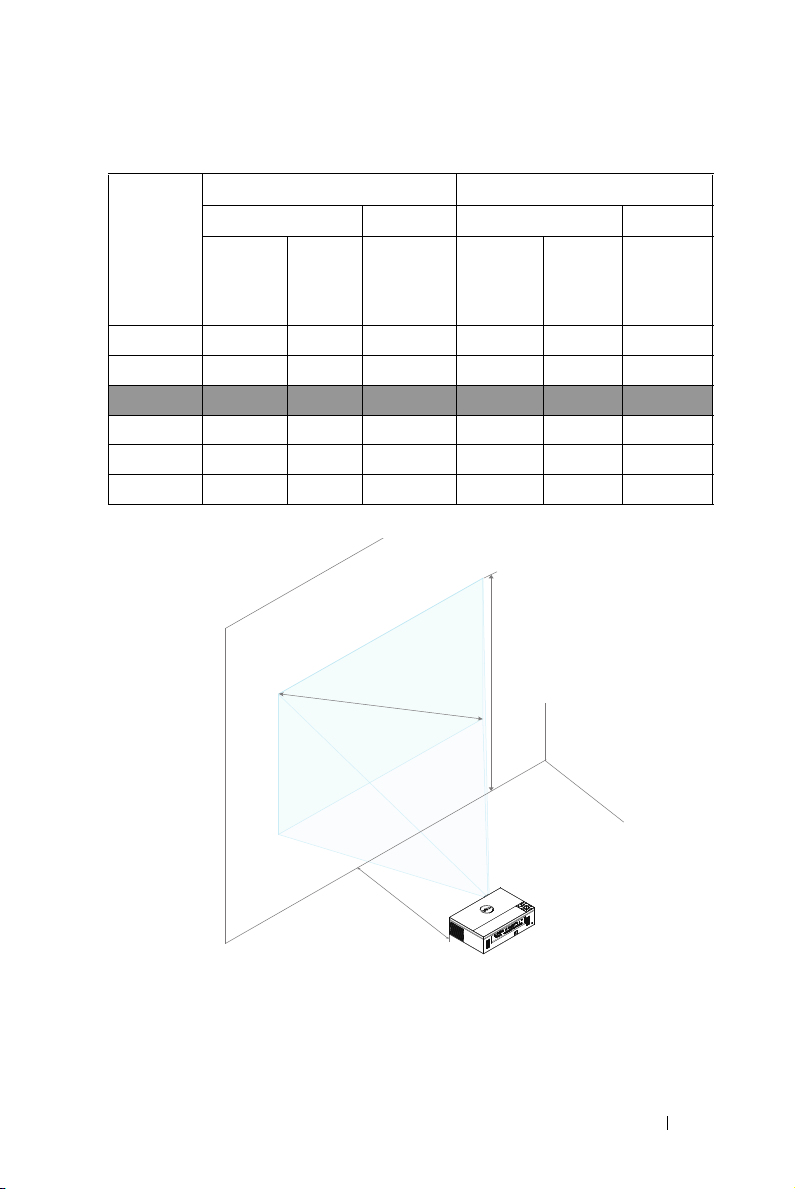
(Min zoom) (Max zoom)
Desired
Distance (m)
<A>
Screen size Top Screen size Top
Diagonal Diagonal
(inch) (inch)
<B> <B>
W (cm) x top of image W (cm) x top of image
H (cm) (cm) H (cm) (cm)
From base to From base to
<C> <C>
1 20.3 45 x 25 29 24.42 54 x 30 35
3.4 69.18 153 x 86 99 83.02 184 x 103 119
5.5 111.91 248 x 139 160 134.29 297 x 167 192
7.7 156.67 347 x 195 224 188.01 416 x 234 269
9.8 199.4 441 x 248 286 239.29 530 x 298 343
12 244.17 541 x 304 350 292.9 649 x 365 420
Height:
B
134.29"
192 cm
C
Distance:
5.5 m
A
Using Your Projector 29
Page 30
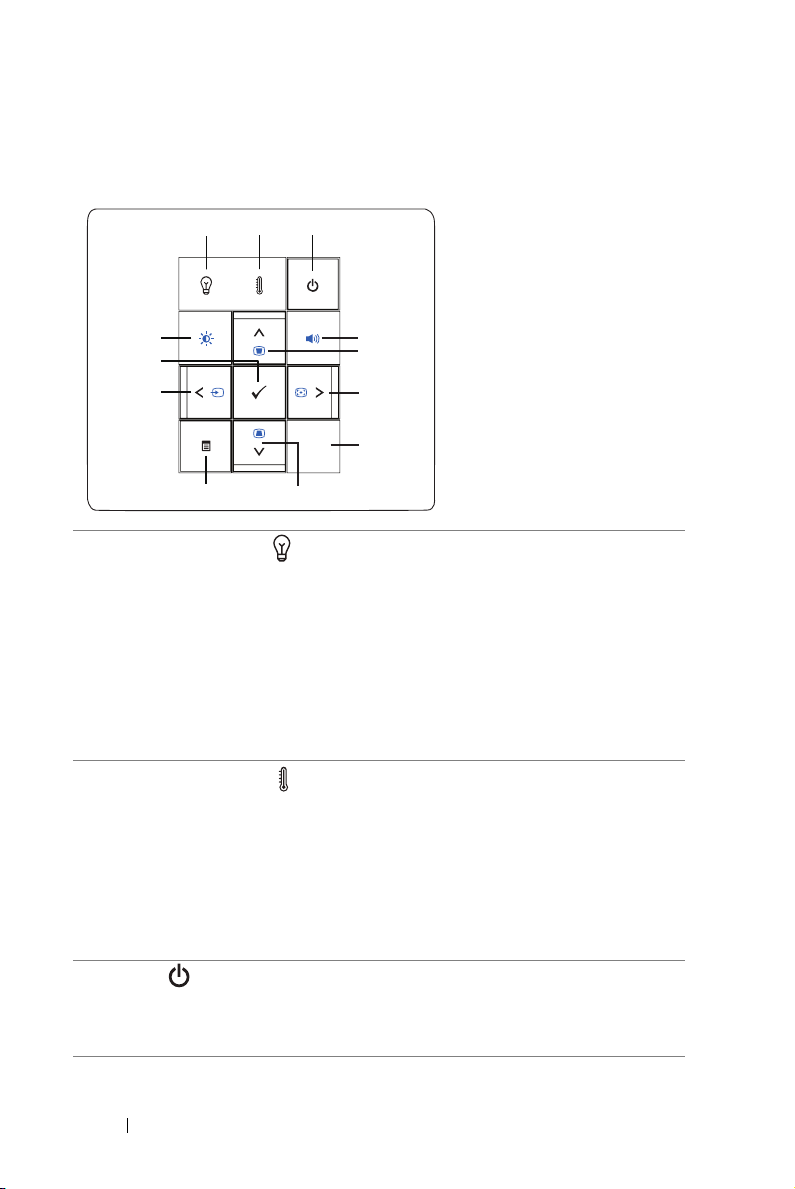
Using the Control Panel
11
10
12
3
2
1
12
11
10
9
8
1 LAMP warning light If the LAMP amber indicator is on or blinking,
4
5
6
7
one of the following problems could be occurring:
• Lamp is reaching its end of usable life
• Lamp module is not properly installed
• Lamp driver failure
• Color wheel failure
For more information, see "Troubleshooting Your
Projector" on page 101 and "Guiding Signals" on
page 105.
2
TEMP warning light
If the TEMP amber indicator is on or blinking,
one of the following problems could be occurring:
• Internal temperature of the projector is too
high
• Color wheel failure
For more information, see "Troubleshooting Your
Projector" on page 101 and "Guiding Signals" on
page 105.
Pow er
3
Turns the projector on or off. For more
information, see "Turning Your Projector On" on
page 25 and "Turning Your Projector Off" on
page 25.
Using Your Projector 30
Page 31

4
Volume Control Allows you to increase or decrease the volume.
5 Up
6
7
8
9
10 Left
11 Enter
12 Brightness and Allows you to adjust the brightness and contrast
/ Keystone Press to navigate through the On-Screen Display
adjustment (OSD) Menu items.
Press to adjust image distortion caused by tilting
the projector (+/-30 degrees).
Right
Auto Adjust (OSD) Menu items.
IR Receiver Point the remote control towards the IR receiver
Down
adjustment
Menu
Contrast Control
/ Press to navigate through the On-Screen Display
Press to synchronize the projector to the input
source.
NOTE: Auto Adjust does not operate if the
on-screen display (OSD) is displayed.
and press a button.
/ Keystone Press to navigate through the On-Screen Display
(OSD) Menu items.
Press to adjust image distortion caused by tilting
the projector (+/-30 degrees).
/ Source Press to navigate through the On-Screen Display
Press to activate the OSD. Use the directional
keys and the Menu button to navigate through
the OSD.
(OSD) Menu items.
Press to toggle through Analog RGB, Composite,
Component (YPbPr via VGA), HDMI, and
S-Video sources when multiple sources are
connected to the projector.
Press to confirm the selection item.
values.
Using Your Projector 31
Page 32

Using the Remote Control
20
11
1
2
12
13
14
15
16
3
4
5
6
7
8
17
18
19
9
10
20
1
2
3
4
5
Pow er
Enter
Right
Down
Aspect Ratio Press to change the aspect ratio of a displayed image.
Turns the projector on or off. For more information,
see "Turning Your Projector On" on page 25 and
"Turning Your Projector Off" on page 25.
Press to confirm the selection.
Press to navigate through the On-Screen Display
(OSD) Menu items.
Press to navigate through the On-Screen Display
(OSD) Menu items.
Using Your Projector 32
Page 33

6
7
8
9 Video mode The projector has preset configurations that are
10 Blank screen Press to hide/unhide the image.
11
12
13
14
Page up
Mute
Page down
Up
Left
Menu
Volume u p
Press to move to the previous page.
NOTE: The Mini USB cable must be connected
if you want to use the Page Up feature.
Press to mute or un-mute the projector speaker.
Press to move to the next page.
NOTE: The Mini USB cable must be connected
if you want to use the Page Down feature.
optimized for displaying data (presentation slides)
or video (movies, games, etc.).
Press the Video Mode button to toggle between
Presentation mode, Bright mode, Movie mode,
sRGB, or Custom mode.
Pressing the Video Mode button once will show the
current display mode. Pressing the Video Mode
button again will switch between modes.
Press to navigate through the On-Screen Display
(OSD) Menu items.
Press to navigate through the On-Screen Display
(OSD) Menu items.
Press to activate the OSD.
Press to increase the volume.
15
Laser
16
Volume d own
Keystone adjustment
17
18 Source Press to switch between Analog RGB, Composite,
Point the remote control at the screen, press and
hold the laser button to activate the laser light.
Press to decrease the volume.
Press to adjust image distortion caused by tilting the
projector (+/-30 degrees).
Component (YPbPr, via VGA), HDMI, and S-Video
source.
WARNING: Do not look at the laser point when
it is active. Avoid directing the laser light on
your eyes.
Using Your Projector 33
Page 34

19 Auto Adjust Press to synchronize the projector with the input
20 Keystone adjustment Press to adjust image distortion caused by tilting the
source. Auto Adjust does not operate if the OSD is
displayed.
projector (+/-30 degrees).
Using Your Projector 34
Page 35

Installing the Remote Control Batteries
NOTE: Remove the batteries from the remote control when not in use.
1
Press the tab to lift the battery compartment cover.
2
Check the polarity (+/-) marking on the batteries.
1
2
3
Insert the batteries and align their polarity correctly
according to the marking in the battery compartment.
NOTE: Avoid mixing different types of batteries or using
new and old batteries together.
4
Slip the battery cover back.
3
AAA
AAA
4
AAA
AAA
Using Your Projector 35
Page 36

Operating Range With Remote Control
Angle
Operating range
Angle
Distance 7 m/22.97 feet
±30°
Angle
Distance
Distance
NOTE: Actual operating range may slightly differ from the diagram. Weak
batteries will also prevent the remote control from properly operating the
projector.
Using Your Projector 36
Page 37

Using the On-Screen Display
• The projector has a multi-language On-Screen Display (OSD) Menu that can be
displayed with or without an input source.
• Press the Menu button on the control panel or the remote control to enter the
Main Menu.
• To navigate through the tabs in the Main Menu, press the
your projector’s control panel or remote control.
• To select a submenu, press the
or remote control.
• To select an option, press the
or remote control. When an item is selected, the color changes to dark blue.
• Use the
settings.
• To go back to the Main Menu, press the
remote control.
• To exit the OSD, press the
remote control.
INPUT SOURCE
The Input Source menu allows you to select your projector’s input source.
or button on your projector’s control panel
or buttons on your projector’s control panel
or buttons on the control panel or remote control to adjust the
Menu
button directly on the control panel or the
button on the control panel or the
or buttons on
AUTO SOURCE—Press to turn on or off Auto Source mode.
VGA-A—Press
VGA-B—Press to detect a VGA-B signal.
HDMI-A—Press
HDMI-B—Press to detect a HDMI-B signal.
OMPONENT—Press to detect a RCA Component signal.
C
OMPOSITE—Press to detect a Composite Video signal.
C
IDEO—Press to detect a S-Video signal.
S-V
to detect a VGA-A signal.
to detect a HDMI-A signal.
Using Your Projector 37
Page 38

WIRELESS/USB—Press to activate the Input Source Wireless/USB menu.
NOTE: The Wireless/USB can be used after the "Wireless and LAN" option is
turned on.
INPUT SOURCE WIRELESS/USB
The Input Source Wireless/USB menu allows you to activate the Wireless Display,
USB Display, and USB Viewer.
W
IRELESS DISPLAY—Press to access the projector's Wireless Guide screen. See
"Wireless Guide screen" on page 57.
ISPLAY—Allows you to display the computer/laptop screen to your projector
USB D
via the USB cable.
USB VIEWER—Allows you to display photo and PPT files from your USB flash drive.
See "Presentation to Go (PtG) Installation" on page 65.
AUTO ADJUST
Auto Adjust automatically adjusts the projector's Horizontal, Vertical, Frequency,
and Tracking in PC mode.
Using Your Projector 38
Page 39

BRIGHTNESS/CONTRAST
The Brightness/Contrast menu allows you adjust the brightness/contrast settings
of your projector.
B
RIGHTNESS—Use
ONTRAST—Use
C
NOTE: If you adjust the settings for Brightness and Contrast the projector
automatically switch to Custom mode.
and
to adjust the brightness of the image.
and
to adjust the display contrast.
VIDEO MODE
The Video Mode menu allows you to optimize the display image: Presentation,
Bright, Movie, sRGB (provides more accurate color representation), and Custom
(set your preferred settings).
Using Your Projector 39
Page 40

VOLUME
The Volume menu allows you adjust the volume settings of your projector.
V
OLUME—Press to increase the volume and to decrease the volume.
AUDIO INPUT
The Audio Input menu allows you to select your audio input source. The options
are: Analog In, HDMI-A, HDMI-B, and Wireless/LAN.
ADVANCED SETTINGS
The Advanced Settings menu allows you to change settings for Image, Display,
Projector, LAN, Wireless, Menu, Power, PIP, and Information.
Using Your Projector 40
Page 41

IMAGE SETTINGS (IN PC MODE)—Select and press to activate image settings.
The image settings menu provides the following options:
COLOR TEMPERATURE—Allows you to adjust the color temperature. The
screen appears cooler at higher color temperatures and warmer at lower
color temperatures. When you adjust the values in the Color Adjust menu,
the Custom mode is activated. The values are saved in the Custom mode.
RGB COLOR ADJUST—Allows you to manually adjust the colors red, green,
and blue.
WHITE INTENSITY—Press and use and to display white intensity.
DYNAMIC APERTURE—Allows you to set the projector dynamic aperture.
The options are: Off, Dynamic, and Auto.
COLOR SPACE—Allows you to select the color space. The options are: RGB,
YCbCr, and YPbPr.
NOTE: If you adjust the settings for Color Temperature, RGB Color Adjust, and
White Intensity the projector automatically switch to Custom mode.
IMAGE SETTINGS (IN VIDEO MODE)—Select and press to activate image settings.
The image settings menu provides the following options:
Using Your Projector 41
Page 42

COLOR TEMPERATURE—Allows you to adjust the color temperature. The
screen appears cooler at higher color temperatures and warmer at lower
color temperatures. When you adjust the values in the Color Adjust menu,
the Custom mode is activated. The values are saved in the Custom mode.
RGB COLOR ADJUST—Allows you to manually adjust the colors red, green,
and blue.
SATURATION—Allows you to adjust the video source from black and white
to fully saturated color. Press to increase the amount of color in the
image and
to decrease the amount of color in the image.
SHARPNESS—Press to increase the sharpness and to decrease the
sharpness.
TINT—Press to increase the amount of green in the image and to
decrease the amount of green in the image (available for NTSC only).
WHITE INTENSITY—Press and use and to display white intensity.
DYNAMIC APERTURE—Allows you to set the projector dynamic aperture.
The options are: Off, Dynamic, and Auto.
COLOR SPACE—Allows you to select the color space. The options are: RGB,
YCbCr, and YPbPr.
NOTE:
1 If you adjust the settings for Color Temperature, RGB Color Adjust,
Saturation, Sharpness, Tint , and White Intensity the projector
automatically switch to Custom mode.
2 Saturation, Sharpness, and Tint are only available when the input source is
from Component, Composite, or S-Video.
Using Your Projector 42
Page 43

DISPLAY SETTINGS (IN PC MODE)—Select and press to activate display settings.
The display settings menu provides the following options:
HORIZONTAL POSITION—Press to move the image right and to move
the image left.
VERTICAL POSITION—Press to move the image up and to move the
image down.
FREQUENCY—Allows you to change the display data clock frequency to
match the frequency of your computer’s graphics card. If you see a vertical
flickering wave, use the Frequency control to minimize the bars. This is a
coarse adjustment.
TRACKING—Synchronize the phase of the display signal with the graphic
card. If you experience an unstable or flickering image, use Tracking to
correct it. This is a fine adjustment.
ASPECT RATIO—Allows you to select the aspect ratio to adjust how the
image appears. Options are: Origin, 16:9, and 4:3.
•Origin — Select Origin to maintain the aspect ratio of the image
projector according to the input source.
•16:9 — The input source scales to fit the width of the screen to project a
16:9 screen image.
•4:3 — The input source scales to fit the screen and projects a 4:3 image.
ZOOM—Press and to zoom and view the image.
Z
OOM NAVIGATION—Press to activate the Zoom Navigation
menu.
Use to navigate the projection screen.
Adjust the image scale by pressing
and press to view on your remote control
only.
or
Using Your Projector 43
Page 44

DISPLAY SETTINGS (IN VIDEO MODE)—Select and press to activate display
settings. The display settings menu provides the following options:
ASPECT RATIO—Allows you to select the aspect ratio to adjust how the
image appears. Options are: Origin, 16:9, and 4:3.
•Origin — Select Origin to maintain the aspect ratio of image projector
according to the input source.
•16:9 — The input source scales to fit the width of the screen to project a
16:9 screen image.
•4:3 — The input source scales to fit the screen and projects a 4:3 image.
ZOOM—Press and to zoom and view the image.
Adjust the image scale by pressing
and press
only.
ZOOM NAVIGATION—Press to activate the Zoom Navigation
menu.
Use
to navigate the projection screen.
to view on your remote control
or
Using Your Projector 44
Page 45

PROJECTOR SETTINGS—Select and press to activate projector settings. The
projector settings menu provides the following options:
AUTO SOURCE—Select Off (the default) to lock the current input signal. If
you press the Source button when the Auto Source mode is set to Off, you
can manually select the input signal. Select On to auto detect the available
input signals. If you press the Source button when the projector is on, it
automatically finds the next available input signal.
AUTO KEYSTONE—Select On to automatically adjust image distortion
caused by tilting the projector.
HORIZONTAL KEYSTONE—Use
keystone.
VERTICAL KEYSTONE—Use
keystone.
and to adjust the image horizontal
and to adjust the image vertical
PROJECTOR MODE—Allows you to select the projector mode, depending
upon how the projector is mounted.
•Rear Projection-Desktop — The projector reverses the image so that you
can project from behind a translucent screen.
•Rear Projection-Ceiling Mount — The projector reverses and turns the
image upside down. You can project from behind a translucent screen with
a ceiling-mounted projection.
•Front Projection-Desktop — This is the default option.
•Front Projection-Ceiling Mount — The projector turns the image upside
down for ceiling-mounted projection.
SPEAKER—Select On to enable the speaker. Select Off to the disable
speaker.
CLOSED CAPTION—Select On to enable close caption and activate the
closed caption menu. Select appropriate closed caption options: CC1,
CC2, CC3, and CC4.
Using Your Projector 45
Page 46

NOTE:
1 Closed caption option is available for NTSC only.
2 Closed captioning can only be enabled via S-Video and Composite Video
inputs.
TEST PATTERN—Test Pattern is used to test focus and resolution.
You can enable or disable the Test Pattern by selecting Off, 1, or 2. You can
also invoke the Test Pattern 1 by pressing and holding down
buttons on the control panel simultaneously for 2 seconds. You can also
invoke the test pattern 2 by pressing and holding down
on the control panel simultaneously for 2 seconds.
Test Pattern 1:
Test Pattern 2:
and
and buttons
FACTORY RESET—Select and press to reset all settings to its factory
default. The below warning message appears:
Reset items include both computer sources and Video source settings.
Using Your Projector 46
Page 47

LAN SETTINGS—Select and press to activate LAN settings. The LAN settings
menu provides the following options:
WIRELESS AND LAN—Select Enabled to active the Wireless and LAN
function.
DHCP—If a DHCP server exists in the network to which the projector is
connected, the IP address will automatically be acquired when you select
DHCP On. If DHCP is Off, manually set the IP Address, Subnet Mask,
and Gateway. Use
Mask, and Gateway. Key in enter to confirm each number and then use
and to set the next item.
IP ADDRESS—Automatically or manually assigns the IP address to the
projector connected to the network.
SUBNET MASK—Configure the Subnet Mask of the network connection.
GATEWAY—Check the Gateway address with your network/system
administrator if you configure it manually.
DNS—Check the DNS Server IP address with your network/system
administrator if you configure it manually.
STORE—Press to save the changes made in network configuration
settings.
and to select the number of IP address, Subnet
NOTE:
1. Use and buttons to select IP Address, Subnet Mask,
Gateway, DNS, and Store.
2. Press the button to enter IP Address, Subnet Mask, Gateway, or
DNS to set the value. (The selected option is highlighted in blue)
a Use
b Use and buttons to set the value.
c After the setup is complete, press the
and buttons to select the option.
button to exit.
Using Your Projector 47
Page 48

3. After the IP Address, Subnet Mask, Gateway, and DNS is set up,
select Store and press
4. If you select Store without pressing the Enter button, the system will
keep the original settings.
button to store the settings.
RESET—Press to reset network configuration.
WIRELESS SETTINGS—Select and press to activate wireless settings. The
wireless settings menu provides the following options:
WIRELESS—Default option is Connected. Select Disconnected to disable
the wireless connection.
NOTE: It is recommended to use the default settings for Wireless
Connect.
DHCP SERVER—Allows you to enable DHCP server of the wireless.
START IP ADDRESS—Automatically or manually assigns the Start IP
address of the DHCP server to the projector connected to the wireless.
END IP ADDRESS—Automatically or manually assigns the End IP address of
the DHCP server to the projector connected to the wireless.
SUBNET MASK—Configure the Subnet Mask of the wireless connection.
GATEWAY—Check the Gateway address with your network/system
administrator if you configure it manually.
DNS—Check the DNS Server IP address with your network/system
administrator if you configure it manually.
STORE—Press to save the changes made in wireless configuration
settings.
NOTE:
1. Use and buttons to select IP Address, Subnet Mask,
Gateway, DNS, and Store.
2. Press the button to enter IP Address, Subnet Mask, Gateway, or
DNS to set the value. (The selected option is highlighted in blue)
Using Your Projector 48
Page 49

a Use and buttons to select the option.
b Use and buttons to set the value.
c After the setup is complete, press the
3. After the IP Address, Subnet Mask, Gateway, and DNS is set up,
select Store and press button to store the settings.
4. If you select Store without pressing the Enter button, the system will
keep the original settings.
button to exit.
RESET—Press to reset wireless configuration.
MENU SETTINGS—Select and press to activate the menu settings. The menu
settings consists of the following options:
MENU POSITION—Allows you to change the position of the OSD menu on
the screen.
MENU TIMEOUT—Allows you to adjust the time for an OSD timeout. By
default, the OSD disappears after 20 seconds of non-activity.
MENU LOCK—Select On to enable the Menu Lock and hide the OSD
menu. Select Off to disable the Menu Lock. If you want to disable the
Menu Lock function and have the OSD disappear, press the Menu button
on the control panel or remote control for 15 seconds, and then disable the
function.
MENU TRANSPARENCY—Select to change the transparency level of the OSD
background.
PASSWORD—When Password Protect is enabled, a Password Protect screen
requesting you to enter a password will be displayed when the power plug is
inserted into the electrical output and the power for the projector is first
turned on. By default, this function is disabled. You can enable this feature
by selecting Enabled. If the password has been set before, key in the
password first and select the function. This password security feature will
Using Your Projector 49
Page 50

be activated the next time you turn on the projector. If you enable this
feature, you will be asked to enter the projector’s password after you turn
on the projector:
First time password input request:
1
a Go to Menu Settings, press and then select Pa sswor d to Enabled
the password settings.
b
Enabling the Password function will pop up a change screen. Key in a
4-digit number from the screen and press .
c
To confirm, enter the password again.
d
2 If you have entered an incorrect password, you will be given another two
3 To disable the password function, select the Disabled option to close the
4 To delete the password, select the Deleted option.
If the password verification is successful, you may resume with accessing
the projector's functions and its utilities.
chances. After three invalid attempts, the projector will automatically turn
off.
NOTE: If you forget your password, contact DELL™ or a qualified
service personnel.
function.
Using Your Projector 50
Page 51

CHANGE PASSWORD—Key in the original password. Then, enter the new
password and confirm the new password again.
POWER SETTINGS—Select and press to activate power settings. The power
settings menu provides the following options:
Using Your Projector 51
Page 52

QUICK SHUTDOWN—Select On to turn off the projector with a single press of
the Power button. This function allows the projector to quickly power off
with an accelerated fan speed. Slightly higher acoustic noise is expected
during quick power off.
NOTE: Before you turn on the projector again, wait for 60 seconds to
allow the internal temperature to stabilize. The projector will take a
longer time to turn on if you try to power on immediately. Its cooling fan
will run at full speed for about 30 seconds to stabilize the internal
temperature.
OWER SAVING—Select Off to disable Power Saving mode. By default, the
P
projector is set to enter power saving mode after 120 minutes of no activity.
A warning message appears on screen showing a 60 seconds countdown
before switching to power saving mode. Press any button during the
countdown period to stop the power-saving mode.
You can also set a different delay period to enter power saving mode. The
delay period is the time you want the projector to wait without an input
signal. Power saving can be set to 30, 60, 90, or 120 minutes.
If an input signal is not detected during the delay period, the projector
turns off. To turn on the projector press the Power button.
IRELESS—Select Always On or Off when Standby to set the Wireless/LAN
W
module on/off while the projector is standby status.
VGA O
UTPUT—Select Always On or Off when Standby the VGA output
feature at projector standby status.
AMP MODE—Allows you to select between Normal or ECO mode.
L
Normal mode operates at full power level. ECO mode operates at a lower
power level which may provide longer lamp life, quieter operation, and
dimmer luminance output on the screen.
AMP HOUR RESET—Press and select the Confirm option to reset the
L
lamp hour.
Using Your Projector 52
Page 53

PIP SETTINGS—Select and press to activate pip settings. The pip settings
menu provides the following options:
PICTURE IN PICTURE—Select On to enable the picture in picture display.
Select Off to disable the feature.
ECOND SOURCE—Allows you to select the possible second source is available
S
in the OSD selection depending on the current primary input source. See
"PIP Combination Sources" on page 113.
WAP—Press to swapping the first and second source displays.
S
IZE—Allows you to adjust the image size of the second source. The
S
options are: Small, Mid, Large, and Half.
AYOUT—Allows you to change the second source position to the four
L
different corners. The options are: Top L ef t , Top R i ght , Bottom Left, and
Bottom Right.
INFORMATION—The information menu displays the current projector settings.
Using Your Projector 53
Page 54

LANGUAGE
Allows you to set the language for the OSD. Press to activate the Language
menu.
HELP
If you encounter problems with your projector, you can access the help menu for
troubleshooting.
Using Your Projector 54
Page 55

Wireless Networking Installation
NOTE: Your computer must have the following minimum system requirements:
Operating System:
•Windows
Microsoft Windows XP™ Home or Professional Service pack 2 (32-bit
recommended), Windows Vista 32-bit, and Windows
32-bit or 64-bit
•MAC
MacBook and above, MacOS 10.5 and above
Minimum Hardware:
a
b
c
d
e
f
Web browser
Microsoft Internet Explorer 6.0 or 7.0 (recommended) or 8.0, Firefox 2.0, Safari
3.0, and above
Intel Dual Core 1.8 MHz or higher
256 MB of RAM required, 512 MB or more recommended
10 MB of available hard-disk space
nViDIA or ATI graphic card must with 64 MB VRAM or above
Ethernet adapter (10 / 100 bps) for an Ethernet connection
A supported WLAN adapter for a WLAN connection (any NDIS-compliant
802.11b or 802.11g or 802.11n WiFi device)
®
7 Home or Professional
Using Your Projector 55
Page 56

Enable Wireless on the Projector
In order to use your projector wirelessly, you need to complete the steps below:
1
Install the optional wireless dongle. See "Installing the Optional Wireless
Dongle" on page 11.
2
Connect the power cable to the wall outlet and press the power button.
3
Press the
Menu
button on your projector control panel or remote control.
NOTE: Use , , and buttons to navigate and to select.
The wireless connection default is
4
page 48.
5
Access the
Wireless Display
on page 38.
INPUT SOURCE
on the sub-menu. See "INPUT SOURCE WIRELESS/USB"
Using Your Projector 56
Enabled
menu, select
. See "Wireless Settings" on
Wireless/USB
and then select
Page 57

The
Wireless Guide Screen
NOTE: If wireless connection is disabled, then follow these steps to set up:
ADVANCED SETTINGS J Wireless Settings J Wireless J Connected. The
image input source will be automatically switched to wireless screen when
wireless option is selected in this step.
shown below appears:
Take note of the
6
ADDRESS
LOGIN CODE, NETWORK NAME (SSID)
. You will need these information to log in later.
Using Your Projector 57
, and
IP
Page 58

Install the Wireless Application Software on Your Computer
7
Connect your computer to the 7700FullHD wireless network.
NOTE:
• Your computer must have wireless network function to detect the
connection.
• When you connect to the 7700FullHD wireless network, you will lose
wireless connectivity with other wireless networks.
NOTE: Remember to turn off all proxies. (In Microsoft
Control Panel J Internet Options J Connections J LAN Settings)
®
Windows Vista: Click
8
Open your Internet browser. You will be automatically directed to the
7700FullHD Web Management
web page.
Using Your Projector 58
Page 59

NOTE: If the web page does not load automatically, enter the IP address
(default IP address is 192.168.100.10) noted from the projector’s screen in the
browser’s address bar.
9
The 7700FullHD Web Management page opens. For first time use, click
Download
.
10
Select the appropriate operating system, then click
Download
Using Your Projector 59
.
Page 60

11
Click
Run
to proceed with the
one-time installation of the
software.
NOTE: You may choose to
save the file and install it at a
latter time. To do this, click
Save.
12
NOTE: If you are unable to
install the application because of inadequate rights on the computer, please
contact your network administrator.
The installation software will launch. Follow the on-screen instructions to
complete setup.
Using Your Projector 60
Page 61

Launch the Wireless Application
Once the installation is complete, the program will launch and search
automatically. If the program not launch automatically, you can double-click the
and then click OK.
Login
To communicate with your projector, enter the Login Code provided in Step 6 of
Wireless Networking Installation, then click OK.
icon on the desktop to start the application. Select the Dell 7700FullHD,
NOTE: If the IP Address is not detected, enter the IP Address displayed at the
bottom left corner of the screen.
Using Your Projector 61
Page 62

Understanding the Buttons
After a successful log in, the following screen appears:
Projection Mode
1
2
3
4
Item Description
1 Status Bar Displays IP and LOGIN CODE information.
Menu Click to activate the application menu.
Minimize button Click to minimize the application.
Close button Click to exit the application.
2 Status Mode
Projection Mode Click to activate the projection mode.
Video Mode Click to activate the video mode.
3 Controls Toolbar
Full screen Click to project the image in full screen.
Split 1 Click to project the image in the upper left
corner of the screen.
Split 2 Click to project the image in the upper right
corner of the screen.
Split 3 Click to project the image in the lower left
corner of the screen.
Split 4 Click to project the image in the lower right
corner of the screen.
Stop Click to stop projection.
Pause Click to pause projection.
Audio Projection Click to enable audio projection.
4 Connection Status
Connection Icon Blinks when projection is in progress.
Using Your Projector 62
Page 63

Projecting the Presentation
• To project the presentation, click any of the projection buttons .
• To pause the presentation, click . The icon turns green.
.
again.
• To continue the presentation, click
• To audio projection the presentation, click . See "Audio Projection
Installation" on page 71.
• To stop the presentation, click
Video Mode
1
Item Description
1 Control Toolbar
Open Click to open folder and searching the video
or music file.
Play Click to starting player.
Stop Click to stop player.
Mute Click to mute/un-mute.
NOTE: The following information is for wireless data presentation mode only.
Image display could be slow or not displayed smoothly if displaying a video clip
or animation. Refer to the frame-rate table below for reference:
Frame Rate of Wireless Presentation
Screen Variation %
1
<5 % 30
<10% 28
<20% 26
<40% 25
<75% 22
<=100% 20
Estimated frames per second
3
3
3
3
3
3
Using Your Projector 63
2
Page 64

NOTE:
1
The percentage of screen variation is based on 1024 x 768. Example to display a
320 x 240 video clip on 1024 x 768 desktop, the screen variation is 9.8%.
2
Actual frame rate could be different depending on factors such as network
environment, image content, signal conditions, locations, and CPU performance.
3 Under clean WLAN environment using 802.11g connection, and no screen
stretching.
4
Compressed to 1024 x 768 and under 802.11g.
NOTE: Your computer will not enter S1 (standby mode) / S3 (sleep mode) / S4
(hibernate mode) when running a wireless, USB Display, or USB Viewer
presentation.
Using the Menu
Click to display the menu.
W
EB MANAGEMENT—Click to open the Web Management page. See "Managing the
Projector From Web Management" on page 78.
SEARCH FOR PROJECTOR—Click to search and connect to wireless projector.
MAKE APPLICATION TOKEN—Click to make application token. See "Make
Application Token" on page 99.
INFO—Click to display system information.
HOTKEY—Click to display the hotkey information.
ABOUT—Click to display the application version.
EXIT—Click to close the application.
Using Your Projector 64
Page 65

Presentation to Go (PtG) Installation
Minimum system requirements to install PtG are as follow:
Operating System:
-Windows
Microsoft Windows XP™ Home or Professional Service pack 2/3 (32-bit
recommended), Windows Vista 32-bit, or Windows
32-bit or 64-bit
- Office 2003 or Office 2007
®
7 Home or Professional
In order to use your USB Viewer, you need to complete the steps below:
"
Wireless and LAN
1
2
Plug the USB Flash drive to your projector.
NOTE:
• Supports only the JPEG format photo within 10 MB x 40 M pixels.
• The PtG converter can convert your PowerPoint files into PtG files. See
"Install the PtG Converter Application Software on Your Computer" on
page 69.
• You can download the "PtG Converter - Lite" from the Dell Support site at
support.dell.com.
At
INPUT SOURCE
on the sub-menu. See "INPUT SOURCE WIRELESS/USB" on page 38.
NOTE:
1
When the Wireless and LAN function is disabled , Go to
select the "
and LAN function.
2
When the Wireless connection is disconnected, Go to
menu, select the "
connection.
" option and "
menu, select
Enabled
" in the "
Connected
Wireless connection
Wireless/USB
Wireless and LAN
" in the
Wireless
" default are enabled.
and then select
" option to activate the Wireless
option to enable wireless
USB Viewer
LAN Settings
Wireless Settings
menu,
Using Your Projector 65
Page 66

PtG Viewer
System will stay in this page when ready.
Photo Viewer
66 Using Your Projector
Page 67

PtG/Photo Function Introduction
Show valid PtG and Photo files which are stored in the USB disk.
NOTE: If only one disk is detected, the system will skip this step.
PtG Overview
Using Your Projector 67
Page 68

Photo Overview
NOTE: Supports 14 languages of photo files name format (Languages: English,
Dutch, French, German, Italian, Japanese, Korean, Polish, Portuguese, Russian,
Simplified Chinese, Spanish, Swedish, and Traditional Chinese).
Buttons-Introduction
Use the up, down, and left buttons to navigate and button on your projector's
control panel or remote control to select.
Button Up Down Left Right Enter
PtG function Up Down Back No function Enter
PtG Playback Pre Page Next Page Back No function Next Pause
Photo
function
Photo
Playback
NOTE: If you enter the OSD menu while using PtG, PtG navigation by the up,
down, and left buttons will not function.
68 Using Your Projector
Up Down Back No function Enter
Pre Page Next Page Back No function No
function
Page 69

Install the PtG Converter Application Software on Your Computer
Please follow the on-screen instructions to complete the setup.
NOTE: You can download the "PtG Converter - Lite" from the Dell Support site at
support.dell.com.
Using Your Projector 69
Page 70

Using the PtG Converter
1
Launch the "PtG Converter - Lite.exe" or double-click the icon on the
desktop to start the application.
2
Click to select a PowerPoint file and start conversion.
3
Click
Browse
button to select the storage location and then press OK.
NOTE:
1
If your computer does not have MS PowerPoint installed, file convert will fail.
2
PtG converter only supports up to 20 pages.
3
PtG converter only supports conversion of .ppt files to .PtG files.
Using Your Projector 70
Page 71

Audio Projection Installation
Audio Projection only supports the Wireless Display and LAN Display input
source.
Minimum system requirements as follow:
Operating System:
•Windows
Microsoft Windows XP™ Home or Professional Service pack 2/3 (32-bit
recommended), Windows Vista 32-bit, or Windows® 7 Home or
Professional 32-bit or 64-bit
•MAC
MacBook Pro and above, MacOS 10.5 and above
Minimum Hardware:
a
Intel® Core™ i5-460 MHz (2.53 GHz/Turbo 2.8 GHz) or greater
b
1 GB DDR3 VRAM independent graphics card or more recommended
c
2 GB dual channel DDR3 SDRAM memory at 1066 MHz required or
more recommended
d
Gigabit Ethernet
e
Integrated 802.11 b/g/n Wi-Fi Device for a WLAN connection
NOTE: If your computer does not meet the minimum hardware requirements,
audio projection may have lag or noise. Meet the recommended system
requirements to have optimized performance of audio projection.
NOTE: If you want to use wireless for audio projection, need installed the
optional wireless dongle. See "Installing the Optional Wireless Dongle" on
page 11.
NOTE: The audio projector function needs an extra driver to be installed. A
pop-up screen will alert you if your computer needs to install the driver. You can
download the Audio Projection Driver from the Dell Support site at
support.dell.com.
NOTE: Ports / Protocol for connection to the projector for projection via
Ethernet:
UDP: 1047, (backup: 1048, 1049)
TCP: 3268, 515, 1688, 1041 (backup: 389, 8080, 21)
Using Your Projector 71
Page 72

Enable Wireless or LAN on the Projector
1
Connect the power cable and turn on the projector by pressing the power
button.
2.1
If the
LAN
is used for audio projection, follow these steps to enable Wireless
and LAN function (default is
Wireless and LAN Enabled
Enabled
.
):
Advanced Settings LAN Settings
2.2
If the
Wireless
connection (default is
Wireless Connected
Using Your Projector 72
is used for audio projection, follow these steps to enable wireless
Connected
):
Advanced Settings Wireless Settings
.
Page 73

3
Access the
Wireless Display
Input Source
on the sub-menu.
menu, select the
Wireless/USB
and then select the
The Wireless Guide Screen shown below appears:
4
Take note of the
ADDRESS
LOGIN CODE, NETWORK NAME (SSID)
. You will need these information to log in later.
, and
Install the Wireless Application Software on Your Computer
5
"Wireless Application Software" is required if the Wireless or LAN is used for
the Audio Projection set-up. Please download and install the software the first
time you use Audio Projection. If it is already installed, skip
NOTE: You only need to install the "Wireless Application Software" once.
Wireless Application Software download and install steps refer to steps 7 to 12
6
of the "Wireless Networking Installation" on page 55.
Step 5 - 6
IP
.
Using Your Projector 73
Page 74

NOTE: If the LAN is used for audio projection, connect the LAN cable to the
projector and the computer.
Launch the Wireless Application
7
Once the installation is complete, the program will launch automatically. Or
you can double-click the icon on the desktop to start the application.
NOTE:
1 When you select the LAN for projection, click "Skip".
2 When you select the Wireless for projection, select the Dell 7700FullHD,
and the click "OK".
Using Your Projector74
Page 75

Login
8
To communicate with your projector, enter the Login Code (see Step 4), and
then click OK.
NOTE: If the IP Address is not detected, enter the IP Address displayed at the
bottom left corner of the wireless screen.
9
You are now logged into the 7700FullHD Wireless Application. Click the "Play"
button in the application to starting the LAN or wireless projection.
NOTE: You may use the controls to either project in full screen mode or in split
screen mode.
Click the "
10
Projection
NOTE: Audio projector function need install extra driver, if your computer do
not install driver, will pop-up need install driver message on screen. You can
download the "extra driver" from the Dell Support site at support.dell.com.
Executing the Windows Media Player or others audio player software
11
(example: Winamp player...) on your computer.
Audio Projection
function.
" button in the application to enable
Audio
Using Your Projector 75
Page 76

Video Stream Installation
Video Stream only supports the Wireless Display and LAN Display input source.
Minimum system requirements as follow:
Operating System:
•Windows
Microsoft Windows XP™ Home or Professional Service pack 2/3 (32-bit
recommended), Windows Vista™ 32-bit, or Windows
Professional 32-bit or 64-bit
•MAC
MacBook Pro and above, MacOS 10.5 and above
Minimum Hardware:
a
Dual® Core™ 1.8 GHz or greater
b
64 MB VRAM independent graphics card or more recommended
c
2 GB DDR SDRAM memory or more recommended
d
Gigabit Ethernet
e
Integrated 802.11 b/g/n Wi-Fi Device for a WLAN connection
NOTE: If your computer does not meet the minimum hardware requirements,
video stream may have lag. Meet the recommended system requirements to
have optimized performance of the video stream.
NOTE: If you want to use wireless feature, need installed the optional wireless
dongle. See "Installing the Optional Wireless Dongle" on page 11.
NOTE: Ports / Protocol for connection to the projector for projection via
Ethernet:
®
7 Home or
UDP: 1047, (backup: 1048, 1049)
TCP: 3268, 515, 1688, 1041 (backup: 389, 8080, 21)
Video Stream Support Format
File Format Video Format Max Resolution Audio Format
MP4, MOV H.263 FWVGA (854x480) AAC LC, LPCM
MP4, MOV H.264 Up to 720P30 AAC LC, LPCM, MP3
MP4, MOV MPEG-4 Up to 720P30 AAC LC, LPCM, MP3
ASF WMV9/VC-1 Up to 720P24 WMA
Using Your Projector 76
Page 77

Enable Wireless or LAN on the Projector
Please refer to "steps 1 to 4 of the Audio Projection Installation" on page 71 for
instructions to enable wireless or LAN feature.
Install the Wireless Application Software on Your Computer
Please refer to "steps 5 to 6 of the Audio Projection Installation" on page 73 for
instructions to install the Dell Wireless Application Software.
Launch the Wireless Application
Please refer to "step 7 of the Audio Projection Installation" on page 74 for
instructions to launching the application..
Login
Please refer to "step 8 of the Audio Projection Installation" on page 75 for
instructions to log-in the application.
1
You are now logged into the 7700FullHD Wireless Application. Click
Video Mode
"
2
Click to select the video or music files and starting player.
NOTE: Select the video or music file, then press Play. The projector will enter
hibernate mode first, it will playback the video or music file after a few seconds.
" button switch to Video Mode screen.
Using Your Projector 77
Page 78

Managing the Projector From Web Management
Configuring the Network Setting
If the projector is connected to a network, you can access the projector using a web
browser. For configuring the network setting, refer to "LAN Settings" on page 47.
Accessing Web Management
Use Internet Explorer 6.0 and above or Firefox 2.0 and above and enter the IP
address. You can now access Web Management and manage the projector from a
remote location.
Home Page
• Access the Web Management Home page by entering the projector’s IP
address at the web browser. See "LAN Settings" on page 47.
• Select the language for web management from the list.
• Click any menu item on the left tab to access the page.
Using Your Projector 78
Page 79

Download the Wireless Application Software
See also "Wireless Networking Installation" on page 55.
Click the Download button of the corresponding operating system of your
computer.
Using Your Projector 79
Page 80

Conference Control
This allows you to host conference presentations from different sources without
using projector cables and lets you control how each presentation will appear on
screen.
NOTE: Without Conference Play Control, the last user to hit the "Play" button on
the application will take control of the full-screen projection.
Computer Name: Lists the computers logged for conference control.
Play Control: Click the buttons to control how each computer’s projection will
appear on screen.
• Full screen projection — The presentation from the computer
occupies the whole screen.
• Split 1 - The presenation from the computer appears on the upper
•
• Split 3- The presenation from the computer appears on the lower left
• Split 4- The presenation from the computer appears on the lower
•
IP Address: Shows each computer’s IP Address.
NOTE: To end the conference, click Home.
left corner of the screen.
Split 2- The presenation from the computer appears on the upper
right corner of the screen.
corner of the screen.
right corner of the screen.
Stop - Projection from the computer is stopped.
Using Your Projector 80
Page 81

Managing Properties
Admin
An administrator password is required to access the Admin page.
• Admin Password: Enter the administrator password and then click Login.
The default password is "admin". To change the password, see "Change
Passwords" on page 86.
Using Your Projector 81
Page 82

System Status
Displays the Network Status, Connection Status, and Projector Status
information.
Using Your Projector 82
Page 83

Network Setup
See OSD section on page 47.
IP Setup
• Choose Obtain an IP address automatically to assign an IP address to the
DHCP Server Setup
• Choose Auto to automatically set up the Start IP, End IP, Subnet Mask,
Wireless Setup
• Choose Enabled to set up the Region, SSID, SSID Broadcast, Channel,
projector automatically, or Use the following IP address to assign an IP
address manually.
Default Gateway, and DNS Server address from a DHCP server, or Disable
to disable this function.
Encryption, and Key. Choose Disable to disable the wireless set up.
Using Your Projector 83
Page 84

SSID: Up to maximum length of 32 characters.
Encryption: You can Disable WPA key or select one of 64-bit or 128-bit in
ASCII or HEX string.
Key: If Encryption is enabled, you have to set key value according to the
encryption mode you selected.
RADIUS Server Setup
• Set up the IP address, Port, and Key information.
GateKeeper
• There are three options:
All Pass: Allow users to access the office network via the wireless projector.
All Block: Block users from accessing the office network via the wireless
projector.
Internet Only: Block users from the office network, but still reserve Internet
connection capability.
Set Security For SNMP
• Setup Write Community information.
Click the Apply button to save and apply changes. The projector must be restarted
for the changes to take effect.
Using Your Projector 84
Page 85

Projection Setup
Projection Setup
• Resolution: Allows you to select the resolution. Options are: XGA (1024 x
768) and 720p (1280 x 720).
• Login Code: Select how you want the login code to be generated by the
projector. There are three options:
•
Disable
•
Random
•
Use the following code
in to the system.
Projector Setup
•Set up the
Click the
for the changes to take effect.
Model Name, Projector Name, Location
information (up to 21 characters for each field).
Apply
button to save and apply changes. The projector must be restarted
: Login code will not be required when logging in to the system.
: Default is
Random
. Login code will be randomly generated.
: Enter a 4-digit code. This code will be used to log
, and
Contact
Using Your Projector 85
Page 86

Change Passwords
This page allows you to change the administrator password.
• Enter New Password: Enter the new password.
• Confirm New Password: Enter the password again and click
NOTE: Contact Dell if you forget your administrator password.
Apply
.
Using Your Projector 86
Page 87

Reset to Default
Click the
settings.
Apply
button to restore the wireless/network setup to its factory default
Using Your Projector 87
Page 88

Firmware Upgrade
Use the Firmware Upgrade page to update your projector’s wireless firmware.
NOTE: Please disable and enable wireless/network using the OSD to restart
the network card for the projector after firmware upgrade is successful.
To start the firmware update, follow these steps:
Press
1
2
Click the
in your device.
Browse
to select the file to update.
Update
button to start. Wait while the system updates the firmware
CAUTION: Do not interrupt the update process as this may cause the system
to crash!
Click OK when the update is complete.
3
Using Your Projector 88
Page 89

Projector Upgrade
Use the Projector Upgrade page to update your projector’s firmware.
NOTE: Please disable and enable wireless/network using the OSD to restart
the network card for the projector after firmware upgrade is successful.
To start the firmware update, follow these steps:
1
2
3
4
NOTE: Ensure the wireless standby mode is turn on (default is off), follow these
steps: Advanced Settings -> Power Settings -> Wireless -> Always On.
Plug in the power cord and the projector will enter standby mode.
Connect the
Open your Internet browser and then enter the IP address (default IP address is
192.168.100.10).
At
Projector Upgrade
LAN cable
to the projector and your computer.
web page, press
Browse
to select the file to update.
Using Your Projector 89
Page 90

5
Click the
in your device.
NOTE: Tem p and Lamp LEDs are both lighted up (Amber).
CAUTION: Do not interrupt the update process as this may cause the system
to crash!
Click OK when the update is complete.
6
Update
button to start. Wait while the system updates the firmware
Using Your Projector 90
Page 91

Projector Control Panel
Projector Information
• Projector Status: There are five status: Lamp On, Standby, Power Saving,
Cooling, and Warming up. Click Refresh to refresh the status and control
settings.
• Pow er Sa ving: Power Saving can be set to Off, 30, 60, 90, or 120 minutes. For
more information, see "Power Saving" on page 52.
• Alert Status: There are three alert states: Lamp warning, Low lamp life, and
Temperature warning. Your projector might lock up in the protection mode
if any of the alerts are activated. To exit the protection mode, click Clear to
clear the Alert Status before you power on your projector.
Using Your Projector 91
Page 92

Image Control
•
Operation Mode
are: Normal Mode and ECO Mode.
•
Projector Mode
the projector is mounted. There are four projection modes: Front
Projection-Desktop, Front Projection-Ceiling Mount, Rear ProjectionDesktop, and Rear Projection-Ceiling Mount.
Source Select
•
input source. You can select VGA-A, VGA-B, S-Video, Composite Video,
HDMI-A, HDMI-B, RCA Component, Wireless Display, USB Display, or
USB Viewer.
•
Video Mod e
projector is being used:
-
Presentation:
-
-
-
-
•
Blank Screen
•
Aspect Ratio
appears.
•
Brightness
•
Contrast
Click the
Audio Control
•
Audio Input: Select the input source. Options are:
HDMI-B
•
Vo lu me
•
Speaker
audio function.
Click the Factory Reset button to restore the factory default settings.
Bright:
Movie:
For viewing movies and photos
sRGB:
Provides a more accurate color representation.
Custom:
Auto Adjust
: Select the value (0~20) for audio volume.
: Select On to enable the audio function or select
: Allows you to select the operation mode. The two options
: Allows you to select the projector mode, depending on how
: The Source Select menu allows you to select your projector
: Select a mode to optimize the display image based on how the
Best for presentation slides.
Maximum brightness and contrast.
User-preferred settings.
: You can select On or Off.
: Allows you to select the aspect ratio to adjust how the image
: Select value to adjust the brightness of the image.
: Select value to adjust the display contrast.
button to adjust the settings automatically.
, and
Wireless/LA N.
Analog In, HDMI-A,
Off
to disable the
Using Your Projector 92
Page 93

Alert Setting
E-mail Alert
• E-mail Alert: You can set whether to be notified by email (Enable) or not
(Disable).
• To /Cc/From: You can enter email address of sender (From) and recipients
(To/Cc) to receive notification when an abnormality or warning occurs.
• Subject: You can enter the subject line of the email.
Click the E-mail Alert Test button to test the e-mail alert settings.
SMTP Setting
• Out going SMTP server, User name, and Password should be provided by
your network administrator or MIS.
Alert Condition
• You can select the abnormalities or warnings to be notified by email. When
any of the alert conditions occur, an email will be sent to the recipients
(To/Cc).
Click the Save button to save the settings.
NOTE: E-mail alert is designed to work with a standard SMTP server using the
default 25 port. It does not support encryption and authentication (SSL or TLS).
Using Your Projector 93
Page 94

Reboot System
Click Reboot to reboot the system.
Crestron
For Crestron function.
Using Your Projector 94
Page 95

FAQS:
I would like to remotely access
the projector via the Internet.
What is the best setting for the
browser?
To have the best setting for the browser, please
follow the below steps:
1
Open
Control Panel Internet Options
General
Settings
2
Some firewall or anti-virus may block the
tab
Temp ora r y In t er n et Fi l es
Select
Every visit to the pages
HTTP application. If possible, turn off the
firewall or anti-virus.
I would like to remotely access The following are the TCP/IP socket ports
the projector via Internet. What which the projector uses.
socket port number should I
open for it in the firewall?
UDP/TCP Port
Description
Number
TCP 80 Web configuration
(HTTP)
UDP/TCP 25 SMTP: used for email
routing between mail
servers
UDP/TCP 161 SNMP: Simple
Network
Management
Protocol
UDP 9131 AMX: used for AMX
discovery
.
Why am I unable to access the
projector via the Internet?
1
Check whether your computer/laptop is
connected to the Internet.
2
Check with your MIS or network
administrator whether your computer/laptop
is in the same subnet.
Using Your Projector 95
Page 96

Why am I unable to access the
SMTP server?
1
Check with your MIS or network
administrator whether the SMTP server
function is open for the projector and the IP
assigned to the projector is allowed to access
the SMTP server. The projector’s SMTP
socket port number is 25, this cannot be
changed.
2
Check if the outgoing SMTP server, user
name, and password are set correctly.
3
Some SMTP servers will check whether the
mail address of "From" correlates with the
"User name" and "Password". For example,
you use test@dell.com as the mail address in
"From". You should also use test@dell.com
account information for the User name and
the password to log in the SMTP server.
Why am I unable to receive the
test alert email even though the
projector already indicates the
test mail is already sent?
Using Your Projector 96
It could be because the SMTP server
recognized the alert mail as a spam mail or
because of the SMTP server restriction. Check
with your MIS or network administrator for
the SMTP server’s setting.
Page 97

Firewall Configuration and FAQ
Q: Why can’t I access the Web Management Page?
A: Your computer’s firewall configuration may prevent you from accessing the
Web Management Web Page. Please refer to the following configuration
settings:
Firewall Protection Configuration
McAfee Security 1
Center
Norton AntiVirus 1
Sygate Personal 1
Firewall
Launch McAfee Security Center (Start > All
Programs > McAfee > McAfee Security Center).
2
3
4
5
2
3
4
5
6
7
2 From the Running Applications list, find and
3
On the
personal firewall plus
Internet Applications List
Find and select
list.
Right-click on its
Select
Allow Full Access
Open Norton AntiVirus (Start > All Programs >
Norton AntiVirus > Norton AntiVirus).
Click
Options
On the
Status
Protection
Find and select
list of programs.
Right-click on its
Select
Permit All
Click OK.
Open Sygate Personal Firewall (Start > All Programs
> Sygate > Sygate Personal Firewall).
right-click on Dell 7700FullHD Projector.
Select
Allow
tab, click
.
Dell 7700FullHD Projector
Permissions
menu, then select
page, select
.
Dell 7700FullHD Projector
Internet Access
from the pop-up menu.
from the pop-up menu.
column.
from the pop-up menu.
Norton AntiVirus
Internet Worm
column.
View the
from the
from the
.
Using Your Projector 97
Page 98

Firewall Protection Configuration
Windows Firewall 1
Zone Alarm 1
Open Windows Firewall (Start > All Programs >
Control Panel). Double-click on
2
On the
exceptions
3
On the
button.
4
Find and select
list of programs, then click OK.
5
2
3
4
5
Click
OK
Open Zone Alarm Firewall (Start > All Programs >
Zone Labs > Zone Labs Center).
On the
Dell 7700FullHD Projector
Right-click on its
Select
Right-click and select
Server-Trusted
Windows Firewall
General
Allow
tab, uncheck
.
Exceptions
to confirm exceptions settings.
Program Control
tab, click the
Dell 7700FullHD Projector
Access-Trusted
from the pop-up menu.
, and
Server-Internet
Don’t allow
Add Program...
page, find and select
from the list.
column.
Allow
for the
from the
Access-Internet
columns.
.
,
Using Your Projector 98
Page 99

Make Application Token
NOTE: This feature is only applicable to wireless-enabled models.
The Application Token lets you perform Plug and Show using a USB token.
From the application software, click >
1
2
The following screen appears. Click
Next
Make Application Token
.
.
3
Plug a flash drive into any of the USB ports on your computer. Select the drive
Next
from the list, then click
.
Using Your Projector 99
Page 100

Click
Finish
to close the wizard.
4
100 Using Your Projector
 Loading...