

Page 1

Latitude 7410
Setup and Specifications
Regulatory Model: P119G and P131G
Regulatory Type: P119G001 and P131G001
Page 2

Notes, cautions, and warnings
NOTE: A NOTE indicates important information that helps you make better use of your product.
CAUTION: A CAUTION indicates either potential damage to hardware or loss of data and tells you how to avoid the
problem.
WARNING: A WARNING indicates a potential for property damage, personal injury, or death.
© 2020 Dell Inc. or its subsidiaries. All rights reserved. Dell, EMC, and other trademarks are trademarks of Dell Inc. or its
subsidiaries. Other trademarks may be trademarks of their respective owners.
May 2020
Rev. A00
Page 3

Contents
1 Set up your computer................................................................................................................... 5
2 Chassis overview..........................................................................................................................7
Display view............................................................................................................................................................................ 7
Palmrest view.........................................................................................................................................................................9
Left view............................................................................................................................................................................... 10
Right view............................................................................................................................................................................. 10
Bottom view.......................................................................................................................................................................... 11
Modes.....................................................................................................................................................................................11
3 Keyboard shortcuts.....................................................................................................................14
4 Specifications of Latitude 7410.................................................................................................... 16
Dimensions and weights......................................................................................................................................................16
Processors............................................................................................................................................................................ 16
Chipset...................................................................................................................................................................................17
Operating system................................................................................................................................................................. 17
Memory..................................................................................................................................................................................17
External ports....................................................................................................................................................................... 18
Internal connectors.............................................................................................................................................................. 18
Wireless module....................................................................................................................................................................18
Audio...................................................................................................................................................................................... 19
Storage................................................................................................................................................................................. 20
Media-card reader...............................................................................................................................................................20
Keyboard...............................................................................................................................................................................20
Camera.................................................................................................................................................................................. 21
Touchpad...............................................................................................................................................................................21
Touchpad gestures........................................................................................................................................................22
Fingerprint reader (optional)..............................................................................................................................................22
Power adapter..................................................................................................................................................................... 22
Battery.................................................................................................................................................................................. 22
Display................................................................................................................................................................................... 23
GPU—Integrated................................................................................................................................................................ 25
Computer environment.......................................................................................................................................................25
Security.................................................................................................................................................................................26
5 System setup.............................................................................................................................27
Entering BIOS setup program............................................................................................................................................ 27
Navigation keys....................................................................................................................................................................27
Boot Sequence.....................................................................................................................................................................27
One time boot menu........................................................................................................................................................... 28
System setup options......................................................................................................................................................... 28
Clearing BIOS (System Setup) and System passwords...........................................................................................35
Contents 3
Page 4

6 Software................................................................................................................................... 36
Operating system................................................................................................................................................................ 36
Downloading the audio driver............................................................................................................................................ 36
Downloading the graphics driver.......................................................................................................................................36
Downloading the USB driver.............................................................................................................................................. 37
Downloading the WiFi driver.............................................................................................................................................. 37
Downloading the media-card reader driver......................................................................................................................38
Downloading the chipset driver......................................................................................................................................... 39
Downloading the network driver....................................................................................................................................... 39
7 Getting help and contacting Dell...................................................................................................41
4 Contents
Page 5

Set up your computer
About this task
This section discusses setting up your Dell Latitude 7410 system for the first time, including setting up the Internet connectivity and,
personalizing with Dell apps.
Steps
1. Connect the power adapter and press the power button.
1
NOTE: To conserve battery power, the battery might enter power-saving mode.
2. Finish operating system initial setup.
For Windows:
a) Connect to a network or Windows updates.
NOTE:
If connecting to a secured wireless network, enter the password for the wireless network access when
prompted.
b) Sign in to your Microsoft account or create an account.
Set up your computer 5
Page 6

c) On the Support and Protection screen, enter your contact details.
For Ubuntu:
Follow the on-screen instructions to complete the setup. For more information about installing and configuring Ubuntu, see the
knowledge base articles SLN151664 and SLN151748 at www.dell.com/support.
3. Locate and use Dell apps from the Windows Start menu—Recommended.
Table 1. Locate Dell apps
Dell Product Registration
Register your system unit with Dell.
Dell Help and Support
Access help and support for your system.
SupportAssist
Proactively checks the health of your system hardware and software.
NOTE: Renew or upgrade your warranty by clicking the
warranty expiry date in SupportAssist.
Dell Update
Utility updates your system with critical fixes and important device
drivers as they become available.
Dell Digital Delivery
Download software applications including software that is purchased
but not preinstalled on your system.
4.
NOTE: Create a recovery drive to troubleshoot and fix problems that may occur with Windows.
Create recovery drive for Windows. For more information, see Create a USB recovery drive for Windows.
6
Set up your computer
Page 7
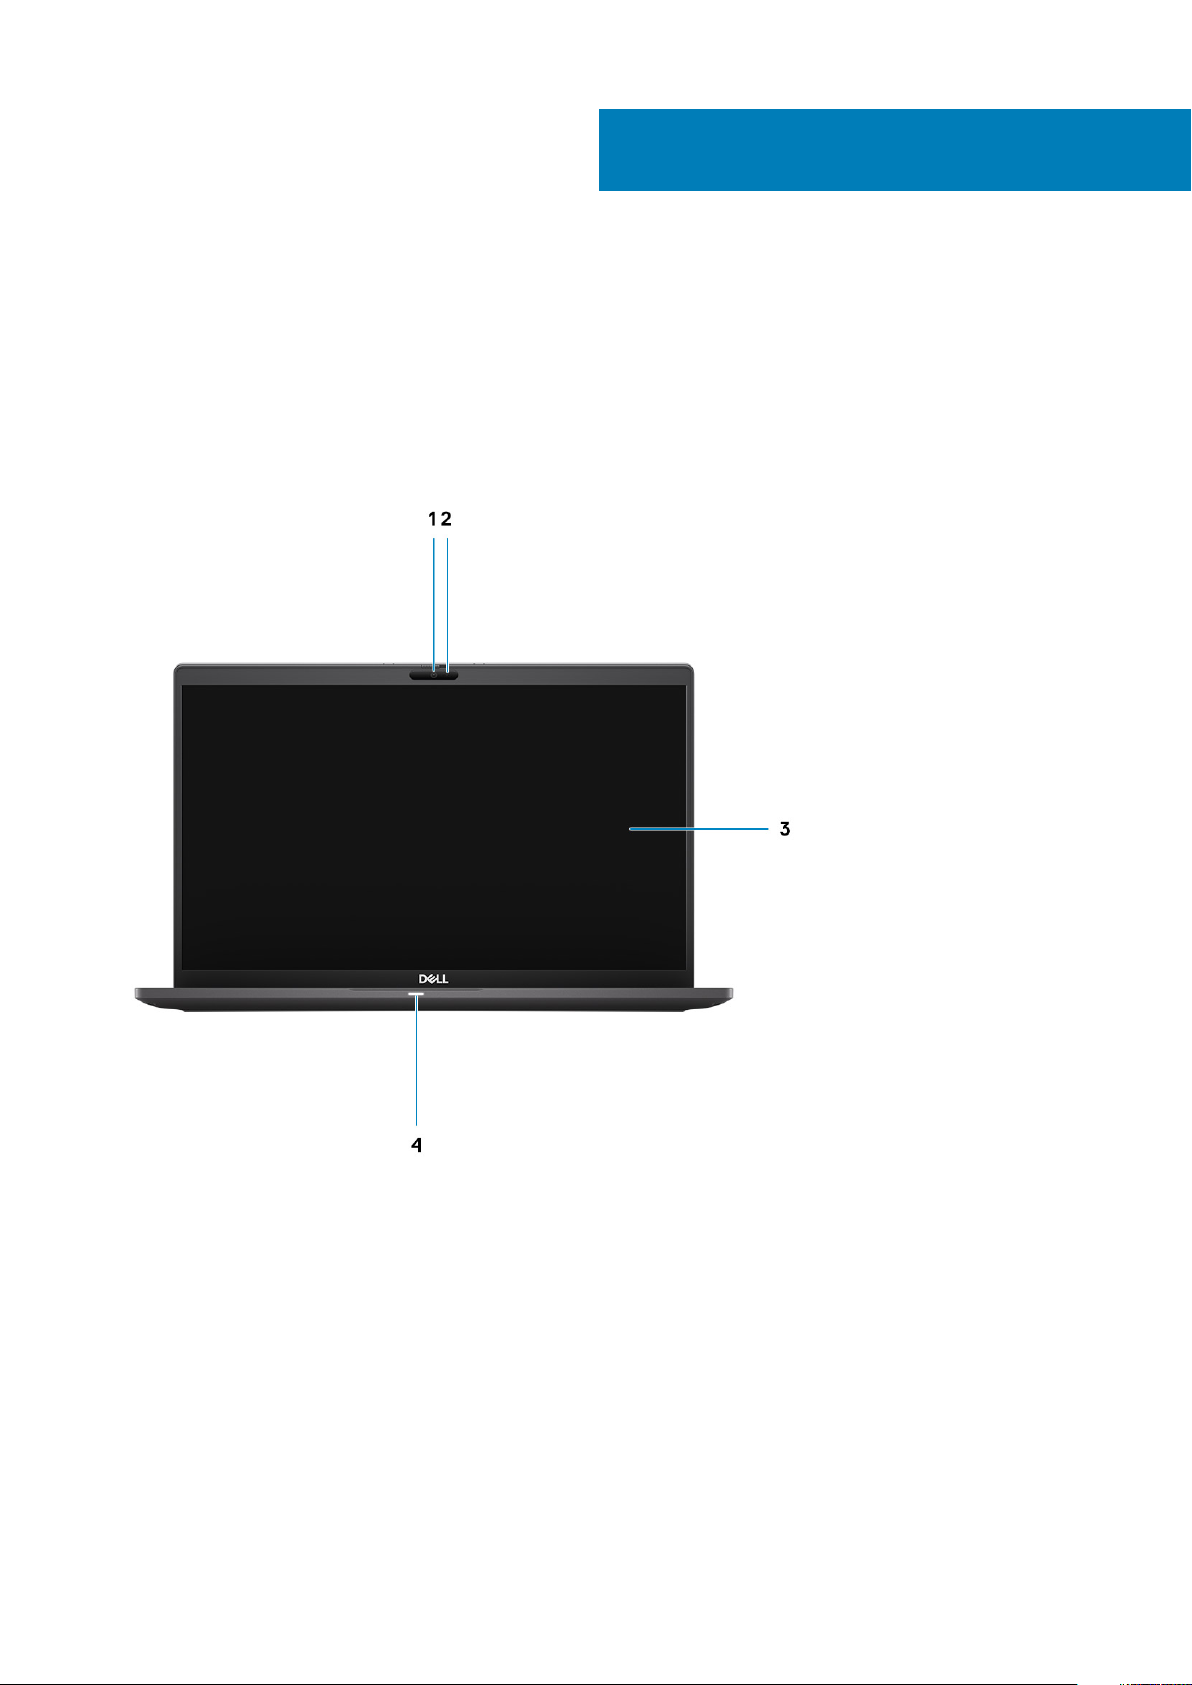
Display view
Laptop
2
Chassis overview
1. RGB or IR Camera (optional) 2. Camera status LED
3. LCD panel 4. Battery status LED
Chassis overview 7
Page 8

2-in-1
1. Proximity sensor 2. IR emitter (optional)
3. RGB or IR Camera (optional) 4. Camera status LED
5. Ambient Light Sensor (ALS) sensor 6. LCD panel
7. Battery status LED
8 Chassis overview
Page 9
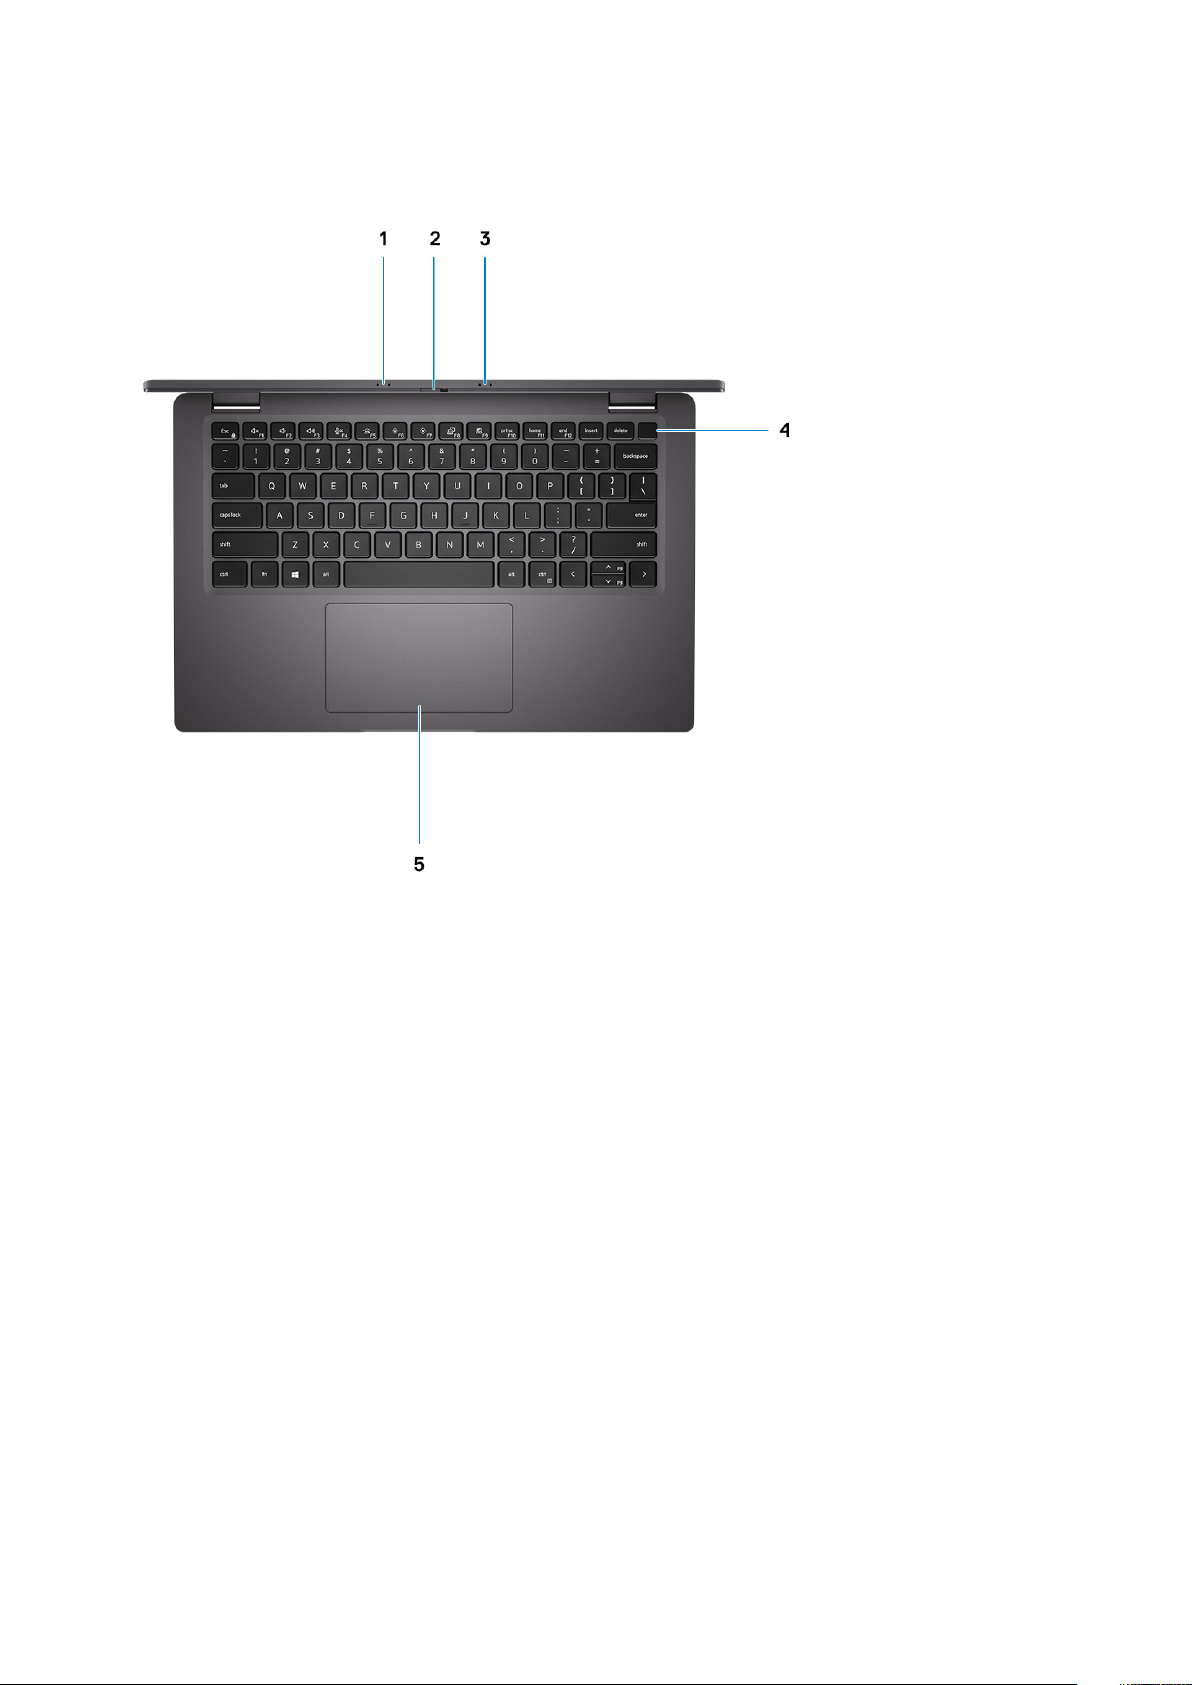
Palmrest view
1.
Microphone array
2. SafeView switch
3. Microphone array
4. Power button (Optional: Fingerprint reader)
5. Touchpad
Chassis overview
9
Page 10

Left view
1. HDMI 2.0 port
2. USB 3.2 Gen 2 Type-C port with DisplayPort (alt mode), Thunderbolt 3.0 with Power Delivery(PD)
3. USB 3.2 Gen 2 Type-C port with DisplayPort (alt mode), Thunderbolt 3.0 with PD
4. micro-SD card slot
5. SmartCard slot (optional)
Right view
1. SIM card slot (optional with WWAN configuration only)
2. Universal Audio Jack
3. USB 3.2 Gen 1 Type-A port
4. USB 3.2 Gen 1 Type-A port, with PowerShare
5. Wedge shaped lock slot
10
Chassis overview
Page 11
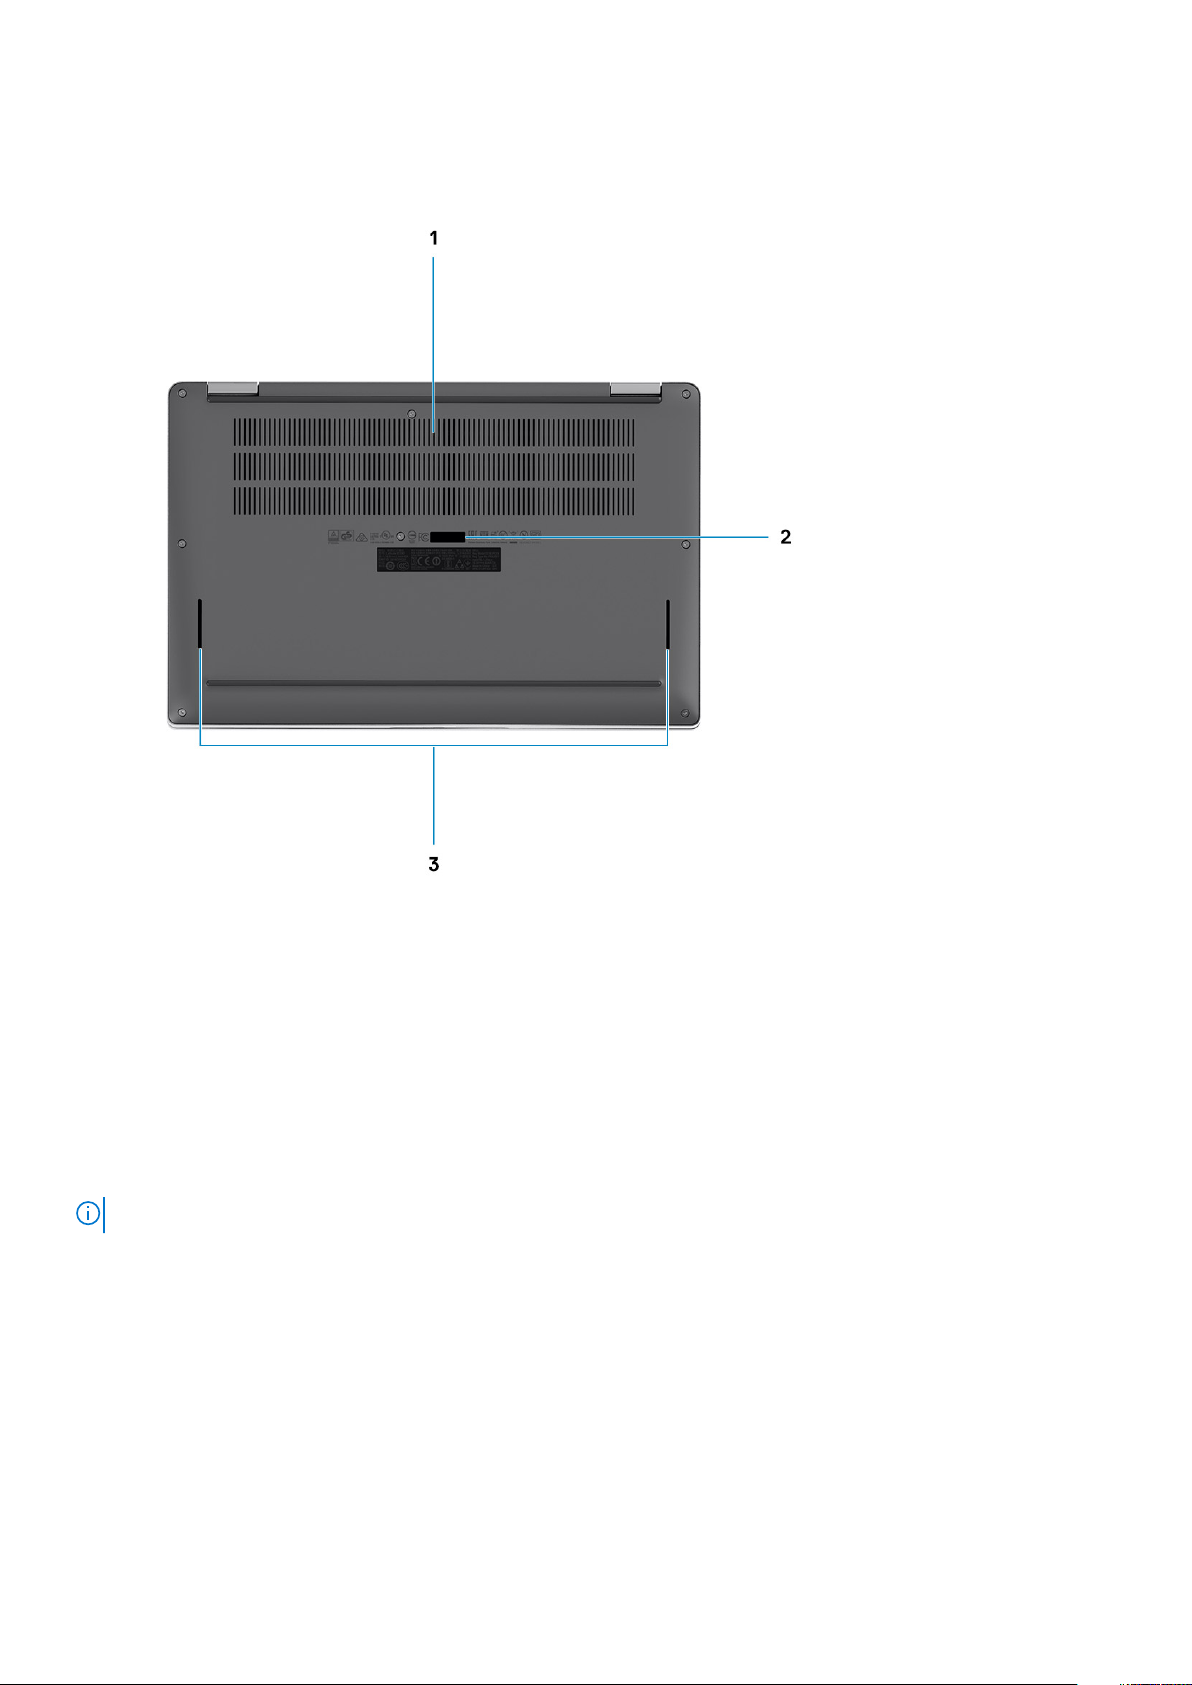
Bottom view
1.
Cooling vents
2. Service tag label
3. Speaker grills
Modes
This section illustrates various usage modes of a Latitude 7410 Laptop and 2-in-1 computer:
Notebook mode
NOTE: This usage mode applies to both laptop and 2-in-1 configurations.
Chassis overview 11
Page 12

2-in-1 Modes
NOTE: These usage mode applies 2-in-1 configurations only.
Tablet mode
12
Chassis overview
Page 13
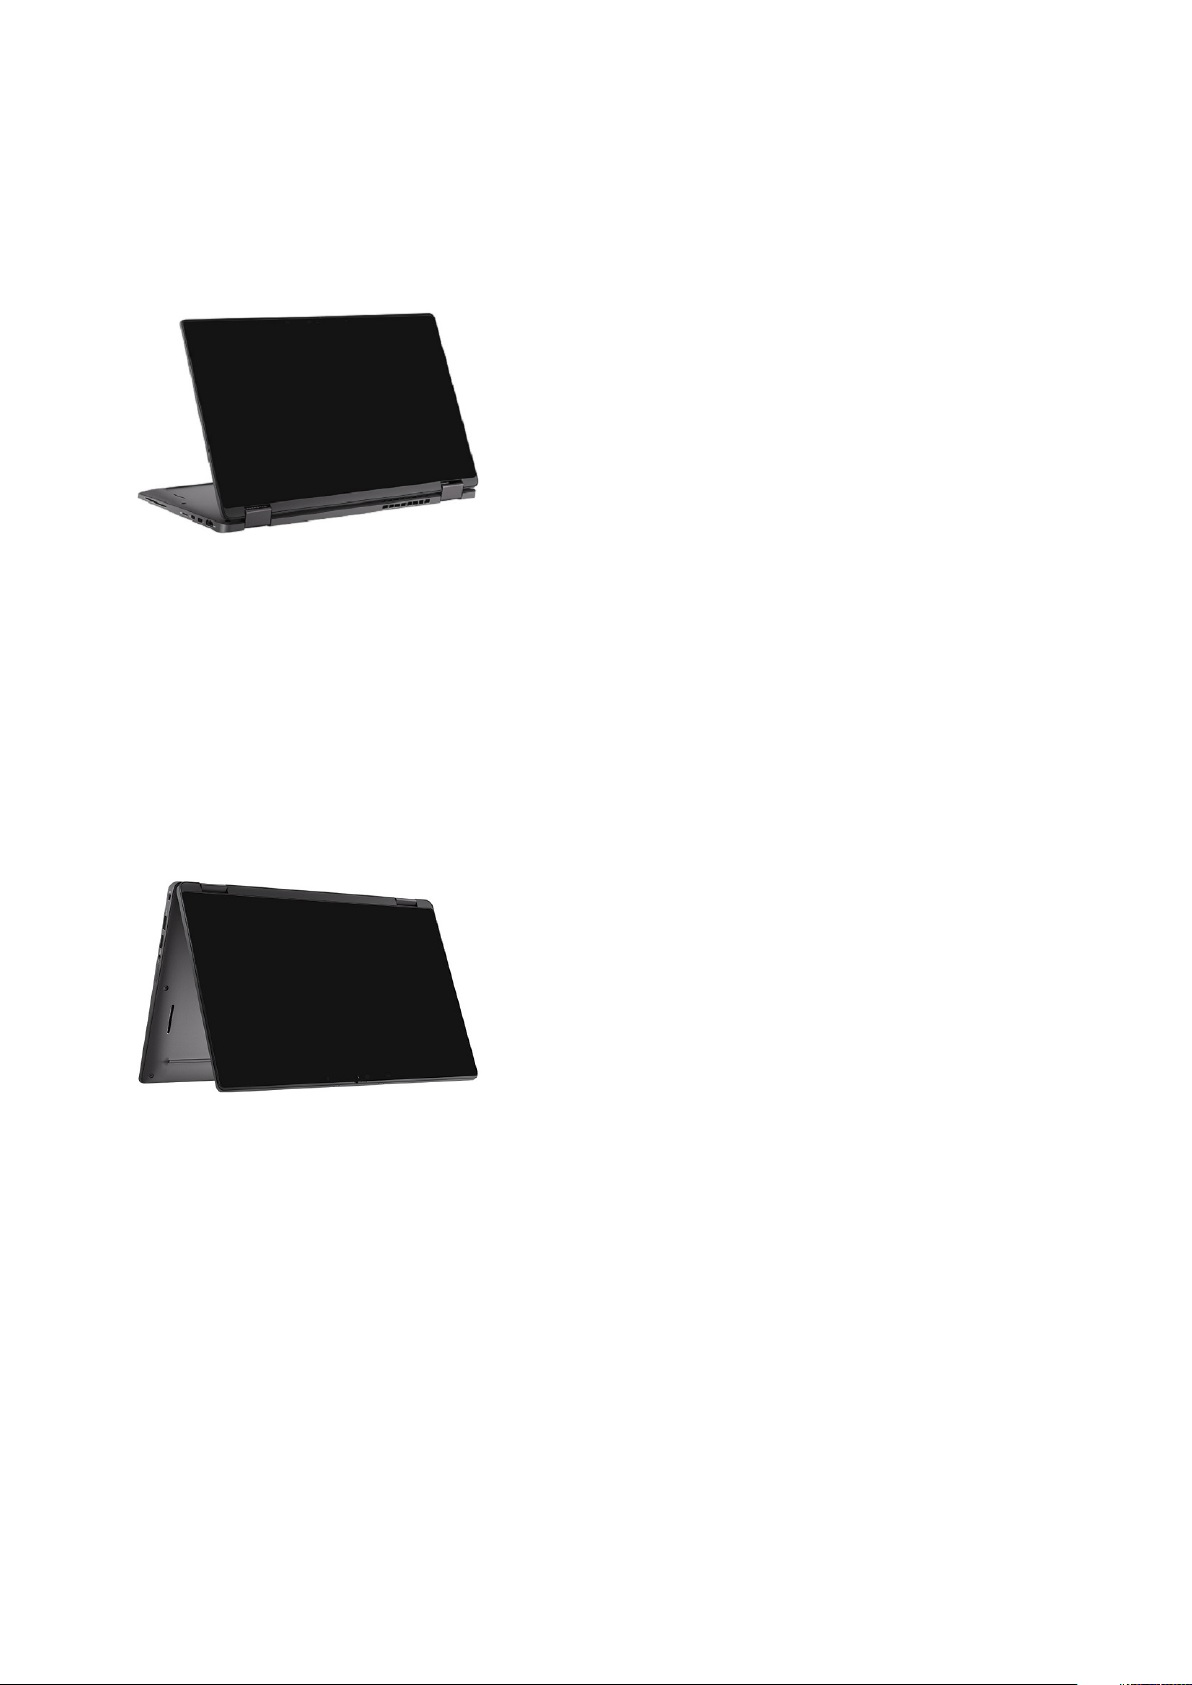
Stand mode
Tent mode
Chassis overview
13
Page 14

3
Keyboard shortcuts
This section describes the primary and secondary function associated with each of the Function Keys and their combination with function
lock.
NOTE: Keyboard characters may differ depending on the keyboard language configuration. Keys that are used for
shortcuts remain the same across all language configurations.
Some keys on your keyboard have two symbols on them. These keys can be used to type alternate characters or to perform secondary
functions. The symbol shown on the lower part of the key refers to the character that is typed out when the key is pressed. If you press
shift and the key, the symbol shown on the upper part of the key is typed out. For example, if you press 2, 2 is typed out; if you press Shift
+ 2, @ is typed out.
The keys F1-F12 at the top row of the keyboard are function keys for multi-media control, as indicated by the icon at the bottom of the
key. Press the function key to invoke the task represented by the icon. For example, pressing F1 mutes the audio (refer to the table
below).
However, if the function keys F1-F12 are needed for specific software applications, multi-media functionality can be disabled by pressing
Fn + esc. Subsequently, multimedia control can be invoked by pressing Fn and the respective function key. For example, mute audio by
pressing Fn + F1.
NOTE:
You can also define the primary behavior of the function keys (F1-F12) by changing Function Key Behavior in
BIOS setup program.
Table 2. List of function shortcuts
Keys Primary behavior Secondary behavior (Fn + Key)
Esc Esc Fn Toggle
F1 Speaker mute F1 behavior
F2 Volume decrease (-) F2 behavior
F3 Volume increase (+) F3 behavior
F4 Mic mute F4 behavior
F5 Keyboard backlight F5 behavior
F6 Screen brightness down (-) F6 behavior
F7 Screen brightness up (+) F7 behavior
F8 Toggle display (Win+P) F8 behavior
F9 Toggle e-Privacy panel (optional with e-
Privacy panel))
F10 Print screen F10 behavior
F11 Home F11 behavior
F12 End F12 behavior
F9 behavior
List of other keyboard shortcuts
Table 3. List of other keyboard shortcuts
Function key combinations Behavior
Pause/Break
14 Keyboard shortcuts
Page 15

Function key combinations Behavior
Toggle scroll lock
System request
Open application menu
Table 4. List of other keyboard shortcuts
Function key combinations Behavior
Fn+Ctrl+B Break
Fn+Shift+B Unobtrusive mode
NOTE: Option is disabled by deafult, needs to be
activated in the BIOS.
Fn+Up Arrow (↑) Page-up
Fn+Down Arrow (↓) Page-down
Keyboard shortcuts 15
Page 16

Specifications of Latitude 7410
Dimensions and weights
The following table lists the height, width, depth, and weight of your Latitude 7410.
Laptop
Table 5. Dimensions and weight
Description Values
Height :
Front height 0.71 in. (18.13 mm)
Rear height 0.76 in. (19.33 mm)
Width 12.65 in. (321.35 mm)
Depth 8.22 in. (208.69 mm)
Weight (starting)
2.93 lb (1.33 kg)
4
2-in-1
Table 6. Dimensions and weight
Description Values
Height (maximum):
Front height 0.67 in. (17.07 mm)
Rear height 0.76 in. (19.38 mm)
Width 12.65 in. (321.35 mm)
Depth 8.22 in. (208.69 mm)
Weight (starting)
NOTE: The weight of your computer depends on the configuration ordered and manufacturing variability.
3.22 lb (1.46 kg)
Processors
Table 7. Processors
Description Values
Processors
10th Generation Intel Core
i5-10210U (non-vPro)
10th Generation Intel Core
i5-10310U (vPro)
10th Generation Intel Core
i7-10610U (vPro)
10th Generation Intel Core
i7-10810U (vPro)
Wattage
Core count
16 Specifications of Latitude 7410
15 W 15 W 15 W 15 W
4 4 4 6
Page 17

Description Values
Thread count
8 8 8 12
Speed
Cache
Integrated graphics
1.6 GHz to 4.2 GHz 1.7 GHz to 4.4 GHz 1.8 to 4.9 GHz 1.1 GHz to 4.9 GHz
6 MB 6 MB 8 MB 12 MB
Intel UHD Graphics Intel UHD Graphics Intel UHD Graphics Intel UHD Graphics
Chipset
Table 8. Chipset
Description Values
Chipset
Processor
DRAM bus width
PCIe bus
Intel Comet Lake U PCH
10th Generation Intel Comet Lake Core i5/i7 processors
64-bit
Up to Gen3
Operating system
• Windows 10 Home (64-bit)
• Windows 10 Professional (64-bit)
• Ubuntu 18.04 LTS (not available for 2-in-1 system configurations)
Memory
The following table lists the memory specifications of your Latitude 7410.
Table 9. Memory specifications
Description Values
Memory slots
Memory type
Memory speed
Maximum memory configuration
Minimum memory configuration
Memory configurations supported
Built on system board
Dual-channel DDR4
2666 MHz
32 GB
4 GB
• 4 GB, 1 x 4 GB
• 8 GB, 2 x 4 GB
• 16 GB, 2 x 8 GB
• 32 GB, 2 x 16 GB
Specifications of Latitude 7410 17
Page 18

External ports
The following table lists the external ports on your Latitude 7410.
Table 10. External ports
Description Values
USB ports
• One USB 3.2 Gen 1 Type-A ports, one with PowerShare
• Two USB 3.2 Gen 2 Type-C ports with Power Delivery,
• One Universal Audio Jack
• One HDMI 2.0 port
DisplayPort over USB Type-C, and Thunderbolt 3
Audio port
Video port
Media-card reader
Docking port
Power-adapter port
Security
One Universal Audio Jack
• One HDMI 2.0 port
• Two USB 3.2 Gen 2 Display port USB Type-C ports and
Thunderbolt 3
One micro-SD Card reader
Supported by USB Type-C port
Two USB 3.2 Gen 2 Type-C ports with Power Delivery
One Wedge-shaped lock slot
Internal connectors
Table 11. Internal ports and connectors
Description Values
One M.2 Key-M (2280 or 2230) for solid-state drive • Class 35: 128 GB, 256 GB, 512 GB 2230 SSD
• Class 40: 256 GB, 512 GB, 1 TB 2280 SSD
• Class 40: 256 GB, 512 GB 2280 SED
One M.2 2230 Key-E for WWAN card • Laptop: Qualcomm Snapdragon X20 LTE-A (DW5829e) eSIM
capable
• 2-in-1: Qualcomm Snapdragon X20 LTE-A (DW5821e) eSIM
capable
NOTE: To learn more about the features of different types of M.2 cards, see the knowledge base article SLN301626.
Wireless module
The following table lists the Wireless Local Area Network (WLAN) and Wireless Wide Area Network (WWAN) module specifications of
your Latitude 7410.
WLAN modules
The WiFi module on this system is built on the system board.
18
Specifications of Latitude 7410
Page 19

Table 12. Wireless module specifications
Description Option one Option two
Model number
Intel Wireless-AC 9560, 2x2, 802.11ac with
Bluetooth 5.1 (non-vpro)
Intel Wi-Fi 6 AX201, 2x2, 802.11ax with
Bluetooth 5.1 (vpro)
Transfer rate
Frequency bands supported
Wireless standards
Encryption
Bluetooth
• 802.11ac - Up to 867 Mbps
• 802.11n - Up to 450 Mbps
• 802.11a/g - Up to 54 Mbps
• 802.11b - Up to 11 Mbps
2.4 GHz/5 GHz 2.4 GHz/5 GHz
IEEE 802.11a/b/g/n/ac MU-MIMO RX IEEE 802.11a/b/g/n/ac/ax, 160MHz channel
• 64/128-bit WEP/AES-CCMP
• PAP, CHAP, TLS, GTC, MS-CHAP,
MS-CHAPv2
Bluetooth 5.1 Bluetooth 5.1
• 2.4 GHz 40M: Up to 574 Mbps
• 5 GHz 80M: Up to 1.2 Gbps
• 5 GHz 160M: Up to 2.4 Gbps
use
• 64/128-bit WEP
• 128-bit AES-CCMP
• TKIP
WWAN modules
The following list provides the mobile broadband module options available on Latitude 7410
1. 2-in-1:
• Qualcomm Snapdragon X20 Gigabit LTE CAT 16 (DW5821e; e-SIM enabled), WW excluding China, Turkey, US
• Qualcomm Snapdragon X20 Gigabit LTE CAT 16 (DW5821e) WW
• Qualcomm Snapdragon X20 Gigabit LTE CAT 16 (DW5821e) for AT&T, Verizon and Sprint, US only
2. Laptop:
• Qualcomm Snapdragon X20 LTE-A CAT 9 (DW5829e; e-SIM enabled) WW excluding China, Turkey, US
• Qualcomm Snapdragon X20 LTE-A CAT 9 (DW5829e) WW
• Qualcomm Snapdragon X20 LTE-A CAT 9 (DW5829e) for AT&T, Verizon and Sprint, US only
Audio
Table 13. Audio specification
Descriptions Values
Type
Controller
Stereo conversion
Internal interface
External interface
Speakers
Internal speaker amplifier
External volume controls
Speaker output:
Average
High-definition audio
Realtek ALC3254
Supported
High-definition audio
Universal audio jack
Two
Supported (audio codec integrated)
Keyboard shortcut controls
2 W
Specifications of Latitude 7410 19
Page 20

Descriptions Values
Peak
2.5 W
Microphone
Dual-array microphones
Storage
This section lists the storage options on your Latitude 7410.
Your computer supports one of the following configurations:
• M.2 2230, PCIe x4 NVMe, Class 35 SSD
• M.2 2280, PCIe x4 NVMe, Class 40 SSD
• M.2 2280, PCIe x4 NVMe, Class 40 SED
NOTE: The primary drive of your computer varies with the storage configuration. For computers with a M.2 drive, the
M.2 drive is the primary drive.
Table 14. Storage specifications
Storage type Interface type Capacity
M.2 2230, PCIe x4 NVMe, Class 35 SSD PCIe x4 NVMe 3.0 up to 512 GB
M.2 2280, PCIe x4 NVMe, Class 40 SSD PCIe x4 NVMe 3.0 up to 1 TB
M.2 2280, PCIe x4 NVMe, Class 40 SED PCIe x4 NVMe 3.0 up to 512 GB
Media-card reader
Table 15. Media-card reader specifications
Description Values
Type
Cards supported
micro-SD Card reader
• micro-Secure Digital (SD)
• micro-Secure Digital High Capacity (SDHC)
• micro-SD Extended Capacity (SDXC)
Keyboard
Table 16. Keyboard specifications
Description Values
Type
Layout
Number of keys
• Standard spill resistant keyboard (Optional backlit)
QWERTY/KANJI
• United States and Canada: 81 keys
• United Kingdom: 82 keys
• Japan: 85 keys
Size
Shortcut keys
20 Specifications of Latitude 7410
X=18.07 mm key pitch
Y=18.07 mm key pitch
Some keys on your keyboard have two symbols on them. These
keys can be used to type alternate characters or to perform
Page 21

Description Values
secondary functions. To type the alternate character, press Shift
and the desired key. To perform secondary functions, press Fn and
the desired key. For more information see the Keyboard shortcuts
section.
Camera
The following table lists the camera specifications of your Latitude 7410.
Table 17. Camera specifications
Description Values
Number of cameras
One
NOTE: You can define the primary behavior of the
function keys (F1–F12) changing Function Key Behavior
in BIOS setup program.
Camera type
Camera location
Camera sensor type
Camera resolution:
Still image
Video
Infrared camera resolution:
Still image
Video
Diagonal viewing angle:
Camera
Infrared camera
• 2.7 mm HD (1920 x 1080 at 30 fps) RGB Webcam
• 3 mm HD (1920 x 1080 at 30 fps) RGB/IR Webcam with ALS
and Proximity Sensor
• 6 mm HD (1920 x 1080 at 30 fps) RGB Webcam
• 6 mm HD (1920 x 1080 at 30 fps) RGB/IR Webcam with ALS
and Proximity Sensor
Front
CMOS sensor technology
2 Megapixels
1920 x 1080 (HD) at 30 fps
2 Megapixels
1920 x 1080 (HD) at 30 fps
78.6 degrees
78.6 degrees
Touchpad
Table 18. Touchpad specifications
Description Values
Resolution:
Horizontal
Vertical
Dimensions:
3054
1790
Specifications of Latitude 7410 21
Page 22

Description Values
Horizontal
105 mm (4.13 in.)
Vertical
65 mm (2.56 in.)
Touchpad gestures
For more information about touchpad gestures for Windows 10, see the Microsoft knowledge base article 4027871 at
support.microsoft.com.
Fingerprint reader (optional)
The following table lists the specifications of the optional fingerprint-reader of your Latitude 7410.
Table 19. Fingerprint reader specifications
Description Values
Option 1 Option 2
Fingerprint-reader sensor technology Capacitive Capacitive
Fingerprint-reader sensor resolution
(dpi)
Fingerprint-reader sensor pixel size 76 x 100 108 x 88
363 500
Power adapter
The following table lists the power adapter specifications of your Latitude 7410.
Table 20. Power adapter specifications
Description Option one Option two
Type
Input voltage
Input frequency
Input current (maximum)
Output current (continuous)
Rated output voltage
Temperature range:
Operating
Storage
65 W, USB Type-C adapter 90 W, USB Type-C adapter
100 VAC/240 VAC 100 VAC/240 VAC
50 Hz/60 Hz 50 Hz/60 Hz
1.50 A 1.70 A
3.25 A 4.5 A
19.50 VDC 19.50 VDC
0°C to 40°C (32°F to 104°F) 0°C to 40°C (32°F to 104°F)
-40°C to 70°C (-40°F to 158°F) -40°C to 70°C (-40°F to 158°F)
Battery
Table 21. Battery specifications
Specifications Option 1 Option 2 Option 3 Option 4
Type: Li-ion Polymer, 3-
cell 39 WHr
22 Specifications of Latitude 7410
Li-ion Polymer, 4cell 52 WHr
Li-ion Polymer, 4cell 52 WHr (LCL)
Li-ion Polymer, 6cell 68 WHr
Page 23

Specifications Option 1 Option 2 Option 3 Option 4
Voltage (VDC) 11.4 V 7.6 V 7.6 V 11.4 V
Weight (maximum) 0.207 kg (0.46 lb) 0.257 kg (0.56 lb) 0.257 kg (0.56 lb) 0.33 kg (0.73 lb)
Dimensions:
Height 251 mm (9.88 in.) 251 mm (9.88 in.) 251 mm (9.88 in.) 292 mm (11.49 in.)
Width 85.8 mm (3.38 in.) 85.8 mm (3.38 in.) 85.8 mm (3.38 in.) 93.7 mm (3.69)
Depth 5 mm (0.19 in.) 5 mm (0.19 in.) 5 mm (0.19 in.) 8.9 mm (0.35 in.)
Temperature range:
Operating
Storage -20°C to 60°C (-4°F to 140°F)
Battery Operating time Varies depending on operating conditions and can significantly reduce under certain
Battery Charging time (approximate)
• Charging: 0°C to 45°C (32°F to 113°F)
• Discharging: 0°C to 70°C (32°F to 158°F)
power-intensive conditions.
• ExpressCharge Boost (0% up to 35% ) : 20 minutes
• Express charge : 2 hours
• Standard charge: 3 hours
NOTE: Control the charging time, duration, start and end time, and so
on using the Dell Power Manger application. For more information on
the Dell Power Manger see, https://www.dell.com/support/home/
product-support/product/power-manager/docs
Life span (approximate) 1 Year or 300 discharge/charge cycles 3 Years or 1000
discharge/charge
cycles
ExpressCharge Supported Supported Supported Supported
User replaceable No (FRU) No (FRU) No (FRU) No (FRU)
Coin-cell battery Main battery reserves 2% of capacity for RTC function.
Coin-cell Operating time
NOTE:
For batteries with the ExpressCharge feature, the battery will typically have at least an 80% charge after about an hour
of charging with the system off, and fully charged in about 2 hours with the system off.
Enabling ExpressCharge requires that both the computer and the battery used be ExpressCharge capable. If these
requirements are not met, ExpressCharge will not be enabled.
68 days with 39 WHr battery
NOTE: Varies depending on operating conditions and can significantly
reduce under certain power-intensive conditions.
1 Year or 300
discharge/charge
cycles
Display
The following tables lists the display specifications of your Latitude 7410.
Table 22. 2-in-1 Display specifications
Description Options 1 Option 2
Display type 14.0-in. FHD SLP with Corning Gorilla Glass
6 (GG6)
Display-panel technology Wide Viewing Angle (WVA) Wide Viewing Angle (WVA)
Display-panel dimensions (active area):
14.0-in. FHD Digital Privacy SafeScreen with
GG6
Specifications of Latitude 7410 23
Page 24

Description Options 1 Option 2
Height
309.4 mm (12.18 in.) 309.4 mm (12.18 in.)
Width
Diagonal
Display-panel native resolution 1920 x 1080 1920 x 1080
Luminance (typical)
Megapixels 2.07 2.07
Color gamut sRGB 100% sRGB 100%
Pixels Per Inch (PPI)
Contrast ratio (min) 1000:1 1000:1
Response time (max) 35 ms 35 ms
Refresh rate 60 Hz 60 Hz
Horizontal view angle 80/80 degrees (min)
Vertical view angle 80/80 degrees (min)
Pixel pitch
173.95 mm (6.85 in.) 173.95 mm (6.85 in.)
355.6 mm (14.0 in.) 355.6 mm (14.0 in.)
300 nt 300 nt
157 157
• Sharing Mode: 80/80 degrees (min)
• Privacy Mode (brightness < 40%) :
30/30 degrees (max)
• Sharing Mode: 80/80 degrees (min)
• Privacy Mode (brightness < 40%) :
30/30 degrees (max)
0.161 mm 0.161 mm
Power consumption (maximum)
Anti-glare vs glossy finish Anti-reflection/Anti-Smudge coating Anti-reflection/Anti-smudge coating
Touch options Touch with Active Pen Support Touch with Active Pen Support
Table 23. Laptop display specifications
Description Options 1 Options 2 Options 3 Options 4 Options 5
Display type 14.0-in. High Definition
(HD)
Display-panel
technology
Display-panel
dimensions (active
area):
Height 309.4 (12.18 in.) 309.4 (12.18 in.) 309.4 (12.18 in.) 309.4 (12.18 in.) 309.4 (12.18 in.)
Width 173.95 (6.85 in.) 173.95 (6.85 in.) 173.95 (6.85 in.) 173.95 (6.85 in.) 173.95 (6.85 in.)
Diagonal 355.6 (14.0 in.) 355.6 (14.0 in.) 355.6 (14.0 in.) 355.6 (14.0 in.) 355.6 (14.0 in.)
Display-panel native
resolution
Luminance (typical) 220 nt 300 nt 300 nt 300 nt 400 nt
Megapixels 1.05 2.07 2.07 2.07 8.29
Color gamut (typical) NTSC 45% NTSC 72% NTSC 72% NTSC 72% sRGB 100%
Twisted Nematic (TN) Wide Viewing Angle
1366 x 768 1920 x 1080 1920 x 1080 1920 x 1080 3840 x 2160
1.9 W • Sharing Mode: 2.36 W
• Privacy Mode : 2.46 W + Touch Power:
0.16 W
14.0-in. Full HD (FHD)
Super Low Power
(SLP)
(WVA)
14.0-in. FHD 14.0-in. FHD Digital
Privacy
SafeScreen
Wide Viewing Angle
(WVA)
Wide Viewing
Angle (WVA)
14.0-in. Ultra HD
low blue light
Wide Viewing
Angle (WVA)
24 Specifications of Latitude 7410
Page 25

Description Options 1 Options 2 Options 3 Options 4 Options 5
Pixels Per Inch (PPI) 112 157 157 157 315
Contrast ratio (min) 1000:1 1000:1 1000:1 1000:1 1000:1
Response time (max) 25 ms 35 ms 35 ms 35 ms 40 ms
Refresh rate 60 Hz 60 Hz 60 Hz 60 Hz 60 Hz
Horizontal view angle 40/40 degrees (min) 80/80 degrees (min) 80/80 degrees (min)
• Sharing Mode:
80/80 degrees
• Privacy Mode
(brightness <
40%) : 30/30
degrees (max)
80/80 degrees
(min)
Vertical view angle 40/40 degrees (min) 80/80 degrees (min) 80/80 degrees (min)
Pixel pitch 0.2265 mm 0.161 mm 0.161 mm 0.161 mm 0.0805 mm
Power consumption
(maximum)
Anti-glare vs glossy
finish
Touch options Non-touch Non-touch Touch (no active pen
2.4 W 2.2 W 4.1 W
Anti-glare Anti-glare Anti-glare Anti-glare Anti-glare
support)
• Sharing Mode:
80/80 degrees
(min)
• Privacy Mode
(brightness <
40%) : 30/30
degrees (max)
• Sharing Mode:
2.3 W
• Privacy Mode
(brightness <
40%) : 2.4 W
(max)
Non-touch Non-touch
80/80 degrees
(min)
3.75 W
NOTE: Low
blue light 4K
display is
TUV
certified.
GPU—Integrated
The following table lists the specifications of the integrated Graphics Processing Unit (GPU) supported by your Latitude 7410.
Table 24. GPU—Integrated
Controller External display support Memory size Processor
Intel UHD Graphics • Two DisplayPort over USB
Type-C with Thunderbolt 3.0
• One HDMI 2.0 port
Shared system memory 10th Generation Intel Comet
Lake Core i5/i7 processors
Computer environment
Airborne contaminant level: G1 as defined by ISA-S71.04-1985
Table 25. Computer environment
Description Operating Storage
Temperature range
Normal ambient condition 25°C and
40~50% 0°C to Normal ambient condition
25°C and 40~50% 40°C (32°F to 104°F)
-40°C to 65°C (-40°F to 149°F)
Specifications of Latitude 7410 25
Page 26

Description Operating Storage
Relative humidity (maximum)
Vibration (maximum)
*
Normal ambient condition 25°C and
40~50% 10% to Normal ambient condition
25°C and 40~50% 90% (non-condensing)
0.66 GRMS 1.30 GRMS
10% to 95% (non-condensing)
Shock (maximum)
Altitude (maximum)
* Measured using a random vibration spectrum that simulates user environment.
† Measured using a 2 ms half-sine pulse when the hard drive is in use.
‡ Measured using a 2 ms half-sine pulse when the hard-drive head is in parked position.
140 G† 160 G†
0 m to 3048 m (0 ft to 10,000 ft) 0 m to 10,688 m (0 ft to 35,000 ft)
Security
Table 26. Security
Feature Specifications
Trusted Platform Module (TPM) 2.0 Integrated on the system board
Firmware TPM Optional
Windows Hello Support Yes, optional fingerprint on power button
Optional IR camera
Cable lock Wedge-shaped lock
Dell Smartcard Keyboard Optional
FIPS 140-2 certification for TPM Yes
ControlVault 3 Advanced Authentication with FIPS 140-2 Level 3
Certification
Fingerprint Reader Only Touch Fingerprint reader in power button tied to ControlVault 3
Contacted Smart Card and ControlVault 3 FIPS 201 Smart card reader certification/SIPR
Yes, for FPR, SC and CSC/NFC
26 Specifications of Latitude 7410
Page 27

5
System setup
CAUTION: Unless you are an expert computer user, do not change the settings in the BIOS Setup program. Certain
changes can make your computer work incorrectly.
NOTE: Depending on the computer and its installed devices, the items listed in this section may or may not be displayed.
NOTE: Before you change BIOS Setup program, it is recommended that you write down the BIOS Setup program screen
information for future reference.
Use the BIOS Setup program for the following purposes:
• Get information about the hardware installed in your computer, such as the amount of RAM and the size of the hard drive.
• Change the system configuration information.
• Set or change a user-selectable option, such as the user password, type of hard drive installed, and enabling or disabling base devices.
Entering BIOS setup program
About this task
Turn on (or restart) your computer and press F2 immediately.
Navigation keys
NOTE:
For most of the System Setup options, changes that you make are recorded but do not take effect until you
restart the system.
Table 27. Navigation keys
Keys Navigation
Up arrow Moves to the previous field.
Down arrow Moves to the next field.
Enter Selects a value in the selected field (if applicable) or follow the link
in the field.
Spacebar Expands or collapses a drop-down list, if applicable.
Tab Moves to the next focus area.
NOTE: For the standard graphics browser only.
Esc Moves to the previous page until you view the main screen.
Pressing Esc in the main screen displays a message that prompts
you to save any unsaved changes and restarts the system.
Boot Sequence
Boot Sequence allows you to bypass the System Setup–defined boot device order and boot directly to a specific device (for example:
optical drive or hard drive). During the Power-on Self Test (POST), when the Dell logo appears, you can:
• Access System Setup by pressing F2 key
• Bring up the one-time boot menu by pressing F12 key
The one-time boot menu displays the devices that you can boot from including the diagnostic option. The boot menu options are:
• Removable Drive (if available)
System setup 27
Page 28

• STXXXX Drive (if available)
NOTE: XXX denotes the SATA drive number.
• Optical Drive (if available)
• SATA Hard Drive (if available)
• Diagnostics
NOTE: Choosing Diagnostics, will display the SupportAssist diagnostics screen.
The boot sequence screen also displays the option to access the System Setup screen.
One time boot menu
To enter one time boot menu, turn on your computer, and then press F2 immediately.
NOTE: It is recommended to shutdown the computer if it is on.
The one-time boot menu displays the devices that you can boot from including the diagnostic option. The boot menu options are:
• Removable Drive (if available)
• STXXXX Drive (if available)
NOTE: XXX denotes the SATA drive number.
• Optical Drive (if available)
• SATA Hard Drive (if available)
• Diagnostics
NOTE: Choosing Diagnostics, will display the SupportAssist diagnostics screen.
The boot sequence screen also displays the option to access the System Setup screen.
System setup options
NOTE:
Depending on this computer and its installed devices, the items that are listed in this section may or may not be
displayed.
Table 28. System setup options—System information menu
Overview
BIOS Version Displays the BIOS version number.
Service Tag Displays the Service Tag of the computer.
Asset Tag Displays the Asset Tag of the computer.
Ownership Tag Displays the ownership tag of the computer.
Manufacture Date Displays the manufacture date of the computer.
Ownership Date Displays the ownership date of the computer.
Express Service Code Displays the express service code of the computer.
Ownership Tag Displays the ownership tag of the computer.
Signed Firmware Update Displays whether the signed firmware update is enabled.
Battery Displays the battery health information.
Primary Displays the primary battery.
Battery Level Displays the battery level.
Battery State Displays the battery state.
Health Displays the battery health.
AC Adapter Displays whether an AC adapter is installed.
Processor Information
28 System setup
Page 29

Overview
Processor Type Displays the processor type.
Maximum Clock Speed Displays the maximum processor clock speed.
Core Count Displays the number of cores on the processor.
Processor L2 Cache Displays the processor L2 Cache size.
Processor ID Displays the processor identification code.
Processor L3 Cache Displays the processor L3 Cache size.
Current Clock Speed Displays the current processor clock speed.
Minimum Clock Speed Displays the minimum processor clock speed.
Microcode Version Displays the microcode version.
Intel Hyper-Threading Capable Displays whether the processor is Hyper-Threading (HT) capable.
64-Bit Technology Displays whether 64-bit technology is used.
Memory Information
Memory Installed Displays the total computer memory installed.
Memory Available Displays the total computer memory available.
Memory Speed Displays the memory speed.
Memory Channel Mode Displays single or dual channel mode.
Memory Technology Displays the technology that is used for the memory.
Device Information
Video Controller Displays the integrate graphics information of the computer.
dGPU Video Controller Displays the discrete graphics information of the computer.
Video BIOS Version Displays the video BIOS version of the computer.
Video Memory Displays the video memory information of the computer.
Panel Type Displays the Panel Type of the computer.
Native Resolution Displays the native resolution of the computer.
Audio Controller Displays the audio controller information of the computer.
Wi-Fi Device Displays the wireless device information of the computer.
Bluetooth Device Displays the Bluetooth device information of the computer.
Table 29. System setup options—Boot options menu
Boot options
Advanced Boot Options
Enable UEFI Network Stack Enables or disables UEFI Network Stack.
Default: OFF.
Boot Mode
Boot Mode: UEFI only Displays the boot mode of this computer.
Enable Boot Devices Enables or disables boot devices for this computer.
Boot Sequence Displays the boot sequence.
BIOS Setup Advanced Mode Enables or disables advanced BIOS settings.
Default: ON.
UEFI Boot Path Security Enables or disables the system to prompt the user to enter the Admin password
when booting a UEFI boot path from the F12 boot menu.
System setup 29
Page 30

Boot options
Default: Always Except Internal HDD.
Table 30. System setup options—System Configuration menu
System Configuration
Date/Time
Date Sets the computer date in MM/DD/YYYY format. Changes to the date take effect
immediately.
Time Sets the computer time in HH/MM/SS 24-hour format. You can switch between 12-
hour and 24-hour clock. Changes to the time take effect immediately.
Enable SMART Reporting Enables or disables SMART (Self-Monitoring, Analysis, and Reporting Technology)
during computer startup to report hard drive errors.
Default: OFF.
Enable Audio Enables or disables all integrated audio controller.
Default: ON.
Enable Microphone Enables or disables microphone.
Default: ON.
Enable Internal Speaker Enables or disables internal speaker.
Default: ON.
USB Configuration
Enable Boot Support Enables or disables booting from USB mass storage devices such as external hard
drive, optical drive, and USB drive.
Enable External USB Ports Enables or disables USB ports to be functional in an operating system environment.
SATA Operation Configures operating mode of the integrated SATA hard drive controller.
Default: RAID. SATA is configured to support RAID (Intel Rapid Restore Technology).
Drives Enables or disables various onboard drives.
M.2 PCIe SSD-0/SATA-2 Default: ON.
SATA-0 Default: ON.
Drive Information Displays the information of various onboard drives.
Miscellaneous Devices Enables or disables various onboard devices.
Enable Camera Enables or disables the camera.
Default: ON.
Keyboard Illumination Configures the operating mode of the keyboard illumination feature.
Default: Disabled. The keyboard illumination will always be off.
Keyboard Backlight Timeout on AC Configures the timeout value for the keyboard when an AC adapter is connected to
the computer. The keyboard backlight timeout value is only effect when the backlight
is enabled.
Default: 10 seconds.
Keyboard Backlight Timeout on Battery Configures the timeout value for the keyboard when the computer is running on
battery. The keyboard backlight timeout value is only effect when the backlight is
enabled.
Default: 10 seconds.
Touchscreen Enables or disables the touchscreen for the operating system.
30 System setup
Page 31

System Configuration
NOTE: Touchscreen will always work in the BIOS setup irrespective of
this setting.
Default: ON.
Table 31. System setup options—Video menu
Video
LCD Brightness
Brightness on battery power Sets the screen brightness when the computer is running on battery power.
Brightness on AC power Sets the screen brightness when the computer is running on AC power.
EcoPower Enables or disables EcoPower which increases the battery life by reducing the screen
brightness when appropriate.
Default: ON.
Table 32. System setup options—Security menu
Security
Enable Admin Setup Lockout Enables or disables the user from entering BIOS Setup when an Admin Password is
set.
Default: OFF.
Password Bypass Bypass the System (Boot) Password and the internal hard drive password prompts
during a system restart.
Default: Disabled.
Enable Non-Admin Password Changes Enables or disables the user to change the system and hard drive password without
the need for admin password.
Default: ON.
Non-Admin Setup Changes
Allow Wireless Switch Changes Enables or disables changes to the setup option when an Administrator password is
set.
Default: OFF.
Enable UEFI Capsule Firmware Updates Enables or disables BIOS updates through UEFI capsule update packages.
Computrace Enable or disable the BIOS module interface of the optional Computrace(R) Service
from Absolute Software.
Intel Platform Trust Technology On Enables or disables Platform Trust Technology (PTT) visibility to the operating
system.
Default: ON.
PPI Bypass for Clear Commands Enables or disables the operating system to skip BIOS Physical Presence Interface
(PPI) user prompts when issuing the Clear command.
Default: OFF.
Clear Enables or disables the computer to clear the PTT owner information, and returns the
PTT to the default state.
Default: OFF.
Intel SGX Enables or disables the Intel Software Guard Extensions (SGX) to provide a secured
environment for running code/storing sensitive information.
Default: Software Control
SMM Security Mitigation Enables or disables additional UEFI SMM Security Mitigation protections.
System setup 31
Page 32

Security
Default: OFF.
NOTE: This feature may cause compatibility issues or loss of
functionality with some legacy tools and applications.
Enable Strong Passwords Enables or disables strong passwords.
Default: OFF.
Password Configuration Control the minimum and maximum number of characters that are allowed for Admin
and System passwords.
Admin Password Sets, Changes, or deletes the administrator (admin) password (sometimes called the
"setup" password).
System Password Sets, Changes, or deletes the system password.
Enable Master Password Lockout Enables or disables the master password support.
Default: OFF.
Table 33. System setup options—Secure Boot menu
Secure Boot
Enable Secure Boot Enables or disables the computer to boos using only validated boot software.
Default: OFF.
NOTE: For Secure Boot to be enabled, the computer needs to be in UEFI
boot mode and the Enable Legacy Option ROMs option needs to be
turned off.
Secure Boot Mode Selects the Secure Boot operation mode.
Default: Deployed Mode.
NOTE: Deployed Mode should be selected for normal operation of Secure
Boot.
Table 34. System setup options—Expert Key Management menu
Expert Key Management
Enable Custom Mode Enables or disables the keys in the PK, KEK, db, and dbx security key databases to be
modified.
Default: OFF.
Custom Mode Key Management Selects the custom values for expert key management.
Default: PK.
Table 35. System setup options—Performance menu
Performance
Intel Hyper-Threading Technology Enables or disables the Intel Hyper-Threading Technology to use processor resources
more efficiently.
Default: ON.
Intel SpeedStep Enables or disables the Intel SpeedStep Technology to dynamically adjust processor
voltage and core frequency, decreasing average power consumption and heat
production.
Default: ON.
Intel TurboBoost Technology Enabled or disabled the Intel TurboBoost mode of the processor. If enabled, the Intel
TurboBoost driver increases the performance of the CPU or graphics processor.
32 System setup
Page 33

Performance
Default: ON.
Multi-Core Support Changes the number of CPU cores available to the operating system. The default
value is set to the maximum number of cores.
Default: All Cores.
Enable C-State Control Enables or disables the CPU's ability to enter and exit low-power states.
Default: ON.
Table 36. System setup options—Power Management menu
Power Management
Wake on AC Enables the computer to turn on and go to boot when AC power is supplied to the
computer.
Default: OFF.
Auto on Time Enables the computer to automatically power on for defined days and times.
Default: Disabled. The system will not automatically power up.
Battery Charge Configuration Enables the computer to run on battery during power usage hours. Use the below
options to prevent AC power usage between certain times of each day.
Default: Adaptive. Battery settings are adaptively optimized based on your typical
battery usage pattern.
Enable Advanced Battery Charge
Configuration
Block Sleep Blocks the computer from entering Sleep (S3) mode in the operating system.
Enable USB Wake Support Enables the USB devices to wake the computer from Standby mode.
Enable Intel Speed Shift Technology Enables or disables Intel Speed Shift Technology support which enables the operating
Lid Switch Enables the computer to power up from the off state whenever the lid is opened.
Table 37. System setup options—Wireless menu
Wireless
Wireless Switch Determines which wireless devices can be controlled by the Wireless Switch. For
Enables Advanced Battery Charge Configuration from the beginning of the day to a
specified work period. Advanced Battery Charged maximizes battery health while still
supporting heavy use during the work day.
Default: OFF.
Default: OFF.
NOTE: If enabled, the computer will not go to sleep, Intel Rapid Start will
be disabled automatically, and the operating system power option will be
blank if it was set to Sleep.
Default: OFF.
system to select the appropriate processor performance automatically.
Default: ON.
Default: ON.
Windows 8 systems, this is controlled by an operating system drive directly. As a
result, the setting does not affect the Wireless Switch behavior.
NOTE: When both WLAN and WiGig are present, enable/disable controls
are tied together. Thus, they cannot be enabled or disabled
independently.
WLAN
Default: ON.
System setup 33
Page 34

Wireless
Bluetooth
Wireless Device Enable Enable or disable internal WLAN/Bluetooth devices.
WLAN
Default: ON.
Default: ON.
Bluetooth
Table 38. System setup options—POST Behavior menu
POST Behavior
Numlock Enable Enables or disables Numlock when the computer boots.
Enable Adapter Warnings Enables the computer to display adapter warning messages during boot.
Extend BIOS POST Time Configures the BIOS POST (Power-On Self-Test) load time.
Fastboot Configures the speed of the UEFI boot process.
Fn Lock Options Enables or disables the Fn lock mode.
Lock Mode
Pull Screen Logo Enabled or disabled the computer to display full screen logo if the image match
Default: ON.
Default: ON.
Default: ON.
Default: 0 seconds.
Default: Thorough. Performs complete hardware and configuration initialization during
boot.
Default: ON.
Default: Lock Mode Secondary. Lock Mode Secondary = If this option is selected, the
F1-F12 keys scan the code for their secondary functions.
screen resolution.
Default: OFF.
Warnings and Errors Selects an action on encountering a warning or error during boot.
Default: Prompt on Warnings and Errors. Stop, prompt and wait for user input when
warnings or errors are detected.
NOTE: Errors deemed critical to the operation of the computer hardware
will always halt the computer.
Table 39. System setup options—Virtualization menu
Virtualization
Intel Virtualization Technology Enables the computer to run a virtual machine monitor (VMM).
Default: ON.
VT for Direct I/O Enables the computer to perform Virtualization Technology for Direct I/O (VT-d).
VT-d is an Intel method that provides virtualization for memory map I/O.
Default: ON.
Table 40. System setup options—Maintenance menu
Maintenance
Asset Tag Creates a system Asset Tag that can be used by an IT administrator to uniquely
identify a particular system. Once set in BIOS, the Asset Tag cannot be changed.
Service Tag Displays the Service Tag of the computer.
34 System setup
Page 35

Maintenance
BIOS Recovery from Hard Drive Enables the computer to recover from a bad BIOS image, as long as the Boot Block
portion is intact and functioning.
Default: ON.
NOTE: BIOS recovery is designed to fix the main BIOS block and cannot
work if the Boot Block is damaged. In addition, this feature cannot work
in the event of EC corruption, ME corruption, or a hardware issue. The
recovery image must exist on an unencrypted partition on the drive.
BIOS Auto-Recovery Enables the computer to automatically recover the BIOS without user actions. This
feature requires BIOS Recovery from Hard Drive to be set to Enabled.
Default: OFF.
Start Data Wipe
Allow BIOS Downgrade Controls flashing of the system firmware to previous revisions.
Table 41. System setup options—System Logs menu
System Logs
Power Event Log Displays Power events.
BIOS Event Log Displays BIOS events.
Thermal Event Log Displays Thermal events.
Table 42. System setup options—SupportAssist menu
SupportAssist
Dell Auto operating system Recovery
Threshold
CAUTION: This Secure Wipe Operation will delete information in a way
that it cannot be reconstructed.
If enabled, the BIOS will queue up a data wipe cycle for storage devices that are
connected to the motherboard on the next reboot.
Default: OFF.
Default: ON.
Default: Keep.
Default: Keep.
Default: Keep.
Controls the automatic boot flow for SupportAssist System Resolution Console and
for Dell operating system Recovery tool.
Default: 2.
SupportAssist operating system Recovery Enables or disables the boot flow for SupportAssist operating system Recovery tool
in the even of certain system errors.
Default: ON.
Clearing BIOS (System Setup) and System passwords
About this task
To clear the system or BIOS passwords, contact Dell technical support as described at www.dell.com/contactdell.
For information on how to reset Windows or application passwords, refer to the documentation accompanying
NOTE:
Windows or your application.
System setup 35
Page 36

This chapter details the supported operating systems along with instructions on how to install the drivers.
Operating system
• Windows 10 Home (64-bit)
• Windows 10 Professional (64-bit)
• Ubuntu 18.04 LTS (not available for 2-in-1 system configurations)
Downloading the audio driver
Steps
1. Turn on your computer.
2. Go to www.dell.com/support.
3. Enter the Service Tag of your computer, and then click Submit.
NOTE: If you do not have the Service Tag, use the auto-detect feature or manually browse for your computer model.
6
Software
4. Click Drivers & downloads.
5. Click the Detect Drivers button.
6. Review and agree to the Terms and Conditions to use SupportAssist, then click Continue.
7. If necessary, your computer starts to download and install SupportAssist.
NOTE: Review on-screen instructions for browser-specific instructions.
8. Click View Drivers for My System.
9. Click Download and Install to download and install all driver updates detected for your computer.
10. Select a location to save the files.
11. If prompted, approve requests from User Account Control to make changes on the system.
12. The application installs all drivers and updates identified.
NOTE:
Not all files can be installed automatically. Review the installation summary to identify if manual installation is
necessary.
13. For manual download and installation, click Category.
14. Click Audio in the drop-down list.
15. Click Download to download the audio driver for your computer.
16. After the download is complete, navigate to the folder where you saved the audio driver file.
17. Double-click the audio driver file icon and follow the instructions on the screen to install the driver.
Downloading the graphics driver
Steps
1. Turn on your computer.
2. Go to www.dell.com/support.
3. Enter the Service Tag of your computer, and then click Submit.
NOTE: If you do not have the Service Tag, use the auto-detect feature or manually browse for your computer model.
4. Click Drivers & downloads.
36 Software
Page 37

5. Click the Detect Drivers button.
6. Review and agree to the Terms and Conditions to use SupportAssist, then click Continue.
7. If necessary, your computer starts to download and install SupportAssist.
NOTE: Review on-screen instructions for browser-specific instructions.
8. Click View Drivers for My System.
9. Click Download and Install to download and install all driver updates detected for your computer.
10. Select a location to save the files.
11. If prompted, approve requests from User Account Control to make changes on the system.
12. The application installs all drivers and updates identified.
NOTE: Not all files can be installed automatically. Review the installation summary to identify if manual installation is
necessary.
13. For manual download and installation, click Category.
14. Click Video in the drop-down list.
15. Click Download to download the graphics driver for your computer.
16. After the download is complete, navigate to the folder where you saved the graphics driver file.
17. Double-click the graphics driver file icon and follow the instructions on the screen to install the driver.
Downloading the USB driver
Steps
1. Turn on your computer.
2. Go to www.dell.com/support.
3. Enter the Service Tag of your computer, and then click Submit.
NOTE: If you do not have the Service Tag, use the auto-detect feature or manually browse for your computer model.
4. Click Drivers & downloads.
5. Click the Detect Drivers button.
6. Review and agree to the Terms and Conditions to use SupportAssist, then click Continue.
7. If necessary, your computer starts to download and install SupportAssist.
NOTE: Review on-screen instructions for browser-specific instructions.
8. Click View Drivers for My System.
9. Click Download and Install to download and install all driver updates detected for your computer.
10. Select a location to save the files.
11. If prompted, approve requests from User Account Control to make changes on the system.
12. The application installs all drivers and updates identified.
NOTE:
Not all files can be installed automatically. Review the installation summary to identify if manual installation is
necessary.
13. For manual download and installation, click Category.
14. Click Chipset in the drop-down list.
15. Click Download to download the USB driver for your computer.
16. After the download is complete, navigate to the folder where you saved the USB driver file.
17. Double-click the USB driver file icon and follow the instructions on the screen to install the driver.
Downloading the WiFi driver
Steps
1. Turn on your computer.
2. Go to www.dell.com/support.
Software
37
Page 38

3. Enter the Service Tag of your computer, and then click Submit.
NOTE: If you do not have the Service Tag, use the auto-detect feature or manually browse for your computer model.
4. Click Drivers & downloads.
5. Click the Detect Drivers button.
6. Review and agree to the Terms and Conditions to use SupportAssist, then click Continue.
7. If necessary, your computer starts to download and install SupportAssist.
NOTE: Review on-screen instructions for browser-specific instructions.
8. Click View Drivers for My System.
9. Click Download and Install to download and install all driver updates detected for your computer.
10. Select a location to save the files.
11. If prompted, approve requests from User Account Control to make changes on the system.
12. The application installs all drivers and updates identified.
NOTE: Not all files can be installed automatically. Review the installation summary to identify if manual installation is
necessary.
13. For manual download and installation, click Category.
14. Click Network in the drop-down list.
15. Click Download to download the WiFi driver for your computer.
16. After the download is complete, navigate to the folder where you saved the WiFi driver file.
17. Double-click the WiFi driver icon and follow the instructions on the screen to install the driver.
Downloading the media-card reader driver
Steps
1. Turn on your computer.
2. Go to www.dell.com/support.
3. Enter the Service Tag of your computer, and then click Submit.
NOTE: If you do not have the Service Tag, use the auto-detect feature or manually browse for your computer model.
4. Click Drivers & downloads.
5. Click the Detect Drivers button.
6. Review and agree to the Terms and Conditions to use SupportAssist, then click Continue.
7. If necessary, your computer starts to download and install SupportAssist.
NOTE: Review on-screen instructions for browser-specific instructions.
8. Click View Drivers for My System.
9. Click Download and Install to download and install all driver updates detected for your computer.
10. Select a location to save the files.
11. If prompted, approve requests from User Account Control to make changes on the system.
12. The application installs all drivers and updates identified.
Not all files can be installed automatically. Review the installation summary to identify if manual installation is
NOTE:
necessary.
13. For manual download and installation, click Category.
14. Click Chipset in the drop-down list.
15. Click Download to download the media-card reader driver for your computer.
16. After the download is complete, navigate to the folder where you saved the media-card reader driver file.
17. Double-click the media-card reader driver file icon and follow the instructions on the screen to install the driver.
38
Software
Page 39

Downloading the chipset driver
Steps
1. Turn on your computer.
2. Go to www.dell.com/support.
3. Enter the Service Tag of your computer, and then click Submit.
NOTE: If you do not have the Service Tag, use the auto-detect feature or manually browse for your computer model.
4. Click Drivers & downloads.
5. Click the Detect Drivers button.
6. Review and agree to the Terms and Conditions to use SupportAssist, then click Continue.
7. If necessary, your computer starts to download and install SupportAssist.
NOTE: Review on-screen instructions for browser-specific instructions.
8. Click View Drivers for My System.
9. Click Download and Install to download and install all driver updates detected for your computer.
10. Select a location to save the files.
11. If prompted, approve requests from User Account Control to make changes on the system.
12. The application installs all drivers and updates identified.
NOTE: Not all files can be installed automatically. Review the installation summary to identify if manual installation is
necessary.
13. For manual download and installation, click Category.
14. Click Chipset in the drop-down list.
15. Click Download to download the chipset driver for your computer.
16. After the download is complete, navigate to the folder where you saved the saved the chipset driver file.
17. Double-click the chipset driver file icon and follow the instructions on the screen to install the driver.
Downloading the network driver
Steps
1. Turn on your computer.
2. Go to www.dell.com/support.
3. Enter the Service Tag of your computer, and then click Submit.
NOTE: If you do not have the Service Tag, use the auto-detect feature or manually browse for your computer model.
4. Click Drivers & downloads.
5. Click the Detect Drivers button.
6. Review and agree to the Terms and Conditions to use SupportAssist, then click Continue.
7. If necessary, your computer starts to download and install SupportAssist.
NOTE: Review on-screen instructions for browser-specific instructions.
8. Click View Drivers for My System.
9. Click Download and Install to download and install all driver updates detected for your computer.
10. Select a location to save the files.
11. If prompted, approve requests from User Account Control to make changes on the system.
12. The application installs all drivers and updates identified.
Not all files can be installed automatically. Review the installation summary to identify if manual installation is
NOTE:
necessary.
13. For manual download and installation, click Category.
14. Click Network in the drop-down list.
Software
39
Page 40

15. Click Download to download the network driver for your computer.
16. After the download is complete, navigate to the folder where you saved the network driver file.
17. Double-click the network driver file icon and follow the instructions on the screen to install the driver.
40 Software
Page 41

Getting help and contacting Dell
Self-help resources
You can get information and help on Dell products and services using these self-help resources:
Table 43. Self-help resources
Self-help resources Resource location
Information about Dell products and services https://www.dell.com/
Dell Support
Tips
Contact Support In Windows search, type Contact Support, and press Enter.
7
Online help for operating system
Troubleshooting information, user manuals, set up instructions,
product specifications, technical help blogs, drivers, software
updates, and so on.
Dell knowledge base articles for various of system concerns:
Learn and get more information about your product:
• Product specifications
• Operating system
• Setting up and using your product
• Data backup
• Troubleshooting and diagnostics
• Factory and system restore
• BIOS information
• Windows: https://www.dell.com/support/windows
• Linux: https://www.dell.com/support/linux
https://www.dell.com/support/home/
1. Go to https://www.dell.com/support/home/?
app=knowledgebase.
2. Type the subject or keyword in the Search box.
3. Click Search to retrieve the related articles.
Dell provides several online and telephone-based support and
service options. If you do not have an active Internet connection,
you can find contact information about your purchase invoice,
packing slip, bill, or Dell product catalog.
• Select Detect Product.
• Locate your product through the drop-down menu under View
Products.
• Enter the Service Tag number or Product ID in the search
bar.
• Once on product support page, scroll down to Manuals and
Documents section to preview all the Manuals, documents, and
other information for your product.
Getting help and contacting Dell 41
Page 42

Contacting Dell
Dell provides several online and telephone-based support and service options. If you do not have an active Internet connection, you can
find contact information about your purchase invoice, packing slip, bill, or Dell product catalog. Availability varies by country/region and
product, and some services may not be available in your area. To contact Dell for sales, technical support, or customer service issues:
1. Go to https://www.dell.com/support/.
2. Select your country/region from the drop-down menu on the lower right corner of the page.
3. For customized support:
a. Enter your system Service Tag in the Enter your Service Tag field.
b. Click submit.
• The support page that lists the various support categories is displayed.
4. For general support:
a. Select your product category.
b. Select your product segment.
c. Select your product.
• The support page that lists the various support categories is displayed.
5. For contact details of Dell Global Technical Support, see https://www.dell.com/contactdell.
NOTE: The Contact Technical Support page is displayed with details to call, chat, or email the Dell Global Technical
Support team.
NOTE: Availability varies by country/region and product, and some services may not be available in your area.
42 Getting help and contacting Dell
 Loading...