

Page 1

Dell PowerEdge 6 Gbps SAS
HBA and Internal Tape
Adapter
User’s Guide
Page 2

Notes, Cautions, and Warnings
NOTE: A NOTE indicates important information that helps you make better use of
your computer.
CAUTION: A CAUTION indicates potential damage to hardware or loss of data if
instructions are not followed.
WARNING: A WARNING indicates a potential for property damage, personal
injury, or death.
________________________________________
Information in this publication is subject to change without notice.
© 2012 Dell Inc. All rights reserved.
Reproduction of these materials in any manner whatsoever without the written permission of Dell Inc.
is strictly forbidden.
Trademarks used in this text: Dell™, the DELL logo, PowerEdge™, and OpenManage™ are
trademarks of Dell Inc.; Microsoft
registered trademarks of Microsoft Corporation in the United States and/or other countries; SUSE
is a registered trademark of Novell, Inc. in the United States and other countries; Red Hat
Hat Enterprise Linux
countries.
Other trademarks and trade names may be used in this document to refer to either the entities claiming
the marks and names or their products. Dell Inc. disclaims any proprietary interest in trademarks and
trade names other than its own.
®
are registered trademarks of Red Hat Inc. in the United States and other
®
, Windows® and Windows Server® are either trademarks or
®
®
and Red
UCS-71, UCS-70, and UCSM-70
2012 - 02 Rev. A00
Page 3

Contents
1Overview . . . . . . . . . . . . . . . . . . . . . . . . . . 5
Hardware Architecture . . . . . . . . . . . . . . . . . . 6
Operating System Support
Related Documentation . . . . . . . . . . . . . . . . . . 7
Contacting Dell
. . . . . . . . . . . . . . . . . . . . . . 8
. . . . . . . . . . . . . . . . . 7
2 PowerEdge 6 Gbps SAS HBA and
Internal Tape Adapter Features . . . . . . . . 9
LED Port Activity Feature for 6 Gbps
SAS HBA Only
. . . . . . . . . . . . . . . . . . . . . . 11
3 Hardware Installation . . . . . . . . . . . . . . . 13
Installing the 6 Gbps SAS HBA and Internal Tape
Adapter Cards
. . . . . . . . . . . . . . . . . . . . . . 13
4 Driver Installation . . . . . . . . . . . . . . . . . . 17
Installing the Windows Driver . . . . . . . . . . . . . 18
Creating the Driver Media
Pre-Installation Requirements
Installing the Driver During a Windows
Server 2003 Operating System
. . . . . . . . . . . . . 18
. . . . . . . . . . . 18
. . . . . . . . . . . 19
Contents 3
Page 4

Installing the Driver During a Windows
Server 2008 or Windows Server 2008 R2
. . . . . . 20
Installing a Windows Server 2003, Windows
Server 2008 or Windows Server 2008 R2 Driver
for a New Controller . . . . . . . . . . . . . . . . 21
Updating the Windows Driver
. . . . . . . . . . . 22
Installing Linux Driver
. . . . . . . . . . . . . . . . . . 23
Installing the RPM Package With DKMS
. . . . . . . . . . . . . . . . . . . . . . . 23
Support
Upgrading the Kernel
. . . . . . . . . . . . . . . . 24
5 6 Gbps SAS HBA BIOS . . . . . . . . . . . . . . 25
POST Messages . . . . . . . . . . . . . . . . . . . . . 25
BIOS Fault Code Messages
Configuration Utility
. . . . . . . . . . . . . . . . . . . 26
Using Configuration Utility
Functions of the Configuration Utility
. . . . . . . . . . . . . 25
. . . . . . . . . . . . . 26
. . . . . . . . 26
Exit Screen . . . . . . . . . . . . . . . . . . . . . 27
6 Troubleshooting . . . . . . . . . . . . . . . . . . . 29
General Issues . . . . . . . . . . . . . . . . . . . . . . 29
Configuration Utility Error Messages
BIOS Error Messages
. . . . . . . . . . . . . . . . . . 31
. . . . . . . . . . 29
A Updating the Firmware . . . . . . . . . . . . . 35
4 Contents
Firmware Package Update Utility . . . . . . . . . . . . 35
Page 5

1
Overview
The Dell PowerEdge 6 Gbps SAS HBA and Internal Tape Adapter cards are part
of the Dell Serial-Attached SCSI (SAS) controllers solutions.
The 6 Gbps SAS HBA and Internal Tape Adapter cards have the following
characteristics:
• T10 SAS 2.0 compliance with 6 Gbps throughput
• Support for Dell-supported external SAS tape devices and RAID Bunch of
Disks (RBOD) connectivity (6 Gbps SAS HBA)
• Support for Dell-supported internal SAS tape devices (Internal Tape
Adapter)
• Standard half-length, half-height PCI-e cards
• Supported with PCI-e x8 link width
• Supported on platforms with PCI-e x8 and x16 connectors
• Communicate with SAS devices using 2x4 mini-SAS connectors
• Support for LT03 060, LT04, and LT05 tape drives
• Support for full hardware Transport Layer Retry (TLR), to improve
maximum tape throughput
• PCI-e 2.0 compliant to key features.
Overview 5
Page 6
Hardware Architecture
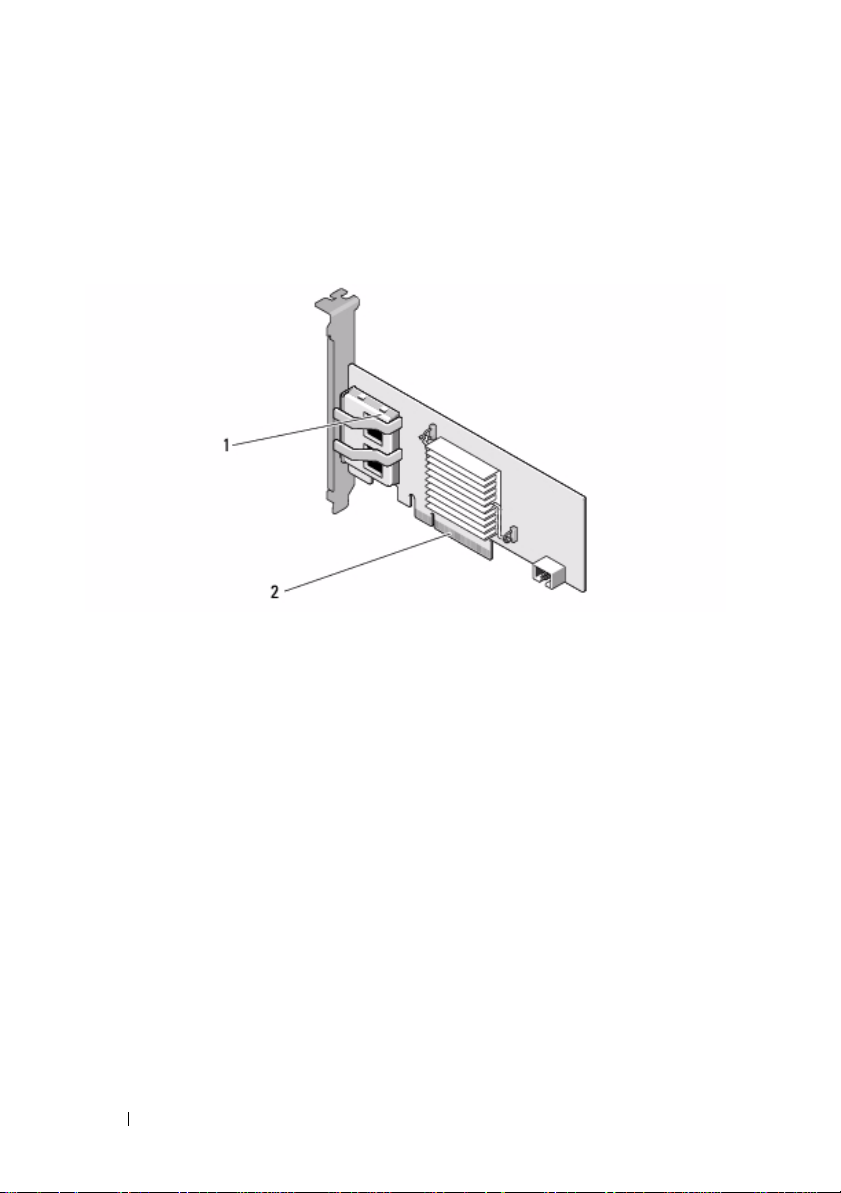
Figure 1-1 displays the hardware architecture of the 6 Gbps SAS HBA. The
Internal Tape Adapter has a similar architecture except that the SAS
connectors are internal.
Figure 1-1. Hardware Architecture of the 6 Gbps SAS HBA and Internal Tape Adapter
1 2x4 external SAS connectors 2 PCI-e connector
6 Overview
Page 7

Operating System Support
The 6 Gbps SAS HBA and Internal Tape Adapter cards support the following
operating systems:
• Microsoft Windows Server 2003 family
• Microsoft Windows Server 2008 family, including Hyper-V Virtualization
• Microsoft Windows Server 2008 R2
• Red Hat Enterprise Linux version 5 update 7 and version 6 Service Pack 1
• SUSE Linux Enterprise Server version 10 Service Pack 4 (64-bit only), and
version 11 Service Pack 2 (64-bit only)
• VMware ESX 4.1 Update 1 and ESXi 5.0.
NOTE: For the latest list of supported operating systems and driver installation
instructions, see the system documentation on the Dell Support website at
support.dell.com/manuals. For specific operating system service pack
requirements, see the Drivers and Downloads section on the Dell Support website
at support.dell.com.
Related Documentation
• To read and download product specific documentation, go to
support.dell.com/manuals
can either type in your Service Tag, choose your product from the list of
models, log in to your account, or click on any of the individual
components.
• For storage controller specific documentation, go to
support.dell.com/manuals
, and follow the instructions on the screen. You
and click
Storage Controllers
.
Overview 7
Page 8

Contacting Dell
NOTE: If you do not have an active Internet connection, you can find contact
information on your purchase invoice, packing slip, bill, or Dell product catalog.
Dell provides several online and telephone-based support and service options.
Availability varies by country and product, and some services may not be
available in your area. To contact Dell for sales, technical support, or
customer service issues:
1
Visit
support.dell.com
2
Select your support category.
3
If you are not a U.S. customer, select your country code at the bottom of
the page, or select
4
Select the appropriate service or support link based on your need.
.
All
to see more choices.
8 Overview
Page 9

2
PowerEdge 6 Gbps SAS HBA and Internal Tape Adapter Features
This section provides the specifications of the Dell PowerEdge 6 Gbps SAS
HBA and Internal Tape Adapter cards.
Table 2-1 compares the specifications of the 6 Gbps SAS HBA and the
Internal Tape Adapter cards.
Table 2-1. 6 Gbps SAS HBA and Internal Tape Adapter Specifications
Specification 6 Gbps SAS HBA Internal Tape Adapter
SAS technology Yes Yes
Support for x4 or x8 PCI-e
host interface
Form factor Half-height, Half-length
I/O Controller (IOC) LSI
SAS 2008
Operating voltage
requirements
Communication to the
system
Communication to end
devices
SAS connectors 2x4 external 2x4 internal
Lead free Yes Yes
Ye s Ye s
Half-height
PCI adapter
LSI SAS 2008
Core speed: 533 MHz
+ 12 V, + 3. 3 V,
+3.3 Vaux
PCI-e lanes PCI-e lanes
SAS links SAS links
Half-length
PCI adapter
LSI SAS 2008
Core speed: 533 MHz
+12 V, +3.3 V, +3.3 Vaux
PowerEdge 6 Gbps SAS HBA and Internal Tape Adapter Features 9
Page 10

Table 2-1. 6 Gbps SAS HBA and Internal Tape Adapter Specifications
Specification 6 Gbps SAS HBA Internal Tape Adapter
Supported operating
systems
Dell-compliant
SAS and SATA
compatibility
Dell-supported direct
connected end devices
Hardware-based RAID
support
Microsoft Windows Server 2003 family
Microsoft Windows Server 2008 family, Windows Server
2008 R2
Red Hat Enterprise Linux version 5 update 7 and later
Red Hat Enterprise Linux version 6 SP 1 and later
SUSE Linux Enterprise Server version 10 SP 4 and later
(64-bit only)
SUSE Linux Enterprise Server version 11 and SP 2 (64bit only).
Ye s Ye s
Dell-supported external
tape devices, Dell
supported external
RBODs.
No No
Dell-supported internal tape
devices.
(continued)
10 PowerEdge 6 Gbps SAS HBA and Internal Tape Adapter Features
Page 11

LED Port Activity Feature for 6 Gbps SAS HBA Only
The 6 Gbps SAS HBA controllers are equipped with port activity or
status LEDs. The LEDs enable you to quickly determine the status of
an external SAS port. Each x4 connector has its own set of LEDs.
Table 2-2 describes the color of the LEDs and corresponding SAS port state.
Table 2-2. x4 Connector LEDs Description
LED Color SAS Port State
Off It indicates one of the following:
• Power is off.
• Port has been reset.
• Either all links in the port are
disconnected or the cable is
disconnected.
Green All links in the port are connected and
functional.
Amber One or more links in the port is not
connected. This is only applicable
in a wide port configuration.
PowerEdge 6 Gbps SAS HBA and Internal Tape Adapter Features 11
Page 12

12 PowerEdge 6 Gbps SAS HBA and Internal Tape Adapter Features
Page 13

3
Hardware Installation
This chapter describes how to install the Dell PowerEdge 6 Gbps SAS HBA
and Internal Tape Adapter cards.
The Dell PowerEdge 6 Gbps SAS HBA and Internal Tape Adapter cards are
either available with the system or as a kit.
When the Dell PowerEdge 6 Gbps SAS HBA and Internal Tape Adapter cards
are available:
• With the system, the drivers will be installed and ready to use.
• As a kit, you need to install the drivers. For more information see "Driver
Installation" on page 17.
Installing the 6 Gbps SAS HBA and Internal Tape
Adapter
CAUTION: Many repairs may only be done by a certified service technician.
1
2
3
4
Cards
You should only perform troubleshooting and simple repairs as authorized in
your product documentation, or as directed by the online or telephone service and
support team. Damage due to servicing that is not authorized by Dell is not
covered by your warranty. Read and follow the safety instructions provided
with the product.
Unpack the 6 Gbps SAS HBA or
damage.
NOTE: Contact Dell if the controller is damaged.
Turn off the system and attached peripherals, and disconnect the system
from the electrical outlet.
For more information on power supplies, see your system’s
Owner’s Manual
Disconnect the system from the network and remove the cover of the
system.
For more information on opening the system, see your system’s
Owner’s Manual
Select an appropriate
or the
or the
PCI-e slot.
User’s Guide
User’s Guide.
Internal Tape Adapter
.
Hardware Installation 13
and check for
Hardware
Hardware
Page 14

When adding a 6 Gbps SAS HBA
1
2
3
or
Internal Tape Adapter, remove the
blank filler bracket on the back of the system aligned with the PCI-e slot
you have selected.
NOTE: For more information about your system’s PCI-e slots, see your
system’s Hardware Owner’s Manual.
5
Align the controller with the PCI-e slot you have selected.
6
Insert the controller in the PCI-e slot. See Figure 3-1.
NOTE: Figure 3-1 displays the 6 Gbps SAS HBA, but the installation instructions
in this section are common for the 6 Gbps SAS HBA and Internal Tape Adapter.
Figure 3-1. Installing a 6 Gbps SAS HBA
1 bracket screw 2 6 Gbps SAS HBA
3 PCI-e slot
14 Hardware Installation
Page 15

7
3
2
1
Tighten the bracket screw, if any, or use the system’s retention clips to
secure the controller to the system’s chassis.
8
For the
Internal Tape Adapter
card, connect the cables from the end
devices to the controller. See Figure 3-2.
NOTE: Although the Internal Tape Adapter has two internal connectors, only one
internal tape device is supported. Use the connector (on the card) labeled 'A'.
Figure 3-2. Connecting the Cable for the Internal Tape Adapter
1 cable 2 SAS x4 internal connector
3 Internal Tape Adapter
9
For the 6 Gbps SAS HBA controller, connect the cable from the external
tape device or enclosure to the adapter. See Figure 3-3.
NOTE: The external cable can be connected to either of the two
external connectors.
Hardware Installation 15
Page 16

Figure 3-3. Connecting the Cable for 6 Gbps SAS HBA
1
2
1 6 Gbps SAS HBA 2 Cable from the external tape device or
enclosure
10
Replace the cover of the system.
For more information on closing the system, see your system’s
Owner’s Manual
11
Reconnect the power cable(s) and network cables, and then turn
or the
User’s Guide.
Hardware
on the system.
NOTE: For more information on connecting your 6 Gbps SAS HBA to an RBOD
enclosure or external tape device see your system’s Hardware Owner’s Manual on
the Dell Support website at support.dell.com/manuals.
NOTE: The 6 Gbps SAS HBA and Internal Tape Adapter cards do not support
installing an operating system on a disk attached to the 6 Gbps SAS HBA or a tape
drive.
NOTE: Hard drives are not supported on the Internal Tape Adapter.
16 Hardware Installation
Page 17

Driver Installation
4
The Dell PowerEdge 6 Gbps SAS HBA and Internal Tape Adapter cards
require software drivers to operate with Microsoft Windows, Red Hat
Enterprise Linux, and SUSE Linux operating systems.
This section contains procedures for installing drivers for the following
operating systems:
• Microsoft Windows Server
• Microsoft Windows Server 2008 Server family
• Windows Server 2008 R2
• Red Hat Linux version 5 Update 7
• SUSE Linux Enterprise Server version 10 Service Pack 4 (64-bit only), and
version 11 Service Pack 2 (64-bit only).
A driver can be installed in the following three ways:
• During operating system installation
• After adding a new 6 Gbps SAS HBA
on an existing operating system
• Updating existing drivers.
NOTE: To ensure you have the latest version of any driver mentioned in this
section, check the Dell Support website at support.dell.com. If a newer version
exists, you can download the driver to your system.
2003 Server family
or Internal Tape Adapter
controller
Driver Installation 17
Page 18

Installing the Windows Driver
This section documents the procedures used to install the Windows driver.
Creating the Driver Media
To create the driver media:
1
Browse to the Download section for the system on the Dell Support
website at s
2
Locate and download the latest 6 Gbps SAS HBA
Adapter
3
Follow the instructions on the Dell Support website for extracting the
driver to the media.
Pre-Installation Requirements
Before you install the operating system:
• Read the Microsoft
operating system.
• Ensure that your system has the latest BIOS and firmware. Ensure that the
latest driver is available for the installation. If required, download the latest
BIOS, firmware, and driver updates from the Dell Support website at
support.dell.com
• Create a device driver media (diskette, USB drive, CD, or DVD).
upport.dell.com
card driver to the system.
Getting Started
.
.
or Internal Tape
document that is shipped with your
Creating the Device Driver Media
To create the device driver media, follow one of the methods described in the
following sections:
Downloading Drivers From the Dell Systems Service and Diagnostic Tools Media
1
Insert the
The
2
Select your system model and operating system.
3
Click
18 Driver Installation
Dell Systems Service and Diagnostics Tools
Welcome to Dell Service and Diagnostic Utilities
Continue
.
media into a system.
screen is displayed.
Page 19

4
From the displayed list of drivers, select the driver that you require and
perform the following steps.
a
Select the self-extracting zip file and click
b
Copy the driver to a diskette drive, CD, DVD, or USB drive.
c
Repeat step 4 for all the drivers that you require.
5
During the operating system installation described in "Installing the Driver
Run
.
During a Windows Server 2003 Operating System" on page 19 and
"Installing the Driver During a Windows Server 2008 or Windows Server
2008 R2" on page 20, use the media that you created with the
Load Driver
option to load mass storage drivers.
Downloading Drivers From the Dell Support Website
1
Go to
support.dell.com
2
Click
Drivers and Downloads
3
Enter the service tag of your system in the
.
.
Choose by Service Tag
select your system’s model.
4
Select the appropriate
and Category
5
It displays the drivers that are applicable to your selection. From the
from the respective drop-down lists.
System Type, Operating System, Driver Language
available list, download the drivers that you require to a diskette drive,
USB drive, CD, or DVD.
6
During the operating system installation described in "Installing the Driver
During a Windows Server 2003 Operating System" on page 19 and, use the
media that you created with the
Load Driver
option to load mass storage
drivers.
field or
,
Installing the Driver During a Windows Server 2003 Operating System
1
Boot the system using the Windows Server 2003 media.
2
Press the <F6> key when the message
third party SCSI or RAID driver
A screen asking for additional controllers in the system is displayed.
3
Press the <S> key.
The system prompts for the driver media to be inserted.
Press F6 if you need to install a
is displayed.
Driver Installation 19
Page 20

NOTE: Use a formatted USB key to provide the driver. For additional details
check the Dell Support website at
4
Insert the driver media in the media drive and press <Enter>.
support.dell.com .
A list of SAS controllers is displayed.
5
Select the appropriate driver for the installed controller and press
<Enter> to load the driver.
NOTE: If the version of the driver you provide does not match the version on
your system a message may be displayed. To use the driver on the media,
press <S>.
6
Press <Enter> to continue the installation process as usual.
Installing the Driver During a Windows Server 2008 or Windows Server 2008 R2
1
Boot the system using the Windows Server 2008 or the Windows Server
2008 R2 media.
2
Follow the on-screen instructions until the following message is displayed:
Where do you want to install 2008
3
Select
Load driver...
The system prompts for the media to be inserted. Insert the installation
media and browse to the proper location when prompted.
4
When prompted, select the appropriate card from the list, click
continue installation as usual.
;
Next
and
20 Driver Installation
Page 21

Installing a Windows Server 2003, Windows Server 2008 or Windows Server 2008 R2 Driver for a New Controller
1
Turn off the system.
2
Install the new controller in the system.
3
Turn on the system.
The Windows operating system detects the new controller and displays a
message.
4
The
Found New Hardware Wizard
device.
5
Click
Next
.
6
On the
my device
7
Make the
Locate Driver Files
8
Click
9
The wizard detects and installs the appropriate device drivers for the new
Locate device driver
and click
Driver Files
Next
available and browse to the proper location from the
screen.
Next
.
.
controller.
10
Click
Finish
to complete the installation.
11
Reboot the system if Windows instructs you to do so.
NOTE: The Windows Server 2008 R2 operating system includes a device driver to
support the SAS controllers. The system automatically detects the new controller
and installs the driver. Check the version of the driver installed by Windows and
update if necessary.
screen displays the detected hardware
screen, select
Search for a suitable driver for
Driver Installation 21
Page 22

Updating the Windows Driver
To update the Windows driver for the 6 Gbps SAS HBA or Internal Tape
Adapter card that is already installed on your system, follow the steps given
below:
NOTE: It is important that you close all applications on your system before
you update the driver.
1
Depending upon your operating system, choose the appropriate action
from the following list:
•
For Windows Server 2003
Click
Start
•
For Windows Server 2008:
Click
Start
•
For Windows Server 2008 R2
Click
Start Control PanelSystem and SecuritySystem
The
System Properties
2
Depending upon your operating system, choose the appropriate action
Settings
Settings
screen is displayed.
from the following list:
• For Windows Server 2003:
Click the
Hardware
• For Windows Server 2008:
Click
Device Manager
• Windows Server 2008 R2:
Click
Device Manager
The
Device Manager
screen is displayed.
:
Control Panel System
Control Panel System
:
tab.
.
.
.
.
NOTE: Alternatively open Device Manager. In Windows Explorer, right-click
on My Computer and select Manage. The Computer Management screen is
displayed. Select Device Manager in the left panel.
3
Double-click on
NOTE: In Windows 2008, SAS is listed under Storage Controllers.
4
Double-click the controller for which you want to update the driver.
5
Click the
The
Upgrade Device Driver Wizard
SCSI and RAID Controllers
Driver
tab and click
Update Driver
.
.
screen is displayed.
22 Driver Installation
Page 23

6
Make the driver files available with the USB key, or other media.
7
Select
Install from a list or specific location
8
Click
Next.
9
Follow the steps in the wizard and browse to the location of the driver files.
10
11
12
Select the
Click
Click
update.
.inf
file from the USB key or other media.
Next
and continue the installation steps in the wizard.
Finish
to exit the wizard and reboot the system for the changes to
.
Installing the Linux Driver
To install the driver for Linux, use the procedures in this section. The driver is
updated frequently. To ensure that you have the current version of the driver,
download the updated Linux driver from the Dell Support website at
support.dell.com.
Installing the RPM Package With DKMS Support
1
Uncompress the gzipped tarball driver release package.
2
Install the DKMS package using the command:
<version>.noarch.rpm
3
Install the driver package using the command:
<version>.noarch.rpm
rpm -ihv dkms-
rpm -ihv mpt2sas-
NOTE: Use rpm -Uvh <package name> when updating an existing
package.
4
If the previous device driver is in use, you must reboot the system for the
updated driver to take effect.
5
Verify that the driver has been loaded with these system commands:
modinfo mpt2sas and dkms status
.
Driver Installation 23
Page 24

Upgrading the Kernel
You must reinstall the DKMS-enabled driver packages when upgrading to a
new kernel.
To update or install the driver for the new kernel:
1
In a terminal window, type the following:
#dkms build -m <module_name> -v <module version> k <kernel version>
#dkms install -m <module_name> -v <module version>
-k <kernel version>
2
To check whether the driver is successfully installed in the new kernel,
type:
dkms status
The following message is displayed:
<new kernel version>: installed
3
If the previous device driver is in use, you must reboot the system for the
updated driver to take effect.
<driver name>, <driver version>,
24 Driver Installation
Page 25

5
6 Gbps SAS HBA BIOS
The BIOS of the Dell PowerEdge 6 Gbps SAS HBA and Internal Tape
Adapter cards have the following features:
• Support for multiple SAS controllers
• Read-only memory (ROM) BIOS recovery image
• POST status error messaging
• POST accessible and text-based configuration utility (<Ctrl><C>).
POST Messages
During POST, the BIOS displays messages that provide the status and
identification information of the controllers, and also displays errors detected
during the POST process.
The BIOS POST identification banner prints the BIOS identification,
copyright information, and the controller version.
The BIOS also prompts you to start the Configuration Utility during the
POST process.
BIOS Fault Code Messages
If you encounter an error in the BIOS during POST, the BIOS Configuration
Utility forces you to acknowledge BIOS errors by halting the POST process
after the error display. You must press any key to continue. The BIOS
Configuration Utility allows you to choose to continue booting or stop
booting if you encounter errors.
NOTE: The BIOS Configuration Utility does not support system boot on devices
connected to the 6 Gbps SAS HBA or the Internal Tape Adapter cards. The following
message is displayed at POST to indicate that system boot is disabled for these
controllers:
Adapter(s)disabled by user.
6 Gbps SAS HBA BIOS 25
Page 26

Configuration Utility
Using Configuration Utility
1
Boot the system.
2
Press <Ctrl><C> during POST when prompted.
Wait until the operating system completes bootup. Then, restart your
system and try again.
NOTE: After you press <Ctrl><C>, press <Enter> on the adapter to manage it.
NOTE: The configuration utility does not offer the ability to configure tape and
RBOD devices. Tape devices and RBODs have their own configuration management
interface.
Functions of the Configuration Utility
The screens are organized in a hierarchical fashion and navigation hints are
displayed at the bottom of each screen.
The screens are:
• Adapter List—Lists all the 6 Gbps SAS HBA and Internal Tape Adapter
cards in the system.
• Global Properties—Lists static and modifiable properties applicable to all
6 Gbps SAS HBA and Internal Tape Adapter cards in the system.
• Adapter Properties—Main screen for the selected controller. Lists the
static and modifiable properties for the selected 6 Gbps SAS HBA and
Internal Tape Adapter cards. Provides a menu for additional screens.
• SAS Topology—Lists the physical topology for the selected controller.
• Device Properties—Lists the properties of physical devices attached to the
selected controller.
• Advanced Adapter Properties—Lists the advanced properties for the
selected controller.
26 6 Gbps SAS HBA BIOS
Page 27

Exit Screen
NOTE: Changes to the SAS BIOS Configuration Utility take effect only
when you exit the utility.
Use the Adapter List and press <Esc> to save and exit the SAS BIOS
Configuration Utility. A similar exit screen appears when you exit other SAS
BIOS Configuration Utility screens. Use these exit screens to save your
settings.
6 Gbps SAS HBA BIOS 27
Page 28

28 6 Gbps SAS HBA BIOS
Page 29

6
Troubleshooting
For support and troubleshooting information on your Dell PowerEdge 6 Gbps
SAS HBA or Internal Tape Adapter cards, see the Dell Support website at
support.dell.com.
General Issues
NOTE: For more troubleshooting information, see the OpenManage Storage
Services User’s Guide on the Dell Support website at support.dell.com.
Configuration Utility Error Messages
NOTE: If the error messages are displayed even after following the resolution
steps mentioned, contact Dell Support for advanced troubleshooting. For
information on how to contact Dell Technical Support, see "Contacting Dell" on
page 8.
•
Message: An error occurred while reading
non-volatile settings.
Description
the firmware.
: An error occurrs while reading one of the settings from
Suggested Solution
•
Message: An error occurred while reading current
controller settings.
Description
Suggested Solution
•
Message: Advanced Device Properties settings not
found.
Description
Suggested Solution
: Reseat the controller and reboot.
: The controller setup and initialization fails.
: Reboot the system.
: Fails to read vital configuration page from firmware.
: Reflash the firmware and reboot.
Troubleshooting 29
Page 30

•
Message: Error obtaining PHY properties
configuration information.
Description
: Fails to read vital configuration page from firmware.
Suggested Solution
• Message: Configuration Utility Options Image
checksum error.
Description
Suggested Solution
firmware on the controller.
• Message: Can't load default Configuration
Utility options.
Description
structure fails.
•
Message: An error occurred while writing
non-volatile settings.
Description
firmware.
: Fails to read
: Memory allocation for
: An error occurs while writing one or more settings to the
: Reflash the firmware and reboot.
Configuration Utility
: Restart and retry. If the issue persists, reflash the
Configuration Utility
options from flash.
options
30 Troubleshooting
Page 31

BIOS Error Messages
•
Message: Press <Ctrl+C> to enable BIOS
Description
enable it by entering the
to
Enabled
•
Message: Adapter configuration may have changed,
reconfiguration is recommended!
Press CTRL-C to run Dell 6 Gbps SAS HBA
Utility
: When the BIOS is disabled, you are given the option to
…
in the
Configuration Utility
Configuration Utility
. You can change the setting
.
Configuration
Description
configuration of the 6 Gbps SAS HBA or Internal Tape Adapter controller.
•
Message: Initializing...
Description
initialize.
•
Message: SAS discovery error
Description: Indicates that there is a discovery error reported by the
firmware and may be accompanied by more such messages. Enter the
Configuration Utility to investigate
•
Message: Device not available at HBA n, HDL n, LUN
Description: Device may not be ready at this time. The device will be
retried. If the problem persists, restart your system.
•
Message: ERROR! Device is not responding to Read
Capacity
Description: The device does not respond to a read capacity command.
Contact Dell.
•
Message: Failed to add device, too many devices!
Description: Cannot allocate resources for additional devices.
•
Message: ERROR! Adapter Malfunctioning!
Description: The adapter did not initialize properly. There may be a
problem with the adapter configuration. Reload the BIOS configuration.
Start the
: Start the
: This message is
Configuration Utility
Configuration Utility
displayed while the BIOS is waiting to
and confirm the
.
again and see if the issue persists.
Troubleshooting 31
Page 32

•
Message: MPT firmware fault
Description
problem with the adapter configuration. Reload the BIOS configuration.
Start the
•
Message: Updating Adapter List!
Description
is created for it.
•
Message: Adapter(s) disabled by user
Description
Utility
•
Message: Adapter configuration may have changed,
reconfiguration is suggested!
Description
the boot order using the available resources.
•
Message: Memory allocation failed
Description
Configuration Utility
•
Message: Invalid or corrupt image
Description
file, or its options file is corrupt. Reload the BIOS. Reflash the firmware.
: The adapter did not initialize properly. There may be a
Configuration Utility
: A new adapter for which there is no record is found. A record
: An adapter is found, but it is disabled in the
and will not be used by the BIOS.
: A controller is moved or reinstalled in the system. Add it to
: The controller cannot allocate enough memory to load the
, its strings file, or its options file. Reboot the system.
: One of the images for the
again and see if the issue persists.
Configuration
Configuration Utility
, its strings
•
Message: Image upload failed
Description
strings file, or its options file. Reload the BIOS. Reflash the firmware.
•
Message: Unable to load the Dell 6 Gbp SAS HBA
Configuration Utility
Description
follows one of the four previous messages.
•
Message: Dell 6 Gbp SAS HBA configuration utility
will load after initialization!
Description
insufficient memory is available. The
after POST initialization.
32 Troubleshooting
: Cannot upload the image for the
: Cannot load the
: <Ctrl><C> is used to start the configuration utility but
Configuration Utility
Configuration Utility
Configuration Utility
. This error usually
, its
loads (boots)
Page 33

•
Message: MPT BIOS Fault xxh encountered at adapter
PCI (xxh, xxh, xxh)
Description
:
– Fault 01: No I/O port assigned to the adapter.
– Fault 02: A MPT firmware fault occurred.
– Fault 03: No image for firmware download boot.
– Fault 04: Firmware download boot checksum error.
– Fault 05: IOC hardware error.
– Fault 06: MPT firmware communication error.
– Fault 07: PCI bus master error.
– Fault 08: String image (messages) not found.
– Fault 09: String memory allocation failed.
– Fault 0A: String upload failed.
– Fault 0B: String image was invalid.
– Fault 0C: Unsupported IOC configuration.
– Fault 0D: Time out waiting for IOC to reply.
– Fault 0E: Transmit doorbell handshake error.
– Fault 0F: Receive doorbell handshake error.
– Fault 10: No memory mapped I/O address assigned.
– Fault 11: IOC facts failure.
– Fault 12: IOC initialization failure.
– Fault 13: Port enable failure.
•
Message: MPT BIOS Fault xxh encountered at adapter
PCI (xxh, xxh, xxh)
Description
: When xxh is 02 or 11, a 4-digit hexadecimal fault value may
be displayed with this message. Ensure that you make a note of this value
and contact technical support for assistance.
•
Message: One or more unsupported device detected!
Description
: There is a topology error during device scan.
Troubleshooting 33
Page 34

•
Message: SAS Address NOT programmed on controller in
slot xx
Description
programmed.
•
Message: Bus master ERROR!
Description
: The SAS address (World Wide ID) equals zero and is not
: The bus master enable was not set for the chip.
34 Troubleshooting
Page 35

7
Updating the Firmware
You can flash the firmware package to update either of the following:
•Dell PowerEdge
• 6 Gbps SAS HBA
• Internal Tape Adapter card firmware.
Flash the firmware package while the controller is in use. Restart the system
for all changes to take effect. If there is a failure while flashing the firmware
package (such as a power outage) the controller reverts to the earlier version
of the firmware.
NOTE: If you flash the firmware while using the controller, you may notice
temporary degradation in the controller's performance.
Firmware Package Update Utility
You can run the firmware package update utility from a variety of operating
systems. The firmware package is automated and does not require user
intervention. You can obtain the firmware package flash utility from the
PowerEdge Service and Diagnostic Utilities media that is shipped with your
system.
You have to perform a manual update. For the latest firmware package
updates and update procedures, see the Dell Support website at
support.dell.com.
Appendix A: Updating the Firmware 35
Page 36

36 Appendix A: Updating the Firmware
 Loading...