

Page 1

Dell Vostro 3905
Owner's Manual
Regulatory Model: D17M
Regulatory Type: D17M002
Page 2

Notes, cautions, and warnings
NOTE: A NOTE indicates important information that helps you make better use of your computer.
CAUTION: A CAUTION indicates either potential damage to hardware or loss of data and tells you
how to avoid the problem.
WARNING: A WARNING indicates a potential for property damage, personal injury, or death.
Copyright © 2015 Dell Inc. All rights reserved. This product is protected by U.S. and international copyright and
intellectual property laws. Dell™ and the Dell logo are trademarks of Dell Inc. in the United States and/or other
jurisdictions. All other marks and names mentioned herein may be trademarks of their respective companies.
2015 - 09
Rev. A00
Page 3

Contents
1 Working on Your Computer................................................................................5
Before Working Inside Your Computer................................................................................................ 5
Turning Off Your Computer..................................................................................................................6
After Working Inside Your Computer................................................................................................... 7
2 Removing and Installing Components............................................................. 8
Recommended Tools............................................................................................................................8
System Overview...................................................................................................................................8
Inside view ...................................................................................................................................... 8
Removing the Cover............................................................................................................................. 9
Installing the Cover............................................................................................................................... 9
Removing the Bezel.............................................................................................................................. 9
Installing the Bezel.............................................................................................................................. 10
Removing the Coin-Cell Battery........................................................................................................ 10
Installing the Coin-Cell Battery........................................................................................................... 11
Removing the Hard-Drive Assembly...................................................................................................11
Installing the Hard-Drive Assembly.................................................................................................... 12
Removing the Optical Drive................................................................................................................12
Installing the Optical Drive..................................................................................................................13
Removing the Card Reader.................................................................................................................13
Installing the Card Reader...................................................................................................................14
Removing the Memory........................................................................................................................14
Installing the Memory..........................................................................................................................15
Removing the Heatsink Module..........................................................................................................15
Installing the Heatsink Module............................................................................................................15
Removing the Processor..................................................................................................................... 15
Installing the Processor.......................................................................................................................16
Removing the Expansion Card(s)........................................................................................................ 17
Installing the Expansion Card(s).......................................................................................................... 17
Removing the Power Supply Unit (PSU)............................................................................................. 17
Installing the Power Supply Unit (PSU)...............................................................................................18
Removing the Power Switch...............................................................................................................18
Installing the Power Switch.................................................................................................................19
Removing the Input/Output (I/O) Panel............................................................................................ 20
Installing the Input/Output (I/O) Panel...............................................................................................21
Removing the System Fan...................................................................................................................21
Installing the System Fan.................................................................................................................... 22
Removing the System Board.............................................................................................................. 22
3
Page 4

Installing the System Board................................................................................................................ 23
System Board Components................................................................................................................23
3 Troubleshooting Your Computer....................................................................25
Diagnostic Power LED Codes.............................................................................................................25
Diagnostic Error Messages................................................................................................................. 26
System Error Messages.......................................................................................................................30
4 System Setup....................................................................................................... 31
Accessing System Setup......................................................................................................................31
System Setup Options......................................................................................................................... 31
Exit..................................................................................................................................................34
System Setup Overview...................................................................................................................... 34
5 Specifications...................................................................................................... 35
6 Contacting Dell...................................................................................................39
4
Page 5
1
Working on Your Computer
Before Working Inside Your Computer
Use the following safety guidelines to help protect your computer from potential damage and to help to
ensure your personal safety. Unless otherwise noted, each procedure included in this document assumes
that the following conditions exist:
• You have read the safety information that shipped with your computer.
• A component can be replaced or--if purchased separately--installed by performing the removal
procedure in reverse order.
WARNING: Disconnect all power sources before opening the computer cover or panels. After you
finish working inside the computer, replace all covers, panels, and screws before connecting to
the power source.
WARNING: Before working inside your computer, read the safety information that shipped with
your computer. For additional safety best practices information, see the Regulatory Compliance
Homepage at
CAUTION: Many repairs may only be done by a certified service technician. You should only
perform troubleshooting and simple repairs as authorized in your product documentation, or as
directed by the online or telephone service and support team. Damage due to servicing that is
not authorized by Dell is not covered by your warranty. Read and follow the safety instructions
that came with the product.
CAUTION: To avoid electrostatic discharge, ground yourself by using a wrist grounding strap or
by periodically touching an unpainted metal surface, such as a connector on the back of the
computer.
CAUTION: Handle components and cards with care. Do not touch the components or contacts
on a card. Hold a card by its edges or by its metal mounting bracket. Hold a component such as a
processor by its edges, not by its pins.
CAUTION: When you disconnect a cable, pull on its connector or on its pull-tab, not on the cable
itself. Some cables have connectors with locking tabs; if you are disconnecting this type of cable,
press in on the locking tabs before you disconnect the cable. As you pull connectors apart, keep
them evenly aligned to avoid bending any connector pins. Also, before you connect a cable,
ensure that both connectors are correctly oriented and aligned.
NOTE: The color of your computer and certain components may appear differently than shown in
this document.
www.dell.com/regulatory_compliance
To avoid damaging your computer, perform the following steps before you begin working inside the
computer.
1. Ensure that your work surface is flat and clean to prevent the computer cover from being scratched.
2. Turn off your computer (see Turning Off Your Computer).
5
Page 6
CAUTION: To disconnect a network cable, first unplug the cable from your computer and
then unplug the cable from the network device.
3. Disconnect all network cables from the computer.
4. Disconnect your computer and all attached devices from their electrical outlets.
5. Press and hold the power button while the computer is unplugged to ground the system board.
6. Remove the cover.
CAUTION: Before touching anything inside your computer, ground yourself by touching an
unpainted metal surface, such as the metal at the back of the computer. While you work,
periodically touch an unpainted metal surface to dissipate static electricity, which could
harm internal components.
Turning Off Your Computer
CAUTION: To avoid losing data, save and close all open files and exit all open programs before
you turn off your computer.
1. Shut down the operating system:
• In Windows 8.1:
– Using a touch-enabled device:
a. Swipe in from the right edge of the screen, opening the Charms menu and select
Settings.
b. Select the and then select Shut down.
Or
* On the Home screen, touch the and then select Shut down.
– Using a mouse:
a. Point to upper-right corner of the screen and click Settings.
b. Click the and select Shut down.
Or
* On the Home screen, click and then select Shut down.
• In Windows 7:
1. Click Start .
2. Click Shut Down.
or
1. Click Start .
6
Page 7

2. Click the arrow in the lower-right corner of the Start menu as shown below, and then click
Shut Down .
2. Ensure that the computer and all attached devices are turned off. If your computer and attached
devices did not automatically turn off when you shut down your operating system, press and hold
the power button for about 6 seconds to turn them off.
After Working Inside Your Computer
After you complete any replacement procedure, ensure you connect any external devices, cards, and
cables before turning on your computer.
1. Replace the cover.
CAUTION: To connect a network cable, first plug the cable into the network device and then
plug it into the computer.
2. Connect any telephone or network cables to your computer.
3. Connect your computer and all attached devices to their electrical outlets.
4. Turn on your computer.
5. If required, verify that the computer works correctly by running the Dell Diagnostics.
7
Page 8
Removing and Installing Components
This section provides detailed information on how to remove or install the components from your
computer.
Recommended Tools
The procedures in this document may require the following tools:
• Small flat-blade screwdriver
• Phillips screwdriver
• Small plastic scribe
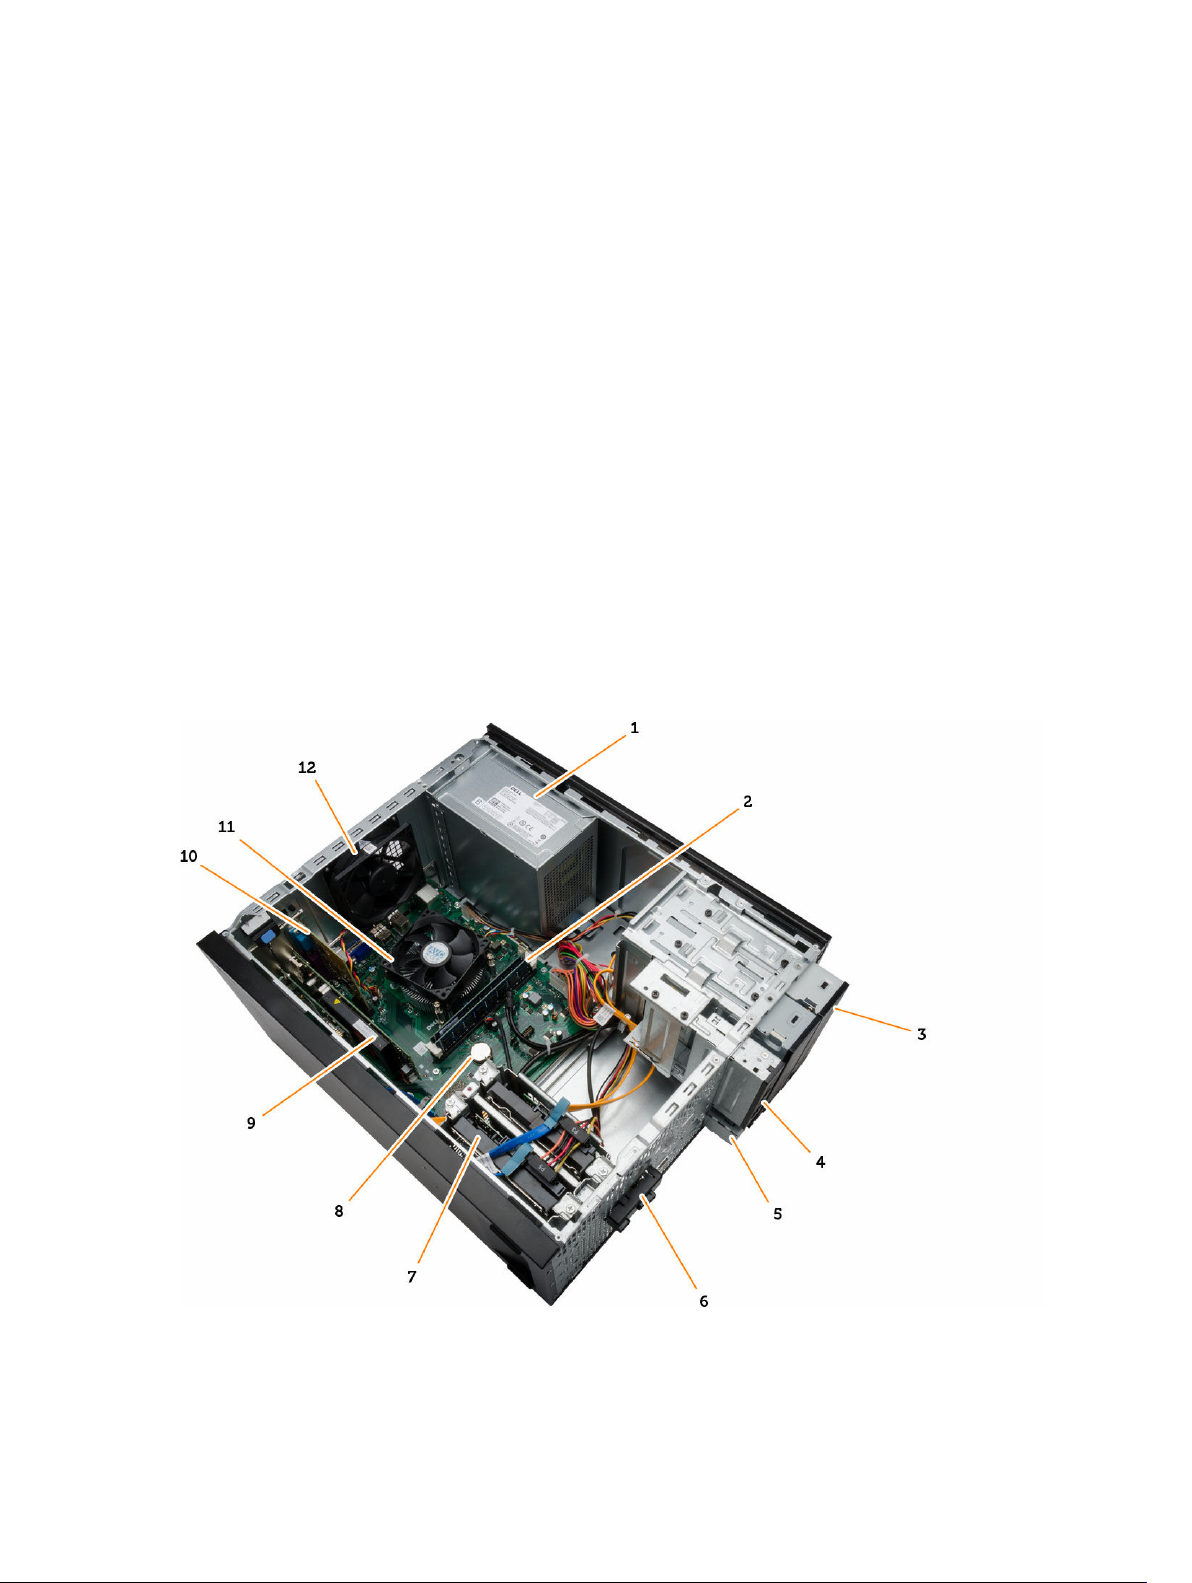
System Overview
Inside view
2
1. Power Supply Unit (PSU) 2. memory module
8
Page 9
3. optical drive 4. card-reader bay
5. I/O board 6. power-switch board
7. hard drive 8. coin-cell battery
9. VGA card 10. expansion card
11. heatsink module 12. system fan
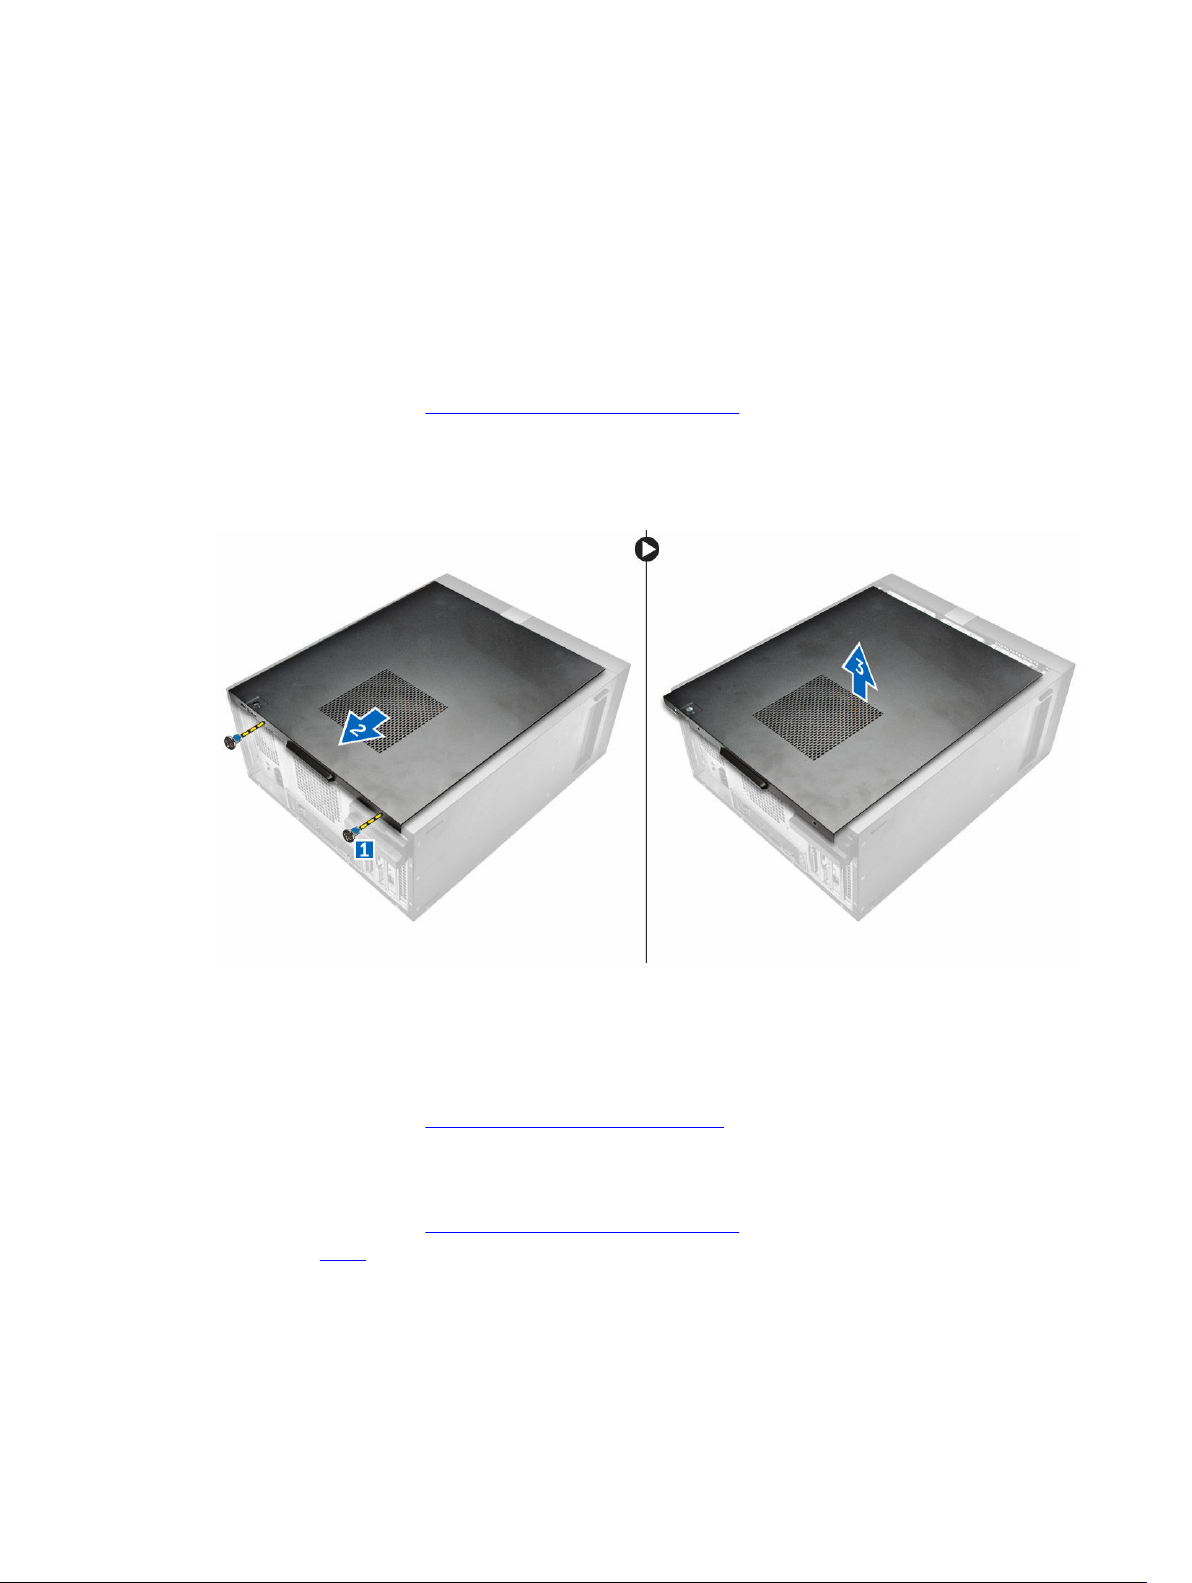
Removing the Cover
1. Follow the procedures in Before Working Inside Your Computer.
2. Follow the steps to remove the cover:
a. Remove the screws that secure the cover to the computer [1].
b. Slide the computer cover towards the back of the computer [2].
c. Lift and remove the cover from the computer [3].
Installing the Cover
1. Place the cover on the computer and slide to install the cover.
2. Tighten the screws to secure the cover to the computer.
3. Follow the procedures in After Working Inside Your Computer.
Removing the Bezel
1. Follow the procedures in Before Working Inside Your Computer.
2. Remove the cover.
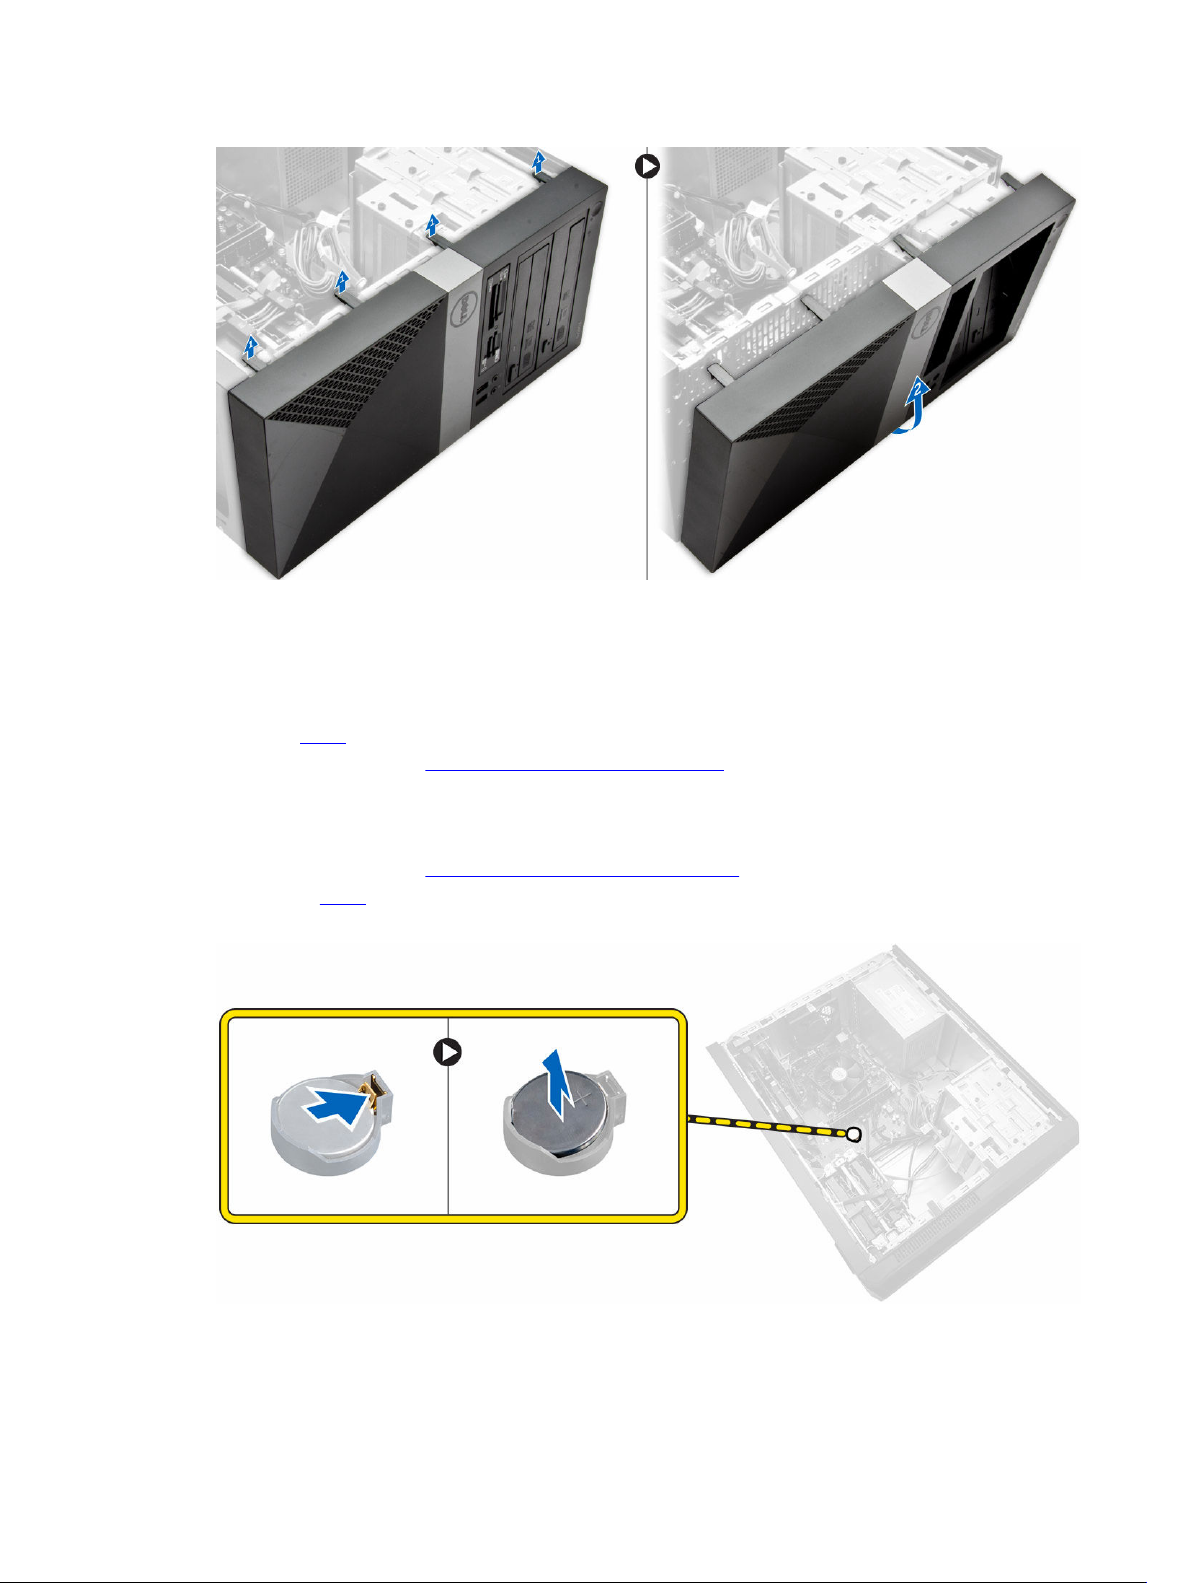
3. Follow the steps to remove the bezel:
a. Pry the front panel retention clips from the chassis to release the front bezel [1].
b. Lift and remove the bezel from the computer [2].
9
Page 10
Installing the Bezel
1. Insert the bezel on the computer aligning it to the placeholders.
2. Press the bezel until the hooks snap in to place.
3. Install the cover.
4. Follow the procedures in After Working Inside Your Computer.
Removing the Coin-Cell Battery
1. Follow the procedures in Before Working Inside Your Computer.
2. Remove the cover.
3. Push the coin-cell release latch and pull the coin-cell battery to remove it from the computer.
10
Page 11

Installing the Coin-Cell Battery
1. Place the coin-cell battery on the system board until it snaps in place.
2. Install the cover.
3. Follow the procedures in After Working Inside Your Computer.
Removing the Hard-Drive Assembly
1. Follow the procedures in Before Working Inside Your Computer.
2. Remove the:
• cover
• bezel
3. Follow the steps to remove the hard-drive assembly from the computer:
a. Disconnect the SATA cable and power cable from the hard drive [1] [2].
b. Remove the screws that secure the hard-drive bracket [3] and lift it upwards to remove it from the
computer [4].
4. Follow the steps to remove the hard-drive bracket.
a. Remove the screws that secure the hard-drive bracket.
b. Lift and remove the hard drive from the hard-drive bracket.
11
Page 12

Installing the Hard-Drive Assembly
1. Replace the hard drive into the hard-drive bracket.
2. Install the screws that secure the hard-drive bracket.
3. Install the hard-drive assembly into its slot on the computer.
4. Install the screws that secure the hard-drive assembly to the computer.
5. Connect the SATA cable and the power cable to the hard-drive assembly.
6. Install the:
• bezel
• cover
7. Follow the procedures in After Working Inside Your Computer.
Removing the Optical Drive
1. Follow the procedures in Before Working Inside Your Computer.
2. Remove the:
• cover
• bezel
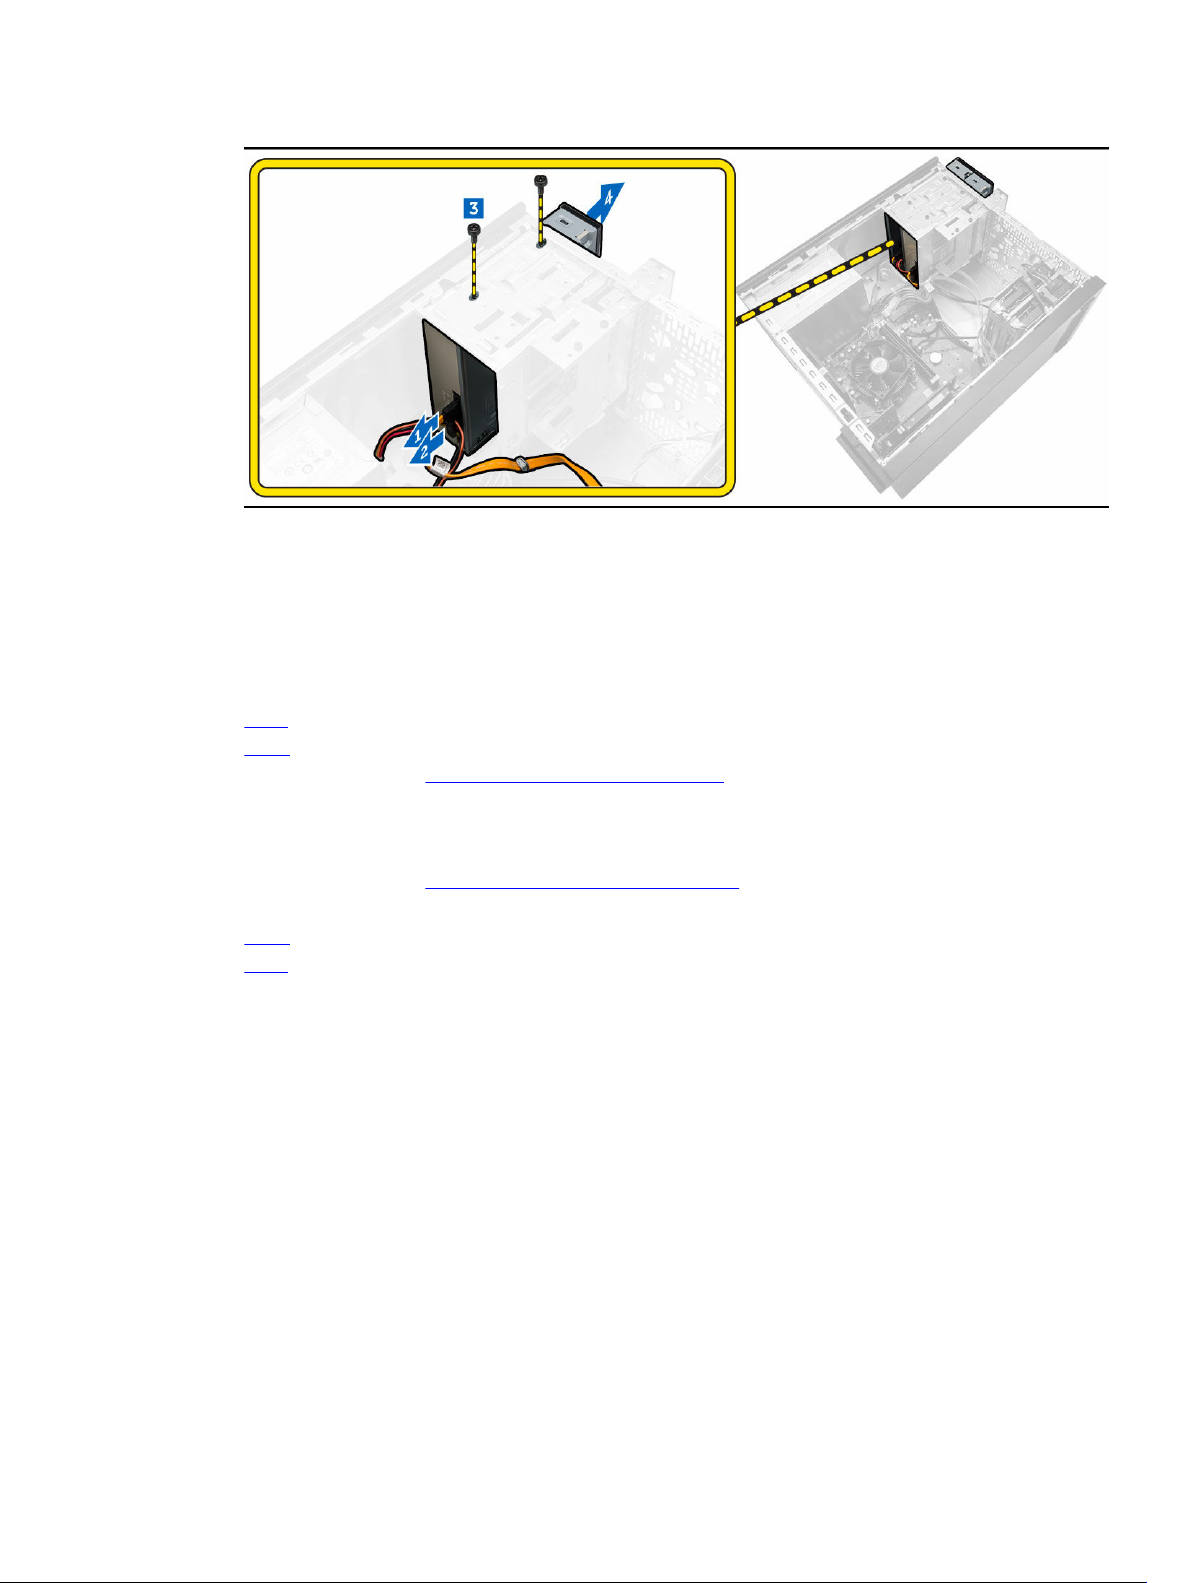
3. Follow the steps to remove the optical drive:
a. Disconnect the data cable [1] and power cable [2] from the optical drive.
b. Remove the screws that secure the optical drive [3].
c. Slide the optical drive from the drive bay to remove it from the computer [4].
12
Page 13
Installing the Optical Drive
1. Push the optical drive into the optical-drive bay until it snaps into place.
2. Tighten the screws to secure the optical drive to the computer.
3. Connect the data cable and power cable to their connectors on the optical drive.
4. Install the:
• bezel
• cover
5. Follow the procedures in After Working Inside Your Computer.
Removing the Card Reader
1. Follow the procedures in Before Working Inside Your Computer.
2. Remove the:
• cover
• bezel
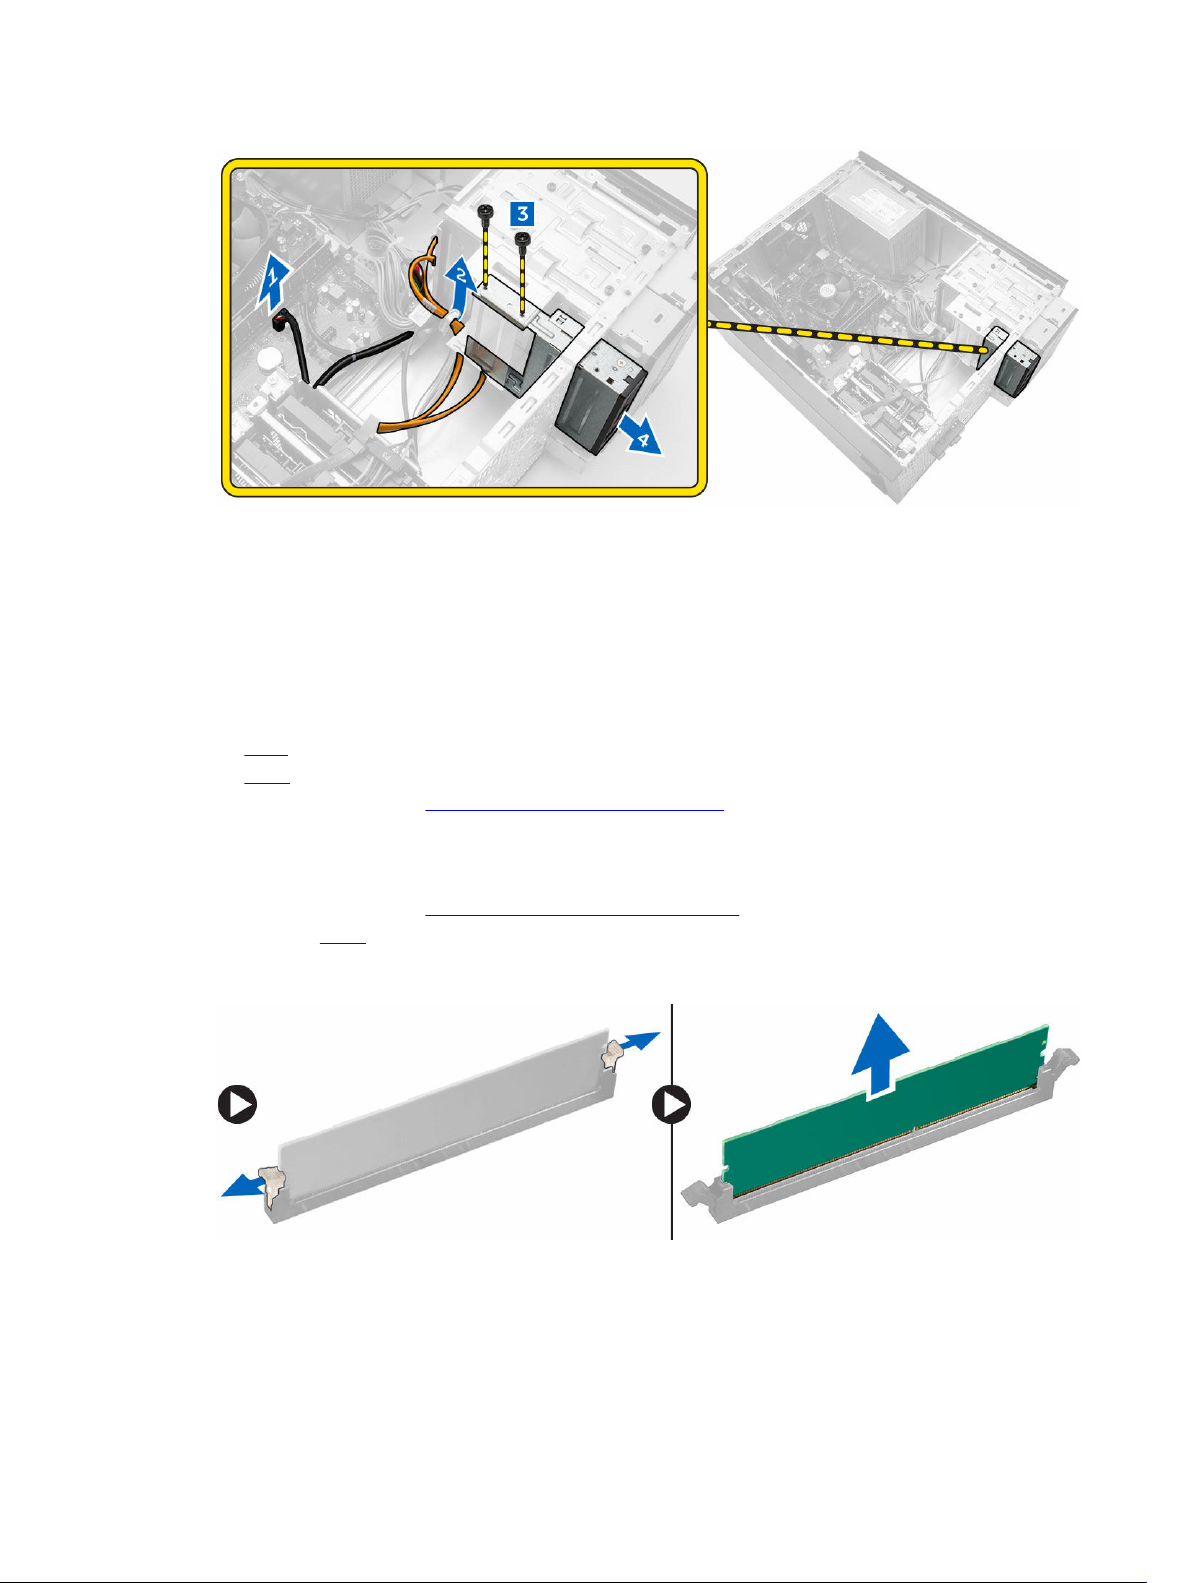
3. Perform the following steps to remove the card reader:
a. Disconnect the power cable of the card reader from the system board [1].
b. Un-thread the power cable from the metal clip [2].
c. Remove the screws that secure the card reader to the computer [3].
d. Push the card reader towards the front of the computer and slide the card reader to remove from
the computer [4].
13
Page 14
Installing the Card Reader
1. Slide the card reader into its slot until it snaps into place.
2. Tighten the screws to secure the card reader to the computer.
3. Thread the card reader power cable through the metal clip.
4. Connect the power cable of the card reader to the system board.
5. Install the:
• bezel
• cover
6. Follow the procedures in After Working Inside Your Computer.
Removing the Memory
1. Follow the procedures in Before Working Inside Your Computer.
2. Remove the cover.
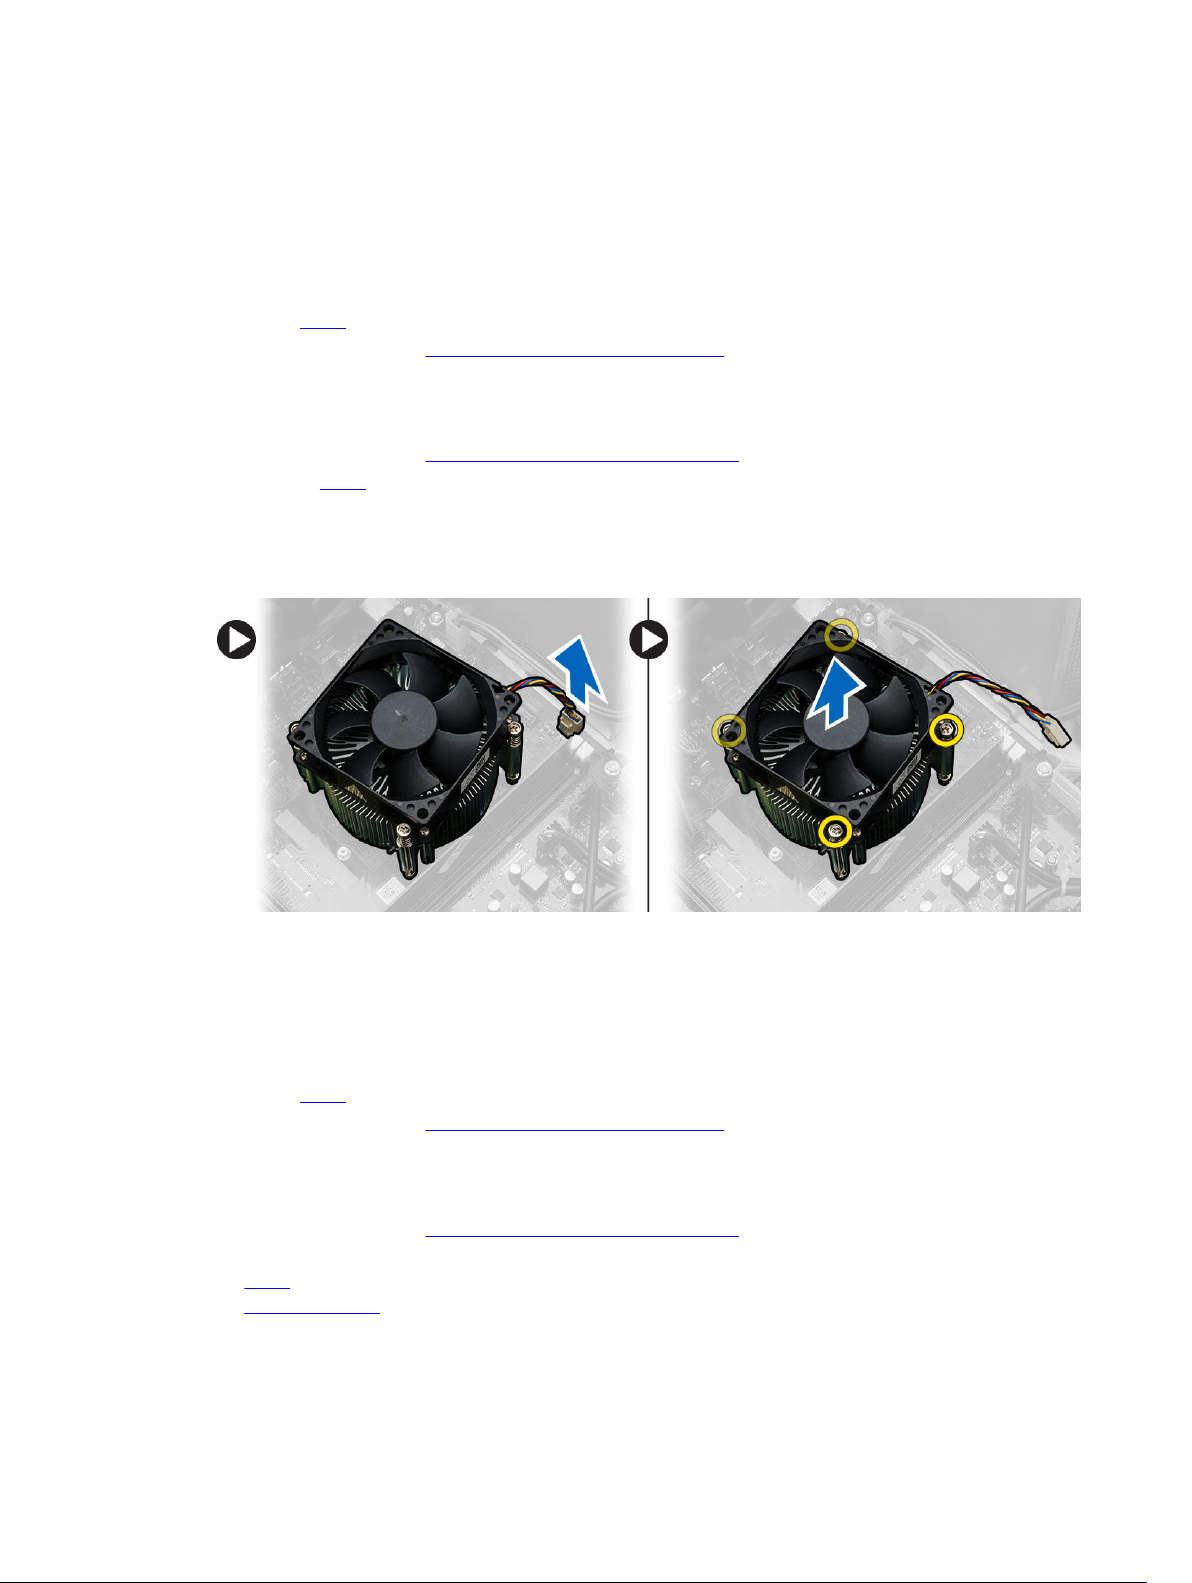
3. Press down on the memory-retention tabs on each side of the memory modules and lift the memory
module upwards to remove it from the computer.
14
Page 15
Installing the Memory
1. Align the notch on the memory card with the tab in the memory connector.
2. Insert the memory module into the memory socket.
3. Press down on the memory module until the memory-retention tabs secure the memory in place.
4. Install the cover.
5. Follow the procedures in After Working Inside Your Computer.
Removing the Heatsink Module
1. Follow the procedures in Before Working Inside Your Computer.
2. Remove the cover.
3. Follow the steps to remove the processor heatsink module:
a. Disconnect the heatsink-module cable from the system board.
b. Loosen the captive screws that secure the heatsink module to the system board.
c. Lift the heatsink module upward and remove it from the computer.
Installing the Heatsink Module
1. Place the heatsink module on the processor.
2. Tighten the captive screws to secure the heatsink module to the system board.
3. Connect the heatsink-module cable to the connector on the system board.
4. Install the cover.
5. Follow the procedures in After Working Inside Your Computer.
Removing the Processor
1. Follow the procedures in Before Working Inside Your Computer.
2. Remove the:
• cover
• heatsink module
3. Push the processor release lever down and then press it outward to release it from the retention
hook that secures it.
15
Page 16
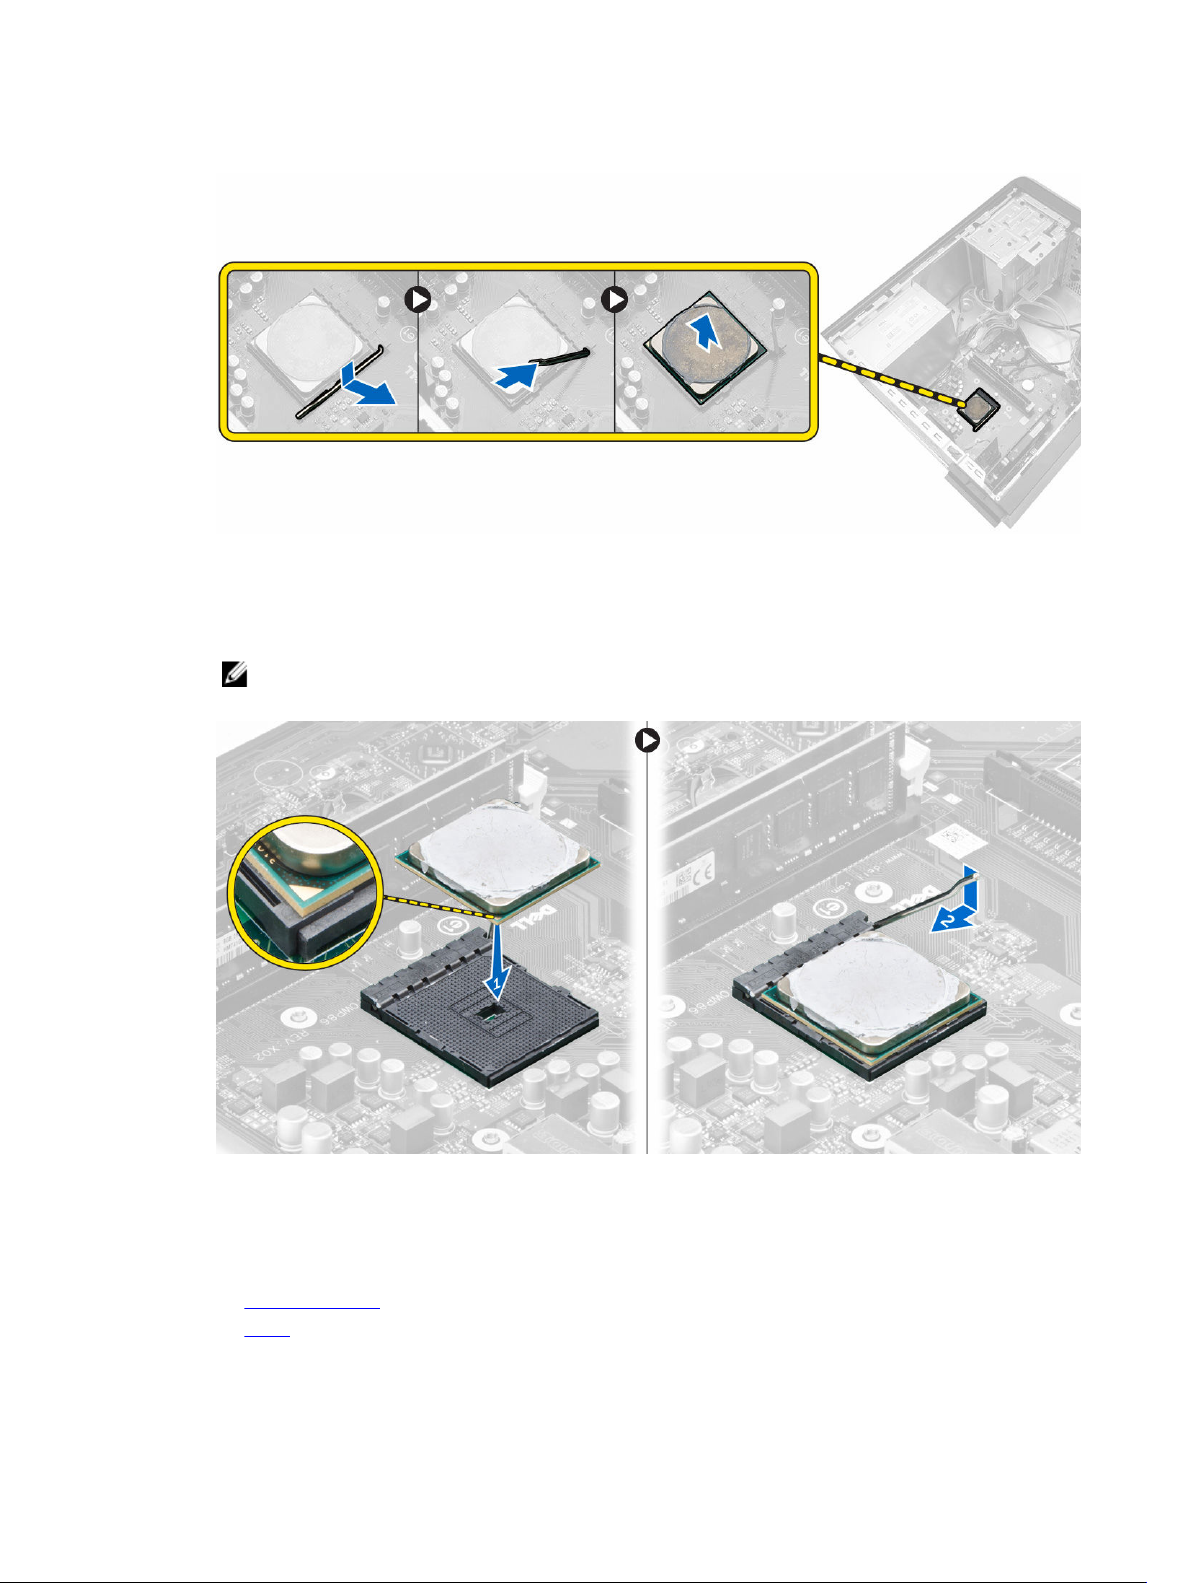
4. Lift the processor to remove it from the computer.
Installing the Processor
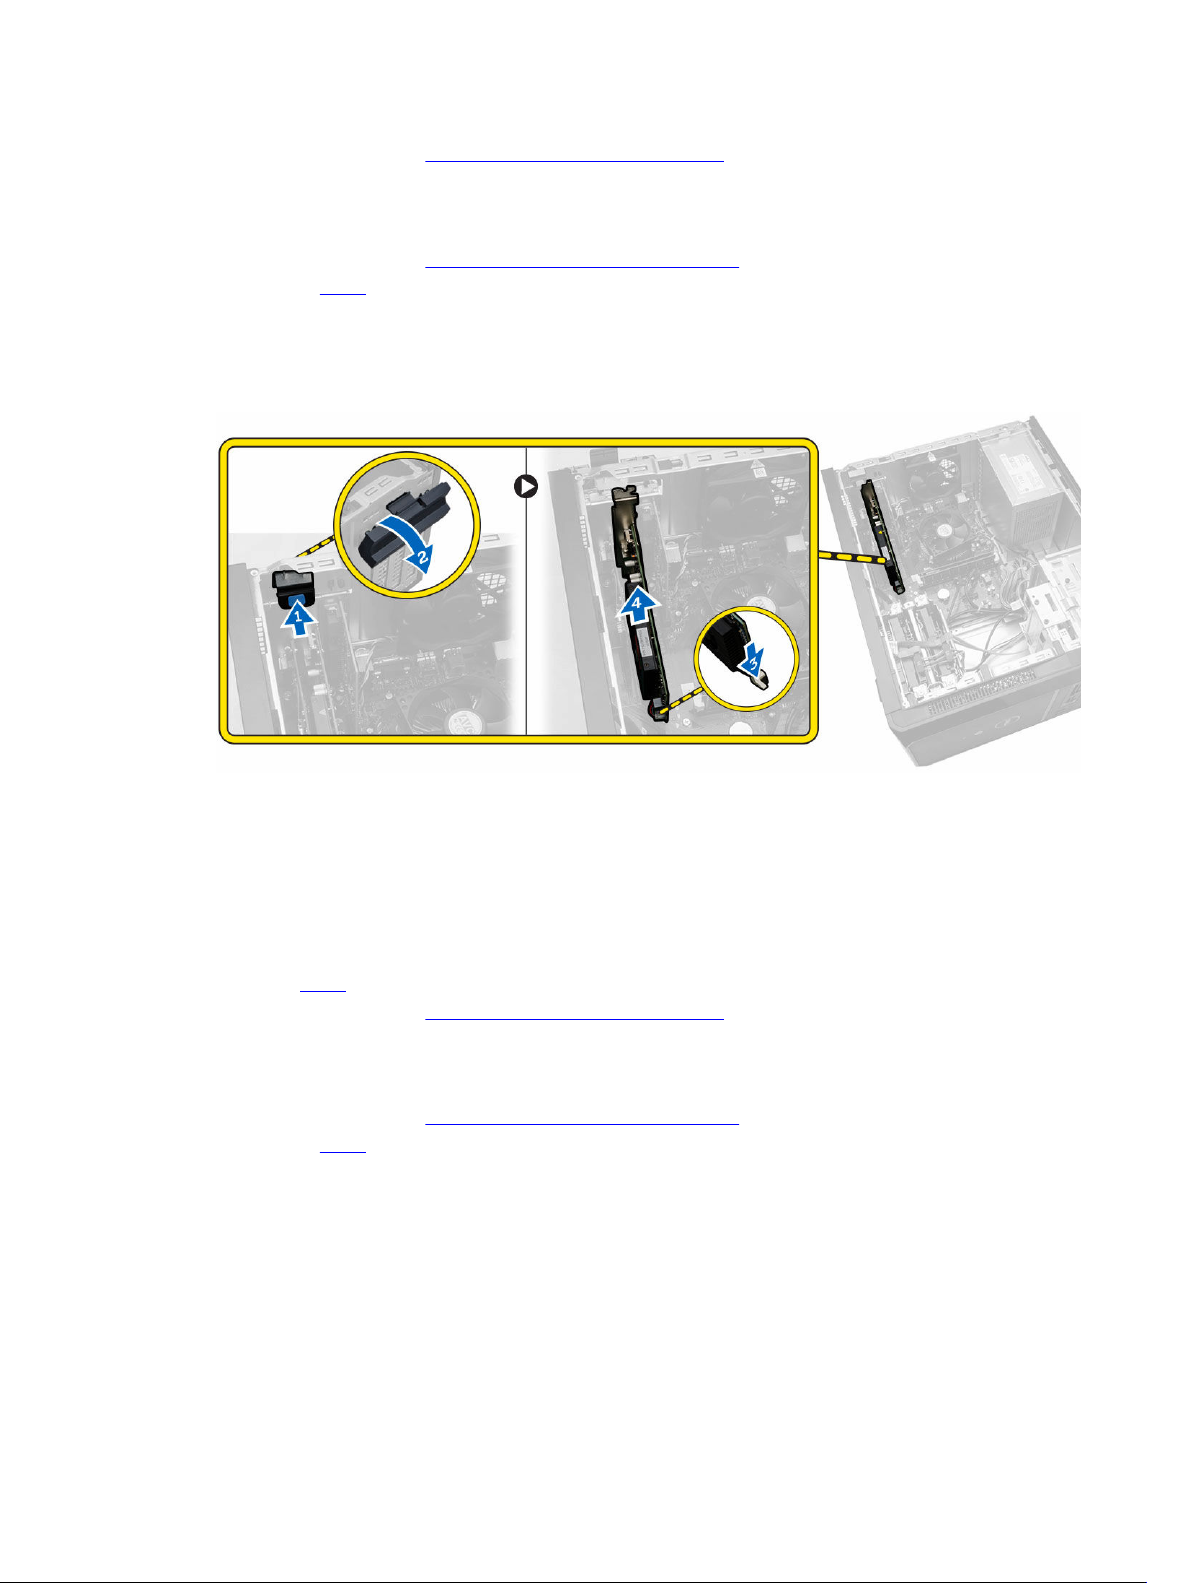
1. Install the processor into the socket.
NOTE: To install the processor correctly in to the socket, align the processor to its position as
displayed in the image.
2. Press down the processor to secure it inside the socket.
3. Push the release lever down and then press it inward to hold the retention hook that secures it.
4. Install the:
• heatsink module
• cover
16
Page 17
5. Follow the procedures in After Working Inside Your Computer.
Removing the Expansion Card(s)
1. Follow the procedures in Before Working Inside Your Computer.
2. Remove the cover.
3. Follow the steps to remove the expansion card:
a. Press the blue tab [1] and slide down the release lever that secures the expansion card [2].
b. Press the retaining tab to release the expansion card from its connector [3].
c. Lift the expansion card from the connector and remove it from the computer [4].
4. Repeat the same sequence of steps to remove any additional expansion card(s) installed.
Installing the Expansion Card(s)
1. Insert the expansion card to its connector on the system board.
2. Secure the expansion card by pushing the card-retention latch until it snaps into place.
3. Repeat the steps to install any additional expansion cards.
4. Install the cover.
5. Follow the procedures in After Working Inside Your Computer.
Removing the Power Supply Unit (PSU)
1. Follow the procedures in Before Working Inside Your Computer.
2. Remove the cover.
3. Disconnect the following power supply cables from the system board by pressing on the retention
latch and lifting it upwards.
• system board [1]
• system fan [2]
17
Page 18
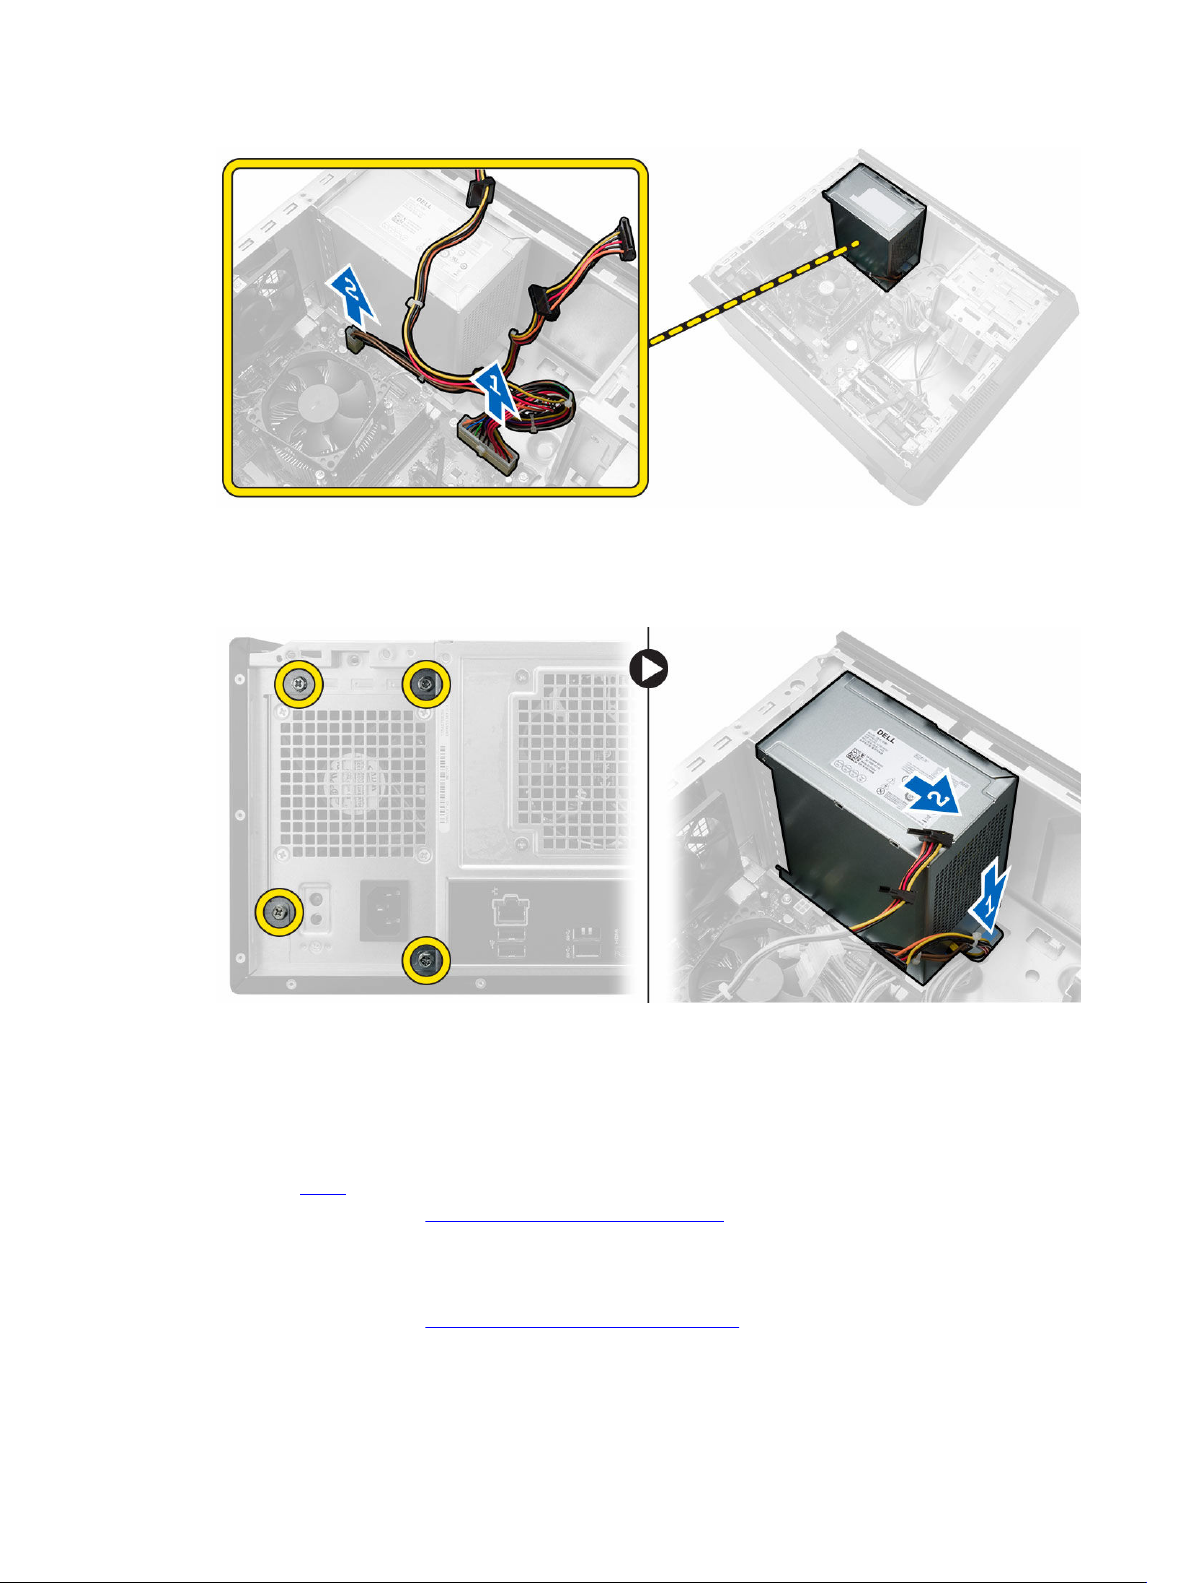
4. Follow the steps to remove the power supply unit:
a. Remove the screws that secure the power supply unit to the computer.
b. Push-in on the blue release tab at the base of the power supply unit [1].
c. Slide the power supply unit towards the back and remove it from the computer [2].
Installing the Power Supply Unit (PSU)
1. Slide the PSU towards the back of the computer until it snaps into place.
2. Replace the screws to secure the power supply unit to the computer.
3. Connect the PSU cables to their connectors on the system board.
4. Install the cover.
5. Follow the procedures in After Working Inside Your Computer.
Removing the Power Switch
1. Follow the procedures in Before Working Inside Your Computer.
2. Remove the:
18
Page 19
• cover
• bezel
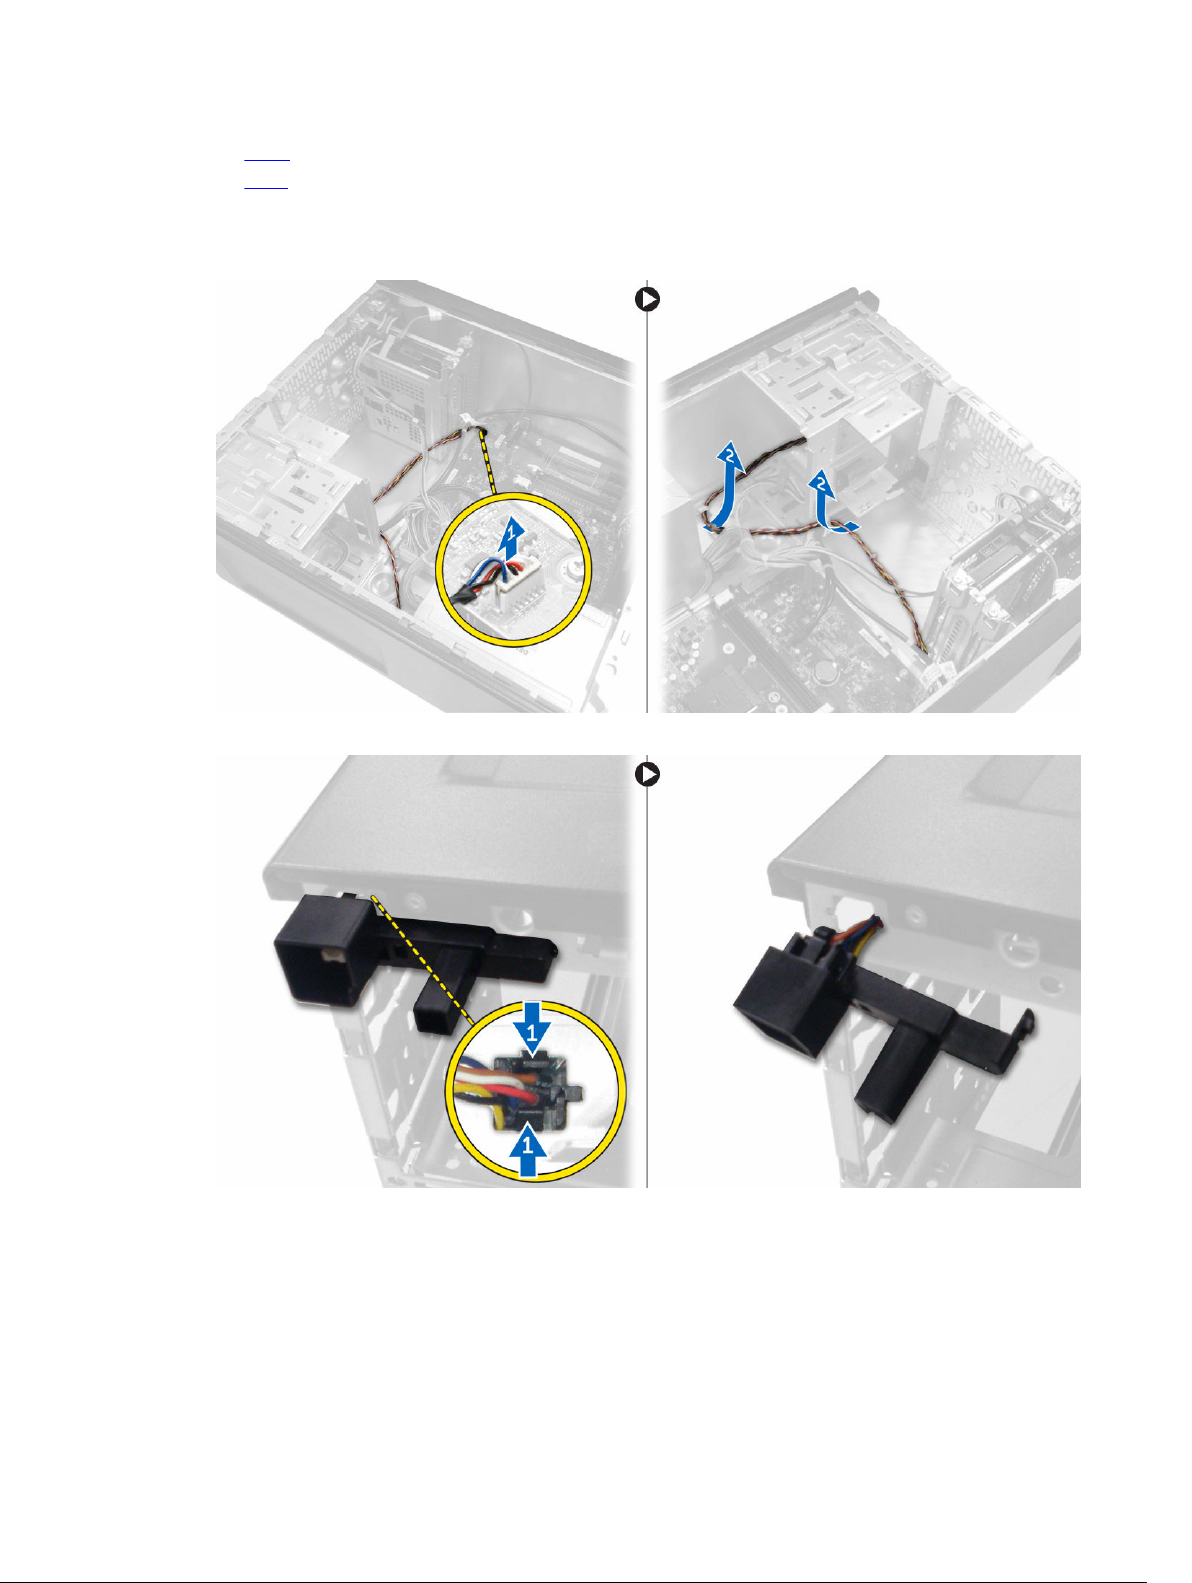
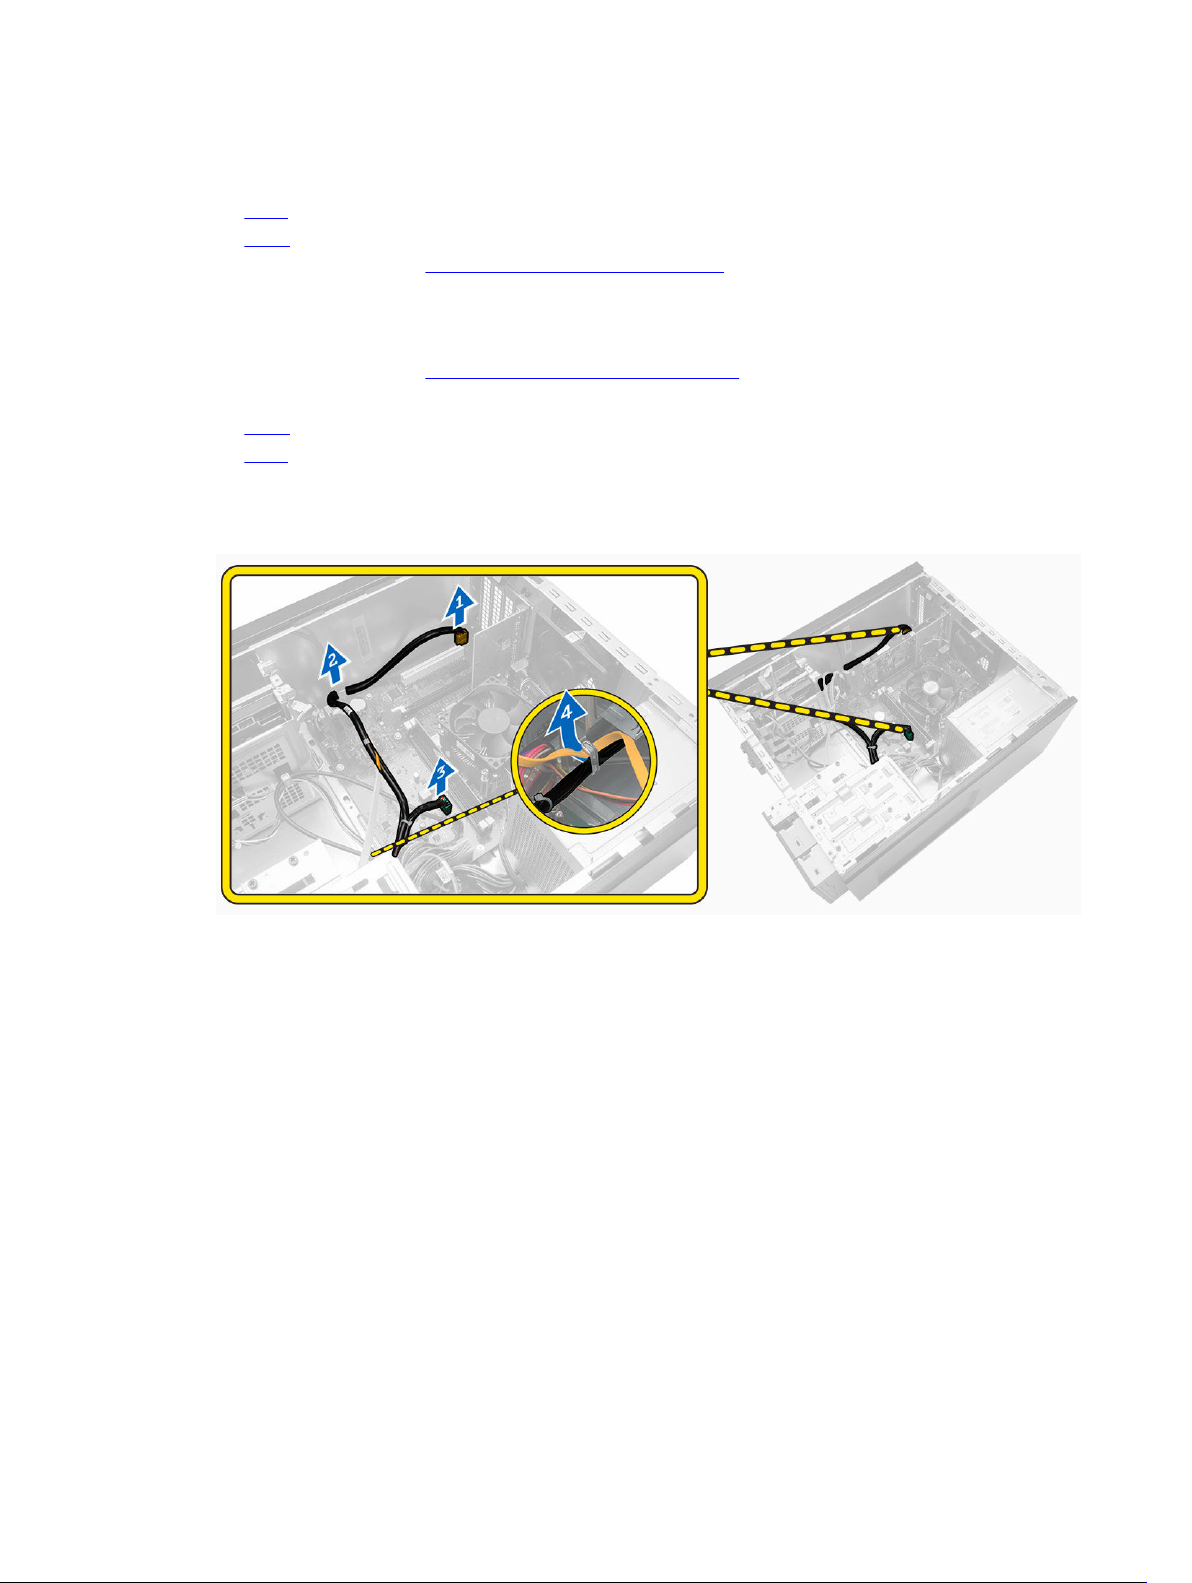
3. Follow the steps to remove the power switch:
a. Disconnect the power-switch cable from the system board [1].
b. Un-thread the power-switch cable from the metal-retention clips [2].
4. Remove the power switch by pressing on the two tabs [1] and pulling it out from the slot.
Installing the Power Switch
1. Insert the power-switch cable through the front of the computer.
2. Push the power switch into its slot and press it in, until it snaps into place.
3. Route the power-switch cable through the metal clip.
19
Page 20
4. Connect the power-switch cable to the connector on the system board.
5. Install the:
• bezel
• cover
6. Follow the procedures in After Working Inside Your Computer.
Removing the Input/Output (I/O) Panel
1. Follow the procedures in Before Working Inside Your Computer.
2. Remove the:
• cover
• bezel
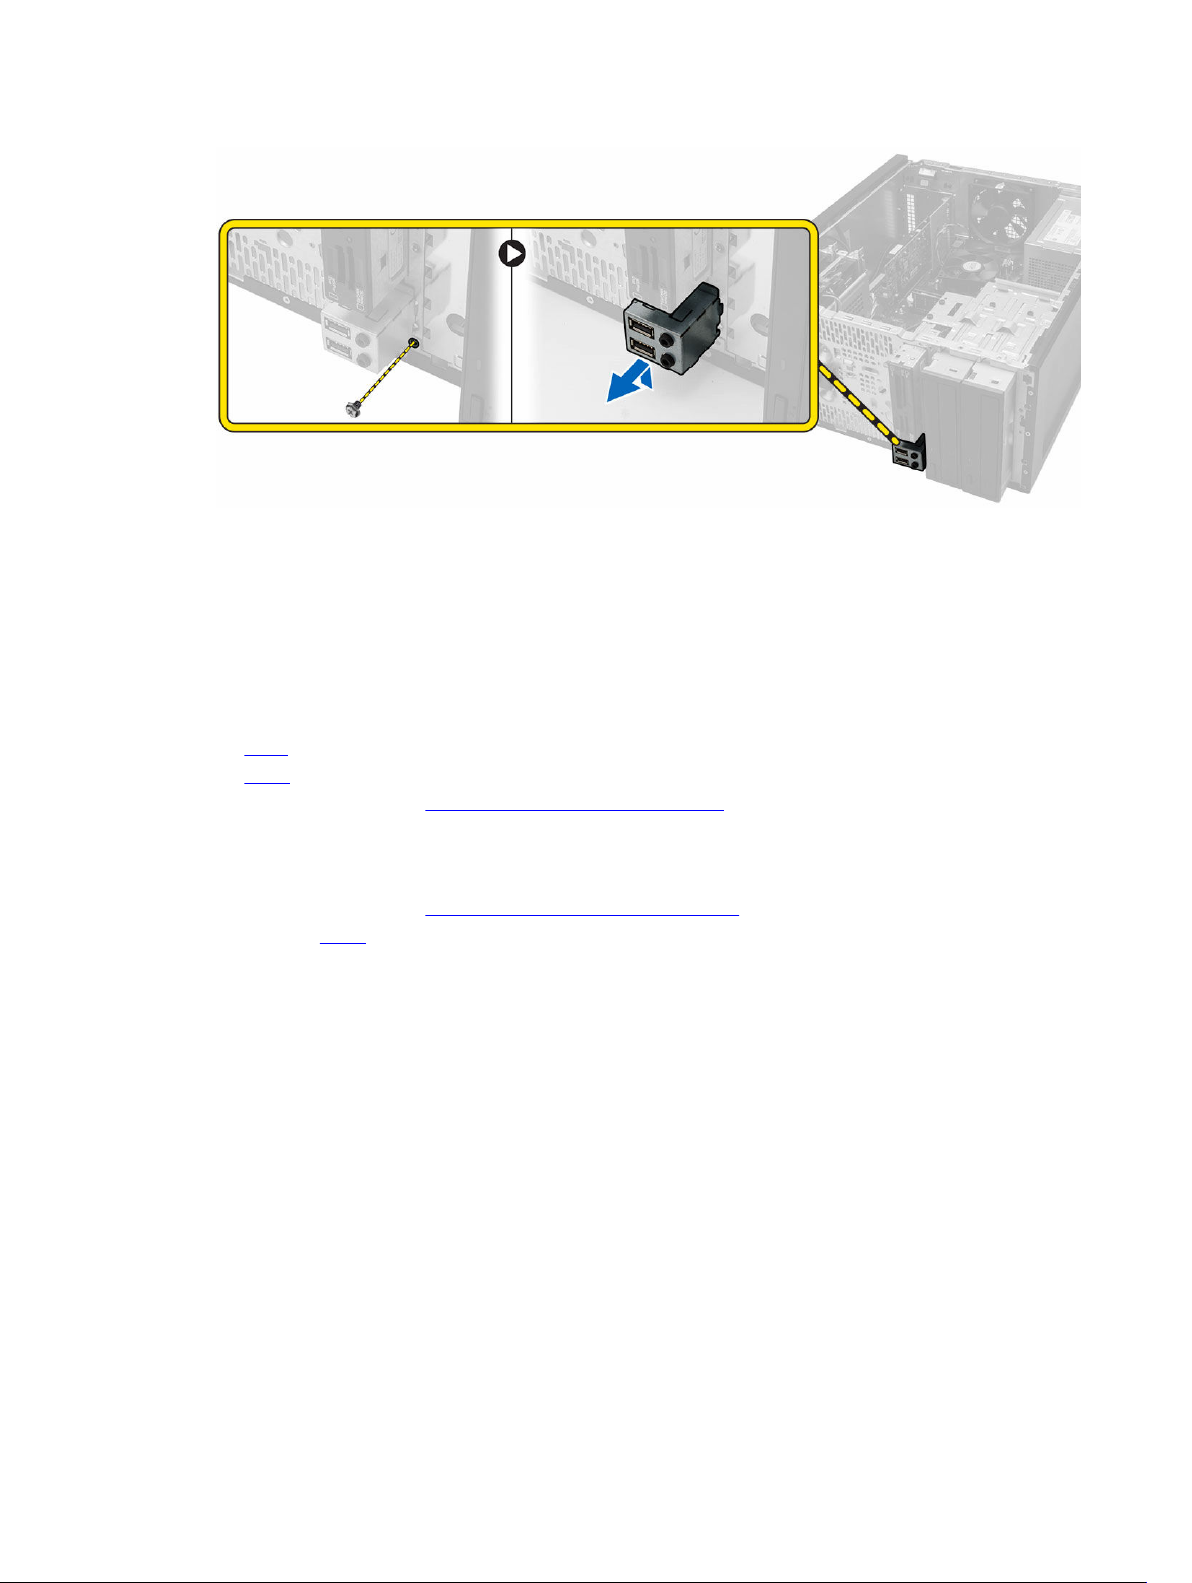
3. Follow the steps to remove the I/O panel cables:
a. Disconnect the I/O panel and FlyWire cables from the system board [1, 3].
b. Un-thread the cables from the metal-retention clips [2, 4].
4. Follow the steps to remove the I/O panel:
a. Remove the screw that secures the I/O panel to the computer.
b. Slide the I/O panel outwards and remove it from the computer.
20
Page 21
Installing the Input/Output (I/O) Panel
1. Slide the I/O panel into its slot on the computer.
2. Tighten the screw to secure the I/O panel to the computer.
3. Route the cables through the metal-rentention clips.
4. Connect the I/O panel and FlyWire cables to their connectors on the system board.
5. Install the:
• bezel
• cover
6. Follow the procedures in After Working Inside Your Computer.
Removing the System Fan
1. Follow the procedures in Before Working Inside Your Computer.
2. Remove the cover.
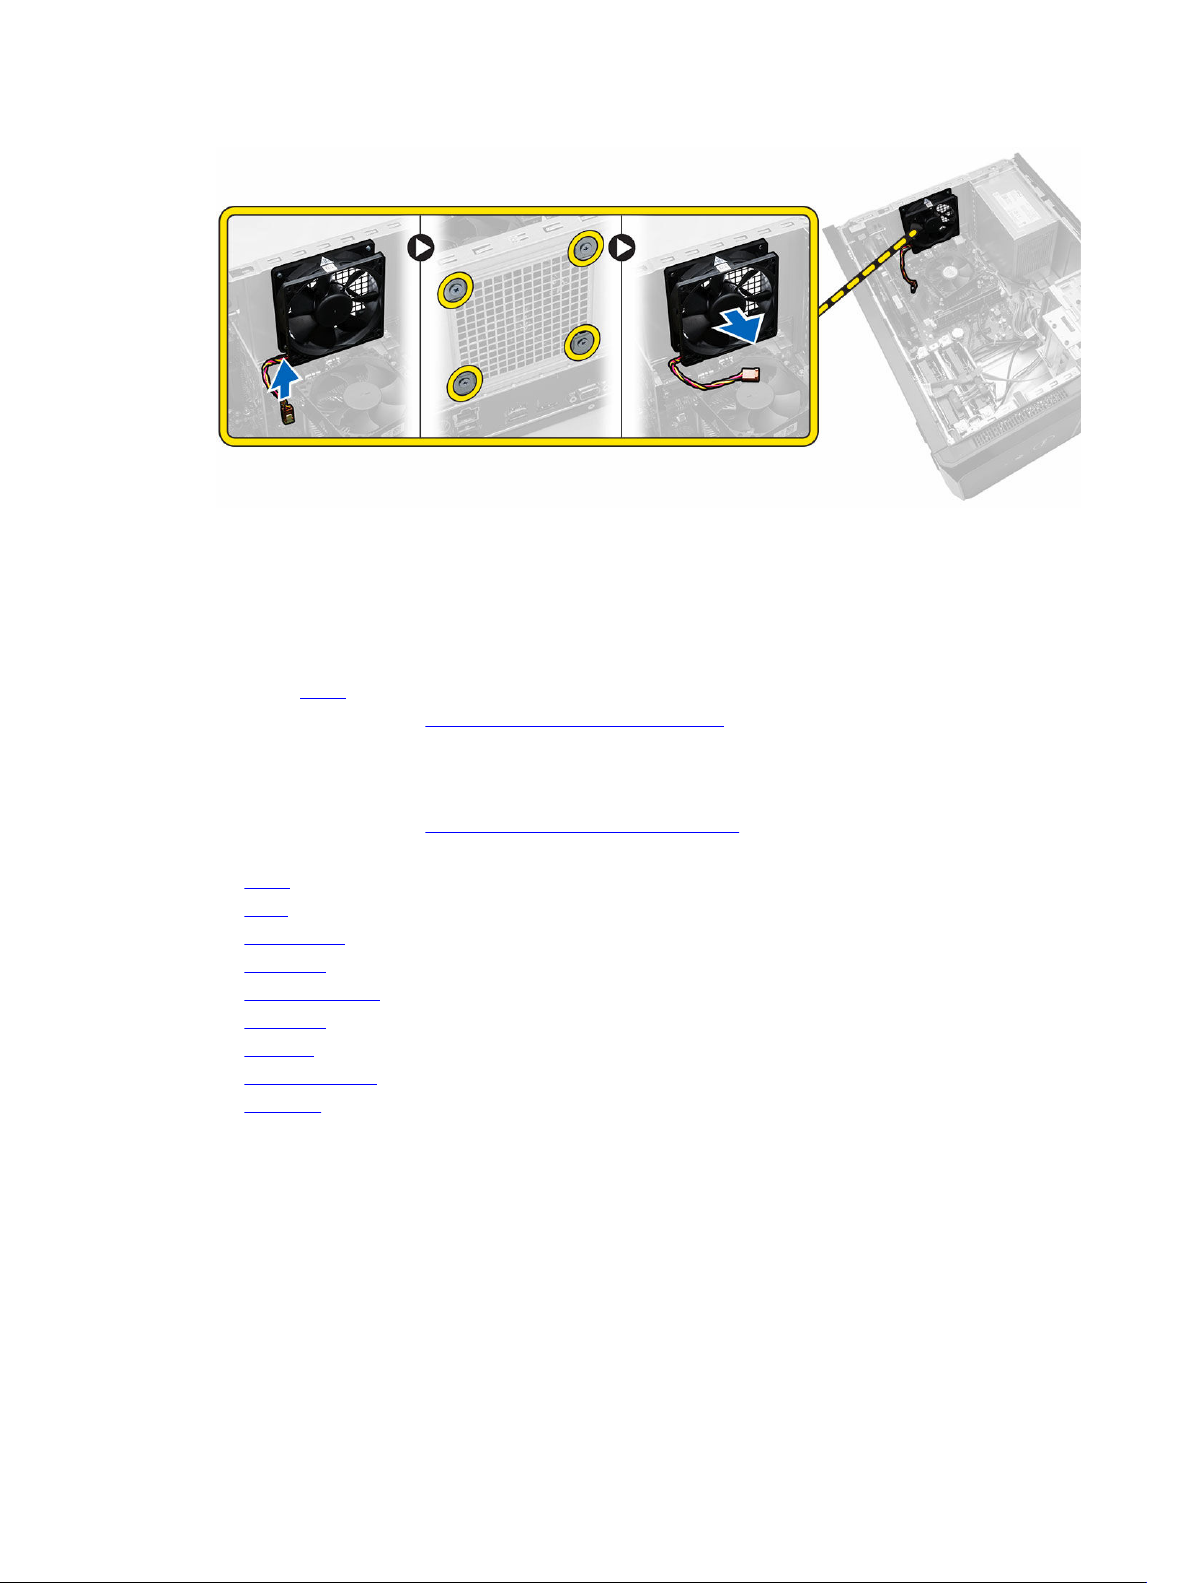
3. Follow the steps to remove the system fan:
a. Disconnect the fan cable from the system board.
b. Remove the screws that secure the system fan to the computer.
c. Push the system fan inwards and remove it from the computer.
21
Page 22
Installing the System Fan
1. Place the system fan on the computer.
2. Tighten the screws to secure the system fan to the computer.
3. Connect the system-fan cable to the connector on the system board.
4. Install the cover.
5. Follow the procedures in After Working Inside Your Computer.
Removing the System Board
1. Follow the procedures in Before Working Inside Your Computer.
2. Remove the:
• cover
• bezel
• optical drive
• hard drive
• heatsink module
• processor
• memory
• expansion cards
• I/O panel
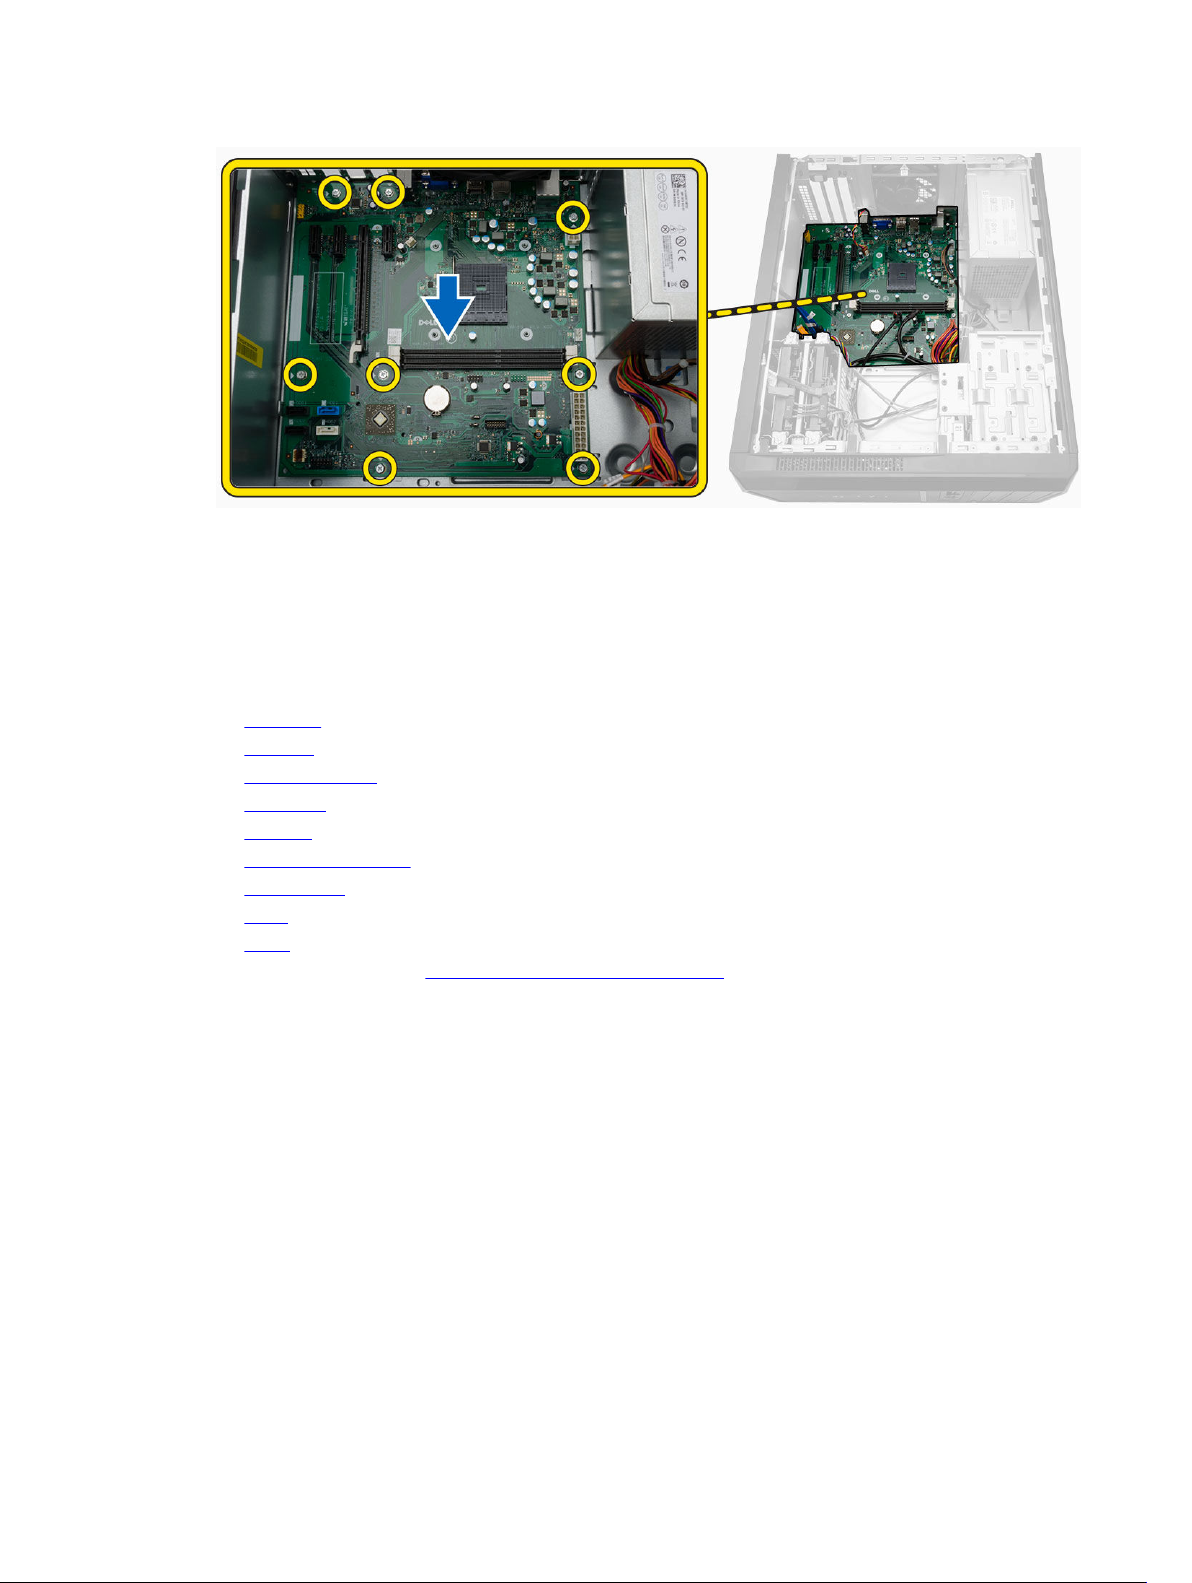
3. Follow the steps to remove the system board:
a. Disconnect and un-thread all the cables connected to the system board.
b. Remove the screws that secure the system board to the computer.
c. Slide the system board towards the front of the computer and tilt to a 45–degree angle.
d. Lift and remove the system board out of the computer.
22
Page 23
Installing the System Board
1. Place the system board into the computer securely until it snaps in place.
2. Tighten the screws to secure the system board to the computer.
3. Thread and connect all the cables to the system board.
4. Install the:
• I/O panel
• memory
• expansion cards
• processor
• heatsink
• hard-drive assembly
• optical drive
• bezel
• cover
5. Follow the procedures in After Working Inside Your Computer.
System Board Components
The following image displays the system board components:
23
Page 24
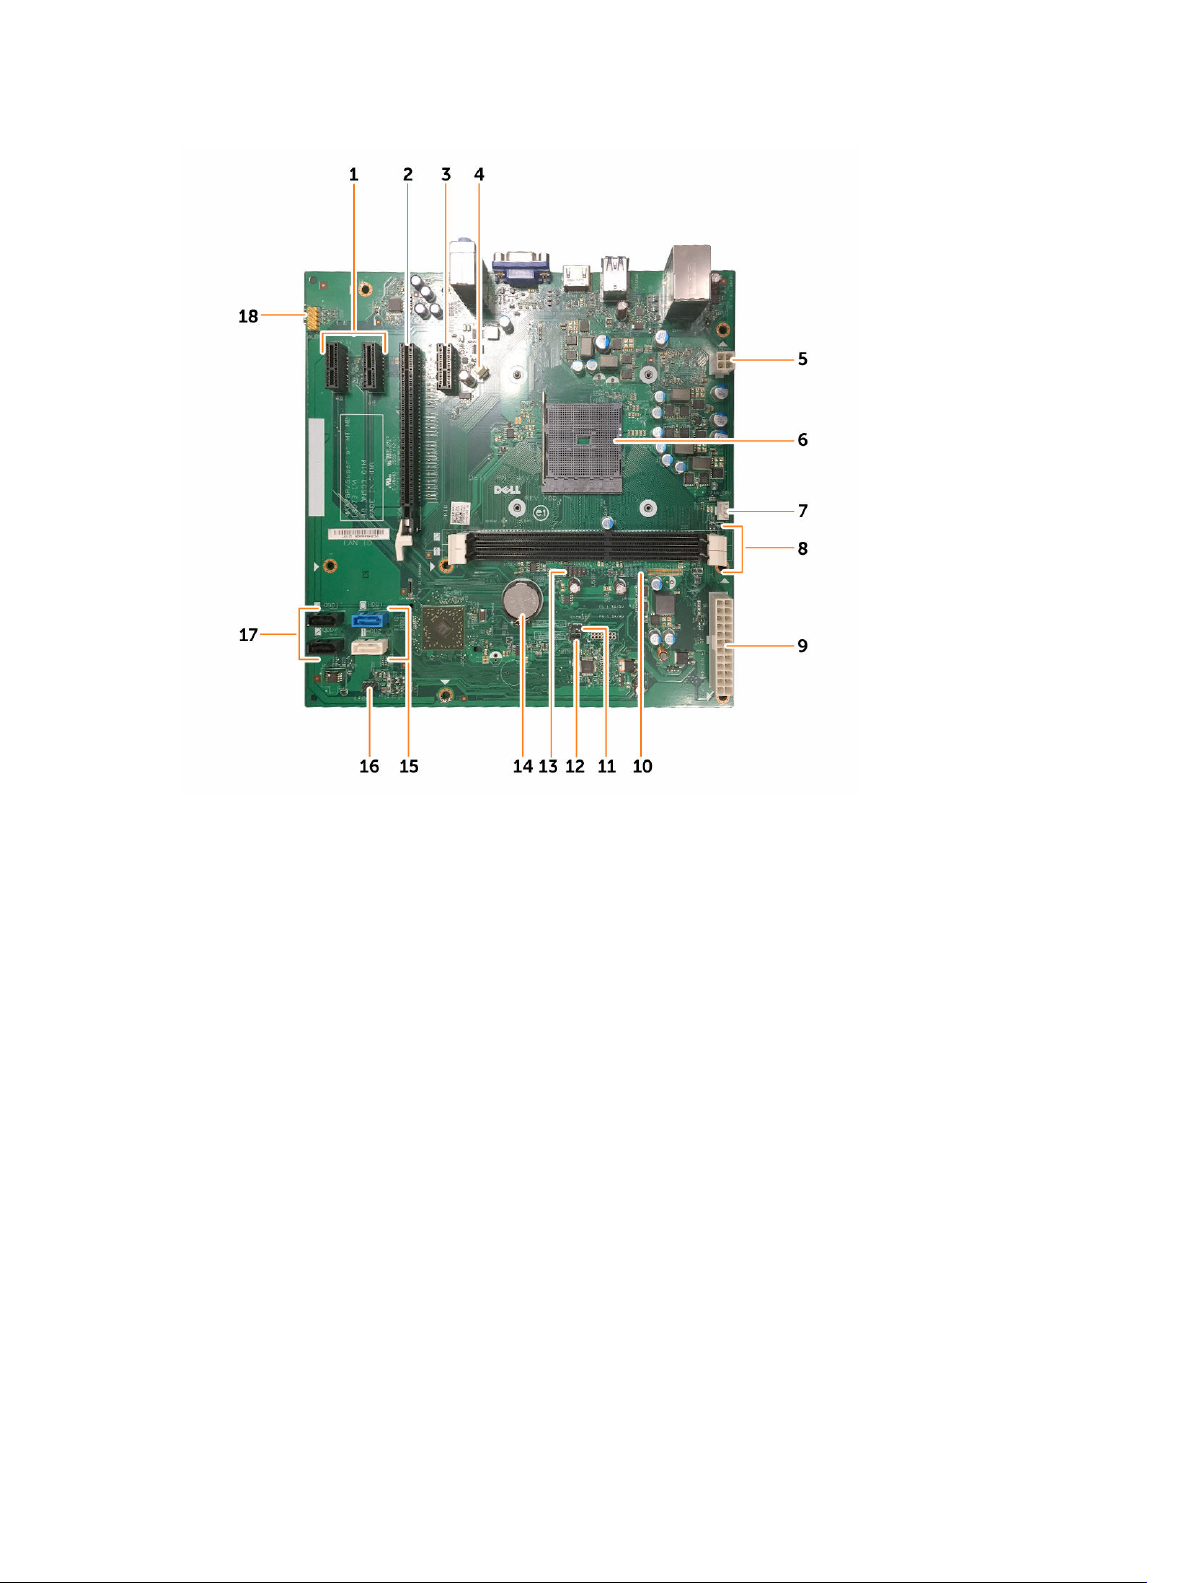
1. PCIe x1 connector 2. PCIe x16 connector
3. PCIe x1 connector 4. system fan connector
5. P2 power connector 6. processor socket
7. processor-fan connector 8. memory connectors
9. P1 power connector 10. front USB connector
11. real-time clock reset jumper 12. password reset jumper
13. card reader connector 14. coin-cell battery
15. SATA connectors 16. power-switch connector
17. SATA connectors 18. front audio connector
24
Page 25

Troubleshooting Your Computer
You can troubleshoot your computer using indicators like Diagnostic Lights, Beep Codes, and Error
Messages during the operation of the computer.
Diagnostic Power LED Codes
Table 1. Diagnostic power LED codes
3
Power
LED Light
Status
Off The computer is either turned off or is not
Steady /
Blinking
Amber
Blinking
White
Light
Possible Cause Troubleshooting Steps
receiving power or in Hibernation mode.
Computer fails to complete POST or
processor failure.
Computer is in sleep mode.
• Re-seat the power cable in the power
connector on the back of the computer
and the electrical outlet.
• If the computer is plugged into a power
strip, ensure the power strip is plugged
into an electrical outlet and is turned on.
Also, bypass power protection devices,
power strips, and power extension cables
to verify the computer turns on properly.
• Ensure the electrical outlet is working by
testing it with another device, such as a
lamp.
• Remove and then reinstall any cards.
• Remove and then reinstall the graphics
card, if applicable.
• Ensure the power cable is connected to
the motherboard and processor.
• Press the power button to bring the
computer out of the sleep mode.
• Ensure all power cables are securely
connected to the system board.
• Ensure the main power cable and front
panel cable are securely connected to
the system board.
Steady
White
The computer is fully functional and in the
On state.
If the computer is not responding, do the
following:
• Ensure the display is connected and
turned on.
• If the display is connected and turned on,
listen for a beep code.
25
Page 26

Diagnostic Error Messages
Table 2. Diagnostic error messages
Error Messages Description
AUXILIARY DEVICE FAILURE The touchpad or external mouse may be faulty. For
an external mouse, check the cable connection.
Enable the Pointing Device option in the system
setup program.
BAD COMMAND OR FILE NAME Ensure that you have spelled the command
correctly, put spaces in the proper place, and used
the correct pathname.
CACHE DISABLED DUE TO FAILURE The primary cache internal to the microprocessor
has failed. Contact Dell.
CD DRIVE CONTROLLER FAILURE The optical drive does not respond to commands
from the computer.
DATA ERROR The hard drive cannot read the data.
DECREASING AVAILABLE MEMORY One or more memory modules may be faulty or
improperly seated. Reinstall the memory modules
or, if necessary, replace them.
DISK C: FAILED INITIALIZATION The hard drive failed initialization. Run the hard
drive tests in the Dell Diagnostics.
DRIVE NOT READY The operation requires a hard drive in the bay
before it can continue. Install a hard drive in the
hard drive bay.
ERROR READING PCMCIA CARD The computer cannot identify the ExpressCard.
Reinsert the card or try another card.
EXTENDED MEMORY SIZE HAS CHANGED The amount of memory recorded in non-volatile
memory (NVRAM) does not match the memory
installed in the computer. Restart the computer. If
the error appears again, Contact Dell
THE FILE BEING COPIED IS TOO LARGE FOR THE
DESTINATION DRIVE
A FILENAME CANNOT CONTAIN ANY OF THE
FOLLOWING CHARACTERS: \ / : * ? " < > | -
GATE A20 FAILURE A memory module may be loose. Reinstall the
GENERAL FAILURE The operating system is unable to carry out the
The file that you are trying to copy is too large to fit
on the disk, or the disk is full. Try copying the file to
a different disk or use a larger capacity disk.
Do not use these characters in filenames.
memory modules or, if necessary, replace them.
command. The message is usually followed by
specific information. For example, Printer out of
paper. Take the appropriate action.
26
Page 27

Error Messages Description
HARD-DISK DRIVE CONFIGURATION ERROR The computer cannot identify the drive type. Shut
down the computer, remove the hard drive, and
boot the computer from an optical drive. Then,
shut down the computer, reinstall the hard drive,
and restart the computer. Run the Hard Disk Drive
tests in the Dell Diagnostics.
HARD-DISK DRIVE CONTROLLER FAILURE 0 The hard drive does not respond to commands
from the computer. Shut down the computer,
remove the hard drive, and boot the computer
from an optical drive. Then, shut down the
computer, reinstall the hard drive, and restart the
computer. If the problem persists, try another
drive. Run the Hard Disk Drive tests in the Dell
Diagnostics.
HARD-DISK DRIVE FAILURE The hard drive does not respond to commands
from the computer. Shut down the computer,
remove the hard drive, and boot the computer
from an optical drive. Then, shut down the
computer, reinstall the hard drive, and restart the
computer. If the problem persists, try another
drive. Run the Hard Disk Drive tests in the Dell
Diagnostics.
HARD-DISK DRIVE READ FAILURE The hard drive may be defective. Shut down the
computer, remove the hard drive, and boot the
computer from an optical. Then, shut down the
computer, reinstall the hard drive, and restart the
computer. If the problem persists, try another
drive. Run the Hard Disk Drive tests in the Dell
Diagnostics.
INSERT BOOTABLE MEDIA The operating system is trying to boot to non-
bootable media, such as a floppy disk or optical
drive. Insert bootable media.
INVALID CONFIGURATION INFORMATION-PLEASE
RUN SYSTEM SETUP PROGRAM
KEYBOARD CLOCK LINE FAILURE For external keyboards, check the cable
KEYBOARD CONTROLLER FAILURE For external keyboards, check the cable
The system configuration information does not
match the hardware configuration. The message is
most likely to occur after a memory module is
installed. Correct the appropriate options in the
system setup program.
connection. Run the Keyboard Controller test in
the Dell Diagnostics.
connection. Restart the computer, and avoid
touching the keyboard or the mouse during the
boot routine. Run the Keyboard Controller test in
the Dell Diagnostics.
27
Page 28

Error Messages Description
KEYBOARD DATA LINE FAILURE For external keyboards, check the cable
connection. Run theKeyboard Controller test in
the Dell Diagnostics.
KEYBOARD STUCK KEY FAILURE For external keyboards or keypads, check the cable
connection. Restart the computer, and avoid
touching the keyboard or keys during the boot
routine. Run the Stuck Key test in the Dell
Diagnostics.
LICENSED CONTENT IS NOT ACCESSIBLE IN
MEDIADIRECT
MEMORY ADDRESS LINE FAILURE AT ADDRESS,
READ VALUE EXPECTING VALUE
MEMORY ALLOCATION ERROR The software you are attempting to run is
MEMORY DOUBLE WORD LOGIC FAILURE AT
ADDRESS, READ VALUE EXPECTING VALUE
MEMORY ODD/EVEN LOGIC FAILURE AT
ADDRESS, READ VALUE EXPECTING VALUE
MEMORY WRITE/READ FAILURE AT ADDRESS,
READ VALUE EXPECTING VALUE
NO BOOT DEVICE AVAILABLE The computer cannot find the hard drive. If the
Dell MediaDirect cannot verify the Digital Rights
Management (DRM) restrictions on the file, so the
file cannot be played.
A memory module may be faulty or improperly
seated. Reinstall the memory modules or, if
necessary, replace them.
conflicting with the operating system, another
program, or a utility. Shut down the computer, wait
30 seconds, and then restart it. Try to run the
program again. If the error message still appears,
see the software documentation.
A memory module may be faulty or improperly
seated. Reinstall the memory modules or, if
necessary, replace them.
A memory module may be faulty or improperly
seated. Reinstall the memory modules or, if
necessary, replace them.
A memory module may be faulty or improperly
seated. Reinstall the memory modules or, if
necessary, replace them.
hard drive is your boot device, ensure that the drive
is installed, properly seated, and partitioned as a
boot device.
NO BOOT SECTOR ON HARD DRIVE The operating system may be corrupted, Contact
Dell.
NO TIMER TICK INTERRUPT A chip on the system board may be
malfunctioning. Run the System Set tests in the
Dell Diagnostics.
NOT ENOUGH MEMORY OR RESOURCES. EXIT
SOME PROGRAMS AND TRY AGAIN
OPERATING SYSTEM NOT FOUND Reinstall the hard drive. If the problem persists,
28
You have too many programs open. Close all
windows and open the program that you want to
use.
Contact Dell.
Page 29

Error Messages Description
OPTIONAL ROM BAD CHECKSUM The optional ROM has failed. Contact Dell.
SECTOR NOT FOUND The operating system cannot locate a sector on
the hard drive. You may have a defective sector or
corrupted FAT on the hard drive. Run the Windows
error-checking utility to check the file structure on
the hard drive. See Windows Help and Support for
instructions (click Start > Help and Support). If a
large number of sectors are defective, back up the
data (if possible), and then reformat the hard drive.
SEEK ERROR The operating system cannot find a specific track
on the hard drive.
SHUTDOWN FAILURE A chip on the system board may be
malfunctioning. Run the System Set tests in the
Contact Dell.
TIME-OF-DAY CLOCK LOST POWER System configuration settings are corrupted.
Connect your computer to an electrical outlet to
charge the battery. If the problem persists, try to
restore the data by entering the system setup
program, then immediately exit the program. If the
message reappears, Contact Dell.
TIME-OF-DAY CLOCK STOPPED The reserve battery that supports the system
configuration settings may require recharging.
Connect your computer to an electrical outlet to
charge the battery. If the problem persists, Contact
Dell.
TIME-OF-DAY NOT SET-PLEASE RUN THE SYSTEM
SETUP PROGRAM
TIMER CHIP COUNTER 2 FAILED A chip on the system board may be
UNEXPECTED INTERRUPT IN PROTECTED MODE The keyboard controller may be malfunctioning, or
X:\ IS NOT ACCESSIBLE. THE DEVICE IS NOT
READY
The time or date stored in the system setup
program does not match the system clock. Correct
the settings for the Date and Time options.
malfunctioning. Run the System Set tests in the
Dell Diagnostics.
a memory module may be loose. Run the System
Memory tests and the Keyboard Controller test in
the System Setup or Contact Dell.
Insert a disk into the drive and try again.
29
Page 30

System Error Messages
Table 3. System error messages
System Message Description
Alert! Previous attempts at booting this system
have failed at checkpoint [nnnn]. For help in
resolving this problem, please note this checkpoint
and contact Dell Technical Support
CMOS checksum error RTC is reset, BIOS Setup default has been loaded.
CPU fan failure CPU fan has failed
System fan failure System fan has failed
Hard-disk drive failure Possible hard disk drive failure during POST
Keyboard failure Keyboard failure or loose cable. If reseating the
No boot device available No bootable partition on hard disk drive, the hard
No timer tick interrupt A chip on the system board might be
The computer failed to complete the boot routine
three consecutive times for the same error.
cable does not solve the problem, replace the
keyboard.
disk drive cable is loose, or no bootable device
exists.
• If the hard drive is your boot device, ensure that
the cables are connected and that the drive is
installed properly and partitioned as a boot
device.
• Enter system setup and ensure that the boot
sequence information is correct.
malfunctioning or motherboard failure.
NOTICE - Hard Drive SELF MONITORING SYSTEM
has reported that a parameter has exceeded its
normal operating range. Dell recommends that
you back up your data regularly. A parameter out
of range may or may not indicate a potential hard
drive problem
30
S.M.A.R.T error, possible hard disk drive failure.
Page 31

4
System Setup
System Setup enables you to manage your computer hardware and specify BIOS‐level options. From the
System Setup, you can:
• Change the NVRAM settings after you add or remove hardware
• View the system hardware configuration
• Enable or disable integrated devices
• Set performance and power management thresholds
• Manage your computer security
Accessing System Setup
1. Turn on (or restart) your computer.
2. After the white Dell logo appears, press <F2> or <F12> immediately.
The System Setup page displays.
NOTE: If you wait too long and the operating system logo appears, continue to wait until you
see the desktop. Then, shut down or restart your computer and try again.
System Setup Options
Table 4. Main
System Information
BIOS Revision Displays the BIOS revision.
BIOS Build Date Displays the date the system BIOS was built.
System Name Displays the model name of the system.
System Time Allows you to reset the time on the computer's
internal clock.
System Date Allows you to reset the date on the computer's
internal calendar.
Service Tag Displays the service tag of your computer.
Asset Tag Displays the asset tag of your computer (if
available).
Processor Information
Processor Type Displays the type of processor.
31
Page 32

System Information
Processor ID Displays the processor ID.
Processor Core Count Displays the processor core count.
Processor L1 Cache Displays the processor L1 cache size.
Processor L2 Cache Displays the processor L2 cache size.
Memory Information
Memory Installed Displays the total computer memory.
Memory Available Displays the available memory.
Memory Running Speed Displays the memory speed.
Memory Technology Displays the memory type and technology.
SATA Information
SATA 0 Displays the model number and capacity of the
hard drive.
SATA 1 Displays the model number and capacity of the
hard drive.
SATA 2 Displays the model number and capacity of the
hard drive.
SATA 3 Displays the model number and capacity of the
hard drive.
Table 5. Advanced
Processor Configuration
AMD Cool ‘N’ Quiet Allows you to enable or disable
Default: Enabled
the AMD Cool ‘N’ Quiet mode in
the installed processor in the
system.
Secure Virtual Machine Mode Allows you to enable or disable
Default: Enabled
AMD Secure Virtual Machine
Mode (SVM).
USB Configuration
Front USB Ports
Allows you to enable or disable
the Front USB Ports.
Rear USB Ports Allows you to enable or disable
Default: Enabled
Default: Enabled
the Rear USB Ports.
Onboard Device Configuration
Onboard Audio Controller Allows you to enable or disable
Default: Enabled
the onboard audio controller.
SATA Mode Displays the SATA Mode Default: AHCI
32
Page 33

Processor Configuration
Onboard LAN Controller Allows you to enable or disable
Default: Enabled
the onboard LAN controller.
Onboard LAN Boot ROM Allows you to enable or disable
Default: Disabled
the onboard LAN boot ROM.
Table 6. Boot
Numlock Key Allows you to enable or disable the numlock key
during Boot.
Secure Boot Control Allows you to enable or disable the Secure Boot
Control.
Secure Boot Mode Allows you to select the secure boot mode
selector.
Load Legacy OPROM Allows you to enable or disable loading of a legacy
OPROM.
Keyboard Errors Allows you to enable or disable the displaying
keyboard errors.
USB Boot Support Allows you to enable or disable USB Boot Support.
Boot Mode Allows you to select the boot mode.
1st Boot Device Allows you to enable or disable the boot device.
2nd Boot Device Allows you to enable or disable the boot device.
3rd Boot Device Allows you to enable or disable the boot device.
4th Boot Device Allows you to enable or disable the boot device.
5th Boot Device Allows you to enable or disable the boot device.
Hard Disk Drivers Displays information about hard-disk drivers.
CD/DVD ROM Drivers Displays information about CD/DVD ROM drivers.
Network Drivers Displays information about network drives.
Table 7. Power
Wake up by Integrated LAN/WLAN Allows you to enable or disable Wake up by
Integrated LAN/WLAN
AC Recovery Specifies the AC recovery mode.
Auto Power On Allows you to enable or disable Auto Power On
mode.
Auto Power On Mode Allows you to select the day to enable the Auto
Power On mode.
Auto Power On Date Allows you to select the specific date to enable the
Auto Power On mode.
33
Page 34

Auto Power On Time Allows you to select the specific time to enable the
Auto Power On mode.
Table 8. Security
Supervisor Password Specifies whether an administrator password has
been assigned.
User Password Specifies whether a user password has been
assigned.
Set Supervisor Password Allows you to change or delete the administrator
password.
HDD Protection Allows you to enable or disable the HDD
protection.
Exit
This section allows you to save, discard, and load default settings before exiting from System Setup.
System Setup Overview
System Setup allows you to:
• change the system configuration information after you add, change, or remove any hardware in your
computer.
• set or change a user-selectable option such as the user password.
• read the current amount of memory or set the type of hard drive installed.
Before you use System Setup, it is recommended that you write down the System Setup screen
information for future reference.
CAUTION: Unless you are an expert computer user, do not change the settings for this program.
Certain changes can cause your computer to work incorrectly.
34
Page 35

Specifications
NOTE: Offerings may vary by region. The following specifications are only those required by law to
ship with your computer. For more information about the configuration of your computer, go to
Help and Support in your Windows operating system and select the option to view information
about your computer.
Table 9. Processor
5
Type
L2 cache Up to 4 MB
Table 10. Memory
Memory module connector two DIMM slots
Memory module capacity 2 GB, 4 GB, and 8 GB
Type 1600 MHz DDR3 (Non-ECC)
Minimum memory 2 GB
Maximum memory 16 GB
Table 11. Video
Video Type:
Integrated AMD Radeon
Discrete
• AMD Sempron 250
• AMD Athlon X2 350
• AMD A4-6300
• AMD A6-6400K
• AMD A8-6500
• AMD HD 8490 (1 GB DDR3) DP/DVI (UI)
• NVIDIA GeForce GT 705 1 GB GDDR3
Integrated video memory Shared system memory
Table 12. Audio
Integrated Integrated 5.1 high-definition audio
Table 13. Network
Integrated Realtek 10/100/1000 Mbps Ethernet
35
Page 36

Table 14. System Information
Chipset AMD A78
BIOS chip (NVRAM) 4 MB SPI Flash ROM
Table 15. Expansion Bus
Bus speed:
PCI Express PCIe 2.0 at speeds upto 5.0 GT/s
SATA SATA Gen 3 at 6 Gb/s
USB speed:
USB 2.0 480 Mb/s
USB 3.0 5 Gb/s
Table 16. Cards
PCIe x16 one full-height card
PCIe x1 up to three full-height cards
Table 17. Drives
Externally accessible:
5.25-inch drive bays one
Internally accessible:
3.5-inch drive bays one
Table 18. External Connectors
Audio:
Back panel three connectors
Front Panel two front-panel connectors for headphone and
microphone
Network one RJ45 connector
USB:
Front panel two USB 2.0 connectors
Back panel
• two USB 2.0 connectors
• two USB 3.0 connectors
Video
• one 15-hole VGA connector
• one 19-pin HDMI connector
36
Page 37

Table 19. Control Lights And Diagnostic Lights
power button light white light — solid white light indicates power-on
state.
blinking white light — solid white light indicates
sleep state of the computer; steady / blinking amber
light indicates a problem with the system board.
drive activity light white light — blinking white light indicates that the
computer is reading data from, or writing data to the
hard drive.
Table 20. Power
Coin-cell battery 3 V CR2032 lithium coin-cell
Input voltage 180 VAC–264 VAC
Input frequency 50 Hz to 60 Hz
Wattage 200 W
Input current 3.0 A
NOTE: Total power output of +5 V and +3.30 V can not exceed 80 W.
Maximum heat dissipation 682 BTU/hr
NOTE: Heat dissipation is calculated by using the power supply wattage rating.
Table 21. Physical
Height 360 mm (14.17 inches)
Width 175 mm (6.88 inches)
Depth 436.3 mm (17.17 inches)
Weight (Minimum) 8.60 kg (18.96 lb)
Table 22. Environmental
Temperature:
Operating 10 °C to 35 °C (50 °F to 95 °F)
Storage –40 °C to 65 °C (–40 °F to 149 °F)
Relative humidity 20 % to 80 % (non-condensing)
Altitude:
Operating –15.20 m to 5000 m (–50 ft to 10,000 ft)
Storage –15.20 m to 5000 m (–50 ft to 35,000 ft)
Airborne contaminant level G1 as defined by ISA-S71.04–1985
37
Page 38

38
Page 39

6
Contacting Dell
NOTE: If you do not have an active Internet connection, you can find contact information on your
purchase invoice, packing slip, bill, or Dell product catalog.
Dell provides several online and telephone-based support and service options. Availability varies by
country and product, and some services may not be available in your area. To contact Dell for sales,
technical support, or customer service issues:
1. Go to dell.com/support.
2. Select your support category.
3. Verify your country or region in the Choose a Country/Region drop-down list at the bottom of the
page.
4. Select the appropriate service or support link based on your need.
39
 Loading...