

Dell 3200MP User Manual

Dell™ 3200MP Projector User's Guide
The information below is provided by the supplier of the referenced device without independent verification by Dell
and is subject to the
Safety Instructions
About Your Projector
Installation
Using Your Projector
Troubleshooting
Specifications
Regulatory Notices
Contacting Dell
restrictions and disclaimers.
Notes, Notices, and Cautions
NOTE: A NOTE indicates important information that helps you make better use of your projector.
NOTICE: A NOTICE indicates either potential damage to hardware or loss of data and tells you how to avoid
the problem.
CAUTION: A CAUTION indicates a potential for property damage, personal injury, or death.
Information in this document is subject to change without notice.
©2002 Coretronic Corporation.
©2002 Dell Computer Corporation. All rights reserved.
Reproduction in any manner whatsoever without the written permission of Dell Computer Corporation is strictly
forbidden.
Trademarks used in this text: Dell and the DELL logo are trademarks of Dell Computer Corporation; DLP and Texas
Instruments are trademarks of Texas Instruments Corporation; Microsoft and Windows are registered trademarks of
Microsoft Corporation; Macintosh is a registered trademark of Apple Computer, Inc.
Other trademarks and trade names may be used in this document to refer to either the entities claiming the marks
and names or their products. Dell Computer Corporation disclaims any proprietary interest in trademarks and trade
names other than its own.
Restrictions and Disclaimers
The information contained in this document, including all instructions, cautions, and regulatory approvals and
certifications, is based upon statements provided to Dell by the manufacturer and has not been independently verified
or tested by Dell. Dell disclaims all liability in connection with any deficiencies in such information.
All statements or claims regarding the properties, capabilities, speeds, or qualifications of the part referenced in this
document are made by the manufacturer and not by Dell. Dell specifically disclaims any knowledge of the accuracy,
completeness, or substantiation for any such statements.
November 2002 Rev. A01

Back to Contents Page
Safety Instructions: Dell™ 3200MP Projector
CAUTION
Use the following safety guidelines to help protect your projector from potential damage and to ensure your own
personal safety:
The lamp becomes very hot with use. Do not attempt to replace the lamp after use until the projector
has been allowed to cool down for at least 30 minutes, and follow all instructions in "
Lamp."
Do not touch the bulb or the lamp glass at any time. The bulb may explode due to improper handling,
including the touching of the bulb or the lamp glass.
Remove lens cap before turning on projector. Failure to do so may cause the lens cap to reach high
temperatures.
To avoid damaging the projector and lamp, allow the cooling fan to run for 2 minutes before turning off
the projector.
The remote control is equipped with a Class II laser that emits laser radiation. To reduce the risk of
injury, do not look directly into the laser light, and do not point the laser light into anyone's eyes.
Changing the
Do not block the ventilation slots and openings on the projector.
Disconnect the power cord from the electrical outlet if the projector is not used for a long period of time.
Do not use the projector in an extremely hot, cold, or humid environment.
Do not use the projector in areas susceptible to excessive dust and dirt.
Do not use the projector near any appliance that generates a strong magnetic field.
Do not place the projector in direct sunlight.
Do not look into the lens while the projector is on; the bright light may hurt your eyes.
To reduce the risk of fire or electric shock, do not expose the projector to rain or moisture.
To prevent electric shock, do not open or disassemble the projector further than what is needed for lamp
replacement.
To avoid damaging the projector, ensure that the zoom lens and elevator foot are fully retracted before
moving the projector or placing the projector in its carrying case.
Turn off the projector and disconnect it from the electrical outlet before cleaning it. Use a soft cloth
moistened with mild detergent to clean the display housing. Do not use abrasive cleaners, waxes, or
solvents.
Back to Contents Page
Back to Contents Page
About Your Projector: Dell™ 3200MP Projector
Features
Equipment
Main Unit
Control Panel
Connection Ports
Remote Control With Mouse Function and Laser Pointer
Features
Single chip 0.7" Texas Instruments DLP™ technology
High contrast, double data rate(DDR) digital micromirror device
True XGA, 1024 x 768 addressable pixels
3.5 lb (1.6 kg) lightweight compact design
1300 ANSI lumens brightness(Max), 1200 ANSI lumens brightness (Average)
Auto image re-sizing to 1024 x 768 full screen with scaling compression compatibility for UXGA,
SXGA+, SXGA, XGA, SVGA, VGA, MAC
State-of-the - art motion adaptive hardware deinterlacing with 3:2 and 2:2 pull down
150- watt, user-replaceable P-VIP lamp
Compatibility with Macintosh® computers
Compatibility with NTSC, NTSC4.43, PAL, PAL-M, PAL -N, SECAM, and HDTV (1080i, 720P, 576P,
480i/P)
Remote control with mouse function and laser pointer
M1 - DA connection for digital and analog video connectivity.
High- definition TV compatibility
User- friendly, multi- language on-screen display (OSD)
Advanced electronic keystone correction
User- friendly control panel with backlight
Carrying case included
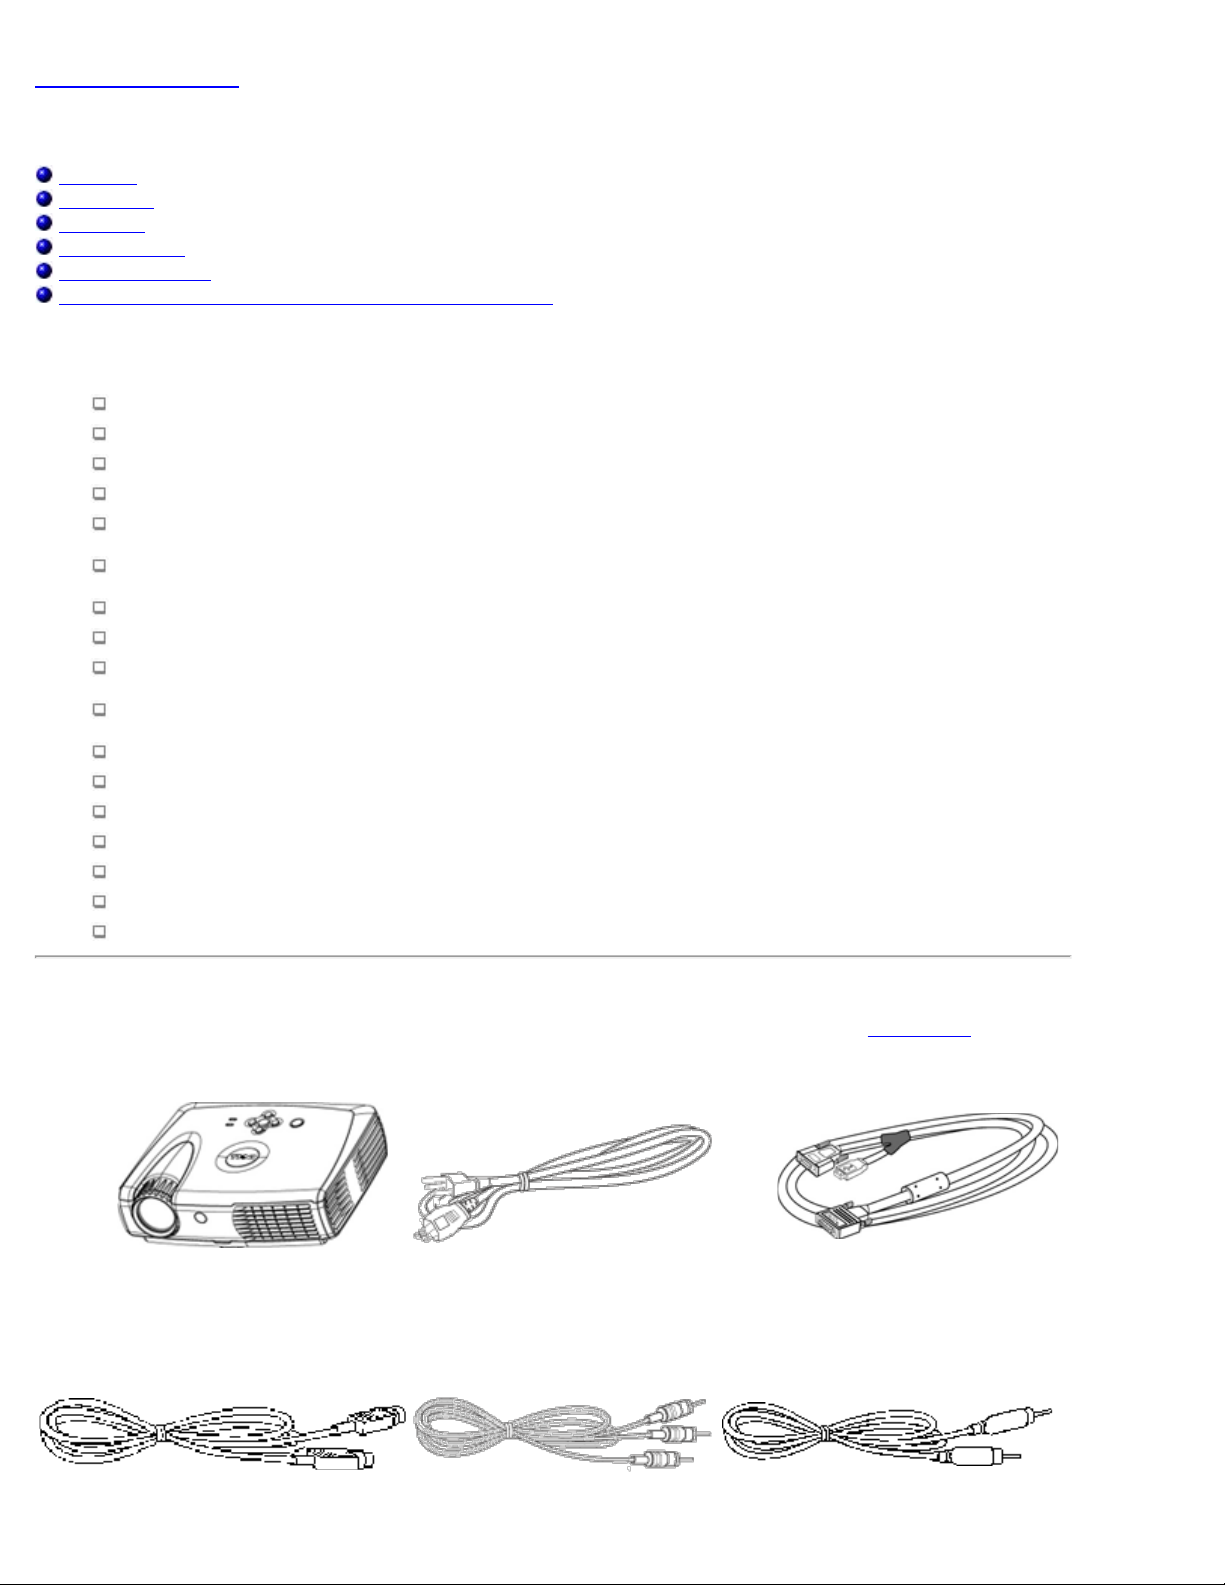
Equipment
Your projector comes with all the items shown below. Ensure that you have all the items, and contact Dell if anything
is missing.
Main unit Power cord M1 - A to VGA cable
S- video cable RCA audio cable Composite video cable
M1 - A signal cable for
HDTV/component
Remote control with mouse
function and laser pointer
Mini pin to mini pin cable Batteries (2)
Dell 3200MP Projector
User's Guide
Dell 3200MP Projector Quick Start
Card
Dell 3200MP Projector Safety and
Warranty Guide
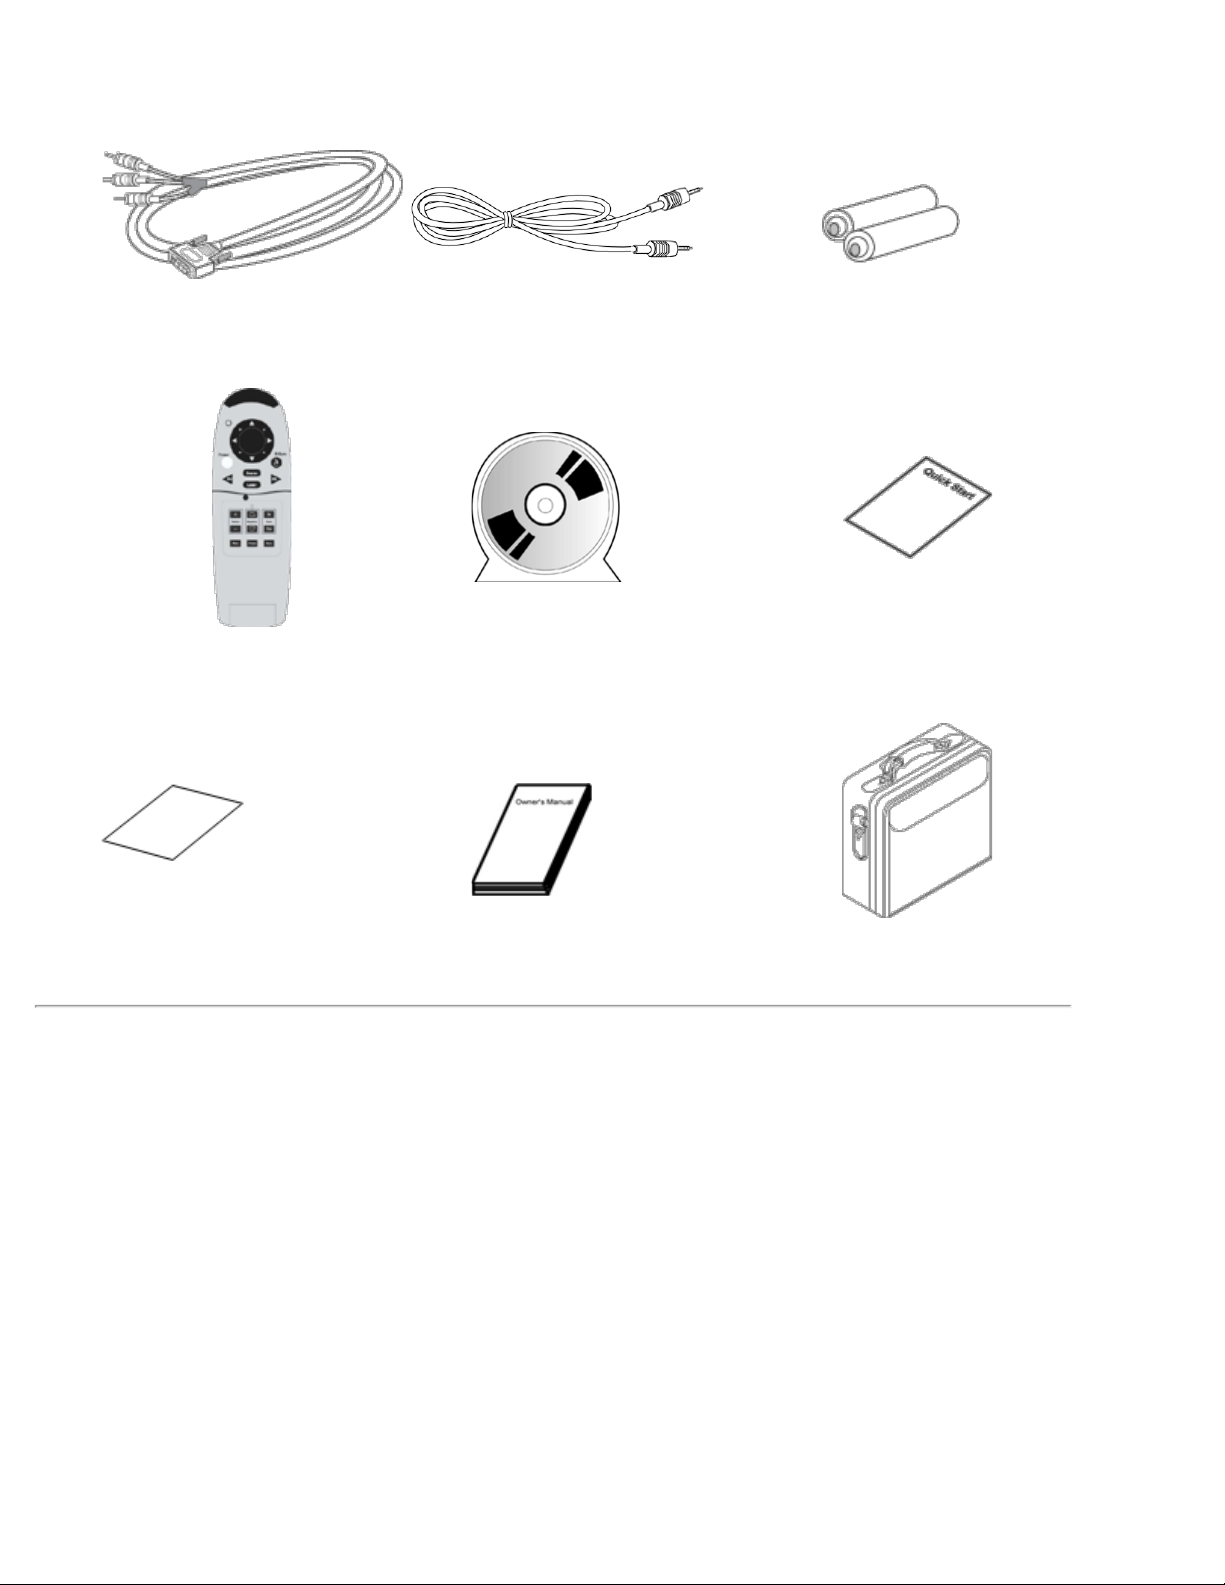
Main Unit
Owner's Manual Carrying case
Control Panel
1 Control panel
2 Zoom ring
3 Focus ring
4 Zoom lens
5 Remote control receiver
6 Elevator button
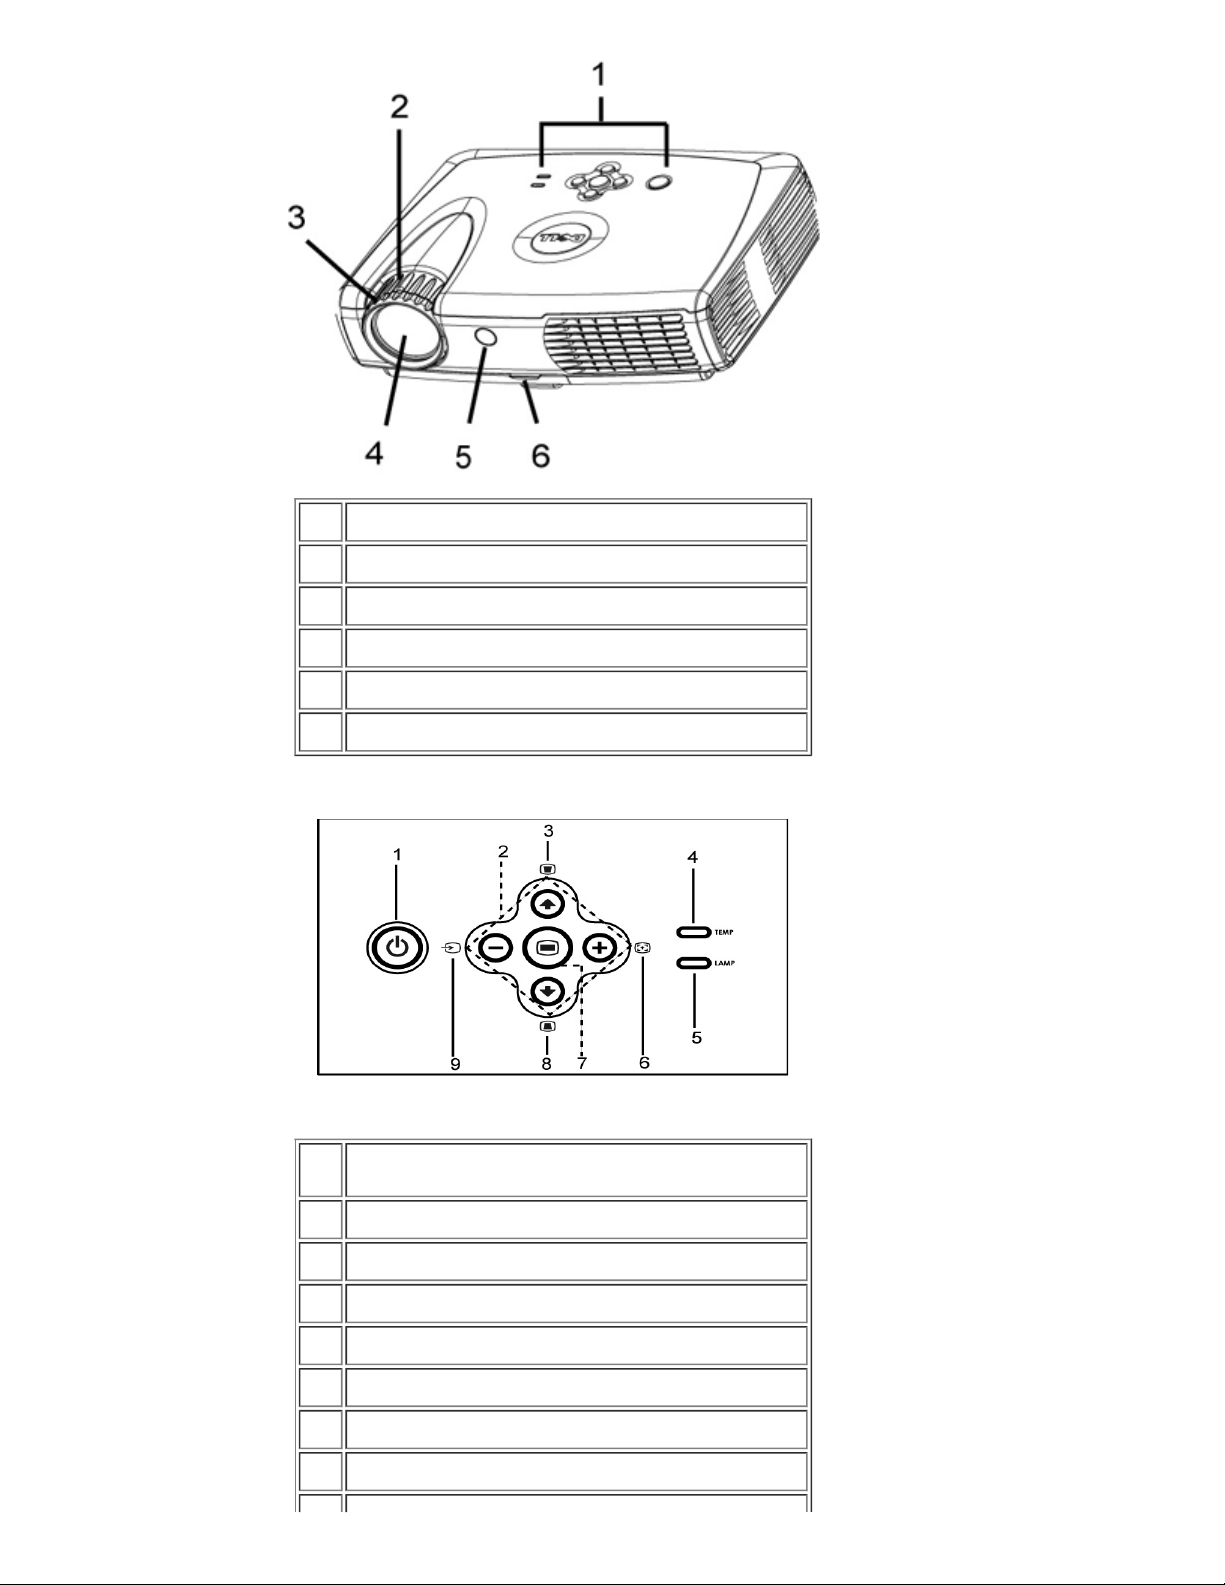
1 Power button
2 Four directional keys
3 Keystone adjustment
4 Temperature warning light
5 Lamp warning light
6 Re-sync
7 Menu
8 Keystone adjustment
9 Source
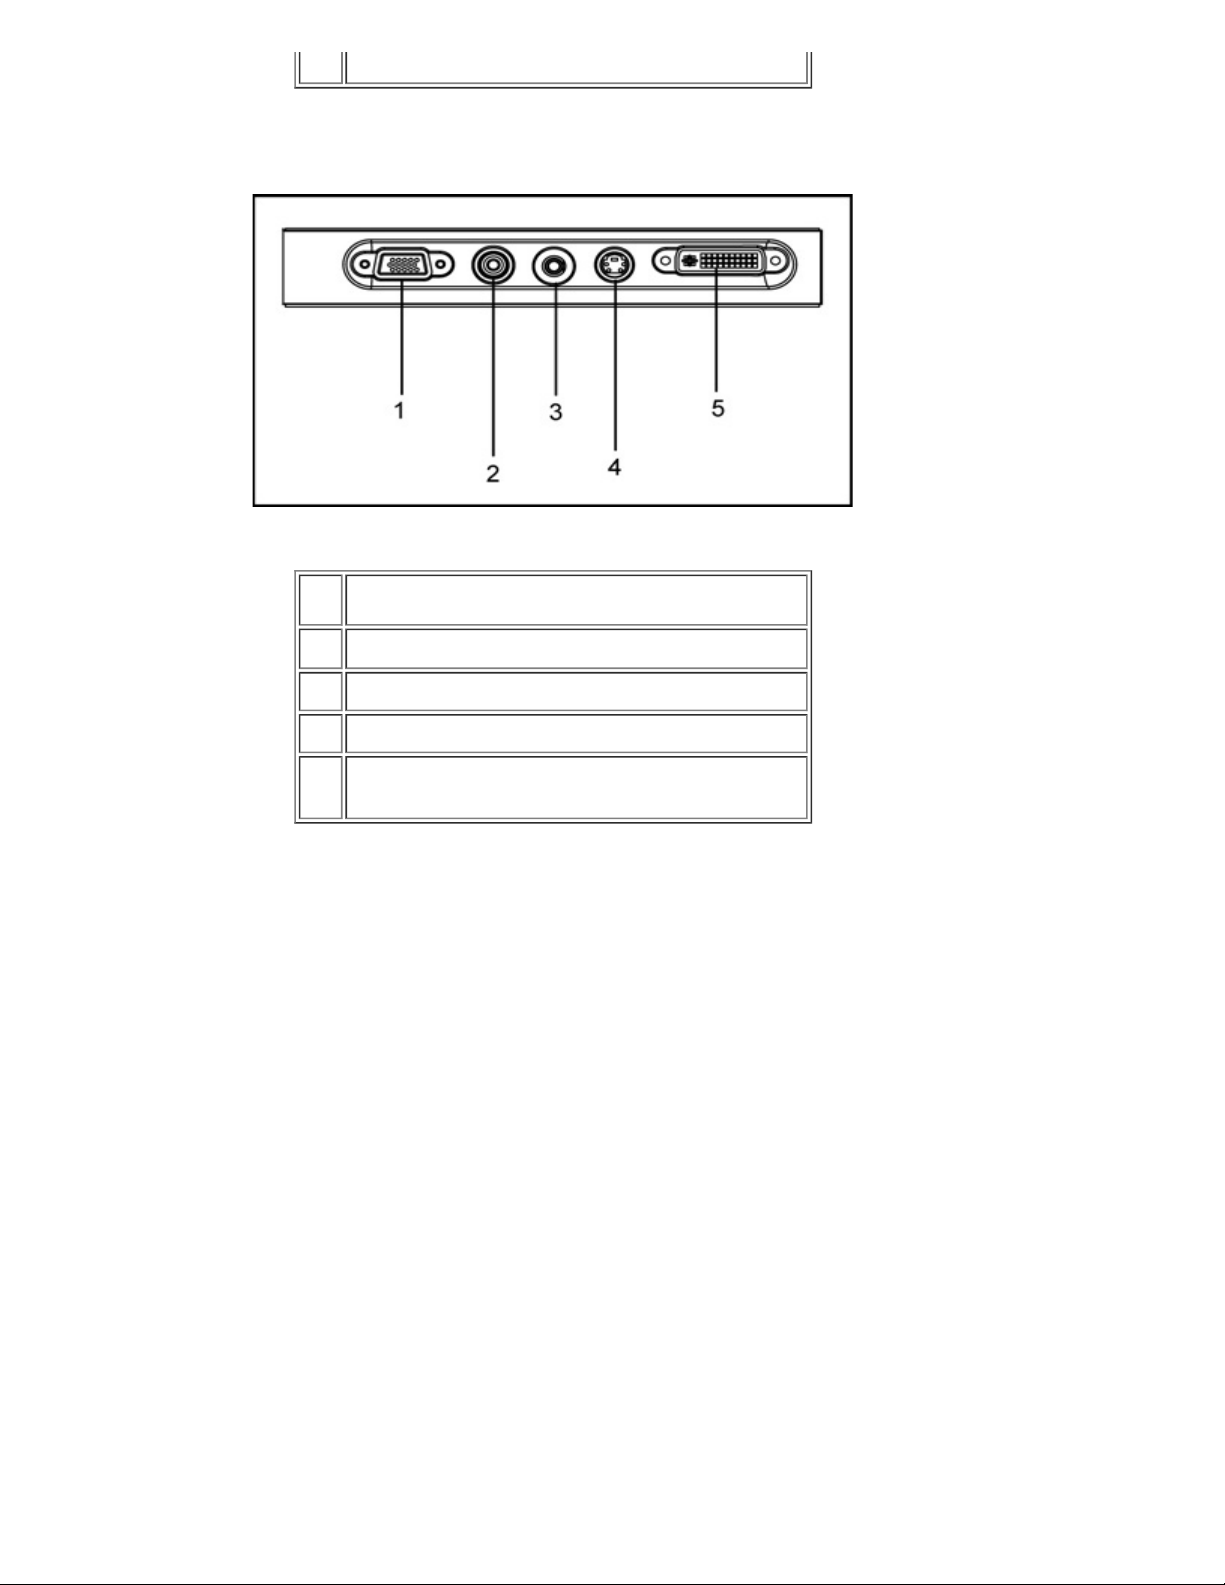
Connection Ports
1 VGA Out (monitor loop - through)
2 Composite video connector
3 Audio input connector
4 S- video connector
Computer input and HDTV/ component video
5
connector with remote mouse
Remote Control With Mouse Function and Laser Pointer
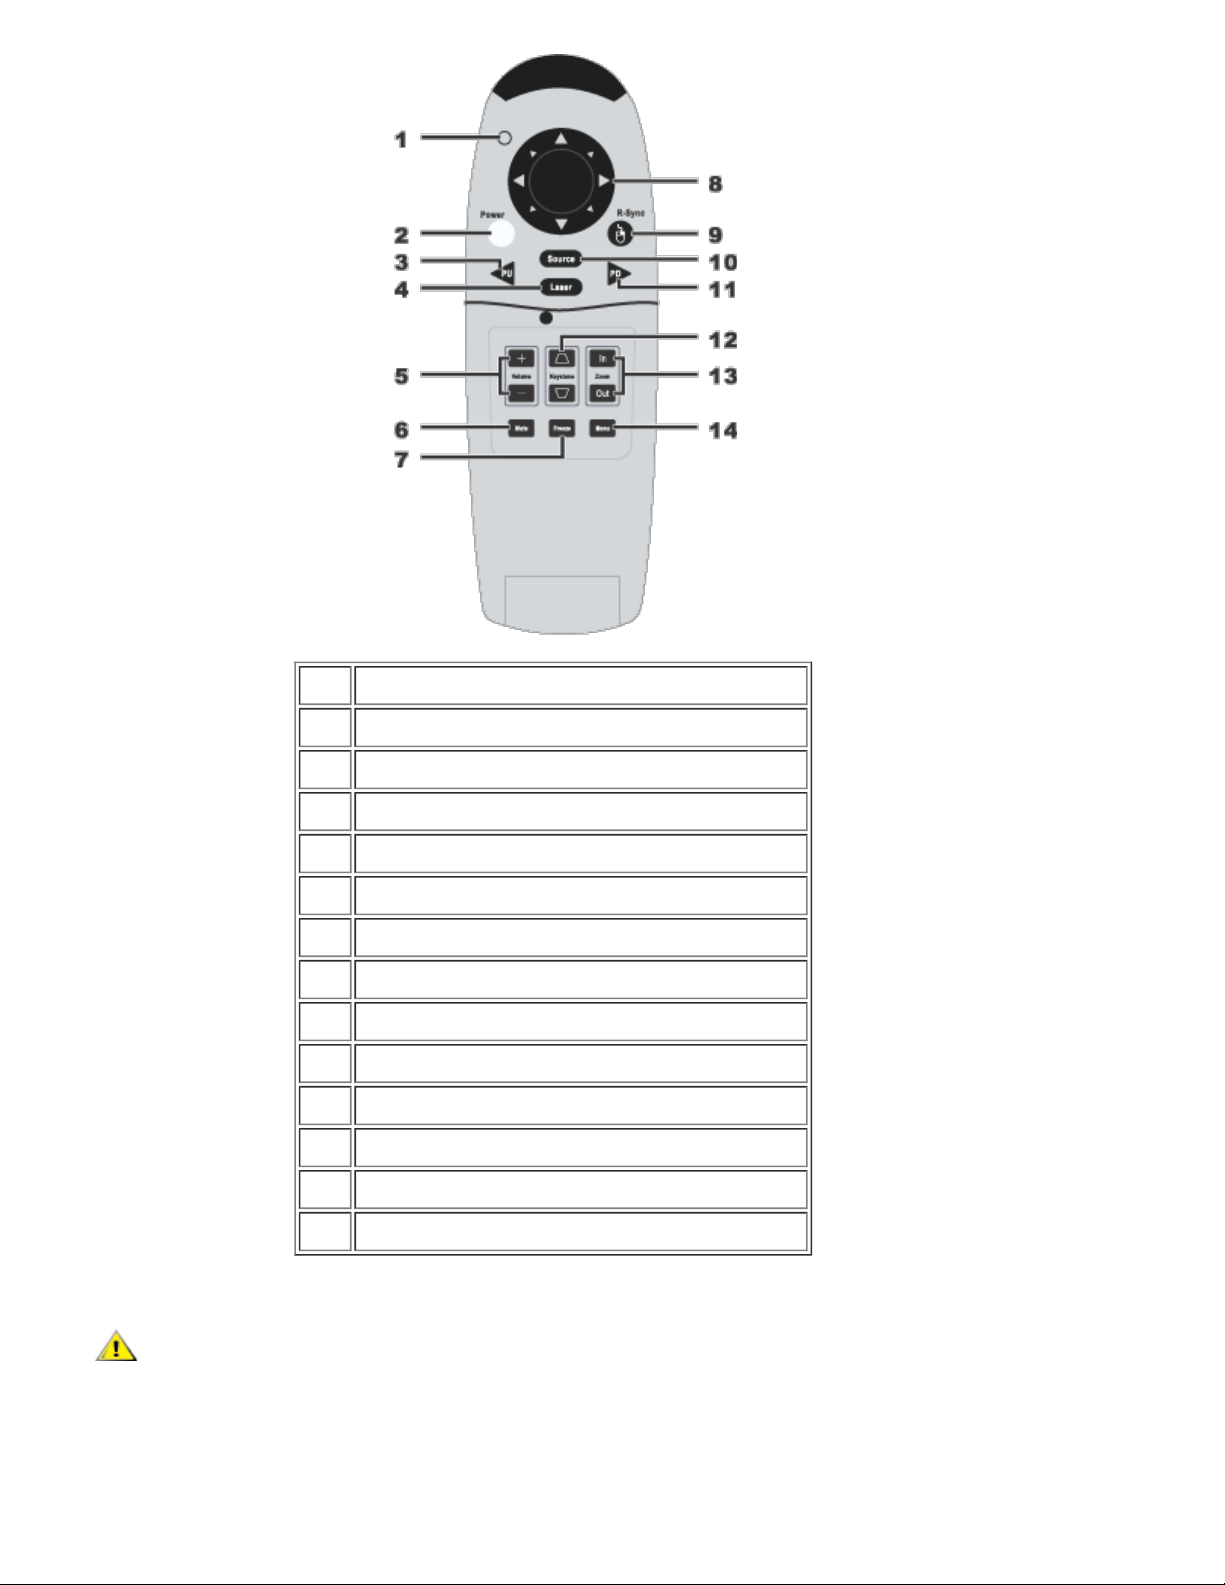
1 Light
2 Power button
3 PU button (page up)
4 Laser pointer
5 Volume controls
6 Mute button
7 Freeze button
8 Directional pad
9 R-Sync button
10 Source button
11 PD button (page down)
12 Keystone correction
13 Zoom in/zoom out
14 Menu button
CAUTION: The remote control has a Class II laser that emits radiation. To reduce the risk of
injury to the eyes, do not look directly into the laser light on the remote control and do not point the
laser light into anyone's eyes.
Battery Disposal: Your projector remote control uses zinc- manganese batteries. If you

need to replace the batteries, see your
.
Do not dispose of used batteries along with household waste. Contact your local waste
disposal agency for the address of the nearest battery deposit site.
Back to Contents Page
Dell 3200MP Projector Quick Start Card
Back to Contents Page
Installation: Dell™ 3200MP Projector
Connecting the Projector
Powering On/Off the Projector
Adjusting the Projected Image
Changing the Lamp
Connecting the Projector
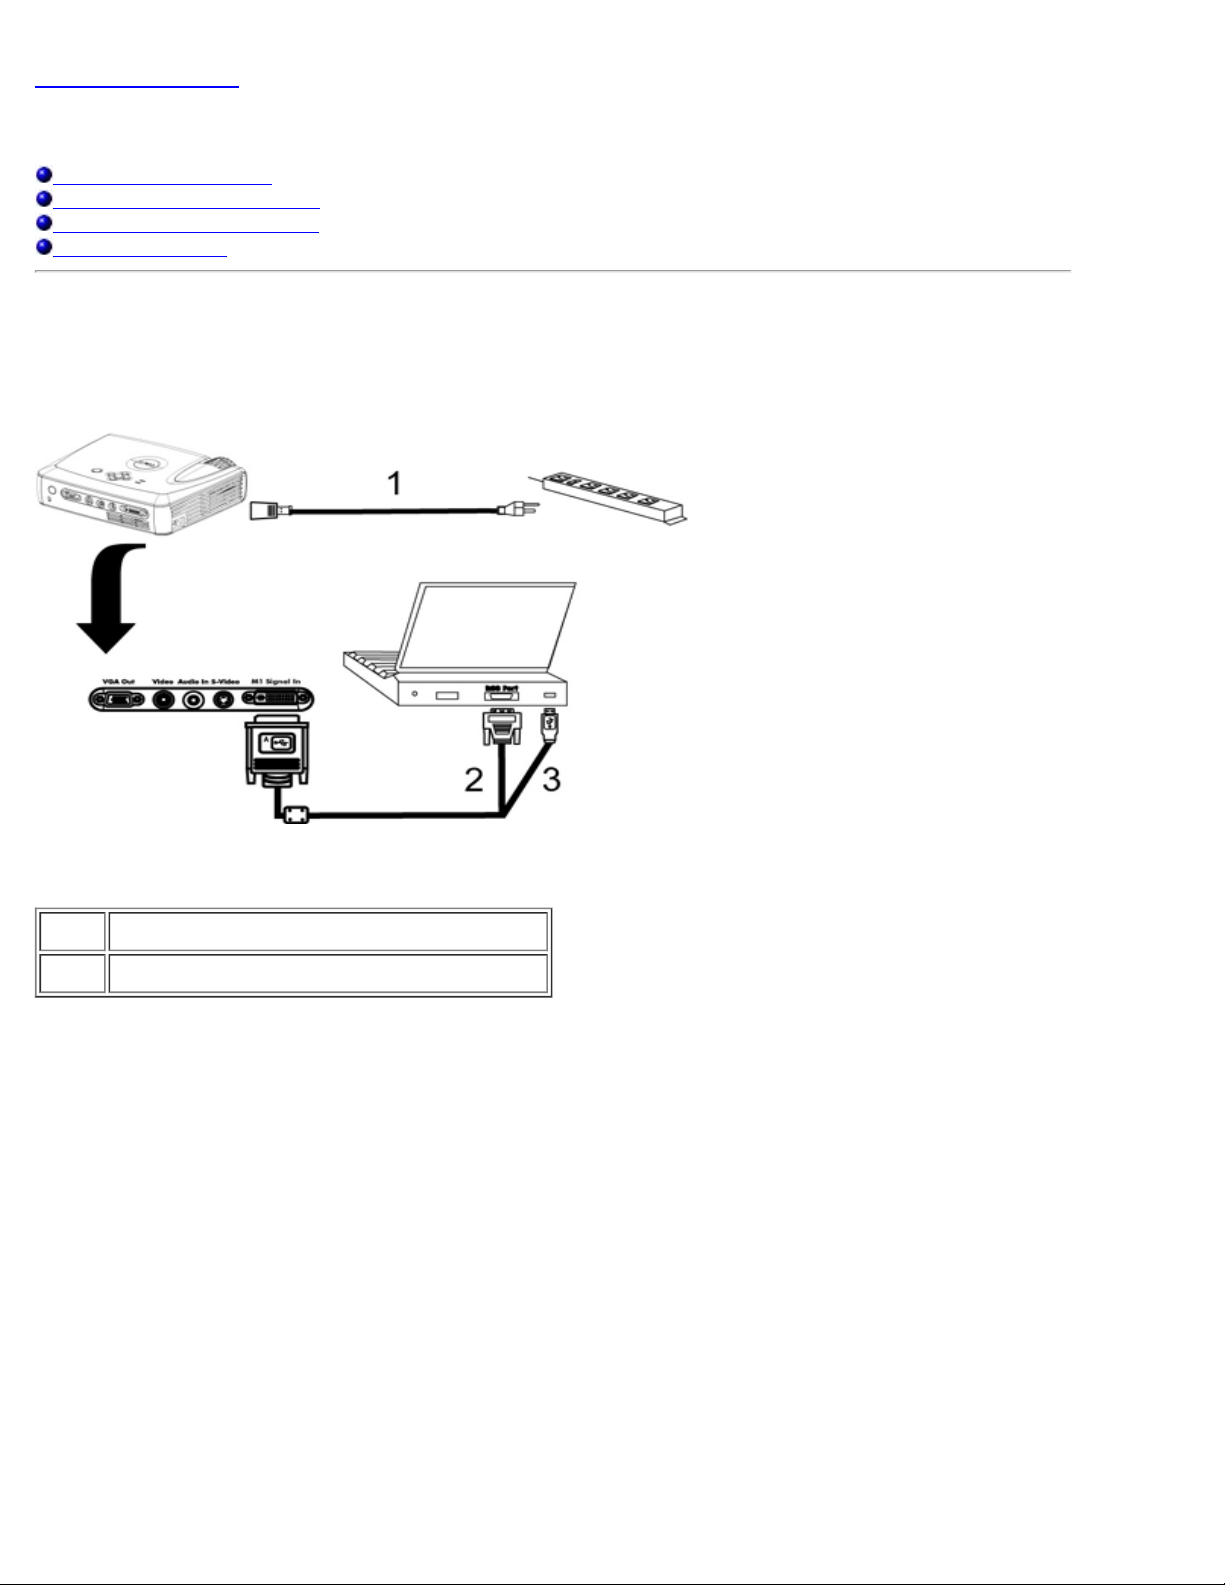
A. To Computer
1 Power cord
2&3 M1 -A to combination VGA and USB cable
B. To DVD Player: There are three possible methods of connecting to a DVD player.
1. Connecting with component cable:

1 Power cord
2 M1 - A signal cable for HDTV/ component
2. Connecting with S - video cable:
1 Power cord
2 S- video cable
3. Connecting with composite cable:
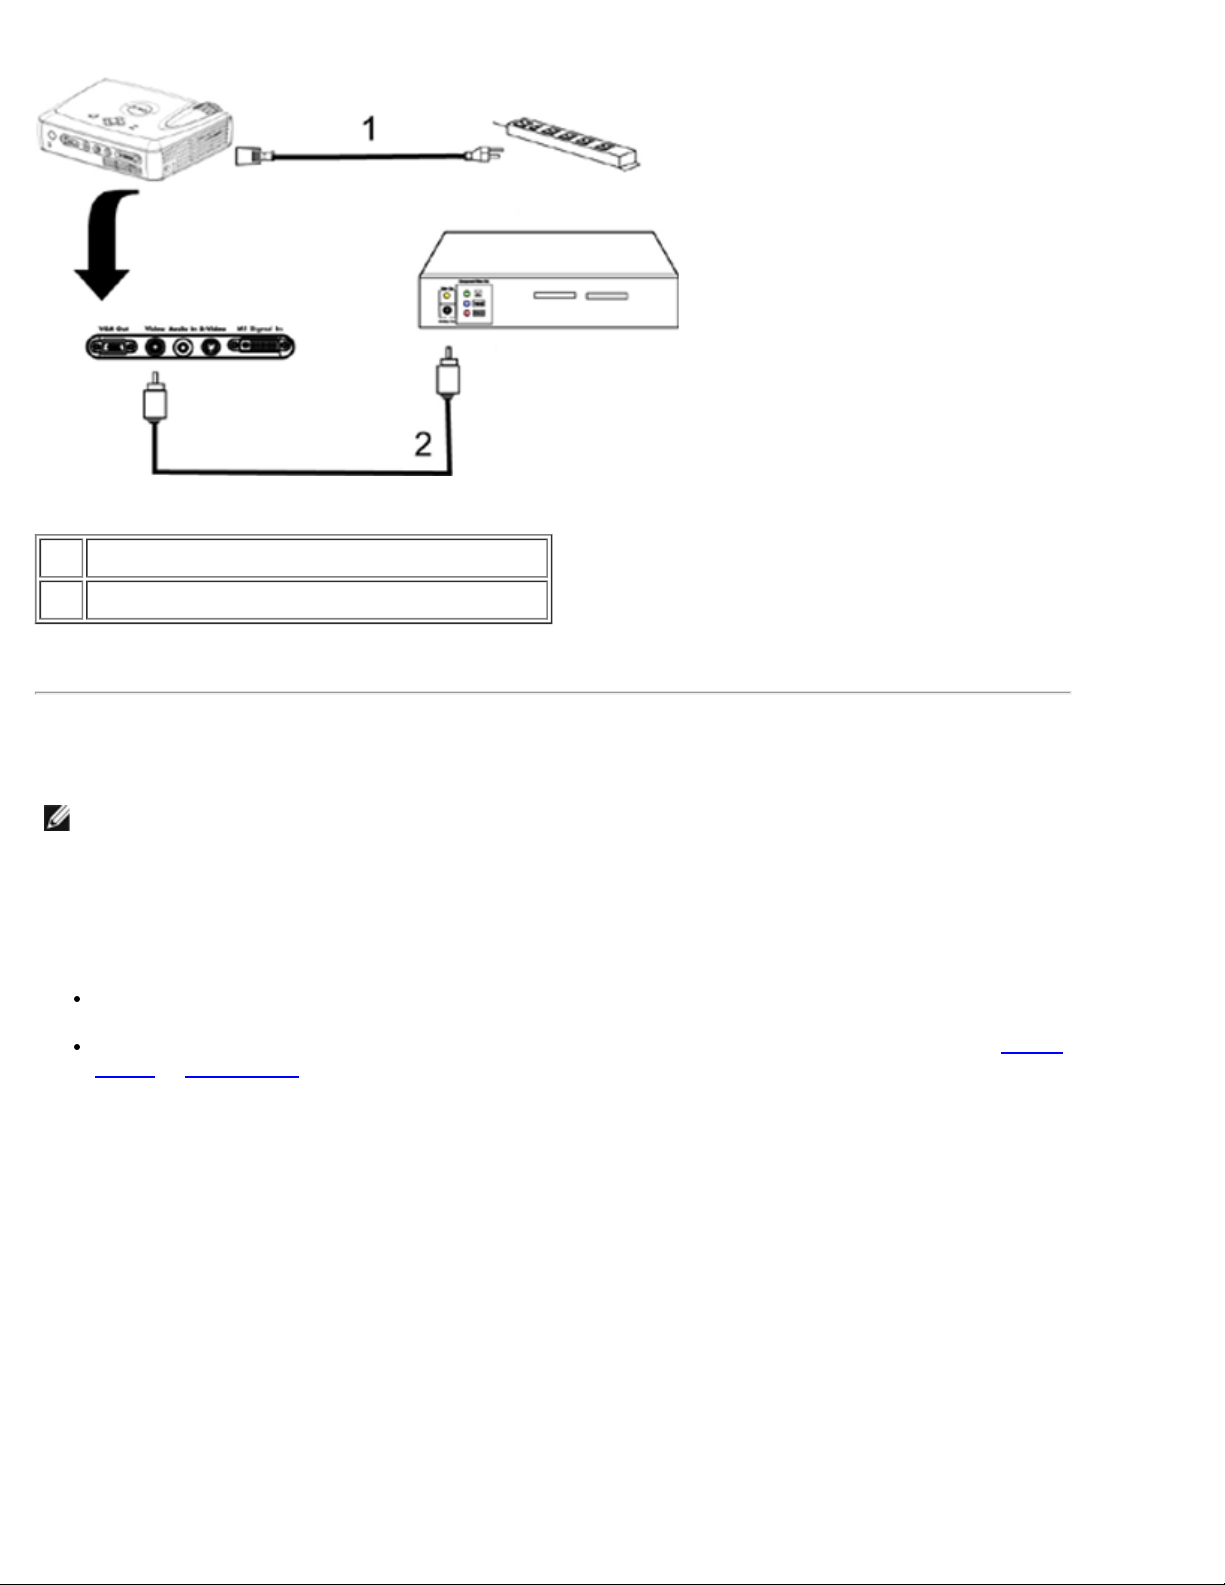
1 Power cord
2 Composite video cable
Powering On/Off the Projector
Powering On the Projector
NOTE: Turn on the projector before you turn on the source.
1. Remove the lens cap.
2. Ensure that the power cord and appropriate signal cable(s) are securely connected. The power button light
blinks green.
3. Press the power button to turn on the projector. The Dell logo will be displayed for 30 seconds.
4. Turn on your source (computer, notebook, DVD, etc...). The projector automatically detects your source.
If the "Searching for signal..." message appears on the screen, ensure that the appropriate signal
cable(s) are securely connected.
If you are connecting multiple sources to the projector simultaneously, press the Source button on the remote
control or control panel to select the desired source.
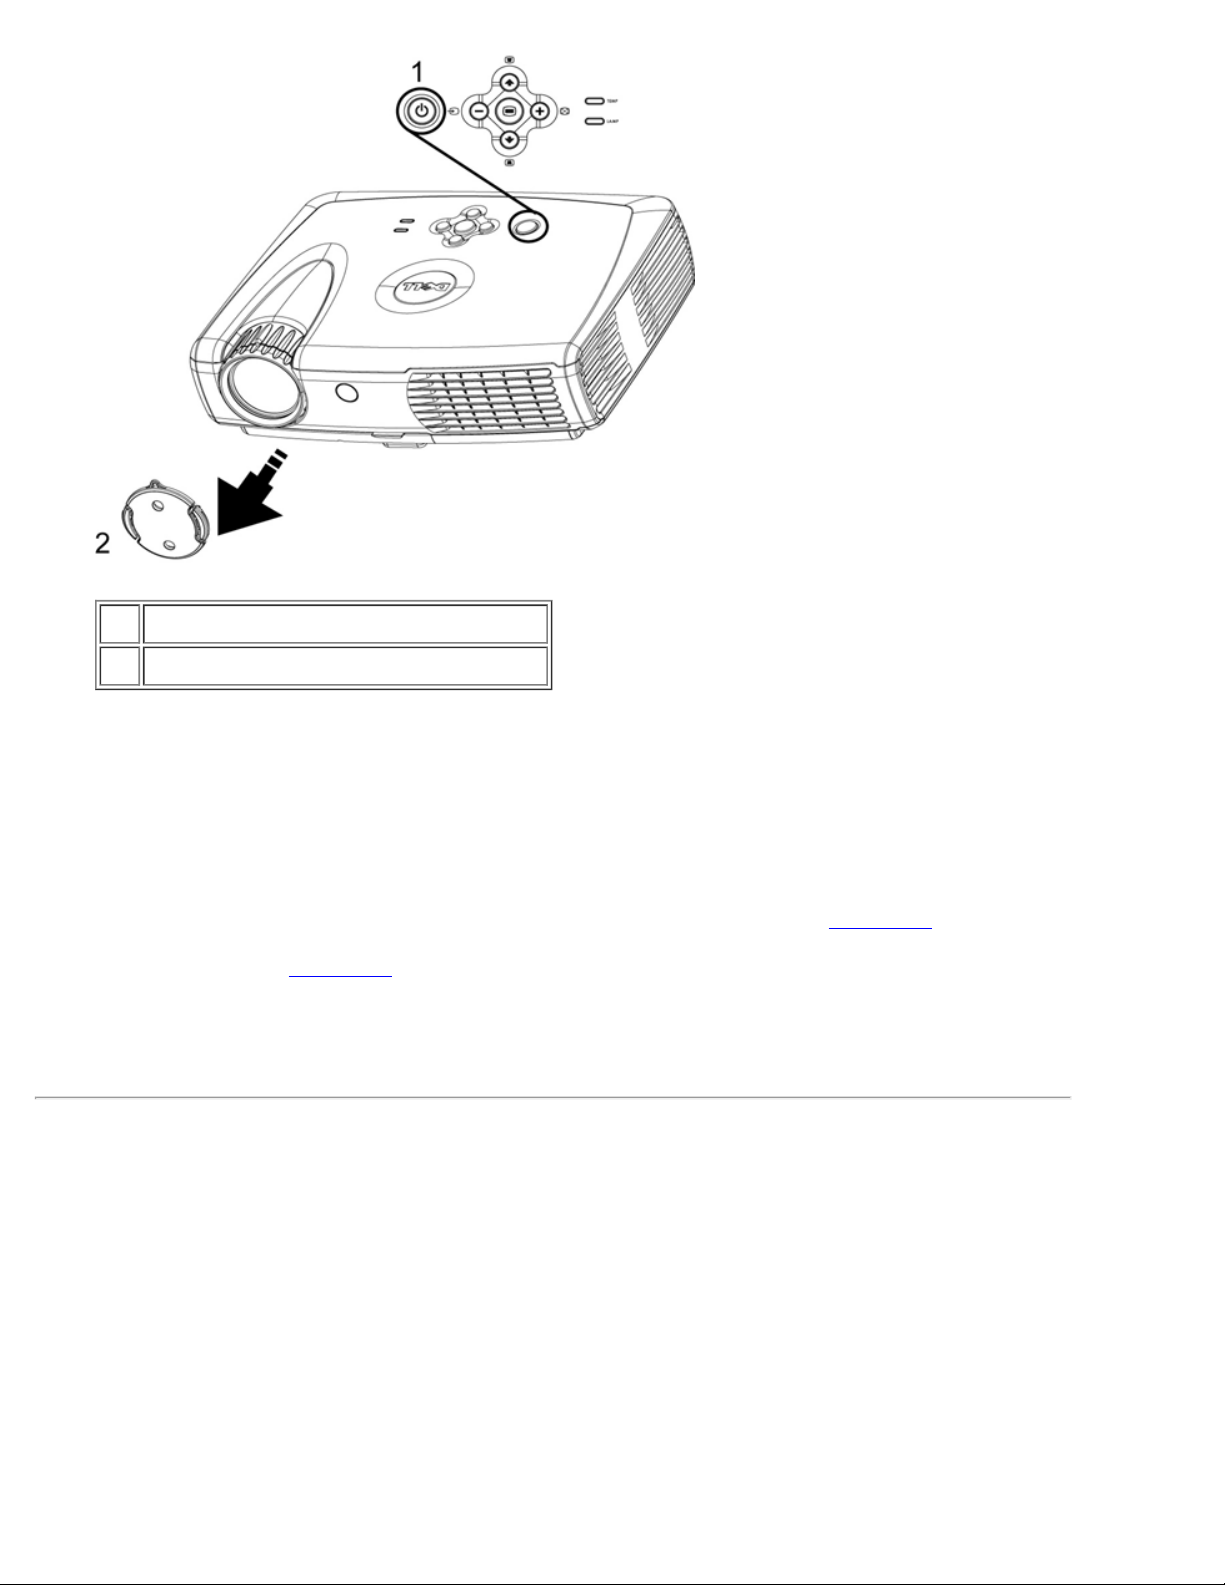
1 Power button
2 Lens cap
Powering Off the Projector
DO NOT UNPLUG THE PROJECTOR BEFORE PROPERLY SHUTTING DOWN USING THE FOLLOWING STEPS.
1. Press the power button to turn off the projector. The "Power Off the Lamp ? " message appears on the
OSD.
2. Press the power button again. The cooling fans continue to operate for 2 minutes.
3. If the LAMP light is solid orange, replace the lamp.
4. If the TEMP light is solid orange, the projector has overheated. The display automatically shuts down. Try
turning the display on again after the projector cools down. If the problem persists,
5. If the TEMP light is blinking orange, a projector fan has failed and the projector will automatically shut down, If
this problem persists,
6. Disconnect the power cord from the electrical outlet and the projector.
7. If you press the power button while the projector is running, the "Power Off the Lamp?" message
appears on the screen. To clear the message, press any button on the control panel or ignore the message;
the message will disappear after 5 seconds.
Adjusting the Projected Image
Adjusting the Projector Height
contact Dell.
contact Dell.
To raise the projector:
1. Press the elevator button.
2. Raise the projector to the desired display angle, and then release the button to lock the elevator foot into
position.
3. Use the tilt adjustment wheel to fine-tune the display angle.
To lower the projector:
1. Press the elevator button.
2. Lower the projector, and then release the button to lock the elevator foot into position.
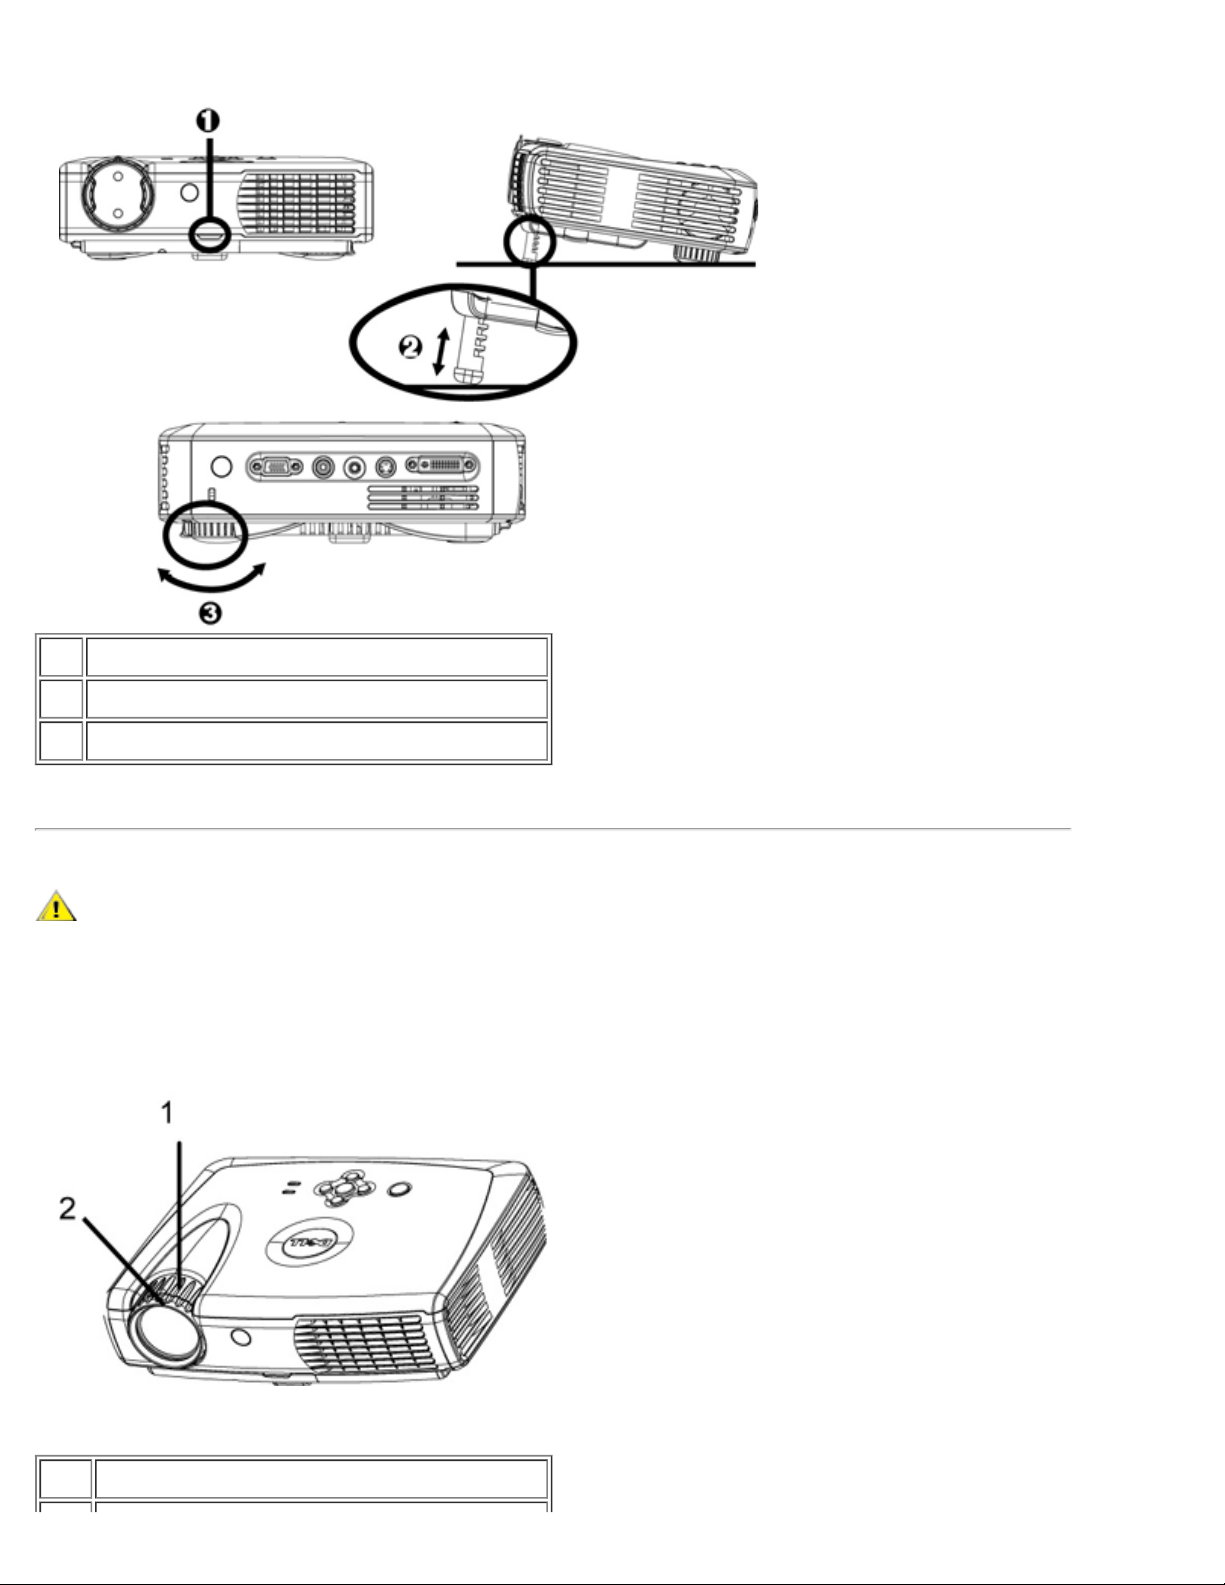
Notice: To avoid damaging the projector, make sure that the elevator foot is fully retracted before placing the
projector in its carrying case.
1 Elevator button
2 Elevator foot
3 Tilt adjustment wheel
Adjusting the Projector Zoom and Focus
CAUTION: To avoid damaging the projector, ensure that the zoom lens is fully retracted before moving the
projector or placing the projector in its carrying case.
1. Rotate the zoom ring to zoom in and out.
2. Rotate the focus ring until the image is clear. The projector focuses at distances from 4.0 ft to 39.4 ft (1.2 m to
12 m).
1 Zoom ring
2 Focus ring
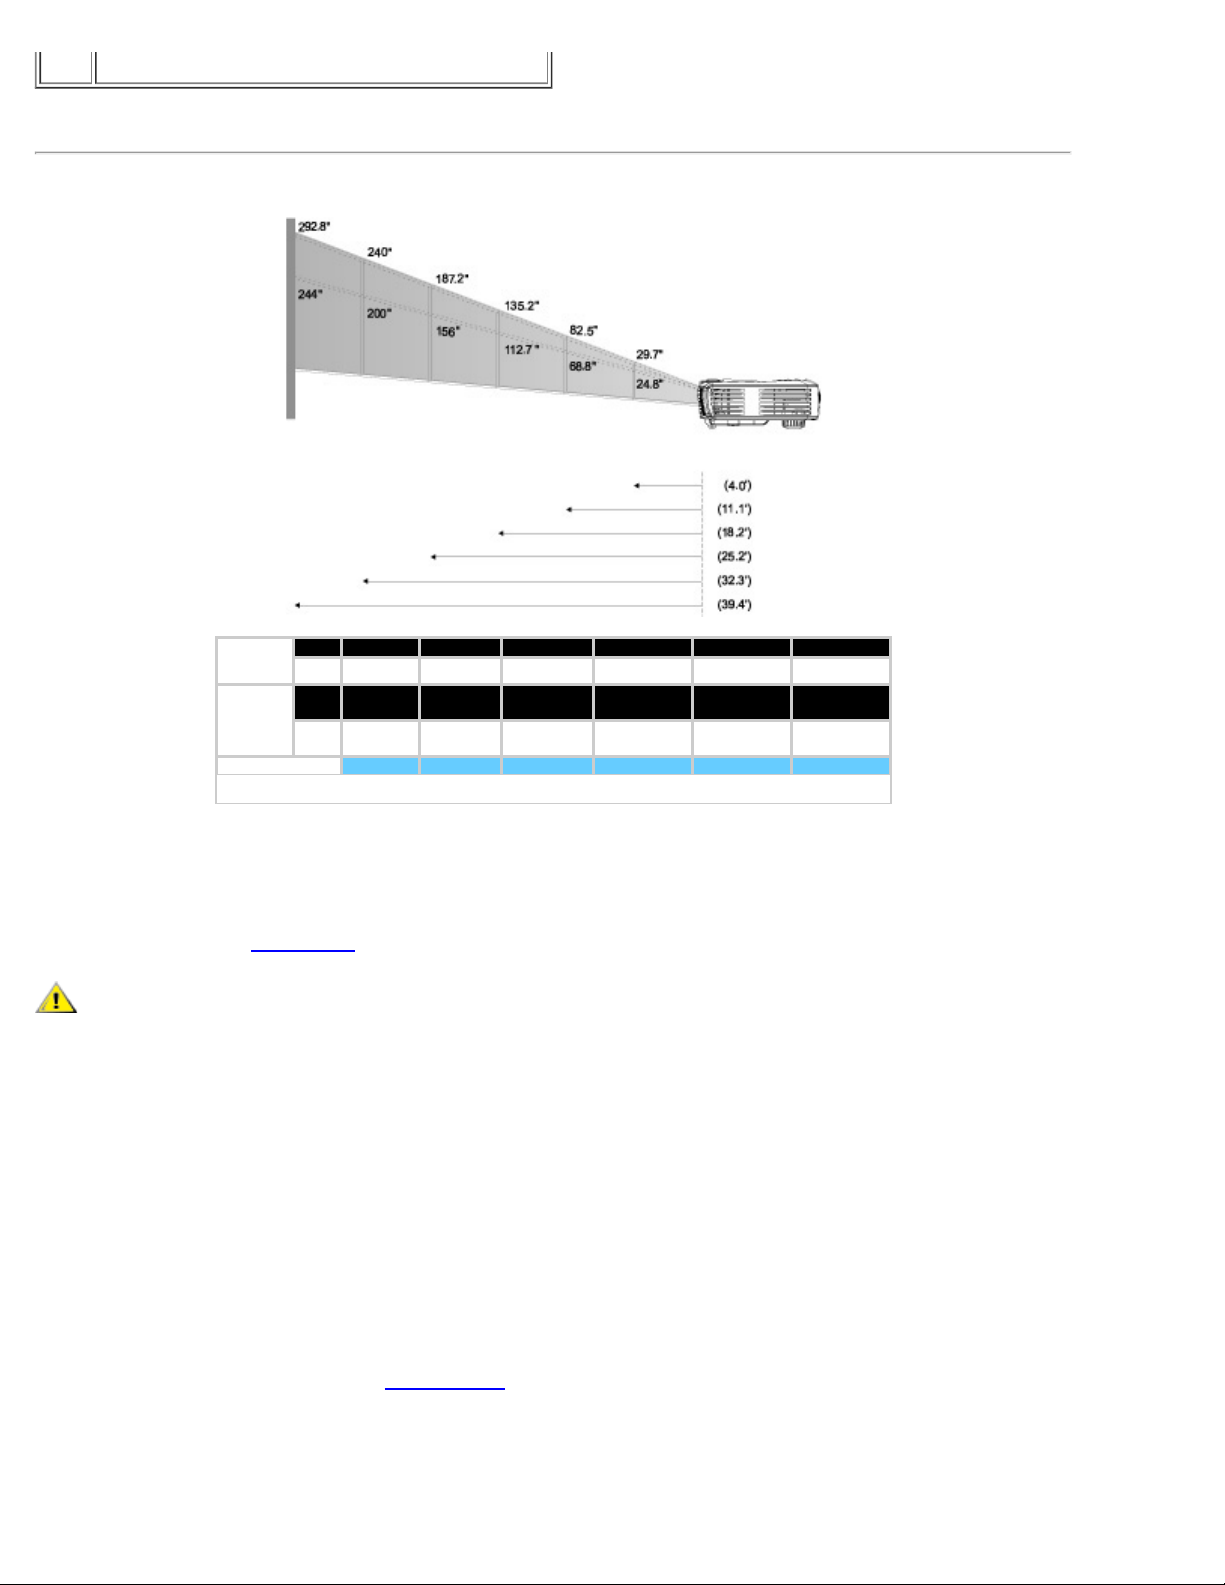
Adjusting Projection Image Size
Screen
(Diagonal)
Screen
Size
Max 29.7" 82.5" 135.2" 187.2" 240.0" 292.8"
Min. 24.8" 68.8" 112.7" 156.0" 200.0"
Max.
23.8"X17.8 66.0"X49.5" 108.2"X81.1" 149.8"X112.3"192.0"X144.0" 234.2"X175.7"
(WXH)
Min.
19.8X14.9" 55.0"X41.3" 90.1"X67.6" 124.8"X93.6" 160.0"X120.0" 195.2"X146.4"
(WXH)
Distance 4.0' 11.1' 18.2' 25.2' 32.3' 39.4'
244.0"
* This graph is for user reference only.
Changing the Lamp
Replace the lamp when you see " Lamp is approaching the end of its useful life.
Replacement suggested!" message on the screen by carefully following these instructions. If this
problem persists,
contact Dell.
CAUTION: The lamp becomes very hot with use. Do not attempt to replace the lamp after use until the
projector has been allowed to cool down for at least 30 minutes.
Lamp Changing Procedure:
1. Turn off the projector and disconnect the
power cord.
2. Let the projector cool for at least 30
minutes.
3. Lossen the two screws that secure the
lamp cover, and remove the cover.
4. Remove the two screws that secure the
lamp.
5. Pull up the lamp by its metal handle.
6. Reverse steps 1 through 5 to install the
new lamp.
7. Reset the lamp by selecting the left Lamp
Reset icon in the OSD
Management tab.
8. Dell may require that lamps replaced under
warranty are returned to Dell. Otherwise,
contact your local waste disposal agency for
the address of the nearest deposit site
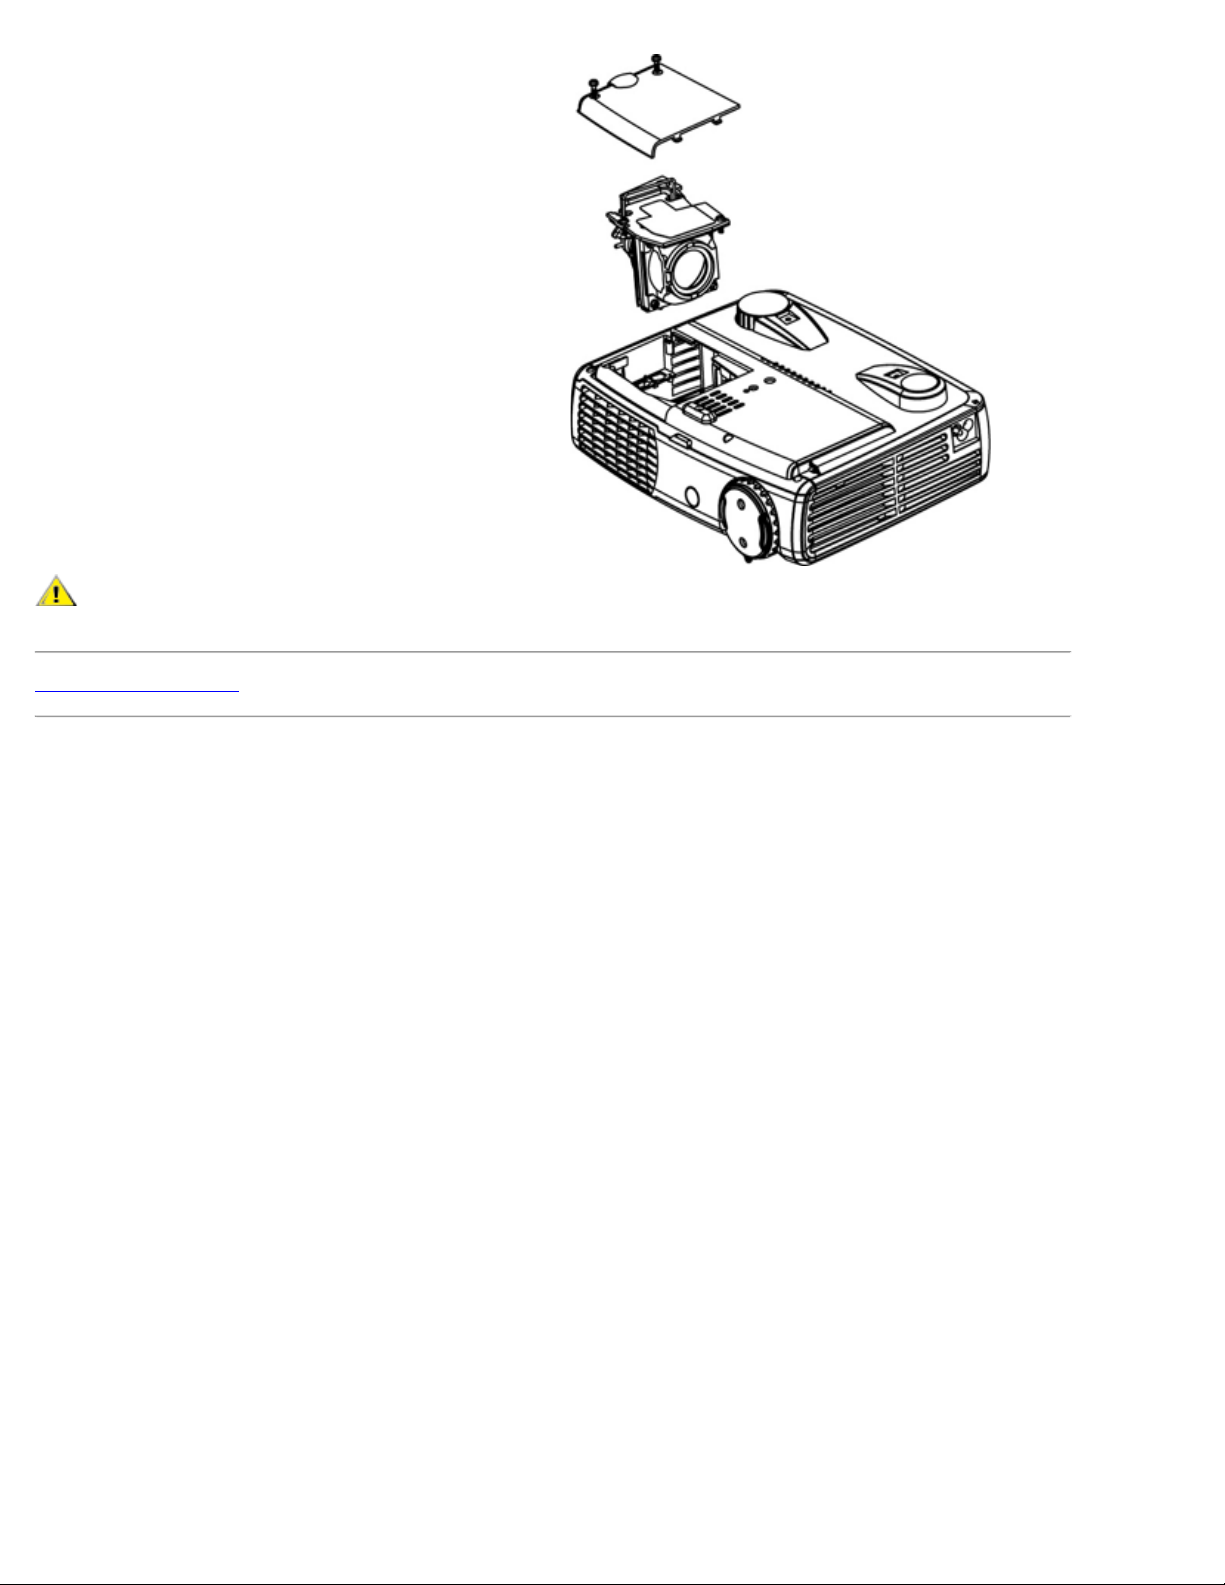
CAUTION: Do not touch the bulb or the lamp glass at any time. The bulb may explode due to improper
handling, including the touching of the bulb or the lamp glass.
Back to Contents Page
Back to Contents Page
Using Your Projector: Dell™ 3200MP Projector
Control Panel
Remote Control
On-Screen Display
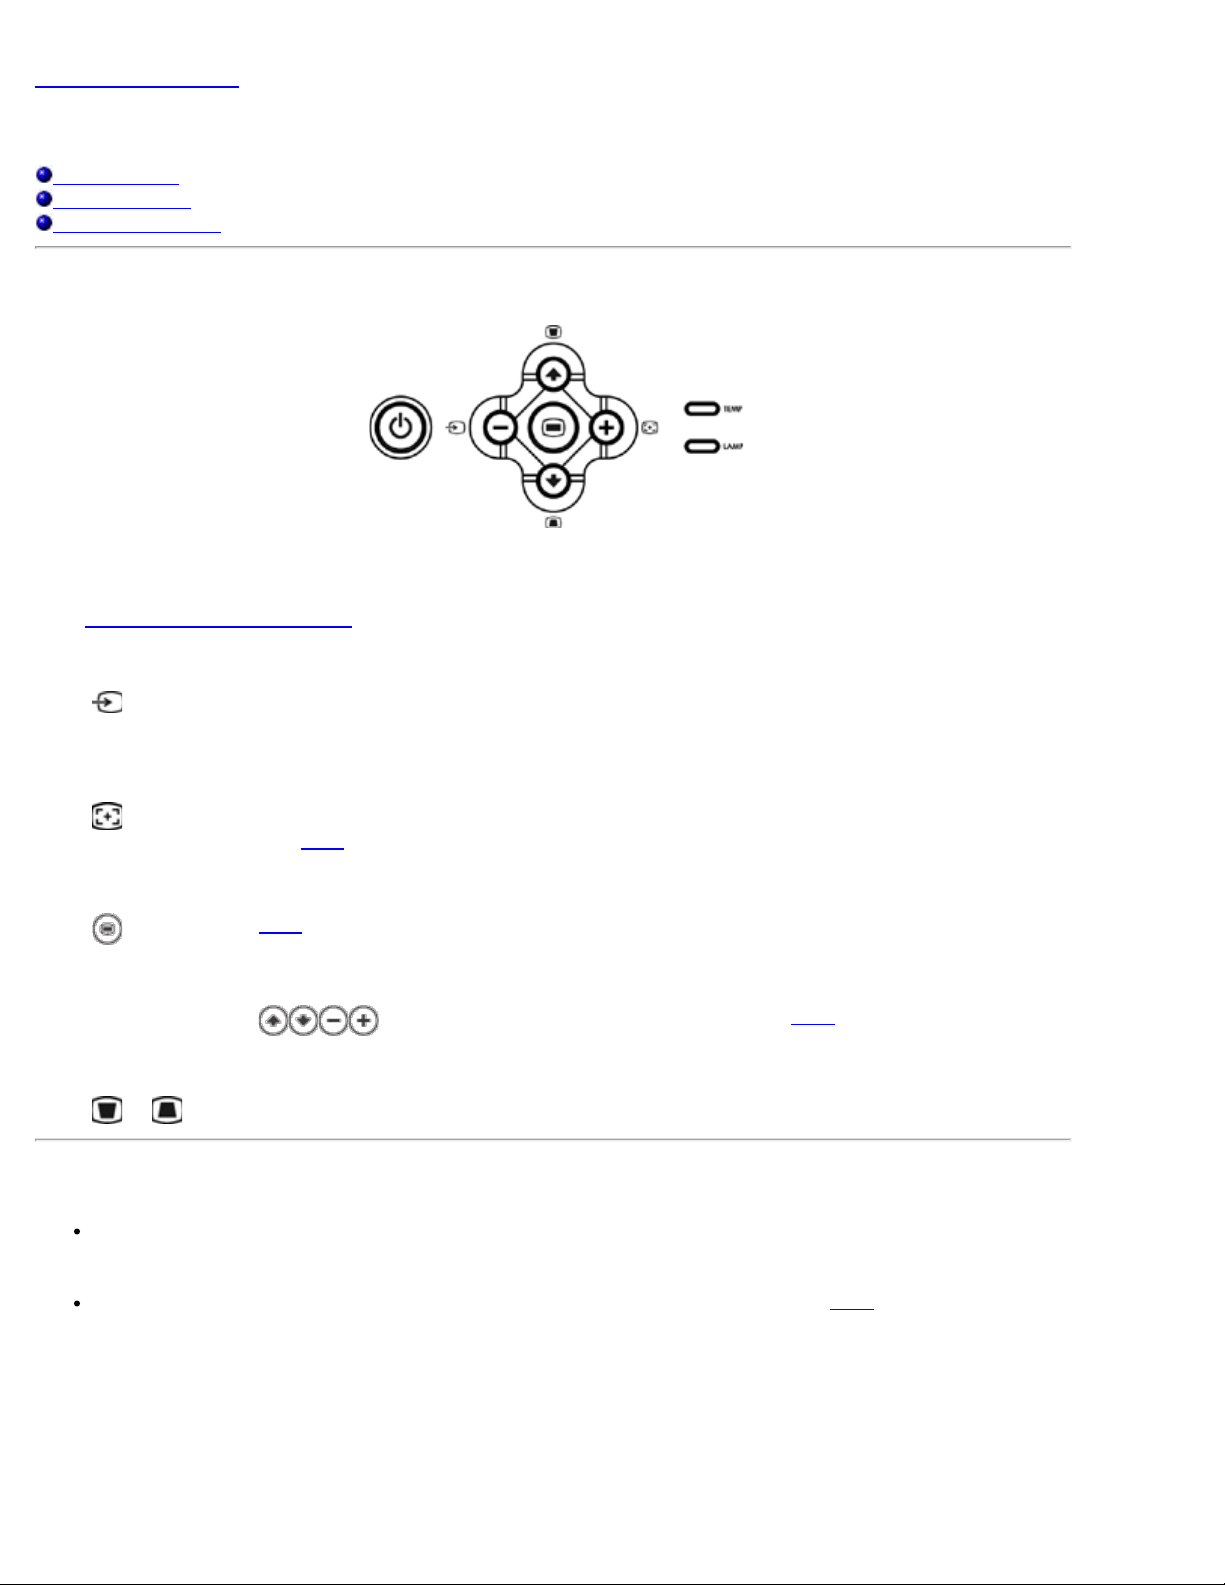
Control Panel
Power
See "
Powering On/Off the Projector."
Source
Press
multiple sources are connected to the projector.
R-Sync (Resync)
Press
R-Sync will not operate if the
Menu
Press
Four Directional Keys
The four directional keys
Keystone
Press
to step through Analog RGB, DVI, Composite, Component- I, S- video, and Analog YPbPr sources when
to synchronize the projector to the input source.
OSD is displayed.
to activate the OSD. An input signal is required to activate the OSD.
can be used to toggle through the tabs in the OSD.
or button to adjust image distortion caused by tilting the projector. (± 30 degrees)
Remote Control
If the remote control cover is closed:
The R-Sync button functions as the right mouse button.
The Enter button functions as the left mouse button.
If the remote control cover is open, use the directional pad to navigate through the OSD tabs.
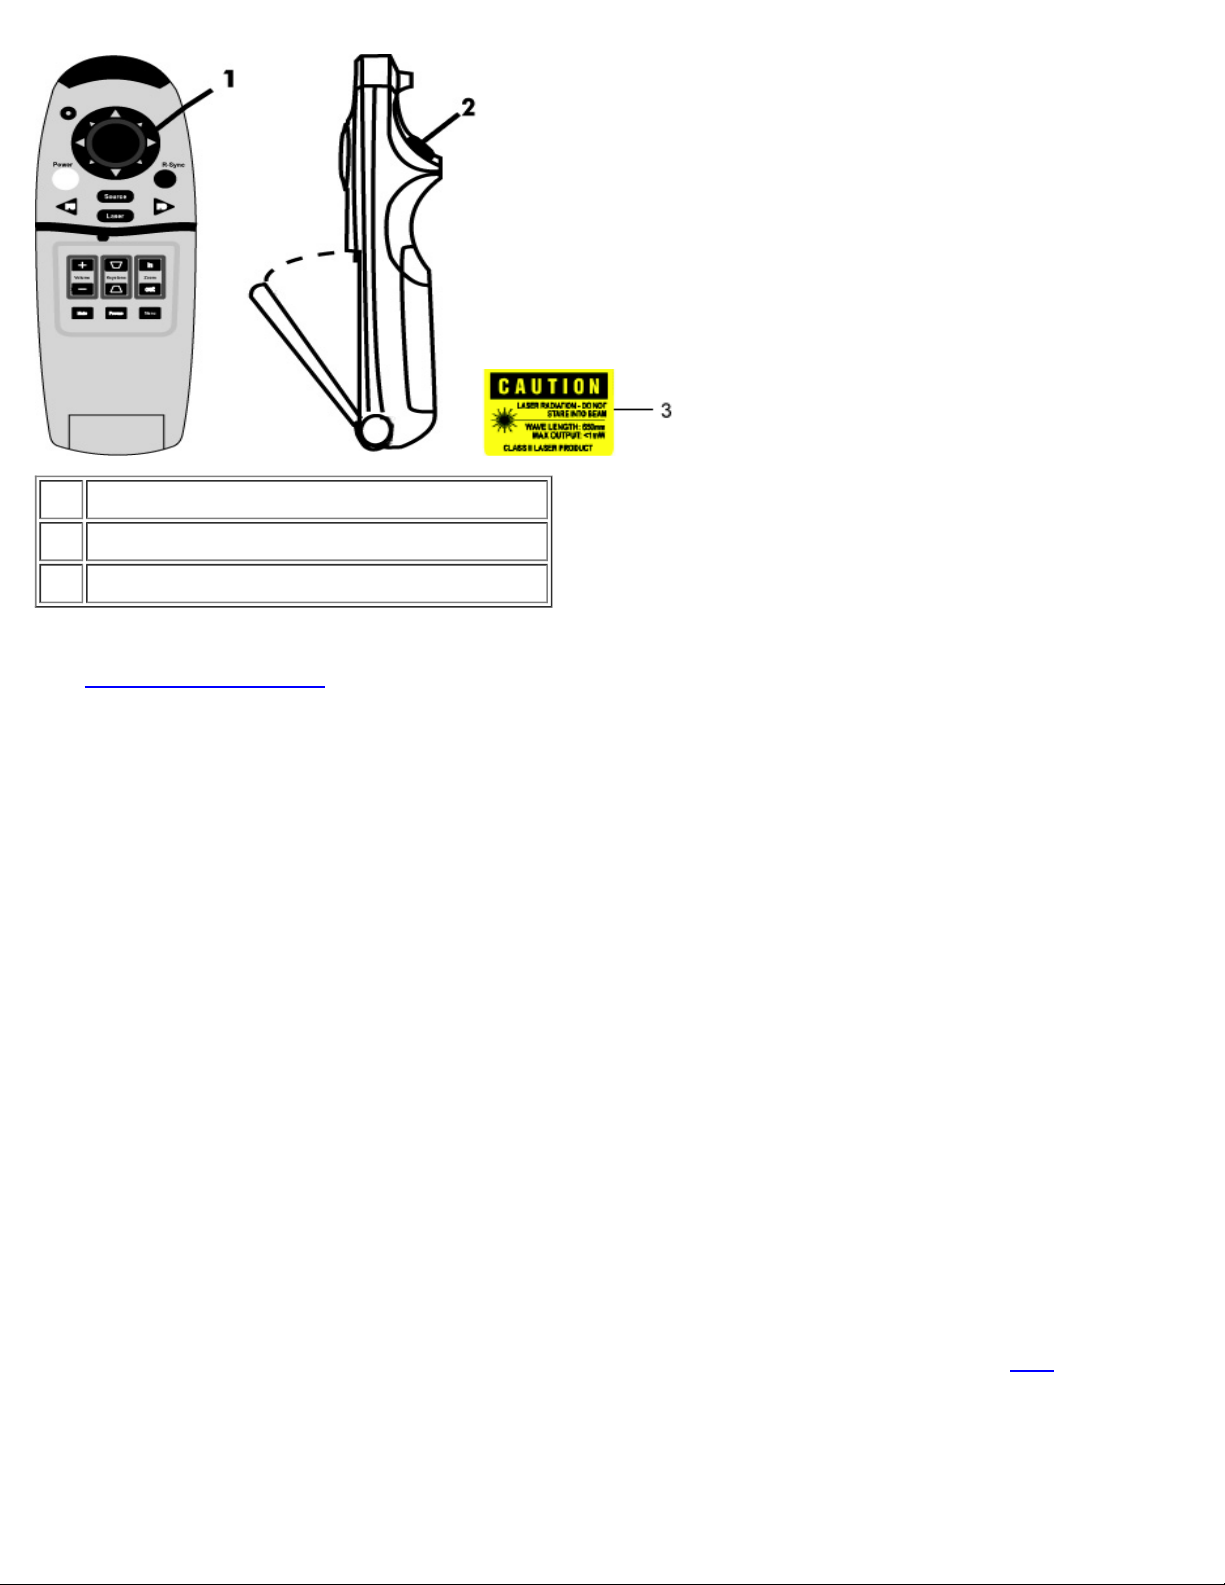
1 Directional pad
2 Enter button
3 Laser radiation caution
Power
Power On/Off the Projector."
See "
Source
Press the Source button to choose Analog RGB, DVI, Composite, Component -I, S-video, and Analog YPbPr
sources.
R-Sync
If the remote control cover is open, the R-Sync button synchronizes the projector to the input source.
If the remote control cover is closed, the R-Sync button functions as the right mouse button.
Directional Pad
The directional pad can be used to control mouse movement when the remote control cover is closed. The mouse
function is enabled using the USB connector on the M1-A to combination VGA and USB cable between your
computer and the projector.
Laser
Aim the remote control at the screen, and press and hold the Laser button to activate the laser light.
Page Up
Press the PU button to page up.
Page Down
Press the PD button to page down.
Menu
Press the Menu button to activate the OSD. Use the directional pad and Enter button to navigate through the
Zoom In/Out
Press the In button to digitally magnify an image up to 32 times on the screen. Press the Out button to reduce the
zoomed image.
OSD.
 Loading...