

Page 1

Dell™ 2355dn Laser MFP
User’s Guide
Page 2
DellTM 2355dn Laser MFP User’s Guide
Click the links to the left for information on the features, options, and operation of your
printer. For information on other documentation included with your printer, see "Finding
Information".
To order replacement toner cartridges or supplies from Dell:
1
Double-click the
OR
2
Visit Dell's website, or order Dell printer supplies by phone.
http://www.dell.com/supplies
Dell 2355dn Laser MFP Toner Reorder
icon on your desktop.
Contacting Dell
NOTE: If you do not have an active Internet connection, you can find contact information on your
purchase invoice, packing slip, bill, or Dell product catalog.
Dell provides several online and telephone-based support and service options. Availability
varies by country and product, and some services may not be available in your area. To contact
Dell for sales, technical support, or customer service issues:
1
Visit
www.support.dell.com
2
Verify your country or region in the
bottom of the page.
3
Click
Contact Us
4
Select the appropriate service or support link based on your need.
5
Choose the method of contacting Dell that is convenient for you.
on the left side of the page.
.
Choose A Country/Region
drop-down menu at the
1
Page 3

Notes, Notices, and Cautions
NOTE: A NOTE indicates important information that helps you make better use of your printer.
NOTICE: A NOTICE indicates either potential damage to hardware or loss of data and tells you how
to avoid the problem.
CAUTION: A CAUTION indicates a potential for property damage, personal injury, or death.
____________________
Information in this document is subject to change without notice.
2010 Dell Inc. All rights reserved.
Reproduction of these materials in any manner whatsoever without the written permission of
Dell Inc. is strictly forbidden.
Trademarks used in this text:
OptiPlex
,
Latitude, PowerEdge, PowerVault, PowerApp, Dell OpenManage
logo are trademarks of Dell Inc.;
Corporation in the U.S. and other countries;
,
Windows Vista
Corporation in the United States and/or other countries.
Other trademarks and trade names may be used in this document to refer to either the entities
claiming the marks and names or their products. Dell Inc. disclaims any proprietary interest in
trademarks and trade names other than its own.
, and
Windows 7
Dell
, the
DELL
logo,
Inspiron, Dell Precision, Dimension
Intel, Pentium
, and
Celeron
and the
are registered trademarks of Intel
YOURS IS HERE
Microsoft, Windows, Windows Server, MS-DOS
are either trademarks or registered trademarks of Microsoft
,
____________________
2
Page 4

Finding Information
What Are You Looking For? Find It Here
• Drivers for my printer
•My User’s Guide
• How to use my printer
Software and Documentation CD
You can use the Software and Documentation CD to install,
uninstall, or reinstall drivers and utilities or access your User’s Guide.
For details, see "Software Overview".
Readme files may be included on your Software and Documentation
CD to provide last-minute updates about technical changes to your
printer or advanced technical reference material for experienced
users or technicians.
Quick Reference Guide
Dell 2355dn MFP Quick Reference Guide
2
1
Front
Front
Front
5
11
12
Front
7
8
9
1
10
1. DADF
2. Document width guides
3. Document input tray
4. Document output tray
5. Operator panel
6. Output tray (face down)
7. MPF (Multi purpose feeder)
8. Front cover
9. Tray 1
10. Optional tray 2
11. USB memory port
12. Paper output extension
13. Document glass
14. Toner cartridge
15. Express ervice code
Back
Back
Back
10
7
9
8
1. USB port
2. Locking slot
3. Network port
4. Optional tray 2 cable
connector
5. Telephone line socket (Line)
6. Extension telephone socket (EXT)
7. Rear door
8. Power receptacle
9. Power switch
10. Express ervice code
11. Optional memory
12. Optional wireless card
Quick Reference Guide
Quick Reference Guide
Operator Panel
Operator Panel
lenaP rotarepO
3
4
13
14
6
15
1. DADF
1. DADF
2. Document width guides
2. Document width guides
3. Document input tray
3. Document input tray
4. Document output tray
4. Document output tray
5. Operator panel
5. Operator panel
6. Output tray (face down)
6. Output tray (face down)
7. MPF (Multi purpose feeder)
7. MPF (Multi purpose feeder)
8. Front cover
8. Front cover
9. Tray 1
9. Tray 1
10. Optional tray 2
10. Optional tray 2
11. USB memory port
11. USB memory port
12. Paper output extension
12. Paper output extension
13. Document glass
13. Document glass
14. Toner cartridge
14. Toner cartridge
15. Express ervice code
15. Express ervice code
11
1
2
12
3
4
5
6
1. USB port
1. USB port
2. Locking slot
2. Locking slot
3. Network port
3. Network port
4. Optional tray 2 cable
4. Optional tray 2 cable
connector
connector
5. Telephone line socket (Line)
5. Telephone line socket (Line)
6. Extension telephone socket (EXT)
6. Extension telephone socket (EXT)
7. Rear door
7. Rear door
8. Power receptacle
8. Power receptacle
9. Power switch
9. Power switch
10. Express ervice code
10. Express ervice code
11. Optional memory
11. Optional memory
12. Optional wireless card
12. Optional wireless card
1. LCD: Display.
2. Status LED: Shows the status of your machine.
3. Job Status button: Shows the jobs.
4. M/C Setup button: Leads you to the machine setup and advanced settings.
5 Start button: Initiate operation.
6. Cancel button: Cancel displayed operation.
1. LCD: Display.
2. Status LED: Shows the status of your machine.
3. Job Status button: Shows the jobs.
4. M/C Setup button: Leads you to the machine setup and advanced settings.
5 Start button: Initiate operation.
6. Cancel button: Cancel displayed operation.
Touch Screen
Touch Screen
Touch Screen
1.
Copy: Enters the copy menu.
2. Fax: Enters the fax menu.
3. Scan: Enters the scan menu.
4. Setup: Enters the advanced settings.
5. None: You can set the option which is frequently uses on
main screen. Also you can change shortcut name as well.
6. : Shows the main screen.
7. : Enters the LCD brightness, the USB memory,
language, and job status.
1. LCD: Display.
2. Status LED: Shows the status of your machine.
3. Job Status button: Shows the jobs.
4. M/C Setup button: Leads you to the machine setup and advanced settings.
5 Start button: Initiate operation.
6. Cancel button: Cancel displayed operation.
8. : Return to the upper menu.
9. : Scroll through available options.
10. : Start a job.
8. : Return to the upper menu.
9. : Scroll through available options.
10. : Start a job.
8. : Return to the upper menu.
9. : Scroll through available options.
10. : Start a job.
CAUTION: Read and follow all safety instructions in your
Product Information Guide prior to setting up and operating your
printer.
NOTE: Quick Reference Gudie may not be provided with your
product depending on your country.
•
How to set up my printer Setup diagram
• Safety information
Product Information Guide
• Warranty information
•Regulatory Notice
3
Page 5
What Are You Looking For? Find It Here
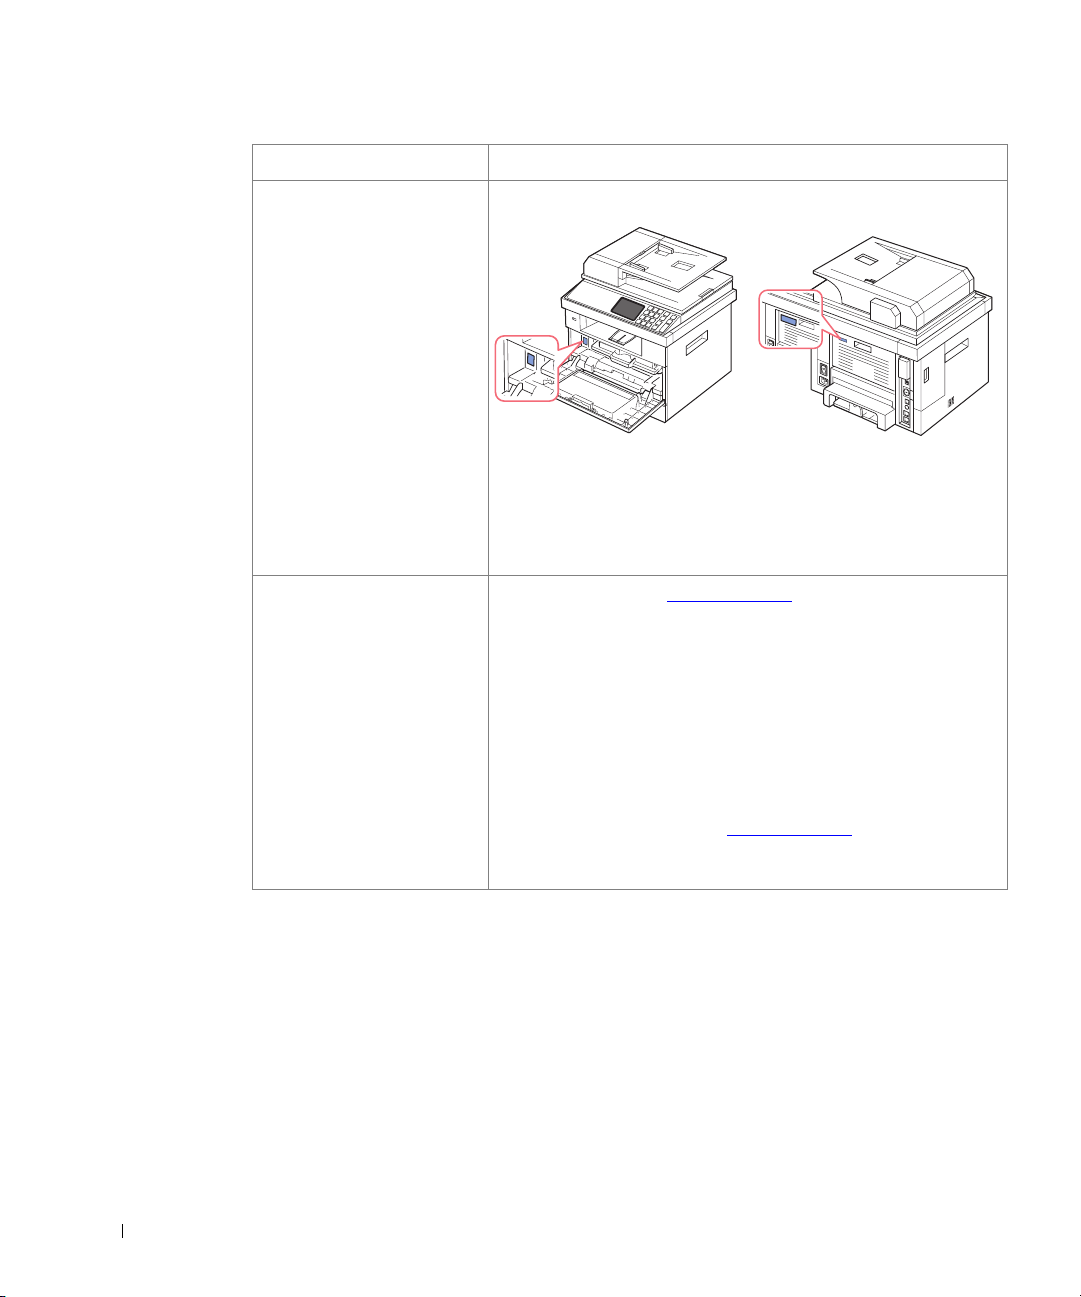
Express Service Code Express Service Code
Identify your printer when you use support.dell.com or contact
technical support.
Enter the Express Service Code to direct your call when contacting
technical support. The Express Service Code is not available in all
countries.
• Latest drivers for my printer
• Answers to technical service
and support questions
• Documentation for my
printer
Dell Support Website: support.dell.com
The Dell Support Website provides several online tools, including:
• Solutions - Troubleshooting hints and tips, articles from
technicians, and online courses
• Upgrades - Upgrade information for components, such as memory
• Customer Care - Contact information, order status, warranty, and
repair information
•Downloads - Drivers
• Reference - Printer documentation and product specifications
You can access Dell Support at
on the WELCOME TO DELL SUPPORT page, and fill in the
requested details to access help tools and information.
support.dell.com
. Select your region
4
Page 6

Contents
DellTM 2355dn Laser MFP User’s Guide. . . . . . . . . . . . . . . . . . . . . . . . . . . . . . . . . . . . . 1
Contacting Dell . . . . . . . . . . . . . . . . . . . . . . . . . . . . . . . . . . . . . . . . . . . . . . . . . . . . . . . . . . 1
Finding Information. . . . . . . . . . . . . . . . . . . . . . . . . . . . . . . . . . . . . . . . . . . . . . . . . . . . . . . 3
Unpacking Your Printer . . . . . . . . . . . . . . . . . . . . . . . . . . . . . . . . . . . . . . . . . . . . . . . . . . 17
About Your Printer. . . . . . . . . . . . . . . . . . . . . . . . . . . . . . . . . . . . . . . . . . . . . . . . . . . . . . . 20
Introducing the Home Screen. . . . . . . . . . . . . . . . . . . . . . . . . . . . . . . . . . . . . . . . . . . . . 24
Front View . . . . . . . . . . . . . . . . . . . . . . . . . . . . . . . . . . . . . . . . . . . . . . . . . . . . . . . . . 20
Rear View. . . . . . . . . . . . . . . . . . . . . . . . . . . . . . . . . . . . . . . . . . . . . . . . . . . . . . . . . . 21
Operator Panel Button Functions. . . . . . . . . . . . . . . . . . . . . . . . . . . . . . . . . . . . . . 22
Common Keys . . . . . . . . . . . . . . . . . . . . . . . . . . . . . . . . . . . . . . . . . . . . . . . . . . . . . . 22
Function Keys . . . . . . . . . . . . . . . . . . . . . . . . . . . . . . . . . . . . . . . . . . . . . . . . . . . . . . 22
Fax Keys . . . . . . . . . . . . . . . . . . . . . . . . . . . . . . . . . . . . . . . . . . . . . . . . . . . . . . . . . . . 22
Understanding the Status LED . . . . . . . . . . . . . . . . . . . . . . . . . . . . . . . . . . . . . . . . 23
Touchscreen . . . . . . . . . . . . . . . . . . . . . . . . . . . . . . . . . . . . . . . . . . . . . . . . . . . . . . . 24
Understanding the Keyboard . . . . . . . . . . . . . . . . . . . . . . . . . . . . . . . . . . . . . . . . . 25
Using Shortcut Menu . . . . . . . . . . . . . . . . . . . . . . . . . . . . . . . . . . . . . . . . . . . . . . . . 26
Internal Fonts . . . . . . . . . . . . . . . . . . . . . . . . . . . . . . . . . . . . . . . . . . . . . . . . . . . . . . . . . . . 27
Printing the PCL Font list . . . . . . . . . . . . . . . . . . . . . . . . . . . . . . . . . . . . . . . . . . . . . 27
Printing the PS3 Font list . . . . . . . . . . . . . . . . . . . . . . . . . . . . . . . . . . . . . . . . . . . . . 27
Setting up the hardware . . . . . . . . . . . . . . . . . . . . . . . . . . . . . . . . . . . . . . . . . . . . . . . . . 27
Installing the Toner Cartridge. . . . . . . . . . . . . . . . . . . . . . . . . . . . . . . . . . . . . . . . . . . . . 29
Loading Paper . . . . . . . . . . . . . . . . . . . . . . . . . . . . . . . . . . . . . . . . . . . . . . . . . . . . . . . . . . 31
Making Connections. . . . . . . . . . . . . . . . . . . . . . . . . . . . . . . . . . . . . . . . . . . . . . . . . . . . . 34
Connecting the Telephone Line . . . . . . . . . . . . . . . . . . . . . . . . . . . . . . . . . . . . . . . 34
Connecting the Printer Cable . . . . . . . . . . . . . . . . . . . . . . . . . . . . . . . . . . . . . . . . . 37
Powering On the Printer . . . . . . . . . . . . . . . . . . . . . . . . . . . . . . . . . . . . . . . . . . . . . . . . . 39
Setting fax setup sequence . . . . . . . . . . . . . . . . . . . . . . . . . . . . . . . . . . . . . . . . . . 39
Dell 2355dn Laser MFP Menu Functions. . . . . . . . . . . . . . . . . . . . . . . . . . . . . . . . . . . . 40
Printing the Printer setting and Op-panel Menu setting . . . . . . . . . . . . . . . . . . . . . . 41
5
Page 7

Printing the Printer setting . . . . . . . . . . . . . . . . . . . . . . . . . . . . . . . . . . . . . . . . . . . 41
Printing the Op-panel Menu setting . . . . . . . . . . . . . . . . . . . . . . . . . . . . . . . . . . . 41
Setting the Machine ID . . . . . . . . . . . . . . . . . . . . . . . . . . . . . . . . . . . . . . . . . . . . . . . . . . 41
Changing the Display Language . . . . . . . . . . . . . . . . . . . . . . . . . . . . . . . . . . . . . . . . . . 42
Selecting Country. . . . . . . . . . . . . . . . . . . . . . . . . . . . . . . . . . . . . . . . . . . . . . . . . . . . . . . 42
Power Save Mode . . . . . . . . . . . . . . . . . . . . . . . . . . . . . . . . . . . . . . . . . . . . . . . . . . . . . . 42
Setting the Sound/Volume . . . . . . . . . . . . . . . . . . . . . . . . . . . . . . . . . . . . . . . . . . . . . . . 44
Setting Daylight Savings Time (Only for USA) . . . . . . . . . . . . . . . . . . . . . . . . . . . . . . 44
Scanner Lamp Power Save Mode. . . . . . . . . . . . . . . . . . . . . . . . . . . . . . . . . . . . . . . . . 45
Changing the Default Mode . . . . . . . . . . . . . . . . . . . . . . . . . . . . . . . . . . . . . . . . . . . . . . 45
Setting the Time Out Option . . . . . . . . . . . . . . . . . . . . . . . . . . . . . . . . . . . . . . . . . . . . . . 45
Setting the Job Management. . . . . . . . . . . . . . . . . . . . . . . . . . . . . . . . . . . . . . . . . . . . . 46
Setting the Toner Save Mode. . . . . . . . . . . . . . . . . . . . . . . . . . . . . . . . . . . . . . . . . . . . . 46
Setting the Timing of Toner Low Alert . . . . . . . . . . . . . . . . . . . . . . . . . . . . . . . . . . . . . 46
Ignoring Blank Pages . . . . . . . . . . . . . . . . . . . . . . . . . . . . . . . . . . . . . . . . . . . . . . . . . . . 47
Ignoring the Toner Low Message (Only for Fax) . . . . . . . . . . . . . . . . . . . . . . . . . . . . 47
Software Overview . . . . . . . . . . . . . . . . . . . . . . . . . . . . . . . . . . . . . . . . . . . . . . . . . . . . . 48
Dell Printer Configuration Web Tool . . . . . . . . . . . . . . . . . . . . . . . . . . . . . . . . . . . . . . 49
Printer Status . . . . . . . . . . . . . . . . . . . . . . . . . . . . . . . . . . . . . . . . . . . . . . . . . . . . . . 50
Printer Settings . . . . . . . . . . . . . . . . . . . . . . . . . . . . . . . . . . . . . . . . . . . . . . . . . . . . 50
Printer Server Settings . . . . . . . . . . . . . . . . . . . . . . . . . . . . . . . . . . . . . . . . . . . . . . 50
Fax Settings . . . . . . . . . . . . . . . . . . . . . . . . . . . . . . . . . . . . . . . . . . . . . . . . . . . . . . . 50
Email Settings. . . . . . . . . . . . . . . . . . . . . . . . . . . . . . . . . . . . . . . . . . . . . . . . . . . . . . 51
Copy Printer Settings . . . . . . . . . . . . . . . . . . . . . . . . . . . . . . . . . . . . . . . . . . . . . . . 55
Printing Statistics. . . . . . . . . . . . . . . . . . . . . . . . . . . . . . . . . . . . . . . . . . . . . . . . . . . 55
Set Password . . . . . . . . . . . . . . . . . . . . . . . . . . . . . . . . . . . . . . . . . . . . . . . . . . . . . . 55
Wireless . . . . . . . . . . . . . . . . . . . . . . . . . . . . . . . . . . . . . . . . . . . . . . . . . . . . . . . . . . 55
Online Help . . . . . . . . . . . . . . . . . . . . . . . . . . . . . . . . . . . . . . . . . . . . . . . . . . . . . . . . 55
®
Installing Software in Microsoft
Windows® Operating System . . . . . . . . . . . . . 56
Installing Dell Software for Local Printing. . . . . . . . . . . . . . . . . . . . . . . . . . . . . . 57
Network Installation . . . . . . . . . . . . . . . . . . . . . . . . . . . . . . . . . . . . . . . . . . . . . . . . 59
Installing Dell Software for Network Printing. . . . . . . . . . . . . . . . . . . . . . . . . . . 60
6
Page 8

Uninstalling Software . . . . . . . . . . . . . . . . . . . . . . . . . . . . . . . . . . . . . . . . . . . . . . . . . . . 65
Using the Dell Toner Management System . . . . . . . . . . . . . . . . . . . . . . . . . . . . . . . . . 66
Printer Status Monitor . . . . . . . . . . . . . . . . . . . . . . . . . . . . . . . . . . . . . . . . . . . . . . . 66
Printer Settings Utility . . . . . . . . . . . . . . . . . . . . . . . . . . . . . . . . . . . . . . . . . . . . . . . . . . . 67
The Directory Section . . . . . . . . . . . . . . . . . . . . . . . . . . . . . . . . . . . . . . . . . . . . . . . 68
The Fax Setting Section. . . . . . . . . . . . . . . . . . . . . . . . . . . . . . . . . . . . . . . . . . . . . . 69
The Setting Section . . . . . . . . . . . . . . . . . . . . . . . . . . . . . . . . . . . . . . . . . . . . . . . . . 69
The Layout Section. . . . . . . . . . . . . . . . . . . . . . . . . . . . . . . . . . . . . . . . . . . . . . . . . . 69
The Paper Option Section . . . . . . . . . . . . . . . . . . . . . . . . . . . . . . . . . . . . . . . . . . . . 69
The Graphic Section. . . . . . . . . . . . . . . . . . . . . . . . . . . . . . . . . . . . . . . . . . . . . . . . . 69
The Emulation Section . . . . . . . . . . . . . . . . . . . . . . . . . . . . . . . . . . . . . . . . . . . . . . . 69
The Network(IPv4) Section . . . . . . . . . . . . . . . . . . . . . . . . . . . . . . . . . . . . . . . . . . . 70
Firmware Update Utility. . . . . . . . . . . . . . . . . . . . . . . . . . . . . . . . . . . . . . . . . . . . . . . . . . 70
Set IP Address Utility . . . . . . . . . . . . . . . . . . . . . . . . . . . . . . . . . . . . . . . . . . . . . . . . . . . . 72
Paper Handling
Print Media Guidelines . . . . . . . . . . . . . . . . . . . . . . . . . . . . . . . . . . . . . . . . . . . . . . . . . . 74
Paper. . . . . . . . . . . . . . . . . . . . . . . . . . . . . . . . . . . . . . . . . . . . . . . . . . . . . . . . . . . . . . 74
Transparencies . . . . . . . . . . . . . . . . . . . . . . . . . . . . . . . . . . . . . . . . . . . . . . . . . . . . . 79
Envelopes. . . . . . . . . . . . . . . . . . . . . . . . . . . . . . . . . . . . . . . . . . . . . . . . . . . . . . . . . . 79
Labels . . . . . . . . . . . . . . . . . . . . . . . . . . . . . . . . . . . . . . . . . . . . . . . . . . . . . . . . . . . . . 81
Card Stock . . . . . . . . . . . . . . . . . . . . . . . . . . . . . . . . . . . . . . . . . . . . . . . . . . . . . . . . . 82
Storing Print Media. . . . . . . . . . . . . . . . . . . . . . . . . . . . . . . . . . . . . . . . . . . . . . . . . . . . . . 82
Identifying Print Media Sources and Specifications. . . . . . . . . . . . . . . . . . . . . . . . . 83
Selecting an Output Location . . . . . . . . . . . . . . . . . . . . . . . . . . . . . . . . . . . . . . . . . . . . . 87
Printing to the Output Tray (Face down) . . . . . . . . . . . . . . . . . . . . . . . . . . . . . . . . 88
Printing to the Rear Door (Face up) . . . . . . . . . . . . . . . . . . . . . . . . . . . . . . . . . . . . 88
Loading Print Media in the Paper Tray . . . . . . . . . . . . . . . . . . . . . . . . . . . . . . . . . . . . . 89
Using the MPF (Multi purpose feeder) . . . . . . . . . . . . . . . . . . . . . . . . . . . . . . . . . . . . . 90
Setting the Paper Size . . . . . . . . . . . . . . . . . . . . . . . . . . . . . . . . . . . . . . . . . . . . . . . . . . . 93
Setting the Paper Type . . . . . . . . . . . . . . . . . . . . . . . . . . . . . . . . . . . . . . . . . . . . . . . . . . . 93
7
Page 9

Setting the Paper Margin . . . . . . . . . . . . . . . . . . . . . . . . . . . . . . . . . . . . . . . . . . . . . . . . 93
Setting the Paper Tray. . . . . . . . . . . . . . . . . . . . . . . . . . . . . . . . . . . . . . . . . . . . . . . . . . . 94
Setting the Tray linking . . . . . . . . . . . . . . . . . . . . . . . . . . . . . . . . . . . . . . . . . . . . . . 94
Substitute Tray . . . . . . . . . . . . . . . . . . . . . . . . . . . . . . . . . . . . . . . . . . . . . . . . . . . . . 94
Setting the Default Tray . . . . . . . . . . . . . . . . . . . . . . . . . . . . . . . . . . . . . . . . . . . . . 94
Setting the paper feeding flow . . . . . . . . . . . . . . . . . . . . . . . . . . . . . . . . . . . . . . . 95
Setting the paper auto feeding . . . . . . . . . . . . . . . . . . . . . . . . . . . . . . . . . . . . . . . 95
Tray Behavior . . . . . . . . . . . . . . . . . . . . . . . . . . . . . . . . . . . . . . . . . . . . . . . . . . . . . . . . . . 96
Tray Linking . . . . . . . . . . . . . . . . . . . . . . . . . . . . . . . . . . . . . . . . . . . . . . . . . . . . . . . . 96
Substitute Size . . . . . . . . . . . . . . . . . . . . . . . . . . . . . . . . . . . . . . . . . . . . . . . . . . . . . 96
MPF . . . . . . . . . . . . . . . . . . . . . . . . . . . . . . . . . . . . . . . . . . . . . . . . . . . . . . . . . . . . . . 97
Bypass Mode . . . . . . . . . . . . . . . . . . . . . . . . . . . . . . . . . . . . . . . . . . . . . . . . . . . . . . 97
Tray Mode . . . . . . . . . . . . . . . . . . . . . . . . . . . . . . . . . . . . . . . . . . . . . . . . . . . . . . . . . 97
Printing
Printing a Document . . . . . . . . . . . . . . . . . . . . . . . . . . . . . . . . . . . . . . . . . . . . . . . . . . . 100
Canceling a Print Job . . . . . . . . . . . . . . . . . . . . . . . . . . . . . . . . . . . . . . . . . . . . . . 102
Printer Settings. . . . . . . . . . . . . . . . . . . . . . . . . . . . . . . . . . . . . . . . . . . . . . . . . . . . . . . . 103
Basic Tab. . . . . . . . . . . . . . . . . . . . . . . . . . . . . . . . . . . . . . . . . . . . . . . . . . . . . . . . . 104
Paper Tab . . . . . . . . . . . . . . . . . . . . . . . . . . . . . . . . . . . . . . . . . . . . . . . . . . . . . . . . 105
Graphic Tab. . . . . . . . . . . . . . . . . . . . . . . . . . . . . . . . . . . . . . . . . . . . . . . . . . . . . . . 107
Advanced Tab. . . . . . . . . . . . . . . . . . . . . . . . . . . . . . . . . . . . . . . . . . . . . . . . . . . . . 110
Dell Tab . . . . . . . . . . . . . . . . . . . . . . . . . . . . . . . . . . . . . . . . . . . . . . . . . . . . . . . . . . 111
Using a Presets Setting . . . . . . . . . . . . . . . . . . . . . . . . . . . . . . . . . . . . . . . . . . . . 112
Using Help. . . . . . . . . . . . . . . . . . . . . . . . . . . . . . . . . . . . . . . . . . . . . . . . . . . . . . . . 112
Printing Multiple Pages on One Sheet of the Paper . . . . . . . . . . . . . . . . . . . . . . . . 113
Change Percentage of Your Document . . . . . . . . . . . . . . . . . . . . . . . . . . . . . . . . . . . 114
Fitting Your Document to a Selected Paper Size . . . . . . . . . . . . . . . . . . . . . . . . . . . 115
Printing Posters . . . . . . . . . . . . . . . . . . . . . . . . . . . . . . . . . . . . . . . . . . . . . . . . . . . . . . . 116
Printing Booklets . . . . . . . . . . . . . . . . . . . . . . . . . . . . . . . . . . . . . . . . . . . . . . . . . . . . . . 117
Printing on Both Sides of Paper . . . . . . . . . . . . . . . . . . . . . . . . . . . . . . . . . . . . . . . . . 118
Using Watermarks . . . . . . . . . . . . . . . . . . . . . . . . . . . . . . . . . . . . . . . . . . . . . . . . . . . . . 119
Using an Existing Watermark . . . . . . . . . . . . . . . . . . . . . . . . . . . . . . . . . . . . . . . 119
Creating a Watermark. . . . . . . . . . . . . . . . . . . . . . . . . . . . . . . . . . . . . . . . . . . . . . 120
8
Page 10

Editing a Watermark. . . . . . . . . . . . . . . . . . . . . . . . . . . . . . . . . . . . . . . . . . . . . . . . 120
Deleting a Watermark . . . . . . . . . . . . . . . . . . . . . . . . . . . . . . . . . . . . . . . . . . . . . . 121
Using Overlays. . . . . . . . . . . . . . . . . . . . . . . . . . . . . . . . . . . . . . . . . . . . . . . . . . . . . . . . . 122
What is an Overlay? . . . . . . . . . . . . . . . . . . . . . . . . . . . . . . . . . . . . . . . . . . . . . . . . 122
Creating a New Page Overlay . . . . . . . . . . . . . . . . . . . . . . . . . . . . . . . . . . . . . . . 122
Using a Page Overlay. . . . . . . . . . . . . . . . . . . . . . . . . . . . . . . . . . . . . . . . . . . . . . . 123
Deleting a Page Overlay . . . . . . . . . . . . . . . . . . . . . . . . . . . . . . . . . . . . . . . . . . . . 125
Copying
Loading Paper for Copying . . . . . . . . . . . . . . . . . . . . . . . . . . . . . . . . . . . . . . . . . . . . . . 128
Selecting the Paper Tray . . . . . . . . . . . . . . . . . . . . . . . . . . . . . . . . . . . . . . . . . . . . . . . . 128
Preparing a Document . . . . . . . . . . . . . . . . . . . . . . . . . . . . . . . . . . . . . . . . . . . . . . . . . . 128
Loading an Original Document . . . . . . . . . . . . . . . . . . . . . . . . . . . . . . . . . . . . . . . . . . . 129
Making Copies. . . . . . . . . . . . . . . . . . . . . . . . . . . . . . . . . . . . . . . . . . . . . . . . . . . . . . . . . 131
Setting Copy Options . . . . . . . . . . . . . . . . . . . . . . . . . . . . . . . . . . . . . . . . . . . . . . . . . . . 132
Number of Copies . . . . . . . . . . . . . . . . . . . . . . . . . . . . . . . . . . . . . . . . . . . . . . . . . . 132
Enlarge/Reduce Copy. . . . . . . . . . . . . . . . . . . . . . . . . . . . . . . . . . . . . . . . . . . . . . . 132
Contrast . . . . . . . . . . . . . . . . . . . . . . . . . . . . . . . . . . . . . . . . . . . . . . . . . . . . . . . . . . 133
Original Size. . . . . . . . . . . . . . . . . . . . . . . . . . . . . . . . . . . . . . . . . . . . . . . . . . . . . . . 133
Original Type . . . . . . . . . . . . . . . . . . . . . . . . . . . . . . . . . . . . . . . . . . . . . . . . . . . . . . 133
Using Special Copy Features . . . . . . . . . . . . . . . . . . . . . . . . . . . . . . . . . . . . . . . . . . . . 134
ECO Copying . . . . . . . . . . . . . . . . . . . . . . . . . . . . . . . . . . . . . . . . . . . . . . . . . . . . . . 135
Book Copying. . . . . . . . . . . . . . . . . . . . . . . . . . . . . . . . . . . . . . . . . . . . . . . . . . . . . . 135
Collate Copying . . . . . . . . . . . . . . . . . . . . . . . . . . . . . . . . . . . . . . . . . . . . . . . . . . . . 136
Auto Fit Copying . . . . . . . . . . . . . . . . . . . . . . . . . . . . . . . . . . . . . . . . . . . . . . . . . . . 136
Clone Copying . . . . . . . . . . . . . . . . . . . . . . . . . . . . . . . . . . . . . . . . . . . . . . . . . . . . . 137
Poster Copying . . . . . . . . . . . . . . . . . . . . . . . . . . . . . . . . . . . . . . . . . . . . . . . . . . . . 137
ID Copying . . . . . . . . . . . . . . . . . . . . . . . . . . . . . . . . . . . . . . . . . . . . . . . . . . . . . . . . 138
2-up or 4-up copying (N-up) . . . . . . . . . . . . . . . . . . . . . . . . . . . . . . . . . . . . . . . . . 139
Printing Copies on Both Sides of Paper . . . . . . . . . . . . . . . . . . . . . . . . . . . . . . . . . . . 139
Changing the Default Settings . . . . . . . . . . . . . . . . . . . . . . . . . . . . . . . . . . . . . . . . . . . 140
Scanning
Scanning Overview. . . . . . . . . . . . . . . . . . . . . . . . . . . . . . . . . . . . . . . . . . . . . . . . . . . . . 142
9
Page 11

SmarThru Office . . . . . . . . . . . . . . . . . . . . . . . . . . . . . . . . . . . . . . . . . . . . . . . . . . . . . . . 142
Starting SmarThru Office . . . . . . . . . . . . . . . . . . . . . . . . . . . . . . . . . . . . . . . . . . . 142
Using SmarThru Office . . . . . . . . . . . . . . . . . . . . . . . . . . . . . . . . . . . . . . . . . . . . . 143
Scanning Using Dell Scan Manager . . . . . . . . . . . . . . . . . . . . . . . . . . . . . . . . . . . . . 146
About Dell Scan Manager . . . . . . . . . . . . . . . . . . . . . . . . . . . . . . . . . . . . . . . . . . 146
Setting scan information in Dell Scan Manager . . . . . . . . . . . . . . . . . . . . . . . 146
Scanning to a PC Application . . . . . . . . . . . . . . . . . . . . . . . . . . . . . . . . . . . . . . . . . . . 148
Scanning and Sending an Email . . . . . . . . . . . . . . . . . . . . . . . . . . . . . . . . . . . . . . . . . 149
Scanning and Sending to SMB Server. . . . . . . . . . . . . . . . . . . . . . . . . . . . . . . . . . . . 150
Scanning and Sending to FTP Server. . . . . . . . . . . . . . . . . . . . . . . . . . . . . . . . . . . . . 151
Scanning and Sending Custom Email. . . . . . . . . . . . . . . . . . . . . . . . . . . . . . . . . . . . . 152
Scan to Fax Server . . . . . . . . . . . . . . . . . . . . . . . . . . . . . . . . . . . . . . . . . . . . . . . . . . . . . 153
Scanning Using the Windows Image Acquisition (WIA) Driver . . . . . . . . . . . . . . 154
Scanning to the USB Memory . . . . . . . . . . . . . . . . . . . . . . . . . . . . . . . . . . . . . . . . . . . 155
About USB Memory. . . . . . . . . . . . . . . . . . . . . . . . . . . . . . . . . . . . . . . . . . . . . . . . 155
Plugging in a USB memory key . . . . . . . . . . . . . . . . . . . . . . . . . . . . . . . . . . . . . . 155
Scanning Using the Default Settings . . . . . . . . . . . . . . . . . . . . . . . . . . . . . . . . . 156
Changing the Scan Feature Settings . . . . . . . . . . . . . . . . . . . . . . . . . . . . . . . . . 157
10
Managing the USB Memory . . . . . . . . . . . . . . . . . . . . . . . . . . . . . . . . . . . . . . . . . . . . . 158
Deleting an Image File . . . . . . . . . . . . . . . . . . . . . . . . . . . . . . . . . . . . . . . . . . . . . 158
Formatting the USB Memory . . . . . . . . . . . . . . . . . . . . . . . . . . . . . . . . . . . . . . . . 158
Printing from the USB Memory Key . . . . . . . . . . . . . . . . . . . . . . . . . . . . . . . . . . 159
Viewing the USB Memory Status . . . . . . . . . . . . . . . . . . . . . . . . . . . . . . . . . . . . 159
Scan to Email Setup. . . . . . . . . . . . . . . . . . . . . . . . . . . . . . . . . . . . . . . . . . . . . . . . . . . . 160
Setting up the Email Account . . . . . . . . . . . . . . . . . . . . . . . . . . . . . . . . . . . . . . . 160
Scanning by a network connection . . . . . . . . . . . . . . . . . . . . . . . . . . . . . . . . . . . . . . 161
Preparing for network scanning . . . . . . . . . . . . . . . . . . . . . . . . . . . . . . . . . . . . . 161
Setting up Address Book . . . . . . . . . . . . . . . . . . . . . . . . . . . . . . . . . . . . . . . . . . . . . . . 167
Registering local email numbers. . . . . . . . . . . . . . . . . . . . . . . . . . . . . . . . . . . . . 167
Adding an E-mail Address to Address Book . . . . . . . . . . . . . . . . . . . . . . . . . . . 167
Editing or Deleting an E-mail Address . . . . . . . . . . . . . . . . . . . . . . . . . . . . . . . . 167
Group Numbers. . . . . . . . . . . . . . . . . . . . . . . . . . . . . . . . . . . . . . . . . . . . . . . . . . . . . . . . 168
Configuring group email numbers. . . . . . . . . . . . . . . . . . . . . . . . . . . . . . . . . . . . 168
Assigning Email Addresses to a Group Number . . . . . . . . . . . . . . . . . . . . . . . 168
Page 12

Deleting a Group Number . . . . . . . . . . . . . . . . . . . . . . . . . . . . . . . . . . . . . . . . . . . 169
Editing Group Numbers . . . . . . . . . . . . . . . . . . . . . . . . . . . . . . . . . . . . . . . . . . . . . 169
Printing Address Book . . . . . . . . . . . . . . . . . . . . . . . . . . . . . . . . . . . . . . . . . . . . . . 170
Changing Default Settings. . . . . . . . . . . . . . . . . . . . . . . . . . . . . . . . . . . . . . . . . . . . . . . 170
Networking
About Sharing the Printer on a Network . . . . . . . . . . . . . . . . . . . . . . . . . . . . . . . . . . 172
Locally-shared Printer . . . . . . . . . . . . . . . . . . . . . . . . . . . . . . . . . . . . . . . . . . . . . . 172
Wired Network-connected Printer . . . . . . . . . . . . . . . . . . . . . . . . . . . . . . . . . . . 172
Printing Across a Network . . . . . . . . . . . . . . . . . . . . . . . . . . . . . . . . . . . . . . . . . . 172
Setting Up the Locally Shared Printer. . . . . . . . . . . . . . . . . . . . . . . . . . . . . . . . . . . . . 172
In Windows 2000/XP/Server 2003/Server 2008/Vista/ 7/ Server 2008 R2. . . . 172
Setting Up a Network-connected Printer. . . . . . . . . . . . . . . . . . . . . . . . . . . . . . . . . . 176
1 Via Network Administration Programs . . . . . . . . . . . . . . . . . . . . . . . . . . . . . . 176
2 Via the Operator Panel . . . . . . . . . . . . . . . . . . . . . . . . . . . . . . . . . . . . . . . . . . . . 176
Faxing
Setting the Printer ID . . . . . . . . . . . . . . . . . . . . . . . . . . . . . . . . . . . . . . . . . . . . . . . . . . . 182
Setting the Time and Date . . . . . . . . . . . . . . . . . . . . . . . . . . . . . . . . . . . . . . . . . . . . . . . 182
Setting Daylight Savings Time . . . . . . . . . . . . . . . . . . . . . . . . . . . . . . . . . . . . . . . . . . . 183
Changing the Clock Mode . . . . . . . . . . . . . . . . . . . . . . . . . . . . . . . . . . . . . . . . . . . . . . . 183
Setting Sounds. . . . . . . . . . . . . . . . . . . . . . . . . . . . . . . . . . . . . . . . . . . . . . . . . . . . . . . . . 184
Speaker, Ringer, Dial Tone, Fault, Conflict, and Selection . . . . . . . . . . . . . . . . 184
Toll Save Mode . . . . . . . . . . . . . . . . . . . . . . . . . . . . . . . . . . . . . . . . . . . . . . . . . . . . . . . . 184
Setting up the Fax System . . . . . . . . . . . . . . . . . . . . . . . . . . . . . . . . . . . . . . . . . . . . . . . 185
Changing the Fax Setup Options . . . . . . . . . . . . . . . . . . . . . . . . . . . . . . . . . . . . . 185
Available Fax Defaults Options. . . . . . . . . . . . . . . . . . . . . . . . . . . . . . . . . . . . . . . 185
Testing Fax line connection . . . . . . . . . . . . . . . . . . . . . . . . . . . . . . . . . . . . . . . . . 187
Sending a Fax. . . . . . . . . . . . . . . . . . . . . . . . . . . . . . . . . . . . . . . . . . . . . . . . . . . . . . . . . . 188
Adjusting the Document Contrast . . . . . . . . . . . . . . . . . . . . . . . . . . . . . . . . . . . . 188
Adjusting the Document Resolution . . . . . . . . . . . . . . . . . . . . . . . . . . . . . . . . . . 188
Sending a Fax Manually . . . . . . . . . . . . . . . . . . . . . . . . . . . . . . . . . . . . . . . . . . . . 189
11
Page 13

Sending a Fax Automatically . . . . . . . . . . . . . . . . . . . . . . . . . . . . . . . . . . . . . . . . 190
Sending a Fax Directly . . . . . . . . . . . . . . . . . . . . . . . . . . . . . . . . . . . . . . . . . . . . . 191
Confirming Transmissions . . . . . . . . . . . . . . . . . . . . . . . . . . . . . . . . . . . . . . . . . . 191
Automatic Redialing . . . . . . . . . . . . . . . . . . . . . . . . . . . . . . . . . . . . . . . . . . . . . . . 192
Redialing fax number . . . . . . . . . . . . . . . . . . . . . . . . . . . . . . . . . . . . . . . . . . . . . . 192
Receiving a Fax . . . . . . . . . . . . . . . . . . . . . . . . . . . . . . . . . . . . . . . . . . . . . . . . . . . . . . . 192
About Receiving Modes . . . . . . . . . . . . . . . . . . . . . . . . . . . . . . . . . . . . . . . . . . . . 192
Loading Paper for Receiving Faxes . . . . . . . . . . . . . . . . . . . . . . . . . . . . . . . . . . 193
Receiving Automatically in the Fax Mode . . . . . . . . . . . . . . . . . . . . . . . . . . . . . 193
Receiving Manually in the Tel Mode . . . . . . . . . . . . . . . . . . . . . . . . . . . . . . . . . 193
Receiving Automatically in the Ans/Fax Mode. . . . . . . . . . . . . . . . . . . . . . . . . 193
Receiving Manually Using an Extension Telephone . . . . . . . . . . . . . . . . . . . . 193
Receiving Faxes Using the DRPD Mode . . . . . . . . . . . . . . . . . . . . . . . . . . . . . . 194
Receiving Faxes in the Memory . . . . . . . . . . . . . . . . . . . . . . . . . . . . . . . . . . . . . 195
Automatic Dialing . . . . . . . . . . . . . . . . . . . . . . . . . . . . . . . . . . . . . . . . . . . . . . . . . . . . . 195
Speed Dialing . . . . . . . . . . . . . . . . . . . . . . . . . . . . . . . . . . . . . . . . . . . . . . . . . . . . . 195
Group Dialing . . . . . . . . . . . . . . . . . . . . . . . . . . . . . . . . . . . . . . . . . . . . . . . . . . . . . 197
Searching for a Number in the Memory . . . . . . . . . . . . . . . . . . . . . . . . . . . . . . 200
Printing a Phonebook List. . . . . . . . . . . . . . . . . . . . . . . . . . . . . . . . . . . . . . . . . . . 201
Other Ways to Fax. . . . . . . . . . . . . . . . . . . . . . . . . . . . . . . . . . . . . . . . . . . . . . . . . . . . . . 201
Sending a Delayed Fax . . . . . . . . . . . . . . . . . . . . . . . . . . . . . . . . . . . . . . . . . . . . . 201
Sending a Priority Fax . . . . . . . . . . . . . . . . . . . . . . . . . . . . . . . . . . . . . . . . . . . . . . 202
Adding Documents to a Scheduled Fax. . . . . . . . . . . . . . . . . . . . . . . . . . . . . . . 203
Canceling a Scheduled Fax . . . . . . . . . . . . . . . . . . . . . . . . . . . . . . . . . . . . . . . . . 203
Fax Forward to E-mail addresses . . . . . . . . . . . . . . . . . . . . . . . . . . . . . . . . . . . . 204
12
Additional Features . . . . . . . . . . . . . . . . . . . . . . . . . . . . . . . . . . . . . . . . . . . . . . . . . . . . 205
Using the Secure Receiving Mode . . . . . . . . . . . . . . . . . . . . . . . . . . . . . . . . . . . 205
Printing Reports . . . . . . . . . . . . . . . . . . . . . . . . . . . . . . . . . . . . . . . . . . . . . . . . . . . 206
Using Advanced Fax Settings . . . . . . . . . . . . . . . . . . . . . . . . . . . . . . . . . . . . . . . 208
Fax Data Back-up. . . . . . . . . . . . . . . . . . . . . . . . . . . . . . . . . . . . . . . . . . . . . . . . . . . . . . 211
Page 14

Macintosh
Installing Software for Macintosh. . . . . . . . . . . . . . . . . . . . . . . . . . . . . . . . . . . . . . . . 214
Install the printer driver . . . . . . . . . . . . . . . . . . . . . . . . . . . . . . . . . . . . . . . . . . . . . 214
UnInstall the printer driver . . . . . . . . . . . . . . . . . . . . . . . . . . . . . . . . . . . . . . . . . . 215
Install the Scan driver . . . . . . . . . . . . . . . . . . . . . . . . . . . . . . . . . . . . . . . . . . . . . . 215
UnInstall the scan driver . . . . . . . . . . . . . . . . . . . . . . . . . . . . . . . . . . . . . . . . . . . . 215
Setting Up the Printer . . . . . . . . . . . . . . . . . . . . . . . . . . . . . . . . . . . . . . . . . . . . . . . . . . . 216
For a Network-connected Macintosh. . . . . . . . . . . . . . . . . . . . . . . . . . . . . . . . . 216
For a USB-connected Macintosh . . . . . . . . . . . . . . . . . . . . . . . . . . . . . . . . . . . . 217
Printing . . . . . . . . . . . . . . . . . . . . . . . . . . . . . . . . . . . . . . . . . . . . . . . . . . . . . . . . . . . . . . . 218
Printing a Document. . . . . . . . . . . . . . . . . . . . . . . . . . . . . . . . . . . . . . . . . . . . . . . . 218
Changing Printer Settings . . . . . . . . . . . . . . . . . . . . . . . . . . . . . . . . . . . . . . . . . . . 218
Printing Multiple Pages on One Sheet of Paper . . . . . . . . . . . . . . . . . . . . . . . . 219
Duplex Printing . . . . . . . . . . . . . . . . . . . . . . . . . . . . . . . . . . . . . . . . . . . . . . . . . . . . 220
Scanning . . . . . . . . . . . . . . . . . . . . . . . . . . . . . . . . . . . . . . . . . . . . . . . . . . . . . . . . . . . . . . 222
Linux
Getting Started. . . . . . . . . . . . . . . . . . . . . . . . . . . . . . . . . . . . . . . . . . . . . . . . . . . . . . . . . 224
Installing the MFP Driver. . . . . . . . . . . . . . . . . . . . . . . . . . . . . . . . . . . . . . . . . . . . . . . . 224
System Requirements . . . . . . . . . . . . . . . . . . . . . . . . . . . . . . . . . . . . . . . . . . . . . . 224
Installing the MFP Driver. . . . . . . . . . . . . . . . . . . . . . . . . . . . . . . . . . . . . . . . . . . . 225
Uninstalling the MFP Driver . . . . . . . . . . . . . . . . . . . . . . . . . . . . . . . . . . . . . . . . . 231
Using the Unified Driver Configurator. . . . . . . . . . . . . . . . . . . . . . . . . . . . . . . . . . . . . 232
Printers Configuration . . . . . . . . . . . . . . . . . . . . . . . . . . . . . . . . . . . . . . . . . . . . . . 233
Scanners Configuration. . . . . . . . . . . . . . . . . . . . . . . . . . . . . . . . . . . . . . . . . . . . . 235
MFP Ports Configuration . . . . . . . . . . . . . . . . . . . . . . . . . . . . . . . . . . . . . . . . . . . . 236
Configuring Printer Properties . . . . . . . . . . . . . . . . . . . . . . . . . . . . . . . . . . . . . . . . . . . 237
Printing a Document . . . . . . . . . . . . . . . . . . . . . . . . . . . . . . . . . . . . . . . . . . . . . . . . . . . . 238
Printing from Applications. . . . . . . . . . . . . . . . . . . . . . . . . . . . . . . . . . . . . . . . . . . 238
Printing Files . . . . . . . . . . . . . . . . . . . . . . . . . . . . . . . . . . . . . . . . . . . . . . . . . . . . . . 240
Scanning a Document . . . . . . . . . . . . . . . . . . . . . . . . . . . . . . . . . . . . . . . . . . . . . . . . . . 240
Using the Image Editor. . . . . . . . . . . . . . . . . . . . . . . . . . . . . . . . . . . . . . . . . . . . . . 243
13
Page 15

Maintenance
Clearing the printer NVRAM . . . . . . . . . . . . . . . . . . . . . . . . . . . . . . . . . . . . . . . . . . . . 246
Backing up Data . . . . . . . . . . . . . . . . . . . . . . . . . . . . . . . . . . . . . . . . . . . . . . . . . . . . . . . 247
Backing up Data. . . . . . . . . . . . . . . . . . . . . . . . . . . . . . . . . . . . . . . . . . . . . . . . . . . 247
Restoring Data . . . . . . . . . . . . . . . . . . . . . . . . . . . . . . . . . . . . . . . . . . . . . . . . . . . . 247
Cleaning Your Printer . . . . . . . . . . . . . . . . . . . . . . . . . . . . . . . . . . . . . . . . . . . . . . . . . . 248
Cleaning the Exterior. . . . . . . . . . . . . . . . . . . . . . . . . . . . . . . . . . . . . . . . . . . . . . . 248
Cleaning the Interior . . . . . . . . . . . . . . . . . . . . . . . . . . . . . . . . . . . . . . . . . . . . . . . 248
Cleaning the scanner . . . . . . . . . . . . . . . . . . . . . . . . . . . . . . . . . . . . . . . . . . . . . . 251
Maintaining the Toner Cartridge . . . . . . . . . . . . . . . . . . . . . . . . . . . . . . . . . . . . . . . . . 252
Storing the Toner Cartridge . . . . . . . . . . . . . . . . . . . . . . . . . . . . . . . . . . . . . . . . . 252
Redistributing Toner . . . . . . . . . . . . . . . . . . . . . . . . . . . . . . . . . . . . . . . . . . . . . . . 252
Replacing the Toner Cartridge. . . . . . . . . . . . . . . . . . . . . . . . . . . . . . . . . . . . . . . 254
Cleaning the Drum . . . . . . . . . . . . . . . . . . . . . . . . . . . . . . . . . . . . . . . . . . . . . . . . . 256
Replacement Parts. . . . . . . . . . . . . . . . . . . . . . . . . . . . . . . . . . . . . . . . . . . . . . . . . . . . . 256
Ordering Supplies . . . . . . . . . . . . . . . . . . . . . . . . . . . . . . . . . . . . . . . . . . . . . . . . . . . . . 257
Troubleshooting
14
Clearing Jams in the DADF. . . . . . . . . . . . . . . . . . . . . . . . . . . . . . . . . . . . . . . . . . . . . . 260
Clearing Jams in the Paper Tray . . . . . . . . . . . . . . . . . . . . . . . . . . . . . . . . . . . . . . . . . 264
Paper Feed Jam (tray 1) . . . . . . . . . . . . . . . . . . . . . . . . . . . . . . . . . . . . . . . . . . . . 265
Paper Feed Jam (optional tray 2) . . . . . . . . . . . . . . . . . . . . . . . . . . . . . . . . . . . . 266
MPF Jam . . . . . . . . . . . . . . . . . . . . . . . . . . . . . . . . . . . . . . . . . . . . . . . . . . . . . . . . . 268
Fuser Area Jam . . . . . . . . . . . . . . . . . . . . . . . . . . . . . . . . . . . . . . . . . . . . . . . . . . . 268
Paper Exit Jam . . . . . . . . . . . . . . . . . . . . . . . . . . . . . . . . . . . . . . . . . . . . . . . . . . . . 269
Duplex Jam . . . . . . . . . . . . . . . . . . . . . . . . . . . . . . . . . . . . . . . . . . . . . . . . . . . . . . . 273
Tips for Avoiding Paper Jams . . . . . . . . . . . . . . . . . . . . . . . . . . . . . . . . . . . . . . . 275
Clearing LCD Error Messages . . . . . . . . . . . . . . . . . . . . . . . . . . . . . . . . . . . . . . . . . . . 276
Solving Problems . . . . . . . . . . . . . . . . . . . . . . . . . . . . . . . . . . . . . . . . . . . . . . . . . . . . . . 282
Paper Feeding Problems . . . . . . . . . . . . . . . . . . . . . . . . . . . . . . . . . . . . . . . . . . . 282
Printing Problems . . . . . . . . . . . . . . . . . . . . . . . . . . . . . . . . . . . . . . . . . . . . . . . . . 283
Printing Quality Problems. . . . . . . . . . . . . . . . . . . . . . . . . . . . . . . . . . . . . . . . . . . 285
Page 16

Fax Problems . . . . . . . . . . . . . . . . . . . . . . . . . . . . . . . . . . . . . . . . . . . . . . . . . . . . . . 290
Copying Problems. . . . . . . . . . . . . . . . . . . . . . . . . . . . . . . . . . . . . . . . . . . . . . . . . . 292
Scanning Problems . . . . . . . . . . . . . . . . . . . . . . . . . . . . . . . . . . . . . . . . . . . . . . . . 293
Global address problems. . . . . . . . . . . . . . . . . . . . . . . . . . . . . . . . . . . . . . . . . . . . 294
Common Windows Problems . . . . . . . . . . . . . . . . . . . . . . . . . . . . . . . . . . . . . . . . 294
Common Linux Problems . . . . . . . . . . . . . . . . . . . . . . . . . . . . . . . . . . . . . . . . . . . . 295
Common Macintosh Problems . . . . . . . . . . . . . . . . . . . . . . . . . . . . . . . . . . . . . . . 297
Troubleshooting PostScript (PS) Errors . . . . . . . . . . . . . . . . . . . . . . . . . . . . . . . 298
Installing Accessories
Precautions When Installing Printer Accessories . . . . . . . . . . . . . . . . . . . . . . . . . . 300
Installing Printer Memory . . . . . . . . . . . . . . . . . . . . . . . . . . . . . . . . . . . . . . . . . . . . . . . 300
Installing an Optional Tray 2 . . . . . . . . . . . . . . . . . . . . . . . . . . . . . . . . . . . . . . . . . . . . . 302
Installing Wireless Network interface card . . . . . . . . . . . . . . . . . . . . . . . . . . . . . . . 304
Specifications
General Specifications . . . . . . . . . . . . . . . . . . . . . . . . . . . . . . . . . . . . . . . . . . . . . . . . . 306
Scanner and Copier Specifications. . . . . . . . . . . . . . . . . . . . . . . . . . . . . . . . . . . . . . . 307
Printer Specifications . . . . . . . . . . . . . . . . . . . . . . . . . . . . . . . . . . . . . . . . . . . . . . . . . . 309
Facsimile Specifications . . . . . . . . . . . . . . . . . . . . . . . . . . . . . . . . . . . . . . . . . . . . . . . . 311
Paper Specifications . . . . . . . . . . . . . . . . . . . . . . . . . . . . . . . . . . . . . . . . . . . . . . . . . . . 312
Overview . . . . . . . . . . . . . . . . . . . . . . . . . . . . . . . . . . . . . . . . . . . . . . . . . . . . . . . . . 312
Guidelines for Using Paper . . . . . . . . . . . . . . . . . . . . . . . . . . . . . . . . . . . . . . . . . . 314
Paper Specifications . . . . . . . . . . . . . . . . . . . . . . . . . . . . . . . . . . . . . . . . . . . . . . . 315
Paper Output Capacity. . . . . . . . . . . . . . . . . . . . . . . . . . . . . . . . . . . . . . . . . . . . . . 315
Printer and Paper Storage Environment. . . . . . . . . . . . . . . . . . . . . . . . . . . . . . . 315
15
Page 17

16
Page 18
Unpacking Your Printer
1
Select a location for your printer.
CAUTION: The printer requires at least two people to lift it safely.
• Leave enough room to open the printer tray, covers, doors, and options. It is also
important to allow enough space around the printer for proper ventilation.
• Provide the proper environment:
• A firm, level surface.
• Away from the direct airflow of air conditioners, heaters, or ventilators.
• Away from sunlight, extreme humidity, or high fluctuations in temperature.
• A clean, dry, and dust free lowcation.
• Select a level, stable place with adequate space for air circulation. See "
hardware".
• Do not set the machine close to the edge of your desk or table.
NOTE: Leave the printer in the box until you are ready to install it.
2
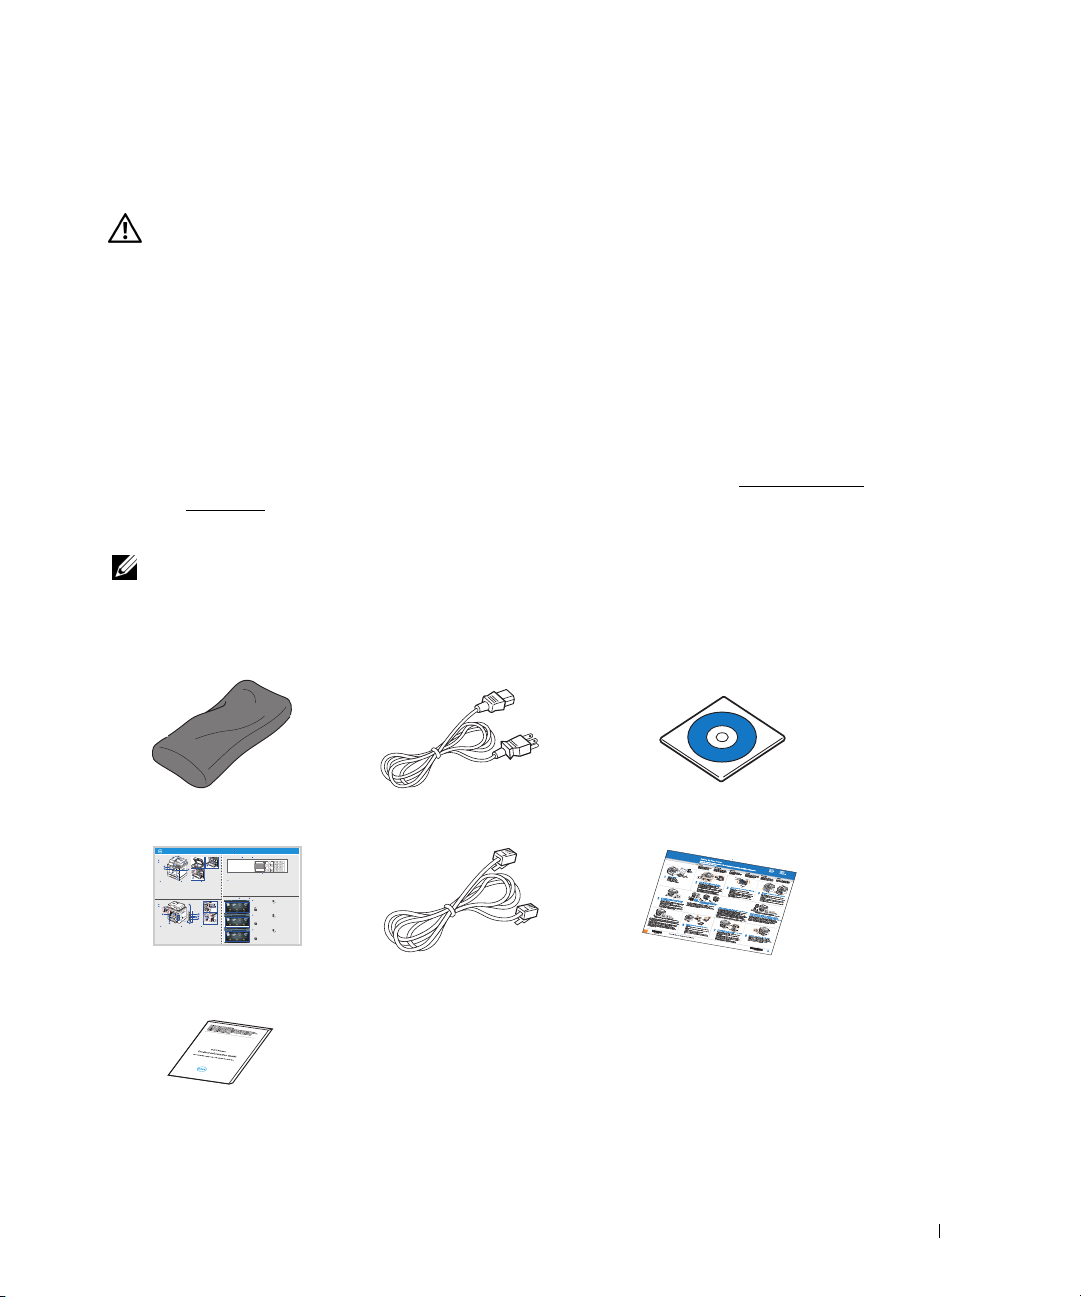
In addition to the
Dell 2355dn Laser MFP
, ensure that you have the following items in
the box. If there is a missing item, contact Dell:
Setting up the
Toner cartridge
Quick Reference Guide
Dell 2355dn MFP Quick Reference Guide
1
Front
Front
Front
5
11
12
Front
7
1
1. DADF
2. Document width guides
3. Document input tray
4. Document output tray
5. Operator panel
6. Output tray (face down)
7. MPF (Multi purpose feeder)
8. Front cover
9. Tray 1
10. Optional tray 2
11. USB memory port
12. Paper output extension
13. Document glass
14. Toner cartridge
15. Express ervice code
Back
Back
Back
10
7
9
8
1. USB port
2. Locking slot
3. Network port
4. Optional tray 2 cable
connector
5. Telephone line socket (Line)
6. Extension telephone socket (EXT)
7. Rear door
8. Power receptacle
9. Power switch
10. Express ervice code
11. Optional memory
12. Optional wireless card
Quick Reference Guide
2
3
4
6
8
9
15
10
1. DADF
2. Document width guides
3. Document input tray
4. Document output tray
5. Operator panel
6. Output tray (face down)
7. MPF (Multi purpose feeder)
8. Front cover
9. Tray 1
10. Optional tray 2
11. USB memory port
12. Paper output extension
13. Document glass
14. Toner cartridge
15. Express ervice code
1
6
1. USB port
2. Locking slot
3. Network port
4. Optional tray 2 cable
connector
5. Telephone line socket (Line)
6. Extension telephone socket (EXT)
7. Rear door
8. Power receptacle
9. Power switch
10. Express ervice code
11. Optional memory
12. Optional wireless card
Operator Panel
Operator Panel
lenaP rotarepO
13
14
1. LCD: Display.
1. LCD: Display.
2. Status LED: Shows the status of your machine.
2. Status LED: Shows the status of your machine.
3. Job Status button: Shows the jobs.
3. Job Status button: Shows the jobs.
4. M/C Setup button: Leads you to the machine setup and advanced settings.
4. M/C Setup button: Leads you to the machine setup and advanced settings.
5 Start button: Initiate operation.
5 Start button: Initiate operation.
6. Cancel button: Cancel displayed operation.
6. Cancel button: Cancel displayed operation.
1. LCD: Display.
1. DADF
2. Status LED: Shows the status of your machine.
2. Document width guides
3. Job Status button: Shows the jobs.
3. Document input tray
4. M/C Setup button: Leads you to the machine setup and advanced settings.
4. Document output tray
5 Start button: Initiate operation.
5. Operator panel
6. Cancel button: Cancel displayed operation.
6. Output tray (face down)
7. MPF (Multi purpose feeder)
8. Front cover
9. Tray 1
10. Optional tray 2
11. USB memory port
12. Paper output extension
13. Document glass
14. Toner cartridge
15. Express ervice code
Touch Screen
Touch Screen
Touch Screen
1.
Copy: Enters the copy menu.
8. : Return to the upper menu.
2. Fax: Enters the fax menu.
3. Scan: Enters the scan menu.
4. Setup: Enters the advanced settings.
5. None: You can set the option which is frequently uses on
main screen. Also you can change shortcut name as well.
6. : Shows the main screen.
7. : Enters the LCD brightness, the USB memory,
language, and job status.
1.
Copy: Enters the copy menu.
2. Fax: Enters the fax menu.
3. Scan: Enters the scan menu.
4. Setup: Enters the advanced settings.
5. None: You can set the option which is frequently uses on
main screen. Also you can change shortcut name as well.
6. : Shows the main screen.
7. : Enters the LCD brightness, the USB memory,
language, and job status.
9. : Scroll through available options.
10. : Start a job.
8. : Return to the upper menu.
9. : Scroll through available options.
10. : Start a job.
8. : Return to the upper menu.
9. : Scroll through available options.
10. : Start a job.
11
2
12
3
4
5
1. USB port
2. Locking slot
3. Network port
4. Optional tray 2 cable
connector
5. Telephone line socket (Line)
6. Extension telephone socket (EXT)
7. Rear door
8. Power receptacle
9. Power switch
10. Express ervice code
11. Optional memory
12. Optional wireless card
Quick Reference Guide
Power cord
c
Telephone line cord
a
Software and Documentation CD
a
Setup diagram
Product Information Guide
a The appearance of the power cord and the telephone line cord may differ according to your country’s
specifications.
b The Software and Documentation CD contains Dell printer drivers, Scan drivers, Printer Settings Utility, Set
IP, Macintosh driver, Linux driver, Dell Toner Management System, SmarThru Office and a User’s Guide.
b
17
Page 19
c Quick Reference Guide may not be provided with your product depending on your country.
NOTE: Use the telephone line cord supplied with your printer. If you choose to use a different cord,
use an AWG #26 or lower gauge cord that is not more than 250 cm (98 inches) in length.
NOTE: The power cord must be plugged into a grounded power socket.
3
Save the carton and packing material in case the printer needs to be repacked.
4
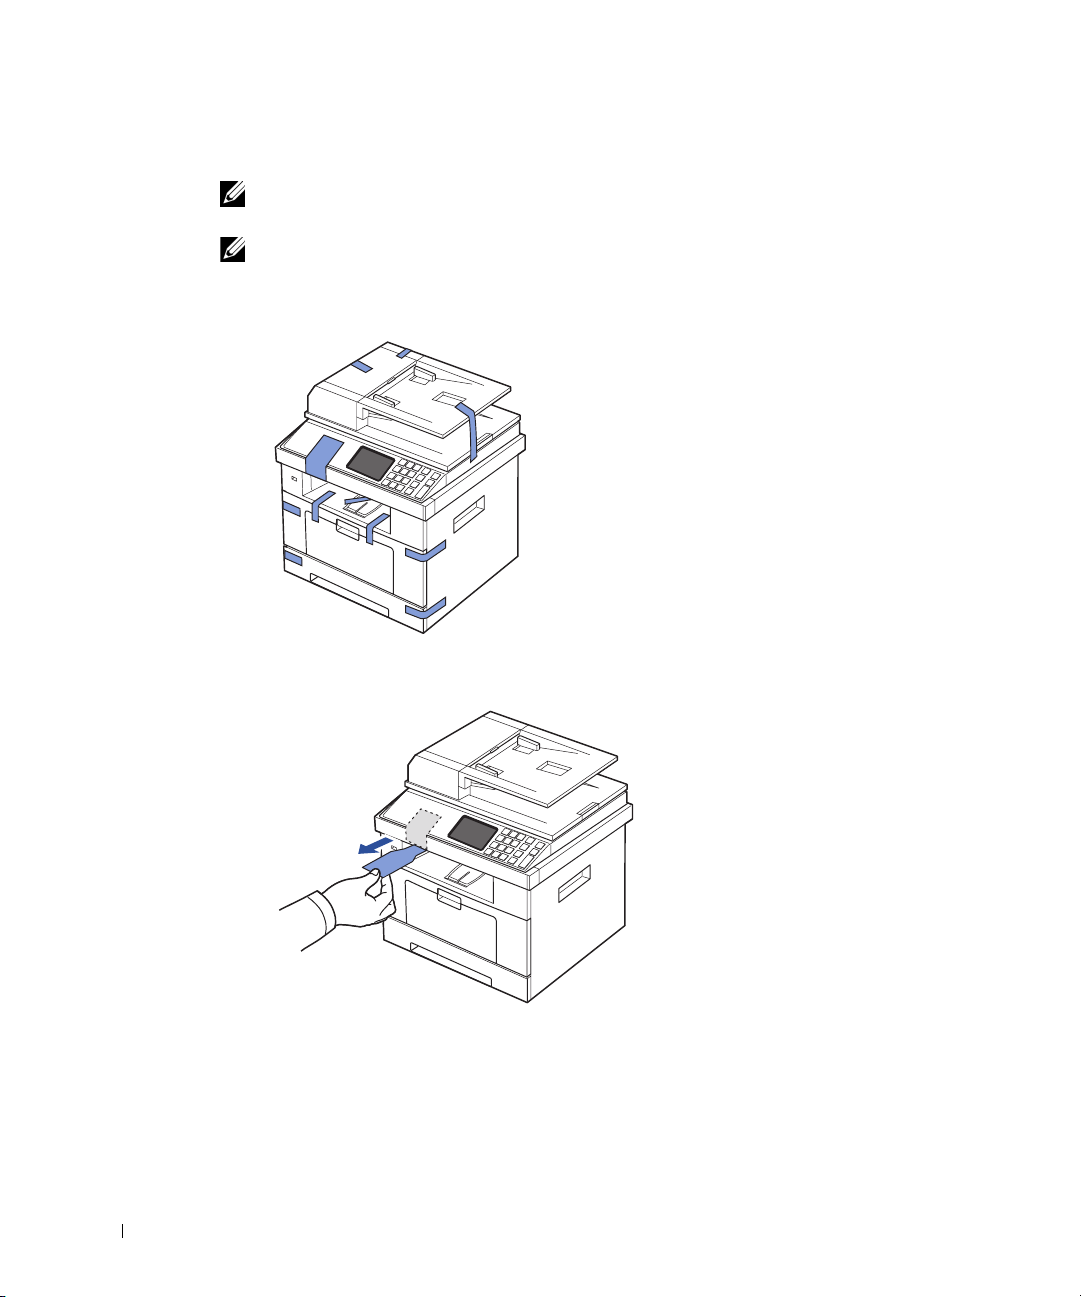
Remove the packing tape from the front, back, and sides of the printer.
5
Remove the label completely from the scanner module by gently pulling it. The scan
unlock switch should move forward to the unlock position as the label is pulled out.
18
Page 20
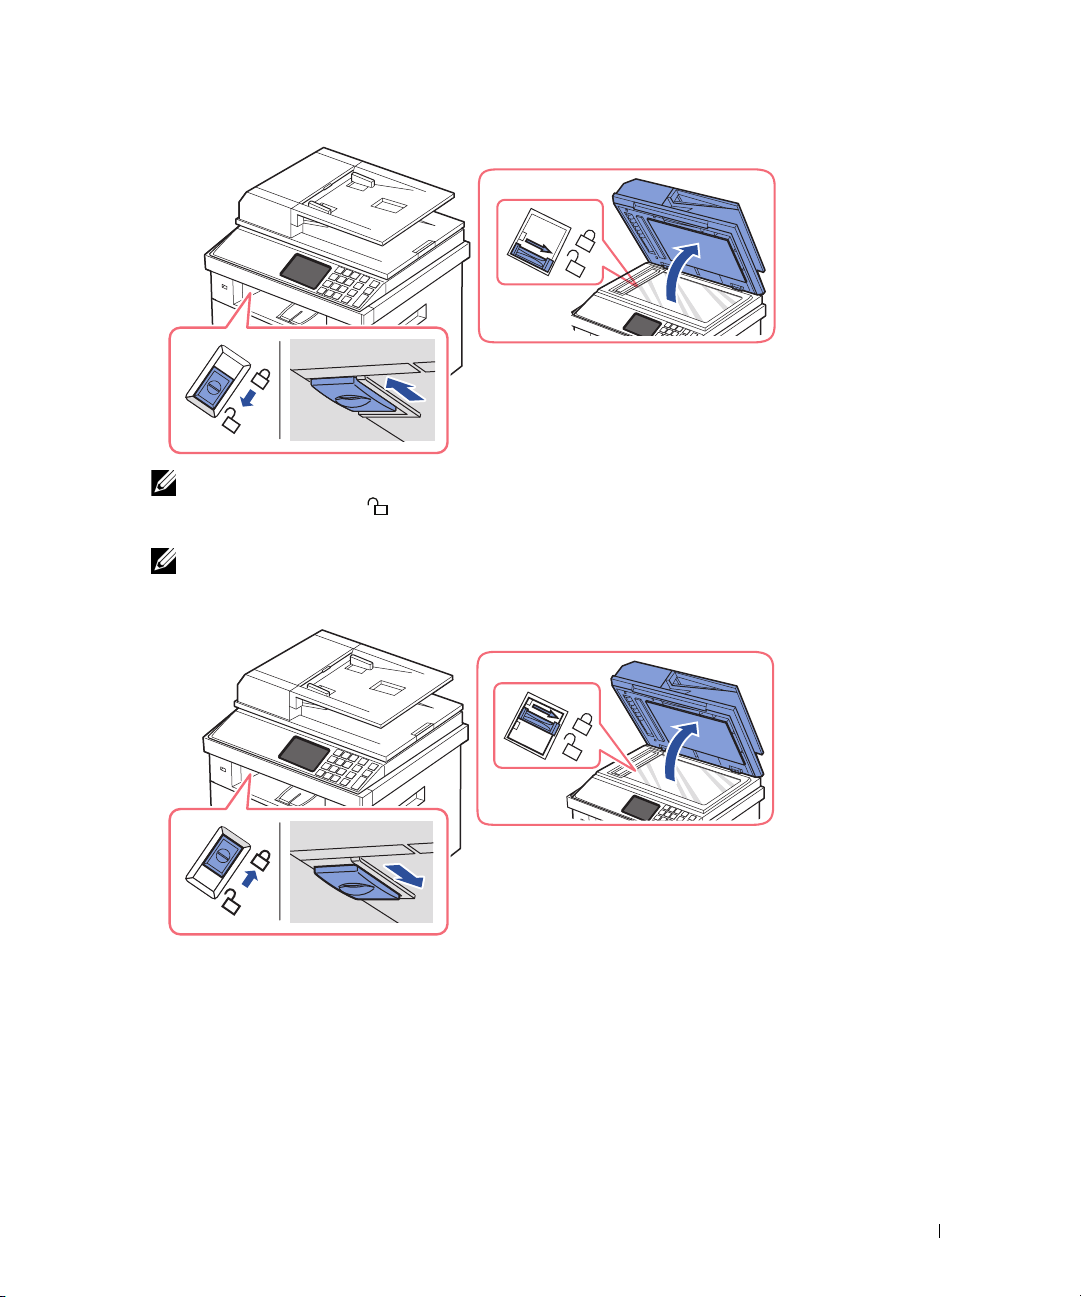
NOTE: To confirm the scanner is unlocked, open the scanner cover and ensure that the blue
latch is in the unlocked ( ) position. If the latch is not in the unlocked position, reach under
the operator panel and pull it forward. If the scan switch is locked, you cannot copy or scan.
NOTE: When you are moving the printer or do not intend to use it for a long period of time,
move the switch BACKWARD to the lock position, as shown.
To scan or copy a document, the switch must be unlocked.
19
Page 21
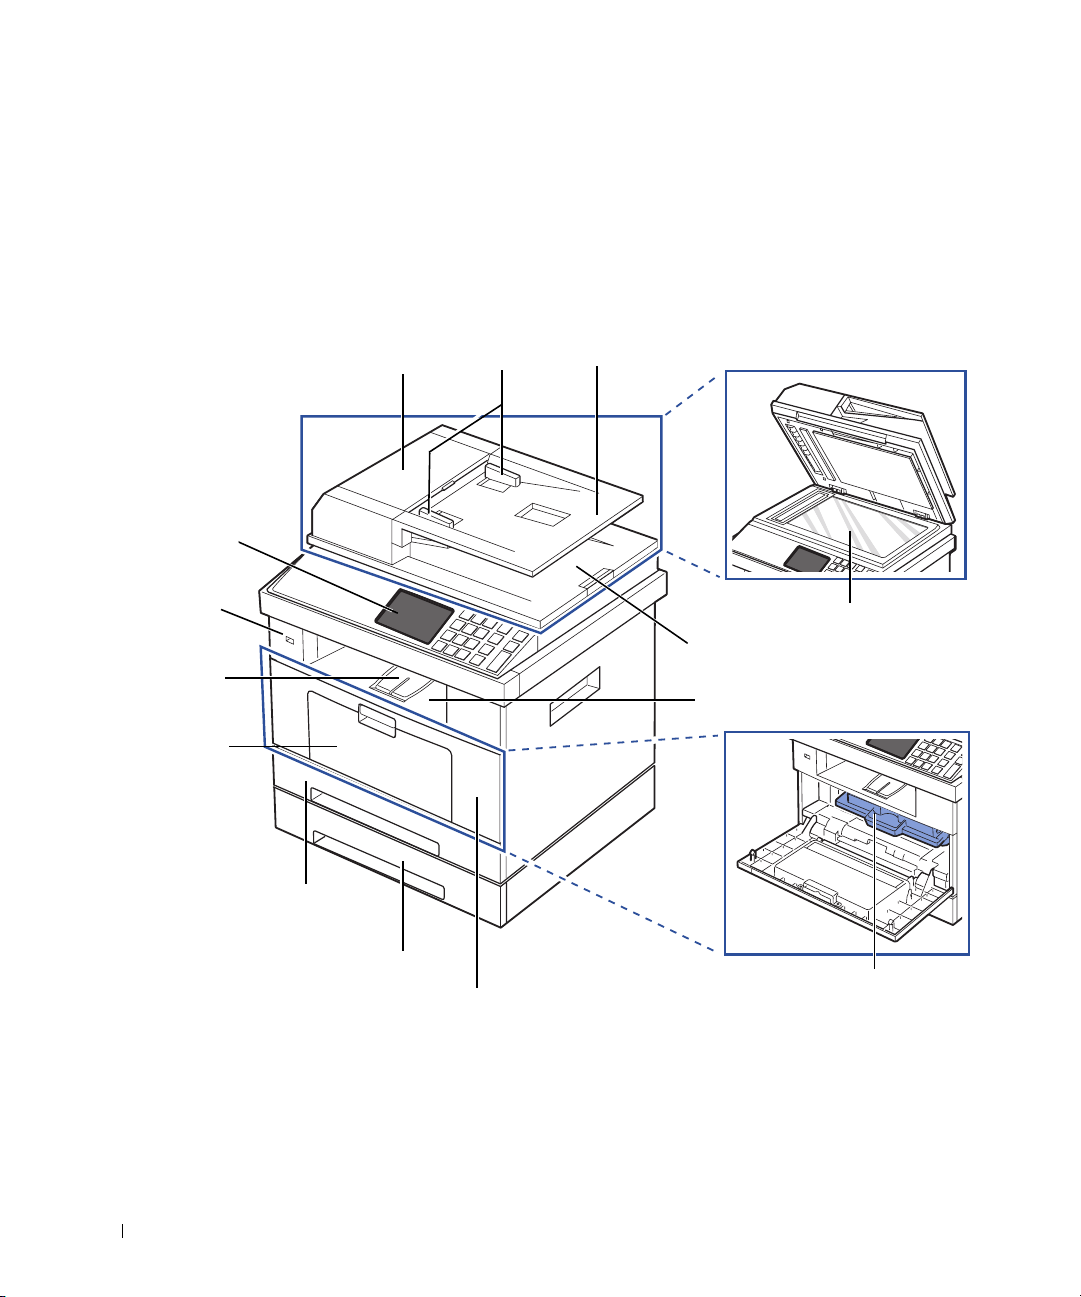
About Your Printer
These are the main components of your printer. The following illustrations show the standard
Dell 2355dn Laser MFP
Front View
and an optional tray 2 attached:
operator panel (See
"Operator Panel
Button Functions".)
USB memory port
paper output
extension
MPF (multi
purpose feeder)
(250-sheet paper feeder)
DADF (Duplex Automatic
Document Feeder) cover
tray 1
document width
guides
document input tray
document glass
document output tray
output tray (face down)
20
optional tray 2
(250-sheet paper feeder)
toner cartridge
front cover
Page 22
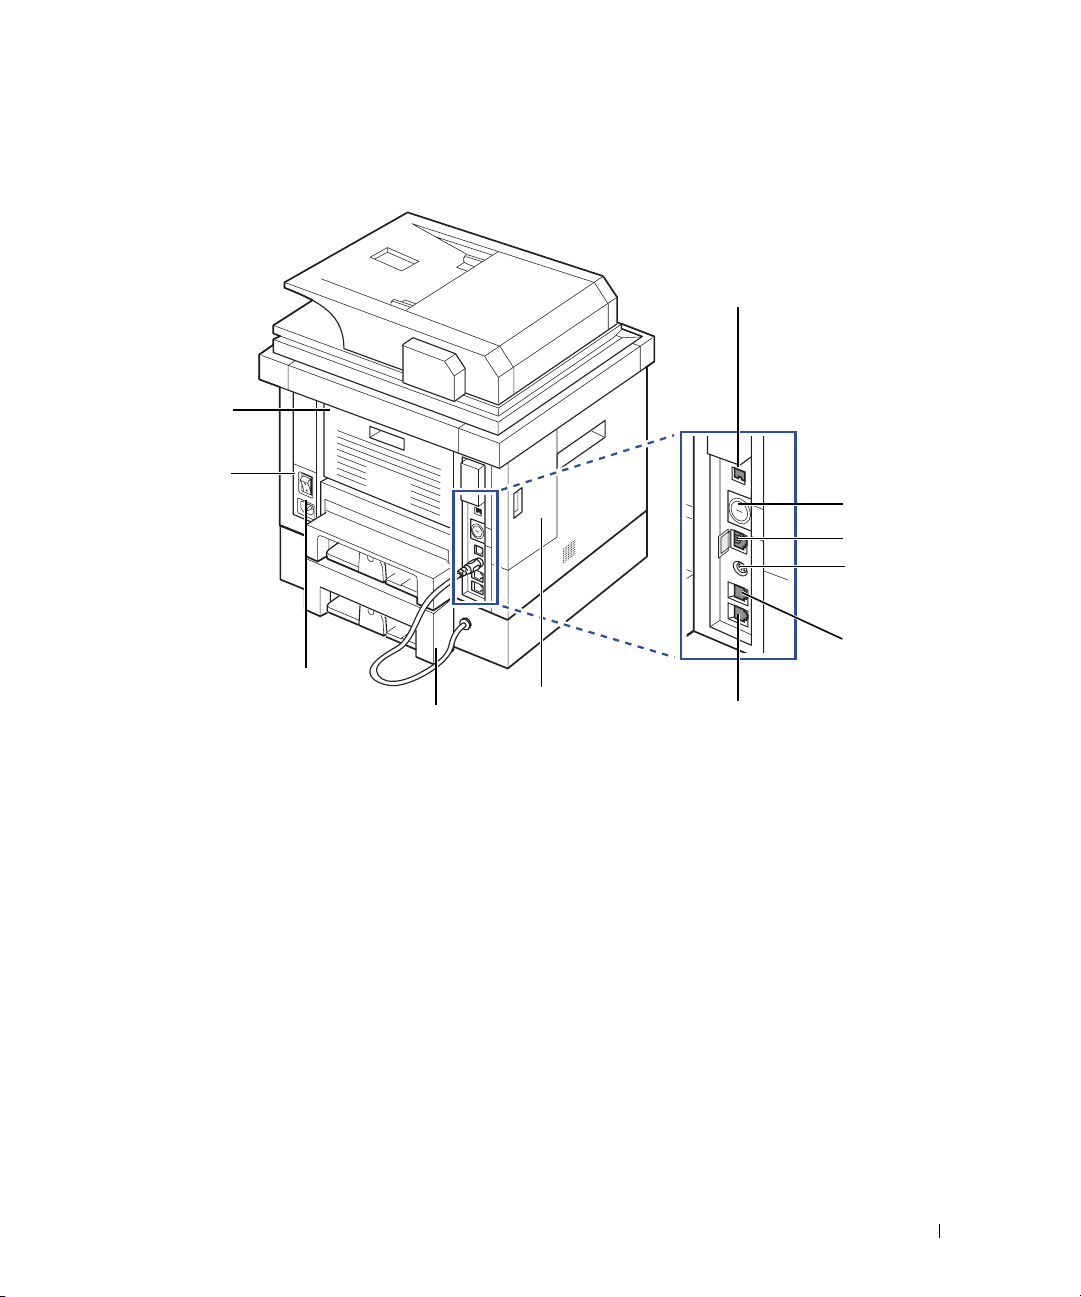
Rear View
rear door
(open for face
up output)
power switch
power receptacle
optional tray 2 cable
control board cover
USB port
locking unit slot
network port
optional tray 2
cable connector
telephone line
socket (Line)
extension telephone socket (EXT)
b
a
a
If you want to connect the extension phone or
answering machine, see "Making Connections".
b
You can purchase a cable lock that completely prevents
access to the control board cover.
21
Page 23
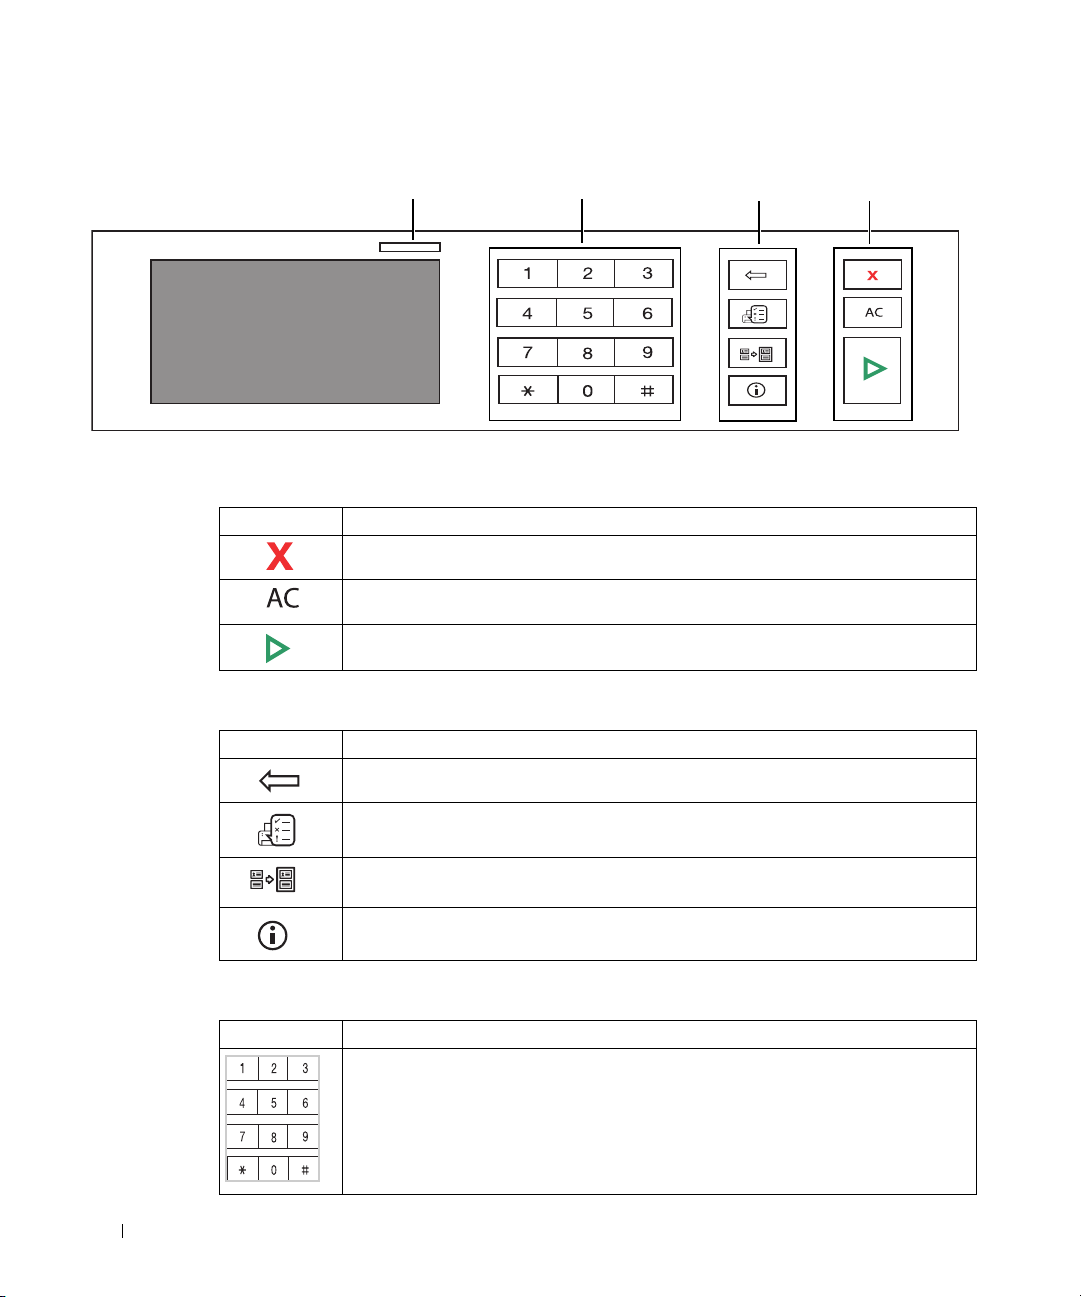
Operator Panel Button Functions
Common Keys
Press: To:
Function Keys
Press: To:
Status LED
Stop an operation at any time, or return to main menu.
Reverts the current setting to the default values.
Start a job.
Deletes characters in the edit area.
Fax keys
Function keys
Common keys
22
Job status shows the jobs currently running and in queue.
You can copy both sides of an ID Card, such as a driver’s license, to a single side of
paper.
Gives detailed information about machine’s info., reports, troubleshooting guide,
and quick reference guide.
Fax Keys
Press: To:
Dial/Enter number.
Page 24
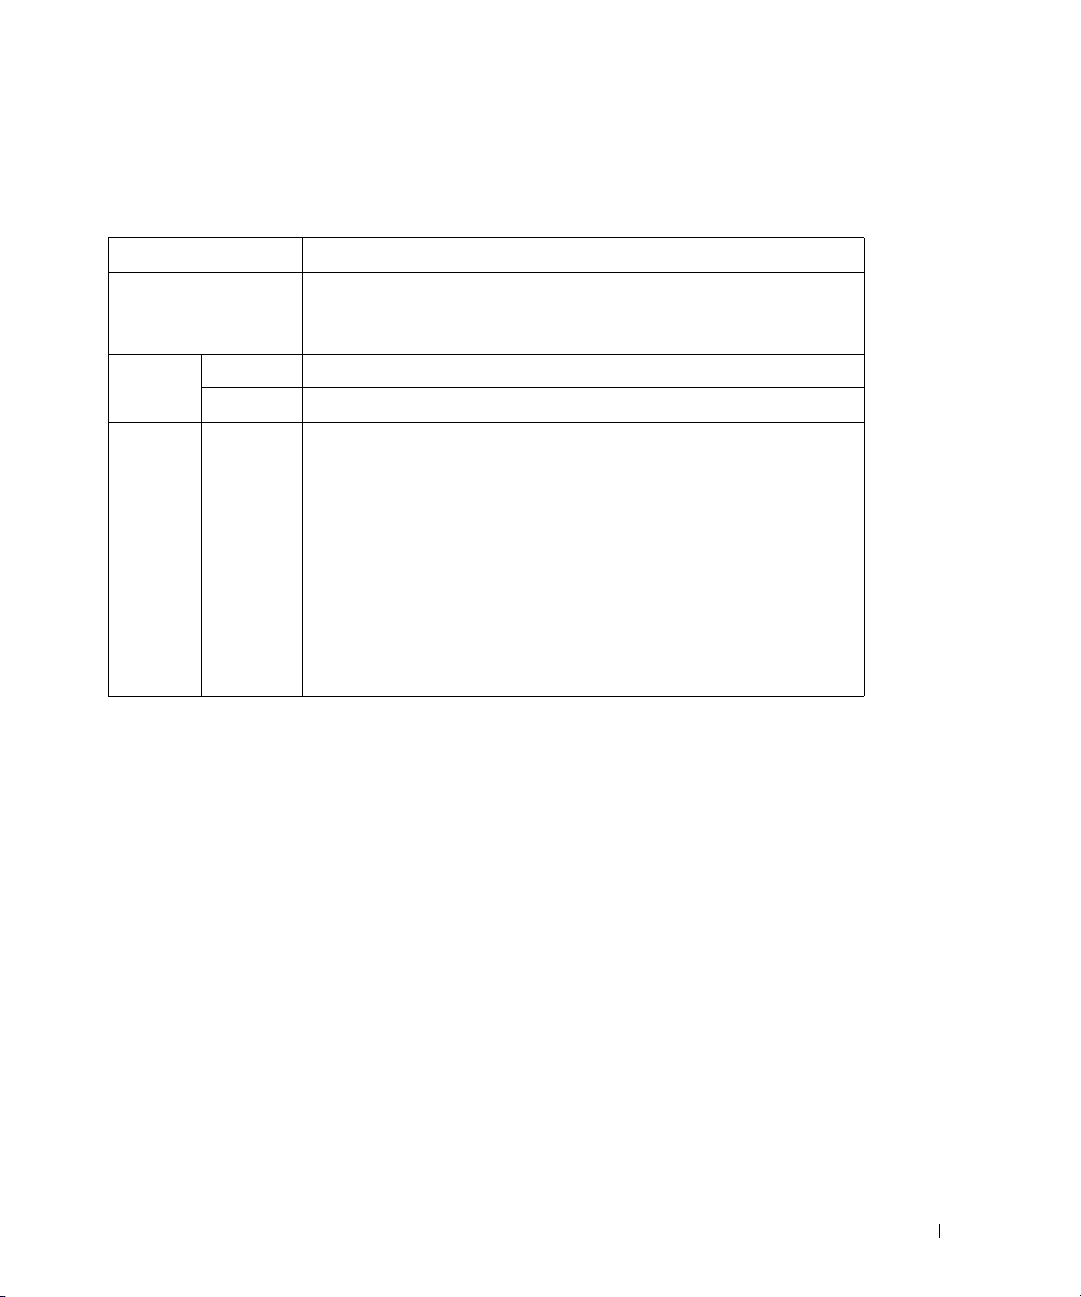
Understanding the Status LED
When the problem occurs, the Status LED indicates the machine's condition by the light
color of it's action.
Status Description
Off
Green Blinking The machine is warming up or ready to receive the data.
On The machine is on-line and can be used.
Orange Blinking
• The machine is off-line.
• The machine is in power save mode. When data is received, or any button
is pressed, it switches to on-line automatically.
• A minor error has occurred and the machine is waiting for the error to be
cleared. Check the display message. When the problem is cleared, the
machine resumes.
• The toner cartridge is low. Order a new toner cartridge. You can
temporarily improve print quality by redistributing the toner.
• The toner cartridge is totally empty. Remove the old toner cartridge and
install a new one.
• A paper jam has occurred.
• There is no paper in the tray. Load paper in the tray.
• The machine has stopped due to a major error. Check the display
message.
23
Page 25
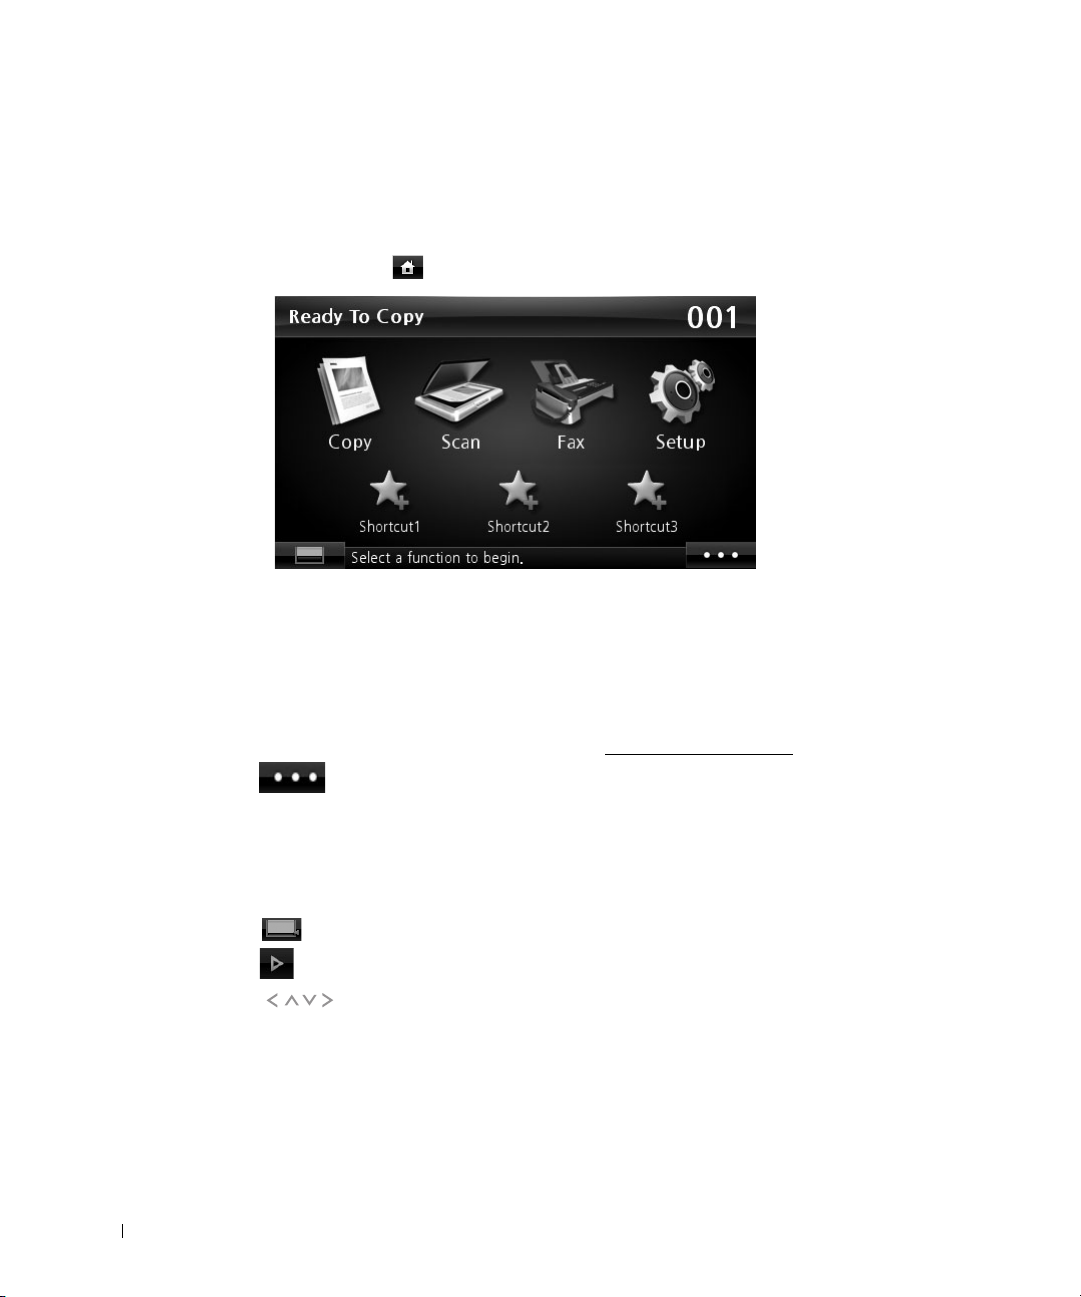
Introducing the Home Screen
Touchscreen
The home screen on the control panel allows user-friendly operation of the machine. Once you
press the home icon ( ) on the screen, it shows the home screen.
•
Copy
: Enters the copy menu.
•
Scan
: Enters the scan menu.
•
Fax
: Enters the fax menu.
•
Setup
: You can browse current machine settings or change machine values.
•
Shortcuts 1, 2, 3
you can change shortcut name as well. See "
• : Enters the LCD Brightness, USB, and Language.
•
USB
: Enters the USB menu when USB memory is inserted into the USB memory port on
your machine.
•
Language
•
LCD Brightness
• : Shows the toner status.
• : Start a job.
• : Scroll through available options.
: You can set the option which is frequently used on home screen. Also
Using Shortcut Menu".
: Changes the display language on the display screen.
: Adjusts brightness of the display screen.
24
Page 26
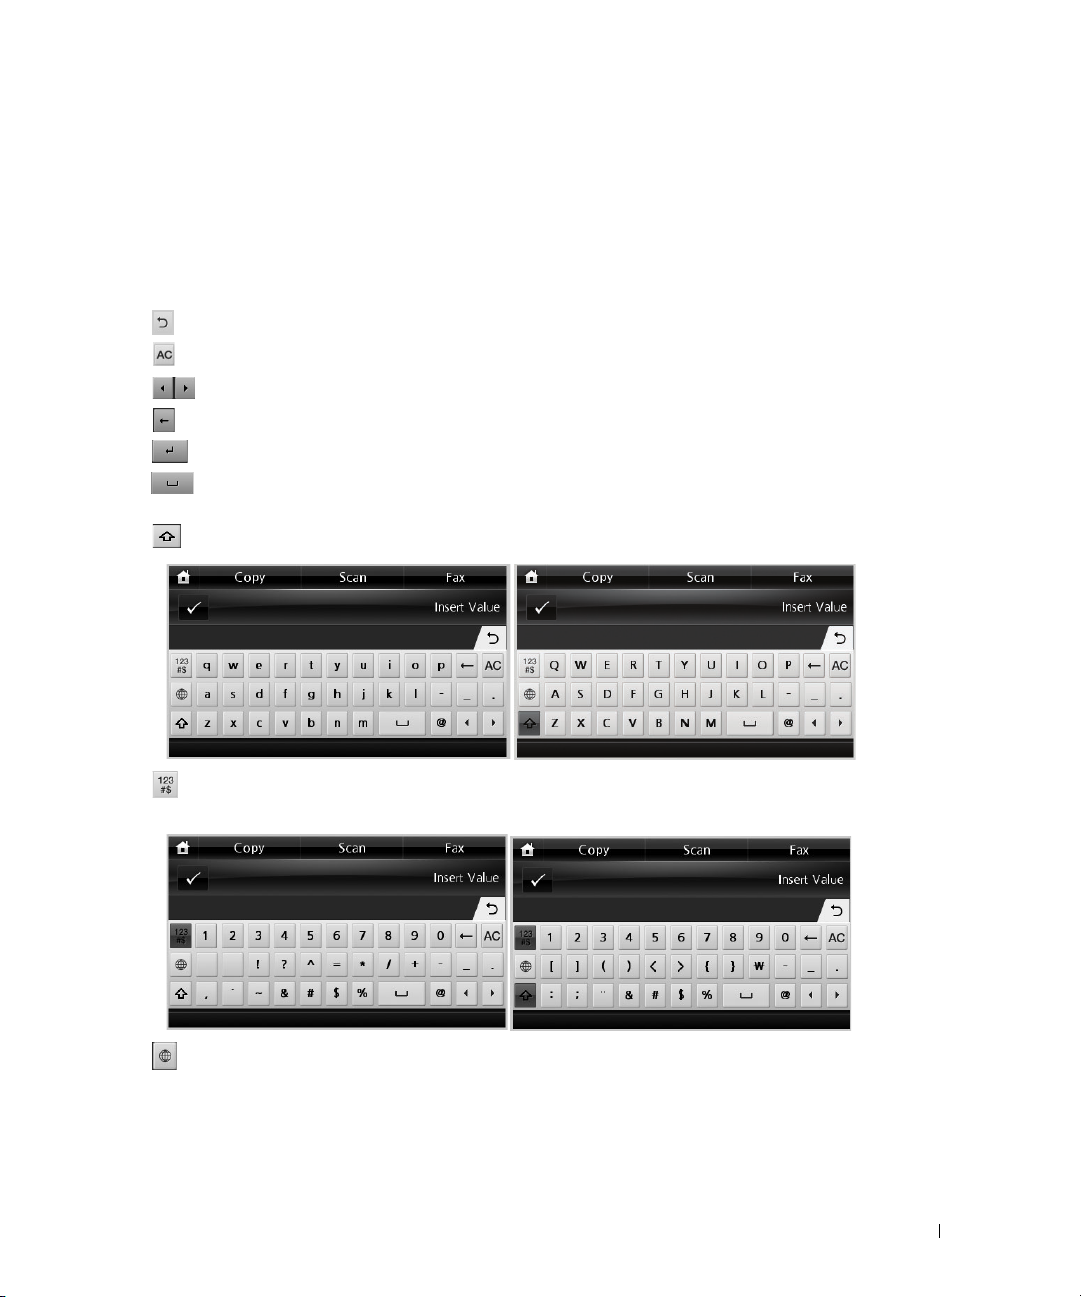
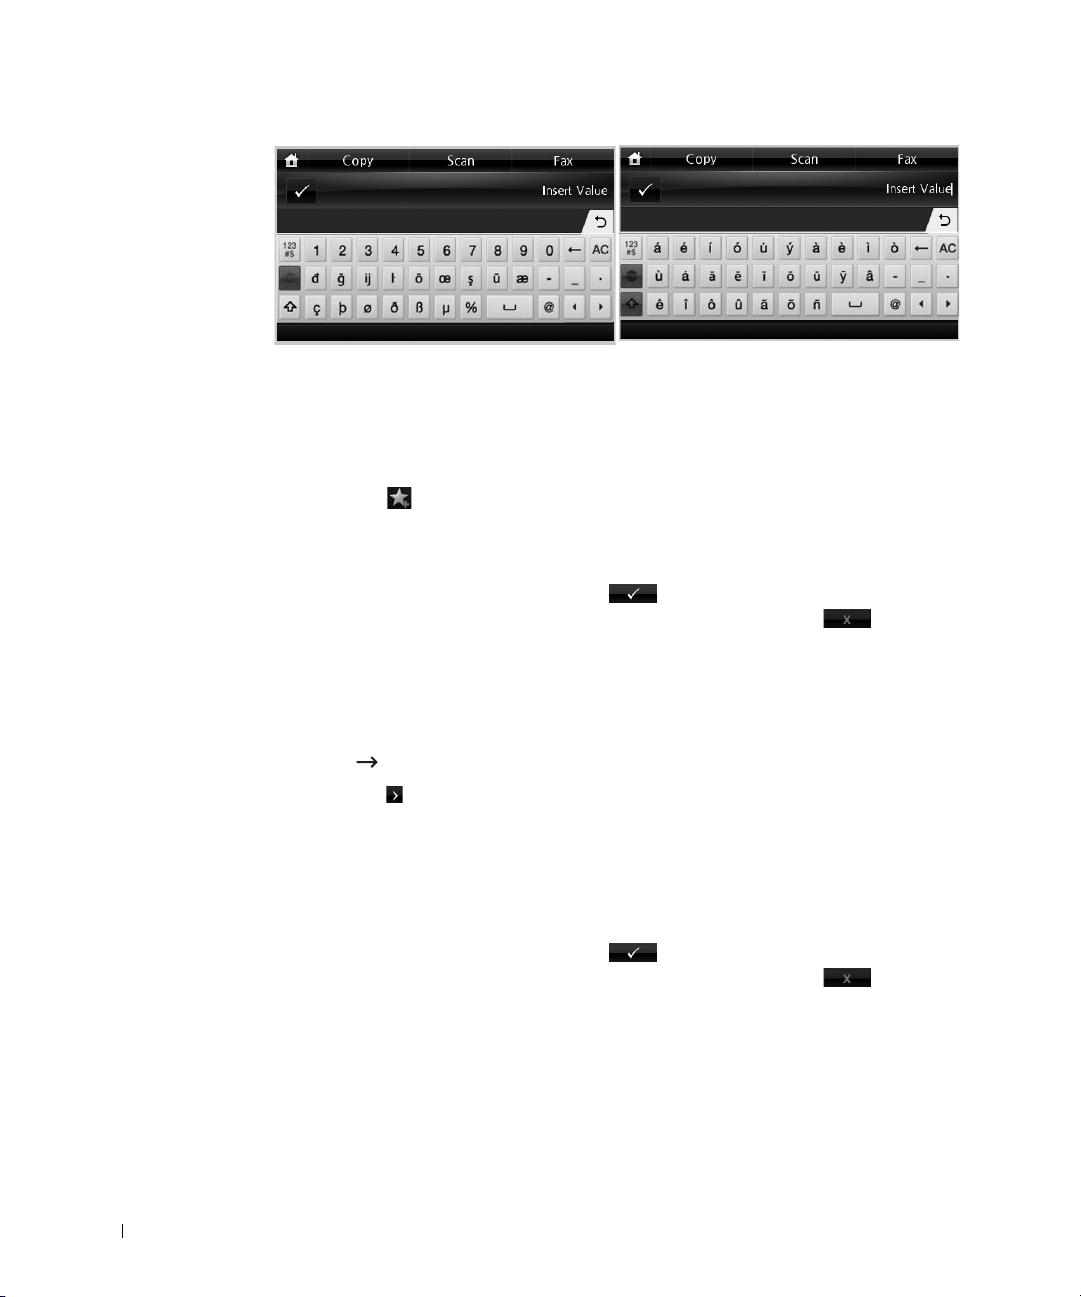
Understanding the Keyboard
You can enter alphabet characters, numbers, diacritical marks, or special symbols using the
keyboard on the home screen. This keyboard is specially arranged like a normal keyboard for
better usability to the user.
Touch the input area where you need to enter alphabet characters, numbers, diacritical marks,
or special symbols and the keyboard pops up on the screen.
• : Return to the upper menu.
• : Deletes all characters in the input area.
• : Moves the cursor between characters in the input area.
• : Deletes the character on the left side of the cursor.
• : Saves and closes input result.
• : Enters a blank between characters. Also, you can insert a pause in the fax number.
A “,” appears on the display.
• : Toggles between lowercase keys and uppercase keys or vice versa.
• : Switches from the alphanumeric keyboard to the numbers or special symbols
keyboard.
• : Switches diacritical characters.
25
Page 27
Using Shortcut Menu
You can set the option which is frequently used on home screen.
Creating Shortcut Menu
1
Press
Shortcut
2
Press the left/right arrows to select the you want shortcut.
3
Press the left/right arrows to select the feature you want.
4
If you want to change shortcut name, press when the confirmation window
appears and enter the new name using the keyboard. Otherwise, press
Setting the Default Settings
The default settings are used unless they are changed by using the operator panel.
To create your own default settings:
1
Press
Setup
2
Press the
3
Press
Default Setting
4
Press the left/right arrows to select
5
Press the left/right arrows to select the you want shortcut.
6
Press the left/right arrows to select the feature you want.
7
If you want to change shortcut name, press when the confirmation window
appears and enter the new name using the keyboard. Otherwise, press
( ) from the home screen.
Machine Setup
Next
( ) button.
.
from the home screen.
Shortcut Default
.
.
.
26
Page 28

Internal Fonts
The
Dell 2355dn Laser MFP
If you want to see the PCL and PS font list, follow these steps:
Printing the PCL Font list
1
Press
Setup
Machine Setup
2
Press the
3
Press the up/down arrows to select
4
Press the up/down arrows to select
5
PCL Font list pages print out.
Next
( ) button.
Printing the PS3 Font list
1
Press
Setup
Machine Setup
2
Press the
3
Press the up/down arrows to select
4
Press the up/down arrows to select
5
PS Font list pages print out.
NOTE: You can add additional PCL fonts and PS fonts in Printer Settings Utility. See "Printer Settings
Utility".
Next
( ) button.
Laser printer supports the PCL and PS fonts.
from the home screen.
Reports
PCL Font List
from the home screen.
Report
PS Font List
.
.
.
.
Setting up the hardware
This section shows the steps to set up the hardware which is explained in the Placemat. Make
sure you read the Placemat and complete the following steps:
1
Select a stable location.
Select a level, stable place with adequate space for air circulation. Allow extra space to
open covers and trays.
The area should be well-ventilated and away from direct sunlight or sources of heat, cold,
and humidity. Do not set the machine close to the edge of your desk or table.
27
Page 29
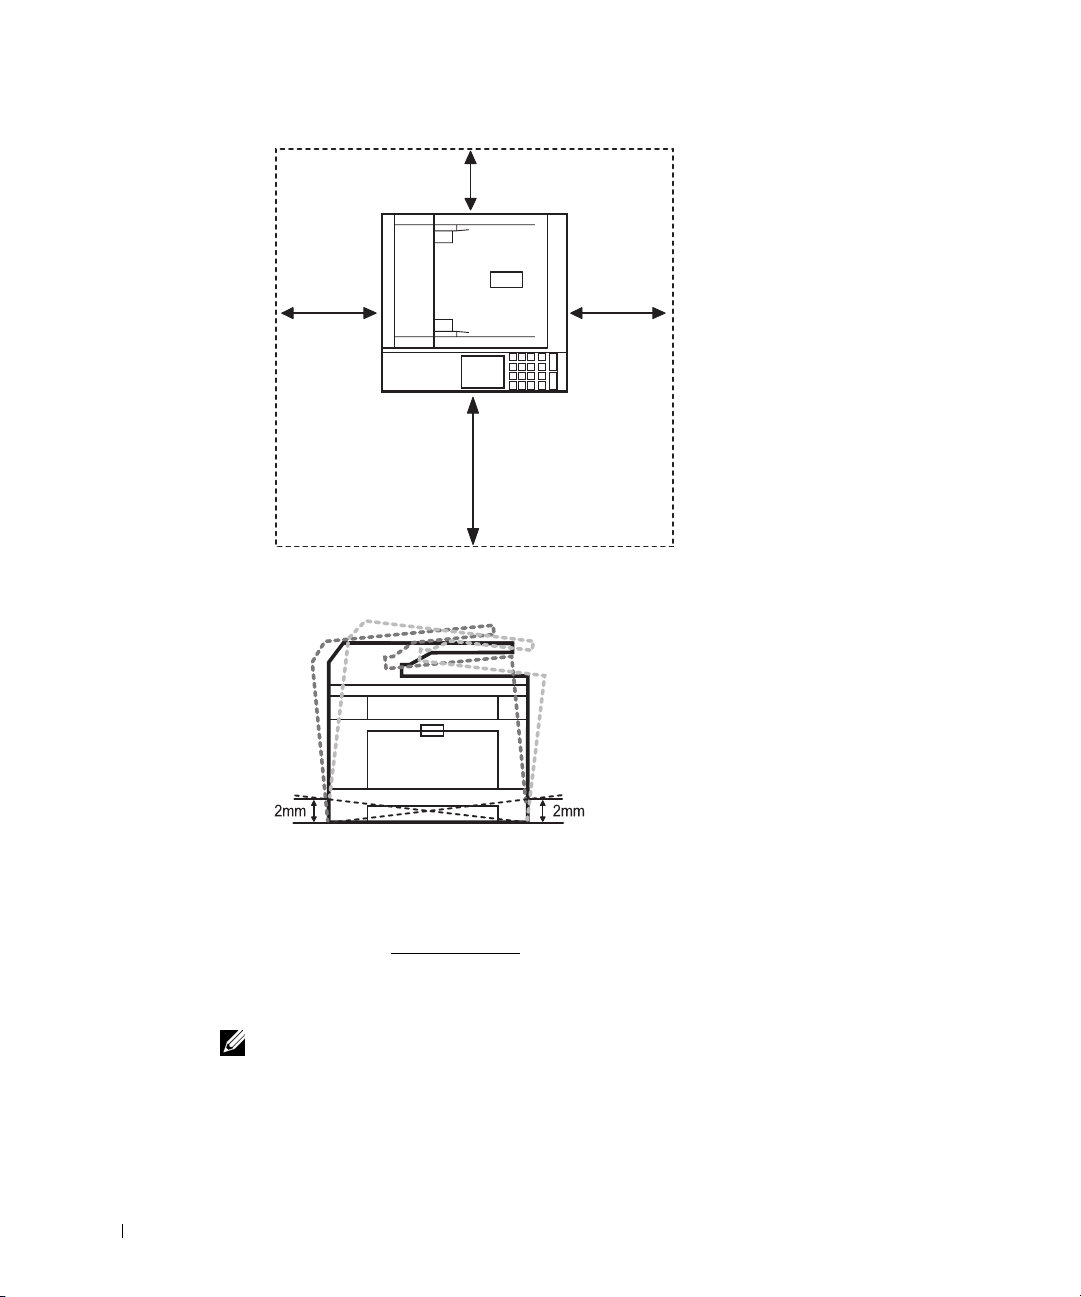
100 mm
(3.9 inches)
200 mm
(7.8 inches)
485 mm (19 inches)
200 mm
(7.8 inches)
Place the machine on a flat, stable surface so that there is no incline greater than 2 mm
(0.08 inch). Otherwise, printing quality may be affected.
2
Unpack the machine and check all the enclosed items.
3
Remove the tape holding the machine tightly.
4
Install the print cartridge.
5
Load paper. See "Loading Paper".
6
Make sure that all the cables are connected to the printer.
7
Turn the printer on.
28
NOTE:
When you move the printer, do not tilt or turn it upside down. Otherwise, the inside of the printer
may be contaminated by toner, which can cause damage to the printer or result in bad printing quality.
Page 30
Installing the Toner Cartridge
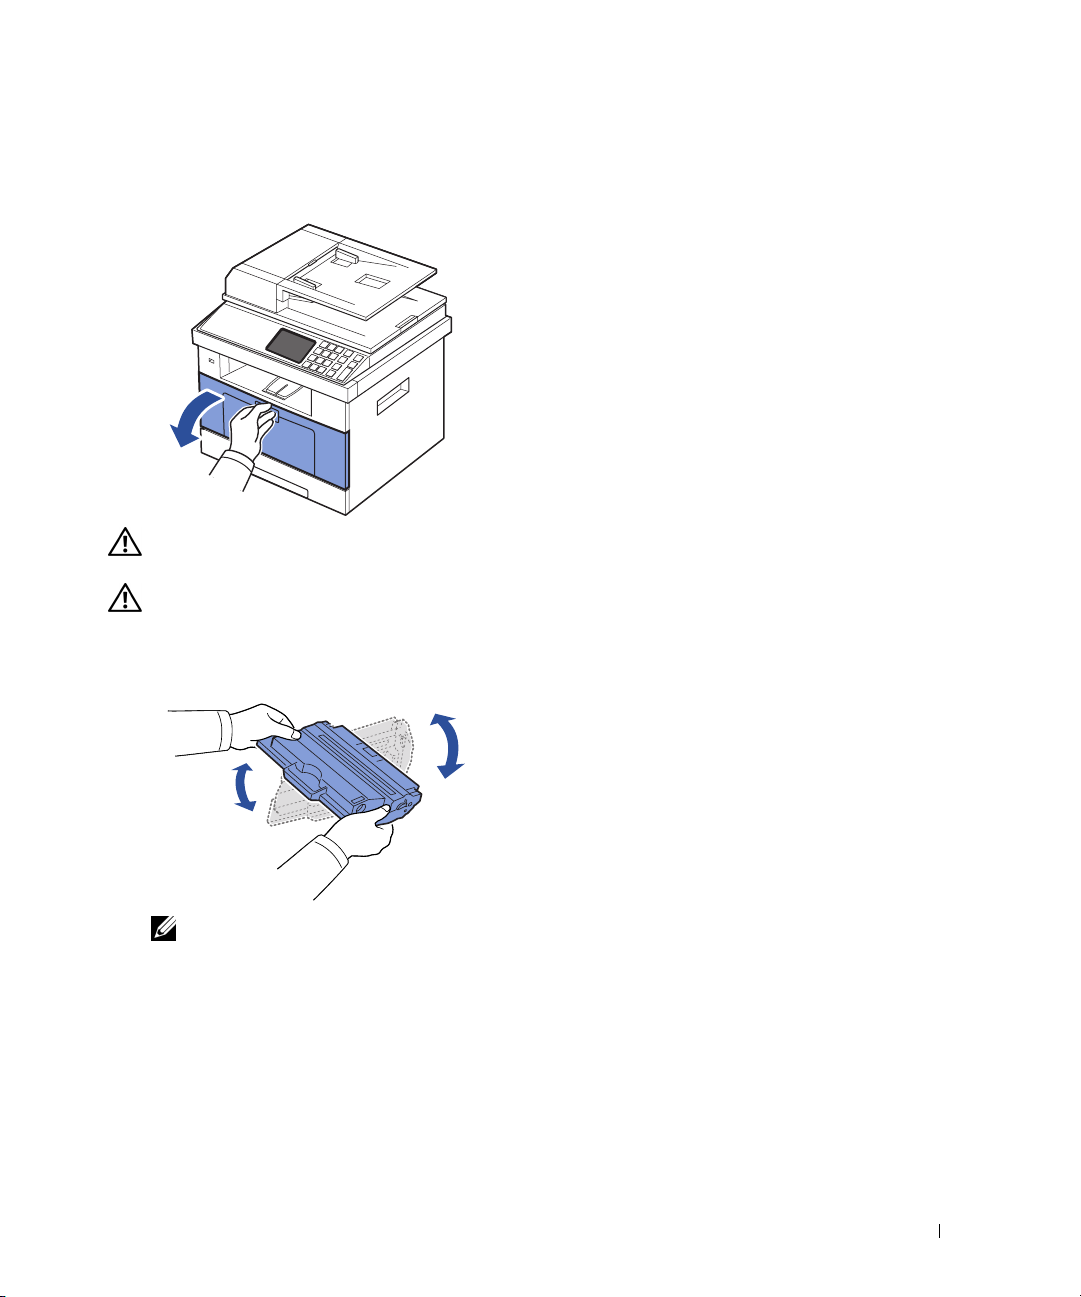
1
Open the front cover.
CAUTION: To prevent damage, do not expose the toner cartridge to light for more than a few
minutes.
CAUTION: Do not touch the green underside of the toner cartridge. Use the handle on the
cartridge to avoid touching this area.
Remove the toner cartridge from its bag and thoroughly shake the cartridge from
2
side-to-side to distribute the toner evenly inside the cartridge.
NOTE: If toner comes into contact with your clothing, wipe the toner off with a dry cloth and
wash your clothing in cold water. Hot water sets toner into fabric.
3
Holding the toner cartridge by the handle, slide it into the printer until it locks firmly
into place.
29
Page 31

4
Close the front cover.
30
Page 32

Loading Paper
Load up to 250 sheets of plain paper (75 g/m2, 20lb) in the paper tray.
NOTE: Set the paper type and size after loading paper into the paper tray. See "Setting the Paper
Typ e" and "Setting the Paper Size" for the paper used in copying and faxing, or "Paper Tab" for
computer printing.
Load the paper:
1
Pull the paper tray out of the printer.
2
If you load paper that is longer than a standard (Letter or A4) size, such as Legal paper,
press and unlatch the guide lock, and then slide the paper length guide out completely to
extend the paper tray to its full length.
31
Page 33

3
Slide in the paper length guide until it rests against the end of the paper stack.
For paper smaller than Letter size, adjust the rear paper length guide so that it lightly
touches the paper stack.
4
Pinch the paper width guide, and move it towards the stack of paper until it touches the
side of the stack.
32
Page 34

5
Flex the sheets back and forth to loosen them, and then fan them out. Do not fold or
crease the print media. Align the edges on a level surface.
6
Insert the paper stack into the paper tray with the side to be printed on facing down.
7
Do not exceed the maximum stack height indicated by the paper limit marks on both the
inside walls of the tray.
NOTE: Overloading the paper tray may cause paper jams.
NOTE: Improper adjustment of paper guides can result in paper jams.
8
Slide the paper tray back into the printer.
33
Page 35

9
Set the paper type and size. For more information, see "Setting the Paper Type" and
"
Setting the Paper Size".
Making Connections
Connecting the Telephone Line
RJ11 telephone line
socket (Line)
To the wall jack
1
Plug one end of a telephone line cord into the RJ11 telephone line socket (FAX) and the
other end into an active wall jack.
To connect a telephone and/or answering machine to your printer, remove the plug from
the extension telephone socket (EXT) ( ) and plug the telephone or answering
machine into the extension telephone socket (EXT).
34
Page 36

2
Alternative setup of Fax connected to a wall socket and a external phone or Telephone
answering device (TAD):
If connecting a FAX using an answering machine or telephone answering device (TAD):
Computer
Telephone Answering Device
NOTE: Set rings to answer to digit greater than the "Ring to Answer" setting for the telephone
answering device (TAD).
If connecting a FAX using a computer modem:
35
Page 37

Telephone Answering Device
NOTE: Set rings to answer to digit greater than the "Ring to Answer" setting for the telephone
answering device (TAD).
NOTE: For additional information, see "Using an Answering machine" or "Using a Computer
Modem".
NOTE: Phone adaptor not supplied for the United Kingdom. You are advised to buy from local
suppliers.
36
Page 38

If the phone communication is serial in your country (such as Germany, Sweden, Denmark,
Austria, Belgium, Italy, France, and Switzerland), connect the telephone or answering machine
as shown in the following figure.
Connecting the Printer Cable
Connecting the printer Locally
Local printer refers to a printer connected to your computer using a USB cable. If your printer
is attached to a network instead of your computer, skip this step and go on to "
printer to the Network".
Connecting the
NOTE: USB cables are sold separately. Contact Dell to purchase a USB cable.
NOTE: Connecting the printer to the USB port of the computer requires a certified USB cable. You
will need to buy a USB 2.0-compliant cable that is about 3 m in length.
1
Ensure that the printer, computer, and any other attached devices are powered off and
unplugged.
2
Connect a USB cable to the USB port on your printer.
37
Page 39

3
Connect the other end of the cable to an available USB port on the computer, not the
USB keyboard.
Connecting the printer to the Network
1
Ensure that the printer, computer, and any other attached devices are powered off and
unplugged.
2
Connect one end of a standard category 5 Unshielded Twisted Pair (UTP) network cable
to a LAN drop or hub, and the other end to the Ethernet network port on the back of the
printer. The printer automatically adjusts for the network speed.
NOTE: After connecting the printer, you need to configure the network parameters on the operator
panel. See "Printing a Network Configuration Page".
38
Page 40

Powering On the Printer
CAUTION: The fusing area at the rear part of the inside of your printer becomes hot once the
printer is powered on.
CAUTION: Be careful not to be burned when you access this area.
CAUTION: Do not disassemble the printer when it is powered on. If you do, it may give you an
electric shock.
To power on the printer:
1
Plug one end of the power cord into the power receptacle at the back of the printer and
the other end into a properly grounded outlet.
2
Press the power switch to turn on the printer. The home screen appears on the display
indicating that the printer is now on.
NOTE: If you power on the printer for the first time, you have to set the language, date, time,
country and fax setup sequence. These settings may be needed also after the firmware upgrade or
after the printer is reset.
Setting fax setup sequence
1
Set the language. See "Changing the Display Language".
2
Select the country. See "Selecting Country".
3
Set the date and time. See "Setting the Time and Date".
4
When fax setup confirmation window appears, select or .
If you selected , your printer restores the fax settings as default.
If you selected :
a
Your printer prints out a Fax Setup Help Report.
b
Enter the machine ID. See "Setting the Printer ID".
c
Select the receive mode and ring to answer. See "Setting up the Fax System".
39
Page 41

d
Test the fax line. See "Testing Fax line connection".
5
Your printer returns to the Standby mode.
Dell 2355dn Laser MFP Menu Functions
The control panel provides access to various menus to set up the machine or use the machine's
functions. These menus can be accessed by pressing touching them on the display screen.
NOTE: Some menus may not appear in the display depending on options or setup.
Refer to the following table:
Copy Scan Fax
Manual Copy
ECO Copy
Book Copy
Collate Copy
Auto Fit Copy
Clone Copy
Poster Copy
ID Copy
N -Up Copy
Setup
Job Status
Machine Setup Default Setting
Maintenance Clear Drum
Troubleshooting
Language
Local PC
Network PC
Send Email
SMB
FTP
Custom Email
Fax Server
USB
Pap er Setup
Tray B e h avio r
Email/Fax List
Reports
Fax Setup
Email Setup
Network Setup
Initial Setup
Restore Options
Job Management
Fax Line Test
Manual Send
Speed Dial Send
Group Dial Send
Delayed Send
Priority Send
Auto Send
On Hook Dial
Redial
40
Page 42

Printing the Printer setting and Op-panel Menu setting
NOTE: This will be helpful for the users to maneuver through the op-panel setting and tree in
changing the defaults.
Printing the Printer setting
1
Press
Setup
Machine Setup
2
Press the
3
Press the up/down arrows to select
4
Press the up/down arrows to select
Next
( ) button.
from the home screen.
Reports
Printer Settings
.
.
The Printer Settings page prints out.
Printing the Op-panel Menu setting
1
Press
Setup
Machine Setup
2
Press the
3
Press the up/down arrows to select
4
Press the up/down arrows to select
Next
( ) button.
The Op-panel menu page prints out.
from the home screen.
Reports
.
Op-panel Menu Tree
.
Setting the Machine ID
You can set the machine ID and fax number which will be printed at the top of each page. If
you have installed the fax multi-line kit, you need to select a line first, follow these steps:
1
Press
Setup
Machine Setup
2
Press the
3
Press the up/down arrows to select
4
Press the up/down arrows to select
5
Enter
more information about using the keyboard.
6
Press the home icon ( ) to return to the Standby mode.
Next
( ) button.
Fax
and ID using the keyboard on the display.
from the home screen.
Initial Setup
Machine ID
.
.
See "Understanding the Keyboard" for
41
Page 43

Changing the Display Language
To change the displayed language that the operator panel displays, follow these steps:
1
Press
Setup
Machine Setup
2
Press the
3
Press the up/down arrows to select
4
Press the up/down arrows to
5
Press the left/right arrows to select the language you want.
6
Press the home icon ( ) to return to the Standby mode.
Next
( ) button.
from the home screen.
Initial Setup
Language
.
.
Selecting Country
To change the country that appears on the operator panel, follow these steps:
1
Press
Setup
Machine Setup
2
Press the
3
Press the up/down arrows to select
4
Press the up/down arrows to select
5
Press the up/down arrows to select the country you want.
6
Press the home icon ( ) to return to the Standby mode.
Next
( ) button.
from the home screen.
Initial Setup
Select Country
.
.
Power Save Mode
42
The Power Save mode enables your printer to reduce power consumption when it is not in
actual use. You can enable this mode by selecting the duration for which the printer waits after
a job is printed before it switches to a reduced power state.
1
Press
Setup
Machine Setup
2
Press the
3
Press the up/down arrows to select
4
Press the up/down arrows to select
5
Press the left/right arrows to select the time settings you want.
6
Press the home icon ( ) to return to the Standby mode.
NOTE: Available setting range is from 5 min. to 120 min. (factory default : 30 min.) and you can also
access this mode from the EWS (Printer Settings Print Settings Setup Menu and select
Print Power Save).
Next
( ) button.
from the home screen.
Initial Setup
Print Power Save
.
.
Page 44

Setting the Time and Date
The time and date are printed on all faxes.
NOTE: It may be necessary to reset the correct time and date if loss of power to the printer occurs.
To set the time and date:
1
Press
Setup
Machine Setup
2
Press the
3
Press the up/down arrows to select
4
Press the up/down arrows to select
5
Enter the date and time each using the up/down arrows.
Next
( ) button.
from the home screen.
Initial Setup
Date & Time
.
.
Day= 01 ~ 31
Month= 01 ~ 12
Year= 2000 ~ 2099
Hour= 01 ~ 12 (12-hour mode)
00 ~ 23 (24-hour mode)
Minute= 00 ~ 59
6
Press the home icon ( ) to return to the Standby mode.
Setting the Clock Mode
To set the clock mode:
1
Press
Setup
Machine Setup
2
Press the
3
Press the up/down arrows to select
4
Press the up/down arrows to select
5
Press the left/right arrows to select the appropriate option you want.
6
Press the home icon ( ) to return to the Standby mode.
Next
( ) button.
from the home screen.
Initial Setup
Clock Mode
.
.
43
Page 45

Setting the Sound/Volume
You can set the volume for button sounds, notice alarms, and the sound that occurs during a
fax job.
1
Press
Setup
Machine Setup
1
Press the
2
Press the up/down arrows to select
3
Press the up/down arrows to select
4
Press the up/down arrows to select the appropriate option you want.
•
Next
Speaker
( ) button.
: Turns On or
such as a dial tone or a fax tone. With this option set to
until the remote machine answers.
•
Ringer
: Adjusts the ringer volume. For the ringer volume, you can select
Med
, and
High
.
•
Dial Tone
: Adjusts the dial tone volume. For the dial tone volume, you can select
1-7.
•
Fault
: Adjusts the ‘error occurs’ volume. For the error volume, you can select
Low, Med
•
Conflict
Med
•
Selection
select
5
Press the home icon ( ) to return to the Standby mode.
, and
High
: Adjusts the conflict volume. For the error volume, you can select
, and
High
.
: You can set the selection volume for when pressing the button; you can
Off, Low, Med
from the home screen.
Initial Setup
Sound & Volume
Off
the sounds from the telephone line through the speaker,
.
.
Comm.
the speaker is on
.
, and
High
.
Off, Low
Off
Off, Low
,
,
,
44
Setting Daylight Savings Time (Only for USA)
If your country switches to Daylight Savings Time each year, use this procedure to
automatically switch to Daylight Savings Time and to Standard time.
1
Press
Setup
Machine Setup
2
Press the
3
Press the up/down arrows to select
4
Press the up/down arrows to select
5
Press the left/right arrows to select
6
Enter the
7
Press the home icon ( ) to return to the Standby mode.
Next
( ) button.
Start Date
and
from the home screen.
Initial Setup
Day Light Saving
Manual
End Date
each using the up/down arrows.
.
.
.
Page 46

Scanner Lamp Power Save Mode
The scan lamp under the document glass automatically turns off when it is not in actual use
after a preset period to reduce power consumption and extend the lamp life. The lamp
automatically turns on and the warm-up cycle begins whenever any key is pressed or the DADF
cover is opened or a document is detected in the DADF.
You can set the duration for which the scan lamp waits after a scan job is completed before it
switches to the Power Save mode.
1
Press
Setup
Machine Setup
2
Press the
3
Press the up/down arrows to select
4
Press the up/down arrows to select
5
Press the left/right arrows to select the timeout value you want.
6
Press the home icon ( ) to return to the Standby mode.
Next
( ) button.
from the home screen.
Initial Setup
Scan Power Save
.
.
Changing the Default Mode
You can set the default values for copy, fax, scan, and home window.
1
Press
Setup
Machine Setup
2
Press the
3
Press the up/down arrows to select
4
Press the up/down arrows to select
5
Press the left/right arrows to the function you want to change, and change its settings.
6
Press the home icon ( ) to return to the Standby mode.
Next
( ) button.
from the home screen.
Initial Setup
Default Mode
.
.
Setting the Time Out Option
You can set the time the printer waits before it restores the default copy or fax settings if you
do not start copying or faxing after changing the settings on the operator panel.
1
Press
Setup
Machine Setup
1
Press the
2
Press the up/down arrows to select
3
Press the up/down arrows to select
4
Press the left/right arrows to select the timeout value you want.
5
Press the home icon ( ) to return to the Standby mode.
Next
( ) button.
from the home screen.
Initial Setup
Timeout
.
.
45
Page 47

Setting the Job Management
1
Press
Setup
Machine Setup
2
Press the
3
Press the up/down arrows to select the job management and press
4
Set each option as you want.
•
•
•
5
Press the home icon ( ) to return to the Standby mode.
Next
( ) button.
Stored Jobs
Job Expiration
before it is deleted.
Clear Stored Job
the
ALL
: Print jobs currently stored in the RAM disk.
: Limits the amount of time a confidential job stays in the printer
: You can delete jobs currently stored in the RAM disk. If you select
, all
Secure Job
from the home screen.
and
Stored Print
are deleted.
Job Management
.
Setting the Toner Save Mode
Toner save mode allows your machine to use less toner on each page. Activating this mode
extends the life of the toner cartridge beyond what one would experience in the normal mode,
but it reduces print quality.
1
Press
Setup
Machine Setup
2
Press the
3
Press the up/down arrows to select
4
Press the up/down arrows to select
5
Press the left/right arrows to select On.
6
Press the home icon ( ) to return to the Standby mode.
Next
( ) button.
from the home screen.
Initial Setup
Ton e r S av e
.
.
46
Setting the Timing of Toner Low Alert
You can customize the level to alert toner low or toner empty. If the current toner amount
drops below the setting level, the printer will display a warning message on the operator panel.
1
Press
Setup
Machine Setup
2
Press the
3
Press the up/down arrows to select
4
Press the up/down arrows to select
5
Press the option you want.
6
Press the left/right arrows to select the option in
7
Press the home icon ( ) to return to the Standby mode.
Next
( ) button.
from the home screen.
Initial Setup
Ton e r S ta tu s Al er t
.
Warn i ng L ev el
.
and
Alert On Panel
.
Page 48

Ignoring Blank Pages
The printer detects the printing data from computer whether a page is empty or includes any
data. To skip the blank pages at printing document, follow these steps:
1
Press
Setup
Machine Setup
2
Press the
3
Press the up/down arrows to select
4
Press the up/down arrows to select
5
Press the left/right arrows to select
6
Press the home icon ( ) to return to the Standby mode.
Next
( ) button.
from the home screen.
Initial Setup
Print Blank Pages
Off
.
.
.
Ignoring the Toner Low Message (Only for Fax)
When the toner cartridge has almost reached its estimated cartridge life, the printer shows the
toner empty message and continues printing except incoming faxes. In this case, incoming
faxes are saved in memory. However, you can set the machine to print incoming faxes, even
though print quality is not optimal.
1
Press
Setup
Machine Setup
2
Press the
3
Press the up/down arrows to select
4
Press the up/down arrows to select
5
Press the left/right arrows to select
6
Press the home icon ( ) to return to the Standby mode.
Next
( ) button.
from the home screen.
Initial Setup
Allow Toner Low
Off
.
.
.
47
Page 49

48
Software Overview
After setting up your printer and connecting it to your computer, you must install the drivers
and utilities from the "Installing Software in Microsoft® Windows® Operating System" CD
included with your printer. If you purchased a Dell
time, the drivers and utilities are automatically installed. You don’t need to install them. The
"Installing Software in Microsoft® Windows® Operating System" CD contains the following:
• Dell Printer PCL driver- allows your computer to communicate with your printer. To use
your printer as a printer in Windows, you must install the printer driver(s). For
information about installing the printer drivers in Windows, see "Installing Software in
Microsoft® Windows® Operating System".
• Dell Printer Configuration Web Tool- enables you to monitor the status of your network
printer without leaving your desk.
• Printer Settings Utility- allows you to set up fax phonebook and the printer's other
options from your computer desktop.
•Dell
Toner Management System- displays the status of the printer and the name of the
job when you send a job to print. The Dell
displays the level of toner remaining and allows you to order replacement toner
cartridges.
• SmarThru Office- this program is the accompanying software for your machine. You can
use this program to scan images or documents. This feature can be used via the local
connection or the network connection.
• Scan Driver- TWAIN or Windows Image Acquisition (WIA) drivers are available for
scanning documents on your printer.
• User’s Guide- PDF documentation provides detailed information about using your
printer.
• Set IP- Use this program to set your printer's TCP/IP addresses.
• PS driver- PostScript Printer Description (PPD) file. You can use the PostScript driver to
print documents.
• Dell Scan Manager- enables you to scan a document on your printer and save it to a
network-connected computer.
• Linux driver- enables you to print and scan in a Linux environment.
• Macintosh printer driver- enables you to use your printer with a Macintosh computer.
• Firmware Update Utility- use this program to update your machine’s firmware. See
"Minimum Requirements"
.
• Status Monitor- This program allows you to monitor the printer’s status and alerts you
when an error occurs during printing.
• LDAP- enables you to store e-mail addresses in the (LDAP) server. Also,
of securing LDAP communication via SSL.
LDAP server attributes.
TM
computer and your printer at the same
Toner Management System window also
supports a method
In the Embedded Web Service, you can set the
Page 50

Dell Printer Configuration Web Tool
The
Dell Printer Configuration Web Tool
lets you monitor the status of your network printer without leaving your desk. You can also
view and/or change the printer configuration settings, monitor the toner level, and order
replacement toner cartridges by clicking on the
browser.
NOTE: The Dell Printer Configuration Web Tool is only available when the multi-function printer is
connected to a (or the) network. See page "Minimum Requirements".
To launch the
address in your Web browser.
If you do not know what your printer's IP address is, print a network configuration page, which
lists the IP address:
1
Press
2
Press the
3
Press the up/down arrow to select
4
Press the up/down arrow to select
If an IP address has not been assigned, assign one for your printer. See "Minimum
Requirements".
Dell Printer Configuration Web Tool
Setup
Machine Setup
Next
( ) button.
, also known as the printer
Dell
supplies link right from your Web
, just type your network printer's IP
from the home screen.
Reports
Network Settings
.
.
Embedded Web Service
,
49
Page 51

Printer Status
Get immediate feedback on printer supply status. When the toner is running low, click the
toner supplies link on the first screen to order additional toner cartridges.
Printer Settings
Change the printer settings, view the printer settings status, and update the print server
firmware.
NOTE: Configuration Menu blocks the user from altering the operator panel setting unless the
correct password is entered.
Printer Server Settings
This menu supports configuration of the following items:
• Basic Information about the administrator
•TCP/IP
•SNMP Traps
• SNMP Community
•SNMPv3
•SLP
• UPnP (SSDP)
•IPP
•Telnet
•EtherTalk
• Secure Access
•802.1x
•WSD
50
Fax Settings
Configure fax settings such as fax cover, receive mode, phone book, and fax server settings.
Fax server setting is needed for sending fax using a fax server.
For information about configuring fax server parameters, contact the fax server administrator.
Page 52

Available Options for FAX Server
Option Description
Fax Server
Menu
Fax Server When you select Enable, you are able to carry out fax server
settings.
Default Scan
Resolution
Default
Attachment Type
Default [From:]
Address
Default [To:]
Address
Customization
Field
Prefix Input characters which shall be added in front of the
Suffix Input characters which shall be appended at the end of the
Select the default scanning resolution.
Select the file format of an attachment.
Enter your email address.
Enter the recipient’s email address.
You can customize the from, to, or subject field.
customized field.
customized field.
Email Settings
Receive an email when the printer needs supplies or intervention. Type your name or the key
operator’s name in the email list box to be notified.
Through this menu the following features can be programmed:
• SMTP Server Setup
• SMTP Client Setup
• Email Alert Setup
• LDAP Server Setup
The following information can be useful in setting up above-mentioned deliverable:
51
Page 53

Available Options for Email Alert
Option Description
Email Alert
Setup
IP Address or Host
Sets the IP address or Host name.
Name
Primary SMTP
Sets the primary SMTP gateway.
Gateway
SMTP Port
Number
Enable Primary
Specifies the SMTP port number. This must be 25 or between
5000 and 65535.
Specifies the authentication method for outgoing e-mail.
SMTP Auth
Primary SMTP
Account Name
Specifies the SMTP login user. Up to 63 alphanumeric
characters, periods, hyphens, under bars, and at symbols (@)
can be used. If specifying more than one address, separate
them using commas.
Primary SMTP
Account Password
Specifies the SMTP account password up to 31 alphanumeric
characters.
Primary From Sender’s e-mail address registered in the Primary server.
SMTP Timeout Sets the timeout period from 30 to 120 seconds.
Reply Address Designates the reply e-mail address sent with each E-mail
Alert.
Secure Email
Connection with
Supports a method of securing SMTP communication via
SSL/TSL.
SSL/TLS
52
Setup POP3
before SMTP
POP3 Server and
a
Port
POP3 User Name
POP3 User
Password
a
Specifies the POP3 server address in IP address format of
"aaa.bbb.ccc.ddd" or as a DNS host name up to 63 characters.
And specifies the POP3 server port number up to 15
alphanumeric characters.
a
Specifies the POP3 account user name.Up to 63 alphanumeric
characters, periods, hyphens, under bars, and at symbols (@)
can be used. If specifying more than one address, separate
them using commas.
Specifies the POP3 account password up to 31 alphanumeric
characters.
Page 54

Option Description
Email Alert
Setup
a. Available when SMTP requires POP3 Before SMTP Authentication is selected.
Email List 1 Sets acceptable e-mail addresses for the E-Mail Alert feature
up to 255 alphanumeric characters.
Email List 2 Sets acceptable e-mail addresses for the E-Mail Alert feature
up to 255 alphanumeric characters.
•
Select Alerts for
List 1
Select Alerts for
List 2
Supply Alert
for consumables.
Pape r H andling Alert
•
E-Mail Alert for paper handling.
•
Supply Alert
for consumables.
Pape r H andling Alert
•
E-Mail Alert for paper handling.
Toner L ow
•
toner low.
Toner Almost Empty
•
E-Mail Alert for toner almost empty.
Toner E mpty
•
for toner empty.
: Select the check box to receive an E-Mail Alert
: Select the check box to receive an
: Select the check box to receive an E-Mail Alert
: Select the check box to receive an
: Select the check box to receive an E-Mail Alert for
: Select the check box to receive an
: Select the check box to receive an E-Mail Alert
53
Page 55

Available Options for LDAP Server
Option Description
LDAP Server
Setup
LDAP Server and
Port
Secure LDAP
Connection
Search Root
Directory
Authentication
method
Append Root to
Base DN
Login Name Specifies the LDAP account user name.Up to 63 alphanumeric
Password Specifies the LDAP account password up to 31 alphanumeric
Maximum Number
of Search Results
Search Timeout Sets the timeout period from 5 to 100 seconds.
Specifies the LDAP server address in IP address format of
"aaa.bbb.ccc.ddd" or as a DNS host name up to 63 characters.
And specifies the LDAP server port number up to 15
alphanumeric characters.
Supports a method of securing LDAP communication via SSL.
Enters the top search level of the LDAP directory tree.
Specifies the authentication method for outgoing LDAP server.
Check if it is needed to append base DN at the end of the user
DN.
characters, periods, hyphens, under bars, and at symbols (@)
can be used. If specifying more than one address, separate
them using commas.
characters.
'0' means that the number of LDAP search results does not
have a limit. It shall be 5 ~ 100 entries.
54
LDAP Referral Check if it is necessary.
Search Name
Order
•Choose
•Choose
•Choose
Common Name
form.
Email Address
form.
Surname Given Name
if user id has "cn=<user name>"
if user id has "mail=<user name>"
otherwise.
Page 56

Copy Printer Settings
Quickly clone the printer's settings to another printer or printers on the network just by typing
each printer's IP address.
NOTE: You must be a network administrator to use this feature.
Printing Statistics
Keep track of printing trends, such as paper usage and the types of jobs being printed.
Set Password
Dell Printer Configuration Web Tool (Embedded Web Service
password. When any of the printer settings are changed using this tool, it will prompt for User
name and Password.
Locking Operator Panel or Administrator Menu (Setup):
This feature is enabled using
Embedded Web Service
and locks the user from altering the
operator panel or Administrator menu setting unless password is specified.
NOTE: You must be a network administrator to use this feature.
) can be locked by setting
Wireless
Please refer to the Wireless Quick Reference Guide for more details on wireless module
settings with the printer.
NOTE: The Wireless menu appears only when you install the wireless network interface card to your
machine.
Online Help
Click
Help
to visit the
NOTE: For more information about the All-In-One Main page, View Saved Images page, or the
Maintain/Troubleshoot page, click the Help link located in the upper right corner of the screen.
Dell
website for printer troubleshooting.
55
Page 57

Installing Software in Microsoft® Windows® Operating System
Before you begin, ensure that your system meets the "Minimum Requirements".
NOTE: For Microsoft Windows® 2000, Windows® XP, Windows Server® 2003 Server® 2008,
Windows Vista®, Windows 7 and Windows Server® 2008 R2, the system administrator should
install Dell software.
Supported Operating Systems
• Windows 2000 Professional or Advanced Server
• Windows XP Home edition or Professional
• Windows Server 2003,
•Windows Vista
•
Windows 7
Minimum Requirements
• Disk space: Windows 2000: 300 MB
Windows XP/Server 2003/Server 2008/Vista: 1 GB
Windows 7: 16 GB
Windows Server 2008 R2: 10 GB
• Memory: Windows 2000: 64 MB
Windows XP/Server 2003: 128 MB
Windows Vista/Server 2008: 512 MB
Windows 7: 1 GB
Windows Server 2008 R2: 512 MB (2048 MB)
• CPU: Windows 2000: Pentium II 400 MHZ or higher
Windows XP/Server 2003/Server 2008/Vista: Pentium III 933 MHZ or higher
Windows 7: Pentium IV 1 GHz 32 bit or 64 bit processor or higher
Windows Server 2008 R2: Pentium IV 1 GHz (x86) or 1.4 GHz (x64) processors (2
GHz or faster)
• Required software: Internet Explorer 5.0 or higher
Windows Server 2008, Windows Server 2008 R2
56
Page 58

Installing Dell Software for Local Printing
A local printer is a printer attached to your computer using a USB cable. If your printer is
attached to a network instead of your computer, skip this step and go on to "Installing Dell
Software for Network Printing".
A printer driver is a software that lets your computer communicate with your printer. The
procedure to install drivers depends on the operating system you are using.
NOTE: If you attach a USB printer cable while your printer and computer are powered on, the
Found New Hardware Wizard launches immediately. Cancel the screen and use the "Installing
Software in Microsoft® Windows® Operating System" CD to install the Dell software.
Ensure that the printer is connected to your computer and powered on. All applications
1
should be closed on your computer before beginning installation.
NOTE: If the printer is not connected to your computer when you install the "Installing
Software in Microsoft® Windows® Operating System" CD, the No Printer Found screen
appears. Follow the instructions on the screen to install the software.
2
Insert the "Installing Software in Microsoft® Windows® Operating System" CD.
NOTE: For Windows Vista/Windows 7/Server 2008 R2, click Continue when the User Account
Control screen appears.
NOTE: If user has disabled auto continue, then please open setup.exe from CD root folder.
3
Select
Personal Installation
.
If necessary, select a language by pressing the
Language
button on the main screen.
57
Page 59

4
Select
Typical Installation
to install the software and the User’s Guide.
58
If you select
change the destination folder. Click
NOTE: If your printer is not connected to the computer, the following printer not founder windows
will appear.
Custom Installation
, select the components to be installed. You can also
Next
.
Page 60

5
When the installation is complete, you may print a test page. Click
Finish
to complete
the installation and close the wizard. You are now ready to print.
Network Installation
Assigning an IP Address
Before using the printer on the network, you must set an IP address, subnet mask, and gateway
for the printer. If you want DHCP or BOOTP to automatically set the IP address, a DHCP or
BOOTP server must exist on the network.
If the network is using DHCP/BOOTP, an IP address is automatically assigned after
connecting the network cable to the printer. In case no DHCP or BOOTP the printer will
automatically assign a legacy IP address 192.0.0192 or local link address 169.254.xxx.xxx.
To configure the IP address manually, you can use the supplied "Installing Software in
Microsoft® Windows® Operating System" CD. Print the Configuration page of the printer to
see the current network configuration and MAC address. You will need this information to
configure the printer for the network.
1
Ensure that the printer is connected to your network and powered on. Close all programs.
2
Insert the "Installing Software in Microsoft® Windows® Operating System" CD.
NOTE: For Windows Vista/Windows 7/Server 2008 R2, click Continue when the User Account
Control screen appears.
NOTE: If user has disabled auto continue, then please open setup.exe from CD root folder.
3
Select
Set IP Address
. The list of printers is available on the network displays.
59
Page 61

4
Select the printer you want to assign an MAC address to. The printer’s MAC address can
be found on the Configuration page for the printer.
5
When you finish setting the IP address for the printer, exit the program.
Installing Dell Software for Network Printing
When you connect your printer to the network, you must first configure the TCP/IP settings
for the printer. After assigning and verifying the TCP/IP settings, you are ready to install the
Dell software on each network printer.
You can install the Dell software on the network computers locally or remotely.
NOTE: You need administrative access to install printer drivers on the network computers.
1
Ensure that the printer is connected to your network and powered on. All applications
should be closed on your computer before beginning installation. For details about
connecting on the network, see "Minimum Requirements"
2
Insert the "Installing Software in Microsoft® Windows® Operating System" CD.
NOTE: For Windows Vista/Windows 7/Server 2008 R2, click Continue when the User Account
Control screen appears.
NOTE: If user has disabled auto continue, then please open setup.exe from CD root folder.
3
Select
Network Installation
.
.
60
If necessary, select a language by pressing the
Language
button on the main screen.
Page 62

4
If you want to install the drivers on this computer for network operation, select
Installation
, and then click
Next
.
If you want to install the Dell software on remote computers or network servers on the
same network, select
Remote Installation
. The domain administrator’s ID and password
are required. Select the client computer(s) in the same domain on a network and then
click
Next
.
Local
NOTE: Both server computer and client computer should be one of the following OS:
Windows XP, Windows 2000, Windows Server 2003, Windows Server 2008,Windows Vista,
Windows 7, and Server 2008 R2.
NOTE: The server computer should be able to resolve the client computer name into an IP
address.
The list of printers available on the network appears. Select the printer that you want to
5
install from the list and then click
Next
.
61
Page 63

If you do not see your printer in the list, click
Printer
to add your printer to the network. To add the printer to the network, enter the
Refresh
to refresh the list or click
port name and an existing IP address for the printer.
Add
62
If you want to install the printer on a server, select the
server
check box.
6
The screen displays the printer drivers installed on your computer.
I am setting up this printer on a
You can change the printer name, set the printer to be shared on the network, and set the
printer as the default printer. Click
Next
.
Page 64

7
Select
Custom Installation
If you select
8
Select the components to be installed, and you can also change the destination folder.
Click
9
When the printer installation is complete, you may print a test page. Click
Typical Installation
Next
.
. Click
, go to step 9.
Next
.
Finish
complete the installation and close the wizard. You are now ready to print.
to
63
Page 65

NOTE: For information about installing the wireless network interface card and configuring the
network parameters, refer to Wireless Network Quick Install Guide.
64
Page 66

Uninstalling Software
You should remove the printer drivers if you are upgrading the software or if your driver
installation fails. You can remove the software using the "Installing Software in Microsoft®
Windows® Operating System" CD or the Windows uninstall option.
NOTE: Close all programs before uninstalling software, and then restart your computer after
uninstalling the software.
1
From the
Dell MFP Software Uninstall
Start
menu, select
Programs Dell Printers Dell 2355dn Laser MFP
.
2
Select the software you want to remove. Click
The selected driver and all of its components are removed from your computer.
3
After the software is removed, click
Finish
Next
.
.
65
Page 67

Using the Dell Toner Management System
The
Printer Status Monitor
network. Printer Ready, Printer Offline, Error-Check Printer, and the toner level or Toner Low
alerts will for your printer.
Printer Status Monitor
The
Printer Status Monitor
only appears on the computer screen. Depending on the remaining toner level, the launched
Printer Status Monitor
NOTE: Help me on Printer Status Monitor window will show you the printer troubleshooting guide.
Click Help me to show animation details about the error condition.
displays the status of the printer that is connected to the local
screen launches when you send a print job to the printer. This
screen is different.
Shows the toner level for your printer.
Click to order replacement toner cartridges
online. See "Minimum Requirements".
66
Or
From the
Printer Status Monitor
Start
menu, select
Programs Dell Printers Dell 2355dn Laser MFP
.
Page 68

Printer Settings Utility
By using the
create and edit Phonebook entries from your computer.
When you install the software, the
For information about installing the software, see "Installing Software in Microsoft®
Windows® Operating System".
To open the Printer Settings Utility:
1
From the
Printer Settings Utility
The
Printer Settings Utility
Start
menu, select
.
Printer Settings Utility
window, you can set up fax system data options, and
Printer Settings Utility
Programs Dell Printers Dell 2355dn Laser MFP
window opens.
is automatically installed.
2
The
Printer Settings Utility
Address Book
For further details, click the
To use the default settings, click the
To exit, click the
),
Fax Setting
Exit
, and
button at the bottom of the window.
window provides several features;
Setting
.
button.
Printer Default
button.
Directory (Phonebook
,
67
Page 69

The Directory Section
Click the
Phonebook or Emailbook entries.
Allows you to edit a
selected Phonebook
entry.
Phonebook
Modify a selected
Phonebook entry.
or
Address Book
section and the
Deletes a selected
Phonebook entry.
Setting
button to create and edit
Retrieve the Phonebook
entries from the printer
to the Printer Settings
Utility.
Downloads the
Phonebook entries from
the Printer Settings
Utility to the printer.
Phonebook entries
68
Page 70

The Fax Setting Section
Click each item under
the printer ID and printer fax number. You can select
Output Options
.
.
Fax Setting
to setup the fax configuration. The printer setup contains
The Setting Section
Click the
You can select
Setting
section and select the power save from the drop-down list.
Power Save, Tone r Sa ve
, and
Emulation Type
Printer Setup, Toll Save
Enter your printer ID.
Enter your fax number.
Click to send this cover page to the printer.
.
, and
Default
The Layout Section
Click the
You can select
Layout
section and select the orientation from the drop-down list.
Orientation, Duplex
The Paper Option Section
Click the
drop-down list.
You can select
Paper Option
section and select the basic paper handling specifications from the
Copies, Paper Size, Paper Type, Paper Source
The Graphic Section
Click the
You can select
Graphic
Darkness
section and select the degree of darkness from the drop-down list.
.
The Emulation Section
Click the
add additional fonts.
Emulation
section and select the emulation from the drop-down list. Also you can
, and
Duplex Margin
.
, and
Tray Lin kin g
.
69
Page 71

Yo u c a n s e le c t
If you want additional PCL fonts and PS fonts, select
Emulation Setting
Emulation Setting
.
.
The Network(IPv4) Section
Click the
Yo u c a n s e le c t
Network(IPv4)
Configure Network
section and select the network environment from the drop-down list.
and
Print Network Configuration Page
Firmware Update Utility
Store PCL Font and Macro
.
in
You can update your printer’s firmware using the
1
From the
Firmware Update Utility
2
Download the latest firmware. Click
3
If your printer is connected with an USB cable, click
Or if your printer is connected with a network cable, click
4
Click
Start
menu, select
Browse
and select the downloaded firmware file.
Programs Dell Printers Dell 2355dn Laser MFP
.
Firmware Update Utility
http://support.dell.com
.
.
USB Connected Printer
Network Connected Printer
.
.
70
Page 72

5
Click
Update Firmware
.
71
Page 73

Set IP Address Utility
This program is for the network IP setting using the MAC address which is the hardware serial
number of the network printer card or interface. Especially, it is for the network administrator
to set several network IPs at the same time.
NOTE: You can only use Set IP Address when your printer is connected to a network.
1
Connect the network cable to your machine.
2
Print the Network Configuration page of the printer to see the current network
configuration and MAC address.
3
From the
Set IP Address
Start
menu, select
.
Programs Dell Printers Dell 2355dn Laser MFP
72
4
Click in the SetIP window to open the TCP/IP configuration window.
5
Enter the network card's MAC address, IP address, subnet mask, default gateway, and
then click
NOTE: when you enter the MAC address, enter it without colon(:).
6
Click OK.
7
Click
Apply
Exit
to close the SetIP program.
Page 74

Paper Handling
Print Media Guidelines
Storing Print Media
Identifying Print Media Sources and Specifications
Selecting an Output Location
Loading Print Media in the Paper Tray
Using the MPF (Multi purpose feeder)
Setting the Paper Size
Setting the Paper Type
Setting the Paper Tray
Tray Behavior
Page 75

Print Media Guidelines
Print media is paper, card stock, transparencies, labels, and envelopes. Your printer provides
high quality printing on a variety of print media. Selecting the appropriate print media for your
printer helps you to avoid printing problems. This chapter provides information on how to
help you make print media selections, how to care for the print media, and how to load it in
the tray 1, optional tray 2, or MPF.
Paper
For the best print quality, use 75 g/m2 (20 lb) xerographic, long grain paper. Try a sample of any
paper you are considering using with the printer before buying large quantities.
When loading paper, note the recommended print side on the paper package, and load the
paper accordingly. See "
purpose feeder)" for detailed loading instructions.
Paper Characteristics
The following paper characteristics affect print quality and reliability. We recommend that you
follow these guidelines when evaluating new paper stock.
Weight
The printer can automatically feed paper weights from 60 to 105 g/m2 (16 to 24 lb bond) grain
long in the DADF and from 60 to 105g/m
Paper lighter than 60 g/m
For best performance, use 75 g/m
For duplex printing, use 75 to 90 g/m
Loading Print Media in the Paper Tray" and "Using the MPF (Multi
2
2
(16 lb bond) may not be stiff enough to feed properly, causing jams.
2
(20 lb bond) long grain paper.
(16 to 24 lb bond) grain long in the paper tray.
2
(20 to 24 lb bond) paper.
74
Curl
Curl is the tendency of print media to curve at its edges. Excessive curl can cause paper
feeding problems. Curl usually occurs after the paper passes through the printer, where it is
exposed to high temperatures. Storing paper unwrapped in humid conditions, even in the
paper tray, can contribute to paper curling prior to printing and can cause feeding problems.
Smoothness
The degree of smoothness of the paper directly affects the print quality. If the paper is too
rough, the toner does not fuse to the paper properly, resulting in poor print quality. If the paper
is too smooth, it can cause paper feeding problems. Smoothness should be between 100 and
300 Sheffield points; however, smoothness between 150 and 250 Sheffield points produces the
best print quality.
Page 76

Moisture Content
The amount of moisture in the paper affects both print quality and the ability of the printer to
feed the paper properly. Leave the paper in its original wrapper until you are ready to use it.
This limits the exposure of the paper to moisture changes that can degrade its performance.
Grain Direction
Grain refers to the alignment of the paper fibers in a sheet of paper. Grain is either long grain,
running the length of the paper, or short grain, running the width of the paper.
For 60 to 90 g/m
heavier than 90 g/m
2
(16 to 24 lb bond) paper, grain long fibers are recommended. For papers
2
(24 lb bond), grain short is preferred. For the MPF, 60 to 90 g/m2 (16 to
24 lb bond) paper, grain long fibers are recommended.
Fiber Content
Most high-quality xerographic paper is made from 100% chemically pulped wood. This
content provides the paper with a high degree of stability resulting in fewer paper feeding
problems and better print quality. Paper containing fibers such as cotton possess characteristics
that can result in degraded paper handling.
Recommended Paper
To ensure the best print quality and feed reliability, use 75 g/m2 (20 lb) xerographic paper.
Business papers designed for general business use may also provide acceptable print quality.
Always print several samples before buying large quantities of any type of print media. When
choosing any print media, consider the weight, fiber content, and color.
Use only paper which can withstand these temperatures without discoloring, bleeding, or
releasing hazardous emissions. Check with the paper manufacturer or vendor to determine
whether the paper you have chosen is acceptable for laser printers.
75
Page 77

Unacceptable Paper
The following papers are not
•
Chemically treated papers used to make copies without carbon paper, also known as
carbonless papers, carbonless copy paper (CCP), or no carbon required (NCR) paper
•
Preprinted papers with chemicals that may contaminate the printer
•
Preprinted papers that can be affected by the temperature in the printer fuser
•
Preprinted papers that require a registration (the precise print location on the page) greater
than
0.09 in., such as optical character recognition (OCR) forms
±
•
Coated papers (erasable bond), synthetic papers, thermal papers
•
Rough-edged, rough or heavily textured surface papers or curled papers
•
Recycled papers containing more than 25% post-consumer waste that do not meet DIN 19
309
•
Recycled paper having a weight less than 60 g/m2 (16 lb)
•
Multiple-part forms or documents
Selecting Paper
Proper paper loading helps prevent jams and ensures trouble-free printing.
To help avoid jams or poor print quality:
•
Always use new, undamaged paper.
•
Before loading paper, know the recommended print side of the paper you are using. This
information is usually indicated on the paper package.
•
Do not use paper that you have cut or trimmed yourself.
•
Do not mix print media sizes, weights, or types in the same source; mixing results in jams.
•
Do not use coated papers.
•
Remember to change the paper size setting when you use a source that does not support
auto size sensing.
•
Do not remove trays while a job is printing.
•
Ensure that the paper is properly loaded in the source.
•
Flex paper back and forth. Do not fold or crease the paper. Straighten the edges on a level
surface.
recommended for use with the printer:
76
Page 78

Selecting Preprinted Forms and Letterhead paper
Use the following guidelines when selecting preprinted forms and letterhead paper for the
printer:
• Use long grain papers for best results.
• Use only forms and letterheads printed using an offset lithographic or engraved printing
process.
• Choose papers that absorb ink, but do not bleed.
• Avoid papers with rough or heavily textured surfaces.
Use papers printed with heat-resistant inks which have been designed for use in xerographic
copiers. The ink must withstand temperatures of 180° C (356° F) without melting or releasing
hazardous emissions. Use inks that are not affected by the resin in the toner or the silicone in
the fuser. Inks that are oxidation-set or oil-based should meet these requirements; latex inks
might not. If you are in doubt, contact your paper supplier.
Preprinted papers such as letterheads must be able to withstand temperatures up to 180° C
(356° F) without melting or releasing hazardous emissions.
77
Page 79

Printing on a Letterhead paper
Check with the manufacturer or vendor to determine whether the preprinted letterhead paper
that you have chosen is acceptable for laser printers.
Page orientation is important when printing on a letterhead paper. Use the following table for
help when loading a letterhead paper in the print media sources.
Print Media Source Top of Page
Print Side Portrait Landscape
tray 1 (standard tray)
optional tray 2
MPF Face up Logo enters the
Print side face down for simplex
(single sided) printing
Print side face up for duplex printing
Front of tray Left side of tray
printer first
Left side of tray
78
Page 80

Selecting Prepunched Paper
Prepunched paper brands can differ in the number and placement of holes and in
manufacturing techniques.
Use the following guidelines to select and use prepunched paper:
• Test paper from several manufacturers before ordering and using large quantities of
pre-punched paper.
• Paper should be punched at the paper manufacturer and not drilled into paper already
packaged in a ream. Drilled paper can cause jams when multiple sheets feed through the
printer.
• Prepunched paper can include more paper dust than standard paper. Your printer may
require more frequent cleaning and feed reliability may not be as good as that of standard
paper.
Transparencies
Try a sample of any transparencies you are considering using with the printer before buying
large quantities:
• Use transparencies designed specifically for laser printers. Transparencies must be able to
withstand temperatures of 180° C (356° F) without melting, discoloring, offsetting or
releasing hazardous emissions.
• Avoid getting fingerprints on the transparencies, as this can cause poor print quality.
• Before loading transparencies, fan the stack to prevent the sheets from sticking together.
• Load one transparency at a time into the MPF.
Selecting Transparencies
The printer can print directly on transparencies which have been designed for use in laser
printers. Print quality and durability depends on the transparency used. Always print samples
on the transparencies you are considering before buying large quantities.
Check with the manufacturer or vendor to determine whether your transparencies are
compatible with laser printers that heat transparencies to 180° C (356° F). Use only
transparencies that are able to withstand these temperatures without melting, discoloring,
offsetting, or releasing hazardous emissions.
Envelopes
Try a sample of any envelopes you are considering using with the printer before buying large
quantities. See "
envelope.
When printing on envelopes:
Using the MPF (Multi purpose feeder)" for instructions on loading an
79
Page 81

• To achieve the best possible print quality, use only high-quality envelopes that are
designed for use in laser printers.
• For best performance, use envelopes made from 75 g/m
up to 90 g/m
2
(24 lb bond) weight for the MPF as long as the cotton content is 25
2
(20 lb bond) paper. You can use
percent or less.
• Use only new, undamaged envelopes.
• For best performance and to minimize jams, do not use envelopes that:
– Have excessive curl or twist
– Are stuck together or damaged in any way
– Contain windows, holes, perforations, cutouts or embossing
– Use metal clasps, string ties, or metal folding bars
– Have an interlocking design
– Have postage stamps attached
– Have any exposed adhesive when the flap is in the sealed or closed position
– Have nicked edges or bent corners
– Have rough, cockle, or laid finishes
• Use envelopes that can withstand temperatures of 180° C (356° F) without sealing,
excessive curling, wrinkling, or releasing hazardous emissions. If you have any doubts
about the envelopes you are considering using, check with the envelope supplier.
• Adjust the width guide to fit the width of the envelopes.
• Load an envelope with the flap side down and with the stamp area on the top left side.
The end of the envelope with the stamp area enters the MPF first.
See "
Using the MPF (Multi purpose feeder)" for instructions on loading an envelope.
80
Page 82

NOTE: You can improve the printing quality of envelopes by pulling down the rear door to
open and pushing the two blue pressure levers down. This instruction will be especially
helpful for DL and C5 size envelopes.
• A combination of high humidity (over 60%) and the high printing temperatures may seal
the envelopes.
Labels
Your printer can print on many labels designed for use with laser printers. These labels are
supplied in letter size, A4 size, and legal size sheets. Label adhesives, face sheet (printable
stock), and topcoats must be able to withstand temperatures of 180° C (356° F) and pressure
of 25 pounds per square inch (psi). You can load one label sheet at a time in the MPF.
Try a sample of any label you are considering using with the printer before purchasing a large
quantity:
• Use full label sheets. Partial sheets may cause labels to peel off during printing, resulting
in a jam. Partial sheets also contaminate your printer and your cartridge with adhesive,
and could void your printer and cartridge warranties.
• Use labels that can withstand temperatures of 180° C (356° F) without sealing, excessive
curling, wrinkling, or releasing hazardous emissions.
• Do not print within 0.04 in. (1 mm) of the edge of the label, of the perforations, or
between die-cuts of the label.
• Do not use label sheets that have adhesive to the edge of the sheet. We recommend zone
coating of the adhesive at least 0.04 in. (1 mm) away from edges. Adhesive material
contaminates your printer and could void your warranty.
• If zone coating of the adhesive is not possible, a 0.125 in. (3 mm) strip should be
removed on the leading and driver edge, and a non-oozing adhesive should be used.
81
Page 83

• Remove a 0.125 in. (3 mm) strip from the leading edge to prevent labels from peeling
inside the printer.
• Portrait orientation is preferred, especially when printing bar codes.
• Do not use labels that have exposed adhesive.
Card Stock
Card stock is single ply, and has a large array of properties, such as the moisture content,
thickness, and texture, that can significantly affect print quality. See "
Sources and Specifications" for information on the preferred weight for the grain direction of
print media.
Try a sample of any card stock you are considering using with the printer before purchasing a
large quantity:
• Be aware that preprinting, perforation, and creasing can significantly affect the print
quality and cause print media handling or jamming problems.
• Avoid using card stock that may release hazardous emissions when heated.
• Do not use preprinted card stock manufactured with chemicals that may contaminate
the printer. Preprinting introduces semi-liquid and volatile components into the printer.
• We recommend the use of grain long card stock.
Identifying Print Media
Storing Print Media
Use the following guidelines for proper print media storage. These help avoid print media
feeding problems and uneven print quality:
• For best results, store print media in an environment where the temperature is
approximately 21° C (70° F) and the relative humidity is 40%.
• Store cartons of print media on a pallet or shelf, rather than directly on the floor.
• If you store individual packages of print media out of the original carton, ensure that they
rest on a flat surface so the edges do not buckle or curl.
• Do not place anything on top of the print media packages.
82
Page 84

Identifying Print Media Sources and Specifications
The following tables provide information on standard and optional sources, including the print
media sizes that you can select from the paper size menu and supported weights.
NOTE: If you use a print media size not listed, select the next larger size.
Media Input Capacity
a
Paper
Paper Tray (tray 1 and optional tray 2) MPF
Plain paper 250 sheets of 75 g/m2 bond (20 lb) 50 sheet of 75 g/m2 bond (20 lb)
b
Transparencyc, Labels,
-
5 sheets of 75 g/m2 bond (20 lb)
Cards, Envelopes
a Recommend the use of manual for special media such as transparency, envelope, and card.
b For special media in MPF, the feeding quality may be degraded depending on the status of paper.
c Recommend the use of short edge for the paper-backed transparency.
Media Output Capacity
Output Location Description
Face down 150 sheets of 75 g/m2 bond (20 lb) paper
5 sheets of transparency, envelope, label, and card.
a
Face up
a The face up is mainly for envelope and thick paper.
b Push the two blue pressure levers down for better printing quality of envelope, label, card, and thick paper.
1 sheet
b
Print Media Sizes and Support
Legend
Dimensions Paper Tray (tray 1
MPF Duplex printing
and optional tray 2)
Y- indicates Support
Print Media Size
A4 8.27 x 11.7 in.
YYY
(210 x 297 mm)
A5a 5.83 x 8.27 in.
(148 x 210 mm)
A6 4.13 x 5.85 in.
(105 x 148.5 mm)
Y Y -
-Y-
83
Page 85

Legend
Y- indicates Support
Print Media Size
Dimensions Paper Tray (tray 1
and optional tray 2)
MPF Duplex printing
JIS B5 7.17 x 10.1 in.
(182 x 257 mm)
ISO B5 6.93 x 9.84 in.
(176 x 250 mm)
Letter 8.5 x 11 in.
(215.9 x 279.4 mm)
Legal 8.5 x 14 in.
(215.9 x 355.6 mm)
Executive 7.25 x 10.5 in.
(184.2 x 266.7 mm)
Oficio 8.5 x 13.5 in.
(216 x 343 mm)
Folio 8.5 x 13 in.
(216 x 330 mm)
Envelope 7-3/4
(Monarch)
3.875 x 7.5 in.
(98.4 x 190.5 mm)
Envelope COM-10 4.12 x 9.5 in.
(105 x 241 mm)
Y Y -
Y Y -
YYY
YYY
Y Y -
YYY
YYY
-Y-
-Y-
84
Envelope DL 4.33 x 8.66 in.
-Y-
(110 x 220 mm)
EnvelopeC5 6.38 x 9.01 in.
-Y-
(162 x 229 mm)
EnvelopeC6 4.49 x 6.38 in.
-Y-
(114 x 162 mm)
Custom 3 x 5 in. to 8.5 x 14 in.
-Y-
(76 x 127 mm to 216
x 356 mm)
a Ensure the A5 paper is NOT A4 paper that has been cut in half.
Page 86

Print Media Supported
Print Media (Paper) Types Paper Tray (tray 1 and optional tray 2) MPF
Plain, Thin, Recycled, Letterhead YY
Thick, Bond, Preprinted, Colored YY
Card Stock -Y
Transparencies -Y
Labels -Y
Dual-web and Integrated Labels -Y
Envelopes -Y
Print Media Types and Weights
Print Media Type Print Media Weight
Tray 1 and Optional Tray 2 MPF
Paper Xerographic or
business paper
Card
stock-maximum
(grain long)
a
Index Bristol - 120 g/m2 (31 lb)
Tag - 120 g/m2 (31 lb)
Cover - 135 g/m2 (35 lb)
Card
stock-maximum
(grain short)
a
Index Bristol - 163 g/m2 (43 lb)
Tag - 163 g/m2 (43 lb)
Cover - 163 g/m2 (43 lb)
Transparencies
b
Laser printer - 138-146 g/m
60-90 g/m2 grain long
(16-24 lb bond)
60-135 g/m2 grain long
(16 to 36 lb bond)
2
(37-39 lb bond)
85
Page 87

Print Media Type Print Media Weight
Tray 1 and Optional Tray 2 MPF
Labels-maximum Paper - 163 g/m
(43 lb bond)
Dual-web paper - 163 g/m
(43 lb bond)
Polyester - 163 g/m
(43 lb bond)
Vinyl - 163 g/m
(43 lb liner)
Integrated Forms Pressure-
sensitive area
(must enter the
- 135-140 g/m
(36-40 lb bond)
printer first)
Paper base (grain
long)
Envelopes 100%
Cotton Content
Maximum Weight24 lb
a Grain short is preferred for papers over 135 g/m2.
b Thickness: 0.1 to 0.15 mm
Sulfite,
wood-free or up
to 100% cotton
bonds
- 75-135 g/m
(20-36 lb bond)
- 75-90 g/m
(20-24 lb)
2
2
2
2
2
2
2
86
Page 88

Selecting an Output Location
The printer has two output locations; the output tray (face down) and the rear door (face up).
Rear Door
Output Tray
To use the output tray, ensure that the rear door is closed. To use the rear door, open it.
NOTE: If paper coming out of the output tray has problems, such as excessive curl, try printing to
the rear door.
NOTE: To avoid paper jams, do not open or close the rear door while the printer is printing.
87
Page 89

Printing to the Output Tray (Face down)
The output tray collects printed paper face-down, in the correct order. The tray should be used
for most print jobs.
If necessary, expand the paper output extension to keep the print media from falling off the
output tray.
Printing to the Rear Door (Face up)
Using the rear door, the paper comes out of the printer face up.
Printing from the MPF to the rear door provides a straight paper path. Using the rear door
might improve the output quality with special materials.
To use the rear door:
Open the rear door by pulling it.
88
CAUTION: The fuser area inside of the rear door of your printer becomes very hot when in use.
Take care when you access this area.
Page 90

Loading Print Media in the Paper Tray
You can load approximately 250 sheets of plain paper in the tray 1 or the optional tray 2. If you
purchased the optional tray 2, see "
faxing, you can use A4, letter or legal paper only. For copying or printing, you can use many
different types and sizes of paper; see "
Follow these instructions to load print media into the tray 1 or optional tray 2. These trays are
loaded the same way.
1
Pull open the paper tray and load paper with the print side face down.
You can load letterhead paper with the design side face down. The top edge of the sheet
with the logo should be placed at the front side of the tray.
Installing an Optional Tray 2" for installing instructions. For
Identifying Print Media Sources and Specifications".
For details about loading paper in the paper tray, see "
NOTE: If you experience problems with paper feed, place the paper in the MPF.
NOTE: You can load previously printed paper. The printed side should be facing up with an uncurled
edge at the front. If you experience problems with paper feed, turn the paper around. Note that the
print quality is not guaranteed.
Loading Paper".
89
Page 91

Using the MPF (Multi purpose feeder)
Use the MPF to print transparencies, labels, envelopes or postcards in addition to making
quick runs of paper types or sizes that are not currently loaded in the paper tray.
Postcards, 3.5 by 5.83 in. (index) cards and other custom-sized materials can be printed with
this printer. The minimum size is 3.0 by 5.0 in. (76 by 127 mm) and the maximum size is 8.5
by 14 in. (216 by 356 mm).
Acceptable print materials are plain paper with sizes ranging from 3.0 by 5.0 in. (76 by 127
mm) to Legal, 8.5 by 14 in. (216 by 356 mm), the largest size acceptable, and weighing
between 16 lb and 43 lb.
NOTE: Always load only the print materials specified in the Specifications on "Paper Specifications"
to avoid paper jams and print quality problems.
NOTE: Flatten any curl on postcards, envelopes and labels before loading them into the MPF.
To use the MPF:
1
Open the MPF and unfold the paper support extension, as shown.
90
2
If you are using paper, flex or fan the edge of the paper stack to separate the pages before
loading.
For transparencies, hold them by the edges and avoid touching the print side. Oils from
your fingers can cause print quality problems.
Page 92

3
Load the print material
with the side to be printed on facing up
.
Depending on the paper type you are using, keep the following loading method:
• Envelopes: load them with the flap side down and with the stamp area on the top left
side.
• Transparencies: load them with the print side up and the top with the adhesive strip
entering the printer first.
• Labels: load them with the print size up and the top short edge entering the printer
first.
• Preprinted paper: load with the design face up, top edge toward the printer.
• Card stock: load them with the print side up and the short edge entering the printer
first.
• Pre printed paper: the printed side should be facing down with an uncurled edge
toward the printer.
4
Squeeze the width guide and adjust it to the width of the print material. Do not force too
much, or the paper will be bent, which will result in a paper jam or skew.
91
Page 93

5
After loading paper, set the paper type and size for the MPF. See "Setting the Paper Type"
for copying and faxing or "Paper Tab"
NOTE: The settings made from the printer driver override the settings on the operator panel.
CAUTION: Ensure that the rear door opens when you print on transparencies. If not, they may tear
while exiting the machine.
After printing, fold away the paper support extension and close the MPF.
6
Tips on using the MPF
for Computer printing.
• Load only one size of print material at a time in the MPF.
• To prevent paper jams, do not add paper when there is still paper in the MPF. This also
applies to other types of print materials.
• Print materials should be loaded face up with the top edge going into the MPF first and
be placed in the center of the tray.
• Always load only the print materials specified in "
Print Media Guidelines" to avoid paper
jams and print quality problems.
• Flatten any curl on postcards, envelopes, and labels before loading them into the MPF.
• When you print on 3 by 5 in. (76 by 127 mm) sized media on the MPF, open the rear
door for a straight paper path to avoid paper jams.
• Ensure that the rear door opens when you print on transparencies. If not, they may tear
while exiting the machine.
92
Page 94

Setting the Paper Size
After loading paper in the paper tray, you need to set the paper size from the operator panel.
This setting will apply to Fax and Copy modes. For Computer printing, you need to select the
paper type in the application program you use.
1
Press
Setup
Machine Setup
2
Press the
3
Press the up/down arrows to select
4
Press the up/down arrows to select the paper tray you want to use.
5
Press the left/right arrows to select the paper size you are using.
6
Press the home icon ( ) to return to the Standby mode.
Next
( ) button.
from the main screen.
Pap er Setup
.
Setting the Paper Type
After loading paper in the paper tray or the MPF, you need to set the paper type from the
operator panel. This setting will apply to Fax and Copy modes. For faxing, you can only set the
paper type to the
application program you use.
1
Press
2
Press the
3
Press the up/down arrows to select
4
Press the up/down arrows to select the paper tray you want to use.
5
Press the left/right arrows to select the paper type you are using.
6
Press the home icon ( ) to return to the Standby mode.
Setup
Next
Plain
mode. For Computer printing, you need to select the paper type in the
Machine Setup
from the home screen.
( ) button.
Pap er Setup
.
Setting the Paper Margin
You can set the paper margin for simplex or duplex printing.
1
Press
Setup
Machine Setup
2
Press the
3
Press the up/down arrows to select
4
Press
5
Press the up/down arrows to select the paper tray you want to use.
6
Press the printing type you want to use.
7
Select a target such as
Next
Margin
( ) button.
.
Top M ar g in, Left Margin, Short Binding, Long Binding
to set the paper margin.
8
Adjust the option you want using the left/right arrows
9
Press the home icon ( ) to return to the Standby mode.
from the main screen.
Pap er Setup
.
, and etc.
93
Page 95

Setting the Paper Tray
This feature allows you to select the tray and paper that you want to use for a printing job.
Paper size and paper tray are adjusted here.
Setting the Tray linking
If tray 1 and tray 2 are filled with letter size paper, when tray1 is empty and this option is On,
then the machine continues printing using the paper in tray 2.
1
Press
Setup
Machine Setup
2
Press the
3
Press the up/down arrows to select
4
Press the up/down arrows to select
5
Press the left/right arrows to select the On you want to use.
6
Press the home icon ( ) to return to the Standby mode.
Next
( ) button.
Substitute Tray
When the paper is mismatched, meaning that tray 1 is filled with the letter size paper, but the
printing job needs A4 size paper, the machine automatically starts printing with Letter sized
paper.
1
Press
Setup
Machine Setup
2
Press the
3
Press the up/down arrows to select
4
Press the up/down arrows to select
5
Press the left/right arrows to select
6
Press the home icon ( ) to return to the Standby mode.
Next
( ) button.
from the home screen.
Tray Behavior
Tray Lin kin g
.
.
from the home screen.
Tray Behavior
Substitute Tray
Nearest Size
.
.
.
94
Setting the Default Tray
You can select the tray you want to use for printing job.
1
Press
Setup
Machine Setup
2
Press the
3
Press the up/down arrows to select
4
Press the up/down arrows to select
5
Press the left/right arrows to select the paper tray you are using.
6
Press the home icon ( ) to return to the Standby mode.
Next
( ) button.
from the home screen.
Tray Behavior
Default Source
.
.
Page 96

Setting the paper feeding flow
1
Press
Setup
Machine Setup
2
Press the
3
Press the up/down arrows to select
4
Press the up/down arrows to select
5
Press the left/right arrows to select the paper tray you are using.
•
Next
Tray Mod e
( ) button.
: When sending a print job from the computer, the printer uses paper in
from the home screen.
Tray Behavior
Configure MPF
.
.
the tray which you have already set in Printer properties. In this mode the MPF is
treated as another paper tray. Instead of treating MPF as first preference paper
source, printer pulls paper from the tray that matches the size and type. The first
preference goes to the default source.
•
Bypass Mode
: When sending a print job from the computer and the MPF is filled
with paper, the printer uses the paper in the MPF first. In this mode the printer pulls
the paper from MPF first unless it is closed or empty. MPF gets the highest priority
and pulls whatever media present in the MPF.
Bypass Mode
is set as a default
setting.
6
Press the home icon ( ) to return to the Standby mode.
Setting the paper auto feeding
When the paper is mismatched, the machine waits for a while (about few seconds) and starts
printing automatically even if the paper mismatches.
1
Press
Setup
Machine Setup
2
Press the
3
Press the up/down arrows to select
4
Press the up/down arrows to select the
5
Press the left/right arrows to select the On you want to use.
6
Press the home icon ( ) to return to the Standby mode.
Next
( ) button.
from the home screen.
Tray Behavior
.
Auto Continue
.
95
Page 97

Tray Behavior
Tray Linking
Tray linking enables the automatic linking feature for trays when you load the same size and
type of print media in multiple sources. The printer automatically links the trays; when one
tray is not available for paper empty or mismatch, the printer will use the next available linked
tray to feed print media for the printing.
For example, if you have the same size and type of print media loaded in tray 2, the printer
selects print media from tray 2 until it becomes empty, and then the printer automatically
feeds print media from the next linked tray.
By linking all trays (standard and optional), you effectively create a single source with a
capacity of up to 550 sheets.
Make sure you load the same size and type of print media in each tray in order to link the trays.
Set the paper size and type for each tray.
To disable tray linking you can either choose unique paper size/type for each tray or using
operator panel to disable tray linking.
NOTE: You can use this feature in print, copy, and fax job.
NOTE: To prevent a paper jam, do not open tray 1 while the machine is printing from tray 2.
1
Press
Setup
Machine Setup
2
Press the
3
Press the up/down arrows to select
4
Press the up/down arrows to select
5
Press the left/right arrows to On for enable and
6
Press the home icon ( ) to return to the Standby mode.
Next
( ) button.
from the home screen.
Tray Behavior
Tray Lin kin g
.
.
Off
to disable tray linking.
96
Substitute Size
This setting is used to determine whether the printer can substitute with another paper size
when the requested paper size is not available in any of the input trays. The Printer will
substitute A4/Letter, A5/Statement, B5/ISO B5, and Folio/Oficio. For example if A4 is requested
paper size and there is no A4 paper in any of the input source then the printer will print on
Letter size paper, if available.
Substitute size set to
option is not applied for received fax printing.
NOTE: You can use this feature in print and copy job.
Off
means no substitution is allowed for the requested paper size. This
Page 98

MPF
MPF can be configured to behave in
MPF
menu in the operator panel.
Tray Mod e
or in
Bypass Mode
by setting the
Configure
Bypass Mode
In this mode the printer pulls the paper from MPF first unless it is closed or empty. MPF gets
the highest priority and pulls whatever media is present in the MPF.
NOTE: You can use this feature in print and copy job.
Tray Mode
In this mode the MPF is treated as another paper tray. Instead of treating MPF as first
preference paper source, printer pulls paper from the tray that matches the size and type. The
first preference goes to the default source.
NOTE: You can use this feature in print, copy, and fax job.
97
Page 99

98
Page 100

Printing
Printing a Document
Printer Settings
Printing Multiple Pages on One Sheet of the Paper
Fitting Your Document to a Selected Paper Size
Printing Posters
Change Percentage of Your Document
Printing Booklets
Printing on Both Sides of Paper
Using Watermarks
Using Overlays
 Loading...