

Page 1
Dell™2330d/dn and 2350d/dn Laser Printer
User's Guide
To order ink or supplies from Dell:
Double-click the icon on your desktop.1.
Visit the Dell website, or order Dell printer supplies by phone.
www.dell.com/supplies
For the best service, ensure that you have the Dell printer Service Tag available.
2.
Notes, Notices, and Cautions
NOTE: A NOTE indicates important information that helps you make better use of your printer.
NOTICE: A NOTICE indicates either potential damage to hardware or loss of data and tells you how to
avoid the problem.
CAUTION: A CAUTION indicates a potential for property damage, personal injury, or death.
Information in this document is subject to change without notice.
© 2010 Dell Inc. All rights reserved.
Reproduction of this document in any manner whatsoever without the written permission of Dell Inc. is strictly forbidden.
Trademarks used in this text: Dell, the DELL logo, and OpenManage are trademarks of Dell Inc. Microsoft and Windows are
registered trademarks of Microsoft Corporation in the United States and/or other countries. Windows Vista is either a trademark
or a registered trademark of Microsoft Corporation in the United States and/or other countries.
Linux is the registered trademark of Linus Torvalds in the U.S. and other countries. SuSE is a trademark of Novell, Inc. in the
United States and other countries. Red Hat is a trademark of Red Hat, Inc. Debian is a registered trademark of Software in the
Public Interest, Inc. and managed by the Debian project. Linspire is a trademark of Linspire, Inc. Ubuntu is a trademark of
Canonical Limited. Red Flag is a trademark of Red Flag Software Co., Ltd.
Macintosh and Mac OS are trademarks of Apple Inc., registered in the U.S. and other countries.
Other trademarks and trade names may be used in this document to refer to either the entities claiming the marks and names or
their products. Dell Inc. disclaims any proprietary interest in trademarks and trade names other than its own.
UNITED STATES GOVERNMENT RESTRICTED RIGHTS
This software and documentation are provided with RESTRICTED RIGHTS. Use, duplication or disclosure by the Government is
subject to restrictions as set forth in subparagraph (c)(1)(ii) of the Rights in Technical Data and Computer Software clause at
Page 2

DFARS 252.227-7013 and in applicable FAR provisions: Dell Inc., One Dell Way, Round Rock, Texas, 78682, USA.
Model 2330d/dn and 2350d/dn
June 2010 SRV HX750 Rev. A03
Page 3
Finding Information
Finding Information About the Printer
What are you looking for?
Find it here
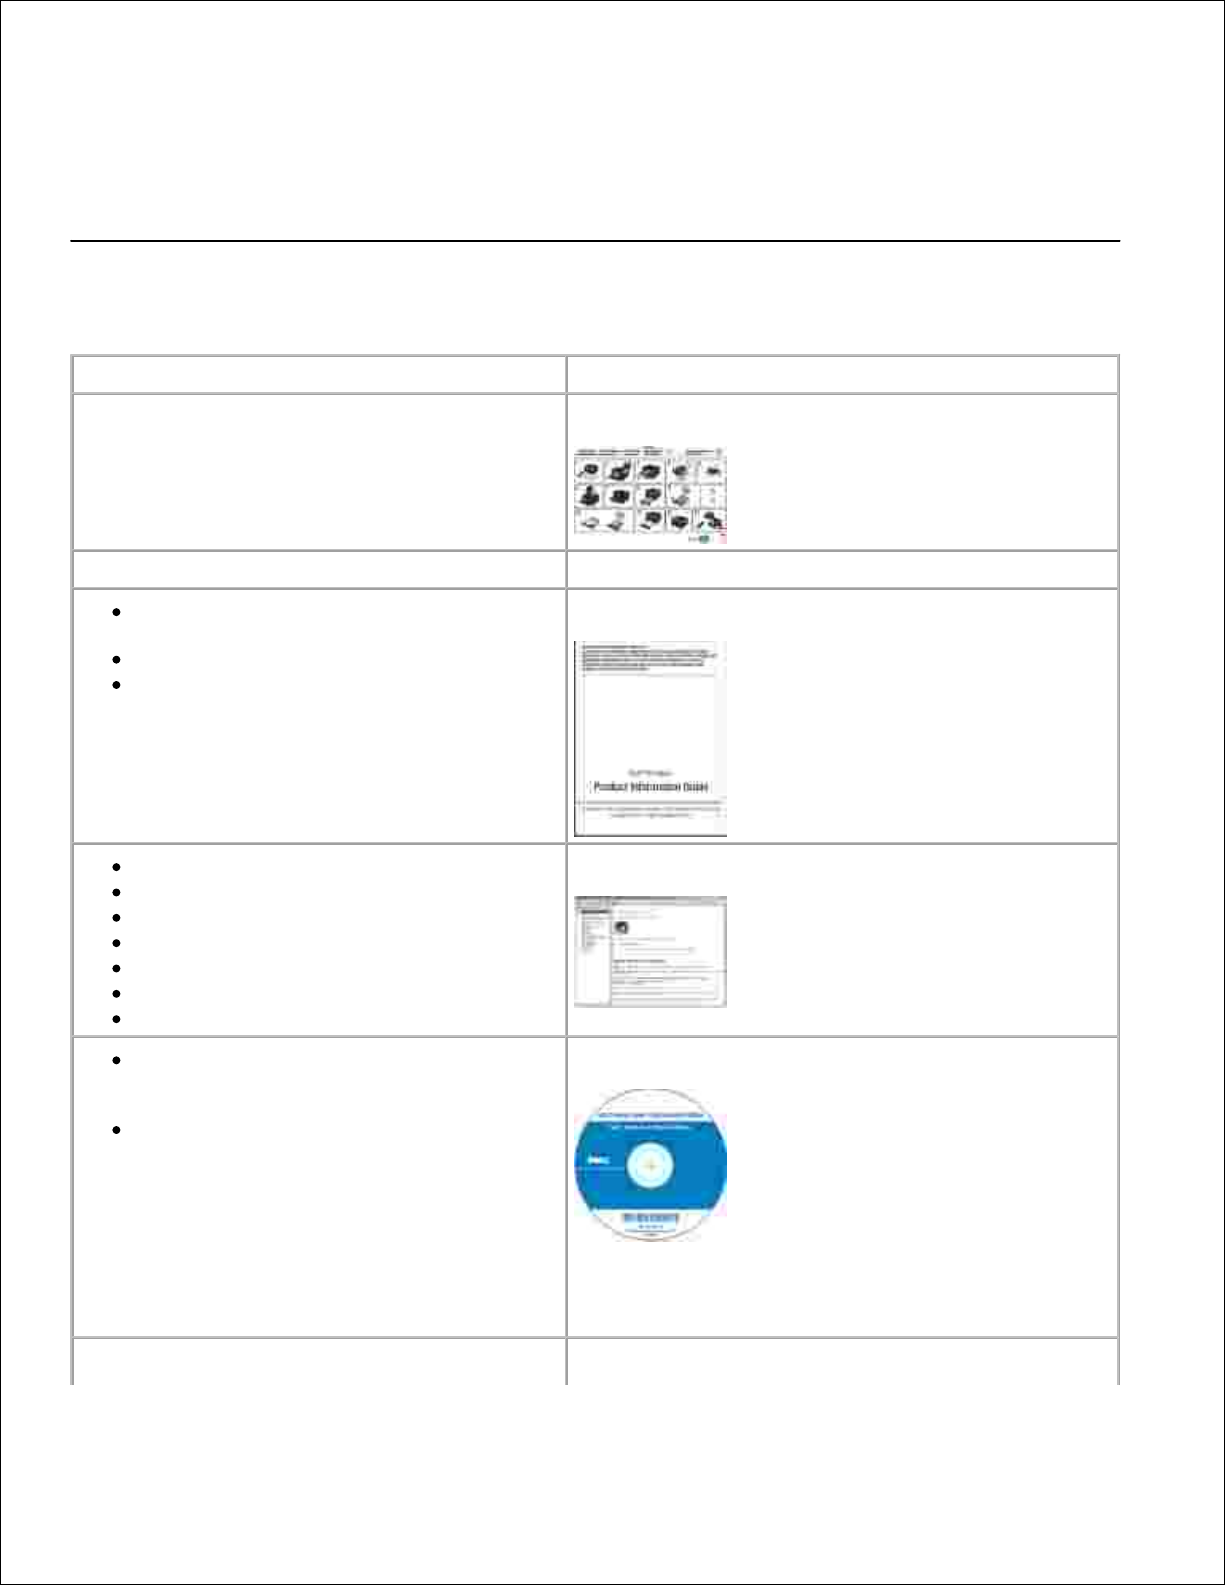
How to set up my printer
Setting Up Your Printer poster
Safety information for preparing to operate
my printer
Regulatory information
Warranty information
Product Information Guide
Supported paper type and sizes
How to select and store print media
How to load printable media into my printer
How to configure printer settings
How to set up and use printer software
How to care for and maintain my printer
How to troubleshoot and solve problems
User's Guide
Software and Drivers-Certified drivers for
your printer and installers for Dell™ printer
software
Readme files-Last minute technical
changes, or advanced technical reference
material for experienced users or
technicians
Software and Documentation CD
NOTE: If you purchased your Dell computer and printer
at the same time, documentation and drivers for your
printer are already installed on your computer.
Express Service Code and Number
Express Service Code and Number
Page 4
What are you looking for?
Find it here
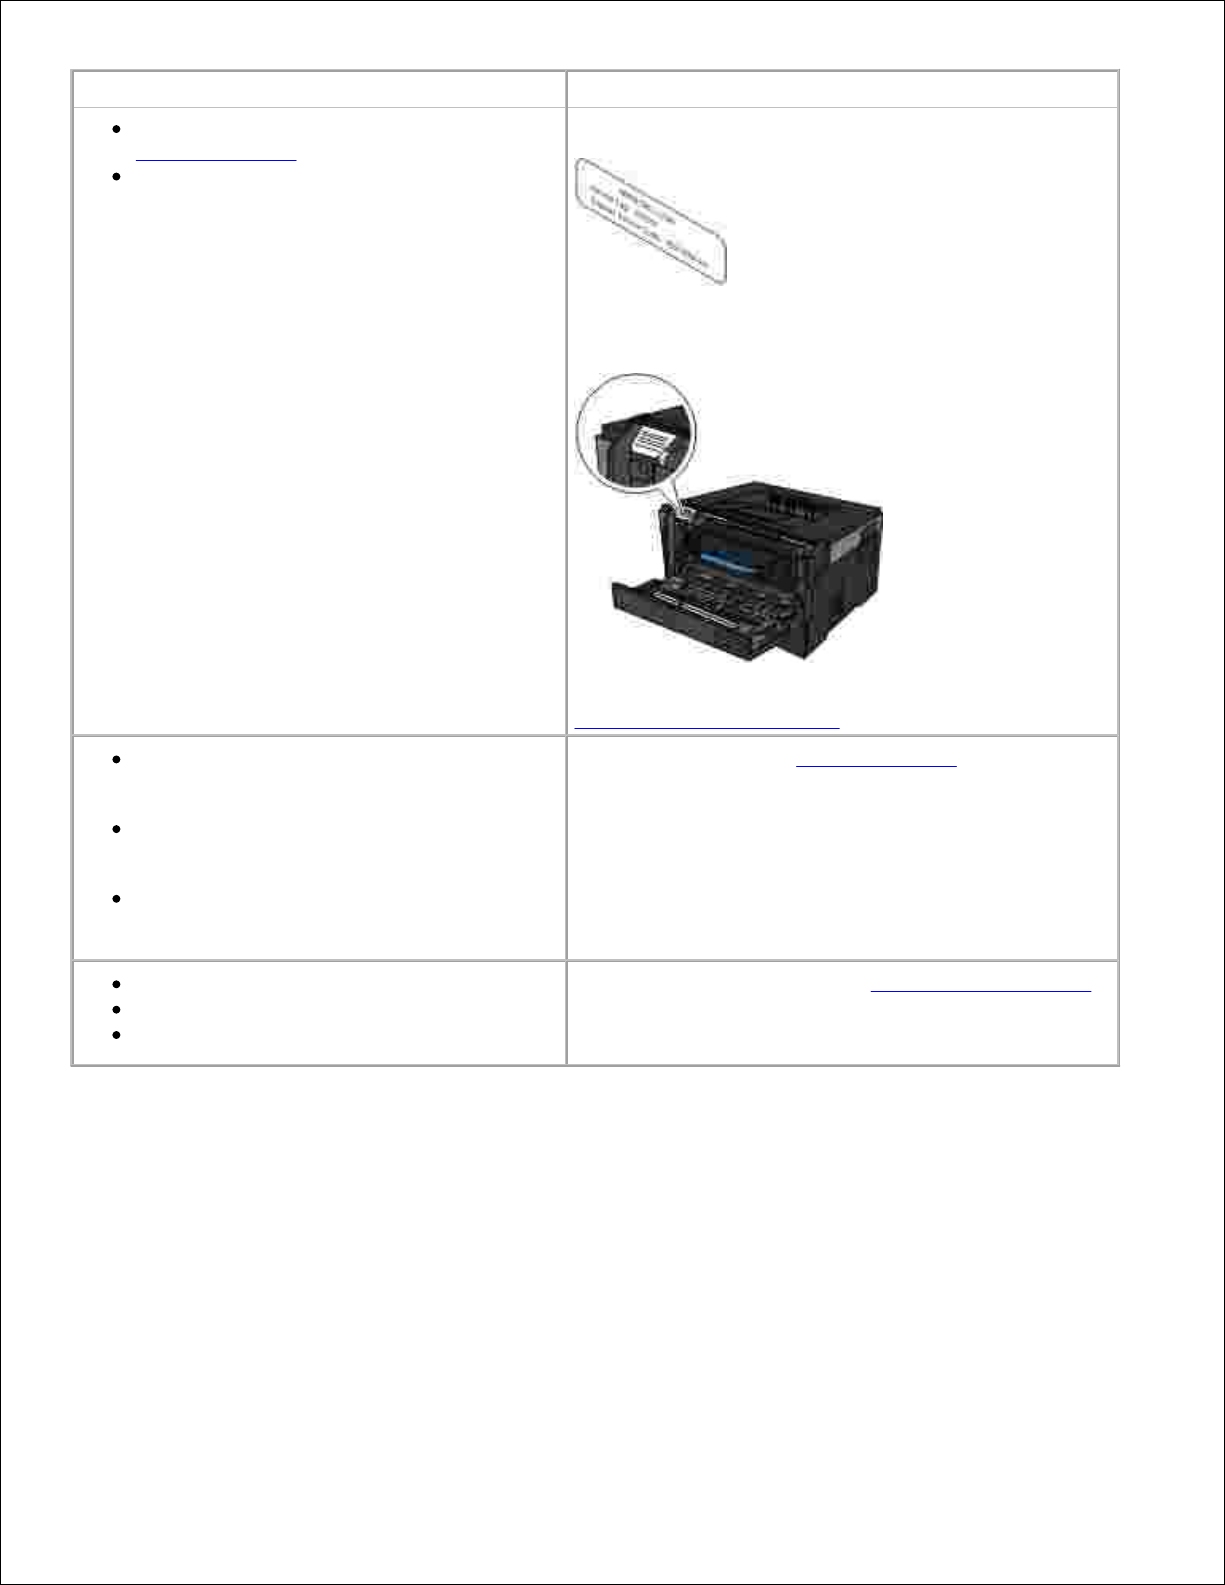
How to identify your printer when you use
support.dell.com or contact support
How to find the Express Service Code to
direct your call when contacting support
These labels are located on your printer.
The illustration below shows the location of the label on
the printer.
For more information about their location, see
Understanding Printer Parts.
Solutions-Troubleshooting hints and tips,
frequently asked questions, documentation,
driver downloads, and product upgrades
Upgrades-Upgrade information for
components such as memory, network
cards, and optional equipment
Customer Care-Contact information,
service call and order status, warranty, and
repair information
Dell Support Website-support.dell.com
NOTE: Select your region or business segment to view
the appropriate support site.
Supplies for my printer
Accessories for my printer
Replacement toner and parts for my printer
Dell Printer Supplies Website-www.dell.com/supplies
You can purchase printer supplies online, by phone, or
in select retail stores.
Page 5
About Your Printer
Understanding Printer Parts
Understanding the Operator Panel
Choosing the Right Cable
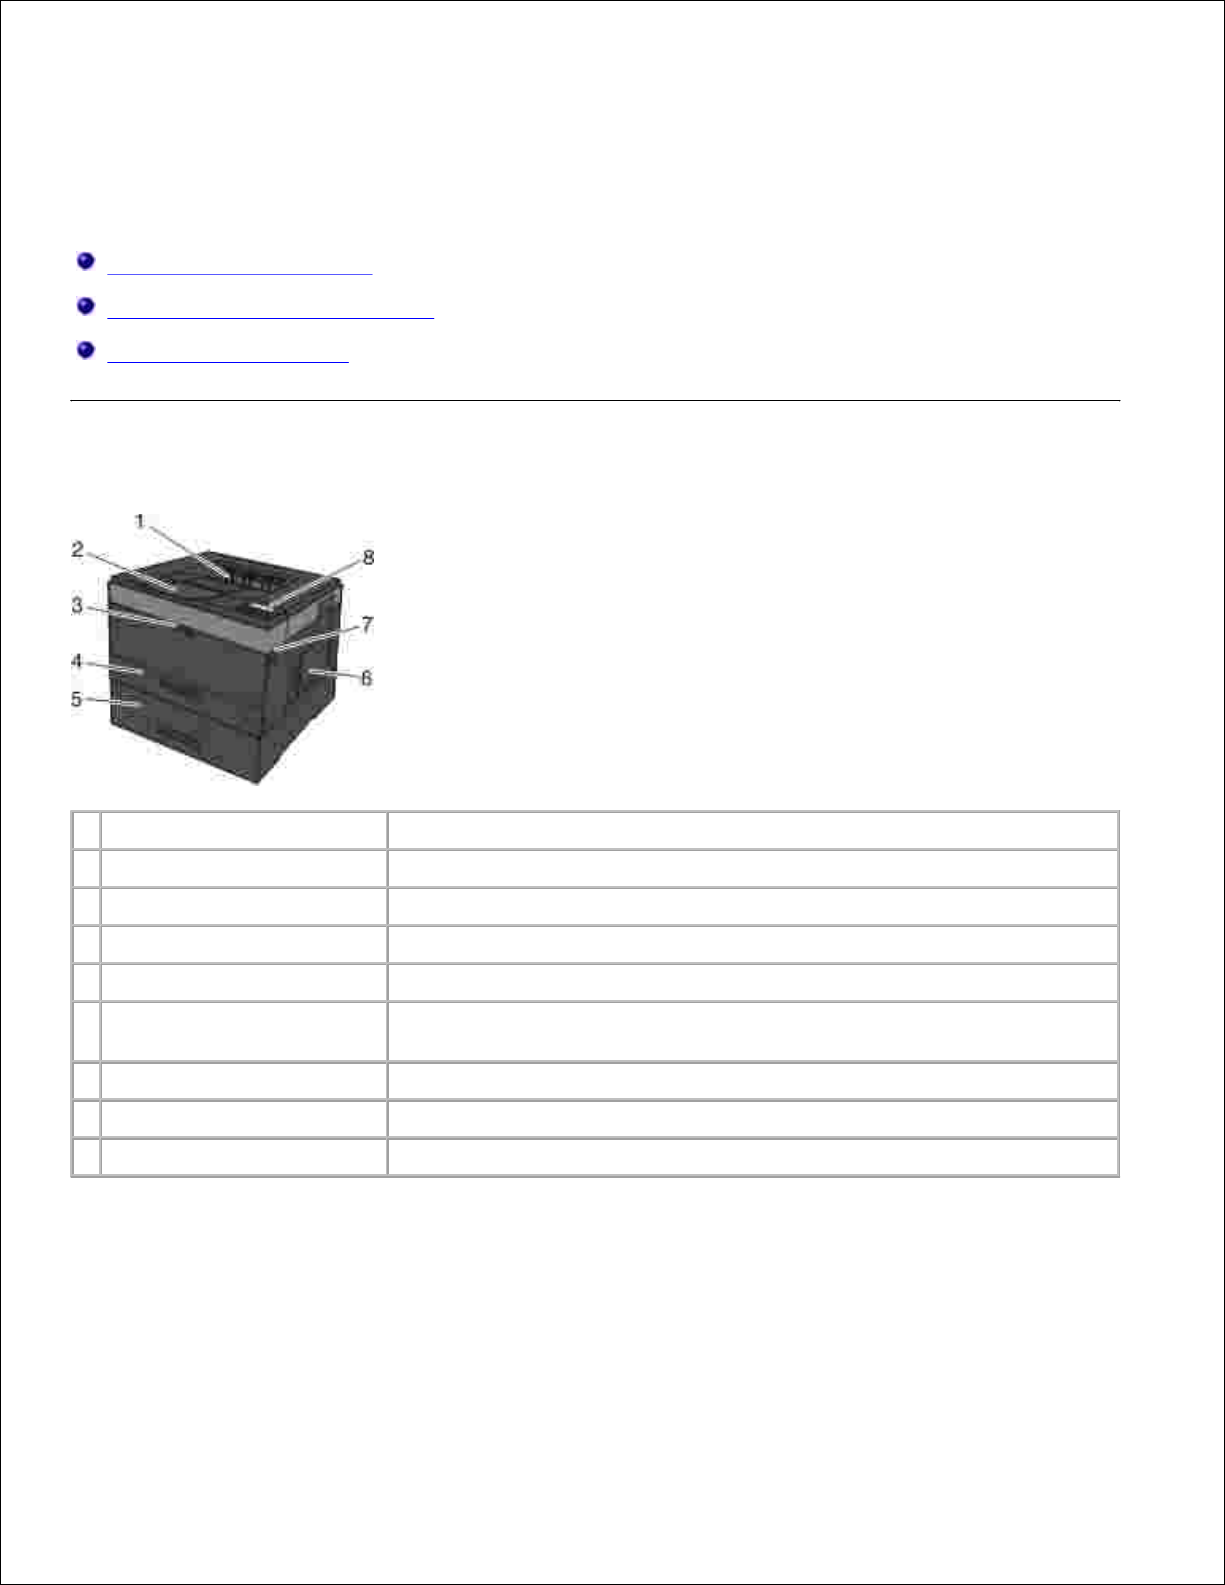
Understanding Printer Parts
Part
Description
1
Front exit
Slot from where the paper exits the printer.
2
Output bin extender
Support for the paper as it exits the printer.
3
Multipurpose feeder cover
Door to gain access to the multipurpose feeder.
4
Standard tray (Tray 1)
Standard paper tray that can hold 250 sheets of paper.
5
Optional 550-sheet drawer
(Tray 2)
Tray that can be purchased separately to increase the amount of blank
paper that your printer can hold.
6
Memory access door
Door to access the printer memory.
7
Door release button
Button to open the front cover of the printer.
8
Operator panel
Panel on the printer to control print jobs.
Page 6
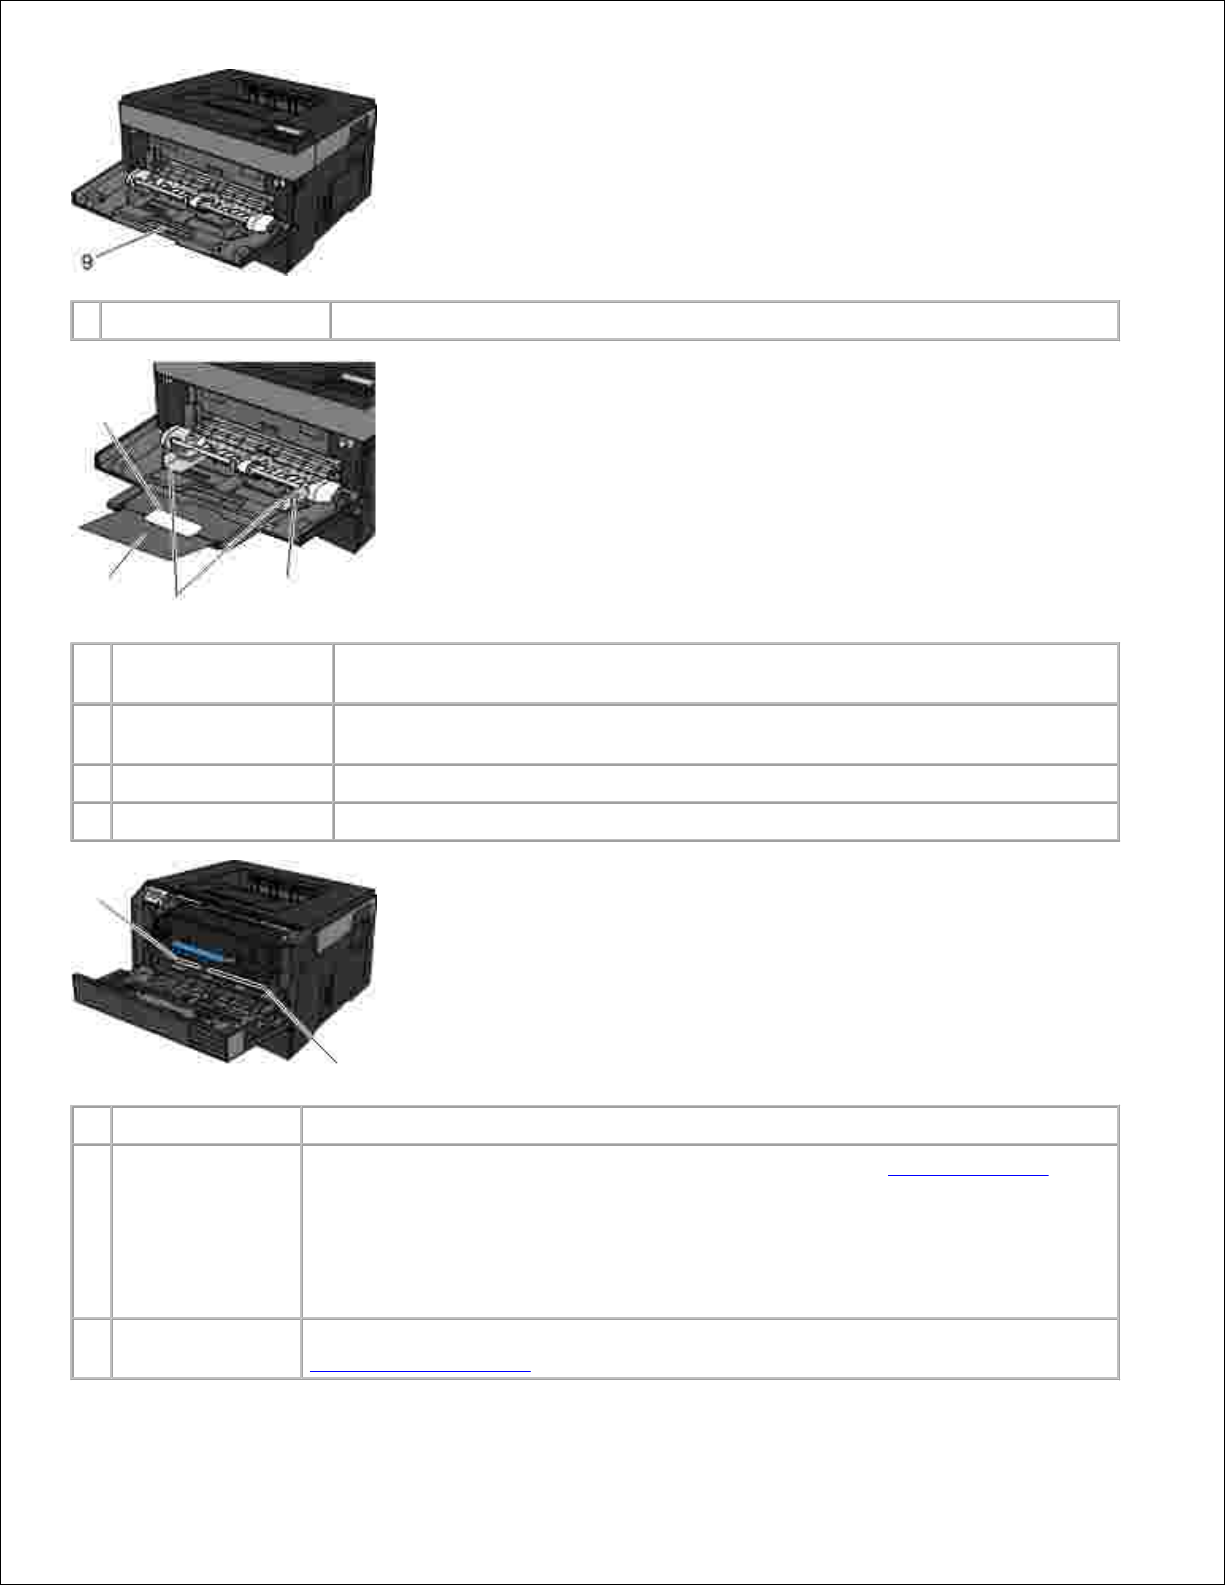
9
Multipurpose feeder
Tray to manually load various paper types such as envelopes.
10
Multipurpose feeder
tray
Support for the paper as it is loaded into the multipurpose feeder.
11
Extension tray
Additional support for print media other than paper, such as envelopes, to
prevent bending or wrinkling.
12
Width guides
Guides for the print media loaded into the multipurpose feeder.
13
Width guide tab
Slide the tab to adjust the width guides.
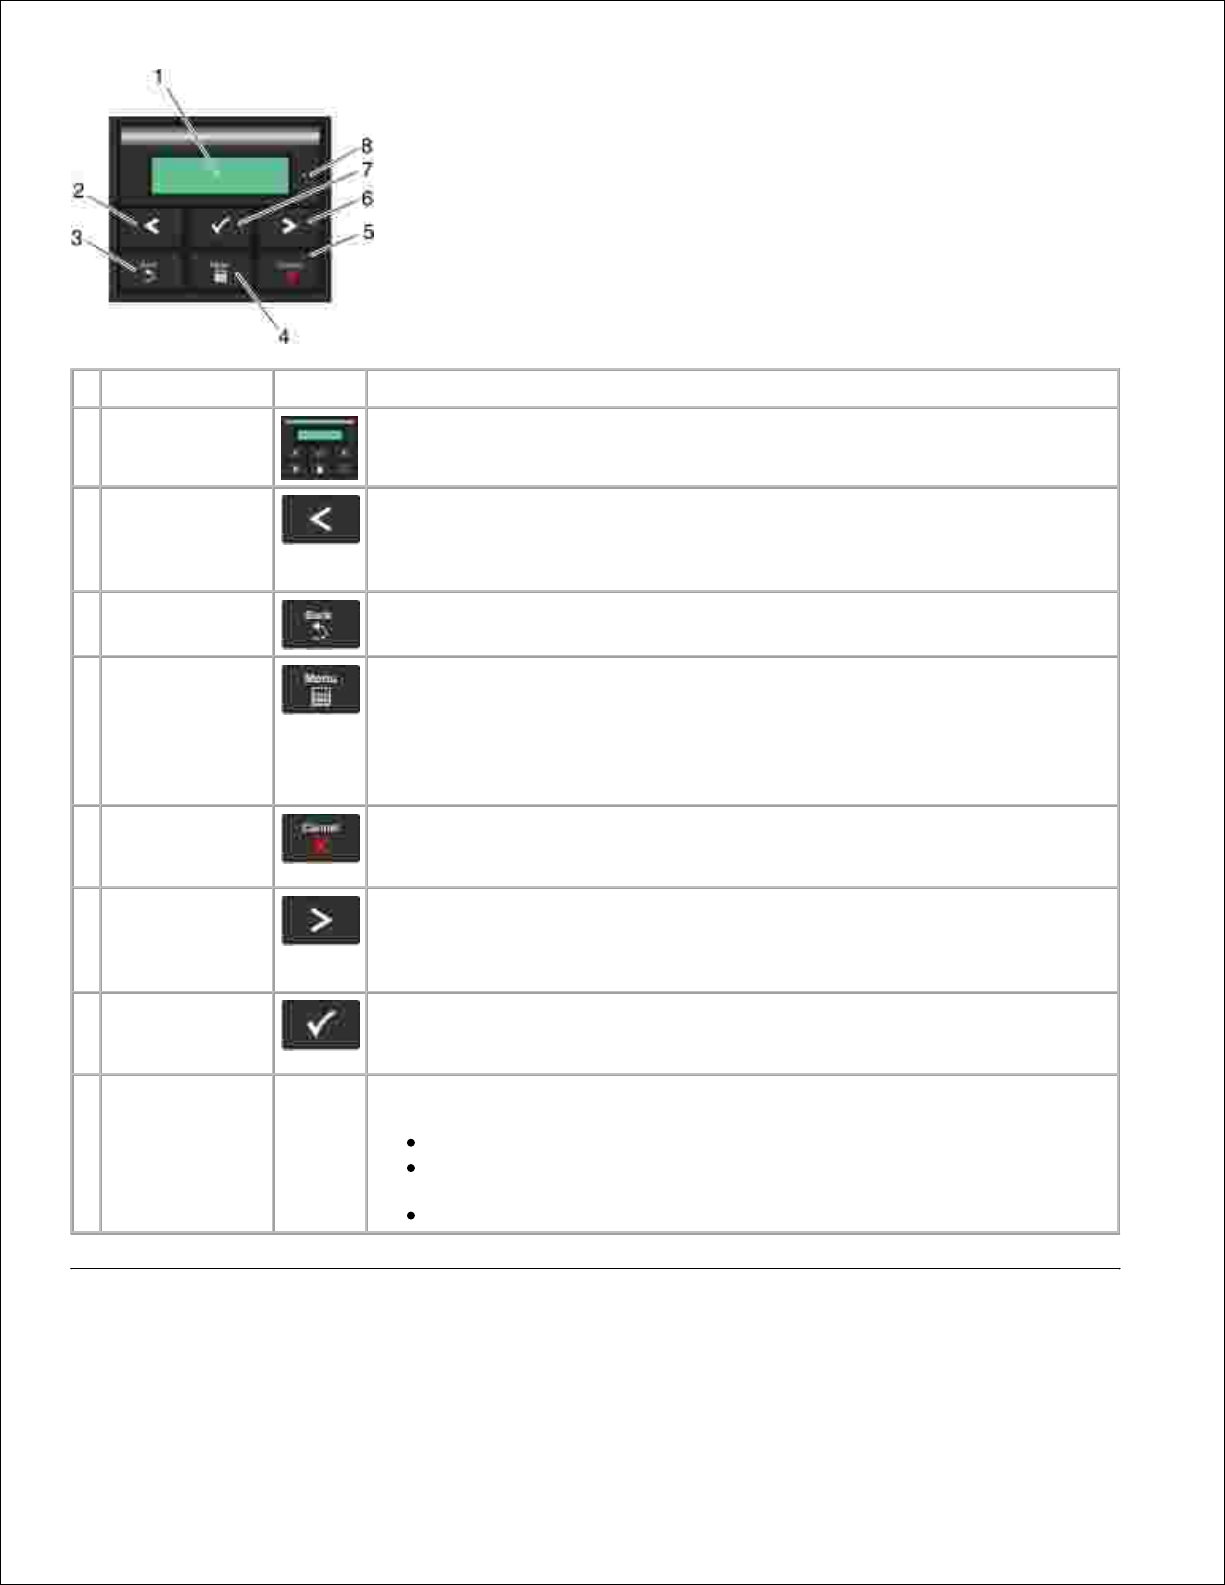
Part
Description
14
Express service
code
A series of numbers that identify your printer when you use support.dell.com or
contact technical support.
Enter the Express Service Code to direct your call when contacting technical
support.
NOTE: The Express Service Code is not available in all countries.
15
Supplies reorder
label
Information on where you can order toner cartridges or paper: visit
www.dell.com/supplies.
Page 7

Part
Description
16
USB port
Slot into which you plug the USB cable (sold separately). The other end of the
USB cable plugs into your computer. Locally attaches printer to the computer.
17
Network port (for
network printers only)
Slot into which you plug the Ethernet cable (sold separately). The other end of
the Ethernet cable plugs into the network port. Attaches printer to the
network.
18
Parallel port
Slot into which you plug the parallel cable (sold separately). The other end of
the parallel cable plugs into your computer. Locally attaches printer to the
computer.
19
Power cord connector
Connects the printer to the power outlet using the supplied country-specific
power cord.
20
Power switch
Switch to turn the printer on or off.
21
Locking device
Security lock that provides physical security to your printer.
22
Rear exit
Door allows print jobs to exit the printer flat, such as those printed on
transparencies or cardstock.
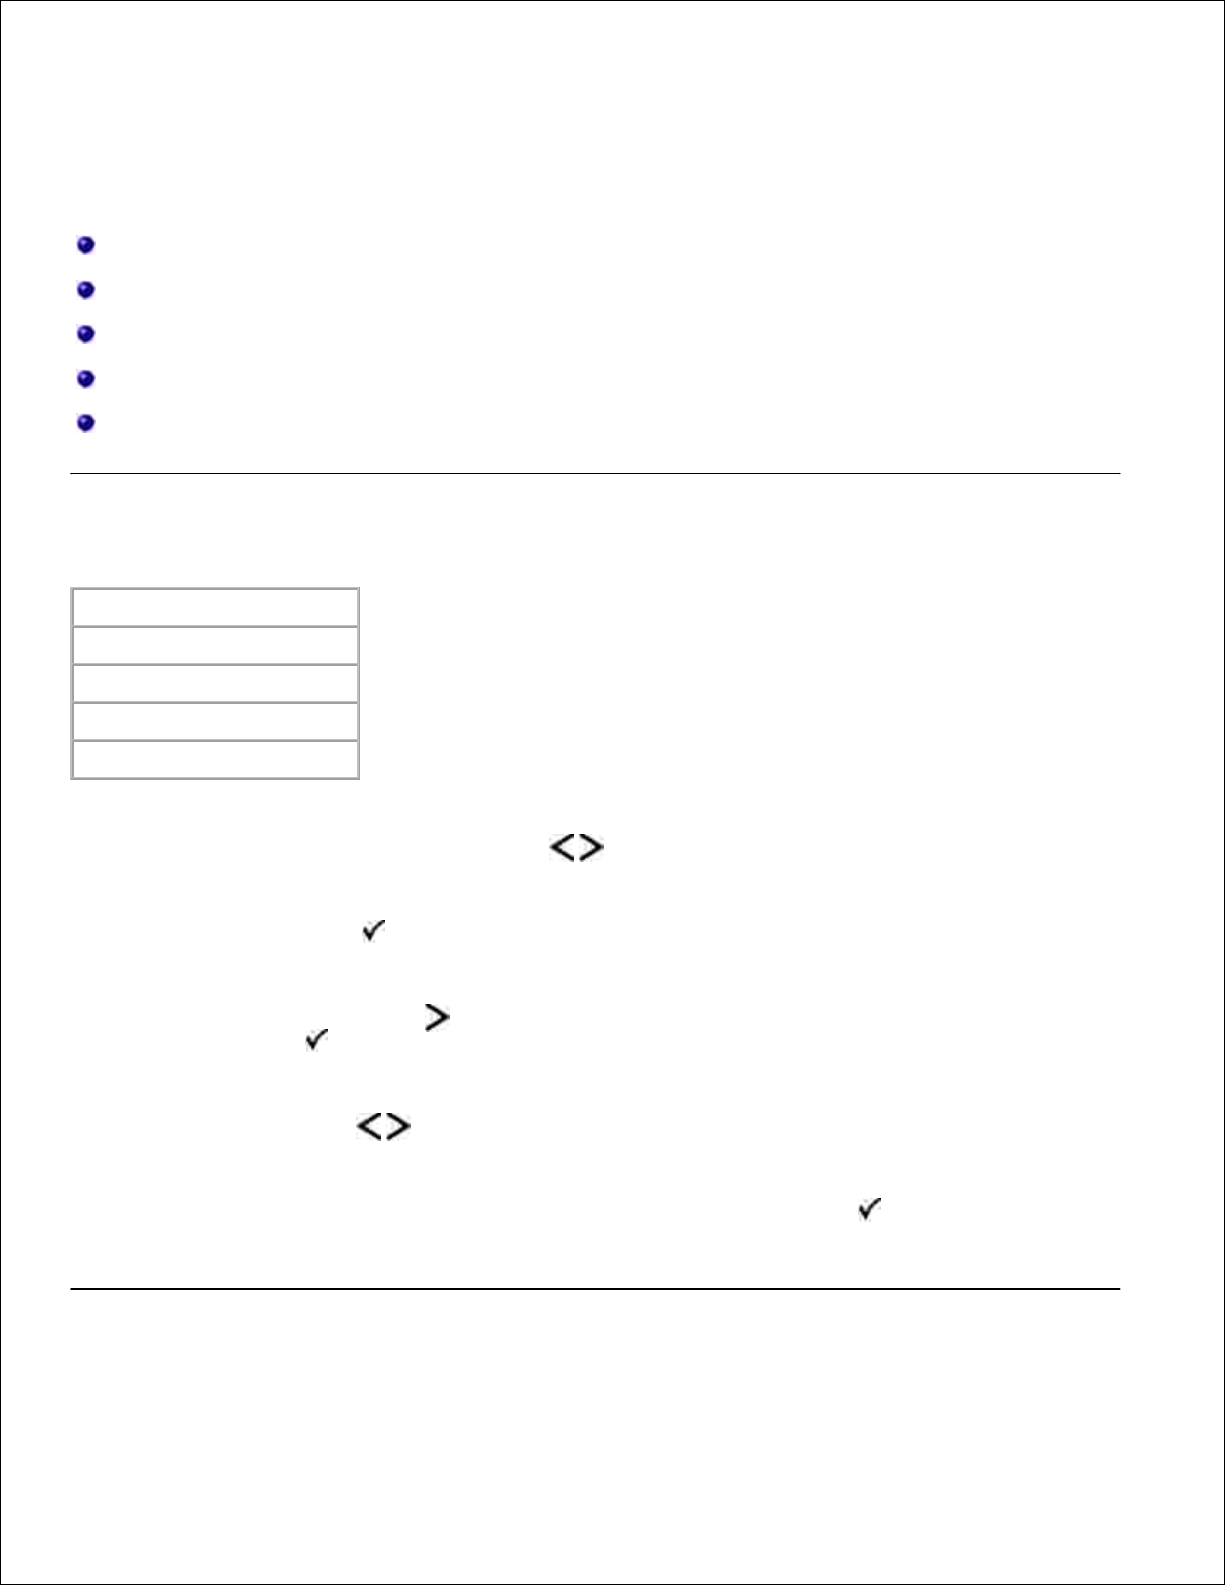
Understanding the Operator Panel
The operator panel contains:
Power indicator light
Two-line LCD display
Six buttons
Page 8
Use the
Icon
To
1
Display
View the number of copies to be printed as well as error codes.
2
Left arrow
button
Scroll through menus, submenus, or settings on the display.
Move to the previous or next option. Each press moves one item in the list
or to a different setting for a menu item.
3
Back button
Return to the previous screen.
4
Menu button
Open the menu. Pressing the menu button while in the menus will return the
user to the top level menu screen.
NOTE:
The menus are available only when the printer is in the Ready state.
5
Stop/Cancel
button
Cancel a print job in progress.
Exit a menu or submenu, and return to the default screen.
6
Right arrow
button
Scroll through menus, submenus, or settings on the display.
Move to the previous or next option. Each press moves one item in the list
or to a different setting for a menu item.
7
Select button
Select a menu or submenu item that appears on the display.
Submit a chosen value or setting for the printer.
8
Indicator light
Indicate the printer status:
Solid Green-The printer is idle or at Ready prompt.
Flashing Green-The printer is warming up, processing data, or
printing.
Solid Amber-Operator intervention needed.
Choosing the Right Cable
Page 9

Your printer interconnection cable must meet the following requirements:
Connection
Cable certification
USB
USB 2.0
Parallel
IEEE-1284
10/100/1000 Ethernet
CAT-5E
Page 10
Operator Panel Menus
Menu List
Paper Menu
Reports
Network/Ports
Settings
Menu List
Admin Menu
Paper Menu
Reports
Network/Ports
Settings
From the menu list, use the Arrow buttons to scroll the main menu.1.
Press the Select button .2.
Press the Right Arrow button until the heading you want appears on the display, and then press
the Select button .
3.
Use the Arrow buttons to scroll through the available menu items.4.
When the setting you want appears on the display, press the Select button to save the setting.5.
Paper Menu
Page 11
Main Menu
Mode Main Menu
Mode Main Menu
Paper Menu
Default Source
Tray <x>*
MP Feeder
Manual Paper
Manual Env
Configure MP
Cassette*
Manual
NOTE: The Cassette setting configures the
multipurpose feeder as an automatic paper
source.
Custom Types
Custom Type <x> (where x represents 1–6)
Recycled
Size/Type
Tray <x>
MP Feeder
Manual Paper
Manual Envelope
*Factory default setting
Page 12
Main Menu
Mode Main Menu
Mode Main Menu
Paper Texture
Plain* Texture
Card Stock Texture
Transparency Texture
Recycled Texture
Labels Texture
Bond Texture
Envelope Texture
Rough Envelope Texture
Letterhead Texture
Preprinted Texture
Colored Texture
Light Texture
Heavy Texture
Rough/Cotton Texture
Custom Type <x> Texture (where x represents
1–6)
*Factory default setting
Page 13

Main Menu
Mode Main Menu
Mode Main Menu
Paper Weight
Plain* Weight
Card Stock Weight
Transparency Weight
Recycled Weight
Labels Weight
Bond Weight
Envelope Weight
Letterhead Weight
Preprinted Weight
Colored Weight
Light Weight
Heavy Weight
Rough/Cotton Weight
Custom Type <x> Weight (where x represents
1–6)
*Factory default setting
Main Menu
Mode Main Menu
Mode Main Menu
Paper Loading
Recycled Loading
Bond Loading
Letterhead Loading
Preprinted Loading
Colored Loading
Light Loading
Heavy Loading
Custom Type <x> Loading (where x represents
1–6)
*Factory default setting
Page 14
Main Menu
Mode Main Menu
Mode Main Menu
Universal Setup
Units of Measure
Portrait Width
Portrait Height
Feed Direction
*Factory default setting
From the menu list, use the Arrow buttons to scroll to the Paper menu.1.
Press the Select button .2.
Press the Right Arrow button until the heading you want appears on the display, and then press
the Select button .
3.
Use the Arrow buttons to scroll through the available menu items.4.
When the setting you want appears on the display, press the Select button to save the setting.5.
Paper Mode Main Menu
Page 15
From this menu:
You can:
Default Source
Set a default paper
source for all print
jobs.
Tray <x>*
MP Feeder
Manual Paper
Manual Env
NOTE: The items on
the default source
vary depending on
the device type and
the attachments
and/or supplies
installed on it. Size
and Type settings are
configured for each of
the listed Default
Source options under
Tray Configuration.
Configure MP
Determine when the
printer selects paper
from the
multipurpose feeder
and the mode of
operation of the
multipurpose feeder.
Cassette*-Treats
the multipurpose
feeder like any
other tray. If a
print job requests
a size or type that
is loaded only in
the multipurpose
feeder, then the
printer pulls print
media from the
multipurpose
feeder for the job.
Manual-Treats
the
multipurpose
feeder like a
manual feed
tray. Load
Manual appears
when a single
sheet of print
media needs to
be inserted into
the
*Factory default setting
Page 16
From this menu:
You can:
the
multipurpose
feeder.
NOTE: The Cassette
setting configures the
multipurpose feeder
as an automatic
paper source.
Custom Types
Specify the type of
print media
associated with each
Custom Type
available in the Paper
Type menu.
Custom
Type <x>
(where x
represents 1–6)
Recycled
*Factory default setting
Size/Type
From this menu:
You can:
Tray <x> Size
Identify the default size for each source.
A4* (non-US)
A5
A6
JIS B5
Letter* (US)
Legal
Executive
Folio
Statement
Universal
NOTE: For more information, see Universal Setup .
Tray <x> Type
Identify the type of print media loaded in each source.
Plain* Paper
Transparency
Labels
Bond
Letterhead
Preprinted
Colored Paper
Light Paper
*Factory default setting
Page 17
From this menu:
You can:
Heavy Paper
Rough/Cotton
Recycled
Custom Type <x> (where x represents 1–6)
MP Feeder Size
Identify the size of print media loaded in the
multipurpose feeder.
A4* (non-US)
A5
A6
JIS B5
Letter* (US)
Legal
Executive
Folio
Statement
Universal
NOTE: For more information, see Universal Setup .
7 3/4 Envelope
9 Envelope
10 Envelope
B5 Envelope
C5 Envelope
DL Envelope
Other Envelope
MP Feeder Type
Identify the type of print media loaded in the
multipurpose feeder.
Plain Paper
Card Stock
Transparency
Recycled
Labels
Bond
Letterhead
Preprinted
Colored Paper
Envelope
Rough Envelope
Light Paper
Heavy Paper
Rough/Cotton
Custom Type <x> (where x represents 1–6)
NOTE: Custom Type 6 is the default paper type.
Manual Paper Size
Identify the size of print media loaded manually in the
multipurpose feeder.
*Factory default setting
Page 18
From this menu:
You can:
A4* (non-US)
A5
A6
JIS B5
Letter* (US)
Legal
Executive
Folio
Statement
Universal
NOTE: For more information, see Universal Setup .
Manual Paper Type
Identify the type of print media loaded manually in the
multipurpose feeder.
Plain* Paper
Card Stock
Transparency
Recycled
Labels
Bond
Letterhead
Preprinted
Colored Paper
Light Paper
Heavy Paper
Rough/Cotton
Custom Type <x> (where x represents 1–6)
Duplex Size
Identify the size of print media loaded for integrated
duplex printing.
A4*
Letter
Legal
Oficio
Folio
Universal
Duplex Type
Identify the type of print media loaded for integrated
duplex printing.
Plain*
Recycled
Bond
Letterhead
Preprinted
Colored Paper
Light Paper
Heavy Paper
*Factory default setting
Page 19
From this menu:
You can:
Rough/Cotton
Custom Type <x> (where x represents 1–6)
Manual Envelope Size
Identify the envelope size being manually loaded.
7 3/4 Envelope
9 Envelope
10 Envelope* (US)
B5 Envelope
C5 Envelope
DL Envelope* (non-US)
Other Envelope
Manual Envelope Type
Identify the envelope type being manually loaded.
Envelope*
Rough Envelope
Custom Type <x> (where x represents 1–6)
*Factory default setting
Paper Texture
Page 20
From this
menu:
You can:
Plain
Card Stock
Transparency
Recycled
Labels
Bond
Envelope
Rough
Envelope
Letterhead
Preprinted
Colored
Light
Heavy
Rough/Cotton
Custom <x>
(where x
represents
1–6)
Specify the relative texture of the print media loaded in a specific tray.
Normal*
Rough
Smooth
*Factory default setting
Paper Weight
Page 21

From this
menu:
You can:
Plain*
Card Stock
Transparency
Recycled
Labels
Bond
Envelope
Rough
Envelope
Letterhead
Preprinted
Colored
Light
Heavy
Rough/Cotton
Custom <x>
(where x
represents
1–6)
Identify the relative weight of the print media loaded in a specific tray and
ensure that the toner adheres properly to the printed page.
Light
Heavy
Normal*
*Factory default setting
Paper Loading
Page 22
From this
menu:
You can:
Recycled
Bond
Letterhead
Preprinted
Colored
Paper
Light
Paper
Heavy
Paper
Custom
Type <x>
(where x
represents
1–6)
Determine whether 2-sided printing occurs for all jobs specifying a print
media type.
Duplex
Off*
*Factory default setting
Universal Setup
From
this
menu:
You can:
Units of
Measure
Specify the height, width, and feed direction of the Universal Paper Size.
Inches* (US)
Millimeters* (non-US)
Portrait
Width
Set the portrait width of the universal media.
3–14.17 inches
76–1219 mm
NOTE: If the width exceeds the maximum, then the printer uses the
maximum width allowed.
NOTE: 8.5 inches is the US factory default setting. Inches can be
increased in 0.01-inch increments.
NOTE: 216 mm is the international factory default setting. Millimeters
can be increased in 1-mm increments.
Portrait
Height
Set the portrait height of the universal media.
3–14.17 inches
76–1219 mm
*Factory default setting
Page 23
From
this
menu:
You can:
NOTE: If the height exceeds the maximum, then the printer uses the
maximum height allowed.
NOTE: 14 inches is the US factory default setting. Inches can be
increased in 0.01-inch increments.
NOTE: 356 mm is the international factory default setting. Millimeters
can be increased in 1-mm increments.
Feed
Direction
Specify the feed direction of the Universal Paper Size.
Short Edge*
Long Edge
NOTE: Feed Direction appears only if the longest edge of the media is shorter
than the Maximum Physical Width of the printer.
*Factory default setting
Reports
Mode
Mode Main Menu
Reports
Menu Settings Page
Device Statistics
Network Setup Page
Profiles List
Print Fonts
Print Directory
Asset Report
From the menu list, use the Arrow buttons to scroll the Reports menu.1.
Press the Select button .2.
Press the Right Arrow button until the heading you want appears on the display, and then press
the Select button .
3.
Use the Arrow buttons to scroll through the available menu items.4.
Page 24
4.
When the setting you want appears on the display, press the Select button to save the setting.5.
From
this
menu:
You can:
Menu
Settings
Page
Display information relating to:
Current settings for each of the menu items for all menus
Cartridge information
List of installed options and features
Device
Statistics
View information relating to:
Job Information
Supply Information
Printer
USB Direct
NOTE: The details presented on this page vary for every device type.
Network
Setup
Page
List important print server information (e.g., hardware addresses, firmware
revision level, protocol settings, etc.).
The page displays specific details about the devices:
Standard Network Card
Integrated Network Option Settings
TCP/IP
IPv6
NOTE: The Compi: field that appears on this screen always displays in
English, regardless of the value of the device's Display.
Profiles
List
View profiles stored in the printer.
Print
Fonts
Print a sample of all the fonts available for the printer language currently set in
the printer.
PCL Fonts
PostScript Fonts
Print
Directory
View a list of resources that are stored in the user area of the flash and disk
options.
NOTE: The Print Directory Page appears only when a non-defective flash
option or a non-defective disk option is installed and formatted.
Asset
Report
Manage the printer's asset information (e.g., serial number, model name, etc.).
Page 25
Network/Ports
Mode
Mode Main Menu
Network/Port
Active NIC
Network Menu
USB Menu
Parallel Menu
Active NIC Mode
Main Menu
Mode Main Menu
Active NIC
Auto*
Standard Network
* Factory default setting
Network Mode
Main Menu
Mode Main Menu
Network
PCL SmartSwitch
PS SmartSwitch
NPA Mode
Network Buffer
MAC Binary PS
Network Setup
Each Network sub-menu appears only if the device has a standard network card or if additional network
cards have been installed.
Use the Network menu to change printer settings on jobs sent through a network port (either Standard
Network or Network Opt <x>).
From the menu list, use the Arrow buttons to scroll to the Network menu.1.
Press the Select button .2.
Press the Right Arrow button until the heading you want appears on the display, and then press
the Select button .
3.
Use the Arrow buttons to scroll through the available menu items.4.
Page 26
4.
When the setting you want appears on the display, press the Select button to save the setting.5.
Network Mode Main Menu
From this
menu:
You can:
PCL
SmartSwitch
Set the printer to automatically switch to PCL emulation when a print job
requires it, regardless of the default printer language.
On*
Off
PS
SmartSwitch
Set the printer to automatically switch to PostScript emulation when a print
job requires it, regardless of the default printer language.
On*
Off
NPA Mode
Send print jobs to the printer, and query printer status information
simultaneously.
Off
Auto*
Network
Buffer
Assign a size to the network input buffer.
Auto*
Disabled
3K to <maximum size allowed> (in 1K increments).
MAC Binary
PS
Configure the printer to process Macintosh binary PostScript emulation print
jobs.
Off
On
Auto*
Standard
Network
Setup
Define basic printer network settings.
Reports
Network Card
TCP/IP
IPv6
* Factory default setting
USB Mode
Mode
Mode Main Menu
USB
PCL SmartSwitch
PS SmartSwitch
NPA Mode
Page 27
Mode
Mode Main Menu
USB Buffer
MAC Binary PS
USB With ENA
NOTE: Applicable only to Dell
3300 Wireless Print Adapter
(sold separately).
Use the USB menu to change printer settings on jobs sent through a USB port.
From the menu list, use the Arrow buttons to scroll to the USB menu.1.
Press the Select button .2.
Press the Right Arrow button until the heading you want appears on the display, and then press
the Select button .
3.
Use the Arrow buttons to scroll through the available menu items.4.
When the setting you want appears on the display, press the Select button to save the setting.5.
USB Mode Main Menu
From this
menu:
You can:
PCL
SmartSwitch
Set the printer to automatically switch to PCL emulation when a print job
requires it, regardless of the default printer language.
On*
Off
PS
SmartSwitch
Set the printer to automatically switch to PostScript emulation when a print
job requires it, regardless of the default printer language.
On*
Off
* Factory default setting
Page 28
From this
menu:
You can:
NPA Mode
Send print jobs to the printer, and query printer status information at the
same time.
Off
Auto*
USB Buffer
Assign a size to the USB input buffer.
Auto*
Disabled
3K to <maximum size allowed> (in 1K increments).
MAC Binary
PS
Configure the printer to process Macintosh binary PostScript emulation print
jobs.
Off
On
Auto*
USB With
ENA
ENA Address-Set the USB port ENA address
ENA Netmask-Set the USB port ENA Netmask
ENA Gateway-Set the USB port ENA Gateway
NOTE: 4-field IP address (0.0.0.0*)
NOTE: The settings are shown when an ENA is attached.
NOTE: This is applicable only to Dell 3300 Wireless Print Adapter
(Sold separately).
* Factory default setting
Parallel Mode
Mode
Mode Main Menu
Parallel
PCL SmartSwitch
PS SmartSwitch
NPA Mode
Parallel Buffer
Advanced Status
Protocol
Honor Init
Parallel Mode 2
MAC Binary PS
Parallel With ENA
Use the Parallel menu to change printer settings on jobs sent through a parallel port.
Page 29
From the menu list, use the Arrow buttons to scroll the Parallel menu.1.
Press the Select button .2.
Press the Right Arrow button until the heading you want appears on the display, and then press
the Select button .
3.
Use the Arrow buttons to scroll through the available menu items.4.
When the setting you want appears on the display, press the Select button to save the setting.5.
Parallel Mode Main Menu
From this
menu:
You can:
PCL
SmartSwitch
Set the printer to automatically switch to PCL emulation when a print job
requires it, regardless of the default printer language.
On*
Off
PS
SmartSwitch
Set the printer to automatically switch to PS emulation when a print job
requires it, regardless of the default printer language.
On*
Off
NPA Mode
Send print jobs to the printer, and query printer status information at the
same time.
Off
Auto*
Parallel
Buffer
Assign a size to the parallel input buffer.
Auto*
Disabled
3K to <maximum size allowed> (in 1K increments).
Advanced
Status
Enable bidirectional communication through the parallel port.
On*
Off
Protocol
Specify the parallel interface protocol.
Receive information at a much higher transmission rate if the printer is set
* Factory default setting
Page 30
From this
menu:
You can:
Receive information at a much higher transmission rate if the printer is set
to Fastbytes (if computer supports Fastbytes), or receive information at a
normal transmission rate if the printer is set to Standard.
Standard
Fastbytes*
Honor Init
Determine whether the printer honors hardware initialization requests from
the computer. The computer requests initialization by activating the INIT
signal on the parallel interface.
Many personal computers activate the INIT signal each time the computer is
turned on and off.
On
Off*
Parallel
Mode 2
Determine whether the parallel port data is sampled on the leading (on) or
trailing (off) edge of the strobe.
Off
On*
NOTE: This menu appears only if supported by the parallel port.
MAC Binary
PS
Configure the printer to process Macintosh binary PostScript emulation print
jobs.
Off
On
Auto*
Parallel With
ENA
ENA
Address
ENA
Netmask
ENA
Gateway
Configure the parallel port ENA address, Netmask, and Gateway settings.
4 field IP address (0.0.0.0*)
NOTE: These settings are shown only when ENA is attached through the
parallel port.
* Factory default setting
Settings
Mode
Mode Main Menu
Settings
General Settings
Setup Menu
Page 31

Mode
Mode Main Menu
Finishing Menu
Quality Menu
Utilities Menu
PostScript Menu
PCL Emul Menu
General Settings Mode
Main Menu
Mode
Main
Menu
General Settings
Display
Language
Run
Initial
Setup
Alarms
Timeouts
Print
Recovery
Factory
Defaults
From the menu list, use the Arrow buttons to scroll to the General Settings menu.1.
Press the Select button .2.
Press the Right Arrow button until the heading you want appears on the display, and then press
the Select button .
3.
Use the Arrow buttons to scroll through the available menu items.4.
When the setting you want appears on the display, press the Select button to save the setting.5.
General Settings Mode Main Menu
Page 32

From this menu:
You can:
Display Language
Set the language of the text appearing on the display.
English*
Arabic
Brazilian Portuguese
Czech
Danish
Dutch
Finnish
French
German
Greek
Hebrew
Iberian Portuguese
Italian
Japanese (Kanji)
Norwegian
Polish
Russian
Simplified Chinese
Spanish
Swedish
Turkish
Run Initial Setup
Launch a setup wizard when the printer is powered
on.
Yes*
No
Alarms
Set an alarm to sound when the printer requires
operator intervention.
Cartridge Alarm
Off*
Single
Timeouts
Specify the number of minutes of inactivity before the
system enters a lower power state.
Power Saver Mode
Disabled
1–240 minutes
60 minutes*
Screen Timeout
15*–300 seconds
*Factory default setting
Page 33

From this menu:
You can:
Print Timeout
Disabled
1–255 seconds
90 seconds*
Wait Timeout
Disabled
15–65535 seconds
40 seconds*
Network Job Timeout
Disabled
10–255 seconds
90 seconds*
Print Recovery
Specify whether the printer continues from certain
offline situations, reprints jammed pages, or waits
until the entire page is processed and ready to be
printed.
Auto Continue
Disabled*
5–255 seconds
Jam Recovery
On
Off
Auto*
Page Protect
On
Off*
Factory Defaults
Reset and restore appropriate settings to their factory
default values.
Do Not Restore*
Restore Now
*Factory default setting
Setup Mode
Page 34

Main Menu
Mode Main Menu
Setup
Printer Language
Print Area
Download Target
Resource Save
From the menu list, use the Arrow buttons to scroll to the Setup menu.1.
Press the Select button .2.
Press the Right Arrow button until the heading you want appears on the display, and then press
the Select button .
3.
Use the Arrow buttons to scroll through the available menu items.4.
When the setting you want appears on the display, press the Select button to save the setting.5.
Use the Setup menu to configure how the printer formats the end of a line depending on the computer
system being used.
Setup Mode Main Menu
From
this
menu:
You can:
Printer
Language
Define the default printer language used to communicate data from the
computer to the printer.
PS Emulation
PCL Emulation*
Print
Area
Modify the logical and physical printable area.
Normal*
Whole Page
Download
Target
Specify the storage location for downloaded resources.
RAM*
Flash
NOTE: Download Target appears only if flash option is installed.
*Factory default setting
Page 35

From
this
menu:
You can:
Resource
Save
Specify whether all permanent downloaded resources, such as fonts and
macros stored in RAM, are saved if the printer receives a job that
requires more memory than is available.
Off*-The printer retains downloaded resources only until memory
is needed. It then deletes those resources associated with the
inactive printer language.
On-The printer retains all downloaded resources for all printer
languages during language changes and printer resets. If the
printer runs out of memory, 38 Memory Full appears.
*Factory default setting
Finishing Mode
Main Menu
Mode Main Menu
Finishing
Sides (Duplex)
Duplex Binding
Copies
Blank Pages
Collate
Separator Sheets
Separator Source
N-up (Pages/Side)
N-up Ordering
Orientation
N-up Border
The finishing menu specifies the default finishing for all print jobs.
From the menu list, use the Arrow buttons to scroll to the Finishing menu.1.
Press the Select button .2.
Press the Right Arrow button until the heading you want appears on the display, and then press
the Select button .
3.
Use the Arrow buttons to scroll through the available menu items.4.
Page 36

4.
When the setting you want appears on the display, press the Select button to save the setting.5.
Finishing Mode Main Menu
From this
menu:
You can:
Sides
(Duplex)
Enable duplex (2-sided) printing.
1 sided*
2 sided
Duplex
Binding
Define the way duplexed pages are bound and how the printing on
the back of the page is oriented in relation to the printing on the
front of the page.
Long Edge*
Short Edge
Copies
Specify a default number of copies for each print job.
1*–999
Blank Pages
Define whether blank pages are inserted in a print job.
Do Not Print*
Print
Collate
Stack the pages of a print job in sequence when printing multiple
copies.
On-Prints the entire job the number of times specified by the
Copies menu item. For example, if you set Copies to 2 and
send three pages to print, the printer prints page 1, page 2,
page 3, page 1, page 2, page 3.
Off*-Prints each page of a job the number of times specified
by the Copies menu item. For example, if you set Copies to 2
and send three pages to print, the printer prints page 1, page
1, page 2, page 2, page 3, page 3.
Separator
Sheets
Specify whether blank separator sheets are inserted.
None*
Between Copies
Between Jobs
Between Pages
Separator
Source
Specify the paper source for separator sheets.
Tray <x>*
MP Feeder
NOTE: From the Paper menu, Configure MP must be set to Cassette
in order for MP Feeder to appear as a menu setting.
N-up
Specify that multiple-page images be printed on one side of a sheet
* Factory default setting
Page 37

From this
menu:
You can:
N-up
(Pages/Side)
Specify that multiple-page images be printed on one side of a sheet
of paper.
Off*
2 Up
3 Up
4 Up
6 Up
9 Up
12 Up
16 Up
N-up
Ordering
Specify the positioning of multiple-page images when using multipage print.
Horizontal*
Vertical
Reverse Horizontal
Reverse Vertical
NOTE: Positioning depends on the number of images and whether
the images are in portrait or landscape orientation.
Orientation
Specify the orientation of a multiple-page sheet.
Auto*
Landscape
Portrait
N-up Border
Print a border around each page image when using multi-page print.
None*
Solid
* Factory default setting
Quality Mode
Mode Menu
Mode Main Menu
Quality
Print Resolution
Pixel Boost
Toner Darkness
Enhance Fine Lines
Gray Correction
Brightness
Contrast
From the menu list, use the Arrow buttons to scroll to the Quality menu.1.
Page 38

1.
Press the Select button .2.
Press the Right Arrow button until the heading you want appears on the display, and then press
the Select button .
3.
Use the Arrow buttons to scroll through the available menu items.4.
When the setting you want appears on the display, press the Select button to save the setting.5.
Quality Mode Main Menu
From this
menu:
You can:
Print
Resolution
Specify the printed output resolution.
600 dpi*
1200 dpi
1200 Image Q
2400 Image Q
Pixel
Boost
Approximate a high-resolution printer font and allow a rough
preview of how the page would look when printed.
Off*
Fonts
Horizontally
Vertically
Both directions
Toner
Darkness
Lighten or darken printed output and conserve toner.
Ranges 1–10
8*
Select a lower value for finer line width, lighter grayscale images,
and lighter printed output.
Select a higher value for bolder line widths or darker grayscale
images.
NOTE: Selecting a smaller number can help conserve toner.
Enhance
Fine Lines
Enable a print mode preferable for files such as architectural
drawings, maps, electrical circuit diagrams, and flow charts.
Off*
On
* Factory default setting
Page 39

From this
menu:
You can:
NOTE: This setting is available only on the PCL emulation driver,
PostScript emulation driver, or on the printer Embedded Web
Server.
Gray
Correction
Automatically adjust the contrast enhancement applied to images.
Auto*
Off
Auto applies different gray values to each object on the printed
page.
Off turns off gray correction.
Brightness
Adjust the gray value of printed images.
-6 to +6
0*
Contrast
Adjust the contrast of printed images.
0–5
0*
* Factory default setting
Utilities Mode
Mode Menu
Mode Main Menu
Utilities
Hex Trace
Use the Utilities menu to troubleshoot printer problems.
From the menu list, use the Arrow buttons to scroll to the Utilities menu.1.
Press the Select button .2.
Press the Right Arrow button until the heading you want appears on the display, and then press
the Select button .
3.
Use the Arrow buttons to scroll through the available menu items.4.
When the setting you want appears on the display, press the Select button to save the setting.5.
Utilities Mode Main Menu
Page 40

From this menu:
You can:
Hex Trace
Determine if there is a problem with the cable or
language interpreter when unexpected character
prints or missing characters are encountered
Isolate printing problems and their source
Identify what information is received by the printer
PostScript Mode
Mode Menu
Mode Main Menu
PostScript
Print PS Error
Font Priority
From the menu list, use the Arrow buttons to scroll to the PostScript menu.1.
Press the Select button .2.
Press the Right Arrow button until the heading you want appears on the display, and then press
the Select button .
3.
Use the Arrow buttons to scroll through the available menu items.4.
When the setting you want appears on the display, press the Select button to save the setting.5.
PostScript Mode Main Menu
From this menu:
You can:
Print PS Error
Print a page containing the PostScript
emulation error.
On
Off*
Font Priority
Establish the font search order.
Resident*
Flash
NOTE: Font Priority is displayed only when a
non-defective, non-write or -Read/Write
protected flash option is installed in the
* Factory default setting
Page 41

From this menu:
You can:
protected flash option is installed in the
device.
* Factory default setting
PCL Emul Mode
Mode Menu
Mode Main Menu
PCL Emul
Font Source
Font Name
Symbol Set
PCL Emulation Settings
Tray Renumber
From the menu list, use the Arrow buttons to scroll to the PCL Emul menu.1.
Press the Select button .2.
Press the Right Arrow button until the heading you want appears on the display, and then press
the Select button .
3.
Use the Arrow buttons to scroll through the available menu items.4.
When the setting you want appears on the display, press the Select button to save the setting.5.
PCL Emul Mode Main Menu
From this
menu:
You can:
Font Source
Specify the set of fonts used by the Font Name menu item.
Resident*
All
Font Name
Identify a specific font and the option where it is stored.
Range: R0* – R90
*Factory
default
setting
Page 42

From this
menu:
You can:
Symbol Set
Specify the symbol set for each font name.
Default: 10U PC-8
PCL Emulation Settings
Point
Size
NOTE: Only
for PostScript
emulation and
typographic
fonts.
Change the point size for scalable typographic fonts.
1.00 – 1008.00 in increments of 0.25
12.00*
Pitch
Assign the font pitch for scalable monospaced fonts.
Range: 0.08 – 100.00 in increments of 0.01
10.00*
Orientation
Specify the orientation of text and graphics on the page.
Portrait*
Landscape
Lines per
Page
Assign the number of lines that print on each page.
1–255
60*
A4 Width
Set the printer to print on A4-size paper.
198 mm*
203 mm
Auto CR
after LF
Specify whether the printer automatically performs a carriage return (CR)
after a line feed (LF) control command.
On
Off*
Auto LF
after CR
Specify whether the printer automatically performs a line feed (LF) after
a carriage return (CR) control command.
On
Off*
Tray Renumber
Assign
MP
Feeder
Assign
Configure the printer to work with printer software or programs that use
different source assignments for trays, drawers, and feeders.
200 = Off*
*Factory
default
setting
Page 43

From this
menu:
You can:
Assign
Tray <x>
Assign
Manual
Paper
Assign
Man Env
0–199
View
Factory
Def
Display the factory default setting assigned to each tray, drawer, or
feeder.
Restore
Defaults
Return all tray, drawer, and feeder assignments to the factory default
settings.
*Factory
default
setting
Page 44

Installing Optional Hardware
Installing the 550-Sheet Optional Drawer
Installing an Optional Memory Card
Installing the 550-Sheet Optional Drawer
An optional drawer attaches under the printer. A drawer consists of two parts: a tray and a support unit.
Your printer supports one optional drawer that holds up to 550 sheets of paper.
CAUTION: If you are installing a drawer after setting up the printer, turn off the printer, and
unplug the power cable before continuing.
Turn the printer off.1.
Unpack the drawer, and remove any packing material.2.
Place the drawer in the location you have chosen for your printer.
NOTE: If you have optional memory to install, leave clearance on the right side of the printer.
3.
Align the holes in the printer with the positioning posts on the drawer, and lower the printer into place.4.
Page 45

Turn the printer back on.5.
In Windows Vista ® or later:
Click Control Panel.a.
Click Hardware and Sound.b.
Click Printers.c.
In Windows® XP and 2000:
Click Start Control Panel.a.
Double-click Printers and Other Hardware.b.
Double-click Printers and Faxes.c.
6.
Right-click your Dell Laser Printer model icon.7.
Click Properties.8.
Click Install Options.9.
Click Ask Printer.10.
Click OK.11.
Click OK, and then close the Printers folder.12.
Page 46

Installing an Optional Memory Card
The system board has one connector for an optional memory card. The printer can support up to 160 MB for
a non-network printer and 288 MB for a network printer. The printer memory can only be upgraded using
128 MB memory cards for both network and non-network printers. The network printer can also be upgraded
using 256 MB memory cards.
CAUTION: If you are installing a memory card after setting up the printer, turn off the
printer, and unplug the power cable before continuing.
Turn the printer off.1.
Open the memory access door on the right side of the printer.
NOTICE: Do not remove the memory card or touch the printer near the area of the memory card
while actively reading, writing, or printing from these devices. Data corruption can occur.
2.
Push open the latches on both ends of the memory connector.
NOTICE: Memory cards are easily damaged by static electricity. Touch a grounded metal surface
before you touch a memory card.
NOTE: Memory cards designed for other printers may not work with your printer.
3.
Unpack the memory card.
Avoid touching the connection points along the edge of the card.
4.
Align the notches on the bottom of the card with the notches on the connector.5.
Page 47

5.
Push the memory card firmly into the connector until the latches on both ends of the connector snap
into place.
It may require some force to fully seat the card.
6.
Ensure that each latch fits over the notch on each end of the card.7.
Close the side cover.8.
Turn the printer back on.9.
In Windows Vista ® or later:
Click Control Panel.a.
Click Hardware and Sound.b.
Click Printers.c.
In Windows® XP and 2000:
Click Start Control Panel.a.
Double-click Printers and Other Hardware.b.
Double-click Printers and Faxes.c.
10.
Right-click your Dell Laser Printer model icon.11.
Page 48

11.
Click Properties.12.
Click Install Options.
NOTE: Memory cards designed for other printers may not work with your printer.
13.
Click Ask Printer.14.
Click OK.15.
Click OK, and then close the Printers folder.16.
Page 49

Loading Paper
Setting the Paper Size and Paper Type
Loading the 250-Sheet Paper Tray
Loading the 550-Sheet Paper Tray
Using the Rear Exit
Using the Multipurpose Feeder
Linking and Unlinking Trays
Setting the Paper Size and Paper Type
NOTE: You must install the software for your printer before configuring the paper trays. For more
information, see Setting up for Local Printing or Setting up for Network Printing.
Dell™ 2330d/2350d Laser Printer - Attached Locally to a
Computer
After you set the Paper Size and Paper Type to the correct settings for the size and type used in the trays,
then any trays containing the same size and type are automatically linked by the printer.
NOTE: If the size of the paper being loaded now is the same size as the previously loaded paper, do
not change the Paper Size setting.
Ensure that the printer is on and Ready appears.1.
From the operator panel, press the Menu button until Paper Menu appears.2.
Press the Select button .3.
Press the Arrow buttons until Size/Type appears, and then press the Select button .
Select Source appears.
4.
Page 50

Press the Arrow buttons until the correct source appears, and then press the Select button .
Size appears under the source name.
5.
Press the Select button .6.
Press the Arrow buttons until the correct size appears, and then press the Select button .
Submitting Changes appears, followed by Size.
7.
Press the Arrow buttons until Type appears, and then press the Select button .8.
Press the Arrow buttons until the correct type appears, and then press the Select button .
Submitting Changes appears, followed by Type.
9.
Dell 2330dn/2350dn Laser Printer - Attached to a Network
Setting the paper size and type for the printer is done through the Dell Printer Configuration Web Tool.
NOTE: Configuring paper trays through the Dell Printer Configuration Web Tool is available only on the
Dell 2330dn/2350dn Laser Printer.
Type your network printer's IP address in your Web browser.
NOTE: If you do not know your printer's IP address, print a network setup page, which lists the
IP address. For more information see Printing a Network Setup Page.
1.
When the Printer Status page opens, select Printer Settings in the left column.2.
From the Printer Settings page, select Paper Menu.3.
Select Paper Size.4.
Select the paper size you have in each tray.5.
Click Submit.6.
Select Printer Settings in the left column.7.
Page 51

7.
From the Printer Settings page, select Paper Menu.8.
Select Paper Type.9.
Select the paper type you have in each tray.10.
Click Submit.11.
Loading the 250-Sheet Paper Tray
Follow these instructions to load paper in the 250-sheet paper tray.
Remove the tray.1.
If you are loading legal or folio-size paper, you must adjust the paper tray to accommodate the larger
paper.
Press down on the latch at the back of the tray.a.
Expand the tray until the extender locks into place.b.
2.
Page 52

b.
If you are loading an A6, you must lift the tab to accommodate the paper.
NOTE: Make sure the paper is below the maximum fill line located on the edge of the tab.
Overloading the tray can cause paper jams and possible printer damage.
3.
Flex a stack of paper back and forth. Straighten the edges on a level surface.4.
Page 53

4.
Load the paper in the tray with the print side facing down.
Ensure that the paper is below the maximum fill line on the side paper guides. Overloading may cause
paper jams.
5.
Slide the two side guides and the rear guide until they rest against the edges of the paper.6.
Replace the tray.7.
Extend the paper support on the output bin.8.
Page 54

8.
Loading the 550-Sheet Paper Tray
Follow these instructions to load paper in the 550-sheet paper tray.
Remove the tray.1.
If you are loading legal or folio-size paper, you must adjust the paper tray to accommodate the larger
paper.
Press down on the latch at the back of the tray.a.
Expand the tray until the extender locks into place.b.
2.
Page 55

b.
Flex a stack of paper back and forth. Straighten the edges on a level surface.3.
Load the paper in the tray with the print side facing down.
Ensure that the paper is below the maximum fill line on the side paper guides. Overloading may cause
paper jams.
4.
Slide the two side guides and the rear guide until they rest against the edges of the paper.5.
Page 56

5.
Replace the tray.6.
Extend the paper support on the output bin.7.
Using the Rear Exit
The single-sheet rear exit provides a straight-through paper path to help reduce curling and potential jams.
This is especially useful for specialty media, such as transparencies, envelopes, labels, card stock, or index
cards.
To use the rear exit, open the rear exit door. When the rear exit door is open, all print jobs come out the
rear exit. When closed, all print jobs are sent to the output bin on top of the printer.
Page 57

Using the Multipurpose Feeder
Configuring the Multipurpose Feeder
This setting is used to designate the mode of operation for the multipurpose feeder.
Mode
Cassette*
The multipurpose feeder source:
functions as a non-sensing automatic source
is assigned an installed size and paper type like any of the other input
sources
is included in the value lists of all printer settings such as the Paper
Source
Manual
The multipurpose feeder source:
is used strictly for manual feed
is removed from the value lists of all printer settings, including Paper
Source
When manual feed is selected, the printer suspends printing and prompts
the user to load print media manually into the multipurpose feeder.
* Factory default setting
Opening the Multipurpose Feeder
The multipurpose feeder is located at the front of your printer and can feed 50 sheets of print media at a
time. You can use the multipurpose feeder to make quick runs of paper types or sizes that are not currently
loaded in the paper tray.
To open the multipurpose feeder:
Pull the multipurpose feeder door down.1.
Page 58

1.
Slide the multipurpose feeder tray forward.2.
Pull the extension so it flips forward.3.
Guide the extension down gently to fully extend the multipurpose feeder.4.
Loading the Multipurpose Feeder
To load the multipurpose feeder:
Place a sheet of the selected print media, print side facing up, at the center of the multipurpose feeder,
but only to the point where its leading edge can contact the paper guides. Otherwise, the printer
1.
Page 59

engages the print media too soon and likely skews the print job.
NOTE: Do not exceed the maximum stack height by forcing paper or specialty media under the
stack height limiters which are located on the guides.
1.
Adjust the paper guides to the print media's width.2.
Prepare the print media for loading.
Flex sheets of paper or paper labels back and forth to loosen them. Do not fold or crease the
paper or labels. Straighten the edges on a level surface.
NOTE: Avoid touching the print side of the transparencies. Be careful not to scratch them.
3.
Page 60

Flex a stack of envelopes back and forth to loosen them. Straighten the edges on a level surface.
NOTE: Do not fold or crease envelopes.
Hold both sides of the print media close to the multipurpose feeder, and load it into the printer.4.
NOTICE: Do not force the print media into the feeder. Forcing the media causes jams.
Insert envelopes with the flap side facing down and with the stamp area as shown.
NOTE: For best performance do not use envelopes that have postage stamps attached.
Hold transparencies by the edges, and avoid touching the print side. Oil from your fingers that is
deposited on the transparency can affect print quality.
Page 61

Load letterhead facing up, with the top of the sheet entering the printer first.
If you experience problems with paper feed, turn the paper around.
Linking and Unlinking Trays
Linking trays
Tray linking is useful for large print jobs or multiple copies. When one linked tray is empty, paper feeds from
the next linked tray. When the Paper Size and Paper Type settings are the same for any trays, the trays are
automatically linked. The Paper Size setting for the multipurpose feeder must be set manually from the
Paper Size menu. The Paper Type setting must be set for all trays from the Paper Type menu. The Paper
Type menu and the Paper Size menu are both available from the Paper Size/Type menu.
Unlinking trays
Unlinked trays have settings that are not the same as the settings of any other tray.
To unlink a tray, change the following tray settings so that they do not match the settings of any other tray:
Paper Type (for example: Plain Paper, Letterhead, Custom Type <x>)
Paper Type names describe the paper characteristics. If the name that best describes your paper is
used by linked trays, assign a different Paper Type name to the tray, such as Custom Type <x>, or
define your own custom name.
Paper Size (for example: letter, A4, statement)
Load a different paper size to change the Paper Size setting for a tray. Paper Size settings for a tray
and the multipurpose feeder must be set manually from the Paper Size menu.
NOTICE: Do not assign a Paper Type name that does not accurately describe the type of paper loaded
in the tray. The temperature of the fuser varies according to the specified Paper Type. Paper may not
be properly processed if an inaccurate Paper Type is selected.
Page 62

Setting up for Local Printing
Windows
®
Mac OS® X: Adding the Printer in Print Center or Printer Setup Utility
Linux
®
Windows
®
Some Windows operating systems may already include a printer driver that is compatible with the printer.
NOTE: Installing custom drivers do not replace the system driver. A separate printer object is created
and appears in the Printers folder.
Operating System:
Use this type of cable:
Windows 7
Microsoft® Windows Server 2008
Microsoft® Windows Server 2008 R2
Windows Vista™
Windows XP
Windows Server 2003
Windows 2000
USB or Parallel
Installing the Printer Drivers
NOTE: Windows 7, Windows Server 2008, Windows Server 2008 R2, Windows Vista, Windows XP,
Windows Server 2003, and Windows 2000 require that you have administrative access to install printer
drivers on your computer.
Insert the Software and Documentation CD.
The Software and Documentation CD launches the installation software automatically.
1.
When the Software and Documentation CD screen appears, click Personal Installation - Install the
printer for use on this computer only, and then click Next.
2.
Page 63

2.
Select your printer from the drop-down menu.3.
Select Typical Installation (recommended), and then click Install.4.
Click Finish, connect the printer to the computer using a USB or parallel cable, and turn on the printer.
The installation prompts you when the setup is completed.
5.
Installing Additional Printer Drivers
Turn on your computer, and insert the Software and Documentation CD.
When the Software and Documentation CD launches, click Cancel.
1.
In Windows Vista® or later (default Start menu):
Click Control Panel.a.
Click Hardware and Sound.b.
Click Printers.c.
In Windows® XP (default Start menu):
Click Start Control Panel.a.
Double-click Printers and Other Hardware.b.
Double-click Printers and Faxes.c.
In Windows® XP (Classic Start menu): Click Start Settings Printers and Faxes.
In Windows Vista® (Classic Start menu) and all other Windows versions: Click
Start Settings Printers.
2.
Double-click Add Printer.3.
Page 64

The Add Printer Wizard opens. If necessary, click Next.
3.
Click Next.4.
Select Add a local printer or Local printer attached to this computer, and then click Next.
You are prompted to attach the printer to the computer.
5.
Select the port you want your printer to use, and then click Next.6.
Select Have Disk.7.
Browse to your CD drive, and select the correct directory for your operating system.
NOTE: If you installed the printer drivers from the Software and Documentation CD before you
connected the printer to your computer, the PCL-XL driver for your operating system was
installed by default.
Operating System
Software Path
Windows 7
Windows Server 2008
Windows Server 2008 R2
Windows Vista
Windows XP
Windows Server 2003
Windows 2000
D:\Drivers\Print\Win_2kXP\, where D:\ is the letter of your CD-ROM.
NOTE: After selecting the directory containing your printer drivers, you may be prompted for
additional files in order to continue installation. Insert the operating system CD, and then click
OK.
8.
Click Open, and then click OK.9.
Select the type of driver you want to install (PCL, HBP, or PS) in the Manufacturer list, and the printer
model in the Printers list, and then click Next.
10.
Proceed through the rest of the Add Printer Wizard, and then click Finish to install the printer driver.11.
Page 65

11.
Installing Additional Printer Software
Turn on your computer, and insert the Software and Documentation CD.
The Software and Documentation CD should launch the installation software automatically.
1.
Select Additional Software Installation - Install the printer support software, and then click
Next.
2.
Select the check boxes next to the printer software you want to install, and then click Install.
The software is installed on your computer.
3.
Mac OS® X: Adding the Printer in Print Center or Printer
Setup Utility
Macintosh® OS X version 10.3 and higher is required for USB printing. In order to print to a USB printer, add
the printer in Print Center or Printer Setup Utility.
Install support for the printer on the computer.
Insert the Software and Documentation CD.a.
Double-click the installer package for the printer.b.
Continue past the Welcome screen and the Read me.c.
Click Continue after viewing the license agreement, and then click Agree to accept the terms of
the agreement.
d.
Select a destination for the installation, and then click Continue.e.
Click Install on the Easy Install screen.f.
1.
Page 66

f.
Enter the administrator password, and then click OK.
The software is installed on the computer.
g.
Quit the installer when it is finished.h.
Open Printer Setup Utility, located in /Applications/Utilities.2.
If the USB printer appears in the Printer List: The printer has been set up successfully, and you can
quit the application.
If the USB printer does not appear in the Printer List: Ensure that the USB cable is properly connected
between the printer and the computer and that the printer is turned on. After the printer appears in
the Printer List, the printer has been set up successfully, and you can quit the application.
3.
Linux
®
Local printing is supported on many Linux platforms, such as Red Hat, SUSE, Debian™ GNU/Linux, Ubuntu,
Red Flag Linux, and Linspire.
Printer software packages and installation instructions are available on the Software and Documentation CD.
All the printer software supports local printing using a parallel connection.
To launch the installation instructions for Linux:
Insert the Software and Documentation CD. If the Software and Documentation CD automatically
launches, click Cancel.
1.
Browse to D:\unix\docs\<your language>\index.html, where D:\ is the letter of your CD-ROM
drive.
2.
Page 67

Setting up for Network Printing
Windows
®
Install the Shared Printer on Client Computers
Mac OS® X: Adding the Printer in Print Center or Printer Setup Utility
Linux
®
Printing a Network Setup Page
Windows
®
In Windows environments, network printers can be configured for direct printing or shared printing. Both
network printing methods require the installation of the printer software and the creation of a network
printer port.
Supported Printer Drivers
Custom drivers are available on the Software and Documentation CD.
Supported Network Printer Ports
Microsoft® Standard TCP/IP port-Windows 7, Windows Server 2008, Windows Server 2008 R2,
Windows Vista™, Windows XP, Windows Server 2003, and Windows 2000
Printer network ports-Windows 7, Windows Server 2008, Windows Server 2008 R2, Windows Vista,
Windows XP, Windows Server 2003, and Windows 2000
For basic printer functionality, install printer software, and use a system network printer port, such as a Line
Printer Remote (LPR) or a standard TCP/IP port. The printer software and port let you maintain a consistent
user interface for use with all the printers on the network. Using a custom network port provides enhanced
functionality, such as printer status alerts.
Network Printing Options
Page 68

In Windows environments, network printers can be configured for direct printing or shared printing. Both
network printing options require the installation of printer software and the creation of a network port.
IP Printing
Shared Printing
Printer is connected directly to the network
using a network cable, such as an Ethernet
cable.
Printer software is typically installed on
each network computer.
Printer is connected to one of the computers on
the network using a local cable, such as a USB or
parallel cable.
Printer software is installed on the computer
attached to the printer.
During software installation, the printer is set up
to be “shared” so that other network computers
can print to it.
Direct Attachment With a Network Cable (Using a Print Server)
A print server is any designated computer that centrally manages all client print jobs. If you are sharing your
printer in a small workgroup environment and want to control all print jobs on this network, connect the
printer to a print server.
NOTE: Print a printer settings page to get the IP address and MAC address of the printer network
adapter before setting up the network printer. For more information, see Printing a Network Setup
Page.
Insert the Software and Documentation CD.
The Software and Documentation CD launches the installation software automatically.
1.
When the Software and Documentation CD screen appears, click Network Installation - Install the
printer for use on a network, and then click Next.
2.
Select I am setting up a print server to share printers with others on the network, and then
click Next.
3.
Select the network printer(s) you want to install.
If you do not see your printer listed, click Refresh List to refresh the list, or click Manual Add to add
a printer to the network.
4.
Page 69

Click Next.5.
For each printer driver listed:
NOTE: Three printer drivers are listed for each printer you selected: a Printer Control Language
(PCL), PostScript (PS), and Host Based Printing (HBP) driver.
Select the printer driver from the list.a.
If you want to change the printer name, enter a new name in the Printer Name field.b.
If you want other users to access this printer, select Share this printer with other computers,
and then enter a share name that users can easily identify.
c.
If you want this printer to be the default printer, select Set this printer to default.d.
If you do not want to install the particular driver for the printer, select Do not install this
printer.
e.
6.
Click Next.7.
Select the check box next to the software and documentation you want to install, and then click
Install.
The drivers, additional software, and documentation are installed on your computer. When the
installation is completed, a Congratulations! screen appears.
8.
If you do not want to print a test page: Click Finish.
If you want to print a test page:
Select the check box next to the printer(s) on which you want to print a test page.a.
Click Print Test Page.b.
Verify the test page printed on the printer(s).c.
d.
9.
Page 70

c.
Click Finish.d.
Direct Attachment With a Network Cable (No Print Server)
Insert the Software and Documentation CD.
The Software and Documentation CD launches the installation software automatically.
1.
When the Software and Documentation CD screen appears, click Network Installation - Install the
printer for use on a network, and then click Next.
2.
Select I want to use a network printer on this computer, and then click Next.3.
Select the network printer(s) you want to install.
If you do not see your printer listed, click Refresh List to refresh the list, or click Manual Add to add
a printer to the network.
4.
Click Next.5.
For each printer driver listed:
NOTE: Three printer drivers are listed for each printer you selected, a Printer Control Language
(PCL), PostScript (PS), and Host Based Printing (HBP) driver.
Select the printer driver from the list.a.
If you want to change the printer name, enter a new name in the Printer Name field.b.
If you want other users to access this printer, select Share this printer with other computers,
and then enter a share name that users can easily identify.
c.
If you want this printer to be the default printer, select Set this printer to default.d.
If you do not want to install the particular driver for the printer, select Do not install this
printer.
e.
6.
Page 71

Click Next.7.
Select the check box next to the software and documentation you want to install, and then click
Install.
The drivers, additional software, and documentation are installed on your computer. When the
installation is completed, a Congratulations! screen appears.
8.
If you do not want to print a test page: Click Finish.
If you want to print a test page:
Select the check box next to the printer(s) on which you want to print a test page.a.
Click Print Test Page.b.
Verify the test page printed on the printer(s).c.
Click Finish.d.
9.
Shared Printing
You can use Microsoft's Point and Print or Peer-to-Peer methods to share a printer on the network with a USB
or parallel cable connection. To use one of these methods, you must first share the printer and then install
the shared printer on client computers.
However, if you use one of these Microsoft methods, you will not have all the Dell features, such as the
Status Monitor, that are installed using the Software and Documentation CD.
NOTE: Windows 7, Windows Vista and Windows XP Professional require that you have administrative
access to share a printer.
Share the Printer
In Windows Vista ® or later (default Start menu):
Click Control Panel.a.
Click Hardware and Sound.b.
1.
Page 72

b.
Click Printers.c.
In Windows®XP (default Start menu):
Click Start Control Panel.a.
Double-click Printers and Other Hardware.b.
Double-click Printers and Faxes.c.
In Windows Vista® (Classic Start menu) and all other Windows versions: Click
Start Settings Printers.
In Windows®XP (Classic Start menu): Click Start Settings Printers and Faxes.
Right-click your printer.2.
Click Sharing.3.
If you are using Windows Vista ® or later, you may be prompted to change the sharing options before
you can continue. Click the Change Sharing Options button, and then click Continue on the next
dialog box.
4.
Select Share this printer or Shared as, and then type a name for the printer.5.
Click Additional Drivers, and then select the operating systems of all network clients printing to this
printer.
6.
Click OK.
If you are missing files, you are prompted to insert the server operating system CD.
Insert the Software and Documentation CD, ensure that the drive letter is correct for your CDROM drive, and then click OK.
a.
In Windows Vista or later: Browse to a client computer running the operating system, and then
click OK.
In earlier Windows versions: Insert the operating system CD, ensure that the drive letter is
b.
7.
Page 73

correct for your CD-ROM drive, and then click OK.
b.
Click Close.8.
To check that the printer was successfully shared:
Ensure that the printer object in the Printers folder shows it is shared. For example, in Windows 2000,
a hand is shown underneath the printer icon.
Browse My Network Places or Network Neighborhood. Find the host name of the server, and look
for the shared name you assigned to the printer.
Now that the printer is shared, you can install the printer on network clients using the Point and Print
method or the Peer-to-Peer method.
Install the Shared Printer on Client Computers
Point and Print
This method is the best use of system resources. The printer server handles driver modifications and print
job processing. This lets network clients return to their programs much faster.
If you use the Point and Print method, a subset of software information is copied from the print server to the
client computer. This is just enough information to send a print job to the printer.
On the Windows desktop of the client computer, double-click My Network Places or Network
Neighborhood.
1.
Double-click the host name of the print server computer.2.
Right-click the shared printer name, and then click Install or Connect.
Wait for the software information to copy from the print server computer to the client computer, and
for a new printer object to be added to the Printers folder. The time this takes varies, based on
network traffic and other factors.
3.
Close My Network Places or Network Neighborhood.4.
Print a test page to verify printer installation.
5.
Page 74

In Windows Vista® or later (default Start menu):
Click Control Panel.1.
Click Hardware and Sound.2.
Click Printers.3.
In Windows®XP (default Start menu):
Click Start Control Panel.1.
Double-click Printers and Other Hardware.2.
Double-click Printers and Faxes.3.
In Windows XP (Classic Start menu): Click Start Settings Printers and Faxes.
In Windows Vista and all other Windows versions: Click Start Settings Printers.
a.
Right-click the printer you just created.b.
Click Properties.c.
Click Print Test Page.d.
When a test page prints successfully, printer installation is completed.
5.
Peer-to-Peer
If you use the Peer-to-Peer method, the printer software is fully installed on each client computer. Network
clients retain control of software modifications. The client computer handles the print job processing.
In Windows Vista ® or later (default Start menu):
1.
Page 75

Click Control Panel.a.
Click Hardware and Sound.b.
Click Printers.c.
In Windows®XP (default Start menu):
Click Start Control Panel.a.
Double-click Printers and Other Hardware.b.
Double-click Printers and Faxes.c.
In Windows®XP (Classic Start menu): Click Start Settings Printers and Faxes.
In Windows Vista ® (Classic Start menu) and all other Windows versions: Click
Start Settings Printers.
1.
Click Add Printer to launch the Add Printer Wizard.2.
Click Network Print Server.3.
Select the network printer from the Shared printers list. If the printer is not listed, type the path of the
printer in the text box. For example: \\<print server host name>\<shared printer name>.
The print server host name is the name of the print server computer that identifies it to the network.
The shared printer name is the name assigned during the print server installation process.
4.
Click OK.
If this is a new printer, you may be prompted to install printer software. If no system software is
available, then you need to provide a path to available software.
5.
Select whether you want this printer to be the default printer for the client, and then click Finish.6.
Print a test page to verify printer installation.
In Windows Vista ® or later (default Start menu):
a.
7.
Page 76

Click Control Panel.1.
Click Hardware and Sound.2.
Click Printers.3.
In Windows®XP (default Start menu):
Click Start Control Panel.1.
Double-click Printers and Other Hardware.2.
Double-click Printers and Faxes.3.
In Windows®XP (Classic Start menu): Click Start Settings Printers and Faxes.
In Windows Vista ® (Classic Start menu) and all other Windows versions: Click
Start Settings Printers.
a.
Right-click the printer you just created.b.
Click Properties.c.
Click Print Test Page.d.
When a test page prints successfully, printer installation is completed.
Mac OS® X: Adding the Printer in Print Center or Printer
Setup Utility
Macintosh® OS X version 10.3 and higher is required for network printing. In order to print to a network
printer, add the printer in Print Center or Printer Setup Utility.
Install support for the printer on the computer.
1.
Page 77

Insert the Software and Documentation CD.a.
Double-click the installer package for the printer.b.
Continue past the Welcome screen and the Read me.c.
Click Continue after viewing the license agreement, and then click Agree to accept the terms of
the agreement.
d.
Select a destination for the installation, and then click Continue.e.
Click Install on the Easy Install screen.f.
Enter the administrator password, and then click OK.
The software is installed on the computer.
g.
Quit the installer when it is finished.h.
1.
Open Printer Setup Utility located in /Applications/Utilities.2.
From the Printers menu, select Add Printer.3.
If you want to print using IP Printing:
Click the IP Printer toolbar icon.a.
Enter the IP address of the printer.b.
Choose the printer manufacturer from the Printer Model pop-up menu.c.
Select the printer from the list, and then click Add.d.
4.
Page 78

d.
If you want to print using AppleTalk:
Click More Printers... and then choose AppleTalk from the pop-up menu.a.
Choose the AppleTalk Zone from the list.
NOTE: Look under the AppleTalk heading on the printer network setup page to know which
zone and printer to select.
b.
Choose the printer from the list, and then click Add.c.
Verify the printer installation.
Open TextEdit in /Applications.a.
From the File menu, choose Print.b.
Choose Summary from the Copies & Pages pop-up menu.c.
If the correct PPD for the printer model is displayed under the Error Reporting group: Setup is
completed.
If Generic PostScript Printer is displayed under the Error Reporting group: Delete the printer from
the Printer List in Print Center or Printer Setup Utility, and follow the instructions again to
set up the printer.
d.
5.
Linux
®
Printer software packages and installation instructions are available on the Software and Documentation CD.
To launch the installation instructions for Linux:
Insert the Software and Documentation CD. If the Software and Documentation CD automatically
launches, click Cancel.
1.
Browse to D:\unix\docs\<your language>\index.html, where D:\ is the letter of your CD-ROM
drive.
2.
Page 79

2.
Printing a Network Setup Page
A network setup page lists the configuration settings of the printer, including the IP address and MAC
address. This information is very helpful when troubleshooting the network configuration of the printer.
To print a network setup page:
Press the Menu button .1.
Navigate to the Reports menu.2.
Select Network Setup Page, and press the Select button .3.
Page 80

Software Overview
Status Monitor Center
Set IP Address Utility
Dell Printer Software Uninstall Utility
Driver Profiler
Dell Printer Configuration Web Tool
Dell Printer Alert Utility
Removing and Reinstalling Software
Dell Toner Management System
Use the Software and Documentation CD that came with your printer to install a combination of software
applications, depending on your operating system.
NOTE: If you purchased your printer and computer separately, you must use the Software and
Documentation CD to install these software applications.
NOTE: These software applications are not available with Linux or Macintosh.
Status Monitor Center
NOTE: For the local Status Monitor Center to work properly, bidirectional communication support must
be in place so the printer and computer can communicate. An exception is added to the Windows
®
Firewall to allow this communication.
Use the Status Monitor Center to manage multiple Status Monitors.
Double-click a printer name to open its Status Monitor, or select Run to open a Status Monitor for a
particular printer.
Select Update to change the appearance of the list of printers.
Select Help to read the online Help.
Page 81

Set IP Address Utility
NOTE: This application is not available when the printer is locally attached to a computer. For the Set
IP Address Utility to work properly, add an exception to the Windows® Firewall.
The Set IP Address Utility lets you set up an IP address and other important IP parameters. To set the IP
address manually:
Connect the network cable, and turn the printer on.
Wait for a moment to make sure the IP address is assigned. Print a network setup page. For more
information, see Printing a Network Setup Page.
1.
Click the TCP/IP settings.2.
Enter the IP Address, Netmask, and Gateway settings.3.
Click Apply.4.
Change the Printer IP address Using the Dell Printer Configuration Web Tool.
Launch the Embedded Web Server (EWS) by typing your network printer IP address in your Web
browser.
1.
Click Configuration.2.
Under Printer Server Settings, click TCP/IP.3.
Click Set static IP address.4.
Enter the IP Address, Netmask, and Gateway settings.
NOTE: If you do not know these settings, contact your network administrator.
5.
Click Submit.6.
Enter the new IP address in your browser to continue using the EWS.7.
Page 82

7.
Dell Printer Software Uninstall Utility
Use the Uninstall Software Utility to remove any currently installed printer software or printer objects.
In Windows Vista ® or later:
Click Programs.a.
Click Dell Printers.b.
Click your Dell Laser Printer model.c.
In Windows® XP and 2000:
Click Start Programs or All Programs Dell Printers your Dell Laser printer model.
1.
Click Dell Printer Software Uninstall.2.
Select the components you want to uninstall, and then click Next.3.
Click Finish.4.
When the uninstall is completed, click OK.5.
Driver Profiler
Use the Driver Profiler to create driver profiles that contain custom driver settings. A driver profile can
contain a group of saved printer driver settings and other data for such things as:
Print orientation and N-Up (document settings)
Installation status of an output tray (printer options)
Page 83

User-defined paper sizes (custom papers)
Simple text and watermarks
Overlay references
Font references
Form associations
Dell Printer Configuration Web Tool
NOTE: This application is not available when the printer is connected locally to a computer.
Have you ever sent a print job to the network printer down the hall, only to find it didn't print because of a
paper jam or an empty paper tray? One of the features of the Dell Printer Configuration Web Tool is the Email Alert Setup, which sends you, or the key operator, an e-mail when the printer needs supplies or
intervention.
If you fill out printer inventory reports requiring the asset tag number of all of the printers in your area, the
Dell Printer Configuration Web Tool has a Printer Information feature that makes it easy. Type the IP address
of each printer on the network to display the asset tag number.
The Dell Printer Configuration Web Tool feature also lets you change printer settings and keep track of
printing trends. If you are a network administrator, you can easily copy the printer's settings to one or all
printers on the network-right from your Web browser.
To launch the Dell Printer Configuration Web Tool, type your network printer's IP address in your Web
browser.
If you do not know what your printer's IP address is, print a network setup page, which lists the IP address.
To print a network setup page, press the Menu button .
For more information, see Printing a Network Setup Page.
Use the Dell Printer Configuration Web Tool for:
Printer Status-Get immediate feedback on printer supply status. When toner is running low, click the
toner supplies link on the first screen to order additional toner cartridges.
Printer Settings-Change printer settings, view the operator panel remotely, and update the print
Page 84

server firmware.
Copy Printer Settings-Quickly clone the printer's settings to another printer or printers on the
network by typing each printer's IP address.
NOTE: You must be a network administrator to use this feature.
Printing Statistics-Keep track of printing trends, such as paper usage and types of jobs being
printed.
Printer Information-Get the information you need for service calls, inventory reports, or the status
of current memory and engine code levels.
E-mail Alert Setup-Receive an e-mail when the printer needs supplies or intervention. Type your
name or the key operator's name in the e-mail list box to be notified.
Set Password-Lock the operator panel with a password so that other users don't inadvertently
change the printer settings you selected. For more information, see Locking the Operator Panel Menus
Using the Embedded Web Server.
NOTE: You must be a network administrator to use this feature.
Online Help-Click Help to visit the Dell website for printer troubleshooting.
Dell Printer Alert Utility
NOTE: This application is not available with Windows 2000.
The Dell Printer Alert Utility informs you when there are errors requiring your intervention on your printer.
When there is an error, a bubble appears telling you what the error is, and points you to the appropriate
recovery information.
NOTE: For the Dell Printer Alert Utility to work properly, bidirectional communication support must be
in place so the printer and computer can communicate. An exception is added to the Windows Firewall
to allow this communication.
If you opted to install the Dell Printer Alert Utility with your printer software, the utility automatically
launches when the software installation is completed. The utility is active if you see in the System Tray.
To disable the Dell Printer Alert Utility:
Page 85

From the System Tray, right click the icon.1.
Select Exit.2.
To re-enable the Dell Printer Alert Utility:
In Windows Vista ® or later (default Start menu):
Click Programs.a.
Click Dell Printers.b.
Click your Dell Laser Printer model.c.
In Windows® XP:
Click Start Programs or All Programs Dell Printers your Dell Laser printer model.
1.
Click Printer Alert Utility.2.
Removing and Reinstalling Software
If your printer does not function properly, or if communication error messages appear when using your
printer, you can remove and reinstall the printer software.
In Windows Vista® or later:
Click Programs.a.
Click Dell Printers.b.
Click your Dell Laser Printer model.c.
In Windows® XP and 2000:
1.
Page 86

Click Start Programs or All Programs Dell Printers your Dell Laser printer model.
Click Dell Printer Software Uninstall.2.
Follow the instructions on the screen.3.
Restart your computer.4.
Insert the Software and Documentation CD, and then follow the instructions on the screen.
If the installation screen does not appear:
In Windows Vista® or later, click Computer.
In Windows® XP, click Start My Computer.
In Windows 2000, double-click My Computer from your desktop.
a.
Double-click the CD-ROM drive icon, and then double-click setup.exe.b.
When the printer software installation screen appears, click Personal Installation, Network
Installation, or Additional Software Installation.
c.
Follow the instructions on your screen to complete the installation.d.
5.
Dell Toner Management System
Printing Status Window
NOTE: For the Printing Status Window to work properly, bidirectional communication support must be
in place so the printer and computer can communicate. An exception is added to the Windows
®
Firewall to allow this communication.
The Printing Status window displays the status of the printer (Printer Ready, Printer Offline, and Error-Check
Printer) and the name of the job when you send a job to print.
The Printing Status window also displays the level of toner so you can:
Page 87

Monitor the toner level for your printer.
Click Order Supplies to order replacement toner cartridges.
Dell Printer Supplies Reorder Application
The Order Supplies dialog box can be launched from the Printing Status window, the Programs window, or
the desktop icon.
You can order toner by phone or from the Web.
If ordering online, launch the Dell Printer Supplies Reorder Application:
In Windows Vista® or later (default Start menu):
Click Programs.a.
Click Dell Printers.b.
Click your Dell Laser Printer model.c.
In Windows® XP and 2000:
Click Start Programs or All Programs Dell Printers your Dell Laser printer model.
1.
Click Dell Printer Supplies Reorder Application.
The Order Supplies dialog box opens.
2.
If Multiple Printers Found launches, select the printer you are ordering the supplies for.3.
Follow the instructions on the screen.4.
If ordering from the Web, click the link under the Order Online heading.
If ordering by phone, call the number that appears under the Order by Phone heading.
Page 88

Page 89

Printing
Printing Documents
Printing on Envelopes
Printing Using the Multipurpose Feeder
Printing on Letterhead
Printing a Two-Sided Document (Duplex Printing)
Printing a Poster
Printing Multiple Page Images on One Page (N-Up Printing)
Printing on Transparencies
Printing a Booklet
Canceling a Print Job
Printing Documents
Turn on your computer and printer, and make sure they are connected.1.
Load the paper. For more information, see Loading Paper.2.
With your document open, click File Print.
The Print dialog box opens.
3.
Click Preferences, Properties, Options, or Setup (depending on the program or operating system).
The Printing Preferences dialog box opens.
4.
Make necessary changes to your document.5.
After customizing your settings, click OK.
The Printing Preferences dialog box closes.
6.
Click OK or Print.7.
Page 90

Printing Using the Multipurpose Feeder
The multipurpose feeder is located at the front of your printer and can feed up to 50 sheets of print media at
a time..
With your document open, click File Print.1.
Click Properties (or Options, Printer, or Setup, depending on the application or operating system).
The Printing Preferences dialog box opens.
2.
Click the Paper tab.3.
Select Multipurpose Feeder from the Paper Tray drop-down list.
NOTE: Multipurpose Feeder appears in the Paper Source when Cassette configuration is selected.
4.
Select the appropriate paper type.5.
Make any necessary changes to your document.6.
Click OK.7.
Click OK on the Print window to send the job to print.8.
Printing a Two-Sided Document (Duplex Printing)
Printing on both sides of the paper reduces printing costs.
You can choose how you want your job duplexed: long edge or short edge.
Page 91

Long Edge
Short Edge
Pages are bound along the long edge of the page
(left edge for portrait, top edge for landscape.
Pages are bound along the short edge of the page
(top edge for portrait, left edge for landscape.
With your document open, click File Print.1.
Click Properties (or Options, Printer, or Setup, depending on the application or operating system).
The Printing Preferences dialog box opens.
2.
Click the Page Layout tab.3.
Under 2-sided printing, select 2-sided long edge or 2-sided short edge (depending on your
printing needs).
4.
Click OK.5.
Click OK.6.
Printing Multiple Page Images on One Page (N-Up Printing)
The Multipage Printing (N-up) setting is used to print multiple page images on a single page. For example, 2up means two page images are printed on one page.
The printer uses the Multipage Order, Multipage View, and Multipage Border settings to determine the order
and orientation of the page images, and whether a border is printed around each page image.
With your document open, click File Print.1.
Page 92

1.
Click Properties (or Options, Printer, or Setup, depending on the application or operating system).
The Printing Preferences dialog box opens.
2.
In the Multipage printing (N-up) section, specify the number of pages you want printed on a sheet
by typing a number or using the arrows in the combo box.
3.
Click OK.4.
Click OK on the Print window to send the job to print.5.
Printing a Booklet
The Booklet setting lets you print multiple pages in booklet form without having to re-format your document
so the pages print in the proper order. The pages print so the finished collated document may be folded
along the center of each page to form a booklet.
If the document contains many pages, a booklet may have too many pages to fold easily. If you are printing
a fairly large booklet, you might want to use the Sheets per Bundle option to specify how many physical
pages are put into one bundle. The printer prints the necessary number of bundles, which you can then bind
into one booklet. Printing in bundles helps the outside edge of the pages line up more evenly.
You must specify whether or not you want to print using any duplex printing options before you select to
print using the booklet function. Once you choose Print Using Booklet, the controls for the duplex options
become inactive and remain at the last setting used.
With your document open, click File Print.1.
Click Properties (or Options, Printer, or Setup, depending on the application or operating system).
The Printing Preferences dialog box opens.
2.
Click More Page Layout Options.3.
Page 93

3.
Click Booklet.4.
Click OK twice.5.
Click OK on the Print window to send the job to print.6.
Printing on Envelopes
Turn on your computer and printer, and ensure that they are connected.1.
With your document open, click File Print.
The Print dialog box opens.
2.
Click Properties (or Options, Printer, or Setup, depending on the application or operating system).
The Printing Preferences dialog box opens.
3.
Click the Paper tab.4.
Select Envelope from the Paper Type drop-down list.5.
Make any necessary changes to your document.6.
Click OK.7.
Click OK on the Print window to send the job to print.8.
Printing on Letterhead
Ensure that the letterhead is properly loaded according to the paper source you are using:1.
Page 94

Tray 1 or 2-Load the letterhead with the print side facing down. The top edge of the sheet with
the logo should be placed at the front of the tray.
Multipurpose feeder-Load the letterhead with the print side facing up and the top of the sheet
entering the printer first.
1.
With your document open, click File Print.2.
Click Properties (or Options, Printer, or Setup, depending on the application or operating system).
The Printing Preferences dialog box opens.
3.
Click the Paper tab.4.
Select Letterhead from the Paper Type drop-down list.5.
Select the appropriate paper size and tray.6.
Click OK.7.
Click OK on the Print window to send the job to print.8.
Page 95

8.
Printing a Poster
The Poster setting lets you print a single image across several pages. Once printed, you can combine the
pages to create one large image.
With your document open, click File Print.1.
Click Properties (or Options, Printer, or Setup, depending on the application or operating system).
The Printing Preferences dialog box opens.
2.
Click More Page Layout Options.3.
Click Poster.4.
Select the poster size you want by choosing the number of pages to use in the poster.5.
To print crop marks on the page, select Print crop marks.6.
Select the amount of overlap you want each page to have.7.
Click OK twice.8.
Click OK on the Print window to send the job to print.9.
Printing on Transparencies
Page 96

Load transparencies.1.
With a document open, click File Print.2.
Click Properties (or Options, Printer, or Setup, depending on the application or operating system).
The Printing Preferences dialog box appears.
3.
Click the Paper tab.4.
Select Transparency from the Paper Type drop-down list.5.
Click OK twice.6.
Click OK on the Print window to send the job to print.7.
NOTE: To prevent smudging, remove each transparency as it exits, and let it dry before stacking.
Transparencies may require up to 15 minutes to dry.
Canceling a Print Job
From the Printer Operator Panel
Press the Cancel button twice to stop the current print job.
From Your Computer
In Windows Vista ® or later (default Start menu):
Click Control Panel.a.
Click Hardware and Sound.b.
1.
Page 97

b.
Click Printers.c.
In Windows® XP (default Start menu):
Click Start Control Panel.a.
Double-click Printers and Other Hardware.b.
Double-click Printers and Faxes.c.
In Windows® XP (Classic Start menu): Click Start Settings Printers and Faxes.
In Windows Vista ® (Classic Start menu) and all other Windows versions: Click
Start Settings Printers.
Double-click the printer you are using to print the job.
A list of print jobs appears.
2.
Right-click the document you want to stop printing, and then click Cancel.3.
Page 98

Maintaining Your Printer
Ordering Supplies
Storing Supplies
Replacing Supplies
Cleaning the Exterior of the Printer
CAUTION: Before performing any of the procedures listed in this section, read and follow the
safety information in your Product Information Guide.
Dell™ toner cartridges are available only through Dell. You can order more toner online at
www.dell.com/supplies.
CAUTION: It is recommended that Dell toner cartridges be used for your printer. Dell does
not provide warranty coverage for problems caused by using accessories, parts, or
components not supplied by Dell.
Ordering Supplies
Printer Attached to a Network
Type your printer IP address in your Web browser to launch the Dell Configuration Web Tool.1.
Click www.dell.com/supplies.2.
Printer Attached Locally to a Computer
In Windows Vista ® or later (default Start menu):
Click Programs.a.
1.
Page 99

a.
Click Dell Printers.b.
Click your Dell Laser Printer model.c.
In Windows® XP and 2000:
Click Start Programs or All Programs Dell Printers your Dell Laser printer model.
Click Dell Printer Supplies Reorder Application.
The Order Supplies window opens.
2.
Click the link under the Order Online heading.3.
Storing Supplies
Storing Print Media
Use the following guidelines for proper print media storage. These help avoid paper feeding problems and
uneven print quality.
For best results, store print media in an environment where the temperature is approximately 21°C
(70°F) and the relative humidity is 40%.
Store cartons of print media on a pallet or shelf, rather than directly on the floor.
If you store individual packages of print media out of the original carton, ensure that they rest on a flat
surface so the edges do not buckle or curl.
Do not place anything on top of the print media packages.
Storing the Toner Cartridge
Store the toner cartridge in the original packaging until you are ready to install it.
Do not store the toner in:
Page 100

Temperatures greater than 40°C (104°F).
An environment with extreme changes in humidity or temperature.
Direct sunlight.
Dusty places.
A car for a long period of time.
An environment where corrosive gases are present.
An environment with salty air.
Replacing Supplies
Replacing the Imaging Drum
You can determine approximately how full the imaging drum is by printing the printer settings configuration
sheet. This helps you decide when you might need to order replacement supplies.
To ensure print quality and to avoid damage to the printer, the printer stops operating after the imaging
drum has reached a maximum of 30,000 pages. The printer automatically notifies you before the imaging
drum reaches this point.
While the printer may continue to function properly after the imaging drum has reached its official end-oflife, print quality significantly decreases until the imaging drum stops operating at the maximum of 30,000
pages.
NOTICE: When replacing the imaging drum, do not leave it exposed to direct light for an extended
period of time. Extended light exposure can cause print quality problems.
Turn the printer off.1.
Open the front cover by pressing the door release button on the right side of the printer and lowering
the cover.
2.
 Loading...