

Page 1

DE202
DEGEN
DEGEN
Thank you for purchasing DE202, DEGEN FM / MW /
SW 1-2 Clock World Receiver! It will give you many
hours of reliable service and listening pleasure.
Before operating the receiver, please read this manual
carefully and retain it for future reference.
INTRODUCTION
CONTENTS
OPERATING INSTRUCTIONS
FM / MW / SW 1-2 WORLD RECEIVER
FM BAND FROM 80MHz
CAMPUS BROADCASTING RECEPTION
DIGITAL FREQUENCY INDICATOR
CLOCK INDICATOR
TIME SET
ALARM SET
STYLISH DESIGN
INSIDE TELESCOPIC ANTENNA
STEREO HEADPHONE
2 WAY POWER WITH AC / DC OPERATIONS
LCD Identification..............................................................1
Location of Control.............................................................2
Battery Operation................................................................3
AC Adaptor Operation.........................................................4
Turn on / off the Unit............................................................5
Band Selection....................................................................6
Tuning in to a Station...........................................................6
Alarm Set............................................................................7
Clock Ser............................................................................8
Volume Control...................................................................8
Listening with Headphones..................................................8
Using Antenna....................................................................9
Cautions.............................................................................11
Specifications.....................................................................
12
FM / MW / SW 1-2 CLOCK WORLD RECEIVER
FM / MW / SW 1-2 CLOCK WORLD RECEIVER
FM STEREO / MW / SW DUAL CONVERSION WORLD RECEIVER
Page 2

1
2
3
4
5
6
1
2
3
4
5
6
SET
8888
AM
KHz
MHz
FM
PM
1
11
5
9
2
12
6
10
3
13
7
4
14
8
D
E2
0
2
F
M
:
8
0
-
1
0
8M
H
Z
M
W
:
525-
1
6
0
5
K
H
Z
SW
:
5
.
9
0
-
18
.
0
0
M
HZ
DEGEN
1
5
2
6
3
7
4
8
11
9
12
10
13
14
21
LOCATION OF CONTROLS
LCD INDENTIFICATION
FREQUENCY / TIME
ALARM SET
ALARM ON
PM
AM BAND / AM
FM
Page 3
3
O
P
EN
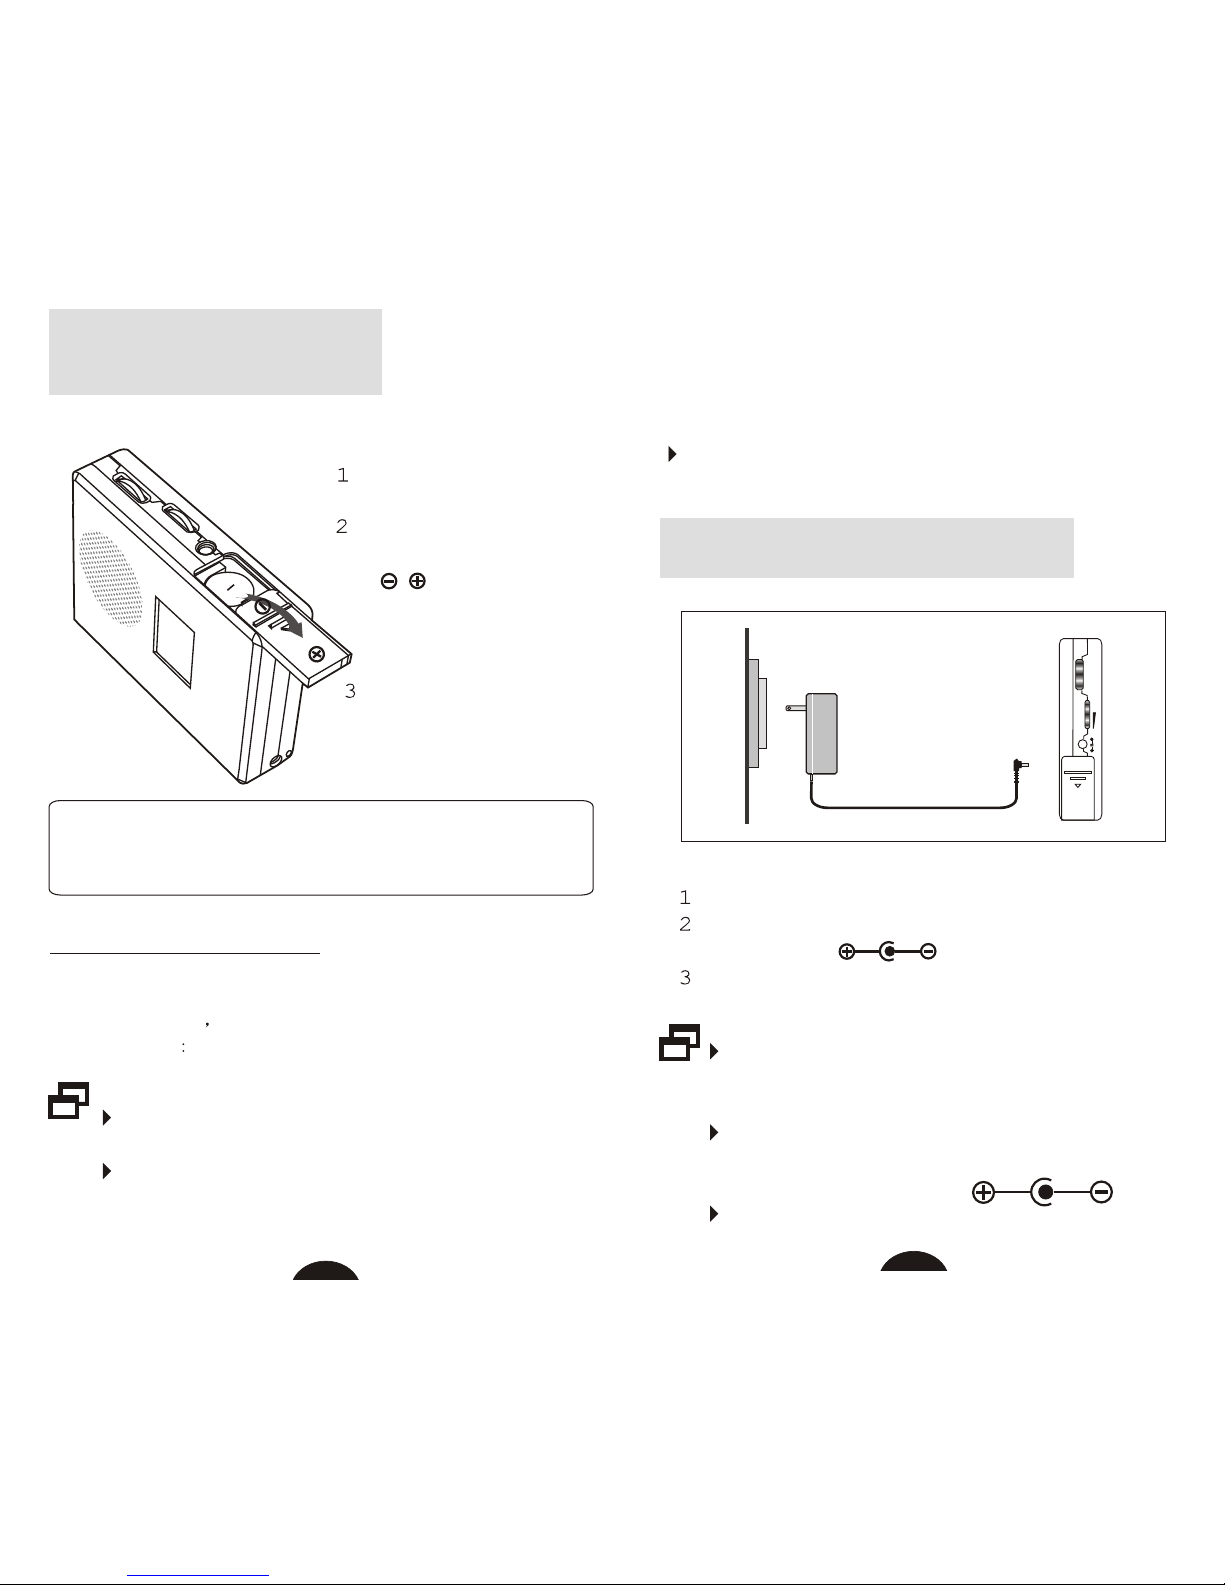
BATTERY OPERATION
Slide the battery lid in the
direction of the arrow.
Insert two AA batteries
according to the mark
on the battery lid.
Slide back the battery lid,
make sure that it snap in
place.
When the batteries become weak, the sound becomes weak
and the display flashes. Please reduce the volume or replace
the batteries with new ones to avoid message losing.
BATTERY REPLACEMENT
Turn off the unit and then replace the batteries with fresh ones
as soon as possible otherwise the messages will be lost and
clock reset to 12 00 am.
Do not mix different types together, or old batteries
with new ones.
When the unit is not being used for a long period of
time, remove the batteries to avoid damage from
battery leakage and corrosion.
AC ADAPTOR OPERATION
Plug the adaptor into an AC power outlet.
Insert the adaptor's small connector plug into the DC
JACK marked on the unit.
Turn on the unit.
If the AC adaptor is connected when regular batteries
are installed, the unit automatically switches to the
AC adaptor power and the batteries are not used.
Make sure the polarity of the AC adaptor suits your
unit before plugging it into the AC power outlet, the
correct mark is as follows:
External power supply can be chosen from 3V to 4.5V.
AC Power Outlet
TUN.
VOL
DC3V
Right Side
If battery leakage occurs, wipe the battery compartment
with a soft cloth before inserting the new ones.
4
Page 4
5
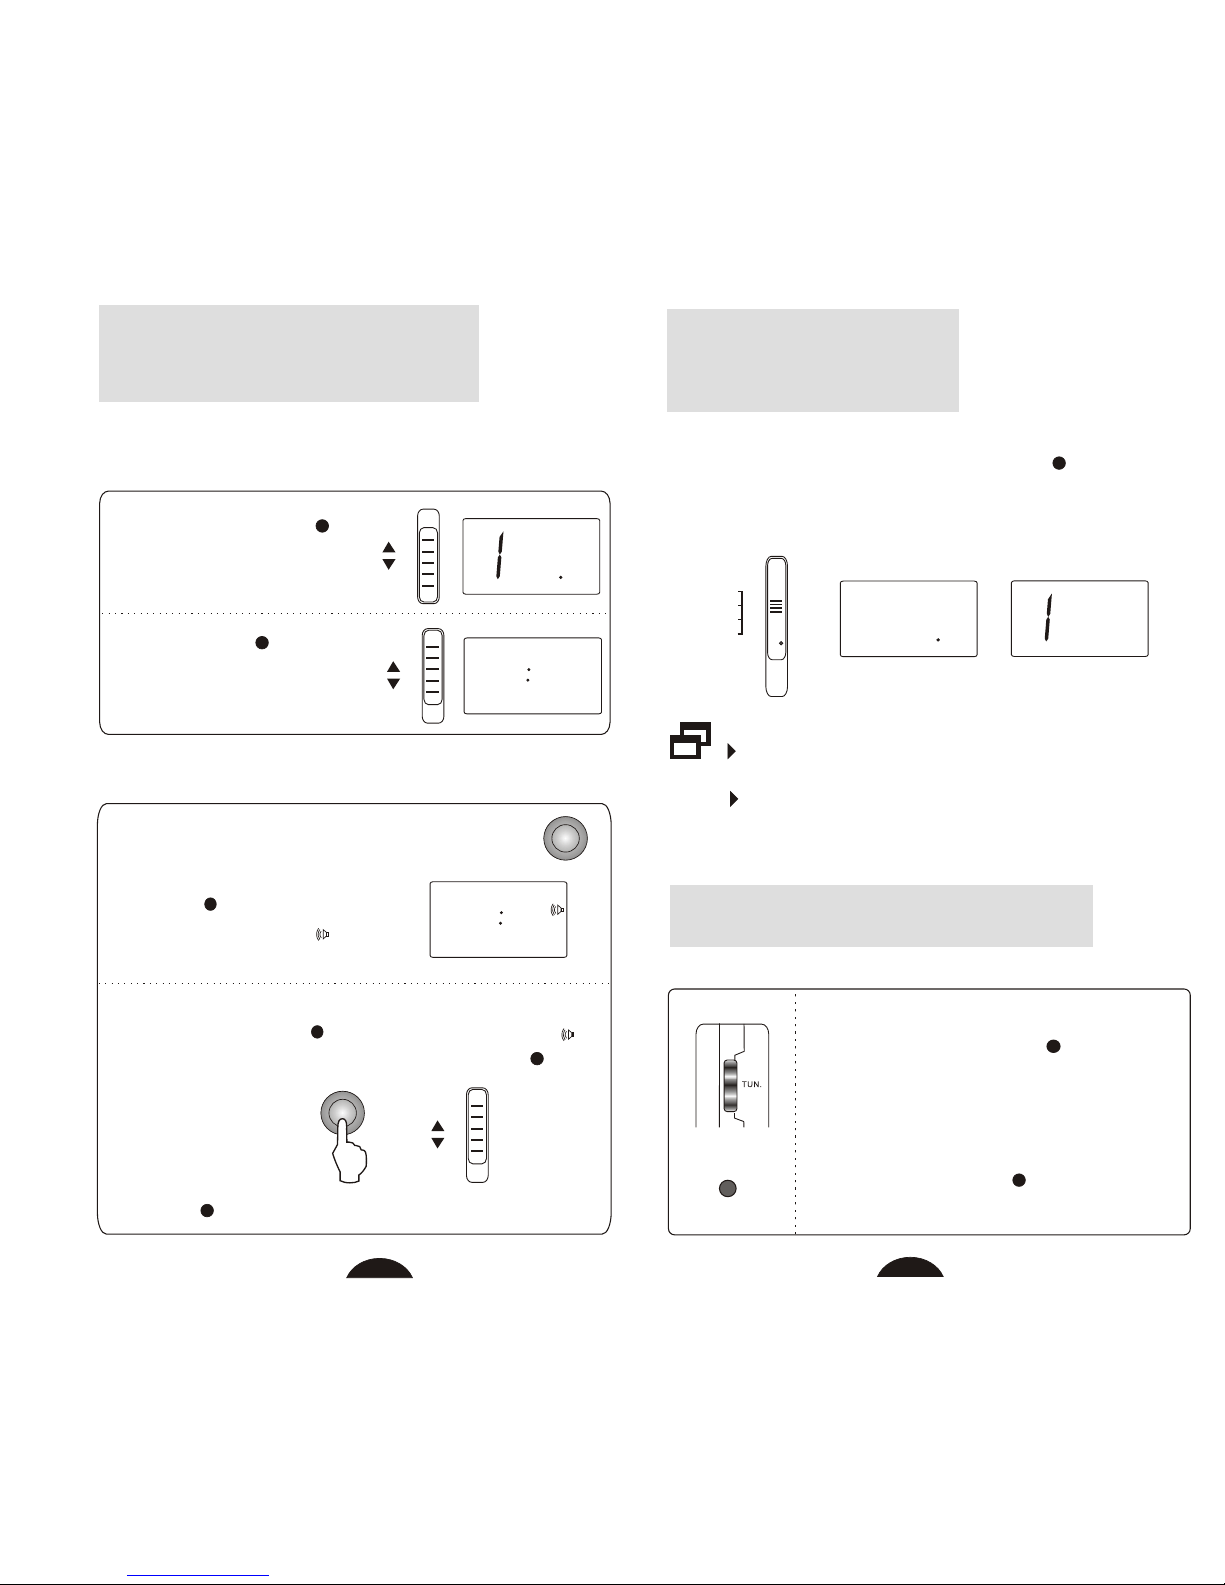
1. Power On / Off
If you have already adjust the
alarm clock (page 7 for ALARM
SET reference), press AL SET
ON / OFF to enable the unit
automatically turns on ( appear
in the display).
2. Alarm On / Off
TURN ON / OFF THE UNIT
To turn off the unit after automatically turns on, you have to
press AL SET ON / OFF first to release alarm state (
disappear in the display) and then switch ON / OFF to OFF.
Set the ON / OFF switch
to turn on the unit, then
you can select FM or AM.
Switch ON / OFF to
turn off the unit and turn
back to clock mode.
OFF
ON
047
FM
MHz
OFF
ON
12
12
12
12
PM
330
AL SET ON/OFF
200
AM
AL SET ON/OFF
OFF
ON
9
9
ON / OFF only can not turn off the unit in alarm state.
6
TUN.
11
After turning on the unit, switch band selector to select FM /
MW / SW1 /SW2, the corresponding band indicator will indicate
in the display.
BAND SELECTION
FM
MW
SW1
SW2
FM stars from 80MHz, it is available for campus
broadcasting reception.
AM is for international broadcasting generally.
2
Adjust the TUNING KNOB according to
the frequency in the display.
When the receiving signal is strong enough,
TUNING INDICATOR is lighten.
TUNING IN TO A STATION
824
FM
MHz
080
AM
KHz
13
Page 5
7
AL SET ON/OFF
SET
PM
300
SET
PM
230
HOUR
MIN
PM
200
047
FM
MHz
5
6
9
9
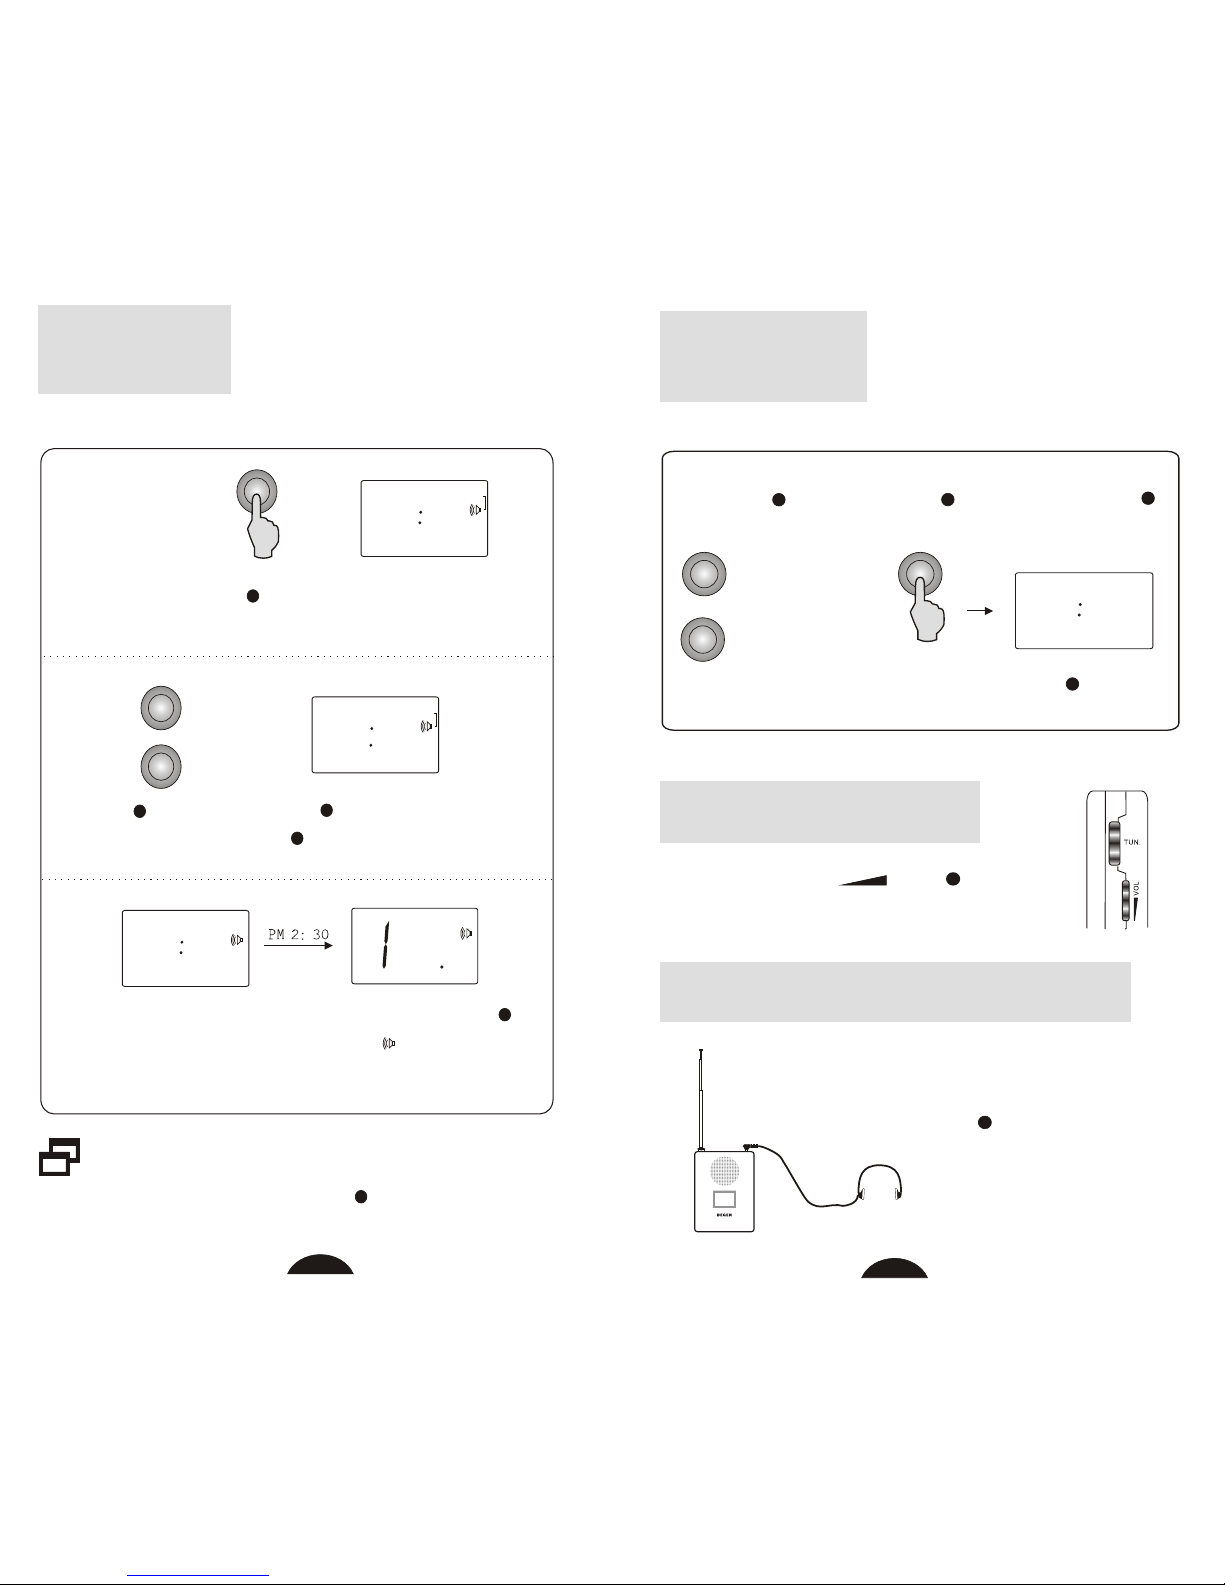
Keep AL SET ON / OFF pressed when the unit is off, alarm
clock and "SET" indicates in the display.
Press HR to adjust hour or MIN to adjust minute while
depressing AL SET ON / OFF .
After adjusting the alarm clock, release AL SET ON / OFF to
back to clock mode, clock set is stored and indicates in the
display. When the time is being, unit will automatically turn on.
ALARM SET
When resetting the alarm clock in the state of alarm
on, press AL SET ON / OFF to set alarm on again
after adjusting.
9
9
8
DE202
LISTENING WITH HEADPHONES
Insert the headphone's small
connector into the EARPHONE
JACK and enjoy listening
with headphones.
HOUR
MIN
PM
330
TIME SET
10
5
6
10
2.After adjusting the clock, release TIME SET and the
clock set is automatically stored.
1.Turn off the unit into CLOCK mode if the unit is on, press
TIME SET together with HR to adjust hour or MIN to
adjust minute.
CLOCK SET
VOLUME CONTROL
Adjust volume using VOL , keep the
volume at a moderate level.
3
1
Page 6
9
MW
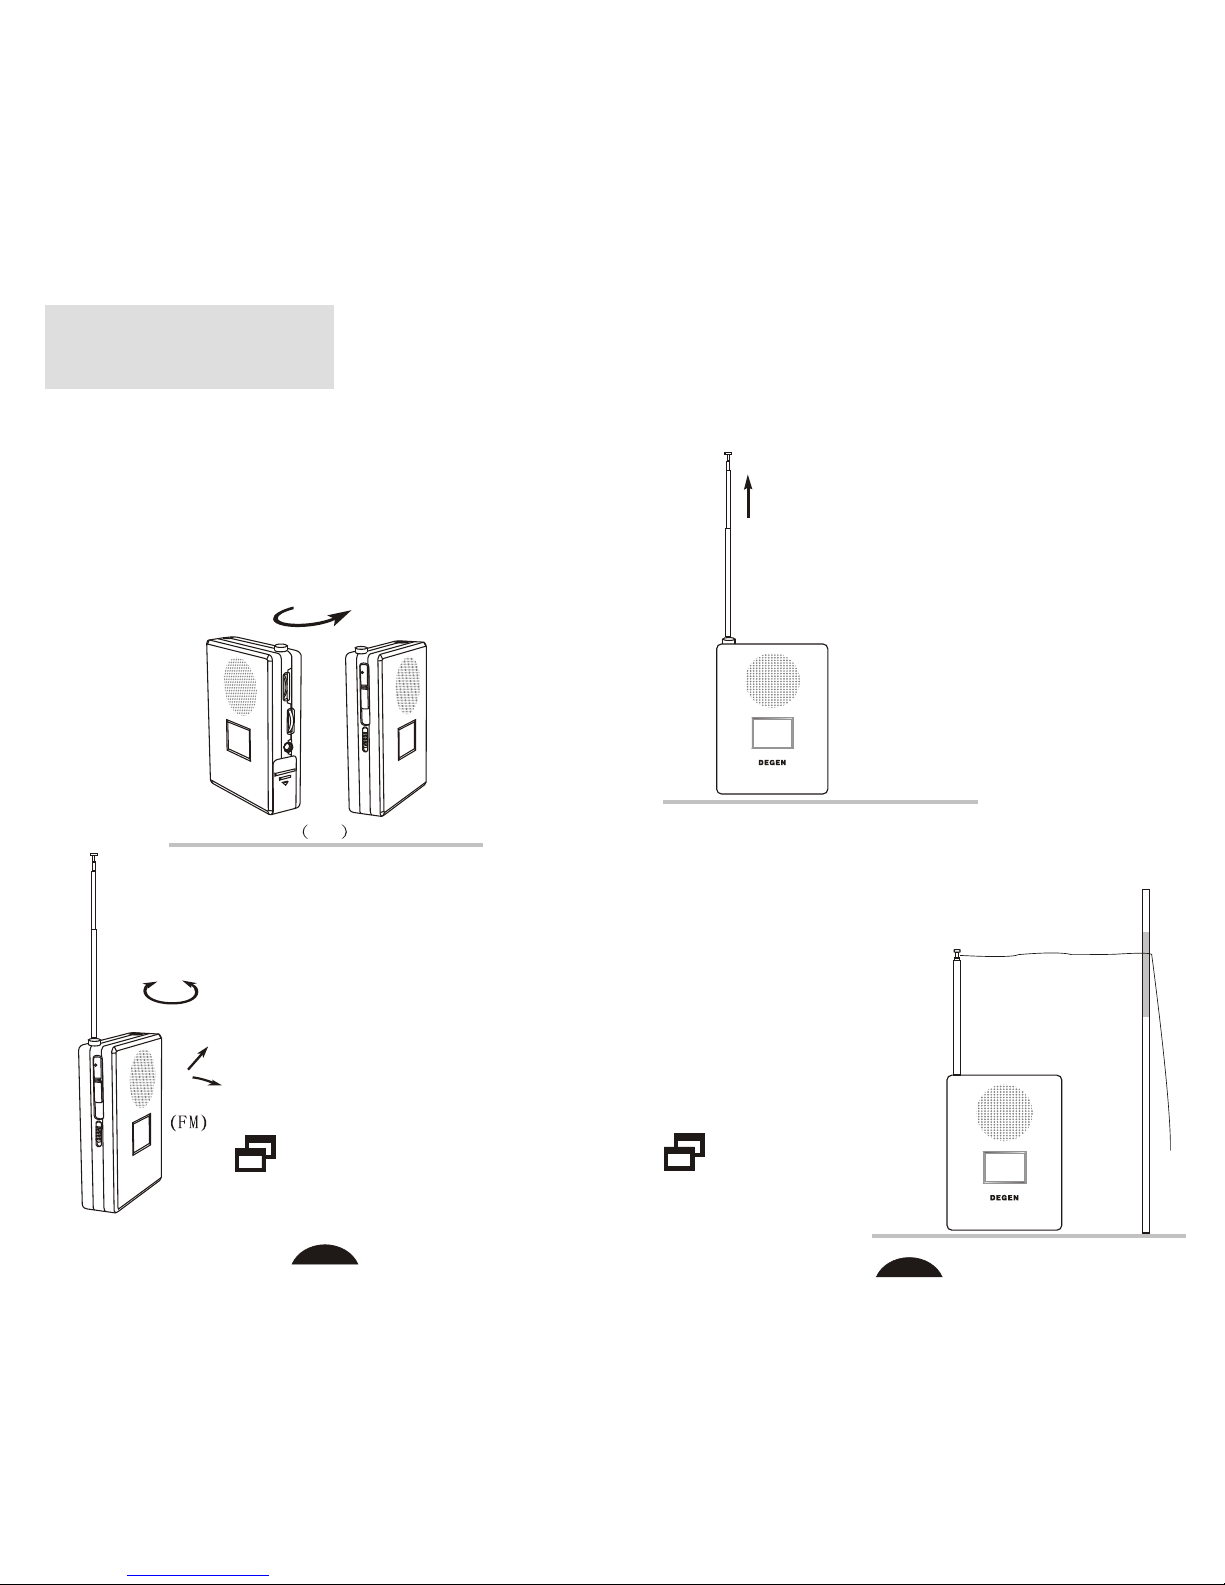
Magnetic antenna inside the unit functions as MW antenna, it
is strongly effected by the reception direction.
When listening to MW broadcast, reorientate the unit to find
the position which gives the best reception.
USING ANTENNA
MW Reception
Inside telescopic antenna functions as
FM antenna, keep it extended and
reorientate the unit to find the position
which gives the best reception.
FM Reception
Headphone wire also can be
used as antenna when listening
FM broadcasting.
DE202
DE202
Telescopic antenna functions
as SW antenna. Extending the
antenna straight upward to
get the best reception.
SW Reception
External Antenna
If FM or SW signal is
too weak, use a external
antenna to improve reception.
Do not use external
antenna in thunder
storm day.
10
Page 7

11
Avoid using headphones at high volume, if you experience
a ringing in your ears, reduce volume or discontinue use.
Shut down the radio before sleeping.
Do not use headphones while driving or cycling, it can also
be potentially dangerous to play your headphones at high
volume while walking, especially at pedestrian crossing.
Notes On Headphones
CAUTIONS
On Handling
Avoid exposure to temperature extremes, direct sunlight,
moisture, sand, dust or mechanical shock.
Should anything wrong with the radio, please remove the
battery and have the unit checked by qualified personnel
before operating it any further.
When the unit is not being used for a long period of time,
remove the batteries to avoid damage form battery leakage
and corrosion.
The LCD display may become hard to see or slow down
when using the unit at high temperatures (above 40 C) or at
low temperatures (below 0 C). At room temperature, the
display will return to its normal operating condition.
12
SPECIFICATIONS
49m 5.95 - 6.20 MHz
41m 7.10 - 7.30 MHz
31m 9.45 - 9.95 MHz
25m 11.65 - 12.05 MHz
21m 13.60 - 13.80 MHz
19m 15.10 - 15.60 MHz
16m 17.55 - 17.90 MHz
SW1: 5.95 - 9.95 MHz SW2: 11.65 - 17.90 MHz
1. Frequency Range
4. Speaker: D 40mm 4 0.25W
5. External Earphone: D 3.5mm
2. Noise Limit Sensitivity
FM 10 V
MW 1mv/m
SW 30 V
3. Power Supply:
3V - 4.5V DC
2 AA Batteries
6. Dimensions: Approx. 87 65 21 mm
7. Mass: Approx. 85 g (excl. Battery)
 Loading...