

Page 1

OPERATION MANUAL
FM STEREO AM SW DSP RECEIVER
MP3 PLAYER
DIGITAL RECORDER
REPEAT
LOUDSPEAKER
MENU
ESC
MUTE
M
M
SW
AM
V
REC
V
DE1129
FM AM SW RAD IO/MP 3/REC ORDER
2011- 08-15
15 : 30 : 22
Radio/ MP3/Rec order
1129
DE A-RDS
FM
MIC
Page 2
LOCATION OF CONTROLS
MENU
2011- 08-15
15 : 30 : 22
Radio/ MP3/Rec order
1129
DE A-RDS
FM
MIC
FM AM SW RAD IO/MP 3/REC ORDER
18
21
20
17
19
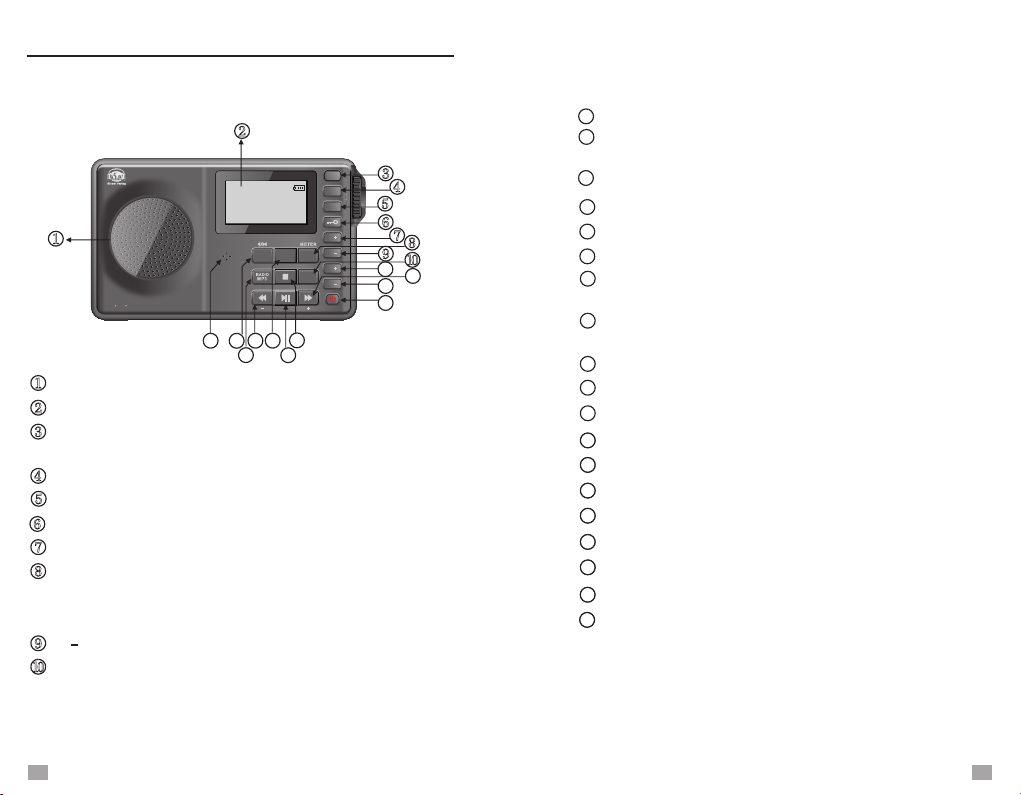
Speaker
Display
Menu: Press to enter
Hold to go back to main menu
Escape
Mute: Turn off/on speaker
Key lock: Hold to lock/unlock
M+
In radio mode: SW button(press in SW mode to change
M Bands)
In music mode: Directly shift repeat mode
M
Record button: In radio mode, press to start recording
In other modes, hold to directly start MIC
recording
ESC
MUTE
M
M
SW
AM
V
REC
15
16
11
V
13
14
11
Volume+
12
In radio mode: Frequency+
In music mode: Next song/FF
13
Volume-
14
Power on/off
15
Stop button
16
12
Play/Pause
17
AM button
In music mode: press to set A-B repeat
18
FrequencyIn music mode: Preview song/REW
19
Radio/Music mode selection
20
FM stereo/moo selection
21
Built-in MIC
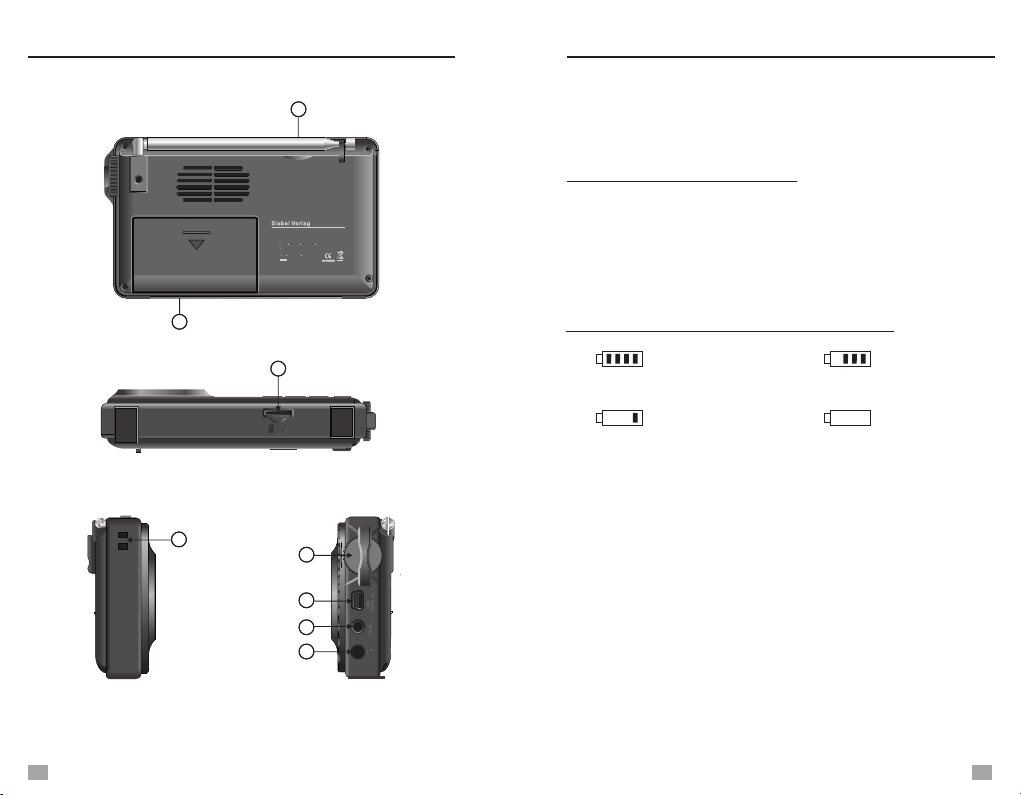
22
Antenna
23
Battery compartment
24
MICRO SD card slot
25
Strap hole
26
Tuning knob
27
Mini-USB jack
28
Line-in jack
29
Earphone jack
1
2
Page 3
LOCATION OF CONTROLS
BATTERY POWER SUPPLY
22
Before initial use, open the battery compartment (behind
the back stand), make sure the lithium battery is installed.
INSTALLING THE BATTERY
1. Turn off the unit and open the battery cover.
1129
DE A-RDS
FM/AM/ SW RADI O
MP3/RE CORDE R
FM 64 0/8 7 0-108 0 MHz
AM 522-1 710KH z
SW
2 30-23 0 0MHz
5V
500mA
23
24
25
26
27
28
29
2. Install the provided lithium battery according to the battery
polarity.
3. Close the battery cover.
BATTERY CONSUMPTION INDICATION
1. Ful l
3. Low
2. Med ium
4. Exh auste d
3
4
Page 4
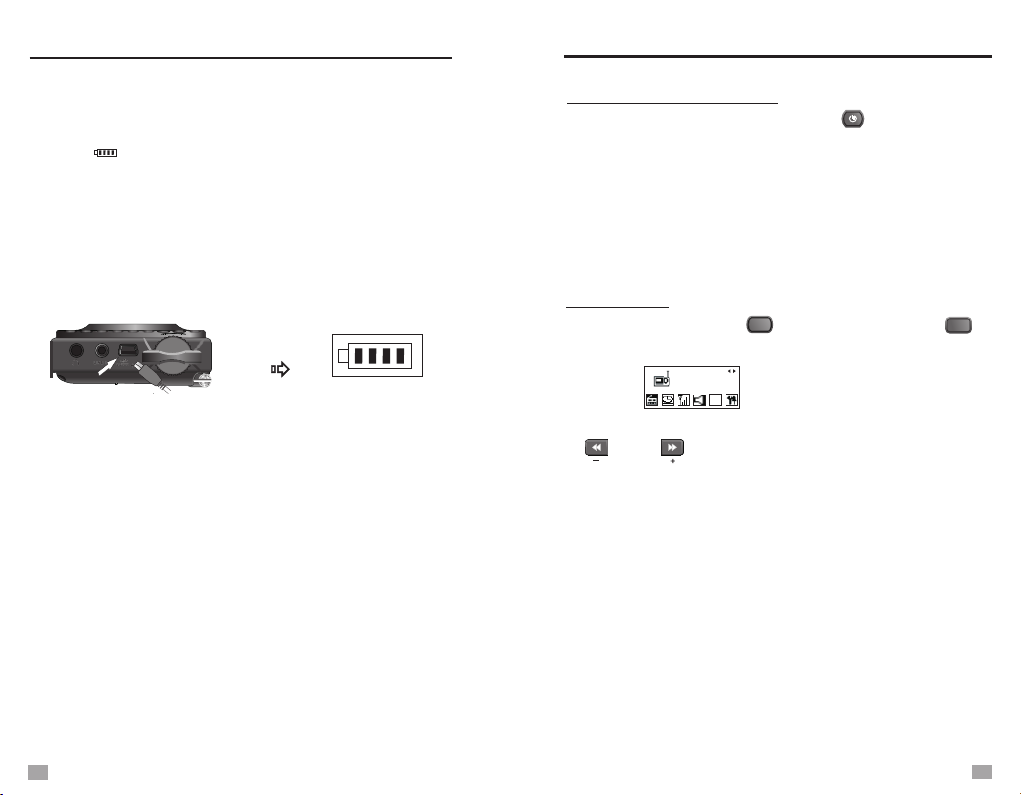
CHARGING THE LITHIUM BATTERY
MAIN MENU
To charge the battery, connect the unit to the mini-USB port
and opposite end to a power source(5V DC/≥500mA, not
provided). While charging, the battery symbol shown on the
display “ ” moves from right to left, and stops when the
battery is full charged.
A computer with a USB jack can also be used as a power
source to charge the battery.
After installing the lithium battery, connect the unit and the
computer with the provided USB cable to charge the battery.
Left side
Mini -USB ja ck
Note: 1. Please turn off the radio while charging the battery
to avoid interference.
2. Prior to first use, fully charge and drain the battery
three times to extend the battery’s life.
Caution: 1. Improperly change of battery will cause explosion,
please only use recommended type of battery.
2. Do not expose the battery to strong sunlight, heat
or other high temperature environment.
3. Do not use the unit when charging with PC to
prevent any damage to computer power source.
TURN ON/OFF THE UNIT
1. Turn ON/OFF manually: Press the < > button.
2. Turn off the unit by using “Alarm off” or “Sleep timer”.
3. Auto Turn Off: The unit will turn off automatically in 3
minutes if not in either Recording, Music or Radio playing
mode.
Note: If the unit can not be turned on/off, please check the
battery or the key lock button.
MAIN MENU
In any Mode, hold the < > button or press the< >
MENU
button can go back to Main Menu.
SELECT
Radio
Main Menu
In Main Menu mode, rotate the Tuning Knob or press the
< > or < > button to select either of below function
and press the Tuning Knob to enter.
FM Radio: FM/AM/SW Radio
Music: MP3 music play mode
Record: MIC Recording mode
Voice: Recording file play mode
Ebook: Text reading mode (Support TXT)
Sys Set (system setting): Time set, date set, calendar info,
alarm set, backlight, language, sleep timer, power off mode,
contrast, memory info, firmware version, firmware upgrade,
date format, time format, exit.
ESC
5
6
Page 5
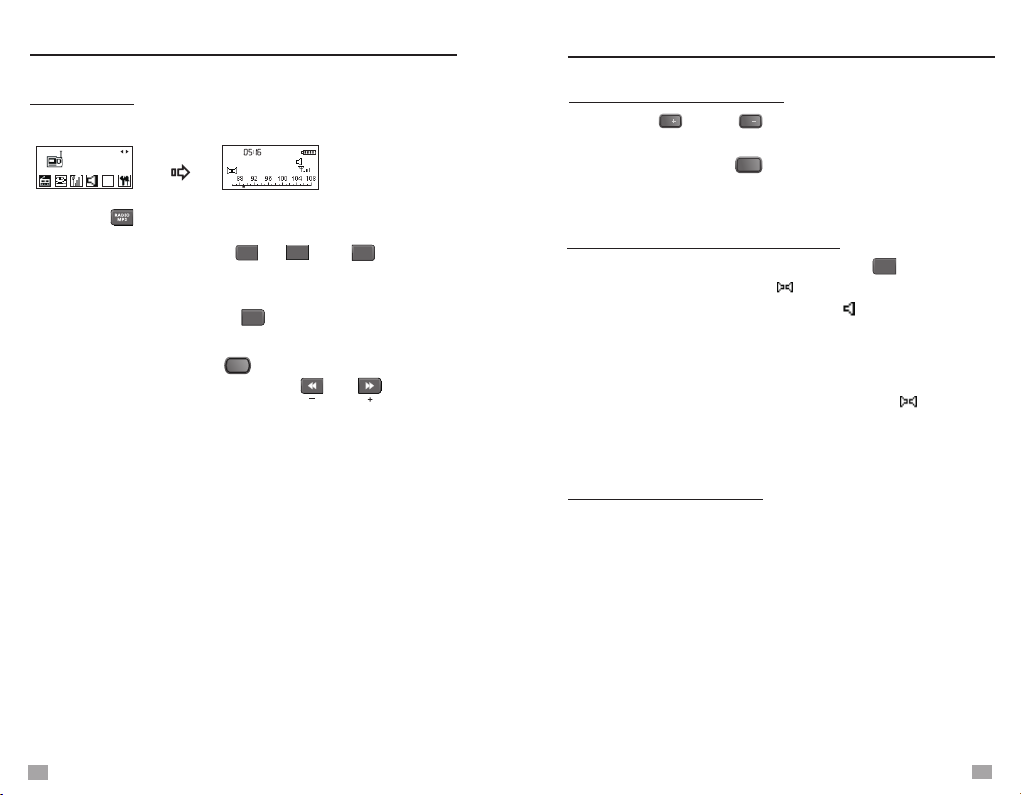
CHOOSE BANDS
TUNE IN STATIONS
FM RADIO
In Main menu, select [FM Radio] by press the Menu button.
SELECT
FM Radio
Press the < > button to enter either Radio or Music mode.
In Rad io Mode , press t he< >,< > o r< > b utton t o
sele ct your d esire d band. The t op left c or ner o f th e
disp lay wil l show th e band yo u are lis tenin g to . Whe n
list ening t o SW, pres s the < > but ton can c ha nge
<m> ba nds.
In Radio mode, press the < > button to enter radio menu.
Rotate the Tuning knob or press the < >, < > button to
select either of the below functions:
- Save : Manua l store t he stat ion int o me mor y fr om 1~50
- Reco rd: Sel ect 129 k/40k B PS dire ct r adi o re cordi ng
- Dele te: Del ete sin gle mem ory
- Dele te all: D elete a ll stor ed memo ry
- ATS: Auto t unes an d store a ll stat ions in to m emo ry
- Norm al Band : 87~10 8MHz
- Japa n Band: 7 6~90M Hz
- Scho ol Band : 64~10 8MHz
- Open R DS: Pre ss to Ope n/Clo se RDS
- Upda te RDS ti me:
- AM Spa cing Sw itch: R epeat edly pr es s to sele ct
9K/1 0K tuni ng step a nd dire ct ente r AM li ste ni ng
9K Fre quenc y range : 522~1 710KH z
10K Fr equen cy rang e: 520~ 1710K Hz
- Exit
FM
M02
06
89.8
MHz
FM Rad io
AM
FM
SW
MENU
SW
Syn th e RDS tim e to the un it
VOLUME ADJUSTMENT
Press the < > or < > button to adjust your desired
V
volume level, the display will show the volume level.
Repeatedly press the < > button to turn on/off the
speaker.
V
MUTE
FM STEREO/MONO SELECTION
To activ ate ste reo lis tenin g, pres s th e < > but to n
and th e displ ay will s how < > sym bol; pr es s aga in t o
deac tivat e, and th e mono sy mbol < > wi ll s how.
Note: 1. Do not use stereo when listening to stations with
weak signal, because the decoding process of stereo
will cause a lot of noise.
2. If you select stereo listening, but the < > symbol
is not shown on the display, it is because the signal
of the station is too weak.
FM
ANTENNA RECEPTION
1. It only works when listen to FM and SW.
2. When listen to FM or SW, you can change the length of
the antenna according to the signal intensity to get better
reception.
7
8
Page 6

TUNE IN STATIONS
STORING STATIONS
USING BUILT-IN ANTENNA
1.It only works when listen to AM Broadcast..
2. While listening to AM station, rotate the radio to find the
position which gives the best reception, as the built-in
ferrite bar is located inside the unit and it is strongly
affected by the direction of placing of the unit.
Note: 1. To have better reception, go near a window when tuning
indoor.
2. Keep away from electrical equipment, AC power supply when
using the unit to avoid interference.
2. Do not use the unit while charging because of the interference.
MANUAL TUNING
Turn on the radio and select [FM Radio] in Main menu,
Press the < > button to enter, then choose your desired
band by pressing on either the FM, AM or SW button.
Using either of the methods below to tune into your desired
station:
1. Rotate the Tuning Knob or press the < >,< >
button.
Frequency display
Stereo symbo
2.Press and hold the < > or < > button for about
two seconds, then release to auto tune into the next
available station.
MENU
Band symbol
FM
M02
89.8
MHz
Frequency point
06
Volume level (0~31)
Signal intensity
AUTO TUNING STORAGE(ATS)
In radio mode, press the < > button and rotate the Tuning
knob to select [ATS]. Press the < > button again to start
auto scan and store the available stations within the memories.
Memory Locations:
FM/SW(ATS): M51 ~ M99
AM(ATS): M26 ~ M50
NOTE: Do not use ATS while charging the unit to avoid interference.
MENU
MENU
Memory Locations
FM
M50
06
89.8
MHz
STORING STATIONS MANUALLY
Sele ct your d esire d stati on, pre ss t he < > bu tt on and
rota te the Tun ing kno b to sele ct [Sav e] , the n ro tate th e
Tun ing kno b or pres s the < >,< > b utton t o se lect
memo ry loca tion fr om 1~50 i n FM/SW m od e or 1~ 25 i n
AM mod e. Pres s the < > but ton aga in to con fi rm.
MENU
Memory Locations:
FM/SW(manual storage): M1 ~ M50
AM(manual storage): M1 ~ M25
MENU
LISTENING TO STORED MEMORIES
After storing stations into memory, press the < > or < >
M
button with the memory address M01~M99 shown on the
display(next to the frequency) to select your desired station
memory.
M
9
10
Page 7

DELETE STORED MEMORIES
FM RDS
DELETE SINGLE/ALL MEMORIES
Pres s the < > but ton in ra dio mod e, and ro ta te th e
Tun ing kno b to sele ct eith er <Del ete> or < De let e All >
and pr ess the < > b utton a gain to d elete s in gle
memo ry or all m emori es.
MENU
MENU
FM RDS
M50
MHz
PS
MENU
06
1. Select an FM station, press the < > button and select
<Open RDS>, the symbol < > will show on the
display.
2. Press the < > button to shift the transmitted details
(display on the bottom of the screen).
RDS is on
87.8
info. SZ87.8
PTY
PTY: Program Type
PS: Station Name
RT: Station Text Message (Only display if the station has
transmitted)
CT: Update RDS time (wait about 2-3 minutes to get the
RDS time)
3. Update RDS time:
display, press the < > button and rotate the Tuning
Only when the time shows on the
MENU
knob to select <Update RDS Time>.
4. Press the < > button and rotate the Tuning knob to
MENU
select <Close RDS> to turn RDS off.
Note: 1. You can receive the RDS information only if the
station has this function.
2. You can get the complete RDS information when
the signal is full. If the RDS signal is weak, please
find another location to receive clear reception.
11
12
Page 8

RECORD RADIO
LISTEN TO MP3 FILES
RECORD RADIO
While listen to the FM/AM/SW stations, you can directly
record the programs by following the steps below:
1. Adjust the volume level up to 10 (minimum).
2. Press the < > button and select [Record], then rotate
the Tuning knob to choose either of below recording
formats:
- 129k BPS (WAV format, max 68 hours, 4G,)
- 40k BPS (MP3 format, max 215 hours, 4G)
3. Press the < > button to confirm your selection and
start recording. The timer on the display starts to count.
4. Press the < > button to pause and press it again to
restart, press the < > button to stop and auto store
the recorded file into the memory.
All recorded files can be located in the <Voice> folder of the
<Main Menu>.
Note: A shortcut to the recording function is to directly press
the < > button, recording format is according to your
last selection.
MENU
MENU
REC
LISTEN TO M P3 FI LES
1. Turn on the unit and select [Music] from Main menu, then
press the < > button to enter.
Pla y( ) P au se ( ) Sto p ( )
2. Rotate the Tuning Knob or press the < > or < >
button to select music file.
To search for a particular song, you can press the < >
button in Stop Playing Mode and select Local folder to find.
3. Press the < > button to play, press it again to pause;
press the < > button to stop.
4. While playing music file, press the < > button to enter
the following settings:
- Repeat: Normal [ ], Repeat One [ ], Repeat All [ ],
Random [ ]
- Equalizer: Natural, Rock, Pop, Classic, Soft, Jazz, Bass,
3D sound
- Tempo rate: -8 to 8 levels, 0 refers to normal speed.
- Lyrics: Press the the < > button to turn on/off
- Exit
Note: 1. A shortcut to the Music playing in radio mode is to
directly press the < > button.
2. The Lyrics must be in LRC format, use the same
name as the song and must be located in the same
folder.
MENU
No. of th e mu si c files
Name of t he s on g and pla ye rs
“T” r ef er s to L RC avai la bl e
for ma t an d Kb ps
Sound q ua li ty mode
MENU
003 00:01:57
Gaga Poker Face
Repea t mo de
MENU
18
MENU
13
14
Page 9

LISTEN TO MP3 FILES
A-B REPEAT
3. When playing the music, press the < > and the < >
SW
AM
button can directly shift Repeat Type and Equalizer.
4. Bass equalizer is used for earphone listening, please
select other equalizer when using speaker.
LISTEN TO THE FILES IN THE SD CARD
Transfer your selected MP3 format music files into the
MICRO-SD card, insert the SD card into the slot at the bottom
of the unit. Then turn on the unit, press the < > button in
MENU
the music mode to enter the [music playing menu], and find
the files.
NOTE:
1. Do not extract or insert the SD card when the unit is on. It
may cause unit dead or file missing.
2. SD card can not save recording files, recorded files can only
be saved in the <Voice> folder.
DELETE MUSIC FILES
While not playing any music, press the < > button to enter
the following settings:
- Local folder: Select music file
- Delete file: Delete a single music file
- Delete all: Delete all music files
- Exit
To operate above settings, press the < > button to enter or
confirm, rotate the Tuning Knob or press the < >, < >
button for selection.
Note: Your can also connect the unit to the computer to
delete files.
MENU
MENU
A-B REPEAT
When playing the music, press < > once to activate,
< > appears on the display with “A” flashes, press < >
again to set the starting point “A”, then “B” flashes. When
reaches your desired position, press < > again to set the
ending point “B”. Then the unit will repeat from A to B. While
repeating, press < > can cancel the repeating and keep
FM
on playing the music.
FM
FM
FM
15
16
Page 10

USE AS AN ACTIVE LOUDSPEAKER
MIC RECORD
USE AS AN ACTIVE LOUDSPEAKER(LINE-IN)
Connect the unit to other medias( MP3, voice recorder,
Laptop, etc.) with a Line-in cable, can increase the sound of
the connected media.
1. Plug one end of the Line-in cable to the earphone jack of
the audio equipment, and the other end into the Line-in jack
of the unit.
other
audio
devices
2.
Turn on the unit and select [FM Radio] in [Main Menu],
press the < > button to enter.
3. Adjust the volume to a proper level, turn on the audio
equipment, the sound will come out from the speaker of
the unit.
NOTE: Only under [FM Radio] mode, the unit be used
as an active loudspeaker.
MENU
can
MIC RECORD
Select [Record] in [Main Menu], press the < > to enter.
File NO./ Time
Rest recording time
Year/Month/Date
Record mode symbol
1. Press the < > button to select REC type:
MENU
019 00:00:00
018 30:01:50
REC019 11/01/20
Record format
- Long Rec (Long time recording- 64K, WAV format)
- High Rec (High quality recording- 129K, WAV format)
- Fine VOR (High quality voice sensor recording- 128K,
VOR format)
Fine VOR: If the audio source volume is too low, the recording
will pause until the audio source volume increase
to a recognizable level.
2. After select desired record format, press the < > button
to start, press the < >button to pause/restart, and press
the < > button to stop. And the recorded file can be
found in the local folder of [Voice] .
MENU
MIC Re cord Mo de
REC
17
18
Page 11

LISTEN TO RECORDING FILES
WORKING WITH EBOOK
LISTEN TO RECORDING FILES
1. Sel ect [Voi ce] in [M ain Men u] and pr es s the < >
butt on to ent er.
2. Pre ss the < > or < > b utton t o se lec t fi le.
3. Pre ss the < > to p lay/p ause th e re cor de d file;
pres s the < > but ton to st op.
Wor ki ng Stat e
Playi ng P ro cess
Playi ng M od e
File fo rm at a nd Kbps
Repea t Mo de
005 00:00:57
REC005 10/10/30 17:05
Note: While not playing, your can press the Tuning Knob
and select <Local Folder> to find particular recording
file.
- Local folder
- Delete file
- Delete all
- Exit
4. While playing recording files, press the < > button to
enter the following settings:
- Repeat: Normal, Repeat One, Repeat All, Random
- Tempo rate: -8 to 8 levels
- Exit
Note: Tempo rate “0" is the normal playing speed, positive
number to speed up, negative number to slow down.
MENU
MENU
WORKING WITH EBOOK
1. Select [Ebook] in [Main Menu], press the < > button
to enter.
2. Select your desired file by rotating the Tuning Knob, and
press the < > button to enter below settings:
MENU
- Local Folder: Select Particular File, press < > to play.
- Play set: Manual or Auto play file
(1~10 seconds page changing time for auto play)
- Delete file: Delete a single file by rotating the Tuning Knob
and select [Yes] to delete; [No] to exit.
- Delete all: Delete all files by rotating the Tuning Knob to
select [Yes] to delete; [No] to exit.
- Exit
In manual play mode, rotate the Tuning Knob or press the
< >, < > button to change the page; press the
< > button to exit.
3. While reading, your can press the < > button to enter:
- Bookmark Select
- Bookmark Delete
- Bookmark Add
- Exit
Note: Before using Ebook function, please first format your
file to “.txt”, then copy to the [Ebook] folder.
MENU
MENU
19
20
Page 12

阅读 电子 书
TIME SET
SYSTEM SETTING
In [Main Menu] mode, rotate the Tuning knob to select
[Sys Set], press the < > button to enter below settings:
Note: Selection time for each step is about 5 seconds.
Rotate the Tuning knob or press the < >, < > button
to select your desired function, and press the Tuning knob to
enter; press the < > button to exit.
MENU
- Time set
- Date set
- Calendar Info
- Alarm set
- Backlight
- Language
Sleep Timer
-
Power off mode
-
- Contrast
- Memory inro
- Firmware version
- Firmware upgrade
- Date format
- Time format
- Exit
ESC
TIME SET
1. Select [Time Set] in Sys Set Mode by rotating the Tuning
knob.
2. Press the < > button and notice the hour-indicator
MENU
flashes, then rotate the Tuning knob or press the < >,
< > button to adjust the hour; Press the < > button
MENU
and notice the minute-indicator flashes, then rotate the
Tuning knob to adjust the minute; Press the < > button
MENU
and notice the second-indicator flashes, then rotate the
Tuning knob to adjust second.
3. Press the < > button to confirm time setting.
MENU
16 20 35
Time Set
: :
Hour: Minute: Second
DATE SET
1. Select [Date set] in Sys Set Mode.
2. Press the < > button to enter and notice the year flashes,
rotate the Tuning Knob or press the < >,< >
button to adjust the year, press the Tuning Knob to confirm;
Then adjust the month and date with the same methods.
3. Press the Tuning Knob to confirm.
MENU
Date Set
2012 07 28
: :
Year: Month: Date
CALENDAR INFO
Select [Calendar Info] in Sys Set Mode, press the < >
button to display the calendar information for few seconds.
MENU
21
22
Page 13

ALARM SET
ALARM ON/OFF
ALARM SET
1. Select [Alarm] in Sys Set mode and press the < >
button, [New] appears on the display.
2. Press the < > button again to enter the new alarm
MENU
setting, [Normal alarm/ Power off/ Power on/ Exit] appears.
3. Rotate the Tuning knob to select [Normal Alarm] and press
MENU
the < > button. Now [Only Once/ Daily] shows on the
display.
4. Rotate the Tuning knob to select either [Only Once/Daily],
press the < > button to enter [Alarm Time Setting].
MENU
5. Rotate the Tuning knob to adjust hours, minutes and
seconds. Press the < > button to confirm. Now it shows
MENU
[Yes/No] and [Do you want to add?] on the display.
6. Rotate the Tuning knob to select [Yes], press the < >
button to confirm and enter the below setting sections:
- Sleep Time: 1~30 minutes SNOOZE timer
- Play Time: 1~30 minutes alarm time
- Alarm Count: 1~30 alarm count
- Alarm Music: Audio/Record alarm music selection
- Alarm Volume: 1~31 level
- Alarm Preview: Alarm with your preset music
- Exit: Exit the alarm setting
Press the < > button to turn off the alarm, and press any
other buttons to pause the alarm, and it will play again in few
minutes.
NOTE: You can totally 6 alarms. set
MENU
MENU
ALARM ON
1. Sel ect [Al arm On] u nder [N ew] in [A la rm se t] , follo w
the st eps of th e norma l alarm s et. Afte r co nfirm ing the
time , rotat e the Tuni ng Knob t o selec t [Yes] , pr ess the
MENU
< > to con firm an d enter t he foll ow ing s el ectio ns:
- Radi o: List ens to th e last ra dio sta ti on
(whe n auto tu rned on )
- Musi c Audio: P lays th e last mu sic fil e
(whe n auto tu rned on )
- Mic Re cord: R ecord s via MIC (when a ut o tur ne d on)
- Radi o Recor d: List ens to an d recor di ng th e la st raid o
stat ion(w hen aut o tu rne d on )
Note: 1. [Normal Alarm], [Power on] timer, [Power off] timer
settings share the same steps.
2. You can Activate/Deactivate/Delete/Reset the alarm
by press the < > button after selecting the
MENU
particular alarm in [Alarm Set] mode.
- Alarm Symbol
Alarm Activated
-
- Alarm Deactivated
ALARM OFF
Sele ct [Ala rm Set] i n Sys Set m ode and p re ss th e Tun ing
Knob t o enter. [ New] ap pears o n the dis play. Pres s th e
Tun ing Kno b again , [ Norma l Alarm, P ower off, P ow er on ,
Exit ] appea rs. Rot ate the Tu ning Kn ob t o sel ec t
[Pow er off], th en foll owing t he same s te ps in [ Al arm Set ].
Note: If the setting time of [Sleep Timer] is earlier than that of
the [Alarm off], the [Sleep Timer] has the priority.
23
24
Page 14

SLEEP TIMER
POWER OFF MODET
BACKLIGHT TIMER
Select [Backlight] in Sys Set mode, press the < > button
to enter, then rotate the Tuning knob to adjust the lighting
timer from 5~30 seconds. Press the < > button to confirm
MENU
and exit.
MENU
LANGUAGE SELECTION
Select [Language] in Sys Set mode, press the < > button
to enter, then rotate the Tuning knob to select your desired
languages.
MENU
SLEEP TIMER
Select [Sleep Timer] in Sys Set mode, press the < >
button to enter, then rotate the Tuning knob or press the
< >, < > button to adjust the auto turn off timer from
0~90, select “0” to turn off the sleep timer.
After set the sleep timer, < > will shown on the display and
a counting number next to the symbol.
Sleep Timer Symbol
30
003 00:01:57
Gaga Poker Face
MENU
POWER OFF MODE
Select [Power Off] in Sys Set mode, press the < > button
to enter and rotate the Tuning knob to enter the below
settings:
Standby mode: After turn off the unit, you can check time by
press any button.
Sleep mode: After turn off the unit, only the < > button
works. This mode can save more electricity.
MENU
CONTRAST SETTING
Select [Contrast] in Sys Set mode and press the < >
button to enter. The brightness level 0~16 appears on the
display, rotate the Tuning knob to adjust, and then press the
Tuning knob to confirm and exit.
MENU
MEMORY INFO
Sele ct [Mem ory Inf o] in Sys S et Mode a nd p res s th e
MENU
< > butt on to dis play th e memor y statu s. P ress th e
< >, < > can s hift ch eckin g the mem or y sta tu s
of the u nit or th e SD card .
25
26
Page 15

DATE FORMAT
FIRMWARE UPGRADE
DATE FO RMAT
Select [Date Format] in Sys Set mode and press the < >
button, then rotate the Tuning knob to select the belowing
date format:
- yyyy mm dd
- mm dd yyyy
- dd mm yyyy
- Exit
Press the < > button to confirm selection or wait for 5
MENU
seconds to automatically cancel and exit.
MENU
TIME FORMAT
MENU
Select [Time Format] in Sys Set mode, press the
button, then rotate the Tuning knob to select your desired time
format, and press the < > button to confirm.
MENU
- 12 Hour Mode
- 24 Hour Mode
- Exit
< >
FIRMWARE UPGRADE
Before upgrade, please remove or copy the files in the unit
to save place.
1. Download the upgraded firmware from our website to a
computer. (http://www.degen.com.cn)
2. Use the provided USB cable to connect both unit and
computer, then transfer the data to the unit.
3. Disconnect the USB cable, then turn on the unit and
select [Firmware Upgrade] in Sys Set mode.
4. Press the < > button and select [Local Folder] to enter
firmware upgrade software. [Updating, please wait!]
appears on the display.
5. After [Updating Success!] appears on the display, the
unit will turn off automatically.
6. Remove the battery and insert few seconds latter.
If the unit can not be turned on, please use a computer to
upgrade by the following steps:
1. Download the ungraded firmware from our website to a
computer.
2. Open [Burn Tool] under the DE1129 Firmware Upgrade
Folder. The below program appears on the screen:
MENU
27
28
Page 16

FIRMWARE UPGRADE
KEY LOCK
3. Select [Update Mode], and click [Import File] to choose the
“DE1129***.upd”, then connect DE1129 and computer with
provided USB cable. Click [Download].
4. The [Device 0,0%] advancing till 100%, and the process
bar turn to green.
5. Disconnect the unit and computer, the unit will turn on
automatically.
Note: 1. If the upgrade fails, cancel the selection of [Update
Mode], and follow the same steps again. But please
remove your files in the unit before this operation.
2. If the computer is not incompatible with the unit,
please try another computer.
KEY LOCK
To activ ate the l ockin g funct ion, pr es s the < > b ut ton,
and th e key loc k symbo l “ ” appea rs on the d is pla y;
pres s it agai n with th e symbo l disap pear to d ea ctiva te.
Note : If the un it has no r espon se to any o pe rat io n,
plea se firs t check i f the key l oc k sym bo l is show n
on the d ispla y, pl ease de activ at e it be fo re any
oper ation .
29
30
Page 17

SPECIFICATIONS
Spec if ication s fo r Radio
1. Frequency Range
FM 87.0 - 108.0MHz or 64.0 - 108.0MHz
AM 522 - 1710 KHz
SW 2.30 - 23.00 MHz
2. Preset Memories: FM 99 AM 50 SW 99
3. Noise Limit Sensitivity
FM ≤ 5 V
AM ≤ 2.5mv/m
SW ≤ 50 V
4. Signal Selection ≥40dB
Spec if ication s fo r MP3
5. Memory
6. Record Format
7. Max. Record Time about 215H (40kbps, MP3 format, 4G)
8. Earphone Output
9. Communication Standard
10. Access Rate
11. Max. Out Power (Speaker) ≥ 500mW
12. Power Source
Built-in Lithium Battery: 3.7V
External Adaptor: 5V 300~500mA
13. Lithium Battery Consumption (Volume is 22 Level)
MP3: About 4H(by Speaker) Radio: About 4H (by Speaker)
14. Speaker D40mm
15. Earphone D3.5mm
16. Dimensions Approx 130 * 78 * 30 mm
17. Weight Approx 170g (not incl. battery)
4G
WAV/MP 3
≤10m W*2
USB 2.0 (hig ht sp eed )
MP3:1 6-3 20Kb ps
WMA:8 -38 4Kbp s
31
V080212
 Loading...