

Page 1
MW / SW / FM STEREO
24 MEMORY PRESETS
/ TIMER / SLEEP
MANUAL TUNING / SEEK TUNING
MONO / STEREO SELECTABLE
LOCK SWITCH
AUTO CUT OFF WITH LOWER POWER
LIGHT INDICATOR
DX / LOCAL SWITCH
BUILT - IN SPEAKER
2 WAY POWER WITH AC / DC OPERATIONS
EXTERNAL ANTENNA JACK
PRESET / DIRECT ENTRY
OPERATING MANUAL
OPERATING MANUAL
9
Page 2
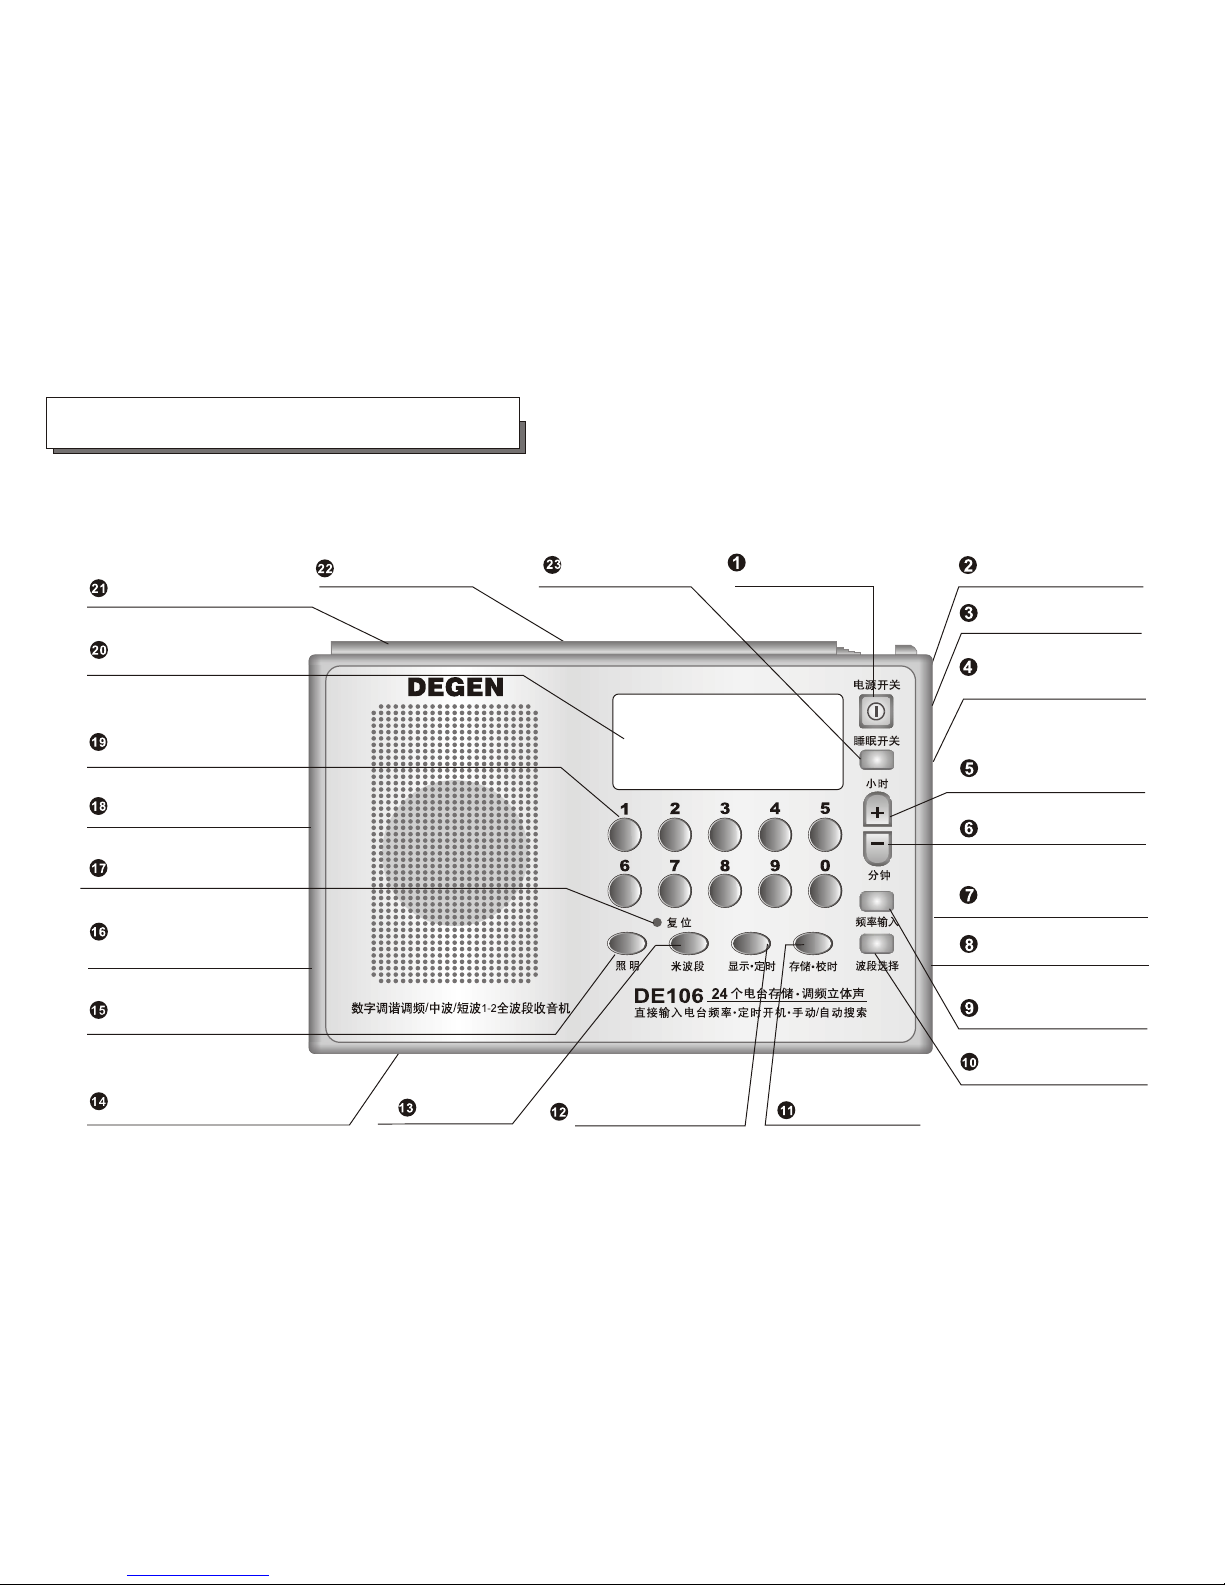
LOCATION OF CONTROLS
VOLUME
LOCK
STEREO/MONO
SCAN+/HR
SCAN-/MIN
EARPHONE
JACK
DC JACK
ENTER
BAND
MEMO/TIME
MODE/ALARM
METER
BATTERY
COMPARTMENT
LIGHT
DX/LOCAL
RESET
EXT.ANT.JACK
0...9
LCD
TELESCOPIC
ANTENNA
STAND
SLEEP
POWER
Page 3
23
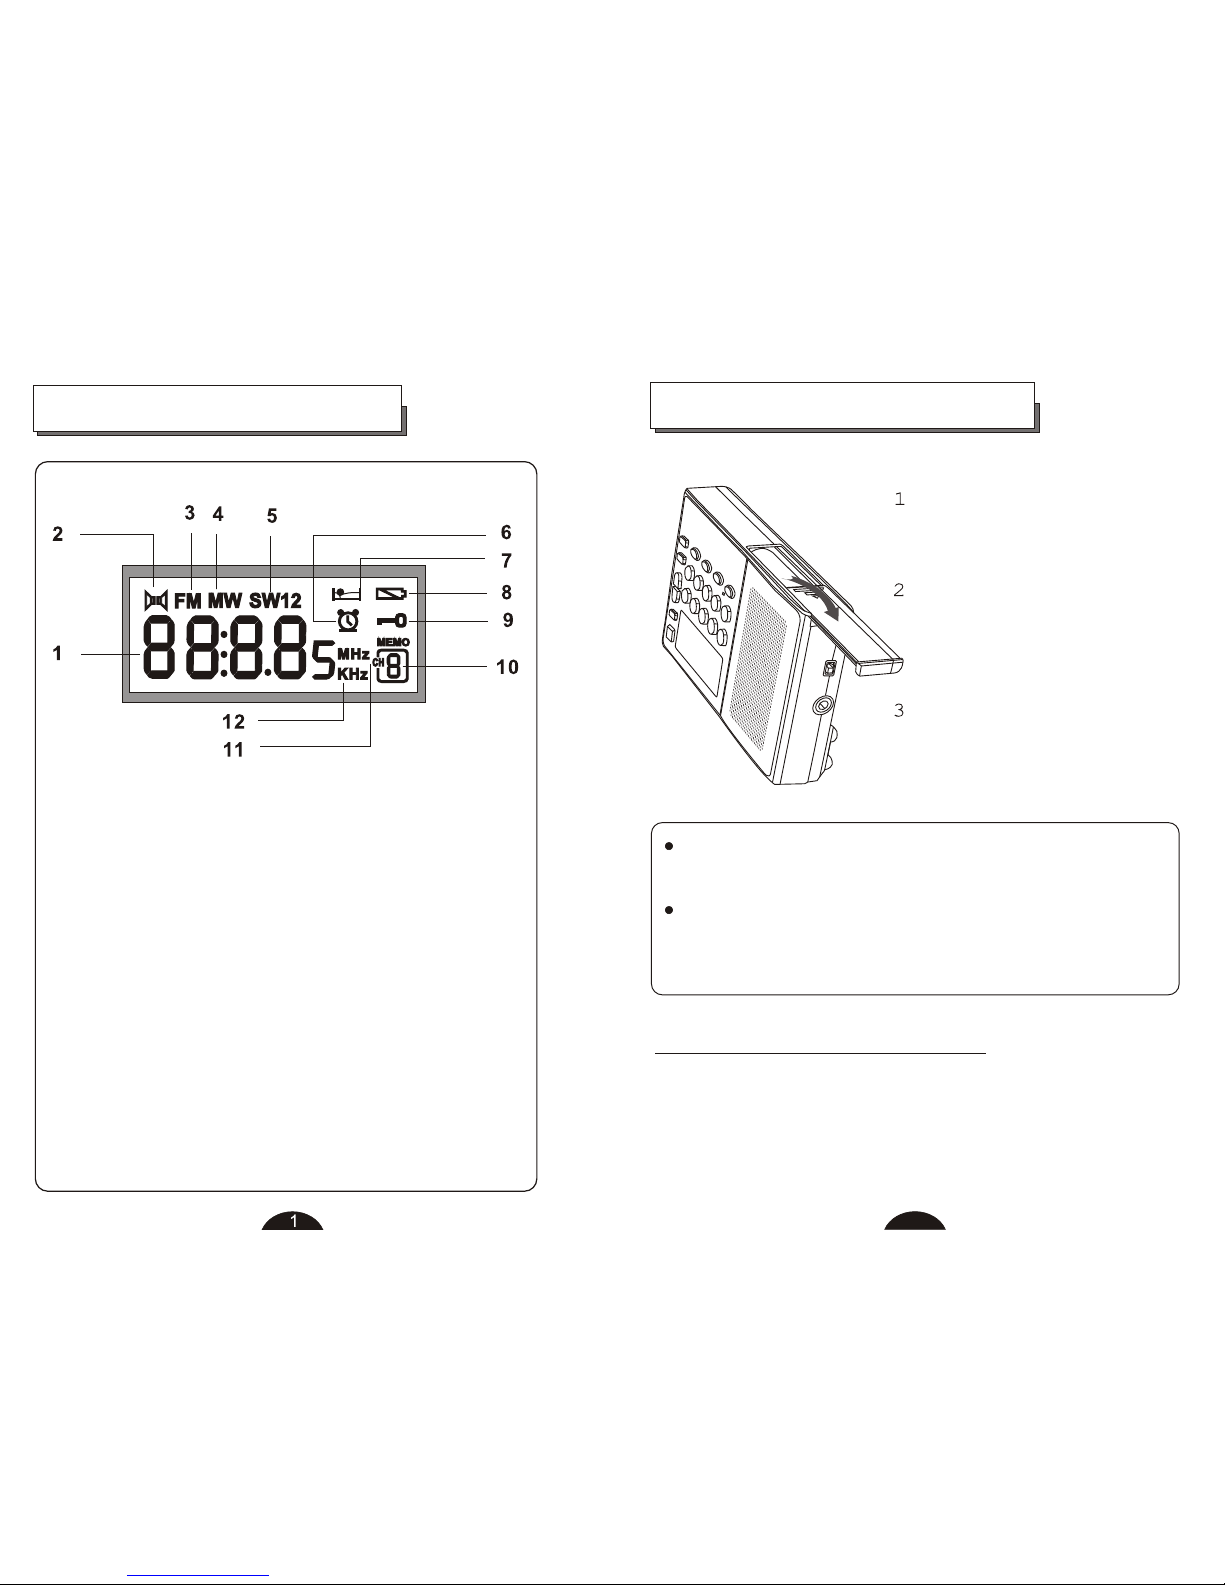
1 FREQUENCY / TIME
2 FM STEREO INDICATOR
3 FM BAND
4 MW BAND
5 SW1 BAND / SW2 BAND
6 ALARM INDICATOR
7 SLEEP INDICATOR
8 WEAK POWER INDICATOR
9 LOCK INDICATOR
10 MEMORY NUMBER
11 MHz
12 KHz
LCD IDENTIFICATION
2
OP
E
N
Slide the battery cover in
the direction of the arrow.
Insert two AA batteries
with correct polarity as
shown.
Slide back the battery
cover, make sure that it is
snapped into place.
When the batteries become weak, please reduce
the volume or replace the batteries with new ones.
If batteries get too weak for proper operation, the
unit will automatically shut off with special
integrated circus.
BATTERY REPLACEMENT
Turn off the unit and then replace the batteries with
fresh ones within 30 minutes.
BATTERY OPERATION
Otherwise, the setting will be cleared and clock reset
to 0 0:00.
Page 4
If the AC adaptor is connected when regular
batteries are installed, the unit automatically
switches to the AC adaptor power and the batteries
are not used.
Make sure the polarity of the AC adaptor suits your
unit before plugging it into the AC power outlet, the
correct mark is as follows:
External power supply can be chosen from 3V to
4.5V.
If you want to continue
listening, please reduce the
voice or replace the batteries
with new ones.
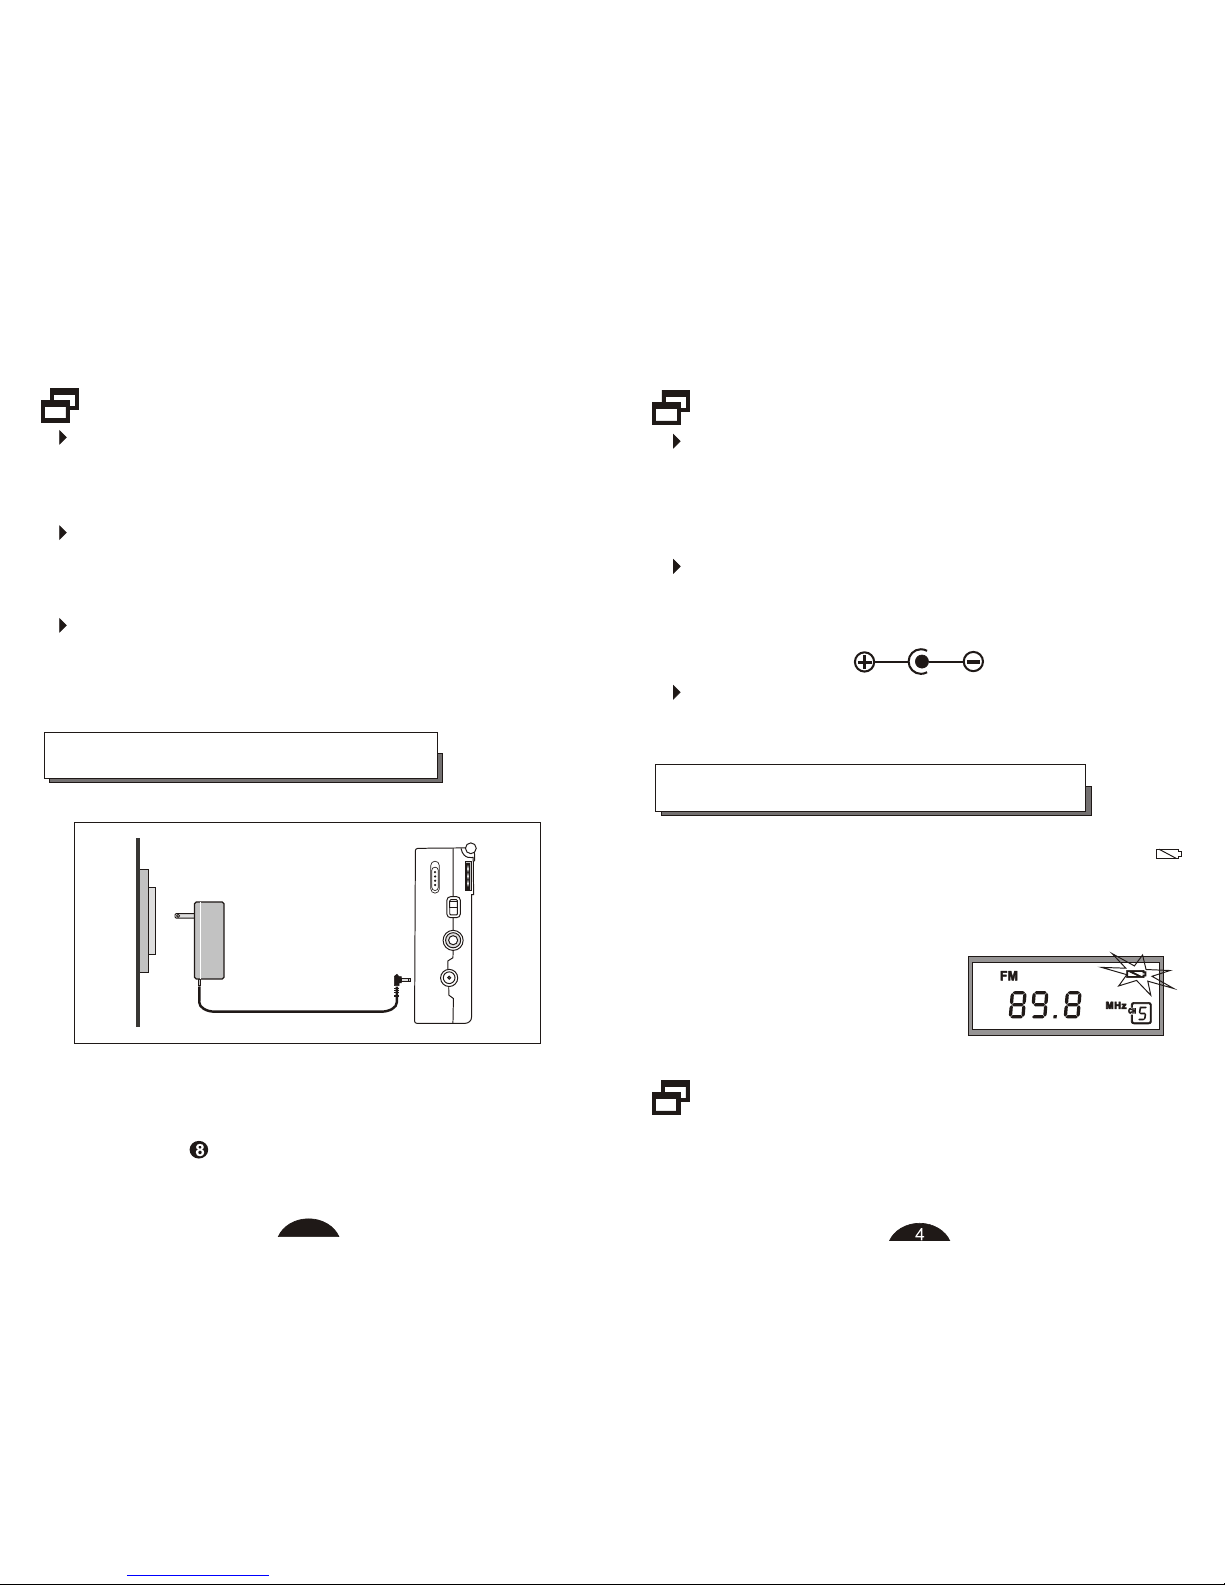
Even if the voice is low or in clock mode, weak power
indicator still flashes, please replace the batteries with
new ones immediately to avoid battery leakage.
WEAK POWER INDICATOR
When power supply is weak, weak power indicator
flashes, meanwhile the unit works disorderly and the
sounds becomes distorted.
3
Do not mix different types together (Alkaline,
Carbon-Zinc, Nickel Cadmium etc.), or old
batteries with new ones.
When the unit is not being used for a long period
of time, remove the batteries to avoid damage from
battery leakage and corrosion.
If battery leakage occurs, wipe the battery
compartment with a soft cloth before inserting the
new ones.
AC ADAPT OPERATION
1. Plug the adaptor into an 220V AC power outlet.
2. Insert the adaptor's small connector plug into the
DC JACK .
3. Turn on the unit.
Page 5
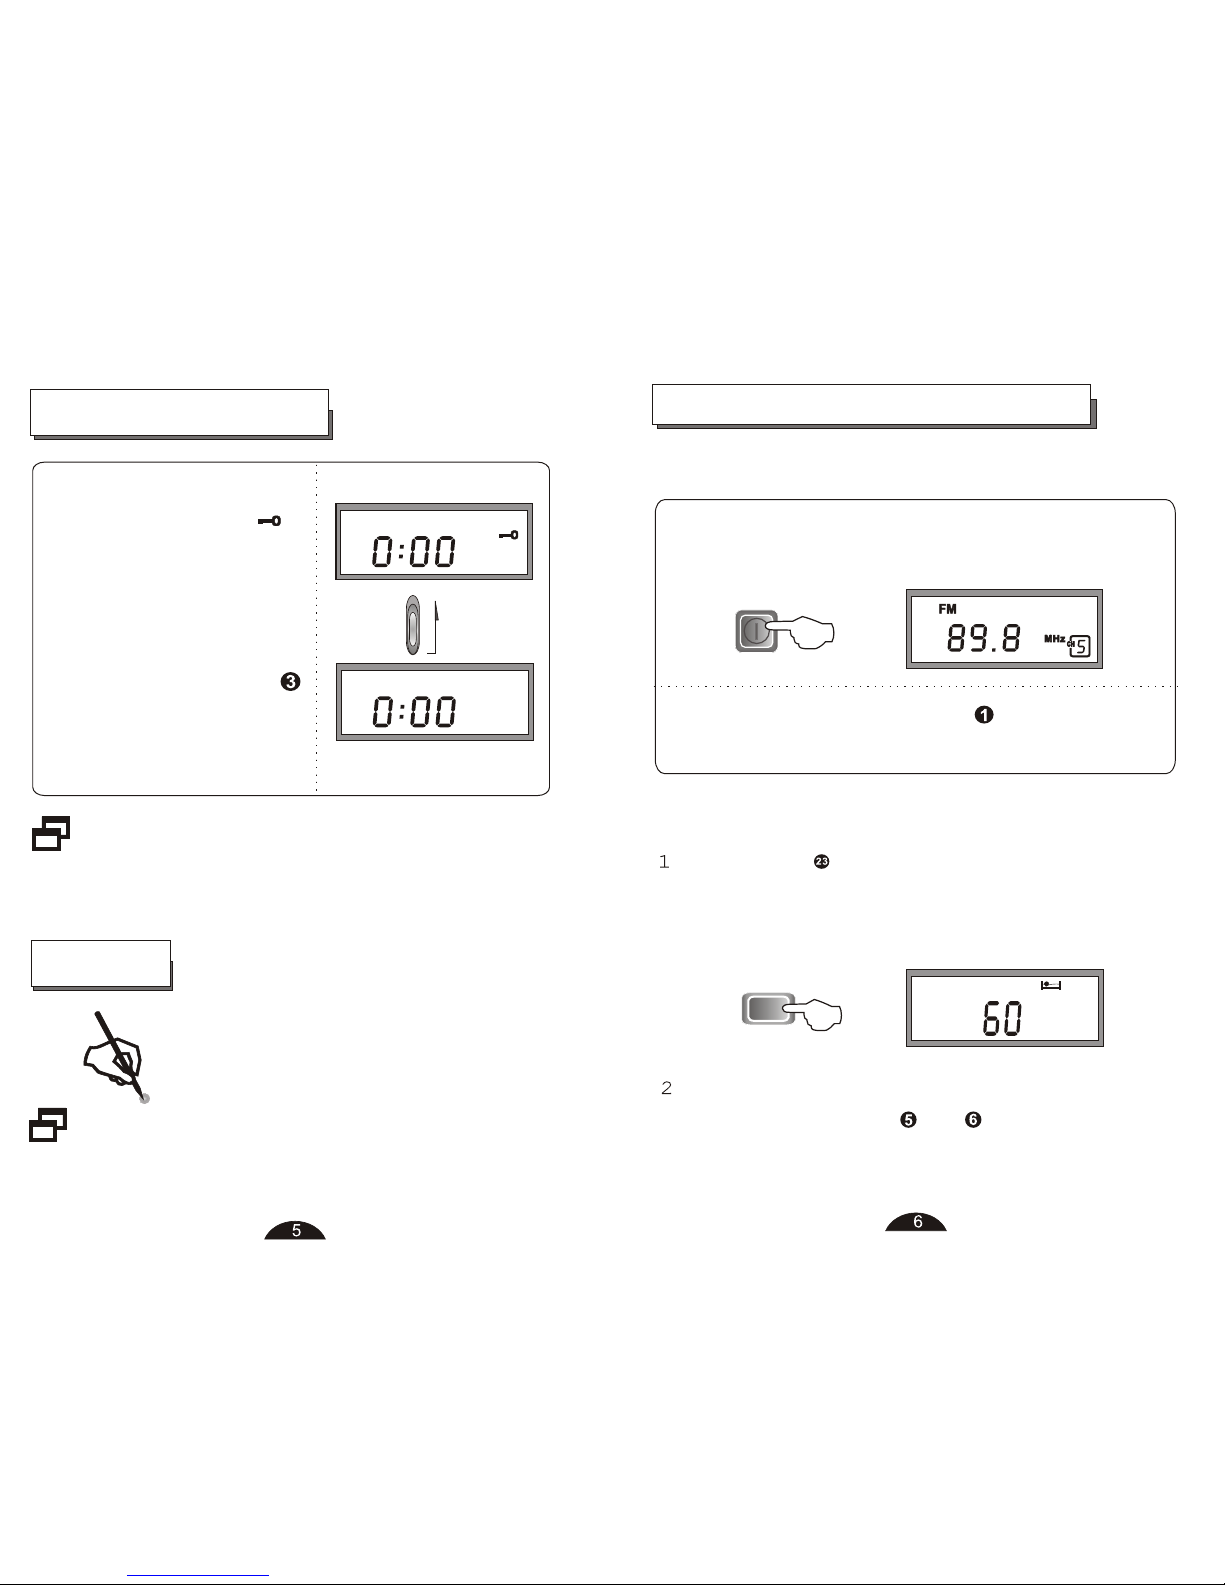
TURN ON / OFF THE UNIT
1. Power On / Off
Press POWER to turn on the unit manually, the
station you stoped listen last operation is heard.
After listening, press POWER to turn off the
unit.
2. Sleep
Press SLEEP to turn on the unit, default sleep
time of 60 minutes indicates in the display and the
tuned station is heard.
While 60 indicates in the display, set the desired
sleep time by press + or - , sleep time is
changenable from 10 to 90 minutes.
When the unit is in lock
status, lock indicator
appears in the display.
None of the buttons except
LIGHT, MONO / ST and
RESET button will work.
LOCK FUNCTION
Slide the LOCK switch
in the opposite direction of
the arrow to unlock the
controls.
Lock function prevent the unit from short, accidental
button press.
RESET
If the unit operates erratically, press
RESET button to resume normal
operation.
Reset will erase all of the memories including clock
setting.
Page 6
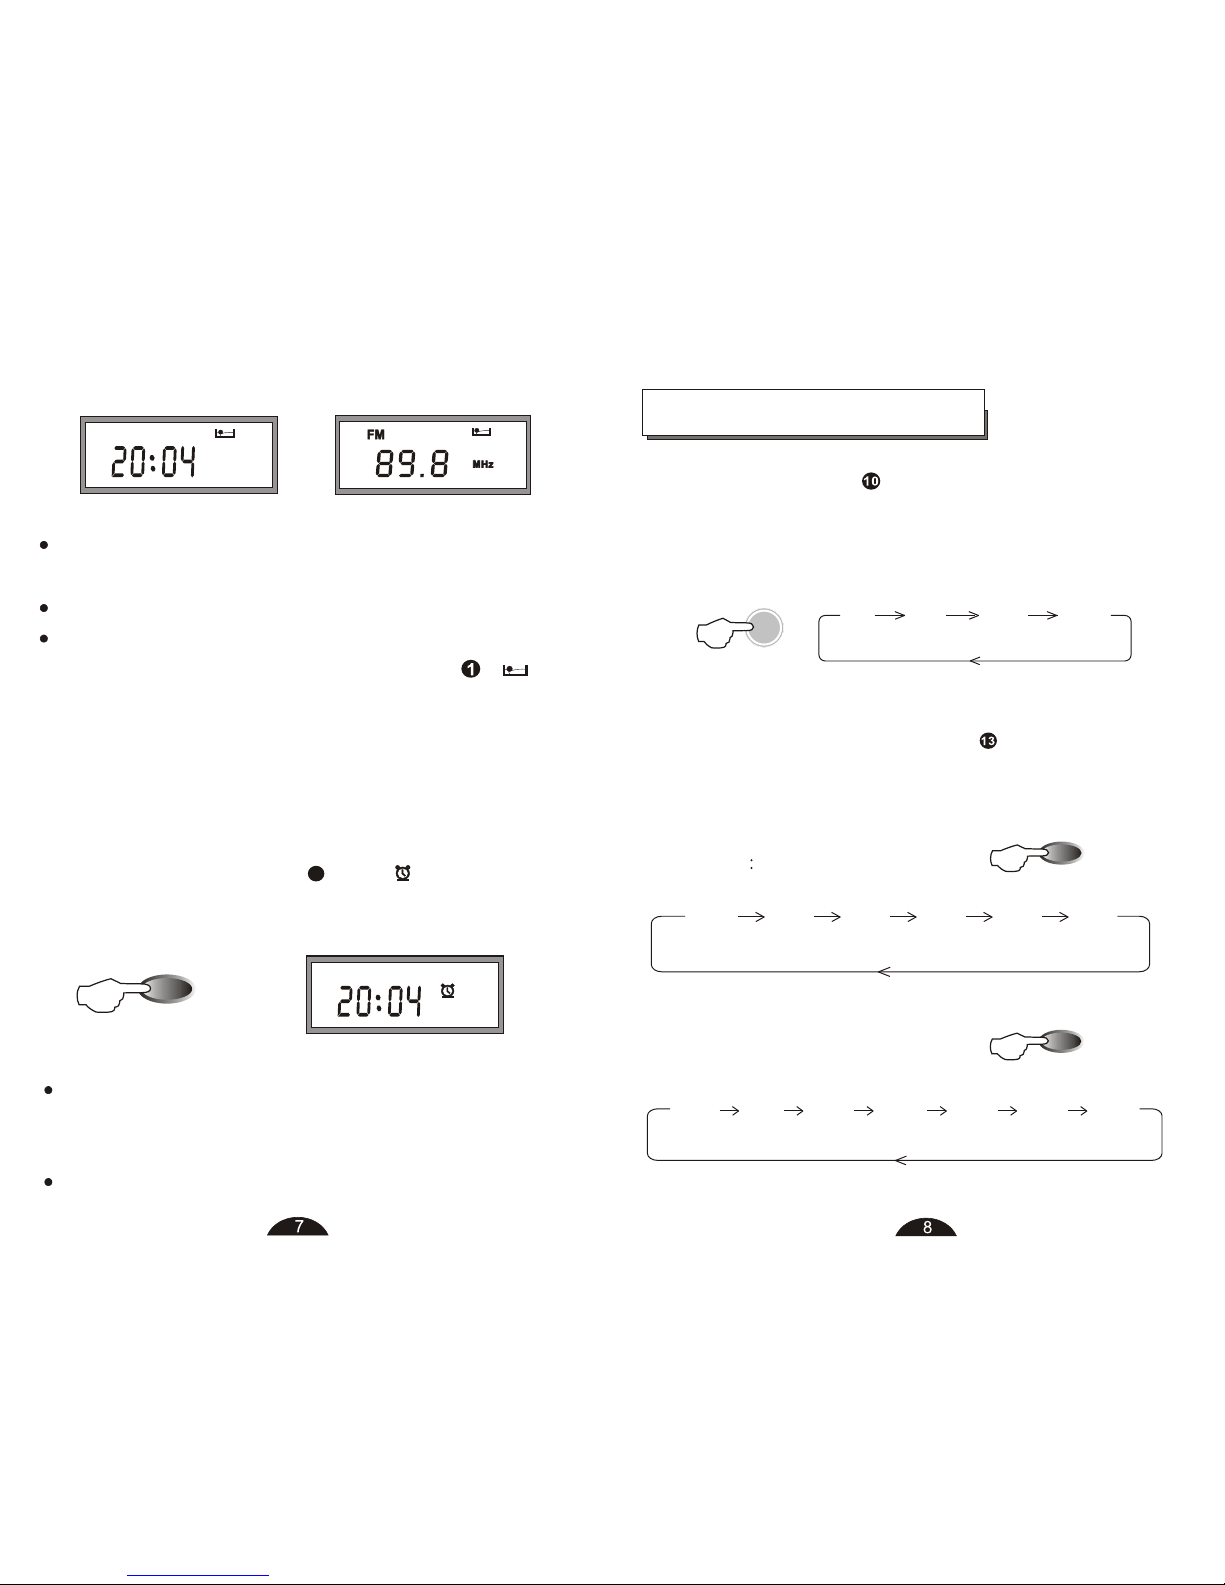
BAND SELECTION
Press BAND button repeatedly to select FM, AM,
SW1, SW2, the corresponding band indicator will
show in the display.
FM MW SW1 SW2
BAND
Repeat
SW1 and SW2 each is divided into several SW meter
bands, press SW METER button repeatedly ,
SW meter range begins as follows:
SW1 2.30 - 7.80 MHz
SW2: 9.10 - 26.10 MHz
2.30 3.20 3.90 4.75 5.95 7.10
SW1 meter band
9.10 11.65 13.60 15.10 17.55 21.45 25.60
SW2 meter band
The unit will shut off automatically after the adjusted
sleep time.
To turn off the unit during sleep time, press SLEEP .
To quit from sleep mode but listening to the
broadcast in normal mode, press POWER , in
the display will disappear and sleep mode is cancel.
3. Timer
Press and hold until indicates
in the display. Timer function is on and the unit will
turn on automatically at the presetting time.
Preparation: Refer to page for information on
ALARM CLOCK SETTING.
Press POWER to turn off the unit. As you can see,
still indicates in the display, timer function
is still on. To turn off timer function, press and hold
MODE TIMER until disappear in the display.
12
Page 7
ÊÖ¶¯ËÑË÷
If tuning become slowly in a frequency range,
try manual tuning to see if there are some weak
stations.
¼ÇÒäµç̨
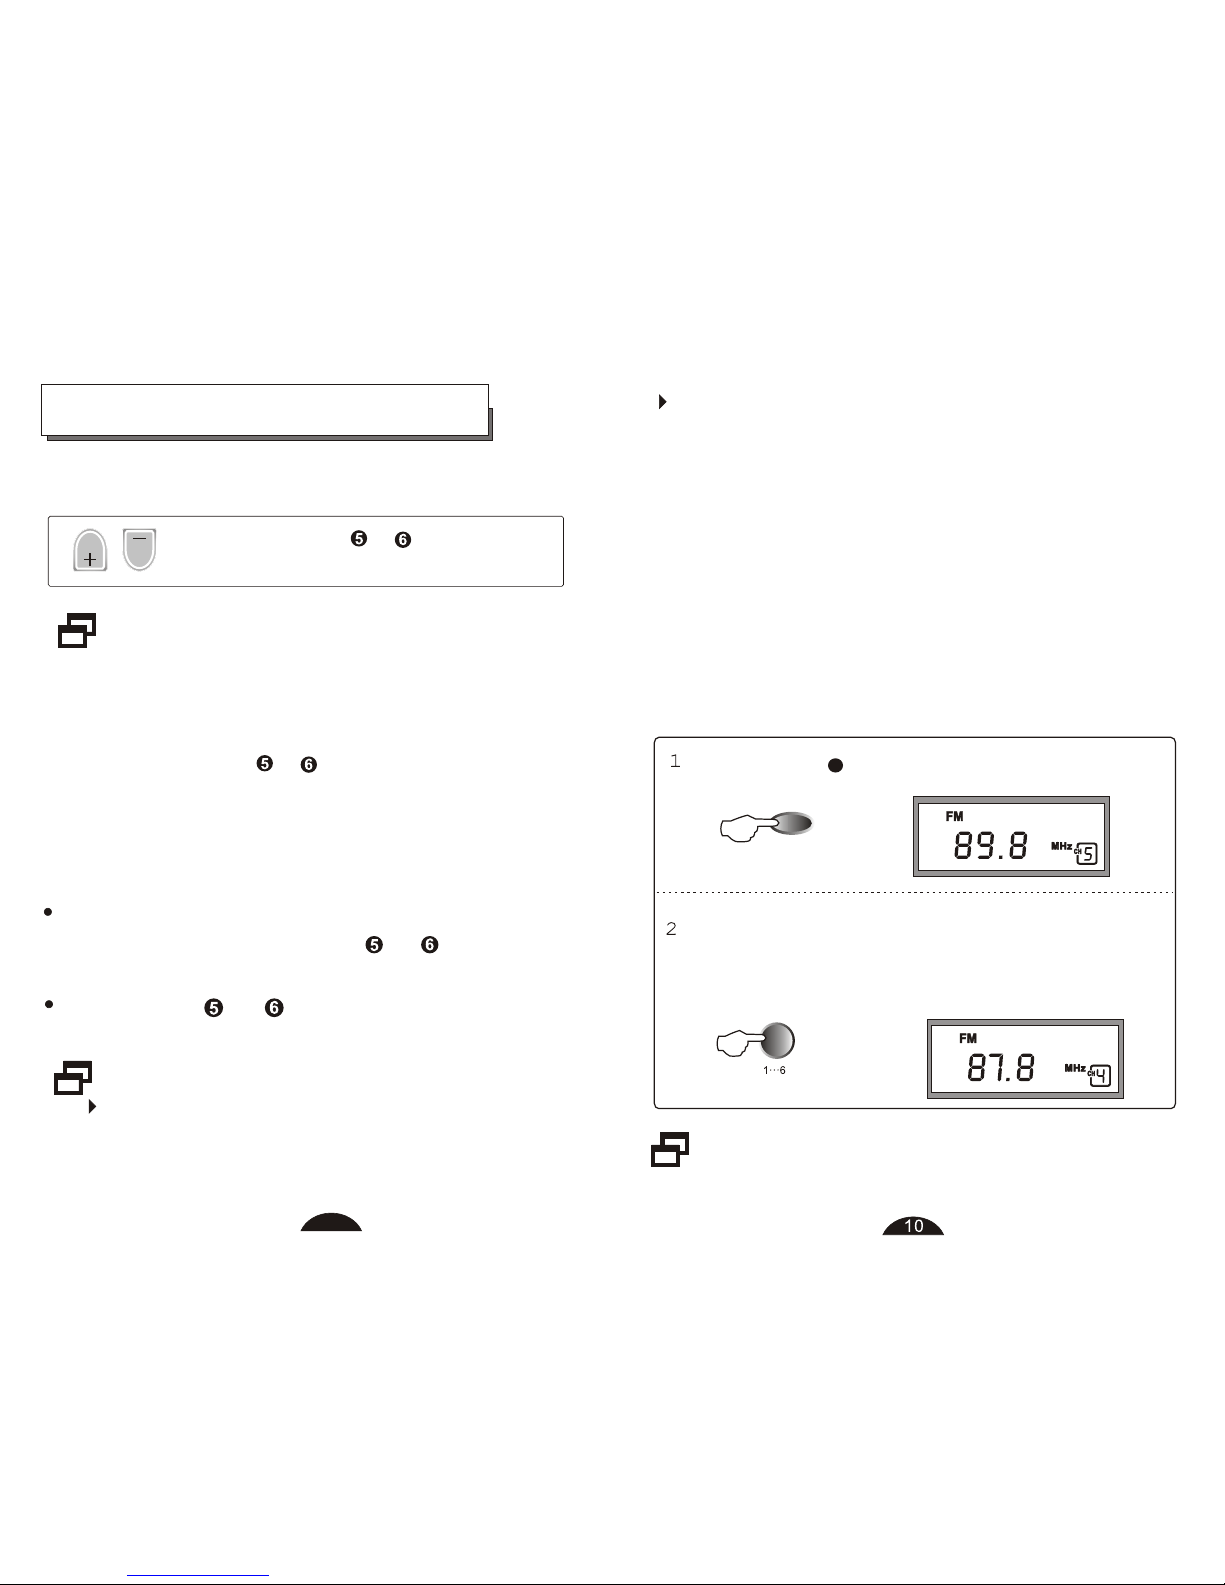
3. Listening to Preset Stations
There are 24 memories, 6 each assigned to FM,
MW,SW1,SW2 with preset number 1...6. Remember
all the preset station numbers for the convenience
of later listening. (Refer to page 10 for information on
presetting stations.)
Stations can only be preset with number 1..6.
7,8,9,0 is invalid.
Press BAND to select the desired band.
Press the preset number(1..6) to tune in to the
preset station. The frequency digits and preset
number show in the display.
9
×Ô¶¯ËÑË÷
Quick Tuning is more suitable for strong
signal broadcast, it may not stop if broadcast
signals are weak.
TUNING IN TO A STATION
ÊÖ¶¯ËÑË÷
1. Manual Tuning
Manual tuning is more suitable for weak signal
broadcast.
Press SCAN button(+ /- ) to tune in to a
clear reception.
2. Quick Tuning
Keep SCAN button (+ / - ) pressed until frequency
indicator changes, the unit starts to tune in to the stations
automatically. When a station is tuned in, scanning stops
and the tuned station is heard.
If there is a station you wish to skip during scanning,
press and hold SCAN button(+ or- ) to skip this
station.
Press SCAN (+ or- ) button while quick tuning,
scanning will stop immediately.
9
Page 8
In general, set the switch in DX position
unless there is strong interference or when
you are listening to local stations.
DX LOCAL
FM 1-6 + MW 1-6 + SW1 1-6 + SW2 1-6 = 24 Presets
You can preset up to 6 stations under each preset
number (1-6) on each band (FM, MW, SW1, SW2):
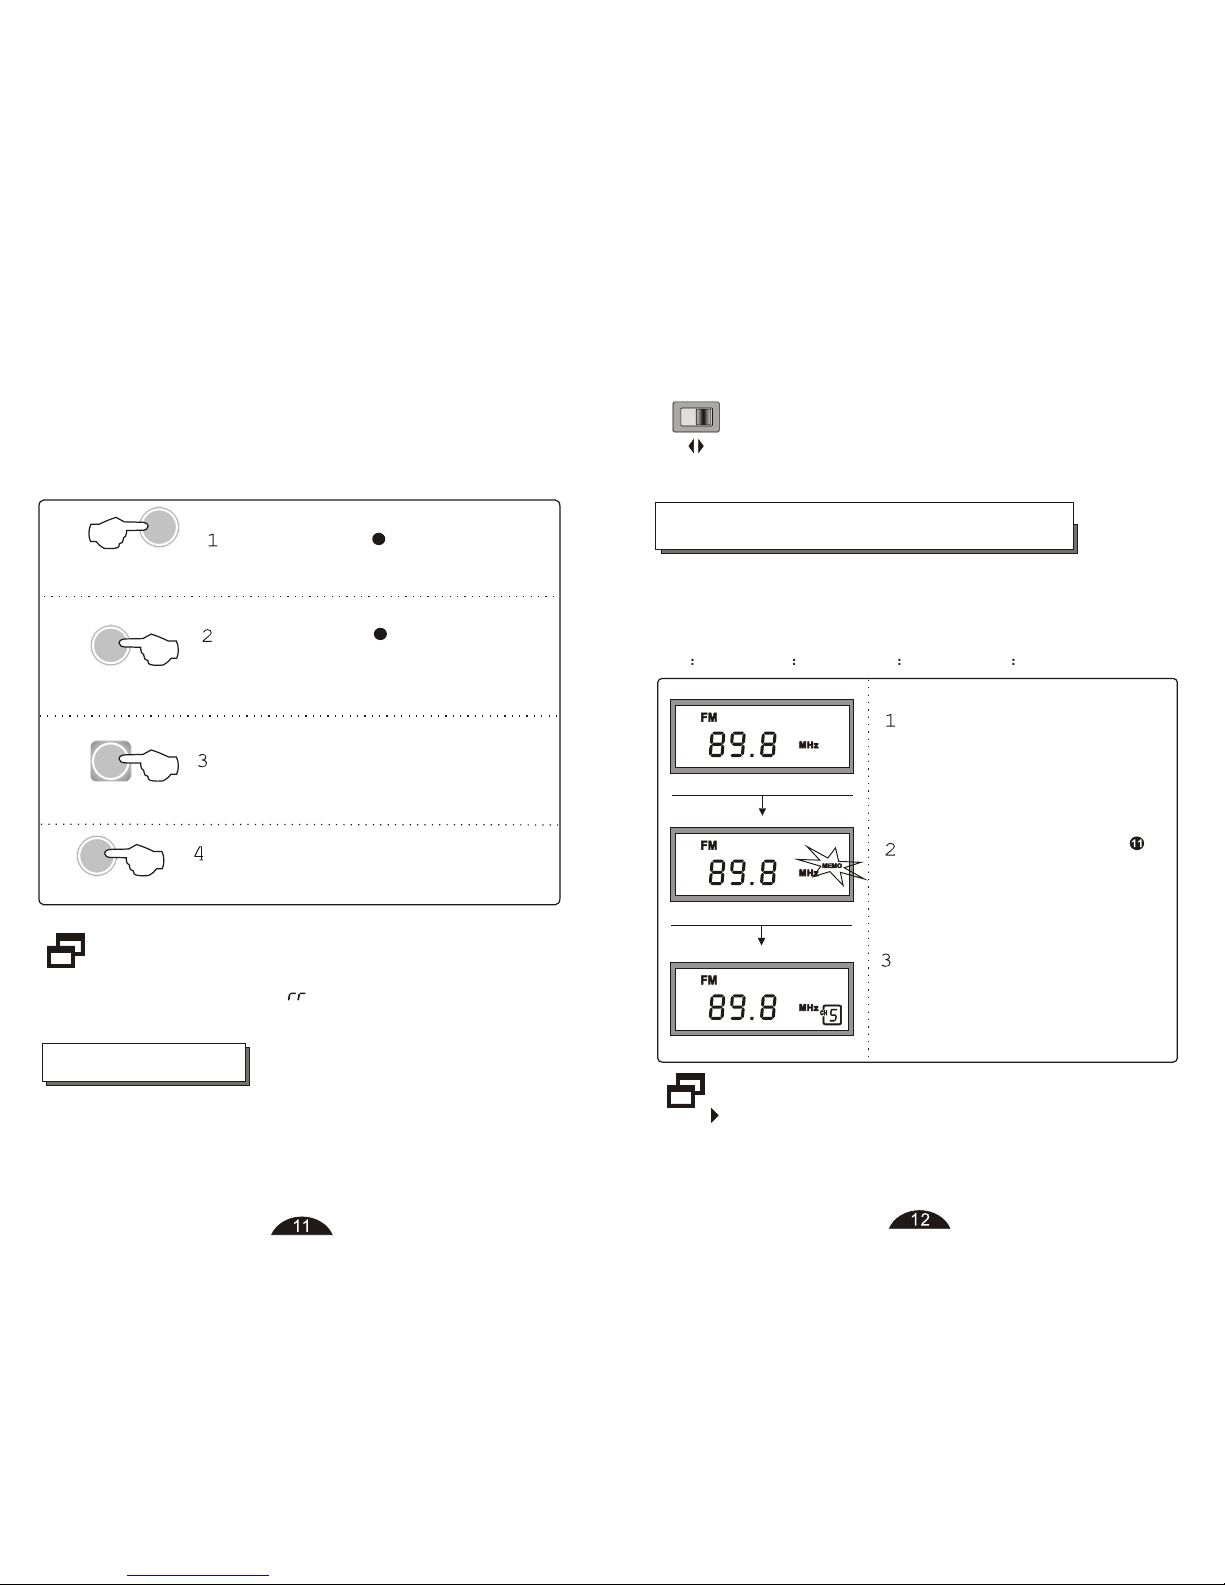
PRESETTING STATIONS
If you can not complete step 3 while the
indications flash time, presetting is failed. You
have to repeat from step 1.
Press STORE button ,
"MEMO" flashes in the
display.
Press a preset number 1....6
to memorize the station. The
corresponding number will
indicate in the display.
Tune in to a desired station
with manual tuning, quick
tuning or direct entry.
4. Direct Frequency Entry
Direct frequency entry makes it extremely easy to
tune in to a station if you knows its exact frequency.
BAND
If entering frequency is not valid in the band
frequency range, indicate in the display.
e
Press BAND to select the
desired band.
9
8
ENTER
Press ENTER , display is blank
for you to enter the frequency for
10s.
0...9
Enter the frequency numbers
with 0...9 .
Press ENTER again, the tuned
station is heard.
ENTER
Set appropriate DX / LOCAL in SW and FM according
to different listening environment could effectively
improves the reception result.
DX / LOCAL
Page 9
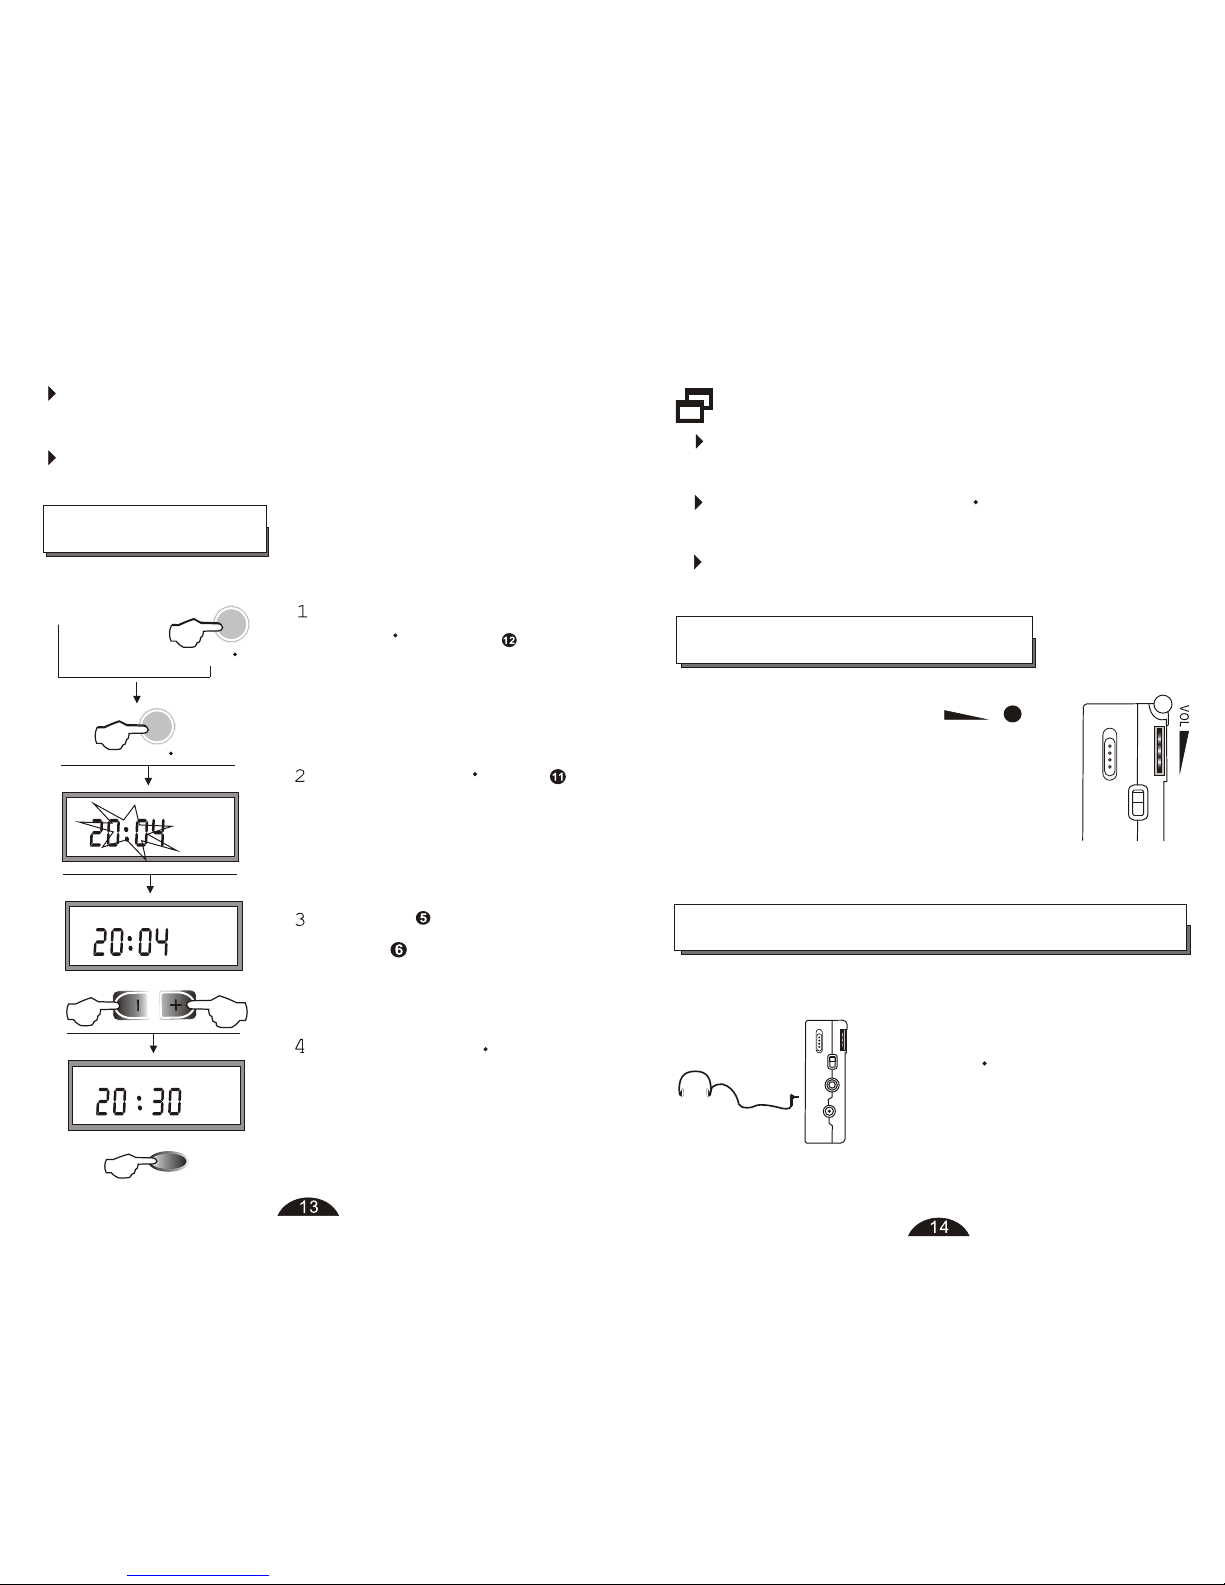
If you can not complete step 3 while the indications
flash time, repeat from step 1.
Make sure to press STORE TIME after clock setting,
otherwise setting is failed.
24 hours system is used in this unit.
3
VOLUME CONTROL
Adjust volume using VOL ,
keep the volume at a moderate level,
this will allow you to hear outside
sounds and to be considerate to people
around you.
LISTENING WITH EARPHONES
When listening to stereo reception,
normally use headphones and set
MONO STEREO to STEREO.
Speakers can only play MONO
sound.
ТфЦКС¡Фс
If a station is already stored, the new station with the
same preset number replaces the old one.
7,8,9,0 is invalid to store stations.
CLOCK SET
16
Turn off the unit or press
MODE TIMER into
CLOCK mode if the unit
is turned on.
OFF
ON
MODE TIMER
STORE TIME
Press STORE TIME ,
clock flashes in the
display.
Press + to adjust hour
and - to adjust minute.
Press STORE TIME
to confirm the setting.
Page 10
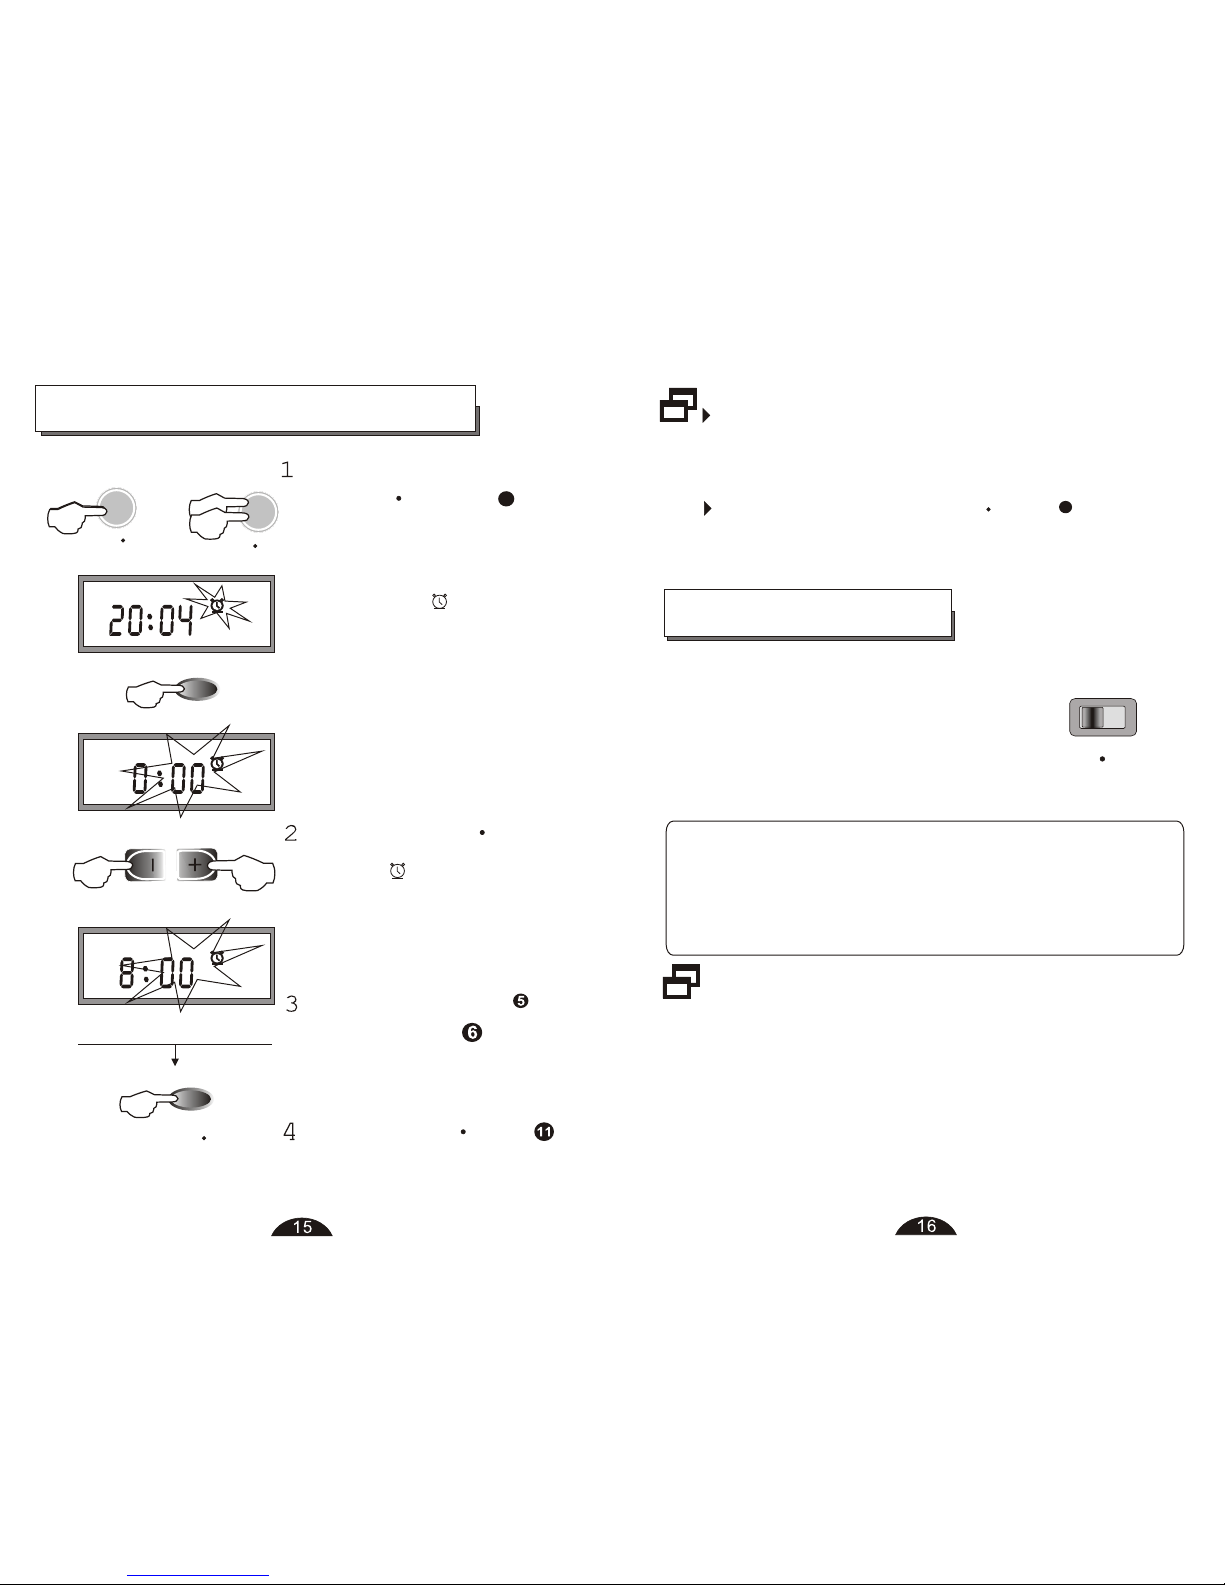
There is 5 second's interval between each step,
if no operation is set to next step, current
operation is cancel.
Make sure to press STORE TIME after alarm
clock setting, otherwise the setting may invalid.
12
MONO: weak signal broadcast, voice program,
mono broadcast.
STEREO: strong signal broadcast, music, FM
Stereo broadcast.
When listening to a stereo reception,
normally set MONO STEREO to
STEREO. If the stereo reception is
too weak or noisy, set the selector
to MONO.
MONO STEREO
MONO/STEREO
When listening to voice program, set the switch to
MONO.
OFF
ON
ALARM CLOCK SETTING
MODE TIMER
MODE TIMER
Press STORE TIME
while flashes for 5s,
clock flashes instead.
Press HOUR (+) or
MINUTE (-) to set
the alarm clock.
Press STORE TIME
to store the setting.
12
Turn off the unit, press
MODE TIMER into
ALARM setting mode
(or press twice if the
unit is on), flashes
and alarm clock show
in the display.
Default alarm clock is
0:00 before setting.
STORE TIME
STORE TIME
Page 11
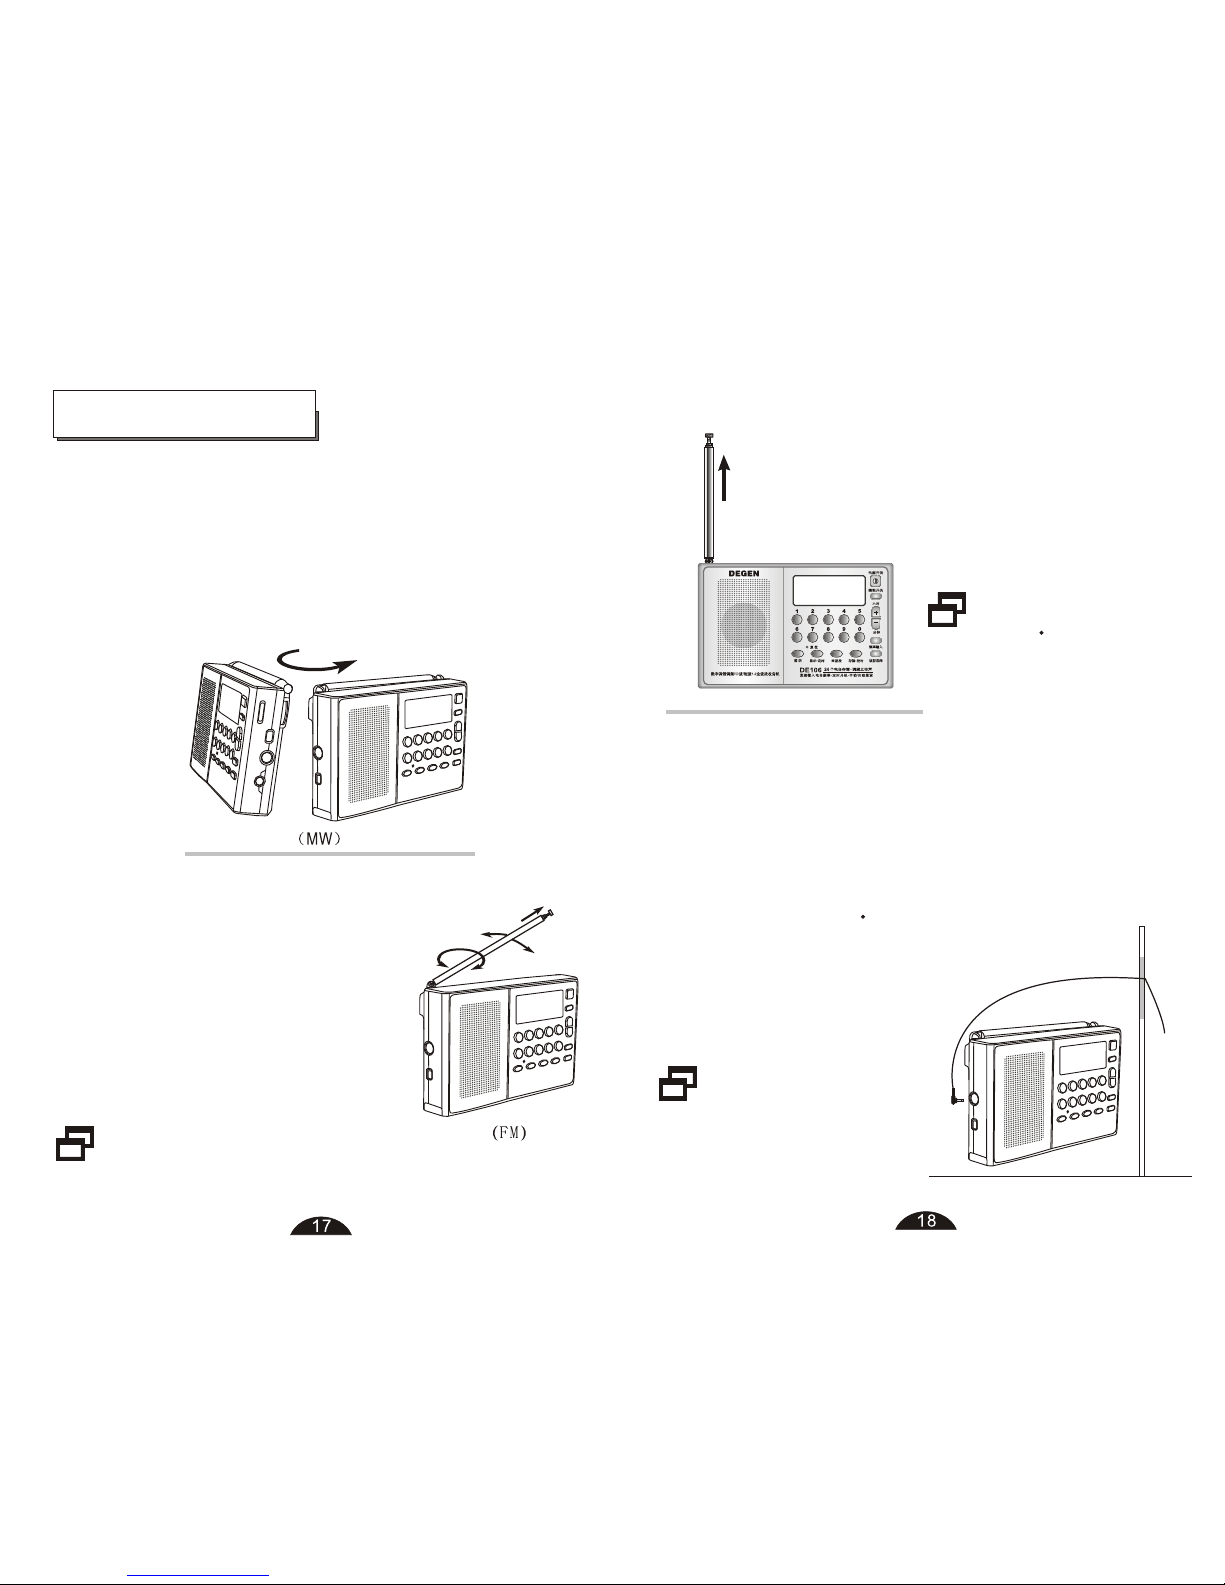
External Antenna
Telescopic antenna
functions as SW antenna.
Extending the antenna
straight upward to get the
best reception.
Set DX LOCAL to DX
when listening to SW
broadcast.
SW Reception
If FM or SW reception
is too weak, set DX
LOCAL to DX, and
use a external antenna
to improve reception.
Do not use external
antenna in thunder
storm day.
Telescopic antenna functions
as FM antenna, keep it
extended and change its length
and direction to find the position
which gives the best reception.
Magnetic antenna inside the unit functions as MW
antenna, it is strongly effected by the reception direction.
When listening to MW broadcast, reorient the unit to
find the position which gives the best reception.
USING ANTENNA
MW Reception
FM Reception
Set DX / LOCAL to LOCAL if FM reception is too
noisy.
Page 12
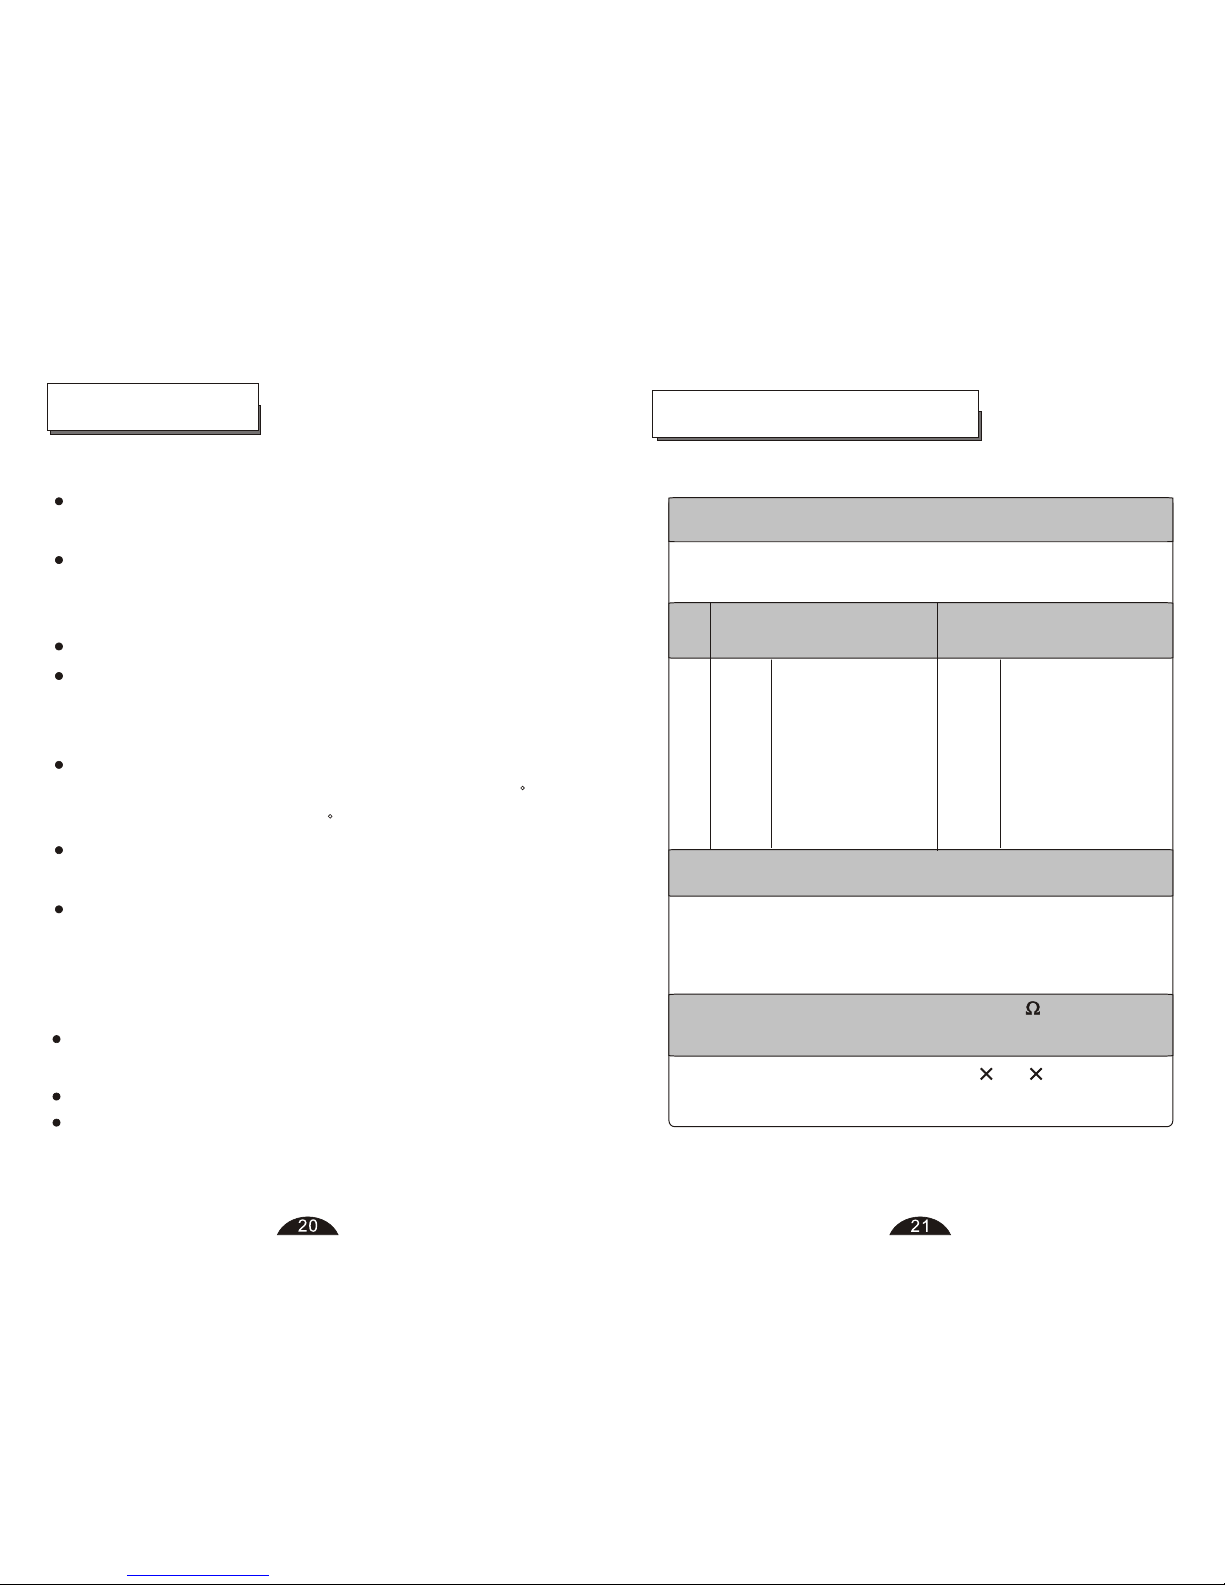
FM 87.5 - 108.0 MHz
MW 522 - 1620 KHz
SW1 SW2
2.30 - 7.80 MHz 9.10 - 26.10 MHz
120m 2.300 - 2.490 MHz
90m 3.200 - 3.400 MHz
75m 3.900 - 4.000 MHz
60m 4.750 - 5.060 MHz
49m 5.950 - 6.200 MHz
41m 7.100 - 7.300 MHz
31m 9.500 - 9.900 MHz
25m 11.65 - 12.05 MHz
22m 13.60 - 13.80 MHz
19m 15.10 - 15.60 MHz
16m 17.55 - 17.90 MHz
13m 21.45 - 21.85 MHz
11m 25.67 - 26.10 MHz
SPECIFICATIONS
1. Frequency Range
SW METER
2. Memory Stations (24)
6. Dimensions: Approx. 71 111 23 mm
7. Mass: Approx. 160 g (excl. Battery)
3. Power Supply:
3V - 4.5V DC
2 AA Batteries
4. Speaker: D 50mm 12 0.25W
5. External Earphone: D 3.5mm
Avoid using earphones at high volume, if you experience
a ringing in your ears, reduce volume or discontinue use.
Shut down the radio before sleeping.
Do not use earphones while driving or cycling, it can also
be potentially dangerous to play your earphones at high
volume while walking, especially at pedestrian crossing.
Notes On Earphones
CAUTIONS
On Handling
Avoid exposure to temperature extremes, direct sunlight,
moisture, sand, dust or mechanical shock.
Should anything wrong with the radio, please remove the
battery and have the unit checked by qualified personnel
before operating it any further.
Use only power sources specified in this manual.
When the unit is not being used for a long period of time,
remove the batteries to avoid damage form battery
leakage and corrosion.
The LCD display may become hard to see or slow down
when using the unit at high temperatures (above 40 C) or
at low temperatures (below 0 C).
At room temperature, the display will return to its normal
operating condition.
The product may not operate normally, when the ESD
(8kv) applied on the metal coated buttons. It is necessary
to reset manually.
 Loading...