


 Loading...
DTL144
DTL145
#$& #
' ( ) * +++++++++++++++++++++++++++++++
,-' +++++++++++++++++++++++++++++
,-' ++++++++++++++++++++++++++++++
++++++++++++++++++++++++++++++++++++++++
! " #
$% &
Placing the rodent guard on the machine
Important safety instructions
General safety |
• Check the water supply hose connection |
|||
by turning on the water before washing and |
||||
• This washing machine is not intended for |
||||
ensure there is no water leakage |
||||
use by persons (including children) with |
||||
• Follow the instructions on the textile tags and |
||||
reduced physical, sensory or mental |
||||
on the detergent package |
||||
capabilities or lack of experience and |
||||
• Installation and repairing procedures must be |
||||
knowledge unless they have been given |
||||
carried out by an Authorized Service Agent . |
||||
supervision or instruction concerning the |
||||
Repairs carried out by incompetent persons |
||||
use of the washing machine by a person |
||||
create a user risk: There may be a risk of |
||||
responsible for their safety. |
||||
accidental fire If the washer operates |
||||
• Children should be supervised to ensure |
||||
abnormally, it may cause an injury The |
||||
that they do not play with the washing |
||||
Manufacturer shall not be held liable for |
||||
machine. |
||||
damages that may arise from procedures |
||||
• Never place the washing machine on a |
||||
carried out by unauthorized persons. |
||||
carpeted floor Lack of airflow beneath the |
||||
• Do not expose the machine to any type of |
||||
machine could cause overheating. |
||||
flame or put cigarettes or any volatile |
||||
• In case of a malfunction or maintenance |
||||
substances on the machine top. The |
||||
work, disconnect the washing machine from |
||||
machine may catch fire or the machine may |
||||
the electrical mains immediately. Repairs |
||||
be deformed due to its large number of |
||||
must only be made by a qualified technician. |
||||
plastic components. |
||||
• Before washing, check all clothes for loose |
||||
• Do not install the machine in a bathroom |
||||
buttons and tears. Check pockets for coins , |
||||
pins or other small articles. Close zips and |
or very humid place. |
|||
Doing so may cause a malfunction or result |
||||
fasteners Wash small articles inside a pillow |
||||
in a short circuit and there is a risk of an |
||||
case. |
||||
electric shock. |
||||
• Do not wash clothes stained with or soaked |
||||
• Never wash the machine by spreading or |
||||
in petrol, thinners, kerosene, vegetable oil or |
||||
pouring water onto it! Avoid spraying water |
||||
any other flammable liquids. Nor should any |
||||
on to the control panel and back of the |
||||
of these liquids be added to the wash water |
||||
machine. There is the risk of an electric |
||||
as they constitute a fire hazard or there may |
||||
shock, and it may cause the machine to |
||||
be a risk of an explosion. |
||||
malfunction. |
||||
• Only use the machine for washing fabrics .Do |
||||
|
|
|
||
not attempt to wash plastic leather or |
|
Warning! Never reach into or put |
|
|
fibreglass. Sort and separate clothes by |
|
your hands into the wash/spin tub |
|
|
fabric, colour and degree of dirt . |
|
whilst the machine is operating. |
|
|
|
If you reach into the wash/spin |
|
||
• Use detergents, softeners and supplements |
|
|
||
|
tub serious injury could result. |
|
||
suitable for top loading automatic washing |
|
|
||
|
Wait until all motion stops. |
|
||
machines only . |
|
|
||
|
Warning! If the wash/spin tub does |
|
||
• Always unplug the machine from the wall |
|
|
||
socket when it requires cleaning or service. |
|
not stop within 15 seconds after |
|
|
Only permit qualified persons to repair or |
|
the washer lid is opened, switch |
|
|
install parts in the washer. |
|
off the washer immediately and |
|
|
• Do not use water which is hotter than 60 |
|
call an authorised service person. |
|
|
|
Warning! The machine must be |
|
||
degrees Celsius as this may deform |
|
|
||
plastic parts of the machine. which could |
|
unplugged during installation, |
|
|
result in injury, electric shock or water |
|
maintenance, cleaning and |
|
|
|
repairing procedures to avoid the |
|
||
leakage. |
|
|
||
|
risk of an electric shock. |
|
||
• The water supply and draining hoses must |
|
|
||
|
|
|
||
be securely fastened and remain undamaged |
|
|
|
|
to prevent water leakage. |
|
|
|
|
page 4 |
|
|
|
|

6
6
6

8
8.Optional feet
Installation
Installation and electrical connections of the |
Connecting the water supply |
|||||
machine must be carried out by an Authorized |
||||||
Service Agent Review information in the user |
|
|
|
|||
|
The water supply pressure required |
|
||||
manual and ensure that the electricity, water |
|
|
||||
supply and water drainage systems are |
|
to run the machine is between 1 to |
|
|||
appropriate before calling an Authorized |
|
10 bars (0 1 - 1 MPa) It is necessary |
|
|||
Service Agent If they are not, call a qualified |
|
to have 10 - 80 litres of water flowing |
|
|||
technician and plumber to have any necessary |
|
from the fully open tap in one minute |
|
|||
arrangements carried out |
|
to have your machine run smoothly |
|
|||
|
|
|
|
Attach a pressure reducing valve if |
|
|
|
Preparation of location, electrical, |
|
|
water pressure is higher |
|
|
|
tap water and waste water |
|
|
|
|
|
|
installations of the machine are the |
|
|
If you are going to use the double |
|
|
|
customer's responsibility . |
|
|
|
||
|
|
|
water inlet machine as a single (cold) |
|
||
|
Warning: Installation and electrical |
|
|
water-inlet unit, you must install the |
|
|
|
connections of the machine must |
|
|
supplied stopper to the hot water |
|
|
|
be carried out by an Authorized |
|
|
valve before operating the machine |
|
|
|
Service Agent. The Manufacturer |
|
|
(Only applies to machines supplied |
|
|
|
|
|
with a blind stopper for closing off the |
|
||
|
shall not be held liable for damages |
|
|
|
||
|
that may arise. |
|
|
hot water valve) |
|
|
|
Warning: Prior to installation, |
|
|
|
|
|
|
|
|
Warning: Models with a single water |
|
||
|
visually check if the machine has |
|
|
|
||
|
|
|
inlet should not be connected to the |
|
||
|
any defects on it If so, do not |
|
|
|
||
|
have it installed. A damaged |
|
|
hot water tap In such a case the |
|
|
|
machine is a safety risk. |
|
|
laundry will get damaged or the |
|
|
|
|
|
|
product will switch to protection |
|
|
|
Ensure that the water inlet, |
|
||||
|
|
|
mode and will not operate. |
|
||
|
discharge hoses and power cable |
|
|
Warning: Do not use old or used |
|
|
|
are not folded, pinched or crushed, |
|
|
|
||
|
|
|
water inlet hoses on the new |
|
||
|
during or after installation or |
|
|
|
||
|
cleaning procedures |
|
|
machine. It may cause stains on your |
|
|
|
|
|
|
laundry. |
|
|
Appropriate installation location |
||||||
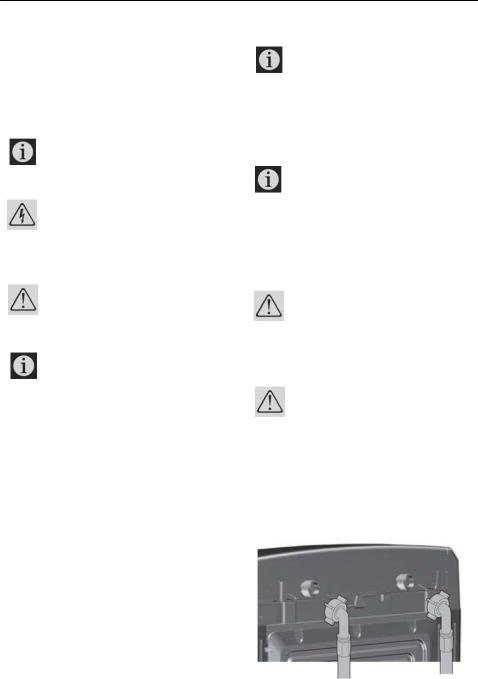
1 Connect the special hoses supplied with the |
||||||
• Place the machine on a rigid floor that has |
||||||
sufficient load carrying capacity |
machine to the water inlets on the machine |
|||||
• Choose a well ventilated dry location out of |
Red hose (left) (max hot water temperature |
|||||
direct sunlight |
for the machine is 60 °C) is for hot water inlet, |
|||||
• Do not place the machine on the power cable |
blue hose (right) (max 25 °C) is for cold water |
|||||
• Do not install the machine at places where |
inlet |
|||||
the temperature may fall below 0°C |
|
|
|
|||
• Place the machine at least 10 mm away from |
|
|
|
|||
the edges of other furniture |
|
|
|
|||
• Hot and cold water taps should be located |
|
|
|
|||
within 1 meter of the inlet valves |
|
|
|
|||
page7

Warning: Ensure that the cold and hot water connections are made correctly when installing the machine to prevent your laundry coming out hot at the end of the washing process and wearing out .
2 Tighten all hose nuts by hand. Never use a tool when tightening the nuts.
3 Open the taps completely after completing the hose connection to check for water leaks at the connection points . If any leaks occur, turn off the tap and remove the nut Retighten the nut carefully after checking the seal. To prevent water leakages and damages caused by them, keep the taps closed when the machine is not in use.
Connecting to the drain
•The end of the drain hose must be directly connected to the wastewater drain or to the washbasin.
Warning: Flooding will occur if the hose comes out of its housing during water discharge. There is risk of scalding due to high washing temperatures! To prevent this and to ensure smooth water intake and discharge of the machine, secure the end of the discharge hose tightly so that it cannot dislodge easily.
•The hose should be attached to a height of at least 65 cm, and 100 cm at most .
•In case the hose is elevated after laying it on the floor level or close to the ground (less than 65 cm above the ground), water discharge becomes more difficult and the laundry may come out excessively wet . Therefore follow the heights as per the following figure.
page 8
•To prevent flow of dirty water back into the machine and to allow for easy . discharge, do not immerse the hose end into the dirty water or do not push it in the drain by more than 15 cm If it is too long, cut it shorter .
•The end of the hose should not be bent,
it should not be stepped on and the hose must not be pinched between the drain and the machine.
•If the length of the hose is too short, use it by adding an original extension hose. Length of the hose may not be longer than 3 2 m. To avoid water leakage, the connection between the extension hose and the drain hose of the machine must be properly fitted with an appropriate clamp so as not to come off and leak .
Placing the rodent guard on the machine:
To place the rodent guard on the machine, remove the screw as per the diagram below. Place the rodent guard in position then fasten the screw to secure the rodent guard in place.
( a ) |
( b ) |
( c )

6
6
6
Optional feet assembly process:
1.Disassembling two front adjsting feet and two rear feet rubbers;
2.Assembling four optional feet according
them by screws;
3.Assembling parts which are disassembled in process 1 to related location.
Front optional feet assembly |
Rear optional feet assembly |
|
|
|
guide picture |
guide picture |
|
|
|
|
|
|
|
|
|
|
|
|
|
|
|
|
|
|
|
|
|
|
|
 Leveler
Loading...