

Page 1

DZ64022.PDF 05/11/07
Page 2

Dee Zee Running Board Installation Instructions
Congratulations on your purchase of a quality Dee Zee product. Dee Zee is
recognized as having the highest quality running boards and accessories on
the market today. We have earned this reputation by offering our customers
a product they can be proud to place on their vehicles. Dee Zee meets all
the criteria of manufacturing a custom-fit product which guarantees it to
be the easiest product to install.
Note: Please take time to read all of the instructions before beginning this installation.
Warning! Please check for wiring or other obstructions before drilling any holes into
the vehicle. If it is necessary to drill any holes into the vehicle, Dee Zee recommends
putting a sealant or rust inhibitor around all holes drilled into the body of the vehicle.
Warning! It is the sole responsibility of the vehicle owner to check for tire clearance.
Warning! It is unlawful and dangerous to ride on running boards or side box boards
while the vehicle is in motion.
Cleaning Instructions: To maintain the bright finish of your Dee Zee running boards,
clean with a mild detergent. For our stainless steel products and accessories, the
application of a high grade automotive type wax is recommended.
If you should happen to have any questions with this product or you have an
installation question, please feel free to call us at:
1-800-779-8222
If you would like to find out more information on Dee Zee’s products please
feel free to visit our website at:
WWW.DEEZEE.COM
DZ64022.PDF 05/11/07
Page 3
Dee Zee Sentinel Running Board Installation Instruction
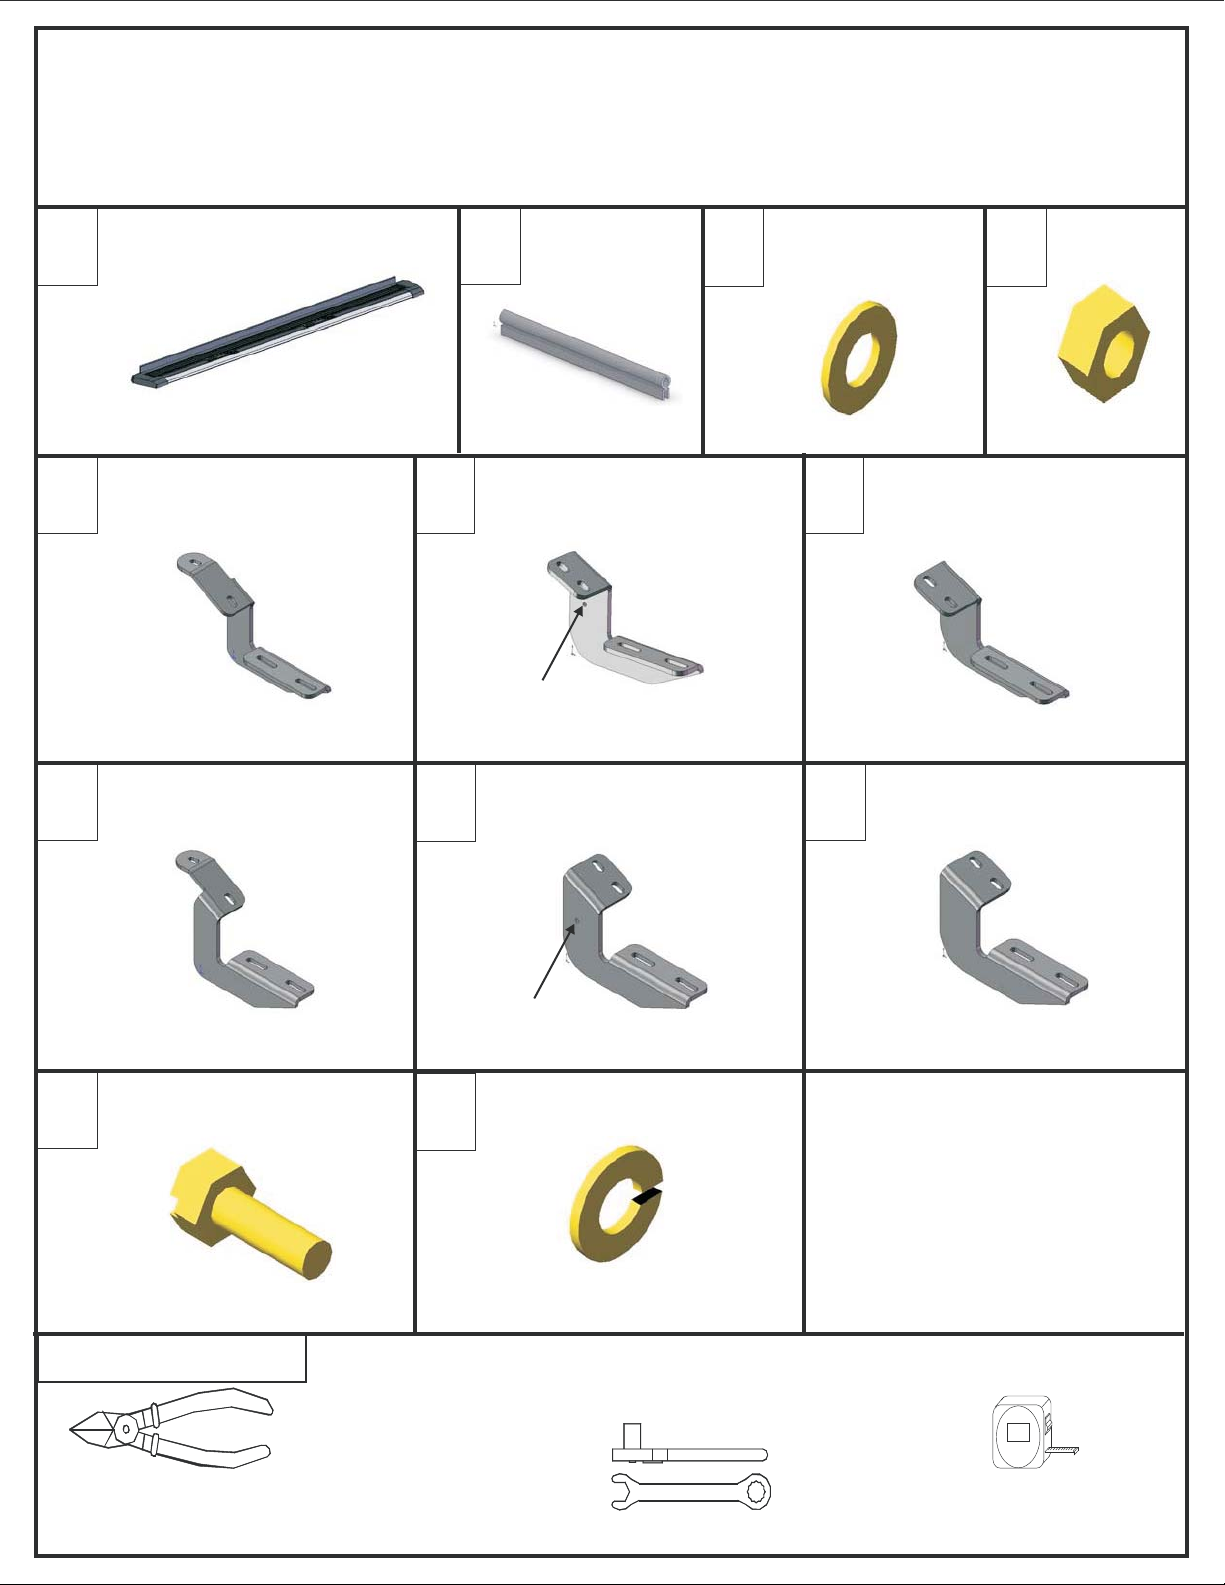
DZ 64022
(2007) Tundra Cr ew Cab Pickup
Sentinel Running Board
A
BD 64022 ASSML/R
Front Driver Side
E
B 1613LP
Body Mount Bracket
Front Passenger Side
X2
F
NOTE: HOLE
X1
Bulb Seal
B
GSK-41
Gasket
14.25 ft.
Middle Driver Side
Body Mount Bracket
Middle Passenger Side
1/4” Flat Washer
C
PN 72
Rear Driver Side
G
Body Mount Bracket
B 1611LPB 1612LP
X1 X2
Rear Passenger Side
X16
1/4” Hex Nut
D
PN 71
X16
H
B 1613RP
Body Mount Bracket
K
PN 525
Tools Required:
X1
X16
Body Mount Bracket
I
NOTE: HOLE
B 1612RP
8MM Lock Washer8MM-25MM Hex Flg. Bolt
L
PN 507B
Ratchet / Wrench
X1
X16
Body Mount Bracket
J
B 1611RP
X2
Tin-snips
Sizes:
13mm
7/16”
Tape Measure
Page 4

1
Place the bulb-seal gasket (B) onto the backclip of the running board (A) and press it fir mly into place.
Cut the bulb-seal gasket so that it is flush with the ends of the running board (A).
Placez la gar niture d’ampoule-joint (b) sur le backlip du panneau courant (a) et serrez
fermement dans l’endroit. Coupez la gar niture d’ampoule-joint de sor te qu’elle soit affleurante
des extremites du panneau courant (a).
Sentinel Running Board
Assembly with Endcaps
B
A
Page 5

2
Remove bolts from mounting locations Front/Middle/Rear.
Quite cerrojos de montar la Frente de ubicaciones/el
Centro/Trasero.
Front Body Mount
(Passenger side shown)
7/16” Wrench
or Socket
Middle Body Mount
(Passenger side shown)
(2 Location)
2-Rear Body Mount
(Passenger side shown)
Page 6

Place the Front (H)/Middle (I)/Rear (J) Bracket up to the Body Mount locations. Place the
3
8MM-25MM Hex Flg. Bolt (K) with the 8MM Lock Washer (L) through the holes in the
Front/Middle/Rear Body Mount Bracket. Do not tighten these bolt into place.
Leave loose until Board is in place.
Coloque la Frente (Middle H)/ (Rear I)/ (J) Paréntesis hasta las ubicaciones del Monte del Cuerpo.
Coloque el Mal de ojo 8MM-25MM Flg. Cier re (K) con la 8 MM Arandela de la Cerradura (L) por los
hoyos en la Frente/el Centro/Paréntesis Trasero de Monte de Cuer po. No apriete éstos cierran en
el lugar. La hoja afloja hasta que la Tabla esté en el lugar.
K L
Front Body Mount
(Passenger side shown)
H
13mm Wrench
or Socket
K L
Middle Body Mount
(Passenger side shown)
(2 Location)
I
K L
2-Rear Body Mount
(Passenger side shown)
J
Page 7

4
Place the running board up to the front / middle / rear body mount br ackets. Align the 1/4 x 3/4” slotted
hex head bolts with the slots in the body mount brackets, place 1/4” flat washers (C) and 1/4” hex nuts (D)
on 1/4” x 3/4” slotted hex head bolt, do not tighten. Make any final adjustments to the alignment of the
r unning board on the vehicle and then tighten the Body Mount Bracket Bolts, then align board and tighten
board bolts.
Coloque la tabla cor riente hasta la frente/el centro/paréntesis traseros de monte de cuer po. Alinee la
1/4 X 3/4” cer rojos de cabeza de mal de ojo de slotted con las ranuras en los paréntesis del monte del
cuerpo, el lugar 1/4” arandelas planas (C) y 1/4” nueces del mal de ojo (D) en 1/4” X 3/4” cerrojo de
cabeza de mal de ojo de slotted, no aprieta. Haga algún ajuste final a la alineación de la tabla
corriente en el vehículo y entonces apriete los Cerrojos del Monte del Cuerpo,
entonces alinean la tabla y aprietan cerrojos de tabla.
C
D
7/16” Wrench
or Socket
 Loading...