

Page 1
BULL BAR
1998-2011 FORD RANGER
Page 1 of 4 10/12/2011REV1(DP)
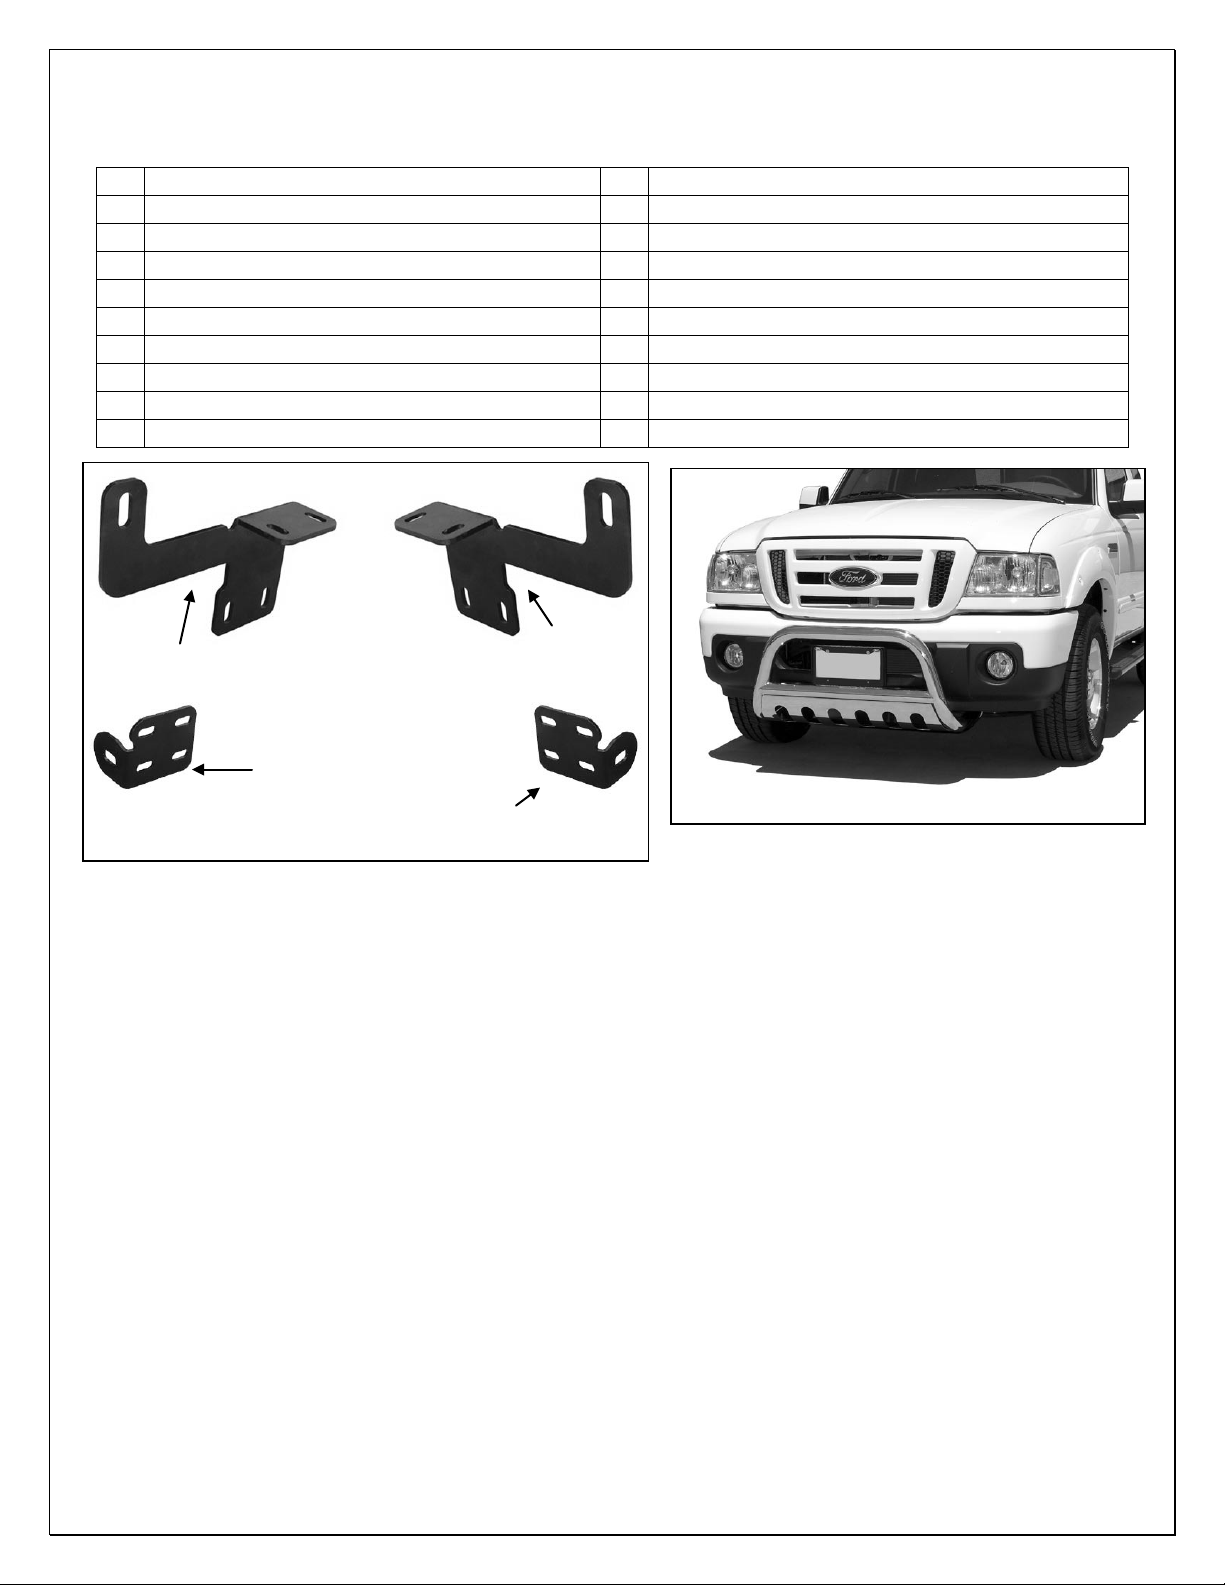
PARTS LIST:
1
Bull Bar
2
12mm Hex Nuts
1
Driver/Left Frame Mounting Bracket
4
10-1.5mm x 35mm Hex Bolts
1
Passenger/Right Frame Mounting Bracket
8
10mm x 27mm OD x 3mm Flat Washers
1
Driver/Left Mounting Bracket
4
10mm Lock Washers
1
Passenger/Right Mounting Bracket
4
10mm Hex Nuts
2
12-1.75mm x 110mm Hex Bolts
4
8-1.25mm x 25mm Special Self Tapping Flange Bolts
2
12-1.75mm x 50mm Hex Bolts
2
8-1.25mm x 55mm Double Sided Studs W/Nut
2
12mm x 44mm OD x 4mm Large Flat Washers
4
8mm x 24mm OD x 2mm Flat Washers
4
12mm x 32mm OD x 3mm STD Flat Washers
4
8mm Lock Washers
4
12mm Lock Washers
2
8mm Hex Nuts
PROCEDURE:
REMOVE CONTENTS FROM BOX. VERIFY ALL PARTS ARE PRESENT. READ INSTRUCTIONS
CAREFULLY BEFORE STARTING INSTALLATION. FACTORY SKID PLATE MUST BE REMOVED OR
MODIFIED FOR INSTALLATION. NOTE: It may be necessary to remove/relocate front license plate and
license plate bracket. It is not required, but strongly recommended. If local/state law requires a license
plate, license plate relocation kit is available.
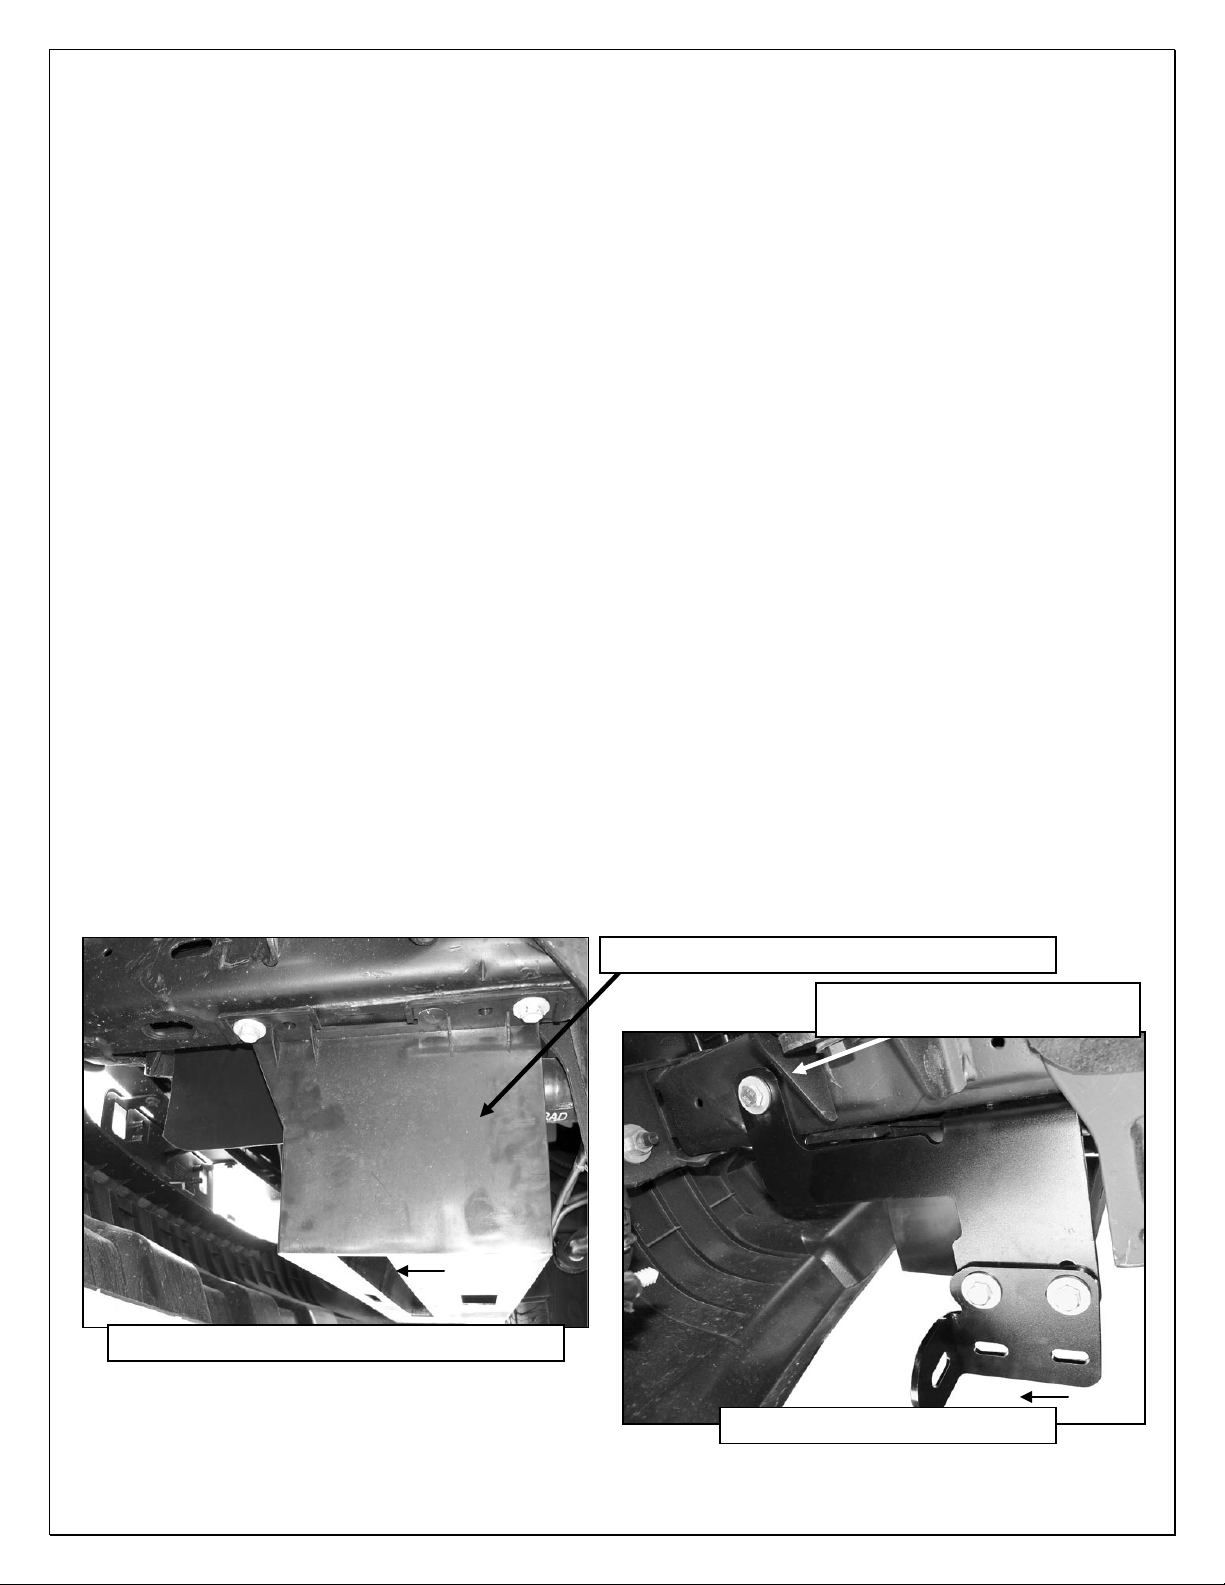
1. Start the installation on the driver side, front of the vehicle. If vehicle is equipped with a plastic air box,
remove the airbox, (Figure 1). Select the driver side Frame Mounting Bracket. Hold the Bracket in
position against the outside of the frame channel. Insert (1) 12mm x 110mm Hex Bolt with (1) 12mm x
32mm Flat Washer sideways through the Mounting Bracket and frame, (Figure 2). Thread (1) 12mm x
44mm Large Flat Washer, (1) 12mm Lock Washer and (1) 12mm Hex Nut onto the end of the 12mm x
110mm Hex Bolt, (Figure 3). Do not tighten hardware at this time.
2. Line up the (2) slots in the bottom of the Bracket with the (2) factory holes in the bottom of the frame.
a. 1998-2009 vehicles without plastic airbox: Slowly thread (2) 8mm x 25mm Self Tapping
Flange Bolts into the factory holes in the frame, (Figure 4). Do not tighten hardware at this time.
Repeat this Step for passenger side Frame Bracket installation. IMPORTANT! Do not over-
tighten the Bracket hardware or damage to the frame may result.
b. 2010-11 vehicles with plastic airbox or factory skid plate (must be removed): The forward
hole is not threaded; the rear hole is threaded for a hex bolt and was used to hold the air box or
skid plate in place. Slowly thread the (1) 8mm x 25mm Self Tapping Flange Bolt into the forward
unthreaded hole in the frame, (Figure 5A). Do not tighten hardware. Thread (1) 8-1.25mm x
50mm Double Sided Stud with (1) 8mm Flat Washer and (1) 8mm Lock Washer into the rear
threaded hole, (Figure 5A & 5B). NOTE: Installation of the 8mm Double Sided Stud will require
Passenger/Right Side
Frame Mounting Bracket
Driver/Left Side Frame
Mounting Bracket
Complete Installation
Driver/Left Side
Mounting Bracket
Passenger/Right Side
Mounting Bracket
Page 2
BULL BAR
1998-2011 FORD RANGER
Page 2 of 4 10/12/2011REV1(DP)
a long reach deep socket. Snug but do not tighten hardware at this time. Repeat this Step for
passenger side Frame Mounting bracket installation. IMPORTANT! Do not over-tighten the
Mounting Bracket hardware or damage to the frame may result.
3. Next, determine the correct mounting position for the driver side Bull Bar Mounting Bracket:
a. 98-09 models: Use the higher installed position to raise the Bull Bar, (See Figure 6A).
b. 2010-11 models: Use the lower installed position to clear the factory spoiler, (See Figure 6B).
4. Bolt the driver side Mounting Bracket to the outside of the Frame Mounting Bracket with the included
(2) 10mm x 35mm Hex Bolts, (4) 10mm Flat Washers, (2) 10mm Lock Washers and (2) 10mm Hex
Nuts, (Figure 6A or 6B). Do not tighten hardware at this time. Repeat this Step for passenger side
Bracket installation.
5. With help position the Bull Bar up to the Mounting Brackets. Use the included (2) 12mm x 50mm Hex
Bolts, (2) 12mm Lock Washers and (2) 12mm Flat Washers to attach the Bull Bar to the Mounting
Brackets, (Figure 7). Snug but do not tighten hardware at this time.
6. Adjust the Bull Bar properly and tighten all hardware. IMPORTANT! Do not over-tighten the Mounting
Bracket hardware or damage to the frame may result.
7. On vehicles with plastic airbox removed in Step 1: Remove the (2) plastic clips from the plastic air
box, (Figure 8). Hold the airbox up to the vehicle. Insert the plastic clips into the forward previously
unused holes if there are corresponding holes in the bottom of the frame. If there are no holes in the
frame, discard the plastic clips. Place the air box in position over the 8mm Double Sided Stud on the
driver side. Secure the air box to the 8mm Double Sided Stud with (1) 8mm Flat Washer, (1) 8mm Lock
Washer and (1) 8mm Hex Nut, (Figure 9). Bolt the front of the airbox to the frame rail with the factory
hex bolt and the plastic clip-if used, (Figure 10). Do not tighten hardware at this time. Repeat this step
to attach the air box on the passenger side. Tighten all hardware.
8. Do periodic inspections to the installation to make sure that all hardware is secure and tight.
To protect your investment, wax this product after installing. Regular waxing is recommended to add a protective layer
over the finish. Do not use any type of polish or wax that may contain abrasives that could damage the finish.
For stainless steel: Aluminum polish may be used to polish small scratches and scuffs on the finish. Mild soap may be
used also to clean the Bull Bar.
For gloss black finishes: Mild soap may be used to clean the Bull Bar.
Driver Side Installation Pictured
(Fig 1) Driver side mounting location pictured
(Fig 2) 2010-2011 model pictured
12mm x 110mm Hex Bolt
12mm x 32mm STD Flat Washer
Front
Front
Remove the factory plastic air box-if equipped
Page 3

BULL BAR
1998-2011 FORD RANGER
Page 3 of 4 10/12/2011REV1(DP)
Driver Side Installation Pictured
(Fig 3) Inside of driver side frame rail pictured
12mm x 44mm Large
Flat Washer
12mm Lock Washer
12mm Hex Nut
(not pictured)
Front
Front
(Fig 4) 1998-2009 without airbox or skid plate
8mm x 50mm Double Sided Stud
8mm Flat Washer
8mm Lock Washer
8mm Self Tapping Flange Bolt
(Fig 6A) 1998-2009 models
10mm x 35mm Hex Bolts
10mm Flat Washers
10mm Lock Washers
10mm Hex Nuts
(Fig 6B) 2010-2011 models
(Fig 5A) 2010-11 with airbox or skid plate
(2) 8mm Self Tapping
Flange Bolts
Front
Front
Front
(Fig 5B) 8mm x 50mm
Double Sided Stud
Page 4

BULL BAR
1998-2011 FORD RANGER
Page 4 of 4 10/12/2011REV1(DP)
Driver Side Installation Pictured
Relocate factory plastic fastener from this hole to
this one on air box if bottom of frame is equipped
from factory with hole in this position, (See Fig 10)
Front
(Fig 8) 2010-2011 models w/airbox
(Fig 10) 2010-11 models w/airbox driver
side pictured from below vehicle
(Fig 9) 2010-2011 models w/airbox
Front
Front
8mm x 50mm Double
Sided Stud
8mm Flat Washer
8mm Lock Washer
8mm Hex Nut
8mm Self Tapping Flange Bolt (not
visible under air box flange). Reinstall
plastic airbox onto Double Sided Stud
and over Self Tapping Hex Bolt.
Factory plastic fastener (or discard fastener
if there is no hole in frame as pictured)
Factory hex bolt
12mm x 50mm Hex Bolt
12mm x 32mm STD Flat Washer
12mm Lock Washer
Front
(Fig 7) 2010-2011 model pictured
(2) 10mm x 35mm Hex Bolts
(4) 10mm Flat Washers
(2) 10mm Lock Washers
(2) 10mm Hex Nuts
 Loading...