

Page 1
Before returning this product
to the store of purchase
Contact Dee Zee if you experience the following problems:
•MissingParts
•InstallationProblems/Questions
•WarrantyQuestions
1.800.779.2102
Hoursofoperation:8am-5pmCST,Mon-Friday
Reviewcompletewarrantypolicyandregisteryourproductat:
www.deezee.com/warranty.php
Page 2
Page 1 of 3 5/9/08 (AM) Rev A
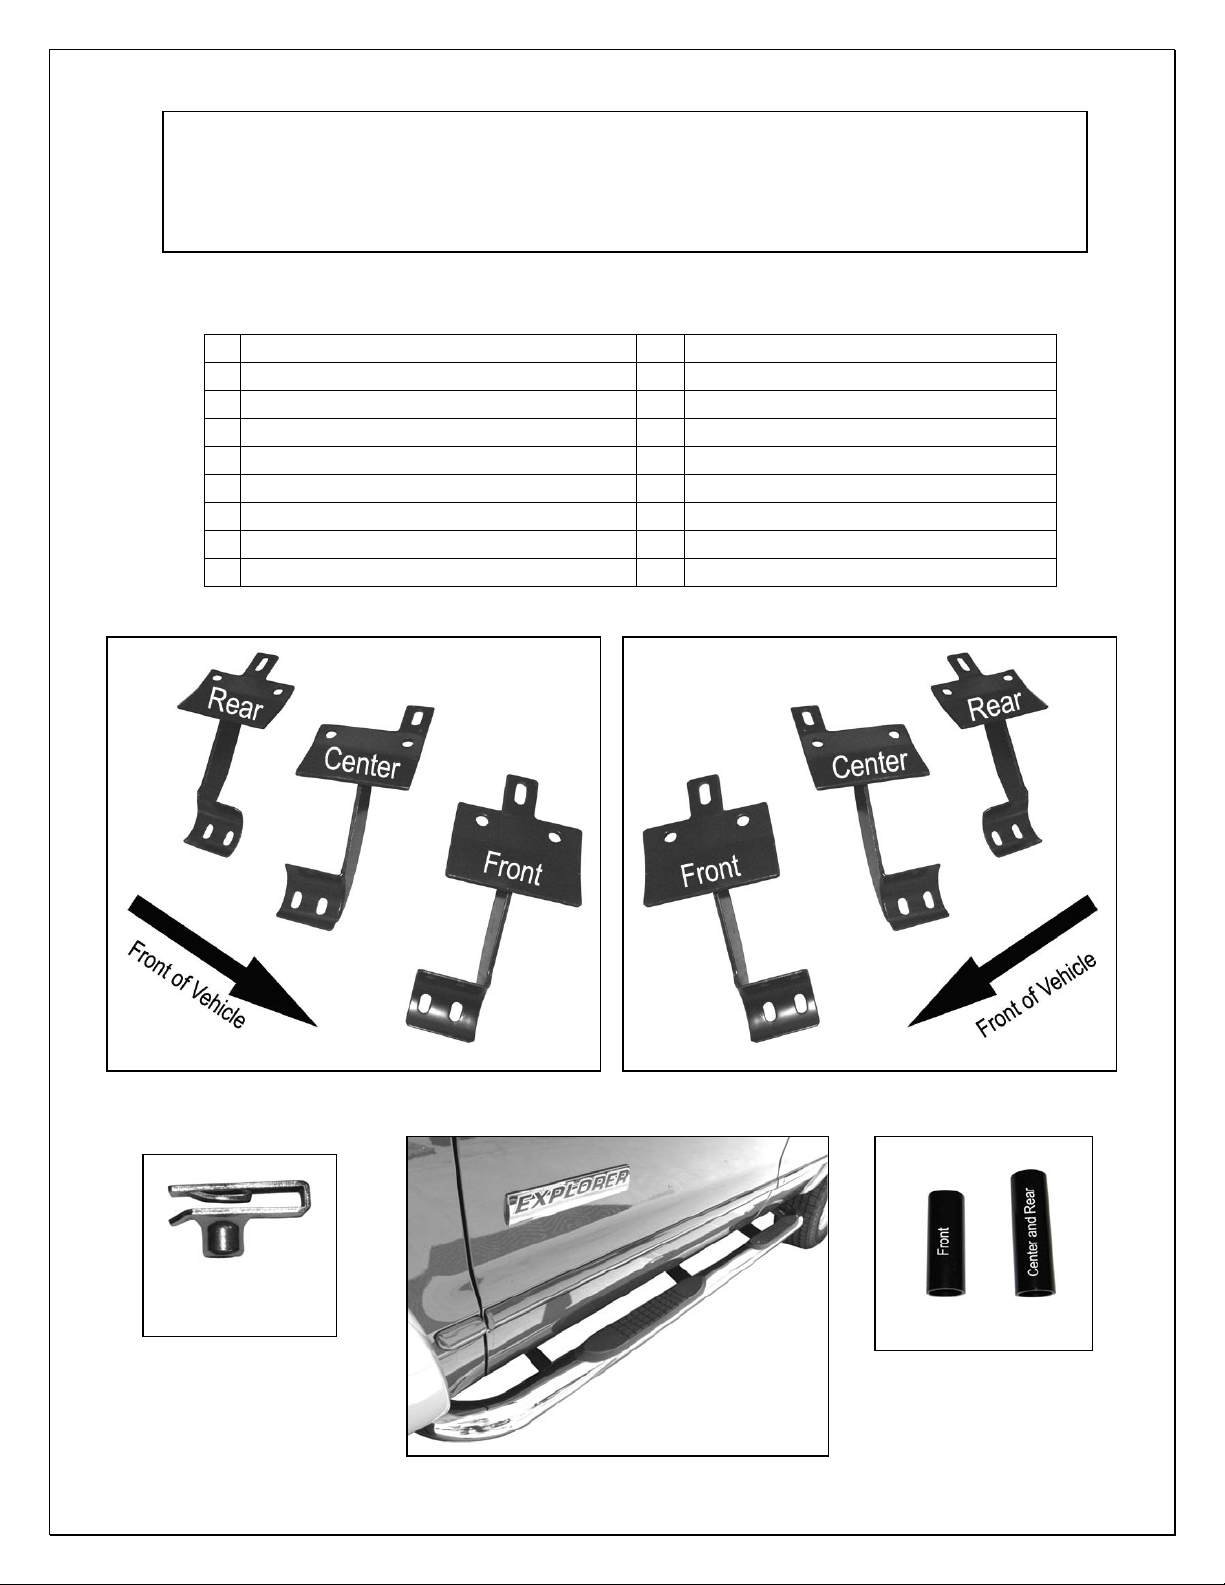
PARTS LIST:
1
Driver/Left Sidebar
4
1” x 3 ¼” Tube Spacers
1
Passenger/Right Sidebar
2
1” x 2 9/16” Tube Spacers
1
Driver/Left Front Mounting Bracket
4
10-1.50mm x 120mm Hex Head Bolts
1
Driver/Left Center Mounting Bracket
2
10-1.50mm x 100mm Hex Head Bolts
1
Driver/Left Rear Mounting Bracket
6
10-1.50mm Clip Nuts
1
Passenger/Right Front Mounting Bracket
24
10-1.50mm x 30mm Hex Head Bolts
1
Passenger/Right Center Mounting Bracket
42
10mm ID x 21mm OD x 1.5mm Flat Washers
1
Passenger/Right Rear Mounting Bracket
30
10mm Lock Washers
12
10mm Hex Nuts
INSTALLATION INSTRUCTIONS
SIDEBAR
06-ON FORD EXPLORER 4 DOOR SUV
PART NUMBER #DZ 372661/372662/372663
Passenger Side
Mounting Brackets
Driver Side
Mounting Brackets
Tube Spacers
Clip Nuts
(6 pcs)
(2 pcs)
(4 pcs)
Page 3

Page 2 of 3 5/9/08 (AM) Rev A
PROCEDURE:
1. REMOVE CONTENTS FROM BOX. VERIFY ALL PARTS ARE PRESENT. READ INSTRUCTIONS
CAREFULLY BEFORE STARTING INSTALLATION.
2. NOTE: Some 08 Models may be equipped with side valance (Figure 1); if so you will need to
permanently remove it from vehicle. From underside of vehicle locate the two Christmas trees fasteners
in the front and two in the back. Use a flat screw driver and a pair of pliers to remove Christmas trees
fasteners from side panel, and then remove plastic brackets with studs from pinch weld (Figure 2).
3. From underside of vehicle, locate the two front factory holes on the driver side floor panel located by
the front tire. With the threaded nut facing up, insert (1) 10mm Clip Nut through larger hole. Orient Clip
Nut to engage in the smaller hole (Figure 3).
4. Partially hang driver front Mounting Bracket to pinch weld using (2) 10mm x 30mm Hex Head Bolts, (2)
10mm Hex Nuts,(2) 10mm Lock Washers, and (4) 10mm Flat Washers (Figure 5).
5. Place (1) 1” x 2 9/16” (smaller) Tube Spacer between the tab on the Mounting Bracket and the already
installed Clip Nut. Insert (1) 10mm x 100mm Hex Head Bolt through tab on the Mounting Bracket and
Tube Spacer and to Clip Nut (Figure 6). Hand-tighten at this time.
6. Repeat steps 2 – 4 for driver center and driver rear Mounting Brackets. Depending upon your vehicle,
the center factory hole (Figure 4) might be too small for the Clip Nut, file the Clip Nut until you are able
to mount it. NOTE: You will be using 1” x 3 ¼” (larger) Tube Spacers with 10mm x 120mm Hex Head
Bolts on the center and rear Mounting Brackets. The front and center cradles on both sides should be
facing the rear of the vehicle (Figure 7) and the rear cradles on both sides should be facing the front of
the vehicle (Figure 8).
7. Once all three Mounting Brackets are partially mounted, carefully position driver Sidebar onto Mounting
Brackets. Attach Sidebar to Mounting Brackets using (6) 10mmx 30mm Hex Head Bolts, (6) 10mm
Lock Washers, and (6) 10mm Flat Washers (Figure 7 & 8). Do not tighten at this time.
8. Level and adjust Sidebar; then tighten all hardware at this time.
9. Do periodic inspections to the installation to make sure all hardware is secure and tight.
To protect your investment, wax this product after installing. Regular waxing is recommended to add a
protective layer over the finish. Do not use any type of polish or wax that may contain abrasives that could
damage the finish.
For stainless steel: Aluminum polish may be used to polish small scratches and scuffs on the finish. Mild
soap may be used also to clean the Sidebar.
For gloss black finishes: Mild soap may be used to clean the Sidebar.
Driver Side Installation Shown)
Fig 1
Fig 2
Page 4

Page 3 of 3 5/9/08 (AM) Rev A
Driver Side Front Mounting Bracket Shown
Driver Side Front Mounting Bracket Shown
10mm x 30mm Hex Head Bolts
10mm Flat Washers
10mm Lock Washers
Front Clip Nut
Center Clip
Nut
10mm x 30mm Hex Head Bolts
10mm Flat Washers
10mm Lock Washers
10mm Hex Nuts
Small Tube
Spacer
(10mm Clip Nut)
10mm x 100mm Hex Head Bolt
10mm Lock Washer
10mm Flat Washer
Fig 5
File Clip
Nut Here
Fig 6
Fig 7
Fig 3
Fig 4
Fig 8
 Loading...