


FOR DIGITAL VIDEO CREATOR II
SOFTWARE USER’S GUIDE
|
|
|
|
|
Dazzle Incorporated |
||
|
47211 Bayside Parkway |
||
Published August 2000 |
Fremont, California 94538 |
||
P/N 78-001-0042 |
|
|
|

License
Agreement
© 2000 Dazzle Incorporated. All rights reserved. No part of this documentation may be reproduced in any form or by any means or used to make any derivative work (such as translation, transformation, or adaptation) without permission from Dazzle Incorporated.
Dazzle Incorporated reserves the right to revise this documentation and to make changes in content from time to time without obligation on the part of Dazzle Incorporated to provide notification of such revision or change.
Dazzle Incorporated provides this documentation without warranty of any kind, either implied or expressed, including, but not limited to, the implied warranties of merchantability and fitness for a particular purpose. Dazzle may make improvements or changes in the product(s) and/or the program(s) described in this documentation at any time.
UNITED STATES GOVERNMENT LEGENDS
If you are a United States government agency, then this documentation and the software described herein are provided to you subject to the following restricted rights:
For units of the Department of Defense:
Restricted Rights Legend: Use, duplication or disclosure by the Government is subject to restrictions as set forth in subparagraph (c) (1) (ii) for restricted Rights in Technical Data and Computer Software clause at 48 C.F.R. 52.227-7013. 3Com Corporation, 5400 Bayfront Plaza, Santa Clara, California 95052-8145.
For civilian agencies:
Restricted Rights Legend: Use, reproduction or disclosure is subject to restrictions set forth in subparagraph (a) through
(d) of the Commercial Computer Software - Restricted Rights Clause at 48 C.F.R. 52.227-19 and the limitations set forth in Dazzle Incorporated’s standard commercial agreement for the software. Unpublished rights reserved under the copyright laws of the United States.
If there is any software on removable media described in this documentation, it is furnished under a license agreement included with the product as a separate document, in the hard copy documentation, or on the removable media in a directory file named LICENSE.TXT. If you are unable to locate a copy, please contact Dazzle and a copy will be provided to you.
[Portions of this documentation are reproduced in whole or in part with permission from (as appropriate).]
Unless otherwise indicated, Dazzle registered trademarks are registered in the United States and may or may not be registered in other countries.
Dazzle is a registered trademark of Dazzle Incorporated, and Dazzle Digital Video Creator II™ and MovieStar™ are trademarks of Dazzle Incorporated.
Windows 98™ DirectDraw™, and ActiveMovie™ are trademarks of Microsoft Corporation.
Other brand and product names may be registered trademarks or trademarks of their respective holders.
CANADIAN EMI REQUIREMENTS
“This Class A or B digital apparatus meets all requirements of the Canadian Interferences-Causing Equipment Regulations.”
“Cet Appareil numerique de la classe A/B respecte toutes les exigences du Reglement sur le material broilleur du Canada.”

License Agreement. . . . . . . . . . . . . . . . . . . . . . . . . . . ii
CHAPTER 1: INTRODUCTION TO
MOVIESTAR™
Welcome. . . . . . . . . . . . . . . . . . . . . . . . . . . . . . . . . . . 1
Applications . . . . . . . . . . . . . . . . . . . . . . . . . . . . . . . . 1
At Home |
2 |
For Business |
3 |
About This Guide . . . . . . . . . . . . . . . . . . . . . . . . . |
. . 3 |
Assumption |
3 |
Installation |
4 |
Conventions & Concepts |
4 |
CHAPTER 2: MOVIESTAR™
USER INTERFACE
Main Interface . . . . . . . . . . . . . . . . . . . . . . . . . . . . . . 1
Video Window |
2 |
Control Buttons |
2 |
Mode Buttons |
2 |
Desktop Background |
3 |
Media Manager . . . . . . . . . . . . . . . . . . . . . . . . . . . . . 4
Options Panel |
5 |
Video Editor |
6 |
Title Editor |
7 |
Still Image Editor |
8 |

CHAPTER 3: MOVIESTAR™
INTRODUCTION TO BASIC FUNCTIONS
Introduction . . . . . . . . . . . . . . . . . . . . . . . . . . . . . . . . 1
Recording Video . . . . . . . . . . . . . . . . . . . . . . . . . . . . . 1
Editing Video . . . . . . . . . . . . . . . . . . . . . . . . . . . . . . . 3
Trimming a Video Clip |
3 |
Joining Two or More Video Clips |
6 |
Splitting & Inserting Video Clips |
7 |
Outputting Video . . . . . . . . . . . . . . . . . . . . . . . . . . . . 9
Outputting Digital Video to TV/VCR |
9 |
Storing Digital Video on CD-R/CD-RW |
10 |
Storing Digital Video on DVD-R |
10 |
Publishing Digital Video to the Internet |
10 |
Recording Tips. . . . . . . . . . . . . . . . . . . . . . . . . . . . . . 11
CHAPTER 4: MOVIESTAR™
MAIN INTERFACE
Key Features . . . . . . . . . . . . . . . . . . . . . . . . . . . . . . . . 1
Video Window . . . . . . . . . . . . . . . . . . . . . . . . . . . . . . 1
Mode Buttons . . . . . . . . . . . . . . . . . . . . . . . . . . . . . . . 2
Video Mode Button |
2 |
Still Image Mode Button |
3 |
Audio Mode Button |
3 |
TV/VCR Output Mode Button |
3 |
Fullscreen, Minimize, & Close . . . . . . . . . . . . . . . . . . 4
Volume Control . . . . . . . . . . . . . . . . . . . . . . . . . . . . . 5
Control Buttons . . . . . . . . . . . . . . . . . . . . . . . . . . . . . 5
Control Slider |
5 |
Start Time |
6 |
End Time |
6 |
Go to Beginning |
6 |
Go to End |
6 |
Play/Pause |
7 |
Stop |
7 |

Jump Back |
7 |
Jump Forward |
7 |
Step Back |
7 |
Step Forward |
8 |
Record |
8 |
Magnify/Still Image Capture |
8 |
Loop |
8 |
Clear/Reset |
9 |
CHAPTER 5: MOVIESTAR™
MEDIA MANAGER
Key Features . . . . . . . . . . . . . . . . . . . . . . . . . . . . . . . . 1
Media Manager . . . . . . . . . . . . . . . . . . . . . . . . . . . . . 1
Detach/Reattach Button |
2 |
Album Groups |
2 |
Import Button |
4 |
Convert Button |
5 |
Webcast Button |
12 |
e-mail Button |
14 |
Slide Show Button |
15 |
DVDit! Button |
15 |
Changing Thumbnail Images |
15 |
Properties... |
16 |
The Right-click Menu |
16 |
The Shortcut Buttons |
17 |
CHAPTER 6: MOVIESTAR™
OPTIONS PANEL
Key Features . . . . . . . . . . . . . . . . . . . . . . . . . . . . . . . . 1
Options . . . . . . . . . . . . . . . . . . . . . . . . . . . . . . . . . . . 1
Configuration Tab |
1 |
Adjust Tab |
5 |
Picture Tab |
8 |
Recording Tab |
10 |

CHAPTER 7: MOVIESTAR™
VIDEO EDITOR
Key Features . . . . . . . . . . . . . . . . . . . . . . . . . . . . . . . . 1
Video Editor . . . . . . . . . . . . . . . . . . . . . . . . . . . . . . . . 1
Adding Clips |
2 |
Deleting Clips |
2 |
Timeline & Timeline Indicator |
2 |
The Editing Tracks |
3 |
Clip Placement |
4 |
Mark In Button |
6 |
Mark Out Button |
6 |
Split Button |
7 |
Record Button |
8 |
New Button |
8 |
Save Button |
8 |
Save As Button |
9 |
Produce Button |
9 |
The “Produce” Options |
9 |
Zoom In/Zoom Out Buttons |
11 |
Undo/Redo Buttons |
11 |
Adding Transitions |
12 |
Adding Titles |
13 |
The Right-click Menu |
14 |
CHAPTER 8: MOVIESTAR™
TITLE EDITOR
Key Features . . . . . . . . . . . . . . . . . . . . . . . . . . . . . . . . 1
Title Editor . . . . . . . . . . . . . . . . . . . . . . . . . . . . . . . . . 1
Font Button |
2 |
Alignment Buttons |
2 |
Scrolling Direction |
2 |
Create Bitmap |
3 |
New Button |
3 |
Save/Save As Buttons |
3 |

CHAPTER 9: MOVIESTAR™
STILL IMAGE EDITOR
Key Features . . . . . . . . . . . . . . . . . . . . . . . . . . . . . . . . 1
Still Image Editor . . . . . . . . . . . . . . . . . . . . . . . . . . . . 1
Edge Enhancement |
2 |
Rotate/Flip |
2 |
Resize |
2 |
Crop |
2 |
Save |
3 |
Restore |
3 |
Undo/Redo |
3 |
CHAPTER 10: MOVIESTAR™
CUSTOMER SUPPORT
Contacting Dazzle Incorporated . . . . . . . . . . . . . . . . 1
Address |
1 |
Technical Support |
1 |
World Wide Web |
1 |
By Fax |
2 |
By Phone |
2 |

INTRODUCTION TO
1 MOVIESTAR™
Welcome |
Congratulations! You have just purchased Dazzle Digital Video |
|
Creator II (DVC II) with MovieStar™, one of the best and |
|
easiest-to-use digital video editing and publishing software programs. |
|
Dazzle MovieStar™ software is used for capturing, editing, and |
|
outputting high-quality, digitally-compressed video with CD-quality |
|
sound from any analog video source. You can also capture |
|
high-quality video stills. |
|
|
Applications |
Organize and edit your VHS, 8mm, and other home videos and then |
|
record them to the video format of your choice. |
|
Turn that box of old tapes into a hilarious hour of your family’s |
|
funniest videos. Or edit a version of your daughter’s younger years |
|
and surprise her at her sixteenth birthday party or bridal shower. |
|
Hey, home videos should be fun, not closet clutter. |
|
Preserve your fondest memories by copying to CDs or |
|
DVDs—today’s most reliable format. |
|
Did you know videotape degenerates over time even without wear |
|
caused by repeated viewing? So keep your favorite memories warm, |
|
not fuzzy by converting to recordable CDs. They have a 100+ year |
|
shelf life and take up a fraction of the space required for VHS. You |
|
can store about an hour of TV-quality video on a single CD. And, |
|
they can be played on any computer with a CD-ROM drive. Need a |
|
CD burner? They’re under $150 now and recordable CDs are under a |
|
buck. |
Welcome

1-2 CHAPTER 1: INTRODUCTION TO MOVIESTAR™
With Dazzle MovieStar you can:
Capture Still Digital Images from Your Favorite Videos
Now you can capture the moment like never before and send it to friends and family. You can even enhance and manipulate the image in a matter of moments.
Create and Edit Your Own Videos
Shoot lots of fun stuff. Edit unwanted footage. Add effects and titles.
Add an audio track of your favorite tunes or a “creative” narration.
Publish your video production and make lots of friends and money.
Share Your Video Clips via E-mail
With Dazzle MovieStar’s MPEG compression, you’ll be sending your buds some giggles at the office, or a glimpse of little Billy’s first ride on a two-wheeler.
Post Streaming Video to Dazzle Webcast Theater
Dazzle MovieStar will help you post your movies to the internet. Select the item you want to post and Dazzle MovieStar will format the video for the internet and upload it to the Dazzle Webcast Theater. You can then share your movies with friends and family all over the world!
Add Video to Your Next PowerPoint Presentation
PowerPoint presentations can be brought to life with the addition of digital movies. Drag and drop your hottest listings, your most prestigious product installs, or your best customer endorsements into your slides to add excitement and interest.
Video is fun and easy . . . just use your imagination.
At Home You can organize and edit your home videos with titles, transitions, and narration. Whether it is a wedding, a graduation, or a vacation, Dazzle MovieStar tools help you to create video stories that everyone can enjoy and understand.
You can easily copy your projects to other media such as CD-R,
DVD-R, or other removable media such as hard drives or Zip disks
About This Guide |
1-3 |
for portability and safety. You can also output your digital movies back to video tape to preserve and share them.
You can send video clips via e-mail or by posting streaming video to a personal web site with the click of a button. The Dazzle MovieStar solution is the ideal way for distant relatives and friends to stay in touch and up-to-date.
For Business Present your products and services with video for a professional look. Send video presentations directly to your customers or post streaming video clips to a company web site. Loop them on a monitor at a trade show. Insert clips into corporate product literature, including tutorials on CD and On-Line Help.
Use custom video clips for compelling PowerPoint presentations.
Produce training videos for employees; use Dazzle MovieStar to make a video that HR can use to familiarize new employees with company policies and procedures and legal issues.
About This Guide This Guide describes how to use Dazzle’s MovieStar software. It is organized into ten chapters:
■Chapter 1: Introduction to MovieStar™ - An introduction to this guide, a brief overview of MovieStar, and a list of conventions and concepts.
■Chapter 2: MovieStar™ User Interface - A brief introduction to the desktop software user interface that you see when you start MovieStar.
■Chapter 3: MovieStar™ Introduction to Basic Functions - A series of short, step-by-step guides to MovieStar’s main functions.
■Chapters 4 to 9: Detailed descriptions of MovieStar’s functions, including the Main Interface, Media Manager, Options Panel, Video Editor, Title Editor, and Still Image Editor.
■Chapter 10: MovieStar™ Customer Support - Contact and troubleshooting information.
Assumption This Guide is written with the assumption that you have a basic working knowledge of the Windows operating system.

1-4 CHAPTER 1: INTRODUCTION TO MOVIESTAR™
Installation
Conventions &
Concepts
For installation instructions, please refer to the Quickstart Installation Guide included in your Dazzle Digital Video Creator II box.
Conventions used in this manual have been established to help you learn to use MovieStar quickly and easily. As much as possible, the conventions correspond to those found in other Windows documentation.
The following is a short description of a few fundamental concepts:
Drag and Drop
The ability in Windows to manipulate files by simply dragging them with a mouse to the location in which you want to use them. MovieStar makes wide use of Drag and Drop.
Thumbnail Icons
Also known simply as Thumbnails, these are small, graphical representations of files in Windows and MovieStar. Usually, thumbnails also contain the file name.
Buttons
Most functions in MovieStar are accessed by clicking on Buttons, small clickable areas of the user interface. Some buttons are graphical, some are textual. Almost all Buttons have Tooltips.
Tabs
A special type of button in MovieStar. Tabs open, close, or switch panels within the user interface.
Tooltips
Brief textual descriptions of functions in the user interface. Tooltips are accessed by simply rolling the mouse pointer over the area of the interface you want to learn about, such as a Button or Tab. No click is required.
Capturing
Converting an analog video or audio signal into a digital format that can be saved as a file on your computer’s hard drive. This is also known as “recording” or “digitizing.”
Previewing
Viewing live video in MovieStar’s Video Window either before or during capture.

About This Guide |
1-5 |
Outputting
Converting digital video or audio files back to analog format, saving digital files to CD-ROMs or DVDs, or publishing digital files to the Internet.

1-6 CHAPTER 1: INTRODUCTION TO MOVIESTAR™

2 |
MOVIESTAR™ |
USER INTERFACE |
Main Interface
This chapter examines the MovieStar™ user interface. It is a high-level view designed to give you a basic orientation to the software. In later chapters, the interface is explained in detail, with a chapter devoted to each function area.
MovieStar uses an intuitive environment designed to give you logical control over all parts of your project so that you can quickly create and output high-quality digital movies and still images.
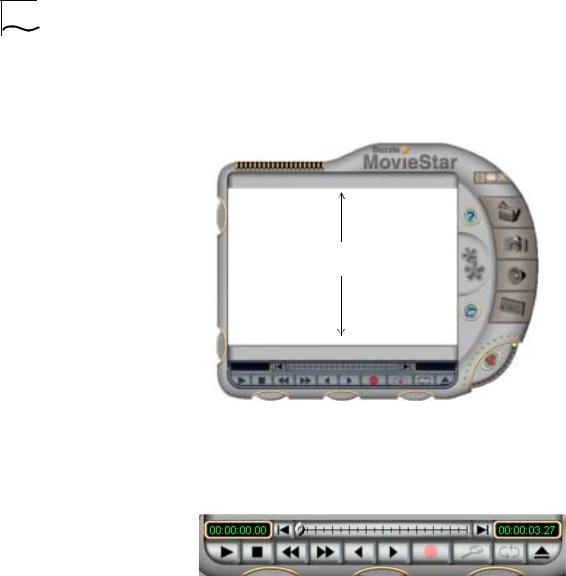
When you start MovieStar, a Main Interface will be presented on your computer desktop. It is a compact and intuitive design, with a Video Window in the center for viewing your selections, Control Buttons underneath to control playback of audio/video clips, four main Mode Buttons on the right, and five Tabs along the left and bottom edges for accessing additional features for managing and editing files and options.
Options |
|
|
|
|
|
|
|
|
|
Help |
|||||||||||||||
|
|
|
|
|
|
|
|
|
|||||||||||||||||
|
|
|
|
|
|
|
|
|
|
|
|
|
|
|
|
||||||||||
|
|
|
|
|
|
|
|
|
|
|
|
|
|
|
|
||||||||||
Tab |
|
|
|
|
|
|
|
|
|
|
|
|
|
|
Mode |
||||||||||
|
|
|
|
|
|
|
|
|
|
|
|
|
|||||||||||||
|
|
|
|
|
|
|
|
|
|
|
|
|
|
|
|
|
|
|
|
|
|
||||
Video |
|
|
|
|
|
|
|
|
|
|
|
|
Buttons |
||||||||||||
Window |
|
|
|
|
|
|
|
|
|
|
|
|
|
|
|
|
|
|
|
||||||
Media Manager |
|
|
|
|
|
|
|
|
|
|
|
|
|
|
|
|
|||||||||
|
|
|
|
|
|
|
|
|
|
|
|
|
|
|
|
||||||||||
|
|
|
|
|
|
|
|
|
|
|
|
|
|
|
|
||||||||||
Tab |
|
|
|
|
|
|
|
|
|
|
|
|
|
|
|
|
|
|
|
Dazzle* |
|||||
|
|
|
|
|
|
|
|
|
|
|
|
|
|
|
|
|
|
|
|
||||||
|
|
|
|
|
|
|
|
|
|
|
|
|
|
|
|||||||||||
Control |
|
|
|
|
|
|
|
|
|
|
|
|
|
Website |
|||||||||||
|
|
|
|
|
|
|
|
|
|
|
|
|
|
|
|
||||||||||
Buttons |
|
|
|
|
|
|
|
|
|
|
|
|
|
|
Open File |
|
Volume |
||||||||
|
|
|
|
|
|
|
|
|
|
|
|
|
|
|
|
|
|
|
|||||||
|
|
|
|
|
|
|
|
|
|
|
|
|
|
|
|
|
|
|
|||||||
|
|
|
|
|
|
|
|
|
|
|
|
|
|
|
|
|
|
||||||||
Video Editor |
|
|
|
Title Editor |
|
|
|
|
Control |
||||||||||||||||
Still Image |
|
||||||||||||||||||||||||
|
|
|
|
|
|
|
|
||||||||||||||||||
|
|
|
|
Tab |
|
|
|
Editor Tab |
|
Tab |
|
|
|
|
|
|
|
||||||||
|
|
|
|
|
|
|
|
||||||||||||||||||
|
|
|
|
|
|
|
|
|
|
|
|||||||||||||||
Main Interface
2-2 CHAPTER 2: MOVIESTAR™ USER INTERFACE
Video Window The large rectangular window in the center of the Main Interface is the Video Window. It's where you will see the image from your video source (camcorder, VCR, etc.) or the image when you playback a video clip. The Video Window also displays still images.
 Video Window
Control Buttons The Control Buttons are located just below the Video Window. It includes Start and Stop Time Indicators, a Control Slider, and a series of VCR-like buttons for Play, Stop, Rewind, Fast Forward, Step Back, Step Forward, Record, Magnify, Loop, and Eject.
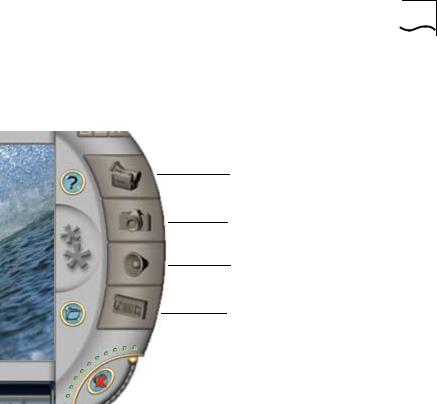
Mode Buttons The Mode Buttons open the path between your Dazzle MovieStar software and your input and output devices, such as camcorders or VCRs. Clicking on a Mode button begins initialization of the device path and the control buttons beneath the Video Window become active.
Main Interface |
2-3 |
There are four Mode buttons: Video Mode, Still Image Mode, Audio
Mode, and TV/VCR Output Mode.
Video Mode Button
Still Image Mode Button
Audio Mode Button
TV/VCR Output Mode Button
Video Mode
Video mode lets you capture and save video clips from external sources, such as a camcorder, TV, or VCR, which is connected to the DVC-II hardware.
Still Image Mode
Still Image mode captures single-frame still images from your video sources and lets you save them in various formats
Audio Mode
Audio mode captures sound into WAVE (.wav) or MPEG (.mpa) file format.
TV/VCR Output Mode
TV/VCR Output mode plays your video though the Digital Video
Creator II to an external device, such as a VCR.
Desktop Background MovieStar puts a Desktop Background behind the Main Interface by default. If you would prefer not to use it, it can be hidden by either clicking the close button  in the top-right corner of the background or turning the background off in Options Panel > Configuration > Background.

2-4 CHAPTER 2: MOVIESTAR™ USER INTERFACE
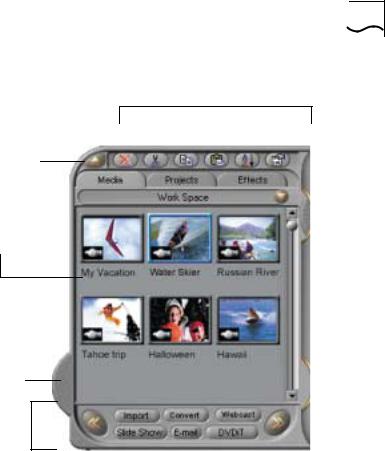
Media Manager
The lower tab on the left-side of the Main Interface opens and closes the Media Manager panel. The Media Manager is a convenient organization space for all of your multimedia files. You can see your files in thumbnail format and you can organize them into groups. Dragging and dropping one of these thumbnails into the Video Window lets you view it; dragging one to the Video Editor or Still Image Editor lets you apply specialized options.
The Media Manager is divided into three main groups: Albums, Projects, and Effects. Albums contains groups of individual files. Projects contains groups of video editing projects. Effects contains transitions and titles for video editing.
Just above the tabs are six shortcut buttons for common file actions: Delete, Cut, Copy, Paste, Sort, and Properties.
At the bottom of the Media Manager is a series of input/output buttons: Import, Convert, Webcast, Slide Show, E-mail, DVDit!.
A convenient feature of the Media Manager is that it is both re-sizable and floatable. Dragging from the bottom left-hand corner stretches it to reveal more clips or space for more clips; clicking on the top left-hand button detaches the Media Manager panel from the Main Interface to let you use your desktop space more efficiently. Clicking it again reattaches it to the Main Interface.
Media Manager |
2-5 |
Shortcut Buttons
Main Groups
Media Manager
Open/Close
Tab
Import/Publish
Buttons
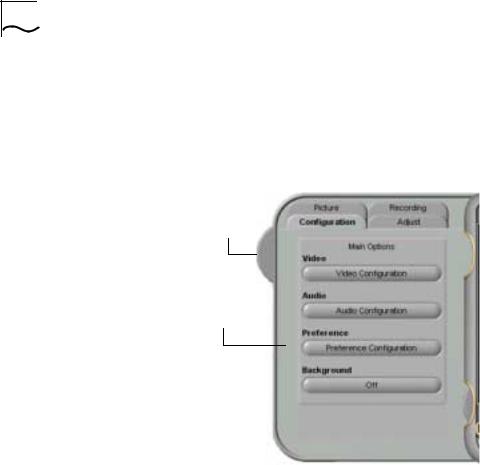
Options Panel On the left side of the Main Interface, the upper tab gives you access to the Options panel.
Within the Options panel are four sub-panels: Configuration, Adjust, Picture, and Recording:
Configuration
Configuration sub-panel lets you determine the settings for Video, Audio, Preference (Language), and Background.
Adjust
Adjust lets you experiment with sophisticated video settings, including Brightness, Sharpness, and Alignment.
Picture
Picture has options for Size, Quality, Color, and File Format of your still-image captures.
2-6 CHAPTER 2: MOVIESTAR™ USER INTERFACE
Recording
Recording is where you choose the type of clip that you will work on; you can choose from a series of templates or create your own; you can see the current disk space and the corresponding Duration Options; and you can select the Working Directory.
Open/Close
Tab
Configuration
Panel
Video Editor The Video Editor panel is used for integrating the parts of your project into a finished production. It is accessed by clicking on the bottom left-side tab. It has spaces for the dragging and dropping of video files, titles, music, and voice-over tracks. These can be split, trimmed, rearranged, and combined, and scrolling titles and transitions can be inserted to give your project a professional look and feel. The panel also stretches and can be expanded on your desktop.
Media Manager |
2-7 |
Time Indicator
Drop Video clips or Still Images here. Drop Titles here
Drop Music clips here.
Drop or Record Voice-over clips here.
Zoom In/Out
Undo
Redo
Delete
|
|
|
|
|
|
|
|
Open/Close |
|
Control Buttons |
|
|
|
||
Tab |
|
|
|
Title Editor The Title Editor is the panel at the bottom-right of the Main Interface below the Video Window. It is accessed by clicking on the right-side tab. Existing titles can be edited or new ones can be created and saved. You can choose different fonts and alignment. You can also create the effect of your titles scrolling in various directions. When you save your title, it is saved into the “Titles” sub-panel in the Media Manager panel. The title can then be dragged and dropped into Video Editor to become part of your project.
Font |
|
Scrolling |
||||||
Browser |
|
|||||||
|
|
|
|
|
|
|
Options |
|
|
|
|
|
|
|
|||
Alignment |
|
|
|
|||||
|
Save Title |
|||||||
Options |
|
|
|
|
||||
|
|
as an Image |
||||||
Open/Close
Tab

2-8 CHAPTER 2: MOVIESTAR™ USER INTERFACE
Still Image Editor The Still Image Editor is the panel in the center of the Main Interface below the Video Window. It is accessed by clicking on the middle tab when a still image is loaded into the Video Window. A wide variety of graphic file types can be edited in the editor. Still Image Editing functions include image enhancement, rotation, resizing, and cropping.
Image Quality
Rotate
Image &
Resize
Density
Open/
Close Tab

MOVIESTAR™
3 INTRODUCTION TO BASIC
FUNCTIONS
Introduction
Your MovieStar software is modularly designed and very easy to use. In this chapter, we will show you how to accomplish three primary tasks:
■Recording Video - from a camcorder or other video source to your PC.
■Editing Video - using Dazzle MovieStar.
■Outputting Video - from your PC to a TV/VCR, CD, or the Internet.
In order to perform these tasks you will need a camcorder or other video source, the DVC-II hardware, and a Personal Computer with the Dazzle MovieStar installed on it (refer to the Quickstart Installation Guide for more information).
Recording Video To edit your analog video using MovieStar, you need to make a digital copy of the video to your PC. This is known as capturing video.
To Capture Video:
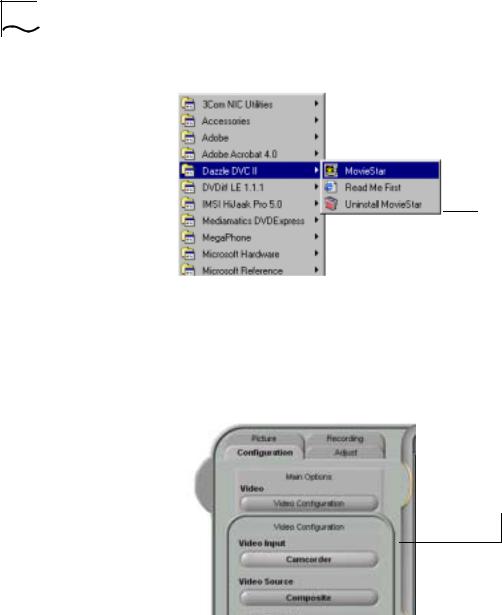
1Launch the MovieStar software.
■In Windows, click the Start button and go to the Programs sub-menu. Move the pointer to the Dazzle DVC II group, and click on the MovieStar icon.
Introduction
3-2 CHAPTER 3: MOVIESTAR™ INTRODUCTION TO BASIC FUNCTIONS
Start Menu
2Select the video settings for capturing.
■Click on the Options tab on the upper-left of the main interface to open the Options panel. Under Configuration > Video Configuration, make sure Video Input is set as Camcorder (or other appropriate source) and that Video Source is selected as either Composite or S-Video to match the input jacks you have used to connect the video source to the DVC-II hardware.
Video Configuration
Options
3Start playing video on your camcorder.
■Press Play button on your camcorder. This ensures that a video signal is coming from the camcorder to the PC for viewing/capturing.

Editing Video |
3-3 |
4Preview video in the MovieStar video window.
■Click the Video Mode Button on MovieStar.
■After a brief initialization, you should see the video from your camcorder playing in the video window on your PC monitor.
5Capture video into the MovieStar Album.
■Start capturing by clicking the red Record button  in the Control Buttons. The video will start recording and a "Recording…" message box will appear.
■Stop capturing by clicking the Stop button in the "Recording…" message box. The captured video will appear as a thumbnail in the Work Space Album in Media Manager.
6View the captured video in the MovieStar Video Window.
■Double-click the thumbnail icon of your new video clip. The clip will start playing immediately.
Using the above steps you can capture as many video clips as you want to the MovieStar album. You can also use the advanced settings in the Options Panel to capture clips in different formats.
Editing Video After a video clip is captured, the file is saved on the hard disk and a thumbnail of it is automatically placed in the Work Space area of the Media Manager. The clip can now be edited using MovieStar's Video Editor Panel.
Dazzle MovieStar has many useful editing features. In this section you will learn about the basic editing features, such as trimming, combining, splitting, and rearranging video clips.
Trimming a Video A common editing application is when you may want to create a Clip shorter length clip by trimming the beginning and/or the end of the
clip.
3-4 CHAPTER 3: MOVIESTAR™ INTRODUCTION TO BASIC FUNCTIONS
1Open the Video Editor panel.
■Click the Video Editor tab.
2Place and select a Video clip in the Video Editor.
■Drag and drop a video clip from the Media Manager in the top track of the Time Line Editor. The video file will appear as a bar in the video track.
■Click the video in the Editor Panel to select it. The video clip will get a highlighted border to indicate that it has been selected.
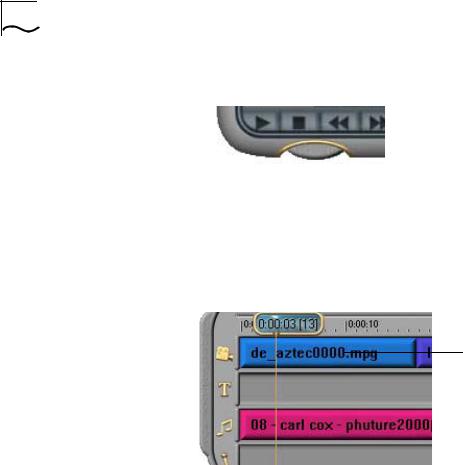
3Mark the starting point from where you want to start the video.
Selecting a
Mark In
Point
■Using the buttons in the Control Panel located in the main interface, play the video and pause it at the rough point you want it to start.
■Move to the exact frame you want by using the Step Forward  and Step Back
  controls.
■Click the Mark In button  located at the bottom of the Editor Panel to locate the point where you want the clip to start. Notice the video clip will become shorter in length and the starting point will be the frame you had chosen to mark in.
Editing Video |
3-5 |
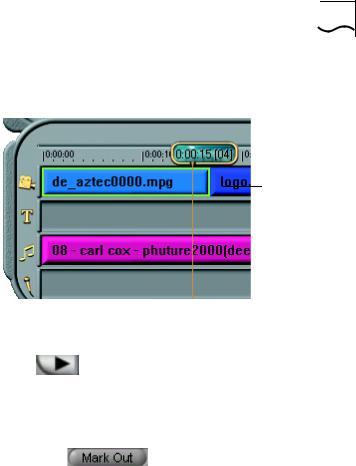
4 Mark the ending point of the video.
Select and
Mark Out
Ending Point
■Click the video in the Editor Panel to select it. The video clip will get a highlighted border to indicate that it has been selected.
■Using the buttons in the Control Panel located in the main
interface, play |
the video and pause it at the rough point |
you want it to stop. |
|
■Move to the exact frame you want by using the Step Forward
 and Step Back
  controls.
■ Click the Mark Out button located at the bottom of the Editor Panel to locate the point where you want the clip to end. Notice the video clip will become shorter in length and the end point will be the frame you had chosen to mark out.
■Alternately, you can adjust the start and end time on a clip in the editor by selecting it and dragging it’s left or right edge.
5Produce the trimmed clip.
■Click the Produce  button located at the bottom of the Editor Panel. The Produce options panel will appear.
■Click the Produce button in the Produce Options Panel. The "Producing…" message will appear until the edited video is rendered and appears as a new video clip in the Album in the Media Manager. (Video rendering is a complex process and may take some time to complete; please be patient.)
6Viewing the trimmed video in the MovieStar video window.
■Double click on the new video in the album.
■Your new video clip will start playing immediately.

3-6 CHAPTER 3: MOVIESTAR™ INTRODUCTION TO BASIC FUNCTIONS
Joining Two or More Often as part of editing you may want to join two or more video Video Clips clips to produce a single long clip.
1Open the Video Editor panel.
■ Click the Video Editor tab.
2Place the first Video clip in the Video Editor. Drag and drop a video
First
Clip
clip from the Media Manager in the top track of the Time Line Editor. The video file will appear as a bar in the video track.
3 Place the second Video clip in the Video Editor.
First |
Second |
|||
Clip |
|
|
|
Clip |
■Drag and drop the second video clip from the Media Manager next to the first clip in the Time Line Editor. The second video file will appear as a bar in the video track.

Editing Video |
3-7 |
4Join or Combine the two videos into a single video.
■Click the Produce button located at the bottom of the Editor Panel. The Produce options panel will appear.
■Click the Produce button in the Produce Options Panel. The "Producing…" message will appear until the new longer video is rendered and appears as a new video clip in the Album in the Media Manager. (Video rendering is a complex process and may take some time to complete; please be patient.)
5Viewing the new joined video in the MovieStar video window.
■Double-click the new video in the album.
■Your new video clip will start playing immediately.
Splitting & Inserting A common editing application is when you may want to split a Video Clips video and insert another clip in the sequence.
1Open the Video Editor panel.
■Click the Video Editor tab.
2Place and select a Video clip in the Video Editor.
■Drag and drop a video clip from the Media Manager in the top track of the time line Editor. The video file will appear as a bar in the video track.
■Click the video in the Editor Panel to select it. The video clip will get a highlighted border to indicate that it has been selected.
3Mark the point where you want to split the video.
■Using the buttons in the Control Panel located in the main interface, play the video and pause it at the rough point you want to split the video.

3-8 CHAPTER 3: MOVIESTAR™ INTRODUCTION TO BASIC FUNCTIONS
■Move to the exact frame you want by using the Step Forward and Step Back controls.
■ Click the Split button located at the bottom of the Editor Panel to mark the point where you want the clip to split. Notice the video clip will get split into two clips.
4Insert a new video between the two split videos.
■Drag and drop the second video clip from the Media Manager between the two halves of the first clip. The second video file will appear as a bar in the video track.
5Produce a final clip.
■Click the Produce  button located at the bottom of the Editor Panel. The Produce Options panel will appear.
■Click the Produce button in the Produce Options Panel. The "Producing…" message will appear until the edited video is rendered and appears as a new video clip in the Album in the Media Manager.
 Loading...