

DAVIS with the Integrated Sensor Suite (ISS) of the Vantage Pro2TM system, 7717 Installation Manual
Page 1

1
Mounting Pole Kit
Installation Manual
This manual covers use of the Mounting Pole Kit with the Integrated Sensor
Suite (ISS) of the Vantage Pro2
TM
system. The kit can also be used with
other Davis Instruments stations, applying the principles shown here with
the ISS.
Components
The mounting kit includes the following:
Tools and Materials Needed
In addition to the hardware shown above, you may need some of the
following tools and materials:
• Adjustable wrench
• Drill with 1/4" (6 mm) bit
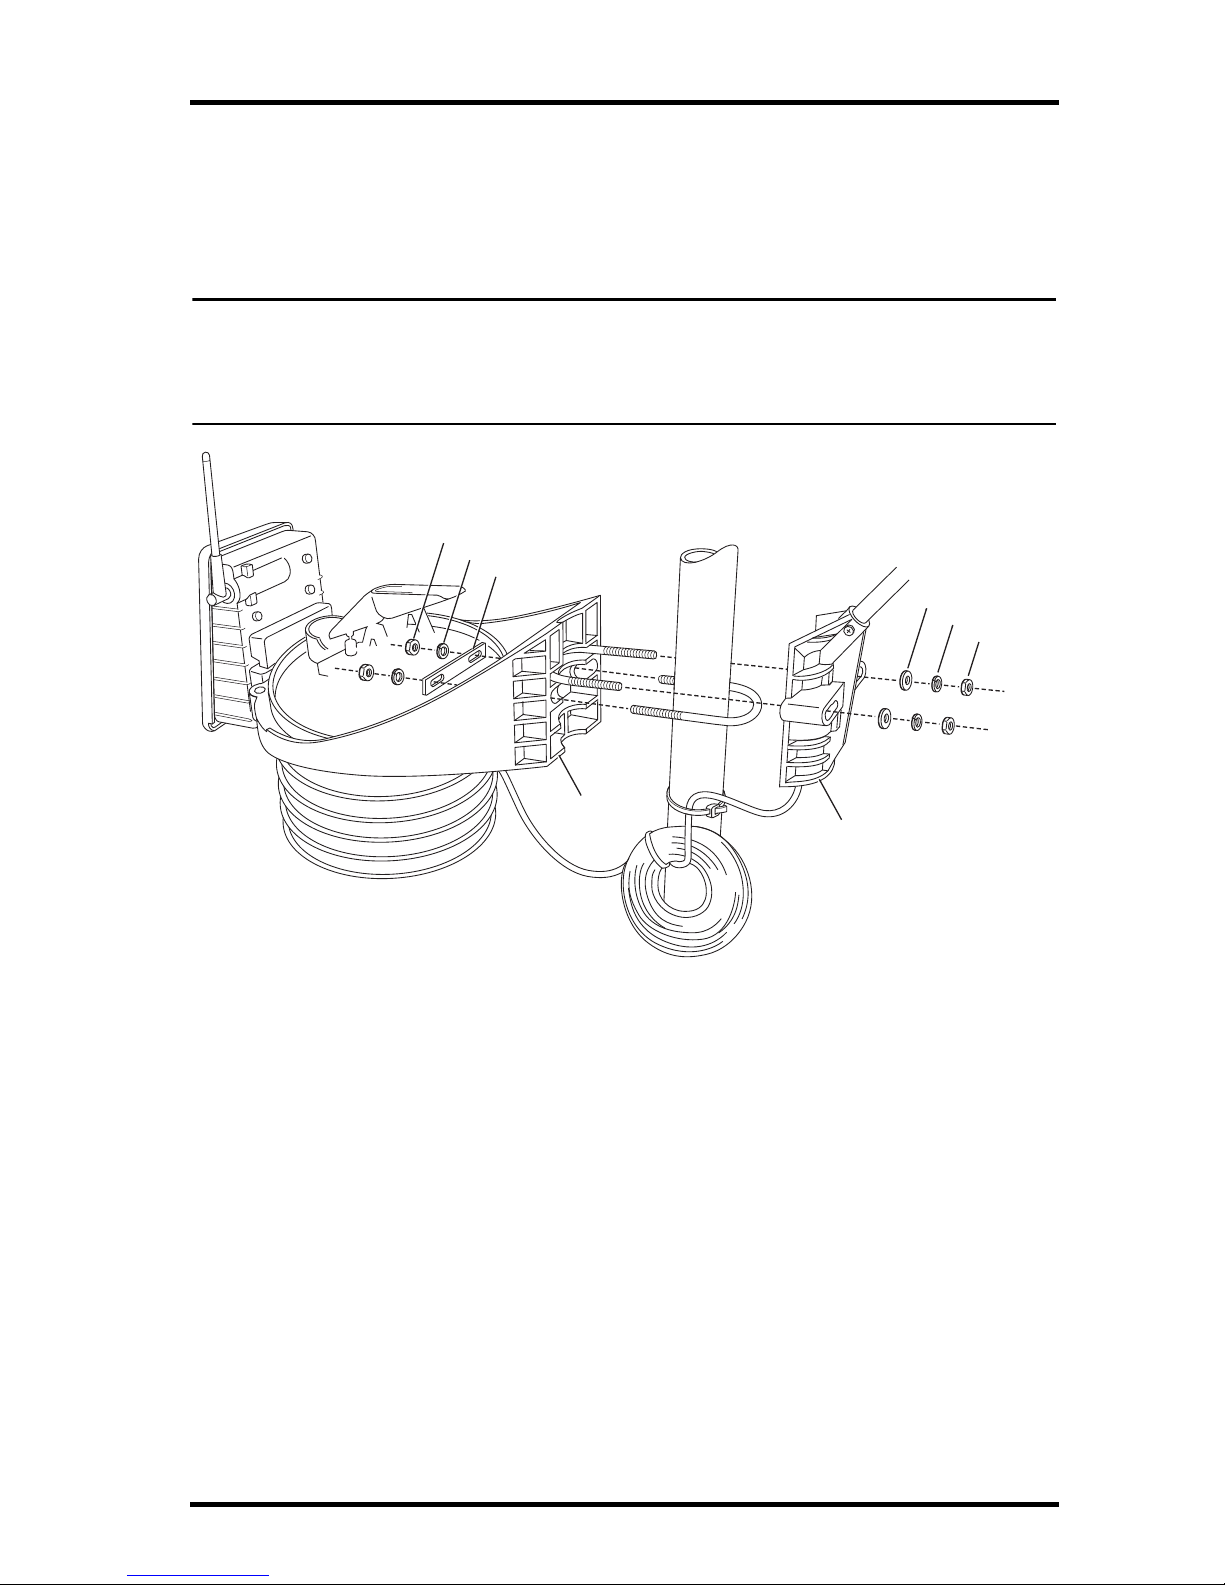
Secure the ISS to the Support Tube
The support tube is 19-1/2" (0.5 m) long, and has a swaged end. After you
secure one or both sides of your ISS to the support tube, this end will be
8" Cable Ties
1-1/2" Saddles
1-1/2" Saddle
5/16" Flat Washers
5/16" Flat Washers
Extension Tube (21" long)
Support Tube
(19.5" long, swaged end)
5/16" x 1-1/2"
U-Bolt
5/16" Lock Washers
5/16" Hex Nuts
5/16" x 3"
Lag Screws
Page 2
Mount the Extension Tube
2
inserted into the top of the extension tube. Make sure the swaged end of the
support tube is pointing downward as you secure the ISS (or other station).
The ISS comes with U-bolts, washers, and hex nuts for the purpose of
mounting it on a pole. Consult your ISS Installation Manual for detailed
instructions.
Note: Remember, when mounting both sides together, that whichever side of the
ISS is mounted first, the U-bolt from the opposite side ALSO must be
placed around the pole before you tighten anything. (If it is not, there is no
way to slide it in later.)
If you wish to put the anemometer higher than the rain collector side of your
ISS on the support tube, follow the instructions in the ISS Installation Manual
for mounting each side separately.
The anemometer arm must point northward or you will have to re-orient the
wind vane after mounting. (As shown in Appendix C in the ISS manual.)
Mount the Extension Tube
The extension tube is 21" long (and does not have a swaged end.)
1. In a fence-post or other flat vertical surface, drill two holes, using one of the
1-1/8" saddles as a guide.
2. Drill another set of holes at least 12" (0.3 m) away from the first holes.
3. Using the 5/16" flat washers and lag screws, secure the saddles against the
extension tube and into the post.
1/4" Hex Nut
1/4" Lock Washer
Nut Plate
U-Bolts
Rain Collector
Mounting Base
1/4" Flat Washer
1/4" Lock Washer
1/4" Hex Nut
Anemometer
Mounting Base
Page 3

Install the Support Tube on the Extension Tube
3
4. Tighten the lag screws until the tube will not slide up or down no matter
how hard you try to move it.
Install the Support Tube on the Extension Tube
1. Insert the swaged end of the support tube in the open top of the extension
tube.
2. Place the U-bolt provided in the mounting pole kit around the tubes where
they overlap. Secure with flat washers, lock washers, and hex nuts as shown
in the illustration.
3. Tighten the hex nuts quite firmly, until the U-bolt begins to dent the tubing
slightly. We recommend the use of a torque wrench with 25 lb-ft of pressure
to fasten the hex nuts.
Support Tube
(swaged end)
Extension Tube
(21" long, no swaged end)
Saddle
Flat Washers
Lag Screws
12"
minimum
Page 4

Product Number: #7717
Davis Instruments Part Number: 7395.298
Rain Collector Heater Installation Manual
Rev. C (12/10/08)
This product complies with the essential protection requirements of the EC EMC Directive 2004/108/EC.
© Davis Instruments Corp. 2008. All rights reserved.
3465 Diablo Avenue, Hayward, CA 94545-2778 U.S.A.
510-732-9229 • Fax: 510-732-9188
E-mail: info@davisnet.com • www.davisnet.com
The tube should be fastened as firmly as possible so that the tube and
station won’t wobble or tilt, causing the station to create and log erroneous
data.
Note: Do not use over 25 lb-ft torque wrench, it may damage the U-bolts.
4. Use the 8" cable ties to secure cable as needed.
Long Extension Tube
(secure in the tripod)
5/16"
Heavy
Duty
Hex Nuts
5/16" Lock
Washers
5/16" Flat
Washers
Saddle
Tighten until
5/16" x 1-1/2" U-bolt
dents the tubing slightly
1 1/4"
Anemometer Extension Tube
(swaged end pointing
downward)
ISS
 Loading...